Showing 480 items
matching targets
-
 Federation University Historical Collection
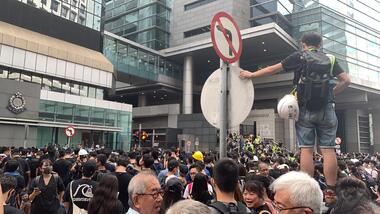
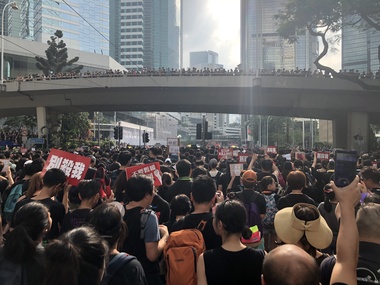
Photograph - Colour, Jarrod Watt, A thousand protestors surround Hong Kong's main police headquarters on Arsenal Street in Wan Chai on June 26th 2019, 21/06/2019
Carrie Lam, Hong Kong’s chief executive, had plenty of political support in the territory’s pro-Beijing legislature to pass a bill that would allow extraditions to mainland China. The legislators were set to begin discussing the bill in early June, and intended to vote on it just weeks later. A series of protests took place, and after a June 16 protest saw the largest turnout yet, Ms. Lam made a major concession: She postponed the bill, at least temporarily. It was an undeniable victory for the protesters — but it did little to quell the unrest. Since the bill could later be reintroduced, protesters felt they remained in danger. The police tactics to break up the demonstrations on June 12, including the use of more than 150 tear gas canisters to push protesters far away from the government office, created a new set of demands from the protesters. Now, instead of just calling for the withdrawal of the bill and Ms. Lam’s resignation, they said they wouldn’t be content unless there was an independent investigation of officers’ conduct. They also wanted the release of protesters arrested on June 12, and for the government to rescind its description of the demonstrations as a “riot,” a designation that carries legal significance. None of that has happened. Many analysts say Ms. Lam is unlikely to step down, nor would Beijing accept her resignation if she offered it. She has more wiggle room on the other demands, but has not indicated any willingness to budge. The Hong Kong Protests are a leaderless, digital movement.There is no single leader or group deciding on or steering the strategy, tactics and goals of the movement. Instead, protesters have used forums and messaging apps to decide next steps. Anyone can suggest a course of action, and others then vote on whether they support it. The most popular ideas rise to the top, and then people rally to make them happen. At its best, this structure has empowered many people to participate and have their voices heard. Protesters say it keeps them all safe by not allowing the government to target specific leaders. Their success in halting the extradition bill, which was shelved by the territory’s chief executive, speaks to the movement’s power. Despite the lack of a clear leader, protesters have shown extensive coordination at the demonstrations, having planned the specifics online beforehand. Supply stations are set up to distribute water, snacks, gloves, umbrellas and shields made of cardboard. Volunteer first aid workers wear brightly colored vests. People form assembly lines to pass supplies across long distances, with protesters communicating what they need through a series of predetermined hand signals. Anyone walking in dangerous areas without a helmet or a mask is quickly offered one. No individual can speak on behalf of the protesters, which makes negotiations difficult, if not impossible. (https://www.nytimes.com/2019/07/02/world/asia/hong-kong-protest-explained.html, accessed 07/07/2019) Hong Kong’s amended extradition law would allow the extradition of suspects to mainland China for the first time. Supporters say the amendments are key to ensuring the city does not become a criminal refuge, but critics worry Beijing will use the law to extradite political opponents and others to China where their legal protections cannot be guaranteed. The government claims the push to change the law, which would also apply to Taiwan and Macau, stems from the killing last year of a Hong Kong woman while she was in Taiwan with her boyfriend. Authorities in Taiwan suspect the woman’s boyfriend, who remains in Hong Kong, but cannot try him because no extradition agreement is in place. Under the amended law, those accused of offences punishable by seven years or more in prison could be extradited. The new legislation would give Hong Kong’s leader, known as the chief executive, authority to approve extradition requests, after review by the courts. Hong Kong’s legislature, the legislative council, would not have any oversight over the extradition process. Many Hong Kongers fear the proposed extradition law will be used by authorities to target political enemies. They worry the new legislation spells the end of the “one country, two systems” policy, eroding the civil rights enjoyed by Hong Kong residents since the handover of sovereignty from the UK to China in 1997. Many attending the protests on Sunday said they could not trust China as it had often used non-political crimes to target government critics, and said they also feared Hong Kong officials would not be able to reject Beijing’s requests. Legal professionals have also expressed concern over the rights of those sent across the border to be tried. The conviction rate in Chinese courts is as high as 99%. Arbitrary detentions, torture and denial of legal representation of one’s choosing are also common. Many in the protests on Sunday 09 June 2019 said they felt overwhelmed by a sense of helplessness in the face of mainland China’s increasing political, economic and cultural influence in Hong Kong. Hong Kong’s top political leader is not elected by ordinary voters but by a 1,200-strong election committee accountable to Beijing. Half of its legislature are chosen through indirect electoral systems that favour pro-Beijing figures. Many Hong Kongers also cited the jailing of leaders and activists from the 2014 Occupy Central movement– a 79-day mass civil disobedience movement – as well as the disqualification of young localist lawmakers as signs of the erosion of civil freedoms. Resentment towards China has been intensified by soaring property prices – with increasing numbers of mainland Chinese buying properties in the city – as well as the government’s “patriotic education” drive, and the large numbers of mainland tourists who flock to Hong Kong. Many Hong Kongers are also concerned about China’s growing control over the city’s news media, as they increasingly self-censor and follow Beijing’s tacit orders. https://www.theguardian.com/world/2019/jun/10/what-are-the-hong-kong-protests-about-explainerMore than a thousand protestors surround Hong Kong's main police headquarters on Arsenal Street in Wan Chai on June 26th following a peaceful rally at Edinburgh Place in Central. Doors to the complex were barricaded by protestors, who left after a six hour siege in protest at police violence at a prtest held earlier on 12 June 2019. Protesters ended a six-hour siege of Hong Kong’s police headquarters – their second in a week over the now-suspended extradition bill – early on Thursday morning. More than 1,000 were involved at the height of the protest, which began after 10pm on Wednesday. Around 100 were left at the end and dispersed without a fight when officers with riot shields emerged from the building in Wan Chai at 4am on Thursday. After a peaceful rally attended by thousands earlier at Edinburgh Place in the Central business district, hundreds descended on Arsenal Street, blocking the junction with Lockhart Road to all traffic and sealing the entrances to the police base. (https://www.scmp.com/news/hong-kong/politics/article/3016238/hong-kong-police-under-siege-again-protesters-surround )carrie lam, hong kong protests, extraditions, protest, protestors -
 Federation University Historical Collection
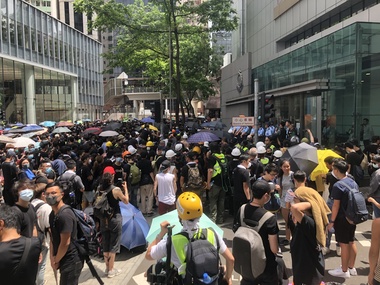
Photograph - Photograph - Colour, Jarrod Watt, Seven police officers stand guard in front of Hong Kong's main police headquarters on Arsenal Street in Wan Chai, 2019, 21/06/2019
Carrie Lam, Hong Kong’s chief executive, had plenty of political support in the territory’s pro-Beijing legislature to pass a bill that would allow extraditions to mainland China. The legislators were set to begin discussing the bill in early June, and intended to vote on it just weeks later. A series of protests took place, and after a June 16 protest saw the largest turnout yet, Ms. Lam made a major concession: She postponed the bill, at least temporarily. It was an undeniable victory for the protesters — but it did little to quell the unrest. Since the bill could later be reintroduced, protesters felt they remained in danger. The police tactics to break up the demonstrations on June 12, including the use of more than 150 tear gas canisters to push protesters far away from the government office, created a new set of demands from the protesters. Now, instead of just calling for the withdrawal of the bill and Ms. Lam’s resignation, they said they wouldn’t be content unless there was an independent investigation of officers’ conduct. They also wanted the release of protesters arrested on June 12, and for the government to rescind its description of the demonstrations as a “riot,” a designation that carries legal significance. None of that has happened. Many analysts say Ms. Lam is unlikely to step down, nor would Beijing accept her resignation if she offered it. She has more wiggle room on the other demands, but has not indicated any willingness to budge. The Hong Kong Protests are a leaderless, digital movement.There is no single leader or group deciding on or steering the strategy, tactics and goals of the movement. Instead, protesters have used forums and messaging apps to decide next steps. Anyone can suggest a course of action, and others then vote on whether they support it. The most popular ideas rise to the top, and then people rally to make them happen. At its best, this structure has empowered many people to participate and have their voices heard. Protesters say it keeps them all safe by not allowing the government to target specific leaders. Their success in halting the extradition bill, which was shelved by the territory’s chief executive, speaks to the movement’s power. Despite the lack of a clear leader, protesters have shown extensive coordination at the demonstrations, having planned the specifics online beforehand. Supply stations are set up to distribute water, snacks, gloves, umbrellas and shields made of cardboard. Volunteer first aid workers wear brightly colored vests. People form assembly lines to pass supplies across long distances, with protesters communicating what they need through a series of predetermined hand signals. Anyone walking in dangerous areas without a helmet or a mask is quickly offered one. No individual can speak on behalf of the protesters, which makes negotiations difficult, if not impossible. (https://www.nytimes.com/2019/07/02/world/asia/hong-kong-protest-explained.html, accessed 07/07/2019) Hong Kong’s amended extradition law would allow the extradition of suspects to mainland China for the first time. Supporters say the amendments are key to ensuring the city does not become a criminal refuge, but critics worry Beijing will use the law to extradite political opponents and others to China where their legal protections cannot be guaranteed. The government claims the push to change the law, which would also apply to Taiwan and Macau, stems from the killing last year of a Hong Kong woman while she was in Taiwan with her boyfriend. Authorities in Taiwan suspect the woman’s boyfriend, who remains in Hong Kong, but cannot try him because no extradition agreement is in place. Under the amended law, those accused of offences punishable by seven years or more in prison could be extradited. The new legislation would give Hong Kong’s leader, known as the chief executive, authority to approve extradition requests, after review by the courts. Hong Kong’s legislature, the legislative council, would not have any oversight over the extradition process. Many Hong Kongers fear the proposed extradition law will be used by authorities to target political enemies. They worry the new legislation spells the end of the “one country, two systems” policy, eroding the civil rights enjoyed by Hong Kong residents since the handover of sovereignty from the UK to China in 1997. Many attending the protests on Sunday said they could not trust China as it had often used non-political crimes to target government critics, and said they also feared Hong Kong officials would not be able to reject Beijing’s requests. Legal professionals have also expressed concern over the rights of those sent across the border to be tried. The conviction rate in Chinese courts is as high as 99%. Arbitrary detentions, torture and denial of legal representation of one’s choosing are also common. Many in the protests on Sunday 09 June 2019 said they felt overwhelmed by a sense of helplessness in the face of mainland China’s increasing political, economic and cultural influence in Hong Kong. Hong Kong’s top political leader is not elected by ordinary voters but by a 1,200-strong election committee accountable to Beijing. Half of its legislature are chosen through indirect electoral systems that favour pro-Beijing figures. Many Hong Kongers also cited the jailing of leaders and activists from the 2014 Occupy Central movement– a 79-day mass civil disobedience movement – as well as the disqualification of young localist lawmakers as signs of the erosion of civil freedoms. Resentment towards China has been intensified by soaring property prices – with increasing numbers of mainland Chinese buying properties in the city – as well as the government’s “patriotic education” drive, and the large numbers of mainland tourists who flock to Hong Kong. Many Hong Kongers are also concerned about China’s growing control over the city’s news media, as they increasingly self-censor and follow Beijing’s tacit orders. https://www.theguardian.com/world/2019/jun/10/what-are-the-hong-kong-protests-about-explainerSeven police officers stand guard in front of Hong Kong's main police headquarters on Arsenal Street in Wan Chai as an estimated one thousand protestors surround on 26 June 2019. Protestors take turns to step up and hurl abuse at the officers, in a protest lasting 6 hours before peacefully dispersing. The protesters chanted 'Release the martyrs' and 'Stop police violence' in reference to violent clashes with police in the days previous. ( https://www.scmp.com/news/hong-kong/politics/article/3016238/hong-kong-police-under-siege-again-protesters-surround)carrie lam, hong kong protests, extraditions, protest, protestors, police, wan chai -
 Federation University Historical Collection
Photograph - Colour, Jarrod Watt, Crowds Gather on June 16 on the Streets of Causeway Bay, 2019, 17/06/2019
Carrie Lam, Hong Kong’s chief executive, had plenty of political support in the territory’s pro-Beijing legislature to pass a bill that would allow extraditions to mainland China. The legislators were set to begin discussing the bill in early June, and intended to vote on it just weeks later. A series of protests took place, and after a June 16 protest saw the largest turnout yet, Ms. Lam made a major concession: She postponed the bill, at least temporarily. It was an undeniable victory for the protesters — but it did little to quell the unrest. Since the bill could later be reintroduced, protesters felt they remained in danger. The police tactics to break up the demonstrations on June 12, including the use of more than 150 tear gas canisters to push protesters far away from the government office, created a new set of demands from the protesters. Now, instead of just calling for the withdrawal of the bill and Ms. Lam’s resignation, they said they wouldn’t be content unless there was an independent investigation of officers’ conduct. They also wanted the release of protesters arrested on June 12, and for the government to rescind its description of the demonstrations as a “riot,” a designation that carries legal significance. None of that has happened. Many analysts say Ms. Lam is unlikely to step down, nor would Beijing accept her resignation if she offered it. She has more wiggle room on the other demands, but has not indicated any willingness to budge. The Hong Kong Protests are a leaderless, digital movement.There is no single leader or group deciding on or steering the strategy, tactics and goals of the movement. Instead, protesters have used forums and messaging apps to decide next steps. Anyone can suggest a course of action, and others then vote on whether they support it. The most popular ideas rise to the top, and then people rally to make them happen. At its best, this structure has empowered many people to participate and have their voices heard. Protesters say it keeps them all safe by not allowing the government to target specific leaders. Their success in halting the extradition bill, which was shelved by the territory’s chief executive, speaks to the movement’s power. Despite the lack of a clear leader, protesters have shown extensive coordination at the demonstrations, having planned the specifics online beforehand. Supply stations are set up to distribute water, snacks, gloves, umbrellas and shields made of cardboard. Volunteer first aid workers wear brightly colored vests. People form assembly lines to pass supplies across long distances, with protesters communicating what they need through a series of predetermined hand signals. Anyone walking in dangerous areas without a helmet or a mask is quickly offered one. No individual can speak on behalf of the protesters, which makes negotiations difficult, if not impossible. (https://www.nytimes.com/2019/07/02/world/asia/hong-kong-protest-explained.html, accessed 07/07/2019) Hong Kong’s amended extradition law would allow the extradition of suspects to mainland China for the first time. Supporters say the amendments are key to ensuring the city does not become a criminal refuge, but critics worry Beijing will use the law to extradite political opponents and others to China where their legal protections cannot be guaranteed. The government claims the push to change the law, which would also apply to Taiwan and Macau, stems from the killing last year of a Hong Kong woman while she was in Taiwan with her boyfriend. Authorities in Taiwan suspect the woman’s boyfriend, who remains in Hong Kong, but cannot try him because no extradition agreement is in place. Under the amended law, those accused of offences punishable by seven years or more in prison could be extradited. The new legislation would give Hong Kong’s leader, known as the chief executive, authority to approve extradition requests, after review by the courts. Hong Kong’s legislature, the legislative council, would not have any oversight over the extradition process. Many Hong Kongers fear the proposed extradition law will be used by authorities to target political enemies. They worry the new legislation spells the end of the “one country, two systems” policy, eroding the civil rights enjoyed by Hong Kong residents since the handover of sovereignty from the UK to China in 1997. Many attending the protests on Sunday said they could not trust China as it had often used non-political crimes to target government critics, and said they also feared Hong Kong officials would not be able to reject Beijing’s requests. Legal professionals have also expressed concern over the rights of those sent across the border to be tried. The conviction rate in Chinese courts is as high as 99%. Arbitrary detentions, torture and denial of legal representation of one’s choosing are also common. Many in the protests on Sunday 09 June 2019 said they felt overwhelmed by a sense of helplessness in the face of mainland China’s increasing political, economic and cultural influence in Hong Kong. Hong Kong’s top political leader is not elected by ordinary voters but by a 1,200-strong election committee accountable to Beijing. Half of its legislature are chosen through indirect electoral systems that favour pro-Beijing figures. Many Hong Kongers also cited the jailing of leaders and activists from the 2014 Occupy Central movement– a 79-day mass civil disobedience movement – as well as the disqualification of young localist lawmakers as signs of the erosion of civil freedoms. Resentment towards China has been intensified by soaring property prices – with increasing numbers of mainland Chinese buying properties in the city – as well as the government’s “patriotic education” drive, and the large numbers of mainland tourists who flock to Hong Kong. Many Hong Kongers are also concerned about China’s growing control over the city’s news media, as they increasingly self-censor and follow Beijing’s tacit orders. https://www.theguardian.com/world/2019/jun/10/what-are-the-hong-kong-protests-about-explainerPhotograph crowds gathering on June 16 on the streets of Causeway Bay before an estimated 2 million people take part in march protesting the government's push for extradition laws to China and demanding an apology from the chief executrive Carrie Lam. Nearly 2 million’ people take to streets, forcing public apology from Hong Kong leader Carrie Lam as suspension of controversial extradition bill fails to appease protesters. (https://www.scmp.com/news/hong-kong/politics/article/3014737/nearly-2-million-people-take-streets-forcing-public-apology )carrie lam, hong kong protests, extraditions, protest, protestors -
 Federation University Historical Collection
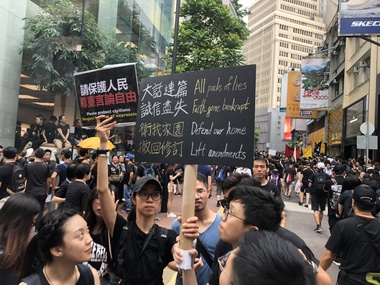
Photograph - Photograph - Colour, Jarrod Watt, Street Protests in Hong Kong against proposed extradition laws, 2019, 17/06/2019
Carrie Lam, Hong Kong’s chief executive, had plenty of political support in the territory’s pro-Beijing legislature to pass a bill that would allow extraditions to mainland China. The legislators were set to begin discussing the bill in early June, and intended to vote on it just weeks later. A series of protests took place, and after a June 16 protest saw the largest turnout yet, Ms. Lam made a major concession: She postponed the bill, at least temporarily. It was an undeniable victory for the protesters — but it did little to quell the unrest. Since the bill could later be reintroduced, protesters felt they remained in danger. The police tactics to break up the demonstrations on June 12, including the use of more than 150 tear gas canisters to push protesters far away from the government office, created a new set of demands from the protesters. Now, instead of just calling for the withdrawal of the bill and Ms. Lam’s resignation, they said they wouldn’t be content unless there was an independent investigation of officers’ conduct. They also wanted the release of protesters arrested on June 12, and for the government to rescind its description of the demonstrations as a “riot,” a designation that carries legal significance. None of that has happened. Many analysts say Ms. Lam is unlikely to step down, nor would Beijing accept her resignation if she offered it. She has more wiggle room on the other demands, but has not indicated any willingness to budge. The Hong Kong Protests are a leaderless, digital movement.There is no single leader or group deciding on or steering the strategy, tactics and goals of the movement. Instead, protesters have used forums and messaging apps to decide next steps. Anyone can suggest a course of action, and others then vote on whether they support it. The most popular ideas rise to the top, and then people rally to make them happen. At its best, this structure has empowered many people to participate and have their voices heard. Protesters say it keeps them all safe by not allowing the government to target specific leaders. Their success in halting the extradition bill, which was shelved by the territory’s chief executive, speaks to the movement’s power. Despite the lack of a clear leader, protesters have shown extensive coordination at the demonstrations, having planned the specifics online beforehand. Supply stations are set up to distribute water, snacks, gloves, umbrellas and shields made of cardboard. Volunteer first aid workers wear brightly colored vests. People form assembly lines to pass supplies across long distances, with protesters communicating what they need through a series of predetermined hand signals. Anyone walking in dangerous areas without a helmet or a mask is quickly offered one. No individual can speak on behalf of the protesters, which makes negotiations difficult, if not impossible. (https://www.nytimes.com/2019/07/02/world/asia/hong-kong-protest-explained.html, accessed 07/07/2019) Hong Kong’s amended extradition law would allow the extradition of suspects to mainland China for the first time. Supporters say the amendments are key to ensuring the city does not become a criminal refuge, but critics worry Beijing will use the law to extradite political opponents and others to China where their legal protections cannot be guaranteed. The government claims the push to change the law, which would also apply to Taiwan and Macau, stems from the killing last year of a Hong Kong woman while she was in Taiwan with her boyfriend. Authorities in Taiwan suspect the woman’s boyfriend, who remains in Hong Kong, but cannot try him because no extradition agreement is in place. Under the amended law, those accused of offences punishable by seven years or more in prison could be extradited. The new legislation would give Hong Kong’s leader, known as the chief executive, authority to approve extradition requests, after review by the courts. Hong Kong’s legislature, the legislative council, would not have any oversight over the extradition process. Many Hong Kongers fear the proposed extradition law will be used by authorities to target political enemies. They worry the new legislation spells the end of the “one country, two systems” policy, eroding the civil rights enjoyed by Hong Kong residents since the handover of sovereignty from the UK to China in 1997. Many attending the protests on Sunday said they could not trust China as it had often used non-political crimes to target government critics, and said they also feared Hong Kong officials would not be able to reject Beijing’s requests. Legal professionals have also expressed concern over the rights of those sent across the border to be tried. The conviction rate in Chinese courts is as high as 99%. Arbitrary detentions, torture and denial of legal representation of one’s choosing are also common. Many in the protests on Sunday 09 June 2019 said they felt overwhelmed by a sense of helplessness in the face of mainland China’s increasing political, economic and cultural influence in Hong Kong. Hong Kong’s top political leader is not elected by ordinary voters but by a 1,200-strong election committee accountable to Beijing. Half of its legislature are chosen through indirect electoral systems that favour pro-Beijing figures. Many Hong Kongers also cited the jailing of leaders and activists from the 2014 Occupy Central movement– a 79-day mass civil disobedience movement – as well as the disqualification of young localist lawmakers as signs of the erosion of civil freedoms. Resentment towards China has been intensified by soaring property prices – with increasing numbers of mainland Chinese buying properties in the city – as well as the government’s “patriotic education” drive, and the large numbers of mainland tourists who flock to Hong Kong. Many Hong Kongers are also concerned about China’s growing control over the city’s news media, as they increasingly self-censor and follow Beijing’s tacit orders. https://www.theguardian.com/world/2019/jun/10/what-are-the-hong-kong-protests-about-explainerPhotograph of a crowd or protestors against proposed extradition laws gathering on the streets of Causeway Bay, Hong Kong, leading down to the gathering area. carrie lam, hong kong protests, extraditions, protest, protestors -
 Federation University Historical Collection
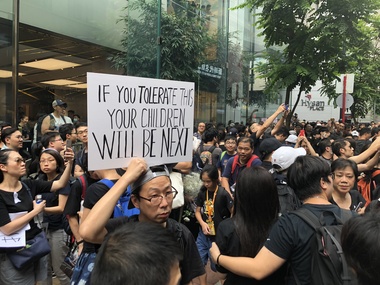
Photograph - Colour, Jarrod Watt, Street Protests in Hong Kong against proposed extradition laws, 2019, 17/06/2019
Carrie Lam, Hong Kong’s chief executive, had plenty of political support in the territory’s pro-Beijing legislature to pass a bill that would allow extraditions to mainland China. The legislators were set to begin discussing the bill in early June, and intended to vote on it just weeks later. A series of protests took place, and after a June 16 protest saw the largest turnout yet, Ms. Lam made a major concession: She postponed the bill, at least temporarily. It was an undeniable victory for the protesters — but it did little to quell the unrest. Since the bill could later be reintroduced, protesters felt they remained in danger. The police tactics to break up the demonstrations on June 12, including the use of more than 150 tear gas canisters to push protesters far away from the government office, created a new set of demands from the protesters. Now, instead of just calling for the withdrawal of the bill and Ms. Lam’s resignation, they said they wouldn’t be content unless there was an independent investigation of officers’ conduct. They also wanted the release of protesters arrested on June 12, and for the government to rescind its description of the demonstrations as a “riot,” a designation that carries legal significance. None of that has happened. Many analysts say Ms. Lam is unlikely to step down, nor would Beijing accept her resignation if she offered it. She has more wiggle room on the other demands, but has not indicated any willingness to budge. The Hong Kong Protests are a leaderless, digital movement.There is no single leader or group deciding on or steering the strategy, tactics and goals of the movement. Instead, protesters have used forums and messaging apps to decide next steps. Anyone can suggest a course of action, and others then vote on whether they support it. The most popular ideas rise to the top, and then people rally to make them happen. At its best, this structure has empowered many people to participate and have their voices heard. Protesters say it keeps them all safe by not allowing the government to target specific leaders. Their success in halting the extradition bill, which was shelved by the territory’s chief executive, speaks to the movement’s power. Despite the lack of a clear leader, protesters have shown extensive coordination at the demonstrations, having planned the specifics online beforehand. Supply stations are set up to distribute water, snacks, gloves, umbrellas and shields made of cardboard. Volunteer first aid workers wear brightly colored vests. People form assembly lines to pass supplies across long distances, with protesters communicating what they need through a series of predetermined hand signals. Anyone walking in dangerous areas without a helmet or a mask is quickly offered one. No individual can speak on behalf of the protesters, which makes negotiations difficult, if not impossible. (https://www.nytimes.com/2019/07/02/world/asia/hong-kong-protest-explained.html, accessed 07/07/2019) Hong Kong’s amended extradition law would allow the extradition of suspects to mainland China for the first time. Supporters say the amendments are key to ensuring the city does not become a criminal refuge, but critics worry Beijing will use the law to extradite political opponents and others to China where their legal protections cannot be guaranteed. The government claims the push to change the law, which would also apply to Taiwan and Macau, stems from the killing last year of a Hong Kong woman while she was in Taiwan with her boyfriend. Authorities in Taiwan suspect the woman’s boyfriend, who remains in Hong Kong, but cannot try him because no extradition agreement is in place. Under the amended law, those accused of offences punishable by seven years or more in prison could be extradited. The new legislation would give Hong Kong’s leader, known as the chief executive, authority to approve extradition requests, after review by the courts. Hong Kong’s legislature, the legislative council, would not have any oversight over the extradition process. Many Hong Kongers fear the proposed extradition law will be used by authorities to target political enemies. They worry the new legislation spells the end of the “one country, two systems” policy, eroding the civil rights enjoyed by Hong Kong residents since the handover of sovereignty from the UK to China in 1997. Many attending the protests on Sunday said they could not trust China as it had often used non-political crimes to target government critics, and said they also feared Hong Kong officials would not be able to reject Beijing’s requests. Legal professionals have also expressed concern over the rights of those sent across the border to be tried. The conviction rate in Chinese courts is as high as 99%. Arbitrary detentions, torture and denial of legal representation of one’s choosing are also common. Many in the protests on Sunday 09 June 2019 said they felt overwhelmed by a sense of helplessness in the face of mainland China’s increasing political, economic and cultural influence in Hong Kong. Hong Kong’s top political leader is not elected by ordinary voters but by a 1,200-strong election committee accountable to Beijing. Half of its legislature are chosen through indirect electoral systems that favour pro-Beijing figures. Many Hong Kongers also cited the jailing of leaders and activists from the 2014 Occupy Central movement– a 79-day mass civil disobedience movement – as well as the disqualification of young localist lawmakers as signs of the erosion of civil freedoms. Resentment towards China has been intensified by soaring property prices – with increasing numbers of mainland Chinese buying properties in the city – as well as the government’s “patriotic education” drive, and the large numbers of mainland tourists who flock to Hong Kong. Many Hong Kongers are also concerned about China’s growing control over the city’s news media, as they increasingly self-censor and follow Beijing’s tacit orders. https://www.theguardian.com/world/2019/jun/10/what-are-the-hong-kong-protests-about-explainerPhotograph of a crowd on the streets of Hong Kong to protest against proposed extradition laws, heading towards Admiralty. carrie lam, hong kong protests, extraditions, protest, protestors, admiralty -
 Federation University Historical Collection
Photograph - Colour Photograph, Street Protests in Hong Kong against proposed extradition laws, 2019, 17/06/2019
Carrie Lam, Hong Kong’s chief executive, had plenty of political support in the territory’s pro-Beijing legislature to pass a bill that would allow extraditions to mainland China. The legislators were set to begin discussing the bill in early June, and intended to vote on it just weeks later. A series of protests took place, and after a June 16 protest saw the largest turnout yet, Ms. Lam made a major concession: She postponed the bill, at least temporarily. It was an undeniable victory for the protesters — but it did little to quell the unrest. Since the bill could later be reintroduced, protesters felt they remained in danger. The police tactics to break up the demonstrations on June 12, including the use of more than 150 tear gas canisters to push protesters far away from the government office, created a new set of demands from the protesters. Now, instead of just calling for the withdrawal of the bill and Ms. Lam’s resignation, they said they wouldn’t be content unless there was an independent investigation of officers’ conduct. They also wanted the release of protesters arrested on June 12, and for the government to rescind its description of the demonstrations as a “riot,” a designation that carries legal significance. None of that has happened. Many analysts say Ms. Lam is unlikely to step down, nor would Beijing accept her resignation if she offered it. She has more wiggle room on the other demands, but has not indicated any willingness to budge. The Hong Kong Protests are a leaderless, digital movement.There is no single leader or group deciding on or steering the strategy, tactics and goals of the movement. Instead, protesters have used forums and messaging apps to decide next steps. Anyone can suggest a course of action, and others then vote on whether they support it. The most popular ideas rise to the top, and then people rally to make them happen. At its best, this structure has empowered many people to participate and have their voices heard. Protesters say it keeps them all safe by not allowing the government to target specific leaders. Their success in halting the extradition bill, which was shelved by the territory’s chief executive, speaks to the movement’s power. Despite the lack of a clear leader, protesters have shown extensive coordination at the demonstrations, having planned the specifics online beforehand. Supply stations are set up to distribute water, snacks, gloves, umbrellas and shields made of cardboard. Volunteer first aid workers wear brightly colored vests. People form assembly lines to pass supplies across long distances, with protesters communicating what they need through a series of predetermined hand signals. Anyone walking in dangerous areas without a helmet or a mask is quickly offered one. No individual can speak on behalf of the protesters, which makes negotiations difficult, if not impossible. (https://www.nytimes.com/2019/07/02/world/asia/hong-kong-protest-explained.html, accessed 07/07/2019) Hong Kong’s amended extradition law would allow the extradition of suspects to mainland China for the first time. Supporters say the amendments are key to ensuring the city does not become a criminal refuge, but critics worry Beijing will use the law to extradite political opponents and others to China where their legal protections cannot be guaranteed. The government claims the push to change the law, which would also apply to Taiwan and Macau, stems from the killing last year of a Hong Kong woman while she was in Taiwan with her boyfriend. Authorities in Taiwan suspect the woman’s boyfriend, who remains in Hong Kong, but cannot try him because no extradition agreement is in place. Under the amended law, those accused of offences punishable by seven years or more in prison could be extradited. The new legislation would give Hong Kong’s leader, known as the chief executive, authority to approve extradition requests, after review by the courts. Hong Kong’s legislature, the legislative council, would not have any oversight over the extradition process. Many Hong Kongers fear the proposed extradition law will be used by authorities to target political enemies. They worry the new legislation spells the end of the “one country, two systems” policy, eroding the civil rights enjoyed by Hong Kong residents since the handover of sovereignty from the UK to China in 1997. Many attending the protests on Sunday said they could not trust China as it had often used non-political crimes to target government critics, and said they also feared Hong Kong officials would not be able to reject Beijing’s requests. Legal professionals have also expressed concern over the rights of those sent across the border to be tried. The conviction rate in Chinese courts is as high as 99%. Arbitrary detentions, torture and denial of legal representation of one’s choosing are also common. Many in the protests on Sunday 09 June 2019 said they felt overwhelmed by a sense of helplessness in the face of mainland China’s increasing political, economic and cultural influence in Hong Kong. Hong Kong’s top political leader is not elected by ordinary voters but by a 1,200-strong election committee accountable to Beijing. Half of its legislature are chosen through indirect electoral systems that favour pro-Beijing figures. Many Hong Kongers also cited the jailing of leaders and activists from the 2014 Occupy Central movement– a 79-day mass civil disobedience movement – as well as the disqualification of young localist lawmakers as signs of the erosion of civil freedoms. Resentment towards China has been intensified by soaring property prices – with increasing numbers of mainland Chinese buying properties in the city – as well as the government’s “patriotic education” drive, and the large numbers of mainland tourists who flock to Hong Kong. Many Hong Kongers are also concerned about China’s growing control over the city’s news media, as they increasingly self-censor and follow Beijing’s tacit orders. https://www.theguardian.com/world/2019/jun/10/what-are-the-hong-kong-protests-about-explainerCrowds mass on Queens Way in Hong Kong as an estimated 2 million people march in protest at the government's refusal to withdraw a controverisal law allowing people to be extradited to mainland China. Chants demanded the chief executive apologise and the legislation be withdrawn, while many held signs protesting police violence. Nearly 2 million protesters flooded the streets of Hong Kong on Sunday, organisers claimed, delivering a stunning repudiation of Chief Executive Carrie Lam Cheng Yuet-ngor’s governance and forcing a public apology out of the city’s leader over her campaign to bulldoze a controversial extradition bill through the legislature. A day after Lam suspended her push for the bill, expecting it to defuse a crisis that has seen violent clashes between mostly young protesters and police, the centre of Hong Kong was brought to a complete standstill as the masses marched to chastise her for refusing to withdraw the bill or apologise when first asked to, and declaring that nothing short of her resignation would satisfy them now. (https://www.scmp.com/news/hong-kong/politics/article/3014737/nearly-2-million-people-take-streets-forcing-public-apology ) carrie lam, hong kong protests, extraditions, protest, protestors, admiralty -
 National Wool Museum
Clothing - Overcoat, Dominex, c.1970
This overcoat was designed and tailored by Dominex, a company that sold clothing in high end department stores such as Myer and David Jones in the 1940s through to the 2000s. As pictured in the accompanying advertising, Dominex looked to produce clothes for women to “casually, confidently wear … the exquisite styling and superb tailoring of… Dominex Coats”. This sentiment was carried by the company for more than 60 years. Amanda Morgan, a director of the Dominex fashion label in an interview from 2003 said “Not everybody wants sass, or sex, or high fashion for that matter. Au contraire. Our customers will be stylish, sophisticated and womanly, but we don’t do shoestring straps or asymmetrical lines." Dominex was a label specialising in exceptional quality "traditional" dressing for corporate wear. Their clothes looked to provide women with a return to the tried and true values of elegant, unpretentious, classic dressing. "Our look is European-influenced," Morgan explained further. "Inspired by Armani, Valentino, Chanel and Escada. Suits have been specially dyed in France to ensure the perfect shade of ice blue, lemon, grey, or slate. Fabrics are natural, silk and linen. Shapes are stylish, with an almost 1930s feel; classic pants, silk shirts, structured overcoats with elegant-length” Returning to this overcoat, it has a label on the inside which reads “Pure Wool Material by Godfrey Hirst of Geelong”. Nowadays Godfrey Hirst produce flooring products and are the largest manufacturer and exporter of residential and commercial carpets in Australasia. They have expanded into hard flooring and left their fashion days behind. This overcoat serves as a useful example of a different time for the company; before they made the change to concentrating exclusively on flooring, when they produced fabrics to be tailored for the height of Australian fashion. This overcoat was purchased and worn by Joan Waller, aunty of the donor, Kim Rosenow. Kim said her aunty was from Ballarat but frequently shopped in Melbourne to keep up with the latest trends. Her aunty Joan fitted the target demographic of Dominex well, as she needed to look sophisticated and elegant at social events and work. Kim donated the overcoat to the National Wool Museum in 2021. Green singled breasted overcoat with a narrow overlap and one column of buttons for fastening. The overcoat features notched lapels of a medium width and two large buttons of a green & dark green marble. The overcoat has two semi-visible jetted pockets at the hips. Internally, the overcoat features a black silk lining for comfort. It also features a stitched patch on the left side of the opening which reads “Pure Wool Material by Godfrey Hirst of Geelong”. At the collar, another patch reads “Dominex REGD”. At the cuffs, the overcoat finishes in a type of gauntlet cuff which stretches back over 200mm. The decorative finish utilises no buttons and has thick piping to accentuate this design feature. The overcoat finishes with a simple invisible hem at the bottom.Wording, gold. Patch stitched at collar: “DomineX / REGD.” Wording, black. Patch stitched at left off opening: “PURE WOOL MATERIAL BY / Godfrey Hirst / OF GEELONG”dominex, fashion, women's corporate wear, godfrey hirst, overcoat, wool clothing -
 Unions Ballarat
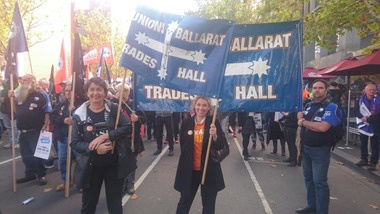
Change the Rules Rally - 9 May 2018, 6 May 2018
Change the Rules is an ACTU campaign starting in 2018 targeted at regaining fairness around right to strike, work, wages, job security, penalty rates, taxation (especially businesses that pay zero tax), equity for working women and younger workers. Nationally, Change the Rules rallies were held on Wednesday 9 May 2018. A contingent from Ballarat travelled to Melbourne by train and participated alongside 100,000 other unionists in the CBD. Photos: 1. Rally - Melbourne CBD - Pictured left to right, Moses, Doug Stewart (CFMEU/Trades Hall), Gabriel Waldron (Trades Hall staffer), Michaela Settle (State ALP candidate for the seat of Buninyong), Sarah De Santis (State ALP candidate for the seat of Ripon), Brett Edgington (Secretary, Ballarat Regional Trades and Labour Council. 2. Rally - MUA and other comrades marching. 3. Ballarat Railway Station - Comrades gathering to make the train journey to the rally. Gabriel Waldron (Trades Hall staffer) in the foreground and Michaele Settle in black jacket. 4. Ballarat Railway Station - Comrades gathering to make the train journey to the rally. Tracey Brown, HWU organiser, pictured in red puffer jacket. 5. Ballarat Railway Station - Comrades gathering to make the train journey to the rally. Gabriel Waldron (Trades Hall staffer) and Tracey Brown, HWU organiser, pictured in red puffer jacket. From the Change the Rules website: "Australian Unions are campaigning to change the rules so that working people have more secure jobs and better pay. Right now, big business has too much power. A third of them aren’t paying any tax. And, too many big businesses are in a race to the bottom on wages and job security. As a result, 40% of Australians are in insecure work and wages have flat-lined. We need a wage rise and secure work. We need to change the rules to give all working people the basic rights they need to improve their living standards. We are building a powerful movement to change the rules, and we need you to join your union to be part of it."Significant to nationwide union campaigning and to living and working conditions of all Australians.Electronic photographs.btlc, ballarat trades hall, ballarat trades and labour council, union campaigns - change the rules, actu, rallies, wages, penalty rates, workers' rights, women, equal pay, right to strike, taxation -
 Surrey Hills Historical Society Collection
Work on paper - Vertical file, Bendigo Bank
1. ‘Surrey Hills community bank update’, SHNN No. 111, April/May 2001 (1 page). 2. ‘Surrey Hills now has half a bank!’, SHNN No. 112, June/July 2001 (1 page). 3. “Which bank” to leave Maling Road, SHNN No. 113, Aug./Sept. 2001 (1 page). 4. ‘Local bank pledge target is a bullseye!’ SHNN No. 114 Oct./Nov. 2001 (1 page). 5. ‘Have you returned your bank survey?’ SHNN No. 115 Dec. 2001/Jan. 2002 (1page). 6. ‘A good news bank story!’ SHNN No. 116, Feb./March 2002 (1 page). 7. ‘Community bank share offer opens’, SHNN No. 118, June/July 2002 (1page). 8. ‘Have you turned your community bank pledge into $$$$ yet? Better hurry!’ SHNN No. 119, Aug./Sept. 2002 (1 page). 9. ‘The community bank boosts local shopping’, SHNN No. 124, June/July 2003 (1 page). 10. ‘The Bank is back in town!’ (2 photos), SHNN No. 1233, April/May 2003 (2 pages). 11. ‘Surrey Hills bank begins sponsorships’, SHNN No. 128, Feb./March 2004 (1 page). 12. ‘Everyone loves a party’, SHNN No. 129 April/Mary, 2004 (1 page). 13. ‘$100 million milestone’, SHNN No. 138 Oct./Nov. 2005 (1 page). 14. ‘Community bank week at SHNC’, SHNN No. 143, Aug./Sept. 2006 (1 page). 15. ‘Bendigo Bank wins awards’, SHNN No. 169, Dec. 2010/Jan./2011 (1 page). 16. ‘Surrey Hills is winning awards!’ SHNN No. 197, Sept./Oct. 2015 (1page). 17. ‘3.2 million reasons….’, Burwood Bulletin, June/August, 2017 (1 page). 18. ‘$100 Million Milestone’, SHNN 138, October/November, 2005 (1 page). -
 Eltham District Historical Society Inc
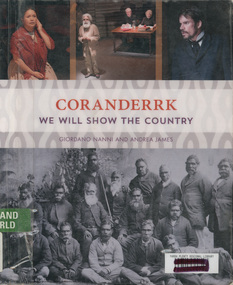
Book, Giordano Nanni et al, Coranderrk; We will show the country, 2013
Comprises twenty-three extracts from the Minutes of Evidence of the Coranderrk Inquiry, accompanied by an analysis of the historical text and context. The book relies strongly on primary-source materials and accurately references historical analysis from scholarly and Aboriginal perspectives. This book is derived from a verbatim-theatre performance in which professional actors portrayed the witnesses who gave evidence before the 1881 Coranderrk Inquiry.; Inscriptions and Markings: illustrations, photographs, facsimiles, maps, portraits About the book One of the first sustained campaigns for justice, land rights and self-determination in colonial Australia was undertaken by the Aboriginal people of Coranderrk reserve in central Victoria. Despite having created an award-winning farm they were targeted for removal to make way for white settlement. As skilled communicators and negotiators, they lobbied the government, in alliance with their white supporters, and succeeded in triggering a Parliamentary Inquiry in 1881. Coranderrk – We Will Show The Country derives from a unique verbatim-theatre performance where professional actors brought to life the witnesses who gave evidence before the 1881 Parliamentary Coranderrk Inquiry. Rescued from dusty archives, and including renowned Wurundjeri leader, William Barak, those witnesses continue to speak to contemporary audiences. Here, their powerful petitioning can be read alongside that of their non-Aboriginal allies, and those who would move them off their land. The book features a concise and accessible history of the Coranderrk Aboriginal Station and of the events that led to the appointment of the 1881 Parliamentary Coranderrk Inquiry. The book also contains a special edition of the verbatim script which has been annotated and referenced so as to provide a blueprint of how the original minutes of evidence from the 1881 Parliamentary Coranderrk Inquiry were adapted into a theatre script. Each scene of the play has also been introduced with a short biography of each character and a discussion of the key themes raised in their testimony. Supplementing the verbatim script of the performance, the book includes a range of historical images and stills from the ILBIJERRI Theatre Company’s production. Coranderrk – We Will Show The Country celebrates the spirit of collaboration between black and white in pursuit of justice, and offers an engaging way to learn about our past – and to think about our future. Coranderrk - We Will Show The Country. (2023, October 19). Retrieved from http://www.minutesofevidence.com.au/education/coranderrk-we-will-show-the-country-book/Ex Yarra Plenty Regional Library copyaboriginal australians, coranderrk, first nations people, healesville, indigenous history, performance, play -
 Flagstaff Hill Maritime Museum and Village
Weapon - Ammunition, Before 1878
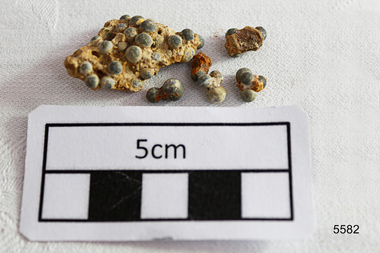
The objects are a small sample of small gauge lead shot raised by Flagstaff Hill divers from the LOCH ARD shipwreck site in 1976. Companion pieces are in the Maritime Village collection. The three masted, iron hulled, LOCH ARD was wrecked against the tall limestone cliffs of Mutton Bird Island in the early hours of the first of June 1878. Included in her diverse and valuable cargo were 22 tons of lead shot, packed in cloth bags and wooden casks. Bulk quantities of lead shot, uniformly round balls of dull grey metal ranging from 2mm “birdshot” to 8mm “buckshot”, were routinely exported to the Australian colonies. Shot was used mostly as projectiles fired from smooth bored guns to bring down moving targets such as wild ducks and small game. It was also useful as ballast, when a dense, “pourable” weight was required to fill cavities or establish volume within a measuring container. The production of consistently round spheres of lead shot required the pouring of molten metal through a sieve and then a long drop through the atmosphere to a water filled basin for final cooling and collection. This “shot tower” process was first patented by William Watts of Bristol in 1782. His calculation of a 150 feet fall was not only to form evenly spherical droplets through surface tension, but also to provide partial cooling and solidification to each shot before they hit the water below. The value of his innovation was the minimising of indentation and shape distortion, avoiding the expense of re-smelting and re-moulding the lead. Lead shot was already being produced in Australia at the time the LOCH ARD loaded her cargo and left Gravesend on the second of March 1878. James Moir constructed a 157 feet circular stone shot tower near Hobart in 1870, with a peak annual production of 100 tons of lead shot sold in 28 pound linen bags. However colonial demand exceeded this source of local supply. The continued strength of the market for lead shot in the Colony of Victoria prompted substantial investment in additional productive capacity in Melbourne in the next decade. In 1882 Richard Hodgson erected the 160 feet round chimney-shaped Clifton Hill shot tower on Alexandra Parade (VHR H0709) and in 1889 Walter Coop built the 160 feet square tower-shaped Melbourne Central shot tower on La Trobe Street (VHR H0067). At its peak, the Coop Tower produced 6 tons of lead shot per week, or 312 tons per annum. The shipwreck of the LOCH ARD is of State significance – Victorian Heritage Register S417 Flagstaff Hill’s collection of artefacts from LOCH ARD is significant for being one of the largest collections of artefacts from this shipwreck in Victoria. It is significant for its association with the shipwreck, which is on the Victorian Heritage Register (VHR S417). The collection is significant because of the relationship between the objects, as together they have a high potential to interpret the story of the LOCH ARD. The LOCH ARD collection is archaeologically significant as the remains of a large international passenger and cargo ship. The LOCH ARD collection is historically significant for representing aspects of Victoria’s shipping history and its potential to interpret sub-theme 1.5 of Victoria’s Framework of Historical Themes (living with natural processes). The collection is also historically significant for its association with the LOCH ARD, which was one of the worst and best known shipwrecks in Victoria’s history. A quantity of 2mm and 4mm lead shot ammunition retrieved from the LOCH ARD shipwreck site. They are concreted together by sediment. There are (6) small pieces with some single shot and a larger conglomerate of cemented shot. flagstaff hill, warrnambool, shipwrecked coast, flagstaff hill maritime museum, maritime museum, shipwreck coast, flagstaff hill maritime village, great ocean road, loch line, loch ard, captain gibbs, eva carmichael, tom pearce, glenample station, mutton bird island, loch ard gorge, lead shot, colonial industry, melbourne shot towers, victorian metallurgy, colonial imports -
 Sunshine and District Historical Society Incorporated
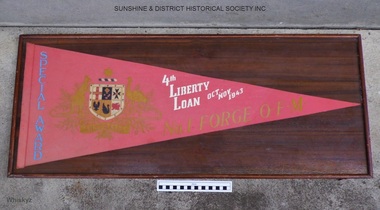
SPECIAL AWARD to No 1 FORGE O.F.M, 4th LIBERTY LOAN (1943), Probably around Circa 1943-1944
O.F.M. was the ORDNANCE FACTORY MARIBYRNONG. Up to the end of June 1943 and at a time when the wages were about £5 ($10) to £6 ($12) per week Australia had spent £1,106,000,000 (£156 per head) on the war effort. A lot of the money was spent at home in making war necessities such as armaments, munitions, boots, clothing, and in providing special training. Significant increases in numbers occurred in the personnel employed in the fighting services, and also in the work force involved in the war effort. During the financial year 1942-1943 the war cost Australia £561,743,000 (over a billion dollars), while the Income Tax raised from individuals totalled only 16.5% of this amount. To finance the war the Australian government had previously borrowed money from the public, and from institutions such as the savings banks, friendly societies, and life assurance societies, by running three successfully subscribed Liberty Loans. The institutions had contributed considerably more money to these Liberty Loans than the public, however it can be argued that the public members of these institutions had also contributed some money indirectly. The 4th Liberty Loan which opened on 5 October 1943 and closed on 9 November 1943 was intended to raise £125,000,000, with the government aiming for 750,000 subscribers. Bonds costing £10 each could be bought on a time payment scheme. A total of £126,408,000 was raised at two different interest rates and maturity dates, however the number of subscribers had only reached 567,533. Some newspaper reports of the time indicate that the low number of subscribers was a partial failure of the loan, because spare money in the community could lead to inflation at a time when goods were in short supply. The government set target quotas on how much money should ideally be raised in a particular district, and how many subscribers should ideally take part. Often these quotas proved to be excessive. The Special Red Pennant Award as given to the No 1 FORGE O.F.M. was normally for achieving the highest per capita contribution within each particular group. What is unknown at this stage is what other entities were in the same group, or how large the group was. There were other variations of the awards such as those given to country districts, where a star was placed on the left hand corner of the pennant if the money quota was reached, while two or three stars indicated that the quota was doubled or tripled. A bar was also included on the pennant if the quota of subscribers was achieved, while two bars indicated double the quota of subscribers. The above information was sourced from Trove newspaper articles at: (1) http://nla.gov.au.nla.news-article70439716, (2) http://nla.gov.au/nla.news-article141292541, (3) http://nla.gov.au/nla.news-article11797265, (4) http://nla.gov.au/nla.news-article11788072, and from (5) http://static.awm.gov.au/images/collection/pdf/RCDIG1070158--1-.PDF (see page 580).This framed award has significance in that it serves as a historic reminder that the No 1 Forge O.F.M. and the Ordnance Factory Maribyrnong once existed within the Shire of Braybrook, and later the City of Sunshine, and that it was involved in the manufacture of ordnance for World War 2. It also serves as a historic reminder that it costs a huge amount of money for a country to be involved in a major war, and that a big contribution is required from the public to raise money and to produce goods for the war effort.Permanently sealed brown stained wood frame with a glass face. Enclosed behind the glossy glass is a triangular shaped pennant made of red felt material. The red colour appears to be somewhat faded. The inscriptions and markings on the pennant are in blue, gold, and white coloured inks.The AUSTRALIAN COAT OF ARMS diagram plus the following writing: SPECIAL AWARD / 4th LIBERTY LOAN / Oct.-Nov. 1943 / No 1 FORGE O.F.M.4th liberty loan, special award, ordnance factory maribyrnong, no 1 forge o.f.m., oct - nov 1943, red pennant -
 Lara RSL Sub Branch
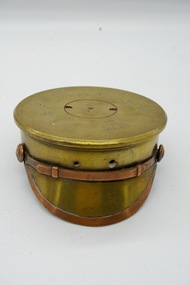
18 Pounder shell ashtray, Souvenir, 1927
Artillery shells were designed to be recycled and spent shells were returned to the munitions factory for re-filling, a mark engraved upon the head-stamp at each re-filling. Millions upon millions of shells were recycled and re-fired. Relationships with ‘objects’ were forged as recycled objects of conflict were welcomed into people’s homes. Such objects were embodied with personal experiences of war, later to become objects textured with memory, remembrance, and longing – attributes that clearly go beyond an object’s form and function. 18-Pounder Artillery Shells: The Great War Recycled and Re-Circulated Categories :Material Culture Machine Subscribe Share on facebook Share on twitter The intention of war is to kill, to maim and to destroy using, for example, the agency of 18-pounder artillery shells (so-called because they weighed 18 pounds). The shells were loaded in to the 18-pounder field guns used by the Royal Artillery and targeted to destroy German batteries and trenches as well as to shoot down aeroplanes. Horse-drawn field gun, Canal du Nord, France. Taken by First World War photographer David McLellan. Available via the National Library of Scotland as CC BY-NC-SA Horse-drawn field gun, Canal du Nord, France. Taken by First World War photographer David McLellan. Available via the National Library of Scotland as CC BY-NC-SA In Under Fire, Henri Barbusse recounts how the incessant and diabolical din of war constantly bombarded the soldier body with the unendurable noise of bursting shells that caused pain to the ears (Barbusse 2010 [1933]: 207). The noise was so ‘monstrously resounding’ that one felt ‘annihilated by the mere sound of the downpour of thunder’ (Barbusse 2010 [1933]: 206). Artillery shells were designed to be recycled and spent shells were returned to the munitions factory for re-filling, a mark engraved upon the head-stamp at each re-filling. Millions upon millions of shells were recycled and re-fired. A mound of spent shell cases, Nord, Nord-pas-de-Calais, France. Taken by war photographer, Tom Aitken, 1918. Available via the National Library of Scotland as CC BY-NC-SA. A mound of spent shell cases, Nord, Nord-pas-de-Calais, France. Taken by war photographer, Tom Aitken, 1918. Available via the National Library of Scotland as CC BY-NC-SA. People’s experience of the First World War did not end with the armistice. Whilst the noise of the artillery had ceased, the noise of war was remembered. Harry Patch on arriving home injured recalled being ‘jumpy for a while’ with the least noise prompting him to dive for cover (2009: 114). Something else materialised. Relationships with ‘objects’ were forged as recycled objects of conflict were welcomed into people’s homes. Such objects were embodied with personal experiences of war, later to become objects textured with memory, remembrance, and longing – attributes that clearly go beyond an object’s form and function. The head-stamp of these particular shells displays the British broad arrow and the initials ‘EOC’ indicates that they were made at the Elswick Ordnance Company, England; the initials ‘CF’ signal that the charge was loaded with cordite, a standard propellant. Spent shells were illicitly scavenged from massive mounds by both soldiers and civilians alike to become personal souvenirs or to swap or sell. Spent artillery shells were crafted, often using a hammer and a bent nail. The crafting of trench art reflects the construction of an identity that offers momentary relief from the hell experienced in the trenches. The lid of an 18Pounder shell which has been adapted for use as an ash tray.Lot 27 1927, 18Pr, III, EOC, C/F, Defence broad arrow, -
 Glen Eira Historical Society
Article - REGENT LODGE, REGENT STREET, 46, ELSTERNWICK
This file contains 10 items about the Regent Lodge Extension Appeal: 1/Three promotional pamphlets, all called ‘Regent Lodge: A special kind of care’, stating that a building appeal will be launched early next year. The pamphlets also list office bearers. 2/A letter from Rodney Horsfield, Chairperson of the Project Working group, to Betty Freeland of the Elsternwick-Caulfield South Parish, dated 25/03/1992, asking for her to consider becoming a member of the Appeal Team. The letter also contains information on the history of Regent Lodge, the plans for development and progress on raising funds to date. 3/A letter from Ian Clark, Chairman of the Regent Lodge Extension Appeal, to Betty Freeland, dated 18/05/1992, inviting her to the official launch of the Regent Lodge Extension Appeal at Caulfield Grammar School, 217 Glen Eira Road Caulfield on 31/05/1992. The letter gives brief details on the launch, saying it will be attended by the appeal’s patron, the Honourable Joan Child, AO, and the Playback Theatre company. 4/A letter, recipient and sender unknown, dated 26/05/1992, giving details of the appeal launch and a brief history of Regent Lodge. 5/Two newspaper articles from the Southern Cross, Caulfield, dated 16/06/1992. The first, ‘Grant boost for dementia sufferers’, discusses a federal government grant of $8 million to dementia services, and $9 million to disability services. Heathlands, Camden Court, Lovell House, Clarence Court, Regent Lodge and St. Kilda House all received funds. The second, ‘Lodge building appeal launched’, describes the Regent Lodge Extension Appeal and its launch, and includes brief comment by appeal patron Joan Child. The article describes the plans for the appeal and extension, and outlines how readers can make donations. Included is a black-and-white photograph of Joan Child with members of the Playback Theatre Group at the Appeal Launch. 6/The original of the photograph used in the newspaper article in item 5, showing Joan Child with members of the Playback Theatre Group at the launch of the Regent Lodge Extension Appeal. 7/A letter from Rod Horsfield, Convenor of the Project Working Group, to Betty Freeland, dated 22/06/1992, discussing the launch and asking for the opportunity to meet with her Parish council or Finance Committee. 8/The plans for the extension of Regent Lodge, as well as a colour drawing of what the front of the extension will look like. 9/Preliminary photographs taken for the appeal brochure ‘Regent Lodge: Committed to Caring’. Twelve black-and-white photographs of two elderly residents at tea. Also, one black-and-white photographs of an elderly resident being assisted by another person, likely a staff member. 10/Three copies of the appeal brochure ‘Regent Lodge: Committed to Caring’. The brochure contains information about the lodge, the plans for the development, including a floorplan for a typical six bedroom unit, the costs of the extension and breakdown of how the appeal target amount would be spent, and messages from patron Joan Child, Appeal Committee Chairman Ian Clark, and Convenor of the Project Working Group Reverend Rod Horsfield. Also included is a list of the members of the Appeal Committee and Project Working Group. Black-and-white photographs of residents and workers at the Lodge are included in the brochure.regent lodge, regent street, elsternwick, emma street, caulfield south, heathlands, camden court, lovell house, st. kilda house, balaclava, caulfield grammar school, glen eira road, st. georges road, caulfield, uniting church, uniting church lodge program, regent lodge alzeimer appeal, regent lodge extension appeal, tansley hunt and partners, nepean presbytery, child joan the honourable, horsefield rod rev., horsfield rod rev., horsfield rodney rev., lukies noela mrs., campbell jack, cardell bob, davies gail mrs., greensmith duncan, tansley vern, merrick ruth ms., seccull barbara ms., freeland betty miss, clark ian, wilcox rosemary mrs., coleman julie, playback theatre company, martens veronica mayor, brown george, terrell tom, diseases, disabled people, nursing homes, fundraising events, aged people -
 Flagstaff Hill Maritime Museum and Village
Plant specimen - Wood Sample, Herbst, 1759-1765
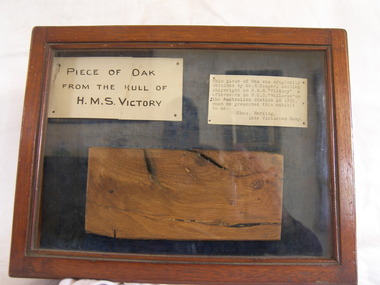
The piece of oak wood sample inside the case was obtained from Mr. H Cooper during the time he served as a shipwright for the British Royal Navy on Nelson’s flagship, HMS Victory, in 1891. By that time the H.M.S. Victory was around 100 years old having been built in 1765 and was currently in dry dock undergoing restoration. Cooper’s skills as a shipwright would have been well employed during this period. HMS Victory was and still does undergoing continuous restoration to preserve her for display as a museum ship, due to the vessel's significant naval history. It was during that time of early restoration that Cooper obtained the piece of Oak from HMS Victory believed to be from the ships hull. Cooper was in Australia in September 1891 serving on the HMS Wallaroo, a British Auxiliary Squadron commissioned to serve as part of the British Royal Navy contingent, tasked to operate in Australian waters. The photograph included with the donation of the wood sample is a portrait of Mr H Cooper taken in 1895 in Sydney. The inscription on the photograph describes him as a skilled shipwright from the H.M.S. Wallaroo, depicting Cooper as a young man in Royal Navy uniform, with the emblem of a petty officer third class. While Cooper was stationed on the H.M.S. Wallaroo in Sydney he presented the display case, containing the wood sample from H.M.S. Victory, as well as the exhibit labels to Charles Harding, ("Chas") late of the Royal Australian Navy. Harding had been based at the H M Naval Torpedo Depot at Williamstown, Victoria. Although not mentioned, it is believed the two men met whilst serving together in Australia in their respective assignments. It could have been a retirement gift from Cooper to Harding with the photograph of Cooper likely included with the case, and gifted to Harding in 1895, as the date on the photograph indicates. One of the exhibits labels indicates that Harding had the item on display whilst serving at the Naval Torpedo Depot in Williamstown. The label indicates: "This piece of Oak is part of the hull of H.M.S. “Victory” Lord Nelson’s renowned Flag Ship, which took such a prominent part in the Battle of Trafalgar. 21st October 1805. Exhibited by Charles Harding, H.M.V. Naval Torpedo Depot, Williamstown.” After Charles Harding died in 1931 the case containing the sample of oak from H.M.S. Victory was donated by his son Reg Harding to Mr. Murphy in 1962. The display case has since become a treasured item at Flagstaff Hill. A newspaper article dated 1905 included with the donation mentions that the city of Hamilton in Victoria was shortly expecting a mounted piece of the H.M.S. Victory, to be included in the city’s commemoration of the centenary of the "Battle of Trafalgar". Battle of Trafalgar: On October 21, 1805, twenty-seven British ships of the line led by Admiral Lord Nelson aboard HMS Victory defeated thirty-three French and Spanish ships of the line under French Admiral Villeneuve. The battle took place in the Atlantic Ocean off the southwest coast of Spain, just west of Cape Trafalgar, near the town of Los Caños de Meca. The victory confirmed the naval supremacy Britain had established during the course of the eighteenth century and it was achieved in part through Nelson's departure from the prevailing naval tactical orthodoxy of the day. Conventional practice at the time was for opposing fleets to engage each other in single parallel lines, in order to facilitate signalling and disengagement, and to maximise fields of fire and target areas. Nelson instead arranged his ships into two columns to sail perpendicularly into the enemy fleet's line. During the battle, Nelson was shot by a French musketeer and he died shortly before the battle ended. Villeneuve was captured, along with his ship Bucentaure. He later attended Nelson's funeral while a captive on parole in Britain. Admiral Federico Gravina, the senior Spanish flag officer, escaped with the remnant of the fleet. He died five months later from wounds sustained during the battle. It was prior to this battle that Nelson had issued his now-famous final orders to his ships in 12 separate flag-hoists “England expects that every man will do his duty”. This wood sample is historically significant for its association with Admiral Lord Nelson the Battle of Trafalgar. Through Nelson’s leadership and unorthodox battle tactics, he secured not only a victory against the French and Spanish but reaffirmed Britain's naval supremacy opening the way for Britain to continuing the policy of colonisation of many countries including Australia.Wood sample adhered to the base of a hinged wood and glass display case. Wood is a sample of oak taken from the hull of Vice-Admiral Lord Nelson's flagship, the HMS Victory, built in 1765. The case also contain two exhibit labels pinned above the wood sample. Other items donated with the display case, and relating to the wood sample: an 1895 photograph, a 1905 newspaper clipping, a 1962 donor's letter (two pages), and a handwritten exhibit label with a border of red lines. Photograph Front: printed- "Herbst" "28 Oxford Street, Hyde Park, Sydney", handwritten - "Mr Cooper", "see back". Back: handwritten - "Mr H Cooper, skilled shipwright, H.M.S. Wallaroo 1895" Exhibit labels still in the case: Left: handwritten- “PIECE OF OAK FROM THE HULL OF H.M.S. VICTORY”, Right: typewritten- “This piece of Oak was originally obtained by Mr. H. Cooper, skilled shipwright on H.M.S. “Victory” & afterwards on H.M.S. “Wallaroo” on the Australian Station in 1895, when he presented this exhibit to me. Chas. Harding, Late Victorian Navy.”flagstaff hill, warrnambool, shipwrecked-coast, flagstaff-hill, flagstaff-hill-maritime-museum, maritime-museum, shipwreck-coast, flagstaff-hill-maritime-village, oak, hms victory, vice-admiral lord nelson, horatio nelson, lord nelson, oak piece, piece of oaknelson, battle of trafalgar, maritime technology, ship relics, 18th century warship, british royal navy, h cooper shipwright, hms wallaroo, herbst hyde park sydney, charles harding, hmv naval orpedo depot williamstown, sir home popham’s telegraphic code, admiralty official day signal book -
 Bendigo Military Museum
Photograph - Royal Australian Survey Corps Surveyors in the Field – Project Cutlass, New Guinea, 1956 – 1957
This is a set of 23 photographs of surveyors and support staff in the field undertaking tasks in New Guinea 1956 – 1957. The surveyors were employed in the establishment of mapping and geodetic control for Project Cutlass, the “Ship-Shore” survey of the New Ireland province. In this survey operation surveyors used theodolites to observe horizontal and vertical angles and chains to measure base line distances between survey stations. Bob Skitch shown in photo .7P was in the 2nd year of his career in the Australian Army. He achieved the rank of Lieutenant-Colonel, and his last appointment was the CO of the Army Survey Regiment from 1976 to 1980.This is a set of 23 photographs of surveyors and support staff in the field undertaking duties during Project Cutlass located in New Ireland, New Guinea 1956 – 1957. The photographs were printed on photographic paper and are part of the Army Survey Regiment’s Collection. The photographs were scanned at 300 dpi. .1) - Photo, colour, 1956. Surveyors travelling main road from Kavieng to Namatanai, New Ireland. .2) - Photo, colour, 1956. Unidentified surveyors assessing recovery of their vehicle after bridge collapsed on west side of New Ireland. .3) - Photo, colour, 1956. Unidentified surveyors assessing recovery of their vehicle after bridge collapsed over flooded creek on west side of New Ireland. .4) - Photo, colour, 1956. Survey personnel L to R: Bev Uwins, John Lambie, Bob Thompson, New Ireland. .5) - Photo, colour, 1956. Survey base camp, New Ireland. .6) - Photo, black & white, 1956-1957. Geoff Helsham with possible human remains, New Ireland. .7) - Photo, black & white, 1956-1957. Bob Skitch undertaking survey observations using Wild T2 theodolite, New Ireland. .8) - Photo, black & white, 1956-1957. Chas Beach undertaking survey observations using Wild T2 theodolite, New Ireland. .9) & .10) - Photo, black & white, 1956-1957. Kev Parker (cook) New Ireland. .11) - Photo, colour, 1957. Brian Berkery taking a break, Top Manor Island, Lihir Island Group off New Ireland. Latitude -2° 46”, Longitude 152° 40”. .12) - Photo, colour, 1957. Survey base camp L to R: Chas Beach, Bev Uwins, Feni Islands, New Ireland. Latitude -4° 05”, Longitude 153° 45”. .13) - Photo, colour, 1957. A Hous Kiap. (Kiaps, known formally as district officers and patrol officers, were travelling representatives of the British and Australian governments), New Ireland. .14) & .15) - Photo, colour, 1957. L to R: Joe Farrington, Tom Royle Bob undertaking survey observations using theodolites from an improvised timber tower, New Ireland. .16) & .17) - Photo, colour, 1957. US Army ship FS216 used for ship-to-shore triangulation docked at Rabaul, New Britain. .18) - Photo, colour, 1957. US Army ship FS216 used for ship-to-shore triangulation docked at Kavieng, New Ireland. Sight target on top of mast. .19) - Photo, colour, 1957. Survey personnel onboard US Army ship FS392, L to R: Peter Frodsham, Bob Thompson, Doc Reid, John Underwood, remainder unidentified, New Ireland. .20) - Photo, colour, 1957. Survey base line party heading ashore, New Ireland. .21) - Photo, colour, 1957. Survey personnel rowing US Army assault boat L to R: Kev Parker, Chas Beach, folded up survey beacons overhanging stern, New Ireland. .22) - Photo, colour, 1957. Les Bailey onboard US Army ship departing Rabaul, New Britain for Brisbane. .23) - Photo, colour, 1957. Ron Newman onboard US Army ship departing Rabaul, New Britain for Brisbane. Active volcano in background..1P to .23P annotated on back – ‘Operation Cutlass’, personnel names, the year and the location. royal australian survey corps, rasvy, army survey regiment, fortuna, a, army svy regt, asr, surveying -
Moorabbin Air Museum
Archive (Item) - Box WP2 Prowse Collection See details under Description
Description: Defence Instruction Air Force AAP 7213.003-3MB2 Mirage Airctraft Metal Repairs - Book 2 of 2 Augusta-109-Hirundo - Preliminary General Description Sky Van: Military - Shorts Sky Van: Multi-Role Aircraft Sky Van: Civil VFW - Fokker VF Level of Importance: State. -
 Federation University Historical Collection
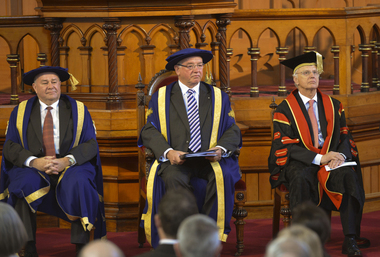
Photograph - Photograph - Colour, Installation of University of Ballarat Chancellor Paul Hemming, 2012, 17/0/2012
In April 2012 former Royal Australian College of General Practitioners president Dr Paul Hemming was appointed the University of Ballarat’s new chancellor. Dr Hemming was a deputy chancellor of the university since 2011 and a member of the university council since 2007, and replaces outgoing chancellor Robert Smith. He was a founding director of Beyondblue and has been president of the Royal Australian College of General Practitioners. He was also president of the Australian Medical Association Victoria and has served on numerous federal government medical bodies and tribunals. Chancellors are appointed to chair the university's council (governing body) as the senior office holder of the University. They also confer the academic awards of the university, and represent the university at meetings, functions and ceremonies. At the installation of Dr Hemming as the Fifth Chancellor Of The University Of Ballarat Governor of Victoria Alex Chrnov said: "I join Bonnie Fagan in acknowledging the traditional owners of this land and I pay my respects to their elders past and present. It is my great pleasure, as Governor of Victoria and Visitor to the University of Ballarat, to install Dr Paul Hemming as the fifth Chancellor of this University. I extend to him and his family my warmest congratulations on this appointment and wish him all the best in his new role. I have no doubt that he will be an industrious and wise leader of this University. Although the University of Ballarat is one of Australia’s newest Universities, it is the third oldest Tertiary institution in our country with the School of Mines being established in 1870. It has much to be proud of, and should be recognised for its commitment to being one of our most outstanding regionally focused higher education institutions. It offers on six campuses a diverse, yet suitably targeted, group of learning models that include higher education, TAFE and senior secondary school education, and is one of the few universities in the country that has an associated Technology Park. This University is uniquely placed to provide higher education in Regional Victoria. For example, I understand that by 2020 the population in the Ballarat area will increase by 20% so this University will have the responsibility and opportunity to provide educational opportunities for this growing population. The role of the Governor can be divided into three parts – ceremonial, constitutional and community engagement. It is the third aspect of the role that is most time consuming and, I add, enjoyable. It includes making official visits to Regional areas of Victoria. To date Elizabeth and I have been on 16 such visits and the thing that stands out is that despite the challenges that face Regional communities whether it be through natural disasters, or the economy more broadly – the stoicism, volunteerism and self reliance are always present. Ballarat is an example of such resilience and confidence in its future that can be dated back to this University’s inception. When the School of Mines was established in 1870 on the back of the gold rush era of the 1850s, the local community had vision and faith in its future that is reflected in the building of this institution. It is not dissimilar to Melbourne, where its relatively few citizens established the iconic pillars of our society like the State Library, the University of Melbourne, Parliament Houses and the National Gallery of Victoria. The contribution by the University of Ballarat to Regional Victoria cannot be overstated. Not only does it provide top educational opportunities for students from the Region but its graduates almost invariably end up working in Regional Australia, and often in their own local communities. More specifically, almost three out of every four of the graduates from this University end up finding employment in Regional areas. Such figures highlight the University’s significant contribution to the Regional economy. But its impact is not limited to our Regional areas – it extends to other parts of Australia and overseas. But like so many other higher education institutions in Australia, the University of Ballarat is facing challenges brought about by events such as global uncertainties and the high Australian dollar that impact on the inflow of international students, and dealing with students, more and more of whom come from the lower socio economic sector. It is in those circumstances that the Chancellor must show leadership that involves, amongst others, objectively guiding the Council and supporting the Vice-Chancellor, albeit without becoming involved in the day to day micro management of the University. A strong, trusting and respectful working relationship between the Chancellor and the Vice-Chancellor is, I believe, critical to the sound progress of a University. Before I turn more specifically to Dr Hemming, I would like to reflect briefly on his immediate predecessor, Emeritus Professor Robert Smith. I am sure that Dr Hemming has already found in Professor Smith an invaluable source of assistance. He was a skilled and effective leader not only here, but also in the broader higher education sector. I mention by way of example his instigation and leadership two years ago of the much acclaimed Chancellors’ Conference that was held in Melbourne. There was great diffidence amongst the Chancellors in having it at all. It was a little like herding cats. But Bob Smith spearheaded the organisation of it, with great attention to detail. And it was his hard work and leadership that resulted in the Conference being such a success and of assistance to all Chancellors who attended. It was an illustration of Bob Smith’s skills as a leader in the sector and of this University. And the sector, just as this University remains indebted to him. And I have no doubt that Dr Hemming will similarly lead this University through the challenging, yet exciting, times that lie ahead. He is eminently qualified to do so, in terms of his personal attributes, academic achievements and experience in governance. With his extensive medical career as a General Practitioner, service on a number of Federal Government medical boards and tribunals, and having been a Founding Director of ‘Beyondblue’, President of the Royal Australian College of General Practitioners and President of the Australian Medical Association (Victoria), his list of personal and professional achievements, as well as his strong sense of public and community duty, is impressive. Importantly, Dr Hemming has a long standing connection with the Ballarat community, having moved here with his family from the United Kingdom in 1977. He is now even accepted as a “local” I am told. Given his range of experience to which I have referred and the time he has already spent on the Council and Standing Committees of this University, he is obviously well placed to take part in leading this University. So it is a great pleasure for me to install Dr Hemming as the fifth Chancellor of the University of Ballarat." (http://www.governor.vic.gov.au/victorias-governor/publications/speeches/speech/speech/104) Colour photographS of three men in academic regalia sitting inside the Ballarat Uniting Church, Lydiard Street South. Chancellor Dr Paul Hemming sit in the centre, with Vice-Chancellor Professor david Battersby on the left. Also audience images, academics and a dinner at Craig's Hotel.university of ballarat, federation university, regalia, chancellor, vice chancellor, paul hemming, david battersby, alex chrnov, todd walker, andy smith, craig's hotel, academics -
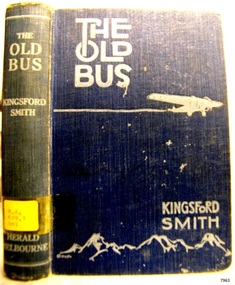 Flagstaff Hill Maritime Museum and Village
Book, The Old Bus
Sir Charles Edward Kingsford Smith is a famous Australian, well known in civil aviation history for his courageous endeavours in flight. He broken many flight records for long distance and time travelled and he was also a war hero in World War 1. He has been referred to as being “known to millions of Australians as “Smithy” … he was one of Australia’s true twentieth-century legends”. In honour of his place amongst the world’s famous pioneers his image is featured on Australia’s $20 note, Sydney airport is named after him, there is a memorial to Kingsford Smith, Taylor and Ulm at the Anderson Park, also in Sydney and his plane “Southern Cross” is on view at Brisbane Airport. Kingsford Smith wrote ‘The Old Bus’ (1932) and he and Ulm were co-authors of ‘Story of 'Southern Cross' Trans-Pacific Flight’ (1928). His also wrote a book about his own life ‘My Flying Life’ which was published after his death in 1937. and the story of his life was filmed in Australia in 1946. A BRIEF HISTORY OF SIR CHARLES EDWARD KINGSFORD SMITH (1897 – 1935) … Kingsford Smith was born 9th February 1897 in Brisbane, Queensland, Australia. His parents were William Charles Smith and Catherine Mary, nee Kingsford. His mother’s maiden name of “Kingsford” was added to the family name when they spent time in Canada from around 1903 to 1907, after which they returned to Sydney, Australia. In 1915 Kingsford Smith enlisted in Australian Imperial Force. He served in 4th Signal Troop, 2nd Division Signal Company at Gallipoli Peninsular as a ‘sapper’ or combat engineer and later in Egypt and in France as a dispatch rider. In 1916 Kingsford Smith was transferred to the Australian Flying Corps as a sergeant. He was discharged after training in England and commissioned as a second lieutenant in the Royal Flying Corps. He was appointed fling officer and soon joined the 23rd Squadron in France. He brought down four machines in his first month there and also did invaluable work attacking enemy targets. He was wounded and shot down and later awarded the Military Cross ‘for conspicuous gallantry and devotion to duty’. He was promoted to lieutenant in 1918 and served as a Flying Instructor with the R.F.C. Kingsford Smith was not allowed to participate in the 1919 England to Australia air race because of assumed lack of navigational experience. He and his pilot friend Cyril Maddocks formed a business and flew joy-flights in both England and America. In America he did some stunt flying with a Flying Circus. Kingsford Smith returned to Australia in 1921 and found employment as a pilot. He soon realised the value of air transport in such a vast country. He formed a partnership with pilot Keith Anderson in 1924 and they purchased two Bristol Tourer biplanes. Their business broadened to include Charles Ulm and became the Interstate Flying services in Sydney. Together they performed important ‘demonstration’ flights including a flight around Australia in 10 days and 5 hours using very limited navigational equipment. Kingsford Smith immediately started to search for support to do a trans-Pacific flight. This support came from the New South Wales government, Sidney Myer and G. Allan Hancock, an American oil magnate. On 31st May 1928 Kingsford Smith, Charles Ulm and two American crewmen, Harry Lyan and Jim Warner, took off from Oakland, California and flew to Brisbane via Hawaii and Suva. This historic flight took 83 hours and 38 minutes. Their Fokker plane had three engines and was named the “Southern Cross”. This amazing achievement resulted in huge financial subscriptions. Kingsford Smith was awarded the Air Force Cross and appointed as honorary squadron leader, Royal Australian Air Force. Kingsford Smith flew his Southern Cross plane from Point Cook in Victoria to Perth nonstop. Then in September – October 1928, with Charles Ulm and an Australian crew, he piloted the Southern Cross from Sidney to Christchurch New Zealand. This flight showed that was possible for regular passenger and mail services across the Tasman Sea. Kingsford Smith flew his plane to England to an order for four aircraft, planning to use them for an inter-capital air service in Australia. Sadly on 1st April 1929 he was forced to land, having lost radio contact with the ground and having run into bad weather over north – west Australia. Keith Anderson and Robert Hitchcock both perished before the search party reached them. Once official enquiries were completed the flight to England continued in June and was completed in record time of 12 days and 18 hours. In January 1930 Kingsford Smith piloted the “Southern Cloud”, one of the new Avro Ten planes, on the first flight of his airline, the Australian National Airways, from Sydney to Melbourne. The “Southern Cross” was overhauled in Holland by the Fokker Aircraft Co. and in June 1930 Kingsford Smith achieved an east-west crossing of the Atlantic from Ireland to Newfoundland in 31.5 hours. Kingsford Smith returned to England and took delivery of an Avro Avian biplane that he named the “Southern Cross Junior” and flew solo from England to Darwin, Australia. This record breaking flight took less than 10 days. He beat four other planes that had left England before him and he was 5.5 days faster than Hinkler. Sadly Kingsford Smith’s “Southern Cloud” was lost during a flight from Sydney to Melbourne in 1931 with no surviving crew or passengers; in 1958 the wreckage was discovered in the Snowy Mountains. Later that year Kingsford Smith flew his “Southern Cloud” from Australia to Timor, collecting mail from a damaged Imperial Airways plane in Timor. Other flights followed. Kingsford Smith was knighted in 1932 for his services in Aviation. He returned to selling joy flights then established the Kingsford Smith Air Service, a flying training school in Sydney. In 1933 Kingsford Smith flew the amazing record flight in “Miss Southern Cross” – a Percival Gull - from London to Wyndham in Western Australia in just over ten days. The Australian Commonwealth then gave Kingsford Smith a large grant and he was also appointed as aviation consultant to Vacuum Oil Co. Another flying record was made when Kingsford Smith and Sir P.G. Taylor flow “Lady Southern Cross” from Brisbane to San Francisco in order to sell her there; the west-east-trans-Pacific flight made aviation history. They returned to Australia to make an attempt at the trans-Tasman flight but their attempt failed due to engine failure; they managed to get back to Sydney safely, minus most of their cargo. Kingsford Smith had his unsold “Lady Southern Cross” shipped back to England, from where he and J. T. Pethybridge in the “Lady Southern Cross” attempted another record breaking flight from England The Old Bus Author: Charles Kingsford Smith Publisher: Distibuted by Herald Feature Service Date; 1932Label on spine cover with typed text RA 629.1309 KIN flagstaff hill, warrnambool, shipwrecked coast, flagstaff hill maritime museum, maritime museum, shipwreck coast, flagstaff hill maritime village, great ocean road, the old bus, charles kingsford smith -
 Flagstaff Hill Maritime Museum and Village
Functional object - Lead shot, Circa 1877
This artifact is a sample of small caliber lead shot recovered by Flagstaff Hill divers from the wreck of the Loch Ard in 1975. Included in her diverse and valuable cargo were 22 tons of lead shot, packed in cloth bags and wooden casks. Bulk quantities of lead shot, uniformly round balls of dull grey metal ranging from 2mm “birdshot” to 8mm “buckshot”, were routinely exported to the Australian colonies. Shot was used mostly as projectiles fired from smooth bored guns to bring down moving targets such as wild ducks and small game. It was also useful as ballast, when a dense, “pourable” weight was required to fill cavities or establish volume within a measuring container. The production of consistently round spheres of lead shot required the pouring of molten metal through a sieve and then a long drop through the atmosphere to a water filled basin for final cooling and collection. This “shot tower” process was first patented by William Watts of Bristol in 1782. His calculation of a 150 feet fall was not only to form evenly spherical droplets through surface tension, but also to provide partial cooling and solidification to each shot before they hit the water below. The value of his innovation was the minimising of indentation and shape distortion, avoiding the expense of re-smelting and re-moulding the lead. Lead shot was already being produced in Australia at the time the Loch Ard sinking in March 1878. James Moir had constructed a 157 feet circular stone shot tower near Hobart in 1870, with a peak annual production of 100 tons of lead shot sold in 28 pound linen bags. However colonial demand exceeded this source of local supply. The continued strength of the market for lead shot in the Colony of Victoria prompted substantial investment in additional productive capacity in Melbourne in the next decade. In 1882 Richard Hodgson erected the 160 feet round chimney-shaped Clifton Hill shot tower on Alexandra Parade (VHR H0709) and in 1889 Walter Coop built the 160 feet square tower-shaped Melbourne Central shot tower on La Trobe Street (VHR H0067). At its peak, the Coop Tower produced 6 tons of lead shot per week, or 312 tons per annum. History of the Loch Ard: The Loch Ard got its name from "Loch Ard" a loch that lies to the west of Aberfoyle, and the east of Loch Lomond. It means "high lake" in Scottish Gaelic. The vessel belonged to the famous Loch Line which sailed many vessels from England to Australia. The Loch Ard was built in Glasgow by Barclay, Curle & Co. in 1873, the vessel was a three-masted square-rigged iron sailing ship that measured 79.87 meters in length, 11.58 m in width, and 7 m in depth with a gross tonnage of 1693 tons with a mainmast that measured a massive 45.7 m in height. Loch Ard made three trips to Australia and one trip to Calcutta before its fateful voyage. Loch Ard left England on March 2, 1878, under the command of 29-year-old Captain Gibbs, who was newly married. The ship was bound for Melbourne with a crew of 37, plus 17 passengers. The general cargo reflected the affluence of Melbourne at the time. Onboard were straw hats, umbrellas, perfumes, clay pipes, pianos, clocks, confectionery, linen, and candles, as well as a heavier load of railway irons, cement, lead, and copper. There were other items included that were intended for display in the Melbourne International Exhibition of 1880. The voyage to Port Phillip was long but uneventful. Then at 3 am on June 1, 1878, Captain Gibbs was expecting to see land. But the Loch Ard was running into a fog which greatly reduced visibility. Captain Gibbs was becoming anxious as there was no sign of land or the Cape Otway lighthouse. At 4 am the fog lifted and a lookout aloft announced that he could see breakers. The sheer cliffs of Victoria's west coast came into view, and Captain Gibbs realised that the ship was much closer to them than expected. He ordered as much sail to be set as time would permit and then attempted to steer the vessel out to sea. On coming head-on into the wind, the ship lost momentum, the sails fell limp and Loch Ard's bow swung back towards land. Gibbs then ordered the anchors to be released in an attempt to hold their position. The anchors sank some 50 fathoms - but did not hold. By this time the ship was among the breakers and the tall cliffs of Mutton Bird Island rose behind. Just half a mile from the coast, the ship's bow was suddenly pulled around by the anchor. The captain tried to tack out to sea, but the ship struck a reef at the base of Mutton Bird Island, near Port Campbell. Waves subsequently broke over the ship and the top deck became loosened from the hull. The masts and rigging came crashing down knocking passengers and crew overboard. When a lifeboat was finally launched, it crashed into the side of Loch Ard and capsized. Tom Pearce, who had launched the boat, managed to cling to its overturned hull and shelter beneath it. He drifted out to sea and then on the flood tide came into what is now known as Lochard Gorge. He swam to shore, bruised and dazed, and found a cave in which to shelter. Some of the crew stayed below deck to shelter from the falling rigging but drowned when the ship slipped off the reef into deeper water. Eva Carmichael a passenger had raced onto the deck to find out what was happening only to be confronted by towering cliffs looming above the stricken ship. In all the chaos, Captain Gibbs grabbed Eva and said, "If you are saved Eva, let my dear wife know that I died like a sailor". That was the last Eva Carmichael saw of the captain. She was swept off the ship by a huge wave. Eva saw Tom Pearce on a small rocky beach and yelled to attract his attention. He dived in and swam to the exhausted woman and dragged her to shore. He took her to the cave and broke the open case of brandy that had washed up on the beach. He opened a bottle to revive the unconscious woman. A few hours later Tom scaled a cliff in search of help. He followed hoof prints and came by chance upon two men from nearby Glenample Station three and a half miles away. In a complete state of exhaustion, he told the men of the tragedy. Tom then returned to the gorge while the two men rode back to the station to get help. By the time they reached Loch Ard Gorge, it was cold and dark. The two shipwreck survivors were taken to Glenample Station to recover. Eva stayed at the station for six weeks before returning to Ireland by steamship. In Melbourne, Tom Pearce received a hero's welcome. He was presented with the first gold medal of the Royal Humane Society of Victoria and a £1000 cheque from the Victorian Government. Concerts were performed to honour the young man's bravery and to raise money for those who lost families in the disaster. Of the 54 crew members and passengers on board, only two survived: the apprentice, Tom Pearce, and the young woman passenger, Eva Carmichael, who lost her family in the tragedy. Ten days after the Lochard tragedy, salvage rights to the wreck were sold at auction for £2,120. Cargo valued at £3,000 was salvaged and placed on the beach, but most washed back into the sea when another storm developed. The wreck of Lochard still lies at the base of Mutton Bird Island. Much of the cargo has now been salvaged and some items were washed up into Lochard Gorge. Cargo and artifacts have also been illegally salvaged over many years before protective legislation was introduced in March 1982. One of the most unlikely pieces of cargo to have survived the shipwreck was a Minton majolica peacock- one of only nine in the world. The peacock was destined for the Melbourne 1880 International Exhibition. It had been well packed, which gave it adequate protection during the violent storm. Today the Minton peacock can be seen at the Flagstaff Hill Maritime Museum in Warrnambool. From Australia's most dramatic shipwreck it has now become Australia's most valuable shipwreck artifact and is one of very few 'objects' on the Victorian State Heritage Register.The shipwreck of the Loch Ard is of significance for Victoria and is registered on the Victorian Heritage Register ( S 417). Flagstaff Hill has a varied collection of artifacts from Loch Ard and its collection is significant for being one of the largest accumulation of artifacts from this notable Victorian shipwreck of which the subject items are a small part. The collection's objects give us a snapshot of how we can interpret the story of this tragic event. The collection is also archaeologically significant as it represents aspects of Victoria's shipping history that allows us to interpret Victoria's social and historical themes of the time. Through is associated with the worst and best-known shipwreck in Victoria's history.Lead shot; a group of mixed -sized lead shot. Small 2mm shot is embedded in a sea sediment clump of concretion. Also in the group are also 5 single 2mm shot and 4 single 4mm shot that are clean and free of sediment. The shot was recovered from the wreck of the Loch Ard.Nonewarrnambool, shipwreck coast, flagstaff hill, flagstaff hill maritime village, flagstaff hill maritime museum, shipwreck artefact, lead shot, loch ard, colonial industry, melbourne shot towers, victorian metallurgy, colonial imports -
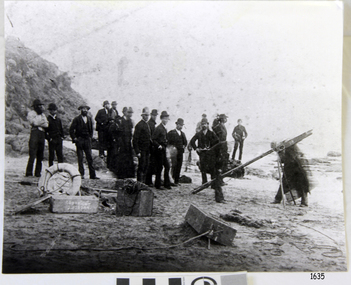 Flagstaff Hill Maritime Museum and Village
Photograph - Shipwreck rescue, c. 1890's
The photograph taken on Sunday September 6, 1891, shows the Port Campbell Rocket Rescue Crew and Equipment at Wreck Beach, Moonlight Head, preparing to save the stranded men on the wreck of the barque Fiji. The man standing in the middle, front of the photograph, facing the ocean, is Herbert Maxwell Morris, a farmer at Barruppa near Princetown, also a member of the Rocket Rescue Crew. The Rocket Rescue lifesaving method used an explosive rocket to shoot a light line from shore across to the distressed vessel. The line was then secured to the ship’s mast and a heavy, continuous line was then sent out with a ‘breaches buoy’ attached (a buoy similar to the seat of a pair of trousers). The stranded seafarers would sit in the seat and be pulled along the line to safety. A lot of skill was needed to set up the line to reach its target and the Crew trained regularly to keep up their skills. The three-masted iron barque Fiji was built in Belfast, Ireland, in 1875 by Harland and Wolfe for a Liverpool based shipping company. The ship departed Hamburg on May 22, 1891, bound for Melbourne under the command of Captain William Vickers with a crew of 25. The Cape Otway light was sighted on September 5, 1891. However, the bearing was different from Captain Vickers’ calculations. At about 2:30am the next morning land was reported only 4-5 miles away. The captain tried to redirect the ship in the rough weather without success and the Fiji struck rock only 300 yards (274 metres) from shore. The crew burned blue lights fired rockets to signal distress. The lifeboats either capsized or were swamped and smashed to pieces. Two younger crewmen volunteered to swim for the shore with a line. One, a Russian named Daniel Carkland, drowned after he was swept away when the line broke. The other, Julius Gebauhr, a 17 year old German able seaman, reached shore safely on his second attempt but had cut the line lose with his sheath-knife when it tangled in kelp. He climbed the steep cliffs in search of help. Later that morning a young man, William (Willie) Ward, saw the wreck of the ship close to shore near Moonlight Head from the cliffs and the alarm sent for help from Princetown, six miles away. At around the same time a Mott’s party of land selectors, including F. J. Stansmore, Leslie Dickson, was travelling on horseback from Princetown towards Moonlight Head. They were near Ryans Den when they found Gebauhr in the scrub, bleeding and dressed only in singlet, socks and a belt with his sheath-knife. They thought the man may be an escaped lunatic, due to his wild and shaggy looking state and what seemed to be gibberish speech. After Gebauhr threw his knife away they realised that he was speaking half-English, half-German as he talked about the wreck. They gave him food, brandy and clothing, and he was taken to a nearby guest house Rivernook, owned by John Evans, where he was cared for. Most of the party went off to the wreck site. Stanmore and Dickson rode for help from both Port Campbell for the two Rocket Rescue Crew buggies, and Warrnambool for the lifeboat. The vessel S.S. Casino sailed from Portland towards the scene. Half of the Port Campbell Rocket Crew and equipment arrived after a 25 mile journey and set up the rocket tripod on the beach below the cliffs. By this time the weary crew of the Fiji had been clinging to the jib-boom for almost 15 hours, calling frantically for help. The Office in Charge of the Rocket Crew, W. Tregear, ordered the rocket to be fired but the light line broke and the rocket was carried away. A second line, successfully set up by Herbert Morris, crossed the ship and was secured. The anxious sailors tried to come ashore along the line but some were washed off as the line sagged with too many on it at one time. Other nearly exhausted crewmen made their way through masses of seaweed and were often smothered by waves. Only 14 of the 24 who had remained on the ship made it to shore. Rocket Crew members and onlookers on the beach took it in turns to go into the surf and drag the half-drowned seamen to safety. These rescuers included Bill (William James) Robe, Herbert Morris, Edwin Vinge, Hugh Cameron, Fenelon Mott, Arthur Wilkinson and Peter Carmody, who was also involved in the rescue of men from the Newfield. Arthur Wilkinson, a 29 year old land selector, swam out to help one of the ship’s crewmen, a carpenter named John Plunken who was trying to swim from the Fiji to the shore. Two or three times both men almost reached the shore but were washed back to the wreck where they were both hauled back on board. Wilkinson was unconscious, possibly from hitting his head on the anchor before they were brought up. Plunken survived but Wilkinson later died and his body was washed up the next day. The 26 year old Bill Robe hauled out the last man; it was the captain and he’d been tangled in the kelp. Only 20 minutes later the wreck of the Fiji was smashed apart and it settled in about 6m of water. Of the 26 men on the Fiji, 11 in total lost their lives. The remains of 7 bodies were washed onto the beach. Their coffins were made from timbers from the wrecked Fiji and they were buried on the cliff top above the wreck. The survivors were taken to Rivernook and cared for over the next few days. Funds were raised by locals soon after the wreck in aid of the sufferers of the Fiji disaster. Captain Vickers was severely reprimanded for his mishandling of the ship. His Masters Certificate was suspended for 12 months. There was public criticism of the rescue. The important canvas ‘breeches buoy’ and heavy line for the Rocket Rescue was in the half of the rocket outfit that didn’t make it in time for the rescue as they had been delayed at the Gellibrand River ferry. The communications to Warrnambool were down so the call for help didn’t get through on time. The boat that had been notified of the wreck failed to reach it in time. Much cargo looting occurred. One looter was caught with a small load of red and white rubber balls. Essence of peppermint mysteriously turned up in many settlers homes. Sailcloth was salvaged and used for horse rugs and tent flies. Soon after the wreck “Fiji tobacco” was being advertised around Victoria. A Customs officer, trying to prevent some of the looting, was assaulted by looters and thrown over a steep cliff. He managed to cling to a bush lower down until rescued. In 1894 some coiled fencing wire was salvaged from the wreck. Hundreds of coils are still strewn over the site of the wreck, encrusted and solidified. The hull is broken but the vessel’s iron ribs can be seen along with some of the cargo of concrete and pig iron. Captain Vickers presented Bill Robe with his silver-cased pocket watch, the only possession that he still had, as a token for having saved his life and the lives of some of the crew. Years later Bill used the pocket watch to pay a debt, and it was handed down through that family. Seaman Julius Gebauhr later gave his knife, in its hand crafted leather sheath, to F. J. Stansmore for caring for him when he came ashore. The knife handle had a personal inscription on it. A marble headstone on the cliffs overlooking Wreck Beach pays tribute to the men who lost their lives when Fiji ran aground. The scene of the wreck is marked by the anchor from the Fiji, erected by Warrnambool skin divers in 1967. Captain Vickers’ pocket watch and Julius Gebauhr’s sheath knife are amongst the artefacts salvaged from the Fiji that are now part of the Fiji collection at Flagstaff Hill Maritime Village. The man identified in the photograph, Herbert Maxwell Morris, was the nephew of the Victorian era artist, William Morris. Herbert had sailed from England to Australia and was about 25 years old when he joined the Rocket Rescue Crew at Port Campbell. His successful rocket line firing at the Fiji wreck site was noted by author Jack Loney in one of his historic shipwreck books. Later Morris moved from his property at Baruppa to Laver’s Hill to run a more profitable enterprise. This photograph is significant as an image of a historical event, being the willingness of local volunteers to aid in the saving of lives of stranded seafarers. It gives a clear picture of the use of Rocket Rescue Equipment in shore-to-ship rescues. Flagstaff Hill’s Fiji collection is of historical significance at a State level because of its association with the wreck Fiji, which is on the Victorian Heritage Register VHR S259. The Fiji is archaeologically significant as the wreck of a typical 19th century international sailing ship with cargo. It is educationally and recreationally significant as one of Victoria's most spectacular historic shipwreck dive sites with structural features and remains of the cargo evident. It also represents aspects of Victoria’s shipping history and its potential to interpret sub-theme 1.5 of Victoria’s Framework of Historical Themes. The Fiji collection meets the following criteria for assessment; Importance to the course, or pattern, of Victoria’s cultural history, possession of uncommon, rare or endangered aspects of Victoria’s cultural history, and potential to yield information that will contribute to an understanding of Victoria’s cultural history. Black and white photograph. Subject is the Rocket Rescue Crew from Pt Campbell on Wreck Beach, Moonlight Head, at the wreck site of the barque 'Fiji'. September 6, 1891.warrnambool, shipwrecked coast, flagstaff hill, flagstaff hill maritime museum, maritime museum, shipwreck coast, flagstaff hill maritime village, shipwrecked artefact, pocket watch, fob watch fiji, william vickers, william robe, bill robe, gebauhr, stansmore, carmody, wreck bay, moonlight head, fiji shipwreck 1891, rocket crew, port campbell rocket crew, lifesaving crew, photograph of rocket crew, herbert morris, warrnambool, shipwreck artefact, mott, william ward, rocket rescue, breeches buoy, rivernook guest house -
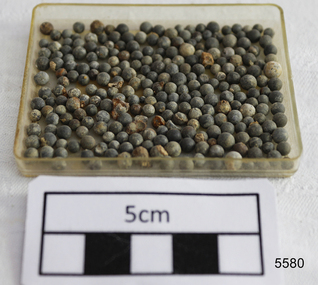 Flagstaff Hill Maritime Museum and Village
Lead shot, Before 1878
The objects comprise a quantity of small calibre lead shot raised from the LOCH ARD shipwreck site by Flagstaff Hill divers in 1976. The Maritime Village’s collection has companion pieces. The three masted, iron hulled, LOCH ARD was wrecked against the tall limestone cliffs of Mutton Bird Island in the early hours of the first of June 1878. Included in her diverse and valuable cargo were 22 tons of lead shot, packed in cloth bags and wooden casks. Bulk quantities of lead shot, uniformly round balls of dull grey metal ranging from 2mm “birdshot” to 8mm “buckshot”, were routinely exported to the Australian colonies. Shot was used mostly as projectiles fired from smooth bored guns to bring down moving targets such as wild ducks and small game. It was also useful as ballast, when a dense, “pourable” weight was required to fill cavities or establish volume within a measuring container. The production of consistently round spheres of lead shot required the pouring of molten metal through a sieve and then a long drop through the atmosphere to a water filled basin for final cooling and collection. This “shot tower” process was first patented by William Watts of Bristol in 1782. His calculation of a 150 feet fall was not only to form evenly spherical droplets through surface tension, but also to provide partial cooling and solidification to each shot before they hit the water below. The value of his innovation was the minimising of indentation and shape distortion, avoiding the expense of re-smelting and re-moulding the lead. Lead shot was already being produced in Australia at the time the LOCH ARD loaded her cargo and left Gravesend on the second of March 1878. James Moir constructed a 157 feet circular stone shot tower near Hobart in 1870, with a peak annual production of 100 tons of lead shot sold in 28 pound linen bags. However colonial demand exceeded this source of local supply. The continued strength of the market for lead shot in the Colony of Victoria prompted substantial investment in additional productive capacity in Melbourne in the next decade. In 1882 Richard Hodgson erected the 160 feet round chimney-shaped Clifton Hill shot tower on Alexandra Parade (VHR H0709) and in 1889 Walter Coop built the 160 feet square tower-shaped Melbourne Central shot tower on La Trobe Street (VHR H0067). At its peak, the Coop Tower produced 6 tons of lead shot per week, or 312 tons per annum. HISTORY OF THE LOCH ARD The LOCH ARD belonged to the famous Loch Line which sailed many ships from England to Australia. Built in Glasgow by Barclay, Curdle and Co. in 1873, the LOCH ARD was a three-masted square rigged iron sailing ship. The ship measured 262ft 7" (79.87m) in length, 38ft (11.58m) in width, 23ft (7m) in depth and had a gross tonnage of 1693 tons. The LOCH ARD's main mast measured a massive 150ft (45.7m) in height. LOCH ARD made three trips to Australia and one trip to Calcutta before its final voyage. LOCH ARD left England on March 2, 1878, under the command of Captain Gibbs, a newly married, 29 year old. She was bound for Melbourne with a crew of 37, plus 17 passengers and a load of cargo. The general cargo reflected the affluence of Melbourne at the time. On board were straw hats, umbrella, perfumes, clay pipes, pianos, clocks, confectionary, linen and candles, as well as a heavier load of railway irons, cement, lead and copper. There were items included that intended for display in the Melbourne International Exhibition in 1880. The voyage to Port Phillip was long but uneventful. At 3am on June 1, 1878, Captain Gibbs was expecting to see land and the passengers were becoming excited as they prepared to view their new homeland in the early morning. But LOCH ARD was running into a fog which greatly reduced visibility. Captain Gibbs was becoming anxious as there was no sign of land or the Cape Otway lighthouse. At 4am the fog lifted. A man aloft announced that he could see breakers. The sheer cliffs of Victoria's west coast came into view, and Captain Gibbs realised that the ship was much closer to them than expected. He ordered as much sail to be set as time would permit and then attempted to steer the vessel out to sea. On coming head on into the wind, the ship lost momentum, the sails fell limp and LOCH ARD's bow swung back. Gibbs then ordered the anchors to be released in an attempt to hold its position. The anchors sank some 50 fathoms - but did not hold. By this time LOCH ARD was among the breakers and the tall cliffs of Mutton Bird Island rose behind the ship. Just half a mile from the coast, the ship's bow was suddenly pulled around by the anchor. The captain tried to tack out to sea, but the ship struck a reef at the base of Mutton Bird Island, near Port Campbell. Waves broke over the ship and the top deck was loosened from the hull. The masts and rigging came crashing down knocking passengers and crew overboard. When a lifeboat was finally launched, it crashed into the side of LOCH ARD and capsized. Tom Pearce, who had launched the boat, managed to cling to its overturned hull and shelter beneath it. He drifted out to sea and then on the flood tide came into what is now known as LOCH ARD Gorge. He swam to shore, bruised and dazed, and found a cave in which to shelter. Some of the crew stayed below deck to shelter from the falling rigging but drowned when the ship slipped off the reef into deeper water. Eva Carmichael had raced onto deck to find out what was happening only to be confronted by towering cliffs looming above the stricken ship. In all the chaos, Captain Gibbs grabbed Eva and said, "If you are saved Eva, let my dear wife know that I died like a sailor". That was the last Eva Carmichael saw of the captain. She was swept off the ship by a huge wave. Eva saw Tom Pearce on a small rocky beach and yelled to attract his attention. He dived in and swam to the exhausted woman and dragged her to shore. He took her to the cave and broke open case of brandy which had washed up on the beach. He opened a bottle to revive the unconscious woman. A few hours later Tom scaled a cliff in search of help. He followed hoof prints and came by chance upon two men from nearby Glenample Station three and a half miles away. In a state of exhaustion, he told the men of the tragedy. Tom returned to the gorge while the two men rode back to the station to get help. By the time they reached LOCH ARD Gorge, it was cold and dark. The two shipwreck survivors were taken to Glenample Station to recover. Eva stayed at the station for six weeks before returning to Ireland, this time by steamship. In Melbourne, Tom Pearce received a hero's welcome. He was presented with the first gold medal of the Royal Humane Society of Victoria and a £1000 cheque from the Victorian Government. Concerts were performed to honour the young man's bravery and to raise money for those who lost family in the LOCH ARD disaster. Of the 54 crew members and passengers on board, only two survived: the apprentice, Tom Pearce and the young woman passenger, Eva Carmichael, who lost all of her family in the tragedy. Ten days after the LOCH ARD tragedy, salvage rights to the wreck were sold at auction for £2,120. Cargo valued at £3,000 was salvaged and placed on the beach, but most washed back into the sea when another storm developed. The wreck of LOCH ARD still lies at the base of Mutton Bird Island. Much of the cargo has now been salvaged and some was washed up into what is now known as LOCH ARD Gorge. Cargo and artefacts have also been illegally salvaged over many years before protective legislation was introduced. One of the most unlikely pieces of cargo to have survived the shipwreck was a Minton porcelain peacock - one of only nine in the world. The peacock was destined for the Melbourne International Exhibition in 1880. It had been well packed, which gave it adequate protection during the violent storm. Today, the Minton peacock can be seen at the Flagstaff Hill Maritime Museum in Warrnambool. From Australia's most dramatic shipwreck it has now become Australia's most valuable shipwreck artefact and is one of very few 'objects' on the Victorian State Heritage Register. The shipwreck of the LOCH ARD is of State significance – Victorian Heritage Register S417 Flagstaff Hill’s collection of artefacts from LOCH ARD is significant for being one of the largest collections of artefacts from this shipwreck in Victoria. It is significant for its association with the shipwreck, which is on the Victorian Heritage Register (VHR S417). The collection is significant because of the relationship between the objects, as together they have a high potential to interpret the story of the LOCH ARD. The LOCH ARD collection is archaeologically significant as the remains of a large international passenger and cargo ship. The LOCH ARD collection is historically significant for representing aspects of Victoria’s shipping history and its potential to interpret sub-theme 1.5 of Victoria’s Framework of Historical Themes (living with natural processes). The collection is also historically significant for its association with the LOCH ARD, which was one of the worst and best known shipwrecks in Victoria’s history. A quantity of lead shot pellets retrieved from the wreck of the LOCH ARD. There are 242 loose 2mm pieces and 17 loose 4mm pieces. They are in good condition, with some shape distortion and sedimentary concretion, and shot tower made.flagstaff hill, warrnambool, shipwrecked coast, flagstaff hill maritime museum, maritime museum, shipwreck coast, flagstaff hill maritime village, great ocean road, loch line, loch ard, captain gibbs, eva carmichael, tom pearce, glenample station, mutton bird island, loch ard gorge, lead shot, colonial industry, melbourne shot towers, victorian metallurgy, colonial imports -
 Melton City Libraries
Document, Minns Family Reunion, 2004
"A perpetual spring in the adjacent creek provided a steady supply of fresh water to the site on which the homestead is built. Although we can not be certain of the identity of the builder, the first stage of ‘The Willows’ homestead appears to have been constructed in the mid 1850s. The house is situated on Crown Allotment No.1 (No Section), Parish of Kororoit, an allotment of 5 acres 3 roods 4 perches. Although it had surveyed the land, the Crown did not offer it for sale until 22nd November 1861, at which time it was purchased by Charles March Williams. (Although the property is directly opposite and immediately adjacent to the Township of Melton, and was sold as ‘Suburban Allotment 33’, it was situated within the Shire of Braybrook rather than the Shire of Melton until 1917.) Considerable improvements had taken place on the land prior to the Crown sale. When CM Williams purchased the allotment in November 1861 he paid £23.5.0 for the land itself, and valued the improvements at £400. Even allowing for some exaggeration by Williams, this is an extremely high valuation for improvements, and must have included a house. Some local research has claimed that in 1858 Williams had taken over the interest of a Mr Parkinson in the property, and that Parkinson built the house upon taking possession of the land c.1855. It was definitely built by 1861, when a map shows a square building on the site marked as ‘House’. The property is important in the district for its association with the establishment of the pound. The district pound had been established in 1854, when George Scarborough of Mount Cottrell (Mt Cottrell Road, south of Greigs Road) was appointed pound-keeper. Scarborough resigned in 1857. The pound was moved to Melton following agitation from local farmers and Charles March Williams appointed pound-keeper on 26th April 1858. Williams, the son of a doctor, had been born in London. Reminiscences of local residents of the time, as recorded in the Express newspaper, note Williams’ success in breeding horses on the property. Sales of up to 60 guineas were noted. Whether this was from Williams’s own stock or from unclaimed pound stock is not made clear. Williams appeared before a government inquiry in 1860 and advocated registration of all stock brands in the State. Williams died in 1862 leaving a widow, Catherine, and five living children aged 15 years to five months. At the time of his death Williams had entered negotiations with one Matthew Devenish and had a mortgage of £100 on allotments 1 and 2, Parish of Kororoit. Catherine Williams was appointed pound-keeper on 2 September 1863, with her eldest son Charles as her assistant. Her tenure was short for on 22nd March 1864 George Minns senior paid Matthew Devenish £135 for allotments 1 and 2 Parish of Kororoit (considerably less than Williams had claimed the property was worth in 1861) and on the same day paid William Tullidge £45 for the adjoining allotments 3 and 4. In April 1867, James Ebden Minns, the newly married son of George senior became the owner of The Willows property having entered into a mortgage arrangement with his father to the extent of £200. At the time George Minns was residing in Kaarimba having left Melton in 1867 for a short trip to England and upon his return having taken up a selection in the Kaarimba district with his son Frederick who had a hotel licence there. James paid out the mortgage on 2-1-1873. James Minns was appointed pound-keeper in 1872; in 1885 the pound was moved elsewhere and Minns purchased the old pound site and added it to his farm. The Willows residence underwent a major change about this time. A two room extension, similar in style but with a lower elevation was added to the original rear of the house with a chimney matching the distinctive originals. Window arrangements did not match the original but became a feature of the façade when the new addition became the front of the building. Six buttresses were attached to the east and west walls of the old building, two to the south wall and the whole rendered with mortar to give the appearance of dressed stonework around the windows. Galvanized iron was placed over the shingles and a verandah added on three sides. By 1876 The Willows was the homestead for a thriving mixed farm of 340 acres of which 156 was rented from a H. Ruck. In October of that year the Australasian travelling reporter visited and reported on the property. In common with the nearly every other property in the district the farm had ‘recently’ (generally within the last two years) abandoned cultivation of crops, and turned over completely to cattle pasture. Butter making was the principal occupation of the farm, which had about 50 head of cattle, a large proportion of which were milking cows. The reporter also noted that a ‘large number of pigs are kept upon this farm and are found to be very profitable stock’. Their manure was used in an orchard and garden in which ‘large quantities of lucerne and prairie grass are grown for the use of stock when ordinary feed is scarce’. Two bores attached to deep brick lined wells supplied water for the house in addition to the farm. A commodious timber barn and necessary sheds had also been constructed. Access to the property was improved following the construction of the bluestone ford across the creek c.1887, when the recreation ground came into use. Prior to this date it may have been that the crossing referred to as ‘Mr Minns bridge’ was used. This appears to have been a flimsy structure and has but two references in Council reports in the Melton Express in the 1880’s. It is believed that in the late 1890’s a timber building was added near the rear of the building to house a kitchen, ablutions and laundry rooms and rooms for seasonal workers. This was attached to the house by means of a trellised walkway using the original front entry to the house (long since the back door). A photograph of this building appears in a local history of Melton. This was demolished in recent decades during the period when the house was tenanted (after the Minns family had left). James Minns son, George, took over the property following his marriage to Alice Walsh in 1903. James and Caroline moved into a house on the former JH Games property at the eastern end of Henry Street. George held the position of Shire Secretary for Melton for 40 years. He was a most prominent member of the community being Secretary to, among others, the Melton Coursing Club, the Shooting Club and the Cemetery Trust. He also rode with the hunting parties who sported across the Plains and were entertained at Mount Kororoit. George and Alice had one son, Norman who followed his father into local government and became Secretary of the Shire of Werribee completing a record term in this position. George retired to Werribee in 1951, where he died in 1965. The National Trust records note that James Ebden Minns and his sons were ‘leading men of the district, Justices of the Peace, and Shire Councillors’. It claims that Sir Thomas Bent was a frequent visitor. The Willows passed into the hands of George’s grandson, Bruce Minns and the property was let for a number of years. In the 1960s it became vacant and was subject to vandalism. Major structural problems arose with the part demolition of the roof, the loss of windows and doors and holes dug into and under the floorboards. The outbuildings were particularly targeted. Following widespread public support, the Shire of Melton purchased the house, with 3.75 acres of land, in 1972. In 1975 the Shire of Melton and the Melton and District Historical Society were successful in nominating the building for National Trust classification, and then the Australian Heritage Commission’s Register of the National Estate. The AHC particularly noted its ‘townscape importance’. It was envisaged that the farmhouse would form ‘a picturesque centrepiece to Melton’s planned … historical park, along with Dunvegan bluestone cottage … and similar structures as they become available.’ In a time of great Melton’s ‘satellite city’ development the Council spelt out its broader vision in its submission to the AHC: ‘Melton is destined to become, by the end of the present century, a city of between 75,000 and 100,000 people. Significant relics of the past, such as ‘The Willows’, regrettably will be rare in that situation. It is essential that sufficient tangible links with Melton’s pioneering days remain to promote in the new community a sense of history and continuity’. Under the direction of ‘The Willows’ Restoration Committee and consultant architect John Hitch, all outbuildings, with the exception of the garage and toilet, were demolished and the dwelling house restored. Finances were provided by the Shire of Melton and the National Estate Grants Program, and considerable amount of voluntary labour was provided by the local community. The orchard was removed, and remaining wooden buildings were relocated to provide an open vista for visitors to the Park. The property was furnished with donations from district families keen to preserve this example of pioneer life in the area. The Willows became the headquarters of the Melton and District Historical Society". Invitation to the family reunion at the Willowslocal identities, pioneer families -
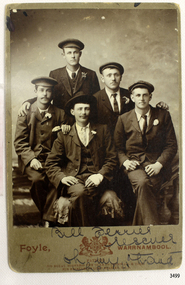 Flagstaff Hill Maritime Museum and Village
Postcard - People, Bill Ferrier - rescuer, 11th November, 1905
The postcard shows a photograph of William Ferrier, the 25-year-old Warrnambool fisherman from South Warrnambool whose rescue of two sailors from the wrecked La Bella made him an overnight National hero, quoted as “one of the most heroic rescues in Victoria’s shipwreck history”. The La Bella was wrecked on 10th November 1905 and the photograph was taken on the next day. In the photograph, William Ferrier is seated in the centre, with four of the five survivors beside him: (from left to right) Leonard Robertson, R. Payne, Oscar Rosenholme and Jack Noake. The photograph was taken by Foyle Photography Studio in Warrnambool, originally owned by James Charles Foyle. He previously had a photographic studio in Melbourne 1882 1887, then opened “Foyle’s Photo Card Studios” in Liebig St, Warrnambool. James Foyle died on 13th July 1905 and his son and daughter, Charles and Lilian Foyle continued on with the business until 1945. This photograph was most likely taken by either Charles or Lilian Foyle. The story of William Ferrier’s brave act follows on below … The ship from which the sailors were rescued was the three-masted, iron and steel barquentine the La Bella, built in Norway in 1893. She was one of two iron and steel ships by Johan Smith, the company was one of the leading shipping families in Tvedestrand, Norway. She was significant to Norwegian shipping, being one of only 27 iron and steel ships ever built in Norway. She was registered in New Zealand and engaged from 1902 in inter-colonial trading of timber in the Pacific, between New Zealand and Australia and was often in Port Phillip Bay, Victoria. On 5th October 1905, the twelve-year-old La Bella left Lyttleton, New Zealand carrying a cargo of timber bound for Warrnambool, Australia. She was manned by a crew of twelve: the Master, (Captain Mylius, previously 1st Mate of La Bella, appointed Captain to La Bella on 6th February 1903) 2 Mates, Cook, six able seamen, one ordinary seaman and a boy. Bad weather en route caused her to shelter at Burnie on Tasmania's North West coast. On November 10th, the 37th day of her journey, La Bella approached Warrnambool. Captain Mylius steered her towards Lady Bay Channel in heavy south-west seas and evening mist. He ordered the helmsman to steer for the light. As the ship came round, a tremendous sea struck her on the port quarter, causing her to breach broadside in a northwesterly direction into breakers. The helm was brought round twice more, but each time heavy seas broke over her, the third time throwing the La Bella on to a submerged reef in Lady Bay now known as La Bella Reef (about 100 yards from the Warrnambool breakwater). The sea was so rough that it even wrenched a one-and-a-half ton anchor from its fastenings and into the sea. As Captain Mylius headed to the steel wheelhouse, intending to send up a rocket flare, a huge sea slammed the steel door into him (resulting in massive bruising front and back) Despite his injuries he still managed to set off a blue light, which he held up in his hands. La Bella’s lifeboats were filled with seawater and broke up on their chocks. The blue light was the first indication to people on the shore that there was a ship in distress. The Harbour Master, Captain Roe (who lived in the Harbour Master’s House opposite Flagstaff Hill), organised a group of volunteers to crew the lifeboat because the trained crew was unavailable; the crewmen were working on a steamer in Port Fairy at the time. He then poured oil onto the water to try and smooth the sea. At around 11 pm three of the crew took shelter in the steel forecastle but the sea crashed into it and broke it up. While the rest of the crew and onlookers watched helplessly in the moonlight the bodies were washed away into the sea, never to be seen again. Some of the crew lashed themselves to the weather rail to keep from being washed away. Watson, the ordinary seaman, became tangled in the rigging lines and was too weak to move, so the 2nd Mate, Robertson, put a line onto him so that he wouldn’t wash off. Around 11 pm three of the crew were unconscious from exhaustion. The situation on La Bella was becoming dangerous. The 2nd Mate moved to the ‘house’ and soon afterwards the ship slipped in the heavy sea. The lashings of the 1st Mate and the ‘boy’ Denham had kept them safe until about 2 am when they were washed overboard; no one was able to help. One by one, the exhausted crew were being washed overboard, too weak to hold on any longer. During the night the La Bella had broken into two and the deckhouse ran out towards the sea. Two more men drowned when trying to reach the lifeboat. By sunrise, the only survivors of the twelve were the Master, 2nd Mate and three seamen. Early in the morning, Captain Roe used the rocket apparatus on shore to try and shoot a line to the ship for a safer rescue but each attempt fell short of the target. Several attempts were made by the lifeboat to rescue the stricken sailors, but the rough conditions made this difficult for the boat to get close enough to the ship and the lifeboat had to return to shore. During a final attempt to reach the ship Captain Mylius ordered his men to jump into the sea. Leonard Robertson, 2nd mate, jumped and swam towards the lifeboat, taking hold of the boat hook offered to him. Oscar Rosenholme managed to reach the boat floating on a piece of timber from the ship’s load and a third survivor, Noake, also made the boat. Along with the lifeboat rescue crew, 25-year-old William Ferrier rowed his small dingy through the heavy seas and managed to rescue the Captain, whom he landed on the breakwater. Ferrier then returned to the ship to attempt a final rescue, losing his oars and rowlocks into the high sea. Using just a spare paddle he skulled towards the La Bella, reaching her stern in time to cut loose the lone surviving sailor, Payne, from the lashing that held him to the ship; the terrified sailor dropped from the ship and into the dingy. Shortly after the last man was rescued, the La Bella was lifted by a huge wave and crashed back down on the reef; she broke up and sank. The ordeal had lasted ten hours. The survivors were taken to the nearby Bay View Hotel and gratefully received warm food and clothing, medical attention and a place to sleep. In the following days, an unidentified body of a young person had washed ashore; it was either Watson or Denham. The body was buried in the Warrnambool cemetery with an appropriate gravestone and inscription. William Ferrier became a national hero as news of the daring rescue spread. In recognition of his bravery in the two daring rescues, he was awarded the Silver Medal for Bravery by the Royal Humane Society and was honoured in the letter from the Prime Minister and the Parliament of the Commonwealth, telegrams and a cheque for £20 from the Governor-General, over £150 subscribed by the public, including Warrnambool and district and readers of The Argus, and a gold medal from the Glenelg Dinghy Club of South Australia. Ferrier’s rescue efforts are one of the most heroic in Victoria’s shipwreck history. (William Ferrier’s son, Frank, received a similar award almost fifty years later when he helped rescue four members of the crew on the yacht Merlan after it ran on to a reef near the Point Lonsdale Lighthouse. ) The wreck of La Bella now lies on her port side in 13 metres of sheltered water inside the reef she struck. The bow section is relatively intact and part of the stern has drifted north-easterly towards the mouth of the Hopkins River. The reef the La Bella struck now bears its name. Those five rescued from the La Bella were Captain George Mylius, Leonard Robertson (2nd Mate, 21 years old), R. Payne, Oscar Rosenholme and Jack Noake. Those seven who lost their lives were Mr Coulson (1st mate), Charles Jackman (cook) Gustave Johnson, Pierre Johann and Robert Gent (all able seamen), Harry Watson (ordinary seaman) and Jack Denham (ship’s boy), Captain Mylius was found guilty of careless navigation; he had sailed into the bay without the services of a pilot. His Master Certificate was suspended for twelve months. Later he was also charged with manslaughter of one of the crew who had died when the La Bella was wrecked but found not guilty. The event’s adverse publicity and damage to his career took a toll on his health and he died of a heart attack six months after the wreck; he was only thirty-seven. His body was buried in the Melbourne General Cemetery. The La Bella was “the best documented of all sailing ships owned in New Zealand”. Her record books, ship logs, correspondence and supporting papers are still available. At the time of the tragedy, she was owned by Messers David C.Turnbull and Co. of Timaru, New Zealand timber merchants and shipping agents, who had purchased her on 13th December 1901. A detailed account of the last journey of La Bella can be read in “Leonard Robertson, the Whangaroa & La Bella” written by Jack Churchouse, published in 1982 by Millwood Press Ltd, Wellington, NZ. As well as this postcard, Flagstaff Hill’s La Bella Collection includes a photograph of the wrecked La Bella, a brass rail holder and the letter from the Prime Minister and other Members of Parliament that was sent to William Ferrier to commend him for his bravery. Some 15 – 17 ships are believed to have sunk in Lady Bay, but only two have been discovered on the seafloor; the “La Bella” and the “Edinburgh Castle”. Both wrecks are popular diving sites and are preserved as significant historical marine and marine archaeological sites. This postcard is part of the La Bella Collection and is significant at both a local and state level. Its connection to the La Bella shipwreck and the rescue of five survivors highlights the dangers of Victoria’s Shipwreck Coast. The photograph of William Ferrier and four of the five survivors demonstrates the bravery of ordinary Australians who risked their lives to save victims of shipwrecks along the coast. The postcard is significant to the history of Warrnambool as it portrays William Ferrier, a local fisherman whose descendants continue to live in the area. It highlights the way of life of people who lived in coastal towns in 19th century Victoria and the effects of shipwrecks upon them. The postcard connects to the congratulatory letter which was sent to William Ferrier by the Prime Minister and Government of Australia and demonstrates the importance they attached to his efforts for Victoria and to Australia. The postcard is also an example of the photography of Foyle Photographers who were in the town of Warrnambool from the late 1800’s. Charles and Lillian Foyle took over the business when their father James died in 1905. Lillian Foyle is significant as the first woman photographer in Warrnambool. It is not known whether Charles of Lillian took this photograph. This postcard is significant because of its association with the sailing ship “La Bella”. The “La Bella” is of local and state and national significance. It is one of the only two shipwrecks discovered in Lady Bay, Warrnambool, out of the 15-17 shipwrecks in the bay. Sepia photograph of William (Bill) Ferrier (seated in the middle), heroic rescuer of two crew members of the La Bella, wrecked at Warrnambool. The photograph is a postcard and shows five men dressed formally in suits and hats. Printed below the photograph are the name and place of the photographer, a royal crest and the details of two patrons of the photographer. Also below the photograph are some handwritten words in black pen. On the back of the postcard is a handwritten message in the same writing as the front.Printed on the front of the card is “Foyle, WARRNAMBOOL” “PATRONS: / HIS ROYAL HIGHNESS THE DUKE OF CORNWALL & YORK. / HIS EXCELLENCY LORD BRAS_ EY, R.O.B.” Handwritten on the front of the card is “Bill Ferrier / rescuer / Oh my hero _ _ _ “ Handwritten on the back of the card is a message. “La Bella” Wrecked off W.Bool Breakwater Nov. 1906 (_ _ _ _ show night) Payne Noake Rosenholme Robertson and Capt Mylius (saved) (moonlight bright) Watson (_ _ _ _ boy) Richwoud [possibly Richmond] drowned” and signed “Desdewoua [possibly Desdemona] Slogos”la bella, foyle, william ferrier, bill ferrier, lady bay, 1905, 10th november 1905, 11th november 1905, parliament of the commonwealth, royal humane society medal, flagstaff hill, warrnambool, shipwrecked coast, flagstaff hill maritime museum, maritime museum, shipwreck coast, flagstaff hill maritime village -
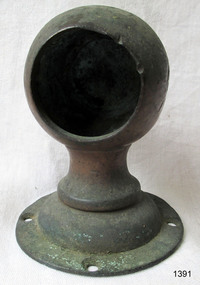 Flagstaff Hill Maritime Museum and Village
Functional object - Rail holder, About 1893, when the ship was made
This brass rail holder fixture would have been used to hold the end of a rail in place. There is no information as to where the fitting or rail would have been placed on the ship; sailing ships had many brass fittings. It was recovered from the wreck of the La Bella, which lies at the bottom of the Warrnambool Harbour. Some 15 ships are believed to have been wrecked in Lady Bay, but only two have been discovered on the sea floor; the La Bella and the Edinburgh Castle. Both wrecks are popular diving sites and are preserved as significant historical marine and marine archaeological sites. The story of the final voyage of the La Bella is summarised as follows … The ship from which the sailors were rescued was the three-masted, iron and steel barquentine the La Bella, built in Norway in 1893. She was one of two iron and steel ships by Johan Smith, the company being one of the leading shipping families in Tvedestrand, Norway. She was significant to Norwegian shipping, being one of only 27 iron and steel ships ever built in Norway. She was registered in New Zealand and engaged from 1902 in inter-colonial trading of timber in the pacific, between New Zealand and Australia and was often in Port Phillip Bay, Victoria. On 5th October, 1905, the twelve year old La Bella left Lyttleton, New Zealand carrying a cargo of timber bound for Warrnambool, Australia . She was manned by a crew of twelve: the Master, (Captain Mylius, previously 1st Mate of La Bella, appointed Captain to La Bella on 6th February 1903) 2 Mates, Cook, six able seamen, one ordinary seaman and a boy. . Bad weather en route caused her to shelter at Burnie on Tasmania's North West coast. On November 10th, the 37th day of her journey, La Bella approached Warrnambool. Captain Mylius steered her towards Lady Bay Channel in heavy south-west seas and evening mist. He ordered the helmsman to steer for the light. As the ship came round, a tremendous sea struck her on the port quarter, causing her to breach broadside in a north-westerly direction into breakers. The helm was brought round twice more, but each time heavy seas broke over her, the third time throwing the La Bella on to a submerged reef in Lady Bay now known as La Bella Reef (about 100 yards from the Warrnambool breakwater). The sea was so rough that it even wrenched a one-and-a-half ton anchor from its fastenings and into the sea. As Captain Mylius headed to the steel wheelhouse, intending to send up a rocket flare, a huge sea slammed the steel door into him (resulting in massive bruising front and back) Despite his injuries he still managed to set off a blue light, which he held up in his hands. La Bella’s lifeboats were filled with sea water and broke up on their chocks. The blue light was the first indication to people on shore that there was a ship in distress. The Harbour Master, Captain Roe (who lived in the Harbour Master’s House opposite Flagstaff Hill), organised a group of volunteers to crew the lifeboat because the trained crew was unavailable; the crewmen were working on a steamer in Port Fairy at the time. He then poured oil onto the water to try and smooth the sea. At around 11pm three of the crew took shelter in the steel forecastle but the sea crashed into it and broke it up. While the rest of the crew and onlookers watched helplessly in the moonlight the bodies were washed away into the sea, never to be seen again. Some of the crew lashed themselves to the weather rail to keep from being washed away. Watson, the ordinary seaman, became tangled in the rigging lines and was too weak to move, so the 2nd Mate, Robertson, put a line onto him so that he wouldn’t wash off. Around 11pm three of the crew were unconscious from exhaustion. The situation on La Bella was becoming dangerous. The 2nd Mate moved to the ‘house’ and soon afterwards the ship slipped in the heavy sea. The lashings of the 1st Mate and the ‘boy’ Denham had kept them safe until about 2am when they were washed overboard; no one was able to help. One by one, the exhausted crew were being washed overboard, too weak to hold on any longer. During the night the La Bella had broken into two and the deckhouse ran out towards the sea. Two more men drowned when trying to reach the lifeboat. By sunrise the only survivors of the twelve were the Master, 2nd Mate and three seamen. Early in the morning Captain Roe used the rocket apparatus on shore to try and shoot a line to the ship for a safer rescue but each attempt fell short of the target. Several attempts were made by the lifeboat to rescue the stricken sailors, but the rough conditions made this difficult for the boat to get close enough to the ship and the lifeboat had to return to shore. During a final attempt to reach the ship Captain Mylius ordered his men to jump into the sea. Leonard Robertson, 2nd mate, jumped and swam towards the lifeboat, taking hold of the boat hook offered to him. Oscar Rosenholme managed to reach the boat floating on a piece of timber from the ship’s load and a third survivor, Noake, also made the boat. Along with the lifeboat rescue crew, 25 year old William Ferrier rowed his small dingy through the heavy seas and managed to rescue the Captain, whom he landed on the breakwater. Ferrier then returned to the ship to attempt a final rescue, losing his oars and rowlocks into the high sea. Using just a spare paddle he skulled towards the La Bella, reaching her stern in time to cut loose the lone surviving sailor, Payne, from the lashing that held him to the ship; the terrified sailor dropped from the ship and into the dingy. Shortly after the last man was rescued, the La Bella was lifted by a huge wave and crashed back down on the reef; she broke up and sank. The ordeal had lasted ten hours. The survivors were taken to the nearby Bay View Hotel and gratefully received warm food and clothing, medical attention and a place to sleep. In the following days an unidentified body of a young person was washed ashore; it was either Watson or Denham. The body was buried in the Warrnambool cemetery with an appropriate gravestone and inscription. William Ferrier became a national hero as news of the daring rescue spread. In recognition of his bravery in the two daring rescues he was awarded the Silver Medal for Bravery by the Royal Humane Society and was honoured in the letter from the Prime Minister and the Parliament of the Commonwealth, telegrams and a cheque for £20 from the Governor General, over £150 subscribed by the public, including Warrnambool and district and readers of The Argus, and a gold medal from the Glenelg Dinghy Club of South Australia. Ferrier’s rescue efforts are one of the most heroic in Victoria’s shipwreck history. (William Ferrier’s son, Frank, received a similar award almost fifty years later, when he helped rescue four members of the crew on the yacht Merlan, after it ran on to a reef near the Point Lonsdale Lighthouse. ) The wreck of La Bella now lies on her port side in 13 metres of sheltered water inside the reef she struck. The bow section is relatively intact and part of the stern has drifted north-easterly towards the mouth of the Hopkins River. The reef the La Bella struck now bears its name. Those five rescued from the La Bella were Captain George Mylius, Leonard Robertson (2nd Mate, 21 years old), R. Payne, Oscar Rosenholme and Jack Noake. Those seven who lost their lives were Mr Coulson (1st mate), Charles Jackman (cook) Gustave Johnson, Pierre Johann and Robert Gent (all able seamen), Harry Watson (ordinary seaman) and Jack Denham (ship’s boy), Captain Mylius was found guilty of careless navigation; he had sailed into the bay without the services of a pilot. His Master Certificate was suspended for twelve months. Later he was also charged with manslaughter of one of the crew who had died when the La Bella was wrecked, but found not guilty. The event’s adverse publicity and damage to his career took a toll on his health and he died of a heart attack six months after the wreck; he was only thirty-seven. His body was buried in the Melbourne General Cemetery. The La Bella was “the best documented of all sailing ships owned in New Zealand”. Her record books, ship logs, correspondence and supporting papers are still available. At the time of the tragedy, she was owned by Messers David C.Turnbull and Co. of Timaru, New Zealand timber merchants and shipping agents, who had purchased her on 13th December 1901. A detailed account of the last journey of La Bella can be read in “Leonard Robertson, the Whangaroa & La Bella” written by Jack Churchouse, published in 1982 by Millwood Press Ltd, Wellington, NZ. Some 15 – 17 ships are believed to have sunk in Lady Bay, but only two have been discovered on the seafloor; the “La Bella” and the “Edinburgh Castle”. Both wrecks are popular diving sites and are preserved as significant historical marine and marine archaeological sites. As well as this letter, Flagstaff Hill’s La Bella Collection includes a photograph of the wrecked La Bella, a brass rail holder and a postcard of William Ferrier with four of the survivors. This original congratulatory letter sent to William Ferrier by the Prime Minister and Government of Australia demonstrates the importance attached to his efforts for Victoria and to Australia. The letter is part of the La Bella Collection and is significant at both a local and state level. Its connection to the La Bella shipwreck and the rescue of five survivors highlights the dangers of Victoria’s Shipwreck Coast. The letter to William Ferrier from the Australian Government acknowledges the bravery of ordinary Australians who risked their lives to save victims of shipwrecks along the coast. The letter is significant to the history of Warrnambool as it honours William Ferrier, a local fisherman whose descendants continue to live in the area. It highlights the way of life of people who lived in coastal towns in 19th century Victoria and the effects of shipwrecks upon them. The letter connects to the postcard of William Ferrier with four of the five rescued crew, the photograph of the wreck of the La Bella and the artefact from the wreck, the rail holder. This item is significant because of its association with the sailing ship “La Bella” . the “La Bella” is of local and state and national significance. It is one of the only two shipwrecks discovered in Lady Bay, Warrnambool, out of the 15-17 shipwrecks in the bay. Brass rail holder from the wreck "La Bella". This rail holder would have been used as a fitting for the end of a rail. It is made up of two parts and looks a little like a goblet in shape. The top is a hollow spherical shape with a circular hole cut out on one side, into which the end of a round rail would fit. There are two gouge marks close to each other on one side of the hole, about one centimetre apart, at 1 and 2 o’clock position. The sphere has a hollow pipe-like stem with a screw thread turned into the outside of the lower section and the bottom of the stem has been flared out after having the base fitted. The base is round and has a mound in the centre. The edge has four evenly spaced fixture holes around its edge. The metal shows signs of pitting and has mild encrustation. The fitting of the base is loose, allowing it to swivel in a complete circle. The top of the sphere is rough and has a dent in it. Underneath the base there is verdigris; some has flaked off and reveals a bright golden colour underneath. rail holder, brass rail holder, la bella, lady bay, norway, 1893, new zealand, captain mylius, william ferrier, flagstaff hill, warrnambool, shipwrecked coast, flagstaff hill maritime museum, maritime museum, shipwreck coast, flagstaff hill maritime village -
 Flagstaff Hill Maritime Museum and Village
Letter - William Ferrier, 14th November 1905
The letter to William Ferrier of South Warrnambool from the Prime Minister and the Parliament of the Commonwealth recognised the significance of William’s brave and courageous lifesaving act to the people of Australia; “They all feel that your conduct was worthy of the best deeds done by British sailors in the past and they are proud to know that Australia can produce such as you.” The story of that brave rescue follows on below … The ship from which the sailors were rescued was the three-masted, iron and steel barquentine the La Bella, built in Norway in 1893. She was one of two iron and steel ships by Johan Smith, The company was one of the leading shipping families in Tvedestrand, Norway. She was significant to Norwegian shipping, being one of only 27 iron and steel ships ever built in Norway. She was registered in New Zealand and engaged from 1902 in inter-colonial trading of timber in the Pacific, between New Zealand and Australia and was often in Port Phillip Bay, Victoria. On 5th October 1905, the twelve-year-old La Bella left Lyttleton, New Zealand carrying a cargo of timber bound for Warrnambool, Australia. She was manned by a crew of twelve: the Master, (Captain Mylius, previously 1st Mate of La Bella, appointed Captain to La Bella on 6th February 1903) 2 Mates, Cook, six able seamen, one ordinary seaman and a boy. Bad weather en route caused her to shelter at Burnie on Tasmania's North West coast. On November 10th, the 37th day of her journey, La Bella approached Warrnambool. Captain Mylius steered her towards Lady Bay Channel in heavy south-west seas and evening mist. He ordered the helmsman to steer for the light. As the ship came round, a tremendous sea struck her on the port quarter, causing her to breach broadside in a north-westerly direction into breakers. The helm was brought round twice more, but each time heavy seas broke over her, the third time throwing the La Bella on to a submerged reef in Lady Bay now known as La Bella Reef (about 100 yards from the Warrnambool breakwater). The sea was so rough that it even wrenched a one-and-a-half ton anchor from its fastenings and into the sea. As Captain Mylius headed to the steel wheelhouse, intending to send up a rocket flare, a huge sea slammed the steel door into him (resulting in massive bruising front and back) Despite his injuries he still managed to set off a blue light, which he held up in his hands. La Bella’s lifeboats were filled with seawater and broke up on their chocks. The blue light was the first indication to people on the shore that there was a ship in distress. The Harbour Master, Captain Roe (who lived in the Harbour Master’s House opposite Flagstaff Hill), organised a group of volunteers to crew the lifeboat because the trained crew was unavailable; the crewmen were working on a steamer in Port Fairy at the time. He then poured oil onto the water to try and smooth the sea. At around 11 pm three of the crew took shelter in the steel forecastle but the sea crashed into it and broke it up. While the rest of the crew and onlookers watched helplessly in the moonlight the bodies were washed away into the sea, never to be seen again. Some of the crew lashed themselves to the weather rail to keep from being washed away. Watson, the ordinary seaman, became tangled in the rigging lines and was too weak to move, so the 2nd Mate, Robertson, put a line onto him so that he wouldn’t wash off. Around 11 pm three of the crew were unconscious from exhaustion. The situation on La Bella was becoming dangerous. The 2nd Mate moved to the ‘house’ and soon afterwards the ship slipped in the heavy sea. The lashings of the 1st Mate and the ‘boy’ Denham had kept them safe until about 2 am when they were washed overboard; no one was able to help. One by one, the exhausted crew were being washed overboard, too weak to hold on any longer. During the night the La Bella had broken into two and the deckhouse ran out towards the sea. Two more men drowned when trying to reach the lifeboat. By sunrise, the only survivors of the twelve were the Master, 2nd Mate and three seamen. Early in the morning, Captain Roe used the rocket apparatus on shore to try and shoot a line to the ship for a safer rescue but each attempt fell short of the target. Several attempts were made by the lifeboat to rescue the stricken sailors, but the rough conditions made this difficult for the boat to get close enough to the ship and the lifeboat had to return to shore. During a final attempt to reach the ship Captain Mylius ordered his men to jump into the sea. Leonard Robertson, 2nd mate, jumped and swam towards the lifeboat, taking hold of the boat hook offered to him. Oscar Rosenholme managed to reach the boat floating on a piece of timber from the ship’s load and a third survivor, Noake, also made the boat. Along with the lifeboat rescue crew, 25-year-old William Ferrier rowed his small dingy through the heavy seas and managed to rescue the Captain, whom he landed on the breakwater. Ferrier then returned to the ship to attempt a final rescue, losing his oars and rowlocks into the high sea. Using just a spare paddle he skulled towards the La Bella, reaching her stern in time to cut loose the lone surviving sailor, Payne, from the lashing that held him to the ship; the terrified sailor dropped from the ship and into the dingy. Shortly after the last man was rescued, the La Bella was lifted by a huge wave and crashed back down on the reef; she broke up and sank. The ordeal had lasted ten hours. The survivors were taken to the nearby Bay View Hotel and gratefully received warm food and clothing, medical attention and a place to sleep. In the following days, an unidentified body of a young person has washed ashore; it was either Watson or Denham. The body was buried in the Warrnambool cemetery with an appropriate gravestone and inscription. William Ferrier became a national hero as news of the daring rescue spread. In recognition of his bravery in the two daring rescues, he was awarded the Silver Medal for Bravery by the Royal Humane Society and was honoured in the letter from the Prime Minister and the Parliament of the Commonwealth, telegrams and a cheque for £20 from the Governor-General, over £150 subscribed by the public, including Warrnambool and district and readers of The Argus, and a gold medal from the Glenelg Dinghy Club of South Australia. Ferrier’s rescue efforts are one of the most heroic in Victoria’s shipwreck history. (William Ferrier’s son, Frank, received a similar award almost fifty years later when he helped rescue four members of the crew on the yacht Merlan after it ran on to a reef near the Point Lonsdale Lighthouse. ) The wreck of La Bella now lies on her port side in 13 metres of sheltered water inside the reef she struck. The bow section is relatively intact and part of the stern has drifted north-easterly towards the mouth of the Hopkins River. The reef the La Bella struck now bears its name. Those five rescued from the La Bella were Captain George Mylius, Leonard Robertson (2nd Mate, 21 years old), R. Payne, Oscar Rosenholme and Jack Noake. Those seven who lost their lives were Mr Coulson (1st mate), Charles Jackman (cook) Gustave Johnson, Pierre Johann and Robert Gent (all able seamen), Harry Watson (ordinary seaman) and Jack Denham (ship’s boy), Captain Mylius was found guilty of careless navigation; he had sailed into the bay without the services of a pilot. His Master Certificate was suspended for twelve months. Later he was also charged with the manslaughter of one of the crew who had died when the La Bella was wrecked but found not guilty. The event’s adverse publicity and damage to his career took a toll on his health and he died of a heart attack six months after the wreck; he was only thirty-seven. His body was buried in the Melbourne General Cemetery. The La Bella was “the best documented of all sailing ships owned in New Zealand”. Her record books, ship logs, correspondence and supporting papers are still available. At the time of the tragedy, she was owned by Messers David C.Turnbull and Co. of Timaru, New Zealand timber merchants and shipping agents, who had purchased her on 13th December 1901. A detailed account of the last journey of La Bella can be read in “Leonard Robertson, the Whangaroa & La Bella” written by Jack Churchouse, published in 1982 by Millwood Press Ltd, Wellington, NZ. As well as this letter, Flagstaff Hill’s La Bella Collection includes a photograph of the wrecked La Bella, a brass rail holder and a postcard of William Ferrier with four of the survivors. Some 15 – 17 ships are believed to have sunk in Lady Bay, but only two have been discovered on the seafloor; the “La Bella” and the “Edinburgh Castle”. Both wrecks are popular diving sites and are preserved as significant historical marine and marine archaeological sites. This original congratulatory letter sent to William Ferrier by the Prime Minister and Government of Australia demonstrates the importance attached to his efforts for Victoria and to Australia. The letter is part of the La Bella Collection and is significant at both a local and state level. Its connection to the La Bella shipwreck and the rescue of five survivors highlights the dangers of Victoria’s Shipwreck Coast. The letter to William Ferrier from the Australian Government acknowledges the bravery of ordinary Australians who risked their lives to save victims of shipwrecks along the coast. The letter is significant to the history of Warrnambool as it honours William Ferrier, a local fisherman whose descendants continue to live in the area. It highlights the way of life of people who lived in coastal towns in 19th century Victoria and the effects of shipwrecks upon them. The letter connects to the postcard of William Ferrier with four of the five rescued crew, the photograph of the wreck of the La Bella and the artefact from the wreck, the rail holder. This letter is significant because of its association with the sailing ship “La Bella”. The “La Bella” is of local and state and national significance. It is one of the only two shipwrecks discovered in Lady Bay, Warrnambool, out of the 15-17 shipwrecks in the bay. Letter to William Ferrier of South Warrnambool from the Prime Minister and Members of Parliament commending him on his bravery. The printed letterhead includes a coat of arms in the top centre and the official address. The letter is very neatly hand written in black pen and includes 4 signatures of Members of Parliament. The rectangular paper is cream coloured with some yellow/brown discolouring. It has the letterhead on the right hand side of it and the written letter begins below the letterhead. The paper has been folded so that the right side becomes the cover page of the letter. The writing is continued onto the inside right hand page of the folded paper and the writing ends here. There is more recent writing on the bottom right hand corner of the back page. The paper has been officially folded in half a total 3 times and there is heavy discolouration on the sections that form the front and back of the folded letter. There is a 4th fold line that is less pronounced that the other folds and would make the paper the size to fit into a pocket. At several fold creases the paper has worn through. The edges of the paper have minor tears. The printed coat of arms is that of the House of Representatives. Underneath is printed “The Parliament of the Commonwealth, / Parliament House / Melbourne”. The hand written, letter is dated “14th November, 1905” and addressed to “Mr. William Ferrier / South Warrnambool” The letter begins “The Speaker, the Prime Minister and Members of the Ministry and its supporters, the Leader and Members of the Opposition, the Leader and Members of the Labour Party, being all the Members of the House of Representatives of the Federal Parliament of Australia” … It continues “desire to express to you their appreciation of your bravery in skulling out to the wreck of the “La Bella” at Warrnambool on Saturday, 11th November, 1905, and recovering therefrom two of the crew who were in imminent danger of their lives. They all feel that your conduct was worthy of the best deeds done by British sailors in the past and they are proud to know that Australia can produce such as you.” The letter is “Signed on behalf of the Members – Speaker (Frederick Holder ), Deputy Leader of the Opposition (Joseph Cook ), Prime Minister (Alfred Deakin), Leader of the Labour Party ( J.C. Watson)” On the back of the letter is blue ink handwriting “OWNER / G. FERRIER / TO. BE. PHOTOGRAPHED / 27-4-76”la bella, william ferrier, bill ferrier, lady bay, 1905, 10th november 1905, 11th november 1905, parliament of the commonwealth, prime minister, australian government, new zealand, flagstaff hill, warrnambool, shipwrecked coast, flagstaff hill maritime museum, maritime museum, shipwreck coast, flagstaff hill maritime village -
 Eltham District Historical Society Inc
Film - Video (VHS), Diamond Creek Fire Brigade, c.1955-1987
Combination of three movie films. Movie One (1950s): 00:00 – 13:14 Black and white footage of Diamond Creek firemen practising in Diamond Street in the 1950s for forthcoming demonstrations of abilities. Mentions of Gordon Brandy and Joe Hislop Running out hoses from old hose reels along Diamond Street, Diamond Creek Displays from various brigades running out and connecting hoses. Also scenes from the 1950s of Diamond Creek Fire Brigade competing in various locations around Victoria and Tasmania. Mentions of Brigade members Dave Kidd, Bruce Hackett, Ron Kirkbride, Jack Marks, Graham Upton who are prominent in these events. Members of Kyneton Fire Brigade also present. Members competing in running out hose reels, connecting hoses togethers and to hydrants then climbing towers to direct water from hose or at a target hanging above the road. Diamond Creek members identified wearing a diamond on their chest and back. Includes scenes of Scottish pipe bands at the events and significant crowds of spectators. Footage of Mel Stone and Beryl Marks, Stan Redpath and Ron Kirkbride, then Ron Kirkbride and Eric Holt viewing flower displays. Film changes to colour at Diamond Creek oval for practice with fire engine entering oval. Members depicted include Bill May, Jack Sinclair, Jim Cox, Bob Beale, Dave Kidd, Bruce Hackett and Captain Clarrie Stone. Reverts to black and white in the 1950s where the Brigade joins forces with the Diamond Valley Community Hospital for a Gala Day on the Diamond Creek Oval. Changes to colour again, possibly same event and scenes of children on bikes and scooters or with prams and carts racing around the oval. Mention of young lad Brian Laurie who has his own fire truck. Dart throwing, pony rides. Scenes with Dr Don Cordner, Gus Lyons, Vic Cohn (?) and spinning wheel and Diamond Creek School children entertain a large crowd with Maypole dancing. Movie Two (1950s): 13:25 – 19:00 This black and white film was taken by a TV film crew in the 1950s depicts a typical call out for the Diamond Creek Fire Brigade. In this case the careless action of a member of the public throwing a lighted match from a car, which can cause extensive damage. Footage features the Shire of Eltham War Memorial tower at Kangaroo Ground before it was modified with a fire spotter’s cabin. Discusses fire spotting operations from the tower. Shows a fire spotter walking around the top of the tower. A fire is detected, and the information is relayed to the nearest fire station, in this case, Diamond Creek. The telephone call is received, and the alarm sounded. Captain Clarrie Stone and firemen May and Shaw leave their workplaces and prepare for action. Scenes of running across the Main Hurstbridge road showing the shops (Shell service station and Chemist prominent). Scenes entering the fire station which has a pictorial warning covering the entire door “Only you can prevent forest fires – If you’re careless – we’re homeless!” Eric Holt pinpoints the location of the fire while Captain Clarrie Stone and Fireman Shaw take note. The advance vehicle (an FE Holden ute, rego GTE-696) leaves to assess the extent of the fire. Having assessed the fire, Fireman Shaw communicates with base showing radio with call sign VL3JZ. Eric Holt takes the call. In the meantime, Captain Clarrie Stone and Fireman Shaw undertake some limited action to address the fire. Firemen Bill May, Jim Bates and Hugh Bar (?) man the tanker. A photo portrait of Queen Elizabeth is visible hanging on the wall. They are later joined by Firemen Jim Cox, Eric DeBuse (?) and Jack Marks. The tanker is seen departing the station and diverging off before the bridge. Captain Clarrie Stone and Fireman Shaw are seen pumping water on the flames with hand pumps when the tanker arrives. The hose is unreeled, and water turned on the flames. Jack Sinclair joins the action. Jim Cox directs water to the high stuff. The fire put out, Jack Marks and Eric DeBuse wind in the hoses and the team head back to town. It’s peaceful again at the memorial tower. Movie Three (1969-1987): 19:14 – 34:34 Colour film “Fired with Dedication”, Country Fire Authority Victoria, produced by I.L. Wadeson, Commentary by A.M. Hem. Credits with CFA Victoria emblem and then placed over a view of an old-style ladder engine. Opens with the scene of a fire engine outside the Diamond Creek Fire Station then various trophies reflecting the competition success of the brigade in various track and disciplined events. Two trophies shown of particular pride to the brigade were for first place in the Torchlight Procession at the State Championships in Mildura in 1986 and also at Swan Hill in 1981. Still photo scenes of ex Captain Clarrie Stone, Brigade Captain for 21 years; ex Captain Jack Marks, 10 years; ex Captain Ian Douglas, 10 years. Cuts to scene of radio control room, January 1969, and news of a fire on the northern side of the township of Diamond Creek. With scenes of flames in bush, the narration explains that until the early 1960s the area was an orchard district which protected the town against the savagery of bushfires. But due to competition from other areas more suitable for orcharding and easier transport to Melbourne the district could no longer remain competitive, and orchards were replaced by grassed areas, which together with the bush areas were a feeding ground for fire. On 8th January 1969, high temperatures and strong north winds, were, with the carelessness of some individual all that was necessary to produce the worst fire the district had seen. Cuts to scene of blackened fields and cattle - Hundreds of hectares of grass land were blackened, and cattle had to be transported to other areas for agistment. Scene of destroyed buildings in the township – 13 houses and the public hall in the town were destroyed as was the theatre equipment which was owned by the fire brigade. The Church of England Hall and bell tower were badly damaged. The whole town could have been burnt out but for the determination, skill, and courage of the Diamond Creek Fire Brigade. Scenes of all that was left of the home on the hill on the west side of the Church of England. Also, the remains of the old Pisy (?) home on the top of the same hill near Lambert Street, and the ruined Crocker home. Cuts to a scene in the mid-1970s to mid-1980s of a house fire in Haley Street attended by the Diamond Creek Fire Brigade. Although the house was severely damaged, it was saved. Mentions that whilst assistance is appreciated, in some circumstances, those doing so are not properly dressed for fighting fires. Breathing apparatus is a must in structure fire attack. Next scene (either on Mangarook or Coventry oval) showing off four Diamond Creek Fire Brigade efficient and very expensive firefighting units. Features a forward control vehicle Toyota 4WD used for conveying task force personnel to the required areas; a Hino Model 3.2 tanker, diesel powered and carries 3,000 litres of water and has a 16 HP petrol driven pump which delivers 900 litres of water per minute; an International tanker (registration TCM-418) which carries 3,000 litres of water with pumping capacity of 600 litres per minute. The Ford diesel powered pumper (registration MXE-754) is a well-equipped vehicle with a water capacity of 1,000 litres and capable of pumping 1,900 litres of water per minute from the main pump, has many lockers which hose equipment such as breathing apparatus and various types of hose nozzles and foam making equipment. The vehicle carries 360m of 64mm diameter hose which can be laid out from the rear lockers and a portable lighting plant, an Oxy Viva resuscitator to revive smoke inhalation victims and forcible entry tools to gain access to structure fires. Views of the main pump and control panel on the vehicle. As well as the main pump, the vehicle is equipped with an auxiliary pump which allows the facility to pump whilst moving. Fire fighters must undergo constant training and hone their skills, Scenes of a training exercise using the pumper to pump from static water. First, the short lengths of suction hose are coupled, a strainer fitted to ensure debris does not foul the pump. Gauges must be constantly monitored to ensure manageable water pressures are maintained. Pressures are normally controlled to allow two fire fighters to work at each nozzle outlet. Two nozzles are tested, one adjustable jet fog type which is used on flammable gasses or within a structure fire to absorb heat. A straight jet nozzle to project water long distances to protect exposed surfaces close to a fire radiated heat. The pumper is quite a versatile vehicle in handling structure fires, but it also carries specialist equipment needed in containing hazardous chemical incidents. Cuts to scene of parade – the Diamond Creek Fire Brigade has with other neighbouring brigades participated in most town fairs and earns the respect of the watching public. It can be seen why this brigade has been so successful at disciplined contests. Views of Plenty Fire Brigade Road Rescue unit which is equipped with the “Jaws of Life” Scenes of athletic competitions – many neighbouring brigades indulge in friendly but keen competition at the Diamond Creek Town Fair. The young are also encouraged to participate in all aspects of Junior Fire Brigade activities and become tomorrow’s generation of volunteer fire fighters. Scene of the 1986 Diamond Creek Town Fair which was the last time veteran Captain Clarrie Stone BEM marched with the brigade. Clarrie was awarded the British Empire Medal for his service to the Country Fire Authority. Also, scenes of vehicles in the parade. Cuts to scene of brigade members in drill formation for inspection by Acting Chief Harry Rothsay (?) on the occasion of the opening of the new fire station extensions on August 29, 1987. Rudy Libel (?) Captain at the time. Scenes of crowds including many dignitaries of neighbouring brigades present including Lieutenant Gordon Grandy (who came down from Queensland for the occasion) and ex-Secretary David Kidd and wife Betty, also ex Captain Clarrie Stone and Mrs Nel Stone, a life member of the Ladies Auxiliary, the Reverend Jock Ryan, son of J.L Ryan, founder of the Diamond Creek Fire Brigade, Foundation Captain of the fire brigade, Keith Bradbury and Mrs Bradbury. Pauline Dick accepts a community service award for services to the CFA. Recognising over 47 and a half years of service, a presentation is made by Mr Neil Marshall, Acting Chairman of the CFA to ex Captain Clarrie Stone with response by Clarrie. Other members of the official party include Cr. Martin Wright, Shire President Wayne Phillips and local Member of Parliament, Mrs Pauline Toner. Ex foreman John Bennett is presented with a life member’s awards by Captain Rudy Libel. The camera also catches Gwen Cox, Jean Ryan and Bessie Layton (?) Provides historic footage of people, places and equipment and a record of the worst fires expoerienced in Diamond Creek in 1969BASF Standard Quality SQ E-180 VHS dubbing (poor quality) of three films Converted to MP4 file format 0:34:38, 1.85GBOn label: "Donation - August 2000 Diamond Creek Unit Old films made up from Fire Brigade shows at competitions - also Kangaroo Ground Tower being used"video recording, diamond creek fire brigade, 1986 diamond creek town fair, a.m. hem, acting chief harry rothsay, athletic competitions, beryl marks, bessie layton, betty kidd, bill may, bob beale, brian laurie, bruce hackett, captain clarrie stone, chemist, church of england hall, clarrie stone, clarrie stone bem, country fire authority victoria, coventry oval, cr. martin wright, crocker home, dart throwing, dave kidd, david kidd, diamond creek, diamond creek fire station, diamond creek oval, diamond creek school, diamond creek town fair, diamond street, diamond valley community hospital, dr don cordner, eric debuse, eric holt, fe holden ute, fire damage – buildings, fire spotter, fire spotter’s cabin, fire station extension, fired with dedication (film), firefighting units, fireman shaw, firemen jim cox, ford pumper, foundation captain, gala day, gordon brandy, gordon grandy, graham upton, gus lyons, gwen cox, haley street, hino model 3.2 tanker, house fire, i.l. wadeson, ian douglas, international tanker, j.l ryan, jack marks, jack sinclair, january 1969, jaws of life, jean ryan, jim bates and hugh bar, jim cox, joe hislop, john bennett, kangaroo ground, kangaroo ground tower, keith bradbury, kyneton fire brigade, lambert street, main hurstbridge road, mangarook oval, maypole dancing, mel stone, mildura 1986, mrs bradbury, mxe754 vic registration, neil marshall, nel stone, orchard district, oxy viva resuscitator, pauline dick, pauline toner mp, pisy home, plenty fire brigade road rescue unit, pony rides, radio control room, reverend jock ryan, ron kirkbride, rudy libel, shell service station, shire of eltham war memorial, shire president wayne phillips, spinning wheel, stan redpath, state championships, swan hill 1981, tcm418 vic registration, torchlight procession, toyota 4wd, trophies, vic cohn, victorian bushfires - 1969, vl3jz -
 Flagstaff Hill Maritime Museum and Village
Painting - Maritime painting, The La Bella, 1980s
This painting of the “La Bella” is associated with Flagstaff Hill’s collection of artefacts from the wreck of the “La Bella”. It was painted around the 1980s by maritime artist Philip J. Gray. Some 15 – 17 ships are believed to have sunk in Lady Bay, but only two have been discovered on the seafloor; the “La Bella” and the “Edinburgh Castle”. Both wrecks are popular diving sites and are preserved as significant historical marine and marine archaeological sites. The Kosnar Picture Framing and Mirrors Shop identified the "GRAY 3135, Y04/111" as their job number for the framing and said that the label "ANOTHER KOSNAR FEATURE" was last used before about 1990. About artist Philip J. Gray “Philip is one of Australia’s leading maritime artists and his meticulous research and social commentary paintings of ships, such as, the Loch Ard and Schomberg form an important part of Warrnambool’s Flagstaff Hill Maritime Museum.” [Dr Marion Manifold, Artist and Art Historian, 2014] Philip James Gray was born in London but has lived most of his life in Australia. He graduated from a London school of art as an illustrator, specialising in technical and scientific illustration as well as other commercial and applied art. He was also a student for a time of Fyffe Christie - British figurative artist, mural painter and humanitarian – who had a great influence on his career. Philip has always worked as a professional artist and illustrator. Many publications on maritime history have featured his work. His paintings have been released and sold all over the world as limited edition prints. The State Library of Victoria’s ‘Latrobe Collection’ holds two of his paintings. His street painting of ‘The Ashes Contest’ decorates the brick wall of Old Bakery Laneway in Sunbury and a Sunbury café owner commissioned him to paint the ‘Sunbury Pop Festival’ as a remembrance of local history. Philip has been an active member of the Sunbury Art Society in Victoria for several years, serving on the committee for some of that time and being involved in exhibitions. He enjoys helping new artists and sharing his skills and experience. About the “La Bella” The wreck of the La Bella lies at the bottom of the Warrnambool Harbour in Lady Bay. Some 15 ships are believed to have been wrecked there but only two have been discovered on the sea floor; the La Bella and the Edinburgh Castle. Both wrecks are popular diving sites and are preserved as significant historical marine and marine archaeological sites. The story of the final voyage of the La Bella is summarised as follows … The ship from which the sailors were rescued was the three-masted, iron and steel barquentine the La Bella, built in Norway in 1893. She was one of two iron and steel ships by Johan Smith, the company being one of the leading shipping families in Tvedestrand, Norway. She was significant to Norwegian shipping, being one of only 27 iron and steel ships ever built in Norway. La Bella was registered in New Zealand and engaged from 1902 in inter-colonial trading of timber in the pacific, between New Zealand and Australia and was often in Port Phillip Bay, Victoria. On 5th October 1905 the twelve year old La Bella left Lyttleton, New Zealand carrying a cargo of timber bound for Warrnambool, Australia . She was manned by a crew of twelve: the Master, (Captain Mylius, previously 1st Mate of La Bella, appointed Captain to La Bella on 6th February 1903) 2 Mates, Cook, six able seamen, one ordinary seaman and a boy. Bad weather en-route caused her to shelter at Burnie on Tasmania's North West coast. On November 10th, the 37th day of her journey, La Bella approached Warrnambool. Captain Mylius steered her towards Lady Bay Channel in heavy south-west seas and evening mist. He ordered the helmsman to steer for the light. As the ship came round, a tremendous sea struck her on the port quarter, causing her to breach broadside in a north-westerly direction into breakers. The helm was brought round twice more, but each time heavy seas broke over her, the third time throwing the La Bella on to a submerged reef in Lady Bay now known as La Bella Reef (about 100 yards from the Warrnambool breakwater). The sea was so rough that it even wrenched a one-and-a-half ton anchor from its fastenings and into the sea. As Captain Mylius headed to the steel wheelhouse, intending to send up a rocket flare, a huge sea slammed the steel door into him (resulting in massive bruising front and back) Despite his injuries he still managed to set off a blue light, which he held up in his hands. La Bella’s lifeboats were filled with sea water and broke up on their chocks. The blue light was the first indication to people on shore that there was a ship in distress. The Harbour Master, Captain Roe (who lived in the Harbour Master’s House opposite Flagstaff Hill), organised a group of volunteers to crew the lifeboat because the trained crew was unavailable; the crewmen were working on a steamer in Port Fairy at the time. He then poured oil onto the water to try and smooth the sea. At around 11pm three of the crew took shelter in the steel forecastle but the sea crashed into it and broke it up. While the rest of the crew and onlookers watched helplessly in the moonlight the bodies were washed away into the sea, never to be seen again. Some of the crew lashed themselves to the weather rail to keep from being washed away. Watson, the ordinary seaman, became tangled in the rigging lines and was too weak to move, so the 2nd Mate, Robertson, put a line onto him so that he wouldn’t wash off. Around 11pm three of the crew were unconscious from exhaustion. The situation on La Bella was becoming dangerous. The 2nd Mate moved to the ‘house’ and soon afterwards the ship slipped in the heavy sea. The lashings of the 1st Mate and the ‘boy’ Denham had kept them safe until about 2am when they were washed overboard; no one was able to help. One by one, the exhausted crew were being washed overboard, too weak to hold on any longer. During the night the La Bella had broken into two and the deckhouse ran out towards the sea. Two more men drowned when trying to reach the lifeboat. By sunrise the only survivors of the twelve were the Master, 2nd Mate and three seamen. Early in the morning Captain Roe used the rocket apparatus on shore to try and shoot a line to the ship for a safer rescue but each attempt fell short of the target. Several attempts were made by the lifeboat to rescue the stricken sailors, but the rough conditions made this difficult for the boat to get close enough to the ship and the lifeboat had to return to shore. During a final attempt to reach the ship Captain Mylius ordered his men to jump into the sea. Leonard Robertson, 2nd mate, jumped and swam towards the lifeboat, taking hold of the boat hook offered to him. Oscar Rosenholme managed to reach the boat floating on a piece of timber from the ship’s load and a third survivor, Noake, also made the boat. Along with the lifeboat rescue crew, 25 year old William Ferrier rowed his small dingy through the heavy seas and managed to rescue the Captain, whom he landed on the breakwater. Ferrier then returned to the ship to attempt a final rescue, losing his oars and rowlocks into the high sea. Using just a spare paddle he skulled towards the La Bella, reaching her stern in time to cut loose the lone surviving sailor, Payne, from the lashing that held him to the ship; the terrified sailor dropped from the ship and into the dingy. Shortly after the last man was rescued, the La Bella was lifted by a huge wave and crashed back down on the reef; she broke up and sank. The ordeal had lasted ten hours. The survivors were taken to the nearby Bay View Hotel and gratefully received warm food and clothing, medical attention and a place to sleep. In the following days an unidentified body of a young person was washed ashore; it was either Watson or Denham. The body was buried in the Warrnambool cemetery with an appropriate gravestone and inscription. William Ferrier became a national hero as news of the daring rescue spread. In recognition of his bravery in the two daring rescues he was awarded the Silver Medal for Bravery by the Royal Humane Society and was honoured in the letter from the Prime Minister and the Parliament of the Commonwealth, telegrams and a cheque for £20 from the Governor General, over £150 subscribed by the public, including Warrnambool and district and readers of The Argus, and a gold medal from the Glenelg Dinghy Club of South Australia. Ferrier’s rescue efforts are one of the most heroic in Victoria’s shipwreck history. (William Ferrier’s son, Frank, received a similar award almost fifty years later, when he helped rescue four members of the crew on the yacht Merlan, after it ran on to a reef near the Point Lonsdale Lighthouse. ) The wreck of La Bella now lies on her port side in 13 metres of sheltered water inside the reef she struck. The bow section is relatively intact and part of the stern has drifted north-easterly towards the mouth of the Hopkins River. The reef the La Bella struck now bears its name. Those five rescued from the La Bella were Captain George Mylius, Leonard Robertson (2nd Mate, 21 years old), R. Payne, Oscar Rosenholme and Jack Noake. Those seven who lost their lives were Mr Coulson (1st mate), Charles Jackman (cook) Gustave Johnson, Pierre Johann and Robert Gent (all able seamen), Harry Watson (ordinary seaman) and Jack Denham (ship’s boy). Captain Mylius was found guilty of careless navigation; he had sailed into the bay without the services of a pilot. His Master Certificate was suspended for twelve months. Later he was also charged with manslaughter of one of the crew who had died when the La Bella was wrecked, but found not guilty. The event’s adverse publicity and damage to his career took a toll on his health and he died of a heart attack six months after the wreck; he was only thirty-seven. His body was buried in the Melbourne General Cemetery. The La Bella was “the best documented of all sailing ships owned in New Zealand”. Her record books, ship logs, correspondence and supporting papers are still available. At the time of the tragedy she was owned by Messers David C.Turnbull and Co. of Timaru, New Zealand timber merchants and shipping agents, who had purchased her on 13th December 1901. A detailed account of the last journey of La Bella can be read in “Leonard Robertson, the Whangaroa & La Bella” written by Jack Churchouse, published in 1982 by Millwood Press Ltd, Wellington, NZ.This painting of the La Bella by Philip J. Gray is part of the La Bella Collection and is significant at both a local and state level. Its connection to the La Bella shipwreck and the rescue of five survivors highlights the dangers of Victoria’s Shipwreck Coast. The painting connects with other objects and artefacts associated with the wreck of the La Bella. This painting is significant because of its association with the sailing ship “La Bella” . the “La Bella” is of local and state and national significance. It is one of the only two shipwrecks discovered in Lady Bay, Warrnambool, out of the 15-17 shipwrecks in the bay. Large framed painting of the three masted barquentine "La Bella" fully rigged. Painted by Phillip J Gray. A fine printed line squares off the painting. Beneath painting and line is a gold plate with black copper plate designating "La Bella" is encased in glass, surrounded by a silver-metal frame. Yellow and brown paper label is adhered to back of painting. Picture framed by Kosnar in Melbourne."The La Bella" on gold plaque Logo of "K" inside a brown square. "GRAY 3135, Y04/111", "ANOTHER KOSNAR FEATURE" flagstaff hill, warrnambool, shipwrecked-coast, flagstaff-hill, flagstaff-hill-maritime-museum, maritime-museum, shipwreck-coast, flagstaff-hill-maritime-village, painting, la bella, artist phillip j gray, maritime painting, lady bay warrnambool -
Southern Sherbrooke Historical Society Inc.
Textile - Helen Gibson collection - material, cottons, etc
-
 Geelong Football Club
Geelong Cats Print 1990s players Sholl, Brad: Snell, Jason: Kilpatrick, Glenn: Hocking, Garry: Pickering, Liam: Riccardi, Peter: Colbert, Leigh: McGrath, Tim: Stoneham, Barry: Mansfield, Michae
Brad ‘Nails’ Sholl Born: 10/11/1972 From: Geelong College via North Melb Height: 184cm Weight: 84kg Natural kicking foot: Right Guernsey number: 12 First senior match for Geelong: Round 1, 1995 v Melbourne at Kardinia Park The attacking small defender delighted fans with his adventurous attacks on the ball and dashes out of the danger area. He was an excellent mark for his size and lacked nothing in courage and determination. His ability to rush to space to create a viable target for a team-mate was another of his trademarks. Occasionally, he was moved forward with success, where he took great delight in booting important goals. Total Brownlow Medal votes for Geelong: 54 Runner-up in club B&F count: 1996 Fourth in club B&F count: 1997, 1998, 2000 Fifth in club B&F count: 1995 Seventh in club B&F count: 1999 GFC Hall of Fame inductee (2002) GFC Life Membership (2001) Career span for Geelong: 1995-2002 Total matches for Geelong: Premiership 169, Night/Pre-Season Series 12, Interstate 1 Total goals for Geelong: Premiership 46, Night/Pre-Season Series 5, Interstate 0 Finals matches for Geelong: 7 Finals goals for Geelong: 0 Last senior match for Geelong: Round 19, 2002 v St Kilda at Docklands Stadium Jason Snell Born: 27/07/1977 From: Upwey-Tecoma/Eastern U18 Height: 181cm Weight: 81kg Natural kicking foot: Right Guernsey numbers: 25 (1996-97) & 4 (1998-2001) First senior match: Round 1, 1996 v Melbourne at the MCG The courageous mid-fielder/small forward possessed sound skills and an excellent football brain. Opposition coaches experienced difficulty in finding suitable match-up opponents to counter him. In a match at Kardinia Park against Port Adelaide in 1997 he scored a match-winning five goals after spending the first half on the bench. He won the club most improved player award in 1999. Tragically, a shocking leg injury sustained at the MCG prematurely terminated his highly promising career. Total Brownlow Medal votes: 5 Career span: 1996-2001 Total matches: Premiership 68, Night/Pre-Season Series 8 Total goals: Premiership 62, Night/Pre-Season Series 3 Finals matches: 3 Finals goals: 1 Last senior match: Round 3, 2001 v Melbourne at the MCG Glenn ‘Killer’ Kilpatrick Born: 29/08/1972 From: Studfield via North Melb Reserves, West Adelaide (SA) & Essendon Height: 184cm Weight: 85kg Natural kicking foot: Right Guernsey number: 13 First senior match for Geelong: Round 5, 1996 v Richmond at Kardinia Park No-one could accuse the dogged half-back flanker and mid-fielder of not giving his all in every match that he played. He used courage and determination to win the ball, negate an opponent or block for a team-mate. Often, his repeated efforts would inspire his fellow Cats. Although effective disposal by foot did not come easy for him, he worked hard on the training track to improve. Total Brownlow Medal votes for Geelong: 27 Runner-up in club B&F count: 1997 Seventh in club B&F count: 2000 Eighth in club B&F count: 1999 (equal) Career span for Geelong: 1996-2002 Total matches for Geelong: Premiership 120, Night/Pre-Season Series 12 Total goals for Geelong: Premiership 31, Night/Pre-Season Series 1 Finals matches for Geelong: 3 Finals goals for Geelong: 0 Last senior match for Geelong: Round 20, 2002 v Fremantle at Subiaco Garry ‘Buddha’ Hocking Born: 08/10/1968 From: Cobram Height: 182cm Weight: 84kg Natural kicking foot: Right Guernsey numbers: 51 (1987) & 32 (1988-2001) First senior match: Round 3, 1987 v Melbourne at Kardinia Park As one of football’s genuine tough and skilful performers, he gave the Cats magnificent service. Undoubtedly, he became one of the code’s all-time greats. His ability to make perfect position, fix eyes on the ball at all costs, seize the ball in packs, mark with vice-like fingers and dispose by hand and foot on either side of his body to bring team-mates into the play made him a nightmare opponent. He delighted in applying gorilla-like tackles and bone-shattering bumps to open up opportunities for his allies. During the last few seasons of his career a severely damaged knee saw him ignore agonizing pain to continue to contribute. He just loved footy! Total Brownlow Medal votes: 133 Captain: 21 matches (1994-95; 1999) Third in Brownlow Medal count: 1991, 1994 Club Best & Fairest: 1991, 1993, 1994, 1996 Runner-up in club B&F count: 1990, 1998 Sixth in club B&F count: 1989, 2000 Seventh in club B&F count: 1997 Ninth in club B&F count: 1995 Tenth in club B&F count: 1992 All Australian selection: 1991, 1993, 1994, 1996 GFC Team of the Century selection (ruck-rover) GFC Hall of Fame inductee (2002) GFC Hall of Fame Legend GFC Life Membership (1995) Career span: 1987-2001 Total matches: Premiership 274, Night/Pre-Season Series 19, Interstate 8 Total goals: Premiership 243, Night/Pre-Season Series 6, Interstate 10 Finals matches: 21 Finals goals: 21 Last senior match: Round 22, 2001 v Carlton at Princes Park Liam Pickering Born: 09/09/1968 From: Stawell via North Melb Height: 184cm Weight: 85kg Natural kicking foot: Right Guernsey number: 23 First senior match for Geelong: Round 3, 1993 v North Melb at Kardinia Park After being unable to command regular senior selection with the Kangaroos, the dogged mid-fielder quickly gained the respect of Geelong coaching staff and team-mates with his faultless reading of the play and ability to bring others into the game. Although not fleet of foot, he was capable of instant decision-making and quick, accurate disposal. He knew how to restrict talented opponents with disciplined manning-up, while having a positive influence on play himself. A series of injuries terminated his career prematurely. Total Brownlow Medal votes for Geelong: 12 Captain: 3 matches (1996-97) Club Best & Fairest: 1997 Third in club B&F count: 1995 Eighth in club B&F count: 1994 Career span for Geelong: 1993-99 Total matches for Geelong: Premiership 102, Night/Pre-Season Series 3, Interstate 1 Total goals for Geelong: Premiership 46, Night/Pre-Season Series 1, Interstate 0 Finals matches for Geelong: 9 Finals goals for Geelong: 8 Last senior match for Geelong: Round 20, 1999 v Carlton at the MCG Peter Riccardi Born: 17/12/1972 From: West St Peters Height: 183cm Weight: 89kg Natural kicking foot: Left Guernsey number: 15 First senior match: Round 4, 1992 v West Coast at Subiaco Few players with more natural pace have represented the club. He is a crisp ball-handler, a safe mark and a long raking left-foot kick. Many of his goals have been registered in spectacular fashion from a long way out, on the run. His versatility as a mid-fielder/forward has been a valuable asset. In recent season he has improved his team-play by improving his tackling and chasing techniques. Total Brownlow Medal votes: 60 Club Best & Fairest: 1998 Runner-up in club B&F count: 1999 Third in club B&F count: 2002 Fifth in club B&F count: 1996 Sixth in club B&F count: 1995 Ninth in club B&F count: 2000 GFC Hall of Fame inductee (2002) GFC Life Membership (1999) Career span: 1992-2006 Total matches: Premiership 288, Night/Pre-Season Series 26, Interstate 2 Total goals: Premiership 286, Night/Pre-Season Series 24, Interstate 1 Finals matches: 19 Finals goals: 13 Last senior match: Round 19, 2006 v St Kilda at Docklands Stadium Leigh ‘Spider’ Colbert Born: 07/06/1975 From: Golden Square Height: 192cm Weight: 92kg Natural kicking foot: Right Guernsey numbers: 35 (1993) & 2 (1994-98) First senior match for Geelong: Round 7, 1993 v West Coast at Kardinia Park Although not strongly built, he was a fearless competitor who performed well at centre half-back. His versatility allowed him to be effective anywhere on the field. Reliable marking, sure ball handling and accurate disposals were features of his play. In 1999 he was appointed captain but a serious knee injury sustained in a pre-season practice match caused him to miss that season. He left the club in controversial circumstances. Total Brownlow Medal votes for Geelong: 10 Captain: 3 matches (1998) Third in club B&F count: 1996 Fifth in club B&F count: 1997 Sixth in club B&F count: 1998 Career span for Geelong: 1993-98 Total matches for Geelong: Premiership 105, Night/Pre-Season Series 7, Interstate 3 Total goals for Geelong: Premiership 50, Night/Pre-Season Series 3, Interstate 1 Finals matches for Geelong: 10 Finals goals for Geelong: 4 Last senior match for Geelong: Round 22, 1998 v Essendon at the MCG Transferred to North Melb in 2000 Tim ‘Bluey’ McGrath Born: 07/10/1970 From: North Dandenong via North Melb Height: 190cm Weight: 94kg Natural kicking foot: Right Guernsey number: 17 First senior match for Geelong: Round 1, 1992 v Hawthorn at Waverley Park He has been one of several players recruited from the Kangaroos to give the club excellent service. His first match for the Cats was a hectic one at full-back opposed to a rampant Jason Dunstall. The selectors showed faith in the strong red-headed defender and he rewarded them with a long string of highly serviceable performances. His determination, safe marking, sound defensive skills and leadership qualities were great assets. Often, he was able to outpoint champion opponents. Around the club he was a valuable role-model with his general attitude. Total Brownlow Medal votes for Geelong: 26 Captain: 8 matches (1999) Runner-up in club B&F count: 1998 Third in club B&F count: 1993, 1999 Seventh in club B&F count: 1998 Eighth in club B&F count: 1995, 1997 Ninth in club B&F count: 2001 Tenth in club B&F count: 1996 GFC Hall of Fame inductee (2002) GFC Life Membership (1998) Career span for Geelong: 1992-2002 Total matches for Geelong: Premiership 219, Night/Pre-Season Series 15, Interstate 1 Total goals for Geelong: Premiership 18, Night/Pre-Season Series 3, Interstate 0 Finals matches for Geelong: 14 Finals goals for Geelong: 1 Last senior match for Geelong: Round 2, 2002 v Adelaide at Football Park Barry Stoneham Born: 09/02/1968 From: St Josephs (VCFL) Height: 194cm Weight: 98kg Natural kicking foot: Right Guernsey numbers: 53 (R 6, 1986) & 26 (R 7, 1986-2000) First senior match: Round 6, 1986 v Footscray at Kardinia Park A fanatical Geelong supporter all his life, the determined big man was in his element at centre half-forward. Excellent positioning, agility, magnificent marking, a mean streak and endless determination were his trademarks. He was able to bring crumbing team-mates into the play and score goals regularly. He was sufficiently versatile to play successfully in any key position or as a relief ruckman. Tragically, in 1994 a badly broken leg severely restricted his mobility and kicking power. Despite such restrictions, he retained his effectiveness by developing additional team skills. Total Brownlow Medal votes: 21 Captain: 59 matches (1991-93; 1996-98) Club Best & Fairest: 1990 Runner-up in club B&F count: 1989 Third in club B&F count: 1992 Fourth in club B&F count: 1991, 1993 Tenth in club B&F count: 1997, 1999 All Australian selection: 1989, 1992 GFC Hall of Fame inductee (2002) GFC Life Membership (1994) Career span: 1986-94; 1996-2000 Total matches: Premiership 241, Night/Pre-Season Series 21, Interstate 7 Total goals: Premiership 223, Night/Pre-Season Series 14, Interstate 2 Finals matches: 15 Finals goals: 14 Last senior match: First Elimination Final, 2000 v Hawthorn at Docklands Stadium Michael Mansfield Born: 08/08/1971 From: St Josephs (VCFL) Height: 183cm Weight: 85kg Natural kicking foot: Left Guernsey numbers: 49 (1990) & 21 (1991-99) First senior match for Geelong: Round 18, 1990 v Essendon at Kardinia Park The well-balanced performer played mostly as an attacking half-back flanker but was capable of being used effectively on the forward line. His exceptional strength, reliable marking and considerable mobility made him a difficult opponent who did not lack courage. His performances in finals matches were outstanding. Total Brownlow Medal votes for Geelong: 28 Captain: 9 matches (1997-99) Third in club B&F count: 1994, 1997 Fourth in club B&F count: 1995 Sixth in club B&F count: 1996 Eighth in club B&F count: 1998 GFC Hall of Fame inductee (2002) GFC Life Membership (1998) Career span for Geelong: 1990-99 Total matches for Geelong: Premiership 181, Night/Pre-Season Series 10, Interstate 4 Total goals for Geelong: Premiership 100, Night/Pre-Season Series 0, Interstate 1 Finals matches for Geelong: 15 Finals goals for Geelong: 9 Last senior match for Geelong: Round 22, 1999 v Fremantle at Kardinia Park Transferred to Carlton in 2000 Historical information provided by GFC Historian Col Hutchinson The print consists of ten player photographs and a Geelong Cat Mascot in the top centre of the print with the words - GEELONG/CATS - below the picture. In the top left are action photographs of Sholl and Snell. In the top right corner are action photographs of Kilpatrick and Hocking. Along the bottom of the print from left to right are action photographs of Pickering, Riccardi, Colbert, McGrath, Stoneham and Mansfield. Each photograph has the player's surname in white text in the bottom left hand corner. Has a wire along the back for hanging. 1990s players Sholl, Brad: Snell, Jason: Kilpatrick, Glenn: Hocking, Garry: Pickering, Liam: Riccardi, Peter: Colbert, Leigh: McGrath, Tim: Stoneham, Barry: Mansfield, Michael.