Showing 3260 items matching "fabric/trimming"
-
 Flagstaff Hill Maritime Museum and Village
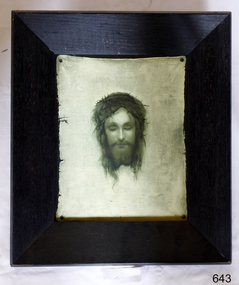
Print - Religious Print, Reinthal & Newman, Jesus Chrisus, ca 1906 - 1960s
Print of an original oil painting created in 1874 (these numbers are in the top left corner) by artist Gabriel Max ("Gab Max" is in top right corner) and reproduced by Kodak. The reproduction was likely made for the Mission to Seamen from the early 1906 to the 1960s to hang in its chapel. The publisher Reinthal & Newman, New York, was in business between 1906 and 1928. The company originally published postcards, but from 1920 they published prints of art from original works of famous and not so well-known artists. The published items were distributed by the House of Art, NY, which continued on into the 1950s. The print was part of the original furnishings of St Nicholas Seamen's Church, Williamstown, Victoria. The church was operated by the Missions to Seamen organisation. THE MISSIONS TO SEAMEN (Brief History: for more, see our Reg. No. 611, Set of Pews) The Missions to Seamen, an Anglican charity, has served seafarers of the world since 1856 in Great Britain. It symbol is a Flying Angel, inspired by a Bible verse. Today there are centr4es in over 200 ports world-wide where seamen of all backgrounds are offered a warm welcome and provided with a wide range of facilities. In Victoria the organisation began in Williamstown in 1857. It was as a Sailors’ Church, also known as ‘Bethel’ or the ‘Floating Church’. Its location was an old hulk floating in Hobson’s Bay, Port of Melbourne. It soon became part of the Missions to Seamen, Victoria. In the year 2000 the organisation, now named Mission to Seafarers, still operated locally in Melbourne, Portland, Geelong and Hastings. The Ladies’ Harbour Lights Guild was formed in 1906 to support the Missions to Seamen in Melbourne and other centres such as Williamstown. Two of the most significant ladies of the Guild were founder Ethel Augusta Godfrey and foundation member Alice Sibthorpe Tracy (who established a branch of the Guild in Warrnambool in 1920). The Guild continued its work until the 1960s. In 1943 a former Williamstown bank was purchased for the Missions to Seaman Club. The chapel was named St Nicholas’ Seamen’s Church and was supported by the Ladies’ Harbour Lights Guild, the Williamstown Lightkeepers’ Auxiliary and the League of Soldiers’ and Sailors’ Friends. It ceased operation in 1966. A Missions to Seamen Chapel and Recreation Room was a significant feature of ports during the late 1800s and into the 1900s. It seemed appropriate for Flagstaff Hill to include such a representation within the new Maritime Village, so the Melbourne Board of Management of Missions to Seamen Victoria gave its permission on 21st May 1979 for the entire furnishings of the Williamstown chapel to be transferred to Flagstaff Hill. The St Nicholas Seamen’s Church was officially opened on October 11, 1981 and closely resembles the Williamstown chapel. The print is significant because of its association with the Mission to Seamen in Williamstown, Victoria. This organisation had strong connections to the colonisation of Victoria by people travelling and arriving by sea. The picture is also significant as a representation of 19th century religious art by Gabriel Cornelius von Max.Print of an oil painting representing Jesus Christ, closed eyes, tear on cheek, with a crown of thorns, titled “Jesus Christus”, produced in 1874 by 19th century artist Gabriel Cornelius von Max (GAB MAX). Print on paper; black and grey drawing on beige canvas-look background with image of fixing pins in each corner, edges look like torn fabric. Published by Reinthal & Newman, New York. Print is behind glass, mounted in heavy wooden frame that is painted dark brown. Reverse has numbers on small white label. Base of reverse has two small holes, each with indentations from something round. Backing board has indentations from nails no longer there. There are remnants of original hanging wire, but this has been replaced. Part of the St Nicholas Seamen's Church Collection.FRONT: Top left :1874” Top right “GAB MAX” [Gabriel Cornelius von Max] Handwritten script under picture “Jesus Christus”. Printed bottom left on front “A33 © REINTHAL & NEWMAN PUBS. N.Y.” REVERSE: “162” written in black felt pen on white label. Pencilled on reverse "11 3/8 x 9 1/4" and "Kodak" and other indecipherable markings.flagstaff hill, warrnambool, shipwrecked-coast, flagstaff-hill, flagstaff-hill-maritime-museum, maritime-museum, shipwreck-coast, flagstaff-hill-maritime-village, christian art, picture of jesus christ, jesus christus, photographic print of jesus christ, missions to seamen victoria, mission to seafarers, flying angel’s club, religious worship, reinthal & newman new york, jesus christ with crown of thorns, religion, religious service, sailors rest, bethel sailors’ church, bethel floating church, ladies harbour light guild, harbor lights guild, joy club for fighters, ladies lightkeepers’ auxiliary, st nicholas mission to seamen church williamstown, mission to seamen williamstown, st nicholas seamen’s church flagstaff hill, 139 nelson place williamstown, print, religious print, jesus christ, 1874, 19th century artist, gabriel cornelius von max, gab max, gabriel max, reinthal & newman, oil painting, st nicholas seamen's church, a33 © reinthal & newman pubs. n.y., kodak, house of art -
 Brighton Historical Society
Clothing - Dress, Visiting dress, late 19th century
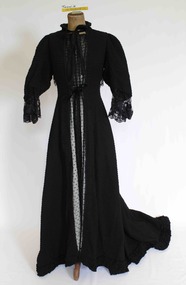
This gown, one of two similar items in the collection, belonged to one of the daughters of George Ward Cole, Miss Margaret Morison Ward Cole or Miss Agnes Bruce Ward Cole. George Ward Cole was an early member of the Victorian Parliament and the family featured prominently in Melbourne Society in their time. They established a substantial home known as “St Ninians” at 10 Miller Street in 1841. The family reportedly entertained Melbourne’s first Royal visitor the Duke Of Edinburgh, Queen Victoria’s second son, at St Ninians in 1867. In later years St Ninians was subsequently subdivided and later demolished.A black and mint green wool, velvet, lace and silk dress from circa 1882. The bodice features a wired, standing collar, finishing just under the chin and open at the front of the throat. On either side at the front of the throat it features long black lace ties with black jet bead fringe. The centre front of the dress from the neckline to the base of the skirt features an insert panel of mint green corded silk. The silk is gathered and the neckline and waist and overlaid a panel of gathered lacy net. Inserted into the seam at either side of this panel at the waist are two velvet ties. The dress secures closed with eight black buttons and one hook and eye down the right side of the mint panel to mid thigh. The edges of the collar and black front panels are finished with a looped ribbon trim. The remainder of the dress is made of a black wool fabric woven a checkered pattern of larger and looser threads and smaller and tighter threads creating a seersucker like pattern. The bodice features a natural shoulder line and an Amadis sleeve of full cut gathered to the bodice at the shoulder and finishing at the elbow with a large black lace flounce. The front panels of the dress are flat and shaped neatly to the body from neck to hip line and gently out to create the Victorian silhouette. On the back of each shoulder the dress features a leaf like, small jet beaded embellishment with multiple long loops of jet beads falling down the back to the waist. Underneath this embellishment is a pleated black ribbon that runs from the shoulder to the back of the pelvis. Over the pelvis are another two jet beaded embellishments of a floral design with two tassels. The skirt is full and pleated in under this embellishment and fulls to the floor with a small train. The base of the dress is finished with a ruched band of the main dress fabric.st ninians, george ward cole, visiting gown, brighton, miss margaret morison ward cole, miss agnes bruce ward cole, 1880s -
 The Beechworth Burke Museum
Geological specimen - Cassiterite
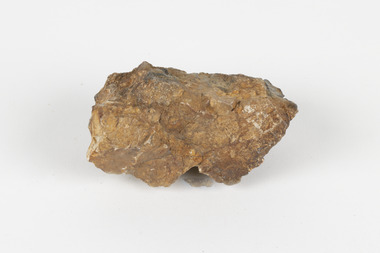
This specimen is Cassiterite in Quartz. Cassiterite is a tin oxide metal that forms in thin crystals which can have a beautiful lustre. Quartz is made of silicon dioxide, also known as silica, and is one of the most common minerals on earth. Cassiterite has been a fundamental source of tin ore for humans throughout history, including today. Tin is an important metal that has a wide variety of human uses in different areas, from dying fabric, to making mirrors, and their most well-known use ‘tin’ cans. Tin cans are primarily made of steel and are coated with tin in order to take advantage of tin’s property of being non-corroding. This is a massive step in the history of food preservation. Tinned food first reached Australia in 1815 with early settlers, and it began to be manufactured here in the 1840s. It was incredibly popular, and was a highly exported product, which would be a contributing factor to the ‘tin mining boom’ of the early 1880s. This specimen was collected at Jingellic, New South Wales, in about 1852. Although the Goldfields of the 1800s are much more well-known, tin mines existed alongside the gold mines which began in the mid 19th century and extended almost one hundred years, to the mid 20th century. Specimens like this would have been used as evidence to justify tin mining operations in the region as an investment. This specimen is part of a larger collection of geological and mineral specimens collected from around Australia (and some parts of the world) and donated to the Burke Museum between 1868-1880. A large percentage of these specimens were collected in Victoria as part of the Geological Survey of Victoria that begun in 1852 (in response to the Gold Rush) to study and map the geology of Victoria. Collecting geological specimens was an important part of mapping and understanding the scientific makeup of the earth. Many of these specimens were sent to research and collecting organisations across Australia, including the Burke Museum, to educate and encourage further study. The Geological Survey of Victoria was headed by British geologist, Alfred Richard Cecil Selwyn (1824-1902), who was responsible for issuing over 60 geological maps during his 17 years as director. These maps were all hand-drawn and coloured and became the benchmark for accuracy for geological mapping. Collecting geological specimens was an important part of mapping and understanding the scientific makeup of the earth. Many of these specimens were sent to research and collecting organisations across Australia, including the Burke Museum, to educate and encourage further study. A fist-sized solid geological specimen made on one half of tin oxide, which is dark grey, and on the other side of silica, which is brown and cream.burke museum, beechworth, geological, geological specimen -
 Flagstaff Hill Maritime Museum and Village
Ceramic - Hot water bottle, late 19th - early 20th century
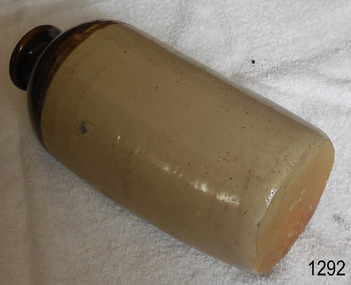
This hot water bottle was designed to lay flat in a bed between the sheets. Its purpose was to warm the bed before use. The bottle was filled with hot water then a stopper was placed in the top to seal it, preventing the water from running out. The inscription on the attached label of this hot water bottle gives both the donor's details and the location of the bottle when it was first displayed at Flagstaff Hill Maritime Village. the "P.M.O." are the initials for the Port Medical Office. The donor's details are also written in pencil on the base of the bottle. In the 16th-century people warmed their beds with the 'bed warmer', which was a long-handled, metal pan filled with hot coals and embers and covered with a lid. The pan was placed between the bedsheets to warm the bed before the person retired to sleep for the night. In the early 19th-century earthenware bed warmers came began to be used for the same purpose. They would be filled with hot water and sealed then often wrapped in fabric. The ceramic material would hold the heat for quite some time, without being too hot for the person in bed to also warm their feet as they went off to sleep. Hot water bottles were later made from glass, copper, brass or tin. Some manufacturers made them into decorative pieces that still had practical use. In 1903 a patent was taken out for the first rubber hot water bottle, invented by Slavoljub Eduard Penkala, a Croatian engineer. This bottle is of historic significance, as an example of personal heating equipment used in the late 19th and early 20th centuries.Hot water bottle, earthenware, pale colour with brown glaze on top over the shoulder and mouth section and clear glaze on the remainder of the sides. The cylindrical bottle tapers to a slightly narrower base. One side of the bottle, about a sixth of the circumference, is flat. The base of the bottle has a handwritten inscription. An inscription was on the paper label originally attached to the bottle. Inscription hand written on base of bottle "Mrs K. Rob _ / Browns Rd / Offic / 3 _ _ 9" Inscription on paper label " "Mrs K Robinson Browns Rd Officer 3809 - Hot water bottle P.M.O." flagstaff hill, warrnambool, shipwrecked-coast, maritime-museum, shipwreck-coast, flagstaff-hill-maritime-village, domestic item, hot water bottle, heating equipment, ceramic bottle, stoneware bottle, potter, earthenware, personal item, bed warmer, foot warmer, flat-sided hot water bottle, household item, stoneware, clay, ceramic -
 National Wool Museum
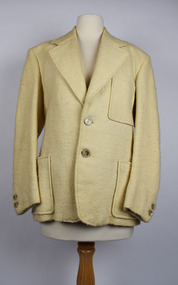
Clothing - Jacket, 1978
The wool for this jacket began on the back of two sheep many kilometres apart. The first fleece for the warp was shorn from a single Merino at Currotha in Moree, NSW. The wool was 21-22 micron and the bloodline is a cross between Bundemar, Rossmore and Eural. The second sheep that provided wool for the weft was shorn in Beaufort, Victoria. It was a single Corriedale fleece shorn at Niawanda. The distance between these two towns is approximately 1250kms; a 15-hour car ride between paddocks. The two fleeces were spun and weaved together by the donor’s mother, Marjorie Allnutt. A level of talent is required to spin Merino fleeces. It is easier to spin cross bred wool, such as Corriedale, because it is less dense and much easier to comb, card and then tease out for a spinning wheel. The donor Philip Allnutt had a suit tailored out of the completed fabric at Ravensdale J & Son, 37 Swanson Street, Melbourne. The tailor was then a member of the Master Tailors Federation of Victoria. The business closed around 1986. Adding to the jacket’s story is its relationship to the household board game “Squatter”. Marjorie Allnutt was the sister-in-law of Robert Crofton Lloyd, the inventor of the wool themed boardgame. With more than 500,000 games sold in Australia as of 2007, it is the most successful board game ever produced in the country. The original “Squatter” board game is located within the National Wool Museum’s Collection. Philip Allnutt donated the Jacket to the National Wool Museum Collection in 2021. Cream singled breasted jacket with a narrow overlap and one column of buttons for fastening. The jacket features notched lapels of a medium width and two buttons of a cream & brown marble. The jacket has three visible pockets. A jetted pocket with no flap is on the right breast. A further two jetted no flap pockets finish an inch above the hem, on either side of the opening. Internally, the jacket features a further two pockets and a white silk lining for comfort. At the cuffs, the jacket utilises another 2 buttons of the same cream & brown marble.merino, currotha, moree, nsw, niawanda, corriedale, beaufort, victoria, hand spun, hand weaved -
 Ballarat Heritage Services
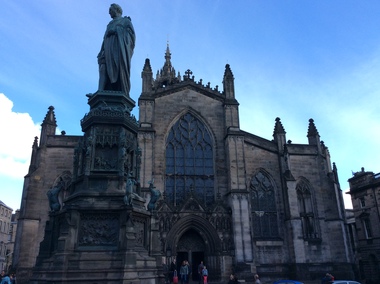
Digital Photograph, St Giles Cathedral, Edinburgh, Scotland, 10/2016
St Giles, also known as the High Kirk of Edinburgh is the principal place of worship for the Church of Scotland. It is very interesting for the mason's marks found on its many stone columns inside the church, and for its connections to the graveyard outside. According to wikipedia, "There is record evidence of a church here, very likely on the present site, in the year 854. In 1120 King Alexander I, rebuilt the church in the Norman style. Of this building characteristic features survived until 1798. During the fourteenth century, Edinburgh was captured and plundered by the English under Edward II. and Edward III., and twice St Giles was laid waste. After restoration, the church was more thoroughly ruined at the Burnt Candlemas in 1387, when Richard II. sacked the city. The western part of the fabric was soon in use again ; but the restoration of the choir and transepts, which were much enlarged, lasted on into the sixteenth century. In 1467 the city endowed St Giles as a collegiate church. It now became usual to speak of the nave, where the stonework was ancient, as the Old Kirk, while the eastern part of the building was called the New Kirk. When the movement for reform drew large crowds to St Giles, separate services began to be regularly held in the Old and New Kirks. Soon this was not enough, and the great church was partitioned off into smaller sections. In 1571 St Giles was seized by Kirkcaldie of Grange, and held by him as a stronghold for Queen Mary. This resulted in serious damage to the structure.Colour photograph of St Giles Cathedral, Edinburgh, Scotlandst giles cathedral, edinburgh, scotland, architecture -
 Ballarat Heritage Services
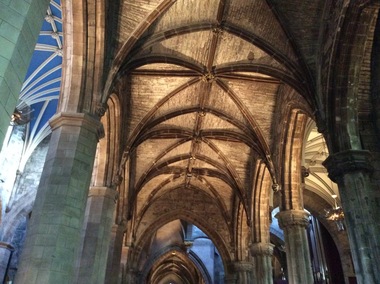
Digital Photograph, Dorothy Wickham, Interior, St Giles Cathedral, Edinburgh, Scotland, 10/2016
St Giles, also known as the High Kirk of Edinburgh is the principal place of worship for the Church of Scotland. It is very interesting for the mason's marks found on its many stone columns inside the church, and for its connections to the graveyard outside. According to wikipedia, "There is record evidence of a church here, very likely on the present site, in the year 854. In 1120 King Alexander I, rebuilt the church in the Norman style. Of this building characteristic features survived until 1798. During the fourteenth century, Edinburgh was captured and plundered by the English under Edward II. and Edward III., and twice St Giles was laid waste. After restoration, the church was more thoroughly ruined at the Burnt Candlemas in 1387, when Richard II. sacked the city. The western part of the fabric was soon in use again ; but the restoration of the choir and transepts, which were much enlarged, lasted on into the sixteenth century. In 1467 the city endowed St Giles as a collegiate church. It now became usual to speak of the nave, where the stonework was ancient, as the Old Kirk, while the eastern part of the building was called the New Kirk. When the movement for reform drew large crowds to St Giles, separate services began to be regularly held in the Old and New Kirks. Soon this was not enough, and the great church was partitioned off into smaller sections. In 1571 St Giles was seized by Kirkcaldie of Grange, and held by him as a stronghold for Queen Mary. This resulted in serious damage to the structure.Two colour photographs of the interior if St Giles Cathedral, Edinburgh, Scotlandst giles cathedral, architecture, mason's marks, stonemasons, church of scotland -
 Ballarat Heritage Services
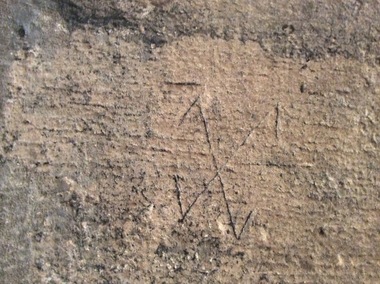
Digital Photograph, Stonemason's marks, St Giles Cathedral, Edinburgh, Scotland, 10/2016
St Giles, also known as the High Kirk of Edinburgh is the principal place of worship for the Church of Scotland. It is very interesting for the mason's marks found on its many stone columns inside the church, and for its connections to the graveyard outside. According to wikipedia, "There is record evidence of a church here, very likely on the present site, in the year 854. In 1120 King Alexander I, rebuilt the church in the Norman style. Of this building characteristic features survived until 1798. During the fourteenth century, Edinburgh was captured and plundered by the English under Edward II. and Edward III., and twice St Giles was laid waste. After restoration, the church was more thoroughly ruined at the Burnt Candlemas in 1387, when Richard II. sacked the city. The western part of the fabric was soon in use again ; but the restoration of the choir and transepts, which were much enlarged, lasted on into the sixteenth century. In 1467 the city endowed St Giles as a collegiate church. It now became usual to speak of the nave, where the stonework was ancient, as the Old Kirk, while the eastern part of the building was called the New Kirk. When the movement for reform drew large crowds to St Giles, separate services began to be regularly held in the Old and New Kirks. Soon this was not enough, and the great church was partitioned off into smaller sections. In 1571 St Giles was seized by Kirkcaldie of Grange, and held by him as a stronghold for Queen Mary. This resulted in serious damage to the structure.Colour photographs of tonemason's marks, St Giles Cathedral, Edinburgh, Scotlandmason's marks, st giles cathedral -
 Ballarat Heritage Services
Photograph - Digital Photograph, Stonemason's marks, St Giles Cathedral, Edinburgh, Scotland, 10/2016
St Giles, also known as the High Kirk of Edinburgh is the principal place of worship for the Church of Scotland. It is very interesting for the mason's marks found on its many stone columns inside the church, and for its connections to the graveyard outside. According to wikipedia, "There is record evidence of a church here, very likely on the present site, in the year 854. In 1120 King Alexander I, rebuilt the church in the Norman style. Of this building characteristic features survived until 1798. During the fourteenth century, Edinburgh was captured and plundered by the English under Edward II. and Edward III., and twice St Giles was laid waste. After restoration, the church was more thoroughly ruined at the Burnt Candlemas in 1387, when Richard II. sacked the city. The western part of the fabric was soon in use again ; but the restoration of the choir and transepts, which were much enlarged, lasted on into the sixteenth century. In 1467 the city endowed St Giles as a collegiate church. It now became usual to speak of the nave, where the stonework was ancient, as the Old Kirk, while the eastern part of the building was called the New Kirk. When the movement for reform drew large crowds to St Giles, separate services began to be regularly held in the Old and New Kirks. Soon this was not enough, and the great church was partitioned off into smaller sections. In 1571 St Giles was seized by Kirkcaldie of Grange, and held by him as a stronghold for Queen Mary. This resulted in serious damage to the structure.Three photographs of stonemason's marks, St Giles Cathedral, Edinburgh, Scotlandmason's marks, st giles cathedral -
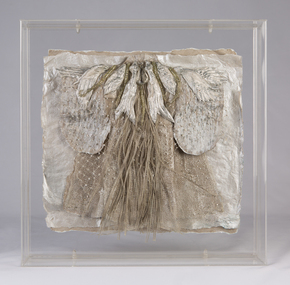 Ararat Gallery TAMA
Mixed media, Inga Hunter, Nrat-tuan Net Leader's Robe, 1986-1989
“A silver-grey robe, denoting a powerful official. The Netleader, or Netmaster, as he is sometimes called is head of one of the many craft guilds on Nrat-Tuan. Fishers Guilds are not only vital economic groups for Nrat-Tuan, but also for the whole Imperium, since the water planet is the major source of foodstuffs for Irusaqu, who cannot produce enough crops on what Is a relatively barren, planet. The various fishing crafts are most responsible occupations, entailing great care for the environment and the food chains. Fishing is carried out by means of either mirrors or nets, both being about equally popular. Mirror-faceted fabrics have always been used by Nrati-Tuan fishermen to dazzle and bemuse the creatures they are trying to catch, (the mirror may also have some predictive power). Research indicates that this odd technique is surprisingly effective. And the harvests are unfailingly good. Contact with the humans of Irusag, when the Imperium was first founded, brought the technique of netting to Nrat-Tuan. The Netleader heads the Netter Guild, which does not limit itself to the merely traditional fishing net, but works with a complex and sophisticated membrane technology, which has, in recent years, revolutionised the whole netting industry. The Master controls the experimental membrane laboratories, which deal with the extraction of metals from sea water, as well as with tools for the fishing industry.” -Inga Hunter -
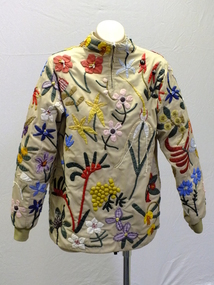 National Alpine Museum of Australia
Ski Jacket, About 1967
This jacket and cap were designed by Rosalie 'Rosa' Kiessling about 1967. They formed part of the Fashion Group Inc's Walkabout Tour of the USA in 1967 which aimed to promote Australian fashion design in America. German by birth Rosalie, grew up skiing and ice skating, studied fashion design in Munich and worked designing women’s ski wear and lingerie before migrating to Australia via New Zealand in 1939 with her husband. As skiing increased in popularity following the end of WWII, Rosalie’s business grew reaching its peak during the 1960s. Though it was never large; at most she employed three staff. Her designs featured in the pages of Australian Vogue, Flair and the Women’s Weekly throughout the 1960s and received coverage from newspapers in Australia, New Zealand the United States. Rosalie was closely involved with the Swiss Club of Victoria, the Australian Wool Board and the Fur Traders Association, participating in numerous fashion shows and awards run by these groups. In the late 1960s she became involved with the Melbourne Branch of the Fashion Group Inc, a worldwide non-commercial association of women involved in the fashion industry. Rosalie continued to design and manufacture fashionable but functional ski wear until the late 1970s, although increasing imports from large overseas manufactures and constant new innovations in fabric technology made it difficult for her to compete in a relatively small industry. This ski jacket and cap illustrate Rosalie Kiessling's emphasis on practical glamour. She was the first Australian ski wear manufacturer to bring high fashion to ski wear design; which though common in the boutiques of St Mortiz, Chamonix and St Anton was new to Australia. The use of an Australian wildflower motif and of these pieces in the Fashion Group's Walkabout Tour also speak to her involvement in and promotion of the Australian fashion industry during the 1960s.Ski jacket and matching cap appliqued with Australian wildflowers.Noneskiing, ski clothing, fashion design, australian fashion, australian flora -
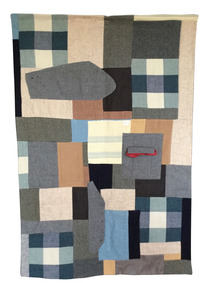 National Wool Museum
Textile - Quilt, By Wagga Design, 2017
‘By Wagga Design’ is the winner of the Art Quilt Australia 2019 Expressions: Wool Quilt Prize. Barbara Mellor, of St Helens in Tasmania, made this quilt after researching the history of waggas and was fascinated by this early form of recycling. ‘By Wagga Design’ is her contemporary take on the traditional wagga that was born out of hard times and limited resources. Barbara wrote the poem below while thinking of the workers who used waggas while travelling: Black night campfire night sheep in the shadows dreams on the track a comforting wagga stitched with love for a homesick heart. The wagga was made in 2017 and was first submitted into the Bay of Fires Art Prize. In 2018 the wagga was submitted into the Break O’Day Stitchers Quilting and Embroidery Exhibition, where it won the Hanger’s Prize. Barbara sourced the fabrics used from a variety of places. Some are from her personal collection while others were given to her. She purchased a woollen three-piece suit from a local op shop and decided to incorporate it into the design, making some unique and distinctive shapes. Another distinctive feature of the quilt is the patch labelled ‘Parkside’. Barbara noted that it was cut from a blanket she purchased from a garage sale from a property that had once been a caravan park titled ‘Parkside’ in the 1960s. The filling of the wagga contains the rest of the Parkside blanket.Quilt made from various woollen garments and bedding in cool tone colours. Patches mostly cut into square and rectangle shapes. Three patches made from a second-hand woollen suit, showcasing the arm with cuff buttons, pocket flap on a hip pocket containing a pocket square and front of vest with buttons. wagga, art quilt australia, expressions: wool quilt prize -
 Ballarat Tramway Museum
Photograph - Colour Photograph/s, Carolyn Dean, Mar. 1999
Set of 23 photographs taken by Carolyn Dean between 6/3/1999 and 16/4/1999 of the Begonia Festival operations and moving the ex SEC bike shed to Bungaree. On Kodak paper. 1094.1 - Group of tramway staff at Gardens Loop - used in May 1999 Fares Please! .2 - tram 40 at loop .3 - sign boards used in 1999 Begonia festival .4 - Welding joint 2-3 road - Warren Doubleday and Gary Wood .5 - ditto with Alastair Reither .6 - Fixing fence at Bungaree - John Phillips .7 - ditto .8 - ditto .9 - site for the hut to go at Bungaree .10 - ditto .11 - treated pine posts for stumps .12 - checking the layout - John Phillips .13 - cutting fire wood .14 - trimming trees .15 - Dismantling the roof on the shed at Ballarat East - John Phillips and Simon Jenkins .16 - roof off .17 - ditto .18 - the moving team - used in May 1999 Fares Please - see caption for people .19 - Lifting the shed out of position .20 - ditto .21 - ditto .22 - surveying the foundations - Peter Winspur, John Phillips and Alastair Reither .23 - ditto .1 > .3 - 6/3/1999: .4 & .5 - 7/3/1999: .6 > .13 - 20/3/1999: .14 - 21/3/1999: .15> .23 - 16/4/1999 See also Reg. No. 1095 and 1101 for next stage of the move. On rear of each photo in blue ink is date in the upper edge and on lower edge "Photo by Carolyn Dean"btm, sec bike shed, begonia festival, track repairs, tram 40 -
 Flagstaff Hill Maritime Museum and Village
Domestic object - Bowl, Late 19th or early 20th Century
The Process of Making Pottery Decorating, Firing, Glazing, Making, Technical There is a rhythm and flow to clay. It can’t be done all at once! Even the making process! It can take weeks to get everything done, especially if you can only work on your pottery once a week! Even though we have three hour classes, it’s often just not enough time! Here is an overview of some of the processes so you have a bit more grasp on some of the technical stuff! Step One – Design There are SO many ideas out there for making stuff in clay! From delicate porcelain jewellery, through to heavy sculptural work and everything in between. Deciding your direction is sometimes not that easy – when you first start, try everything, you will naturally gravitate to the style that you enjoy! The options and variations are endless and can get a wee bit overwhelming too! Check in with me before you start to ensure your ideas will work, what order you might do things, how you could achieve the look you are seeking and any other technical data required! Step Two – Making Clay is thixotropic. This means that as you work with it, the clay first gets sloppier and wetter, before is begins to dry in the atmosphere. For most things, you simply can’t do all parts of the project at once. An example of work order might look like: Get last weeks work out from the shelves Prepare clay for today’s work – roll your clay, prepare balls for throwing, make the first stage of a pinch pot) Clean up last week’s work and put it on the shelf for bisque firing Check that you have any glazing to do – and do enough of it that you will have time to finish your main project Do the next step of your next project – there might be a further step that can’t be complete immediately, in that case, wrap your work well and put onto the shelves. Letting your work rest for a while can really help keep your work clean and professional looking. Many things require bagging under plastic to keep it ready for work the next week – put your name on the outside of the bag so you can find your work easily. We have stickers and markers. Consider how you want to decorate your work – coloured slip can be applied at a fairly wet stage (remembering that it will make your work even wetter!). Trying to apply slip to dry clay won’t work! If you want to do sgraffito – you will need to keep the work leather hard (a state of dryness where you can still work the clay with a little effort and a little water and care). Step Three – Drying Most of the time your work can go into the rack uncovered to let it dry out for the following week. If you want to continue forming or shaping you will need to double bag your work – put your work on a suitable sized bat and put the bat in a bag so the base of the bag is under the bat, then put another bag over the top of the work and tuck the top of the bag under the bat. If you want to trim (or turn) your thrown work the following week, it should also be double bagged. If your work is large, delicate, or of uneven thicknesses, you should lightly cover your work for drying. When considering the drying process, bare in mind the weather, humidity and wind! The hotter and dryer, the faster things dry and work can dry unevenly in the shelves – this can lead to cracking – another time to lightly cover your work for drying. Step Four – Trimming and Cleaning Up Your work is dry! It is called greenware now and it is at it’s most fragile! Handle everything with two hands. I often refer to soft hands – keep everything gentle and with your fingers spread as much as possible. Try to not pick up things like plates too much, and always with both hands! Before your work can be bisque fired it should be “cleaned up”. You work won’t go into the kiln if it has sharp edges – when glazed, sharp edges turn into razor blades! Use a piece of fly wire to rub the work all over – this will scratch a little so be light handed. Use a knife or metal kidney to scrape any areas that require a bit more dynamic treatment than the fly wire offers! Finally, a very light wipe over with a slightly damp sponge can help soften and soothe all of your edges and dags! Trimming thrown work: If you are planning to trim (or turn) your thrown work (and you should be), make sure you bag it well – your work should be leather hard to almost dry for easiest trimming. Use this step to finish the work completely – use a metal kidney to polish the surface, or a slightly damp sponge to give a freshly thrown look. Wipe the sponge around the rim after trimming, and check the inside of the pot for dags! Trimming slip cast work: Usually I will trim the rims of your work on the wheel the following day to make that stage easier, however you will still need to check your work for lumps and bumps. Last but not least – check that your name is still clearly on the bottom of your work. Step Five – Bisque Firing When the work is completely dry it can go into the bisque kiln. The bisque kiln is fired to 1000°C. This process burns off the water in the clay as well as some of the chemically bound water. The structure of the clay is not altered that much at this temperature. Inside the bisque kiln, the work is stacked a little, small bowl inside a larger bowl and onto a heavy plate. Smaller items like decorations or drink coasters might get stacked several high. Consideration is paid to the weight of the stack and shape of the work. A bisque kiln can fire about one and a half times the amount of work that the glaze kiln can fire. The firing takes about 10 hours to complete the cycle and about two days to cool down. Once it has been emptied the work is placed in the glaze room ready for you to decorate! Step Six – Glazing Decorating your work with colour can be a lot of fun – and time consuming! There are three main options for surface treatment at this stage: Oxide Washes Underglazes Glazes Washes and underglazes do not “glaze” the work – It will still need a layer of glaze to fully seal the clay (washes don’t need glaze on surfaces not designed for food or liquid as they can gloss up a little on their own). Underglazes are stable colourants that turn out pretty much how they look in the jar. They can be mixed with each other to form other colours and can be used like water colours to paint onto your work. Mostly they should have a clear glaze on top to seal them. Oxides are a different species – the pink oxide (cobalt) wash turns out bright blue for instance. They don’t always need a glaze on top, and some glazes can change the colour of the wash! The glazes need no other “glaze” on top! Be careful of unknown glaze interactions – you can put any combination of glaze in a bowl or on a plate, but only a single glaze on the outside of any vertical surface! Glazes are a chemical reaction under heat. We don’t know the exact chemicals in the Mayco glazes we use. I can guess by the way they interact with each other, however, on the whole, you need to test every idea you have, and not run the test on a vertical surface! Simply put, glaze is a layer of glass like substance that bonds with the clay underneath. Clay is made of silica, alumina and water. Glaze is made of mostly silica. Silica has a melting point of 1700°C and we fire to 1240°C. The silica requires a “flux” to help it melt at the lower temperature. Fluxes can be all sorts of chemicals – a common one is calcium – calcium has a melting point of 2500°C, however, together they both melt at a much lower temperature! Colourants are metal oxides like cobalt (blue), chrome (green through black), copper (green, blue, even red!), manganese (black, purple and pink) iron (red brown), etc. Different chemicals in the glaze can have dramatic effects. for example, barium carbonate (which we don’t use) turns manganese bright pink! Other elements can turn manganese dioxide brown, blue, purple and reddish brown. Manganese dioxide is a flux in and of itself as well. So, glazes that get their black and purple colours, often interact with other glazes and RUN! Our mirror black is a good example – it mixes really well with many glazes because it fluxes them – causes them to melt faster. It will also bring out many beautiful colours in the glazes because it’s black colouring most definitely comes from manganese dioxide! Glaze chemistry is a whole subject on it’s own! We use commercial Mayco glazes on purpose – for their huge range of colour possibilities, stability, cool interactions, artistic freedom with the ability to easily brush the glazes on and ease of use. We currently have almost 50 glazes on hand! A major project is to test the interactions of all glazes with each other. That is 2,500 test tiles!!!! I’m going to make the wall behind the wheels the feature wall of pretty colours! Step Seven – Glaze (Gloss or sometimes called “Glost”) Firing Most of the time this is the final stage of making your creation (but not always!) The glaze kiln goes to 1240°C. This is called cone 6, or midrange. It is the low end of stoneware temperatures. Stoneware clays and glazes are typically fired at cone 8 – 10, that is 1260 – 1290°C. The energy requirement to go from 1240°C to 1280°C is almost a 30% more! Our clay is formulated to vitrify (mature, turn “glass-like”) at 1240°, as are our glazes. A glaze kiln take around 12 hours to reach temperature and two to three days to cool down. Sometimes a third firing process is required – this is for decoration that is added to work after the glaze firing. For example – adding precious metals and lustres. this firing temperature is usually around 600 – 800°C depending upon the techniques being used. There are many students interested in gold and silver trims – we will be doing this third type of firing soon! After firing your work will be in the student finished work shelves. Remember to pay for it before you head out the door! There is a small extra charge for using porcelain clay (it’s more than twice the price of regular clay), and for any third firing process! Once your work has been fired it can not turn back into clay for millennia – so don’t fire it if you don’t like it! Put it in the bucket for recycling. https://firebirdstudios.com.au/the-process-of-making-pottery/ The bowl is an example of kitchenware used in the 19th century and still in use today.Bowl white ceramic. Crack on side. Badly stained.Backstamp very faint and unable to be read.flagstaff hill, warrnambool, shipwrecked-coast, flagstaff-hill, flagstaff-hill-maritime-museum, maritime-museum, shipwreck-coast, flagstaff-hill-maritime-village, mixing bowl, food preparation, kitchen equipment, ceramic -
 Flagstaff Hill Maritime Museum and Village
Domestic object - Bowl
The Process of Making Pottery Decorating, Firing, Glazing, Making, Technical There is a rhythm and flow to clay. It can’t be done all at once! Even the making process! It can take weeks to get everything done, especially if you can only work on your pottery once a week! Even though we have three hour classes, it’s often just not enough time! Here is an overview of some of the processes so you have a bit more grasp on some of the technical stuff! Step One – Design There are SO many ideas out there for making stuff in clay! From delicate porcelain jewellery, through to heavy sculptural work and everything in between. Deciding your direction is sometimes not that easy – when you first start, try everything, you will naturally gravitate to the style that you enjoy! The options and variations are endless and can get a wee bit overwhelming too! Check in with me before you start to ensure your ideas will work, what order you might do things, how you could achieve the look you are seeking and any other technical data required! Step Two – Making Clay is thixotropic. This means that as you work with it, the clay first gets sloppier and wetter, before is begins to dry in the atmosphere. For most things, you simply can’t do all parts of the project at once. An example of work order might look like: Get last weeks work out from the shelves Prepare clay for today’s work – roll your clay, prepare balls for throwing, make the first stage of a pinch pot) Clean up last week’s work and put it on the shelf for bisque firing Check that you have any glazing to do – and do enough of it that you will have time to finish your main project Do the next step of your next project – there might be a further step that can’t be complete immediately, in that case, wrap your work well and put onto the shelves. Letting your work rest for a while can really help keep your work clean and professional looking. Many things require bagging under plastic to keep it ready for work the next week – put your name on the outside of the bag so you can find your work easily. We have stickers and markers. Consider how you want to decorate your work – coloured slip can be applied at a fairly wet stage (remembering that it will make your work even wetter!). Trying to apply slip to dry clay won’t work! If you want to do sgraffito – you will need to keep the work leather hard (a state of dryness where you can still work the clay with a little effort and a little water and care). Step Three – Drying Most of the time your work can go into the rack uncovered to let it dry out for the following week. If you want to continue forming or shaping you will need to double bag your work – put your work on a suitable sized bat and put the bat in a bag so the base of the bag is under the bat, then put another bag over the top of the work and tuck the top of the bag under the bat. If you want to trim (or turn) your thrown work the following week, it should also be double bagged. If your work is large, delicate, or of uneven thicknesses, you should lightly cover your work for drying. When considering the drying process, bare in mind the weather, humidity and wind! The hotter and dryer, the faster things dry and work can dry unevenly in the shelves – this can lead to cracking – another time to lightly cover your work for drying. Step Four – Trimming and Cleaning Up Your work is dry! It is called greenware now and it is at it’s most fragile! Handle everything with two hands. I often refer to soft hands – keep everything gentle and with your fingers spread as much as possible. Try to not pick up things like plates too much, and always with both hands! Before your work can be bisque fired it should be “cleaned up”. You work won’t go into the kiln if it has sharp edges – when glazed, sharp edges turn into razor blades! Use a piece of fly wire to rub the work all over – this will scratch a little so be light handed. Use a knife or metal kidney to scrape any areas that require a bit more dynamic treatment than the fly wire offers! Finally, a very light wipe over with a slightly damp sponge can help soften and soothe all of your edges and dags! Trimming thrown work: If you are planning to trim (or turn) your thrown work (and you should be), make sure you bag it well – your work should be leather hard to almost dry for easiest trimming. Use this step to finish the work completely – use a metal kidney to polish the surface, or a slightly damp sponge to give a freshly thrown look. Wipe the sponge around the rim after trimming, and check the inside of the pot for dags! Trimming slip cast work: Usually I will trim the rims of your work on the wheel the following day to make that stage easier, however you will still need to check your work for lumps and bumps. Last but not least – check that your name is still clearly on the bottom of your work. Step Five – Bisque Firing When the work is completely dry it can go into the bisque kiln. The bisque kiln is fired to 1000°C. This process burns off the water in the clay as well as some of the chemically bound water. The structure of the clay is not altered that much at this temperature. Inside the bisque kiln, the work is stacked a little, small bowl inside a larger bowl and onto a heavy plate. Smaller items like decorations or drink coasters might get stacked several high. Consideration is paid to the weight of the stack and shape of the work. A bisque kiln can fire about one and a half times the amount of work that the glaze kiln can fire. The firing takes about 10 hours to complete the cycle and about two days to cool down. Once it has been emptied the work is placed in the glaze room ready for you to decorate! Step Six – Glazing Decorating your work with colour can be a lot of fun – and time consuming! There are three main options for surface treatment at this stage: Oxide Washes Underglazes Glazes Washes and underglazes do not “glaze” the work – It will still need a layer of glaze to fully seal the clay (washes don’t need glaze on surfaces not designed for food or liquid as they can gloss up a little on their own). Underglazes are stable colourants that turn out pretty much how they look in the jar. They can be mixed with each other to form other colours and can be used like water colours to paint onto your work. Mostly they should have a clear glaze on top to seal them. Oxides are a different species – the pink oxide (cobalt) wash turns out bright blue for instance. They don’t always need a glaze on top, and some glazes can change the colour of the wash! The glazes need no other “glaze” on top! Be careful of unknown glaze interactions – you can put any combination of glaze in a bowl or on a plate, but only a single glaze on the outside of any vertical surface! Glazes are a chemical reaction under heat. We don’t know the exact chemicals in the Mayco glazes we use. I can guess by the way they interact with each other, however, on the whole, you need to test every idea you have, and not run the test on a vertical surface! Simply put, glaze is a layer of glass like substance that bonds with the clay underneath. Clay is made of silica, alumina and water. Glaze is made of mostly silica. Silica has a melting point of 1700°C and we fire to 1240°C. The silica requires a “flux” to help it melt at the lower temperature. Fluxes can be all sorts of chemicals – a common one is calcium – calcium has a melting point of 2500°C, however, together they both melt at a much lower temperature! Colourants are metal oxides like cobalt (blue), chrome (green through black), copper (green, blue, even red!), manganese (black, purple and pink) iron (red brown), etc. Different chemicals in the glaze can have dramatic effects. for example, barium carbonate (which we don’t use) turns manganese bright pink! Other elements can turn manganese dioxide brown, blue, purple and reddish brown. Manganese dioxide is a flux in and of itself as well. So, glazes that get their black and purple colours, often interact with other glazes and RUN! Our mirror black is a good example – it mixes really well with many glazes because it fluxes them – causes them to melt faster. It will also bring out many beautiful colours in the glazes because it’s black colouring most definitely comes from manganese dioxide! Glaze chemistry is a whole subject on it’s own! We use commercial Mayco glazes on purpose – for their huge range of colour possibilities, stability, cool interactions, artistic freedom with the ability to easily brush the glazes on and ease of use. We currently have almost 50 glazes on hand! A major project is to test the interactions of all glazes with each other. That is 2,500 test tiles!!!! I’m going to make the wall behind the wheels the feature wall of pretty colours! Step Seven – Glaze (Gloss or sometimes called “Glost”) Firing Most of the time this is the final stage of making your creation (but not always!) The glaze kiln goes to 1240°C. This is called cone 6, or midrange. It is the low end of stoneware temperatures. Stoneware clays and glazes are typically fired at cone 8 – 10, that is 1260 – 1290°C. The energy requirement to go from 1240°C to 1280°C is almost a 30% more! Our clay is formulated to vitrify (mature, turn “glass-like”) at 1240°, as are our glazes. A glaze kiln take around 12 hours to reach temperature and two to three days to cool down. Sometimes a third firing process is required – this is for decoration that is added to work after the glaze firing. For example – adding precious metals and lustres. this firing temperature is usually around 600 – 800°C depending upon the techniques being used. There are many students interested in gold and silver trims – we will be doing this third type of firing soon! After firing your work will be in the student finished work shelves. Remember to pay for it before you head out the door! There is a small extra charge for using porcelain clay (it’s more than twice the price of regular clay), and for any third firing process! Once your work has been fired it can not turn back into clay for millennia – so don’t fire it if you don’t like it! Put it in the bucket for recycling. https://firebirdstudios.com.au/the-process-of-making-pottery/ This bowl is an example of kitchenware used in the 19th century and still in use today.Bowl white ceramic plain that has two sets of edging around lip. Inside bowl has plaster designed to look like cooking mixture.flagstaff hill, warrnambool, shipwrecked-coast, flagstaff-hill, flagstaff-hill-maritime-museum, maritime-museum, shipwreck-coast, flagstaff-hill-maritime-village, kitchen equipment, ceramic -
 Flagstaff Hill Maritime Museum and Village
Domestic object - Bowl, J & G Meakin, Late 19th or early 20th Century
The Process of Making Pottery Decorating, Firing, Glazing, Making, Technical There is a rhythm and flow to clay. It can’t be done all at once! Even the making process! It can take weeks to get everything done, especially if you can only work on your pottery once a week! Even though we have three hour classes, it’s often just not enough time! Here is an overview of some of the processes so you have a bit more grasp on some of the technical stuff! Step One – Design There are SO many ideas out there for making stuff in clay! From delicate porcelain jewellery, through to heavy sculptural work and everything in between. Deciding your direction is sometimes not that easy – when you first start, try everything, you will naturally gravitate to the style that you enjoy! The options and variations are endless and can get a wee bit overwhelming too! Check in with me before you start to ensure your ideas will work, what order you might do things, how you could achieve the look you are seeking and any other technical data required! Step Two – Making Clay is thixotropic. This means that as you work with it, the clay first gets sloppier and wetter, before is begins to dry in the atmosphere. For most things, you simply can’t do all parts of the project at once. An example of work order might look like: Get last weeks work out from the shelves Prepare clay for today’s work – roll your clay, prepare balls for throwing, make the first stage of a pinch pot) Clean up last week’s work and put it on the shelf for bisque firing Check that you have any glazing to do – and do enough of it that you will have time to finish your main project Do the next step of your next project – there might be a further step that can’t be complete immediately, in that case, wrap your work well and put onto the shelves. Letting your work rest for a while can really help keep your work clean and professional looking. Many things require bagging under plastic to keep it ready for work the next week – put your name on the outside of the bag so you can find your work easily. We have stickers and markers. Consider how you want to decorate your work – coloured slip can be applied at a fairly wet stage (remembering that it will make your work even wetter!). Trying to apply slip to dry clay won’t work! If you want to do sgraffito – you will need to keep the work leather hard (a state of dryness where you can still work the clay with a little effort and a little water and care). Step Three – Drying Most of the time your work can go into the rack uncovered to let it dry out for the following week. If you want to continue forming or shaping you will need to double bag your work – put your work on a suitable sized bat and put the bat in a bag so the base of the bag is under the bat, then put another bag over the top of the work and tuck the top of the bag under the bat. If you want to trim (or turn) your thrown work the following week, it should also be double bagged. If your work is large, delicate, or of uneven thicknesses, you should lightly cover your work for drying. When considering the drying process, bare in mind the weather, humidity and wind! The hotter and dryer, the faster things dry and work can dry unevenly in the shelves – this can lead to cracking – another time to lightly cover your work for drying. Step Four – Trimming and Cleaning Up Your work is dry! It is called greenware now and it is at it’s most fragile! Handle everything with two hands. I often refer to soft hands – keep everything gentle and with your fingers spread as much as possible. Try to not pick up things like plates too much, and always with both hands! Before your work can be bisque fired it should be “cleaned up”. You work won’t go into the kiln if it has sharp edges – when glazed, sharp edges turn into razor blades! Use a piece of fly wire to rub the work all over – this will scratch a little so be light handed. Use a knife or metal kidney to scrape any areas that require a bit more dynamic treatment than the fly wire offers! Finally, a very light wipe over with a slightly damp sponge can help soften and soothe all of your edges and dags! Trimming thrown work: If you are planning to trim (or turn) your thrown work (and you should be), make sure you bag it well – your work should be leather hard to almost dry for easiest trimming. Use this step to finish the work completely – use a metal kidney to polish the surface, or a slightly damp sponge to give a freshly thrown look. Wipe the sponge around the rim after trimming, and check the inside of the pot for dags! Trimming slip cast work: Usually I will trim the rims of your work on the wheel the following day to make that stage easier, however you will still need to check your work for lumps and bumps. Last but not least – check that your name is still clearly on the bottom of your work. Step Five – Bisque Firing When the work is completely dry it can go into the bisque kiln. The bisque kiln is fired to 1000°C. This process burns off the water in the clay as well as some of the chemically bound water. The structure of the clay is not altered that much at this temperature. Inside the bisque kiln, the work is stacked a little, small bowl inside a larger bowl and onto a heavy plate. Smaller items like decorations or drink coasters might get stacked several high. Consideration is paid to the weight of the stack and shape of the work. A bisque kiln can fire about one and a half times the amount of work that the glaze kiln can fire. The firing takes about 10 hours to complete the cycle and about two days to cool down. Once it has been emptied the work is placed in the glaze room ready for you to decorate! Step Six – Glazing Decorating your work with colour can be a lot of fun – and time consuming! There are three main options for surface treatment at this stage: Oxide Washes Underglazes Glazes Washes and underglazes do not “glaze” the work – It will still need a layer of glaze to fully seal the clay (washes don’t need glaze on surfaces not designed for food or liquid as they can gloss up a little on their own). Underglazes are stable colourants that turn out pretty much how they look in the jar. They can be mixed with each other to form other colours and can be used like water colours to paint onto your work. Mostly they should have a clear glaze on top to seal them. Oxides are a different species – the pink oxide (cobalt) wash turns out bright blue for instance. They don’t always need a glaze on top, and some glazes can change the colour of the wash! The glazes need no other “glaze” on top! Be careful of unknown glaze interactions – you can put any combination of glaze in a bowl or on a plate, but only a single glaze on the outside of any vertical surface! Glazes are a chemical reaction under heat. We don’t know the exact chemicals in the Mayco glazes we use. I can guess by the way they interact with each other, however, on the whole, you need to test every idea you have, and not run the test on a vertical surface! Simply put, glaze is a layer of glass like substance that bonds with the clay underneath. Clay is made of silica, alumina and water. Glaze is made of mostly silica. Silica has a melting point of 1700°C and we fire to 1240°C. The silica requires a “flux” to help it melt at the lower temperature. Fluxes can be all sorts of chemicals – a common one is calcium – calcium has a melting point of 2500°C, however, together they both melt at a much lower temperature! Colourants are metal oxides like cobalt (blue), chrome (green through black), copper (green, blue, even red!), manganese (black, purple and pink) iron (red brown), etc. Different chemicals in the glaze can have dramatic effects. for example, barium carbonate (which we don’t use) turns manganese bright pink! Other elements can turn manganese dioxide brown, blue, purple and reddish brown. Manganese dioxide is a flux in and of itself as well. So, glazes that get their black and purple colours, often interact with other glazes and RUN! Our mirror black is a good example – it mixes really well with many glazes because it fluxes them – causes them to melt faster. It will also bring out many beautiful colours in the glazes because it’s black colouring most definitely comes from manganese dioxide! Glaze chemistry is a whole subject on it’s own! We use commercial Mayco glazes on purpose – for their huge range of colour possibilities, stability, cool interactions, artistic freedom with the ability to easily brush the glazes on and ease of use. We currently have almost 50 glazes on hand! A major project is to test the interactions of all glazes with each other. That is 2,500 test tiles!!!! I’m going to make the wall behind the wheels the feature wall of pretty colours! Step Seven – Glaze (Gloss or sometimes called “Glost”) Firing Most of the time this is the final stage of making your creation (but not always!) The glaze kiln goes to 1240°C. This is called cone 6, or midrange. It is the low end of stoneware temperatures. Stoneware clays and glazes are typically fired at cone 8 – 10, that is 1260 – 1290°C. The energy requirement to go from 1240°C to 1280°C is almost a 30% more! Our clay is formulated to vitrify (mature, turn “glass-like”) at 1240°, as are our glazes. A glaze kiln take around 12 hours to reach temperature and two to three days to cool down. Sometimes a third firing process is required – this is for decoration that is added to work after the glaze firing. For example – adding precious metals and lustres. this firing temperature is usually around 600 – 800°C depending upon the techniques being used. There are many students interested in gold and silver trims – we will be doing this third type of firing soon! After firing your work will be in the student finished work shelves. Remember to pay for it before you head out the door! There is a small extra charge for using porcelain clay (it’s more than twice the price of regular clay), and for any third firing process! Once your work has been fired it can not turn back into clay for millennia – so don’t fire it if you don’t like it! Put it in the bucket for recycling. https://firebirdstudios.com.au/the-process-of-making-pottery/This bowl was made by renowned pottery company J & G Meakin of England. The firm was established in the mid-1800's. The bowl is an example of kitchenware used in the 19th century and still in use today.Bowl; white ceramic, round and tapering inwards towards base. Made by J and G Meakin England.On base, 'Ironstone China Reg SOL 391413' with symbolflagstaff hill, flagstaff hill maritime museum and village, warrnambool, maritime museum, maritime village, great ocean road, shipwreck coast, mixing bowl, food preparation, j & g meakin, pottery, stoke-on-trent, kitchen equipment, ceramic -
 Flagstaff Hill Maritime Museum and Village
Domestic object - Plate
The Process of Making Pottery Decorating, Firing, Glazing, Making, Technical There is a rhythm and flow to clay. It can’t be done all at once! Even the making process! It can take weeks to get everything done, especially if you can only work on your pottery once a week! Even though we have three hour classes, it’s often just not enough time! Here is an overview of some of the processes so you have a bit more grasp on some of the technical stuff! Step One – Design There are SO many ideas out there for making stuff in clay! From delicate porcelain jewellery, through to heavy sculptural work and everything in between. Deciding your direction is sometimes not that easy – when you first start, try everything, you will naturally gravitate to the style that you enjoy! The options and variations are endless and can get a wee bit overwhelming too! Check in with me before you start to ensure your ideas will work, what order you might do things, how you could achieve the look you are seeking and any other technical data required! Step Two – Making Clay is thixotropic. This means that as you work with it, the clay first gets sloppier and wetter, before is begins to dry in the atmosphere. For most things, you simply can’t do all parts of the project at once. An example of work order might look like: Get last weeks work out from the shelves Prepare clay for today’s work – roll your clay, prepare balls for throwing, make the first stage of a pinch pot) Clean up last week’s work and put it on the shelf for bisque firing Check that you have any glazing to do – and do enough of it that you will have time to finish your main project Do the next step of your next project – there might be a further step that can’t be complete immediately, in that case, wrap your work well and put onto the shelves. Letting your work rest for a while can really help keep your work clean and professional looking. Many things require bagging under plastic to keep it ready for work the next week – put your name on the outside of the bag so you can find your work easily. We have stickers and markers. Consider how you want to decorate your work – coloured slip can be applied at a fairly wet stage (remembering that it will make your work even wetter!). Trying to apply slip to dry clay won’t work! If you want to do sgraffito – you will need to keep the work leather hard (a state of dryness where you can still work the clay with a little effort and a little water and care). Step Three – Drying Most of the time your work can go into the rack uncovered to let it dry out for the following week. If you want to continue forming or shaping you will need to double bag your work – put your work on a suitable sized bat and put the bat in a bag so the base of the bag is under the bat, then put another bag over the top of the work and tuck the top of the bag under the bat. If you want to trim (or turn) your thrown work the following week, it should also be double bagged. If your work is large, delicate, or of uneven thicknesses, you should lightly cover your work for drying. When considering the drying process, bare in mind the weather, humidity and wind! The hotter and dryer, the faster things dry and work can dry unevenly in the shelves – this can lead to cracking – another time to lightly cover your work for drying. Step Four – Trimming and Cleaning Up Your work is dry! It is called greenware now and it is at it’s most fragile! Handle everything with two hands. I often refer to soft hands – keep everything gentle and with your fingers spread as much as possible. Try to not pick up things like plates too much, and always with both hands! Before your work can be bisque fired it should be “cleaned up”. You work won’t go into the kiln if it has sharp edges – when glazed, sharp edges turn into razor blades! Use a piece of fly wire to rub the work all over – this will scratch a little so be light handed. Use a knife or metal kidney to scrape any areas that require a bit more dynamic treatment than the fly wire offers! Finally, a very light wipe over with a slightly damp sponge can help soften and soothe all of your edges and dags! Trimming thrown work: If you are planning to trim (or turn) your thrown work (and you should be), make sure you bag it well – your work should be leather hard to almost dry for easiest trimming. Use this step to finish the work completely – use a metal kidney to polish the surface, or a slightly damp sponge to give a freshly thrown look. Wipe the sponge around the rim after trimming, and check the inside of the pot for dags! Trimming slip cast work: Usually I will trim the rims of your work on the wheel the following day to make that stage easier, however you will still need to check your work for lumps and bumps. Last but not least – check that your name is still clearly on the bottom of your work. Step Five – Bisque Firing When the work is completely dry it can go into the bisque kiln. The bisque kiln is fired to 1000°C. This process burns off the water in the clay as well as some of the chemically bound water. The structure of the clay is not altered that much at this temperature. Inside the bisque kiln, the work is stacked a little, small bowl inside a larger bowl and onto a heavy plate. Smaller items like decorations or drink coasters might get stacked several high. Consideration is paid to the weight of the stack and shape of the work. A bisque kiln can fire about one and a half times the amount of work that the glaze kiln can fire. The firing takes about 10 hours to complete the cycle and about two days to cool down. Once it has been emptied the work is placed in the glaze room ready for you to decorate! Step Six – Glazing Decorating your work with colour can be a lot of fun – and time consuming! There are three main options for surface treatment at this stage: Oxide Washes Underglazes Glazes Washes and underglazes do not “glaze” the work – It will still need a layer of glaze to fully seal the clay (washes don’t need glaze on surfaces not designed for food or liquid as they can gloss up a little on their own). Underglazes are stable colourants that turn out pretty much how they look in the jar. They can be mixed with each other to form other colours and can be used like water colours to paint onto your work. Mostly they should have a clear glaze on top to seal them. Oxides are a different species – the pink oxide (cobalt) wash turns out bright blue for instance. They don’t always need a glaze on top, and some glazes can change the colour of the wash! The glazes need no other “glaze” on top! Be careful of unknown glaze interactions – you can put any combination of glaze in a bowl or on a plate, but only a single glaze on the outside of any vertical surface! Glazes are a chemical reaction under heat. We don’t know the exact chemicals in the Mayco glazes we use. I can guess by the way they interact with each other, however, on the whole, you need to test every idea you have, and not run the test on a vertical surface! Simply put, glaze is a layer of glass like substance that bonds with the clay underneath. Clay is made of silica, alumina and water. Glaze is made of mostly silica. Silica has a melting point of 1700°C and we fire to 1240°C. The silica requires a “flux” to help it melt at the lower temperature. Fluxes can be all sorts of chemicals – a common one is calcium – calcium has a melting point of 2500°C, however, together they both melt at a much lower temperature! Colourants are metal oxides like cobalt (blue), chrome (green through black), copper (green, blue, even red!), manganese (black, purple and pink) iron (red brown), etc. Different chemicals in the glaze can have dramatic effects. for example, barium carbonate (which we don’t use) turns manganese bright pink! Other elements can turn manganese dioxide brown, blue, purple and reddish brown. Manganese dioxide is a flux in and of itself as well. So, glazes that get their black and purple colours, often interact with other glazes and RUN! Our mirror black is a good example – it mixes really well with many glazes because it fluxes them – causes them to melt faster. It will also bring out many beautiful colours in the glazes because it’s black colouring most definitely comes from manganese dioxide! Glaze chemistry is a whole subject on it’s own! We use commercial Mayco glazes on purpose – for their huge range of colour possibilities, stability, cool interactions, artistic freedom with the ability to easily brush the glazes on and ease of use. We currently have almost 50 glazes on hand! A major project is to test the interactions of all glazes with each other. That is 2,500 test tiles!!!! I’m going to make the wall behind the wheels the feature wall of pretty colours! Step Seven – Glaze (Gloss or sometimes called “Glost”) Firing Most of the time this is the final stage of making your creation (but not always!) The glaze kiln goes to 1240°C. This is called cone 6, or midrange. It is the low end of stoneware temperatures. Stoneware clays and glazes are typically fired at cone 8 – 10, that is 1260 – 1290°C. The energy requirement to go from 1240°C to 1280°C is almost a 30% more! Our clay is formulated to vitrify (mature, turn “glass-like”) at 1240°, as are our glazes. A glaze kiln take around 12 hours to reach temperature and two to three days to cool down. Sometimes a third firing process is required – this is for decoration that is added to work after the glaze firing. For example – adding precious metals and lustres. this firing temperature is usually around 600 – 800°C depending upon the techniques being used. There are many students interested in gold and silver trims – we will be doing this third type of firing soon! After firing your work will be in the student finished work shelves. Remember to pay for it before you head out the door! There is a small extra charge for using porcelain clay (it’s more than twice the price of regular clay), and for any third firing process! Once your work has been fired it can not turn back into clay for millennia – so don’t fire it if you don’t like it! Put it in the bucket for recycling. https://firebirdstudios.com.au/the-process-of-making-pottery/Ceramics have evolved over thousands of years.White earthenware dinner plate. Crazing evident all over.Backstamped ‘Made in England S LTD’flagstaff hill, warrnambool, shipwrecked-coast, flagstaff-hill, flagstaff-hill-maritime-museum, maritime-museum, shipwreck-coast, flagstaff-hill-maritime-village, ceramics, tableware -
 Flagstaff Hill Maritime Museum and Village
Domestic object - Plate, Johnson Bros
The Process of Making Pottery Decorating, Firing, Glazing, Making, Technical There is a rhythm and flow to clay. It can’t be done all at once! Even the making process! It can take weeks to get everything done, especially if you can only work on your pottery once a week! Even though we have three hour classes, it’s often just not enough time! Here is an overview of some of the processes so you have a bit more grasp on some of the technical stuff! Step One – Design There are SO many ideas out there for making stuff in clay! From delicate porcelain jewellery, through to heavy sculptural work and everything in between. Deciding your direction is sometimes not that easy – when you first start, try everything, you will naturally gravitate to the style that you enjoy! The options and variations are endless and can get a wee bit overwhelming too! Check in with me before you start to ensure your ideas will work, what order you might do things, how you could achieve the look you are seeking and any other technical data required! Step Two – Making Clay is thixotropic. This means that as you work with it, the clay first gets sloppier and wetter, before is begins to dry in the atmosphere. For most things, you simply can’t do all parts of the project at once. An example of work order might look like: Get last weeks work out from the shelves Prepare clay for today’s work – roll your clay, prepare balls for throwing, make the first stage of a pinch pot) Clean up last week’s work and put it on the shelf for bisque firing Check that you have any glazing to do – and do enough of it that you will have time to finish your main project Do the next step of your next project – there might be a further step that can’t be complete immediately, in that case, wrap your work well and put onto the shelves. Letting your work rest for a while can really help keep your work clean and professional looking. Many things require bagging under plastic to keep it ready for work the next week – put your name on the outside of the bag so you can find your work easily. We have stickers and markers. Consider how you want to decorate your work – coloured slip can be applied at a fairly wet stage (remembering that it will make your work even wetter!). Trying to apply slip to dry clay won’t work! If you want to do sgraffito – you will need to keep the work leather hard (a state of dryness where you can still work the clay with a little effort and a little water and care). Step Three – Drying Most of the time your work can go into the rack uncovered to let it dry out for the following week. If you want to continue forming or shaping you will need to double bag your work – put your work on a suitable sized bat and put the bat in a bag so the base of the bag is under the bat, then put another bag over the top of the work and tuck the top of the bag under the bat. If you want to trim (or turn) your thrown work the following week, it should also be double bagged. If your work is large, delicate, or of uneven thicknesses, you should lightly cover your work for drying. When considering the drying process, bare in mind the weather, humidity and wind! The hotter and dryer, the faster things dry and work can dry unevenly in the shelves – this can lead to cracking – another time to lightly cover your work for drying. Step Four – Trimming and Cleaning Up Your work is dry! It is called greenware now and it is at it’s most fragile! Handle everything with two hands. I often refer to soft hands – keep everything gentle and with your fingers spread as much as possible. Try to not pick up things like plates too much, and always with both hands! Before your work can be bisque fired it should be “cleaned up”. You work won’t go into the kiln if it has sharp edges – when glazed, sharp edges turn into razor blades! Use a piece of fly wire to rub the work all over – this will scratch a little so be light handed. Use a knife or metal kidney to scrape any areas that require a bit more dynamic treatment than the fly wire offers! Finally, a very light wipe over with a slightly damp sponge can help soften and soothe all of your edges and dags! Trimming thrown work: If you are planning to trim (or turn) your thrown work (and you should be), make sure you bag it well – your work should be leather hard to almost dry for easiest trimming. Use this step to finish the work completely – use a metal kidney to polish the surface, or a slightly damp sponge to give a freshly thrown look. Wipe the sponge around the rim after trimming, and check the inside of the pot for dags! Trimming slip cast work: Usually I will trim the rims of your work on the wheel the following day to make that stage easier, however you will still need to check your work for lumps and bumps. Last but not least – check that your name is still clearly on the bottom of your work. Step Five – Bisque Firing When the work is completely dry it can go into the bisque kiln. The bisque kiln is fired to 1000°C. This process burns off the water in the clay as well as some of the chemically bound water. The structure of the clay is not altered that much at this temperature. Inside the bisque kiln, the work is stacked a little, small bowl inside a larger bowl and onto a heavy plate. Smaller items like decorations or drink coasters might get stacked several high. Consideration is paid to the weight of the stack and shape of the work. A bisque kiln can fire about one and a half times the amount of work that the glaze kiln can fire. The firing takes about 10 hours to complete the cycle and about two days to cool down. Once it has been emptied the work is placed in the glaze room ready for you to decorate! Step Six – Glazing Decorating your work with colour can be a lot of fun – and time consuming! There are three main options for surface treatment at this stage: Oxide Washes Underglazes Glazes Washes and underglazes do not “glaze” the work – It will still need a layer of glaze to fully seal the clay (washes don’t need glaze on surfaces not designed for food or liquid as they can gloss up a little on their own). Underglazes are stable colourants that turn out pretty much how they look in the jar. They can be mixed with each other to form other colours and can be used like water colours to paint onto your work. Mostly they should have a clear glaze on top to seal them. Oxides are a different species – the pink oxide (cobalt) wash turns out bright blue for instance. They don’t always need a glaze on top, and some glazes can change the colour of the wash! The glazes need no other “glaze” on top! Be careful of unknown glaze interactions – you can put any combination of glaze in a bowl or on a plate, but only a single glaze on the outside of any vertical surface! Glazes are a chemical reaction under heat. We don’t know the exact chemicals in the Mayco glazes we use. I can guess by the way they interact with each other, however, on the whole, you need to test every idea you have, and not run the test on a vertical surface! Simply put, glaze is a layer of glass like substance that bonds with the clay underneath. Clay is made of silica, alumina and water. Glaze is made of mostly silica. Silica has a melting point of 1700°C and we fire to 1240°C. The silica requires a “flux” to help it melt at the lower temperature. Fluxes can be all sorts of chemicals – a common one is calcium – calcium has a melting point of 2500°C, however, together they both melt at a much lower temperature! Colourants are metal oxides like cobalt (blue), chrome (green through black), copper (green, blue, even red!), manganese (black, purple and pink) iron (red brown), etc. Different chemicals in the glaze can have dramatic effects. for example, barium carbonate (which we don’t use) turns manganese bright pink! Other elements can turn manganese dioxide brown, blue, purple and reddish brown. Manganese dioxide is a flux in and of itself as well. So, glazes that get their black and purple colours, often interact with other glazes and RUN! Our mirror black is a good example – it mixes really well with many glazes because it fluxes them – causes them to melt faster. It will also bring out many beautiful colours in the glazes because it’s black colouring most definitely comes from manganese dioxide! Glaze chemistry is a whole subject on it’s own! We use commercial Mayco glazes on purpose – for their huge range of colour possibilities, stability, cool interactions, artistic freedom with the ability to easily brush the glazes on and ease of use. We currently have almost 50 glazes on hand! A major project is to test the interactions of all glazes with each other. That is 2,500 test tiles!!!! I’m going to make the wall behind the wheels the feature wall of pretty colours! Step Seven – Glaze (Gloss or sometimes called “Glost”) Firing Most of the time this is the final stage of making your creation (but not always!) The glaze kiln goes to 1240°C. This is called cone 6, or midrange. It is the low end of stoneware temperatures. Stoneware clays and glazes are typically fired at cone 8 – 10, that is 1260 – 1290°C. The energy requirement to go from 1240°C to 1280°C is almost a 30% more! Our clay is formulated to vitrify (mature, turn “glass-like”) at 1240°, as are our glazes. A glaze kiln take around 12 hours to reach temperature and two to three days to cool down. Sometimes a third firing process is required – this is for decoration that is added to work after the glaze firing. For example – adding precious metals and lustres. this firing temperature is usually around 600 – 800°C depending upon the techniques being used. There are many students interested in gold and silver trims – we will be doing this third type of firing soon! After firing your work will be in the student finished work shelves. Remember to pay for it before you head out the door! There is a small extra charge for using porcelain clay (it’s more than twice the price of regular clay), and for any third firing process! Once your work has been fired it can not turn back into clay for millennia – so don’t fire it if you don’t like it! Put it in the bucket for recycling. https://firebirdstudios.com.au/the-process-of-making-pottery/Ceramics have evolved over thousands of years.A white earthenware side plate with a gadroon edge. Has water marks and chips on front.‘Johnson Bros England Reg No 15587’flagstaff hill, warrnambool, shipwrecked-coast, flagstaff-hill, flagstaff-hill-maritime-museum, maritime-museum, shipwreck-coast, flagstaff-hill-maritime-village, johnson bros, ceramics, tableware -
 Flagstaff Hill Maritime Museum and Village
Domestic object - Plate, Alfred Meakin
The Process of Making Pottery Decorating, Firing, Glazing, Making, Technical There is a rhythm and flow to clay. It can’t be done all at once! Even the making process! It can take weeks to get everything done, especially if you can only work on your pottery once a week! Even though we have three hour classes, it’s often just not enough time! Here is an overview of some of the processes so you have a bit more grasp on some of the technical stuff! Step One – Design There are SO many ideas out there for making stuff in clay! From delicate porcelain jewellery, through to heavy sculptural work and everything in between. Deciding your direction is sometimes not that easy – when you first start, try everything, you will naturally gravitate to the style that you enjoy! The options and variations are endless and can get a wee bit overwhelming too! Check in with me before you start to ensure your ideas will work, what order you might do things, how you could achieve the look you are seeking and any other technical data required! Step Two – Making Clay is thixotropic. This means that as you work with it, the clay first gets sloppier and wetter, before is begins to dry in the atmosphere. For most things, you simply can’t do all parts of the project at once. An example of work order might look like: Get last weeks work out from the shelves Prepare clay for today’s work – roll your clay, prepare balls for throwing, make the first stage of a pinch pot) Clean up last week’s work and put it on the shelf for bisque firing Check that you have any glazing to do – and do enough of it that you will have time to finish your main project Do the next step of your next project – there might be a further step that can’t be complete immediately, in that case, wrap your work well and put onto the shelves. Letting your work rest for a while can really help keep your work clean and professional looking. Many things require bagging under plastic to keep it ready for work the next week – put your name on the outside of the bag so you can find your work easily. We have stickers and markers. Consider how you want to decorate your work – coloured slip can be applied at a fairly wet stage (remembering that it will make your work even wetter!). Trying to apply slip to dry clay won’t work! If you want to do sgraffito – you will need to keep the work leather hard (a state of dryness where you can still work the clay with a little effort and a little water and care). Step Three – Drying Most of the time your work can go into the rack uncovered to let it dry out for the following week. If you want to continue forming or shaping you will need to double bag your work – put your work on a suitable sized bat and put the bat in a bag so the base of the bag is under the bat, then put another bag over the top of the work and tuck the top of the bag under the bat. If you want to trim (or turn) your thrown work the following week, it should also be double bagged. If your work is large, delicate, or of uneven thicknesses, you should lightly cover your work for drying. When considering the drying process, bare in mind the weather, humidity and wind! The hotter and dryer, the faster things dry and work can dry unevenly in the shelves – this can lead to cracking – another time to lightly cover your work for drying. Step Four – Trimming and Cleaning Up Your work is dry! It is called greenware now and it is at it’s most fragile! Handle everything with two hands. I often refer to soft hands – keep everything gentle and with your fingers spread as much as possible. Try to not pick up things like plates too much, and always with both hands! Before your work can be bisque fired it should be “cleaned up”. You work won’t go into the kiln if it has sharp edges – when glazed, sharp edges turn into razor blades! Use a piece of fly wire to rub the work all over – this will scratch a little so be light handed. Use a knife or metal kidney to scrape any areas that require a bit more dynamic treatment than the fly wire offers! Finally, a very light wipe over with a slightly damp sponge can help soften and soothe all of your edges and dags! Trimming thrown work: If you are planning to trim (or turn) your thrown work (and you should be), make sure you bag it well – your work should be leather hard to almost dry for easiest trimming. Use this step to finish the work completely – use a metal kidney to polish the surface, or a slightly damp sponge to give a freshly thrown look. Wipe the sponge around the rim after trimming, and check the inside of the pot for dags! Trimming slip cast work: Usually I will trim the rims of your work on the wheel the following day to make that stage easier, however you will still need to check your work for lumps and bumps. Last but not least – check that your name is still clearly on the bottom of your work. Step Five – Bisque Firing When the work is completely dry it can go into the bisque kiln. The bisque kiln is fired to 1000°C. This process burns off the water in the clay as well as some of the chemically bound water. The structure of the clay is not altered that much at this temperature. Inside the bisque kiln, the work is stacked a little, small bowl inside a larger bowl and onto a heavy plate. Smaller items like decorations or drink coasters might get stacked several high. Consideration is paid to the weight of the stack and shape of the work. A bisque kiln can fire about one and a half times the amount of work that the glaze kiln can fire. The firing takes about 10 hours to complete the cycle and about two days to cool down. Once it has been emptied the work is placed in the glaze room ready for you to decorate! Step Six – Glazing Decorating your work with colour can be a lot of fun – and time consuming! There are three main options for surface treatment at this stage: Oxide Washes Underglazes Glazes Washes and underglazes do not “glaze” the work – It will still need a layer of glaze to fully seal the clay (washes don’t need glaze on surfaces not designed for food or liquid as they can gloss up a little on their own). Underglazes are stable colourants that turn out pretty much how they look in the jar. They can be mixed with each other to form other colours and can be used like water colours to paint onto your work. Mostly they should have a clear glaze on top to seal them. Oxides are a different species – the pink oxide (cobalt) wash turns out bright blue for instance. They don’t always need a glaze on top, and some glazes can change the colour of the wash! The glazes need no other “glaze” on top! Be careful of unknown glaze interactions – you can put any combination of glaze in a bowl or on a plate, but only a single glaze on the outside of any vertical surface! Glazes are a chemical reaction under heat. We don’t know the exact chemicals in the Mayco glazes we use. I can guess by the way they interact with each other, however, on the whole, you need to test every idea you have, and not run the test on a vertical surface! Simply put, glaze is a layer of glass like substance that bonds with the clay underneath. Clay is made of silica, alumina and water. Glaze is made of mostly silica. Silica has a melting point of 1700°C and we fire to 1240°C. The silica requires a “flux” to help it melt at the lower temperature. Fluxes can be all sorts of chemicals – a common one is calcium – calcium has a melting point of 2500°C, however, together they both melt at a much lower temperature! Colourants are metal oxides like cobalt (blue), chrome (green through black), copper (green, blue, even red!), manganese (black, purple and pink) iron (red brown), etc. Different chemicals in the glaze can have dramatic effects. for example, barium carbonate (which we don’t use) turns manganese bright pink! Other elements can turn manganese dioxide brown, blue, purple and reddish brown. Manganese dioxide is a flux in and of itself as well. So, glazes that get their black and purple colours, often interact with other glazes and RUN! Our mirror black is a good example – it mixes really well with many glazes because it fluxes them – causes them to melt faster. It will also bring out many beautiful colours in the glazes because it’s black colouring most definitely comes from manganese dioxide! Glaze chemistry is a whole subject on it’s own! We use commercial Mayco glazes on purpose – for their huge range of colour possibilities, stability, cool interactions, artistic freedom with the ability to easily brush the glazes on and ease of use. We currently have almost 50 glazes on hand! A major project is to test the interactions of all glazes with each other. That is 2,500 test tiles!!!! I’m going to make the wall behind the wheels the feature wall of pretty colours! Step Seven – Glaze (Gloss or sometimes called “Glost”) Firing Most of the time this is the final stage of making your creation (but not always!) The glaze kiln goes to 1240°C. This is called cone 6, or midrange. It is the low end of stoneware temperatures. Stoneware clays and glazes are typically fired at cone 8 – 10, that is 1260 – 1290°C. The energy requirement to go from 1240°C to 1280°C is almost a 30% more! Our clay is formulated to vitrify (mature, turn “glass-like”) at 1240°, as are our glazes. A glaze kiln take around 12 hours to reach temperature and two to three days to cool down. Sometimes a third firing process is required – this is for decoration that is added to work after the glaze firing. For example – adding precious metals and lustres. this firing temperature is usually around 600 – 800°C depending upon the techniques being used. There are many students interested in gold and silver trims – we will be doing this third type of firing soon! After firing your work will be in the student finished work shelves. Remember to pay for it before you head out the door! There is a small extra charge for using porcelain clay (it’s more than twice the price of regular clay), and for any third firing process! Once your work has been fired it can not turn back into clay for millennia – so don’t fire it if you don’t like it! Put it in the bucket for recycling. https://firebirdstudios.com.au/the-process-of-making-pottery/Ceramics have evolved over thousands of years.Earthenware dessert plate, cream colour. Made by Alfred Meakin, England. Backstamped ‘Alfred Meakin England’. flagstaff hill, warrnambool, shipwrecked-coast, flagstaff-hill, flagstaff-hill-maritime-museum, maritime-museum, shipwreck-coast, flagstaff-hill-maritime-village, alfred meakin, ceramics, earthenware, kitchenware -
 Flagstaff Hill Maritime Museum and Village
Domestic object - Jug
The Process of Making Pottery Decorating, Firing, Glazing, Making, Technical There is a rhythm and flow to clay. It can’t be done all at once! Even the making process! It can take weeks to get everything done, especially if you can only work on your pottery once a week! Even though we have three hour classes, it’s often just not enough time! Here is an overview of some of the processes so you have a bit more grasp on some of the technical stuff! Step One – Design There are SO many ideas out there for making stuff in clay! From delicate porcelain jewellery, through to heavy sculptural work and everything in between. Deciding your direction is sometimes not that easy – when you first start, try everything, you will naturally gravitate to the style that you enjoy! The options and variations are endless and can get a wee bit overwhelming too! Check in with me before you start to ensure your ideas will work, what order you might do things, how you could achieve the look you are seeking and any other technical data required! Step Two – Making Clay is thixotropic. This means that as you work with it, the clay first gets sloppier and wetter, before is begins to dry in the atmosphere. For most things, you simply can’t do all parts of the project at once. An example of work order might look like: Get last weeks work out from the shelves Prepare clay for today’s work – roll your clay, prepare balls for throwing, make the first stage of a pinch pot) Clean up last week’s work and put it on the shelf for bisque firing Check that you have any glazing to do – and do enough of it that you will have time to finish your main project Do the next step of your next project – there might be a further step that can’t be complete immediately, in that case, wrap your work well and put onto the shelves. Letting your work rest for a while can really help keep your work clean and professional looking. Many things require bagging under plastic to keep it ready for work the next week – put your name on the outside of the bag so you can find your work easily. We have stickers and markers. Consider how you want to decorate your work – coloured slip can be applied at a fairly wet stage (remembering that it will make your work even wetter!). Trying to apply slip to dry clay won’t work! If you want to do sgraffito – you will need to keep the work leather hard (a state of dryness where you can still work the clay with a little effort and a little water and care). Step Three – Drying Most of the time your work can go into the rack uncovered to let it dry out for the following week. If you want to continue forming or shaping you will need to double bag your work – put your work on a suitable sized bat and put the bat in a bag so the base of the bag is under the bat, then put another bag over the top of the work and tuck the top of the bag under the bat. If you want to trim (or turn) your thrown work the following week, it should also be double bagged. If your work is large, delicate, or of uneven thicknesses, you should lightly cover your work for drying. When considering the drying process, bare in mind the weather, humidity and wind! The hotter and dryer, the faster things dry and work can dry unevenly in the shelves – this can lead to cracking – another time to lightly cover your work for drying. Step Four – Trimming and Cleaning Up Your work is dry! It is called greenware now and it is at it’s most fragile! Handle everything with two hands. I often refer to soft hands – keep everything gentle and with your fingers spread as much as possible. Try to not pick up things like plates too much, and always with both hands! Before your work can be bisque fired it should be “cleaned up”. You work won’t go into the kiln if it has sharp edges – when glazed, sharp edges turn into razor blades! Use a piece of fly wire to rub the work all over – this will scratch a little so be light handed. Use a knife or metal kidney to scrape any areas that require a bit more dynamic treatment than the fly wire offers! Finally, a very light wipe over with a slightly damp sponge can help soften and soothe all of your edges and dags! Trimming thrown work: If you are planning to trim (or turn) your thrown work (and you should be), make sure you bag it well – your work should be leather hard to almost dry for easiest trimming. Use this step to finish the work completely – use a metal kidney to polish the surface, or a slightly damp sponge to give a freshly thrown look. Wipe the sponge around the rim after trimming, and check the inside of the pot for dags! Trimming slip cast work: Usually I will trim the rims of your work on the wheel the following day to make that stage easier, however you will still need to check your work for lumps and bumps. Last but not least – check that your name is still clearly on the bottom of your work. Step Five – Bisque Firing When the work is completely dry it can go into the bisque kiln. The bisque kiln is fired to 1000°C. This process burns off the water in the clay as well as some of the chemically bound water. The structure of the clay is not altered that much at this temperature. Inside the bisque kiln, the work is stacked a little, small bowl inside a larger bowl and onto a heavy plate. Smaller items like decorations or drink coasters might get stacked several high. Consideration is paid to the weight of the stack and shape of the work. A bisque kiln can fire about one and a half times the amount of work that the glaze kiln can fire. The firing takes about 10 hours to complete the cycle and about two days to cool down. Once it has been emptied the work is placed in the glaze room ready for you to decorate! Step Six – Glazing Decorating your work with colour can be a lot of fun – and time consuming! There are three main options for surface treatment at this stage: Oxide Washes Underglazes Glazes Washes and underglazes do not “glaze” the work – It will still need a layer of glaze to fully seal the clay (washes don’t need glaze on surfaces not designed for food or liquid as they can gloss up a little on their own). Underglazes are stable colourants that turn out pretty much how they look in the jar. They can be mixed with each other to form other colours and can be used like water colours to paint onto your work. Mostly they should have a clear glaze on top to seal them. Oxides are a different species – the pink oxide (cobalt) wash turns out bright blue for instance. They don’t always need a glaze on top, and some glazes can change the colour of the wash! The glazes need no other “glaze” on top! Be careful of unknown glaze interactions – you can put any combination of glaze in a bowl or on a plate, but only a single glaze on the outside of any vertical surface! Glazes are a chemical reaction under heat. We don’t know the exact chemicals in the Mayco glazes we use. I can guess by the way they interact with each other, however, on the whole, you need to test every idea you have, and not run the test on a vertical surface! Simply put, glaze is a layer of glass like substance that bonds with the clay underneath. Clay is made of silica, alumina and water. Glaze is made of mostly silica. Silica has a melting point of 1700°C and we fire to 1240°C. The silica requires a “flux” to help it melt at the lower temperature. Fluxes can be all sorts of chemicals – a common one is calcium – calcium has a melting point of 2500°C, however, together they both melt at a much lower temperature! Colourants are metal oxides like cobalt (blue), chrome (green through black), copper (green, blue, even red!), manganese (black, purple and pink) iron (red brown), etc. Different chemicals in the glaze can have dramatic effects. for example, barium carbonate (which we don’t use) turns manganese bright pink! Other elements can turn manganese dioxide brown, blue, purple and reddish brown. Manganese dioxide is a flux in and of itself as well. So, glazes that get their black and purple colours, often interact with other glazes and RUN! Our mirror black is a good example – it mixes really well with many glazes because it fluxes them – causes them to melt faster. It will also bring out many beautiful colours in the glazes because it’s black colouring most definitely comes from manganese dioxide! Glaze chemistry is a whole subject on it’s own! We use commercial Mayco glazes on purpose – for their huge range of colour possibilities, stability, cool interactions, artistic freedom with the ability to easily brush the glazes on and ease of use. We currently have almost 50 glazes on hand! A major project is to test the interactions of all glazes with each other. That is 2,500 test tiles!!!! I’m going to make the wall behind the wheels the feature wall of pretty colours! Step Seven – Glaze (Gloss or sometimes called “Glost”) Firing Most of the time this is the final stage of making your creation (but not always!) The glaze kiln goes to 1240°C. This is called cone 6, or midrange. It is the low end of stoneware temperatures. Stoneware clays and glazes are typically fired at cone 8 – 10, that is 1260 – 1290°C. The energy requirement to go from 1240°C to 1280°C is almost a 30% more! Our clay is formulated to vitrify (mature, turn “glass-like”) at 1240°, as are our glazes. A glaze kiln take around 12 hours to reach temperature and two to three days to cool down. Sometimes a third firing process is required – this is for decoration that is added to work after the glaze firing. For example – adding precious metals and lustres. this firing temperature is usually around 600 – 800°C depending upon the techniques being used. There are many students interested in gold and silver trims – we will be doing this third type of firing soon! After firing your work will be in the student finished work shelves. Remember to pay for it before you head out the door! There is a small extra charge for using porcelain clay (it’s more than twice the price of regular clay), and for any third firing process! Once your work has been fired it can not turn back into clay for millennia – so don’t fire it if you don’t like it! Put it in the bucket for recycling. https://firebirdstudios.com.au/the-process-of-making-pottery/The form of the jug has been in use for many centuries.Stoneware jug. Two tone brown glaze with pierced lip behind spout. Spout chipped.None.flagstaff hill, warrnambool, shipwrecked-coast, flagstaff-hill, flagstaff-hill-maritime-museum, maritime-museum, shipwreck-coast, flagstaff-hill-maritime-village, jug, ceramic jug -
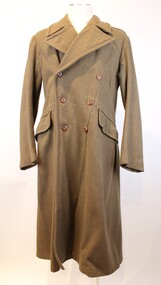 Shepparton RSL Sub Branch
Uniform, Great Coat, C. 1951
Shin length long sleeved heavy woollen coat in khaki-green with double breasted fastening via three bakelite brown buttons. Two angled hip height pockets on the left and right hips with exterior flap, lined with cotton. Two red curved shoulder flashes on each shoulder embroidered with the words “ROYAL AUSTRALIAN/REGIMENT” in a cream thread with a cream border. Collar has two small buttons either side on the exterior and a hook and eye which fastens under the chin. Fabric epaulette on either shoulder with brown button to secure. Lower back of coat is secured by two buttons and a belt which attaches to left and right seam line and fastens via three buttons. Interior shoulder area is lined with short cotton lining which sits under the arms; sleeves lined in cotton. Pockets are cotton on interior with inscriptions; two labels on interior lower right. Labels reads “REGIMENTAL NO. 3/400922/NAME ROBINSON/GREAT COAT G.S. 1966 PATT/1951/[two lines of text overwritten with “83A” stamp]/A LANDAU VIC 1951”. Interior right pocket reads “11556/ROBERTSON/203 111051”. Shoulder lining has three stamps reading “83A” and one handwritten “83A”. Buttons read “AUSTRALIAN MILITARY FORCES”. Shoulder flashes read “ROYAL AUSTRALIAN/REGIMENT”robinson, robertson, world war ii, second world war, wwii, winter, uniform, military -
 Federation University Historical Collection
Book, Australasian Institute of Mining Engineers, Transactions of the Australasian Institute of Mining Engineers, Volume X, 1905, 1905
Fabric covered hardcovered book of 367 pages. Includes a number of pullout plans. Contents * Mount Lyell Mining Field Tasmania by Professor J.W. Gregory * Concentration of solver-led ores (with 6 plates) by V.F. Stanley Low * Phosphate Deposites of Ocean and Pleasnt Islands (with 15 plates) by F. Danvers Power * Coal and Coal Mining in New SoPleassant Isuth Wales by Thomas Parton * Method of TImbering at the Mount Rex Tin Mne, Ben Lomand, Tasmania by Mark Ireland * Peck's Centrifugal Elevator by W. Peck * A Portable Assay Furnace by J.J. Gillio * NOtes on Sampling by A.C. Thomas * The Career of the Gold Dredge i n New South Wales by David K. Blair * The Transmission of Power by COmpressed Air in Mines by R.W. Chapman * The Misplacement of Mning Shafts and Adits in Victoria (with 7 figures) * The Indicators of the Daylesford Gold Mines, Victoria * Mining Accounts by R.N. Kirknon-fictionausimm, a.s. kenyon, frank a. moss, mount lyell, j.w. gregory, coal, gold dredge, transmission of power, mining shaft audits, daylesford gold mines, spitzkastens, ocean island banaba, pleasant island nauru, pinnacles on flat reef pleasant island, ocean island, blow hole howe bay, rock phosphate, thomas parton, mark ireland, mount rex tin mine, ngapara dredge, w. peck, w.h. vale, daylesford, jim crow diggings, glenmona gmc, f. danvers power, leigh g. hancock, workers' industrial union of australia (barrier district) -
 Flagstaff Hill Maritime Museum and Village
Clothing - Jacket, before April 1874
THE JACKET This jacket has been tailored to flatter the wearer’s figure. It also has elements that keep it in good shape and condition, preserve it from soiling and give it a longer life: - the hooks and eyes that join the jacket to the skirt allow the outfit to be made in two pieces but fit close to the body without exposing undergarments - the seams for the metal stays have been cut and stitched to allow maximum movement of the wearer and still keep a trim figure - the discreet breast pocket allows the wearer to keep a handkerchief, coins or other small items close at hand - the lining includes removable padded shields to absorb underarm perspiration - the lining has two cotton loops attached for hanging up to air and freshen it - new cuffs have been attached over the original sleeves that have buttonholes but no buttons. The buttons may have been used to replace missing buttons on the front of the jacket or perhaps to repair worn cuffs The amber coloured satin jacket is fully lined, has turned-back cuffs, a band collar, and looped, coffee-coloured braid trim. A row of closely spaced, round bronze buttons with a floral motif form a decorative closure most of the way down the front of the jacket, below which are metal hooks and eyes that finish at the waist. Underneath the cuffs there is a closely fitted cuff with a row of three button holes but no buttons. The jacket lining has vertical metal stays spaced around the midriff, sides and back. There is an absorbent, removable pad hand-stitched to the underarm section of each sleeve opening. A small satin pocket is stitched discreetly onto the lining above the chest on the right-hand side. There are also two cotton loops sewn onto the lining. Several small metal rings are sewn at intervals around the inside of the waist A satin bow from the same fabric is attached at the centre back of the jacket at waist level. antique satin jacket, colonial evening jacket, ladies evening jacket, 19th century ladies satin jacket, evening outfit -
 Flagstaff Hill Maritime Museum and Village
Leisure object - Porcelain Doll, 1920-1941
Unable to determine a specific company that manufactured this doll many Japanese companies manufactured dolls of this type for export and these were only marked "Nippon" to show country of manufacture. These dolls marked this way were in production from around 1920 until 1941 when Japanese toy factories began to manufacturing items for war.Unable to be determined provenance relating to specific Japanese manufacturer. The doll is an example of a children's toy from the 1920s-1940s.Porcelain Doll in white fabric dress Doll, female, has porcelain face, composite body with swivel head and limbs. Head has long brown curly mohair wig attached into a hole in the pate; several doll-sized hairpins hold hair in place. Face has open mouth showing two porcelain front teeth, brown eyes of hand blown glass and hand painted features. Back of neck has two pressed holes above maker’s mark. Doll has removable white silk socks and brown shoes with tied ankle strap and hard soles. Doll is wearing old fashioned cream coloured knitted woollen singlet, cream flannel vest with draw-string cotton bodice and scalloped edge. The doll also has a more modern style white cotton dress with pink smocking. Inscription pressed into back of neck, shaded with pencil, "Nippon"Maker’s Mark “NIPPON” (See media section this document for a list of possible manufactures of doll)flagstaff hill, warrnambool, shipwrecked coast, flagstaff hill maritime museum, maritime museum, shipwreck coast, flagstaff hill maritime village, great ocean road, doll, nippon, nippon novelty company, porcelain, japanese doll manufacturer, porcelain doll, vintage doll -
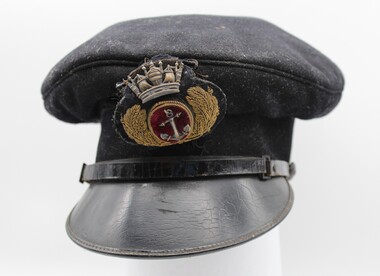 Montmorency–Eltham RSL Sub Branch
Uniform - Merchant Navy Cap
This merchant navy officer's cap has a black woollen felt hat band, black woollen felt fixed top cap and a black patent leather peak. Along the top of the peak there is a black patent strap. At the left hand of the peaked cap is a non-standard black plastic button and on the right side is a standard black cloth button. Above the peak there is a black wool badge of an Officer of the Merchant Navy. This insignia has a central, oval reserve of red velvet edged with gold metal coil with base metal anchor at the centre. The oval is surrounded by oak leaves of gold purl with stems of applied gold coil, and surrounded by a stamped base metal crown. The badge is backed with a wool blend fabric and attached to the top cat by brown cotton. Along the base of the hat band there is a bias hem. Inside the cap, the hat band is lined with hessian. Crimson silk is fixed to the top cap and hand stitched to the hessian as a lining to the cap.British merchant navy officer's cap insignia.merchant navy cap, british merchant navy -
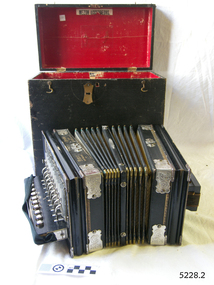 Flagstaff Hill Maritime Museum and Village
Instrument - Accordion, International Accordion Company, 1930's
This MEZON brand button accordion was made specifically for Lyons, Musical Instrument Importer, 207 Bourke Street Melbourne, as can be seen on the embossed lettering on the top of the accordion. The hand inscribed nameplate indicates that the owner was T H Betts. On August 19th, 1903, Michael Edward Lyons applied to the Trade Mark’s Office of Sydney for registration of “The Invented word “MEZON” to be applied to musical instruments. In 1908 he was advertising himself as sole agents for MEZON accordions. He had been at that address for 15 years (since 1893) and was moving to larger premises at 256 Bourke Street, Melbourne. Still at this address in 1925, Lyons advertises MEZON accordions as “The ideal Xmas present, Maker your friends happy, This Xmas let the Present be a MEZON”. There was a choice of three styles: The Organ, The Wonder and The Grand Organ. They came with a Fibre Case with Lock and Key and a Leather Handle. The promise was “They Give Satisfaction”. They were obtainable at all stores or from Sole Distributors in Australia. In 1927 the MEZON was sold by Albert & Sons in Western Australia, Victoria, New South Wales and Queensland as well as by Lyons in Melbourne. The favoured German accordion brands were Monarch and Sterling, which were made by the International Accordion Company in Leipzig, Saxony, Germany. The company was founded in 1871 by Ernest Deines and made a variety of musical instruments. The company closed business in 1834. The International Accordion Company’s accordion range made the International brand and others such as MEZON, Globe, and Dienst. Australia imported the MEZON brand. American companies imported a range of the popular German branded accordions until World War II, when they were no longer available. In general, accordions produced after the war were not as high a quality and not loud enough to be heard over the electronic guitars and the drum kit of the bands. This accordion represents the type of musical instruments used in the late 19h and early 20th century, locally and Australia wide. In colonial Australia musical instruments like this one were imported from Germany as well as other countries. At that time, German made instruments represented good quality. This accordion is significant for being especially imported into Australia by a Melbourne retailer. Music was a part of family and social life, associated with dances, song and general fun.Button accordion with case. Accordion with steel reeds, three bass valves and ten treble valves. It is coloured black with very dark green trim, decorative silver metal reinforcing on main corners, gold reinforcing on corners of the bellows and delicate printed, gold printed patterned trims. Hand support for buttons is made of fabric. Folds of the bellows are light coloured with fine dark pattern. It has a nameplate on the front. Black wooden case has red lining, two brass hinges, two brass hook and eye catches and a swivel brass lock. The base of the case has a loose brass fitting. The top has a thin metal handle. Inscription on hand inscribed name on front, label inside case lid, silver reinforcing, leather on bellows top, and frame of accordion. Manufactured with the brand MEZON in Saxony, Germany, for Lyons of Melbourne. Once the property of T H Betts.Printed on label “MEZON ACCORDEONS.” Impressed in metal corners and reinforcing “MEZON” with logo [circle enclosing entwined capital D and E] “MADE IN SAXONY” Embossed in gold on frame “Made in Saxony”, “MEZON Accordion/ manufactured for LYONS / MELBOURNE, Bourke Street” Name inscribed by hand “T H Betts”flagstaff hill, warrnambool, shipwrecked coast, flagstaff hill maritime museum, maritime museum, shipwreck coast, flagstaff hill maritime village, great ocean road, mezon accordion, lyons, made in saxony, t h betts, betts, mezon, squeeze box, musical instrument, button accordion, germany, michael lyons, international accordion company, ernest deines, circle enclosing d e, d e, e d, german accordion -
 Bendigo Historical Society Inc.
Clothing - LONG SLEEVED NAVY DRESS WITH ROULEAU TRIM
Clothing. Navy blue textured fabric possibly crimplene. Long tapered sleeves fastened with three covered buttons and loops at the wrist. High back neckline shaped to a V shape at the front. Centre front opening fastens with sixteen covered buttons and loops. Front yoke has a rouleau trim of fleur-de-lyse, and circular coils from 1 cm to 1.5 cm diameter. Side front panels are shirred at the yoke seam, and gathered at the shaped waistline panel. Waistline has a diamond shaped panel- 2.5 cm wide at the side seams, and eleven cms wide at the centre. Where the buttons extend over the midriff panel, the panel is shaped in a 7 cm V shape. Midriff panel extends into a belt at the side seams, fastening at the centre with a press-stud, and decorated with a flower of seven rouleau coils-1 cm in diameter. Hand stitched hem.costume, female, long sleeved navy dress -
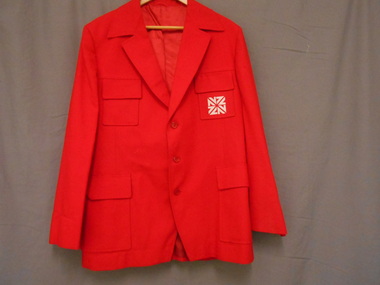 Bendigo Historical Society Inc.
Clothing - ALLAN MONAGHAN COLLECTION: BRIGHT RED BLAZER, 1974
1974 Commonwealth Games jacket - New Zealand. Bright red single breasted wool blazer. Front opening fastened with three 1.7 cm red plastic buttons. Four external front pockets with fold over rectangular flaps. Two breast pockets 11 cm X14cm. LHS breast pocket has white embroidered square emblem with letters N2 in each corner. Two below waist pockets 22 cm X 16 cm. Body of blazer lined with red satin. Two internal pockets in the lining with slit openings. Blazer has centre back 32 cm vent from hem and half belt (fabric) 31 cm X 5.5 cm across centre back above the vent.Long straight sleeves are lined with white satin and have 7.5 cm vents at wrist with two decorative 1.5 cm red plastic buttons. Hanging tape at inside back of neck.Labels inside RHS front ''SABRE'', another Granui product. Made in N2'' ''42'' ''Pure Virgin Wool'' ''XTH British Commonwealth Games 1974''. ''Monaghan'' written on lining of RH sleeve (Pen).costume, male, bright red jacket -
 Bendigo Historical Society Inc.
Photograph - NORMAN PENROSE COLLECTION: MALE AND FEMALE PORTRAITS
Photograph. Norman Penrose collection: (A) Photo portrait of a man wearing a suit and tie. He is also wearing glasses, dark hair. (B) Tinted portrait of a lady with black hair. She is wearing a grey dress with beads and fabric flowers and leaves at the shoulders. She is also wearing sun glasses. Picture mounted on cardboard. (C) Black and white portrait of a lady with shoulder length curly hair. She is wearing a black dress. She is also wearing glasses. Portrait mounted with matt board. (D) Coloured portrait of a lady wearing a bright yellow dress with large black buttons at the shoulders. She has short, curly hair. She is wearing glasses which are black with clear lower edges to the frames. Also black ear-rings. The portrait has been taken from the side and she has her head turned to the camera. The background is pale blue.photograph, person, norman penrose collection, artwork, male and female portraits -
 Ballarat Tramway Museum
Functional object - Destination Roll, State Electricity Commission of Victoria (SECV), "Ballarat" (white background), late 1967
Yields information and demonstrates aspects about Ballarat's destination rolls used in trams after 1967 when these rolls replaced those with the opposite colour arrangementDestination roll black lettering on white fabric background used in Ballarat from late 1967 until closure, replaced white letters on black background. Layout of individual destinations follows that shown in K.S.Kings, "Ballarat Tramways" - see image file for copy. Main letters are 150 high. On rear of roll, has abbreviated destinations painted in black paint to enable drivers to locate easier the individual destinations. See Reg. item 844 for a white on black roll, same destinations and order and details of use. Images btm1744i1 to i4 - sections of the destination roll, when rolled out, i3 shows an example of an abbreviated destination - note it has been rolled in an flat oval shape. i5 and i6 - nature of water damage at top left hand edge of roll. i7 - list of destinations on roll (obtained by inverting the image in btm844i) See K.S.Kings "Ballarat Tramways" Not to be used in a tramcar destination box - original to be kept in archives. tram, trams, ballarat, destination roll