Showing 3052 items
matching pink
-
 Kew Historical Society Inc
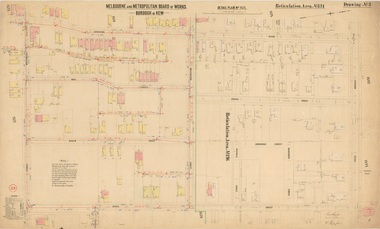
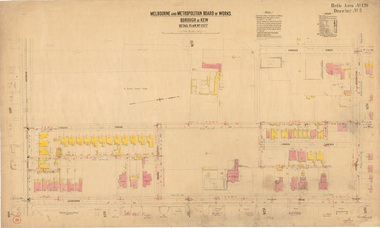
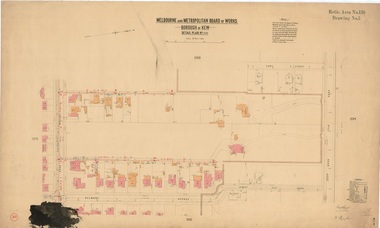
Plan, Melbourne & Metropolitan Board of Works : Borough of Kew : Detail Plan No.1571, 1904
The Melbourne and Metropolitan Board of Works (MMBW) plans were produced from the 1890s to the 1950s. They were crucial to the design and development of Melbourne's sewerage and drainage system. The plans, at a scale of 40 feet to 1 inch (1:480), provide a detailed historical record of Melbourne streetscapes and environmental features. Each plan covers one or two street blocks (roughly six streets), showing details of buildings, including garden layouts and ownership boundaries, and features such as laneways, drains, bridges, parks, municipal boundaries and other prominent landmarks as they existed at the time each plan was produced. (Source: State Library of Victoria)This plan forms part of a large group of MMBW plans and maps that was donated to the Society by the Mr Poulter, City Engineer of the City of Kew in 1989. Within this collection, thirty-five hand-coloured plans, backed with linen, are of statewide significance as they include annotations that provide details of construction materials used in buildings in the first decade of the 20th century as well as additional information about land ownership and usage. The copies in the Public Record Office Victoria and the State Library of Victoria are monochrome versions which do not denote building materials so that the maps in this collection are invaluable and unique tools for researchers and heritage consultants. A number of the plans are not held in the collection of the State Library of Victoria so they have the additional attribute of rarity.Digital copy of the original survey plan, issued by the MMBW to a contractor with responsibility for constructing sewers in the area identified on the plan within the Borough of Kew. The plan was at some stage hand-coloured, possibly by the contractor, but more likely by officers working in the Engineering Department of the Borough and later Town, then City of Kew. The hand-coloured sections of buildings on the plan were used to denote masonry or brick constructions (pink), weatherboard constructions (yellow), and public buildings (grey). This plan is part of a large and historically significant group of MMBW plans and maps that was donated to the Society by the Mr Poulter, City Engineer of the City of Kew in 1989. When the contracts were let for surveyors to identify and record the extant houses and landscapes within an area for the Board of Works, the contracts were let at separate times, hence the anomaly where two copies of Plan No.1571 exist in our collection. The first of these plans identifies the building materials used in houses bordering Fitzwilliam Street, Edgevale Road, May Street, Malin Street, Davis Street and Wellington Street. The cut off point for the survey was the south side of Wellington Street. By 1903 when the survey was undertaken many of the sites were already built on, particularly those facing Edgevale Road. The plan identifies the preponderance of weatherboard houses in the area. The other version of the plan identifies the buildings between Wellington Street and Cotham Road.melbourne and metropolitan board of works, detail plans, mmbw 1571, cartography -
 Kew Historical Society Inc
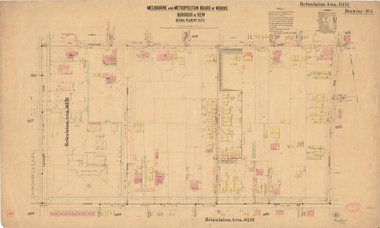
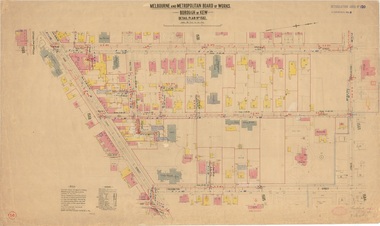
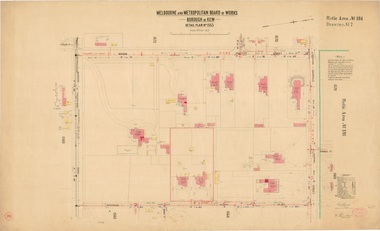
Plan, Melbourne & Metropolitan Board of Works : Borough of Kew : Detail Plan No.1573, 1905
The Melbourne and Metropolitan Board of Works (MMBW) plans were produced from the 1890s to the 1950s. They were crucial to the design and development of Melbourne's sewerage and drainage system. The plans, at a scale of 40 feet to 1 inch (1:480), provide a detailed historical record of Melbourne streetscapes and environmental features. Each plan covers one or two street blocks (roughly six streets), showing details of buildings, including garden layouts and ownership boundaries, and features such as laneways, drains, bridges, parks, municipal boundaries and other prominent landmarks as they existed at the time each plan was produced. (Source: State Library of Victoria)This plan forms part of a large group of MMBW plans and maps that was donated to the Society by the Mr Poulter, City Engineer of the City of Kew in 1989. Within this collection, thirty-five hand-coloured plans, backed with linen, are of statewide significance as they include annotations that provide details of construction materials used in buildings in the first decade of the 20th century as well as additional information about land ownership and usage. The copies in the Public Record Office Victoria and the State Library of Victoria are monochrome versions which do not denote building materials so that the maps in this collection are invaluable and unique tools for researchers and heritage consultants. A number of the plans are not held in the collection of the State Library of Victoria so they have the additional attribute of rarity.Original survey plan, issued by the MMBW to a contractor with responsibility for constructing sewers in the area identified on the plan within the Borough of Kew. The plan was at some stage hand-coloured, possibly by the contractor, but more likely by officers working in the Engineering Department of the Borough and later Town, then City of Kew. The hand-coloured sections of buildings on the plan were used to denote masonry or brick constructions (pink), weatherboard constructions (yellow), and public buildings (grey). This plan has detailed annotations written in red or blue ink, showing prices, which may be the annual valuations of the properties, and some owners’ names, a most unusual feature on contractor's maps. Some areas, such as the buildings of Methodist Ladies’ College (MLC), include the school’s tennis court and swimming pool, but are not coloured to show building materials – did the draftsman just run out of time, or ink, or enthusiasm, before his plan had to be submitted? MLC had been founded in 1882 as a ‘modern school of the first order’ with buildings that formed ‘a collegiate institution for girls unsurpassed in the colonies’. The goal of its founders was to provide a high-class Christian education for girls, comparable with that provided elsewhere for boys. Some shops are shown along Edgevale Road, though they are not designated as commercial premises. Larger houses are depicted, including ‘Fairlawn’ in Barkers Road, and ‘Clevedon’ and ‘Rosehill’ (now demolished) in Fitzwilliam Street.melbourne and metropolitan board of works, detail plans, mmbw 1573, maps - borough of kew, cartography -
 The Beechworth Burke Museum
Animal specimen - Quoll, Trustees of the Australian Museum, 1860-1880
Four species of quoll occur in Australia: the northern, spotted-tailed, eastern and western quolls. Once, most parts of Australia were inhabited by at least one of the species.Captain Cook collected quolls along the east coast in 1770, and recorded "quoll" as their local Aboriginal name. Quolls were often seen by early settlers, who called them "native cat", "native polecat" and "spotted marten", names based on familiar European animals. Since 1770, all four species have declined dramatically in numbers. This is mainly because of habitat loss or change across Australia, and introduced predators such as foxes and cats. Quolls are carnivorous marsupials with a pointed snout, a long tail and brown to black fur distinctively spotted with white. They are lively, attractive animals, with bright eyes, a moist pink nose and many sharp teeth. Like most Australian mammals, quolls are mainly active at night. Typically, they spend the day in one of their many dens, although spotted-tailed quolls and northern quolls sometimes forage and bask in the sunshine. Their large home ranges can extend for several kilometres in each direction from a smaller core range, and the range of a male quoll often overlaps those of several females. An interesting feature of their behaviour is the use of shared latrine (toilet) sites in open spaces such as rock ledges, for marking their territory and other social functions. Male quolls travel widely during the breeding season, with mating occurring during winter. All four species have a gestation period of 21 days. Because they are marsupial mammals, their young are born tiny and undeveloped and must work their way to the pouch, where they attach themselves to a teat to feed. Only the spotted-tailed quoll has a true pouch. In the other species, the young are protected by shallow folds of skin around the teats. As the pups grow, they dangle from the mother's belly; later, she carries them on her back. Quolls reach sexual maturity at one year. They have a naturally short life span, with smaller quolls living an average of only two years, and the larger spotted-tailed quoll about four to five years. The northern quoll is particularly short-lived. This specimen is part of a collection of almost 200 animal specimens that were originally acquired as skins from various institutions across Australia, including the Australian Museum and the National Museum of Victoria, as well as individuals such amateur anthropologist Reynell Eveleigh Johns between 1860-1880. These skins were then mounted by members of the Burke Museum Committee and put-on display in the formal space of the Museum’s original exhibition hall where they continue to be on display. This display of taxidermy mounts initially served to instruct visitors to the Burke Museum of the natural world around them, today it serves as an insight into the collecting habits of the 19th century. This specimen is part of a significant and rare taxidermy mount collection in the Burke Museum. This collection is scientifically and culturally important for reminding us of how science continues to shape our understanding of the modern world. They demonstrate a capacity to hold evidence of how Australia’s fauna history existed in the past and are potentially important for future environmental research. This collection continues to be on display in the Museum and has become a key part to interpreting the collecting habits of the 19th century.Average sized quoll with brown fur with white spots on body but absence on the long tail which is furry unlike the smooth body fur. The quoll has a small had with a pointed snout lined with sharp teeth, and thin membraned ears that are slightly covered in fur. The forelegs of the quoll are slightly smaller than the hindlegs, with all four legs featuring sharp clawed paws.On mounting board: BMM5984/ On Catalogue Tag (attached to left hindleg): Native Cat./ Catalogue. Page 50./ burke museum, taxidermy, taxidermy mount, fauna, animal, animalia, reynell eveleigh johns, quoll, native cat, dasyurus -
 Ballarat Tramway Museum
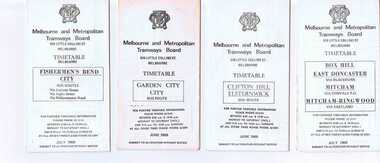
Ephemera - Timetable/s, Melbourne and Metropolitan Tramways Board (MMTB), Set of 14 MMTB Melbourne bus timetables, 1969
Set of 14 MMTB timetables for various bus routes, dated July 1969. Generally includes Sat and Suns, Good Friday and Christmas day as well as weekdays, unless noted otherwise. Also includes a map of the route, detailed time points, sections, connecting services, fares, and organisation address - 616 Little Collins St. Melbourne. Have been folded into eight or ten portions. All on white paper unless noted otherwise. Items shown with an # - have a sticker modifying timetable information details on the front page. Items shown with a % are larger size sheets of paper, folded into 10. 1155.1 - Clifton Hill - Elsternwick # .2 - Garden City - City # .3 - Fishermen's Bend - City .4 - Box Hill - East Doncaster via Blackburn, Mitcham via Donvale PO and Mitcham - Ringwood via Eastland .5 - Warrandyte via Templestowe, via East Doncaster, Donvale PO - City % .6 - Warrandyte, Park Orchards Ringwood .7 - Williamstown Rd., Footscray Railway Station, Ballarat Rd # .8 - Latrobe University, Northland, West Heidelberg - City # % .9 - Deer Park, Sunshine Park, Sunshine, Footscray - City # .10 - as above, but for Saturdays and Sundays on pink paper # .11 - Box Hill, Heidelberg, Templestowe .12 - Box Hill, North Blackburn .13 - East Kew, Box Hill, Doncaster .14 - Bullen, North Kew - City # % Images of a sample of documents added 16-11-2013. mmtb, timetables, melbourne -
 Ballarat Tramway Museum
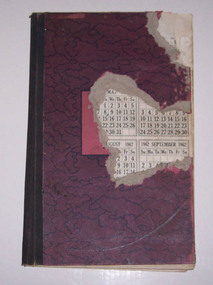
Administrative record - Log book, Diary, Collins Bros, 1961
Yields information about the track maintenance activities of the track gang in Ballarat, the work they did, notes, names and other information.Collins Australian Diary, 1962, No. 324 printed by Collins Bros, pattered dark red cover with green cloth binding on cover, card covers, sewn sections with ruled sheets providing a diary for 1962, one week per double page. Has "useful information" sheets at from the diary. Used by the SEC Ballarat track gang to record their daily work, leave, welding, track cleaning, truck driver etc In the Memoranda section (last two pages), list of names and addresses of track gang and notes on materials used, costs, scrubber use and hours, and length of track. Has notes when some finished on the track gang - elsewhere within the SEC? Grove Platt Lancaster Wiseman Lakey Edwards Dowie Marks Fish Eames Smith Loose contents 1. - Inside front cover - 12 green and pink "Workshop Requisition" requesting work by the track gang outside the direct tramway area, eg Ballarat B station and one handwritten note. 2.- Telephone numbers - a receipt made out to E. Fish for jury duties fees. 3 - 19/3/1962 - printed card from the Municipal Officers Assoc (SECOA) for a general meeting at Electra Hall on 7/12. 4 - April Cash account - note re requirement for tip truck to pick up materials. 5 - Inside last sheets - medical certificate for H. Dowie, dated 10/7/1962. tram, trams, sec, ballarat, depot, trackwork, rails, scrubber tram -
 Bendigo Historical Society Inc.
Document - PETER ELLIS COLLECTION: DEBUTANTE BALL, 13th Judy, 1984
Off White coloured glossy card. Pink writing. ST. Clement's Anglican Debutante Ball Huntly Friday, July 13th 1984. Programme Debutantes Partners Michelle Gran,t Jamie Creely, Robyn Wells, Norman Sheahan, Erica Wilkinson, Damien Tangey, Debbie Clarke, Greg Pocock, Natalie Gundry, Grant Andrea, Lynne Edwards, Rod Mills, Sally James, Darren Thompson, Kathy Creely, Peter Matthews, Lisa Tehan, Mark Yates, Amanda Clayton, Peter Morgan, Paula Ingham, Craig Clayton, Rosalyn Varker, Darren Cartner. Presented to The Bishop of Bendigo Rt. Rev. O. Heyward & Mrs Heyward 9.15p.m. Flower girl Kasie Watson, Page boy Andrew Swatton, Flower girl Emily Stevens, Page boy Bradley Clay, Chaperone Mrs. Bev. Read Trainers: Mr. Peter Ellis & Mrs. Mary Smith Pianist Mrs J.Grotto Announcer Mrs. M. Pitson MC Mr. Colin Silk 1 Foxtrot, 2 Charmaine, 3 Parma Waltz, 4 Gypsy Tap, 5 Foxtrot, 6 Pride of Erin, 7 Progressive Barn Dance, 8 Modern Waltz, 9 Maxina, 10 Evening Three Step, 11 Foxtrot, 12 Alberts, 13 Tangoette,14 Foxtrot, 15 Valetta Waltz/ St. Bernard Waltz, 16 Gay Gordons, 17 Swing Waltz, 18 Foxtrot Presentation Dance Metropolitan Quadrille. Autographs.person, individual, peter ellis oam -
 Kew Historical Society Inc
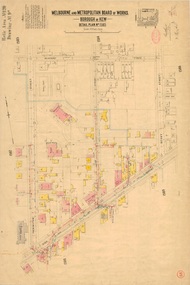
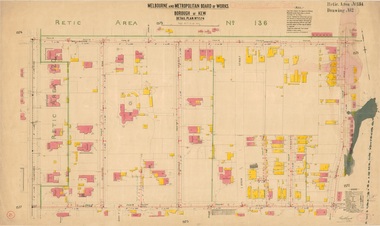
Plan, Borough of Kew Detail Plan No.1577, 1904
The Melbourne and Metropolitan Board of Works (MMBW) plans were produced from the 1890s to the 1950s. They were crucial to the design and development of Melbourne's sewerage and drainage system. The plans, at a scale of 40 feet to 1 inch (1:480), provide a detailed historical record of Melbourne streetscapes and environmental features. Each plan covers one or two street blocks (roughly six streets), showing details of buildings, including garden layouts and ownership boundaries, and features such as laneways, drains, bridges, parks, municipal boundaries and other prominent landmarks as they existed at the time each plan was produced. (Source: State Library of Victoria)This plan forms part of a large group of MMBW plans and maps that was donated to the Society by the Mr Poulter, City Engineer of the City of Kew in 1989. Within this collection, thirty-five hand-coloured plans, backed with linen, are of statewide significance as they include annotations that provide details of construction materials used in buildings in the first decade of the 20th century as well as additional information about land ownership and usage. The copies in the Public Record Office Victoria and the State Library of Victoria are monochrome versions which do not denote building materials so that the maps in this collection are invaluable and unique tools for researchers and heritage consultants. A number of the plans are not held in the collection of the State Library of Victoria so they have the additional attribute of rarity.Original survey plan, issued by the MMBW to a contractor with responsibility for constructing sewers in the area identified on the plan within the Borough of Kew. The plan was at some stage hand-coloured, possibly by the contractor, but more likely by officers working in the Engineering Department of the Borough and later Town, then City of Kew. The hand-coloured sections of buildings on the plan were used to denote masonry or brick constructions (pink), weatherboard constructions (yellow), and public buildings (grey). MMBW Plan No.1577 includes some of the most significant houses in Kew: Herbert Henty’s ‘Roxeth’ (now part of Trinity Grammar), ‘Butleigh Wooton’, ‘Bokara’ and ‘Harrow’. It also includes the streets that have since changed their names. That part of College Parade linked to Glenferrie Road is now named College Place, College Parade now extends further north, and Charles Street did not yet reach Barkers Road. Roxeth is one of a number of Henty houses in Kew. Herbert Henty made his home here and was elected a member of Kew Municipal Council in 1864 and mayor in 1868-69. Walter Henry Serle, of Harrow served in the First World War. He was awarded the Military Medal ‘’For conspicuous bravery and devotion to duty. On 29th September near BELLICOURT he showed the greatest bravery and determination when his platoon was attacked by enemy bombing parties. It was due largely to his personal efforts that all the attacks were repulsed. Until wounded, his utter disregard of personal safety and boldness in dealing with the attacks were the means of saving the situation and were an inspiring example to his men.’melbourne and metropolitan board of works, detail plans, maps - borough of kew, mmbw 1577, cartography -
 Kew Historical Society Inc
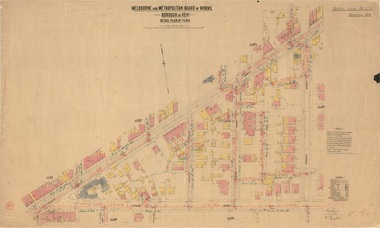
Plan, Melbourne & Metropolitan Board of Works : Borough of Kew : Detail Plan No.1582, 1904
The Melbourne and Metropolitan Board of Works (MMBW) plans were produced from the 1890s to the 1950s. They were crucial to the design and development of Melbourne's sewerage and drainage system. The plans, at a scale of 40 feet to 1 inch (1:480), provide a detailed historical record of Melbourne streetscapes and environmental features. Each plan covers one or two street blocks (roughly six streets), showing details of buildings, including garden layouts and ownership boundaries, and features such as laneways, drains, bridges, parks, municipal boundaries and other prominent landmarks as they existed at the time each plan was produced. (Source: State Library of Victoria)This plan forms part of a large group of MMBW plans and maps that was donated to the Society by the Mr Poulter, City Engineer of the City of Kew in 1989. Within this collection, thirty-five hand-coloured plans, backed with linen, are of statewide significance as they include annotations that provide details of construction materials used in buildings in the first decade of the 20th century as well as additional information about land ownership and usage. The copies in the Public Record Office Victoria and the State Library of Victoria are monochrome versions which do not denote building materials so that the maps in this collection are invaluable and unique tools for researchers and heritage consultants. A number of the plans are not held in the collection of the State Library of Victoria so they have the additional attribute of rarity.Original survey plan, issued by the MMBW to a contractor with responsibility for constructing sewers in the area identified on the plan within the Borough of Kew. The plan was at some stage hand-coloured, possibly by the contractor, but more likely by officers working in the Engineering Department of the Borough and later Town, then City of Kew. The hand-coloured sections of buildings on the plan were used to denote masonry or brick constructions (pink), weatherboard constructions (yellow), and public buildings (grey). Public buildings, coloured grey on the Plan 1582 include the police station and post office, churches and schools. The earliest church school, Common School No.356 was located at the rear of the Congregational Church in Peel Street. It was constructed in 1859. The first buildings of Kew Primary School No.1075 on the other side of Peel Street were constructed in 1871. The school in 1903 only occupied a small fraction of its current site. In 1903, where the rear playground is now located, were two weatherboard and one brick villa. Trinity Grammar School was founded in 1902 and opened in the Parish Hall at the rear of Holy Trinity Anglican Church. It was not to move to its current site until 1906. The outline of the building housing the Kew Fire Brigade in the centre of the north side of Walton Street is shown but not named on the plan. Further down Pakington Street stood the two-storey Italianate mansion ‘Overton’. The home of Stanford Chapman, it was to be featured in the Imperial Institute series of bromide photographs of Victoria, Vol. 1: Homes and scenery. It was later to become a boarding house before it was later demolished.melbourne and metropolitan board of works, detail plans, maps - borough of kew, mmbw 1582, cartography -
 Kew Historical Society Inc
Plan, Melbourne & Metropolitan Board of Works : Borough of Kew : Detail Plan No.1585, 1904
The Melbourne and Metropolitan Board of Works (MMBW) plans were produced from the 1890s to the 1950s. They were crucial to the design and development of Melbourne's sewerage and drainage system. The plans, at a scale of 40 feet to 1 inch (1:480), provide a detailed historical record of Melbourne streetscapes and environmental features. Each plan covers one or two street blocks (roughly six streets), showing details of buildings, including garden layouts and ownership boundaries, and features such as laneways, drains, bridges, parks, municipal boundaries and other prominent landmarks as they existed at the time each plan was produced. (Source: State Library of Victoria)This plan forms part of a large group of MMBW plans and maps that was donated to the Society by the Mr Poulter, City Engineer of the City of Kew in 1989. Within this collection, thirty-five hand-coloured plans, backed with linen, are of statewide significance as they include annotations that provide details of construction materials used in buildings in the first decade of the 20th century as well as additional information about land ownership and usage. The copies in the Public Record Office Victoria and the State Library of Victoria are monochrome versions which do not denote building materials so that the maps in this collection are invaluable and unique tools for researchers and heritage consultants. A number of the plans are not held in the collection of the State Library of Victoria so they have the additional attribute of rarity.Original survey plan, issued by the MMBW to a contractor with responsibility for constructing sewers in the area identified on the plan within the Borough of Kew. The plan was at some stage hand-coloured, possibly by the contractor, but more likely by officers working in the Engineering Department of the Borough and later Town, then City of Kew. The hand-coloured sections of buildings on the plan were used to denote masonry or brick constructions (pink), weatherboard constructions (yellow), and public buildings (grey). This plan, which covers parts of High Street, Pakington Street and Derby Street is dominated by two historic Kew mansions: ‘Konetta’ and ‘Ramornie’. Ramornie was constructed in 1890 for James Maitland Campbell, three times Mayor of Kew. Sold in 1940, it became a boarding house known as ‘The Towers’. Now a private residence again, it has only one of its three balconies remaining. The location of the missing two balconies can be seen on the plan. In 1903, the grounds of Ramornie included a large tennis court fronting Pakington Street. The rear of the property is shown as extending to Cobden Street. One of Kew’s oldest hotels, the Prospect Hill Hotel on the corner of High and Cobden Street was established in 1858. The outline of the hotel shown on the plan represents the second building on the site. During the 19th century it was often used for electoral meetings. The Prospect Hill Hotel was to be redeveloped again in 1928, by the local architect Robert McIntyre. Since the 1980s, the hotel has been a live music venue, the home of the Melbourne Jazz Club, a restaurant and a liquor outlet.melbourne and metropolitan board of works, detail plans, maps - borough of kew, mmbw 1585, cartography -
 Kew Historical Society Inc
Plan, Melbourne & Metropolitan Board of Works : Borough of Kew : Detail Plan No.1588, 1904
The Melbourne and Metropolitan Board of Works (MMBW) plans were produced from the 1890s to the 1950s. They were crucial to the design and development of Melbourne's sewerage and drainage system. The plans, at a scale of 40 feet to 1 inch (1:480), provide a detailed historical record of Melbourne streetscapes and environmental features. Each plan covers one or two street blocks (roughly six streets), showing details of buildings, including garden layouts and ownership boundaries, and features such as laneways, drains, bridges, parks, municipal boundaries and other prominent landmarks as they existed at the time each plan was produced. (Source: State Library of Victoria)This plan forms part of a large group of MMBW plans and maps that was donated to the Society by the Mr Poulter, City Engineer of the City of Kew in 1989. Within this collection, thirty-five hand-coloured plans, backed with linen, are of statewide significance as they include annotations that provide details of construction materials used in buildings in the first decade of the 20th century as well as additional information about land ownership and usage. The copies in the Public Record Office Victoria and the State Library of Victoria are monochrome versions which do not denote building materials so that the maps in this collection are invaluable and unique tools for researchers and heritage consultants. A number of the plans are not held in the collection of the State Library of Victoria so they have the additional attribute of rarity.Original survey plan, issued by the MMBW to a contractor with responsibility for constructing sewers in the area identified on the plan within the Borough of Kew. The plan was at some stage hand-coloured, possibly by the contractor, but more likely by officers working in the Engineering Department of the Borough and later Town, then City of Kew. The hand-coloured sections of buildings on the plan were used to denote masonry or brick constructions (pink), weatherboard constructions (yellow), and public buildings (grey). This plan shows the original configuration of the Kew Post Office, Court House and Police Station, which had opened in 1888. This configuration was to essentially remain until the purchase of the Court House and Police Station by the City of Boroondara in 2007 and its subsequent renovation. Interestingly, the MMBW surveyors incorrectly labelled parts of the complex. In the triangle in front of the Post Office, before the erection of the Kew Cenotaph in 1925, was located a lawn and the Queen Victoria Jubilee Fountain. While many of the shops on the south side of High street had been constructed by 1903 a number of sites were still used as vegetable gardens. Further along High Street, on the corner of Charles Street, the Salvation Army Barracks can be seen on the plan. These Barracks predate the later Citadel and ‘Young People’s Hall’ that were opened in 1919. At 22 Charles Street can be seen the house of James Venn Morgan. Hailed as the ‘father of Kew’, Morgan arrived in Melbourne in 1840. He was first engaged as a bookmaker, but a fortunate venture on the goldfields enabled him to purchase land in Kew. He conducted a market garden and dairy in Kew for many years.melbourne and metropolitan board of works, detail plans, maps - borough of kew, mmbw 1588, cartography -
 Kew Historical Society Inc
Plan, Melbourne & Metropolitan Board of Works : Borough of Kew : Detail Plan No.1591, 1905
The Melbourne and Metropolitan Board of Works (MMBW) plans were produced from the 1890s to the 1950s. They were crucial to the design and development of Melbourne's sewerage and drainage system. The plans, at a scale of 40 feet to 1 inch (1:480), provide a detailed historical record of Melbourne streetscapes and environmental features. Each plan covers one or two street blocks (roughly six streets), showing details of buildings, including garden layouts and ownership boundaries, and features such as laneways, drains, bridges, parks, municipal boundaries and other prominent landmarks as they existed at the time each plan was produced. (Source: State Library of Victoria)This plan forms part of a large group of MMBW plans and maps that was donated to the Society by the Mr Poulter, City Engineer of the City of Kew in 1989. Within this collection, thirty-five hand-coloured plans, backed with linen, are of statewide significance as they include annotations that provide details of construction materials used in buildings in the first decade of the 20th century as well as additional information about land ownership and usage. The copies in the Public Record Office Victoria and the State Library of Victoria are monochrome versions which do not denote building materials so that the maps in this collection are invaluable and unique tools for researchers and heritage consultants. A number of the plans are not held in the collection of the State Library of Victoria so they have the additional attribute of rarity.Original survey plan, issued by the MMBW to a contractor with responsibility for constructing sewers in the area identified on the plan within the Borough of Kew. The plan was at some stage hand-coloured, possibly by the contractor, but more likely by officers working in the Engineering Department of the Borough and later Town, then City of Kew. The hand-coloured sections of buildings on the plan were used to denote masonry or brick constructions (pink), weatherboard constructions (yellow), and public buildings (grey). That area of Kew bordered by Cotham Road, Park Hill Road, Ermington Lane (now Ermington Place), and Belmont Avenue contained some of the significant homes owned by Kew pioneers. Chief among these was ‘Park Hill’ on an enormous lot facing Park Hill Road. The Jubilee History of 1910 noted, six years after this plan was drawn, that: ‘Park Hill Road, forming the southern boundary of the cemetery, takes its name from Park Hill, the residence of Mr. Thomas Judd, who has resided there since December, 1852.’ Other named houses on the plan include ‘Ferndale’ facing Cotham Road; ‘Ermington’ adjacent to Judd’s Park Hill, facing Park Hill Road; and ‘Gilden’ and ‘Mont Belmont’ facing Belmont Avenue. Mont Belmont was designed by the architectural firm of Reed, Henderson and Smart for William George Lilley in 1887 and was completed in 1888. Lilley was Mayor of Kew in 1887-88, a Justice of the Peace and a member of the first Board of Guardians of Kew’s St. Hilary’s Church of England.melbourne and metropolitan board of works, detail plans, survey plans - borough of kew, mmbw 1591, cartography -
 Kew Historical Society Inc
Plan, Melbourne & Metropolitan Board of Works : Borough of Kew : Detail Plan No.1563, 1905
The Melbourne and Metropolitan Board of Works (MMBW) plans were produced from the 1890s to the 1950s. They were crucial to the design and development of Melbourne's sewerage and drainage system. The plans, at a scale of 40 feet to 1 inch (1:480), provide a detailed historical record of Melbourne streetscapes and environmental features. Each plan covers one or two street blocks (roughly six streets), showing details of buildings, including garden layouts and ownership boundaries, and features such as laneways, drains, bridges, parks, municipal boundaries and other prominent landmarks as they existed at the time each plan was produced. (Source: State Library of Victoria)This plan forms part of a large group of MMBW plans and maps that was donated to the Society by the Mr Poulter, City Engineer of the City of Kew in 1989. Within this collection, thirty-five hand-coloured plans, backed with linen, are of statewide significance as they include annotations that provide details of construction materials used in buildings in the first decade of the 20th century as well as additional information about land ownership and usage. The copies in the Public Record Office Victoria and the State Library of Victoria are monochrome versions which do not denote building materials so that the maps in this collection are invaluable and unique tools for researchers and heritage consultants. A number of the plans are not held in the collection of the State Library of Victoria so they have the additional attribute of rarity.Original survey plan, issued by the MMBW to a contractor with responsibility for constructing sewers in the area identified on the plan within the Borough of Kew. The plan was at some stage hand-coloured, possibly by the contractor, but more likely by officers working in the Engineering Department of the Borough and later Town, then City of Kew. The hand-coloured sections of buildings on the plan were used to denote masonry or brick constructions (pink), weatherboard constructions (yellow), and public buildings (grey). This plan covers the area between Barkers Road, Wrixon Street, Sackville Street and Brougham Place, much of it now occupied by Carey Baptist Grammar and Preshil schools. This was an area of large and prestigious homes in 1903, some with formally laid-out gardens, such as ‘Tower Hill’ and ‘Opawa’. ‘Kalimna’ was built in 1890-91 for William H. Jarman, an accountant, and ‘Blackhall’ at the same time for W.H. Roberts. Blackhall was to be acquired by the Salvation Army in 1915 and renamed ‘Catherine Booth Girls’ Home’. The Home accommodated girls, aged between 4 and 16. Kalimna and Blackhall are of significance as typical and intact late Victorian mansions and as such are two key Victorian buildings to have been built in Kew. Both Blackhall and Kalimna are now part of Preshil. ‘Fairview’ was for a long time occupied by the Sisters of St. Joseph of Cluny as a care home for the elderly, but it is now part of Carey Grammar School, as are the grounds of ‘Wagga Merne’, ‘Weemutta’, ‘Blakely’, ‘Daheim’ and ‘Mildura’ (later ‘Urangeline’), the last being particularly impressive in 1903, with a tennis court, conservatory, outhouses, and two bathrooms!melbourne and metropolitan board of works, detail plans, mmbw 1563, cartography -
 Kew Historical Society Inc
Plan, Melbourne & Metropolitan Board of Works : Borough of Kew : Detail Plan No.1574, 1905
The Melbourne and Metropolitan Board of Works (MMBW) plans were produced from the 1890s to the 1950s. They were crucial to the design and development of Melbourne's sewerage and drainage system. The plans, at a scale of 40 feet to 1 inch (1:480), provide a detailed historical record of Melbourne streetscapes and environmental features. Each plan covers one or two street blocks (roughly six streets), showing details of buildings, including garden layouts and ownership boundaries, and features such as laneways, drains, bridges, parks, municipal boundaries and other prominent landmarks as they existed at the time each plan was produced. (Source: State Library of Victoria)This plan forms part of a large group of MMBW plans and maps that was donated to the Society by the Mr Poulter, City Engineer of the City of Kew in 1989. Within this collection, thirty-five hand-coloured plans, backed with linen, are of statewide significance as they include annotations that provide details of construction materials used in buildings in the first decade of the 20th century as well as additional information about land ownership and usage. The copies in the Public Record Office Victoria and the State Library of Victoria are monochrome versions which do not denote building materials so that the maps in this collection are invaluable and unique tools for researchers and heritage consultants. A number of the plans are not held in the collection of the State Library of Victoria so they have the additional attribute of rarity.Original survey plan, issued by the MMBW to a contractor with responsibility for constructing sewers in the area identified on the plan within the Borough of Kew. The plan was at some stage hand-coloured, possibly by the contractor, but more likely by officers working in the Engineering Department of the Borough and later Town, then City of Kew. The hand-coloured sections of buildings on the plan were used to denote masonry or brick constructions (pink), weatherboard constructions (yellow), and public buildings (grey). This plan shows several very large houses, particularly along Glenferrie Road, and the area now occupied by Ruyton Girls’ School. ‘Tarring’ (incorrectly spelled here as ‘Karring’) was built for Henry Henty in 1872, on part of his original allotment of 20 acres, and ‘Mount View’, which retains its original building and the fountain in the front garden, is part of Ruyton’s Junior School. The most significant change to Tarring and its grounds since 1903, involve the removal of a number of the outbuildings, including a Burmese temple, bought by Henty from the Burmese Exhibit at the Great Exhibition of 1880. It is shown on the plan as a summerhouse. The two-storey mansion, on the corner of Glenferrie Road and Wellington Street, was built in 1891 by leading architect Alfred White as his own home. Having an initial N.A.V. of £160, the house was purchased by a warehouseman Henry Lister, by 1900, when the N.A.V. was recorded at £111. By the turn of the century the house was known as ‘Comaques’. By contrast, much smaller houses are shown in Scott and Byron Streets, including a tiny Mission Hall in Byron Street, which belonged to the Anglican Church from at least 1903 to 1917.melbourne and metropolitan board of works, detail plans, maps - borough of kew, mmbw 1574, cartography -
 Brighton Historical Society
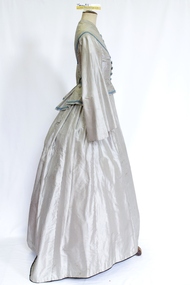
Clothing - Dress, Day dress, circa 1855-1872
This dress was donated as having belonged to Annie Elizabeth McLean, who worked as a maid to the daughters of Samuel Renwick of Caulfield. Annie was born in Argyllshire, Scotland in 1853. This dress appears to have been originally made circa 1855 and then modified circa 1872. As Annie would only have been two years old in 1855, this indicates that the dress would most probably have been originally made for someone else and later acquired by Annie. Annie Elizabeth McLean arrived in the Colony of Victoria from Argyllshire, Scotland with her aunts and cousins in 1867, aged thirteen and a half. She had been educated in Scotland and eventually became a personal maid and then companion to the Renwick girl, daughters of Samuel Renwick of Caulfield, Victoria. The Renwicks' home, 'The Garrell' on Glen Eira Road, was one of Caulfield's earliest residences, having been built around 1854. Samuel was a business partner of William Kerr Thomson, a well-known Brighton resident and the original occupant of the North Road mansion 'Kamesburgh'. During her time with the Renwick family, Annie travelled with them to England, then to Scotland, then back to Victoria. She left the family upon the marriage of the youngest Renwick daughter, then went to the household of Sir William and Lady McCullough until she left to be married to Alfred John Ashfold in 1878.This c1872 grey and white silk pin stripe dress features a high round neckline with eleven decorative blue silk buttons and secured by a concealed line of fifteen hook and eyelet closure. The bodice (.1) has decorative blue and green braid over the shoulder and bust and across the base of the bodice. The dress features three darts shaping the dress to the body. The sleeve is cut high but relatively full and tapers to the elbow then flares again in Pagoda like style but ends at the wrist or hand. The skirt (.2) opens over the left hip and features a pocket over the right hip. The skirt at the front finishes at the ankle or just above the ground. At the back the bodice features panels shaping the dress into the body and pleated and flared from the waist. At the small of the back is a decorative bow with pinked edges and decorative braid. The skirt at the back is uncommon in shape most likely as the result of modification. It appears to have had panels removed reducing its original fullness. It has a tape inside the back of the skirt that would draw the skirt in creating a bustle like shape . It would appear that the dress had been modified in order to create a more fashionable silhouette most probably in circa 1872. There are three separate pieces of fabric. One is made up into a semi-circular over-skirt trimmed with blue braid and fringing (.3). Two pieces are unpicked skirt gores, one still has its cotton lining attached (.4 and .5).annie elizabeth mclean, samuel renwick, the garrell, caulfield -
 Melbourne Tram Museum
Document - Notice, Tramway Board, "Tramway Board War Loan 5% Bonds, Repayable in 1927", Mar. 1918
Set of 9 notices and other documents concerned with the issuing of "Tramway Board War Loan 5% Bonds, Repayable in 1927". by the Commonwealth Government. Signed W. O Strangward Secretary. .1 - Notice - setting out the conditions, the need, payments - dated 26/2/1918 - 2 copies held. .2 - Notice - application notice - dated 6/3/1918 giving conditions - 2 copies held. .3 - Memo dated 11/4/1918 - on half foolscap, carbon copy, address to all stations regarding extension of the closing date. .4 - Gestetner printed notice dated 27/2/18, forwarding copies of the notices and conditions of the loan and documents. .5 - Quarto printed sheet - Memorandum of Agreement for the employee to signed, giving conditions and signature lines. .6 - Sheet, headed "Tramway Board Melbourne Commonwealth 5% War Bonds" - for each car or power house, listing the names, number of bonds, applicants signature and the amount paid. Double sided, Nos. 104 and 105 .7 - Poster or notice - printed foolscap sheet - advertising the Bonds, and conditions and asking employees to consider. .8 - Memorandum to the Officer in Charge of a particular location, dated 19/9/18, advising of the war loans and associated paperwork. Two copies held. .9 - Form to record payments for the war loans for a particular person, three copies, numbered 496, 497 and 500. Pink cloth back recording the location, name and application number - form No. 530. See also Reg Item 3924 for other documents.trams, tramways, tramway board, world war 1, finances, bonds -
 Glen Eira Historical Society
Ephemera - Caulfield Cricket Club
This file contains two items. A menu and programme for Caulfield Cricket Club. Includes handwritten list of names of office-bearers and printed list of sponsors. Thirty-four newspaper clippings on Caulfield Cricket Club. “Haviland, Pritchard give Caulfield Boost”, cutting from Caulfield Port Phillip Leader, 21/12/2010 on recent match. “Daron Cruickshank Shows His Class” cutting from Caulfield Port Phillip Leader 11/01/2011 on Daron Cruickshank from Trinidad-Tobago who whit 111 not out in recent match for Caulfield against Ormond. “Century Lifts Monds, Another Ton For Hansen” cutting from Caulfield Port Phillip Leader on 01/02/2011 on recent centuries by Michael Hansen of Ormond in matches. “Fields Take Minor Premiership” cutting from Caulfield Port Phillip Leader 08/03/2011 on forthcoming match of Elsternwick against Coburg. “Richo’s Century Puts Caulfield in Driver’s Seat” cutting from Caulfield Port Phillip Leader 15/03/2011 on Shaun Richardson’s 160 for Caulfield against Brunswick in a recent match. “Caulfield Up for Challenge” by Brad Beitzel cutting from Caulfield Port Phillip Leader 22/03/2011 on forthcoming match against Coburg. “Fielders Work For It. Sliver of Hope Going Into Day Two” by Paul Amy, cutting from Caulfield Port Phillip Leader 29/03/2011 on recent match of Caulfield against Malvern. Photograph, cutting from Caulfield Port Phillip Leader 05/04/2011 of batsman Matt Lawrence who had announced his retirement, pictured with unnamed wicket-keeper. “‘Grub’ will be missed” cutting from Caulfield Port Phillip Leader 12/04/2011. Obituary of Tony Sheehan who represented Caulfield in 170 matches. “Caulfield Goes in to Bat Early” cutting from Caulfield Port Phillip Leader 03/05/2011 on recent recruits Adam Warren and Rob Bartlett for forthcoming season. “South Caulfield on Top” cutting from Caulfield Port Phillip Leader 01/11/2011 on prospects of South Caulfield Club and recent matches. “Monds Break Duck” cutting from Caulfield Port Phillip Leader 31/01/2012 on recent win by Ormond Club. “Help To Put Cancer Fund in the Pink” article from the Caulfield Port Phillip Leader dated 07/02/2012 concerning the Caulfield South Cricket Club’s participation in Pink Stumps Day in order to raise funds for cancer research. “Premier Cricket” by Brad Beitzel, cutting from Caulfield Port Phillip Leader 14/02/2012 on recent watches of local clubs. “Damiano’s Three Tons A record” by Brad Beitzel, cutting from Caulfield Port Phillip Leader 28/02/2012 on batting record of Ricky Damiano. “Caulfield Digs In. Baldry Leads Lower Order Fight Against Malvern” by Paul Amy, cutting from Caulfield Port Phillip Leader 13/03/2012 on undefeated season of Caulfield club and future match. “Fields Bound For Glory. Rugged Day for Elsty” by Brad Beitzel cutting from Caulfield Port Phillip Leader 20/03/2012 on success of Caulfield Club. “Fielders Perfect Finish. Golden Summer Capped by Premiership” by Brad Beitzel cutting from Caulfield port Phillip Leader 27/03/2012 on undefeated season of Caulfield Club. “Caulfield Leaders Pay Hospital Visit to Club Stalwart. That Was For ‘Morro’” by Paul Amy cutting from Caulfield Port Phillip Leader 02/03/2012 on visit to ill Brian Morrison. “Caulfield Hearts Heavy After Death of Club Legend ‘Morro’” by Paul Amy cutting from Caulfield Port Phillip Leader 10/04/2012 on death of Brian Morrison. “Big Send Off For Legend ‘Morro’” cutting from Caulfield Port Phillip Leader 17/04/2012 on funeral of Brian Morrison. “Cricket Season to Commence” clipping from unnamed journal or magazine, hand dated 10/12 on new cricket season. “Christiansen Cracks Ton in Elsternwick Victory”, cutting from Glen Eira Port Phillip Leader 30/10/2012 on century by Cam Christiansen in match against Malvern. “Harwood Hits Hard to Set test For Caulfield” by Paul Amy cutting from Glen Eira Port Phillip Leader 13/11/2012 on performance of Shane Harwood in match against Melton. “ ‘Richo’ To The Rescue” by Paul Amy cutting from Glen Eira Port Phillip Leader 11/12/2012 on performance of Shaun Richardson in match against Williamstown. “Victorian Turf Cricket Association South Poised for Outright Win Against Bernies” cutting from Glen Eira Port Phillip Leader 29/01/2013 on match between South Caulfield and St. Bernards. “Tough Chase Awaits Caulfield” cutting from Glen Eira Port Phillip Leader 22/01/2013 on prospects of Caulfield Club. “Stateswide Twenty 20 Cup. South Caulfield Gets The Chance To Play At the MCG” photocopy of article in Glen Eira Port Phillip Leader 12/02/2013 that the team is to play in the MCG in finish of Twenty 20 Competition. “Nurse to the rescue for Wiaks” by Paul Amy cutting from Glen Eira Port Phillip Leader 19/02/2013 on century by Harry Nurse in match against Yarraville. “VTCA South Caulfield Crowned Twenty 20 Champion” cutting from Glen Eira Port Phillip Leader 12/03/2013 on win by South Caulfield in state wide Twenty 20 Cup. “Sub-District Cricket Finals. Caulfield Up Agianst Melton and Weather” cutting from Glen Eira Port Phillip Leader 19/03/2013 on semi-final match between Caulfield and Elsternwick. “Cricket Championship Team” photograph cutting from Glen Eira Port Phillip Leader 09/04/2013 of Championship Caulfield Club with thirteen players named in caption. “Cricket High Hopes for Scholarship Winner” cutting from Glen Eira Port Phillip Leader 16/04/2013 on cricket scholarship for Adam Cosgrove, aged twelve.caulfield cricket club, ormond cricket club, elsternwick cricket club, south caulfield cricket club, north caulfield glenhuntly cricket club, malvern cricket club, sheehan tony, damiano ricky, oakleigh cricket club, morrison brian, little harold, christiansen cam, harwood shane, richardson shaun, murrumbeena cricket club, carnegie cricket club, mcg, melbourne cricket grounds, nurse harry, reilly geoff, shipley colin, jacobs bill, lahiff tommy, haviland james, pritchard heath, cruickshank daron, hansen michael, lawrence matt, warren adam, baldry leigh, vtca, twenty 20 club, cosgrove adam, cricket, cricket clubs, cricketers, sporting clubs, sports -
 Warrnambool and District Historical Society Inc.
Letter Books, 1875 - 1945
Eight of these letter books contain letters written by the Warrnambool lawyer George Mackay. They are mostly letters written to contacts while he was living in Scotland and letters sent from Warrnambool to Scotland to his daughter, Margueretta (Meta) who was studying medicine. Scottish-born George Sutherland Mackay (1850-1926) opened a legal practice in Kepler Street, Warrnambool in 1891 and in 1893 bought the business of the late James Fletcher, with the business known as Fletcher and Mackay. In the 1920s John Taylor became a partner and the firm of Mackay, Taylor & Co. (later Mackay Taylor) continued until 1999 when it merged with Taits Solicitors to form Tait Taylor (now Taits Legal). George Mackay was a Warrnambool Councillor and the first Mayor to hold office for four successive years. He was instrumental in getting the Warrnambool High School established and was the Chairman of the first School Council. Two of these letter books contain letters written by Ernest Powling. One letter book contains letters written by James Mack, a Warrnambool accountant These letter books are of considerable importance as they contain letters relating to legal matters in Warrnambool and district from the late 19th century to the mid 1940s. The letters also give an insight into the private life of a prominent Warrnambool lawyer, George Sutherland Mackay..1 This letter book has a dark blue cover, brown leather binding, an alphabetical index with tabs and handwritten letters. The spine is damaged. .2 This letter book has a dark red cover with red binding, an alphabetical index with tabs, a handwritten label on the front cover, information on the ledger maker and the handwriting of the letter writer inside the front cover. The spine is slightly damaged. .3 This letter book has a dark red mottled cover with white binding, an alphabetical index with tabs and a handwritten label on the front cover. .4 This letter book has a dark red cover with white paper binding and a handwritten label on the cover. .5 This letter book has a dark blue cover, red binding, and alphabetical index with tabs. The spine is slightly damaged. A loose receipt is inside the front cover. .6 This letter book has a mottled blue and pink cover, black binding, an alphabetical index with tabs and handwritten personal letters. .7 This letter book has a dark green cover, brown binding, an alphabetical index with coloured tabs and handwritten private letters. .8 This letter book has a mottled cover with black binding and an alphabetical index with tabs. Many of the letter copies are upside down. .9 This letter book has a dark green cover with red binding, an alphabetical index with tabs and handwritten personal letters. .10 This letter book has a dark green cover with buff-coloured leather binding, an alphabetical index with tabs and copies of typed letters. The leather is torn on the front cover. .11 This letter book has a green cover, a brown leather spine and a paper label pasted on the cover. This book has the spine detached and is badly waterstained .2 G Sutherland Mackay 1874 Private Letter Book james mack, warrnambool, ernest powling, port fairy, george mackay, warrnambool, history of warrnambool -
 Kew Historical Society Inc
Plan, Melbourne & Metropolitan Board of Works : Borough of Kew : Detail Plan No.1569, 1905
The Melbourne and Metropolitan Board of Works (MMBW) plans were produced from the 1890s to the 1950s. They were crucial to the design and development of Melbourne's sewerage and drainage system. The plans, at a scale of 40 feet to 1 inch (1:480), provide a detailed historical record of Melbourne streetscapes and environmental features. Each plan covers one or two street blocks (roughly six streets), showing details of buildings, including garden layouts and ownership boundaries, and features such as laneways, drains, bridges, parks, municipal boundaries and other prominent landmarks as they existed at the time each plan was produced. (Source: State Library of Victoria)This plan forms part of a large group of MMBW plans and maps that was donated to the Society by the Mr Poulter, City Engineer of the City of Kew in 1989. Within this collection, thirty-five hand-coloured plans, backed with linen, are of statewide significance as they include annotations that provide details of construction materials used in buildings in the first decade of the 20th century as well as additional information about land ownership and usage. The copies in the Public Record Office Victoria and the State Library of Victoria are monochrome versions which do not denote building materials so that the maps in this collection are invaluable and unique tools for researchers and heritage consultants. A number of the plans are not held in the collection of the State Library of Victoria so they have the additional attribute of rarity.Original survey plan, issued by the MMBW to a contractor with responsibility for constructing sewers in the area identified on the plan within the Borough of Kew. The plan was at some stage hand-coloured, possibly by the contractor, but more likely by officers working in the Engineering Department of the Borough and later Town, then City of Kew. The hand-coloured sections of buildings on the plan were used to denote masonry or brick constructions (pink), weatherboard constructions (yellow), and public buildings (grey). This plan covers parts of Sackville Street, John Street, Thomas Street and Cotham Road, and includes several very large houses in Sackville Street. Job Smith built ‘Berrington’ in about 1888-90 for himself, and ‘Pomeroy’ (now ‘Merridale’) in 1885 for James Mickleburgh. ‘Heathfield’ was built in 1888 for Henry Eeles, and was one of many fine homes in Kew, Hawthorn and surrounding suburbs designed by prolific architect John Beswicke; it later became “La Verna” and was a Franciscan monastery. Similarly, in Cotham Road, we can see ‘Bella Vista’ (now demolished), and ‘Charleville’, with its double-storeyed arcade frontage, built in 1889 for Charles Donaldson whose family occupied it until 1939. This was renamed ‘Ross House’ by the second owner, Dr. Thomas King, and then substantially restored in the 1960s by the Stillwell family, well known as car drivers and dealers. Bella Vista (later ‘Malinda’) was originally designed by the architect Robert Haddon and built for Abel Hoadley, inventor of the Violet Crumble Bar and many other delicious delicacies. He began by manufacturing jams and pickles in South Melbourne using fruit from his own orchard in East Burwood.melbourne and metropolitan board of works, detail plans, mmbw 1569, cartography -
 National Wool Museum
Textile - Community Textile Tapestry, Lisa Kendal et al, WARM, 2016
WARM was a community textile art project that saw over 250 knitters come together to create a beautiful collage tapestry. Made entirely from wool, the artwork contains more than 1000 individual hand knitted sections. The project takes aim at global warming, it highlights both the causes and solutions for us to create a sustainable and safe climate for future generations. Lisa Kendal, the co-creator of the project, said “One of the problems in the world is that we have forgotten how to warm ourselves with wool. We have become too dependent on fossil fuels (for heating)”. This is the key idea surrounding the project. WARM began as two large scale images created by Lars Stenberg. The first image is a landscape scarred by coal mining. The second image is the same landscape only many decades later. Regeneration and regrowth have taken over the landscape and hidden the past coal mine completely. In its place is a beautiful landscape including trees, native flowers, a lake, lots of greenery and wind turbines. From March to the end of August in 2016, knitters worked hard to create the over one thousand pieces that came together to form the final tapestry. The pieces were all designed by Fibre Artist Georgie Nicolson of Tikki Knitting Designs, who converted the second image of the healed landscape into patterns for the 250 plus knitters to follow. These patterns included unusual designs such as gum leaves, trees, native flowers and even the wind turbines. During several days of installation, the knitted pieces were stitched together by Lars Stenberg over a picture of the first image of the operational coal mine. They worked to create the second image of the renewed landscape; like an enormous collage. The WARM project was donated to the National Wool Museum in 2021. It was a much-loved hanging within the Ballarat Hospital for many years before coming to the museum. More information about the project can be found on the following website. http://www.seam.org.au/warm The tapestry is made from 1000+ hand knitted sections stitched together to make an image. In the foreground of this image is a large gum tree that stretches from the bottom left to the top right corner. The trunk of this tree follows the left edge of the tapestry, with foliage from the gum tree spanning its top border. The bottom third of the tapestry is predominantly green grass with yellow, pink and red flowers providing sporadic colour. The middle third encompasses a lake, with orange colours surrounding the banks of the water as opposed to the green grasses of the bottom third. To the right of the lake are wind turbines. The top third of the tapestry is blue sky with white clouds. It also contains the previously described gum tree leaves. Each piece of the tapestry is 100% wool and was hand knitted and stitched together. The Tapestry is accompanied by an oil painting on canvas. It is a painting that matches the tapestry and served as a template for the final tapestry. Finally, the tapestry is accompanied by another pointing on wood board. This final panting is of a coal mine. This is the setting before regeneration and regrowth have reclaimed this site, which is the theme captured in the final tapestry. In the foreground of the coal mine painting is the same gum tree described in the tapestry; however, it is grey and sickle with only 4 leaves visible at the top border, compared to the numerous leaves in the tapestry. Also in the foreground is a broken barb wire fence adding to the unwelcoming nature of the site. The colour scheme of this image is of dark greys and browns. A coal fired power plant can be seen in the final third of the image with four chimneys emitting plumes of smoke into the sky. In front of this power plant is the spiral shape of a coal mine, burrowing deep into the earth’s crust. Inside of the coal mine 3 yellow trucks are seen mining and transporting coal to the top of the mine.warm, community textile tapestry, knitting, community artwork, global warming -
 Ballarat Tramway Museum
Functional object - Fare Token, Electric Supply Co. of Vic (ESCo), 1913
Demonstrates aspects of the Ballarat Tramways fare system at the time of the one man trams, tokens which could be pre purchased by travellers and save time when boarding trams. See notes on file re these eg Reg Item 1801.Fare token- 2d - 21mm diameter - green celluloid - with "B.E.T." in large capitals on front centre of token and words "Ballarat Electric Tramways 1913" on circumference. On reverse in large font "2" and a small font "D" at top of the two - indicating token had a value of two pence. Extract from A. Bradley "The Golden City and its Tramways" about tokens and why. "The ESCo worked out its procedures from its own experience. A "pay as you enter" system was used on city-bound cars, and a "pay as you leave" system on outward-bound cars. On Sundays during busy periods this was reversed on the Gardens lines, but conductors were still required on this line to cope with the heavy summer holiday traffic. Trams 1 to 18 were altered by altering the end seating, placing gates on doorways and "pay as you enter" and "pay as you leave" signs. Once on board, passengers paid their coins into a farebox mounted behind the driver, which was fitted with glass windows and mirrors to enable the driver to see the coins slide into the box - a form of "moral check on passengers". Regular passengers could buy pink or green celluloid tokens at a discount price, to save the motorman having to issue tickets and give change." Stopped being in use in 1921, see Reg Item 1801.1 and 1802. Place of manufacture not known. For other 2d token see Reg. Item 1943 and 2488 page 31. See Reg. Item 2514 for H.P. James notes on the token system. 1794.1 - added 18/4/2009 - donation of Lyall Denning Related documents provides some information on the value of the items. eBay sale 15/10/2006 $20 - eBay slip with worksheet - see related items.trams, tramways, tickets, tokens, esco, one man trams -
 Ballarat Tramway Museum
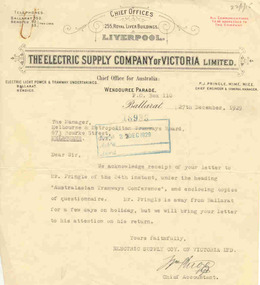
document - Correspondence, Electric Supply Co. of Vic (ESCo), "Australasian Tramway Conference", 1929 - 1930
Set of four letters between the Manager TB and Geelong, Ballarat and Bendigo tramways between the period of 27 Dec. 1929 and 30 July 1930 regarding the "Australasian Tramway Conference. See image files for details of the letterhead of the various company offices. 1972.1 - Letter from the Engineer and Manager of the Melbourne Electric Supply Company Limited, Melbourne office advising Mr. A. D. Murdoch, Manager of the Melbourne and Metropolitan Tramways Board that he had forwarded the questionnaire to their Geelong Engineer for completion. Dated 30/12/1929. Stamped as being received by the TB as 31/12/1929. See image 1972i1 for image of letter. 1972.2 - Letter from the Chief Accountant of ESCo Ballarat, to the Manager TB acknowledging receipt of the letter dated 24/12/1929 regarding the questionnaire and saying Mr. Pringle is on holidays and will be attended to on his return. Dated 27/12/1929 and stamped as being received by the TB as 28/12/1929. See image 1972i2 for image of letter. 1972.3 - Carbon copy of a letter on pink paper from Manager TB to Mr. G.F. Cole, Resident Engineer and Local Manager of ESCo ( Ballarat) regarding the questionnaire - too late to be included. Dated 9/7/1930. 1972.4 - Letter from Mr. G.F. Cole, Resident Engineer and Local Manager of ESCo Bendigo office - forwarding the questionnaire to the TB and apologising for the late arrival. On letterhead of the ESCo Bendigo office - see image 1972i1 for image of letter. Dated 5 July 1930, and received by TB on 7/7/1930. Questionnaire (attached to 1972.4) details sections and fares, section lengths, holiday fares, workmen's fares, scholars' fares (no concessions) details of concession fares, postmen fares, health nurses, employees, periodical tickets, prepaid tickets. On top of the sheets written in pencil is the file number "22/1/15"tram, trams, australasian tramway conference, fares, sections, letterhead, mmtb, mesco, esco -
 Melbourne Tram Museum
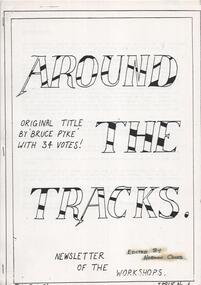
Newsletter, Norm Cross, Preston Workshops, "Around the Tracks Newsletter of the Workshops", 1985
Set of six magazines, A4 photocopied titled ""Around the Tracks Newsletter of the Workshops"" edited by Norm Cross stapled on the left hand side, during the early days of The Met. .1 - Issue 4 - 11 A4 pages, undated, cFeb.1985, titled suggested by Bruce Pyke, news from paint shop, body shop, MTA Cricket, machine shop, E. Sires President of the Shop Committee, plan of changes to Cameron Hall, floor plan, buy and sell. .2 - Issue 5 - 6 A4 sheets, printed on yellow paper, Paint shop news, Pete Budge Manning, Cricket news, history of 2001 written by Norm Cross, machine shop news, and for sale or buy. .3 - Issue 6 - 4 A sheets, poem "The lights of Cobb & Co", Workshops cricket trip April, Roachie & Yabby on Safari, general news and for sale and buy. .4 - Issue 7 - 8 A4 sheets, a crossword, general personal news, Apprentice Day and awards, includes a list of apprentices who completed their training including Craig Tooke, machine shop news, list of trams not repainted, Roachie & Yabby on Safari part 2, notice to employees about the microwave oven and prevention of back injuries. .5 - Issue 8 - 8 sheets mainly doubled side, printed on pink paper, minutes of the Workshops Consultative Committee, the use of MTA personnel at Mt Buffalo (written by Craig Roach - (The War that never ends"), Credit Union meeting, poem by Bobby Sparks (Chester), Malcolm, the Story of a film, new library books, changes to the workshops, new traverser. .6 - Issue 9 - Christmas - 11 A4 sheets single sided, body shop news, personality profiles, machine shop news, Fleeing the Killing fields (Cambodia) by John Prideaux, for sale and buy.Yellow highlighted applied where Norm's name is mentioned or his columns.trams, tramways, preston workshops, the met, cricket, sports, unions, cameron hall, apprentices, malcolm -
 Flagstaff Hill Maritime Museum and Village
Domestic object - Bowl, Late 19th or early 20th Century
The Process of Making Pottery Decorating, Firing, Glazing, Making, Technical There is a rhythm and flow to clay. It can’t be done all at once! Even the making process! It can take weeks to get everything done, especially if you can only work on your pottery once a week! Even though we have three hour classes, it’s often just not enough time! Here is an overview of some of the processes so you have a bit more grasp on some of the technical stuff! Step One – Design There are SO many ideas out there for making stuff in clay! From delicate porcelain jewellery, through to heavy sculptural work and everything in between. Deciding your direction is sometimes not that easy – when you first start, try everything, you will naturally gravitate to the style that you enjoy! The options and variations are endless and can get a wee bit overwhelming too! Check in with me before you start to ensure your ideas will work, what order you might do things, how you could achieve the look you are seeking and any other technical data required! Step Two – Making Clay is thixotropic. This means that as you work with it, the clay first gets sloppier and wetter, before is begins to dry in the atmosphere. For most things, you simply can’t do all parts of the project at once. An example of work order might look like: Get last weeks work out from the shelves Prepare clay for today’s work – roll your clay, prepare balls for throwing, make the first stage of a pinch pot) Clean up last week’s work and put it on the shelf for bisque firing Check that you have any glazing to do – and do enough of it that you will have time to finish your main project Do the next step of your next project – there might be a further step that can’t be complete immediately, in that case, wrap your work well and put onto the shelves. Letting your work rest for a while can really help keep your work clean and professional looking. Many things require bagging under plastic to keep it ready for work the next week – put your name on the outside of the bag so you can find your work easily. We have stickers and markers. Consider how you want to decorate your work – coloured slip can be applied at a fairly wet stage (remembering that it will make your work even wetter!). Trying to apply slip to dry clay won’t work! If you want to do sgraffito – you will need to keep the work leather hard (a state of dryness where you can still work the clay with a little effort and a little water and care). Step Three – Drying Most of the time your work can go into the rack uncovered to let it dry out for the following week. If you want to continue forming or shaping you will need to double bag your work – put your work on a suitable sized bat and put the bat in a bag so the base of the bag is under the bat, then put another bag over the top of the work and tuck the top of the bag under the bat. If you want to trim (or turn) your thrown work the following week, it should also be double bagged. If your work is large, delicate, or of uneven thicknesses, you should lightly cover your work for drying. When considering the drying process, bare in mind the weather, humidity and wind! The hotter and dryer, the faster things dry and work can dry unevenly in the shelves – this can lead to cracking – another time to lightly cover your work for drying. Step Four – Trimming and Cleaning Up Your work is dry! It is called greenware now and it is at it’s most fragile! Handle everything with two hands. I often refer to soft hands – keep everything gentle and with your fingers spread as much as possible. Try to not pick up things like plates too much, and always with both hands! Before your work can be bisque fired it should be “cleaned up”. You work won’t go into the kiln if it has sharp edges – when glazed, sharp edges turn into razor blades! Use a piece of fly wire to rub the work all over – this will scratch a little so be light handed. Use a knife or metal kidney to scrape any areas that require a bit more dynamic treatment than the fly wire offers! Finally, a very light wipe over with a slightly damp sponge can help soften and soothe all of your edges and dags! Trimming thrown work: If you are planning to trim (or turn) your thrown work (and you should be), make sure you bag it well – your work should be leather hard to almost dry for easiest trimming. Use this step to finish the work completely – use a metal kidney to polish the surface, or a slightly damp sponge to give a freshly thrown look. Wipe the sponge around the rim after trimming, and check the inside of the pot for dags! Trimming slip cast work: Usually I will trim the rims of your work on the wheel the following day to make that stage easier, however you will still need to check your work for lumps and bumps. Last but not least – check that your name is still clearly on the bottom of your work. Step Five – Bisque Firing When the work is completely dry it can go into the bisque kiln. The bisque kiln is fired to 1000°C. This process burns off the water in the clay as well as some of the chemically bound water. The structure of the clay is not altered that much at this temperature. Inside the bisque kiln, the work is stacked a little, small bowl inside a larger bowl and onto a heavy plate. Smaller items like decorations or drink coasters might get stacked several high. Consideration is paid to the weight of the stack and shape of the work. A bisque kiln can fire about one and a half times the amount of work that the glaze kiln can fire. The firing takes about 10 hours to complete the cycle and about two days to cool down. Once it has been emptied the work is placed in the glaze room ready for you to decorate! Step Six – Glazing Decorating your work with colour can be a lot of fun – and time consuming! There are three main options for surface treatment at this stage: Oxide Washes Underglazes Glazes Washes and underglazes do not “glaze” the work – It will still need a layer of glaze to fully seal the clay (washes don’t need glaze on surfaces not designed for food or liquid as they can gloss up a little on their own). Underglazes are stable colourants that turn out pretty much how they look in the jar. They can be mixed with each other to form other colours and can be used like water colours to paint onto your work. Mostly they should have a clear glaze on top to seal them. Oxides are a different species – the pink oxide (cobalt) wash turns out bright blue for instance. They don’t always need a glaze on top, and some glazes can change the colour of the wash! The glazes need no other “glaze” on top! Be careful of unknown glaze interactions – you can put any combination of glaze in a bowl or on a plate, but only a single glaze on the outside of any vertical surface! Glazes are a chemical reaction under heat. We don’t know the exact chemicals in the Mayco glazes we use. I can guess by the way they interact with each other, however, on the whole, you need to test every idea you have, and not run the test on a vertical surface! Simply put, glaze is a layer of glass like substance that bonds with the clay underneath. Clay is made of silica, alumina and water. Glaze is made of mostly silica. Silica has a melting point of 1700°C and we fire to 1240°C. The silica requires a “flux” to help it melt at the lower temperature. Fluxes can be all sorts of chemicals – a common one is calcium – calcium has a melting point of 2500°C, however, together they both melt at a much lower temperature! Colourants are metal oxides like cobalt (blue), chrome (green through black), copper (green, blue, even red!), manganese (black, purple and pink) iron (red brown), etc. Different chemicals in the glaze can have dramatic effects. for example, barium carbonate (which we don’t use) turns manganese bright pink! Other elements can turn manganese dioxide brown, blue, purple and reddish brown. Manganese dioxide is a flux in and of itself as well. So, glazes that get their black and purple colours, often interact with other glazes and RUN! Our mirror black is a good example – it mixes really well with many glazes because it fluxes them – causes them to melt faster. It will also bring out many beautiful colours in the glazes because it’s black colouring most definitely comes from manganese dioxide! Glaze chemistry is a whole subject on it’s own! We use commercial Mayco glazes on purpose – for their huge range of colour possibilities, stability, cool interactions, artistic freedom with the ability to easily brush the glazes on and ease of use. We currently have almost 50 glazes on hand! A major project is to test the interactions of all glazes with each other. That is 2,500 test tiles!!!! I’m going to make the wall behind the wheels the feature wall of pretty colours! Step Seven – Glaze (Gloss or sometimes called “Glost”) Firing Most of the time this is the final stage of making your creation (but not always!) The glaze kiln goes to 1240°C. This is called cone 6, or midrange. It is the low end of stoneware temperatures. Stoneware clays and glazes are typically fired at cone 8 – 10, that is 1260 – 1290°C. The energy requirement to go from 1240°C to 1280°C is almost a 30% more! Our clay is formulated to vitrify (mature, turn “glass-like”) at 1240°, as are our glazes. A glaze kiln take around 12 hours to reach temperature and two to three days to cool down. Sometimes a third firing process is required – this is for decoration that is added to work after the glaze firing. For example – adding precious metals and lustres. this firing temperature is usually around 600 – 800°C depending upon the techniques being used. There are many students interested in gold and silver trims – we will be doing this third type of firing soon! After firing your work will be in the student finished work shelves. Remember to pay for it before you head out the door! There is a small extra charge for using porcelain clay (it’s more than twice the price of regular clay), and for any third firing process! Once your work has been fired it can not turn back into clay for millennia – so don’t fire it if you don’t like it! Put it in the bucket for recycling. https://firebirdstudios.com.au/the-process-of-making-pottery/ The bowl is an example of kitchenware used in the 19th century and still in use today.Bowl white ceramic. Crack on side. Badly stained.Backstamp very faint and unable to be read.flagstaff hill, warrnambool, shipwrecked-coast, flagstaff-hill, flagstaff-hill-maritime-museum, maritime-museum, shipwreck-coast, flagstaff-hill-maritime-village, mixing bowl, food preparation, kitchen equipment, ceramic -
 Flagstaff Hill Maritime Museum and Village
Domestic object - Bowl
The Process of Making Pottery Decorating, Firing, Glazing, Making, Technical There is a rhythm and flow to clay. It can’t be done all at once! Even the making process! It can take weeks to get everything done, especially if you can only work on your pottery once a week! Even though we have three hour classes, it’s often just not enough time! Here is an overview of some of the processes so you have a bit more grasp on some of the technical stuff! Step One – Design There are SO many ideas out there for making stuff in clay! From delicate porcelain jewellery, through to heavy sculptural work and everything in between. Deciding your direction is sometimes not that easy – when you first start, try everything, you will naturally gravitate to the style that you enjoy! The options and variations are endless and can get a wee bit overwhelming too! Check in with me before you start to ensure your ideas will work, what order you might do things, how you could achieve the look you are seeking and any other technical data required! Step Two – Making Clay is thixotropic. This means that as you work with it, the clay first gets sloppier and wetter, before is begins to dry in the atmosphere. For most things, you simply can’t do all parts of the project at once. An example of work order might look like: Get last weeks work out from the shelves Prepare clay for today’s work – roll your clay, prepare balls for throwing, make the first stage of a pinch pot) Clean up last week’s work and put it on the shelf for bisque firing Check that you have any glazing to do – and do enough of it that you will have time to finish your main project Do the next step of your next project – there might be a further step that can’t be complete immediately, in that case, wrap your work well and put onto the shelves. Letting your work rest for a while can really help keep your work clean and professional looking. Many things require bagging under plastic to keep it ready for work the next week – put your name on the outside of the bag so you can find your work easily. We have stickers and markers. Consider how you want to decorate your work – coloured slip can be applied at a fairly wet stage (remembering that it will make your work even wetter!). Trying to apply slip to dry clay won’t work! If you want to do sgraffito – you will need to keep the work leather hard (a state of dryness where you can still work the clay with a little effort and a little water and care). Step Three – Drying Most of the time your work can go into the rack uncovered to let it dry out for the following week. If you want to continue forming or shaping you will need to double bag your work – put your work on a suitable sized bat and put the bat in a bag so the base of the bag is under the bat, then put another bag over the top of the work and tuck the top of the bag under the bat. If you want to trim (or turn) your thrown work the following week, it should also be double bagged. If your work is large, delicate, or of uneven thicknesses, you should lightly cover your work for drying. When considering the drying process, bare in mind the weather, humidity and wind! The hotter and dryer, the faster things dry and work can dry unevenly in the shelves – this can lead to cracking – another time to lightly cover your work for drying. Step Four – Trimming and Cleaning Up Your work is dry! It is called greenware now and it is at it’s most fragile! Handle everything with two hands. I often refer to soft hands – keep everything gentle and with your fingers spread as much as possible. Try to not pick up things like plates too much, and always with both hands! Before your work can be bisque fired it should be “cleaned up”. You work won’t go into the kiln if it has sharp edges – when glazed, sharp edges turn into razor blades! Use a piece of fly wire to rub the work all over – this will scratch a little so be light handed. Use a knife or metal kidney to scrape any areas that require a bit more dynamic treatment than the fly wire offers! Finally, a very light wipe over with a slightly damp sponge can help soften and soothe all of your edges and dags! Trimming thrown work: If you are planning to trim (or turn) your thrown work (and you should be), make sure you bag it well – your work should be leather hard to almost dry for easiest trimming. Use this step to finish the work completely – use a metal kidney to polish the surface, or a slightly damp sponge to give a freshly thrown look. Wipe the sponge around the rim after trimming, and check the inside of the pot for dags! Trimming slip cast work: Usually I will trim the rims of your work on the wheel the following day to make that stage easier, however you will still need to check your work for lumps and bumps. Last but not least – check that your name is still clearly on the bottom of your work. Step Five – Bisque Firing When the work is completely dry it can go into the bisque kiln. The bisque kiln is fired to 1000°C. This process burns off the water in the clay as well as some of the chemically bound water. The structure of the clay is not altered that much at this temperature. Inside the bisque kiln, the work is stacked a little, small bowl inside a larger bowl and onto a heavy plate. Smaller items like decorations or drink coasters might get stacked several high. Consideration is paid to the weight of the stack and shape of the work. A bisque kiln can fire about one and a half times the amount of work that the glaze kiln can fire. The firing takes about 10 hours to complete the cycle and about two days to cool down. Once it has been emptied the work is placed in the glaze room ready for you to decorate! Step Six – Glazing Decorating your work with colour can be a lot of fun – and time consuming! There are three main options for surface treatment at this stage: Oxide Washes Underglazes Glazes Washes and underglazes do not “glaze” the work – It will still need a layer of glaze to fully seal the clay (washes don’t need glaze on surfaces not designed for food or liquid as they can gloss up a little on their own). Underglazes are stable colourants that turn out pretty much how they look in the jar. They can be mixed with each other to form other colours and can be used like water colours to paint onto your work. Mostly they should have a clear glaze on top to seal them. Oxides are a different species – the pink oxide (cobalt) wash turns out bright blue for instance. They don’t always need a glaze on top, and some glazes can change the colour of the wash! The glazes need no other “glaze” on top! Be careful of unknown glaze interactions – you can put any combination of glaze in a bowl or on a plate, but only a single glaze on the outside of any vertical surface! Glazes are a chemical reaction under heat. We don’t know the exact chemicals in the Mayco glazes we use. I can guess by the way they interact with each other, however, on the whole, you need to test every idea you have, and not run the test on a vertical surface! Simply put, glaze is a layer of glass like substance that bonds with the clay underneath. Clay is made of silica, alumina and water. Glaze is made of mostly silica. Silica has a melting point of 1700°C and we fire to 1240°C. The silica requires a “flux” to help it melt at the lower temperature. Fluxes can be all sorts of chemicals – a common one is calcium – calcium has a melting point of 2500°C, however, together they both melt at a much lower temperature! Colourants are metal oxides like cobalt (blue), chrome (green through black), copper (green, blue, even red!), manganese (black, purple and pink) iron (red brown), etc. Different chemicals in the glaze can have dramatic effects. for example, barium carbonate (which we don’t use) turns manganese bright pink! Other elements can turn manganese dioxide brown, blue, purple and reddish brown. Manganese dioxide is a flux in and of itself as well. So, glazes that get their black and purple colours, often interact with other glazes and RUN! Our mirror black is a good example – it mixes really well with many glazes because it fluxes them – causes them to melt faster. It will also bring out many beautiful colours in the glazes because it’s black colouring most definitely comes from manganese dioxide! Glaze chemistry is a whole subject on it’s own! We use commercial Mayco glazes on purpose – for their huge range of colour possibilities, stability, cool interactions, artistic freedom with the ability to easily brush the glazes on and ease of use. We currently have almost 50 glazes on hand! A major project is to test the interactions of all glazes with each other. That is 2,500 test tiles!!!! I’m going to make the wall behind the wheels the feature wall of pretty colours! Step Seven – Glaze (Gloss or sometimes called “Glost”) Firing Most of the time this is the final stage of making your creation (but not always!) The glaze kiln goes to 1240°C. This is called cone 6, or midrange. It is the low end of stoneware temperatures. Stoneware clays and glazes are typically fired at cone 8 – 10, that is 1260 – 1290°C. The energy requirement to go from 1240°C to 1280°C is almost a 30% more! Our clay is formulated to vitrify (mature, turn “glass-like”) at 1240°, as are our glazes. A glaze kiln take around 12 hours to reach temperature and two to three days to cool down. Sometimes a third firing process is required – this is for decoration that is added to work after the glaze firing. For example – adding precious metals and lustres. this firing temperature is usually around 600 – 800°C depending upon the techniques being used. There are many students interested in gold and silver trims – we will be doing this third type of firing soon! After firing your work will be in the student finished work shelves. Remember to pay for it before you head out the door! There is a small extra charge for using porcelain clay (it’s more than twice the price of regular clay), and for any third firing process! Once your work has been fired it can not turn back into clay for millennia – so don’t fire it if you don’t like it! Put it in the bucket for recycling. https://firebirdstudios.com.au/the-process-of-making-pottery/ This bowl is an example of kitchenware used in the 19th century and still in use today.Bowl white ceramic plain that has two sets of edging around lip. Inside bowl has plaster designed to look like cooking mixture.flagstaff hill, warrnambool, shipwrecked-coast, flagstaff-hill, flagstaff-hill-maritime-museum, maritime-museum, shipwreck-coast, flagstaff-hill-maritime-village, kitchen equipment, ceramic -
 Flagstaff Hill Maritime Museum and Village
Domestic object - Bowl, J & G Meakin, Late 19th or early 20th Century
The Process of Making Pottery Decorating, Firing, Glazing, Making, Technical There is a rhythm and flow to clay. It can’t be done all at once! Even the making process! It can take weeks to get everything done, especially if you can only work on your pottery once a week! Even though we have three hour classes, it’s often just not enough time! Here is an overview of some of the processes so you have a bit more grasp on some of the technical stuff! Step One – Design There are SO many ideas out there for making stuff in clay! From delicate porcelain jewellery, through to heavy sculptural work and everything in between. Deciding your direction is sometimes not that easy – when you first start, try everything, you will naturally gravitate to the style that you enjoy! The options and variations are endless and can get a wee bit overwhelming too! Check in with me before you start to ensure your ideas will work, what order you might do things, how you could achieve the look you are seeking and any other technical data required! Step Two – Making Clay is thixotropic. This means that as you work with it, the clay first gets sloppier and wetter, before is begins to dry in the atmosphere. For most things, you simply can’t do all parts of the project at once. An example of work order might look like: Get last weeks work out from the shelves Prepare clay for today’s work – roll your clay, prepare balls for throwing, make the first stage of a pinch pot) Clean up last week’s work and put it on the shelf for bisque firing Check that you have any glazing to do – and do enough of it that you will have time to finish your main project Do the next step of your next project – there might be a further step that can’t be complete immediately, in that case, wrap your work well and put onto the shelves. Letting your work rest for a while can really help keep your work clean and professional looking. Many things require bagging under plastic to keep it ready for work the next week – put your name on the outside of the bag so you can find your work easily. We have stickers and markers. Consider how you want to decorate your work – coloured slip can be applied at a fairly wet stage (remembering that it will make your work even wetter!). Trying to apply slip to dry clay won’t work! If you want to do sgraffito – you will need to keep the work leather hard (a state of dryness where you can still work the clay with a little effort and a little water and care). Step Three – Drying Most of the time your work can go into the rack uncovered to let it dry out for the following week. If you want to continue forming or shaping you will need to double bag your work – put your work on a suitable sized bat and put the bat in a bag so the base of the bag is under the bat, then put another bag over the top of the work and tuck the top of the bag under the bat. If you want to trim (or turn) your thrown work the following week, it should also be double bagged. If your work is large, delicate, or of uneven thicknesses, you should lightly cover your work for drying. When considering the drying process, bare in mind the weather, humidity and wind! The hotter and dryer, the faster things dry and work can dry unevenly in the shelves – this can lead to cracking – another time to lightly cover your work for drying. Step Four – Trimming and Cleaning Up Your work is dry! It is called greenware now and it is at it’s most fragile! Handle everything with two hands. I often refer to soft hands – keep everything gentle and with your fingers spread as much as possible. Try to not pick up things like plates too much, and always with both hands! Before your work can be bisque fired it should be “cleaned up”. You work won’t go into the kiln if it has sharp edges – when glazed, sharp edges turn into razor blades! Use a piece of fly wire to rub the work all over – this will scratch a little so be light handed. Use a knife or metal kidney to scrape any areas that require a bit more dynamic treatment than the fly wire offers! Finally, a very light wipe over with a slightly damp sponge can help soften and soothe all of your edges and dags! Trimming thrown work: If you are planning to trim (or turn) your thrown work (and you should be), make sure you bag it well – your work should be leather hard to almost dry for easiest trimming. Use this step to finish the work completely – use a metal kidney to polish the surface, or a slightly damp sponge to give a freshly thrown look. Wipe the sponge around the rim after trimming, and check the inside of the pot for dags! Trimming slip cast work: Usually I will trim the rims of your work on the wheel the following day to make that stage easier, however you will still need to check your work for lumps and bumps. Last but not least – check that your name is still clearly on the bottom of your work. Step Five – Bisque Firing When the work is completely dry it can go into the bisque kiln. The bisque kiln is fired to 1000°C. This process burns off the water in the clay as well as some of the chemically bound water. The structure of the clay is not altered that much at this temperature. Inside the bisque kiln, the work is stacked a little, small bowl inside a larger bowl and onto a heavy plate. Smaller items like decorations or drink coasters might get stacked several high. Consideration is paid to the weight of the stack and shape of the work. A bisque kiln can fire about one and a half times the amount of work that the glaze kiln can fire. The firing takes about 10 hours to complete the cycle and about two days to cool down. Once it has been emptied the work is placed in the glaze room ready for you to decorate! Step Six – Glazing Decorating your work with colour can be a lot of fun – and time consuming! There are three main options for surface treatment at this stage: Oxide Washes Underglazes Glazes Washes and underglazes do not “glaze” the work – It will still need a layer of glaze to fully seal the clay (washes don’t need glaze on surfaces not designed for food or liquid as they can gloss up a little on their own). Underglazes are stable colourants that turn out pretty much how they look in the jar. They can be mixed with each other to form other colours and can be used like water colours to paint onto your work. Mostly they should have a clear glaze on top to seal them. Oxides are a different species – the pink oxide (cobalt) wash turns out bright blue for instance. They don’t always need a glaze on top, and some glazes can change the colour of the wash! The glazes need no other “glaze” on top! Be careful of unknown glaze interactions – you can put any combination of glaze in a bowl or on a plate, but only a single glaze on the outside of any vertical surface! Glazes are a chemical reaction under heat. We don’t know the exact chemicals in the Mayco glazes we use. I can guess by the way they interact with each other, however, on the whole, you need to test every idea you have, and not run the test on a vertical surface! Simply put, glaze is a layer of glass like substance that bonds with the clay underneath. Clay is made of silica, alumina and water. Glaze is made of mostly silica. Silica has a melting point of 1700°C and we fire to 1240°C. The silica requires a “flux” to help it melt at the lower temperature. Fluxes can be all sorts of chemicals – a common one is calcium – calcium has a melting point of 2500°C, however, together they both melt at a much lower temperature! Colourants are metal oxides like cobalt (blue), chrome (green through black), copper (green, blue, even red!), manganese (black, purple and pink) iron (red brown), etc. Different chemicals in the glaze can have dramatic effects. for example, barium carbonate (which we don’t use) turns manganese bright pink! Other elements can turn manganese dioxide brown, blue, purple and reddish brown. Manganese dioxide is a flux in and of itself as well. So, glazes that get their black and purple colours, often interact with other glazes and RUN! Our mirror black is a good example – it mixes really well with many glazes because it fluxes them – causes them to melt faster. It will also bring out many beautiful colours in the glazes because it’s black colouring most definitely comes from manganese dioxide! Glaze chemistry is a whole subject on it’s own! We use commercial Mayco glazes on purpose – for their huge range of colour possibilities, stability, cool interactions, artistic freedom with the ability to easily brush the glazes on and ease of use. We currently have almost 50 glazes on hand! A major project is to test the interactions of all glazes with each other. That is 2,500 test tiles!!!! I’m going to make the wall behind the wheels the feature wall of pretty colours! Step Seven – Glaze (Gloss or sometimes called “Glost”) Firing Most of the time this is the final stage of making your creation (but not always!) The glaze kiln goes to 1240°C. This is called cone 6, or midrange. It is the low end of stoneware temperatures. Stoneware clays and glazes are typically fired at cone 8 – 10, that is 1260 – 1290°C. The energy requirement to go from 1240°C to 1280°C is almost a 30% more! Our clay is formulated to vitrify (mature, turn “glass-like”) at 1240°, as are our glazes. A glaze kiln take around 12 hours to reach temperature and two to three days to cool down. Sometimes a third firing process is required – this is for decoration that is added to work after the glaze firing. For example – adding precious metals and lustres. this firing temperature is usually around 600 – 800°C depending upon the techniques being used. There are many students interested in gold and silver trims – we will be doing this third type of firing soon! After firing your work will be in the student finished work shelves. Remember to pay for it before you head out the door! There is a small extra charge for using porcelain clay (it’s more than twice the price of regular clay), and for any third firing process! Once your work has been fired it can not turn back into clay for millennia – so don’t fire it if you don’t like it! Put it in the bucket for recycling. https://firebirdstudios.com.au/the-process-of-making-pottery/This bowl was made by renowned pottery company J & G Meakin of England. The firm was established in the mid-1800's. The bowl is an example of kitchenware used in the 19th century and still in use today.Bowl; white ceramic, round and tapering inwards towards base. Made by J and G Meakin England.On base, 'Ironstone China Reg SOL 391413' with symbolflagstaff hill, flagstaff hill maritime museum and village, warrnambool, maritime museum, maritime village, great ocean road, shipwreck coast, mixing bowl, food preparation, j & g meakin, pottery, stoke-on-trent, kitchen equipment, ceramic -
 Flagstaff Hill Maritime Museum and Village
Domestic object - Plate
The Process of Making Pottery Decorating, Firing, Glazing, Making, Technical There is a rhythm and flow to clay. It can’t be done all at once! Even the making process! It can take weeks to get everything done, especially if you can only work on your pottery once a week! Even though we have three hour classes, it’s often just not enough time! Here is an overview of some of the processes so you have a bit more grasp on some of the technical stuff! Step One – Design There are SO many ideas out there for making stuff in clay! From delicate porcelain jewellery, through to heavy sculptural work and everything in between. Deciding your direction is sometimes not that easy – when you first start, try everything, you will naturally gravitate to the style that you enjoy! The options and variations are endless and can get a wee bit overwhelming too! Check in with me before you start to ensure your ideas will work, what order you might do things, how you could achieve the look you are seeking and any other technical data required! Step Two – Making Clay is thixotropic. This means that as you work with it, the clay first gets sloppier and wetter, before is begins to dry in the atmosphere. For most things, you simply can’t do all parts of the project at once. An example of work order might look like: Get last weeks work out from the shelves Prepare clay for today’s work – roll your clay, prepare balls for throwing, make the first stage of a pinch pot) Clean up last week’s work and put it on the shelf for bisque firing Check that you have any glazing to do – and do enough of it that you will have time to finish your main project Do the next step of your next project – there might be a further step that can’t be complete immediately, in that case, wrap your work well and put onto the shelves. Letting your work rest for a while can really help keep your work clean and professional looking. Many things require bagging under plastic to keep it ready for work the next week – put your name on the outside of the bag so you can find your work easily. We have stickers and markers. Consider how you want to decorate your work – coloured slip can be applied at a fairly wet stage (remembering that it will make your work even wetter!). Trying to apply slip to dry clay won’t work! If you want to do sgraffito – you will need to keep the work leather hard (a state of dryness where you can still work the clay with a little effort and a little water and care). Step Three – Drying Most of the time your work can go into the rack uncovered to let it dry out for the following week. If you want to continue forming or shaping you will need to double bag your work – put your work on a suitable sized bat and put the bat in a bag so the base of the bag is under the bat, then put another bag over the top of the work and tuck the top of the bag under the bat. If you want to trim (or turn) your thrown work the following week, it should also be double bagged. If your work is large, delicate, or of uneven thicknesses, you should lightly cover your work for drying. When considering the drying process, bare in mind the weather, humidity and wind! The hotter and dryer, the faster things dry and work can dry unevenly in the shelves – this can lead to cracking – another time to lightly cover your work for drying. Step Four – Trimming and Cleaning Up Your work is dry! It is called greenware now and it is at it’s most fragile! Handle everything with two hands. I often refer to soft hands – keep everything gentle and with your fingers spread as much as possible. Try to not pick up things like plates too much, and always with both hands! Before your work can be bisque fired it should be “cleaned up”. You work won’t go into the kiln if it has sharp edges – when glazed, sharp edges turn into razor blades! Use a piece of fly wire to rub the work all over – this will scratch a little so be light handed. Use a knife or metal kidney to scrape any areas that require a bit more dynamic treatment than the fly wire offers! Finally, a very light wipe over with a slightly damp sponge can help soften and soothe all of your edges and dags! Trimming thrown work: If you are planning to trim (or turn) your thrown work (and you should be), make sure you bag it well – your work should be leather hard to almost dry for easiest trimming. Use this step to finish the work completely – use a metal kidney to polish the surface, or a slightly damp sponge to give a freshly thrown look. Wipe the sponge around the rim after trimming, and check the inside of the pot for dags! Trimming slip cast work: Usually I will trim the rims of your work on the wheel the following day to make that stage easier, however you will still need to check your work for lumps and bumps. Last but not least – check that your name is still clearly on the bottom of your work. Step Five – Bisque Firing When the work is completely dry it can go into the bisque kiln. The bisque kiln is fired to 1000°C. This process burns off the water in the clay as well as some of the chemically bound water. The structure of the clay is not altered that much at this temperature. Inside the bisque kiln, the work is stacked a little, small bowl inside a larger bowl and onto a heavy plate. Smaller items like decorations or drink coasters might get stacked several high. Consideration is paid to the weight of the stack and shape of the work. A bisque kiln can fire about one and a half times the amount of work that the glaze kiln can fire. The firing takes about 10 hours to complete the cycle and about two days to cool down. Once it has been emptied the work is placed in the glaze room ready for you to decorate! Step Six – Glazing Decorating your work with colour can be a lot of fun – and time consuming! There are three main options for surface treatment at this stage: Oxide Washes Underglazes Glazes Washes and underglazes do not “glaze” the work – It will still need a layer of glaze to fully seal the clay (washes don’t need glaze on surfaces not designed for food or liquid as they can gloss up a little on their own). Underglazes are stable colourants that turn out pretty much how they look in the jar. They can be mixed with each other to form other colours and can be used like water colours to paint onto your work. Mostly they should have a clear glaze on top to seal them. Oxides are a different species – the pink oxide (cobalt) wash turns out bright blue for instance. They don’t always need a glaze on top, and some glazes can change the colour of the wash! The glazes need no other “glaze” on top! Be careful of unknown glaze interactions – you can put any combination of glaze in a bowl or on a plate, but only a single glaze on the outside of any vertical surface! Glazes are a chemical reaction under heat. We don’t know the exact chemicals in the Mayco glazes we use. I can guess by the way they interact with each other, however, on the whole, you need to test every idea you have, and not run the test on a vertical surface! Simply put, glaze is a layer of glass like substance that bonds with the clay underneath. Clay is made of silica, alumina and water. Glaze is made of mostly silica. Silica has a melting point of 1700°C and we fire to 1240°C. The silica requires a “flux” to help it melt at the lower temperature. Fluxes can be all sorts of chemicals – a common one is calcium – calcium has a melting point of 2500°C, however, together they both melt at a much lower temperature! Colourants are metal oxides like cobalt (blue), chrome (green through black), copper (green, blue, even red!), manganese (black, purple and pink) iron (red brown), etc. Different chemicals in the glaze can have dramatic effects. for example, barium carbonate (which we don’t use) turns manganese bright pink! Other elements can turn manganese dioxide brown, blue, purple and reddish brown. Manganese dioxide is a flux in and of itself as well. So, glazes that get their black and purple colours, often interact with other glazes and RUN! Our mirror black is a good example – it mixes really well with many glazes because it fluxes them – causes them to melt faster. It will also bring out many beautiful colours in the glazes because it’s black colouring most definitely comes from manganese dioxide! Glaze chemistry is a whole subject on it’s own! We use commercial Mayco glazes on purpose – for their huge range of colour possibilities, stability, cool interactions, artistic freedom with the ability to easily brush the glazes on and ease of use. We currently have almost 50 glazes on hand! A major project is to test the interactions of all glazes with each other. That is 2,500 test tiles!!!! I’m going to make the wall behind the wheels the feature wall of pretty colours! Step Seven – Glaze (Gloss or sometimes called “Glost”) Firing Most of the time this is the final stage of making your creation (but not always!) The glaze kiln goes to 1240°C. This is called cone 6, or midrange. It is the low end of stoneware temperatures. Stoneware clays and glazes are typically fired at cone 8 – 10, that is 1260 – 1290°C. The energy requirement to go from 1240°C to 1280°C is almost a 30% more! Our clay is formulated to vitrify (mature, turn “glass-like”) at 1240°, as are our glazes. A glaze kiln take around 12 hours to reach temperature and two to three days to cool down. Sometimes a third firing process is required – this is for decoration that is added to work after the glaze firing. For example – adding precious metals and lustres. this firing temperature is usually around 600 – 800°C depending upon the techniques being used. There are many students interested in gold and silver trims – we will be doing this third type of firing soon! After firing your work will be in the student finished work shelves. Remember to pay for it before you head out the door! There is a small extra charge for using porcelain clay (it’s more than twice the price of regular clay), and for any third firing process! Once your work has been fired it can not turn back into clay for millennia – so don’t fire it if you don’t like it! Put it in the bucket for recycling. https://firebirdstudios.com.au/the-process-of-making-pottery/Ceramics have evolved over thousands of years.White earthenware dinner plate. Crazing evident all over.Backstamped ‘Made in England S LTD’flagstaff hill, warrnambool, shipwrecked-coast, flagstaff-hill, flagstaff-hill-maritime-museum, maritime-museum, shipwreck-coast, flagstaff-hill-maritime-village, ceramics, tableware -
 Flagstaff Hill Maritime Museum and Village
Domestic object - Plate, Johnson Bros
The Process of Making Pottery Decorating, Firing, Glazing, Making, Technical There is a rhythm and flow to clay. It can’t be done all at once! Even the making process! It can take weeks to get everything done, especially if you can only work on your pottery once a week! Even though we have three hour classes, it’s often just not enough time! Here is an overview of some of the processes so you have a bit more grasp on some of the technical stuff! Step One – Design There are SO many ideas out there for making stuff in clay! From delicate porcelain jewellery, through to heavy sculptural work and everything in between. Deciding your direction is sometimes not that easy – when you first start, try everything, you will naturally gravitate to the style that you enjoy! The options and variations are endless and can get a wee bit overwhelming too! Check in with me before you start to ensure your ideas will work, what order you might do things, how you could achieve the look you are seeking and any other technical data required! Step Two – Making Clay is thixotropic. This means that as you work with it, the clay first gets sloppier and wetter, before is begins to dry in the atmosphere. For most things, you simply can’t do all parts of the project at once. An example of work order might look like: Get last weeks work out from the shelves Prepare clay for today’s work – roll your clay, prepare balls for throwing, make the first stage of a pinch pot) Clean up last week’s work and put it on the shelf for bisque firing Check that you have any glazing to do – and do enough of it that you will have time to finish your main project Do the next step of your next project – there might be a further step that can’t be complete immediately, in that case, wrap your work well and put onto the shelves. Letting your work rest for a while can really help keep your work clean and professional looking. Many things require bagging under plastic to keep it ready for work the next week – put your name on the outside of the bag so you can find your work easily. We have stickers and markers. Consider how you want to decorate your work – coloured slip can be applied at a fairly wet stage (remembering that it will make your work even wetter!). Trying to apply slip to dry clay won’t work! If you want to do sgraffito – you will need to keep the work leather hard (a state of dryness where you can still work the clay with a little effort and a little water and care). Step Three – Drying Most of the time your work can go into the rack uncovered to let it dry out for the following week. If you want to continue forming or shaping you will need to double bag your work – put your work on a suitable sized bat and put the bat in a bag so the base of the bag is under the bat, then put another bag over the top of the work and tuck the top of the bag under the bat. If you want to trim (or turn) your thrown work the following week, it should also be double bagged. If your work is large, delicate, or of uneven thicknesses, you should lightly cover your work for drying. When considering the drying process, bare in mind the weather, humidity and wind! The hotter and dryer, the faster things dry and work can dry unevenly in the shelves – this can lead to cracking – another time to lightly cover your work for drying. Step Four – Trimming and Cleaning Up Your work is dry! It is called greenware now and it is at it’s most fragile! Handle everything with two hands. I often refer to soft hands – keep everything gentle and with your fingers spread as much as possible. Try to not pick up things like plates too much, and always with both hands! Before your work can be bisque fired it should be “cleaned up”. You work won’t go into the kiln if it has sharp edges – when glazed, sharp edges turn into razor blades! Use a piece of fly wire to rub the work all over – this will scratch a little so be light handed. Use a knife or metal kidney to scrape any areas that require a bit more dynamic treatment than the fly wire offers! Finally, a very light wipe over with a slightly damp sponge can help soften and soothe all of your edges and dags! Trimming thrown work: If you are planning to trim (or turn) your thrown work (and you should be), make sure you bag it well – your work should be leather hard to almost dry for easiest trimming. Use this step to finish the work completely – use a metal kidney to polish the surface, or a slightly damp sponge to give a freshly thrown look. Wipe the sponge around the rim after trimming, and check the inside of the pot for dags! Trimming slip cast work: Usually I will trim the rims of your work on the wheel the following day to make that stage easier, however you will still need to check your work for lumps and bumps. Last but not least – check that your name is still clearly on the bottom of your work. Step Five – Bisque Firing When the work is completely dry it can go into the bisque kiln. The bisque kiln is fired to 1000°C. This process burns off the water in the clay as well as some of the chemically bound water. The structure of the clay is not altered that much at this temperature. Inside the bisque kiln, the work is stacked a little, small bowl inside a larger bowl and onto a heavy plate. Smaller items like decorations or drink coasters might get stacked several high. Consideration is paid to the weight of the stack and shape of the work. A bisque kiln can fire about one and a half times the amount of work that the glaze kiln can fire. The firing takes about 10 hours to complete the cycle and about two days to cool down. Once it has been emptied the work is placed in the glaze room ready for you to decorate! Step Six – Glazing Decorating your work with colour can be a lot of fun – and time consuming! There are three main options for surface treatment at this stage: Oxide Washes Underglazes Glazes Washes and underglazes do not “glaze” the work – It will still need a layer of glaze to fully seal the clay (washes don’t need glaze on surfaces not designed for food or liquid as they can gloss up a little on their own). Underglazes are stable colourants that turn out pretty much how they look in the jar. They can be mixed with each other to form other colours and can be used like water colours to paint onto your work. Mostly they should have a clear glaze on top to seal them. Oxides are a different species – the pink oxide (cobalt) wash turns out bright blue for instance. They don’t always need a glaze on top, and some glazes can change the colour of the wash! The glazes need no other “glaze” on top! Be careful of unknown glaze interactions – you can put any combination of glaze in a bowl or on a plate, but only a single glaze on the outside of any vertical surface! Glazes are a chemical reaction under heat. We don’t know the exact chemicals in the Mayco glazes we use. I can guess by the way they interact with each other, however, on the whole, you need to test every idea you have, and not run the test on a vertical surface! Simply put, glaze is a layer of glass like substance that bonds with the clay underneath. Clay is made of silica, alumina and water. Glaze is made of mostly silica. Silica has a melting point of 1700°C and we fire to 1240°C. The silica requires a “flux” to help it melt at the lower temperature. Fluxes can be all sorts of chemicals – a common one is calcium – calcium has a melting point of 2500°C, however, together they both melt at a much lower temperature! Colourants are metal oxides like cobalt (blue), chrome (green through black), copper (green, blue, even red!), manganese (black, purple and pink) iron (red brown), etc. Different chemicals in the glaze can have dramatic effects. for example, barium carbonate (which we don’t use) turns manganese bright pink! Other elements can turn manganese dioxide brown, blue, purple and reddish brown. Manganese dioxide is a flux in and of itself as well. So, glazes that get their black and purple colours, often interact with other glazes and RUN! Our mirror black is a good example – it mixes really well with many glazes because it fluxes them – causes them to melt faster. It will also bring out many beautiful colours in the glazes because it’s black colouring most definitely comes from manganese dioxide! Glaze chemistry is a whole subject on it’s own! We use commercial Mayco glazes on purpose – for their huge range of colour possibilities, stability, cool interactions, artistic freedom with the ability to easily brush the glazes on and ease of use. We currently have almost 50 glazes on hand! A major project is to test the interactions of all glazes with each other. That is 2,500 test tiles!!!! I’m going to make the wall behind the wheels the feature wall of pretty colours! Step Seven – Glaze (Gloss or sometimes called “Glost”) Firing Most of the time this is the final stage of making your creation (but not always!) The glaze kiln goes to 1240°C. This is called cone 6, or midrange. It is the low end of stoneware temperatures. Stoneware clays and glazes are typically fired at cone 8 – 10, that is 1260 – 1290°C. The energy requirement to go from 1240°C to 1280°C is almost a 30% more! Our clay is formulated to vitrify (mature, turn “glass-like”) at 1240°, as are our glazes. A glaze kiln take around 12 hours to reach temperature and two to three days to cool down. Sometimes a third firing process is required – this is for decoration that is added to work after the glaze firing. For example – adding precious metals and lustres. this firing temperature is usually around 600 – 800°C depending upon the techniques being used. There are many students interested in gold and silver trims – we will be doing this third type of firing soon! After firing your work will be in the student finished work shelves. Remember to pay for it before you head out the door! There is a small extra charge for using porcelain clay (it’s more than twice the price of regular clay), and for any third firing process! Once your work has been fired it can not turn back into clay for millennia – so don’t fire it if you don’t like it! Put it in the bucket for recycling. https://firebirdstudios.com.au/the-process-of-making-pottery/Ceramics have evolved over thousands of years.A white earthenware side plate with a gadroon edge. Has water marks and chips on front.‘Johnson Bros England Reg No 15587’flagstaff hill, warrnambool, shipwrecked-coast, flagstaff-hill, flagstaff-hill-maritime-museum, maritime-museum, shipwreck-coast, flagstaff-hill-maritime-village, johnson bros, ceramics, tableware -
 Flagstaff Hill Maritime Museum and Village
Domestic object - Plate, Alfred Meakin
The Process of Making Pottery Decorating, Firing, Glazing, Making, Technical There is a rhythm and flow to clay. It can’t be done all at once! Even the making process! It can take weeks to get everything done, especially if you can only work on your pottery once a week! Even though we have three hour classes, it’s often just not enough time! Here is an overview of some of the processes so you have a bit more grasp on some of the technical stuff! Step One – Design There are SO many ideas out there for making stuff in clay! From delicate porcelain jewellery, through to heavy sculptural work and everything in between. Deciding your direction is sometimes not that easy – when you first start, try everything, you will naturally gravitate to the style that you enjoy! The options and variations are endless and can get a wee bit overwhelming too! Check in with me before you start to ensure your ideas will work, what order you might do things, how you could achieve the look you are seeking and any other technical data required! Step Two – Making Clay is thixotropic. This means that as you work with it, the clay first gets sloppier and wetter, before is begins to dry in the atmosphere. For most things, you simply can’t do all parts of the project at once. An example of work order might look like: Get last weeks work out from the shelves Prepare clay for today’s work – roll your clay, prepare balls for throwing, make the first stage of a pinch pot) Clean up last week’s work and put it on the shelf for bisque firing Check that you have any glazing to do – and do enough of it that you will have time to finish your main project Do the next step of your next project – there might be a further step that can’t be complete immediately, in that case, wrap your work well and put onto the shelves. Letting your work rest for a while can really help keep your work clean and professional looking. Many things require bagging under plastic to keep it ready for work the next week – put your name on the outside of the bag so you can find your work easily. We have stickers and markers. Consider how you want to decorate your work – coloured slip can be applied at a fairly wet stage (remembering that it will make your work even wetter!). Trying to apply slip to dry clay won’t work! If you want to do sgraffito – you will need to keep the work leather hard (a state of dryness where you can still work the clay with a little effort and a little water and care). Step Three – Drying Most of the time your work can go into the rack uncovered to let it dry out for the following week. If you want to continue forming or shaping you will need to double bag your work – put your work on a suitable sized bat and put the bat in a bag so the base of the bag is under the bat, then put another bag over the top of the work and tuck the top of the bag under the bat. If you want to trim (or turn) your thrown work the following week, it should also be double bagged. If your work is large, delicate, or of uneven thicknesses, you should lightly cover your work for drying. When considering the drying process, bare in mind the weather, humidity and wind! The hotter and dryer, the faster things dry and work can dry unevenly in the shelves – this can lead to cracking – another time to lightly cover your work for drying. Step Four – Trimming and Cleaning Up Your work is dry! It is called greenware now and it is at it’s most fragile! Handle everything with two hands. I often refer to soft hands – keep everything gentle and with your fingers spread as much as possible. Try to not pick up things like plates too much, and always with both hands! Before your work can be bisque fired it should be “cleaned up”. You work won’t go into the kiln if it has sharp edges – when glazed, sharp edges turn into razor blades! Use a piece of fly wire to rub the work all over – this will scratch a little so be light handed. Use a knife or metal kidney to scrape any areas that require a bit more dynamic treatment than the fly wire offers! Finally, a very light wipe over with a slightly damp sponge can help soften and soothe all of your edges and dags! Trimming thrown work: If you are planning to trim (or turn) your thrown work (and you should be), make sure you bag it well – your work should be leather hard to almost dry for easiest trimming. Use this step to finish the work completely – use a metal kidney to polish the surface, or a slightly damp sponge to give a freshly thrown look. Wipe the sponge around the rim after trimming, and check the inside of the pot for dags! Trimming slip cast work: Usually I will trim the rims of your work on the wheel the following day to make that stage easier, however you will still need to check your work for lumps and bumps. Last but not least – check that your name is still clearly on the bottom of your work. Step Five – Bisque Firing When the work is completely dry it can go into the bisque kiln. The bisque kiln is fired to 1000°C. This process burns off the water in the clay as well as some of the chemically bound water. The structure of the clay is not altered that much at this temperature. Inside the bisque kiln, the work is stacked a little, small bowl inside a larger bowl and onto a heavy plate. Smaller items like decorations or drink coasters might get stacked several high. Consideration is paid to the weight of the stack and shape of the work. A bisque kiln can fire about one and a half times the amount of work that the glaze kiln can fire. The firing takes about 10 hours to complete the cycle and about two days to cool down. Once it has been emptied the work is placed in the glaze room ready for you to decorate! Step Six – Glazing Decorating your work with colour can be a lot of fun – and time consuming! There are three main options for surface treatment at this stage: Oxide Washes Underglazes Glazes Washes and underglazes do not “glaze” the work – It will still need a layer of glaze to fully seal the clay (washes don’t need glaze on surfaces not designed for food or liquid as they can gloss up a little on their own). Underglazes are stable colourants that turn out pretty much how they look in the jar. They can be mixed with each other to form other colours and can be used like water colours to paint onto your work. Mostly they should have a clear glaze on top to seal them. Oxides are a different species – the pink oxide (cobalt) wash turns out bright blue for instance. They don’t always need a glaze on top, and some glazes can change the colour of the wash! The glazes need no other “glaze” on top! Be careful of unknown glaze interactions – you can put any combination of glaze in a bowl or on a plate, but only a single glaze on the outside of any vertical surface! Glazes are a chemical reaction under heat. We don’t know the exact chemicals in the Mayco glazes we use. I can guess by the way they interact with each other, however, on the whole, you need to test every idea you have, and not run the test on a vertical surface! Simply put, glaze is a layer of glass like substance that bonds with the clay underneath. Clay is made of silica, alumina and water. Glaze is made of mostly silica. Silica has a melting point of 1700°C and we fire to 1240°C. The silica requires a “flux” to help it melt at the lower temperature. Fluxes can be all sorts of chemicals – a common one is calcium – calcium has a melting point of 2500°C, however, together they both melt at a much lower temperature! Colourants are metal oxides like cobalt (blue), chrome (green through black), copper (green, blue, even red!), manganese (black, purple and pink) iron (red brown), etc. Different chemicals in the glaze can have dramatic effects. for example, barium carbonate (which we don’t use) turns manganese bright pink! Other elements can turn manganese dioxide brown, blue, purple and reddish brown. Manganese dioxide is a flux in and of itself as well. So, glazes that get their black and purple colours, often interact with other glazes and RUN! Our mirror black is a good example – it mixes really well with many glazes because it fluxes them – causes them to melt faster. It will also bring out many beautiful colours in the glazes because it’s black colouring most definitely comes from manganese dioxide! Glaze chemistry is a whole subject on it’s own! We use commercial Mayco glazes on purpose – for their huge range of colour possibilities, stability, cool interactions, artistic freedom with the ability to easily brush the glazes on and ease of use. We currently have almost 50 glazes on hand! A major project is to test the interactions of all glazes with each other. That is 2,500 test tiles!!!! I’m going to make the wall behind the wheels the feature wall of pretty colours! Step Seven – Glaze (Gloss or sometimes called “Glost”) Firing Most of the time this is the final stage of making your creation (but not always!) The glaze kiln goes to 1240°C. This is called cone 6, or midrange. It is the low end of stoneware temperatures. Stoneware clays and glazes are typically fired at cone 8 – 10, that is 1260 – 1290°C. The energy requirement to go from 1240°C to 1280°C is almost a 30% more! Our clay is formulated to vitrify (mature, turn “glass-like”) at 1240°, as are our glazes. A glaze kiln take around 12 hours to reach temperature and two to three days to cool down. Sometimes a third firing process is required – this is for decoration that is added to work after the glaze firing. For example – adding precious metals and lustres. this firing temperature is usually around 600 – 800°C depending upon the techniques being used. There are many students interested in gold and silver trims – we will be doing this third type of firing soon! After firing your work will be in the student finished work shelves. Remember to pay for it before you head out the door! There is a small extra charge for using porcelain clay (it’s more than twice the price of regular clay), and for any third firing process! Once your work has been fired it can not turn back into clay for millennia – so don’t fire it if you don’t like it! Put it in the bucket for recycling. https://firebirdstudios.com.au/the-process-of-making-pottery/Ceramics have evolved over thousands of years.Earthenware dessert plate, cream colour. Made by Alfred Meakin, England. Backstamped ‘Alfred Meakin England’. flagstaff hill, warrnambool, shipwrecked-coast, flagstaff-hill, flagstaff-hill-maritime-museum, maritime-museum, shipwreck-coast, flagstaff-hill-maritime-village, alfred meakin, ceramics, earthenware, kitchenware -
 Flagstaff Hill Maritime Museum and Village
Domestic object - Jug
The Process of Making Pottery Decorating, Firing, Glazing, Making, Technical There is a rhythm and flow to clay. It can’t be done all at once! Even the making process! It can take weeks to get everything done, especially if you can only work on your pottery once a week! Even though we have three hour classes, it’s often just not enough time! Here is an overview of some of the processes so you have a bit more grasp on some of the technical stuff! Step One – Design There are SO many ideas out there for making stuff in clay! From delicate porcelain jewellery, through to heavy sculptural work and everything in between. Deciding your direction is sometimes not that easy – when you first start, try everything, you will naturally gravitate to the style that you enjoy! The options and variations are endless and can get a wee bit overwhelming too! Check in with me before you start to ensure your ideas will work, what order you might do things, how you could achieve the look you are seeking and any other technical data required! Step Two – Making Clay is thixotropic. This means that as you work with it, the clay first gets sloppier and wetter, before is begins to dry in the atmosphere. For most things, you simply can’t do all parts of the project at once. An example of work order might look like: Get last weeks work out from the shelves Prepare clay for today’s work – roll your clay, prepare balls for throwing, make the first stage of a pinch pot) Clean up last week’s work and put it on the shelf for bisque firing Check that you have any glazing to do – and do enough of it that you will have time to finish your main project Do the next step of your next project – there might be a further step that can’t be complete immediately, in that case, wrap your work well and put onto the shelves. Letting your work rest for a while can really help keep your work clean and professional looking. Many things require bagging under plastic to keep it ready for work the next week – put your name on the outside of the bag so you can find your work easily. We have stickers and markers. Consider how you want to decorate your work – coloured slip can be applied at a fairly wet stage (remembering that it will make your work even wetter!). Trying to apply slip to dry clay won’t work! If you want to do sgraffito – you will need to keep the work leather hard (a state of dryness where you can still work the clay with a little effort and a little water and care). Step Three – Drying Most of the time your work can go into the rack uncovered to let it dry out for the following week. If you want to continue forming or shaping you will need to double bag your work – put your work on a suitable sized bat and put the bat in a bag so the base of the bag is under the bat, then put another bag over the top of the work and tuck the top of the bag under the bat. If you want to trim (or turn) your thrown work the following week, it should also be double bagged. If your work is large, delicate, or of uneven thicknesses, you should lightly cover your work for drying. When considering the drying process, bare in mind the weather, humidity and wind! The hotter and dryer, the faster things dry and work can dry unevenly in the shelves – this can lead to cracking – another time to lightly cover your work for drying. Step Four – Trimming and Cleaning Up Your work is dry! It is called greenware now and it is at it’s most fragile! Handle everything with two hands. I often refer to soft hands – keep everything gentle and with your fingers spread as much as possible. Try to not pick up things like plates too much, and always with both hands! Before your work can be bisque fired it should be “cleaned up”. You work won’t go into the kiln if it has sharp edges – when glazed, sharp edges turn into razor blades! Use a piece of fly wire to rub the work all over – this will scratch a little so be light handed. Use a knife or metal kidney to scrape any areas that require a bit more dynamic treatment than the fly wire offers! Finally, a very light wipe over with a slightly damp sponge can help soften and soothe all of your edges and dags! Trimming thrown work: If you are planning to trim (or turn) your thrown work (and you should be), make sure you bag it well – your work should be leather hard to almost dry for easiest trimming. Use this step to finish the work completely – use a metal kidney to polish the surface, or a slightly damp sponge to give a freshly thrown look. Wipe the sponge around the rim after trimming, and check the inside of the pot for dags! Trimming slip cast work: Usually I will trim the rims of your work on the wheel the following day to make that stage easier, however you will still need to check your work for lumps and bumps. Last but not least – check that your name is still clearly on the bottom of your work. Step Five – Bisque Firing When the work is completely dry it can go into the bisque kiln. The bisque kiln is fired to 1000°C. This process burns off the water in the clay as well as some of the chemically bound water. The structure of the clay is not altered that much at this temperature. Inside the bisque kiln, the work is stacked a little, small bowl inside a larger bowl and onto a heavy plate. Smaller items like decorations or drink coasters might get stacked several high. Consideration is paid to the weight of the stack and shape of the work. A bisque kiln can fire about one and a half times the amount of work that the glaze kiln can fire. The firing takes about 10 hours to complete the cycle and about two days to cool down. Once it has been emptied the work is placed in the glaze room ready for you to decorate! Step Six – Glazing Decorating your work with colour can be a lot of fun – and time consuming! There are three main options for surface treatment at this stage: Oxide Washes Underglazes Glazes Washes and underglazes do not “glaze” the work – It will still need a layer of glaze to fully seal the clay (washes don’t need glaze on surfaces not designed for food or liquid as they can gloss up a little on their own). Underglazes are stable colourants that turn out pretty much how they look in the jar. They can be mixed with each other to form other colours and can be used like water colours to paint onto your work. Mostly they should have a clear glaze on top to seal them. Oxides are a different species – the pink oxide (cobalt) wash turns out bright blue for instance. They don’t always need a glaze on top, and some glazes can change the colour of the wash! The glazes need no other “glaze” on top! Be careful of unknown glaze interactions – you can put any combination of glaze in a bowl or on a plate, but only a single glaze on the outside of any vertical surface! Glazes are a chemical reaction under heat. We don’t know the exact chemicals in the Mayco glazes we use. I can guess by the way they interact with each other, however, on the whole, you need to test every idea you have, and not run the test on a vertical surface! Simply put, glaze is a layer of glass like substance that bonds with the clay underneath. Clay is made of silica, alumina and water. Glaze is made of mostly silica. Silica has a melting point of 1700°C and we fire to 1240°C. The silica requires a “flux” to help it melt at the lower temperature. Fluxes can be all sorts of chemicals – a common one is calcium – calcium has a melting point of 2500°C, however, together they both melt at a much lower temperature! Colourants are metal oxides like cobalt (blue), chrome (green through black), copper (green, blue, even red!), manganese (black, purple and pink) iron (red brown), etc. Different chemicals in the glaze can have dramatic effects. for example, barium carbonate (which we don’t use) turns manganese bright pink! Other elements can turn manganese dioxide brown, blue, purple and reddish brown. Manganese dioxide is a flux in and of itself as well. So, glazes that get their black and purple colours, often interact with other glazes and RUN! Our mirror black is a good example – it mixes really well with many glazes because it fluxes them – causes them to melt faster. It will also bring out many beautiful colours in the glazes because it’s black colouring most definitely comes from manganese dioxide! Glaze chemistry is a whole subject on it’s own! We use commercial Mayco glazes on purpose – for their huge range of colour possibilities, stability, cool interactions, artistic freedom with the ability to easily brush the glazes on and ease of use. We currently have almost 50 glazes on hand! A major project is to test the interactions of all glazes with each other. That is 2,500 test tiles!!!! I’m going to make the wall behind the wheels the feature wall of pretty colours! Step Seven – Glaze (Gloss or sometimes called “Glost”) Firing Most of the time this is the final stage of making your creation (but not always!) The glaze kiln goes to 1240°C. This is called cone 6, or midrange. It is the low end of stoneware temperatures. Stoneware clays and glazes are typically fired at cone 8 – 10, that is 1260 – 1290°C. The energy requirement to go from 1240°C to 1280°C is almost a 30% more! Our clay is formulated to vitrify (mature, turn “glass-like”) at 1240°, as are our glazes. A glaze kiln take around 12 hours to reach temperature and two to three days to cool down. Sometimes a third firing process is required – this is for decoration that is added to work after the glaze firing. For example – adding precious metals and lustres. this firing temperature is usually around 600 – 800°C depending upon the techniques being used. There are many students interested in gold and silver trims – we will be doing this third type of firing soon! After firing your work will be in the student finished work shelves. Remember to pay for it before you head out the door! There is a small extra charge for using porcelain clay (it’s more than twice the price of regular clay), and for any third firing process! Once your work has been fired it can not turn back into clay for millennia – so don’t fire it if you don’t like it! Put it in the bucket for recycling. https://firebirdstudios.com.au/the-process-of-making-pottery/The form of the jug has been in use for many centuries.Stoneware jug. Two tone brown glaze with pierced lip behind spout. Spout chipped.None.flagstaff hill, warrnambool, shipwrecked-coast, flagstaff-hill, flagstaff-hill-maritime-museum, maritime-museum, shipwreck-coast, flagstaff-hill-maritime-village, jug, ceramic jug -
 The Beechworth Burke Museum
Geological specimen - Feldspathic Sandstone
Feldspathic arenites are sandstones that contain less than 90% quartz, and more feldspar than unstable lithic fragments, and minor accessory minerals.Feldspathic sandstones are commonly immature or sub-mature.These sandstones occur in association with cratonic or stable shelf settings. Feldspathic sandstones are derived from granitic-type, primary crystalline, rocks. If the sandstone is dominantly plagioclase, then it is igneous in origin Sandstone features prominently in public buildings throughout Victoria. Most of the sandstone used as dimension stone in the State came from three sources: the Heatherlie quarry in the Grampians (Silurian), the Bacchus Marsh area (Permian), and the Barrabool Hills near Geelong (Cretaceous).Sandstone features prominently in public buildings throughout Victoria, making this specimen special as it shows the materials used by Victorian building companies. Sandstone can also be crushed, crushed stone is used in the construction of roadways and road structures such as bridges, and in buildings, both commercial and residential. This specimen is part of a larger collection of geological and mineral specimens collected from around Australia (and some parts of the world) and donated to the Burke Museum between 1868-1880. A large percentage of these specimens were collected in Victoria as part of the Geological Survey of Victoria that begun in 1852 (in response to the Gold Rush) to study and map the geology of Victoria. Collecting geological specimens was an important part of mapping and understanding the scientific makeup of the earth. Many of these specimens were sent to research and collecting organisations across Australia, including the Burke Museum, to educate and encourage further study. A feldspar-rich sandstone, a sandstone intermediate in composition between an arkosic sandstone and a quartz sandstone, containing 10% to 25% feldspar and less than 20% matrix material of clay, sericite, and chlorite. Feldspathic arenite containing less than 90 percent of the composition of quartz. Feldspar is the main composition. Feldspathic arenite may contain fragments of unstable rock, and a little amount of other minerals such as mica and heavy minerals. Some feldspathic arenite have pink or red color because of the presence of potassium feldspar or iron oxide. There are also colored light gray to white. These sandstones are usually medium to coarse grained and can contain a high percentage of granules with angular until subangular roundness. The content of the matrix can appear as the rest up to more than 15 percent, and sorting of grains can present as moderate to poorly sorted. Feldspathic sandstones are generally immature in textural maturity. Feldspathic arenite can not be judged from the structure of the sediment. Bedding can emerge from the laminate parallel to the crossbed. Fossils may appear in the layer deposited on the sea. Feldspathic arenites usually appear on the craton or the continental shelf, which can be associated with conglomerate, quartz lithic arenite, carbonate rock, or evaporites. This sandstone may also appear on the succession of sedimentary basins deposited on an unstable or deep sea, and moving arc setting. According to Pettijohn (1963) Arkose make up about 15 percent of all sandstones. Some Arkose formed in situ when the granite and related rocks disintegrate and generate granular sediments. Most of the material feldspathic sandstones derived from primary crystalline granitic rocks, such as granite or metasomatic rocks containing abundant potassium feldspar. Mineral contained in sandstones is mostly a form of plagioclase feldspar derived from quartz diorite or volcanic rock. Feldspar contained on this sandstone comes from arid to cool climates when the chemical weathering process is reduced.sandstone, natural stone, feldspathic sandstone, burke museum, geology, geological, geological specimen