Showing 963 items matching " tram 19"
-
 Ballarat Tramway Museum
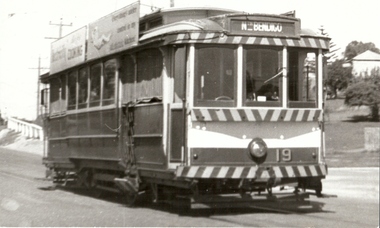
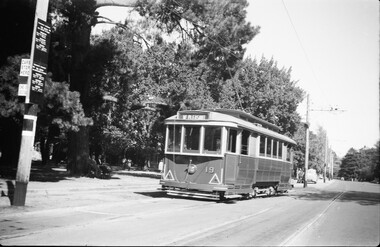
Photograph - SECV Geelong tram 19 at Belmont, 1950s
... SECV Geelong tram 19 at Belmont......tram 19...Photo of SECV Geelong tram 19 at the Belmont terminus with the return destination of North. ...Photo of SECV Geelong tram 19 at the Belmont terminus with the return destination of North. ...Photo of SECV Geelong tram 19 at the Belmont terminus with the return destination of North. Photographer unknown, 1950s. Yields information about Geelong tram 19 and the Belmont terminus.Black and white photograph with printers dates on the rear. geelong, tramways, belmont, tram 19 -
 Ballarat Tramway Museum
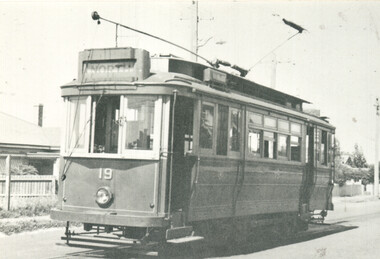
Photograph - SECV tram 19 Wendouree Parade, 5-4-1958
... SECV tram 19 Wendouree Parade......Tram 19...Photograph shows SECV Ballarat tram 19 in Wendouree Parade with the Gardens in the background. ...Photograph SECV tram 19 Wendouree Parade ...Photograph shows SECV Ballarat tram 19 in Wendouree Parade with the Gardens in the background. Received in an envelope dated 5-4-1958, photographer not known.Yields information about tram 19 and Wendouree Parade.Colour print on AGFA paper.tramcars, trams, secv, wendouree parade, tram 19 -
 Ballarat Tramway Museum
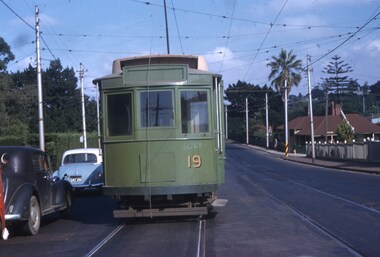
Photograph - SECV Geelong tram 19 at Ryrie & Moorabool, 1950s
... SECV Geelong tram 19 at Ryrie & Moorabool.......tram 19...Photo of SECV Geelong tram 19 at the corner of Ryrie St and Moorabool St. ...Photo of SECV Geelong tram 19 at the corner of Ryrie St and Moorabool St. ...Photo of SECV Geelong tram 19 at the corner of Ryrie St and Moorabool St. The tram has the destination of Eastern Park. In the background are the neon bar lights, Belchers Corner building and their original building. Photographer unknown, Photo 1950s.Yields information about Geelong tram 19 and the intersection of Ryrie and Mooabool Sts.Black and White photograph with printers marks on the rear, printed on AGFA paper.geelong, tramways, tram 19, ryrie st, moorabool st -
 Ballarat Tramway Museum
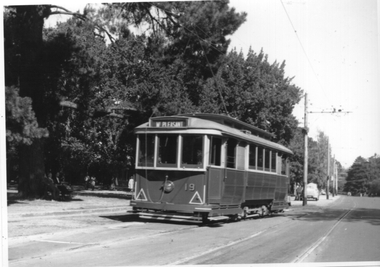
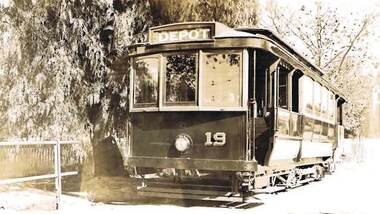
Photograph - Ballarat tram 19 Gardens Loop, mid to late 1950s
... Ballarat tram 19 Gardens Loop......tram 19...The photograph shows Ballarat tram No. 19 (Mt Pleasant) at Gardens Loop North in Wendouree Parade. ...Photograph Ballarat tram 19 Gardens Loop ...The photograph shows Ballarat tram No. 19 (Mt Pleasant) at Gardens Loop North in Wendouree Parade. Photo mid 1950s. Photographer unknown. Yields information about tram 19 at Gardens loop in the mid to late 1950s.Black and white print - plain back. Two copies held.tramcars, tramways, wendouee parade, tram 19, gardens loop -
 Ballarat Tramway Museum
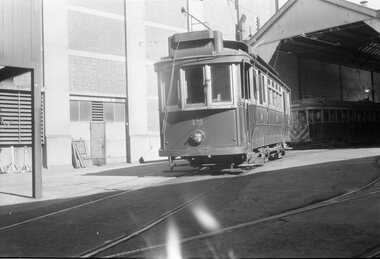
Negative - SECV Geelong tram 19 at Geelong Depot, Laurie Gallop, early 1956
... SECV Geelong tram 19 at Geelong Depot......tram 19...Photo shows Tram 19 at Geelong Depot One of a set of photos was taken between 15/2/1956 and 3/3/1956 when services operated only between Belmont and North before the final closure of the Belmont route on 25/31956 and that bogie tram 31 is not shown on the board, having gone to Ballarat on 15/2/1956 - see item 5554. ...Yields information about the Geelong operations toward the closure of the tram system. tramways Geelong Geelong depot tram 19 Black and white Negative - 120 size Negative SECV Geelong tram 19 at Geelong Depot Laurie Gallop ...Photo shows Tram 19 at Geelong Depot One of a set of photos was taken between 15/2/1956 and 3/3/1956 when services operated only between Belmont and North before the final closure of the Belmont route on 25/31956 and that bogie tram 31 is not shown on the board, having gone to Ballarat on 15/2/1956 - see item 5554. See item 8213 for an article on the Geelong system by Keith Kings. Yields information about the Geelong operations toward the closure of the tram system.Black and white Negative - 120 sizetramways, geelong, geelong depot, tram 19 -
 Ballarat Tramway Museum
Administrative record - SEC Tramcar record - tram 19, State Electricity Commission of Victoria (SECV), 1936 to 1960
... SEC Tramcar record - tram 19......tram 19...Lists the work carried out by the SEC on tram No. 19. Includes notes on the tram itself, body, brake gear, electrical, and truck. ...Administrative record SEC Tramcar record - tram 19 State Electricity Commission of Victoria (SECV) ...Lists the work carried out by the SEC on tram No. 19. Includes notes on the tram itself, body, brake gear, electrical, and truck. The tram was transferred to Bendigo during 1960 along with Number 25.Demonstrates the SECV practice of maintaining records for the work on the tramcars in Ballarat.Foolscap ruled sheet with stamp tram car number and work category, typed or handwritten entries.tramways, tramcars, ballarat, sec, tramcar maintenance, records, tram 19 -
 Ballarat Tramway Museum
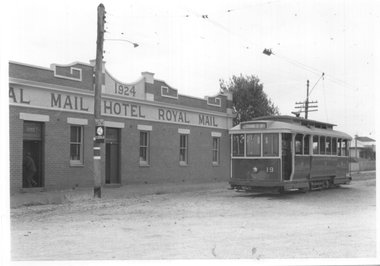
Photograph - Ballarat tram 19 Sebastopol, late 1950s
... Ballarat tram 19 Sebastopol......tram 19...The photograph shows Ballarat Tram No. 19 at the Sebastopol terminus late 1950s with the driver/conductor standing by the front door before returning to Lydiard St North. ...Photograph Ballarat tram 19 Sebastopol ...The photograph shows Ballarat Tram No. 19 at the Sebastopol terminus late 1950s with the driver/conductor standing by the front door before returning to Lydiard St North. On the opposite side of the tram is the "Pay as You Enter" sign. The Royal Mail Hotel is in the background. Photographer unknown. Yields information about tram 19 at the Sebastopol terminus, late 1950s.Black and white prints - plain back. tramcars, tramways, one man trams, sebastopol, royal mail hotel, crews, tram 19 -
 Ballarat Tramway Museum
Photograph - Ballarat tram 19 Sebastopol, Ken Winney, 12/1949
... Ballarat tram 19 Sebastopol......tram 19...The photograph shows SEC Ballarat tram No. 19 at the Sebastopol terminus shortly after arriving. ...Yields information about tram 19 and the Sebastopol terminus. Tramcars Sebastopol tram 19 Albert St. ...The photograph shows SEC Ballarat tram No. 19 at the Sebastopol terminus shortly after arriving. The pole is yet to be reversed, though the destination has been set for Lydiard St North. The Royal Mail Hotel is in the background. Note the departure clock on the tram stop pole - see second image - appears to be set for a 20 min service at 2mins etc past the hour. Photo by I K Winney of Sydney, 12/1949.Yields information about tram 19 and the Sebastopol terminus.Black and white photograph with photographers details on rear."Car No. 19 at Sebastopol terminus, Ballarat 12/1949, I K Winney"tramcars, sebastopol, tram 19, albert st., royal mail hotel, clocks -
 Melbourne Tram Museum
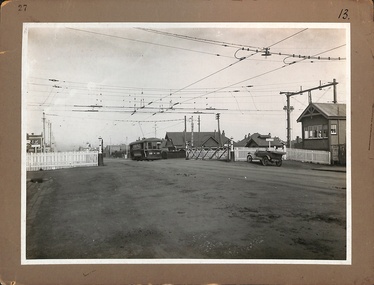
Photograph - Lygon St Level crossing and MBCTT tram 19, mid 1921
... Lygon St Level crossing and MBCTT tram 19......tram 19...Photograph of the Level Crossing in Lygon St with the inner Circle Railway North Carlton, with Melbourne Brunswick and Coburg Tram No. 19 crossing with the interlocked gates and signal box in the view. ...Photograph Lygon St Level crossing and MBCTT tram 19 ...Photograph of the Level Crossing in Lygon St with the inner Circle Railway North Carlton, with Melbourne Brunswick and Coburg Tram No. 19 crossing with the interlocked gates and signal box in the view. Photo mid 1921. The level crossing was electrified on 5-7-1921, but the wires etc would have been positioned earlier. See Weekly Notice Extracts 1894-1994, published 1996. See item 3432 for a smaller print.Yields information about the Lygon St North Carlton level crossing and a MBCTT tramcar.Black and white photo mounted on grey brown card with notes on the rear. In ink on the rear "Lygon St Crossing" and numbers 18 and 14 within circles.tramways, lygon st, north carlton, level crossings, mbctt, tram 19, s class -
 Melbourne Tram Museum
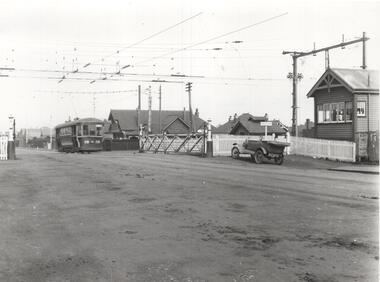
Photograph - Lygon St Level crossing and MBCTT tram 19, mid 1921
... Lygon St Level crossing and MBCTT tram 19...... tram 19...Photograph of the Level Crossing in Lygon St with the inner Circle Railway North Carlton, with Melbourne Brunswick and Coburg Tram No. 19 crossing with the interlocked gates and signal box in the view. ...Photograph Lygon St Level crossing and MBCTT tram 19 ...Photograph of the Level Crossing in Lygon St with the inner Circle Railway North Carlton, with Melbourne Brunswick and Coburg Tram No. 19 crossing with the interlocked gates and signal box in the view. Photo mid 1921. The level crossing was electrified on 5-7-1921, but the wires etc would have been positioned earlier. See Weekly Notice Extracts 1894-1994, published 1996. See item 9517 for a wider view and a larger size print.Yields information about the Lygon St North Carlton level crossing and a MBCTT tramcar.Photograph, Black and White, with notes on the rear.In ink on the rear: "Melbourne - Ex Coburg Trust route / No. 19 in Lygon St at railway crossing North Carlton / (later No. 166) After 10/8/1920. Has KSK stamp and Number LWR-3 and CEE 13 in to right hand corner.trams, tramways, lygon st, north carlton, level crossings, mbctt, tram 19, s class -
 Bendigo Historical Society Inc.
Photograph - PHOTOGRAPH. TRAM NO.19, BENDIGO TRAMWAYS
... PHOTOGRAPH. TRAM NO.19, BENDIGO TRAMWAYS....Tram...no. 19...Colour photograph - Tram No. 19, Bendigo Tramways....History House 11 Mackenzie Street Bendigo goldfields PHOTOGRAPH Tram no. 19 Photograph. Bendigo Tram No. 19. Bendigo Tramways. ...Colour photograph - Tram No. 19, Bendigo Tramways.photograph, tram, no. 19, photograph. bendigo tram no. 19. bendigo tramways. -
 Ballarat Tramway Museum
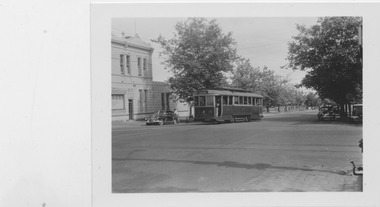
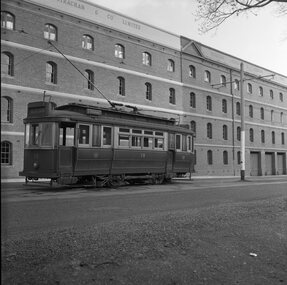
Photograph - Tram 19 - Cnr Drummond St South and Sturt St, 11/1/1954
... Tram 19 - Cnr Drummond St South and Sturt St......Tram 19...No 1905" Black and white photograph on plain paper Photograph Tram 19 - Cnr Drummond St South and Sturt St ...Photograph of Ballarat Tramcar 19 in Drummond St South, about to turn into Sturt StYields information about SEC tramway operations.Black and white photograph on plain paper"8" "91" "KEN MAGOR Neg. No 1905"ballarat, tram 19, drummond st south, sturt st, sturt st west -
 Bendigo Historical Society Inc.
Photograph - BENDIGO TRAM NO 19, 1935
... BENDIGO TRAM NO 19...Tram...no. 19...Black and White Photo of Tram No 19, No 19 Tram parked by a Peppercorn Tree, Destination Plate at top of tram reads 'Depot', Markings on back of Photo read 'Bendigo Electric Tramways 1935', '1935 One man- two man cars', 'S.E.C. ...History House 11 Mackenzie Street Bendigo goldfields PHOTOGRAPH Tram no. 19 Bendigo Tram Bendigo Trams Bendigo Tramways Trams Bendigo Electric Tramways Black and White Photo of Tram No 19, No 19 Tram parked by a Peppercorn Tree, Destination Plate at top of tram reads 'Depot', Markings on back of Photo read 'Bendigo Electric Tramways 1935', '1935 One man- two man cars', 'S.E.C. ...Black and White Photo of Tram No 19, No 19 Tram parked by a Peppercorn Tree, Destination Plate at top of tram reads 'Depot', Markings on back of Photo read 'Bendigo Electric Tramways 1935', '1935 One man- two man cars', 'S.E.C. Colours', stamped with 'Printed by Olivers Bendigo'photograph, tram, no. 19, bendigo tram, bendigo trams, bendigo tramways, trams, bendigo electric tramways -
 Ballarat Tramway Museum
Photograph - SECV Bendigo Bendigo tram No. 19, 1930
... SECV Bendigo Bendigo tram No. 19...... tram 19...Photo of Bendigo tram No. 19, 1st of the ex MMTB cars to Bendigo, prior to any conversion work. ...Photo of Bendigo tram No. 19, 1st of the ex MMTB cars to Bendigo, prior to any conversion work. ...Photo of Bendigo tram No. 19, 1st of the ex MMTB cars to Bendigo, prior to any conversion work. Tram has "Bendigo Tramways" painted on the side of the tram, a sign at the front of the tram saying "Pay as you Leave", the destination of Golden Square. Has one conductor and five drivers? (motormen) standing alongside the front of the tram. Wal Jack has written in on the album "No. 19, 1st of ex MMTB cars at depot 1930". Black and White print contained within the Wal Jack Bendigo and Geelong Album, see Reg Item 5003 for more details. Peter Duckett photo or collection.Yields information about Bendigo tram 19, the first ex MMTB Car in Bendigo.Black and white print with initials on the rear.On the rear in blue ink "PWD"trams, tramways, bendigo, new trams, signs, crews, tram 19 -
 Ballarat Tramway Museum
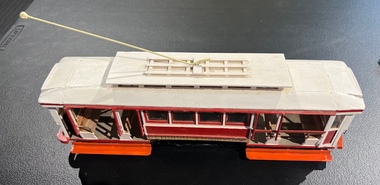
Model - Model of Bendigo tram No. 19
... Model of Bendigo tram No. 19......tram 19...Model Model of Bendigo tram No. 19 ...Model of Bendigo 19, Open California combination car in the Bendigo Trust colour scheme with the name of the operator "Bendigo Tramways" on the side and the front dash panel and a destination of "Gold Mine". The Modeller has detailed the seats the end saloons. Balsa wheels had broken off, repaired with 'O' gauge wheels along with other parts by the Museum's model builder.Demonstrates model tram building. One of a series of Ballarat and Bendigo tram models. Not known who built them.Model tram - made from Balsa wood, cardboard, paint, metal, styrene, wire.models, trams, bendigo, tram 19, bendigo trust -
 Melbourne Tram Museum
Slide, John Webster, 10/11/1961 12:00:00 AM
... ... tram 19...Colour slide, Kodak, white cardboard of MMTB Freight tram No. 19 in Wallen Road, Hawthorn, on the west side of the existing depot. ...Hand writing on rear in ink "13-2-61, Tram No. 19"...Melbourne Tram Museum 8 Wallen Road Hawthorn melbourne Trams tramways Freight tram Wallen Rd Work Trams tram 19 Hand writing on rear in ink "13-2-61, Tram No. 19" Colour slide, Kodak, white cardboard of MMTB Freight tram No. 19 in Wallen Road, Hawthorn, on the west side of the existing depot. ...Colour slide, Kodak, white cardboard of MMTB Freight tram No. 19 in Wallen Road, Hawthorn, on the west side of the existing depot. The house in the photo remains. Slide dated 13-2-1961.Hand writing on rear in ink "13-2-61, Tram No. 19"trams, tramways, freight tram, wallen rd, work trams, tram 19 -
 Melbourne Tram Museum
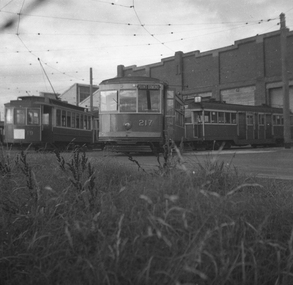
Negative - Set of 2, Possibly Geoff Grant, c1950
... ... tram 19...Set of two Black and white negatives of trams at Preston Workshops .1 - Trams - Freight car 19. X class 217 and a W2. The X has the destination of Point Ormond. .2 - Freight tram 19 - side on view. ...Melbourne Tram Museum 8 Wallen Road Hawthorn melbourne Trams tramways Preston Workshops X class W2 class Freight tram tram 19 tram 217 Set of two Black and white negatives of trams at Preston Workshops .1 - Trams - Freight car 19. ...Set of two Black and white negatives of trams at Preston Workshops .1 - Trams - Freight car 19. X class 217 and a W2. The X has the destination of Point Ormond. .2 - Freight tram 19 - side on view. Photo not in Wal Jack Melbourne album.trams, tramways, preston workshops, x class, w2 class, freight tram, tram 19, tram 217 -
 Bendigo Historical Society Inc.
Photograph - BASIL MILLER COLLECTION: NO 19 TRAM
... BASIL MILLER COLLECTION: NO 19 TRAM...Black and white photo of No 19 tram on Thunder St North Bendigo. S.E.C Colour scheme....Photograph BASIL MILLER COLLECTION: NO 19 TRAM ...Black and white photo of No 19 tram on Thunder St North Bendigo. S.E.C Colour scheme.person, individual, basil miller -
 Ballarat Tramway Museum
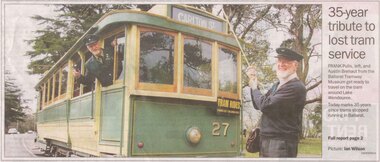
Document - Photocopies, Austin Brehaut, "35th Anniversary of tram closure 19-9-2006", 20/09/2006 12:00:00 AM
... "35th Anniversary of tram closure 19-9-2006"...Set of photocopies of papers/newspaper cuttings titled "35th Anniversary of tram closure 19-9-2006" and notes by Austin Brehaut. .1 - Photocopy of front cover of The Courier, Ballarat 19/9/2006, with Austin Brehaut and Frank Pulls (mis spelt as Pulis), with No. 27. .2 - Photocopy of page of page 2, with photo of Frank Pulls at the controls of No. 27 and story by James Kelly. ...Contained within the worksheet are notes by Austin on the day itself and events. "35th Anniversary of tram closure 19-9-2006" Document Photocopies Austin Brehaut ...Commemorates the 35th anniversary of the closure of the SEC trams in Ballarat and the operation of the BTM.Set of photocopies of papers/newspaper cuttings titled "35th Anniversary of tram closure 19-9-2006" and notes by Austin Brehaut. .1 - Photocopy of front cover of The Courier, Ballarat 19/9/2006, with Austin Brehaut and Frank Pulls (mis spelt as Pulis), with No. 27. .2 - Photocopy of page of page 2, with photo of Frank Pulls at the controls of No. 27 and story by James Kelly. Photos by Ian Wilson. .3 - Papers associated with the event, notes written by Austin Brehaut and editorial in the Courier of the day about the event and congratulating the Museum. See Reg Item No. 3597 - CD - for scans of these photos in colour. Image files below created from these scans. Contained within the worksheet are notes by Austin on the day itself and events.trams, tramways, btm, anniversary, editorial -
 Ballarat Tramway Museum
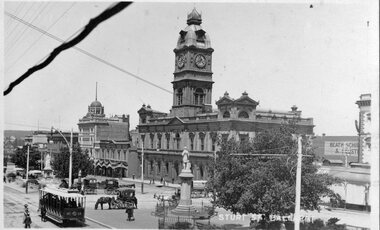
Postcard, Kodak, ESCo crossbench tram No. 19
... ESCo crossbench tram No. 19...Printed black and white photographic postcard of Ballarat ESCo crossbench tram No. 19 at the intersection of Armstrong and Sturt St. travelling east along the north side of Sturt Street. ....3 - rear of postcard ESCo crossbench tram No. 19 Postcard Kodak ...Printed black and white photographic postcard of Ballarat ESCo crossbench tram No. 19 at the intersection of Armstrong and Sturt St. travelling east along the north side of Sturt Street. Photo appears to be taken in the early days of tram operation - small destination box. Has the Ballarat Town Hall, the National Mutual Life building, Snows and other buildings on the south side of Sturt. St. Has a number of horse drawn vehicles in the image as well. Titled "Sturt Street, Ballarat" in bottom right hand corner". On rear of postcard, printed is the words "Post Card", areas for "Correspondence" and "Address Only" and in stamp area in a square "Kodak Australia" twice. Handwritten on the card is "With Best Wishes for a Happy New Year to all Rostella / W. Lovett". Images .1 - shows postcard, .2 - close up, of No. 19, note Inspector along side tram, the stance of the motorman/driver, and conductor on the rear platform of the tram. Appears to have a destination of "Gardens ?" .3 - rear of postcard Handwritten letter on card.trams, tramways, esco, sturt st, postcards, armstrong st -
 Ballarat Tramway Museum
Photograph - Black & White Photograph/s, John Webster, 21/08/1955 12:00:00 AM
... ... tram 19...Black and white photograph of Geelong No. 19 with the background of the wool store area. Tram has the destination of Chilwell. ... ink on rear "Tram 19 Geelong Vic. W. John Webster Photo". ...Ballarat Tramway Museum South Gardens Reserve Wendouree Parade Ballarat Ballarat goldfields Yields information about the appearance of one Geelong's single truck trams and its wool store environment. tramways trams Geelong tram 19 ink on rear "Tram 19 Geelong Vic. W. ...Yields information about the appearance of one Geelong's single truck trams and its wool store environment.Black and white photograph of Geelong No. 19 with the background of the wool store area. Tram has the destination of Chilwell. Photographed by John Webster, 21/8/1955. Photo used on page 43 of Destination Eaglehawk. Actual print is part of the whole negative. See image 4210i3 On Negative in ink "EH 33" Negative scanned at hi res 4/6/2020 and image updated. ink on rear "Tram 19 Geelong Vic. W. John Webster Photo". On top edge "9263#" and EH33 21-8-55 and initials JR. In pencil is the instruction, increase to 31ems and pencil cropping marks on the rear.tramways, trams, geelong, tram 19 -
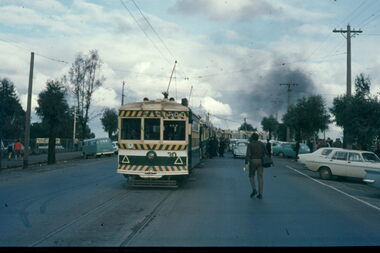
 Ballarat Tramway Museum
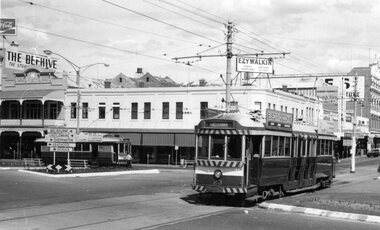
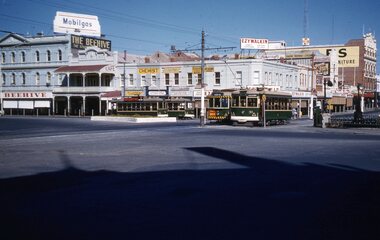
Photograph - Black & White Photograph/s, George Bishop, Dec. 1971
... ... tram 19...The Beehive and Ezywalkin buildings in the background. No. 19 in the distance. Both trams have SEC Electric Cooking Roof Advertisements. ...On the back of the photo in ink "SEC trams No. 19 and 23 (Bendigo System) at Charing Cross. / G. ...Ballarat Tramway Museum South Gardens Reserve Wendouree Parade Ballarat Ballarat goldfields tramways trams Bendigo Charing Cross Pall Mall tram 19 tram 23 On the back of the photo in ink "SEC trams No. 19 and 23 (Bendigo System) at Charing Cross. / G. ...Black and white photographs of Bendigo No. 23 and 19 at Charing Cross 12/1971. No. 23 has destination of Eaglehawk. The Beehive and Ezywalkin buildings in the background. No. 19 in the distance. Both trams have SEC Electric Cooking Roof Advertisements. Photos by George Bishop. .On the back of the photo in ink "SEC trams No. 19 and 23 (Bendigo System) at Charing Cross. / G. Bishop photo."tramways, trams, bendigo, charing cross, pall mall, tram 19, tram 23 -
 Ballarat Tramway Museum
Photograph - SECV Geelong 19 in Ryrie St, 1950s
... ...tram 19...Photo of a SECV Geelong tram 19, eastbound in Ryrie St to East at Gheringhap St. ...Photo of a SECV Geelong tram 19, eastbound in Ryrie St to East at Gheringhap St. ...Photo of a SECV Geelong tram 19, eastbound in Ryrie St to East at Gheringhap St. Photographer unknown. Photo 1950s.Yields information about Geelong tram 19 at the intersection of Ryrie and Gheringhap Sts.Black and white photograph with printers marks on the rear printed on Minolta paper.geelong, tramways, ryrie st, gheringhap st, tram 19 -
 Ballarat Tramway Museum
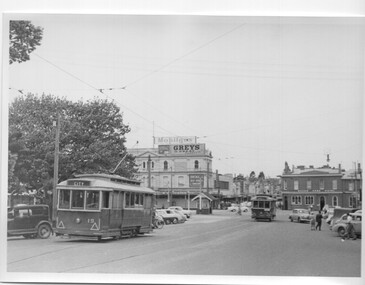
Photograph - Black & White Photograph/s, Charles Craig, 1950's
... ... tram 19...Black and white photograph of Ballarat tram 19 in the City Loop and tram 30 in Sturt St, leaving Grenville St. ...Trams tramways Sturt St Grenville St City Loop tram 19 tram 30 Black and white photograph of Ballarat tram 19 in the City Loop and tram 30 in Sturt St, leaving Grenville St. ...Yields information about the use of the appearance of City Loop and the intersection with Grenville St during the late 1950's.Black and white photograph of Ballarat tram 19 in the City Loop and tram 30 in Sturt St, leaving Grenville St. Photo has a number of motor vehicles in the view, along with the Bucks Head Hotel, S E Dickins Grocery store on the north side of Bridge St, with adverts for Mobilgas and Greys cigarettes. The Grenville St shelter is in the view as well. Photo by Charles Craig possibly late 1950's. trams, tramways, sturt st, grenville st, city loop, tram 19, tram 30 -
 Bendigo Historical Society Inc.
Photograph - BASIL MILLER COLLECTION: NUMBER 19 TRAM, DRIVER AND SENIOR OFFICIALS
... BASIL MILLER COLLECTION: NUMBER 19 TRAM, DRIVER AND SENIOR OFFICIALS....Black and white photograph of Number 19 tram, Conductor standing on tram, driver is on extreme right. ...History House 11 Mackenzie Street Bendigo goldfields PERSON Individual basil miller Percy Pinder Black and white photograph of Number 19 tram, Conductor standing on tram, driver is on extreme right. ...Black and white photograph of Number 19 tram, Conductor standing on tram, driver is on extreme right. Four others appear to be Senior Tramways Officials, note double breasted jackets, tram is destined for Golden Square. On front bottom right corner signed 'P.Basil Miller' 284 King Street Bendigo.Percy Pinderperson, individual, basil miller -
 Ballarat Tramway Museum
Photograph - Black & White Photograph/s, Negative, Ellis Collection, c1950
... ... tram 19...Black and white photograph of tram 19 leaving Gardens Loop with the destination of Mt Pleasant. ...Ballarat Tramway Museum South Gardens Reserve Wendouree Parade Ballarat Ballarat goldfields Yields information about the appearance of the Gardens Crossing Loop and tram 19. Trams tramways Gardens Loop Wendouree Parade Tram Stops tram 19 On the top edge of one of the prints "Wendouree Parade 1950 have print" Black and white photograph of tram 19 leaving Gardens Loop with the destination of Mt Pleasant. ...Yields information about the appearance of the Gardens Crossing Loop and tram 19.Black and white photograph of tram 19 leaving Gardens Loop with the destination of Mt Pleasant. Note the tram stop pole behind the tram, fitted with timetable boards, stop sign and section sign. Item donated comprised negative 1144, A4 print and laminated A4 print. Negative scanned at 2400dpi. See Reg Item 3376 for another print - noted that it was from the Ellis Collection. On the top edge of one of the prints "Wendouree Parade 1950 have print"trams, tramways, gardens loop, wendouree parade, tram stops, tram 19 -
 Ballarat Tramway Museum
Slide - Bendigo trams - Quarry Hill - Eaglehawk route - set of 6, Warren Doubleday, 13/9/1970
... ...tram 19...Set of six slides of Bendigo trams taken by Warren Doubleday on 13/9/1970 during an ARHS tour to Bendigo - 1 - tram 30 at the head of a long line up at the railway station 2 - tram 19 - part of the convoy 3 - tram 25 - turning into View St 4 - tram 24 leaving a loop on the Eaglehawk line - note the signals on the pole with one showing a green light. 5 - tram 26 outbound to Eaglehawk 6 - tram 3 inbound about to enter a loop - note the red signal on the pole....Bendigo Charing Cross Eaglehawk Quarry Hill tram 30 tram 19 tram 25 tram 24 tram 26 tram 3 Signals Have the photographer's slide number written on them. ...Set of six slides of Bendigo trams taken by Warren Doubleday on 13/9/1970 during an ARHS tour to Bendigo - 1 - tram 30 at the head of a long line up at the railway station 2 - tram 19 - part of the convoy 3 - tram 25 - turning into View St 4 - tram 24 leaving a loop on the Eaglehawk line - note the signals on the pole with one showing a green light. 5 - tram 26 outbound to Eaglehawk 6 - tram 3 inbound about to enter a loop - note the red signal on the pole.Yields information about the Bendigo tram system and the tram used on a tour in Sept. 1970.Colour Slide - Anscochrome GAF plastic mounts - set of 6Have the photographer's slide number written on them.bendigo, charing cross, eaglehawk, quarry hill, tram 30, tram 19, tram 25, tram 24, tram 26, tram 3, signals -
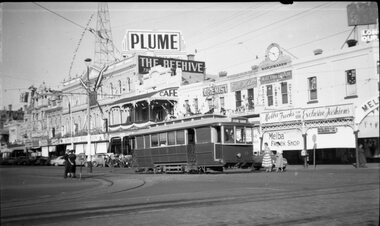 Ballarat Tramway Museum
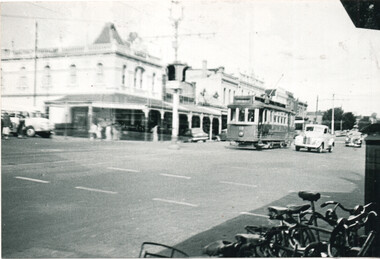
Negative, Wal Jack, 7/03/1954 12:00:00 AM
... ... tram 19...Negative and Digital images of the Wal Jack Bendigo Negative file of tram 19 at Charing Cross. Tram has the destination of Charing Cross. ...Ballarat Tramway Museum South Gardens Reserve Wendouree Parade Ballarat Ballarat goldfields Trams tramways Bendigo Pall Mall Charing Cross Royal Visit tram 19 Negative and Digital images of the Wal Jack Bendigo Negative file of tram 19 at Charing Cross. ...Negative and Digital images of the Wal Jack Bendigo Negative file of tram 19 at Charing Cross. Tram has the destination of Charing Cross. In the background is are decoration for the Royal Visit (on The Beehive building), Evelyn Amor, A. G. Trelor watchmaker, Melba Frocks, the latter with a sign provided by the RACV pointing towards Melbourne. A large Plume sign is on The Beehive building. Assumed taken on the same day as Reg Item 7878 - Royal Visit.trams, tramways, bendigo, pall mall, charing cross, royal visit, tram 19 -
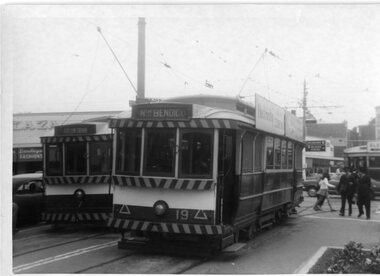 Ballarat Tramway Museum
Photograph - Black & White Photograph/s, Ian Barkla, 30/08/1969 12:00:00 AM
... ...Tram 19...In background is a driver and conductor walking towards 19. Tram 19 has two large SEC roof ads. Taken 30-8-1969. ...In background is a driver and conductor walking towards 19. Tram 19 has two large SEC roof ads. Taken 30-8-1969. ...Black and white photograph of Bendigo 7 and 19 at Charing Cross, with the end of a Bogie tram in the background. Bendigo 19 has destination of "Nth Bendigo", 7 of "Golden Square". Both trams have the large white strip under the dash canopy lighting. In background is a driver and conductor walking towards 19. Tram 19 has two large SEC roof ads. Taken 30-8-1969. On Kodak paper.On rear in black biro "Bendigo 19 at the Fountain, 30-8-69 / Ex 185 MMTB"trams, tramways, bendigo, pall mall, charing cross , tram 19, 7 -
 Ballarat Tramway Museum
Slide - 35mm slide/s, Keith Kings, 8/01/1961 12:00:00 AM
... ... tram 19...By front door of tram 30 is a 'Safety Zone' sign. Tram 19, has a 'Briquette' ad on front panel. ...Ballarat Tramway Museum South Gardens Reserve Wendouree Parade Ballarat Ballarat goldfields Tramways trams Bendigo Birney Charing Cross tram 19 tram 29 tram 28 tram 30 Stamped 'K.S.Kings etc' and in blue ink, 'K(r)(335)m, Bendigo, 1/250. f4.5, 8/1/61, 29, 28, 19 and 30 at Charing Cross' Bendigo, Charing Cross, 8-1-1961. ...Bendigo, Charing Cross, 8-1-1961. Trams 30 (large white bumper) and 19 (top and bottom safety stripes, but no lighting) on Eaglehawk/Quarry Hill run, and trams 29, 28 on North Bendigo/Golden Square. Both Birneys have had bumpers painted white. Large white painted traffic island on North side. Ezywalkin, Beehive buildings and Mobilgas sign. By front door of tram 30 is a 'Safety Zone' sign. Tram 19, has a 'Briquette' ad on front panel. Photo by Keith Kings.Stamped 'K.S.Kings etc' and in blue ink, 'K(r)(335)m, Bendigo, 1/250. f4.5, 8/1/61, 29, 28, 19 and 30 at Charing Cross'tramways, trams, bendigo, birney, charing cross, tram 19, tram 29, tram 28, tram 30