Showing 81 items matching " bridge st loop"
-
 Ballarat Tramway Museum
Slide - 35mm slide/s, Keith Kings, 20/10/1962 12:00:00 AM
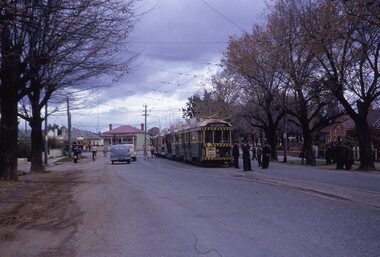
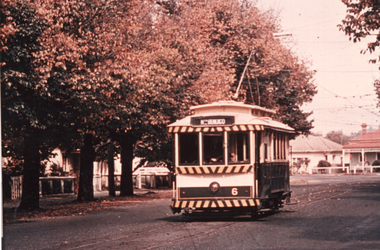
... ... Bridge St Loop...Bendigo trams, 18, 26, 29, 11 in Bridge St. Loop, with 5 in Nolan St waiting for a Bendigo tram? ...Stamped 'K.S.KIngs etc', and in blue ink 'K(k)(384), 1/250, f5.6, 20/10/62, ARHS, Convoy 'A' 5,11,29,26,18 on Bridge St.. Loop, Bendigo'...Ballarat Tramway Museum South Gardens Reserve Wendouree Parade Ballarat Ballarat goldfields Tramways trams Bendigo North Bendigo Bridge St Loop ARHS tram 18 tram 26 tram 29 tram 11 tram 5 Stamped 'K.S.KIngs etc', and in blue ink 'K(k)(384), 1/250, f5.6, 20/10/62, ARHS, Convoy 'A' 5,11,29,26,18 on Bridge St.. ...Bendigo trams, 18, 26, 29, 11 in Bridge St. Loop, with 5 in Nolan St waiting for a Bendigo tram? on 20-10-1962 as part of an ARHS tour to Bendigo. Note white convoy marker on front tram, Tram 18 showing 'RLY Station' destination. Tram 18 has 'Kohn Drinks' ad on front panel. Photo by Keith Kings.Stamped 'K.S.KIngs etc', and in blue ink 'K(k)(384), 1/250, f5.6, 20/10/62, ARHS, Convoy 'A' 5,11,29,26,18 on Bridge St.. Loop, Bendigo'tramways, trams, bendigo, north bendigo, bridge st loop, arhs, tram 18, tram 26, tram 29, tram 11, tram 5 -
 Ballarat Tramway Museum
Slide - 35mm slide/s - set of 2 - Bendigo 6, Noel Simons, Apr. 1967
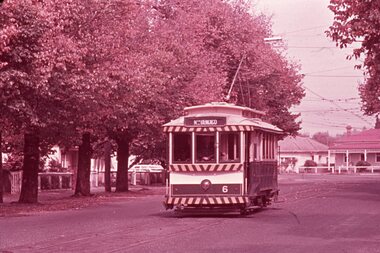
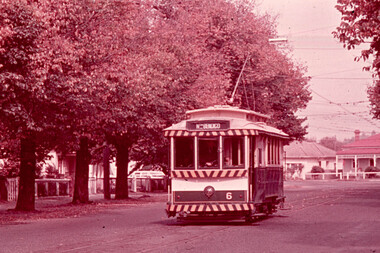
... ... Bridge St Loop...Set of 2 slides made from the Association of Railway Enthusiast Provincial Tramways film strip, possibly during April 1967. 1191.1 - No. 6 heading for North Bendigo in Bridge St., just past the disused Bridge St. Loop. See item 9449 for a print of this photo. 1191.2 - Bendigo 16 and 17 in the depot. ...1191.1 - "No. 6 passes the disused Bridge St. loop on its path to North Bendigo" - dated with a hand stamp in purple ink "Apr 1967". 1191.2 - "No. 16 and 17 at rear of Bendigo Depot". - slide not dated - late 60's or early 70's. ...Ballarat Tramway Museum South Gardens Reserve Wendouree Parade Ballarat Ballarat goldfields Tramways trams North Bendigo Bendigo Bridge St Loop Depot tram 6 tram 16 tram 17 1191.1 - "No. 6 passes the disused Bridge St. loop on its path to North Bendigo" - dated with a hand stamp in purple ink "Apr 1967". 1191.2 - "No. 16 and 17 at rear of Bendigo Depot". - slide not dated - late 60's or early 70's. ...Set of 2 slides made from the Association of Railway Enthusiast Provincial Tramways film strip, possibly during April 1967. 1191.1 - No. 6 heading for North Bendigo in Bridge St., just past the disused Bridge St. Loop. See item 9449 for a print of this photo. 1191.2 - Bendigo 16 and 17 in the depot. Photo taken inside the building. No. 16 showing Thorpe St., 17 - Depot.1191.1 - "No. 6 passes the disused Bridge St. loop on its path to North Bendigo" - dated with a hand stamp in purple ink "Apr 1967". 1191.2 - "No. 16 and 17 at rear of Bendigo Depot". - slide not dated - late 60's or early 70's. Details are in blue ink written onto slide mount.tramways, trams, north bendigo, bendigo, bridge st loop, depot, tram 6, tram 16, tram 17 -
 Ballarat Tramway Museum
Slide - 35mm slide/s - set of 4, Noel Simons, Apr. 1967
... ... Bridge St Loop...Tramways trams North Bendigo Bendigo Bridge St Loop Depot tram 21 tram 23 tram 28 tram Scrubber Details in blue ink, date hand stamped in purple ink. 1192.1 - "No. 21 heads along High St for Golden Square between Wattle and Vine Streets." 1192.2 - "Birney No. 28 in Christmas Garb, traverses Pall Mall en route to North Bendigo". 1192.3 - "No. 23 at Needle Loop on its run to Eaglehawk". 1192.4 - "Scrubber car at Bendigo Depot". ...Set of 4 slides made from the Association of Railway Enthusiast Provincial Tramways film strip, possibly during April 1967. 1192.1 and 1192.3 mounted in Kodak Ready Mounts. The others in plain white mounts. Slides dated Dec. 1968. 1192.1 - No. 21 outbound to Golden Square in High St., between Wattle and Vine Streets. Photo taken after the tram has passed photographer. Has a sign for "Reid's Furnituorium" in the background. 1192.2 - Bendigo No. 28 dressed up as Myers Christmas tram, passing the Post Office and Courts in Pall Mall. 1192.3 - Bendigo No. 23 at Needle Loop en route to Eaglehawk. Tram has two SEC roof ads, one "Electric Cooking" and the other "Everything fine in my all electric kitchen". 1192.4 - Bendigo scrubber parked at the end of the main depot lead, alongside the depot office buildings.Details in blue ink, date hand stamped in purple ink. 1192.1 - "No. 21 heads along High St for Golden Square between Wattle and Vine Streets." 1192.2 - "Birney No. 28 in Christmas Garb, traverses Pall Mall en route to North Bendigo". 1192.3 - "No. 23 at Needle Loop on its run to Eaglehawk". 1192.4 - "Scrubber car at Bendigo Depot".tramways, trams, north bendigo, bendigo, bridge st loop, depot, tram 21, tram 23, tram 28, tram scrubber -
 Ballarat Tramway Museum
Slide - 35mm slide/s, Dave Macartney, Apr. 1967
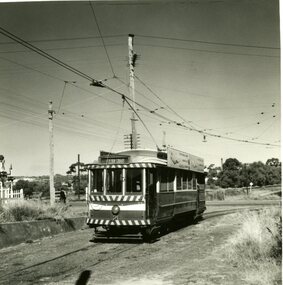
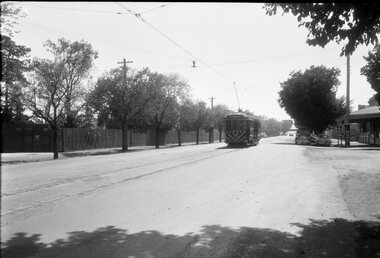
... White cardboard mount, 35mm slide, from the Association of Railway Enthusiast's film strip titled "Provincial Tramway Film Strip" of Bendigo No. 6, passing the disused Bridge St. Loop, Bridge St., North Bendigo. Tram has the destination of North Bendigo. ...Bridge St Bendigo tram 6 Stamped on base of slide "11799" and written in ink on top edge "No. 6 Bridge St. Bendigo" White cardboard mount, 35mm slide, from the Association of Railway Enthusiast's film strip titled "Provincial Tramway Film Strip" of Bendigo No. 6, passing the disused Bridge St. Loop ...White cardboard mount, 35mm slide, from the Association of Railway Enthusiast's film strip titled "Provincial Tramway Film Strip" of Bendigo No. 6, passing the disused Bridge St. Loop, Bridge St., North Bendigo. Tram has the destination of North Bendigo. The film strip notes (Reg. Item 2560), provided the following caption details: "No. 6 heads past the disused Bridge St. loop toward "NORTH BENDIGO" on a windy autumn day. - Apr. '67 (Dave Macartney)" See image btm2589p.tif for high level scan of image. Stamped on base of slide "11799" and written in ink on top edge "No. 6 Bridge St. Bendigo"tramways, trams, are, film strip, bridge st, bendigo, tram 6 -
 Ballarat Tramway Museum
Photograph - Black & White Photograph/s, David Clark, 17/02/1971 12:00:00 AM
... Bridge St... City Loop...Ballarat Tramway Museum South Gardens Reserve Wendouree Parade Ballarat Ballarat goldfields Yields information about the Ballarat's tramcars in the early 1970's, the City Loop parking area and the Grenville St buildings. tramways trams Sturt St Grenville St Bridge St City Loop tram 26 tram 11 On the rear in ink "Tram No. 1`1 & 26 in Sturt St at Lydiard St. looking to Bridge St. 17/2/71. ...Yields information about the Ballarat's tramcars in the early 1970's, the City Loop parking area and the Grenville St buildings.Black and white photograph of Ballarat No. 11 and 26 in the City Loop with the Grenville St buildings in the background. Photo by David Clark 17/2/1971. No. 11 and has the destination of "City". In the background are the Big W, Dickins store and Clifford and Young shops.On the rear in ink "Tram No. 1`1 & 26 in Sturt St at Lydiard St. looking to Bridge St. 17/2/71. Ballarat Tramways, Photo 27, Taken by David Clark", with David's address stamp "4 Adeney Ave Kew 3101" with "Melbourne" underneath.tramways, trams, sturt st, grenville st, bridge st, city loop, tram 26, tram 11 -
 Ballarat Tramway Museum
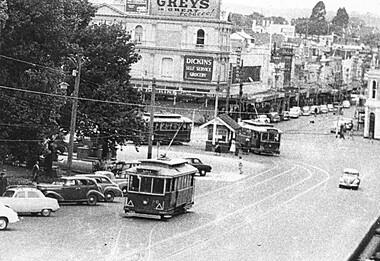
Photograph - Digital image, Late 1950's
... Bridge St... City Loop...Trams tramways Grenville St Sturt St Bridge St City Loop tram 30 Digital scan from the Ben Parle collection of SEC trams tram 30 in the loop and two other single truckers at the Grenville St stop. ...Yields information the appearance and details about the Grenville St intersection in the background in particular the shops on the corner in the late 1950's.Digital scan from the Ben Parle collection of SEC trams tram 30 in the loop and two other single truckers at the Grenville St stop. Photo 1950's or early 1960 prior to introduction of dash canopy lighting. Note the SE Dickins store on the north side, with the hotel on south side. Dickins later moved to the south side. Morsheads sign in photo as well as Grey's cigarettes. Photo received with the Ben Parle slides 09/2004. trams, tramways, grenville st, sturt st, bridge st, city loop, tram 30 -
 Ballarat Tramway Museum
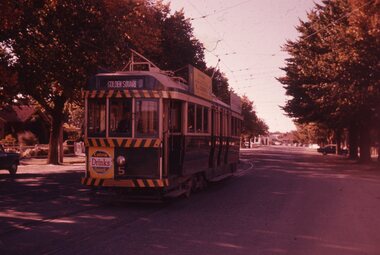
Slide - 35mm slide/s, Travis Jeffrey, c1962
... Agfa plastic mount (blue base, white cover) with a photo of Bendigo 5 passing through the Bridge St Loop. Tram has the destination of Golden Square, a Cohns Soft drink ad on the dash panel and a "R.J. ...Tramways trams Bendigo North Bendigo Bridge St tram 5 "BES 31" in pencil Agfa plastic mount (blue base, white cover) with a photo of Bendigo 5 passing through the Bridge St Loop. ...Agfa plastic mount (blue base, white cover) with a photo of Bendigo 5 passing through the Bridge St Loop. Tram has the destination of Golden Square, a Cohns Soft drink ad on the dash panel and a "R.J. Conroy" roof advertisement. Photo taken c1962."BES 31" in penciltramways, trams, bendigo, north bendigo, bridge st, tram 5 -
 Melbourne Tram Museum
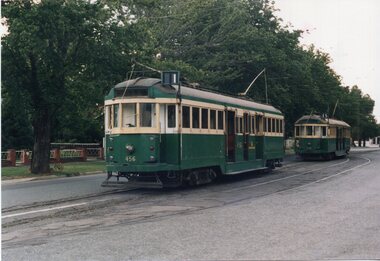
Photograph - Colour Photograph/s, Jeff Bounds, 27/11/1988 12:00:00 AM
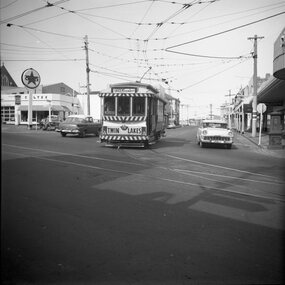
... Colour print Ex Melbourne W2 class Nos. 456 & 470 on test run in Bridge St, at old loop, from cnr. Nolan St. / J. Bounds Photo 27/11/88" 456 has a The Met logo on the side....On rear in ink "Bendigo - Ex Melbourne W2 class Nos. 456 & 470 on test run in Bridge St, at old loop, from cnr. Nolan St. / J. Bounds Photo 27/11/88"...Melbourne Tram Museum 8 Wallen Road Hawthorn melbourne Trams tramways Bendigo W2 class Bridge St tram 456 tram 470 On rear in ink "Bendigo - Ex Melbourne W2 class Nos. 456 & 470 on test run in Bridge St, at old loop, from cnr. ...Colour print Ex Melbourne W2 class Nos. 456 & 470 on test run in Bridge St, at old loop, from cnr. Nolan St. / J. Bounds Photo 27/11/88" 456 has a The Met logo on the side.On rear in ink "Bendigo - Ex Melbourne W2 class Nos. 456 & 470 on test run in Bridge St, at old loop, from cnr. Nolan St. / J. Bounds Photo 27/11/88"trams, tramways, bendigo, w2 class, bridge st, tram 456, tram 470 -
 Ballarat Tramway Museum
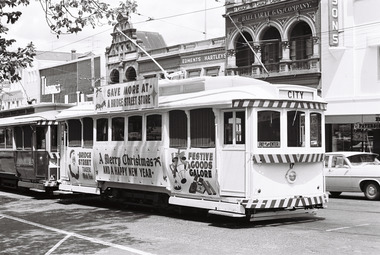
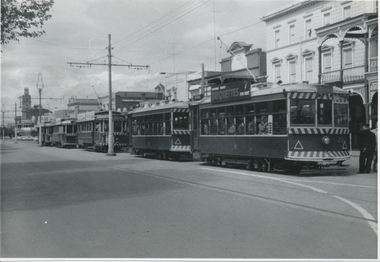
Negative - SECV Ballarat operations set of 4, Robert Green, 12/1967
... Bridge St...signals...City Loop...Set of 4 photographs by Robert Green during Dec. 1967, showing the tramcar operations of the SECV system. 1 -Tram 17 as the Bridge St traders Christmas Tram in the City Loop 2 -Tram 13 behind No. 17 in the City Loop 3 -Tram 27 Leaving Bridge St for Sturt St at Grenville St. ...The three signals can be seen on the two poles on either side of the road 4 -Tram 21 at Lydiard St North Yields information about the SECV Ballarat tramways operations during Dec. 1967 Tramways Wendouree Parade Sturt St tram 17 tram 13 tram 27 tram 21 Lydiard St Nth Bridge St signals City Loop Santa Tram 35mm negative in a film strip - set of 4 Negative SECV Ballarat operations set of 4 Robert Green ...Set of 4 photographs by Robert Green during Dec. 1967, showing the tramcar operations of the SECV system. 1 -Tram 17 as the Bridge St traders Christmas Tram in the City Loop 2 -Tram 13 behind No. 17 in the City Loop 3 -Tram 27 Leaving Bridge St for Sturt St at Grenville St. Has Morseheads, Dickins in the background. The three signals can be seen on the two poles on either side of the road 4 -Tram 21 at Lydiard St North Yields information about the SECV Ballarat tramways operations during Dec. 196735mm negative in a film strip - set of 4tramways, wendouree parade, sturt st, tram 17, tram 13, tram 27, tram 21, lydiard st nth, bridge st, signals, city loop, santa tram -
 Ballarat Tramway Museum
Negative, Travis Jeffrey, 17/06/1962 12:00:00 AM
... N396, of Bendigo Birney No. 30 on the North Bendigo line at the Bridge St. loop. Tram has the destination of Golden Square. ...Trams tramways Bendigo Bridge St North Bendigo tram 30 In red pen on folder that contained negative, "NR69B" and "17 Jun 62". Colour Negative No. N396, of Bendigo Birney No. 30 on the North Bendigo line at the Bridge St. loop. ...Colour Negative No. N396, of Bendigo Birney No. 30 on the North Bendigo line at the Bridge St. loop. Tram has the destination of Golden Square. Photo possibly 17/6/1962. Colour laser printed copy of image stored in box 73. Image scanned at hi res 27/5/2020 and image updated.In red pen on folder that contained negative, "NR69B" and "17 Jun 62". trams, tramways, bendigo, bridge st, north bendigo, tram 30 -
 Ballarat Tramway Museum
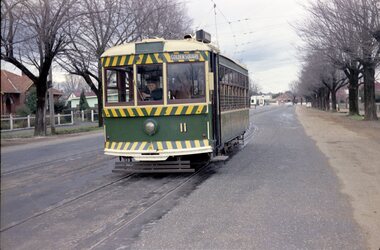
Negative, Travis Jeffrey, 5/08/1962 12:00:00 AM
... N407, of the Bendigo No 11 on the North Bendigo line at the Bridge St. loop. Tram has the destination of Golden Square. ...Trams tramways Bendigo North Bendigo Bridge St tram 11 In red pen on folder that contained negative, "NR95B" and "5 Aug 62". Colour Negative No. N407, of the Bendigo No 11 on the North Bendigo line at the Bridge St. loop. ...Colour Negative No. N407, of the Bendigo No 11 on the North Bendigo line at the Bridge St. loop. Tram has the destination of Golden Square. Photo taken possibly on 5/8/1962. Colour laser printed copy of image stored in box 73. Original negative hires scan and image updated 28/5/2020.In red pen on folder that contained negative, "NR95B" and "5 Aug 62". trams, tramways, bendigo, north bendigo, bridge st, tram 11 -
 Ballarat Tramway Museum
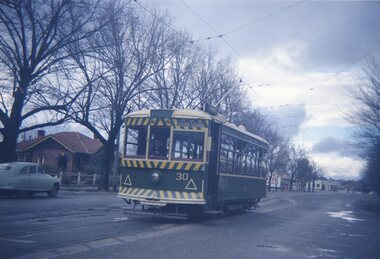
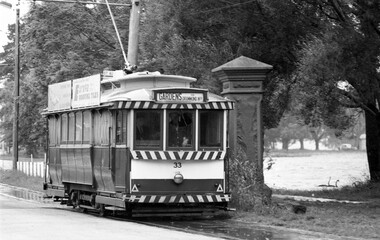
Photograph - ARHS Tour to Bendigo - set of 7, Keith Kings, 20/10/1962
... Set of seven images of the ARHS Special tour of Bendigo on 20-10-1962. .1 - Trams 28, 30, 21, 7 and 19 in Pall Mall .2 - 18, 26, 29, 11 and 5 at the Bridge St loop on the North Bendigo line. .3 - 28, 30, 21, 7, 19 on "down" line and 18, 26, 29, 11, 5 and service car 3 on "up" line, View St Opposite Oval .4 - 28, 30, 21, 7, and 19 at Eaglehawk .5 - 28, 30, 21 in North Bendigo siding and 7 and 9 in Thunder St - photo taken in Thunder St. .6 - ditto photo taking from vacant land on the south side of the terminus, along with No. 6 the service tram. .7 - 28, 30, 21, 7, 19 in View St with Goodyear and Caltex signs in the photo and the Commercial Banking Company of Australia building in the background. ...On rear in ink. .1 - "28, 30, 21, 7, 19 Pall Mall 20-10-62" .2 - "Bendigo ARHS Convoy "A" on Bridge St loop, Nos. 18, 26, 29, 11, 5 20/10/62" with Keith Kings copy right stamp printed in top right hand corner and number "N(y)(12)" written in. .3 - "18, 26, 29, 11, 5 and service car 3 on "up" line, 28, 30, 21, 7, 19 on "down" View St 20-8-62" .4 - "28, 30, 21, 7, and 19 Eaglehawk 20-10-62" .5 - "19, 7 in, 28, 30, 21 in spur siding Nth Bendigo 20/10/62" .6 - "28, 30, 21, 7, 19 plus No. 6 service car Nth B/go 20/10/62" .7 - "Bendigo ARHS Convoy "B" - 28, 30, 21, 7, 19 Charing Cross, 20/10/62" with Keith Kings copy right stamp printed in top right hand corner and number "N(y)(14)" written in....Set of seven images of the ARHS Special tour of Bendigo on 20-10-1962. .1 - Trams 28, 30, 21, 7 and 19 in Pall Mall .2 - 18, 26, 29, 11 and 5 at the Bridge St loop on the North Bendigo line. .3 - 28, 30, 21, 7, 19 on "down" line and 18, 26, 29, 11, 5 and service car 3 on "up" line, View St Opposite Oval .4 - 28, 30, 21, 7, and 19 at Eaglehawk .5 - 28, 30, 21 in North Bendigo siding and 7 and 9 in Thunder St - photo taken in Thunder St. .6 - ditto photo taking from vacant land on the south side of the terminus, along with No. 6 the service tram. .7 - 28, 30, 21, 7, 19 in View St with Goodyear and Caltex signs in the photo and the Commercial Banking Company of Australia building in the background. ...Set of seven images of the ARHS Special tour of Bendigo on 20-10-1962. .1 - Trams 28, 30, 21, 7 and 19 in Pall Mall .2 - 18, 26, 29, 11 and 5 at the Bridge St loop on the North Bendigo line. .3 - 28, 30, 21, 7, 19 on "down" line and 18, 26, 29, 11, 5 and service car 3 on "up" line, View St Opposite Oval .4 - 28, 30, 21, 7, and 19 at Eaglehawk .5 - 28, 30, 21 in North Bendigo siding and 7 and 9 in Thunder St - photo taken in Thunder St. .6 - ditto photo taking from vacant land on the south side of the terminus, along with No. 6 the service tram. .7 - 28, 30, 21, 7, 19 in View St with Goodyear and Caltex signs in the photo and the Commercial Banking Company of Australia building in the background. Most printed on Ilford paper .Black and White print contained within the Wal Jack Bendigo and Geelong Album, see Reg Item 5003 for more details.Yields information about the ARHS tour to Bendigo in 1962 and the trams used.Set of 7 Black and white print with photographer’s notes on the rear.On rear in ink. .1 - "28, 30, 21, 7, 19 Pall Mall 20-10-62" .2 - "Bendigo ARHS Convoy "A" on Bridge St loop, Nos. 18, 26, 29, 11, 5 20/10/62" with Keith Kings copy right stamp printed in top right hand corner and number "N(y)(12)" written in. .3 - "18, 26, 29, 11, 5 and service car 3 on "up" line, 28, 30, 21, 7, 19 on "down" View St 20-8-62" .4 - "28, 30, 21, 7, and 19 Eaglehawk 20-10-62" .5 - "19, 7 in, 28, 30, 21 in spur siding Nth Bendigo 20/10/62" .6 - "28, 30, 21, 7, 19 plus No. 6 service car Nth B/go 20/10/62" .7 - "Bendigo ARHS Convoy "B" - 28, 30, 21, 7, 19 Charing Cross, 20/10/62" with Keith Kings copy right stamp printed in top right hand corner and number "N(y)(14)" written in.trams, tramways, bendigo, arhs, tours, eaglehawk, north bendigo, view st, tram 28, tram 30, tram 21, tram 7, tram 19, tram 6, tram 18, tram 26, tram 29, tram 11, tram 3 -
 Ballarat Tramway Museum
Slide - 35mm slide/s, Travis Jeffrey, c1962
... Agfa plastic mount (blue base, white cover) with a photo of Bendigo 7, at the north end of the Bridge St. Loop. Photo taken c1962. Note the road works in the background with the kerosene warning lamps and wooden protection barriers. ...Tramways trams Bendigo North Bendigo McCrae St Road Works tram 7 "BES 11" in pencil Agfa plastic mount (blue base, white cover) with a photo of Bendigo 7, at the north end of the Bridge St. Loop. Photo taken c1962. Note the road works in the background with the kerosene warning lamps and wooden protection barriers. ...Agfa plastic mount (blue base, white cover) with a photo of Bendigo 7, at the north end of the Bridge St. Loop. Photo taken c1962. Note the road works in the background with the kerosene warning lamps and wooden protection barriers. House opposite tram is 122 Bridge St., which is part of a butchers shop (noted during 8/2004 visit)"BES 11" in penciltramways, trams, bendigo, north bendigo, mccrae st, road works, tram 7 -
 Ballarat Tramway Museum
Slide - 35mm slide/s - set of 13, Noel Simons, 28/04/1971 12:00:00 AM
... Can see the Dawson St. crossover track, just after a heavy hail storm. 1168.11 - No. 21 and three other trams at City Loop looking east along the south side of Sturt St. See also image 1168i1a - cleaned up and edited by Peter Waugh April 2024 - used in the April 2024 issue of Fares Please. 1168.12 - No. 14 entering the South side of Sturt St. from Bridge St. with Dickins Store in the background and the Grenville St. shelter alongside the tram. 1168.13 - No. 37 at Sturt and Dawson St., eastbound, showing "Lydiard St. ...1168.1 -"Sturt & Lydiard Sts" 1168.2 - "Town Hall" 1168.3 - "Sturt St & Dawson Sts" 1168.4 - "Sturt and Lydiard Sts" 1168.5 - "Sturt St." 1168.6 - "Sturt and Lydiard Sts" 1168.7 - "Sturt St." 1168.8 - "Bridge St." 1168.9 - "City Loop" 1168.10 -"Dawson & Sturt Sts." 1168.11 - "City Loop" 1168.12 - "Bridge St." ...Bridge St. Titanic Bandstand tram 11 tram 14 tram 18 tram 21 tram 26 tram 30 tram 34 tram 37 1168.1 -"Sturt & Lydiard Sts" 1168.2 - "Town Hall" 1168.3 - "Sturt St & Dawson Sts" 1168.4 - "Sturt and Lydiard Sts" 1168.5 - "Sturt St." 1168.6 - "Sturt and Lydiard Sts" 1168.7 - "Sturt St." 1168.8 - "Bridge St." 1168.9 - "City Loop" 1168.10 -"Dawson & Sturt Sts." 1168.11 - "City Loop" 1168.12 - "Bridge St." ...Set of 13 transparencies taken on 28/4/1971 on PAKON mounts. 1168.1 - No. 21 at City terminus - taken from North side of street. Has Boer War statue on right side and National Mutual building in the background. 1168.2 - No. 34 with destination "Sebastopol" in Sturt St., outside Town Hall, with National Mutual building in background. 1168.3 - No. 18 at corner of Sturt and Lydiard Sts with National Mutual building and Craigs Hotel in background. 1168.4 - 18 at intersection of Sturt and Dawson St. 1168.5 - No. 30 at intersection of Armstrong St and Sturt St. with Fletcher Jones building in background. 1168.6 - No. 14 at City Terminus, showing destination of "Victoria St." with Town Hall in the background. 1168.7 - No. 11 bound for Mt Pleasant, opposite Titanic Bandstand in Sturt St. Has a Twin Lakes advertisement on the front dash panel and an unknown roof advertisement. 1168.8 - No. 21 at bottom of Sturt St. approaching the Grenville St. junction, with Dickins Food Store and the Spot Cafe in the background. Tram has destination of "Victoria St". and a roof advertisement for a cigarette? company. 1168.9 - No. 26 and three other trams in City Loop, looking west along Sturt St., just after a heavy hail storm. 1168.10 - No. 21 at the intersection of Sturt St and Dawson St. with Golden City Hotel and the Ritzy Cafe in the background. Can see the Dawson St. crossover track, just after a heavy hail storm. 1168.11 - No. 21 and three other trams at City Loop looking east along the south side of Sturt St. See also image 1168i1a - cleaned up and edited by Peter Waugh April 2024 - used in the April 2024 issue of Fares Please. 1168.12 - No. 14 entering the South side of Sturt St. from Bridge St. with Dickins Store in the background and the Grenville St. shelter alongside the tram. 1168.13 - No. 37 at Sturt and Dawson St., eastbound, showing "Lydiard St. Nth" Has SEC roof advertisement on the side of the tram.1168.1 -"Sturt & Lydiard Sts" 1168.2 - "Town Hall" 1168.3 - "Sturt St & Dawson Sts" 1168.4 - "Sturt and Lydiard Sts" 1168.5 - "Sturt St." 1168.6 - "Sturt and Lydiard Sts" 1168.7 - "Sturt St." 1168.8 - "Bridge St." 1168.9 - "City Loop" 1168.10 -"Dawson & Sturt Sts." 1168.11 - "City Loop" 1168.12 - "Bridge St." All have date stamp of "28 Apr 1971" in purple ink on base. All blue ink unless otherwise noted.tramways, trams, town hall, sturt st., dawson st, armstrong st., grenville st, bridge st., titanic bandstand, tram 11, tram 14, tram 18, tram 21, tram 26, tram 30, tram 34, tram 37 -
 Ballarat Tramway Museum
Photograph - Black & White Photograph/s set of 19, Mar. 1972
... at Eaglehawk, side on view. 981.4 - tram 26 at Quarry Hill terminus looking back into city. 981.5 - tram 7 en route to North Bendigo at the site of the Bridge St. loop. Has a Peters Ice Cream truck and Sandhurst Fruit Juices truck on right side of photograph. 981.6 - tram 2 at Quarry Hill terminus. 981.7 - tram 2? ...at Eaglehawk, side on view. 981.4 - tram 26 at Quarry Hill terminus looking back into city. 981.5 - tram 7 en route to North Bendigo at the site of the Bridge St. loop. Has a Peters Ice Cream truck and Sandhurst Fruit Juices truck on right side of photograph. 981.6 - tram 2 at Quarry Hill terminus. 981.7 - tram 2? ...Set of 19 black and white prints, all 89mm square of Bendigo trams, date machine printed on print is "Mar 1972". 981.1 - Tram 21 at North Bendigo terminus, with level crossing in background. Has destination "Golden Square" and two SEC roof ads. 981.2 - tram 2? at Eaglehawk, with destination "Depot", two SEC roof ads and "Leo A. Hughes Photographer" on side of building in background. 981.3 - tram 2? at Eaglehawk, side on view. 981.4 - tram 26 at Quarry Hill terminus looking back into city. 981.5 - tram 7 en route to North Bendigo at the site of the Bridge St. loop. Has a Peters Ice Cream truck and Sandhurst Fruit Juices truck on right side of photograph. 981.6 - tram 2 at Quarry Hill terminus. 981.7 - tram 2? at one of the loops on the Eaglehawk line, inbound? 981.8 - bogie tram at Charing Cross with fountain in background. Side on view looking south. 981.9 -trams 7 and 21 on Golden Square/North Bendigo line with bogie tram in background, at Charing Cross. Same as item 972. 981.10 - bogie tram at Charing Cross - has buildings in south west corner in background, including Colonial Mutual Life and an advertisement for the Herald newspaper. 981.11 - trams 25, 7 and two other trams at Charing Cross. 981.12 - trams 2 and 26 and three others at Charing Cross. 981.13 - tram 25 at Golden Square terminus, with Rodda's Golden Square Hotel in the background. Tram showing destination of "Nth Bendigo" 981.14 - tram 24, showing "Special" on depot access track. Has two Johnnie Walker roof ads on side. 981.15 - as above, but tram on bridge outside depot. 981.16 - trams 25 and 28 at depot 981.17 - tram 24 showing "Special" on depot access track with a single truck car in background. 981.18 - trams 2 and 26 at Charing Cross. Has advertisements for "Armstrong Tyre Service" and "Cohn's drinks" on buildings in background. 981.19 - Bendigo 2 at location?, about to enter a loop or double track section. Has hotel in background. On rear of each photo in the top left hand corner is a print number 1 to 19 in ink and location notes, generally "Bendigo"trams, tramways, charing cross, bendigo, golden square, quarry hill, tram 2, tram 21, tram 7, tram 24, tram 26 -
 Ballarat Tramway Museum
Slide - 35mm slide/s - set of 20, Noel Simons, 21/05/1971 12:00:00 AM
... Bridge St. (White Hills Road). Note signal light for Bridge St. loop on pole corner of street. ...St. Eaglehawk" 1197.8 - "Nos. 26 and 17 crossing at Job's Gully Loop" 1197.9 - "No. 17 crossing railway bridge at Job's Gully near Eaglehawk". 1197.10 - "No. 26 at Long Gully" 1197.11 - 'Northern end of points at Long Gully Loop". 1197.12 - "No. 17 turning into View St. from Bamard St. ...Bridge St. (White Hills Road). Note signal light for Bridge St. loop on pole corner of street. ...Set of 20 transparencies taken on 21/5/1971 on Kodak mounts. 1197.1 - Bendigo No. 5 en route to Eaglehawk at Creeth St Long Gully. Tram has a SEC roof ad and Cinzano roof ad. 1197.2 - No 5 approaching Needle Loop between Long Gully and California Gully. On left hand side is the City of Bendigo sign, indicating city boundary. 1197.3 - As for 1197.2 but actually entering loop. Photo taken after tram has passed photographer. 1197.4 - No. 26 bound for Eaglehawk descending the railway bridge near Eaglehawk, at Jobs Gully. 1197.5 - as for 1197.4, but after crossing bridge, now ascending a hill. Photo taken after tram has passed photographer. 1197.6 - No. 26 climbing High St. hill Eaglehawk, nearing end of Double track, bound for Quarry Hill. Shows centre of the road poles. 1197.7 - As for 1197.6, with tram entering single track section. Photo taken after tram has passed photographer. Has a BP service station in the background. 1197.8 - No. 26 (bound for Quarry Hill) crossing No. 17 (Eaglehawk) at Job's Gully Loop. 1197.9 - No. 17 climbing railway bridge at Job's Gully, en route to Eaglehawk. Photo taken after tram has passed photographer. 1197.10 - No.26 bound for Quarry Hill, leaving Long Gully Loop? Has the Creeth St. church in l197.l in the far background. Photo taken after tram has passed photographer. 1197.11 - Tramway Point work at the northern end of Long Gully Loop. 1197.12 - No. 17 en route for Quarry Hill turning into View St. from Bamard St. Tram has SEC roof ads "Everything fine in my all electric Kitchen' and 'Electric Cooking is Matchless'. 1197.13 - as for 1197.12, but tram has turned into View St and about to enter the double line track. Photo taken after tram has passed photographer. 1197.14 - No. 21 enters Nolan St after turning from MacRae St. en route to Bendigo. Note sign on its own post noting tram turns "Beware Tram Turns" and stop sign on adjacent pole "Trams stop on Request". No. 21 has two SEC roof ads. 1197.15 - No. 21 in Nolan St. after turning from Bridge St. (White Hills Road). Note signal light for Bridge St. loop on pole corner of street. Photo taken after tram has passed photographer. 1197.16 - No. 2 bound for Eaglehawk at unknown location. 1197.17 - Tram stop sign on a pole "CARS STOP BY REQUEST" 1197.18 - No. 5 in Carpenter St.? en route to Quarry Hill. 1197.19 - No. 28 has just arrive at Golden Square terminus, passengers are disembarking and the trolley pole is being turned. Golden Square Hotel in the background. 1197.20 - No. 28 at Golden Square terminus. Has a "Nothing beats Briquettes for hear roof ad. Information written on in black ink and date stamped on purple ink. 1197.1 - "No. 5 at Creeth St. Long Gully" 1197.2 - "No. 5 approaching Needle Loop between Long Gully and California Gully" 1197.3 - "No. 5 at Needle Loop between Long Gully and California Gully" 1197.4 - "No. 26 crossing railway bridge at Job's Gully near Eaglehawk" 1197.5 - "No. 26 just after crossing railway bridge at Job's Gully near Eaglehawk/ 1197.6 - "No. 26 in High St. Eaglehawk" 1197.7 - "No. 26 at end of double track in High St. Eaglehawk" 1197.8 - "Nos. 26 and 17 crossing at Job's Gully Loop" 1197.9 - "No. 17 crossing railway bridge at Job's Gully near Eaglehawk". 1197.10 - "No. 26 at Long Gully" 1197.11 - 'Northern end of points at Long Gully Loop". 1197.12 - "No. 17 turning into View St. from Bamard St. Bendigo". 1197.13 -'No. 17 at beginning of double track in View St. after leaving Bamard St. Bendigo. 1197.14 - "No. 21 enters Nolan St. from MacRae St. Bendigo." 1197.15 - "No. 21 in Nolan St. Bendigo just after leaving White Hills Road." 1197.16 - "No. 2" 1197.18 - "No. 5" 1197.19 - "Birney car No. 28 at Golden Square Terminus" 1197.20 "Birney car No. 28 at Golden Square Terminus" tramways, trams, bendigo, long gully, railway bridge, jobs gully, trackwork, nolan st, quarry hill, tram stops, golden square, tram 2, tram 5, tram 17, tram 21, tram 26, tram 28 -
 Ballarat Tramway Museum
Slide - Set of 7, Warren Doubleday, Ballarat - last weekday of full operations, 20/8/1971
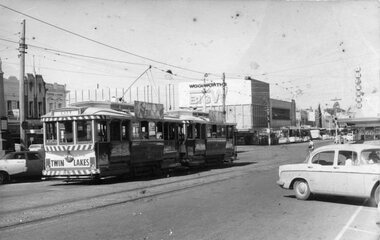
... St west. 3 - tram 13 at Stones Corner, Bridge and Victoria St on its way to Victoria St. Has buildings / advertisements for Schonell cycles, Gear chemist, Phillip Howard, The Sun, AVCO, ANZ, Roddas, CS Pennant, Top 4, State Savings Bank and H Whitefield Hair dresser. 4 - trams 30 and 13 crossing at the King St loop in Victoria St. 5 - tram 37 in Sturt St arriving at the City stop 6 - tram 43 southbound in Lydiard St crossing Mair St - note the traffic lights, one of the first installations in Ballarat. ...St west. 3 - tram 13 at Stones Corner, Bridge and Victoria St on its way to Victoria St. Has buildings / advertisements for Schonell cycles, Gear chemist, Phillip Howard, The Sun, AVCO, ANZ, Roddas, CS Pennant, Top 4, State Savings Bank and H Whitefield Hair dresser. 4 - trams 30 and 13 crossing at the King St loop in Victoria St. 5 - tram 37 in Sturt St arriving at the City stop 6 - tram 43 southbound in Lydiard St crossing Mair St - note the traffic lights, one of the first installations in Ballarat. ...Photos taken on the last weekday of full operations by the SECV in Ballarat prior to the first closure of the Victoria St line on 22/8/1971. 1 - tram 30 arriving at Victoria St with school children and others alighting. 2 - tram 30 waiting to return to Gardens via Sturt St west. 3 - tram 13 at Stones Corner, Bridge and Victoria St on its way to Victoria St. Has buildings / advertisements for Schonell cycles, Gear chemist, Phillip Howard, The Sun, AVCO, ANZ, Roddas, CS Pennant, Top 4, State Savings Bank and H Whitefield Hair dresser. 4 - trams 30 and 13 crossing at the King St loop in Victoria St. 5 - tram 37 in Sturt St arriving at the City stop 6 - tram 43 southbound in Lydiard St crossing Mair St - note the traffic lights, one of the first installations in Ballarat. Has adverts for Peter's, and Speedee cleaners. 7 - track cleaner with broom with tram No. 12 behind, with the destination of City. Has the Chinese cafe, seafood bar, Kodak advert, Town Hall, and tramway shelter in the view.Yields information about the last full week day of SEC Tramway operations in Ballarat and has a strong association with the archivist. Set of 7 Kodachrome colour slides - cardboard mountsHave the photographer's slide numbers written on them.trams, tramways, closure, depot, victoria st, sturt st, lydiard st, tram 13, tram 30, tram 12, tram 37, tram 43 -
 Ballarat Tramway Museum
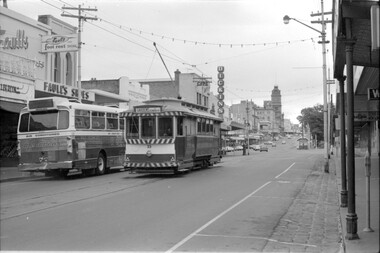
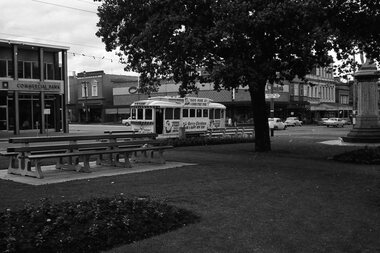
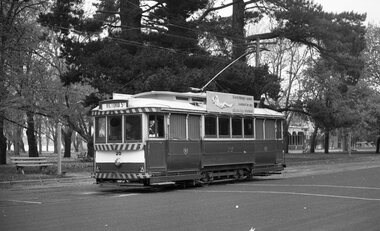
Slide - City Loop Ballarat Sturt St - set of 6, Ron Hood, 12/1970
... Set of 6 slides showing trams parked in the City Loop 1 - taken from Lydaird St and Sturt St - looking east with Dickins food store, Patersons and a Neptune sign 2 - Photo looking east with tram 35 and 4 single truckers parked in the loop 3 - ditto with the Woolworths Big W store in the background. 4 - Head on view of 35 with a tram in Bridge St along with the Grenville St shelter 5 - as for 3 6 - ditto with tram 26 passing the parked trams....Ballarat Tramway Museum South Gardens Reserve Wendouree Parade Ballarat Ballarat goldfields Set of 6 slides showing trams parked in the City Loop 1 - taken from Lydaird St and Sturt St - looking east with Dickins food store, Patersons and a Neptune sign 2 - Photo looking east with tram 35 and 4 single truckers parked in the loop 3 - ditto with the Woolworths Big W store in the background. 4 - Head on view of 35 with a tram in Bridge St along with the Grenville St shelter 5 - as for 3 6 - ditto with tram 26 passing the parked trams. ...Set of 6 slides showing trams parked in the City Loop 1 - taken from Lydaird St and Sturt St - looking east with Dickins food store, Patersons and a Neptune sign 2 - Photo looking east with tram 35 and 4 single truckers parked in the loop 3 - ditto with the Woolworths Big W store in the background. 4 - Head on view of 35 with a tram in Bridge St along with the Grenville St shelter 5 - as for 3 6 - ditto with tram 26 passing the parked trams.Yields information about the use of the City Loop in Sturt St to park out of service trams between the peak periods.Set of six colour slides in hanimount cardboard mounts."Ballarat" in ink on some of the slides and December 1970 on one. All are numbered in ink.tramways, trams, sturt st, city loop, tram 35, tram 26 -
 Ballarat Tramway Museum
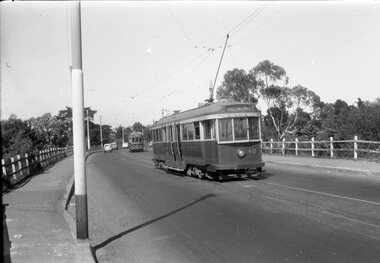
Photograph - SECV Ballarat 33 Bridge St, Mal Rowe, 1/1/1970
... Bridge St to the Gardens. The tram is passing a Redline coach. In the background are Faull's shoes, and the Dickins supermarket. Taken by Mal Rowe on 1/1/1970. Yields information about the the use of the Haddon St loop ...The photograph shows Ballarat tram 33 westbound in Bridge St to the Gardens. The tram is passing a Redline coach. In the background are Faull's shoes, and the Dickins supermarket. Taken by Mal Rowe on 1/1/1970.Yields information about the the use of the Haddon St loop and trams 17 and 21.Digital image of a black and white photograph.tramways, tramcars, bridge st, tram 33 -
 Ballarat Tramway Museum
Photograph - SECV Ballarat - operations - set of 14, George Stevens, 30/12/1967
... Set of 14 Digital images, from negatives taken by George Stevens on 30/12/1967: 1 - Tram 17 As the Bridge St traders Christmas Tram in Surt St at Armstrong St with Crockers and the CBA bank in the background. 2 - Tram 33 In Sturt St with the Town Hall in the background 3 - Tram 28 Has the destination of City, at the City stop with the Town Hall in the background 4 - Tram 41 A well loaded tram for Lydiard St North at the City stop. Has two Johnnie Walker whiskey roof adverts 5 - Tram 31 Turning from Sturt St West into Hamilton Ave 6 - Tram 41 Northbound in Drummond St North. 7 - Trams 41, 13, 14 Wendouree Parade at Depot loop...Ballarat Tramway Museum South Gardens Reserve Wendouree Parade Ballarat Ballarat goldfields Set of 14 Digital images, from negatives taken by George Stevens on 30/12/1967: 1 - Tram 17 As the Bridge St traders Christmas Tram in Surt St at Armstrong St with Crockers and the CBA bank in the background. 2 - Tram 33 In Sturt St with the Town Hall in the background 3 - Tram 28 Has the destination of City, at the City stop with the Town Hall in the background 4 - Tram 41 A well loaded tram for Lydiard St North at the City stop. Has two Johnnie Walker whiskey roof adverts 5 - Tram 31 Turning from Sturt St West into Hamilton Ave 6 - Tram 41 Northbound in Drummond St North. 7 - Trams 41, 13, 14 Wendouree Parade at Depot loop ...Set of 14 Digital images, from negatives taken by George Stevens on 30/12/1967: 1 - Tram 17 As the Bridge St traders Christmas Tram in Surt St at Armstrong St with Crockers and the CBA bank in the background. 2 - Tram 33 In Sturt St with the Town Hall in the background 3 - Tram 28 Has the destination of City, at the City stop with the Town Hall in the background 4 - Tram 41 A well loaded tram for Lydiard St North at the City stop. Has two Johnnie Walker whiskey roof adverts 5 - Tram 31 Turning from Sturt St West into Hamilton Ave 6 - Tram 41 Northbound in Drummond St North. 7 - Trams 41, 13, 14 Wendouree Parade at Depot loop looking west, 8 - Tram 13 Wendouree Parade south of Gardens Loop 9 - Tram 14 Arriving at the Mt Pleasant terminus in Barkly St at Cobden St/ Note the tram stop signage 10 - Tram 28 Skipton St 11 - Tram 28 Albert St 12 - Tram 28 Crossing Albert St - taken from the south side of the crossing 13 - Tram 28 At the terminus with the Royal Mail Hotel in the background - taken from the eastern side of Albert St 14 - Tram 28 At the Lydiard St Nth level crossing with the Signal gantry, Reids Palace, Provincial Hotel and the signal box in the view.Yields information about the tramcars used on 30/12/1967 and the various locations around the system.Set of 14 digital images scanned from black and white negatives.tramways, sturt st, sebastopol, tram 17, tram 33, tram 28, santa tram, hamilton ave, albert st, tram 41, tram 13, tram 14, drummond st nth, wendouree parade, mt pleasant, barkly st, skipton st, level crossing -
 Ballarat Tramway Museum
Negative - SECV Ballarat operations set of 6, Robert Green, 1967
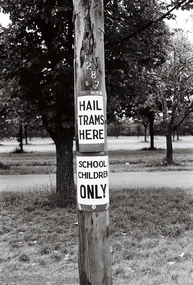
... Set of 6 photographs by Robert Green during 1967, showing the tramcar operations of the SECV system. 1 - Tram stop at the Victoria Park loop for School Children only and a Hail Trams here sign 2 -Tram 21 at Stones corner, with destination of Mt Pleasant. Shows the nature of the overhead at this location. In the background is a Top 4 dry cleaner, C W Pennant, Wallpapers 3 - Compulsory Tram stop in Bridge St, with a round sign bolted above painted stop 4 - Level crossing trackwork 5 - Dawson St cross overhead 6 - Trackwork for the depot entrance ...Ballarat Tramway Museum South Gardens Reserve Wendouree Parade Ballarat Ballarat goldfields Set of 6 photographs by Robert Green during 1967, showing the tramcar operations of the SECV system. 1 - Tram stop at the Victoria Park loop for School Children only and a Hail Trams here sign 2 -Tram 21 at Stones corner, with destination of Mt Pleasant. Shows the nature of the overhead at this location. In the background is a Top 4 dry cleaner, C W Pennant, Wallpapers 3 - Compulsory Tram stop in Bridge St, with a round sign bolted above painted stop 4 - Level crossing trackwork 5 - Dawson St cross overhead 6 - Trackwork for the depot entrance Yields information about the SECV Ballarat tramways operations during 1967. ...Set of 6 photographs by Robert Green during 1967, showing the tramcar operations of the SECV system. 1 - Tram stop at the Victoria Park loop for School Children only and a Hail Trams here sign 2 -Tram 21 at Stones corner, with destination of Mt Pleasant. Shows the nature of the overhead at this location. In the background is a Top 4 dry cleaner, C W Pennant, Wallpapers 3 - Compulsory Tram stop in Bridge St, with a round sign bolted above painted stop 4 - Level crossing trackwork 5 - Dawson St cross overhead 6 - Trackwork for the depot entrance Yields information about the SECV Ballarat tramways operations during 1967.35mm negative in a film strip - set of 6 - - Black and white prints of item 5 held.tramways, tram 21, tram stops, stones corner, bridge st, level crossing, dawson st, depot junction -
 Ballarat Tramway Museum
Negative - SECV Ballarat operations set of 8, Robert Green, 1967
... Bridge St...St Aidans Drive...Wendouree Parade...tram 33...Hamilton Ave...tram 17...Carlton St Loop...Tram has the destination of Victoria St. 5 -Trams 17,33 crossing at Carlton St loop 6 -Tram 17 Evening photo at Gardens loop 7 -Tram 17 ditto - side on photo 8 - night photo of a tram at Lydiard St North Yields information about the SECV Ballarat tramways operations during 1967. Tramways Bridge ...Set of 8 photographs by Robert Green during 1967, showing the tramcar operations of the SECV system. 1 -Tram 33 passing the stone gate pillars at St Aidans Drive with the lake in the backgound 2 -Tram 33 in Wendouree Parade, just to the north of the current BTM depot junction 3 -Tram 33 in Wendouree Parade. 4 -Tram 17 in Hamilton Ave with the Convent fence in the background. Tram has the destination of Victoria St. 5 -Trams 17,33 crossing at Carlton St loop 6 -Tram 17 Evening photo at Gardens loop 7 -Tram 17 ditto - side on photo 8 - night photo of a tram at Lydiard St North Yields information about the SECV Ballarat tramways operations during 1967.35mm negative in a film strip - set of 8tramways, bridge st, st aidans drive, wendouree parade, tram 33, hamilton ave, tram 17, carlton st loop, gardens loop, lydiard st north -
 Ballarat Tramway Museum
Negative - SECV Operations in Ballarat - set of 5, Robert Green, c1968
... Bridge St...tram 17...tram 21...Victoria St...tram 33...Mt Pleasant...tram 20...Gardens Loop...Set of 5 photographs by Robert Green taken around 1968 - were not able to listed with specific dates. 1 -Tram 20 at Gardens loop 2 -Tram 20 ditto 3 -Tram 17 in Bridge St, eastbound to Victoria St with Edwards Disposals Variety Store, Faulls shoes, Dickens store in the background 4 -Tram 21 at Victoria St, photo taken through a wooden shelter 5 -Tram 33 at Mt Pleasant terminus with part of a shelter in the view ...Tramways Bridge St tram 17 tram 21 Victoria St tram 33 Mt Pleasant tram 20 Gardens Loop 35mm negative in a film strip - set of 5 Negative SECV Operations in Ballarat - set of 5 Robert Green ...Set of 5 photographs by Robert Green taken around 1968 - were not able to listed with specific dates. 1 -Tram 20 at Gardens loop 2 -Tram 20 ditto 3 -Tram 17 in Bridge St, eastbound to Victoria St with Edwards Disposals Variety Store, Faulls shoes, Dickens store in the background 4 -Tram 21 at Victoria St, photo taken through a wooden shelter 5 -Tram 33 at Mt Pleasant terminus with part of a shelter in the view Yields information about some miscellaneous photos of Ballarat trams.35mm negative in a film strip - set of 5tramways, bridge st, tram 17, tram 21, victoria st, tram 33, mt pleasant, tram 20, gardens loop -
 Ballarat Tramway Museum
Negative - Geelong trams 33 & 40 Barwon Bridge, Laurie Gallop, early 1956
... Photo shows Geelong trams 33 & 40 in Moorabool St just south of the Barwon Bridge on the long crossing loop. Based on the running board at item 8267, most likely tram No. 33. ...Ballarat Tramway Museum South Gardens Reserve Wendouree Parade Ballarat Ballarat goldfields Photo shows Geelong trams 33 & 40 in Moorabool St just south of the Barwon Bridge on the long crossing loop. Based on the running board at item 8267, most likely tram No. 33. ...Photo shows Geelong trams 33 & 40 in Moorabool St just south of the Barwon Bridge on the long crossing loop. Based on the running board at item 8267, most likely tram No. 33. One of a set of photos was taken between 15/2/1956 and 3/3/1956 when services operated only between Belmont and North before the final closure of the Belmont route on 25/31956 and that bogie tram 31 is not shown on the board, having gone to Ballarat on 15/2/1956 - see item 5554. See item 8213 for an article on the Geelong system by Keith Kings. Yields information about the Geelong operations toward the closure of the tram system.Black and white Negative - 120 sizetramways, geelong, moorabool st, tram 33, tram 40, barwon river -
 Ballarat Tramway Museum
Postcard - Folder Set, Nu-color-vue or Nucolorvue Productions, "Ballarat the Begonia City", early 1960s
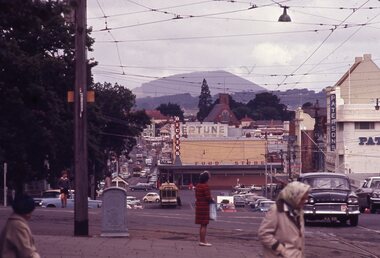
... St with a number of trams in the City Loop. It would appear that the trams have been fitted with dash canopy lightings which dates the photo to early 1960s to mid 1960s. As well Eureka Stockade, Civic Hall, Lake Wendouree, Bridge...St with a number of trams in the City Loop. It would appear that the trams have been fitted with dash canopy lightings which dates the photo to early 1960s to mid 1960s. As well Eureka Stockade, Civic Hall, Lake Wendouree, Bridge ...Published by Nucolorvue Productions of Moorabbin Vic. Features photos the Imperial Crown at the Shell House, Ballarat Post Office, looking west up Sturt St with a number of trams in the City Loop. It would appear that the trams have been fitted with dash canopy lightings which dates the photo to early 1960s to mid 1960s. As well Eureka Stockade, Civic Hall, Lake Wendouree, Bridge St from Stones Corner that shows the tramway overhead and signals, Arch of Victory, Sturt St Statuary and Gardens, Begonia House, The Gardens and the Floral Clock with the Town or City Hall. Demonstrates a postcard folder produced by Nucolorvue.Printed colour postcard folder titled "Ballarat The Begonia City", featuring a photo of begonias on the cover and an address box on the rear of the folder.sturt st, city loop, postcards, gardens, lake wendouree, begonias, eureka stockade, shell house -
 Ballarat Tramway Museum
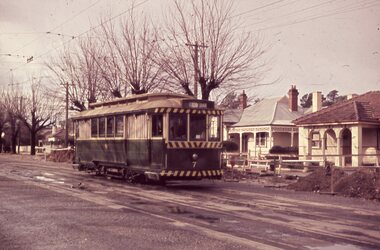
Photograph - Bendigo 6 in Bridge St, Noel J Simons, 4/1967
... Bridge St on its way to North Bendigo, April 1967. Photo by Noel Simons. See also item 1191 for a colour slide. Yields information about the Bridge St loop and tram No. 6. tramcars tram 6 North Bendigo Bridge St Colour print - on plain paper. ...Colour print of Bendigo No. 6 in Bridge St on its way to North Bendigo, April 1967. Photo by Noel Simons. See also item 1191 for a colour slide.Yields information about the Bridge St loop and tram No. 6.Colour print - on plain paper.tramcars, tram 6, north bendigo, bridge st -
 Ballarat Tramway Museum
Negative - Geelong tram at Balliang St loop in Moorabool St, Laurie Gallop, early 1956
... Photo shows a Geelong tram to North in Moorabool St at the Balliang St / Forser St loop in Moorabool St. Has the rail over bridge in the far distance. ...Ballarat Tramway Museum South Gardens Reserve Wendouree Parade Ballarat Ballarat goldfields Photo shows a Geelong tram to North in Moorabool St at the Balliang St / Forser St loop in Moorabool St. Has the rail over bridge in the far distance. ...Photo shows a Geelong tram to North in Moorabool St at the Balliang St / Forser St loop in Moorabool St. Has the rail over bridge in the far distance. See also item 8298 for the approaching photo.Yields information about the Geelong operations toward the closure of the tram system.Black and white Negative - 120 sizetramways, geelong, belmont, moorabool st -
 Ballarat Tramway Museum
Photograph - Set of four black and white negatives of Ballarat trams, Warren Doubleday, 20-4-1968
... Bridge St. .2 - No. 28 running from Bridge Street into Sturt Street with a "Trotting at Bray Raceway Tonight" Auxillary board. Tram has the destination of Gardens via Sturt St West. In the background are the Big W and the Dickins Store. .3 - Tram 43 on "0" road at the SEC Ballarat Depot. .4 - Tram 13 at the Gardens Loop in Wendouree Parade. ...Bridge St. .2 - No. 28 running from Bridge Street into Sturt Street with a "Trotting at Bray Raceway Tonight" Auxillary board. Tram has the destination of Gardens via Sturt St West. In the background are the Big W and the Dickins Store. .3 - Tram 43 on "0" road at the SEC Ballarat Depot. .4 - Tram 13 at the Gardens Loop in Wendouree Parade. ...Photos 25-4-69, of: .1 - Ballarat 17 at Stones Corner with Caltex Service Station in the background. Tram leaving Main Road before joining Bridge St. .2 - No. 28 running from Bridge Street into Sturt Street with a "Trotting at Bray Raceway Tonight" Auxillary board. Tram has the destination of Gardens via Sturt St West. In the background are the Big W and the Dickins Store. .3 - Tram 43 on "0" road at the SEC Ballarat Depot. .4 - Tram 13 at the Gardens Loop in Wendouree Parade. Tram has an ANA Hospital and Medical Benefits (Australian Natives Association) Advertising Board.Yields information about the operation of the Ballarat tramway system that was operated by the State Electricity Commission of Victoria.Set of four black and white negatives of Ballarat Tramways, 120 size. ballarat, trams, tramways, sturt street, tram 17, main road, bridge street, tram 28, bray raceway, dickins, big w, tram 13, ana health, wendouree parade, gardens loop, depot, tram 43, stones corner, caltex -
 Ballarat Tramway Museum
Film - Movie Film & Box, Kodak, 1960
... Starts with an overhead shot, shows clock at the Caltex service station,. 17:37 31 inbound approaching Bakery Hill and then descending to the junction after it passes camera. 18:09 25 climbing outbound in Victoria St, passing the camera, to then pass through the King St loop. 18:47 25 inbound in Victoria St, passing the camera, then pass through the King St loop, with St Alypius Church in the background. 19:36 14 approaching the rail bridge in Victoria St and stopping at the 2nd last stop to left of passengers. 20:01 14 leaving the terminus and approaching the camera and the a short sequence going away, to the next stop to pick up quite a few passengers. 20:14 “Trams Stop Here” sign, metal wrap around on a steel pole. 20:16 Title “The Mount Pleasant Line” 20:21 11 inbound in Main St, with a passenger leaping off the tramcar and another getting off just before the junction. 20:45 11 passes the junction and then proceeds away from the camera in Bridge St. 21:04 30 outbound in Main St, then turns into Barkly St, a bus (Eclipse Motors) passes in Main St just before the sequence ends. 21:31 30 inbound near Steinfield St. ...Starts with an overhead shot, shows clock at the Caltex service station,. 17:37 31 inbound approaching Bakery Hill and then descending to the junction after it passes camera. 18:09 25 climbing outbound in Victoria St, passing the camera, to then pass through the King St loop. 18:47 25 inbound in Victoria St, passing the camera, then pass through the King St loop, with St Alypius Church in the background. 19:36 14 approaching the rail bridge in Victoria St and stopping at the 2nd last stop to left of passengers. 20:01 14 leaving the terminus and approaching the camera and the a short sequence going away, to the next stop to pick up quite a few passengers. 20:14 “Trams Stop Here” sign, metal wrap around on a steel pole. 20:16 Title “The Mount Pleasant Line” 20:21 11 inbound in Main St, with a passenger leaping off the tramcar and another getting off just before the junction. 20:45 11 passes the junction and then proceeds away from the camera in Bridge St. 21:04 30 outbound in Main St, then turns into Barkly St, a bus (Eclipse Motors) passes in Main St just before the sequence ends. 21:31 30 inbound near Steinfield St. ...Yields information in movie film format of Ballarat trams in 1960, how the system operated and was used by people., Yields information in movie film format of Ballarat trams in 1960, how the system operated and was used by people.Movie film - 8mm, approx. 30mins, with leader strip on a plastic reel, within a black and white plastic box, titled "Ballarat No. 1. 1960". Has been transferred to DVD - see Reg item 4100 as Segment No. 2. Made by Ben Parle. Also transferred to DVD by Rod Cook Oct. 2015, via Roger Greenwood for use in his DVD, "The City of Ballarat Trams, Gardens & Gold" of 2016. See Reg Item 6883. Synopsis: based on time. 0:00 View of typed introduction, noting that this is a pictorial record of Ballarat. 0:10 Title “The Tramways of Ballarat 1960, Part 1” 0:16 13, showing “View Point” at Stones Corner, Bridge St, east end, with trolley pole being turned, while another single trucker heads out towards Mt Pleasant. 0:25 13 leaving Stones Corner, short approach and then longer trailing shot of the tram going towards the City in Bridge St. 0:44 View out of front of tram in Bridge St heading towards the City, with cars in the photo, then passing through city Loop, no trams in the loop and running up to Lydiard St Nth and crossing the road. 1:22 Running up Sturt St from Armstrong St, passes over Dawson St X-over and up to the next intersection, Lyons St. 1:54 Title “The View Point Line” 1:59 19 inbound, in Ripon St, from crossing Mair St, towards camera and then passing away and turning into Sturt St. 2:49 View of a “Warning Oncoming Trams” sign 2:52 19 in Ripon St, going to View Point, crossing Webster St towards camera, then going away through the disconnected Victoria Ave loop, pass the “Warning Oncoming Trams” sign. Note very windy scene with people running across roads. 3:17 19 in Wendouree Parade, in bound, though showing destination View Point, going away from the camera, past the View Point Hotel. 3:39 19 coming towards camera near Excerpt or Devon St and then going away towards the terminus. 4:04 19 at the terminus, stationary, with a single trucker 3?, passing from Macarthur St into Wendouree Parade, behind 19. 4:20 33 coming towards camera in Wendouree Parade from St Aidans Drive, stopping to pick up passenger at Forest St and then going away towards the City, photographed from near the depot, on a wet and windy day. 4:54 35 in Wendouree Parade, coming towards the Camera from St Aidans Drive and then going away with the Gardens Loop area in the background. Tram stops at stop to let a passenger off. 5:28 21 leaving Gardens Loop for the City via the Depot, green light in signal can be seen. 5:43 28?, closely followed by 26 turn from Drummond St South into Sturt St. 6:18 Scene opens with shot of “Sebastopol” destination on a bogie tram. 6:21 Title “The Sebastopol Line” 6:24 21 turning from Sturt St into Drummond St Sth with destination of Bell St and then going away from the camera. 6:55 38 in Drummond St Sth, coming towards the camera and then passing the camera with Sturt St just in the view. 7:10 21, showing Gregory St, in Drummond St Sth, approaching and then going away, entering the Urquhart St Loop, 7:39 34 in Drummond St Sth (location check required (Latrobe?)), approaches camera, picks up passengers and the goes away. 8:09 39 at ? Street, turns from Drummond St Sth into Skipton St, after picking up and setting down passengers, bound for Sebastopol 8:55 35 inbound in Skipton St passes through the Bell Street Loop, and then goes away from the camera. 9:33 42 outbound in Skipton St, approaches the camera, passes and then crosses over the half the road into Albert St. 10:00 39 inbound in Albert St – location? 10:31 34 outbound for Sebastopol, approaches camera and just starts to pass by. 10:36 34 in Grey St crossing loop, crosses 42 inbound. 10:59 39 outbound in Albert St, with shopping centre in bound, approaches camera, passes and then crosses over Albert St. Mid morning scene. 11:39 39 inbound, Albert St south, approaches camera and then passes and the crosses over Albert St. 12:16 41 outbound in Albert St passes the camera, and pulls into the terminus with the conductor getting out on the back bumper to pull the pole down as the tram stops and a passenger walks into the Royal Hotel. 12:39 Title “The Lydiard Street North Line” 12:44 Filmed from the Hotel balcony, 21 inbound in Lydiard St Nth passes over Mair St, stops while 33 passes in the other direction. 13:18 With the red light showing on the Seymour St loop signal, 33 inbound for Sebastopol stops and picks up many passengers, passes the camera and runs past the VRI building in the background and through the loop. Possibly filmed on a Sunday given the ladies dresses and quieter streets. 14:01 30 outbound, passes the camera and stops at Macarthur St. Filmed alongside the brick wall of the cutting. 14:28 30 inbound arrives, passes through the Gregory St loop and then proceeds past the camera, making a stop to pick up passengers. 15:14 28 in Lydiard St Nth – location?, approaches and goes away from the camera, north of Gregory St. 15:34 28 ditto location? 15:53 21 arrives at the terminus with passengers getting on and off. 16:11 View of the a vertical positioned “End of Section” sign on a pole at the terminus and then lifting the camera to see the timetable board and the stop sign. 16:33 31 in Bridge St passing Morseheads and then turning into Sturt St, stops at the Grenville St stop, while another single trucker comes down to the stop from the City. 16:58 31 outbound in Bridge St, with destination of Victoria St. 17:14 Title “The Victoria Street Line” 17:18 31 outbound to Victoria St from Stones Corner. Starts with an overhead shot, shows clock at the Caltex service station,. 17:37 31 inbound approaching Bakery Hill and then descending to the junction after it passes camera. 18:09 25 climbing outbound in Victoria St, passing the camera, to then pass through the King St loop. 18:47 25 inbound in Victoria St, passing the camera, then pass through the King St loop, with St Alypius Church in the background. 19:36 14 approaching the rail bridge in Victoria St and stopping at the 2nd last stop to left of passengers. 20:01 14 leaving the terminus and approaching the camera and the a short sequence going away, to the next stop to pick up quite a few passengers. 20:14 “Trams Stop Here” sign, metal wrap around on a steel pole. 20:16 Title “The Mount Pleasant Line” 20:21 11 inbound in Main St, with a passenger leaping off the tramcar and another getting off just before the junction. 20:45 11 passes the junction and then proceeds away from the camera in Bridge St. 21:04 30 outbound in Main St, then turns into Barkly St, a bus (Eclipse Motors) passes in Main St just before the sequence ends. 21:31 30 inbound near Steinfield St. (exact location?) 21:49 25 approaches the camera, then proceeds away and passes through the Grant St. loop. 22:29 25 inbound, windy day, between Grant and Cobden, (exact location?), with a horse drawn bread van in the view and the breadman walking behind the tram as it passes. 23:02 11 outbound in Barkly St, (exact location?) 23:37 11 inbound in Barkly St (exact location?) 23:44 Mt Pleasant terminus signage 23:50 30 approaches the terminus and then stops with the conductor alighting turning the pole, passengers getting on and off and the driver appearing at the other end. 24:32 Title “The Gardens Via Sturt St. West Line” 24:35 21 outbound in Sturt St near Raglan St, approaches and passes the Camera. 25:09 12, showing City Oval, approaches and passes the camera, outbound near Windermere St. 25:33 13 showing View Point, goes away from the camera – location? 25:44 12 comes from St. West, inbound passes the camera and then stop as the next stop next Talbot St? 26:21 Short sequence of a “Warning Oncoming Trams” sign 26:28 42 inbound in Sturt St West, just before Ripon St, view coming towards camera and then going away to cross Ripon St. 27:10 34 passes through the Parker St loop 27:25 35 or 39 inbound past the college in Sturt St West 28:04 41 outbound at the Russell St curve, passes away from the camera. 28:11 35? inbound passes away from the camera through the Victoria Park or Morrison St loop, swinging out into the roadway. 28:29 View of timetable sign at Hamilton Ave. 28:37 35 turning from Sturt St West into Hamilton Ave, can see the conductor changing over the barrier rails. 29:11 42 inbound, crosses another bogie tram (35?) at Carlton St loop then passes the camera and goes past the Olympic rings monument. 29:42 12 approaches the Carlton St gates. 30:07 12 outbound, crosses a bogie tram in the loop with both trams then leaving the loop. 30:20 Title “End of Part One” Written labels giving title information on outside of box.trams, tramways, ballarat, sebastopol, lydiard st north, victoria st, mt pleasant, sturt st west -
 Ballarat Tramway Museum
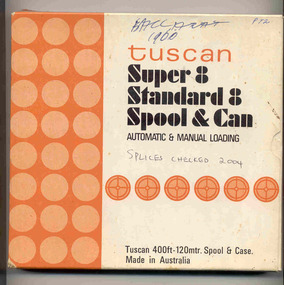
Film - Movie Film & Box, Kodak, 1960
... 0:30 SEC Logo 0:45 Ballarat Station sign and intro “Some City Scenes” 0:49 35 turning from Lydiard St Nth to Sturt St towards Grenville St with Commonwealth Bank in view. and then 42 returning 1:19 42 showing Mt Pleasant, turns from Sturt St into Lydiard St Nth 1:53 Tramway road works in Lydiard St Nth, near intersection with Mair St with Jelbart Road roller in use, starts with an SEC roadworks sign. 2:12 39 passing the works out bound to Lydiard St Nth. 2:46 Good view of the roller working before 35 arrives. 3:01 35 passing the works in bound with 3:29 14 crossing Lydiard St in Sturt St, towards Grenville St 3:47 Trams in City Loop 3:55 21 coming up the hill 4:04 31 entering Bridge St from Sturt St with Bucks Head Hotel in the background. 4:27 Overhead work at corner of Sturt and Lydiard, with view of the sign at the City terminus “Trams leave here for Sebastopol, Gardens, View Point.” 4:34 Passengers getting off and then onto 38, ex Lydiard St Nth at city terminus including a young lady wearing gloves and a wheeling a pram hurriedly the photographer. ...0:30 SEC Logo 0:45 Ballarat Station sign and intro “Some City Scenes” 0:49 35 turning from Lydiard St Nth to Sturt St towards Grenville St with Commonwealth Bank in view. and then 42 returning 1:19 42 showing Mt Pleasant, turns from Sturt St into Lydiard St Nth 1:53 Tramway road works in Lydiard St Nth, near intersection with Mair St with Jelbart Road roller in use, starts with an SEC roadworks sign. 2:12 39 passing the works out bound to Lydiard St Nth. 2:46 Good view of the roller working before 35 arrives. 3:01 35 passing the works in bound with 3:29 14 crossing Lydiard St in Sturt St, towards Grenville St 3:47 Trams in City Loop 3:55 21 coming up the hill 4:04 31 entering Bridge St from Sturt St with Bucks Head Hotel in the background. 4:27 Overhead work at corner of Sturt and Lydiard, with view of the sign at the City terminus “Trams leave here for Sebastopol, Gardens, View Point.” 4:34 Passengers getting off and then onto 38, ex Lydiard St Nth at city terminus including a young lady wearing gloves and a wheeling a pram hurriedly the photographer. ...Yields information in movie film format of Ballarat trams in 1960, how the system operated and was used by people., Yields information in movie film format of Ballarat trams in 1960, how the system operated and was used by people.Movie film - 8mm, approx. 17.5 mins, with leader strip on a plastic reel, within a black and white plastic box, titled "Ballarat No. 1. 1960" contained with a cardboard box, 'Tuscan Super 8 and Standard 8 Spool and Can' . Has been transferred to DVD - see Reg item 4100 as Segment No. 1. Filmed and made by Ben Parle. Also transferred to DVD by Rod Cook Oct. 2015, via Roger Greenwood for use in his DVD, "The City of Ballarat Trams, Gardens & Gold" of 2016. See Reg Item 6883. Synopsis: based on time. 0:00 Starts with bogies cars crossing railway level crossing (34?, 39?) 0:30 SEC Logo 0:45 Ballarat Station sign and intro “Some City Scenes” 0:49 35 turning from Lydiard St Nth to Sturt St towards Grenville St with Commonwealth Bank in view. and then 42 returning 1:19 42 showing Mt Pleasant, turns from Sturt St into Lydiard St Nth 1:53 Tramway road works in Lydiard St Nth, near intersection with Mair St with Jelbart Road roller in use, starts with an SEC roadworks sign. 2:12 39 passing the works out bound to Lydiard St Nth. 2:46 Good view of the roller working before 35 arrives. 3:01 35 passing the works in bound with 3:29 14 crossing Lydiard St in Sturt St, towards Grenville St 3:47 Trams in City Loop 3:55 21 coming up the hill 4:04 31 entering Bridge St from Sturt St with Bucks Head Hotel in the background. 4:27 Overhead work at corner of Sturt and Lydiard, with view of the sign at the City terminus “Trams leave here for Sebastopol, Gardens, View Point.” 4:34 Passengers getting off and then onto 38, ex Lydiard St Nth at city terminus including a young lady wearing gloves and a wheeling a pram hurriedly the photographer. A number of other prams in the view as well as. The Conductor helps to unload the pram. 5:07 41 proceeding up Sturt St, appears to have just rained. 5:26 11 using the Dawson St crossover, with a motor car doing a U turn as well. 6:00 14 descending Sturt St towards the City, filmed at Dawson St. 6:11 Title “The Gardens via Drummond St North Line” 6:16 19 showing Victoria St, turning from Drummond St Nth into Sturt St. 6:28 30 inbound in Drummond St Nth, approach and trailing shots. Trailing shot ahs the hospital in the background. 6:49 31 outbound, Drummond St Nth, approach and trailing shots, trees are in autumn colours. 7:04 12, inbound Drummond St Nth, with Macarthur St in the background, stopping to pick up a lady, approach and trailing shots and then entering the Mill St crossing loop. 7:53 14 outbound in Drummond St Nth, dropping a lady passenger off and then turning into Macarthur St and then tram going away. 8:37 View of overhead junction at View Point Jtn. 8:45 View of “Cars Stop Here” sign and pole sign “To City Only” 8:55 30 inbound in Wendouree Parade, stops to pick up passenger, and then a trailing shot of tram entering Macarthur St loop 9:37 View of “Cars Stop Here”, “End of Section” and timetable boards at Haddon St. 9:50 34, pausing at Haddon St and then proceeding towards depot – approach and trailing shots, with “Warning Oncoming Trams” sign in shot. 10:27 “Warning Oncoming Trams” sign 10:32 34 crossing 12 at the Martin Ave loop 10:48 39? Wendouree Parade, near Barrett Ave, stopping and letting off passengers. 11:24 30 passing depot junction and then trailing shot of it entering Tram Sheds or Depot Loop and then proceeding towards the City. 12:11 Shot of the “Caution Beware of Trams” sign at the depot. 12:14 25 stopping at depot junction and then trailing shot of it going toward Forrest St. 12:47 12 passing Depot Junction, trailing shot. 13:07 Shot of :Electricity Supply Department, Ballarat Branch” sign at depot. 13:13 View of a destination showing “Depot” on a bogie tram 13:15 Title “Some Depot Scenes” 13:19 View of a trolley pole and then 13 leaving the depot through the gates, destination showing “View Point”. 13:54 View of trolley pole and then 32 stopping at the depot gates. 14:08 12 (Sunny view) running out onto Wendouree Parade and then a bogie tram approaching Depot Loop. 14:43 View of 42 running in with a single trucker behind in Wendouree Parade, and another single trucker running out. 15:02 Title “Some Scenes in the Gardens” 15:05 25 running through the Gardens, approach and trailing shots, near our Depot Junction. 15:55 View of “No Parking East of Loop” sign 15:59 View of overhead and then trackwork (with points removed), but overhead still in position at the Old Gardens Loop or Gardens South Loop and then 12 entering the loop from the south and then a trailing shot looking along the Parade. 16:33 View of “Cars Stop Here” and “End of Section” and then timetable boards at Gardens Loop. 16:55 View of 34 leaving the loop 17:14 Title “The End”Written labels giving title information on outside of box.trams, tramways, ballarat, sebastopol, lydiard st north, victoria st, mt pleasant, sturt st west