Showing 808 items matching " passenger signs"
-
 Ballarat Tramway Museum
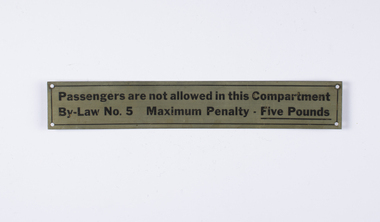
Sign - Warning Sign - Passengers are not allowed in this Compartment, Melbourne and Metropolitan Tramways Board (MMTB), 1940s?
... sign...passenger signs...Sign - "Passengers are not allowed in this Compartment / By-Law No. 5 Maximum Penalty Five Pounds" - provided in each driving compartment of a W class trams to advise passengers that they were not permitted in the driver/s cabin. ...Demonstrates MMTB tramcar signage. tramways tramcars sign passenger signs behaviour Sign - engraved brass sheet, with black lettering and lining on the outside and screw holes in each corner. ...Sign - "Passengers are not allowed in this Compartment / By-Law No. 5 Maximum Penalty Five Pounds" - provided in each driving compartment of a W class trams to advise passengers that they were not permitted in the driver/s cabin. Demonstrates MMTB tramcar signage.Sign - engraved brass sheet, with black lettering and lining on the outside and screw holes in each corner.tramways, tramcars, sign, passenger signs, behaviour -
 Ballarat Tramway Museum
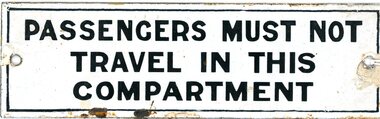
Sign - "Passengers must not travel in this compartment."
... signs...Passenger information signs...Reverse enameled in black. Sign reads "Passengers must not travel in this compartment". ...Tramways signs Passenger information signs Enameled signs Enameled metal sign, black capital letters and border lines on an off- white background. ...Demonstrates how the SEC used enameled signs to convey instructions to passengers, and confirm the advice of the conductor.Enameled metal sign, black capital letters and border lines on an off- white background. Reverse enameled in black. Sign reads "Passengers must not travel in this compartment". The writing appears to have been stenciled over the white enamel base. The enameling has broken away from areas near the two screw holes formed to attach the sign to the compartment. An attempt has been made to address damage with paint. Enamel on reverse is marked where the sign appears to have been laying on a frame prior to firing. tramways signs, passenger information signs, enameled signs -
 Ballarat Tramway Museum
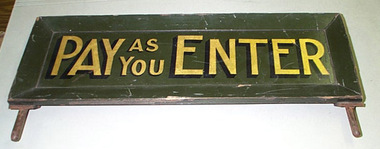
Sign - Pay As You Enter Sign, State Electricity Commission of Victoria (SECV), "Pay As You Enter", c1935
... Sign... Passenger Signs...Trams tramways Advisory Sign Passenger Signs One Man Trams Pay As You Enter sign once fitted to side of SEC tramcar by door - with pins, - Sign writing gold leaf, black shading, green background paint. ...Demonstrates the signage used on the trams to indicate to passengers when the trams were operating as a one-man tram. Yields information about the construction of the sign and paintwork.Pay As You Enter sign once fitted to side of SEC tramcar by door - with pins, - Sign writing gold leaf, black shading, green background paint. See original catalogue sheet for more details including sketch. See photo in use on No. 14 in an accident with a Ford Truck when in SEC early colour scheme. Has actual paint used at the time. See photo of No. 14 and a collision with a Ford Truck. To be kept in light controlled areatrams, tramways, advisory sign, passenger signs, one man trams -
 Melbourne Tram Museum
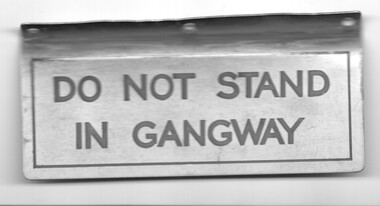
Sign, Melbourne & Metropolitan Tramways Board (MMTB), "DO NOT STAND IN GANGWAY'", 1950's
... ... Passenger Signs...Melbourne Tram Museum 8 Wallen Road Hawthorn melbourne Trams tramways Signs Tramcars Tramways Passenger Signs Sign - engraved brass sheet, with black lettering and lining on the outside, with three screw holes along the top edge. ...Sign - engraved brass sheet, with black lettering and lining on the outside, with three screw holes along the top edge. The top of the sign has been folded to enable it to be fitted to the tram body. "DO NOT STAND IN GANGWAY'trams, tramways, signs, tramcars, tramways, passenger signs -
 Melbourne Tram Museum
Sign, Melbourne & Metropolitan Tramways Board (MMTB), "TO STOP CAR PULL LEFT HAND CORD ONCE'", 1940's?
... ... Passenger Signs...Melbourne Tram Museum 8 Wallen Road Hawthorn melbourne Trams tramways Signs Tramcars Tramways Passenger Signs Sign - engraved brass sheet, with black lettering and lining on the outside and screw holes in each corner with the words. ...Sign - engraved brass sheet, with black lettering and lining on the outside and screw holes in each corner with the words. "TO STOP CAR PULL LEFT HAND CORD ONCE' See Reg item 2935 for another version in upper and lower case.trams, tramways, signs, tramcars, tramways, passenger signs -
 Melbourne Tram Museum
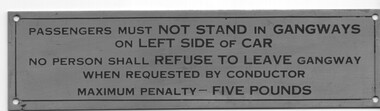
Sign, Melbourne & Metropolitan Tramways Board (MMTB), "PASSENGERS MUST NOT STAND IN GANGWAYS ", 1940's?
... ... Passenger Signs...Sign - engraved brass sheet, with black lettering and lining on the outside and screw holes in each corner with the words. "PASSENGERS...Melbourne Tram Museum 8 Wallen Road Hawthorn melbourne Used in tramcars to try and keep passengers clear of internal and external doorways and passages. Trams tramways Signs Tramcars Tramways Passenger Signs behaviour Sign - engraved brass sheet, with black lettering and lining on the outside and screw holes in each corner with the words. ...Used in tramcars to try and keep passengers clear of internal and external doorways and passages. Sign - engraved brass sheet, with black lettering and lining on the outside and screw holes in each corner with the words. "PASSENGERS MUST NOT STAND IN GANGWAYS ON LEFT SIDE OF CAR / NO PERSON SHALL REFUSE TO LEAVE GANGWAY WHEN REQUESTED BY CONDUCTOR / MAXIMUM PENALTY FIVE POUNDS" Two copies held.trams, tramways, signs, tramcars, tramways, passenger signs, behaviour -
 Melbourne Tram Museum
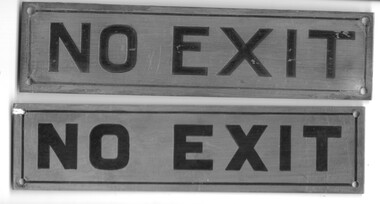
Sign, Melbourne & Metropolitan Tramways Board (MMTB), "NO EXIT", 1940's?
... ... Passenger Signs...Melbourne Tram Museum 8 Wallen Road Hawthorn melbourne Trams tramways Signs Tramcars Tramways Passenger Signs behaviour Sign - engraved brass sheet, with black lettering and lining on the outside and screw holes in each corner with the words. ...Sign - engraved brass sheet, with black lettering and lining on the outside and screw holes in each corner with the words. "NO EXIT" Two copies held - with slightly different font size and type. 3rd copy added 13/8/2020 - different size - ex Keith Kings - not image.trams, tramways, signs, tramcars, tramways, passenger signs, behaviour -
 Melbourne Tram Museum
Sign, Melbourne & Metropolitan Tramways Board (MMTB), "Passengers are not allowed in this Compartment", 1940's?
... ... Passenger Signs...Sign - engraved brass sheet, with black lettering and lining on the outside and screw holes in each corner with the words. "Passengers...Melbourne Tram Museum 8 Wallen Road Hawthorn melbourne Trams tramways Signs Tramcars Tramways Passenger Signs behaviour Sign - engraved brass sheet, with black lettering and lining on the outside and screw holes in each corner with the words. ...Sign - engraved brass sheet, with black lettering and lining on the outside and screw holes in each corner with the words. "Passengers are not allowed in this Compartment / By-Law No. 5 Maximum Penalty Five Pounds" Copy 1 - has been trimmed around the edge and slightly curved to fit the tram car space and holes redrilled. Copy 2 - has the edge lining around the sign. Copy 3 - added 13/8/2020, ex Keith Kings - duplicate of copy 2.trams, tramways, signs, tramcars, tramways, passenger signs, behaviour -
 Melbourne Tram Museum
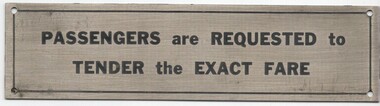
Sign, Melbourne & Metropolitan Tramways Board (MMTB), "Passengers are requested to tender the EXACT FARE", 1940's?
... ... Passenger Signs...Sign - engraved brass sheet, with black lettering and lining on the outside and screw holes in each corner with the words. "Passengers...Melbourne Tram Museum 8 Wallen Road Hawthorn melbourne Trams tramways Signs Tramcars Tramways Passenger Signs behaviour Sign - engraved brass sheet, with black lettering and lining on the outside and screw holes in each corner with the words. ...Sign - engraved brass sheet, with black lettering and lining on the outside and screw holes in each corner with the words. "Passengers are requested to tender the EXACT FARE" See Reg Item 2554 for a larger version.trams, tramways, signs, tramcars, tramways, passenger signs, behaviour -
 Melbourne Tram Museum
Sign, Melbourne & Metropolitan Tramways Board (MMTB), "Passengers are requested to tender the EXACT FARE", 1940's?
... ... Passenger Signs...Sign - engraved brass sheet, with black lettering and lining on the outside and screw holes in each corner with the words. "Passengers...Melbourne Tram Museum 8 Wallen Road Hawthorn melbourne Trams tramways Signs Tramcars Tramways Passenger Signs behaviour Sign - engraved brass sheet, with black lettering and lining on the outside and screw holes in each corner with the words. ...Sign - engraved brass sheet, with black lettering and lining on the outside and screw holes in each corner with the words. "Passengers are requested to tender the EXACT FARE" See Reg Item 2553 for a smaller version.trams, tramways, signs, tramcars, tramways, passenger signs, behaviour -
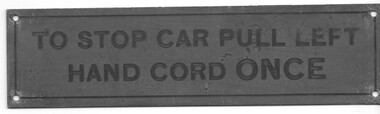
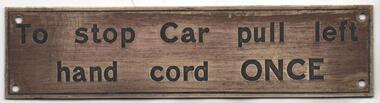 Melbourne Tram Museum
Sign, Melbourne & Metropolitan Tramways Board (MMTB), "To stop Car pull left hand cord ONCE", 1940's?
... ... Passenger Signs...Melbourne Tram Museum 8 Wallen Road Hawthorn melbourne Trams tramways Signs Tramcars Tramways Passenger Signs Sign - engraved brass sheet, with black lettering and lining on the outside and screw holes in each corner with the words. ...Sign - engraved brass sheet, with black lettering and lining on the outside and screw holes in each corner with the words. "To stop Car pull left hand cord ONCE" See Reg Item 2426 for another version in upper and lower case.trams, tramways, signs, tramcars, tramways, passenger signs -
 Melbourne Tram Museum
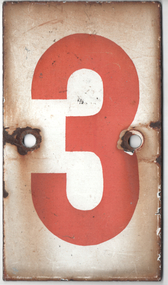
Functional object - Tram stop sign number - set of 2, Melbourne & Metropolitan Tramways Board (MMTB), 1960s?
... ...Passenger Signs...Demonstrates a MMTB tram stop number of two types of materials. tramways mmtb tram stops Passenger Signs Set of two numerals used on tram stops, both with two holes on the sides, and originally a red number on a white background. ...Used by the MMTB to number each tram stop on the system. Was attached to a pole using a metal strap. See item 185 for an example with a strap.Demonstrates a MMTB tram stop number of two types of materials.Set of two numerals used on tram stops, both with two holes on the sides, and originally a red number on a white background. No. 3 - sheet metal baked enamalled. No. 7 - white core bakelite sheet.tramways, mmtb, tram stops, passenger signs -
 Ballarat Tramway Museum
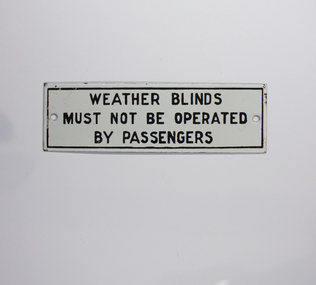
Sign, "Weather Blinds must not be operated by Passengers", 1960's
... Enamel sign, black capital letters and lines on white background, with words in capital letters "Weather Blinds must not be operated by Passengers". Sign has a black enamel backing, with marks from the enamelling process and two holes centrally at either end. ..."Weather Blinds must not be operated by Passengers" Sign ...Enamel sign, black capital letters and lines on white background, with words in capital letters "Weather Blinds must not be operated by Passengers". Sign has a black enamel backing, with marks from the enamelling process and two holes centrally at either end. Two copies held.trams, tramways, signs, sec -
 Mt Dandenong & District Historical Society Inc.
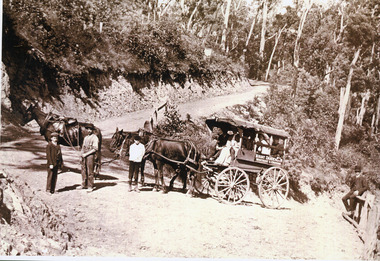
Photograph, Jeeves Coach at Devil's Elbow 1912
... Three horse passenger coach with sign Mount Dandenong, Montrose & Croydon. ...Farndons Community Hall 42 Falls Road Mt Dandenong yarra-valley-and-the-dandenong-ranges Coach Service Kalorama Jeeves Devil's Elbow Three horse passenger coach with sign Mount Dandenong, Montrose & Croydon. ...Three horse passenger coach with sign Mount Dandenong, Montrose & Croydon. Driver in front with woman passenger and other passengers in coach. Four males are on the road, two passengers and two workmen. (2 copies)coach service, kalorama, jeeves, devil's elbow -
 Mission to Seafarers Victoria
Souvenir - Menu, MV Neptunia Crossing the Line Menu
... Extra historical context by the addition of ship's passengers and crew signing their names and providing contact details. ...Extra historical context by the addition of ship's passengers and crew signing their names and providing contact details. ...MV Neptunia ship's menu for the February 1959 equator crossing. Extra historical context by the addition of ship's passengers and crew signing their names and providing contact details. Representative cruise ship paraphernalia of the period, showing the significance and tradition of celebrating a ship's crossing of the equator. Ship's restaurant menu consisting of single folded light card, with vivid watercolour painting of flowers of orange and purple on the front cover. On opening the card, printed menu selection in Spanish is on the left and is in English on the right. Guests and crew have signed randomly over and around the menu listings. menu, crossing-the-line, equator, neptunia, nick garlick -
 Melbourne Tram Museum
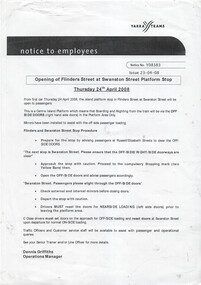
Document, Yarra Trams, "Opening of Flinders St at Swanston St platform stop", 24-4-2008
... Gives instructions re door controls, and that mirrors had been installed to assist with passenger loading. Signed by Dennis Griffiths, Operations Manager....Gives instructions re door controls, and that mirrors had been installed to assist with passenger loading. Signed by Dennis Griffiths, Operations Manager. ...Document titled "Opening of Flinders St at Swanston St platform stop", notice to employees for 24/4/2008. New tram stop built as an island platform stop that required trams to open the off-side or opposite doors to that previous. This was the first platform stop in Melbourne. Gives instructions re door controls, and that mirrors had been installed to assist with passenger loading. Signed by Dennis Griffiths, Operations Manager.Yields information about the first island platform stop in Melbourne.Document A4 printed sheet.trams, tramways, platform stops, flnders st, island paltform -
 Ballarat Tramway Museum
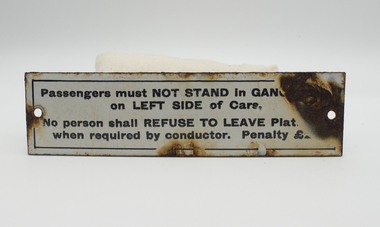
Sign - Warning Sign - Passengers must not stand, "Passengers must not stand..."
... Sign advising passengers that they must not stand in gangways on the left side of cars and a penalty if refused to leave by the Conductor. ..."Passengers must not stand..." Sign Warning Sign - Passengers must not stand ...Sign advising passengers that they must not stand in gangways on the left side of cars and a penalty if refused to leave by the Conductor. The penalty appears to start with a 2. May not be relevant to SEC tramcars.Demonstrates signs used on tramcars to advise passengers of their behaviour.Enamel sign - black letters on a white base with screw holes at either end.signs, passengers, tramways, tramcars, btm, ballarat tramways -
 Melbourne Tram Museum
Document - Report, Melbourne & Metropolitan Tramways Board (MMTB), "Survey of Passengers April 1974 - first Z3 tram in service", 25/09/1979 12:00:00 AM
... Photocopy of an A4 page with hand written headings, titled "Survey of Passengers April 1974 - first Z3 tram in service", giving response to the questionnaire completed by 110 passengers and comments received. Signed R. Dunning? 25-9-1979....Melbourne Tram Museum 8 Wallen Road Hawthorn melbourne Trams tramways Z3 class Surveys New Trams Photocopy of an A4 page with hand written headings, titled "Survey of Passengers April 1974 - first Z3 tram in service", giving response to the questionnaire completed by 110 passengers and comments received. Signed R. Dunning? 25-9-1979. ...Photocopy of an A4 page with hand written headings, titled "Survey of Passengers April 1974 - first Z3 tram in service", giving response to the questionnaire completed by 110 passengers and comments received. Signed R. Dunning? 25-9-1979.trams, tramways, z3 class, surveys, new trams -
 Melbourne Tram Museum
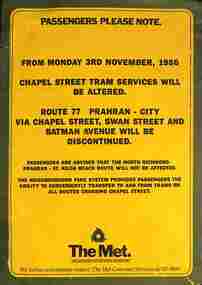
Sign - Route 77 - Prahran discontinued, The Met, Nov. 1986
... Sign advising passengers that the Route 77 Prahran to City - Batman Ave via Chapel St service will be discontinued from 3/11/1986. ...Melbourne Tram Museum 8 Wallen Road Hawthorn melbourne Sign advising passengers that the Route 77 Prahran to City - Batman Ave via Chapel St service will be discontinued from 3/11/1986. ...Sign advising passengers that the Route 77 Prahran to City - Batman Ave via Chapel St service will be discontinued from 3/11/1986. Published by The Met. Notes that the Neighbourhood Fare System allows for transfers to and from Chapel St trams.Yields information about the closure or discontinuance of route 77 trams in 1986.Sign - printed A4 sheet with remnants of adhesive on rear.trams, tramways, the met, chapel st, route 77 -
 Mission to Seafarers Victoria
Photograph, Peckham Photographic Studios, Geo Beachcroft, Capt Dahlström and 2nd mate of the C.B. Pedersen, c. 1935
... Eight persons, including three women and a small boy were accepted as passengers, and signed on as members of the crew at salaries of 1/ a month". ...Eight persons, including three women and a small boy were accepted as passengers, and signed on as members of the crew at salaries of 1/ a month". ...In the Sydney Morning Herald, Tuesday 27 April 1937, page 12: "The C. B. Pedersen was built in 1891. It has visited Australia several times, the most recent occasion having been in 1935, when It was anchored in Port Phillip Bay, Victoria, for several weeks, awaiting a suitable cargo. At length the master, (Captain Hjalmar Dahlström) announced that, as no cargo could be obtained he would be prepared to carry passengers in a voyage to Gothenburg, via Torres Strait. Eight persons, including three women and a small boy were accepted as passengers, and signed on as members of the crew at salaries of 1/ a month". Artist Violet Teague was one of the passengers. She painted during the voyage and exhibited her work in 1938. Built in 1891 the C.B Pedersen, a four-masted steel barque (2142 tons) was used as a training Barque. The ship foundered in April 1937, the crew was saved. Several photographs of the C.B. Pedersen taken by the same studio are held at the State Library of Victoria.see links aboveBlack and white photograph depicting two sailors in attire on the deck of a ship.verso in Black ink; Photographic studio stampcrew, c.b pedersen, captain hjalmar dahlström, violet teague, windjammer -
 Melbourne Tram Museum
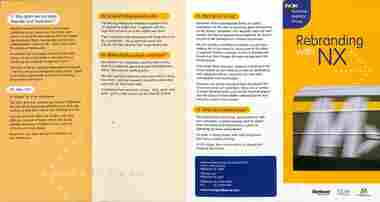
Pamphlet, National Express Group, "Rebranding with NX", 8/2001
... 2 - Letter enclosed with the above pamphlet, dated 30/8/2001, about the change of branding, V/Line passengers, and National Bus. Signed by Peter Strachan...2 - Letter enclosed with the above pamphlet, dated 30/8/2001, about the change of branding, V/Line passengers, and National Bus. Signed by Peter Strachan Yields information about the rebranding of National Express operations in Melbourne in 2001. tramways trams National Express Swanston Trams Bayside trains V/Line Reports M>tram M>train Pamphlet, colour, four fold DL - and folded three fold two page letter to staff. ...1 - Pamphlet issued by National Express, the operators of Bayside Trains, Swanston Trams, and VLine, to staff about the rebranding of National Express to National Bus, and M>Tram and M>Train. Notes new names, uniforms, train and tram livery, signage, website, basis of branding, colours, and why M? 2 - Letter enclosed with the above pamphlet, dated 30/8/2001, about the change of branding, V/Line passengers, and National Bus. Signed by Peter StrachanYields information about the rebranding of National Express operations in Melbourne in 2001. Pamphlet, colour, four fold DL - and folded three fold two page letter to staff.tramways, trams, national express, swanston trams, bayside trains, v/line, reports, m>tram, m>train -
 Mission to Seafarers Victoria
Photograph, circa 1935
... Eight persons, including three women and a small boy were accepted as passengers, and signed on as members of the crew at salaries of 1/ a month". ...Eight persons, including three women and a small boy were accepted as passengers, and signed on as members of the crew at salaries of 1/ a month". ...In 1935, the CB Pedersen arrived on the 13th of April after 198 days at sea. The ship left on the 18th June (date written on the photograph) after two months in Melbourne. Captain Dalhstrom had been its skipper for 13 years. In the Sydney Morning Herald, Tuesday 27 April 1937, page 12: "The C. B. Pedersen was built in 1891. It has visited Australia several times, the most recent occasion having been in 1935, when It was anchored in Port Phillip Bay, Victoria, for several weeks, awaiting a suitable cargo. At length the master, (Captain Hjalmar Dahlström) announced that, as no cargo could be obtained he would be prepared to carry passengers in a voyage to Gothenburg, via Torres Strait. Eight persons, including three women and a small boy were accepted as passengers, and signed on as members of the crew at salaries of 1/ a month". Artist Violet Teague was one of the passengers. She painted during the voyage and exhibited her work in 1938. Built in 1891 the C.B Pedersen, a four-masted steel barque (2142 tons) was used as a training Barque. The ship foundered in April 1937, the crew was saved.The C.B. Pedersen was one of the last windjammers sailing in the 1930s with the Herzogin Cecilie and the Grace Harwar. Black and white photographLower right corner front in black ink: H. Dahlström / June 13th 1935 / On board the CBP / in Hobson's Bayc.b. pedersen, captain hjalmar dahlström, violet teague, windjammer, sweden -
![Photograph - Photograph, Black and white, Peckham Photographic Studios, Geo Beachcroft, Hanging on up aloft [the] C.B. Pedersen, c. 1935](/media/collectors/4f729f5897f83e0308601603/items/4f72bbce97f83e03086061e1/item-media/581a839ad0cdd11ed4ac0ec3/item-fit-380x285.jpg?cb=6) Mission to Seafarers Victoria
Mission to Seafarers VictoriaPhotograph - Photograph, Black and white, Peckham Photographic Studios, Geo Beachcroft, Hanging on up aloft [the] C.B. Pedersen, c. 1935
... Eight persons, including three women and a small boy were accepted as passengers, and signed on as members of the crew at salaries of 1/ a month". ...Eight persons, including three women and a small boy were accepted as passengers, and signed on as members of the crew at salaries of 1/ a month". ...Snapshot in time of tall ship and the relaxed clambering about the rigging by sailors. The C.B. Pedersen is also referred to as a Training Ship for Swedish seamen and cadets. A reference in Annual reports and in Jottings from our log notes that classes in Swedish amongst other languages were offered by the LHLG to members and some of the earliest photographs note Swedish sailors relaxing. The first officer and captain of the C.B. Pedersen are depicted in photograph (0706) on permanent display. In the Sydney Morning Herald, Tuesday 27 April 1937, page 12: "The C. B. Pedersen was built in 1891. It has visited Australia several times, the most recent occasion having been in 1935, when It was anchored in Port Phillip Bay, Victoria, for several weeks, awaiting a suitable cargo. At length the master, (Captain Hjalmar Dahlström) announced that, as no cargo could be obtained he would be prepared to carry passengers in a voyage to Gothenburg, via Torres Strait. Eight persons, including three women and a small boy were accepted as passengers, and signed on as members of the crew at salaries of 1/ a month". Artist Violet Teague was one of the passengers. She painted during the voyage and exhibited her work in 1938. Built in 1891 the C.B Pedersen, a four-masted steel barque (2142 tons) was used as a training Barque. The ship foundered in April 1937, the crew was saved. Several other photographs of the C.B. Pedersen taken by the same studio are held at the State Library of Victoria.Training of seamen has always been of of keen interest to the Mission to Seamen and many cadets have been welcomed over the 20th Century when widespread training was undertaken by a number of seafaring nations. Black and white photograph of 9 men hanging from ropes in the rigging. One man is upside down, another is holding his hat out. The mast is off to the right-hand side of the photograph and there are several ropes and chains.On the back of the photograph in the top left-hand corner is an ink stamp with the text "Peckham Photographic Studios/Geo Beachcroft/Propr./21 Charlotte St./Richmond/Victoria, Australia". In black pen is the text "Hanging on up aloft/C.B.Pedersen".richmond, chains, rope, seafarers, rigging, peckham photographic studios, geo beachcroft propr, cb pedersen, tall ships, captain hjalmar dahlström, windjammer -
 Ballarat Tramway Museum
Sign - "Passengers are requested to present the correct amount of Fare."
... Demonstrates how the SEC used enameled signs to convey instructions to passengers and confirm the advice of the conductor....An enameled sign, with black letters and border lines on an off-white background. Sign reads "Passengers are requested to present the correct amount of Fare." ...Sign reads "Passengers are requested to present the correct amount of Fare." ...Demonstrates how the SEC used enameled signs to convey instructions to passengers and confirm the advice of the conductor.An enameled sign, with black letters and border lines on an off-white background. Sign reads "Passengers are requested to present the correct amount of Fare." Two holes on the left and right hand sides have been made to attach the sign to the tram cab. There are rust marks permeating the enamel on the front. And paint has been used on the RH side to cover chipped enamel. The reverse has been coated in black enamel, with rust marks showing where the enamel was placed on a frame prior to firing, and where the enamel has chipped away from the outer edge.tramways sign, enameled tramway signage -
 Melbourne Tram Museum
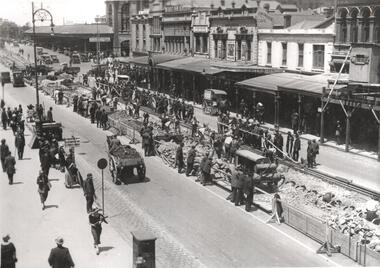
Photograph - Black & White Photograph/s, Melbourne & Metropolitan Tramways Board (MMTB), Dec 1925 or Jan 1926
... Note the signs advising passengers to go to Princes Bridge for buses, horse drawn vehicles with excavated spoil, air compressor, the cable tram slot rail supporting yokes. ...Note the signs advising passengers to go to Princes Bridge for buses, horse drawn vehicles with excavated spoil, air compressor, the cable tram slot rail supporting yokes. ...Black and white photograph of the conversion of the Flinders St end of Swanston Street from cable trams to electric trams. Note the signs advising passengers to go to Princes Bridge for buses, horse drawn vehicles with excavated spoil, air compressor, the cable tram slot rail supporting yokes. In the background is the Flinders St Station. Photo from the Collection of the Department of Infrastructure now with the Public Records Office - image number H101. Note: this photo is now out of copyright and was not an original VR photograph, but one copied from another source and collected as their Heritage series.Has Department of Infrastructure copy right stamp on rear and number "H243" in ink on rear and "2-4"trams, tramways, swanston st, cable trams, trackwork, new tramway, flinders st, conversion -
 Ballarat Tramway Museum
Slide - 35mm slide/s, Ben Parle, 5/04/1958 12:00:00 AM
... Both trams are carrying the AETA special car auxiliary signs. Passengers are walking across to the service car - note the level of traffic on the main highway to Melbourne. ...Both trams are carrying the AETA special car auxiliary signs. Passengers are walking across to the service car - note the level of traffic on the main highway to Melbourne. ...Kodachrome Transparency - 35mm slide - cardboard mount, with one side with red border and words "Kodachrome Transparency / Processed by Kodak" top and bottom. Photo taken by Ben Parle 5/4/1958. Has slide No. "16" stamped in red in top corner. Photo of the No. 41 and 21 at the Victoria St terminus, with another single truck tram behind. No. 21 has destination of Special. Both trams are carrying the AETA special car auxiliary signs. Passengers are walking across to the service car - note the level of traffic on the main highway to Melbourne. Group of AETA travellers standing on the right hand side of the photo. Meagher's Hotel can be seen on the left hand side. Note the tram stop signage at the terminus. For high resolution scan see btm2849h.tif"Victoria St line" "5-4-58"tramways, trams, victoria st, aeta, tram 21, tram 41 -
 Melbourne Tram Museum
Album - Robert Thomson Slide Collection - box 17
... Number Date Brief Description Box 17 RT396 Nov. 99 A 239 arriving Batman Ave Route 70 RT397 Nov 99 W7 1012 running Special, Clarendon St RT398 Nov 99 A 300, Port Melbourne, Mont Albert route 109 RT399 Nov 99 A 286 Port Melbourne line, route 109 RT400 Nov 99 Z3 223 Carlisle St St Kilda, route 69 – with destination set for return Kew Cotham Road RT401 Nov 99 W7 1005 Swanston St route 8 with Christmas decorations – route 8 RT402 Nov 99 Z3 140 Swanston St route 8 with Christmas decorations – route 11 RT403 Nov 99 Z3 144 Swanston and Bourke with “Give way to passengers ”sign – route 1 RT404 Nov 99 Z3s 144 and 196 Swanston St – with sign “Tram stop ahead” RT405 Nov 99 W6 977 Swanston St – route 8 and Z1 72 RT406 Nov 99 11W and City Circle SW5 723 – Spencer and Collins Sts RT407 Nov 99 SW6 960 University terminus, route 16 RT408 Nov 99 SW6 960 University terminus with Z2 108 and other trams RT409 Nov. 99 A 234 Wattle Park terminus, route 70 RT410 Nov 99 New track docklands with old shipping shed in the view. ...Number Date Brief Description Box 17 RT396 Nov. 99 A 239 arriving Batman Ave Route 70 RT397 Nov 99 W7 1012 running Special, Clarendon St RT398 Nov 99 A 300, Port Melbourne, Mont Albert route 109 RT399 Nov 99 A 286 Port Melbourne line, route 109 RT400 Nov 99 Z3 223 Carlisle St St Kilda, route 69 – with destination set for return Kew Cotham Road RT401 Nov 99 W7 1005 Swanston St route 8 with Christmas decorations – route 8 RT402 Nov 99 Z3 140 Swanston St route 8 with Christmas decorations – route 11 RT403 Nov 99 Z3 144 Swanston and Bourke with “Give way to passengers ”sign – route 1 RT404 Nov 99 Z3s 144 and 196 Swanston St – with sign “Tram stop ahead” RT405 Nov 99 W6 977 Swanston St – route 8 and Z1 72 RT406 Nov 99 11W and City Circle SW5 723 – Spencer and Collins Sts RT407 Nov 99 SW6 960 University terminus, route 16 RT408 Nov 99 SW6 960 University terminus with Z2 108 and other trams RT409 Nov. 99 A 234 Wattle Park terminus, route 70 RT410 Nov 99 New track docklands with old shipping shed in the view. ...Photo - see pdf file for further information. Number Date Brief Description Box 17 RT396 Nov. 99 A 239 arriving Batman Ave Route 70 RT397 Nov 99 W7 1012 running Special, Clarendon St RT398 Nov 99 A 300, Port Melbourne, Mont Albert route 109 RT399 Nov 99 A 286 Port Melbourne line, route 109 RT400 Nov 99 Z3 223 Carlisle St St Kilda, route 69 – with destination set for return Kew Cotham Road RT401 Nov 99 W7 1005 Swanston St route 8 with Christmas decorations – route 8 RT402 Nov 99 Z3 140 Swanston St route 8 with Christmas decorations – route 11 RT403 Nov 99 Z3 144 Swanston and Bourke with “Give way to passengers ”sign – route 1 RT404 Nov 99 Z3s 144 and 196 Swanston St – with sign “Tram stop ahead” RT405 Nov 99 W6 977 Swanston St – route 8 and Z1 72 RT406 Nov 99 11W and City Circle SW5 723 – Spencer and Collins Sts RT407 Nov 99 SW6 960 University terminus, route 16 RT408 Nov 99 SW6 960 University terminus with Z2 108 and other trams RT409 Nov. 99 A 234 Wattle Park terminus, route 70 RT410 Nov 99 New track docklands with old shipping shed in the view. RT411 Nov 99 Flinders St extension Docklands new track RT412 Nov 99 A 255 route 109 Port Melbourne terminus with former station building RT413 Nov 99 SW6 954 Route 16, Acland St terminus with a Z3 behind. RT414 Nov 99 Restraurant tram 442, Esplanade. RT 415 Nov 2000 Z27 and Z1 Balaclava Junction RT416 Nov 2000 A 278 route 109 Port Melbourne terminus with former station building RT417 Nov 2001 B2 2010 in Yarra livery, Bourke St at Spencer St RT418 Nov 2001 B2 2108 turning from Bourke into Spencer St (route 96) followed by another B2 2048? RT 419 Nov 2001 Z 80 and another two Zs in Swanston St RT420 Nov 2001 Z137 and other Z’s in Swanston St RT421 Nov 2001 Z82 Swanston st RT422 Nov 2001 Z3 169 Wests Road, West Maribyrnong terminus with another Z arriving. Route 57 RT423 Nov 2001 West Maribyrnong terminus board with Swanston Trams signage RT424 Nov 2001 Z3 172 route 82, Wests Road RT425 Nov 2001 A class Flinders St extension route 48 in Yarra Trams livery RT426 Nov 2001 11W Bourke St with MTOCco building in the background. Demonstrates the work of Robert Thomson in photography, collection and/or production of slidesAssembled album in a black presentation folder of 31 colour slides, collected or produced by Robert Thomson. A list of all photographs with details has been compiled. All rights reserved for all photos., melbourne, tramways, trams, tram 239, route 70, batman ave, tram 1012, clarendon st, tram 300, port melbourne, route 109, tram 223, tram 69, tram 1005, route 8, swanston st, tram 140, tram 144, tram 196, tram 977, tram 72, tram 11w, tram 723, city circle, tram 960, tram 108, tram 234, wattle park, docklands, trackwork, flinders st, tram 255, tram 954, tram 442, tram 27, tram 1, tram 278, tram 2010, tram 2108, tram 80, tram 137, tram 82, tram 169, wests road, west maribyrnong, swanston trams, tram 172, route 82, route 48, bourke st, mtoco -
 Ballarat Tramway Museum
Slide - 35mm slide/s - set of 3, Dave Simpson, trams in Sturt St near Hospital Corner, late 1960's early 1970's
... Above this is a sign advising passengers that trams depart this point for The Gardens, View Point and Sebastopol. ...Above this is a sign advising passengers that trams depart this point for The Gardens, View Point and Sebastopol. ....1 -No. 35, outbound to Sebastopol with the Southern Cross Hotel in the background. Has signs for Fosters Larger, Carlton Draught and Victoria Bitter. Has a number of passengers boarding the tram. .2 - at Hospital corner with the signal system control box for the Forest City signals in the foreground on a pole. Has marking for Sebastopol, Sturt St West and Drummond St North? written on the box. Above this is a sign advising passengers that trams depart this point for The Gardens, View Point and Sebastopol. In the background is J. A. Malpass Hairdresser shop. See item 8900 for the actual switch. .3 - No. 35 turning into Drummond St south with the bottle shop on the south east corner in the background.Yields information about Hospital corner and the switch for the Forest City signalling system controls.Set of three 35mm slides - AGFA dark blue / white plastic mounts of trams in Sturt St near Hospital Corner. tramways, trams, sturt st, hotels, hospital corner, forest city signals, signs, tram 35 -
 Ballarat Tramway Museum
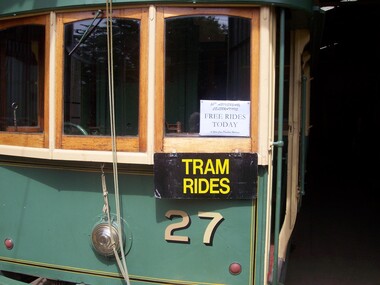
Photograph - Digital image Set of 25, Warren Doubleday, 26/12/2004 12:00:00 AM
... Set of 21 Digital Images of the recommencement or reopening of tram services following the reconstruction of the power supply and substation on 26/12/2004. .1 - Sign announcing free rides today in the front of No. 27 .2 - Peter Winspur and Garry Wood showing Peter the process for turning the power on .3 - ditto .4 - closing the Circuit Breaker .5 - 27 runs across Wendouree Parade .6 - 27 leaves the depot .7 - Peter Winspur removes the sign on the pole saying we were not running .8 - 27 in Wendouree Parade .9 - Carolyn Cleak removing a sign .10 - Placing signs and turning the pole at Carlton St .11 - Carlton St and waiting passengers .12 - Pole sign and bicycle warning sign re tram tracks .13 - Sam Boon and band at Gardens Loop .14 - ditto .15 - ditto .16 - Happy passengers .17 - Richard Gilbert - reopening speech. .18 - No. 26 and happy passengers .19 - 27 and 26 at the loop .20 - No. 26 at the loop, with passengers and the band. .21 - as for 19...Ballarat Tramway Museum South Gardens Reserve Wendouree Parade Ballarat Ballarat goldfields Trams tramways BTM Substation Wendouree Parade Reopening Carlton St Gardens Loop tram 27 tram 26 Set of 21 Digital Images of the recommencement or reopening of tram services following the reconstruction of the power supply and substation on 26/12/2004. .1 - Sign announcing free rides today in the front of No. 27 .2 - Peter Winspur and Garry Wood showing Peter the process for turning the power on .3 - ditto .4 - closing the Circuit Breaker .5 - 27 runs across Wendouree Parade .6 - 27 leaves the depot .7 - Peter Winspur removes the sign on the pole saying we were not running .8 - 27 in Wendouree Parade .9 - Carolyn Cleak removing a sign .10 - Placing signs and turning the pole at Carlton St .11 - Carlton St and waiting passengers .12 - Pole sign and bicycle warning sign re tram tracks .13 - Sam Boon and band at Gardens Loop .14 - ditto .15 - ditto .16 - Happy passengers .17 - Richard Gilbert - reopening speech. .18 - No. 26 and happy passengers .19 - 27 and 26 at the loop .20 - No. 26 at the loop, with passengers and the band. .21 - as for 19 Photograph Digital image Set of 25 Warren Doubleday ...Set of 21 Digital Images of the recommencement or reopening of tram services following the reconstruction of the power supply and substation on 26/12/2004. .1 - Sign announcing free rides today in the front of No. 27 .2 - Peter Winspur and Garry Wood showing Peter the process for turning the power on .3 - ditto .4 - closing the Circuit Breaker .5 - 27 runs across Wendouree Parade .6 - 27 leaves the depot .7 - Peter Winspur removes the sign on the pole saying we were not running .8 - 27 in Wendouree Parade .9 - Carolyn Cleak removing a sign .10 - Placing signs and turning the pole at Carlton St .11 - Carlton St and waiting passengers .12 - Pole sign and bicycle warning sign re tram tracks .13 - Sam Boon and band at Gardens Loop .14 - ditto .15 - ditto .16 - Happy passengers .17 - Richard Gilbert - reopening speech. .18 - No. 26 and happy passengers .19 - 27 and 26 at the loop .20 - No. 26 at the loop, with passengers and the band. .21 - as for 19trams, tramways, btm, substation, wendouree parade, reopening, carlton st, gardens loop, tram 27, tram 26 -
 Melbourne Tram Museum
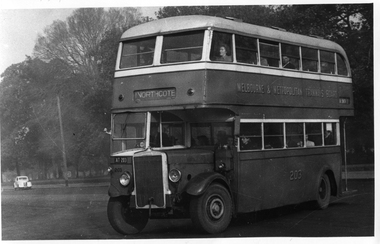
Photograph - Set of 11 Black and White photograph, Ken Flood, 18/04/1974 12:00:00 AM
... .- Bus No 492 1943 Ford Austerity - at Queens Pde Clifton Hill - Note the Pram and Passenger bus sign by the front doorway. Photo not dated. .4 - Bus No 365 1948 OPS1 - Nicholson Street at Victoria Pde. bound for East Brunswick. ....- Bus No 492 1943 Ford Austerity - at Queens Pde Clifton Hill - Note the Pram and Passenger bus sign by the front doorway. Photo not dated. .4 - Bus No 365 1948 OPS1 - Nicholson Street at Victoria Pde. bound for East Brunswick. ...Set of 11 black and white photographs sent to Keith Kings received from Ken Flood 4/6/1975. .1 - Bus No 203 1940 Leyland TD5c - Turning from Nicholson Street into Gertrude Street. - bound for Northcote. .2 - Bus No 201 1940 Leyland TD5c - In Nicholson Street at Albert Street - Photo. bound for Northcote .3.- Bus No 492 1943 Ford Austerity - at Queens Pde Clifton Hill - Note the Pram and Passenger bus sign by the front doorway. Photo not dated. .4 - Bus No 365 1948 OPS1 - Nicholson Street at Victoria Pde. bound for East Brunswick. Photo not dated. .5 - Bus No 325 1950 OPS4 - Nicholson Street at Victoria Pde. bound for East Brunswick. Photo not dated. Bus did not enter service until 1950. .6 - Bus No 500 1943 Ford Austerity - Marine Pde. Point Ormond. Note the Pram bus sign by the front door. .7 - Bus No 19 1938 Leyland Cub (diesel) with Preston Workshops body. - Lonsdale Street at William Street. W2 No 305 passes behind the bus. Late 1940's photo. .8 - Bus No 143 1940 Leyland TS8c drop enter - in Russell Street at LaTrobe Street bound for North Kew. (Belford Road via Collingwood). Photo not dated. .9 - Bus No 9 1938 Leyland Cub (diesel) with Preston Workshops body. - in Russell Street at LaTrobe Street bound for North Carlton .10 - Bus No 4 1938 Leyland Cub (Diesel) with Preston Workshops body - in Lonsdale Street at William Street. note destination not reset for the return trip. .11 - Bus No 150 1940 Leyland TS11c Drop enter - Nicholson Street at Victoria Pde. Photo not dated. Most of the photos dated 9/6/1949 unless noted otherwise. Notes on photos provided by Rod Atkins - see htd5860doc.pdfOn rear of the photos in ink; .1 - MMTB 203 9/6/49 - K Flood .2 - MMTB 201 - 9/6/49 - K Flood .3 - MMTB Ford #492 - K Flood .4 - MMTB #365 - K Flood .5 - MMTB #325 - K Flood .6 - MMTB #500 Pt Ormond 6/6/49 - K Flood .7 - MMTB #19 9/6/49 - K Flood .8 - MMTB #143 - K Flood .9 - MMTB #4 9/6/49, K Flood .10 - MMTB #4 9/6/49, K Flood .11 - MMTB #150 - K Floodtrams, tramways, buses, double deck buses, prams, mmtb buses, austerity buses, w2 class, tram 305, bus 203, bus 201, bus 492, bus 365, bus 500, bus 19, bus 143, bus 9, bus 4, bus 150, leyland, ford motor company, td5c class, ops1 class, ops4 class, ts8c class, cub class, ts11c class