Showing 125 items matching " route 27"
-
 Melbourne Tram Museum
Negative, Wal Jack, 19/01/1941 12:00:00 AM
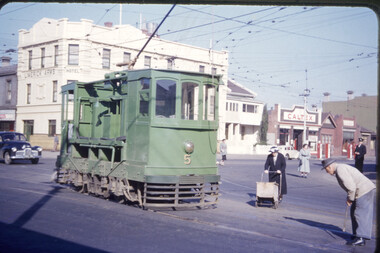
... ... Route 27...Black and white negative, by Wal Jack, of W2 238 (Hawthorn Route 27) and W2 625 (Spencer St?, Route 40) at Hawthorn Bridge Junction, Church St and Burwood Road, Hawthorn. ...Melbourne Tram Museum 8 Wallen Road Hawthorn melbourne Trams tramways Hawthorn Bridge Church St Burwood Road Route 40 Route 27 W2 class tram 238 tram 625 Black and white negative, by Wal Jack, of W2 238 (Hawthorn Route 27) and W2 625 (Spencer St? ...Black and white negative, by Wal Jack, of W2 238 (Hawthorn Route 27) and W2 625 (Spencer St?, Route 40) at Hawthorn Bridge Junction, Church St and Burwood Road, Hawthorn. In the background is the Hawthorn West Primary School. Photo dated 19-1-1941 in the Wal Jack album along with details of the location.trams, tramways, hawthorn bridge, church st, burwood road, route 40, route 27, w2 class, tram 238, tram 625 -
 Melbourne Tram Museum
Photograph - Block Mounted Photograph, Hugh Waldron, c2000?
... ... Route 27...Tram has the destination of City Market St, Route 27. On the rear is a Nowak company label, who mounted the print for Hugh....Tram has the destination of City Market St, Route 27. On the rear is a Nowak company label, who mounted the print for Hugh. ...Block mounted photograph on chipboard of B 2001 at Riversdale Junction, soon after its relay, tram turning from Riversdale Road into Power St with St Anthony's Shrine Catholic Church in the background. Tram has the destination of City Market St, Route 27. On the rear is a Nowak company label, who mounted the print for Hugh.trams, tramways, b class, riversdale rd, power st, riversdale junction, city - market st, route 27, tram 2001 -
 Melbourne Tram Museum
Negative, Wal Jack, c1950
... ... Route 27...Tram has the destination of Spencer St, route 27?. Appears to be in Wellington Parade at the Simpson St sidings junction...Melbourne Tram Museum 8 Wallen Road Hawthorn melbourne Trams tramways W2 class Wellington Parade Accidents Route 27 tram 257 Black and white negative, by Wal Jack, of W2 257 after a collision with a large vehicle. ...Black and white negative, by Wal Jack, of W2 257 after a collision with a large vehicle. Has part of the front saloon stowed in, footboard and grab handles torn away. Tram has the destination of Spencer St, route 27?. Appears to be in Wellington Parade at the Simpson St sidings junction. - see also Reg Item 5093 for another photo. Photo Wal Jack on a very wet day. Ray Pearson album dates the photo as 20/4/1957.trams, tramways, w2 class, wellington parade, accidents, route 27, tram 257 -
 Melbourne Tram Museum
Negative, Wal Jack, c1955
... ... Route 27...Tram has the destination of Spencer St, route 27?. Appears to be in Bridge Road with the river in the background - see also Reg Item 5171 for another photo in Wellington Parade, near Simpson St Photo Wal Jack on a very wet day. ...Melbourne Tram Museum 8 Wallen Road Hawthorn melbourne Trams tramways W2 class Wellington Parade Accidents Route 27 tram 257 Black and white negative, by Wal Jack, of W2 257 after a collision with a large vehicle. ...Black and white negative, by Wal Jack, of W2 257 after a collision with a large vehicle. Has part of the front saloon stowed in, footboard and grab handles torn away. Tram has the destination of Spencer St, route 27?. Appears to be in Bridge Road with the river in the background - see also Reg Item 5171 for another photo in Wellington Parade, near Simpson St Photo Wal Jack on a very wet day. Dated 20/4/1951 in the Ray Pearson Album, photographed in Wellington Parade.trams, tramways, w2 class, wellington parade, accidents, route 27, tram 257 -
 Melbourne Tram Museum
Postcard, Rose Stereograph Co, "Flinders Street Melbourne", late 1930s
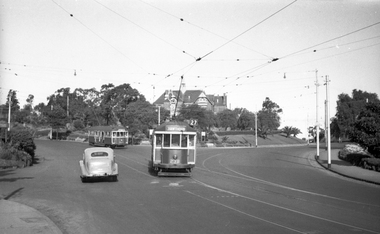
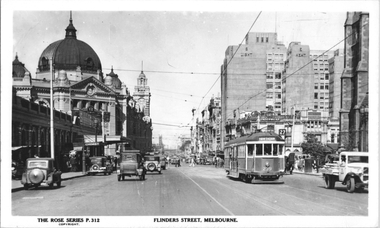
... ...Route 27...Has W2 class tram No. 239 (Hawthorn Route 27) east bound. On the left Is the Princess Bridge Railway Station and Flinders Street Railway station. ...Has W2 class tram No. 239 (Hawthorn Route 27) east bound. On the left Is the Princess Bridge Railway Station and Flinders Street Railway station. ...Rose Series postcard No. P 312, titled ""Flinders Street Melbourne", looking west along Flinders St from about the Ball and Welch building. Has W2 class tram No. 239 (Hawthorn Route 27) east bound. On the left Is the Princess Bridge Railway Station and Flinders Street Railway station. In the background is the Fish Market and the railway viaduct. On the right is St. Paul Cathedral, Princess Bridge Hotel, Sargood Gardiner Limited Wherehouse plus the recently opened (1936) Snows Department Store. Note the tramway overhead of the curve outside Flinders Street Railway station. Yields information about Flinders St late 1930s.Postcard - printed real photograph with Rose Stereograph Co. name on the rear. Two copies held.tramways, trams, flinders st, tram 239, w2 class, flinders st station, princes bridge station, route 27 -
 Melbourne Tram Museum
Slide - Set of 2, John Webster, 21/07/1959 12:00:00 AM
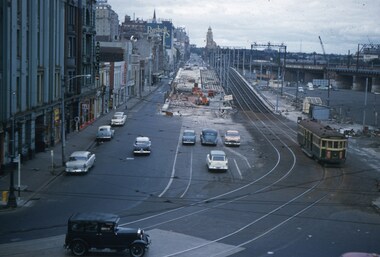
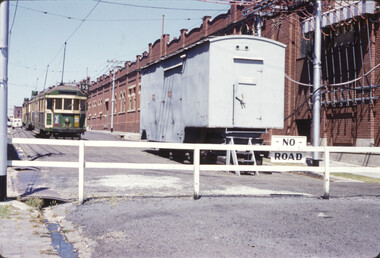
... ... Route 27...Note the cross over at the base of the bridge. .1 - possibly 357 running a route 27 to Spencer St. Has the Great Southern Hotel on the left side. .2 - similar photo taken from the viaduct, further along - has the Bushels and Penfolds Wines signs in the background....Melbourne Tram Museum 8 Wallen Road Hawthorn melbourne Trams tramways Trackwork Flinders St King St Track Construction Bridges W2 class Route 27 tram 357? Hand writing on rear in ink; .1 and .2 - "2-4-60 - Tracks - Flinders St Melbourne" Both slides have the speed and the f reading on the left hand side. ...Set of two Colour slides, Kodak, white cardboard of trams of the construction of the Flinders St overpass over King St from the railway viaduct over Spencer St, looking east. Shows the temporary track on the south side of the bridge and the large car park under construction from the former cool stores on this site. Also shows the former track into Spencer St. Note the cross over at the base of the bridge. .1 - possibly 357 running a route 27 to Spencer St. Has the Great Southern Hotel on the left side. .2 - similar photo taken from the viaduct, further along - has the Bushels and Penfolds Wines signs in the background.Hand writing on rear in ink; .1 and .2 - "2-4-60 - Tracks - Flinders St Melbourne" Both slides have the speed and the f reading on the left hand side.trams, tramways, trackwork, flinders st, king st, track construction, bridges, w2 class, route 27, tram 357? -
 Melbourne Tram Museum
Slide - Set of 4, John Webster, 14/12/1959 12:00:00 AM
... ... Route 27...Set of four Colour slides, Kodak, white cardboard, .4 brown cardboard of trams using the Flinders St overpass of King St, 14-12-1959 .1 - SW6 854 at the top of the new bridge. .2 - SW6 854 at the bottom of the new bridge, has destination of Hawthorn route 27, and adverts for Biro pens, Lindeman's sherry, Knights Jewellery and KSP ? ...Set of four Colour slides, Kodak, white cardboard, .4 brown cardboard of trams using the Flinders St overpass of King St, 14-12-1959 .1 - SW6 854 at the top of the new bridge. .2 - SW6 854 at the bottom of the new bridge, has destination of Hawthorn route 27, and adverts for Biro pens, Lindeman's sherry, Knights Jewellery and KSP ? ...Set of four Colour slides, Kodak, white cardboard, .4 brown cardboard of trams using the Flinders St overpass of King St, 14-12-1959 .1 - SW6 854 at the top of the new bridge. .2 - SW6 854 at the bottom of the new bridge, has destination of Hawthorn route 27, and adverts for Biro pens, Lindeman's sherry, Knights Jewellery and KSP ? .3 - SW6 854 trailing photo with William St, nearing the intersection with William St. with the Yarra Family Hotel and a shop selling Oysters and Crayfish. .4 - Photo showing a W2 and W5? climbing the bridge. Note the overhead has been set up for a junction. In the background are adverts for Penfolds Wines, Bushels, the Flinders St viaduct, Nestles Milk, Girlings, Barrow Bros, Store.Hand writing on rear in ink; .1 - 14-12-59 - KFL2 - Flinders St flyover, Melbourne Vic. .2 - 14-12-59 - KFL2a - Trams coming over the Flinders St flyover, Melbourne Vic. .3 - 14-12-59 - KFL3 - temporary track during building of the Flinders St flyover, Melbourne. .4 - 14-12-59 - KFL3a - Flinders St flyover, Melbourne Vic.trams, tramways, trackwork, flinders st, king st, track construction, bridges, sw6 class, hawthorn, route 27, tram 854 -
 Melbourne Tram Museum
Photograph - Set of 7 Black & White Photograph/s, Melbourne & Metropolitan Tramways Board (MMTB), 1966
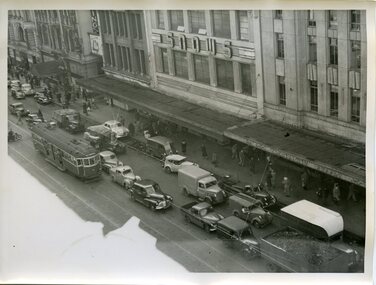
... ... Route 27...with passengers waiting at a safety zone - has the Dennys Lascelles building in the background. .4 - Flinders St looking north east with Snows, the SEC, a Hotel and Hearnes sign showing. Has a W2 436? route 27 Hawthorn eastbound. Typed on rear "Enlargement of No. 76, Sheet No. 28 (report P25/1/8), "Spare" written in pencil and "For Testing Engrs 1/11/51" in ink. .5 - looking north with a horse drawn cart and a SW6 (East Kew) with dash canopy lighting. .6 - looking north - with Hearnes Provisions, Olympia Inn and Coffee Lounge and Young & Jacksons Hotel. ...Melbourne Tram Museum 8 Wallen Road Hawthorn melbourne Trams tramways Traffic Control Congestion Flinders St Spencer St Route 27 Route 28 East Kew Richmond Route 48 William St Safety Zone Hawthorn tram 317 tram 436 Series of 7 black and white photographs of the traffic congestion in the CBD during 1951. .1 - Flinders St from Flinders St Station office looking northwest with a W2 317 Richmond route 28 and many cars. ...Series of 7 black and white photographs of the traffic congestion in the CBD during 1951. .1 - Flinders St from Flinders St Station office looking northwest with a W2 317 Richmond route 28 and many cars. Has "32" on rear in pencil. Has Snows and the SEC building in the view. .2 - Spencer St bridge, looking north with Fish Market/Cool Stores and the VR Head Office in the view. Has Taylor and ? General Carriers and Nestle's truck in the view. .3 - William St? with passengers waiting at a safety zone - has the Dennys Lascelles building in the background. .4 - Flinders St looking north east with Snows, the SEC, a Hotel and Hearnes sign showing. Has a W2 436? route 27 Hawthorn eastbound. Typed on rear "Enlargement of No. 76, Sheet No. 28 (report P25/1/8), "Spare" written in pencil and "For Testing Engrs 1/11/51" in ink. .5 - looking north with a horse drawn cart and a SW6 (East Kew) with dash canopy lighting. .6 - looking north - with Hearnes Provisions, Olympia Inn and Coffee Lounge and Young & Jacksons Hotel. Has a W2 partly in the photo about to enter the Safety Zone. ..7 - similar to .1 - with Snows, W2 route 48 North Balwyn and a Pattons Dry Cleaning van. See also Reg 4519 for another 7 photos of the same series.trams, tramways, traffic control, congestion, flinders st, spencer st, route 27, route 28, east kew, richmond, route 48, william st, safety zone, hawthorn, tram 317, tram 436 -
 Melbourne Tram Museum
Photograph - Spencer & Clarendon Sts traffic issues - set of 3, Melbourne & Metropolitan Tramways Board (MMTB), 1954
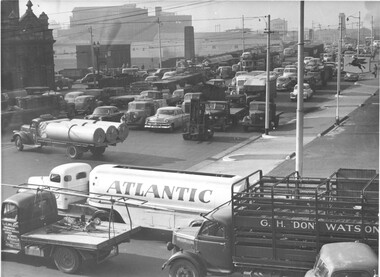
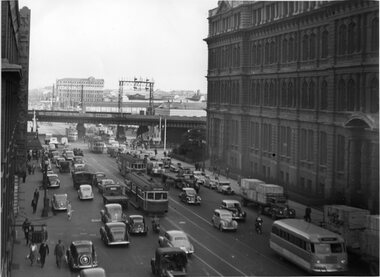
... ...Route 27...Has in the view, W2 class tram 574, running to "East Preston" route 9 service, and W2 No.566, running to "Hawthorn" on route 27 service. In the background is the Victorian Railways Head office, the Tea House and the railway viaduct. ...Yields information about the traffic issues in Clarendon and Spencer Sts. 1954 Trams tramways traffic congestion W2 class tram 808 tram 574 W5 class Clarendon St Spencer St tram 566 Route 9 Route 27 Route 9B On the rear of each print is the details - see Context. ...1 - "Spencer Street looking south from the roof of Hamill tyre service, tramcar held up in northbound traffic for a period of 3.5 minutes, date 28.9.54, time 0835 hrs. In the background is part of the Fish market building, the bridge itself carrying very heavy traffic. In the foreground is coming out of Siddeley Street, is an "Atlantic" petrol tanker and trucks for L & G Wilson carriers, and G H 'Don' Watson cattle truck. Note the truck carrying paper reels has come out of the Mobil Service Station and is turning south onto the bridge. Traffic is also struggling to exit Queens Wharf Road onto the bridge as well. The W2 class, is running to East Preston on Route 9 service. Note the Pioneer Tour coach, "CDR" petrol tanker and a forklift truck in the traffic mix. 2 - "Clarendon Street at Whiteman Street looking north (from tray of tramways truck), northbound trams held up by traffic across tracks, date 13-10-54, time 0810hrs". In the view is W5 class No. 808, running a Thornbury route 9B service. Another "Thornbury" bound tram can be glimpsed in the traffic ahead. In the background are the Robar Tea House, Hart & Co, Robur Tea advert, Bullen's Circus, and Vincent's pills. 3 - "Spencer Street from Batman Hill Hotel, looking south, general view of traffic, dated 22-10-54, time 1712 hrs". Has in the view, W2 class tram 574, running to "East Preston" route 9 service, and W2 No.566, running to "Hawthorn" on route 27 service. In the background is the Victorian Railways Head office, the Tea House and the railway viaduct. Note also the advertising for both Philips and Berger Master (Paints). Yields information about the traffic issues in Clarendon and Spencer Sts. 1954Black and white photograph with handwritten details of time and location on the rear. - set of 3.On the rear of each print is the details - see Context.trams, tramways, traffic congestion, w2 class, tram 808, tram 574, w5 class, clarendon st, spencer st, tram 566, route 9, route 27, route 9b -
 Melbourne Tram Museum
Photograph - set of 9 Black & White Photograph/s, Melbourne & Metropolitan Tramways Board (MMTB), 1966
... ... Route 27...Has "G3" in pencil on rear. .2 - similar view but with a different vehicle mix - W2 317 (Richmond Route 28), an SW6 route 27 and another W2 (route 41). Includes one large truck carrying Land Rover boxes. ...Has "G3" in pencil on rear. .2 - similar view but with a different vehicle mix - W2 317 (Richmond Route 28), an SW6 route 27 and another W2 (route 41). Includes one large truck carrying Land Rover boxes. ...Series of 9 black and white photographs of the traffic congestion in the CBD during 1951. .1 - view looking south along Spencer St from Collins St showing the VR Head office, and the railway viaduct with a Berger Paint advertisement, Has one wide body tram with dash canopy lighting and three W2's. Also one small bus. Has "G3" in pencil on rear. .2 - similar view but with a different vehicle mix - W2 317 (Richmond Route 28), an SW6 route 27 and another W2 (route 41). Includes one large truck carrying Land Rover boxes. Typed on rear "Enlargement of No. 72 - Sheet No. 26 (Report P25/1/8) and in ink initials and "For Testing Engs 1/11/51". .3 - View looking north along Swanston St Princes Bridge with a route 6 tram and Princes Bridge Station and St Pauls Cathedral. On rear in pencil "11/2" .4 - Spencer St - trams crossing Spencer St bridge - W5 781 (Route 10) and a W2 649, route 9, South Melbourne Beach. .5 - Queensbridge under bridge - showing many cars jammed and the railway viaduct. .6 - ?? - Collins St - National Mutual and Shaw Savill Line offices - has a Safety Zone stand. .7 - Collins St looking east from Market St - with many trams in the view and many cars. .8 - Collins at Market St with a SW6 with dash canopy lighting - route 45, followed by a route 9A .9 - same location - total chaos. See also Reg 4520 for another 7 photos of the same series.trams, tramways, traffic control, congestion, spencer st, route 27, route 28, route 41, route 6, princes bridge, swanston st, w2 class, sw6 class, route 10, route 9, spencer st bridge, market st, collins st, route 45, route 9a, tram 317, tram 781, tram 649 -
 Melbourne Tram Museum
Slide - MMTB and MTA tramway operations - set of 11, Hugh Ballment, 1950s to 1980s
... ...Route 27...HBM029 - MMTB Tram 380, Nov. 1987, Flinders Street, at Swanston Street running a route 27 service. Possibility during a tram maintenance staff strike. ...HBM029 - MMTB Tram 380, Nov. 1987, Flinders Street, at Swanston Street running a route 27 service. Possibility during a tram maintenance staff strike. ...Set of 11 photos by Hugh Ballment of MMTB or MTA trams or works: HBM024 - MMTB Tram Scrubber No 5, 24/05/1954, Clarendon Street, turning into Park Street HBM025 - MTA SW6 class No 961, Nov. 1997, Swanston Street, running a route 6 to University. Has the MLC, Drews Corner building in the background. HBM026 - MTA B No 2002, April 1988, Spencer Street, running a route 96 to St Kilda Beach. Has the start of the construction of the World Trade Centre Hotel and convention center on the right side of the photo. In the background is The Tea House with track work upgrades on the south end of Spencer Street Bridge. An AEC MkVI meal bus is present. HBM027 - W2 502, c1987, Flinders Street, Art tram by Rosemary Ryan with the Herald Sun building and Lindrum's in the background plus construction of Shell House on the corner of Spring Street which was completed in 1989. Tram is running as a Special. HBM028 - MTA W2 No 442 Restaurant Tram, Nov 1997, Clarendon Street, with A Class car behind it. The Crown Casino sign is in the background. HBM029 - MMTB Tram 380, Nov. 1987, Flinders Street, at Swanston Street running a route 27 service. Possibility during a tram maintenance staff strike. Has St Pauls Cathedral in the background HBM030 - MTA Z No 86, c1987, Queensbridge, Light Rail sign at left with the Port Melbourne/St Kilda rail line bridge in the background. In the background is Alstergren timber building and the Queen Bridge Hotel with a Foster's Lager advert. HBM031 - MTA SW6 No 915, 1987, Bourke Street, running a route 95 service in the Bourke Street Mall. Possibly during a tram maintenance strike. Shows the original first permanent street furniture. In the background is a Triple M building advert, Billy Guyatt's and Roger David. The Royal Mail Hotel is on the South East corner of the intersection. HBM032 - MTA, Aug 1987, Spencer Street, track work to install curves at the intersection Bourke and Spencer Streets. Note the overhead is all in place. Also shows the V/Line Spencer Street station on the right of the of the photo together with Z3 class no 145 HBM033 - MTA, Aug 1987, Light Rail Junction, looking towards Montague under construction with removal of part of the former St Kilda railway line embankment but the Port Melbourne line is still complete. HBM034 - MTA, Aug 1987, Clarendon Street Junction at Whiteman Street, prior to the removal of the railway overbridge and the erection of the new tram overhead into the Light rail. Yields information about Melbourne tram operations, and the construction of the St Kilda to Port Melbourne Light Rail.Kodachrome card board or plastic mounts, with notes - set of 11tramways, queensbridge, light rail, bourke st, railways, tram 5, clarendon st, swanston st, spencer st, tram 961, tram 2002, tram 502, tram 442, restaurant tram, tram 86, tram 915, bourke st mall, flinder st, trackworks, tram 145, z3 class, a class, w2 class, b class, scrubber tram, z class, whiteman st, arts trams, route 27, route 96, route 6 -
 Melbourne Tram Museum
Ephemera - Timetable/s, Melbourne & Metropolitan Tramways Board (MMTB), "MMTB Timetables set of 39", 1960
... ... Route 27...Not dated, based on fares - 1960 and possibly after Point Ormond had closed. .1 - Route 1, 21 - East Coburg - City .2 - Route 4, 4A, 4B - Carnegie - City .3 - Route 4D, 14 - East Malvern - City .4 - Route 5, 5A - Malvern Burke Road - City .5 - Route 6, 6A, 6B - Glen Iris - City .6 - Route 7, 7A, 7B, 7D - Camberwell - City .7 - Route 8, 8A - Toorak - City .8 - Route 9, 9A - Northcote via St Georges Road - City .9 - Route 9, 9B, 10, 12 - Sth Melbourne Beach, St Kilda Beach - City .10 - Route 10,11 - West Preston - City .11 - Route 15, 16 - St Kilda Beach - City .12 - Route 15, 22 - Moreland - City .13 - Route 18, 19, 20 - North Coburg - City .14 - Route 27, 28 - Hawthorn - Spencer St .15 - Route 42, 44, 45 - Mont Albert - City .16 - Route 48, 40, 41 - North Balwyn - Spencer St .17 - Route 49 - Essendon (Matthews Ave) - City .18 - Route 50, 54, 57, 58, 60 - West Maribyrnong - City .19 - Route 55, 56 - West Coburg - City .20 - Route 59 - Essendon Aerodrome - City .21 - Route 61, 62, 64, 65 - East Brighton - City .22 - Route 69 - Kew Cotham Road - St Kilda Beach .23 - Route 70, 71, 76 - Wattle Park - City .24 - Route 74, 75, 76 - Burwood - City .25 - Route 77, 80 - Prahran - City .26 - Route 78, 79 - North Richmond - Prahran .27 - Route 82 - Moonee Ponds - Footscray .28 - Williamstown Road - Footscray - Tram and bus .29 - Ballarat Road - Footscray - Tram and bus .30 - Russell St - - Footscray - Tram and bus .31 - East Brunswick - City .32 - Domain Road - City .33 - West Heidelberg - City .34 - Sunshine - City via Ballarat and Footscray Roads .35 - Sunshine - City via South and Dynon Roads .36 - Sunshine Park - City .37 - Garden City - City (Victoria St) .38 - Queens Bridge - Fisherman's Bend via Ingles St .39 - Queens Bridge - Fisherman's Bend via Lorimer St and Princes Bridge - Fisherman's Bend via Williamstown Rd....Melbourne Tram Museum 8 Wallen Road Hawthorn melbourne Trams tramways MMTB Timetables Melbourne Fares Route 1 Route 22 Route 4 Route 4A Route 4B Route 4D Route 14 Route 5 Route 5A Route 6 Route 6A Route 6B Route 7 Route 7A Route 7B Route 7D Route 8 Route 8A Route 9 Route 9A Route 9B Route 10 Route 11 Route 12 Route 15 Route 16 Route 22 Route 18 Route 19 Route 20 Route 27 Route 28 Route 42 Route 45 Route 44 Route 48 Route 40 Route 41 Route 49 Route 50 Route 54 Route 57 Route 58 Route 60 Route 52 Route 56 Route 59 Route 61 Route 62 Route 64 Route 65 Route 69 Route 70 Route 71 Route 76 Route 74 Route 75 Route 76 Route 77 Route 80 Route 78 Route 79 Route 82 Williamstown Rd Ballarat Rd Russell St Route 96 Domain Rd West Heidelberg Sunshine Garden City Queens Bridge Fishermen's Bend All have the route number in ink on the front cover - see image 5691i.jpg for standard cover. ...Set of 39 MMTB Tram timetables, 2 fold sheets, , providing timetables for specific routes, route numbers, day of week giving information on tram times at departure time points, sections and fares, where applicable all night bus services. All signed by B. H. Misson, Traffic Manager. All sponsored by Kays Rent a Car and Motor Drome, 18-30 Mount Alexander Road, Flemington. The only one missing is Point Ormond. Not dated, based on fares - 1960 and possibly after Point Ormond had closed. .1 - Route 1, 21 - East Coburg - City .2 - Route 4, 4A, 4B - Carnegie - City .3 - Route 4D, 14 - East Malvern - City .4 - Route 5, 5A - Malvern Burke Road - City .5 - Route 6, 6A, 6B - Glen Iris - City .6 - Route 7, 7A, 7B, 7D - Camberwell - City .7 - Route 8, 8A - Toorak - City .8 - Route 9, 9A - Northcote via St Georges Road - City .9 - Route 9, 9B, 10, 12 - Sth Melbourne Beach, St Kilda Beach - City .10 - Route 10,11 - West Preston - City .11 - Route 15, 16 - St Kilda Beach - City .12 - Route 15, 22 - Moreland - City .13 - Route 18, 19, 20 - North Coburg - City .14 - Route 27, 28 - Hawthorn - Spencer St .15 - Route 42, 44, 45 - Mont Albert - City .16 - Route 48, 40, 41 - North Balwyn - Spencer St .17 - Route 49 - Essendon (Matthews Ave) - City .18 - Route 50, 54, 57, 58, 60 - West Maribyrnong - City .19 - Route 55, 56 - West Coburg - City .20 - Route 59 - Essendon Aerodrome - City .21 - Route 61, 62, 64, 65 - East Brighton - City .22 - Route 69 - Kew Cotham Road - St Kilda Beach .23 - Route 70, 71, 76 - Wattle Park - City .24 - Route 74, 75, 76 - Burwood - City .25 - Route 77, 80 - Prahran - City .26 - Route 78, 79 - North Richmond - Prahran .27 - Route 82 - Moonee Ponds - Footscray .28 - Williamstown Road - Footscray - Tram and bus .29 - Ballarat Road - Footscray - Tram and bus .30 - Russell St - - Footscray - Tram and bus .31 - East Brunswick - City .32 - Domain Road - City .33 - West Heidelberg - City .34 - Sunshine - City via Ballarat and Footscray Roads .35 - Sunshine - City via South and Dynon Roads .36 - Sunshine Park - City .37 - Garden City - City (Victoria St) .38 - Queens Bridge - Fisherman's Bend via Ingles St .39 - Queens Bridge - Fisherman's Bend via Lorimer St and Princes Bridge - Fisherman's Bend via Williamstown Rd.All have the route number in ink on the front cover - see image 5691i.jpg for standard cover.trams, tramways, mmtb, timetables, melbourne, fares, route 1, route 22, route 4, route 4a, route 4b, route 4d, route 14, route 5, route 5a, route 6, route 6a, route 6b, route 7, route 7a, route 7b, route 7d, route 8, route 8a, route 9, route 9a, route 9b, route 10, route 11, route 12, route 15, route 16, route 22, route 18, route 19, route 20, route 27, route 28, route 42, route 45, route 44, route 48, route 40, route 41, route 49, route 50, route 54, route 57, route 58, route 60, route 52, route 56, route 59, route 61, route 62, route 64, route 65, route 69, route 70, route 71, route 76, route 74, route 75, route 76, route 77, route 80, route 78, route 79, route 82, williamstown rd, ballarat rd, russell st, route 96, domain rd, west heidelberg, sunshine, garden city, queens bridge, fishermen's bend -
 Melbourne Tram Museum
Slide - MMTB and VR tramway operations set of 10, Hugh Ballment, 1950s to 1960s
... ...Route 27...HBM074 - MMTB, W2 439, on Route 27, 1960s, Flinders Street flyover, with viaduct in the background. ...HBM074 - MMTB, W2 439, on Route 27, 1960s, Flinders Street flyover, with viaduct in the background. ...Set of 10 photos by Hugh Ballment, unless noted, of VR and MMTB trams: HBM070 - MMTB, W2 379, 9/03/1959, Coldblo Road Malvern Depot, Portable substation in street, see also slide HMB068 HBM071 - VR, No 53, mid 1950s, Barkly Street north of Carlisle Street, Note the road works. The building behind has since been substantially modified. HBM072 - VR, No 53, mid 1950s, Middle Brighton, (Damaged - salvaged from the end of the film) HBM073 - VR, No 3, mid 1950s, Elwood Depot, No 3 visible in back yard along with the substation. HBM074 - MMTB, W2 439, on Route 27, 1960s, Flinders Street flyover, with viaduct in the background. Has White Crow dash panel adverts. HBM075 - MMTB, SW6 923, RAAF recruitment tram, on Route 7, 1950s, St Kilda Road south of Toorak Road, Temporary trackwork. Note the two former Austerity buses being used by the Per-way Division including No 23. A W2 class tram is also visible in the photo. HBM076 - MMTB, SW6 928, may have been just after conversion to a single headlight in the early 1950s, departing Preston Workshops, on Route 9 at the corner of St Georges Road and Miller Street, W5 826 in Miller Street is running to East Preston on Route 9A, Ahead of that is a W2 class tram about to climb the "Hump". HBM077 - MMTB 1950s, St Kilda Road south of Toorak Road, Temporary trackwork, shows that nature of the work and temporary track arrangements with overhead lighting. One former Mutition and two former Austerity buses are being used by the Per-Way division including No 23. HBM078 - MMTB, W3 658 and 665, 1950s, St Georges Road, at Miller Street. No 658 appears to have recently been repainted into the new livery while 665 is in original livery. Both running route 10 services. HBM079 - MMTB, W2 604, 1950s, running Route 5, Princes Bridge at Batman Avenue. Night photo with decorations set up for an event, eg: Moomba or a Royal Visit. Yields information about Melbourne tram operations, with 1950s or 1960s photos of Melbourne tramways.Kodachrome cardboard mounts, with notes - set of 10tramways, tram 379, tram 53, barkly st, vr, st kilda brighton tramway, tram 3, flinders st, tram 439, tram 923, st kilda road, track work, st georges road, miller st, tram 658, tram 665, tram 604, preston workshops, trams, malvern depot, elwood depot, princes bridge, batman ave, w2 class, route 5, w3 class, route 9a, tram 826, w5 class, coldblo road, vr class, sw6 class, raaf, route 7, permanent way, temporary track, track reconstruction, route 10, route 9, tram 928, route 27, austerity buses, esplandade, brighton, st kilda, substation -
 Melbourne Tram Museum
Ephemera - Timetable, Yarra Trams, Set of 15 Yarra Trams timetables, 7/1999 to 9/2001
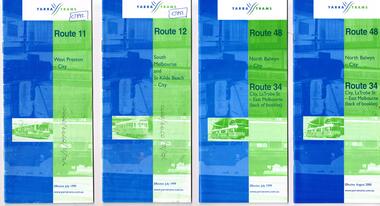
... ... Route 27...Set of 15 Yarra Trams timetables, blue green cover with route number on cover, giving details of popular destination, check points, use of Metcards and contact details, tram hire, frequency, Some include maps. .1 - Route 11 - West Preston - City - July 1999 - 24 Pages .2 - Route 12 - South Melbourne and St Kilda Beach - City - July 1999 - 24 pages .3 - Route 48 and Route 34 - North Balwyn - City or via Latrobe St - East Melbourne, includes references to Routes 23, 24, 27 and 30 - July 1999 - 28 pages, includes a small map. .4 - ditto - August 2000 .5 - ditto - September 2001 .6 - Route 70 - Wattle Park - City - October 1999 - 24 pages .7 - Route 70 - Wattle Park - City via MCG - December 2000 - 24 pages - includes a map .8 - Route 75 - East Burwood - City - July 1999 - - 24 pages .9 - ditto - August 2000 .10 - Route 86 - Bundoora RMIT - Colonial Stadium via Bourke St - March 2000 - 28 page. .11 - Route 96 - St Kilda Beach - East Brunswick -March 2000 - 24 pages .12 - Route 109 - Mont Albert - Port Melbourne - July 1999 - includes references to route 23, 24, 27. 30 and 34 - 36 pages .13 - Route 109 - ditto includes La Trobe St services - September 2001 - 36 pages .14 - Route 112 - South Melbourne - St Kilda Beach to West Preston via City, including temporary combination of routes 11 and 12, route 11 and Route 12 - August 2000 - 48 pages. .15 - Route 112 - notes that it the combination of Routes 11 and 12 - September 2001 - 48 pages. .16 - Route 11 - West Preston - City - Nov. 1998 - 24 pages .17 - Route 48 - North Balwyn - City - Dec. 1998 - 24 pages .18 - Route 34 and 48 - North Balwyn - City and City LaTrobe - East Melbourne - August 2000 - 32 pages .19 - Route 109 - Port Melbourne - Mont Albert - Nov. 1998 - 24 pages....Melbourne Tram Museum 8 Wallen Road Hawthorn melbourne Trams tramways Yarra Trams Tram Services Timetables Route 11 Route 48 Route 34 Route 23 Route 24 Route 27 Route 30 Route 70 Route 75 Route 86 Route 96 Route 109 Route 112 Some have notes such as "OPR", and number notes and notes written inside about changes or errors in ink. ...Set of 15 Yarra Trams timetables, blue green cover with route number on cover, giving details of popular destination, check points, use of Metcards and contact details, tram hire, frequency, Some include maps. .1 - Route 11 - West Preston - City - July 1999 - 24 Pages .2 - Route 12 - South Melbourne and St Kilda Beach - City - July 1999 - 24 pages .3 - Route 48 and Route 34 - North Balwyn - City or via Latrobe St - East Melbourne, includes references to Routes 23, 24, 27 and 30 - July 1999 - 28 pages, includes a small map. .4 - ditto - August 2000 .5 - ditto - September 2001 .6 - Route 70 - Wattle Park - City - October 1999 - 24 pages .7 - Route 70 - Wattle Park - City via MCG - December 2000 - 24 pages - includes a map .8 - Route 75 - East Burwood - City - July 1999 - - 24 pages .9 - ditto - August 2000 .10 - Route 86 - Bundoora RMIT - Colonial Stadium via Bourke St - March 2000 - 28 page. .11 - Route 96 - St Kilda Beach - East Brunswick -March 2000 - 24 pages .12 - Route 109 - Mont Albert - Port Melbourne - July 1999 - includes references to route 23, 24, 27. 30 and 34 - 36 pages .13 - Route 109 - ditto includes La Trobe St services - September 2001 - 36 pages .14 - Route 112 - South Melbourne - St Kilda Beach to West Preston via City, including temporary combination of routes 11 and 12, route 11 and Route 12 - August 2000 - 48 pages. .15 - Route 112 - notes that it the combination of Routes 11 and 12 - September 2001 - 48 pages. .16 - Route 11 - West Preston - City - Nov. 1998 - 24 pages .17 - Route 48 - North Balwyn - City - Dec. 1998 - 24 pages .18 - Route 34 and 48 - North Balwyn - City and City LaTrobe - East Melbourne - August 2000 - 32 pages .19 - Route 109 - Port Melbourne - Mont Albert - Nov. 1998 - 24 pages.Some have notes such as "OPR", and number notes and notes written inside about changes or errors in ink. See History.trams, tramways, yarra trams, tram services, timetables, route 11, route 48, route 34, route 23, route 24, route 27, route 30, route 70, route 75, route 86, route 96, route 109, route 112 -
 Melbourne Tram Museum
Ephemera - Timetable/s, Yarra Trams, Set of five timetable books - 2002. Provide details about Yarra Trams, Metcards, route map, timing points and route description, 8/2000 to 9/2002
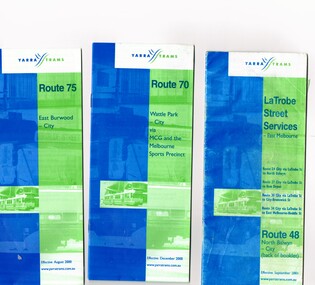
... ... Route 27...Provide details about Yarra Trams, Metcards, route map, timing points and route description. .1 - printed 24 page book, blue green cover stapled timetable for "Route 75 - East Burwood - City" tram service, dated August 2000. .2 - printed 24 page book, blue green cover stapled timetable for "Route 70 - Wattle Park - City" tram service, dated December 2000. .3 - printed 24 page book, blue green cover stapled timetable for "La Trobe Street Services - East Melbourne" and "North Balwyn - City" tram service, dated September 2001. Covers Route 48, 24, 27, 30 and 34. Has Route 48 on the reverse of the book. .4 - printed 28 page book, blue green cover stapled timetable for "Route 86 - Bundoora / RMIT - Colonial Stadium via Bourke St" tram service, dated September 2002. .5 - printed 32 page book, blue green cover stapled timetable for "Route 109 - Port Melbourne - Mont Albert" and La Trobe St services (back of booklet) tram services, dated September 2001....Melbourne Tram Museum 8 Wallen Road Hawthorn melbourne Trams tramways Tickets Yarra Trams Tram Services Timetables La Trobe St Route 70 Route 75 Route 109 Route 86 Route 86 Route 109 Route 48 Route 24 Route 27 Route 30 Route 34 Set of five timetable books - 2002. ...Set of five timetable books - 2002. Provide details about Yarra Trams, Metcards, route map, timing points and route description. .1 - printed 24 page book, blue green cover stapled timetable for "Route 75 - East Burwood - City" tram service, dated August 2000. .2 - printed 24 page book, blue green cover stapled timetable for "Route 70 - Wattle Park - City" tram service, dated December 2000. .3 - printed 24 page book, blue green cover stapled timetable for "La Trobe Street Services - East Melbourne" and "North Balwyn - City" tram service, dated September 2001. Covers Route 48, 24, 27, 30 and 34. Has Route 48 on the reverse of the book. .4 - printed 28 page book, blue green cover stapled timetable for "Route 86 - Bundoora / RMIT - Colonial Stadium via Bourke St" tram service, dated September 2002. .5 - printed 32 page book, blue green cover stapled timetable for "Route 109 - Port Melbourne - Mont Albert" and La Trobe St services (back of booklet) tram services, dated September 2001.trams, tramways, tickets, yarra trams, tram services, timetables, la trobe st, route 70, route 75, route 109, route 86, route 86, route 109, route 48, route 24, route 27, route 30, route 34 -
 Melbourne Tram Museum
Slide - MMTB and MTA tramway operations and light rail - set of 11, Hugh Ballment, 1950s to 1987
... ...Route 27...Yields information about Melbourne tram operations, and the construction of the St Kilda to Port Melbourne Light Rail and 1950s or 1960s photos of Melbourne tramways. tramways Queensbridge Light Rail Bourke St Clarendon St Swanston St Spencer St trackworks new tramway Brunswick Depot tram 931 tram 408 tram 737 tram 83 tram 380 railways Trams Whiteman St Elizabeth St Lonsdale St Queensberry St Russell St Flinders St W2 class W5 class SW6 class W6 class Z class MMTB Buses TD5c class Volvo B59 Tower Trucks Route 27 Route 19 Tram 859 tram 988 Tram 873 Route 55 Kodachrome plastic and cardboard mounts, with notes - set of 11 Slide MMTB and MTA tramway operations and light rail - set of 11 Hugh Ballment Keith Kings ...Set of 11 photos by Hugh Ballment, unless noted, of MMTB, MTA trams or works: HBM047 - MTA, Sep 1987, New St. Kilda light rail line beside Whiteman Street looking toward the city, with the Melbourne skyline in the background. HBM048 - MTA, Sep 1987, Light rail from Clarendon Street, under construction. Junction installed and track being positioned. HBM049 - MTA, Aug 1987, New St Kilda light rail from beside Whiteman Street from under the new West Gate Freeway and a Port Melbourne train, with work on the new light rail underway. HBM050 - MTA W2 380, 1987, Flinders Street, with St Paul's Cathedral and the former Gas & Fuel building being refurbished HBM051 - MTA, Z 83, bound for Domain on Route 55. A Volvo B59 bus in 870's is bound for Garden City. 1987, Queensbridge, Light Rail billboard at left, with former St Kilda/Port Melbourne viaduct. HBM052 - MTA, Aug 1987, Reconstruction of the Bourke and Spencer Street corner with new curves. Note the open Railway carpark on the west side of Spencer Street. HBM053 - MMTB, W5 737, 1950s, Elizabeth Street at Londsdale Street, running a route 19, North Coburg service. Note the former cable tram curves into Lonsdale Street in the view. HBM054 - MMTB, early 1950s, Bourke Street, looking east at Elizabeth Street with two double deck buses in the view - Keith Kings photo HBM055 - MMTB, SW6 873 and 931, W2 408 and one other, plus a W5 class car. 1950s, Brunswick Depot, also parked on the southside open storage is another W2 class car. HBM056 - MMTB, W6 988, 19/06/1955, Bourke Street, The first electric tram in Bourke Street, two tower wagons, checking and adjusting the overhead - Keith Kings photo HBM057 - MMTB SW6 859, 1960s, Elizabeth Street, near Queensberry Street, on Route 19. A W5 class is bound for Flinders Street. Yields information about Melbourne tram operations, and the construction of the St Kilda to Port Melbourne Light Rail and 1950s or 1960s photos of Melbourne tramways.Kodachrome plastic and cardboard mounts, with notes - set of 11tramways, queensbridge, light rail, bourke st, clarendon st, swanston st, spencer st, trackworks, new tramway, brunswick depot, tram 931, tram 408, tram 737, tram 83, tram 380, railways, trams, whiteman st, elizabeth st, lonsdale st, queensberry st, russell st, flinders st, w2 class, w5 class, sw6 class, w6 class, z class, mmtb buses, td5c class, volvo b59, tower trucks, route 27, route 19, tram 859, tram 988, tram 873, route 55 -
 Melbourne Tram Museum
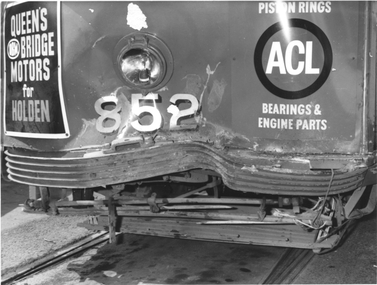
Photograph - SW6 852 accident damage, Melbourne & Metropolitan Tramways Board (MMTB), c1965
... Has a sign "Collision not to be touched", and adverts for Queen's Bridge Motors for Holden and ACL motor car parts. Showing route 27. Tram has not been fitted with marker lights - photo possibly early to mid 1960s when it was based at Hawthorn depot....Has a sign "Collision not to be touched", and adverts for Queen's Bridge Motors for Holden and ACL motor car parts. Showing route 27. Tram has not been fitted with marker lights - photo possibly early to mid 1960s when it was based at Hawthorn depot. ...The photograph shows SW6 852 after an accident which has severely damaged the bumper bar. Photographed at Hawthorn Depot. Has a sign "Collision not to be touched", and adverts for Queen's Bridge Motors for Holden and ACL motor car parts. Showing route 27. Tram has not been fitted with marker lights - photo possibly early to mid 1960s when it was based at Hawthorn depot.Yields information about the tram accident damage and tram 852Black and white photograph with a MMTB stamp and number on the rear.MMTB Stamp and number "P2 5/1/472"trams, tramways, accidents, collision, sw6 class, tram 852 -
 Melbourne Tram Museum
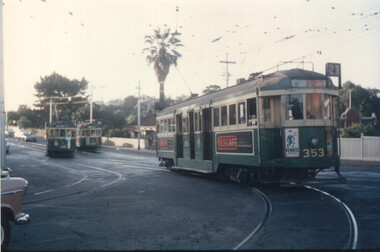
Photograph - Colour prints - last day of Hawthorn tram depot operations - set of 2, 14/2/1965
... Possibly a copy print. 1 - looking at operations in Wallen Road with W2 353 (Hawthorn route 27) returning to the depot and two W2s (possibly 330 and 332) shunting in Wallen Road. 2 - SW6 855 and SW6 848 are on roads 5 and 6 in the "new" shed at Hawthorn. ...Possibly a copy print. 1 - looking at operations in Wallen Road with W2 353 (Hawthorn route 27) returning to the depot and two W2s (possibly 330 and 332) shunting in Wallen Road. 2 - SW6 855 and SW6 848 are on roads 5 and 6 in the "new" shed at Hawthorn. ...Set of two colour prints taken on the last day of operation, of the Hawthorn Tram depot as a running depot in the evening. The photographer is not known. Possibly a copy print. 1 - looking at operations in Wallen Road with W2 353 (Hawthorn route 27) returning to the depot and two W2s (possibly 330 and 332) shunting in Wallen Road. 2 - SW6 855 and SW6 848 are on roads 5 and 6 in the "new" shed at Hawthorn. The depot ceased as a running shed on 14/2/1965. Yields information about the last day of Hawthorn tram depot as a running depot.Set of two colour prints - printed on Kodak Royal paper.trams, tramways, sw6 class, w2 class, last day, hawthorn tram depot, wallen road, tram 353, tram 855, tram 848 -
 Melbourne Tram Museum
Pamphlet, Yarra Trams, Times Change, Jul. 2014
... Pamphlet, A4 white paper, titled "Times Change" advising new timetables and route changes for 27/7/2014. Changes for routes 1, 11, 24, 31, 48, 78, 79, 95, 109 and 112. ...Melbourne Tram Museum 8 Wallen Road Hawthorn melbourne Trams tramways Yarra Trams Timetables Tram Routes Pamphlet, A4 white paper, titled "Times Change" advising new timetables and route changes for 27/7/2014. Changes for routes 1, 11, 24, 31, 48, 78, 79, 95, 109 and 112. ...Pamphlet, A4 white paper, titled "Times Change" advising new timetables and route changes for 27/7/2014. Changes for routes 1, 11, 24, 31, 48, 78, 79, 95, 109 and 112. Has the Yarra Trams and PTV logos and the tramTracker logo.trams, tramways, yarra trams, timetables, tram routes -
 Ballarat Tramway Museum
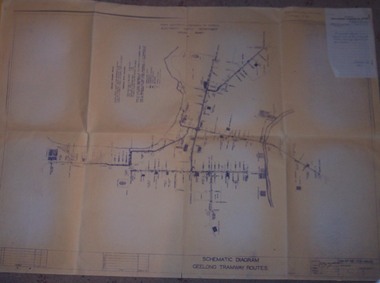
Drawing - Map, State Electricity Commission of Victoria (SECV), "Schematic Diagram Geelong Tramway Routes", 1953
... GE-T13-8829, titled "Schematic Diagram Geelong Tramway Routes". Drawing prepared 27/8/1953. Stapled to the top right hand corner of the sheet is a SEC memo form from finance section, distribution services to the Dept. ...GE-T13-8829, titled "Schematic Diagram Geelong Tramway Routes". Drawing prepared 27/8/1953. Stapled to the top right hand corner of the sheet is a SEC memo form from finance section, distribution services to the Dept. ...The drawing is very detailed showing streets, cross streets, route, loops, schools, woollen mills, ovals, sections, track phones, stops, route and track miles, pedestrian crossings, railway stations and notes on through route mileages.Print of a drawing showing in very good detail, the schematic layout of the Geelong Tram system. Produced in 1953 and sent to Tramway Supt. in 1970 for his records. Gives very detailed information on another SEC tramway system.Dyeline print of SEC Drawing No. GE-T13-8829, titled "Schematic Diagram Geelong Tramway Routes". Drawing prepared 27/8/1953. Stapled to the top right hand corner of the sheet is a SEC memo form from finance section, distribution services to the Dept. Tramway Superintendent, Ballarat, dated 6-2-1970 forwarding Les Denmead the plan. Was unstapled during the 1/2008 copying of the drawing. On top right hand corner of drawing, "Ballarat Tramway Preservation Society Catalogue No. 605" in ink and on rear in two places "Geelong Tramways" and one "BTPS 605"geelong, map, track layout, tram stops -
 Melbourne Tram Museum
Slide - Set of 5, Keith Kings, 15/11/1959 12:00:00 AM
... Keith notes - 903 stranded on temporary track as test car for Kings St bridge overpass Flinders St between William and Market Sts. .3 - tram 903 testing the track, has a number of workers in the view - 22/11/1959 Keith's notes - 903 first tram (on its second use) testing Flinders St overpass track and approach curves on east side. .4 - trams 939 (route 46) and 350 (route 27, Spencer St) at the east end of the new bridge with people watching. ...Keith notes - 903 stranded on temporary track as test car for Kings St bridge overpass Flinders St between William and Market Sts. .3 - tram 903 testing the track, has a number of workers in the view - 22/11/1959 Keith's notes - 903 first tram (on its second use) testing Flinders St overpass track and approach curves on east side. .4 - trams 939 (route 46) and 350 (route 27, Spencer St) at the east end of the new bridge with people watching. ...Set of five Colour slides, Kodak, white cardboard mount of track laying and the construction of the Flinders Street overpass during November 1959. .1 - Photo showing the tram line in the pre location position with the new track over the first stage of the overpass read to be cut in. 15/11/1959. Tram running a route 46. Keith notes - 317 to Spencer St terminus in Flinders St from Cnr of Spencer with temporary track ready for trams on the overpass. .2 - track being tested on 21/11/1959 - has the Flinders St station and signal gantry in the background. On the bridge is a sign for Coffey Ford. Keith notes - 903 stranded on temporary track as test car for Kings St bridge overpass Flinders St between William and Market Sts. .3 - tram 903 testing the track, has a number of workers in the view - 22/11/1959 Keith's notes - 903 first tram (on its second use) testing Flinders St overpass track and approach curves on east side. .4 - trams 939 (route 46) and 350 (route 27, Spencer St) at the east end of the new bridge with people watching. Note the "cars stop here" on the orange pole near the bottom of the ramp. 22/11/1959 Keith's notes - 939 - first passenger tram over Flinders St overpass on return journey and 350 second passenger tram. .5 - tram 939 first passenger car over the bridge at the western end of the new bridge with many workers in the background. Also Markillies Hotel. Also shows the reinforcing in the side of the bridge for the next section of the bridge to be built following this stage. 22/11/1959 Keith's notes - 939 first passenger tram over Flinders St overpass over King St. Slide Number K(l)(287), K(m)(275), K(m)(278), K(m)(287), K(m)(282) respectively.Extensive handwriting on rear in ink giving the photographic details of exposure.trams, tramways, flinders st, track equipment, track construction, trackwork, route 46, testing, king st, tram 371, tram 903, tram 939, tram 350 -
 Melbourne Tram Museum
Album - Robert Thomson Slide Collection - box 16
... RT392 27-1-1980 Z3 188? Bourke St route 96 RT393 27-1-1980 3MP tram Camberwell Route 72 at Gardiner level crossing RT394 28-1-1980 MMTB Bus 370, Leyland OPS1 on display RT395 28-1-1980 MAN Bus 103, on display showing Doncaster Depot ...Airport West terminus, route 52, RT388 26-1-1980 High St Kew track reconstruction, W6 986, route 48 RT389 26-1-1980 SW6 965 route 67, Glen Huntly Road level crossing RT390 27-1-1980 SW6 962 Collins St route 42 Spencer St terminus RT391 27-1-1980 Z3 121, route 88 Bourke St Mal with parked cars. ...Photo - see pdf file for further information. Number Date Brief Description Box 16 RT372 23-1-1980 W2 271, High St Kew reconstruction trackwork – route 48 RT373 23-1-1980 W2 504 Burwood Road RT374 23-1-1980 Z7 East Burwood terminus RT375 23-1-1980 Z26 Burwood Highway, route 75 RT376 23-1-1980 W2 255 North Balwyn terminus, route 48 RT377 24-1-1980 W5 at North Coburg terminus – route 19 RT378 24-1-1980 Z37 (route 19) and a W route 20 at North Coburg terminus RT379 24-1-1980 W2 378? Park St St Kilda terminus, route 12 RT380 24-1-1980 Z121 route 88 at Bourke St terminus with Spencer St station in background RT381 25-1-1980 Z1 118 and another Z81? At East Preston terminus – both route 88 RT382 26-1-1980 SW5 812 route 67 at Carnegie terminus RT383 28-1-1980 MMTB Austerity bus No. 301 RT384 26-1-1980 SW5 818? And SW6 965 at Carnegie Glen Huntly Road at start of the single line Truganini Road – note the single track signs. Both route 67. RT385 26-1-1980 W2 504 at East Malvern Darling Road – route 3 RT386 26-1-1980 SW5 787 route 52, Mathews Ave. RT387 26-1-1980 SW5 684? Airport West terminus, route 52, RT388 26-1-1980 High St Kew track reconstruction, W6 986, route 48 RT389 26-1-1980 SW6 965 route 67, Glen Huntly Road level crossing RT390 27-1-1980 SW6 962 Collins St route 42 Spencer St terminus RT391 27-1-1980 Z3 121, route 88 Bourke St Mal with parked cars. RT392 27-1-1980 Z3 188? Bourke St route 96 RT393 27-1-1980 3MP tram Camberwell Route 72 at Gardiner level crossing RT394 28-1-1980 MMTB Bus 370, Leyland OPS1 on display RT395 28-1-1980 MAN Bus 103, on display showing Doncaster Depot Demonstrates the work of Robert Thomson in photography, collection and/or production of slidesAssembled album in a black presentation folder of 24 colour slides, collected or produced by Robert Thomson. A list of all photographs with details has been compiled. All rights reserved for all photos., melbourne, tramways, trams, tram 271, high st kew, trackworks, route 48, tram 504, tram 7, east burwood, tram 26, tram 255, north coburg, route 19, tram 37, park st st kilda, tram 121, bourke st, spencer st, tram 118, east preston, route 88, route 12, route 67, carnegie, tram 812, tram 67, buses, tram 965, truganini road, route 3, route 52, tram 787, tram 986, level crossings, glen huntly rd, matthews ave, tram 962, collins st, route 42, tram 188, route 72, gardiner -
 Melbourne Tram Museum
Album - Robert Thomson Slide Collection, "Melbourne AETA 1964"
... RT207 Y1 611 Batman Ave 4-4-64 - "Wattle Park Elgar Rd" RT208 Hawthorn Depot 25-3-64 - trams 582 & 841 RT209 L 105 City Swanston St 25-3-64 route 4B RT210 SW6 853 Chapel St Richmond 25-3-64 -"Prahran" - route 77 RT211 L 102 City Swanston St 25-3-64 - "Carnegie" - route 4 RT212 27-4-62 - tram 495 - "Camberwell" - route 7 & tram 334 RT213 tram 11 - "Special" Flinders St RT214 March 1964 - tram 779 - "West Coburg via William St" - route 55 RT215 March 1964 W7 Collins St - tram 1024 - "Northcote via St Georges Rd" - route 9A RT216 March 1964 Victoria Parade - tram 892 - "City" - route 42 RT217 March 1964 Spring St - tram 1034 - "East Preston" - route 88 RT218 March 1964 Essendon Terminus - tram 741 - "City" - route 59 RT219 1964 AETA Convention - tram 672 - "City" RT220 1964 AETA Convention - tram 672 - "West Coburg Bell St" RT221 1964 AETA Convention - tram 676 - "Leura Grove" RT222 1964 AETA Convention - tram 672 - "Special" tram bridge RT223 1964 AETA Convention - tram 672 - "Special" RT224 1964 AETA Convention - tram 676 - "Burwood" RT225 1964 AETA Convention - tram 672 - "City" - route 59 RT226 1964 AETA Convention - tram 672 - "Special" RT227 1964 AETA Convention - tram 469 - "Special" & tram 895 - "City" - route 2A RT228 1964 AETA Convention - tram south melb depot works yard ...RT207 Y1 611 Batman Ave 4-4-64 - "Wattle Park Elgar Rd" RT208 Hawthorn Depot 25-3-64 - trams 582 & 841 RT209 L 105 City Swanston St 25-3-64 route 4B RT210 SW6 853 Chapel St Richmond 25-3-64 -"Prahran" - route 77 RT211 L 102 City Swanston St 25-3-64 - "Carnegie" - route 4 RT212 27-4-62 - tram 495 - "Camberwell" - route 7 & tram 334 RT213 tram 11 - "Special" Flinders St RT214 March 1964 - tram 779 - "West Coburg via William St" - route 55 RT215 March 1964 W7 Collins St - tram 1024 - "Northcote via St Georges Rd" - route 9A RT216 March 1964 Victoria Parade - tram 892 - "City" - route 42 RT217 March 1964 Spring St - tram 1034 - "East Preston" - route 88 RT218 March 1964 Essendon Terminus - tram 741 - "City" - route 59 RT219 1964 AETA Convention - tram 672 - "City" RT220 1964 AETA Convention - tram 672 - "West Coburg Bell St" RT221 1964 AETA Convention - tram 676 - "Leura Grove" RT222 1964 AETA Convention - tram 672 - "Special" tram bridge RT223 1964 AETA Convention - tram 672 - "Special" RT224 1964 AETA Convention - tram 676 - "Burwood" RT225 1964 AETA Convention - tram 672 - "City" - route 59 RT226 1964 AETA Convention - tram 672 - "Special" RT227 1964 AETA Convention - tram 469 - "Special" & tram 895 - "City" - route 2A RT228 1964 AETA Convention - tram south melb depot works yard Demonstrates the work of Robert Thomson in photography, collection and/or production of slides Melbourne tramways trams MMTB Hawthorn Depot SW6 class W2 class W3 class W4 class W5 class W7 class Y class Y1 class X2 class SW5 class L class South Melbourne Per-way Yard tram 11 tram 3 tram 9 tram 485 tram 676 tram 672 tram 1024 tram 1034 tram 841 tram 469 tram 611 tram 612 tram 101 tram 102 tram 105 tram 826 tram 779 tram 741 tram 655 tram 467 tram 552 tram 582 tram 495 tram 334 tram 888 tram 951 tram 853 tram 892 tram 895 Route 59 Route 2A Route 88 Route 42 Route 9A Route 55 Route 7 Route 4 Route 77 Route 4B Route 1 Route 69 Route 64 Route 5 Assembled album in a black presentation folder of 31 colour slides, collected or produced by Robert Thomson. ...Photo - see pdf file for further information. Number Brief Description RT198 SW6 888 Dandenong Rd 1-4-64 - "Malvern Rd Burke Rd" - route 5 RT199 W2 552 Dandenong Rd 1-4-64 - "City" - route 5 RT200 W3 655 Dandenong Rd 1-4-64 - "City" - route 64 RT201 SW6 951 St Kilda Beach 1-4-64 - "Kew Cotham Rd" - route 69 RT202 10 W3 667 East Coburg 1-4-64 - "South Melb Beach" - route 1 RT203 W5 826 top of Latrobe St (?) 1-4-64 - "City via La Trobe St" - RT204 L 105 Carnegie 1-4-64 -"city" - route 4 RT205 L 101 Carnegie 1-4-64 - "University" - route 4 RT206 tram 612 - "Burwood" - Batman Ave (?) RT207 Y1 611 Batman Ave 4-4-64 - "Wattle Park Elgar Rd" RT208 Hawthorn Depot 25-3-64 - trams 582 & 841 RT209 L 105 City Swanston St 25-3-64 route 4B RT210 SW6 853 Chapel St Richmond 25-3-64 -"Prahran" - route 77 RT211 L 102 City Swanston St 25-3-64 - "Carnegie" - route 4 RT212 27-4-62 - tram 495 - "Camberwell" - route 7 & tram 334 RT213 tram 11 - "Special" Flinders St RT214 March 1964 - tram 779 - "West Coburg via William St" - route 55 RT215 March 1964 W7 Collins St - tram 1024 - "Northcote via St Georges Rd" - route 9A RT216 March 1964 Victoria Parade - tram 892 - "City" - route 42 RT217 March 1964 Spring St - tram 1034 - "East Preston" - route 88 RT218 March 1964 Essendon Terminus - tram 741 - "City" - route 59 RT219 1964 AETA Convention - tram 672 - "City" RT220 1964 AETA Convention - tram 672 - "West Coburg Bell St" RT221 1964 AETA Convention - tram 676 - "Leura Grove" RT222 1964 AETA Convention - tram 672 - "Special" tram bridge RT223 1964 AETA Convention - tram 672 - "Special" RT224 1964 AETA Convention - tram 676 - "Burwood" RT225 1964 AETA Convention - tram 672 - "City" - route 59 RT226 1964 AETA Convention - tram 672 - "Special" RT227 1964 AETA Convention - tram 469 - "Special" & tram 895 - "City" - route 2A RT228 1964 AETA Convention - tram south melb depot works yard Demonstrates the work of Robert Thomson in photography, collection and/or production of slidesAssembled album in a black presentation folder of 31 colour slides, collected or produced by Robert Thomson. All photographs have been scanned and placed on the Museum's G drive. A list of all photographs with details has been compiled. melbourne, tramways, trams, mmtb, hawthorn depot, sw6 class, w2 class, w3 class, w4 class, w5 class, w7 class, y class, y1 class, x2 class, sw5 class, l class, south melbourne per-way yard, tram 11, tram 3, tram 9, tram 485, tram 676, tram 672, tram 1024, tram 1034, tram 841, tram 469, tram 611, tram 612, tram 101, tram 102, tram 105, tram 826, tram 779, tram 741, tram 655, tram 467, tram 552, tram 582, tram 495, tram 334, tram 888, tram 951, tram 853, tram 892, tram 895, route 59, route 2a, route 88, route 42, route 9a, route 55, route 7, route 4, route 77, route 4b, route 1, route 69, route 64, route 5 -
 Melbourne Tram Museum
Ephemera - Timetable, Swanston Trams, Set of Swanston Trams timetables, 1999
... Has a fold out with a feed back form. .1 - Route 1/22 - East Coburg / Moreland - South Melbourne Beach and Arts Centre - January 1999 - 40 pages. .2 - ditto - July 1999. .3 - Route 3 - East Malvern - University - July 1999 - 28 pages .4 - ditto - January 1999 .5 - Route 5 - Malvern (Burke Rd) - University - July 1999 - 24 pages .6 - Route 6 - Glen Iris - City - January 1999 - 28 pages .7 - ditto - July 1999. .8 - Route 8 - Toorak - January 1999 - 32 pages .9 - ditto July 1999 .10 - Route 16 - St Kilda Beach - University - January 1999 - 28 pages .11 - ditto July 1999 .12 - Route 19 - North Coburg - City - January 1999 - 48 pages .13 - ditto July 1999 .14 - Route 55 - West Coburg - Domain Interchanges via William St - January 1999 - 32 pages .15 - ditto July 1999 .16 - Route 57 - West Maribyrnong - City - January 1999 .17 - ditto July 1999 .18 - Route 59 - Airport West - City - June 1999 .19 - Route 64 - East Brighton - University - January 1999 - 28 pages .20 - ditto July 1999 .21 - Route 67 - Carnegie - City - January 1999 - 28 pages .22 - ditto July 1999 .23 - Route 69 - Kew Cotham Rd - St Kilda Beach - January 1999 - 28 pages .24 - ditto July 1999 .25 - Route 72 - Camberwell - University - January 1999 - 28 pages .26 - ditto July 1999 .27 - Route 78/79 - North Richmond - Prahran or St Kilda Beach - January 1999 - 28 pages .28 - ditto July 1999 .29 - Route 82 - Moonee Ponds - Footscray - January 1999 - 20 pages .30 - ditto July 1999...Has a fold out with a feed back form. .1 - Route 1/22 - East Coburg / Moreland - South Melbourne Beach and Arts Centre - January 1999 - 40 pages. .2 - ditto - July 1999. .3 - Route 3 - East Malvern - University - July 1999 - 28 pages .4 - ditto - January 1999 .5 - Route 5 - Malvern (Burke Rd) - University - July 1999 - 24 pages .6 - Route 6 - Glen Iris - City - January 1999 - 28 pages .7 - ditto - July 1999. .8 - Route 8 - Toorak - January 1999 - 32 pages .9 - ditto July 1999 .10 - Route 16 - St Kilda Beach - University - January 1999 - 28 pages .11 - ditto July 1999 .12 - Route 19 - North Coburg - City - January 1999 - 48 pages .13 - ditto July 1999 .14 - Route 55 - West Coburg - Domain Interchanges via William St - January 1999 - 32 pages .15 - ditto July 1999 .16 - Route 57 - West Maribyrnong - City - January 1999 .17 - ditto July 1999 .18 - Route 59 - Airport West - City - June 1999 .19 - Route 64 - East Brighton - University - January 1999 - 28 pages .20 - ditto July 1999 .21 - Route 67 - Carnegie - City - January 1999 - 28 pages .22 - ditto July 1999 .23 - Route 69 - Kew Cotham Rd - St Kilda Beach - January 1999 - 28 pages .24 - ditto July 1999 .25 - Route 72 - Camberwell - University - January 1999 - 28 pages .26 - ditto July 1999 .27 - Route 78/79 - North Richmond - Prahran or St Kilda Beach - January 1999 - 28 pages .28 - ditto July 1999 .29 - Route 82 - Moonee Ponds - Footscray - January 1999 - 20 pages .30 - ditto July 1999 Set of Swanston Trams timetables Ephemera Timetable Swanston Trams ...Set of Swanston Trams timetables, red white green cover with route number on cover, giving details of popular destination, check points, use of Metcards and contact details, tram hire, frequency, a Welcome to Swanston Trams, description of route and route map. Has a fold out with a feed back form. .1 - Route 1/22 - East Coburg / Moreland - South Melbourne Beach and Arts Centre - January 1999 - 40 pages. .2 - ditto - July 1999. .3 - Route 3 - East Malvern - University - July 1999 - 28 pages .4 - ditto - January 1999 .5 - Route 5 - Malvern (Burke Rd) - University - July 1999 - 24 pages .6 - Route 6 - Glen Iris - City - January 1999 - 28 pages .7 - ditto - July 1999. .8 - Route 8 - Toorak - January 1999 - 32 pages .9 - ditto July 1999 .10 - Route 16 - St Kilda Beach - University - January 1999 - 28 pages .11 - ditto July 1999 .12 - Route 19 - North Coburg - City - January 1999 - 48 pages .13 - ditto July 1999 .14 - Route 55 - West Coburg - Domain Interchanges via William St - January 1999 - 32 pages .15 - ditto July 1999 .16 - Route 57 - West Maribyrnong - City - January 1999 .17 - ditto July 1999 .18 - Route 59 - Airport West - City - June 1999 .19 - Route 64 - East Brighton - University - January 1999 - 28 pages .20 - ditto July 1999 .21 - Route 67 - Carnegie - City - January 1999 - 28 pages .22 - ditto July 1999 .23 - Route 69 - Kew Cotham Rd - St Kilda Beach - January 1999 - 28 pages .24 - ditto July 1999 .25 - Route 72 - Camberwell - University - January 1999 - 28 pages .26 - ditto July 1999 .27 - Route 78/79 - North Richmond - Prahran or St Kilda Beach - January 1999 - 28 pages .28 - ditto July 1999 .29 - Route 82 - Moonee Ponds - Footscray - January 1999 - 20 pages .30 - ditto July 1999Some have number notes and notes written inside about changes or errors in ink. See History.trams, tramways, swanston trams, tram services, timetables, route 1, route 22, route 3, route 5, route 6, route 8, route 16, route 19, route 55, route 57, route 59, route 64, route 67, route 69, route 72, route 78, route 79, route 82 -
 Melbourne Tram Museum
Ephemera - Olympic Scrap book, "MMTB #1", 1987 to 2003
... - 21/11/1986 27 - tram route ruling angers commuters - (route 82) - 4/1/1986 28 - History back on the tracks - photo o W1 612 - 3/8/1987 29 - The last number 77 - The Age 8/1/1986 30 - Art on wheels (tram 336) - Progress Press 10/12/1986 31 - Ban on Trams - Kew Depot - Progress Press 10/12/1986 32 - The Ghosts of Brisbane Past - Brisbane Courier Mail - 9/10/1987 33 - Trammies had to be tough in the days of cable cars - The Herald - 11/11/1985 34 - Catch a vintage tram at Bylands - 11/11/1985 35 - Aboard the trams home - 26/8/1987 36 - The end of the line for a private tram fleet - 28/3/1989 37 - Jim's tram plan clangs to a halt 38 - Red nose trams in a class of their own 39 - PTC Statewide Open Day - 17/10/1991 40 - Trams a vital part of city's transport - 18/5/1988 41 - Fun tram just the ticket -15/3/1988 42 - Desire is a streetcar for Jim, a collector obsessed 0 8/3/1988 43 - Tram crash 31 hurt - 7/2/1989 44 - Tramway exhibition to roll - Progrss Report - 18/10/1989 45 - Business on the right line - Restaurant tram - 30/10/1989 46 - Experience the 'real' tram museum on a shaky ride - 17/6/1989 47 - The start of electric trams - progress press 18/10/1989 48 - Trams Back - fights erupt as trammies vote - 2/2/1990 49 - Tram row legacy to linger on - 2/2/1990 50 - Trams back, but travelers aren't - Progress Press - 14/2/1990 51 - advert by The Met - Trams operating today - 8/2/1990 52 - Trams roll - rebe;'s rage still a threat - Z33 3/2/1990 53 - An early tram catches a few passengers - Month before all trams back - 5/2/1990 ...- 21/11/1986 27 - tram route ruling angers commuters - (route 82) - 4/1/1986 28 - History back on the tracks - photo o W1 612 - 3/8/1987 29 - The last number 77 - The Age 8/1/1986 30 - Art on wheels (tram 336) - Progress Press 10/12/1986 31 - Ban on Trams - Kew Depot - Progress Press 10/12/1986 32 - The Ghosts of Brisbane Past - Brisbane Courier Mail - 9/10/1987 33 - Trammies had to be tough in the days of cable cars - The Herald - 11/11/1985 34 - Catch a vintage tram at Bylands - 11/11/1985 35 - Aboard the trams home - 26/8/1987 36 - The end of the line for a private tram fleet - 28/3/1989 37 - Jim's tram plan clangs to a halt 38 - Red nose trams in a class of their own 39 - PTC Statewide Open Day - 17/10/1991 40 - Trams a vital part of city's transport - 18/5/1988 41 - Fun tram just the ticket -15/3/1988 42 - Desire is a streetcar for Jim, a collector obsessed 0 8/3/1988 43 - Tram crash 31 hurt - 7/2/1989 44 - Tramway exhibition to roll - Progrss Report - 18/10/1989 45 - Business on the right line - Restaurant tram - 30/10/1989 46 - Experience the 'real' tram museum on a shaky ride - 17/6/1989 47 - The start of electric trams - progress press 18/10/1989 48 - Trams Back - fights erupt as trammies vote - 2/2/1990 49 - Tram row legacy to linger on - 2/2/1990 50 - Trams back, but travelers aren't - Progress Press - 14/2/1990 51 - advert by The Met - Trams operating today - 8/2/1990 52 - Trams roll - rebe;'s rage still a threat - Z33 3/2/1990 53 - An early tram catches a few passengers - Month before all trams back - 5/2/1990 Yields information about the Melbourne tram network in the 1990s tramways Melbourne newspapers Box Hill tram museums Unions tram blockade A class East Burwood Bundoora cable trams B class route 82 route 77 Danton Carson Brisbane Restaurant tram Adelaide Scrap book - Olympic - 32 plain sheets + printed card covers, centre stapled. ...Collection of newspaper clippings pasted into the scrapbook by the donor. Covers the period 1979 to 1990 when the Melbourne tram system underwent large changes. All from The Herald Sun or The Sun, unless noted otherwise. Contains the following cuttings: 1 - New tram link proves popular - Progress Print 12/12/1979 2 - Extension for tram? Standard 28/11/1979 3 - Ban trams from mall call - Herald - 14/12/1979 4 - Its war on tram yobbos - Sun 25/4/1980 5 - A bus drivers' dream sale 6 - Art lovers in transport of delight - The Bulletin 3/4/1979 7 - Your turn: Our Red cars are gone and all but forgotten - Los Angeles Herald Examiner 21/6/1978 8 - Push for tram line - Eastern Standard - 3/12/1980 9 - Photo of the opening of Bundoora line - 19/5/1983 10 - From cable cars to electric trams - Reg Baird - City Extra 13/11/1985 11 - Louie fears he'll soon be history - Sun 12/11/1985 12 - The first tram rolls unofficially of course - Box Hill Gazette - 18/7/1978 13 - Then and now - Board looks back to 1916 - Box Hill Gazette - 18/7/1978 14 - Blockade - trams buses choke city - 20/7/1987 15 - What a clangers - Tranquil city of trammies, and a City of the Rails - 21/7/1984 16 - Trammies on the buses - 24/7/1984 17 - A tram voted a winner - Progress Press 17/10/1984 18 - A class trams - Eastern Standard 23/10/1984 19 - Danton Carson - ex cable trammie - 12/11/1985 20 - Tram line upgrade - 10/9/1985 21 - Launch of B1 2001 - 16/11/1984 22 - Home built from trams - Progress Press - 9/11/1983 23 - A shortcut on the Brunswick line - Malcolm tram on Miller St bridge - 22/8/1985 24 - Stone and brick and cable tram - The Age 2/11/1985 25 - Danton Carson article by Lahey at Large - The Age 9/11/1985 26 - Why not a City tram loop? - 21/11/1986 27 - tram route ruling angers commuters - (route 82) - 4/1/1986 28 - History back on the tracks - photo o W1 612 - 3/8/1987 29 - The last number 77 - The Age 8/1/1986 30 - Art on wheels (tram 336) - Progress Press 10/12/1986 31 - Ban on Trams - Kew Depot - Progress Press 10/12/1986 32 - The Ghosts of Brisbane Past - Brisbane Courier Mail - 9/10/1987 33 - Trammies had to be tough in the days of cable cars - The Herald - 11/11/1985 34 - Catch a vintage tram at Bylands - 11/11/1985 35 - Aboard the trams home - 26/8/1987 36 - The end of the line for a private tram fleet - 28/3/1989 37 - Jim's tram plan clangs to a halt 38 - Red nose trams in a class of their own 39 - PTC Statewide Open Day - 17/10/1991 40 - Trams a vital part of city's transport - 18/5/1988 41 - Fun tram just the ticket -15/3/1988 42 - Desire is a streetcar for Jim, a collector obsessed 0 8/3/1988 43 - Tram crash 31 hurt - 7/2/1989 44 - Tramway exhibition to roll - Progrss Report - 18/10/1989 45 - Business on the right line - Restaurant tram - 30/10/1989 46 - Experience the 'real' tram museum on a shaky ride - 17/6/1989 47 - The start of electric trams - progress press 18/10/1989 48 - Trams Back - fights erupt as trammies vote - 2/2/1990 49 - Tram row legacy to linger on - 2/2/1990 50 - Trams back, but travelers aren't - Progress Press - 14/2/1990 51 - advert by The Met - Trams operating today - 8/2/1990 52 - Trams roll - rebe;'s rage still a threat - Z33 3/2/1990 53 - An early tram catches a few passengers - Month before all trams back - 5/2/1990 Yields information about the Melbourne tram network in the 1990sScrap book - Olympic - 32 plain sheets + printed card covers, centre stapled.tramways, melbourne, newspapers, box hill, tram museums, unions, tram blockade, a class, east burwood, bundoora, cable trams, b class, route 82, route 77, danton carson, brisbane, restaurant tram, adelaide -
 Bendigo Military Museum
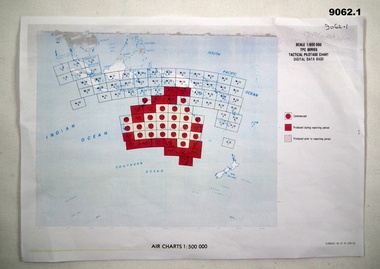
Map - RASvy " Map Makers Exhibition 2025 "- Map display, RAN Hydrographic Office, 1972 - 1992
... ROUTE CHART. AUSTRALIA ERC HIGH. H1 and H2. LAMBERT CONFORMAL CONIC PROJECTION. This series of charts were regularly produced by the RAAF Aeronautical Information Service (AIS) and contained current aeronautical information for pilots. These charts were printed at the Army Survey Regiment, Bendigo. Royal Australian Survey Corps RASvy Fortuna Detachment - Army Survey Regiment Army Svy Regt ASR .1 Tactical Pilotage Chart Series Catalogue. Current as at 30 Jun 92. .2 Extract of Navigational Plotting Chart " NP22-2 Tasmania " .3 Extract of Navigational Plotting Chart " NP 27 ...All of these Charts / Maps were used for the RSL Museum display " The Mapmakers " ( of RASvy. ) 10 Jun - 10 Aug 2025. .1 Catalogue of Tactical Pilotage Charts, 1:500 000 Scale. Digital Data Base available as at 30Jun 92. This catalogue page shows the extent of the Australian area of responsibility for aeronautical charting. .2 RAAF PLOTTING CHART. NP 22-2 (Navigational Plotting) Tasmania. MERCATOR PROJECTION. This series of charts were used for the training of RAAF Navigators. These charts were produced and printed at the Army Survey Regiment, Bendigo. .3 RAAF PLOTTING CHART AUSTRALIA - SOUTHEAST. NP 27 is Based on LAMBERT CONFORMAL CONIC PROJECTION. This series of charts was used by RAAF Navigators for the planning of RAAF flights. These charts were produced and printed at the Army Survey Regiment, Bendigo. .4 RAAF LONG RANGE PLOTTING CHART. NP 43-4 AUSTRALIA WESTERN. MERCATOR PROJECTION. This series of maps were used for the planning of RAAF flights. Of Particular note these charts were used to plot "Rhumb Lines or loxodromes" where a course crosses all Meridians (Lines of latitude and longitude) at the same angle. On Mercator projection charts Rhumb lines are conveniently shown as straight lines and are also lines of constant compass bearing. Rhumb lines are usually longer than the shortest distance between two points. The shortest distance between two points on the earth's surface is called a "Great Circle Route" which is a route on a circular path on the surface of the earth where the centre of that circle is also the centre of the earth. Great Circle Routes on a Mercator Projection are however curves and harder to plot. These charts were produced and printed at the Army Survey Regiment, Bendigo. .5 RAAF LONG RANGE PLOTTING CHART. NP 43-7 SOLOMON ISLANDS. MERCATOR PROJECTION. Used for the planning of RAAF flights. .6 RAAF AIR STAFF PLANNING CHART NS 137-1 DARWIN NORTH WEST. AZIMUTHAL EQUIDISTANT PROJECTION. This series of charts were used for planning by the staff. The whole chart was produced by joining the four quadrant maps together. The charts are based on a single point of tangency (in this case Darwin) and shows radius (distance) in nautical miles to and from that point. A series of charts were produced centred on each of the major airfields in Northern Australia. These charts were produced and printed at the Army Survey Regiment, Bendigo. .7 RAAF AIR STAFF PLANNING CHART NS 137-2 DARWIN NORTH EAST. AZIMUTHAL EQUIDISTANT PROJECTION. Used for the planning by the staff. The charts are based on a point of tangency and show radius in nautical miles. .8 RAAF AIR STAFF PLANNING CHART NS 137-4 DARWIN SOUTH WEST. AZIMUTHAL EQUIDISTANT PROJECTION. Used for the planning by the staff. The charts are based on a point of tangency and show radius in nautical miles. .9 RAAF AIR STAFF PLANNING CHART NS 137-3 DARWIN SOUTH EAST. AZIMUTHAL EQUIDISTANT PROJECTION. Used for the planning by the staff. The charts are based on a point of tangency and show radius in nautical miles. .10 TACTICAL PILOTAGE CHART. TPC R-13B. LAMBERT CONFORMAL PROJECTION. Used by pilots for flight planning and could be used in flight if necessary for visual navigation using major ground features shown on the chart. These charts also contained aeronautical information such as airfields, radio navigation beacons and obstructions. Contours and height information was shown in feet to be compatible with aircraft altimeters. Each graticule square also contained a Maximum Safe Elevation Figure (MEF) also in feet. Coverage of this series over Australia's area of interest were produced and printed at the Army Survey Regiment, Bendigo. .11 HYDROGRAPHIC CHART. AUS 158. PORT PHILLIP SOUTH and WEST CHANNELS. PROJECTION TRANSVERSE MERCATOR. Used by all people needing to navigate a vessel. Hydrographic charts were printed at the Army Survey Regiment, Bendigo. .12 HYDROGRAPHIC CHART. AUS 157. GEELONG HARBOUR and APPROACHES. PROJECTION TRANSVERSE MERCATOR. Used by all people needing to navigate a vessel. .13 EN ROUTE CHART. AUSTRALIA ERC HIGH. H1 and H2. LAMBERT CONFORMAL CONIC PROJECTION. This series of charts were regularly produced by the RAAF Aeronautical Information Service (AIS) and contained current aeronautical information for pilots. These charts were printed at the Army Survey Regiment, Bendigo..1 Tactical Pilotage Chart Series Catalogue. Current as at 30 Jun 92. .2 Extract of Navigational Plotting Chart " NP22-2 Tasmania " .3 Extract of Navigational Plotting Chart " NP 27 RAAF PLOTTING CHART AUSTRALIA - SOUTHEAST " .4 Extract of Navigational Plotting Chart " RAAF LONG RANGE PLOTTING CHART NP43-4 AUSTRALIA WESTERN " .5 Extract of Navigational Plotting Chart " RAAF LONG RANGE PLOTTING CHART NP43-7 SOLOMON ISLANDS " .6 Extract of Navigational Series " RAAF AIR STAFF PLANNING CHART NS 137-2 DARWIN NORTH WEST " .7 Extract of Navigational Series " RAAF AIR STAFF PLANNING CHART NS 137-1 DARWIN NORTH EAST " .8 Extract of Navigational Series " RAAF AIR STAFF PLANNING CHART NS 137-4 DARWIN SOUTH WEST " .9 Extract of Navigational Series " RAAF AIR STAFF PLANNING CHART NS 137-3 DARWIN SOUTH EAST " .10 Extract of Tactical Pilotage Chart " TPC R-13B " .11 Extract of Hydrographic Chart " PORT PHILLIP SOUTH and WEST CHANNELS " .12 Extract of Hydrographic Chart " GEELONG HARBOUR and APPROACHES " .13 Extract of En Route Chart " AUSTRALIA ERC HIGH " " H1 and H2 " royal australian survey corps, rasvy, fortuna, detachment - army survey regiment, army svy regt, asr -
 Bendigo Military Museum
Photograph - 4th Field Survey Squadron ANZAC Day Parade. Adelaide, SA, 1994
... route. L to R: CAPT Tony Stephens, CPL Brett Parkin, SPR Mark Linwood, SGT H. Evertz, SPR Mark Sinderberry, unidentified (x2). .27) - Photo, colour, 1994. ...route. L to R: CAPT Tony Stephens, CPL Brett Parkin, SPR Mark Linwood, SGT H. Evertz, SPR Mark Sinderberry, unidentified (x2). .27) - Photo, colour, 1994. ...This is a set of 32 photographs of 4th Field Survey Squadron personnel parading through the streets of the Adelaide CBD on ANZAC Day, on the 25th of April 1994. The march concluded at the Cross of Sacrifice in Pennington Gardens East followed by the ANZAC Day Service of Remembrance. See items 6566.14P and 6567.11P for more photos taken during ANZAC Day, 1994.This is a set of 32 photographs of 4th Field Survey Squadron personnel parading through the streets of the Adelaide CBD on ANZAC Day, on the 25th of April 1994. The colour photographs are on 35mm negative film and are part of the Army Survey Regiment’s Collection. The photographs were scanned at 96 dpi. .1) - Photo, colour, 1994. Preparation. Bayonets fixed on SLR rifles. .2) - Photo, colour, 1994. Eyes right as unit passes dignitaries on the dais. .3) - Photo, colour, 1994. Eyes right as unit passes dignitaries on the dais. CAPT Rob Gray, centre of photo, OC MAJ Peter Demaine on right. .4) to .7) - Photo, colour, 1994. Eyes right as unit passes dignitaries on the dais. .8) - Photo, colour, 1994. Unit marches along the parade route. .9) to .13) - Photo, colour, 1994. Eyes right as unit passes dignitaries. .14) - Photo, colour, 1994. Unit marches along the parade route. Right file L to R: WO2 Peter Hammer, unidentified, SGT Dave Longbottom, SGT Paul Baker, unidentified. .15) - Photo, colour, 1994. Unit marches along the parade route. Right file L to R: SGT Paul Baker, unidentified (x2), SPR Fran Calvert, SPR Greg Richards, SGT H. Evertz. Centre file: SGT Mark Donnelly, SPR Mark McInerney, unidentified (x2), SPR Matt Arnold. .16) - Photo, colour, 1994. Unit marking time. Right file L to R: SGT Paul Baker, unidentified (x2), SPR Fran Calvert, SPR Greg Richards, SGT H. Evertz, CPL Brett Parkin. Centre file L to R: SPR Matt Arnold, SPR Mark Linwood. Right file L to R: unidentified, SPR Mark Sinderberry. Officers L to R: unidentified (x2), CAPT Rob Gray, CAPT Tony Stephens. .17) - Photo, colour, 1994. Unit marking time. L to R: SGT Paul Baker, unidentified, SSGT John ‘Shep’ Shephard, SGT Dave Longbottom, SPR Daryl Miller, CPL Steve Wegener, unidentified (x2), CPL Jeremy Archer, WO2 Peter Hammer, unidentified Warrant Officers (x2). .18) - Photo, colour, 1994. Unit marking time. L to R: SPR Mark Linwood, SPR Greg Richards, SPR Matt Arnold, SPR Mark Sinderberry, unidentified (x5), SPR Chris Pearse, unidentified, CPL Dick Crawford, unidentified, SSGT John ‘Shep’ Shephard, CPL Steve Wegener, unidentified, CPL Jeremy Archer, unidentified Warrant Officer. .19) - Photo, colour, 1994. Unit marking time. Officers L to R: unidentified (x2), CAPT Tony Stephens. L to R: SPR Mark Linwood, SPR Greg Richards, SPR Matt Arnold, SPR Mark Sinderberry, remainder unidentified. .20) - Photo, colour, 1994. Unit marched along the parade route. L to R: CAPT Rob Gray, unidentified officer. .21) - Photo, colour, 1994. Unit marches along the parade route. OC MAJ Peter Demaine. .22) - Photo, colour, 1994. Unit marches along the parade route. L to R: CAPT Tony Stephens, SPR Mark Linwood, SPR Matt Arnold, SPR Mark Sinderberry, unidentified (x3), SPR Chris Pearse, unidentified, CPL Dick Crawford, unidentified, SGT Dave Longbottom, SSGT John ‘Shep’ Shephard, CPL Steve Wegener, CPL Jeremy Archer, unidentified Warrant Officers (x2). .23) - Photo, colour, 1994. Unit marches along the parade route. L to R: SSGT John ‘Shep’ Shephard, SPR Daryl Miller, CPL Steve Wegener, unidentified, CPL Jeremy Archer, unidentified Warrant Officers (x2). .24) - Photo, colour, 1994. Unit marches along the parade route. L to R: unidentified, CPL Dick Crawford, SGT Dave Longbottom, SSGT John ‘Shep’ Shephard, unidentified, CPL Steve Wegener, WO2 Peter Hammer, CPL Jeremy Archer, unidentified Warrant Officers (x2). .25) - Photo, colour, 1994. Unit marches along the parade route. L to R: unidentified (x3), SPR Fran Calvert, unidentified (x2), SPR Chris Pearse, unidentified, CPL Dick Crawford, SPR Daryl Miller, SSGT John ‘Shep’ Shephard. .26) - Photo, colour, 1994. Unit marches along the parade route. L to R: CAPT Tony Stephens, CPL Brett Parkin, SPR Mark Linwood, SGT H. Evertz, SPR Mark Sinderberry, unidentified (x2). .27) - Photo, colour, 1994. Unit marches along the parade route. L to R: CPL Brett Parkin, CAPT Tony Stephens, SPR Mark Linwood, SPR Greg Richards, SPR Matt Arnold, unidentified, SPR Mark Sinderberry, unidentified (x3), SPR Chris Pearse, unidentified, CPL Dick Crawford, unidentified, SGT SSGT John ‘Shep’ Shephard, CPL Steve Wegener, CPL Jeremy Archer, unidentified Warrant Officer. .28) - Photo, colour, 1994. Unit marches along the parade route. L to R: Officers - OC MAJ Peter Demaine, unidentified (x2), CAPT Rob Gray, CAPT Tony Stephens. L to R: CPL Brett Parkin, SGT H. Evertz, SPR Mark Linwood, SSGT Pat ‘Fuji’ Drover, SPR Mark Sinderberry, unidentified. .29) - Photo, colour, 1994. Unit preparing to halt. .30) to .32) - Photo, colour, 1994. Unit ‘stand easy’..1P to .32P – There are no personnel identified. ‘1994 ANZAC DAY’ annotated on negatives sleeve.royal australian survey corps, rasvy, 4 fd svy sqn -
 Eltham District Historical Society Inc
Photograph, George Burton Coop, The Royal Train enroute to Lilydale, near Croydon, 6 Mar. 1954
... 27, Queen Elizabeth II was the first reigning British monarch to visit Australia.. She visited Victoria between March 1-10. Where to see the Queen (1954, January 21). Fern Tree Gully and District Times (Boronia, Vic. : 1953-1954), p. 5. Retrieved October 25, 2021, from http://nla.gov.au/nla.news-article264220429 “The Lilydale Shire President, Cr. Burgi, stated that the Royal train en route...27, Queen Elizabeth II was the first reigning British monarch to visit Australia.. She visited Victoria between March 1-10. Where to see the Queen (1954, January 21). Fern Tree Gully and District Times (Boronia, Vic. : 1953-1954), p. 5. Retrieved October 25, 2021, from http://nla.gov.au/nla.news-article264220429 “The Lilydale Shire President, Cr. Burgi, stated that the Royal train en route ...Believed to have been taken bewteen Croydon Railway Station and the Dorset Road bridge. Taken late afternnon by George Coop's father. There is a Landrover parked on the grass with a person standing on it - believed to be Security. George recalls originally being located closer to the fence and being ushered up the hill where it was 'safer' to stand. In 1954 at age 27, Queen Elizabeth II was the first reigning British monarch to visit Australia.. She visited Victoria between March 1-10. Where to see the Queen (1954, January 21). Fern Tree Gully and District Times (Boronia, Vic. : 1953-1954), p. 5. Retrieved October 25, 2021, from http://nla.gov.au/nla.news-article264220429 “The Lilydale Shire President, Cr. Burgi, stated that the Royal train en route for Warburton on Saturday, March 6th, would slow down at Croydon and Lilydale. There was little possibility that it would stop at either of these towns. The train would pass through Lilydale at 5.52 p.m. Council had appointed a sub-committee to arrange matters, and had allocated £400 towards expenses. It was suggested that the train slow down between the railway station and Dorset Rd. bridge at Croydon, and between the Cave Hill Quarry and railway station at Lilydale.” An album of images of the Queen's visit to Victoria is available on the PROV Flickr account at https://www.flickr.com/photos/public-record-office-victoria/7252885616Digital TIFF file Scan of Kopdak 620 black and white negative transparencygeorge coop collection, croydon, royal train -
 Eltham District Historical Society Inc
Photograph, George Burton Coop, The Royal Train enroute to Lilydale, near Croydon, 6 Mar. 1954
... 27, Queen Elizabeth II was the first reigning British monarch to visit Australia.. She visited Victoria between March 1-10. Where to see the Queen (1954, January 21). Fern Tree Gully and District Times (Boronia, Vic. : 1953-1954), p. 5. Retrieved October 25, 2021, from http://nla.gov.au/nla.news-article264220429 “The Lilydale Shire President, Cr. Burgi, stated that the Royal train en route...27, Queen Elizabeth II was the first reigning British monarch to visit Australia.. She visited Victoria between March 1-10. Where to see the Queen (1954, January 21). Fern Tree Gully and District Times (Boronia, Vic. : 1953-1954), p. 5. Retrieved October 25, 2021, from http://nla.gov.au/nla.news-article264220429 “The Lilydale Shire President, Cr. Burgi, stated that the Royal train en route ...Believed to have been taken bewteen Croydon Railway Station and the Dorset Road bridge. Taken late afternnon by George Coop's father. There is a Landrover parked on the grass with a person standing on it - believed to be Security. George recalls originally being located closer to the fence and being ushered up the hill where it was 'safer' to stand. In 1954 at age 27, Queen Elizabeth II was the first reigning British monarch to visit Australia.. She visited Victoria between March 1-10. Where to see the Queen (1954, January 21). Fern Tree Gully and District Times (Boronia, Vic. : 1953-1954), p. 5. Retrieved October 25, 2021, from http://nla.gov.au/nla.news-article264220429 “The Lilydale Shire President, Cr. Burgi, stated that the Royal train en route for Warburton on Saturday, March 6th, would slow down at Croydon and Lilydale. There was little possibility that it would stop at either of these towns. The train would pass through Lilydale at 5.52 p.m. Council had appointed a sub-committee to arrange matters, and had allocated £400 towards expenses. It was suggested that the train slow down between the railway station and Dorset Rd. bridge at Croydon, and between the Cave Hill Quarry and railway station at Lilydale.” An album of images of the Queen's visit to Victoria is available on the PROV Flickr account at https://www.flickr.com/photos/public-record-office-victoria/7252885616Digital TIFF file Scan of Kopdak 620 black and white negative transparencygeorge coop collection, croydon, royal train