Showing 23 items matching " shell depot"
-
 Glenelg Shire Council Cultural Collection
Photograph - Photograph - Bulk storage terminal, n.d
... ... Shell Depot...Black and white photograph of bulk oil storage terminal at Shell depot, taken from an elevated position....Glenelg Shire Council Cultural Collection History House Cliff Street Portland great-ocean-road Port of Portland Authority Archives Port of Portland Archives Bulk Oil Storage Shell Depot Black and white photograph of bulk oil storage terminal at Shell depot, taken from an elevated position. ...Port of Portland Authority Archivesport of portland archives, bulk oil storage, shell depot -
 Orbost & District Historical Society
black and white photograph, first half 20th century
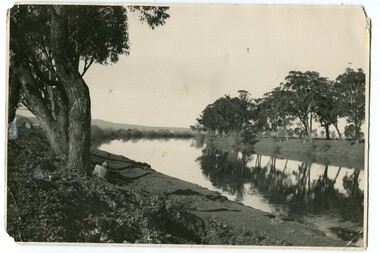
... In Orbost, the Fishers had a Shell fuel depot at the back of the bean factory. ...In Orbost, the Fishers had a Shell fuel depot at the back of the bean factory. ...The seed bean industry was a major industry in the Orbost district for the first half of the 20th century. The total area sown with beans for seed at Orbost was estimated to be about 1000 acres. Fisher Bros, grew or supervised the growing of approximately one quarter of the bean seed produced at Orbost, and, in addition, prepared for market and sold a considerable quantity for other growers. From Newsletter February 2015 : "the Fishers took over the old Butter Factory in Lochiel Street. They had sorting tables there in the 1920s. In Orbost, the Fishers had a Shell fuel depot at the back of the bean factory. The Fishers were very enterprising people, very smart. One of their uncles is supposed to have invented the knot that was used to tie the sheaves of hay in the fields. At their Lochend Barn, they had a Blackstone engine which ran on oil. They used to light a fire under it and hot it up to start it. This engine drove all the bean machinery in the barn" The seed bean industry was a major industry in the Orbost district for the first half of the 20th century. the Fisher Brothers were a significant part of that industry.A black / white photograph tajen from a river bank. On the right behind some trees is a barn. On the left between tres is a small building. Reflections can be seen in the water.on back - "Snowy River, Fisher barn on right. Mary Gilbert"bean-industry fisher-beans snowy-river -
 Bendigo Military Museum
Photograph - PHOTOGRAPHS WW1, FRAMED, All three, 19414 - 18
... Embark for Egypt 15.9.1915, on Gallipoli 7.12.1915, embark for France 25.3.1916, hospital 11.7.1916, with I.C.F Heel, rejoin unit 19.7.1916, WIA 16.8.1916 GSW right thigh severe, shell contusions back and shoulder, from there he moves through various convalescent depots and units until embark for Australia for discharge on 19.10.1918, discharged from the AIF 11.2.1919....Embark for Egypt 15.9.1915, on Gallipoli 7.12.1915, embark for France 25.3.1916, hospital 11.7.1916, with I.C.F Heel, rejoin unit 19.7.1916, WIA 16.8.1916 GSW right thigh severe, shell contusions back and shoulder, from there he moves through various convalescent depots and units until embark for Australia for discharge on 19.10.1918, discharged from the AIF 11.2.1919. photography-photographs military history B&W portraits of the Hindley brothers in uniform. ...John James Hindley No 2747 enlisted in the AIF on 2.7.1915 age 26 years 9 months. Embarked for Egypt 15.9.1915 then joined unit on Gallipoli 13.11.1915, hospital 14.12.1915 with Influenza, rejoin unit 22.12.1915, transfer to 4th machine Gun Coy 6.4.1916, embark for France 1.6.1916, reported WIA and missing reincourt 11.4.1917, reported POW, died while POW at Dulmen Germany 6.5.1917. Francis Grant Hindley No 790 enlisted in the AIF on 18.8.1914 age 19 years. Embark for Egypt 19.10.1914, embark for Gallipoli 5.4.1915, WIA 6.7.1915 with shock/concussion and then gets Influenza, rejoin unit 9.1.1916, transfer to 59th Batt 24.2.1916, transfer to 57th Batt 20.3.1916, embark for France 17.6.1916, transfer to 58th Batt 23.7.1916, promoted Sgt 1.4.1917, hospital with Scabies 21.7.1917, rejoin unit 25.7.1917, reverts to ranks 5.8.1917, promoted L/Cpl 15.9.1917, hospital 15.10.1917, with Haemorroids, rejoin unit 22.10 1917, embark for Australia 25.3.1918, discharged medically unfit 21.8.1918. Harold Hindley No 2570 enlisted in the AIF in 8th reinforcements 5th Batt on 8.7.1915 age 30 years 8 months. Embark for Egypt 15.9.1915, on Gallipoli 7.12.1915, embark for France 25.3.1916, hospital 11.7.1916, with I.C.F Heel, rejoin unit 19.7.1916, WIA 16.8.1916 GSW right thigh severe, shell contusions back and shoulder, from there he moves through various convalescent depots and units until embark for Australia for discharge on 19.10.1918, discharged from the AIF 11.2.1919.B&W portraits of the Hindley brothers in uniform. All items have dark green wooden frames. .1) John Hindley, full length standing, hands behind back with flowers and stairs in background. .2) Francis Hindley, full length standing with dog. .3) Harold Hindley, head and shoulders, photo is oval shaped.photography-photographs, military history -
 Bendigo Military Museum
Award - MEDAL SET WW1, WW2, Post 1919, post 1945
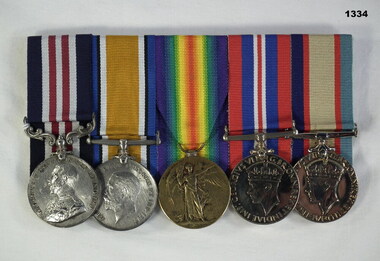
... shell fire and machine guns. Hospitalised on 20.10.18 with Influenza. Discharged from the AIF on 27.10.19. He enlisted again during WW11 on 24.4.41 for home service in the CMF, served in various Garrison Bn’s Ordnance and Salvage depots and was discharged on 18.1.45....shell fire and machine guns. Hospitalised on 20.10.18 with Influenza. Discharged from the AIF on 27.10.19. He enlisted again during WW11 on 24.4.41 for home service in the CMF, served in various Garrison Bn’s Ordnance and Salvage depots and was discharged on 18.1.45. ...John Thomas O'Bree (born Wood Wood Vic, enlisted Melbourne) Enlisted in 20th reinforcements 22nd Batt AIF on 4.7.16. As a Stretcher Bearer he was awarded a "Military Medal on 4.10.18 during an attack at Estrees east of Peronne. He worked without rest for 24 hours bringing out wounded lying helpless under concentrated shell fire and machine guns. Hospitalised on 20.10.18 with Influenza. Discharged from the AIF on 27.10.19. He enlisted again during WW11 on 24.4.41 for home service in the CMF, served in various Garrison Bn’s Ordnance and Salvage depots and was discharged on 18.1.45.Medal set, court mounted, set of (5) re J.T O'Bree. 1. Military Medal. 2. British War Medal 1914-18 3. Victory Medal 1914 - 19 4. War Medal 1939-45. 5. Australian Service Medal 1939 - 451 "6865 Pte J T O'Bree 22 Aust Inf" 2 & 3 "6865 Pte J T O'Bree 22 Bn" 4 & 5 "V13666 J T O'Bree"medals, military, history -
 Bendigo Military Museum
Photograph - PHOTOGRAPH WW1, FRAMED, C.1918
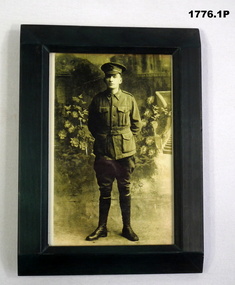
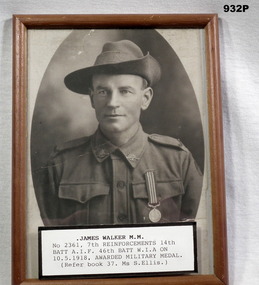
... Depot before joining the 7th reinforcements 14th Batt on 5.7.15. Embarked for Egypt 10.8.15, transfered to the 46th Batt 3.3.16, he is charged twice in Egypt before embarking for France on 2.6.16 and is charged twice more, one serious and is sentenced to 5 years Penal Servitude on 30.12.16. The penalty is reduced to 2 years hard labour on 2.2.17. He is released and rejoins his unit on 25.1.18. Somewhere between this date and 10.5.18 when he is WIA with Shell...Depot before joining the 7th reinforcements 14th Batt on 5.7.15. Embarked for Egypt 10.8.15, transfered to the 46th Batt 3.3.16, he is charged twice in Egypt before embarking for France on 2.6.16 and is charged twice more, one serious and is sentenced to 5 years Penal Servitude on 30.12.16. The penalty is reduced to 2 years hard labour on 2.2.17. He is released and rejoins his unit on 25.1.18. Somewhere between this date and 10.5.18 when he is WIA with Shell ...James Walker “MM” No 2361 AIF. (Born Melbourne, enlisted Seymour). Records are misleading but it appears he enlisted on 28.9.14 age 37 years and remained at Depot before joining the 7th reinforcements 14th Batt on 5.7.15. Embarked for Egypt 10.8.15, transfered to the 46th Batt 3.3.16, he is charged twice in Egypt before embarking for France on 2.6.16 and is charged twice more, one serious and is sentenced to 5 years Penal Servitude on 30.12.16. The penalty is reduced to 2 years hard labour on 2.2.17. He is released and rejoins his unit on 25.1.18. Somewhere between this date and 10.5.18 when he is WIA with Shell concussion he is awarded a Military Medal. He returns to Australia and is discharged medically unfit on 28.10.18. He dies in hospital on 2.1.1920. Framed photo of James Walker M.M, No 2361, 7th Reinforcements, 14th Battalion AIF, 46th Battalion, W.I.A. on 10/05/1918. Awarded Military Medal.Label at bottom has: "James Walker MM no 2361, 7th Reinforcements 14th Batt AIF. 46th Bn, WIA on 10/5/18, awarded Military Medal." On rear: "Photo Mrs Suzette Ellis"military history, photography - photographs - frame accessories, military medal -
 Ballarat Tramway Museum
Photograph - SECV Ballarat - operations - set of 8, George Stevens, 11/4/1971
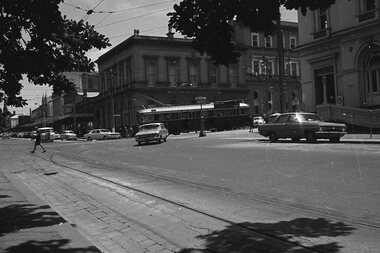
... Set of 8 Digital images, from slides taken by George Stevens on 11/4/1971: 1 - Tram 21 Hospital corner turning from the North side into Drummond St - has the Shell service station in the background 2 - Tram 26 Wendouree Parade at depot junction, with a Bliss Bomb advert and a pay-as-you-enter sign 3 - Tram 18 On depot fan 4 - Trams 33 and 30 33 was the AETA Tour Car, showing City, with 30 behind for Lydiard St Nth. ...Ballarat Tramway Museum South Gardens Reserve Wendouree Parade Ballarat Ballarat goldfields Set of 8 Digital images, from slides taken by George Stevens on 11/4/1971: 1 - Tram 21 Hospital corner turning from the North side into Drummond St - has the Shell service station in the background 2 - Tram 26 Wendouree Parade at depot junction, with a Bliss Bomb advert and a pay-as-you-enter sign 3 - Tram 18 On depot fan 4 - Trams 33 and 30 33 was the AETA Tour Car, showing City, with 30 behind for Lydiard St Nth. ...Set of 8 Digital images, from slides taken by George Stevens on 11/4/1971: 1 - Tram 21 Hospital corner turning from the North side into Drummond St - has the Shell service station in the background 2 - Tram 26 Wendouree Parade at depot junction, with a Bliss Bomb advert and a pay-as-you-enter sign 3 - Tram 18 On depot fan 4 - Trams 33 and 30 33 was the AETA Tour Car, showing City, with 30 behind for Lydiard St Nth. Both trams have Bliss bombs adverts and No. 33 an Eureka tile roof advert. 5 - Trams 33 and 30 Both trams are crossing Albert St, Sebastopol 6 - Trams 33 and 30. Both trams are northbound in Albert St 7 - Trams 33 and 30 Crossing 32 at the Bell St loop in Drummond St Sth. 8 - Tram 21 Southbound in Lydiard St Nth with level crossing in the background. Yields information about the tramcars used on 11/4/1971 and the various locations around the system.Set of 8 digital images scanned from slides.tramways, tram 33, tram 30, lydiard st nth, level crossing, albert st, bell st loop, drummond st sth, depot junction, tram 18, depot, aeta tour, tram 21, hospital corner -
 Ballarat Tramway Museum
Photograph - SECV Ballarat - operations - set of 17, George Stevens, 4/12/1968
... Has the Commonwealth Bank building in the background and the newsagent kiosk 6 - Trams 36 & 11 At Depot Junction 7 - Tram Scrubber On 0 road by the Tennis court fence 8 - Tram 40 On the depot fan 9 - Tram 30 In Wendouree Parade near at View Point 10 - Tram 28 At Hospital Corner with the Southern Cross Hotel in the background 11 - Tram 42 Passing Ballarat City Fire station 12 - Tram 28 At the City tram stop, with the destination of Grey St. Has two SEC cooking roof adverts' 13 - Tram 40 Northbound in Drummond St North 14 - Tram 40 Turning from Drummond St Nth into MacArthur St with a Shell...Has the Commonwealth Bank building in the background and the newsagent kiosk 6 - Trams 36 & 11 At Depot Junction 7 - Tram Scrubber On 0 road by the Tennis court fence 8 - Tram 40 On the depot fan 9 - Tram 30 In Wendouree Parade near at View Point 10 - Tram 28 At Hospital Corner with the Southern Cross Hotel in the background 11 - Tram 42 Passing Ballarat City Fire station 12 - Tram 28 At the City tram stop, with the destination of Grey St. Has two SEC cooking roof adverts' 13 - Tram 40 Northbound in Drummond St North 14 - Tram 40 Turning from Drummond St Nth into MacArthur St with a Shell ...Set of 17 Digital images, from negatives taken by George Stevens on 4/12/1968 1 - Tram 42 Turning from Sturt St into Lydiard St Nth with ANZ Bank in the background 2 - Tram 30 Crossing Lydiard St with the destination of View Point 3 - Tram 37 Turning from Lydiard St Nth into Sturt St 4 - Tram 28 At the City tram stop 5 - Tram 20 Crossing Lydiard St in Sturt St. Has the Commonwealth Bank building in the background and the newsagent kiosk 6 - Trams 36 & 11 At Depot Junction 7 - Tram Scrubber On 0 road by the Tennis court fence 8 - Tram 40 On the depot fan 9 - Tram 30 In Wendouree Parade near at View Point 10 - Tram 28 At Hospital Corner with the Southern Cross Hotel in the background 11 - Tram 42 Passing Ballarat City Fire station 12 - Tram 28 At the City tram stop, with the destination of Grey St. Has two SEC cooking roof adverts' 13 - Tram 40 Northbound in Drummond St North 14 - Tram 40 Turning from Drummond St Nth into MacArthur St with a Shell service station in the background 15 - Tram 40 In Wendouree Parade near Haddon St 16 - Tram 37 Northbound in Drummond St South for Lydiard St North 17 - Tram 41 Crossing the level crossing with a Trotting Bray Raceway Auxiliary board. Yields information about the tramcars used on 4/12/1968 and the various locations around the system.Set of 17 digital images scanned from black and white negatives.tramways, sturt st, sebastopol, albert st, drummond st nth, wendouree parade, mt pleasant, barkly st, skipton st, level crossing, tram 42, tram 30, tram 37, lydiard st nth, tram 28, tram 36, tram 11, tram 40, hospital corner -
 Ballarat Tramway Museum
Photograph - Geelong Tramway MESCo Conductors
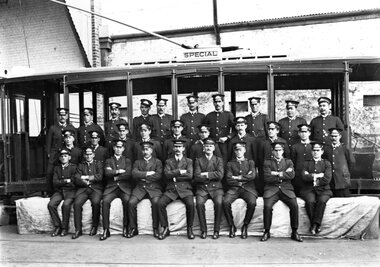
... Melbourne Electric Supply Company tramway Conductors at the depot in Geelong with one of the summer cars, 11 or 12, behind. Three Inspectors are in the centre of front row. At the far left is an upturned can of Shell benzine that fueled the company's three buses which ran from 1912 until 1923. ...Ballarat Tramway Museum South Gardens Reserve Wendouree Parade Ballarat Ballarat goldfields Melbourne Electric Supply Company tramway Conductors at the depot in Geelong with one of the summer cars, 11 or 12, behind. Three Inspectors are in the centre of front row. At the far left is an upturned can of Shell benzine that fueled the company's three buses which ran from 1912 until 1923. ...Melbourne Electric Supply Company tramway Conductors at the depot in Geelong with one of the summer cars, 11 or 12, behind. Three Inspectors are in the centre of front row. At the far left is an upturned can of Shell benzine that fueled the company's three buses which ran from 1912 until 1923. The date of the photograph is between 1916 and 1923 as the Inspector on the right was a Motorman in a photograph taken in 1916.Black and white print on paper.,The No. 1 in a circle written in ink on the reverse. GRS710/21/1/3 and 21-3, written in pencil on the reverse.melbourne electric supply co. conductors, geelong tramway conductor, geelong tramway inspector, geelong summer car nos. 11 and 12 -
 Ballarat Tramway Museum
Newspaper, State Electricity Commission of Victoria (SEC) and The Courier Ballarat, Tram future rests with Government, Feb. 1962
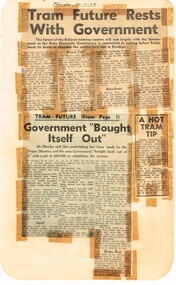
... Also notes Cr Tuppen of Sebastopol. 3 - "A hot tram tip" - 22-2-62 - suggestion by Cr Cooper suggested the tram be retained around the lake for Historical reasons, Mr Murray of the SEC, sell/give to the Historical Society, Cr W E Roff replied about not wanting them and put them in a tip. 7940.2 1 - "SEC Not to sell this - 20-2-62 - photo of the power house in Ripon St, with the caption that the SEC did not propose to sell the property, but would be selling the tram depot site. 2 - "The talk was trams" - 22-2-62 - photo of Mr Mawby, Cr A D Mason, H Linaker and Mr K L Murray at the meeting with Council the previous day. 3 - "Save our Trams" - 21-2-62 - long letter - about the closing the trams and railway losses including building, new rail lines being built. 4 - "Tram fight" - letter by R Courtney Union Secretary, about the formation of a Committee to oppose closure. 7940.3 "Sound Shell Plan+ - 21-2-62 - Long editorial about the construction of a Sound Shell and council discussions and inability to make a decision....Also notes Cr Tuppen of Sebastopol. 3 - "A hot tram tip" - 22-2-62 - suggestion by Cr Cooper suggested the tram be retained around the lake for Historical reasons, Mr Murray of the SEC, sell/give to the Historical Society, Cr W E Roff replied about not wanting them and put them in a tip. 7940.2 1 - "SEC Not to sell this - 20-2-62 - photo of the power house in Ripon St, with the caption that the SEC did not propose to sell the property, but would be selling the tram depot site. 2 - "The talk was trams" - 22-2-62 - photo of Mr Mawby, Cr A D Mason, H Linaker and Mr K L Murray at the meeting with Council the previous day. 3 - "Save our Trams" - 21-2-62 - long letter - about the closing the trams and railway losses including building, new rail lines being built. 4 - "Tram fight" - letter by R Courtney Union Secretary, about the formation of a Committee to oppose closure. 7940.3 "Sound Shell Plan+ - 21-2-62 - Long editorial about the construction of a Sound Shell and council discussions and inability to make a decision. ...Yields information about the views of various letter writers, views of the Courier, union views, rehabilitation costs Geelong, public meetings and meetings with SEC.Set of three Foolscap sheet of plain paper, with rounded corners, with newspaper cuttings, concerning the mooted closure of the Ballarat Tram system 20 Feb and 22 Feb 1962. All from The Courier, unless noted otherwise. 7940.1 1 - "Tram future rests with Government" - 22-2-62 - news report about the SEC being insistent on tabling the motion to close in Parliament, price of replacement trams. Attending Mr K L Murray, Mr Linaker, Mr A V Mawby of the SEC, Cr. A Pittard and Town Clerk Mr. H H Maddern. 2 - "Government "Bought itself out" - continuation from above, quoting Mr Mawby about the rehabilitation of the system in 1934 by the Government, discussions about fares, losses, time of travel from Sebastopol compared to buses. Also notes Cr Tuppen of Sebastopol. 3 - "A hot tram tip" - 22-2-62 - suggestion by Cr Cooper suggested the tram be retained around the lake for Historical reasons, Mr Murray of the SEC, sell/give to the Historical Society, Cr W E Roff replied about not wanting them and put them in a tip. 7940.2 1 - "SEC Not to sell this - 20-2-62 - photo of the power house in Ripon St, with the caption that the SEC did not propose to sell the property, but would be selling the tram depot site. 2 - "The talk was trams" - 22-2-62 - photo of Mr Mawby, Cr A D Mason, H Linaker and Mr K L Murray at the meeting with Council the previous day. 3 - "Save our Trams" - 21-2-62 - long letter - about the closing the trams and railway losses including building, new rail lines being built. 4 - "Tram fight" - letter by R Courtney Union Secretary, about the formation of a Committee to oppose closure. 7940.3 "Sound Shell Plan+ - 21-2-62 - Long editorial about the construction of a Sound Shell and council discussions and inability to make a decision.closure, letter to the editor, editorial, sec, rehabilitation, staff, buses, concession fares, museum, power station, ballarat a power station, botanical gardens -
 Melbourne Tram Museum
Photograph - Tram Tracks at various locations - set of 3, Melbourne & Metropolitan Tramways Board (MMTB), 1960s
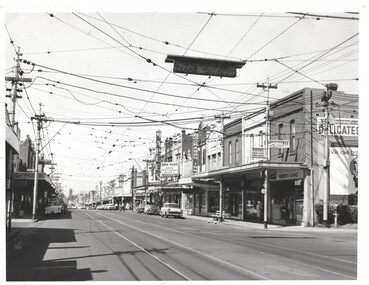
... Shell Service station is visible on the left side of the photo and Milk bar on the right. Demonstrates the work of the MMTB to show various arrangements of roads and tram tracks. tramways motor traffic Glenferrie Road Malvern Depot West Coburg Bell St St Georges Road Image 1 - MMTB stamp P250.765 image 3 - MMTB stamp P257.1898 Black and white print with notes on the rear Photograph Tram Tracks at various locations - set of 3 Melbourne & Metropolitan Tramways Board (MMTB) ...Set of 3 photos showing tramway tracks and the road environment at various locations 1 - Glenferrie Road, Malvern Depot entrance looking south - Coldblo Road, showing the illuminated overhead "Trams crossing sign". In the background is Maples electrical store advertising Kelvinator, Dragon Inn, and a Greek small goods store. 2 - West Coburg terminus at Bell St - showing the end of the track arrangements, including a traffic light. In the background is a Continental Grocer, Tony's Fish Shop, JJ & TG Leech newsagent, and a Continental Butcher. Adverts for Winfield, Alimentari, Coca Cola, Doug Thorley caravans, The Age, The Sun, Herald, Sporting Globe, Macelleria. Note the newspaper stand by the traffic light. 3 - St Georges Road looking south over Normandy Road Thornbury - shows the tram track layout prior to the separation of the tracks on either side of the Median strip. A Shell Service station is visible on the left side of the photo and Milk bar on the right.Demonstrates the work of the MMTB to show various arrangements of roads and tram tracks.Black and white print with notes on the rearImage 1 - MMTB stamp P250.765 image 3 - MMTB stamp P257.1898tramways, motor traffic, glenferrie road, malvern depot, west coburg, bell st, st georges road -
 National Vietnam Veterans Museum (NVVM)
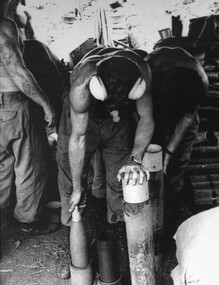
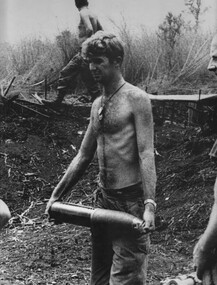
Photograph, Gibbons, Denis, Preparing Shells 1
... shells for firing. The battery was in action against NVA/VietCong sappers attempting to attack the giant US supply depot at Long Binh in Bien Hoa province during the 1969 Tet Offensive...Depot Denis Gibbons A black and white photograph of Gnr. Mike Longley and Gnr Charlie Hayden, of 104 Battery Royal Australian Artillery, at Fire Base "Betty" in the ammunition bunker preparing shells for firing. ...Denis Gibbons (1937 – 2011) Trained with the Australian Army, before travelling to Vietnam in January 1966, Denis stayed with the 1st Australian Task Force in Nui Dat working as a photographer. For almost five years Gibbons toured with nine Australian infantry battalions, posting compelling war images from within many combat zones before being flown out in late November 1970 after sustaining injuries. The images held within the National Vietnam Veterans Museum make up the Gibbons Collection.A black and white photograph of Gnr. Mike Longley and Gnr Charlie Hayden, of 104 Battery Royal Australian Artillery, at Fire Base "Betty" in the ammunition bunker preparing shells for firing. The battery was in action against NVA/VietCong sappers attempting to attack the giant US supply depot at Long Binh in Bien Hoa province during the 1969 Tet Offensivephotograph, gnr charlie hayden, gnr mike longley, 104 battery raa, fire base betty, nva/vc, long binh, bien hoa, tet offensive, 1969, gibbons collection catalogue, ammunition bunker, nva/vietcong sappers, us supply depot, denis gibbons -
 National Vietnam Veterans Museum (NVVM)
Photograph, Gibbons, Denis, Fire Mission 3
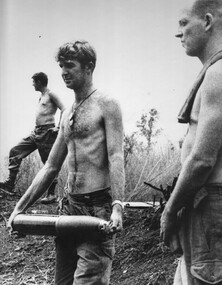
... shell to the gun at Fire Support Base Betty. The battery was in action against NVA/VietCong sappers attempting to breach the US Army Supply Depot at Long Binh in Bien Hoa Province during the 1969 Tet Offensive...Photograph Sgt Peter Tilbrook Gnr Jim Dunn 104 Battery RAA Long Binh Bien Hoa Province Fire Base Betty Tet Offensive 1969 Gibbons Collection Catalogue Denis Gibbons NVA/VietCong Sappers US Army Supply Depot A black and white photograph of Gnr Jim Dunn, watched by Stg Pete Tilbrook, of 104 Battery RAA, carries a 105mm shell to the gun at Fire Support Base Betty. ...Denis Gibbons (1937 – 2011) Trained with the Australian Army, before travelling to Vietnam in January 1966, Denis stayed with the 1st Australian Task Force in Nui Dat working as a photographer. For almost five years Gibbons toured with nine Australian infantry battalions, posting compelling war images from within many combat zones before being flown out in late November 1970 after sustaining injuries. The images held within the National Vietnam Veterans Museum make up the Gibbons Collection.A black and white photograph of Gnr Jim Dunn, watched by Stg Pete Tilbrook, of 104 Battery RAA, carries a 105mm shell to the gun at Fire Support Base Betty. The battery was in action against NVA/VietCong sappers attempting to breach the US Army Supply Depot at Long Binh in Bien Hoa Province during the 1969 Tet Offensivephotograph, sgt peter tilbrook, gnr jim dunn, 104 battery raa, long binh, bien hoa province, fire base betty, tet offensive, 1969, gibbons collection catalogue, denis gibbons, nva/vietcong sappers, us army supply depot -
 National Vietnam Veterans Museum (NVVM)
Photograph, Gibbons, Denis, Preparing Shells 2
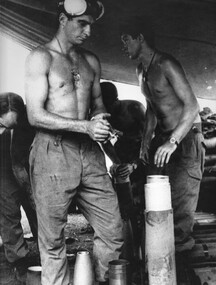
... shells for firing. The battery was in action against NVA/VietCong sappers attempting to attack the giant US supply depot at Long Binh in Bien Hoa Province during the 1969 Tet Offensive...Photograph 104 Battery RAA Gnr Mike Longley Gnr Charlie Hayden Fire Base Betty NVA/VC Bien Hoa Province Tet Offensive 1969 Gibbons Collection Catalogue Royal Australian Artillery Ammunition Bunker NVA/VietCong Sappers US Supply Depot Denis Gibbons Gunners A black and white of Gnr Mike Longley and Gnf Charlie Hayden, 104 Battery Royal Australian Artillery, at Fire Base Betty in the ammunition bunker preparing shells for firing. ...Denis Gibbons (1937 – 2011) Trained with the Australian Army, before travelling to Vietnam in January 1966, Denis stayed with the 1st Australian Task Force in Nui Dat working as a photographer. For almost five years Gibbons toured with nine Australian infantry battalions, posting compelling war images from within many combat zones before being flown out in late November 1970 after sustaining injuries. The images held within the National Vietnam Veterans Museum make up the Gibbons Collection.A black and white of Gnr Mike Longley and Gnf Charlie Hayden, 104 Battery Royal Australian Artillery, at Fire Base Betty in the ammunition bunker preparing shells for firing. The battery was in action against NVA/VietCong sappers attempting to attack the giant US supply depot at Long Binh in Bien Hoa Province during the 1969 Tet Offensivephotograph, 104 battery raa, gnr mike longley, gnr charlie hayden, fire base betty, nva/vc, bien hoa province, tet offensive, 1969, gibbons collection catalogue, royal australian artillery, ammunition bunker, nva/vietcong sappers, us supply depot, denis gibbons, gunners -
 National Vietnam Veterans Museum (NVVM)
Photograph, Gibbons, Denis, Ramming a Shell Home
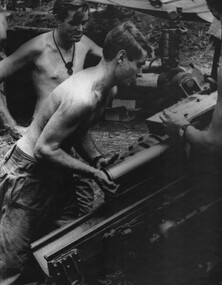
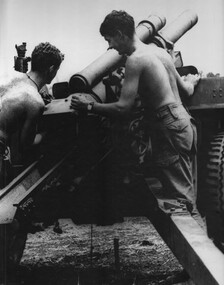
... A black and white photograph of Gnr Alan Muston rams a shell home watched by Gnr Dave Thomas 104 Battery Royal Australian Artillery, at Fire Base Betty. The battery was in action against NVA/VietCong sappers attempting to beach the US Army Supply Depot at Long Binh in Bien Hoa Province during the 1969 Tet Offensive...Photograph Gnr Dave Thomas Gnr Alan Muston 104 Battery RAA Fire Base Betty NVA/VC Long Binh Bien Hoa Province Gibbons Collection Catalogue Denis Gibbons Royal Australian Artillery NVA/VietCong Sappers US Army Supply Depot Tet Offensive 1969 A black and white photograph of Gnr Alan Muston rams a shell home watched by Gnr Dave Thomas 104 Battery Royal Australian Artillery, at Fire Base Betty. ...Denis Gibbons (1937 – 2011) Trained with the Australian Army, before travelling to Vietnam in January 1966, Denis stayed with the 1st Australian Task Force in Nui Dat working as a photographer. For almost five years Gibbons toured with nine Australian infantry battalions, posting compelling war images from within many combat zones before being flown out in late November 1970 after sustaining injuries. The images held within the National Vietnam Veterans Museum make up the Gibbons Collection.A black and white photograph of Gnr Alan Muston rams a shell home watched by Gnr Dave Thomas 104 Battery Royal Australian Artillery, at Fire Base Betty. The battery was in action against NVA/VietCong sappers attempting to beach the US Army Supply Depot at Long Binh in Bien Hoa Province during the 1969 Tet Offensivephotograph, gnr dave thomas, gnr alan muston, 104 battery raa, fire base betty, nva/vc, long binh, bien hoa province, gibbons collection catalogue, denis gibbons, royal australian artillery, nva/vietcong sappers, us army supply depot, tet offensive, 1969 -
 National Vietnam Veterans Museum (NVVM)
Photograph, Gibbons, Denis, Fire Mission 4
... shell to the gun at Fire Support Base "Betty". The battery was in action against NVA/VietCong sappers attempting to breach the giant US Army Supply Depot at Long Binh in Bien Hoa Province during the Tet Offensive 1969....Photograph 104 Battery RAA Gnr Jim Dunn NVA/VC Long Binh Bien Hoa Province Tet Offensive 1969 Gibbons Collection Catalogue 105mm Artillery Fire Support Base Betty NVA/VietCong US Army Supply Depot Royal Australian Airforce Denis Gibbons A black and white photograph of Gnr Jim Dunn, 104 Battery Royal Australian Artillery, carries a 105mm shell to the gun at Fire Support Base "Betty". ...Denis Gibbons (1937 – 2011) Trained with the Australian Army, before travelling to Vietnam in January 1966, Denis stayed with the 1st Australian Task Force in Nui Dat working as a photographer. For almost five years Gibbons toured with nine Australian infantry battalions, posting compelling war images from within many combat zones before being flown out in late November 1970 after sustaining injuries. The images held within the National Vietnam Veterans Museum make up the Gibbons Collection.A black and white photograph of Gnr Jim Dunn, 104 Battery Royal Australian Artillery, carries a 105mm shell to the gun at Fire Support Base "Betty". The battery was in action against NVA/VietCong sappers attempting to breach the giant US Army Supply Depot at Long Binh in Bien Hoa Province during the Tet Offensive 1969.photograph, 104 battery raa, gnr jim dunn, nva/vc, long binh, bien hoa province, tet offensive, 1969, gibbons collection catalogue, 105mm artillery, fire support base betty, nva/vietcong, us army supply depot, royal australian airforce, denis gibbons -
 National Vietnam Veterans Museum (NVVM)
Photograph, Gibbons, Denis, Fire Mission 6
... A black and white photograph of a 104 Battery, Royal Australian Artillery Gunner , rams a shell home while the gun is readied for firing at Fire Support Base "Betty".. The battery was in action against NVA/VietCong sappers attempting to breach the US supply depot at Long Binh in Bien Hoa Province during the Tet Offensive 1969...Photograph 104 Battery Fire Base Betty RAA NVA/VC Long Binh Bien Hoa Province Tet Offensive 1969 Gibbons Collection Catalogue Gunner Royal Australian Artillery NVA Viet Cong NVA/VietCong Sappers US Supply Depot Denis Gibbons A black and white photograph of a 104 Battery, Royal Australian Artillery Gunner , rams a shell home while the gun is readied for firing at Fire Support Base "Betty".. ...Denis Gibbons (1937 – 2011) Trained with the Australian Army, before travelling to Vietnam in January 1966, Denis stayed with the 1st Australian Task Force in Nui Dat working as a photographer. For almost five years Gibbons toured with nine Australian infantry battalions, posting compelling war images from within many combat zones before being flown out in late November 1970 after sustaining injuries. The images held within the National Vietnam Veterans Museum make up the Gibbons Collection.A black and white photograph of a 104 Battery, Royal Australian Artillery Gunner , rams a shell home while the gun is readied for firing at Fire Support Base "Betty".. The battery was in action against NVA/VietCong sappers attempting to breach the US supply depot at Long Binh in Bien Hoa Province during the Tet Offensive 1969photograph, 104 battery, fire base betty, raa, nva/vc, long binh, bien hoa province, tet offensive, 1969, gibbons collection catalogue, gunner, royal australian artillery, nva viet cong, nva/vietcong sappers, us supply depot, denis gibbons -
 Lilydale RSL Sub Branch
Photograph, William John Chauvin (3044) (Private)
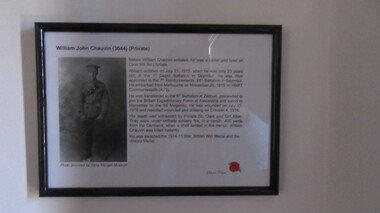
... Depot Battalion in Seymour. He was then appointed to the 7th Reinforcements, 24th Battalion in Seymour. He embarked from Melbourne on November 20, 1915 on HMAT Commonwealth (A73) He was transferred to the 8th Battalion at Zeitoun, proceeded to join the British Expeditionary Force at Alexandria and sailed to Marseilles on the SS Megantic. He was wounded on July 25,1916 and reported wounded and missing on October 4,1916. His death was witnessed by Private GL. Clark and GH Allen. They were under enfilade artillery fire, 400 yards from the Germans, when a shell...Depot Battalion in Seymour. He was then appointed to the 7th Reinforcements, 24th Battalion in Seymour. He embarked from Melbourne on November 20, 1915 on HMAT Commonwealth (A73) He was transferred to the 8th Battalion at Zeitoun, proceeded to join the British Expeditionary Force at Alexandria and sailed to Marseilles on the SS Megantic. He was wounded on July 25,1916 and reported wounded and missing on October 4,1916. His death was witnessed by Private GL. Clark and GH Allen. They were under enfilade artillery fire, 400 yards from the Germans, when a shell ...Before William Chauvin enlisted he was a carter and lived on Cave Hill Rd Lilydale. William enlisted on July 21,1915 when he was only 23 years old, in the 1st Depot Battalion in Seymour. He was then appointed to the 7th Reinforcements, 24th Battalion in Seymour. He embarked from Melbourne on November 20, 1915 on HMAT Commonwealth (A73) He was transferred to the 8th Battalion at Zeitoun, proceeded to join the British Expeditionary Force at Alexandria and sailed to Marseilles on the SS Megantic. He was wounded on July 25,1916 and reported wounded and missing on October 4,1916. His death was witnessed by Private GL. Clark and GH Allen. They were under enfilade artillery fire, 400 yards from the Germans, when a shell landed in the trench. William Chauvin was killed instantly. He was awarded the 1914-15 Star, British War Medal and the Victory Medal. Framed photocopy and precis of photograph William John Chauvin -
 Melbourne Tram Museum
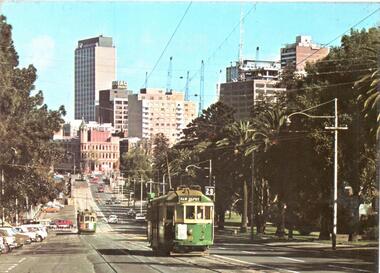
Postcard, Murfett Publishers, W2 509 outbound in Wellington Parade Melbourne, early 1980's
... Depot and route 29. In the background is a hoarding for the construction of the Melbourne Underground loop - indicates the photo taken late 1970's or early 1980's. Note the building on the corner of Spring and Flinders St, prior to the construction of Shell House mid 1980's. ...Depot and route 29. In the background is a hoarding for the construction of the Melbourne Underground loop - indicates the photo taken late 1970's or early 1980's. Note the building on the corner of Spring and Flinders St, prior to the construction of Shell House mid 1980's. ...Postcard - full colour, Divided back type of W2 509 outbound in Wellington Parade Melbourne. Two other trams are in the view. Tram has the destination of Kew Depot and route 29. In the background is a hoarding for the construction of the Melbourne Underground loop - indicates the photo taken late 1970's or early 1980's. Note the building on the corner of Spring and Flinders St, prior to the construction of Shell House mid 1980's. Note at this time Wellington Parade was only available for through motor traffic out of the city. published by National View by Murfett Publishers Australia. Has the details on the rear with place for stamp, address etc and logo.trams, tramways, wellington parade, kew depot, route 29, spring st, flinders st, tram 509 -
 Melbourne Tram Museum
Negative - Set of 3, Wal Jack, 19/01/1941 12:00:00 AM
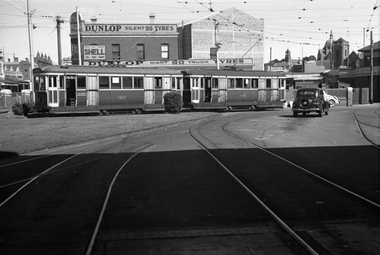
... Depot, 19/1/1941. In the background is a building advertising Castrol Oil, Dunlop tyres and Shell petrol and D&J Evans Hardware Merchants....Depot, 19/1/1941. In the background is a building advertising Castrol Oil, Dunlop tyres and Shell petrol and D&J Evans Hardware Merchants. ...Set of three Black and white negative by Wal Jack of Q148 and Q192 in the yard at Camberwell Depot, 19/1/1941. In the background is a building advertising Castrol Oil, Dunlop tyres and Shell petrol and D&J Evans Hardware Merchants.trams, tramways, camberwell depot, q class, tram 148, tram 192 -
 Melbourne Tram Museum
Negative - Q 200 Workers special, Hugh Ballment, c1954
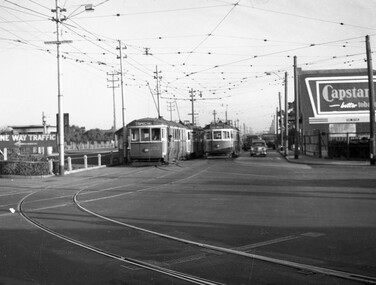
... This site later became a Shell service station. The track in the foreground leads into the Thornbury Depot. ...This site later became a Shell service station. The track in the foreground leads into the Thornbury Depot. ...The photograph shows Q class tram 200 in St Georges Road alongside a SW6 class car possibly No 896 (East Preston route 9) and another sliding door tram is running a route 9A ahead of No 200. Q 200 is running a special service to West Preston for Preston Workshops employees - see image of the photo sleave. On the right hand side of the photo is an advert for Capstan cigarettes. This site later became a Shell service station. The track in the foreground leads into the Thornbury Depot. Q 200 was withdrawn in 1955 and sold in 1957. Note the one-way traffic sign for southbound motor vehicle traffic in St Georges Road. See item 8997 for a subsequent photograph. Photo c1954.Yields information about the of a tram to operate a special service for Preston Workshops workers to West Preston.Negative - 127 film black and white and image of the photo sleeve.Photo sleeve in red ink "H.Ballment Coll. MMTB Q200 St Georges Road, Thornbury running 415pm down workers PWS Special to West Preston"tramways, preston workshops, tram 200, q class, st georges road, miller st, trams, sw6 class, thornbury depot, special trams -
 Melbourne Tram Museum
Negative, Wal Jack, c1950
... Black and white negative, by Wal Jack, Q class 190 in the shunt at Camberwell Depot. Behind the tram is a building advertising Shell and Ampol. ...Depot. Behind the tram is a building advertising Shell and Ampol. ...Black and white negative, by Wal Jack, Q class 190 in the shunt at Camberwell Depot. Behind the tram is a building advertising Shell and Ampol. Tram in Chocolate and cream paint scheme and looks in poor condition. See Reg Item 3435i2 - Charles Craig and TAP343_190 by Jack Strangertrams, tramways, camberwell depot, q class, tram 190 -
 Melbourne Tram Museum
Photograph - Set of 11 - Melbourne trams c1970, Norm Cross, 1970s
... Set of 11 colour photographs of Melbourne trams by Norm Cross. 1 - Tram W2 550 - Truganini Road with adverts for HMV, Channel 9 and CU. 2 - Tram W2 268 - Brunswick St - with a board on the front bumper celebrating 50 years of the tram 3 - Tram W2 411 Victoria Parade and St Vincent's Hospital with adverts for National TV, and AAMI 4 - Tram SW6 902 St Kilda Road and High St. with an advert for Jigglers tea bags and Courage draught beer, 5 - Tram W2 432 Turganini Road - AVCO Finance Co and Heinz baked beans. 6 - Tram W2 241, Swanston St (East Malvern Darling Road, route 3) with Heinz baked beans side advert. 7 - tram W5 781, St Georges Road (route 9) with a Shell motor oil advert in the background. 8 - tram W5 825, St Georges Road with a Shumberland advert 9 - tram W2 631, Victoria Parade, route 10 with St Vincents in the background. 10 - tram W3 class 657, Brunswick Depot with route 2A, St Kilda Beach showing and a Princes Curtain/drape cleaning service. 11 - tram L class 103, running out at Essendon Depot,...Melbourne Tram Museum 8 Wallen Road Hawthorn melbourne Set of 11 colour photographs of Melbourne trams by Norm Cross. 1 - Tram W2 550 - Truganini Road with adverts for HMV, Channel 9 and CU. 2 - Tram W2 268 - Brunswick St - with a board on the front bumper celebrating 50 years of the tram 3 - Tram W2 411 Victoria Parade and St Vincent's Hospital with adverts for National TV, and AAMI 4 - Tram SW6 902 St Kilda Road and High St. with an advert for Jigglers tea bags and Courage draught beer, 5 - Tram W2 432 Turganini Road - AVCO Finance Co and Heinz baked beans. 6 - Tram W2 241, Swanston St (East Malvern Darling Road, route 3) with Heinz baked beans side advert. 7 - tram W5 781, St Georges Road (route 9) with a Shell motor oil advert in the background. 8 - tram W5 825, St Georges Road with a Shumberland advert 9 - tram W2 631, Victoria Parade, route 10 with St Vincents in the background. 10 - tram W3 class 657, Brunswick Depot with route 2A, St Kilda Beach showing and a Princes Curtain/drape cleaning service. 11 - tram L class 103, running out at Essendon Depot, Yields information about various Melbourne trams in the 1970s. trams tramways W2 class St Kilda Road SW6 class tram 550 tram 268 tram 411 tram 902 Truganini Rd Brunswick St Victoria Parade Carnegie Swanston St tram 431 tram 241 W5 class tram 781 tram 825 W3 class L class tram 103 tram 657 tram 631 Colour print with plain back, rounded corners - set of four Photograph Set of 11 - Melbourne trams c1970 Norm Cross ...Set of 11 colour photographs of Melbourne trams by Norm Cross. 1 - Tram W2 550 - Truganini Road with adverts for HMV, Channel 9 and CU. 2 - Tram W2 268 - Brunswick St - with a board on the front bumper celebrating 50 years of the tram 3 - Tram W2 411 Victoria Parade and St Vincent's Hospital with adverts for National TV, and AAMI 4 - Tram SW6 902 St Kilda Road and High St. with an advert for Jigglers tea bags and Courage draught beer, 5 - Tram W2 432 Turganini Road - AVCO Finance Co and Heinz baked beans. 6 - Tram W2 241, Swanston St (East Malvern Darling Road, route 3) with Heinz baked beans side advert. 7 - tram W5 781, St Georges Road (route 9) with a Shell motor oil advert in the background. 8 - tram W5 825, St Georges Road with a Shumberland advert 9 - tram W2 631, Victoria Parade, route 10 with St Vincents in the background. 10 - tram W3 class 657, Brunswick Depot with route 2A, St Kilda Beach showing and a Princes Curtain/drape cleaning service. 11 - tram L class 103, running out at Essendon Depot,Yields information about various Melbourne trams in the 1970s.Colour print with plain back, rounded corners - set of fourtrams, tramways, w2 class, st kilda road, sw6 class, tram 550, tram 268, tram 411, tram 902, truganini rd, brunswick st, victoria parade, carnegie, swanston st, tram 431, tram 241, w5 class, tram 781, tram 825, w3 class, l class, tram 103, tram 657, tram 631 -
 Melbourne Tram Museum
Slide - MMTB, KCR, Yarra and MTA, tramway operations set of 12, Hugh Ballment, 1950s to 1990s
... Depot into High Street South. HBM130 - Yarra Tram 866, cNov 1997, Spencer St, City Circle livery, at Bourke St. In the background is the Spencer St station building. HBM131 - KCR, cNov1997, ComEng Dandenong, Tuen Mun tram, Hong Kong, in the water testing bay. With a Comeng train shell...Depot into High Street South. HBM130 - Yarra Tram 866, cNov 1997, Spencer St, City Circle livery, at Bourke St. In the background is the Spencer St station building. HBM131 - KCR, cNov1997, ComEng Dandenong, Tuen Mun tram, Hong Kong, in the water testing bay. With a Comeng train shell ...Set of 12 photos by Hugh Ballment, unless noted, of MMTB, KCR, MTA and Yarra trams: HBM127 - MTA Tram 2, cNov 1997, Swanston St, northbound, near Lonsdale Street HBM128 - MTA SW5 class tram No. 848, April 1988, High Street South, Kew, Near back road Kew depot HBM129 - MTA A Class trams No.235, 251, Apr 1988, High Street South, Kew at Barkers Road, shows the east exit track from the Kew Depot into High Street South. HBM130 - Yarra Tram 866, cNov 1997, Spencer St, City Circle livery, at Bourke St. In the background is the Spencer St station building. HBM131 - KCR, cNov1997, ComEng Dandenong, Tuen Mun tram, Hong Kong, in the water testing bay. With a Comeng train shell alongside. HBM132 - MTA Tram 2040, cNov1997, Spencer St, at Latrobe Street, with the Australia Post and the Remand Centre buildings in the background. Tram has an advertisment for Bertocchi. HBM133 - MTA Tram 2023, cNov1997, Bourke Street, at Elizabeth Street with London Stores, and Roger David in the background. HBM134 - MTA Tram 169, cNov1997, Queensbridge, running a route 55 Domain & St Kilda Road service. In the background are the National Mutual, Port Authority, and National Bank buildings. A Comeng train is on the viaduct HBM135 -, cNov 1997, East Camberwell, ComEng train HBM136 - MTA Tram 276, Apr 1988, Collins Street, At Spring Street, running a route 109 to Mont Albert. HBM137 - MTA B class tram No. 2002, and A class tram No. 284, c1997?, Clarendon Street, South Melbourne, running each Route 96 to St Kilda and Route 109 to Mont Albert, respectively. Has a large Crown Casino and Planet Hollywood signs in the background. HBM138 - MMTB Trams 934, 252, 1950s, Batman Ave, RAAF tram, leaving for Burwood route 74. Has a route 72. W2 class tram behind. Yields information about Melbourne tram operations, with 1950s to 1980s photos of Melbourne tramways.Kodachrome cardboard and plastic mounts, with notes - set of 12new tramway, elizabeth st, flinders st, kew depot, bourke st, swanston st, tram 2, tram 848, tram 235, tram 251, tram 866, spencer st, city circle, tram 2040, tram 2023, tram 169, hong kong, comeng, tram 286, tram 2002, tram 284, tram 934, tram 252, raaf, batman ave, clarendon st, a class, high street south, b class, w2 class, sw6 class