Showing 1939 items matching " tram 7"
-
 Ballarat Tramway Museum
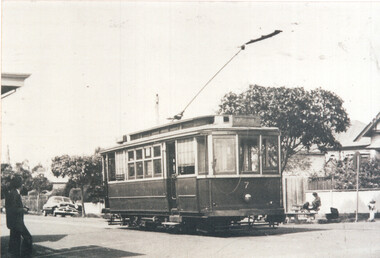
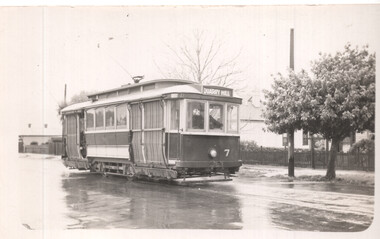
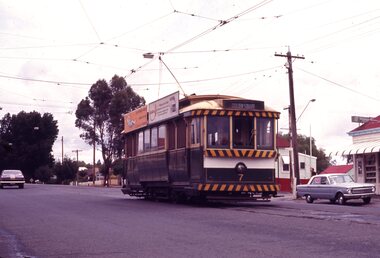
Photograph - SECV Geelong tram 7 at Newtown, c1952
... SECV Geelong tram 7 at Newtown......tram 7...Photo of SECV Geelong tram 7 at the Newtown terminus. The return destination of Eastern Park has been set. ...Photo of SECV Geelong tram 7 at the Newtown terminus. The return destination of Eastern Park has been set. ...Photo of SECV Geelong tram 7 at the Newtown terminus. The return destination of Eastern Park has been set. The awning of the shop at the terminus is in the view, along with a Ford Customline motor car with a divided windscreen in the background - c1952? On the seat at the terminus are two young boys and a pram. Photographer unknown.Yields information about Geelong tram 7 and the Newtown terminus.Black and white photograph with printers dates on the rear, printed on AGFA paper.geelong, tramways, newtown, tram 7, ford motor company -
 Melbourne Tram Museum
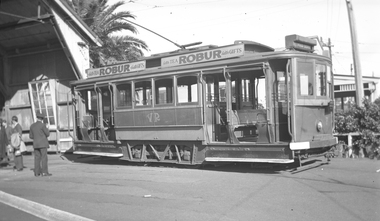
Photograph - VR tram 7 Elwood depot, 16-8-1947
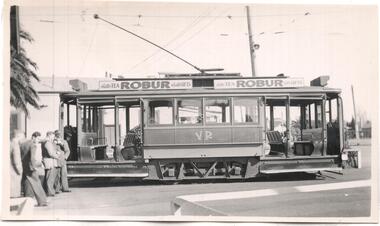
... VR tram 7 Elwood depot...... tram 7...Negative (120) and contact print of VR tram No. 7 at the Elwood depot. See also Reg Item 3623 for another photo showing the tram....Photograph VR tram 7 Elwood depot ...Set of two photographs taken while on an AETA tour 16-8-1947 - see reference .1 - View of the tram and the depot building. .2 - End on photograph of the tram showing the white bumpers and steps, taken at St Kilda Station Side on photo, showing the strengthening steel work applied to this four wheel tram. Has two Robur Tea advertisements. Tram possibly preparing for a tour given the number of men standing on the side. Yields information about VR tram No. 7 at St Kilda station and Elwood depot.Negative (120) and contact print of VR tram No. 7 at the Elwood depot. See also Reg Item 3623 for another photo showing the tram.Envelope containing negative and photo typed "Tram VR Elwood Spread the load." .1 - On the rear of the print "VR Tram - Elwood Depot 5'3" gauge". .2 - 'VR Tram St Kilda Station Extension 5'3" gauge".trams, tramways, victorian railways, vr, elwood depot, aeta, st kilda railway station, tram 7 -
 Melbourne Tram Museum
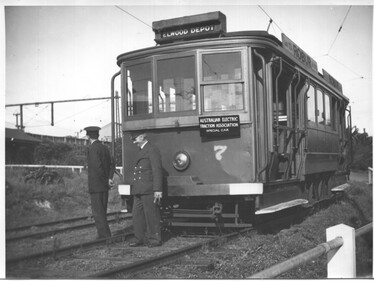
Photograph - VR Tram 7 St Kilda Station, 16-8-1947
... VR Tram 7 St Kilda Station......tram 7...Photo of VR tram 7 at St Kilda Railway station in the yard while on a AETA tour, 16-8-1947. ...Melbourne Tram Museum 8 Wallen Road Hawthorn melbourne Photo of VR tram 7 at St Kilda Railway station in the yard while on a AETA tour, 16-8-1947. ...Photo of VR tram 7 at St Kilda Railway station in the yard while on a AETA tour, 16-8-1947. Has the destination Elwood Depot. Two crewmen and standing by the front of the tram, which has the war time markings on the bumper bar and footsteps. The driver has his controls in his hand. Dated from the Victorian Rail Tours database - see reference. Yields information about VR tram No. 7 at St Kilda station.Black and white photograph with a stamp on the rear.Has the Ken Magor stamp and number "734" written in.tramcars, tramways, vr, st kilda railway station, tram 7, aeta tours -
 Ballarat Tramway Museum
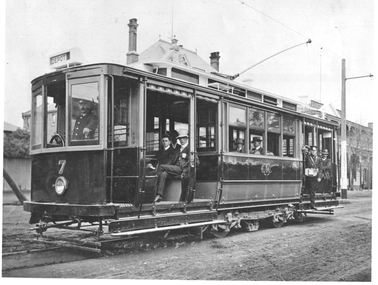
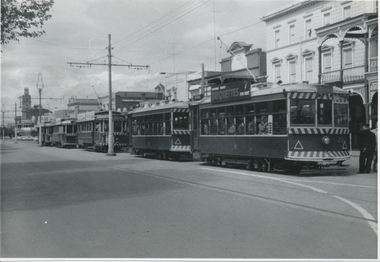
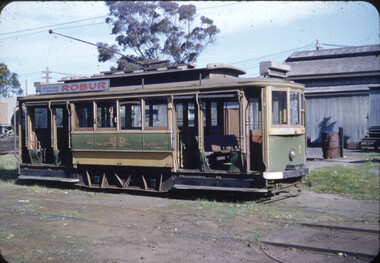
Photograph - Geelong MESCo tram 7, Melbourne Electric Supply Co. (MESCo), 3/1912
... Geelong MESCo tram 7 ......tram 7...The photograph shows Geelong 7 as built, understood to be a test tram prior to the opening of the system. ...Photograph Geelong MESCo tram 7 Melbourne Electric Supply Co. (MESCo) ...The photograph shows Geelong 7 as built, understood to be a test tram prior to the opening of the system. Photo taken in the then Corio Terrace, now Brougham Street Geelong 1912. Has a number of men on board the tram - depot workers for the photograph? See Item 4314 for another photo looking the other way and item 8612 for a framed version.Shows Geelong tram No. 7 as built.Black and White photograph with details on rear. Negative ex Scienceworks held.Has SEC Publicity photo stamp on the rear and number 9/274 and a pencil note "Corio Terrace before opening In March 1912"geelong, mesco, tram 7, corio terrace, opening, tramways -
 Ballarat Tramway Museum
Photograph - Bendigo - Tram 7 - (2nd)
... Bendigo - Tram 7 - (2nd)......tram 7...Photo shows the second Bendigo tram to carry the number 7. It has the destination of Quarry Hill. ...Yields information about Bendigo tramways operations and tram 7. tramways trams SEC Tramways tram 7 Quarry Hill Black and white photograph of the 2nd Bendigo No. 7 Photograph Bendigo - Tram 7 - (2nd) ...Photo shows the second Bendigo tram to carry the number 7. It has the destination of Quarry Hill. Most of the weather blinds are drawn. The tram was former MMTB No. 90, purchased in 1931, scrapped in 1951. The tram was not converted for one-man operation. Reference Destination Eaglehawk. Photo c1940.Yields information about Bendigo tramways operations and tram 7.Black and white photograph of the 2nd Bendigo No. 7tramways, trams, sec tramways, tram 7, quarry hill -
 Ballarat Tramway Museum
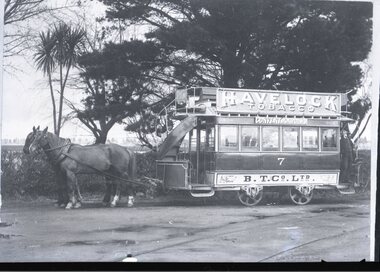
Photograph - Black and White - Ballarat Horse Tram No. 7, c1890
... Black and White - Ballarat Horse Tram No. 7 ......tram 7...Ballarat horse tram No. 7 with two horses with the lake in the background at the tram depot in Wendouree Parade. ...Yields information about tram 7 and the triangular track into the Wendouree Parade depot. ...Ballarat horse tram No. 7 with two horses with the lake in the background at the tram depot in Wendouree Parade. Shows the triangular leg at the depot entrance.Yields information about tram 7 and the triangular track into the Wendouree Parade depot.Black and white photograph - multiple copies held. Fifth copy has notes on rear - see image 2trams, ballarat tramways, horse tram, depot, tram 7 -
 Melbourne Tram Museum
Photograph - VR tram No. 7 at the Elwood depot, 16-8-1947
... VR tram No. 7 at the Elwood depot...... tram 7...Negative (120) and contact print of VR tram No. 7 at the Elwood depot. See also Reg Item 3624 for other photos showing the tram. ...Melbourne Tram Museum 8 Wallen Road Hawthorn melbourne Trams tramways Victorian Railways VR Elwood Depot tram 7 Envelope containing negative and photo typed "Tram VR Elwood Spread the load." ...Negative (120) and contact print of VR tram No. 7 at the Elwood depot. See also Reg Item 3624 for other photos showing the tram. Side on photo, showing the strengthening steel work applied to this four wheel tram. Has two Robur Tea advertisements. Tram possibly preparing for a tour given the number of men standing on the side. Hi Res image filed in the dbtext/hawthtramcoll/Large Images/htd3623Large.jpgEnvelope containing negative and photo typed "Tram VR Elwood Spread the load." On the rear of the print "VR Tram - Elwood Depot 5'3" gauge".trams, tramways, victorian railways, vr, elwood depot, tram 7 -
 Ballarat Tramway Museum
Photograph - Digital image, John Ward, 22/03/1970 12:00:00 AM
... ... tram 7...Slide title "00755 220370 SEC single truck tram 7 in High St at Robert St Golden Square Bendigo Vic"...Ballarat Tramway Museum South Gardens Reserve Wendouree Parade Ballarat Ballarat goldfields Trams tramways Bendigo High St Golden Square tram 7 Digital image of Bendigo tram 7 outward bound to Golden Square at corner of High and Laurel St Bendigo, with the United Kingdom Hotel in the background with a Carlton Draught sign. ...Digital image of Bendigo tram 7 outward bound to Golden Square at corner of High and Laurel St Bendigo, with the United Kingdom Hotel in the background with a Carlton Draught sign. Photo by John Ward 22 March 1970. Slide title "00755 220370 SEC single truck tram 7 in High St at Robert St Golden Square Bendigo Vic"trams, tramways, bendigo, high st, golden square, tram 7 -
 Melbourne Tram Museum
Photograph - Black & White Photograph/s, Ray Jackson, c1970
... ... tram 7...Black and White photograph of flusher tram No. 7, in Queensway St Kilda c1970....Melbourne Tram Museum 8 Wallen Road Hawthorn melbourne Trams tramways Service tramcars Queensway Flushing tram 7 tram 7W Black and White photograph of flusher tram No. 7, in Queensway St Kilda c1970. ...Black and White photograph of flusher tram No. 7, in Queensway St Kilda c1970.trams, tramways, service tramcars, queensway, flushing, tram 7, tram 7w -
 Ballarat Tramway Museum
Photograph - Black & White Photograph/s, Andrew Ward, 15/01/1972 12:00:00 AM
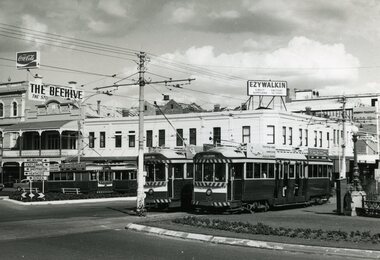
... ... tram 7...Black and White photograph of four trams at Charing Cross, taken from the south east corner, looking towards the Beehive building and Ezywalkin stores. Trams 7, 5 and 26 in the photograph. Photo by Andrew Ward 15.1.1972....Ballarat Tramway Museum South Gardens Reserve Wendouree Parade Ballarat Ballarat goldfields Yields information about the appearance of Bendigo electric trams at the time of opening, how passengers could be seated, staff, paint schemes, decorations, and truck arrangements. trams tramways Bendigo Charing Cross Pall Mall tram 7 tram 5 tram 26 On rear in ink "Sat 15.1.72" / "single truck car 7 and bogie cars 5 & 26" in the top left hand corner and in a mix of ink and pencil "Bendigo Trust / Andrew C. ...Yields information about the appearance of Bendigo electric trams at the time of opening, how passengers could be seated, staff, paint schemes, decorations, and truck arrangements.Black and White photograph of four trams at Charing Cross, taken from the south east corner, looking towards the Beehive building and Ezywalkin stores. Trams 7, 5 and 26 in the photograph. Photo by Andrew Ward 15.1.1972.On rear in ink "Sat 15.1.72" / "single truck car 7 and bogie cars 5 & 26" in the top left hand corner and in a mix of ink and pencil "Bendigo Trust / Andrew C. Ward, Bendigo Vic 3550".trams, tramways, bendigo, charing cross, pall mall, tram 7, tram 5, tram 26 -
 Ballarat Tramway Museum
Photograph - Digital image, John Ward, 22/03/1970 12:00:00 AM
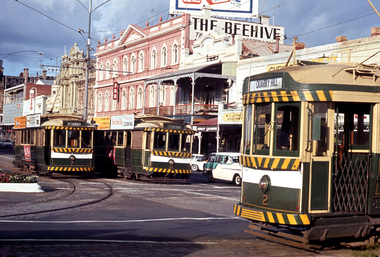
... ... tram 7...Digital image of three Bendigo trams at Charing Cross. Trams 7 (North Bendigo), 21 (Golden Square) and 2 (Quarry Hill). ...Ballarat Tramway Museum South Gardens Reserve Wendouree Parade Ballarat Ballarat goldfields Trams tramways Bendigo Charing Cross Pall Mall Mitchell St tram 7 tram 21 tram 2 Digital image of three Bendigo trams at Charing Cross. ...Digital image of three Bendigo trams at Charing Cross. Trams 7 (North Bendigo), 21 (Golden Square) and 2 (Quarry Hill). Has the Beehive building in the background, along with sings for 3BO, Myer, Amor gowns and Wm I Jones Chemist. The trams have some SEC Roof adverts. Photo by John Ward 22 March 1970. Slide title "00757 220370 SEC single truck trams 7 & 21 Pall Mall bogie tram 2 Mitchell St Charing Cross Bendigo Vic"trams, tramways, bendigo, charing cross, pall mall, mitchell st, tram 7, tram 21, tram 2 -
 Ballarat Tramway Museum
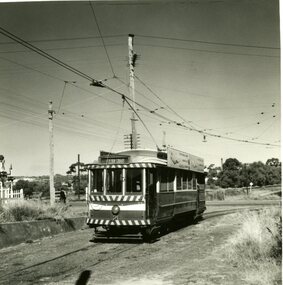
Photograph - Black & White Photograph/s, John Webster, 21/08/1955 12:00:00 AM
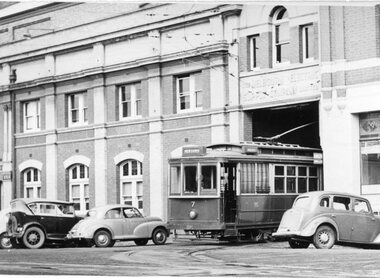
... ... tram 7...Black and white photograph of Geelong No. 7 leaving the depot with a number of motor cars on either side of the tram. ...On rear in ink "Tram 7, from Depot Vic" and in top right hand corner "EH 30 / 21-8-55 JR" Copy 2 - "EH30 21-8-55" in top right hand corner....Ballarat Tramway Museum South Gardens Reserve Wendouree Parade Ballarat Ballarat goldfields Yields information about the appearance of one of Geelong's trams prior to closure and entry to the depot building. tramways trams Geelong Depot tram 7 On rear in ink "Tram 7, from Depot Vic" and in top right hand corner "EH 30 / 21-8-55 JR" Copy 2 - "EH30 21-8-55" in top right hand corner. ...Yields information about the appearance of one of Geelong's trams prior to closure and entry to the depot building.Black and white photograph of Geelong No. 7 leaving the depot with a number of motor cars on either side of the tram. The tram has the destination of "Newtown" Photographed by John Webster, 21/8/1955. Two copies. See Reg Item 4225 for the original negative possibly from which this photo has been cropped from.On rear in ink "Tram 7, from Depot Vic" and in top right hand corner "EH 30 / 21-8-55 JR" Copy 2 - "EH30 21-8-55" in top right hand corner.tramways, trams, geelong, depot, tram 7 -
 Melbourne Tram Museum
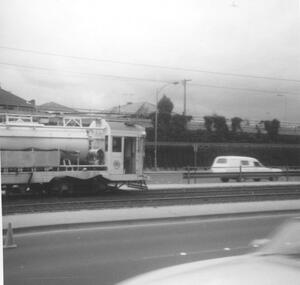
Negative, Wal Jack, Oct. 1940
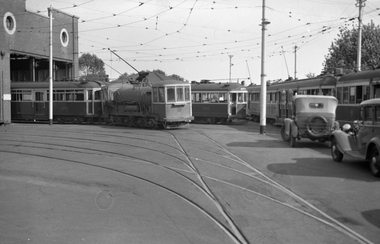
... ... tram 7...Black and white negative by Wal Jack of the second or new shed at Hawthorn Tram Depot with SW6 847, water tram 7,W2 300, and other W2's on the depot fan, Oct. 1940....Melbourne Tram Museum 8 Wallen Road Hawthorn melbourne Trams tramways Hawthorn Tram Depot SW6 class W2 class Work Trams tram 847 tram 300 tram 7 Black and white negative by Wal Jack of the second or new shed at Hawthorn Tram Depot with SW6 847, water tram 7,W2 300, and other W2's on the depot fan, Oct. 1940. ...Black and white negative by Wal Jack of the second or new shed at Hawthorn Tram Depot with SW6 847, water tram 7,W2 300, and other W2's on the depot fan, Oct. 1940.trams, tramways, hawthorn tram depot, sw6 class, w2 class, work trams, tram 847, tram 300, tram 7 -
 Ballarat Tramway Museum
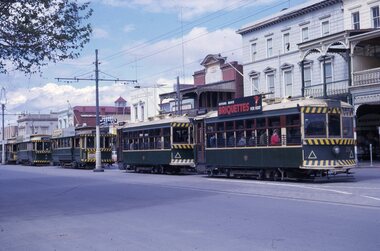
Slide - Bendigo No. 7 - Golden Square - set of 2, Ron Hood, 12/1970
... ...tram 7...Set of two colour photographs by Ron Hood December 1970 taken at the Golden Square terminus: 1 - Tram 7 at the Golden Square terminus with a electric cooking and a Wilkinson Sword roof adverts. 2 - ditto with a briquettes roof advert and the Golden Square Hotel in the background....Yields information about Bendigo tram 7 and the Golden Square terminus - December. 1970 tramways trams tram 7 Golden Square Numbered "Golden Sq terminus" in ink. ...Set of two colour photographs by Ron Hood December 1970 taken at the Golden Square terminus: 1 - Tram 7 at the Golden Square terminus with a electric cooking and a Wilkinson Sword roof adverts. 2 - ditto with a briquettes roof advert and the Golden Square Hotel in the background.Yields information about Bendigo tram 7 and the Golden Square terminus - December. 1970Set of 2 Colour slides in hanimount cardboard mounts.Numbered "Golden Sq terminus" in ink.tramways, trams, tram 7, golden square -
 Ballarat Tramway Museum
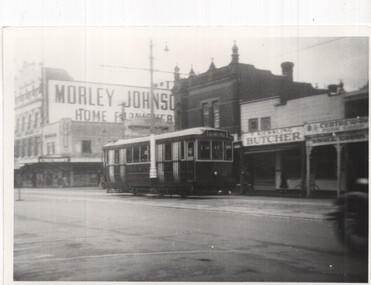
photograph - Set of 5 Black & White - Bendigo tramways, Peter Duckett, early 1950s
... ...tram 7...Kessling Butcher 2 - Tram No. 3 at the depot. 3 - Tram 7 on a Quarry Hill service. 4 - Bogie tram 24 at the depot 5 - Track cleaner - scrubber and another ex Melbourne single trucker at the depot....Yields information about Bendigo trams early 1950s Bendigo tramcars Bendigo Tramways Quarry Hill Charing Cross Mitchell St tram 22 tram 3 tram 7 tram 24 scrubber tram Details the image on the rear of the print in ink. ...Set of five photographs of Bendigo trams photographed by Peter Duckett, early 1950s 1 - Bendigo 22 in Mitchell Street. Tram has the destination of Quarry Hill. In the background is the Morley Johnson Home furnisher and F. Kessling Butcher 2 - Tram No. 3 at the depot. 3 - Tram 7 on a Quarry Hill service. 4 - Bogie tram 24 at the depot 5 - Track cleaner - scrubber and another ex Melbourne single trucker at the depot.Yields information about Bendigo trams early 1950sSet of five black and white photographs by Peter Duckett.Details the image on the rear of the print in ink.bendigo, tramcars, bendigo tramways, quarry hill, charing cross, mitchell st, tram 22, tram 3, tram 7, tram 24, scrubber tram -
 Ballarat Tramway Museum
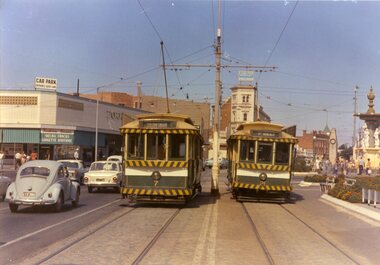
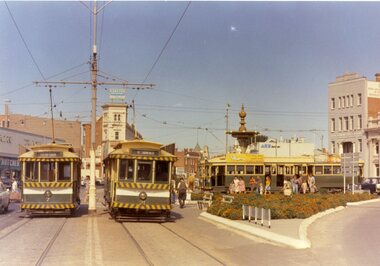
Photograph - Colour Photograph/s, 1960's
... ... tram 7...Colour postcard size print of an SEC Bendigo trams 7 and 21 at Charing Cross. Printed on AGFA paper. ...Ballarat Tramway Museum South Gardens Reserve Wendouree Parade Ballarat Ballarat goldfields Bendigo Pall Mall Charing Cross tram 7 tram 21 Colour postcard size print of an SEC Bendigo trams 7 and 21 at Charing Cross. ...Colour postcard size print of an SEC Bendigo trams 7 and 21 at Charing Cross. Printed on AGFA paper. Photo taken during last years of Bendigo. Trams have dash canopy lighting and large white strip under the driver's windows. Tram 21 showing "North Bendigo" and 7 showing "Golden Square" destinations. Photo has Cenotaph, fountain and buildings on the south east corner of Mitchell St and Pall Mall in background.bendigo, pall mall, charing cross, tram 7, tram 21 -
 Ballarat Tramway Museum
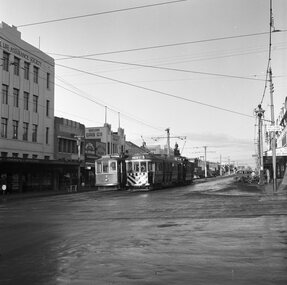
Photograph - B&W print of donated negative, John Webster, 21/08/1955 12:00:00 AM
... ... tram 7...Black and white digital print from scan of a donated negative showing trams 7 and 39 and one other tram in Ryrie St at the corner with Moorabool Street. ...Ballarat Tramway Museum South Gardens Reserve Wendouree Parade Ballarat Ballarat goldfields Yields information about the appearance of the appearance of the Geelong tramway system, two of its trams in Ryrie St Geelong tramways trams Geelong Tram Stops Moorabool St tram 7 tram 39 On left hand side of the negatives in ink is "EI 15" Black and white digital print from scan of a donated negative showing trams 7 and 39 and one other tram in Ryrie St at the corner with Moorabool Street. ...Yields information about the appearance of the appearance of the Geelong tramway system, two of its trams in Ryrie St GeelongBlack and white digital print from scan of a donated negative showing trams 7 and 39 and one other tram in Ryrie St at the corner with Moorabool Street. Has the National Mutual Life Association and Geelong Gas Co. buildings in the background and a few cars on the street. Assumed photo taken on the same day as the others - 21-8-1955. Black and White prints made from scan of negative. Original Negative stored with Negatives. Negative scanned at hi res 4/6/2020 and image updated.On left hand side of the negatives in ink is "EI 15"tramways, trams, geelong, tram stops, moorabool st, tram 7, tram 39 -
 Ballarat Tramway Museum
Photograph - Colour Photograph/s, 1960's
... ... tram 7...Colour postcard size print of an SEC Bendigo trams 7 and 21 at Charing Cross with two bogie trams by fountain. ...Ballarat Tramway Museum South Gardens Reserve Wendouree Parade Ballarat Ballarat goldfields Bendigo Pall Mall Charing Cross tram 7 tram 21 Colour postcard size print of an SEC Bendigo trams 7 and 21 at Charing Cross with two bogie trams by fountain. ...Colour postcard size print of an SEC Bendigo trams 7 and 21 at Charing Cross with two bogie trams by fountain. Printed on AGFA paper. Photo taken during last years of Bendigo. Trams have dash canopy lighting and large white strip under the driver's windows. Tram 21 showing "North Bendigo" and 7 showing "Golden Square" destinations. Taken at same time as 971. Photo has Cenotaph, fountain and buildings on the south side Charing Cross in the background, including ANZ bank and RACV office.bendigo, pall mall, charing cross, tram 7, tram 21 -
 Ballarat Tramway Museum
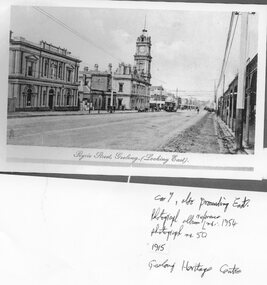
Photograph - Black & White Photograph/s - set of 2, 1915
... ... tram 7...4403.1 - Black and white (sepia coloured) reproduction of a photograph from an album photo from the Geelong Heritage Centre collection of the Post office, in Ryrie St Geelong, looking east, with tram 7 proceeding east, from Album No. 1954, photograph No. 50, 1915. 4403 - as above, but photos Nos. 48 and ?...Ballarat Tramway Museum South Gardens Reserve Wendouree Parade Ballarat Ballarat goldfields Yields information about the appearance of the official last Geelong tram, No. 4, prior to its use that evening. trams tramways Geelong Ryrie St tram 7 4303.1 - in ink on the front "Car 7, also proceeding East. ...Yields information about the appearance of the official last Geelong tram, No. 4, prior to its use that evening.4403.1 - Black and white (sepia coloured) reproduction of a photograph from an album photo from the Geelong Heritage Centre collection of the Post office, in Ryrie St Geelong, looking east, with tram 7 proceeding east, from Album No. 1954, photograph No. 50, 1915. 4403 - as above, but photos Nos. 48 and ?, also showing the Post Office, prior to the construction of the tramway and another view of the Post Office. Printed on Hewlett Packard paper.4303.1 - in ink on the front "Car 7, also proceeding East. Photograph album reference Nos. 1954, photograph No. 50, / 1915 / Geelong Heritage Centre" 4303.2 - "Geelong Heritage Centre / Photograph album ref no. 1954/50 1915" trams, tramways, geelong, ryrie st, tram 7 -
 Ballarat Tramway Museum
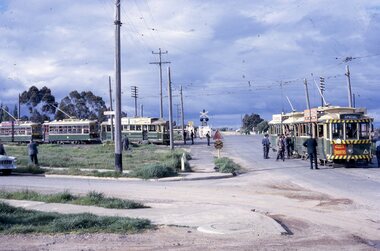
Photograph - ARHS Tour to Bendigo - set of 7, Keith Kings, 20/10/1962
... ... tram 7...Set of seven images of the ARHS Special tour of Bendigo on 20-10-1962. .1 - Trams 28, 30, 21, 7 and 19 in Pall Mall .2 - 18, 26, 29, 11 and 5 at the Bridge St loop on the North Bendigo line. .3 - 28, 30, 21, 7, 19 on "down" line and 18, 26, 29, 11, 5 and service car 3 on "up" line, View St Opposite Oval .4 - 28, 30, 21, 7, and 19 at Eaglehawk .5 - 28, 30, 21 in North Bendigo siding and 7 and 9 in Thunder St - photo taken in Thunder St. .6 - ditto photo taking from vacant land on the south side of the terminus, along with No. 6 the service tram. .7 - 28, 30, 21, 7, 19 in View St with Goodyear and Caltex signs in the photo and the Commercial Banking Company of Australia building in the background. ...Set of seven images of the ARHS Special tour of Bendigo on 20-10-1962. .1 - Trams 28, 30, 21, 7 and 19 in Pall Mall .2 - 18, 26, 29, 11 and 5 at the Bridge St loop on the North Bendigo line. .3 - 28, 30, 21, 7, 19 on "down" line and 18, 26, 29, 11, 5 and service car 3 on "up" line, View St Opposite Oval .4 - 28, 30, 21, 7, and 19 at Eaglehawk .5 - 28, 30, 21 in North Bendigo siding and 7 and 9 in Thunder St - photo taken in Thunder St. .6 - ditto photo taking from vacant land on the south side of the terminus, along with No. 6 the service tram. .7 - 28, 30, 21, 7, 19 in View St with Goodyear and Caltex signs in the photo and the Commercial Banking Company of Australia building in the background. ...Set of seven images of the ARHS Special tour of Bendigo on 20-10-1962. .1 - Trams 28, 30, 21, 7 and 19 in Pall Mall .2 - 18, 26, 29, 11 and 5 at the Bridge St loop on the North Bendigo line. .3 - 28, 30, 21, 7, 19 on "down" line and 18, 26, 29, 11, 5 and service car 3 on "up" line, View St Opposite Oval .4 - 28, 30, 21, 7, and 19 at Eaglehawk .5 - 28, 30, 21 in North Bendigo siding and 7 and 9 in Thunder St - photo taken in Thunder St. .6 - ditto photo taking from vacant land on the south side of the terminus, along with No. 6 the service tram. .7 - 28, 30, 21, 7, 19 in View St with Goodyear and Caltex signs in the photo and the Commercial Banking Company of Australia building in the background. Most printed on Ilford paper .Black and White print contained within the Wal Jack Bendigo and Geelong Album, see Reg Item 5003 for more details.Yields information about the ARHS tour to Bendigo in 1962 and the trams used.Set of 7 Black and white print with photographer’s notes on the rear.On rear in ink. .1 - "28, 30, 21, 7, 19 Pall Mall 20-10-62" .2 - "Bendigo ARHS Convoy "A" on Bridge St loop, Nos. 18, 26, 29, 11, 5 20/10/62" with Keith Kings copy right stamp printed in top right hand corner and number "N(y)(12)" written in. .3 - "18, 26, 29, 11, 5 and service car 3 on "up" line, 28, 30, 21, 7, 19 on "down" View St 20-8-62" .4 - "28, 30, 21, 7, and 19 Eaglehawk 20-10-62" .5 - "19, 7 in, 28, 30, 21 in spur siding Nth Bendigo 20/10/62" .6 - "28, 30, 21, 7, 19 plus No. 6 service car Nth B/go 20/10/62" .7 - "Bendigo ARHS Convoy "B" - 28, 30, 21, 7, 19 Charing Cross, 20/10/62" with Keith Kings copy right stamp printed in top right hand corner and number "N(y)(14)" written in.trams, tramways, bendigo, arhs, tours, eaglehawk, north bendigo, view st, tram 28, tram 30, tram 21, tram 7, tram 19, tram 6, tram 18, tram 26, tram 29, tram 11, tram 3 -
 Ballarat Tramway Museum
Photograph - Black & White Photograph/s set of 19, Mar. 1972
... ... tram 7...Side on view looking south. 981.9 -trams 7 and 21 on Golden Square/North Bendigo line with bogie tram in background, at Charing Cross. ...Side on view looking south. 981.9 -trams 7 and 21 on Golden Square/North Bendigo line with bogie tram in background, at Charing Cross. ...Set of 19 black and white prints, all 89mm square of Bendigo trams, date machine printed on print is "Mar 1972". 981.1 - Tram 21 at North Bendigo terminus, with level crossing in background. Has destination "Golden Square" and two SEC roof ads. 981.2 - tram 2? at Eaglehawk, with destination "Depot", two SEC roof ads and "Leo A. Hughes Photographer" on side of building in background. 981.3 - tram 2? at Eaglehawk, side on view. 981.4 - tram 26 at Quarry Hill terminus looking back into city. 981.5 - tram 7 en route to North Bendigo at the site of the Bridge St. loop. Has a Peters Ice Cream truck and Sandhurst Fruit Juices truck on right side of photograph. 981.6 - tram 2 at Quarry Hill terminus. 981.7 - tram 2? at one of the loops on the Eaglehawk line, inbound? 981.8 - bogie tram at Charing Cross with fountain in background. Side on view looking south. 981.9 -trams 7 and 21 on Golden Square/North Bendigo line with bogie tram in background, at Charing Cross. Same as item 972. 981.10 - bogie tram at Charing Cross - has buildings in south west corner in background, including Colonial Mutual Life and an advertisement for the Herald newspaper. 981.11 - trams 25, 7 and two other trams at Charing Cross. 981.12 - trams 2 and 26 and three others at Charing Cross. 981.13 - tram 25 at Golden Square terminus, with Rodda's Golden Square Hotel in the background. Tram showing destination of "Nth Bendigo" 981.14 - tram 24, showing "Special" on depot access track. Has two Johnnie Walker roof ads on side. 981.15 - as above, but tram on bridge outside depot. 981.16 - trams 25 and 28 at depot 981.17 - tram 24 showing "Special" on depot access track with a single truck car in background. 981.18 - trams 2 and 26 at Charing Cross. Has advertisements for "Armstrong Tyre Service" and "Cohn's drinks" on buildings in background. 981.19 - Bendigo 2 at location?, about to enter a loop or double track section. Has hotel in background. On rear of each photo in the top left hand corner is a print number 1 to 19 in ink and location notes, generally "Bendigo"trams, tramways, charing cross, bendigo, golden square, quarry hill, tram 2, tram 21, tram 7, tram 24, tram 26 -
 Ballarat Tramway Museum
Slide - 35mm slide/s, Wal Jack, 20/10/1962 12:00:00 AM
... ... tram 7...Bendigo, trams 28, 30, 21, 7, and 19 in Pall Mall heading for Charing Cross, on 20-10-1962, as part of a ARHS tour....Ballarat Tramway Museum South Gardens Reserve Wendouree Parade Ballarat Ballarat goldfields Tramways trams Bendigo Pall Mall Charing Cross tram 28 tram 30 tram 21 tram 7 tram 19 'Pall Mall, 28,30,21,7,19, 20-10-1962' Bendigo, trams 28, 30, 21, 7, and 19 in Pall Mall heading for Charing Cross, on 20-10-1962, as part of a ARHS tour. ...Bendigo, trams 28, 30, 21, 7, and 19 in Pall Mall heading for Charing Cross, on 20-10-1962, as part of a ARHS tour.'Pall Mall, 28,30,21,7,19, 20-10-1962'tramways, trams, bendigo, pall mall, charing cross, tram 28, tram 30, tram 21, tram 7, tram 19 -
 Ballarat Tramway Museum
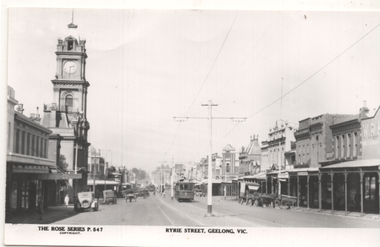
Postcard, Rose Stereograph Co, Ryrie St Geelong, 1930s
... ...tram 7...Reproduction of Rose Series postcard No. 547 of Ryrie St Geelong with tram No. 7 east bound and another tram in the distance. ...Yields information about Ryrie St Geelong. trams tramways Geelong Ryrie St Geelong Post Office tram 7 Reproduction of Rose series postcard No. ...Reproduction of Rose Series postcard No. 547 of Ryrie St Geelong with tram No. 7 east bound and another tram in the distance. Photo shows the tramway centre poles. Has the old Geelong Post Office (see reference) on the left side of the image.Yields information about Ryrie St Geelong.Reproduction of Rose series postcard No. P547 trams, tramways, geelong, ryrie st, geelong post office, tram 7 -
 Ballarat Tramway Museum
Postcard, Rose Stereograph Co, Ryrie St Geelong, 1930s
... ...tram 7...Reproduction of Rose Series postcard No. 547 of Ryrie St Geelong with tram No. 7 east bound and another tram in the distance. ...Reproduction of Rose Series postcard No. 547 of Ryrie St Geelong with tram No. 7 east bound and another tram in the distance. ...Reproduction of Rose Series postcard No. 547 of Ryrie St Geelong with tram No. 7 east bound and another tram in the distance. Photo shows the tramway centre poles. Has the old Geelong Post Office (see reference) on the left side of the image.Yields information about Ryrie St Geelong.Reproduction of Rose series postcard No. P547 trams, tramways, geelong, ryrie st, geelong post office, tram 7, geelong tramway -
 Ballarat Tramway Museum
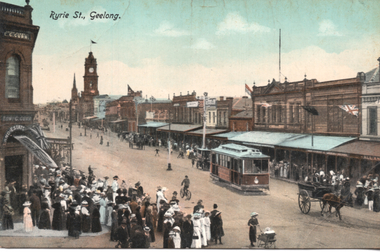
Postcard, R.E.M Series Melbourne, "Ryrie St., Geelong", c1912
... ...tram 7...Postcard produced by REM Melbourne, printed in Saxony of a view of Ryrie St Geelong looking west. Has tram No. 7 in the view, a horse drawn cart and a large crowd looking on - opening day or a test tram? ...Yields information about Ryrie St Geelong c1912. tramways trams Geelong Ryrie St tram 7 Geelong Tramway Has the Ken Magor stamp on the rear. ...Postcard produced by REM Melbourne, printed in Saxony of a view of Ryrie St Geelong looking west. Has tram No. 7 in the view, a horse drawn cart and a large crowd looking on - opening day or a test tram? In the view are E Gurr Real Estate, Allans, and the Geelong Town Hall.Yields information about Ryrie St Geelong c1912.Colour Postcard divided back, unused.Has the Ken Magor stamp on the rear.tramways, trams, geelong, ryrie st, tram 7, geelong tramway -
 Melbourne Tram Museum
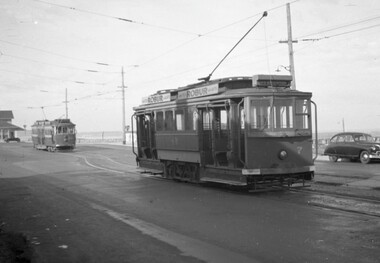
Negative - VR trams 40 & 7 at Brighton Beach, Hugh Ballment, early 1950s
... ...tram 7...The photograph shows Victorian Railways trams 40 and 7 at the Brighton Beach terminus. ...Negative VR trams 40 & 7 at Brighton Beach. Hugh Ballment ...The photograph shows Victorian Railways trams 40 and 7 at the Brighton Beach terminus. Both trams have Robur tea adverts. Photo early 1950s.Yields information about VR Tramcars at the Brighton Beach terminus.Negative - 127 film black and white.tramways, vr, victorian railways, brighton beach, tram 40, tram 7 -
 Ballarat Tramway Museum
Slide - 35mm slide/s, Wal Jack, 20/10/1962 12:00:00 AM
... ... tram 7...Three trams at terminus, and 7 and 9 standing in street. Tram 19 has briquette ad on front panel, Electric cooking roof ad and is carrying the white 'tram following' disk. ...Ballarat Tramway Museum South Gardens Reserve Wendouree Parade Ballarat Ballarat goldfields Tramways trams Bendigo North Bendigo ARHS tram 28 tram 30 tram 21 tram 7 tram 19 'White Hills, ARHS 100 Rly Anniversary, 20-10-62, 28, 30, 21, 7, 19' in blue ink Bendigo, North Bendigo terminus, trams (from rear), 28, 30, 21, 7 and 19 at time of ARHS 100th Anniversary tour, on 20-10-1962. ...Bendigo, North Bendigo terminus, trams (from rear), 28, 30, 21, 7 and 19 at time of ARHS 100th Anniversary tour, on 20-10-1962. Three trams at terminus, and 7 and 9 standing in street. Tram 19 has briquette ad on front panel, Electric cooking roof ad and is carrying the white 'tram following' disk. No. 7 has a Castrol roof ad, and No. 21 Sandhurst Milk Ad. Level crossing with flashing lights in background, old style level crossing sign in foreground.'White Hills, ARHS 100 Rly Anniversary, 20-10-62, 28, 30, 21, 7, 19' in blue inktramways, trams, bendigo, north bendigo, arhs, tram 28, tram 30, tram 21, tram 7, tram 19 -
 Ballarat Tramway Museum
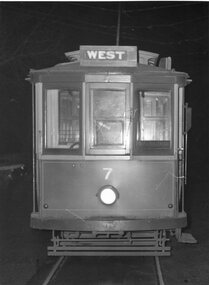
Photograph - Black & White Photograph/s - set of 3, W.C. Meyer and Photographer, 1955
... ... tram 7...Set of three photographs of Geelong single trams, one of the same type of tram (No. 7) prior to fitting with marker lights and No. 4 after fitting with marker lights, one during daylight and one at night. ...Ballarat Tramway Museum South Gardens Reserve Wendouree Parade Ballarat Ballarat goldfields trams tramways Geelong Dash Canopy Lights Lights Mirrors tram 7 tram 4 All stamped with black ink stamp " W.C. ...Set of three photographs of Geelong single trams, one of the same type of tram (No. 7) prior to fitting with marker lights and No. 4 after fitting with marker lights, one during daylight and one at night. Three photographs taken by W.C. Meyer, Photographer, 333 Myers St. East Geelong, Phone 3289. Photo of one end of the tram only. Note top marker lights, not repeated on any other cars shown in photographs in Destination Eaglehawk. Shows as well, arrangements for tow bars, mirror and handrails. 1872.1 - Before fitting with additional lights, at night with 'flash' - showing destination 'West' - tram No. 7 1872.2 - after fitting with lights and stripes, during daylight - showing destination 'CITY' - tram No. 4 1872.3 - ditto at night, showing destination of 'CITY'. - tram No. 4 1872i4 - close up of the mirror and light on the roof - right hand side of i2. Note all lights illuminated in the night photo. Destination Eaglehawk, page 44, notes tram 4 as being fitted with dash canopy lighting and zebra stripes in 1955. No mention of No. 7 being so fitted. For date of photograph, assumed early 1955 at this time (14/11/2001) See Destination EaglehawkAll stamped with black ink stamp " W.C. Meyer, Photographer, 333 Myers St. East Geelong, Phone 3289" and on rear of photos in dark blue ink, handwriting, 1872.1 - Night - with 'flash' photo. 1872.2 - Daylight 1872.3 - Night - with 'flash' photo. This tram has supplementary lights trams, tramways, geelong, dash canopy lights, lights, mirrors, tram 7, tram 4 -
 Melbourne Tram Museum
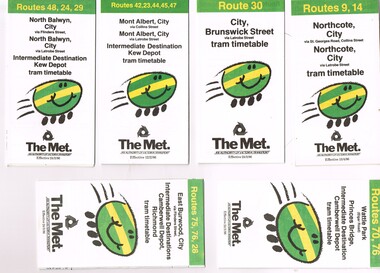
Ephemera - Timetable, The Met, Set of 7 Tram Timetables - The Met, 1986
... Set of 7 Tram Timetables - The Met...Set of 7 Tram Timetables, Printed fold out timetable for various tram routes, published by The Met. ...Melbourne Tram Museum 8 Wallen Road Hawthorn melbourne Trams tramways Timetables Tickets Tram Services Route 9 Route 14 Latrobe St La Trobe St Kew Depot Route 30 Route 42 Route 23 Route 44 Route 45 Route 47 Route 48 Route 24 Route 29 Route 70 Route 76 Route 75 Route 28 Route 96 Route 97 Route 95 Camberwell Depot Set of 7 Tram Timetables, Printed fold out timetable for various tram routes, published by The Met. ...Set of 7 Tram Timetables, Printed fold out timetable for various tram routes, published by The Met. Provides a map, description of route, time points, timetable, ticketing information (Travel cards and Neighbourhood tickets). .1 - Routes 9 and 14 - Northcote City both via Collins St and Latrobe St. - 13/4/1986 .2 - Route 30 - City - Brunswick St via Latrobe St - 24/3/1986. .3 - Routes 42, 23, 33, 45 and 47 - Mont Albert both via Collins St and Latrobe St. and Kew Depot - 12/2/1986 .4 - Routes 48, 24 and 29 North Balwyn both via Collins St and Latrobe St. and Kew Depot - 24/3/1986 .5 - Routes 70 and 76 - Wattle Park and Camberwell Depot - 24/3/1986. .6 - Route 76, 76 and 28 - East Burwood - City, Camberwell Depot and Richmond - 24/3/1986 .7 - Route 96, 97 and 95 - East Brunswick - 24/3/1986trams, tramways, timetables, tickets, tram services, route 9, route 14, latrobe st, la trobe st, kew depot, route 30, route 42, route 23, route 44, route 45, route 47, route 48, route 24, route 29, route 70, route 76, route 75, route 28, route 96, route 97, route 95, camberwell depot -
 Melbourne Tram Museum
Slide - VR Trams - Elwood and Black Rock - set of 11, Hugh Ballment, 1950s
... ...tram 7...In the background is a Chemist, Morley Auctioneers, State Savings Bank and motor dealer advertising Standard Cars HBM004 - VR Tram 7, 26-5-1954, Brighton Beach, HBM005 - VR Tram 37, c1955, St Kilda St, Outside Elwood depot HBM006 - VR Tram 54, c1955, St Kilda St, Outside Elwood depot, with an Ampol service station in the background HBM007 - VR Tram 35, c1955, Broadway, HBM008 - VR Tram 35, c1955, Broadway, at Glenhuntly Rd, passengers boarding. ...Yields information about the VR trams during the 1950s and their operations. tramways VR Victorian Railways St Kilda St Kilda Railway Station Black Rock tram 3 tram 52 tram 35 tram 7 tram 37 tram 54 tram 43 tram 48 Kodachrome card board mounts, with notes - set of 12 Slide VR Trams - Elwood and Black Rock - set of 11 Hugh Ballment ...Set of 12 Kodachrome slides of Victorian Railways Trams - St Kilda - Brighton and Sandringham to Black Rock HBM001 - VR Tram 3, c1955, Elwood depot, tram scrapped during 1956 HBM002 - VR Tram 52, c1955, St Kilda St, outside Elwood depot, with conductor on footboard HBM003 - VR Tram 35, c1955, Broadway, at Glenhuntly Rd, passengers boarding. In the background is a Chemist, Morley Auctioneers, State Savings Bank and motor dealer advertising Standard Cars HBM004 - VR Tram 7, 26-5-1954, Brighton Beach, HBM005 - VR Tram 37, c1955, St Kilda St, Outside Elwood depot HBM006 - VR Tram 54, c1955, St Kilda St, Outside Elwood depot, with an Ampol service station in the background HBM007 - VR Tram 35, c1955, Broadway, HBM008 - VR Tram 35, c1955, Broadway, at Glenhuntly Rd, passengers boarding. In the background is a Chemist, Morley Auctioneers, State Savings Bank and motor dealer advertising Standard Cars and adverts for Turf Cigarettes HBM009 - VR Tram 43, c1955, Elwood depot, note the railway style point lever. The tram has a "Don't Move" sign HBM010 - VR Tram 54, c1955, StKilda St, HBM011 - VR Tram 37, c1955, St Kilda St, Outside Elwood depot HBM012 - VR Tram 48, early 1950s, Black Rock, The photograph shows Victorian Railways tram 49 at the Black Rock terminus with a VR bus connecting from Beaumaris parked behind. The tram has Robur tea adverts on the roof. The tram crew are chatting with another. In the background is a Newsagent advertising The Herald newspaper and Marie Lynne Beauty Salon. Photo early 1950s. See also item 8959 for a black and white negative. Yields information about the VR trams during the 1950s and their operations.Kodachrome card board mounts, with notes - set of 12tramways, vr, victorian railways, st kilda, st kilda railway station, black rock, tram 3, tram 52, tram 35, tram 7, tram 37, tram 54, tram 43, tram 48