Showing 3883 items matching " tram 3"
-
 Melbourne Tram Museum
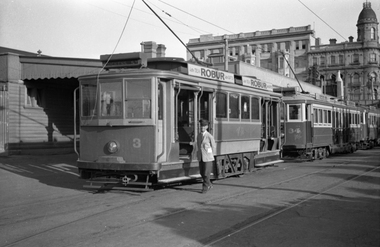
Negative - Set of 2 - St Kilda station - tram 3, Wal Jack, 30/12/1940
... Set of 2 - St Kilda station - tram 3......tram 3...Set of two Photo of Victorian Railways trams 3, 34 and 40 at the St Kilda Railway station, with a driver in the view. ...Trams tramways Victorian Railways VR Trams Brighton tram 3 tram 34 tram 40 crews uniforms Set of two Black and white negatives. ...Set of two Photo of Victorian Railways trams 3, 34 and 40 at the St Kilda Railway station, with a driver in the view. Photo in the Wal Jack Victorian Railways Album - dated 30-12-1940.Yields information about VR trams at the St Kilda Railway Station during Dec. 1940.Set of two Black and white negatives.trams, tramways, victorian railways, vr trams, brighton, tram 3, tram 34, tram 40, crews, uniforms -
 Melbourne Tram Museum
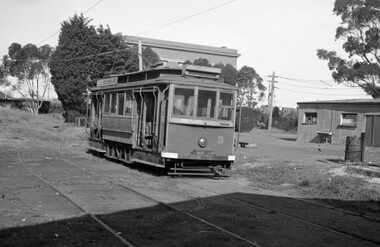
Negative - VR tram 3 at Elwood Depot, Hugh Ballment, mid 1950s
... VR tram 3 at Elwood Depot......tram 3...The photograph shows Victorian Railways tram 3 in the yard at Elwood Depot. In the background is the VR Substation that provided the power for the St Kilda to Brighton tramway and part of the depot buildings. ...Negative VR tram 3 at Elwood Depot Hugh Ballment ...The photograph shows Victorian Railways tram 3 in the yard at Elwood Depot. In the background is the VR Substation that provided the power for the St Kilda to Brighton tramway and part of the depot buildings. Photo mid 1950sYields information about VR Tram depot in Elwood and tram No. 3Negative - 127 film black and white.tramways, vr, victorian railways, elwood tram depot, tram 3 -
 Melbourne Tram Museum
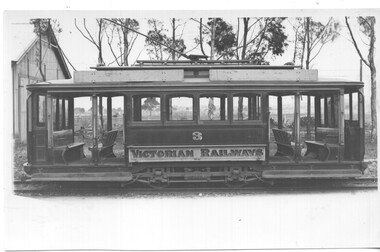
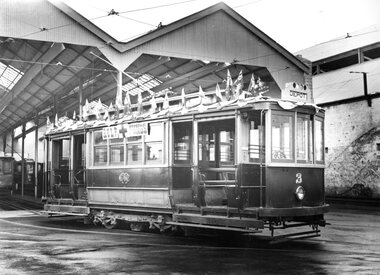
Photograph - VR tram 3, Elwood depot, Victorian Railways (VR)
... VR tram 3, Elwood depot......tram 3...Formal Victorian Railways Rolling stock photo of VR tram No 3, a Combination tramcar at Elwood Depot. ...Photograph VR tram 3, Elwood depot Victorian Railways (VR) ...Formal Victorian Railways Rolling stock photo of VR tram No 3, a Combination tramcar at Elwood Depot. The tram was built in 1907 and scrapped in 1956.Yields information about VR Tram No. 3.Black and white photograph with notes on the rear."Victorian Railways, No. 3 Combination (old photo and cleaner car) at Elwood shed" in ink and RS63. in penciltramcars, tramways, vr, elwood depot, tram 3 -
 Melbourne Tram Museum
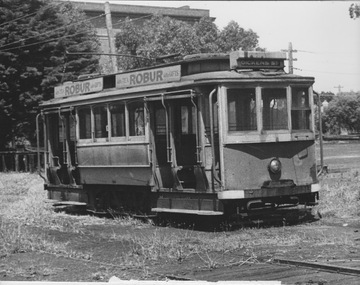
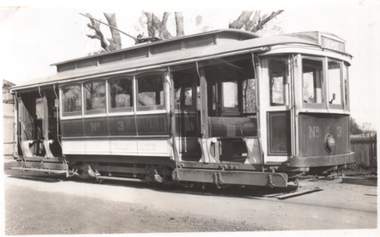
Photograph - VR Single truck tram 3 second fleet
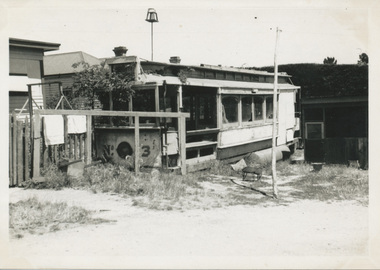
... VR Single truck tram 3 second fleet......VR tram 3...Photograph shows single truck VR tram 3 second fleet in Elwood Depot yard with trolley pole raised, weather blinds raised and destination Dickens St. ...Yields information about VR tram 3 and Elwood Depot Victorian Railways St Kilda Railway Station VR tram 3 second fleet Dickens St Elwood Depot Black and white photograph with surface peeling at bottom of print Photograph VR Single truck tram 3 second fleet ...Photograph shows single truck VR tram 3 second fleet in Elwood Depot yard with trolley pole raised, weather blinds raised and destination Dickens St. The exterior of the tram appears to be in poor condition and it stands amid low grass with trees and a large building at the rear. Dickens St was an intermediate crossover about 2 km south of the St Kilda Station terminus and was used as a turnback for short run cars during peak hours.Yields information about VR tram 3 and Elwood Depot Black and white photograph with surface peeling at bottom of printvictorian railways, st kilda railway station, vr tram 3, second fleet, dickens st, elwood depot -
 Ballarat Tramway Museum
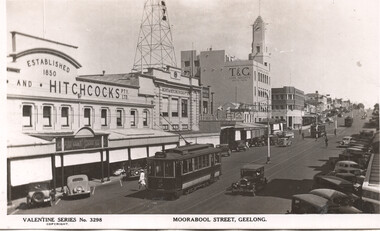
Postcard - Moorabool Street Geelong - SECV tram 3, Valentine & Sons Publishing Co, c1940
... Moorabool Street Geelong - SECV tram 3.......tram 3...Postcard looking south along Moorabool St from near little Malop St. Has tram No 3 southbound to Belmont in the view. ...Postcard looking south along Moorabool St from near little Malop St. Has tram No 3 southbound to Belmont in the view. ...Postcard looking south along Moorabool St from near little Malop St. Has tram No 3 southbound to Belmont in the view. The tram is is the SECV green and cream colour scheme. There are two other Duncan & Fraser built trams in the view. In the background is Bright and Hitchcocks, Drayton stores, a butcher, the T&G building, the radio tower and the bank of NSW. A young lady is walking away from the tram. Card by Valentine, No. 3298. Has the Valentine's logo on the rear and that it is a real photo.Yields information about Geelong trams 2 and Moorabool St c1940.Black and white postcard titled Postcard - Moorabool Street Geelong, divided back, unused.geelong, tramways, moorabool st, tram 3 -
 Ballarat Tramway Museum
Photograph - ESCo Bendigo tram 3, 1930s
... ESCo Bendigo tram 3......tram 3...Photograph of Bendigo Tram No 3 at the tram depot, with the destination of Depot. ...Photograph of Bendigo Tram No 3 at the tram depot, with the destination of Depot. ...Photograph of Bendigo Tram No 3 at the tram depot, with the destination of Depot. Tram in the ESCo Red and Cream colour scheme with the tram number on the side of the vehicle. The tram commenced life with the Hawthorn Tramway Trust as their No. 8. Became No. 114 when the MMTB took over, sold to the SEC in 1931 and became Bendigo No. 3. It was donated to the AETA in 1956 and subsequently rebuilt as HTT 8. The tram is on display at the Melbourne Tram Museum Hawthorn. See reference for further details. One of a series of 7 photos (items 9108 to 9114) possibly taken at the time of the SEC takeover in 1934 to illustrate the type of tram that was being used at Bendigo. Possibly an SEC report photo. Based on the book Destination Eaglehawk, most likely from the Basil Miller collection.Yields information about Bendigo tram 3 during the mid 1930s.Photograph, black and white with notes on rear.In ink on rear "No. 3 - Electric Supply Co of Victoria (Prior to 1934 when SEC acquired the undertaking), and Ken Magor stamp.tramways, trams, bendigo, tram 3, aeta, tram 8, bendigo tramway -
 Bendigo Historical Society Inc.
Negative - TRAM NO. 3 EAGLEHAWK, 1890-2017
... TRAM NO. 3 EAGLEHAWK......tram no. 3...Negative of Tram Number 3 Eaglehawk. ...BENDIGO Tramways tram no. 3 http://www.bendigotramways.com/images/stories/pdf/thebendigotramwaystory.pdf (Full History of Tramways) Negative of Tram Number 3 Eaglehawk. ...Negative of Tram Number 3 Eaglehawk. bendigo, tramways, tram no. 3, http://www.bendigotramways.com/images/stories/pdf/thebendigotramwaystory.pdf (full history of tramways) -
 Ballarat Tramway Museum
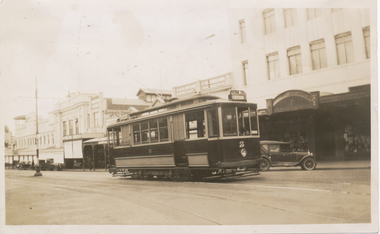
Photograph - SECV Geelong tram 3 in Moorabool St, 1940
... SECV Geelong tram 3 in Moorabool St...... tram 3...Photo of Geelong No. 3 in Moorabool St. 1940. No details of photographer on rear. Tram has the destination of East. ...On rear in ink "84 Geelong Tramways, State Electricity Commission, No. 3 One of their original trams I believe. They ride very steady and smooth. ...Photograph SECV Geelong tram 3 in Moorabool St ...Black and White print contained within the Wal Jack Bendigo and Geelong Album, see Reg Item 5003 for more details. Photo of Geelong No. 3 in Moorabool St. 1940. No details of photographer on rear. Tram has the destination of East. In the background is a sign for Berger Paints and F&M Ritchie? Wal's album notes provides the date of 1940. Printed on Kodak Velox Paper.Yields information about Geelong tram 3 in Moorabool St c1940Black and white print with a handwritten note on the rear.On rear in ink "84 Geelong Tramways, State Electricity Commission, No. 3 One of their original trams I believe. They ride very steady and smooth. Duncan and Fraser body. The Brush Electrical Engineering Co. Ltd, Loughborough England, long wheel base truck."trams, tramways, geelong, moorabool st, tram 3 -
 Melbourne Tram Museum
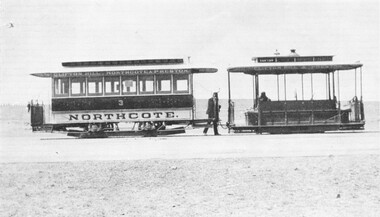
Photograph, Northcote cable tram 3
... Northcote cable tram 3......tram 3...The photograph shows a Northcote cable tram set - grip car and trailer No. 3. The trailer is lettered - Clifton Hill - Northcote & Preston. ...Trams tramways cable tram Northcote Clifton Hill tram 3 Photograph, black and white, plain paper Northcote cable tram 3 Photograph ...The photograph shows a Northcote cable tram set - grip car and trailer No. 3. The trailer is lettered - Clifton Hill - Northcote & Preston. The background has been whited out though possibly a conductor and the gripman can be seen. For the story of the Northcote line, see the Museum's article - Northcote: the on again, off again cable tramway in the references.Yields information about the Northcote cable trams before they were merged with the MMTB.Photograph, black and white, plain papertrams, tramways, cable tram, northcote, clifton hill, tram 3 -
 Ballarat Tramway Museum
Photograph - Digital image, Wal Jack, Ballarat ESCo tram 3 after scrapping, 12/1/1946
... Ballarat ESCo tram 3 after scrapping...... tram 3... Photo of the body of ESCo No. 3 in Cobden St, Mt Pleasant 12-1-1946. Has the details on the rear of the photograph. This tram...Ballarat ESCo tram 3 after scrapping Photograph Digital image Wal Jack ...Photo of the body of ESCo No. 3 in Cobden St, Mt Pleasant 12-1-1946. Has the details on the rear of the photograph. This tram began its life as a Sydney C class electric tram, possibly No. 14. It was scrapped in 1935. See image i2 for rear of photograph. See image i3 for hi res scan of print. See image i4 for hi res scan of negativeYields information the condition in 1946 of an old ESCo Tram body that was sold.Negative and Digital image from the Wal Jack Ballarat Album.on rear in ink "SEC / Ballarat / Old No. 3 original electric (body) Mount Pleasant / 12-1-46" and the Wal Jack stamp with "T102"trams, tramways, esco, scrapped trams, tram 3 -
 Melbourne Tram Museum
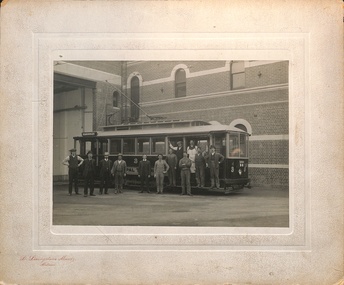
Photograph - PMTT Tram No 3 and workshop staff, "D Livingstone Munz Malvern", 1910
... PMTT Tram No 3 and workshop staff......tram 3...The photo shows PMTT combination car No. 3 built by Duncan and Fraser, parked in front of the original depot building with 12 men standing around or on the tram....Photograph PMTT Tram No 3 and workshop staff "D Livingstone Munz Malvern" ...The photo shows PMTT combination car No. 3 built by Duncan and Fraser, parked in front of the original depot building with 12 men standing around or on the tram.Yields information about PMTT tram No. 3 and the workshop staff, in 1910.Photograph, mounted onto heavy indented card with measurement notes on the rear. Printed with studios name in the bottom left hand corner.on rear in ink "25 and 12" x 10" " and printed "D Livingstone Munz Malvern"tramways, pmtt, malvern depot, tram 3 -
 Ballarat Tramway Museum
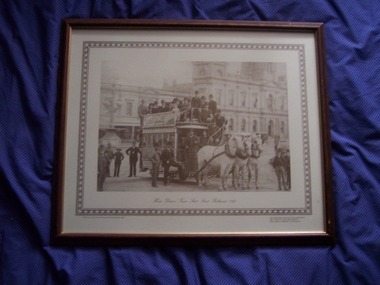
Photograph - Framed Print - of a horse drawn tram (3 horses) - Sturt St, Harris House of Photography, 1988
... Framed Print - of a horse drawn tram (3 horses) - Sturt St....Framed print of a horse drawn tram (3 horses) see Reg Item 699 at the corner of Sturt and Lydiard St, within a wooden frame, with non-reflective glazing. ...Photograph Framed Print - of a horse drawn tram (3 horses) - Sturt St. Harris House of Photography ...Photograph of Ballaarat Tramway Company horse tram in Lydiard St. North with Town Hall in background. Horse tram has three horses in harness, with about 30 men and boys, passengers, standing around or on the horse tram. Vine Hotel advertisement on the modesty panel of the tramcar. See also item 699 for another print.Demonstrates the way the Australian Bi-Centenary and other celebrations were carried out with souvenir prints.Framed print of a horse drawn tram (3 horses) see Reg Item 699 at the corner of Sturt and Lydiard St, within a wooden frame, with non-reflective glazing. The print by the Harris House of Photography has been mounted onto a piece of Masonite. On rear are picture hanging metal loops and a wire hanging strip. In the bottom right hand corner of the print are "Celebrating Australia's Bi Centenary / Ballaarat's 150th Anniversary / Ballaarat's Tramways Centenary" and in the bottom left hand corner "Reproduced by Harris House of Photography 1988".trams, tramways, horse trams, sturt st, lydiard st nth, ballaarat tramway company, town hall -
 Bendigo Historical Society Inc.
Photograph - BASIL MILLER COLLECTION: ELECTRIC TRAM NO. 3
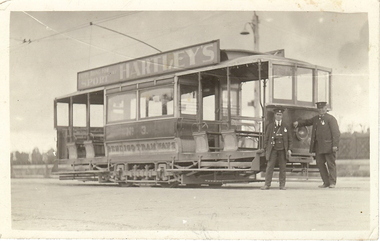
... BASIL MILLER COLLECTION: ELECTRIC TRAM NO. 3...Black and white postcard of Bendigo Tramways Electric Tram No. 3 showing a driver and a conductor. Advertising 'Hartley's Everything for Sport'. ...Photograph BASIL MILLER COLLECTION: ELECTRIC TRAM NO. 3 ...BHS CollectionBlack and white postcard of Bendigo Tramways Electric Tram No. 3 showing a driver and a conductor. Advertising 'Hartley's Everything for Sport'. Taken in front of Bendigo Cemetery, Carpenter St, Bendigo.Kodak Australiaperson, individual, basil miller -
 Ballarat Tramway Museum
Photograph, Moorabool Street Geelong - tram 3, late 1940s
... Moorabool Street Geelong - tram 3...3 just to the south of Malop St. Has Hitchcocks, T & G building and the Bank of NSW buildings in the view. The tram...Yields information about the Moorabool St Geelong, late 1940s. tramways trams Geelong Moorabool St tram 8 Geelong Tramway In pencil on rear "No. 3 car". Ken Magor stamp and in pencil "K McCarthy No. 71" Colour photograph titled "Moorabool Street Geelong - No. 1" Moorabool Street Geelong - tram 3 Photograph ...The colour print of Moorabool Street Geelong shows SEC No. 3 just to the south of Malop St. Has Hitchcocks, T & G building and the Bank of NSW buildings in the view. The tram is shown with a red colour scheme which is incorrect, should be green. There are two other trams in the view. Possibly a Kodak print.Yields information about the Moorabool St Geelong, late 1940s.Colour photograph titled "Moorabool Street Geelong - No. 1"In pencil on rear "No. 3 car". Ken Magor stamp and in pencil "K McCarthy No. 71" tramways, trams, geelong, moorabool st, tram 8, geelong tramway -
 Bendigo Historical Society Inc.
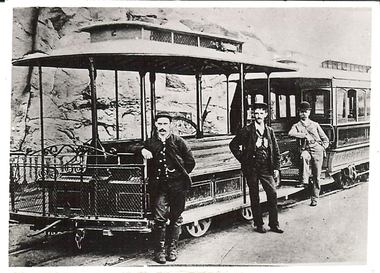
Photograph - BASIL MILLER COLLECTION: TRAM WITH 3 MEN
... BASIL MILLER COLLECTION: TRAM WITH 3 MEN...Black and white photograph of tram with 3 men, 2 in uniform, one in suit with bowler hat. ...Photograph BASIL MILLER COLLECTION: TRAM WITH 3 MEN ...Black and white photograph of tram with 3 men, 2 in uniform, one in suit with bowler hat. Possibly to be cable car or battery tram. '(2)' written in blue ink on back, '6' written in pencil on back of photo.person, individual, basil miller -
 Ballarat Tramway Museum
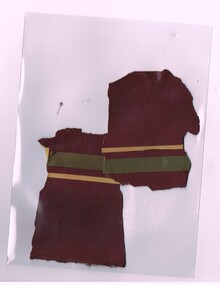
Functional object, Preston Workshops, W6 939, restaurant tram No. 3, c1990's
... W6 939, restaurant tram No. 3...Sample of paint chip scraped off the roof line of W6 939, restaurant tram No. 3, during Feb. 2015. Shows the base colour of the paint applied to the tram (would have faded), and striping. ...W6 939, restaurant tram No. 3 Functional object Preston Workshops ...Sample of paint chip scraped off the roof line of W6 939, restaurant tram No. 3, during Feb. 2015. Shows the base colour of the paint applied to the tram (would have faded), and striping. Two separate samples retained.trams, tramways, restaurant tram, paintwork -
 Ballarat Tramway Museum
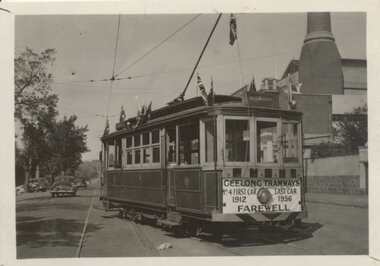
Photograph - SECV Geelong, last official tram - set of 3, Keith Kings, 26/03/1956
... SECV Geelong, last official tram - set of 3...Set of three black and white photographs from Keith Kings of the staged closures of the Geelong tramways. 1 - Geelong No. 4 - decorated as the Last tram, has a dash sign "Geelong Tramways No. 4 first car 1912, Last car 1956 Farewell", with the destination of Belmont. Photographed with power station in the background in Corio Terrace. 26/3/1956, KSK Photo (T)(e)(8). ...On the rear in ink and with the Keith Kings Copyright stamp: 1 - "Geelong - 4 - decorated as Official "Last" tram -26/3/56" - (T)(e)(8). 2 - "Geelong - 4 - illuminated as last tram Sun 26/3/56" - (T)(g)(3). 3 - "Geelong - 4 - last tram, back at Depot, Sun 26/3/56" - (T)(g)(8). ...Set of 3 black and white prints with photographer's notes on the rear. Photograph SECV Geelong, last official tram - set of 3 Keith Kings ...Black and White print contained within the Wal Jack Bendigo and Geelong Album, see Reg Item 5003 for more details. Set of three black and white photographs from Keith Kings of the staged closures of the Geelong tramways. 1 - Geelong No. 4 - decorated as the Last tram, has a dash sign "Geelong Tramways No. 4 first car 1912, Last car 1956 Farewell", with the destination of Belmont. Photographed with power station in the background in Corio Terrace. 26/3/1956, KSK Photo (T)(e)(8). Printed on Ilford Paper. See also Reg Item 2667 and 4388 for a colour slide version of the same photograph. 2 - ditto - about to leave the depot - KSK Photo - T(g)(3) 3 - ditto - back at the depot - KSK Photo - T(g)(8)Yields information about the closure of the Geelong tram system and the work of Keith Kings.Set of 3 black and white prints with photographer's notes on the rear.On the rear in ink and with the Keith Kings Copyright stamp: 1 - "Geelong - 4 - decorated as Official "Last" tram -26/3/56" - (T)(e)(8). 2 - "Geelong - 4 - illuminated as last tram Sun 26/3/56" - (T)(g)(3). 3 - "Geelong - 4 - last tram, back at Depot, Sun 26/3/56" - (T)(g)(8). trams, tramways, geelong, closure, depot, last tram, tram 4 -
 Ballarat Tramway Museum
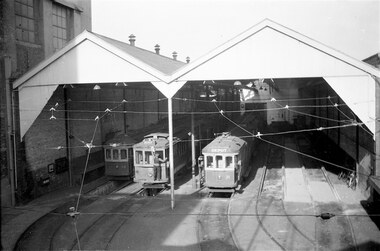
Photograph - SECV Geelong 36, 3 & 31 - depot - cleaner, c1950
... ...tram 3...Photograph taken from the top of a stairway looking at the front of the Geelong tram depot with trams 36, 3 and 31. Shows a cleaner wiping down or polishing the trolley rope protection bar on the top of tram No. 3, standing on the bumper while over the pit. ...Geelong tramways tramcar cleaning tram 36 tram 3 tram 31 depot Digital image from a photograph. ...Photograph taken from the top of a stairway looking at the front of the Geelong tram depot with trams 36, 3 and 31. Shows a cleaner wiping down or polishing the trolley rope protection bar on the top of tram No. 3, standing on the bumper while over the pit. Photo c1950, unknown photographer.Yields information about the Geelong tram depot and cleaning practices.Digital image from a photograph.geelong, tramways, tramcar, cleaning, tram 36, tram 3, tram 31, depot -
 Ballarat Tramway Museum
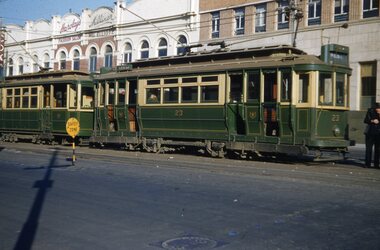
Slide - SECV Geelong 23 in Ryrie St, Hugh Ballment, 25/5/1954
... ...tram 3...Photograph of Geelong No. 23 in Ryrie St with the destination of West and tram 3 to Newtown. Note the Safety Zone sign. ...Yields information about trams 23 and 3 in Ryrie St. Tramways Geelong Ryrie St tram 23 tram 3 In ink "#23, Ryrie St? ...Photograph of Geelong No. 23 in Ryrie St with the destination of West and tram 3 to Newtown. Note the Safety Zone sign. Photo by Hugh Ballment 25/5/1954. In the background are the Bank of NSW, Harclays Fashion Salon and Mrs Elliott Milliner.Yields information about trams 23 and 3 in Ryrie St.Slide - Kodak cardboard mountIn ink "#23, Ryrie St?, SEC Geelong, 25/5/1954" and Hugh Ballment stamp.tramways, geelong, ryrie st, tram 23, tram 3 -
 Ballarat Tramway Museum
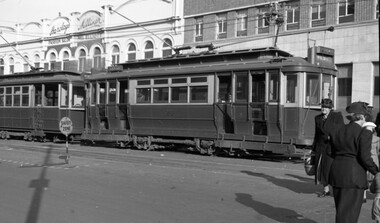
Photograph - SECV Geelong 3 at Ryrie and Moorabool Sts, 1951
... ...tram 3...Photo of a SECV Geelong tram 3 at the intersection of Moorabool and Ryrie Sts. ...Photo of a SECV Geelong tram 3 at the intersection of Moorabool and Ryrie Sts. ...Photo of a SECV Geelong tram 3 at the intersection of Moorabool and Ryrie Sts. The tram has the destination of East. Two safety zone signs are visible and another Duncan & Fraser tram can be seen in Moorabool St. The tram has been fitted with tail lights but remains in the green and cream livery.Yields information about Geelong tram 3 and the intersection of Moorabool and Ryrie Sts.Black and white photograph with printers marks on the rear and a handwritten note.in ink on the rear "1951"geelong, tramways, tram 3, ryrie st, moorabool st -
 Ballarat Tramway Museum
Negative - SECV Geelong 23 at Moorabool and Ryrie Sts, Hugh Ballment, 25/5/1954
... ...tram 3...Photo shows Geelong tram 23 and tram 3 the Safety Zone in Ryrie St. with the destinations of West and Newtown respectively. ...Yields information about trams 23 and 3 in Ryrie St. Tramways tramcars Geelong tram 3 tram 23 Ryrie St Negative - 127 film black and white Negative SECV Geelong 23 at Moorabool and Ryrie Sts. ...Photo shows Geelong tram 23 and tram 3 the Safety Zone in Ryrie St. with the destinations of West and Newtown respectively. Has the Safety Zone in the foreground and a number of ladies, one with a shopping basket in the view. In the background is the Bank of NSW, Harclays Fashion Salon and Mrs Elliott Milliner. See also item 10313 for a colour slide. Based on the date of a series of colour slides and a sleeve date of 1954 photo taken 25/5/1954. Yields information about trams 23 and 3 in Ryrie St.Negative - 127 film black and whitetramways, tramcars, geelong, tram 3, tram 23, ryrie st -
 Melbourne Tram Museum
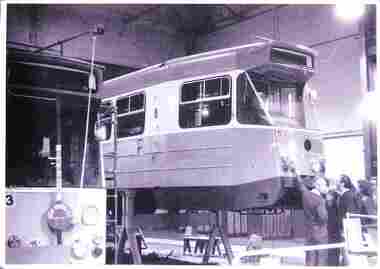
Photograph - Z3 and Z5 under construction Preston Workshops, 1975
... ...tram 3...The photograph shows Z-class trams 3 and 5 being fitted out or constructed at Preston Workshops, 1975. ...Melbourne Tram Museum 8 Wallen Road Hawthorn melbourne The photograph shows Z-class trams 3 and 5 being fitted out or constructed at Preston Workshops, 1975. ...The photograph shows Z-class trams 3 and 5 being fitted out or constructed at Preston Workshops, 1975. Z3 has been fitted with a trolley pole and other equipment, while Z5 is on stands. There are a number of people looking at Z5, which indicates a possible workshop tour. The tours database does not give a formal enthusiast tour of Preston in 1975. Z3 entered service in June 1975 after being delivered from Comeng in Feb. 1975.Yields information about the construction of Z class trams.Black and White Photograph with a plain back.tramways, trams, z class, tram 3, tram 5, preston workshops, new trams -
 Ballarat Tramway Museum
Photograph - Geelong Tram No.3 - Red Cross
... Geelong Tram No.3 - Red Cross...Photograph Geelong Tram No.3 - Red Cross Melbourne Electric Supply Co. ...Duncan and Fraser tramcar No 3 at the depot bedecked with large Australian flags and small Red Cross flags and seeking donations to the Red Cross. It is most likely the date is during WW1, probably 1916-1918.Black and white print on paper.12/1 and No. 1 in a circle written in pen on the reverse. GRS170/12/1/1 written in pencil on the reverse.geelong trams, duncan and fraser tramcar, ww1 decorations on trams -
 Ballarat Tramway Museum
Newspaper, ex VR tram, Corowa 3/1959, Mar. 1959
... ex VR tram, Corowa 3/1959...Newspaper clipping of former St Kilda - Black Rock tramway (Operated by Victorian Railways) tramcar No. 33, on semitrailer passing through town of Corowa on way to form summer cabins - Newspaper unknown, one of six bodies to Corowa. ex VR tram, Corowa 3/1959 Newspaper ...Newspaper clipping of former St Kilda - Black Rock tramway (Operated by Victorian Railways) tramcar No. 33, on semitrailer passing through town of Corowa on way to form summer cabins - Newspaper unknown, one of six bodies to Corowa.On top "keep" and on bottom "Mar 19th 59". On rear has "432" in a box.trams, tramways, vr trams, corowa, scrapped trams, disposal -
 Victorian Railway History Library
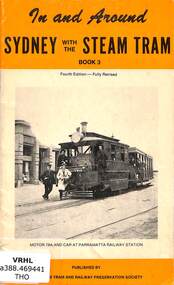
Booklet, New South Wales Steam Tram and Railway Preservation Society, In and around Sydney with the Steam Tram Book 3 Revised
... In and around Sydney with the Steam Tram Book 3 Revised...In and around Sydney with the Steam Tram Book 3 Revised Booklet New South Wales Steam Tram and Railway Preservation Society ...Book 3 revised of a history of the steam trams of Sydney in four volumes.Ill, maps. p.29.non-fictionBook 3 revised of a history of the steam trams of Sydney in four volumes.tramways - sydney, steam trams - sydney -
 Victorian Railway History Library
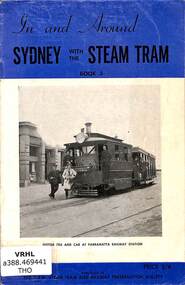
Booklet, New South Wales Steam Tram and Railway Preservation Society, In and around Sydney with the Steam Tram Book 3
... In and around Sydney with the Steam Tram Book 3...In and around Sydney with the Steam Tram Book 3 Booklet New South Wales Steam Tram and Railway Preservation Society ...Book 3 of a history of the steam trams of Sydney in four volumes.Ill, maps. p.25.non-fictionBook 3 of a history of the steam trams of Sydney in four volumes.tramways - sydney, steam trams - sydney -
 Ballarat Tramway Museum
Slide - Bendigo trams - Quarry Hill - Eaglehawk route - set of 6, Warren Doubleday, 13/9/1970
... ...tram 3...Set of six slides of Bendigo trams taken by Warren Doubleday on 13/9/1970 during an ARHS tour to Bendigo - 1 - tram 30 at the head of a long line up at the railway station 2 - tram 19 - part of the convoy 3 - tram 25 - turning into View St 4 - tram 24 leaving a loop on the Eaglehawk line - note the signals on the pole with one showing a green light. 5 - tram 26 outbound to Eaglehawk 6 - tram 3 inbound about to enter a loop - note the red signal on the pole....Bendigo Charing Cross Eaglehawk Quarry Hill tram 30 tram 19 tram 25 tram 24 tram 26 tram 3 Signals Have the photographer's slide number written on them. ...Set of six slides of Bendigo trams taken by Warren Doubleday on 13/9/1970 during an ARHS tour to Bendigo - 1 - tram 30 at the head of a long line up at the railway station 2 - tram 19 - part of the convoy 3 - tram 25 - turning into View St 4 - tram 24 leaving a loop on the Eaglehawk line - note the signals on the pole with one showing a green light. 5 - tram 26 outbound to Eaglehawk 6 - tram 3 inbound about to enter a loop - note the red signal on the pole.Yields information about the Bendigo tram system and the tram used on a tour in Sept. 1970.Colour Slide - Anscochrome GAF plastic mounts - set of 6Have the photographer's slide number written on them.bendigo, charing cross, eaglehawk, quarry hill, tram 30, tram 19, tram 25, tram 24, tram 26, tram 3, signals -
 Ballarat Tramway Museum
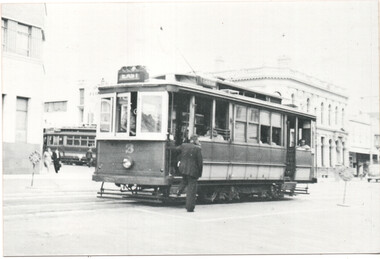
Photograph - Geelong 3 at Railway Station, Ken McCarthy, 4-2-1948
... ...tram 3...The photo shows Geelong tram No. 3 at the railway station with the destination of Newtown. ...The photo shows Geelong tram No. 3 at the railway station with the destination of Newtown. ...The photo shows Geelong tram No. 3 at the railway station with the destination of Newtown. Photo by Ken McCarthy 4-2-1948Yields information about the Geelong railway station terminus and tram 3.Black and white photograph with stamped details on rear.Typed on rear "No. 3 car SEC Geelong 4 Feb 1948, copyright K McCarthy, Photo No. 76". Ken Magor stamp as well" tramways, trams, geelong, tram 3, railway, railway station, geelong tramway -
 Ballarat Tramway Museum
photograph - Set of 5 Black & White - Bendigo tramways, Peter Duckett, early 1950s
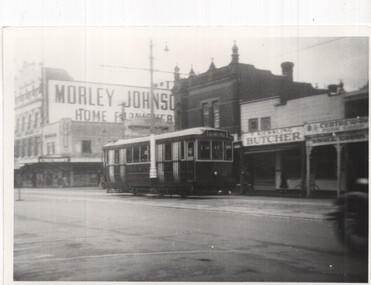
... ...tram 3...Kessling Butcher 2 - Tram No. 3 at the depot. 3 - Tram 7 on a Quarry Hill service. 4 - Bogie tram 24 at the depot 5 - Track cleaner - scrubber and another ex Melbourne single trucker at the depot....Kessling Butcher 2 - Tram No. 3 at the depot. 3 - Tram 7 on a Quarry Hill service. 4 - Bogie tram 24 at the depot 5 - Track cleaner - scrubber and another ex Melbourne single trucker at the depot. ...Set of five photographs of Bendigo trams photographed by Peter Duckett, early 1950s 1 - Bendigo 22 in Mitchell Street. Tram has the destination of Quarry Hill. In the background is the Morley Johnson Home furnisher and F. Kessling Butcher 2 - Tram No. 3 at the depot. 3 - Tram 7 on a Quarry Hill service. 4 - Bogie tram 24 at the depot 5 - Track cleaner - scrubber and another ex Melbourne single trucker at the depot.Yields information about Bendigo trams early 1950sSet of five black and white photographs by Peter Duckett.Details the image on the rear of the print in ink.bendigo, tramcars, bendigo tramways, quarry hill, charing cross, mitchell st, tram 22, tram 3, tram 7, tram 24, scrubber tram -
 Ballarat Tramway Museum
Slide - SECV Bendigo trams operations - set of 9, Warren Doubleday, 31/1/1972
... ...tram 3...Set of 9 photos of Bendigo tramway operations taken on 31/1/1972: 1 - tram 3 on the Eaglehawk line for Quarry Hill 2 - Birney 29 on North Bendigo crossing bridge 3 - Charing Cross with trams 29, 6, 3 and 5 4 - Tram 29 at Golden Square with the Golden Square Hotel on the left 5 - tram 29 passing the Fire Station 6 - tram 29 on the North Bendigo line 7 - tram 6 passing the Cathedral 8 - tram 5 on its way to Quarry Hill 9 - tram 18 on its way to Eaglehawk ...Ballarat Tramway Museum South Gardens Reserve Wendouree Parade Ballarat Ballarat goldfields Set of 9 photos of Bendigo tramway operations taken on 31/1/1972: 1 - tram 3 on the Eaglehawk line for Quarry Hill 2 - Birney 29 on North Bendigo crossing bridge 3 - Charing Cross with trams 29, 6, 3 and 5 4 - Tram 29 at Golden Square with the Golden Square Hotel on the left 5 - tram 29 passing the Fire Station 6 - tram 29 on the North Bendigo line 7 - tram 6 passing the Cathedral 8 - tram 5 on its way to Quarry Hill 9 - tram 18 on its way to Eaglehawk Yields information about Bendigo tramways operations in Jan. 1972 tramways Bendigo tram 6 tram 18 tram 5 tram 29 tram 3 Have the photographer's slide number written on them. "2/72/25 to 34" Colour Slide - Kodak cardboard mounts - set of 9 Slide SECV Bendigo trams operations - set of 9 Warren Doubleday ...Set of 9 photos of Bendigo tramway operations taken on 31/1/1972: 1 - tram 3 on the Eaglehawk line for Quarry Hill 2 - Birney 29 on North Bendigo crossing bridge 3 - Charing Cross with trams 29, 6, 3 and 5 4 - Tram 29 at Golden Square with the Golden Square Hotel on the left 5 - tram 29 passing the Fire Station 6 - tram 29 on the North Bendigo line 7 - tram 6 passing the Cathedral 8 - tram 5 on its way to Quarry Hill 9 - tram 18 on its way to Eaglehawk Yields information about Bendigo tramways operations in Jan. 1972Colour Slide - Kodak cardboard mounts - set of 9Have the photographer's slide number written on them. "2/72/25 to 34"tramways, bendigo, tram 6, tram 18, tram 5, tram 29, tram 3