Showing 5 items matching " tram 573"
-
 Melbourne Tram Museum
Album - Photo Album, Transit Australia Publishing, "TAP - Part B - W to W4, L, X and Y class trams – sheets B1 to B36", 1950's to 1990's
... ... tram 573...Melbourne Tram Museum 8 Wallen Road Hawthorn melbourne Trams tramways Transit Australia Destination City Tramcars Depots W Class W1 class W2 class W3 class W4 class L class X class Y Class tram 106 tram 102 tram 105 tram 218 tram 610 tram 219 tram 249 tram 275 tram 297 tram 305 tram 306 tram 210 tram 334 tram 336 tram 349 tram 380 tram 426 tram 436 tram 441 tram 449 tram 478 tram 534 tram 536 tram 544 tram 548 tram 573 tram 574 tram 646 tram 658 tram 665 tram 459 tram 460 tram 467 tram 678 tram 679 tram 680 tram 469 tram 610 tram 611 tram 613 tram 104 tram 1024 tram 217 tram 218 tram 280 tram 308 tram 210 tram 681 tram 317 tram 340 tram 364 tram 390 tram 422 tram 426 tram 436 tram 511 tram 514 tram 544 tram 568 tram 660 tram 658 tram 660 tram 665 tram 671 tram 673 tram 674 tram 459 tram 679 tram 610 tram 611 tram 613 tram 419 tram 510 Photo Album - titled "TAP - Part B - W to W4, L, X and Y class trams – sheets B1 to B36", from Transit Australia Publishing. ...Photo Album - titled "TAP - Part B - W to W4, L, X and Y class trams – sheets B1 to B36", from Transit Australia Publishing. Photos used in the Destination City and other publications series. For a detailed list of photographs see htd4601i.pdf. For individual photo images see: \dbtext\hawthtramcoll\photo collections\htd4601-TAP-ParB, images TAP67 to TAP160. TAP67_106_ElsternwickPO_WalJack.jpg TAP68_102_GlenhuntlyRd_ALBebeek.jpg TAP69_105_StKildaRd_Jun1979_RayMarsh.jpg TAP70_218-610_PointOrmond_JohnBeckett.jpg TAP71_218_ElsternwickStation_25Sep1953_WJohnWebster.jpg TAP72_219_Dec1923_JohnStevenson_KSKcollection.jpg TAP73_249_Esplanade_decorations-gone_1939_PWDuckett.jpg TAP74_275_ElginSt_24Mar1956_KeithKings.jpg TAP75_297_EastBrighton_14May1961_KeithKings.jpg TAP76_305_SouthMelbourne_14May1961_KeithKings.jpg TAP77_306_StKildaRd_25Sep1953_WJohnWebster.jpg TAP78_310_PrincesBridge_WJohnWebster.jpg TAP79_329_GlenhuntlyDepot_Jul1929.jpg TAP80_334_EastPrestonDepot_7April1969_KeithKings.jpg TAP81_3326_ColinsSt_WJohnWebster.jpg TAP82_348_BalaclavaJunction_13Jan1962_KeithKings.jpg TAP83_380-dropcentreSeats_RYoul.jpg TAP84_426_BatmanAve_23Sep1953_WJohnWebster.jpg TAP85_436_HighSt-at-BennettsRd_16Feb1957_KeithKings.jpg TAP86_441_Victoria150_NorthBalwyn.jpg TAP87_No7-truck_449_KIngsway_KeithKings_9Sep1961n.jpg TAP88_478_BatmanAve_23Sep1953_WJohnWebster.jpg TAP89_534_VictoriaSt_RayPearson.jpg TAP90_536_HighSt_Kew_KeithKings_28Sep1961.jpg TAP91_536_HighSt_Kew_KeithKings_28Sep1961.jpg TAP92_No7-truck_544_WJohnWebster_29Sep1953.jpg TAP93_548_StLouis.EIB64.Trucks_BrunswickDepot_JohnAlfred_28Jan1957.jpg TAP94_548_StLouis.EIB64.Trucks_StKildaRd_KeithKings_19Mar1955.jpg TAP95_573_PointOrmond_LindsayCrow.jpg TAP96_574_CollinsSt_WJohnWebster_28Sep1953.jpg TAP97_646-113_1987_Bundoora.jpg TAP98_654_RoyalPde_BobLilburn_1949.jpg TAP99_658_ElizabethSt_WJohnWebster_28Sep1953.jpg TAP100_665_CollinsSt_WJohnWebster_28Sep1953.jpg TAP101_665_MacarthurSt_WJohnWebster_28Sep1953.jpg TAP102_459_BallaratRd_Footscray_ALBebee.jpg TAP103_459_BallaratRd_Footscray_ALBebee.jpg TAP104_460_NicholsonSt-into-BuckleySt_Footscray_WJohnWebster_28Sep1953.jpg TAP105_467_GordonSt.jpg TAP106_X1_WilliamstownRd.jpg T AP107_X1_interior.jpg TAP108_678_WilliamstownRd_KeithKings_13Jan1962.jpg TAP109_679_BuckleySt-depot.jpg TAP110_680_FootscrayStation_RayPearson.jpg TAP111_469_BatmanAve_25Sep1953_WJohnWebster.jpg TAP112_469_CamberwellDepot_KeithKings_25April1950.jpg TAP113_469_RiversdaleRd_NedMackintosh_1972.jpg TAP114_610_PointOrmond_JohnBeckett.jpg TAP115_611_CamberwellDepot_BobLilburn.jpg TAP116_613_BatmanAve_WJohnWebster_23Sep1953.jpg TAP117_104_JohnBeckett.jpg TAP118_105_MMTB.jpg TAP119_103-1024_StKildaRd_6Jan1973_AndrewFoy.jpg TAP120_106_GlenhuntlyRd.jpg TAP121_217_MalvernDepot_MMTB.jpg TAP122_217_MalvernDepot_DaveMacartney_12Sep1971.jpg TAP123_218_PointOrmond_LCrow.jpg TAP124_218_Elsternwick_WJohnWebster_c1953.jpg TAP125_218_GlenhuntlyRd_Broadway.jpg TAP126_W-body_MMTB.jpg TAP127_275_MalvernDepot.jpg TAP128_275_SwanstonSt.jpg TAP129_280_StKilda_WJohnWebster_c1953.jpg TAP130_308_KewDepot_c1925_MMTBAnnualReport.jpg TAP131_310-681_BatmanAve_RayPearson_1930s.jpg TAP132_317_Traverser_Preston_MMTB.jpg TAP133_340_HighSt_MMTB.jpg TAP134_364_Preston_MMTB.jpg TAP135_390_WellingtonPde.jpg TAP136_422_SwanstonSt_WJohnWebster_c1953.jpg TAP137_426_BatmanAve_LCrow.jpg TAP138_426_BatmanAve_WJohnWebster.jpg TAP139_426_CamberwellDepot_GeoffGrant_7May1955.jpg TAP140_436_SpencerSt_BobLilburn_1948.jpg TAP141_511_CamberwellDepot_GeoffGrant_7May1955.jpg TAP142_514_StKildaRd_WJohnWebster.jpg TAP143_544_StKilda_WJohnWebster.jpg TAP144_568_Decorated_RayPearson.jpg TAP145_660_GlenhuntlyDepot_LCrow.jpg TAP146_658_SwanstonSt_PaulNicholson_23Dec1967.jpg TAP145 - copy of TAP 145 TAP148_665_MacarthurSt_WJohnWebster_28Sep1953.jpg TAP149_671_Preston_MMTB.jpg TAP150_673_decorated_Preston_MMTB.jpg TAP151_674_PeelSt_DaleBudd_1965.jpg TAP152_674_WJohnWebster_c1953.jpg TAP153_456_PointOrmond_WJohnWebster_c1953.jpg TAP154_679_BuckleySt_LCrow_mid1950s.jpg TAP155_610_MorelandRd_PaulNicholson_22Sep1968.jpg TAP156_610_Preston_MMTB_1930.jpg TAP157_611_Preston_MMTB.jpg TAP158_613_BatmanAve_25Sep1953_WJohnWebster.jpg TAP159_419_Preston_MMTB.jpg TAP160_510_WellingtonPde_PTC_1989.jpgtrams, tramways, transit australia, destination city, tramcars, depots, w class, w1 class, w2 class, w3 class, w4 class, l class, x class, y class, tram 106, tram 102, tram 105, tram 218, tram 610, tram 219, tram 249, tram 275, tram 297, tram 305, tram 306, tram 210, tram 334, tram 336, tram 349, tram 380, tram 426, tram 436, tram 441, tram 449, tram 478, tram 534, tram 536, tram 544, tram 548, tram 573, tram 574, tram 646, tram 658, tram 665, tram 459, tram 460, tram 467, tram 678, tram 679, tram 680, tram 469, tram 610, tram 611, tram 613, tram 104, tram 1024, tram 217, tram 218, tram 280, tram 308, tram 210, tram 681, tram 317, tram 340, tram 364, tram 390, tram 422, tram 426, tram 436, tram 511, tram 514, tram 544, tram 568, tram 660, tram 658, tram 660, tram 665, tram 671, tram 673, tram 674, tram 459, tram 679, tram 610, tram 611, tram 613, tram 419, tram 510 -
 Melbourne Tram Museum
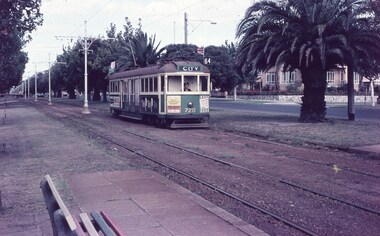
Slide - Set of 6, Keith Caldwell, 11/03/1960 12:00:00 AM
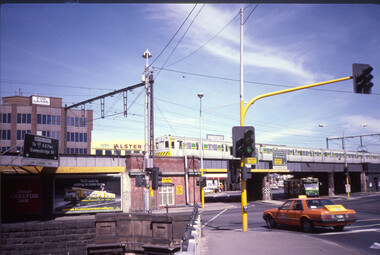
... ... tram 573...Set of six Agfa Colour slide, cardboard mount, by Keith Caldwell - all dated 11 March 1960 .1 - W5 720 inbound Dandenong Road, route 64, City, with advertisements for Tek toothbrushes, Bridge and Webster, auto electrical and Band aids. .2 - W2 573, showing St Kilda Junction, no route number. Tram has adverts but not easily read. .3 - SW6 947, showing route 62, city. ...Melbourne Tram Museum 8 Wallen Road Hawthorn melbourne Trams tramways Dandenong Rd W5 class Route 64 W2 class St Kilda Junction SW6 class Route 62 Route 5 tram 720 tram 573 tram 947 tram 816 tram 398 tram 958 hand stamped "11 Mar '60". .5 has "W2" in ink. ...Set of six Agfa Colour slide, cardboard mount, by Keith Caldwell - all dated 11 March 1960 .1 - W5 720 inbound Dandenong Road, route 64, City, with advertisements for Tek toothbrushes, Bridge and Webster, auto electrical and Band aids. .2 - W2 573, showing St Kilda Junction, no route number. Tram has adverts but not easily read. .3 - SW6 947, showing route 62, city. Has adverts for Qantas and ? soap. .4 - W5 816, showing route 5, city, with adverts for Ducklings, Champion Spark plugs and Ferris car radios. .5 - W2 398, as for .4, with adverts for Remy Martin Brandy and 3AW. .6 - SW6 958, as for .1, followed by 833?. The first tram has adverts for Persil soap powder? and 3AWhand stamped "11 Mar '60". .5 has "W2" in ink.trams, tramways, dandenong rd, w5 class, route 64, w2 class, st kilda junction, sw6 class, route 62, route 5, tram 720, tram 573, tram 947, tram 816, tram 398, tram 958 -
 Melbourne Tram Museum
Photograph - Block Mounted Photograph, Surrey Hill Neighbourhood Centre, c1920
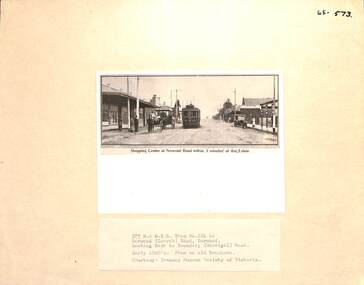
... Melbourne Tram Museum 8 Wallen Road Hawthorn melbourne Trams tramways Burwood Toorak Road tram 124 On rear in ink "Copied for Keith Kings 2002: and the "Surrey Hill Neighbourhood Centre" stamp. Photograph - mounted onto a heavy card, numbered 65-573 in the top right hand corner of MTTB No. 124 at the Burwood Road, or Norwood terminus in Toorak Road, at Boundary Road. ...Photograph - mounted onto a heavy card, numbered 65-573 in the top right hand corner of MTTB No. 124 at the Burwood Road, or Norwood terminus in Toorak Road, at Boundary Road. Copied from a Real Estate brochure. Photo courtesy of the TMSV. Photo shows a number of shops or stores, including a Tea Merchant and the single line tramway on the south side of the roadway. See image i2 for a scan of the photograph.On rear in ink "Copied for Keith Kings 2002: and the "Surrey Hill Neighbourhood Centre" stamp.trams, tramways, burwood, toorak road, tram 124 -
 Melbourne Tram Museum
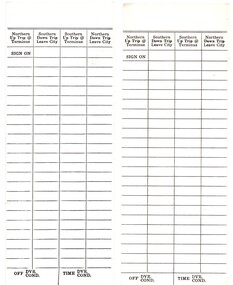
Administrative Record - Table Cards, Melbourne & Metropolitan Tramways Board (MMTB), blank unused form on preprinted cards, c1980 to c2000
... trams? - 210H x 79W .2 - as above, but printed on heavy card, both sides .3 -printed on heavy paper, blank with sign on times, giving drivers and conductors, and hours worked - 165H x 80W - understood used with the plastic card holders. - form number 3/572 .4 - as for .2, light paper, double sided - 163H x 80W - form number 3/573...trams? - 210H x 79W .2 - as above, but printed on heavy card, both sides .3 -printed on heavy paper, blank with sign on times, giving drivers and conductors, and hours worked - 165H x 80W - understood used with the plastic card holders. - form number 3/572 .4 - as for .2, light paper, double sided - 163H x 80W - form number 3/573 .5 - as for .2, heavy paper double sided - 165H x 80W - form number 3/573 .6 - as for .4 .7 - single sided sheet, printed on light page, 210H x 79W, no form number. ...Set of six different Table cards - blank unused form on preprinted card ruled to provide a timetable for crews - drivers and conductors, and hours worked. .1 - printed heavy paper for Northern and Southern trips from Terminus - Swanston trams? - 210H x 79W .2 - as above, but printed on heavy card, both sides .3 -printed on heavy paper, blank with sign on times, giving drivers and conductors, and hours worked - 165H x 80W - understood used with the plastic card holders. - form number 3/572 .4 - as for .2, light paper, double sided - 163H x 80W - form number 3/573 .5 - as for .2, heavy paper double sided - 165H x 80W - form number 3/573 .6 - as for .4 .7 - single sided sheet, printed on light page, 210H x 79W, no form number. See Reg Item 2601 for a sample used and backed onto a sheet of Masonite.trams, tramways, forms, drivers, table cards, conductors -
 Melbourne Tram Museum
Slide - MMTB and MTA tramway operations - set of 11, Hugh Ballment, 1950s to 1980s
... tram 845...Bourke St...Point Ormond...railways...Trams...X class...X1 class...W2 class...SW5 class...Y1 class...W6 class...MMTB Buses...bus 573...HBM020 - MMTB Tram W6 994, 24/06/1955, Bourke Street, Test run new electric tramway. Photo at corner with Elizabeth Street. AEC MkIII bus No 573...HBM020 - MMTB Tram W6 994, 24/06/1955, Bourke Street, Test run new electric tramway. Photo at corner with Elizabeth Street. AEC MkIII bus No 573 ...Set of 11 photos by Hugh Ballment, unless noted, of MMTB or MTA trams or works: HBM013 - MTA A class tram No 242, c1987, Queensbridge Street, operating out of South Melbourne Depot on driver training. Note the Light Rail sign at left. A refurbished Harris train set on running a Port Melbourne service. Alstergren building in the background HBM014 - MMTB Trams S 164, X 217, 19/03/1960, Malvern Depot, 164 has WW2 white stripe - Keith Kings photo. HBM015 - MMTB Tram Y1 612, operating to Burwood in the early 1950s, Batman Avenue, HBM016 - MMTB Tram W2 395, 26/05/1954, Swanston Street, SW6 923 in air force recruitment livery ahead of it and a W4 class car beside it. HBM017 - MMTB Tram SW5 845, 24/05/1954, Batman Avenue, with a W2 391 at the terminus. Note the black and yellow taxi on the left side of the image, and a sign for Holden cars in the far background. HBM018 - MTA Tram A class 242, c1987, Queensbridge Street, Light Rail sign at left - see also item HBM013 HBM019 - MMTB Tram W2 639, c Feb 1954, Swanston Street, Royal Visit crown over Collins Street intersection with barrier rails partly set up for a parade on the day. In the background is The Graham Hotel, Calders Jewellery store advert and Damman's store on the corner. HBM020 - MMTB Tram W6 994, 24/06/1955, Bourke Street, Test run new electric tramway. Photo at corner with Elizabeth Street. AEC MkIII bus No 573 is running a Northcote service. There is another bus mostly hidden by the tram and the new tram stop sign is in place. In the background is Nettlebergs, Furriers, store HBM021 - MMTB Tram X 218, 26/05/1954, Point Ormond, HBM022 - MMTB Trams X1 468, W2 315, 1950s, Leeds St Footscray, Tram X1 468 is about to return to the depot. Tram W2 315 is running a route 82. Tram X1 463 is in the distance. HBM023 - Tram Q 200, c1954, St Georges Road at Miller Street. Tram is running a workshop for employees special to West Preston - see also item 8151 & 8997. Note chimney stacks in the background belong to the former brickworks. Yields information about Melbourne tram operations, a Royal Visit and the construction of the St Kilda to Port Melbourne Light Rail.Kodachrome card board or plastic mounts, with notes - set of 11tramways, queensbridge, tram 242, light rail, tram 164, tram 217, tram 612, batman ave, swanston st, tram 395, tram 923, raaf, flinders st, tram 639, royal visit, tram 845, bourke st, point ormond, railways, trams, x class, x1 class, w2 class, sw5 class, y1 class, w6 class, mmtb buses, bus 573, a class, s class, sw6 class, w4 class, route 7, route 77, route 74, tram 994, tram 218, tram 468, tram 463, route 82, leeds st, tram 200, q class, tram 315, route 15, route 4, collins st, elizabeth st, st georges road, miller st, malvern depot