Showing 9 items matching " tram 678"
-
 Melbourne Tram Museum
Photograph - Footscray - Victoria St - tram 678, Jim Seletto, c1960
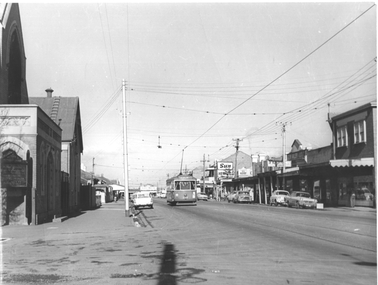
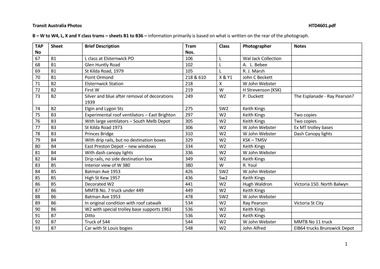
... Footscray - Victoria St - tram 678......tram 678...The photograph shows MMTB X2 class tram No 678, southbound in Victoria St Footscray/Seddon on its way to Williamstown Road terminus at the corner with Walter St. ...Yields information about the trams in Victoria St Footscray / Seddon c1960. trams X2 class tram 678 Victoria St Footscray "J Seletto photo" Black and White photograph with photographer's notes on rear Photograph Footscray - Victoria St - tram 678 Jim Seletto ...The photograph shows MMTB X2 class tram No 678, southbound in Victoria St Footscray/Seddon on its way to Williamstown Road terminus at the corner with Walter St. On the left side is the Victoria St Methodist church. On the right is a shopping centre with signs for The Sun, The Herald, Keily, Solite floor, and Glen Valley tea. See item 8215 for a photo of X1 in the same street.Yields information about the trams in Victoria St Footscray / Seddon c1960.Black and White photograph with photographer's notes on rear"J Seletto photo"trams, x2 class, tram 678, victoria st, footscray -
 Melbourne Tram Museum
Photograph - Tram 678 crossing Geelong Road Footscray, Jim Seletto, c1960
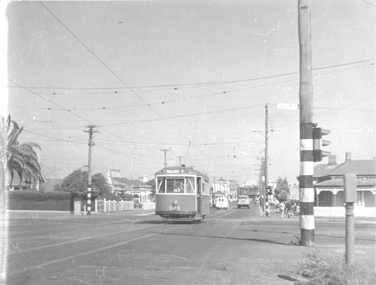
... Tram 678 crossing Geelong Road Footscray......tram 678...The photograph shows an X2 class No. 678, north bound in Droop St Footscray, crossing Geelong Road with the destination of Ballarat Rd. Another tram...Black and White photograph with photographer's notes on rear Photograph Tram 678 crossing Geelong Road Footscray Jim Seletto ...The photograph shows an X2 class No. 678, north bound in Droop St Footscray, crossing Geelong Road with the destination of Ballarat Rd. Another tram can be seen southbound. Note the street fire alarm pillar on the right side of the photograph.Yields information about the trams in Droop St Footscray, c1960.Black and White photograph with photographer's notes on rear"678 Crossing Geelong Road" and "J Seletto photo" in ink.trams, footscray, x2 class, tram 678, droop st, geelong road -
 Melbourne Tram Museum
Slide - MMTB, tramway operations set of 11, Hugh Ballment, 1950s to 1960s
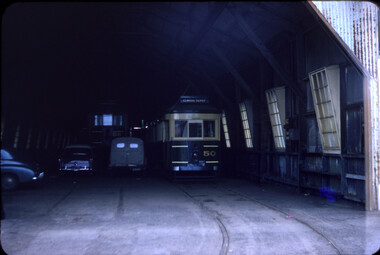
... ...tram 678...HBM095 - MMTB Trams 931, 408, 1950s, Brunswick depot, parked in the depot along with three other cars HBM096 - MMTB Tram 980, 1950s, Malvern depot, HBM097 - MMTB Tram 980, 25/06/1955, Bourke St, AETA tour HBM098 - MMTB Tram 1001, 26/06/1955, Preston depot, AETA tour HBM099 - MMTB Tram 947, 1950s, St Kilda Rd, Temporary trackwork HBM100 - MMTB Tram 678, c1960, Leeds St, at Footscray Station, with Cummings Chemist in the background, advertising Kodak Film. ...HBM095 - MMTB Trams 931, 408, 1950s, Brunswick depot, parked in the depot along with three other cars HBM096 - MMTB Tram 980, 1950s, Malvern depot, HBM097 - MMTB Tram 980, 25/06/1955, Bourke St, AETA tour HBM098 - MMTB Tram 1001, 26/06/1955, Preston depot, AETA tour HBM099 - MMTB Tram 947, 1950s, St Kilda Rd, Temporary trackwork HBM100 - MMTB Tram 678, c1960, Leeds St, at Footscray Station, with Cummings Chemist in the background, advertising Kodak Film. ...Set of 11 photos by Hugh Ballment, unless noted, of MMTB trams: HBM093 - MMTB Trams 486, 180, c1960, Leeds St, at Footscray Station. Tram 180 is running a Williamstown Road service, while 482 running a route 82. In the background is Appleton & Wright Mens Wear, Launder and a large sign advertising Furniture with a clock on it. HBM094 - MMTB Tram 787, 1950s, Royal Park, At Flemington Rd, route 55. Alongside is the former waiting shelter. HBM095 - MMTB Trams 931, 408, 1950s, Brunswick depot, parked in the depot along with three other cars HBM096 - MMTB Tram 980, 1950s, Malvern depot, HBM097 - MMTB Tram 980, 25/06/1955, Bourke St, AETA tour HBM098 - MMTB Tram 1001, 26/06/1955, Preston depot, AETA tour HBM099 - MMTB Tram 947, 1950s, St Kilda Rd, Temporary trackwork HBM100 - MMTB Tram 678, c1960, Leeds St, at Footscray Station, with Cummings Chemist in the background, advertising Kodak Film. HBM101 - c1960, Tram interior, unknown system, could be Kalgoorlie or Perth or ? HBM102 - MMTB , c1960, Bourke St, at Exhibition St HBM103 - MMTB Tram 197, 1950s, Malvern depot, an all-night tram. Possibly at the time of a tram tour.Yields information about Melbourne tram operations, with 1950s or 1960s photos of Melbourne tramways.Kodachrome cardboard and plastic mounts, with notes - set of 11tramways, new tramway, williamstown road, russell st, ballarat road, footscray, leeds st, tram 180, tram 486, royal park, tram 787, flemington road, tram 931, tram 408, tram 980, malvern depot, tram 1001, tram 947, tram 678, bourke st, aeta tours, tram 197 -
 Melbourne Tram Museum
Slide - MMTB, MTA and VR tramway operations set of 12, Hugh Ballment, 1950s to 1980s
... ...tram 678...HBM090 - MMTB T 181, c1960, in Ballarat Road at the Rosamond Road terminus showing Williamstown Road on the destination. HBM091 - MMTB Tram 678, c1960, Ballarat Road, At Eleanor Street, with E V Young general store in the background advertising Robur Tea, and Cadbury's chocolate. ...HBM090 - MMTB T 181, c1960, in Ballarat Road at the Rosamond Road terminus showing Williamstown Road on the destination. HBM091 - MMTB Tram 678, c1960, Ballarat Road, At Eleanor Street, with E V Young general store in the background advertising Robur Tea, and Cadbury's chocolate. ...Set of 12 photos by Hugh Ballment, unless noted, of VR, MTA and MMTB trams: HBM081 - VR Tram No 50, mid 1950s, Elwood Depot, with a Don't move sign. Tram 38 is alongside HBM082 - MMTB, c1975, Spring Street, Z1 class cars- (fuzzy photo) HBM083 - MMTB Trams X1 466 and 463, early 1960s, Leeds Street, Footscray station. In the background are J Burmah tailor, K C Field pawn broker, HBM084 - MTA, B 2001, Showing "Southbank Depot" Route 91, late 1980s, Albert Park, Light rail level crossing at Birdport Street. HBM085 - MMTB X2 677, late 1950s, Elsternwick, Glen Huntly Road, with the Railway level crossing gates closed. In the background are adverts for The Rex Fruit shop, The Sun, The Age, spray painting, Turf, and Holden cars. HBM086 - MMTB Tram 677, late 1950s, in Glen Huntly Road at the intersection of Broadway and Ormond Road bound for Port Ormond. In the background is a Chemist, Morley Auctioneers, State Savings Bank, and a motor dealer advertising Standard Cars. HBM087 - MMTB X1 459, early 1960s, Barkly Street?, running a Russell Street service. HBM088 - MMTB PCC 980, 26/05/1954, Preston Workshops, HBM089 - MMTB X1 460, c1960, at the Russell St terminus in Barkly Street, West Footscray. The tram has the return destination of Williamstown Road. In the background is E J Coxhead, Men's and Boy's Wear shop. This line closed in 1962. HBM090 - MMTB T 181, c1960, in Ballarat Road at the Rosamond Road terminus showing Williamstown Road on the destination. HBM091 - MMTB Tram 678, c1960, Ballarat Road, At Eleanor Street, with E V Young general store in the background advertising Robur Tea, and Cadbury's chocolate. HBM092 - MMTB Tram 467, c1960, in Francis Street at the Williamstown Road terminus, showing the return destination of Ballarat Road. Has a Gent's Hairdresser in the background. Yields information about Melbourne tram operations, with 1950s or 1960s photos of Melbourne tramways.Kodachrome cardboard and plastic mounts, with notes - set of 12tramways, vr, st kilda brighton tramway, tram 50, z class, tram 466, tram 463, footscray, williamstown road, russell st, ballarat road, tram 2001, tram 677, tram 459, tram 980, preston workshops, glen huntly road, trams, elwood depot, spring st, leeds st, x1 class, pcc class, route 91, birdport st, b class, albert park, yarraville, west footscray, barkly st, broadway, ormond road, rosamond road, tram 460, x2 class, t class, tram 181, francis st, tram 678, tram 467 -
 Melbourne Tram Museum
Album - Photo Album, Transit Australia Publishing, "TAP - Part B - W to W4, L, X and Y class trams – sheets B1 to B36", 1950's to 1990's
... ... tram 678...Melbourne Tram Museum 8 Wallen Road Hawthorn melbourne Trams tramways Transit Australia Destination City Tramcars Depots W Class W1 class W2 class W3 class W4 class L class X class Y Class tram 106 tram 102 tram 105 tram 218 tram 610 tram 219 tram 249 tram 275 tram 297 tram 305 tram 306 tram 210 tram 334 tram 336 tram 349 tram 380 tram 426 tram 436 tram 441 tram 449 tram 478 tram 534 tram 536 tram 544 tram 548 tram 573 tram 574 tram 646 tram 658 tram 665 tram 459 tram 460 tram 467 tram 678 tram 679 tram 680 tram 469 tram 610 tram 611 tram 613 tram 104 tram 1024 tram 217 tram 218 tram 280 tram 308 tram 210 tram 681 tram 317 tram 340 tram 364 tram 390 tram 422 tram 426 tram 436 tram 511 tram 514 tram 544 tram 568 tram 660 tram 658 tram 660 tram 665 tram 671 tram 673 tram 674 tram 459 tram 679 tram 610 tram 611 tram 613 tram 419 tram 510 Photo Album - titled "TAP - Part B - W to W4, L, X and Y class trams – sheets B1 to B36", from Transit Australia Publishing. ...Photo Album - titled "TAP - Part B - W to W4, L, X and Y class trams – sheets B1 to B36", from Transit Australia Publishing. Photos used in the Destination City and other publications series. For a detailed list of photographs see htd4601i.pdf. For individual photo images see: \dbtext\hawthtramcoll\photo collections\htd4601-TAP-ParB, images TAP67 to TAP160. TAP67_106_ElsternwickPO_WalJack.jpg TAP68_102_GlenhuntlyRd_ALBebeek.jpg TAP69_105_StKildaRd_Jun1979_RayMarsh.jpg TAP70_218-610_PointOrmond_JohnBeckett.jpg TAP71_218_ElsternwickStation_25Sep1953_WJohnWebster.jpg TAP72_219_Dec1923_JohnStevenson_KSKcollection.jpg TAP73_249_Esplanade_decorations-gone_1939_PWDuckett.jpg TAP74_275_ElginSt_24Mar1956_KeithKings.jpg TAP75_297_EastBrighton_14May1961_KeithKings.jpg TAP76_305_SouthMelbourne_14May1961_KeithKings.jpg TAP77_306_StKildaRd_25Sep1953_WJohnWebster.jpg TAP78_310_PrincesBridge_WJohnWebster.jpg TAP79_329_GlenhuntlyDepot_Jul1929.jpg TAP80_334_EastPrestonDepot_7April1969_KeithKings.jpg TAP81_3326_ColinsSt_WJohnWebster.jpg TAP82_348_BalaclavaJunction_13Jan1962_KeithKings.jpg TAP83_380-dropcentreSeats_RYoul.jpg TAP84_426_BatmanAve_23Sep1953_WJohnWebster.jpg TAP85_436_HighSt-at-BennettsRd_16Feb1957_KeithKings.jpg TAP86_441_Victoria150_NorthBalwyn.jpg TAP87_No7-truck_449_KIngsway_KeithKings_9Sep1961n.jpg TAP88_478_BatmanAve_23Sep1953_WJohnWebster.jpg TAP89_534_VictoriaSt_RayPearson.jpg TAP90_536_HighSt_Kew_KeithKings_28Sep1961.jpg TAP91_536_HighSt_Kew_KeithKings_28Sep1961.jpg TAP92_No7-truck_544_WJohnWebster_29Sep1953.jpg TAP93_548_StLouis.EIB64.Trucks_BrunswickDepot_JohnAlfred_28Jan1957.jpg TAP94_548_StLouis.EIB64.Trucks_StKildaRd_KeithKings_19Mar1955.jpg TAP95_573_PointOrmond_LindsayCrow.jpg TAP96_574_CollinsSt_WJohnWebster_28Sep1953.jpg TAP97_646-113_1987_Bundoora.jpg TAP98_654_RoyalPde_BobLilburn_1949.jpg TAP99_658_ElizabethSt_WJohnWebster_28Sep1953.jpg TAP100_665_CollinsSt_WJohnWebster_28Sep1953.jpg TAP101_665_MacarthurSt_WJohnWebster_28Sep1953.jpg TAP102_459_BallaratRd_Footscray_ALBebee.jpg TAP103_459_BallaratRd_Footscray_ALBebee.jpg TAP104_460_NicholsonSt-into-BuckleySt_Footscray_WJohnWebster_28Sep1953.jpg TAP105_467_GordonSt.jpg TAP106_X1_WilliamstownRd.jpg T AP107_X1_interior.jpg TAP108_678_WilliamstownRd_KeithKings_13Jan1962.jpg TAP109_679_BuckleySt-depot.jpg TAP110_680_FootscrayStation_RayPearson.jpg TAP111_469_BatmanAve_25Sep1953_WJohnWebster.jpg TAP112_469_CamberwellDepot_KeithKings_25April1950.jpg TAP113_469_RiversdaleRd_NedMackintosh_1972.jpg TAP114_610_PointOrmond_JohnBeckett.jpg TAP115_611_CamberwellDepot_BobLilburn.jpg TAP116_613_BatmanAve_WJohnWebster_23Sep1953.jpg TAP117_104_JohnBeckett.jpg TAP118_105_MMTB.jpg TAP119_103-1024_StKildaRd_6Jan1973_AndrewFoy.jpg TAP120_106_GlenhuntlyRd.jpg TAP121_217_MalvernDepot_MMTB.jpg TAP122_217_MalvernDepot_DaveMacartney_12Sep1971.jpg TAP123_218_PointOrmond_LCrow.jpg TAP124_218_Elsternwick_WJohnWebster_c1953.jpg TAP125_218_GlenhuntlyRd_Broadway.jpg TAP126_W-body_MMTB.jpg TAP127_275_MalvernDepot.jpg TAP128_275_SwanstonSt.jpg TAP129_280_StKilda_WJohnWebster_c1953.jpg TAP130_308_KewDepot_c1925_MMTBAnnualReport.jpg TAP131_310-681_BatmanAve_RayPearson_1930s.jpg TAP132_317_Traverser_Preston_MMTB.jpg TAP133_340_HighSt_MMTB.jpg TAP134_364_Preston_MMTB.jpg TAP135_390_WellingtonPde.jpg TAP136_422_SwanstonSt_WJohnWebster_c1953.jpg TAP137_426_BatmanAve_LCrow.jpg TAP138_426_BatmanAve_WJohnWebster.jpg TAP139_426_CamberwellDepot_GeoffGrant_7May1955.jpg TAP140_436_SpencerSt_BobLilburn_1948.jpg TAP141_511_CamberwellDepot_GeoffGrant_7May1955.jpg TAP142_514_StKildaRd_WJohnWebster.jpg TAP143_544_StKilda_WJohnWebster.jpg TAP144_568_Decorated_RayPearson.jpg TAP145_660_GlenhuntlyDepot_LCrow.jpg TAP146_658_SwanstonSt_PaulNicholson_23Dec1967.jpg TAP145 - copy of TAP 145 TAP148_665_MacarthurSt_WJohnWebster_28Sep1953.jpg TAP149_671_Preston_MMTB.jpg TAP150_673_decorated_Preston_MMTB.jpg TAP151_674_PeelSt_DaleBudd_1965.jpg TAP152_674_WJohnWebster_c1953.jpg TAP153_456_PointOrmond_WJohnWebster_c1953.jpg TAP154_679_BuckleySt_LCrow_mid1950s.jpg TAP155_610_MorelandRd_PaulNicholson_22Sep1968.jpg TAP156_610_Preston_MMTB_1930.jpg TAP157_611_Preston_MMTB.jpg TAP158_613_BatmanAve_25Sep1953_WJohnWebster.jpg TAP159_419_Preston_MMTB.jpg TAP160_510_WellingtonPde_PTC_1989.jpgtrams, tramways, transit australia, destination city, tramcars, depots, w class, w1 class, w2 class, w3 class, w4 class, l class, x class, y class, tram 106, tram 102, tram 105, tram 218, tram 610, tram 219, tram 249, tram 275, tram 297, tram 305, tram 306, tram 210, tram 334, tram 336, tram 349, tram 380, tram 426, tram 436, tram 441, tram 449, tram 478, tram 534, tram 536, tram 544, tram 548, tram 573, tram 574, tram 646, tram 658, tram 665, tram 459, tram 460, tram 467, tram 678, tram 679, tram 680, tram 469, tram 610, tram 611, tram 613, tram 104, tram 1024, tram 217, tram 218, tram 280, tram 308, tram 210, tram 681, tram 317, tram 340, tram 364, tram 390, tram 422, tram 426, tram 436, tram 511, tram 514, tram 544, tram 568, tram 660, tram 658, tram 660, tram 665, tram 671, tram 673, tram 674, tram 459, tram 679, tram 610, tram 611, tram 613, tram 419, tram 510 -
 Melbourne Tram Museum
Photograph - Set of six colour prints - last day of local Footscary lines, 10/2/1962
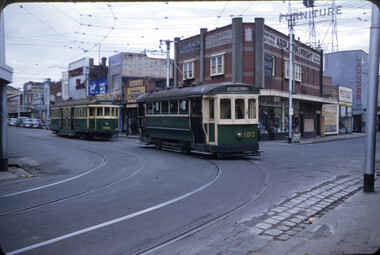
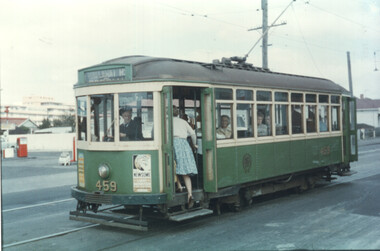
... ...tram 678...Tram depot for the AETA tour. (Reference provides information that X2 468 was the second car) 4 - X1 468 with the destination of Williamstown Road turning into Leeds St from Hopkins St 5 - X2 677 and two X1s at Footscray Station in Leeds St. - on the AETA tour. 6 - X2 678 turning from Ballarat Road into Droop St showing the "Ballarat Road" destination. ...Yields information about the AETA tour to mark the closure of the Footscray local system. trams tramways Footscray Ballarat Road Leeds St X1 class X2 class AETA tours tram 459 tram 678 tram 467 tram 468 tram 677 MMTB Footscray Depot Set of six Colour print on Kodak Royal paper. ...Colour prints showing some of the trams used on the last day of local Footscray services. 1 - X1 459 - picking up a passenger in Ballarat Road - has a service station in the background and the Footscray Hospital 2 - X1 459 and another X2 in Leeds St Footscray. 3 - X1 467, and another X1 and X2 677 at Footscray Tram depot for the AETA tour. (Reference provides information that X2 468 was the second car) 4 - X1 468 with the destination of Williamstown Road turning into Leeds St from Hopkins St 5 - X2 677 and two X1s at Footscray Station in Leeds St. - on the AETA tour. 6 - X2 678 turning from Ballarat Road into Droop St showing the "Ballarat Road" destination. Note Kinnears Rope works building behind the tram.Yields information about the AETA tour to mark the closure of the Footscray local system. Set of six Colour print on Kodak Royal paper.trams, tramways, footscray, ballarat road, leeds st, x1 class, x2 class, aeta tours, tram 459, tram 678, tram 467, tram 468, tram 677, mmtb, footscray depot -
 Melbourne Tram Museum
Slide - Set of 7, Keith Caldwell, 11/03/1962 12:00:00 AM
... ... tram 678...The tram has a modified 21E truck. .6 - X2 468 as above with part of the curve in the view. Has an advertisement for Bon Stores of Hopkins St Footscray. .7 - X2 678 at ditto....Melbourne Tram Museum 8 Wallen Road Hawthorn melbourne Trams tramways Footscray Closure Maribyrnong Gordon St River St Irving St Maribyrnong River Bridges X1 class X2 class Rosamond Rd 21E trucks tram 463 tram 678 tram 460 tram 466 .1 - in ink - "Farewell Footscray" Sun 11.3.1962 - Footscray Depot cars departing areas en route to Main system." .2 - .7 all have "Footscray Sun 11.3.62" Set of 7 Agfa Colour slides, cardboard mounts, by Keith Caldwell dated 11.3.1962 of the transfer of cars from Footscray to the "Main System" the day after the system was closed. ...Set of 7 Agfa Colour slides, cardboard mounts, by Keith Caldwell dated 11.3.1962 of the transfer of cars from Footscray to the "Main System" the day after the system was closed. See Keith Kings history of Footscray notes. All trams running trolley wheels. .1 - Footscray depot cars X1 463, X2 678, X1 460 and X1 466 in Gordon St, about to turn into River Street. .2 - X2 678 turning from Nicholson St into Irving St. Footscray with the Rockmans Store in the background. This store was later demolished for the Ring Road. Also is J. Boltons Chemist shop advertising Kodak film and another shop advertising Darrell Lea Chocolates, Peters Icecream and ? Lopes fruit shop. .3 - X1 460 at same location. .4 - X2 678 crossing Maribyrnong River Bridge - note the person crouching down on the south side of the bridge behind the tram. .5 - X1 460 in Rosamond Road, just before the curve onto Williamson Rd. This site became the Bunnings site. The tram has a modified 21E truck. .6 - X2 468 as above with part of the curve in the view. Has an advertisement for Bon Stores of Hopkins St Footscray. .7 - X2 678 at ditto..1 - in ink - "Farewell Footscray" Sun 11.3.1962 - Footscray Depot cars departing areas en route to Main system." .2 - .7 all have "Footscray Sun 11.3.62"trams, tramways, footscray, closure, maribyrnong, gordon st, river st, irving st, maribyrnong river, bridges, x1 class, x2 class, rosamond rd, 21e trucks, tram 463, tram 678, tram 460, tram 466 -
 Melbourne Tram Museum
Slide - MMTB, SEC, and VR tramway operations set of 12, Hugh Ballment, 1950s to 1980s
... Set of 12 photos by Hugh Ballment, unless noted, of MMTB, VR, and MTA: HBM152 - MMTB Trams 1, 604, Dec 1974, Preston workshops, cable set 1 on traverser after MMTB work and 604 in background HBM153 - VR Tram 51, 26/5/1954, Black Rock, Terminus with newsagent and beauty salon in the background, see also image HBM170 HBM154 - MMTB Tram 658, 1950s, St Georges Rd, At Miller St HBM155 - MMTB Trams 678, 180, early 1960s, Leeds St, Footscray station, with an X1 leaving for Williamstown Road. ...Set of 12 photos by Hugh Ballment, unless noted, of MMTB, VR, and MTA: HBM152 - MMTB Trams 1, 604, Dec 1974, Preston workshops, cable set 1 on traverser after MMTB work and 604 in background HBM153 - VR Tram 51, 26/5/1954, Black Rock, Terminus with newsagent and beauty salon in the background, see also image HBM170 HBM154 - MMTB Tram 658, 1950s, St Georges Rd, At Miller St HBM155 - MMTB Trams 678, 180, early 1960s, Leeds St, Footscray station, with an X1 leaving for Williamstown Road. ...Set of 12 photos by Hugh Ballment, unless noted, of MMTB, VR, and MTA: HBM152 - MMTB Trams 1, 604, Dec 1974, Preston workshops, cable set 1 on traverser after MMTB work and 604 in background HBM153 - VR Tram 51, 26/5/1954, Black Rock, Terminus with newsagent and beauty salon in the background, see also image HBM170 HBM154 - MMTB Tram 658, 1950s, St Georges Rd, At Miller St HBM155 - MMTB Trams 678, 180, early 1960s, Leeds St, Footscray station, with an X1 leaving for Williamstown Road. In the background is Cummings Chemist advertising Kodak film, along with a group of trammies standing around the Bundy Clock. In the far background, a Laundry and I M Collins advertising Phillips radios and televisions. HBM156 - MMTB Tram 880, 26/05/1954, Swanston St, At Lonsdale St. with dash canopy lighting with destination of route 6 Glen Iris. In the background is a sign advertising Empire Day 24/5/1954, Renwick Pride Printers, Drossous Restaurant, with an advert for Stonyfell wines. HBM157 - MMTB Tram 1041, c9/1973, Spring St, turning into Bourke St soon after issuing to traffic during August 1973 as the dark brown strip on the lower edge of the tram has yet to be painted on it. HBM158 - VR Trams 35, 54, mid to late 1950s, Elwood Depot, In street outside depot HBM159 - MMTB, 1950s, Matthews Ave aerial photo, Lancefield Rd at bottom left. Matthews Ave appears to be unmade. HBM160 - MMTB Tram 87, c1985, Flemington Rd, Looking toward Haymarket with the flagpole that was erected during 1984 - see https://www.melbourne.vic.gov.au/haymarket-flagpole HBM161 - c1900, Bourke St east from Elizabeth St, from a high viewpoint. Telephone pole lines remain in view along with many horse-drawn vehicles. Yields information about Melbourne tram operations, with 1950s to 1980s photos of Melbourne tramways.Kodachrome cardboard and plastic mounts, with notes - set of 12new tramway, preston workshops, tram 880, tram 1041, elwood depot, bourke st, cable trams, tram 35, tram 54, matthews ave, essendon aerodrome, tram 87, flemington road, haymarket, swanston st -
 Ballarat Tramway Museum
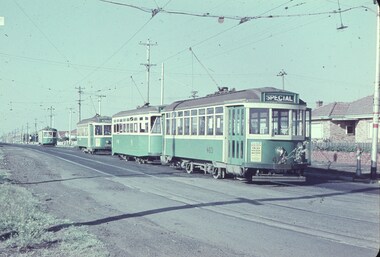
Photograph - Bendigo Steam tram View St, Between 1890 and 1903
... tram is hauling a bogie trailer. Rear view, trailer closest to the camera. Shops and offices in background. Outside edges of older photograph are apparent in the photograph. Photographer assumed to be G.Eardley, same handwriting as for 678...tram is hauling a bogie trailer. Rear view, trailer closest to the camera. Shops and offices in background. Outside edges of older photograph are apparent in the photograph. Photographer assumed to be G.Eardley, same handwriting as for 678 ...Photograph of a steam hauled tram in Bendigo - View St. Steam tram is hauling a bogie trailer. Rear view, trailer closest to the camera. Shops and offices in background. Outside edges of older photograph are apparent in the photograph. Photographer assumed to be G.Eardley, same handwriting as for 678 or from his collection. 677.1 - Black and White copy print contained within the Wal Jack Bendigo and Geelong Album, see Reg Item 5003 for more details. Added 1/7/2013 Copy negative from the Wal Jack collection of negatives added 11/6/2020 - scanned at hires - see image i4. See The Bendigo Tramways, K.S.KingsYields information about Bendigo Steam tram operations.Black and white photo copy print.On rear in ink "Bendigo Steam Tram" & "G.H.Eardley Collection" .1 - "Bendigo steam tram and trailer in View St Bendigo"trams, tramways, bendigo, steam trams, view st