Showing 12 items matching "2/6th armoured regiment"
-
 8th/13th Victorian Mounted Rifles Regimental Collection
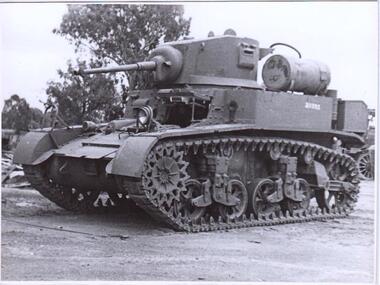
Photograph - Stuart light tank
... ...2/6th Armoured Regiment...M3 Stuart Light tank was the first tank supplied to Australia in WWII under Lend Lease Scheme. The 2/6th Armoured Regiment used Stuart tanks in the Battle for Buna, ...8th/13th Victorian Mounted Rifles Regimental Collection 4/19 Prince of Wales's Light Horse Simpson Barracks McLeod melbourne M3 Stuart Light tank was the first tank supplied to Australia in WWII under Lend Lease Scheme. The 2/6th Armoured Regiment used Stuart tanks in the Battle for Buna, Good quality image of the type of tank first used by Australians in the Papua New Guinea campaign WWII (1939-1945). tank 2/6th Armoured Regiment stuart m3 Black and white photograph of M3 Stuart Light tank. ...M3 Stuart Light tank was the first tank supplied to Australia in WWII under Lend Lease Scheme. The 2/6th Armoured Regiment used Stuart tanks in the Battle for Buna, Good quality image of the type of tank first used by Australians in the Papua New Guinea campaign WWII (1939-1945). Black and white photograph of M3 Stuart Light tank.tank, 2/6th armoured regiment, stuart m3 -
 8th/13th Victorian Mounted Rifles Regimental Collection
Photograph
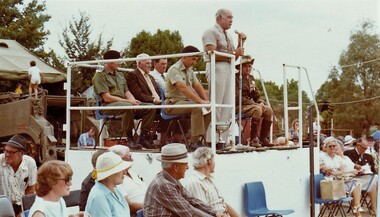
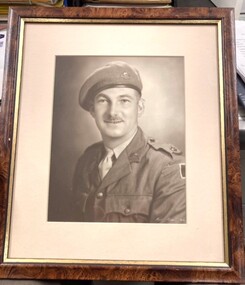
... Major Whitehead served in 21st Light Horse prior to WW11 ; 2/6th Armoured Regiment in WW11, and 8/13 VMR past WW11....8th/13th Victorian Mounted Rifles Regimental Collection 4/19 Prince of Wales's Light Horse Simpson Barracks McLeod melbourne Major Whitehead served in 21st Light Horse prior to WW11 ; 2/6th Armoured Regiment in WW11, and 8/13 VMR past WW11. ...Major Whitehead served in 21st Light Horse prior to WW11 ; 2/6th Armoured Regiment in WW11, and 8/13 VMR past WW11.Colour photograph of Major Norman Whitehead MC ( Retd) addressing gathering at 8/13 Victorian Mounted Rifles Open Day at Buna Barracks 28 February 1982. On dais with him are , left to right : Major G. Cole, Mr J Maynes, Mr. J. Moyle, Lieutenant Colonel M. Hough and Captain R. Fyffe ( Retd) -
 8th/13th Victorian Mounted Rifles Regimental Collection
Photograph - Whitehead
... He served with 2/6th Armoured Regiment in New Guinea in WW2 and was awarded the Military Cross at Buna. ...He served with 2/6th Armoured Regiment in New Guinea in WW2 and was awarded the Military Cross at Buna. ...Norman Whitehead served with 7/21st Light Horse prior to WW2. He served with 2/6th Armoured Regiment in New Guinea in WW2 and was awarded the Military Cross at Buna. Following the war he served with 8/13 Victorian Mounted Rifles.Black and white photograph of retired Major Norman Whitehead at Buna Barracks Mess.whitehead, buna, albury, barracks, mc -
 8th/13th Victorian Mounted Rifles Regimental Collection
Photograph - Coleman, Neale & Whitehead
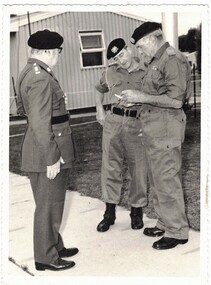
... He joined the AIF and served with 2/6th Armoured Regiment. He was wounded during the capture of Buna New Guinea 1942 and awarded the Military Cross. ...He joined the AIF and served with 2/6th Armoured Regiment. He was wounded during the capture of Buna New Guinea 1942 and awarded the Military Cross. ...Colonel Leslie Coleman was the Honorary Colonel of 8/13 VMR. Colonel Coleman graduated to the RAAC from the Royal Military College in 1939 and transferred to the 2nd AIF in 1941. He was adjutant of the 2/10 Armoured Regiment when the unit was raised in 1941. Later in the war he was attached to British 7 Armoured Division in Western Europe during and shortly after the invasion of Normandy. Lieutenant Colonel John Neale served in the Royal Australian Navy in World War Two. Following the war he returned to Albury and joined the 8/13 VMR in 1948. He rose through the ranks and became the Commanding Officer in 1974. He too was the Honorary Colonel 1990-92. Major Norman Whitehead MC served with the 21 Light Horse prior to World War Two. He joined the AIF and served with 2/6th Armoured Regiment. He was wounded during the capture of Buna New Guinea 1942 and awarded the Military Cross. Following the war he was one of the original officers of the 8/13 VMR when it was raised in 1948. He was squadron Commander of 'A' Squadron. He maintained close contact with the regiment after his retirement and frequently visited annual camp.Black and white photograph of Colonel Coleman, Lieutenant Colonel John Neale and Major Norman Whitehead taken during 8/13 Victorian Mounted Rifles Annual Camp at Puckapunyal 1974.Ink stamp on reverse "Mikainis Photo Studio / 23 Jun 1974 / 61 Goulburn St., Seymour / Telephone 92-2141 Vic"military, world war two, vmr, camp, coleman, neal, whitehead -
 Australian Commando Association - Victoria
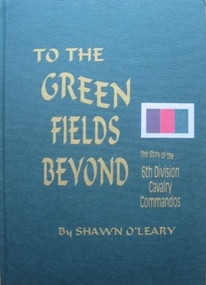
Book - 6th Div, Shawn OLeary, To The Green Fields Beyond:The story of the 6th Division Cavalry Commandos
... Australian Commando Association - Victoria The Association does not have a museum or address available to the public. melbourne ww2 australian commandos australian special forces world war 2 The comprehensive history of the 6th Australian Division Cavalry Commandos – a (now out of print) reprint of one of the rarer Armoured unit history books. This is the story of one of Australia’s most famous fighting regiments ...The comprehensive history of the 6th Australian Division Cavalry Commandos – a (now out of print) reprint of one of the rarer Armoured unit history books. This is the story of one of Australia’s most famous fighting regiments during World War II. As an armoured cavalry unit it fought the Italians and Germans in the sands of the African desert and the Vichy French in the mountains of Syria. Later as a dismounted commando unit it fought the Japanese in the terrifying jungles of New Guinea. The heroism of the men in its ranks and the actions in which they engaged are portrayed in a way which makes battle deeds leap realistically from the pages. “To The Green Fields Beyond” is a documented and detailed book which is of value to everyone who is interested in Australia’s story. Seldom before has such a contribution been made to record of our national history. The book has been approved and sponsored by the Australian War Memorial. The 6th Division Cavalry Regiment was formed in November 1939 and, just two months later, was sent overseas to the Middle East in January 1940. Arriving in Egypt, the regiment immediately went to Palestine, where it joined the rest of the 6th Division and trained using machine-gun carriers and, from October, six old Vickers light tanks. At the end of the year the regiment moved into the Western Desert, where it joined British forces ready for the major offensive to commence on 9 December. Two days later the regiment became the first unit of the 2nd Australian Imperial Force (AIF) to go into action when one of its squadron fought a sharp action against the Italians holding Garn el Grein and Fort Maddalina on 11 and 12 December. By 21 December British forces had captured Sidi Barrrani and the desert was now open for the 6th Division’s advance along the Libyan coast. On 3 January 1941 the division attacked and captured the Italian fort of Bardia. The regiment’s A Squadron, under the command of Major Denzil Macarthur-Onslow, who went on to command the 4th Armoured Brigade, supported the attack. Tobruk was the next Italian fort to be captured, with the regiment again in support and covering the 19th Brigade’s advance. The regiment, though, was under-equipped and without its full compliment of vehicles, using only machine gun carriers. To compensate for this, A Squadron was parity re-equipped with captured Italian light tanks, which had large kangaroos painted on the hulls and turrets to distinguish them from enemy vehicles. After Tobruk, the regiment was used as part of the advance guard in the capture of Derna and then Benghazi. In April the unit moved to Helwan, where it was equipped with Vickers light tanks and machine-gun carriers, and operated with British troops in capturing Sollum. Towards the end of May the regiment moved to Palestine, where it came under the command of the 7th Division for the imminent invasion of Syria. The regiment experienced its heaviest fighting during the Syrian campaign, which began on 7 June. A Squadron was attached to the 21st Brigade and advanced along the coast, where the rugged hills made it difficult to manoeuvre the tanks and carriers. The squadron was relieved by one of the 9th Division Cavalry Regiment’s squadrons on 13 and 14 June. C Squadron, meanwhile, was with the 25th Brigade, and advanced along the Rosh Pinna road, engaging strong enemy defences at Fort Khirbe. C Squadron was relieved by B Squadron, which was later attacked by Vichy French tanks that were supported by heavy artillery and machine-gun fire, which forced the Australians to withdrawal. Always willing or needing to improvise during the campaign, A and B Squadrons both operated three captured French R35 Renault light tanks, while C Squadron provided personnel for a horse troop, quickly nicknamed the “Kelly Gang”, to patrol the high, rugged hills near the Mardjayoun–Banis Road. The regiment remained in Syria as part of the occupation force and returned to Australia in March 1942. It was sent to the Adelaide River, in the Northern Territory, and then later to Murgon, in Queensland. In 1943 and 1944 divisional cavalry regiments were reorganised into cavalry (commando) regiments. In January 1944 the 6th Division Cavalry Regiment became the 2/6th Cavalry (Commando) Regiment. The regiment lost its vehicles and became the administrative headquarters for the 2/7th, 2/9th, and 2/10th Commando Squadrons. The regiment remained with the 6th Division and participated in the Aitpae–Wewak campaign, in New Guinea, during 1945. Includes Nominal Rollnon-fictionThe comprehensive history of the 6th Australian Division Cavalry Commandos – a (now out of print) reprint of one of the rarer Armoured unit history books. This is the story of one of Australia’s most famous fighting regiments during World War II. As an armoured cavalry unit it fought the Italians and Germans in the sands of the African desert and the Vichy French in the mountains of Syria. Later as a dismounted commando unit it fought the Japanese in the terrifying jungles of New Guinea. The heroism of the men in its ranks and the actions in which they engaged are portrayed in a way which makes battle deeds leap realistically from the pages. “To The Green Fields Beyond” is a documented and detailed book which is of value to everyone who is interested in Australia’s story. Seldom before has such a contribution been made to record of our national history. The book has been approved and sponsored by the Australian War Memorial. The 6th Division Cavalry Regiment was formed in November 1939 and, just two months later, was sent overseas to the Middle East in January 1940. Arriving in Egypt, the regiment immediately went to Palestine, where it joined the rest of the 6th Division and trained using machine-gun carriers and, from October, six old Vickers light tanks. At the end of the year the regiment moved into the Western Desert, where it joined British forces ready for the major offensive to commence on 9 December. Two days later the regiment became the first unit of the 2nd Australian Imperial Force (AIF) to go into action when one of its squadron fought a sharp action against the Italians holding Garn el Grein and Fort Maddalina on 11 and 12 December. By 21 December British forces had captured Sidi Barrrani and the desert was now open for the 6th Division’s advance along the Libyan coast. On 3 January 1941 the division attacked and captured the Italian fort of Bardia. The regiment’s A Squadron, under the command of Major Denzil Macarthur-Onslow, who went on to command the 4th Armoured Brigade, supported the attack. Tobruk was the next Italian fort to be captured, with the regiment again in support and covering the 19th Brigade’s advance. The regiment, though, was under-equipped and without its full compliment of vehicles, using only machine gun carriers. To compensate for this, A Squadron was parity re-equipped with captured Italian light tanks, which had large kangaroos painted on the hulls and turrets to distinguish them from enemy vehicles. After Tobruk, the regiment was used as part of the advance guard in the capture of Derna and then Benghazi. In April the unit moved to Helwan, where it was equipped with Vickers light tanks and machine-gun carriers, and operated with British troops in capturing Sollum. Towards the end of May the regiment moved to Palestine, where it came under the command of the 7th Division for the imminent invasion of Syria. The regiment experienced its heaviest fighting during the Syrian campaign, which began on 7 June. A Squadron was attached to the 21st Brigade and advanced along the coast, where the rugged hills made it difficult to manoeuvre the tanks and carriers. The squadron was relieved by one of the 9th Division Cavalry Regiment’s squadrons on 13 and 14 June. C Squadron, meanwhile, was with the 25th Brigade, and advanced along the Rosh Pinna road, engaging strong enemy defences at Fort Khirbe. C Squadron was relieved by B Squadron, which was later attacked by Vichy French tanks that were supported by heavy artillery and machine-gun fire, which forced the Australians to withdrawal. Always willing or needing to improvise during the campaign, A and B Squadrons both operated three captured French R35 Renault light tanks, while C Squadron provided personnel for a horse troop, quickly nicknamed the “Kelly Gang”, to patrol the high, rugged hills near the Mardjayoun–Banis Road. The regiment remained in Syria as part of the occupation force and returned to Australia in March 1942. It was sent to the Adelaide River, in the Northern Territory, and then later to Murgon, in Queensland. In 1943 and 1944 divisional cavalry regiments were reorganised into cavalry (commando) regiments. In January 1944 the 6th Division Cavalry Regiment became the 2/6th Cavalry (Commando) Regiment. The regiment lost its vehicles and became the administrative headquarters for the 2/7th, 2/9th, and 2/10th Commando Squadrons. The regiment remained with the 6th Division and participated in the Aitpae–Wewak campaign, in New Guinea, during 1945. Includes Nominal Rollww2, australian commandos, australian special forces, world war 2 -
 National Vietnam Veterans Museum (NVVM)
Poster - Information Board - 5 RAR 2nd Tour 1969 to 1970, 5 RAR 2nd Tour 1969 to 1970
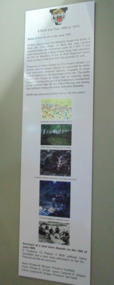
... 6th to 8th June 169. In their second tour, the Battalion fought the Battle of Binh Ba. The village of Binh Ba was located approximately six kilometres north of 1 ATF. It had been occupied by a large enemy force, later identified as the 1st Battalion of the 33 NVA Regiment which was guided by the local Binh Ba guerrilla VC unit. Following an initial assault by D Company (phase 1) a further infantry sweep (phase 2) supported by tanks and armoured...6th to 8th June 169. In their second tour, the Battalion fought the Battle of Binh Ba. The village of Binh Ba was located approximately six kilometres north of 1 ATF. It had been occupied by a large enemy force, later identified as the 1st Battalion of the 33 NVA Regiment which was guided by the local Binh Ba guerrilla VC unit. Following an initial assault by D Company (phase 1) a further infantry sweep (phase 2) supported by tanks and armoured ...6 RAR 2nd Tour 1969 to 1970. Battle of Binh Ba 6th to 8th June 169. In their second tour, the Battalion fought the Battle of Binh Ba. The village of Binh Ba was located approximately six kilometres north of 1 ATF. It had been occupied by a large enemy force, later identified as the 1st Battalion of the 33 NVA Regiment which was guided by the local Binh Ba guerrilla VC unit. Following an initial assault by D Company (phase 1) a further infantry sweep (phase 2) supported by tanks and armoured personal carriers, engaged in close quarter fighting for the remainder of the day. The battle raged from house to house with an intensity rarely equalled during any period of Australia's involvement in the Vietnam War. By the end of the day, the enemy had suffered heavy causalities and were defeated. 5RAR was awarded a Battle Honour for this action. An Information Board of a Schematic drawing and two colour photos with description of Battle of Binh Ba 6th to 8th June 1969. Two other photos of other actions of 2nd tour. Tiger emblem on black V. Black text on white background Under the bottom black and white photograph reads: Survivors of a land mine disaster on the 15th of June 1969. D Company 12 Platoon 5 RAR suffered heavy casualties due a land mine detonation at Dat Do. Pictured are the six survivors. Rear Private W Morgan, Private A Tuckfield, Front B Savige, Lance Corporal R Chaplin, Lance Corporal R Knapp, Private A Van Hulst.dat do, 5 rar, pte w.morgan, pte a. tuckfield, pte b. savage, pte a van hulet, l/cpl r. chaplin, l/cpl r knapp, poster, information board, battle of binh ba, 12 platoon, 33 nva regiment, viet cong, battle honour, 1 atf, pte william morgan, 1201663, royal australian infantry corps, 8th battalion, pte allan david tuckfield, 4720252, 1 australian reinforcement unit, australian national serviceman, 5th battalion, pte bruce ronald savige, 3793395, l/cpl raymond michael chaplin, 2789408, cpl (temp) raymond michael chaplin, l/cpl raymond john knapp, 2789701, pte arnoldus johanus van hulst, 2790009 -
 National Vietnam Veterans Museum (NVVM)
Poster - Information Board - The Infantry War, The Infantry War
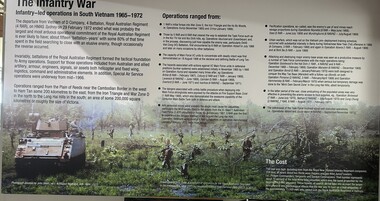
... National Vietnam Veterans Museum (NVVM) 25 Veterans Drive Newhaven phillip-island-and-the-bass-coast Photo donated by John Smith ex 1 Armoured Regiment SVN, 1969-1970 Drawn from A Duty Done: A summary of operations by the Royal Australian Regiment in the Vietnam War 1965-1972 by Lieutenant Colonel Fred Fairhead (Rtd) (2012) p.487 Infantry D Company 4th Battalion The Royal Australian Regiment 4RAR HMAS Sydney Cambodian Border Ham Tan Long Hai Hills Operations Hump Ho Bob Woods Operation Crimp 5RAR 6RAR Nui Thi Vai Nui Dinh Mountains Operations Vaucluse Operation Queanbeyan D445 Battalion (NVA/VietCong) Operation Hobart Battle of Long Tan Operation Bribie Operation Coburg Operation Lavarack Operation Camden Operation Overlord Operation Ivanhoe Fire Support Base - Coral 1RAR Centurion Tank Anti Personnel Mines M16 Landmines 1st Australian Task Force Route 44 Operation Renmark 8RAR Operation Hammersley Operations Reynella Operation Mundingburra Tet Offensive A Company 3RAR Operation Nowra Binh Ba Operation Goodwood Hat Dich Operation Marsden May Tao Base Operation Bondi Operation Pinnaroo Minh Dam Secret Zone Operation Birdwood Operation Nathan Operation Cung Chung 2 RAR/NZ 7RAR Operation Valiant Operation South Ward Capt Maurice Frederick Fairhead Lt Col Maurice Frederick Fairhead 57064 Royal Australian Infantry Corps 6th Battalion Photo donated by John Smith ex 1 Armoured Regiment SVN, 1969-1970 Drawn from A Duty Done: A summary of operations by the Royal Australian Regiment in the Vietnam War 1965-1972 by Lieutenant Colonel Fred Fairhead (Rtd) (2012) p.487 Summary of Infantry Operations 1965-1972. ...Photo donated by John Smith ex 1 Armoured Regiment SVN, 1969-1970 Drawn from A Duty Done: A summary of operations by the Royal Australian Regiment in the Vietnam War 1965-1972 by Lieutenant Colonel Fred Fairhead (Rtd) (2012) p.487Summary of Infantry Operations 1965-1972. Text superimposed on colour photo of infantry soldiers on operations with APC. See media file for more information.Photo donated by John Smith ex 1 Armoured Regiment SVN, 1969-1970 Drawn from A Duty Done: A summary of operations by the Royal Australian Regiment in the Vietnam War 1965-1972 by Lieutenant Colonel Fred Fairhead (Rtd) (2012) p.487infantry, d company, 4th battalion, the royal australian regiment, 4rar, hmas sydney, cambodian border, ham tan, long hai hills, operations hump, ho bob woods, operation crimp, 5rar, 6rar, nui thi vai, nui dinh mountains, operations vaucluse, operation queanbeyan, d445 battalion (nva/vietcong), operation hobart, battle of long tan, operation bribie, operation coburg, operation lavarack, operation camden, operation overlord, operation ivanhoe, fire support base - coral, 1rar, centurion tank, anti personnel mines, m16 landmines, 1st australian task force, route 44, operation renmark, 8rar, operation hammersley, operations reynella, operation mundingburra, tet offensive, a company, 3rar, operation nowra, binh ba, operation goodwood, hat dich, operation marsden, may tao base, operation bondi, operation pinnaroo, minh dam secret zone, operation birdwood, operation nathan, operation cung chung, 2 rar/nz, 7rar, operation valiant, operation south ward, capt maurice frederick fairhead, lt col maurice frederick fairhead, 57064, royal australian infantry corps, 6th battalion -
 Wangaratta RSL Sub Branch
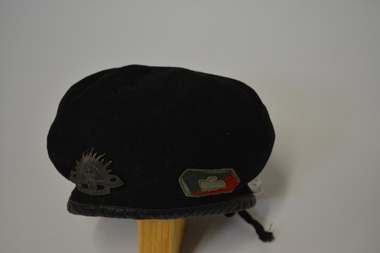
Headwear - Beret, 2/6th Australian Regiment 1941
... 2...beret...2nd 6th australian armoured regiment...Wangaratta RSL Sub Branch 2-4 Templeton Street Wangaratta high-country wwii beret wwii world war 2 beret 2nd 6th australian armoured regiment military patch Inside: M.T.X. ...Black woollen beret with leather edging, string drawstring and rising sun badge. Also has 2/6 Aust Armoured Reg 1941 patch of green top, red bottom and white tank in the middle with white edging.Inside: M.T.X. Size 6 3/4wwii beret, wwii, world war 2, beret, 2nd 6th australian armoured regiment, military patch -
 8th/13th Victorian Mounted Rifles Regimental Collection
Photograph - Major H J Archer 2/8 AR
... Armoured Regiment. On 17th April 1943, Henri embarked for service in New Guinea, for a period of 2 months. He again embarked on 3rd September 1943, for service in Rabaul, returning to Australia on 6th February 1944. ...Armoured Regiment. On 17th April 1943, Henri embarked for service in New Guinea, for a period of 2 months. He again embarked on 3rd September 1943, for service in Rabaul, returning to Australia on 6th February 1944. ...Henri John ARCHER was born in Brunswick Victoria, Australia, on 27th May 1907, to parents William Thomas and Hetta (née LAWSON) ARCHER. In 1934, Henri married Stella Florence COLLER, and they had 3 children. Living in Balwyn, Victoria, and employed as an Insurance Superintendent, Henri commenced full-time duty as an officer in the Citizen Military Forces from 7th July 1940, until 20th February 1941 (number V7097). His appointment in the rank of Major with the 7th Infantry Battalion was due to him having served part time as an officer in the CMF since 1927. On 21st February 1941, Henri joined the Australian Imperial Force and was appointed as a Major, with the number VX39872. Following the completion of various armoured corps training courses at Puckapunyal, he was taken on strength with the 2nd/8th Armoured Regiment. On 17th April 1943, Henri embarked for service in New Guinea, for a period of 2 months. He again embarked on 3rd September 1943, for service in Rabaul, returning to Australia on 6th February 1944. Following the end of the War, on 8th May 1946, Henri was appointed as a member of the War Crimes Courts with HQ 8MD, and embarked for duty with the War Crimes Trials in Rabaul two days later. Henri returned to Australia on 15th August 1946, and was subsequently transferred to the Reserve of Officers (Armoured Corps) list for the 3rd Military District (Victoria) on 27th November 1946. He was awarded the Efficiency Decoration, as well as the 1939-45 Star, Pacific Star, 1939-45 War Medal and the Australia Service Medal. He was also issued Returned from Active Service Badge number A343705. Henri died in Melbourne on 27th July 1971, aged 64, and his ashes are interred in the Springvale Botanical Cemetery, Banksia Wall ZJ, Niche 01. (Compiled by Karan CAMPBELL-DAVIS from historical records kept by Births, Deaths and Marriages Victoria, the National Archives of Australia, and Find A Grave website. )Photograph mounted with timber frame. Some manuscript inscriptions of reverse.HENRI JOHN ARCHER / VX39872 / B 27 MAY 1907 / ENL 7 JULY 1940 / DISCH 26 NOV 1946 / OC A SQN 2/8 AAR [and] PURCHASED FROM EBAY / MAY 2024 [followed by signature undecipherable]wwii, armour, 2/8 armourned regiment, war crimes, rabaul, cmf -
 8th/13th Victorian Mounted Rifles Regimental Collection
Photograph
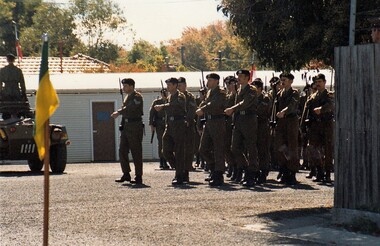
... Regiments to form the 8th/13th Victorian Mounted Rifles. Colonel G K Howard, Director of the Royal Australian Armoured Corps was the Reviewing Officer. The Pipes and Drums of the 5th/6th Battalion Royal Victorian Regiment provided the music for the occasion. Following the parade Colonel Howard officially opened the Regimental Museum. Colour photograph of No 2 ...‘A’ Squadron 8/13 Victorian Mounted Rifles conducted a parade at Buna Barracks, Albury on Sunday 1 May 1988 to mark the 103rd Anniversary of the formation of the Victorian Mounted Rifles and the 40th Anniversary of the linking of the 8th (Indi), 13th (Gippsland) and 20th (Victorian Mounted Rifles) Light Horse Regiments to form the 8th/13th Victorian Mounted Rifles. Colonel G K Howard, Director of the Royal Australian Armoured Corps was the Reviewing Officer. The Pipes and Drums of the 5th/6th Battalion Royal Victorian Regiment provided the music for the occasion. Following the parade Colonel Howard officially opened the Regimental Museum. Colour photograph of No 2 Guard marching on to parade ground. -
 8th/13th Victorian Mounted Rifles Regimental Collection
Photograph
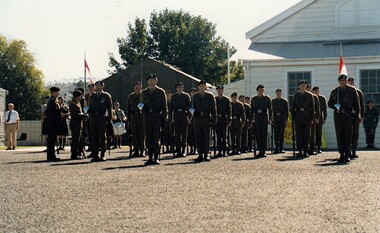
... Regiments to form the 8th/13th Victorian Mounted Rifles. Colonel G K Howard, Director of the Royal Australian Armoured Corps was the Reviewing Officer. The Pipes and Drums of the 5th/6th Battalion Royal Victorian Regiment provided the music for the occasion. Following the parade Colonel Howard officially opened the Regimental Museum. Photograph of Colonel G.K.Howard inspecting No.2 ...‘A’ Squadron 8/13 Victorian Mounted Rifles conducted a parade at Buna Barracks, Albury on Sunday 1 May 1988 to mark the 103rd Anniversary of the formation of the Victorian Mounted Rifles and the 40th Anniversary of the linking of the 8th (Indi), 13th (Gippsland) and 20th (Victorian Mounted Rifles) Light Horse Regiments to form the 8th/13th Victorian Mounted Rifles. Colonel G K Howard, Director of the Royal Australian Armoured Corps was the Reviewing Officer. The Pipes and Drums of the 5th/6th Battalion Royal Victorian Regiment provided the music for the occasion. Following the parade Colonel Howard officially opened the Regimental Museum.Photograph of Colonel G.K.Howard inspecting No.2 Guard -
 8th/13th Victorian Mounted Rifles Regimental Collection
Photograph
... Regiments to form the 8th/13th Victorian Mounted Rifles. Colonel G K Howard, Director of the Royal Australian Armoured Corps was the Reviewing Officer. The Pipes and Drums of the 5th/6th Battalion Royal Victorian Regiment provided the music for the occasion. Following the parade Colonel Howard officially opened the Regimental Museum. Colonel G. K. Howard inspecting No 2 ...‘A’ Squadron 8/13 Victorian Mounted Rifles conducted a parade at Buna Barracks, Albury on Sunday 1 May 1988 to mark the 103rd Anniversary of the formation of the Victorian Mounted Rifles and the 40th Anniversary of the linking of the 8th (Indi), 13th (Gippsland) and 20th (Victorian Mounted Rifles) Light Horse Regiments to form the 8th/13th Victorian Mounted Rifles. Colonel G K Howard, Director of the Royal Australian Armoured Corps was the Reviewing Officer. The Pipes and Drums of the 5th/6th Battalion Royal Victorian Regiment provided the music for the occasion. Following the parade Colonel Howard officially opened the Regimental Museum.Colonel G. K. Howard inspecting No 2 Guard.