
Showing 5 items matching "admiral commanding"
-
 National Vietnam Veterans Museum (NVVM)
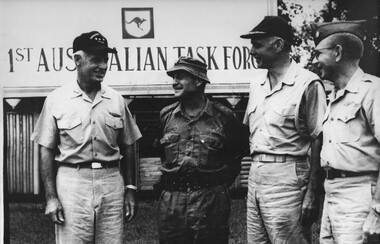
Photograph, Gibbons, Denis, Brig Sandy Pearson
... ...Admiral Commanding...A black and white photograph of the 1st Australian Task Force Commander Brig C.M "Sandy" Pearson meets with the Admiral commanding the United States 7th Fleet upon his arrival at 1ATF. ...Photograph 1st ATF Base Brig Sandy Pearson US 7th Fleet Gibbons Collection Catalogue Troops Fire Support Commander Admiral Commanding Naval Gunfire Support Australian Troops Denis Gibbons A black and white photograph of the 1st Australian Task Force Commander Brig C.M "Sandy" Pearson meets with the Admiral commanding the United States 7th Fleet upon his arrival at 1ATF. ...Denis Gibbons (1937 – 2011) Trained with the Australian Army, before travelling to Vietnam in January 1966, Denis stayed with the 1st Australian Task Force in Nui Dat working as a photographer. For almost five years Gibbons toured with nine Australian infantry battalions, posting compelling war images from within many combat zones before being flown out in late November 1970 after sustaining injuries. The images held within the National Vietnam Veterans Museum make up the Gibbons Collection. A black and white photograph of the 1st Australian Task Force Commander Brig C.M "Sandy" Pearson meets with the Admiral commanding the United States 7th Fleet upon his arrival at 1ATF. The Admiral and his staff had called on Brig Pearson to discuss naval gunfire support for Australian troops whilst on operations as there had been some problems with the Americans understanding the Australian forward, artillery, observers radio transmissions when calling for fire support.photograph, 1st atf base, brig sandy pearson, us 7th fleet, gibbons collection catalogue, troops, fire support, commander, admiral commanding, naval gunfire support, australian troops, denis gibbons -
 Flagstaff Hill Maritime Museum and Village
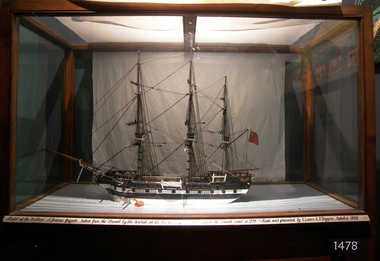
Craft - Ship Model, Arethusa, 1894
... Belle Poule was on a reconnaissance mission, along with the 26-gun Licorne, the corvette Hirondelle and the smaller Coureur when she encountered a large British squadron that included Arethusa at a point 37 km south of The Lizard. Admiral Keppel, commanding the British fleet ordered that the French ships be pursued. ...Belle Poule was on a reconnaissance mission, along with the 26-gun Licorne, the corvette Hirondelle and the smaller Coureur when she encountered a large British squadron that included Arethusa at a point 37 km south of The Lizard. Admiral Keppel, commanding the British fleet ordered that the French ships be pursued. ...Original Ships History: Aréthuse was a French frigate, launched in 1757 during the Seven Years War between England and France. She was captured by the Royal Navy in 1759 and became the fifth-rate HMS Arethusa. She remained in Royal Navy service for twenty years until she was wrecked after being badly damaged in battle. The ship was constructed at Le Havre for privateer warfare as ”Pélerine” and soon after her launch, she was purchased by King Louis XV (1710-1774) and commissioned as Aréthuse on 21 January 1758. In June, under captain Vauquelin, she sailed through the British blockade of Louisbourg helping to defend the site before departing, again forcing the blockade. On 18 May 1759, she was in transit from Rochefort to Brest, under the command of Louis-Philippe de Rigaud, Marquis of Vaudreuil, when she was intercepted near Audierne Bay (Baie d'Audierne) by three Royal Navy ships the Thames, Venus and Chatham. She attempted to escape but after two hours, lost her topmasts and was overtaken by her pursuers. Thames and Venus engaged her with heavy fire, causing 60 casualties before the vessel surrendered. She entered service with the Royal Navy for the rest of the war, and was in service in British home waters and became responsible for the capture of several French privateer cutters. In 1777, a Scotsman James Aitken, widely known as John the Painter, was hanged from her mizzenmast for burning the Rope House at Portsmouth Royal Dockyard on 7 December 1776, to aid the struggle of American independence. The mast was struck from the ship and re-erected at the dockyard entrance so as many people as possible could watch the execution. On 17 June 1778, she fought a famous duel against the French 36-gun frigate, Belle Poule. Belle Poule was on a reconnaissance mission, along with the 26-gun Licorne, the corvette Hirondelle and the smaller Coureur when she encountered a large British squadron that included Arethusa at a point 37 km south of The Lizard. Admiral Keppel, commanding the British fleet ordered that the French ships be pursued. The captain of Belle Poule refused the order to sail back to the British fleet. The British fired a warning shot across his ship's bow, to which he responded with a full broadside. This action began a furious, two-hour battle between the two ships that resulted in the deaths of the French second captain and 30 of the crew. However, Arethusa was crippled by the loss of a mast and withdrew, allowing Belle Poule to escape. This battle was the first between British and French naval forces during the American Revolutionary War and took place around three weeks before France had made a formal declaration of war. The battle was widely celebrated in France as a victory, even inspiring a hair-style in court circles that included a model of Belle Poule. It was also viewed as a victory in Britain and became the subject of a traditional Sea shanty, The Saucy Arethusa. On 18 March 1779, under captain Charles Holmes Everitt, Arethusa engaged the French Aigrette, under Lieutenant Mortemart, sustaining considerable damage in the fight. Arethusa was wrecked the next day off Ushant, It was the fame of this Arethusa which induced the Royal Navy, during the following two centuries, to bestow the name on a further seven consecutive individual ships and two consecutive classes of cruisers. (See Provenance Sec this document for information on the makers of this model). Model ship of the 3 masted frigate the “Arethusa”, model is painted black and white with varnished deck and masts. A British flag is flown at the stern. The ship is displayed in a glass case with timber frame and 4 legged stand.Label at bottom of glass case, printed in black script on a gold strip “Model of the “Arethusa" "A famous frigate, taken from the French by the British, on the 18th of May 1759 and lost on the French coast in 1779. – Made and presented by G. Lance & P. Diggins, October 1894” flagstaff hill, warrnambool, shipwrecked-coast, flagstaff-hill, flagstaff-hill-maritime-museum, maritime-museum, shipwreck-coast, flagstaff-hill-maritime-village, arethusa ship model, george lance, peter diggins, len asling, warrnambool art gallery, warrnambool exhibition, message in a bottle -
 Flagstaff Hill Maritime Museum and Village
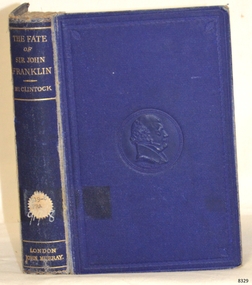
Book - Reference Travel Diary/History, Sir Francis Leopold M'Clintock, The Voyage of The 'Fox'. Fate of Sir John Franklin, 1881
... commanding the Fox, M'Clintock participated in three earlier government-sponsored Franklin search parties. During these, he revolutionized Arctic travel by perfecting the use of human-hauled and dog-driven sledges, mapping thousands of miles of unknown Arctic coastline. His successful retrieval of the Victory Point record made him a national hero. Upon his return to England, he was knighted and granted the freedom of the City of London. In later life, he rose through the naval ranks to become a full Admiral...commanding the Fox, M'Clintock participated in three earlier government-sponsored Franklin search parties. During these, he revolutionized Arctic travel by perfecting the use of human-hauled and dog-driven sledges, mapping thousands of miles of unknown Arctic coastline. His successful retrieval of the Victory Point record made him a national hero. Upon his return to England, he was knighted and granted the freedom of the City of London. In later life, he rose through the naval ranks to become a full Admiral ...This classic 1859 maritime narrative with the subject copy being the 1881 fifth edition details one of the most significant moments in Arctic exploration. It follows the definitive discovery of what happened to Sir John Franklin’s lost expedition. The Voyage of the 'Fox' is a first-hand travel diary and official report written by Captain Francis Leopold McClintock.The Voyage of The 'Fox'. The Fate of Sir John Franklin Author: Sir F Leopold M'Clintock Publisher: John Murray, Albemarle Street, London. Publisher to the Admiralty Date: 1881 Blue embossed hardcover with a blue spine and lettering in gold. The spine has a Library label with an inscription.non-fictionThis classic 1859 maritime narrative with the subject copy being the 1881 fifth edition details one of the most significant moments in Arctic exploration. It follows the definitive discovery of what happened to Sir John Franklin’s lost expedition. The Voyage of the 'Fox' is a first-hand travel diary and official report written by Captain Francis Leopold McClintock.flagstaff hill, warrnambool, shipwrecked coast, flagstaff hill maritime museum, maritime museum, shipwreck coast, flagstaff hill maritime village, great ocean road, book, pattison collection, warrnambool library, warrnambool mechanics’ institute, ralph eric pattison, corangamite regional library service, warrnambool city librarian, mechanics’ institute library, victorian library board, warrnambool books and records, warrnambool children’s library, the voyage of the 'fox'. the fate of sir john franklin, sir f leopold m'clintock, arctic exploration -
 Wangaratta RSL Sub Branch
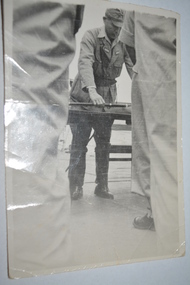
Photograph, 8/9/1945
... ON THE TABLE IS THE SWORD OF THE COMMANDING OFFICER OF THE JAPANESE FORCES VICE ADMIRAL KAMADA....ON THE TABLE IS THE SWORD OF THE COMMANDING OFFICER OF THE JAPANESE FORCES VICE ADMIRAL KAMADA. ww2 japanese surrender borneo hmas burdekin Black and white photograph of japanese officer placing sword on table Photograph Photograph ...OFF SAMARINDA, BORNEO. 1945-09-08. SIGNING OF THE INSTRUMENT OF SURRENDER OF THE JAPANESE FORCES IN DUTCH BORNEO ON THE QUARTERDECK OF THE FRIGATE HMAS BURDEKIN. ON THE TABLE IS THE SWORD OF THE COMMANDING OFFICER OF THE JAPANESE FORCES VICE ADMIRAL KAMADA.Black and white photograph of japanese officer placing sword on tableww2, japanese surrender, borneo, hmas burdekin -
 Wangaratta RSL Sub Branch
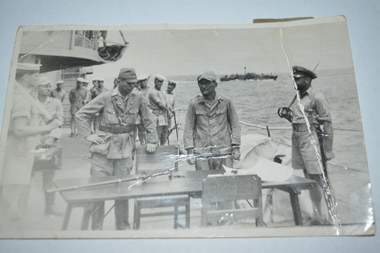
Photograph, 8/9/1945
... ON THE TABLE IS THE SWORD OF THE COMMANDING OFFICER OF THE JAPANESE FORCES VICE ADMIRAL KAMADA....ON THE TABLE IS THE SWORD OF THE COMMANDING OFFICER OF THE JAPANESE FORCES VICE ADMIRAL KAMADA. ww2 japanese surrender borneo hmas burdekin Black and white photograph of japanese officer standing before sword on table Photograph Photograph ...OFF SAMARINDA, BORNEO. 1945-09-08. SIGNING OF THE INSTRUMENT OF SURRENDER OF THE JAPANESE FORCES IN DUTCH BORNEO ON THE QUARTERDECK OF THE FRIGATE HMAS BURDEKIN. ON THE TABLE IS THE SWORD OF THE COMMANDING OFFICER OF THE JAPANESE FORCES VICE ADMIRAL KAMADA.Black and white photograph of japanese officer standing before sword on tableww2, japanese surrender, borneo, hmas burdekin
