Showing 354 items matching "bendigo tram in eaglehawk"
-
 Bendigo Historical Society Inc.
Slide - BENDIGO & EASTER FAIR, 1972
... Bendigo Tram in Eaglehawk...Bendigo Tram in Eaglehawk.... SLIDE Bendigo bendigo trams. Bendigo Tram in Eaglehawk Bendigo ...Bendigo Tram in Eaglehawk.slide, bendigo, bendigo trams., bendigo tram in eaglehawk -
 Bendigo Historical Society Inc.
Slide - BENDIGO & EASTER FAIR, 1972
... Bendigo tram at Eaglehawk.... SLIDE Bendigo bendigo trams. Bendigo Trams Bendigo tram ...Bendigo tram at Eaglehawk.slide, bendigo, bendigo trams., bendigo trams -
 Ballarat Tramway Museum
Slide - 35mm slide/s - set of 3, Eldon Hogan, early 1960's
... .1 - "Trams at Bendigo" .2 - "Trams at Fountain at Bendigo... Parade Ballarat Ballarat goldfields Tramways trams Bendigo ...Set of three Kodak cardboard mounted slides - have handwritten captions and slide numbers - no date, post dash canopy lights but with the largely green front - early 1960's. From the Eldon Hogan collection. Scanned on the Canon scanner at the depot 15/12/1971 at the time of the installation of the scanner. .1 - No. 16 and a bogie car at Charing Cross, early 1960's with the City Club Hotel in the background. .2 - No. 18 at Charing Cross with the destination of Quarry Hill and with the City Club Hotel in the background .3 - No. 25 at the Eaglehawk terminus with two crewmen standing in front of the tram. Tram has the destination of Eaglehawk. The Town Hall in the background has a money raising thermometer for the Olympic Swimming Pool fund..1 - "Trams at Bendigo" .2 - "Trams at Fountain at Bendigo" .3 - "Tram at Eaglehawk" all in penciltramways, trams, bendigo, eaglehawk, charing cross, tram 16, tram 18, tram 25 -
 Bendigo Historical Society Inc.
Slide - BENDIGO TRAMS, Nov 1971
... Slide. Bendigo Trams. Tram arriving at Eaglehawk terminal.... As by the Eaglehawk Town Hall clock. Slide BENDIGO TRAMS. ...Slide. Bendigo Trams. Tram arriving at Eaglehawk terminal at 10:15am. As by the Eaglehawk Town Hall clock.slide, bendigo, bendigo trams., bendigo trams. -
 Bendigo Historical Society Inc.
Document - BASIL MILLER COLLECTION: OPEN CROSS-SEAT TRAMS
... cars Bendigo Railway station - Eaglehawk. Two copies....basil miller Bendigo Trams Photo from 1892 battery ...Photo from 1892 battery-electrics replaced by steam tram cars Bendigo Railway station - Eaglehawk. Two copies.basil miller, bendigo trams -
 Ballarat Tramway Museum
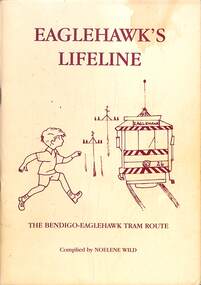
Book, Noelene Wild, "Eaglehawk's Lifeline", 1997
... and operation of the Bendigo to Eaglehawk tram route. The tram service..." details the history and operation of the Bendigo to Eaglehawk tram ...Book, "Eaglehawk's Lifeline" details the history and operation of the Bendigo to Eaglehawk tram route. The tram service, operated by the SEC ceased in 1972. Has a table of contents, forward written by Dennis Bell and an introduction written by the author Noelene Wild. Published by the Eaglehawk Heritage Society 1997. Includes many photographs, and a (not fully inclusive) list of people who worked on the line in various capacities. Provides a detailed history of the Eaglehawk Bendigo tram route.Book - 72 A5 pages + card covers centre stapledtrams, tramways, eaglehawk, noelene wild, sec, bendigo -
 Ballarat Tramway Museum
Slide - 35mm slide/s, Keith Kings, 20/04/1962 12:00:00 AM
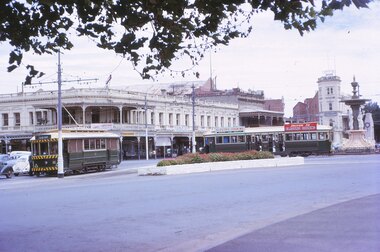
... Bendigo trams 26,18,29,11, & 5 at Eaglehawk terminus... Parade Ballarat Ballarat goldfields Tramways trams Bendigo ...Bendigo trams 26,18,29,11, & 5 at Eaglehawk terminus on a special tour for the ARHS Vic. Div on day of Bendigo Centenarian tour, on 20/4/1962. Trams have arrived at terminus and many passengers around, taking photos etc. Trams fitted with safety stripes etc. Leading tram showing 'SPECIAL'. Photo by Keith Kings.Stamped on 'K.S.Kings etc' and in blue ink 'K(k)(381) 1/250, f5.6, 20/4/62, ARHS, trams 26,18,29,11 & 5 as specials at Eaglehawk terminus during Bendigo Centenarian trip.'tramways, trams, bendigo, eaglehawk, tram 26, tram 18, tram 29, tram 11, tram 5 -
 Ballarat Tramway Museum
Photograph - Colour Photograph/s, 21/11/1962 12:00:00 AM
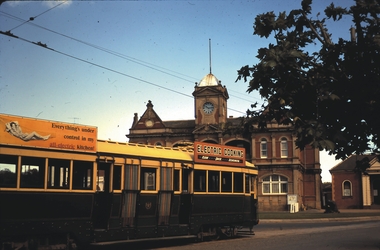
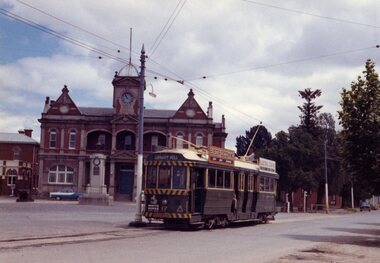
... Colour print of Bendigo SECV Bendigo tram 17 at Eaglehawk... print of Bendigo SECV Bendigo tram 17 at Eaglehawk Terminus ...Colour print of Bendigo SECV Bendigo tram 17 at Eaglehawk Terminus. On Kodacolor paper with a Kodak red ink stamp on rear. Tram has dash canopy lights, but no large white strip under the drivers windows. Photo not dated but appears to be at about the same time as 977, 21.11.1962. Has Eaglehawk Town Hall and Post office in background and war memorial. Tram showing destination of "Quarry Hill". Photo shows how tram line extended past the town hall with the white posts visible. Tram has White Horse Whiskey ad on front dash panel and two SEC "Electric Cooking" ads.On rear top left hand corner "17".eaglehawk, bendigo, town hall, post office, tram 17 -
 Ballarat Tramway Museum
Photograph - Colour Photograph/s, 1960's
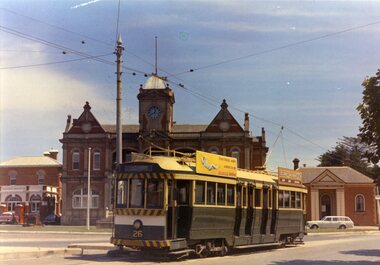
... Colour postcard size print of an SEC Bendigo tram 26... Parade Ballarat Ballarat goldfields Eaglehawk Bendigo Post Office ...Colour postcard size print of an SEC Bendigo tram 26 at the Eaglehawk terminus. Printed on AGFA paper. Tram has SEC roof ads, both re Electric cooking. Has Eaglehawk Post Office, Town Hall and Mechanics Institute in the background. Tram fitted with dash canopy lighting and large white strip under driver's windows. Photo undated, taken late 1960's or early 1970's. Tram has destination of "Eaglehawk".eaglehawk, bendigo, post office, town hall, tram 26 -
 Bendigo Historical Society Inc.
Photograph - BASIL MILLER COLLECTION: TRAMWAY STAFF WITH FIRST CONDUCTOR, MOTORMAN AND DRIVER OF ELECTRIC TRAM, 1953
... Laurens drove the first electric tram from Bendigo to Eaglehawk... Bendigo to Eaglehawk, Mr Lynch was the conductor on that tram ...BHS CollectionBlack and white photograph of Motorman Doug Dean shaking hands with George Laurens. Behind them is Tom Lynch. George Laurens drove the first electric tram from Bendigo to Eaglehawk, Mr Lynch was the conductor on that tram. Sizing specification written in blue pencil on back of photo, 'Reduce to 5' x 5' page 67 66%' written in black pen on back, copyright Bendigo Advertiser, Bendigo Advertiser photographic services, for reorder quote DP138 on back.Bendigo Advertiserbasil miller, doug dean, george laurens, bendigo tramways -
 Ballarat Tramway Museum
Photograph - Colour Photograph/s, 21/11/1962 12:00:00 AM
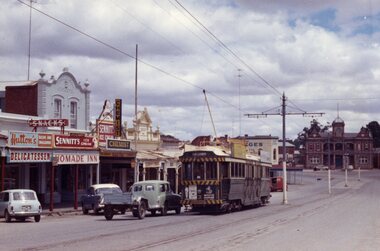
... Colour print of Bendigo SECV Bendigo tram 3 travelling... of Bendigo SECV Bendigo tram 3 travelling High St Eaglehawk towards ...Colour print of Bendigo SECV Bendigo tram 3 travelling High St Eaglehawk towards the Eaglehawk Terminus. Photo taken after the tram has passed the photographer. On Kodacolor paper with a Kodak red ink stamp on rear. Tram has dash canopy lights, but no large white strip under the drivers windows. Photo not dated but appears to be at about the same time as 977, 21.11.1962. Has Eaglehawk Town Hall and Post office in background and shops along the south side of High St. Tram showing destination of "Eaglehawk". Tram has White Horse Whiskey ad and another on front dash panel and two roof ads. In photo are advertisements for "Hutton's Bacon" and "Sennett's Ice Cream" on shop roof advertisements.On rear top left hand corner "3"eaglehawk, bendigo, town hall., high st, tram 3 -
 Ballarat Tramway Museum
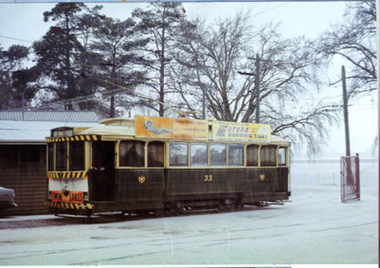
Document - Calendar, Topmill Pty Ltd, "Australian Trams 1999 Calendar", 1998
... 's. Used for month of June. Bendigo trams - 1299i3... trams - 1299i3 - No. 4 at Eaglehawk terminus - 1/2/1971 ...24 Page full colour calendar featuring Australian Trams, published by Top mill Pty Ltd. Cover (1299i5) features Sydney trams outside Central station in Eddy Ave. Other cities represented - Brisbane, Sydney, Adelaide, Perth, Fremantle, Bendigo, Ballarat, Sydney light rail, Hobart and Melbourne. Photos by Hugh Ballment, Dale Budd, Robert Merchant, Arthur Perry and the Sydney Tramway Museum. Priced at $9.95, and has "Parkholme Newsagency and Toys" sticker over bar code section, giving the same price. Distributed by Gordon and Gotch. Ballarat trams - 1299i1 - 33 at depot during hail storm on 20/8/1971 and 1299i2 - BTM trams 14 and 26 at Carlton St. during BTM operations 1970's or early 1980's. Used for month of June. Bendigo trams - 1299i3 - No. 4 at Eaglehawk terminus - 1/2/1971 and 1299i4 - trams 28, 2, 23 and two single truckers at Charing Cross 1970. Used for month of May.tramways, trams, australian trams, ballarat, bendigo, museums -
 Eltham District Historical Society Inc
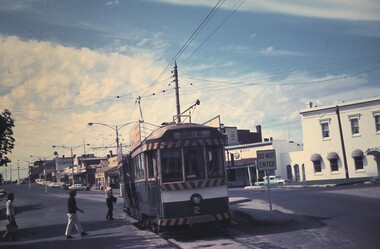
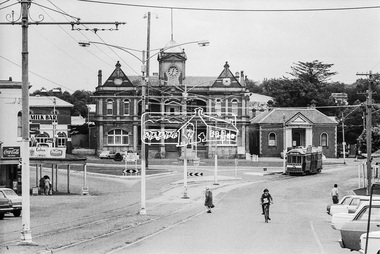
Photograph, Bendigo Tramways No. 2 en route to Quarry Hill outside Eaglehawk Town Hall, January 1972, Jan 1972
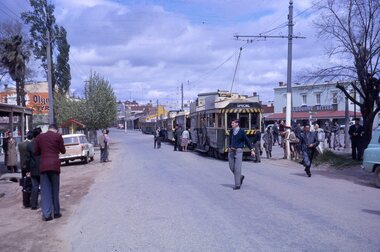
Viewed from High Street (Loddon Valley Highway) looking northwest from near Napier StreetDigital TIFF file Scan of 35mm Ilford FP3 black and white negative transparencybendigo, bendigo tramways no. 2, eaglehawk, eaglehawk mechanics institute, eaglehawk town hall, george coop collection, high street, loddon valley highway, milk bar, quarry hill, sailors gully road, tram -
 Eltham District Historical Society Inc
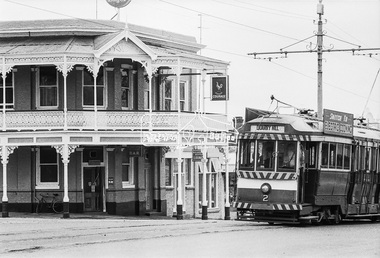
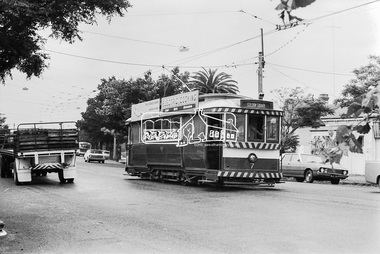
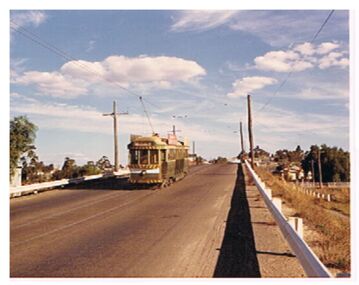
Photograph, Bendigo Tramways No. 2 en route from Quarry Hill outside the Victoria Hotel near the intersection of High Street at Victoria Street, Eaglehawk, January 1972, Jan 1972
Looking northwest across High Street, Eaglehawk at the intersection with Victoria Street. The Victoria Hotel is the present day New Victoria HotelDigital TIFF file Scan of 35mm Ilford FP3 black and white negative transparencybendigo, bendigo tramways no. 2, eaglehawk, eaglehawk mechanics institute, eaglehawk town hall, george coop collection, high street, loddon valley highway, milk bar, street new victoria hotel, pub, quarry hill, sailors gully road, tram, victoria hotel -
 Eltham District Historical Society Inc
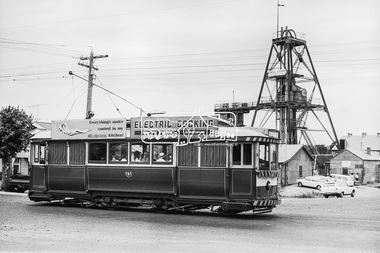
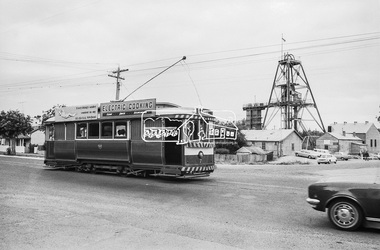
Photograph, Bendigo Tramways No. 7 en route to Golden Square passes the Central Deborah Gold Mining Co, High Street (Midland Highway) and Violet Street, Bendigo, January 1972, Jan 1972
Looking east from Midland Highway at intersection of Violet StreetDigital TIFF file Scan of 35mm Ilford FP3 black and white negative transparencybendigo, bendigo tramways no. 7, central deborah gold mining co. n.l., eaglehawk, george coop collection, golden square, high street, midland highway, tram, violet street -
 Eltham District Historical Society Inc
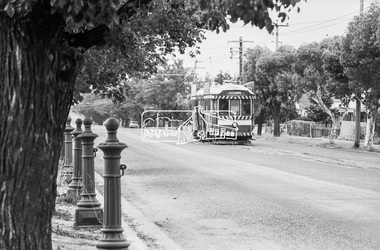
Photograph, Bendigo Tramways No. 7 en route to Golden Square, January 1972, Jan 1972
Most likely High Street, Golden SquareDigital TIFF file Scan of 35mm Ilford FP3 black and white negative transparencybendigo, bendigo tramways no. 7, eaglehawk, george coop collection, golden square, high street, tram -
 Eltham District Historical Society Inc
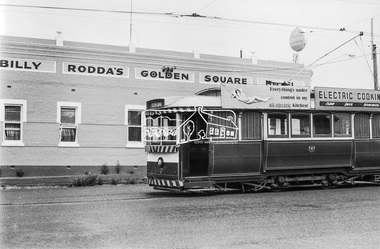
Photograph, Bendigo Tramways No. 7 en route to Golden Square on High Street near the intersection of Maple Street, Golden Square, January 1972, Jan 1972
Billy Rodda's Golden Square Hotel now known as the Golden Square HotelDigital TIFF file Scan of 35mm Ilford FP3 black and white negative transparencybendigo, bendigo tramways no. 7, billy rodda's golden square hotel, eaglehawk, george coop collection, golden square, high street, maple street, tram -
 Eltham District Historical Society Inc
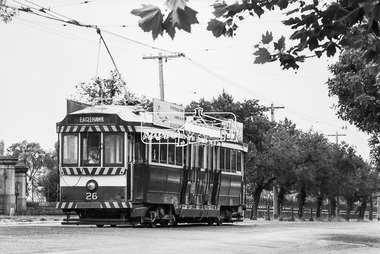
Photograph, Bendigo Tramways No. 26 en route to Eaglehawk outside Bendigo Cemetery, Carpenter street, Quarry Hill, January 1972, Jan 1972
Looking south along Carpenter StreetDigital TIFF file Scan of 35mm Ilford FP3 black and white negative transparencybendigo, bendigo cemetery, bendigo tramways no. 26, carpenter street. quarry hill, eaglehawk, george coop collection, tram -
 Eltham District Historical Society Inc
Photograph, Bendigo Tramways No. 26 en route to Eaglehawk outside the entrance to Bendigo Cemetery, Carpenter street, Quarry Hill, January 1972, Jan 1972
Looking south along Carpenter StreetDigital TIFF file Scan of 35mm Ilford FP3 black and white negative transparencybendigo, bendigo cemetery, bendigo tramways no. 26, carpenter street. quarry hill, eaglehawk, george coop collection, tram -
 Eltham District Historical Society Inc
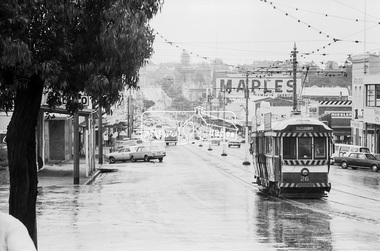
Photograph, Bendigo Tramways No. 26 descending Mitchell Street en route to Eaglehawk, January 1972, Jan 1972
Possibly Pall Mall, Bendigo, Mitchell StreetDigital TIFF file Scan of 35mm Ilford FP3 black and white negative transparencybendigo, bendigo tramways no. 26, eaglehawk, george coop collection, maples, pall mall, tram -
 Eltham District Historical Society Inc
Photograph, Bendigo Tramways No. 2 en route to Quarry Hill passes over the Mitchell Street Railway Bridge, Bendigo, January 1972, Jan 1972
Digital TIFF file Scan of 35mm Ilford FP3 black and white negative transparencybendigo, bendigo railway station, bendigo tramways no. 2, eaglehawk, george coop collection, mitchell street, railway line, tram -
 Eltham District Historical Society Inc
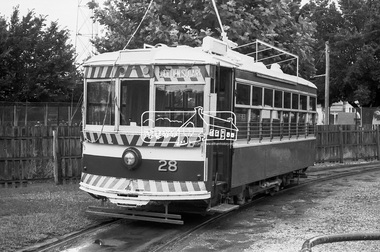
Photograph, Golden Square route Bendigo Tramways No. 28 parked, possibly near the Arnold Street Tram Depot, Bendigo, January 1972, Jan 1972
Birney (USA manufacture) tram carDigital TIFF file Scan of 35mm Ilford FP3 black and white negative transparencyarnold street depot, bendigo, bendigo tramways no. 28, eaglehawk, george coop collection, golden square, tram, birney (usa) tram car -
 Eltham District Historical Society Inc
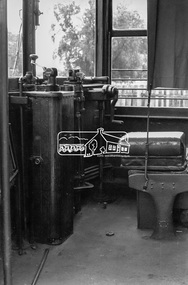
Photograph, Driver compartment, Bendigo Tramways No.28, January 1972, Jan 1972
Digital TIFF file Scan of 35mm Ilford FP3 black and white negative transparencybendigo, bendigo tramways no. 28, eaglehawk, george coop collection, interior, tram -
 Eltham District Historical Society Inc
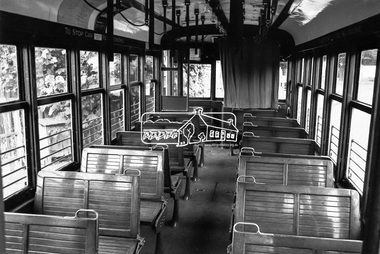
Photograph, Interior, Bendigo Tramways No.28, January 1972, Jan 1972
Digital TIFF file Scan of 35mm Ilford FP3 black and white negative transparencybendigo, bendigo tramways no. 28, eaglehawk, george coop collection, interior, tram -
 Bendigo Historical Society Inc.
Newspaper - JENNY FOLEY COLLECTION: TRUDLING
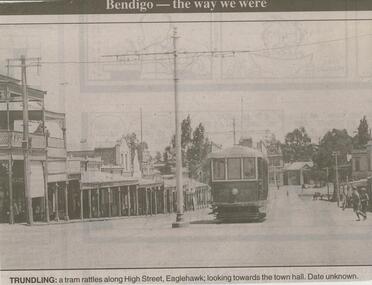
Bendigo Advertiser ''The way we were'' from 2001. Trudling: a tram rattles along High street, Eaglehawk, looking towards the town hall. Date unknown. The clip is in a folder.newspaper, bendigo advertiser, the way we were -
 Bendigo Historical Society Inc.
Document - BENDIGO - THE HEART OF VICTORIA
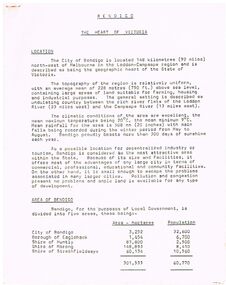
Typed article titled Bendigo, The Heart of Victoria. Items mentioned are Location, Area of Bendigo, The People, Work Force, Industrial Base, natural Resources, Agriculture and Livestock, Minerals, Forests, Rail and Road, Sea and Air, Power and Water, Electricity, Natural Gas, Water, Sewerage, Industrial Land, Services, Community Services and Facilities, Educational Facilities, Hospitals, Culture and Tourism and Media.document, bendigo - the heart of victoria, city of bendigo, borough of eaglehawk, shire of huntly, shire of marong, shire of strathfieldsaye, bendigo development committee, department of agriculture, department of state development decentralization and tourism, state electricity commission, gas & fuel corporation of victoria, state rivers & water supply commission, bendigo sewerage authority, the bendigo college of advanced education, home and hospital for the aged, home for the blind, northern school of nursing, art gallery, historical society, dudley house, sun loong, central deborah gold mine, the vintage talking trams and transport museum, bcv8, the bendigo advertiser, golden city gazette, 3bo, 3cv, mr a j kelly -
 Bendigo Historical Society Inc.
Photograph - TRAM ON EAGLEHAWK BRIDGE
... BENDIGO Hospital Bendigo tram Eaglehawk bridge Photo: tram ...Photo: tram on Eaglehawk Bridge.bendigo, hospital, bendigo, tram, eaglehawk bridge -
 Bendigo Historical Society Inc.
Book - BOOKLET: BENDIGO IN 74
48 paged booklet - ''Bendigo in 74 - The Tourist Centre of Victoria'' - compiled as a community service by Bendigo Jaycees. Comprehensive information about Bendigo and attractions - Index: Accommodation; Additional information; An introduction to Bendigo; Aquarium; Art Gallery; Bendigo Trust; Caravan parks; Dai Gum San; Directory; Eaglehawk Museum; Entertainment; Emergency services; Joss House; Lake Eppalock; National Trust classified buildings; Natural history; Map of Bendigo; Map of city centre; Pottery; Picnic areas; sporting facilities; 'Talking Trams'; Thanks; Tours; Tourist attractions; Victoria Hill; What's on in Bendigo.Bendigo Jaycees. Espress Printers Bendigo.bendigo, tourism, guide 1974, bendigo jaycees, radio 3bo, city family hotel, don murray's hotel motel, cambrian hotel, charlies craft & lifestyle store, powneys authorised newsagent, the bendigo trust, white hills panel works, bendigo pottery, bendigo racecourse, homestead motor inn, peter wade, the persian room, sandhurst trading co. pty. ltd., bendigo air services, bendigo sec, geo. r. innes & sons, cohns, the copper pot, sandhurst travel service. golden hills motel, welcome stranger motel, brian boru hotel, john lindsay's pharmacy & photographic centre, alf morris motors