Showing 17 items matching "box hill mall"
-
 Box Hill Historical Society
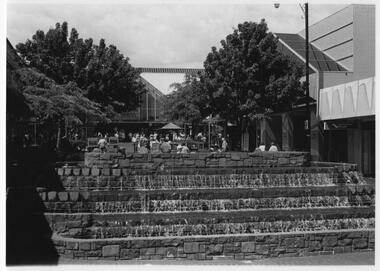
Photograph - Box Hill Mall Fountain, 1994
... Box Hill Mall Fountain...Box Hill Mall...The fountain in Box Hill Mall, demolished in 2003...Box Hill Historical Society Box Hill Heritage Centre Suite 7 Town Hall Hub Box Hill melbourne The fountain in Box Hill Mall, demolished in 2003 Box Hill Mall Fountains Photograph Box Hill Mall Fountain ...The fountain in Box Hill Mall, demolished in 2003box hill mall, fountains -
 Box Hill Historical Society
Photograph - Kiosk, Simon Fox, 1/12/1994
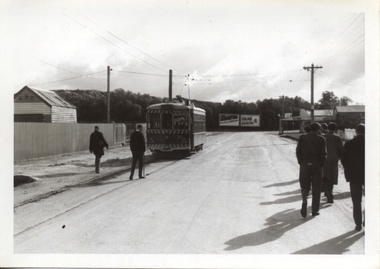
... ...Box Hill Mall...Charity kiosk in the Box Hill Mall. Photograph taken December 1994. ...Box Hill Mall, Box Hill, Victoria, Australia...Box Hill Historical Society Box Hill Heritage Centre Suite 7 Town Hall Hub Box Hill melbourne Charity kiosk in the Box Hill Mall. ...Charity kiosk in the Box Hill Mall. Photograph taken December 1994. See page 25 "The days we remember"B&w photokiosks, box hill mall, charitable organisations, box hill, shops, the days we remember -
Box Hill Historical Society
Book, Loder and Bayly, Box Hill Mall - Submission, 1/12/1982 12:00:00 AM
... Box Hill Mall - Submission...Box Hill. It includes examples of their previous projects for pedestrian malls, program, team, budget and fees....It includes examples of their previous projects for pedestrian malls, program, team, budget and fees. Box Hill Mall - Submission Book Loder and Bayly ...A proposal, submitted by Loder and Bayly, Planning, Engineering and Landscape Consultants, for the pedestrianisation of Main and Market Streets, Box Hill. It includes examples of their previous projects for pedestrian malls, program, team, budget and fees.glasson> don, martin> jan, safstrom> nick, read> michael, loder> john, saggers> bill, conybeare> darrel, morrison> bill, main street, market street, box hill, land use, malls, shopping centres, town planning -
 Box Hill Historical Society
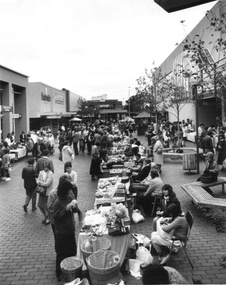
Photograph - Markets
... Box Hill Mall...Crafts Market in Box Hill Hall, looking east towards Bank Street. McEwans can be seen on the right. Box Hill Mall Street stalls Craft markets Shops McEwans B&w photo Photograph Markets ...Crafts Market in Box Hill Hall, looking east towards Bank Street. McEwans can be seen on the right.B&w photobox hill mall, street stalls, craft markets, shops, mcewans -
 Bendigo Military Museum
Memorabilia - MEDALLION, RSL, C.2007
... Bendigo Military Museum 37 - 39 Pall Mall Bendigo goldfields Medallions anniversary Rooty Hill RSL .1) Circular on front: “Rooty Hill Sub Branch, 70th Anniversary”. In centre on front: “Logo” Around rim on back: “1937 - 2007 Lest We Forget” In centre: Poem, “The Ode” .1) Medallion. .2) Felt box, blue. ....1) Medallion. .2) Felt box, blue..1) Circular on front: “Rooty Hill Sub Branch, 70th Anniversary”. In centre on front: “Logo” Around rim on back: “1937 - 2007 Lest We Forget” In centre: Poem, “The Ode”medallions, anniversary, rooty hill rsl -
 Bendigo Historical Society Inc.
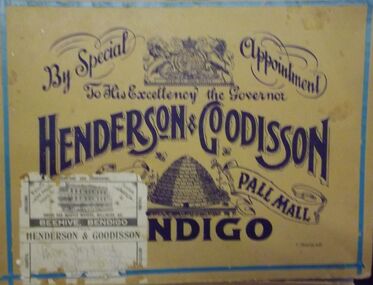
Ephemera - BOX LID - BEEHIVE BENDIGO
... Cardboard box lid with paper label reading Beehive Bendigo, from Henderson & Goodisson to Miss Jeffery, C/o Mrs Faul, Quarry Hill. Printed on lid - by special appointment to His Excellency the Governor, Henderson & Goodison, Pall Mall, Bendigo, with coat of arms & illustration of Bees and Bee Hive Markings - T. ...History House 11 Mackenzie Street Bendigo goldfields COMMERCE Shop equipment beehive building Cardboard box lid with paper label reading Beehive Bendigo, from Henderson & Goodisson to Miss Jeffery, C/o Mrs Faul, Quarry Hill. Printed on lid - by special appointment to His Excellency the Governor, Henderson & Goodison, Pall Mall, Bendigo, with coat of arms & illustration of Bees and Bee Hive Markings - T. ...Cardboard box lid with paper label reading Beehive Bendigo, from Henderson & Goodisson to Miss Jeffery, C/o Mrs Faul, Quarry Hill. Printed on lid - by special appointment to His Excellency the Governor, Henderson & Goodison, Pall Mall, Bendigo, with coat of arms & illustration of Bees and Bee Hive Markings - T. Frame & Co.commerce, shop equipment, beehive building -
 Ballarat Tramway Museum
Slide - 35mm slide/s - set of 23, Noel Simons, 26/02/1972 12:00:00 AM
... Hill. Has the Ezywalkin and the Beehive buildings in the background. 1205.20 - as for 1205.19, but a few moments later. Adjacent pole has a "NO ROAD" letter in reflectors vertically. 1205.21 - Charing Cross with Nos. 25, 21, 26 and 7, looking south from Pall Mall end. 1205.22 - No. 24 crossing Mitchell St. en route for Golden Square, showing 'special' with the Beehive and Ezywalkin buildings in the background. 1205.23 - Charing Cross with Nos. 24, 21 and 7 in the photo and Fountain Plaza in the background. Print of 1205.7 - stored in box...Hill. Has the Ezywalkin and the Beehive buildings in the background. 1205.20 - as for 1205.19, but a few moments later. Adjacent pole has a "NO ROAD" letter in reflectors vertically. 1205.21 - Charing Cross with Nos. 25, 21, 26 and 7, looking south from Pall Mall end. 1205.22 - No. 24 crossing Mitchell St. en route for Golden Square, showing 'special' with the Beehive and Ezywalkin buildings in the background. 1205.23 - Charing Cross with Nos. 24, 21 and 7 in the photo and Fountain Plaza in the background. Print of 1205.7 - stored in box ...Set of 23 transparencies taken on 26/2/1972 on Kodak mounts. 1205.1 - Bendigo No. 25 on a special tour at Fire Station Loop, en route to Golden Square. 1205.2 - No. 21 and 25 crossing at Fire Station Loop, note photographers on the ground. No. 21 bound for North Bendigo. 1205.3 - as for 1205.3, but with trams departing loop and fire station in the background. 1205.4 - No. 25 at Golden Square Hotel with 'Rodda's Golden Square Hotel' in the background. Tram on a special tour, but showing destination of North Bendigo. 1205.5 - as for 1205.4 - but showing special. Has the end of the track in the photograph. 1205.6 - Nos. 7 and 25 (on a special tour) crossing at Myrtle St. Loop. 1205.7 - No. 7 leaving Myrtle St. loop with the mine poppet head in the background. Photo taken after tram has passed photographer. (Print made of this slide 10/2001 for use in the Gold Gold Gold exhibition of 10/2001 - See Reg. item 1979. 1205.8 - No. 25 entering depot. Tram showing 'special'. Tennis court on right has players. Photo taken after tram has passed photographer. 1205.9 - No. 24 (showing 'special') and No. 20 (showing 'Long Gully') at Bendigo Depot. 1205.10 - No. 24 on a special charter, leaving Bendigo depot. Tram has two 'Johnnie Walker' roof ads. 1205.11 - Bendigo depot with 29, 25 and a bogie car inside the depot doors. 1205.12 - As for 1205.11, but with 28 and 29. 1205.13 - No. 24 standing at front entrance of Bendigo depot with No. 20 in the background. 1205.14 - No. 24 running out into McCrae St showing special, with conductor on front step. 1205.15 - No. 24 in Caledonia St. at corner of Thunder St with the Gasworks in the background. 1205.16 - No. 5 en route for Quarry Hill at Charing cross with No. 26 (en route for Eaglehawk) about to arrive. Has former crossover at this location in the foreground. Has the Ezywalkin building in the background. 1205.17 - No. 5 and 26 at Charing Cross, with the Alexandra Fountain in the foreground and the Beehive and Ezywalkin buildings in the background. No.26 has two SEC roof ads. 1205.18 - Charing Cross looking along Pall Mall with trams 7 and 21 and 26 in the picture. 1205.19 - Charing Cross, with 21 departing for Golden Square and No. 5 heading for Quarry Hill. Has the Ezywalkin and the Beehive buildings in the background. 1205.20 - as for 1205.19, but a few moments later. Adjacent pole has a "NO ROAD" letter in reflectors vertically. 1205.21 - Charing Cross with Nos. 25, 21, 26 and 7, looking south from Pall Mall end. 1205.22 - No. 24 crossing Mitchell St. en route for Golden Square, showing 'special' with the Beehive and Ezywalkin buildings in the background. 1205.23 - Charing Cross with Nos. 24, 21 and 7 in the photo and Fountain Plaza in the background. Print of 1205.7 - stored in box D1.Information written on in blue ink and date stamped on purple ink. 1205.1 - "No. 25 at Fire Station Loop High Street, Golden Square." 1205.2 - "Nos. 25 and 21 crossing at Fire Station Loop, near Golden Square." 1205.3 - "Nos. 25 and 21 crossing at Fire Station Loop, near Golden Square." 1205.4 - "No. 25 at Golden Square terminus." 1205.5 - "No. 25 at Golden Square terminus." 1205.6 - "Nos. 7 and 25 crossing at Myrtle St. Loop." 1205.7 - "No. 7 leaving Myrtle St. Loop." 1205.8 - "No 25, entering Bendigo Depot." 1205.9 - "Nos. 20 and 24 at Bendigo Depot." 1205.10 - "No. 24 at Bendigo Depot." 1205.11 - "Nos. 25 and 29 at Bendigo Depot." 1205.12 - "Birney cars 29 and 28 at Bendigo Depot." 1205.13 - "No. 24 (with 20 beyond) at Bendigo Depot." 1205.14 - "No. 24 entering McCrae St. from Arnold St." 1204.15 - "No. 24 in Caledonia St. at cnr of Thunder St." 1204.16 - "No. 5 waits at Charing Cross as No. 26 arrives from Quarry Hill. Note remains of crossover abandoned on relocation in 1965." 1204.17 - "Nos. 5 and 26 at Charing Cross." 1204.18 - "Nos. 26, 7 and 21 at Charing Cross (No. 5 just visible behind No. 26)." 1204.19 - "No. 21 leaves Charing Cross for Golden Square as No. 5 starts off for Quarry Hill." 1204.20 - "No. 21 swings onto the single track Golden Square line as No. 5 heads into Mitchell St. towards Quarry Hill." 1204.21 - "Nos. 25, 21 and 26 watch No. 7 arrive at Charing Cross from Golden Square." 1204.22 - "No. 24 at Charing Cross crossing Mitchell St." 1204.23 - "Nos. 24, 21 and 7 at Charing Cross."tramways, trams, bendigo, golden square, myrtle st., fire station, depot, charing cross, tram 5, tram 7, tram 20, tram 21, tram 24, tram 25, tram 28, tram 29 -
 Ballarat Tramway Museum
Photograph - Black & White Photograph/s - set of 32, Eldon Hogan, 4/06/1965 12:00:00 AM
... The photos are not necessarily in photographic order. .1 - 30 on the Eaglehawk terminal track, beyond the normal terminus. .2 - 30 & 29 High St Eaglehawk. .3 - ditto with a poppet head in the background. .4 - 30 at one of the crossing loops .5 - 30 at Eaglehawk terminus extension .6 - ditto. .7 - ditto .8 - cleaning out the track .9 - showing the location of the track at Eaglehawk terminus and its extension .10 - cleaning out track .11 - a portable shed adjacent to the track .12 - A view of the two Birneys travelling in the empty country. .13 - ditto .14 - 19 and 18 at Golden Square .15 - Bendigo tram depot - creek crossing .16 - Scrubber at the depot .17 - 28 and 19 at the North Bendigo terminus .18 - 18 and 30 on the Golden Sq line .19 - 28 and 19 at the North Bendigo terminus .20 - ditto. .21 - 28 and 19 near the depot entry. .22 - 28 and 30 Pall Mall .23 - 28 at North Bendigo .24 - 17 and 19 and 6 at Quarry Hill .25 - 28 and 30 Mitchell St .26 - 19, 6 and 21 Quarry Hill .27 - 19 and 6 Quarry Hill .28 - 28 and 6 at the depot entry .29 - ditto .30 - 18 and 30, Golden Sq line .31 - 25 at depot .32 - 6 and 19 Charing Cross. Photographer Eldon Hogan. Printed on Kodak Paper .33 - roll of negatives of some of the above photos - stored in box...The photos are not necessarily in photographic order. .1 - 30 on the Eaglehawk terminal track, beyond the normal terminus. .2 - 30 & 29 High St Eaglehawk. .3 - ditto with a poppet head in the background. .4 - 30 at one of the crossing loops .5 - 30 at Eaglehawk terminus extension .6 - ditto. .7 - ditto .8 - cleaning out the track .9 - showing the location of the track at Eaglehawk terminus and its extension .10 - cleaning out track .11 - a portable shed adjacent to the track .12 - A view of the two Birneys travelling in the empty country. .13 - ditto .14 - 19 and 18 at Golden Square .15 - Bendigo tram depot - creek crossing .16 - Scrubber at the depot .17 - 28 and 19 at the North Bendigo terminus .18 - 18 and 30 on the Golden Sq line .19 - 28 and 19 at the North Bendigo terminus .20 - ditto. .21 - 28 and 19 near the depot entry. .22 - 28 and 30 Pall Mall .23 - 28 at North Bendigo .24 - 17 and 19 and 6 at Quarry Hill .25 - 28 and 30 Mitchell St .26 - 19, 6 and 21 Quarry Hill .27 - 19 and 6 Quarry Hill .28 - 28 and 6 at the depot entry .29 - ditto .30 - 18 and 30, Golden Sq line .31 - 25 at depot .32 - 6 and 19 Charing Cross. Photographer Eldon Hogan. Printed on Kodak Paper .33 - roll of negatives of some of the above photos - stored in box ...Yields information about a 1924 Jelbart Engine manufacturing display in Sturt St and the street scene and peoples clothing at the time.Set of 32 black and white photographs of an Association of Railway Enthusiasts tour to Bendigo and trams 4/7/1965. The photos are not necessarily in photographic order. .1 - 30 on the Eaglehawk terminal track, beyond the normal terminus. .2 - 30 & 29 High St Eaglehawk. .3 - ditto with a poppet head in the background. .4 - 30 at one of the crossing loops .5 - 30 at Eaglehawk terminus extension .6 - ditto. .7 - ditto .8 - cleaning out the track .9 - showing the location of the track at Eaglehawk terminus and its extension .10 - cleaning out track .11 - a portable shed adjacent to the track .12 - A view of the two Birneys travelling in the empty country. .13 - ditto .14 - 19 and 18 at Golden Square .15 - Bendigo tram depot - creek crossing .16 - Scrubber at the depot .17 - 28 and 19 at the North Bendigo terminus .18 - 18 and 30 on the Golden Sq line .19 - 28 and 19 at the North Bendigo terminus .20 - ditto. .21 - 28 and 19 near the depot entry. .22 - 28 and 30 Pall Mall .23 - 28 at North Bendigo .24 - 17 and 19 and 6 at Quarry Hill .25 - 28 and 30 Mitchell St .26 - 19, 6 and 21 Quarry Hill .27 - 19 and 6 Quarry Hill .28 - 28 and 6 at the depot entry .29 - ditto .30 - 18 and 30, Golden Sq line .31 - 25 at depot .32 - 6 and 19 Charing Cross. Photographer Eldon Hogan. Printed on Kodak Paper .33 - roll of negatives of some of the above photos - stored in box 83 as well. trams, tramways, are, bendigo, eaglehawk, quarry hill, golden square, north bendigo, tram 30, tram 29, tram 28, tram 6, tram 19, tram 25, tram 17, tram 18 -
Box Hill Historical Society
Book, Henshall Hansen Associates, Planners and Economists,Green and Dale Associates, Urban Designers and Landscape Architects, Box Hill District Centre Structure Plan - June 1991, 1991
... Box Hill Historical Society Box Hill Heritage Centre Suite 7 Town Hall Hub Box Hill melbourne Two copies on shelf. Central Business District Land use Car Parks Transport Town planning Landscape Planning Box Hill Central This paper provides ideas for the plans for the Box Hill District Centre for the next decade. During the 1980s the Box Hill District Centre underwent substantial development. A new retail complex (Box Hill Central) combined with a transport interchange (rail/bus services) and a pedestrian mall ...This paper provides ideas for the plans for the Box Hill District Centre for the next decade. During the 1980s the Box Hill District Centre underwent substantial development. A new retail complex (Box Hill Central) combined with a transport interchange (rail/bus services) and a pedestrian mall added greater choice for the shopper as well as convenience and improved access.292pThis paper provides ideas for the plans for the Box Hill District Centre for the next decade. During the 1980s the Box Hill District Centre underwent substantial development. A new retail complex (Box Hill Central) combined with a transport interchange (rail/bus services) and a pedestrian mall added greater choice for the shopper as well as convenience and improved access.central business district, land use, car parks, transport, town planning, landscape planning, box hill central -
 Ballarat Heritage Services
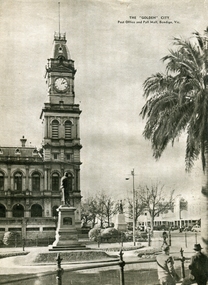
Photograph - Image - Black and White, Bendigo Post Office and Pall Mall, c1950, c1950
... Ballarat Heritage Services PO Box 2209 Bakery Hill Post Office goldfields bendigo bendigo post office pall mall A black and white image of a the Bendigo Post Office tower and statues in Pall Mall. ...A black and white image of a the Bendigo Post Office tower and statues in Pall Mall.bendigo, bendigo post office, pall mall -
 Whitehorse Historical Society Inc.
Pamphlet, 'Boosting Box Hill'
... Pamphlet describing vision for a revitalised Box Hill including plans for Carrington Road, Market Street Mall, Blank facades of Whitehorse Plaza, Prospect street, Whitehorse Road median, tramline extension to Mall Area....Whitehorse Historical Society Inc. 2-10 Deep Creek Road Mitcham melbourne box hill carrington road Pamphlet describing vision for a revitalised Box Hill including plans for Carrington Road, Market Street Mall, Blank facades of Whitehorse Plaza, Prospect street, Whitehorse Road median, tramline extension to Mall Area. ...Pamphlet describing vision for a revitalised Box Hill including plans for Carrington Road, Market Street Mall, Blank facades of Whitehorse Plaza, Prospect street, Whitehorse Road median, tramline extension to Mall Area.box hill carrington road -
 Ballarat Heritage Services
Photograph - Image, Pall Mall, Bendigo, 1951
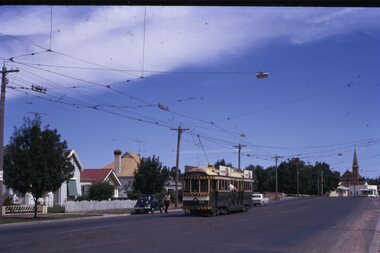
... Ballarat Heritage Services PO Box 2209 Bakery Hill Post Office goldfields Bendigo Charring Cross Pall Mall A tram at Charring Cross Bendigo. ...A tram at Charring Cross Bendigo. bendigo, charring cross, pall mall -
 Ballarat Heritage Services
Photograph - Digital photograph, Nose in Admiralty Arch, London, 19/09/2016
... Ballarat Heritage Services PO Box 2209 Bakery Hill Post Office goldfields Admiralty Arch is a landmark building in London which incorporates an archway providing road and pedestrian access between The Mall, which extends to the southwest, and Trafalgar Square to the northeast. ...Admiralty Arch is a landmark building in London which incorporates an archway providing road and pedestrian access between The Mall, which extends to the southwest, and Trafalgar Square to the northeast. Admiralty Arch, commissioned by King Edward VII in memory of his mother, Queen Victoria and designed by Aston Webb is now a Grade I listed building. In the past, it served as residence of the First Sea Lord and was used by the Admiralty. Until 2011, the building housed government offices, but in 2012 the government sold a 125-year lease over the building to a property developer (Prime Investors Capital, run by Rafael Serrano) for redevelopment into a luxury hotel, restaurant and apartments. (Wikipedia) On the inside wall of the northernmost arch is a small protrusion the size and shape of a human nose. It was placed there by artist Rick Buckley in 1997 as part of a campaign against the "Big Brother" society. The nose is at a height of about seven feet, and sits at waist height for anyone riding through the arch on a horse. Prior to Buckley being unmasked in 2011 by the London Evening Standard, an urban myth grew that the nose is there in honour of the Duke of Wellington, who was known for having a particularly large nose.(wikipedia)admiralty arch, london, nose -
 Bendigo Historical Society Inc.
Negative - Photos of Bendigo - Glass Plate Negatives, Early 1900s
... Box of eight whole plate negatives of Pall Mall, Bendigo. Copies from original photos, or negatives made by the Army Survey Regiment stationed at Fortuna Villa. The original photos were taken by Alan Fox in 1857 and are in the State library of Victoria. 11122a Photo taken from View Street looking towards Pall Mall over the Bendigo Creek. 11122b Charing Cross Bendigo looking along High Street towards Golden Square with the Bendigo Creek on the left. 11122c Pall Mall Bendigo looking towards White Hills. ...mall Box of eight whole plate negatives of Pall Mall, Bendigo. Copies from original photos, or negatives made by the Army Survey Regiment stationed at Fortuna Villa. The original photos were taken by Alan Fox in 1857 and are in the State library of Victoria. 11122a Photo taken from View Street looking towards Pall Mall over the Bendigo Creek. 11122b Charing Cross Bendigo looking along High Street towards Golden Square with the Bendigo Creek on the left. 11122c Pall Mall Bendigo looking towards White Hills. ...Box of eight whole plate negatives of Pall Mall, Bendigo. Copies from original photos, or negatives made by the Army Survey Regiment stationed at Fortuna Villa. The original photos were taken by Alan Fox in 1857 and are in the State library of Victoria. 11122a Photo taken from View Street looking towards Pall Mall over the Bendigo Creek. 11122b Charing Cross Bendigo looking along High Street towards Golden Square with the Bendigo Creek on the left. 11122c Pall Mall Bendigo looking towards White Hills. The building on the lower left in the distance is St Killians Stone Church. 11122d Bendigo and Pall Mall - taken looking over View St. 11122e Jackson's Gold Office View Pointphotos, bendigo, mike butcher collection, view st, golden square, jacksons gold office, view point, pall mall -
 Ballarat Tramway Museum
Slide - 35mm slide/s - set of 10, Eldon Hogan, mid 1960's to early 1970's
... Mall, Charing Cross, with the Beehive building in the background. Trams have SEC roof advertisement. .8 - ditto with Coca Cola ad on the Beehive building, turning around. .9 - No. 29 and a bogie tram at the Golden Square terminus with Billy Rodda's Golden Square Hotel in the background. Just past the tram is a large truck carrying boxes. .10 - Nos, 18, a bogie tram, 21 and 29 at the Quarry Hill...Mall, Charing Cross, with the Beehive building in the background. Trams have SEC roof advertisement. .8 - ditto with Coca Cola ad on the Beehive building, turning around. .9 - No. 29 and a bogie tram at the Golden Square terminus with Billy Rodda's Golden Square Hotel in the background. Just past the tram is a large truck carrying boxes. .10 - Nos, 18, a bogie tram, 21 and 29 at the Quarry Hill ...Set of 10 Agfa Plastic mounted slides - from the Eldon Hogan collection - possibly on an ARE Bendigo tours - mid 1960's (black destination rolls) and late 1960's or early 1970's. Scanned on the Canon scanner at the depot 15/12/1971 at the time of the installation of the scanner. .1 - No. 24 in bound along High St Bendigo with the discovery of gold monument in the foreground, Golden Sq route. .2 - ditto .3 - No. 26 outbound at the above location. .4 - No. 24 at the corner of Short St and High St, with the Technical college building? in the background. .5 - No. 26 at ditto, outbound for Golden Square. .6 - No. 24, High St Bendigo, with the Cathedral in the background. Tram has two Johnnie Walker Whiskey roof advertisements. .7 - Three trams, Pall Mall, Charing Cross, with the Beehive building in the background. Trams have SEC roof advertisement. .8 - ditto with Coca Cola ad on the Beehive building, turning around. .9 - No. 29 and a bogie tram at the Golden Square terminus with Billy Rodda's Golden Square Hotel in the background. Just past the tram is a large truck carrying boxes. .10 - Nos, 18, a bogie tram, 21 and 29 at the Quarry Hill terminus. tramways, trams, bendigo, tram 18, tram 24, tram 26, tram 21, tram 29 -
 Bendigo Historical Society Inc.
Photograph - Robert Green Collection - Photos of Bendigo Tramways - Sheet 1 of 8, 1960s
... Houses in the foreground, on the left is 245 Eaglehawk Road and on the right 241 Eaglehawk Road. 11147.1e No 28 Birney Car Special 11147.1f No 28 Birney Car Special and No 2 possibly in Eaglehawk 11147.1g No 18 roars up Eaglehawk Road into Iron Bark 11147.1h Tram crossing the railway at Jobs Gully, on its way to Bendigo 11147.1i Tram crossing the railway at Jobs Gully, on its way to Eaglehawk 11147.1j Central Deborah Gold Mine 11147.1k The intersection of Reginald and Houston St, with the Cemetery on the left. 11147.1l Tram Stop on Pall Mall opposite Ezywalkins Conrner of Mitchell St 11147.1m Electrical Cable junction box 11147.1n Electrical Cable junction box 11147.1o No 18 at Canterbury Park Terminus Eaglehawk 11147.1p No 26 at the top of Mitchell St on its way to Quarry Hill 11147.1q Nos 26 and 18 at the Railway Station stop in Mitchell St 11147.1r No 18 coming down Mitchell St 11147.1s No 5 possibly in Carpenter St 11147.1t No 5 at the Cemetery Gates ready to depart the terminus 11147.1u No 5 at the Cemetery Gates ready to depart the terminus 11147.1v No 5 at the Cemetery Gates ready to depart the terminus 11147.1w Nos 18 and 5 crossover at the Fountain 11147.1x Nos 18 and 5 crossover at the Fountain 11147.1y Nos 18 and 5 crossover at the Fountain 11147.1z Heading into Long Gully past the Manchester Arms Hotel 11147.1aa No 5 loading passengers at the Eaglehawk Terminus next to Canterbury Park 11147.1ab Traffic conjestion at the loop on the way back to Bendigo 11147.1ac The Eaglehawk Terminus next to Canterbury Park 11147.1ad The Eaglehawk Terminus next to Canterbury Park 11147.1ae The Eaglehawk Terminus next to Canterbury Park 11147.1af The Eaglehawk Terminus next to Canterbury Park...Houses in the foreground, on the left is 245 Eaglehawk Road and on the right 241 Eaglehawk Road. 11147.1e No 28 Birney Car Special 11147.1f No 28 Birney Car Special and No 2 possibly in Eaglehawk 11147.1g No 18 roars up Eaglehawk Road into Iron Bark 11147.1h Tram crossing the railway at Jobs Gully, on its way to Bendigo 11147.1i Tram crossing the railway at Jobs Gully, on its way to Eaglehawk 11147.1j Central Deborah Gold Mine 11147.1k The intersection of Reginald and Houston St, with the Cemetery on the left. 11147.1l Tram Stop on Pall Mall opposite Ezywalkins Conrner of Mitchell St 11147.1m Electrical Cable junction box 11147.1n Electrical Cable junction box 11147.1o No 18 at Canterbury Park Terminus Eaglehawk 11147.1p No 26 at the top of Mitchell St on its way to Quarry Hill 11147.1q Nos 26 and 18 at the Railway Station stop in Mitchell St 11147.1r No 18 coming down Mitchell St 11147.1s No 5 possibly in Carpenter St 11147.1t No 5 at the Cemetery Gates ready to depart the terminus 11147.1u No 5 at the Cemetery Gates ready to depart the terminus 11147.1v No 5 at the Cemetery Gates ready to depart the terminus 11147.1w Nos 18 and 5 crossover at the Fountain 11147.1x Nos 18 and 5 crossover at the Fountain 11147.1y Nos 18 and 5 crossover at the Fountain 11147.1z Heading into Long Gully past the Manchester Arms Hotel 11147.1aa No 5 loading passengers at the Eaglehawk Terminus next to Canterbury Park 11147.1ab Traffic conjestion at the loop on the way back to Bendigo 11147.1ac The Eaglehawk Terminus next to Canterbury Park 11147.1ad The Eaglehawk Terminus next to Canterbury Park 11147.1ae The Eaglehawk Terminus next to Canterbury Park 11147.1af The Eaglehawk Terminus next to Canterbury Park Photograph Robert Green Collection - Photos of Bendigo Tramways - Sheet 1 of 8 ...This collection contains eight archive sheets (Sheet 1 to Sheet 8) of strips of original 35mm black and white negatives of photographs taken during the 1960s and early 1970s by Robert Green, of the Bendigo State Electricty Commission of Victoria Tramways prior to their abandonment The collection also includes two archive quality sheets (Sheet A and Sheet B) of original 35mm colour slides taken by Robert Green during the same period. Sheet B also contains one slide taken by Robert's friend Keigh S King (1928-2019) who was the author of the book 'The Bendigo Tramways an illustrated history, published by the Australian Railway Historical Society Victorian Division Melbourne in February 1972; BHS Item no. 5052. The collection also includes one USB stick which contains images of all photographs described above, except for one colour slide taken by Keith S Kings. Sixteen black and white prints from the images are also included.Robert Green Collection, this item contains thirty three Black and White Negatives of trams at various locations around Bendigo. Photos: 11147.1a and 11147.1b Tram on its way out of Long Gully along Mt Korong (Eaglehawk) Road towards Eaglehawk. Houses in the foreground, on the left is 245 Eaglehawk Road and on the right 241 Eaglehawk Road. 11147.1c Birney Car Tram on its way out of Long Gully along Mt Korong (Eaglehawk) Road towards Eaglehawk, looking back ove the Long Gully township. 11147.1d Birney Car Tram on its way out of Long Gully along Mt Korong (Eaglehawk) Road towards Eaglehawk. Houses in the foreground, on the left is 245 Eaglehawk Road and on the right 241 Eaglehawk Road. 11147.1e No 28 Birney Car Special 11147.1f No 28 Birney Car Special and No 2 possibly in Eaglehawk 11147.1g No 18 roars up Eaglehawk Road into Iron Bark 11147.1h Tram crossing the railway at Jobs Gully, on its way to Bendigo 11147.1i Tram crossing the railway at Jobs Gully, on its way to Eaglehawk 11147.1j Central Deborah Gold Mine 11147.1k The intersection of Reginald and Houston St, with the Cemetery on the left. 11147.1l Tram Stop on Pall Mall opposite Ezywalkins Conrner of Mitchell St 11147.1m Electrical Cable junction box 11147.1n Electrical Cable junction box 11147.1o No 18 at Canterbury Park Terminus Eaglehawk 11147.1p No 26 at the top of Mitchell St on its way to Quarry Hill 11147.1q Nos 26 and 18 at the Railway Station stop in Mitchell St 11147.1r No 18 coming down Mitchell St 11147.1s No 5 possibly in Carpenter St 11147.1t No 5 at the Cemetery Gates ready to depart the terminus 11147.1u No 5 at the Cemetery Gates ready to depart the terminus 11147.1v No 5 at the Cemetery Gates ready to depart the terminus 11147.1w Nos 18 and 5 crossover at the Fountain 11147.1x Nos 18 and 5 crossover at the Fountain 11147.1y Nos 18 and 5 crossover at the Fountain 11147.1z Heading into Long Gully past the Manchester Arms Hotel 11147.1aa No 5 loading passengers at the Eaglehawk Terminus next to Canterbury Park 11147.1ab Traffic conjestion at the loop on the way back to Bendigo 11147.1ac The Eaglehawk Terminus next to Canterbury Park 11147.1ad The Eaglehawk Terminus next to Canterbury Park 11147.1ae The Eaglehawk Terminus next to Canterbury Park 11147.1af The Eaglehawk Terminus next to Canterbury Parkkeith s king, bendigo, trams, robert green -
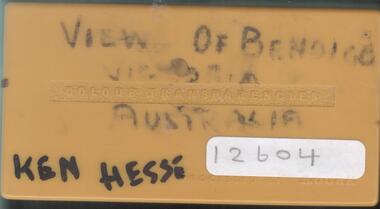 Bendigo Historical Society Inc.
Photograph - Ken Hesse Collection: Photos of Bendigo, 1950-1960s
... This item contains the following photos: 12604 Colour photo of the slide box 12604a The Queen Elizabeth Oval from the lookout tower; football match in progress 12604b A holden car going up a hill besides a park 12604c View of Bendigo from the lookout in Rosalind Park 12604d The old post office and law courts in Pall Mall 12604e Looking up Mitchell Street, the fountain, an Eaglehawk bound tram and the Fountain Plaza 12604f Mirradong Home for the Blind, McIvor Road Bendigo 12604g Wildflower 12604h View overlooking East Bendigo in the distance 12604i The Sacred Heart Cathedral front from McKenzie Street 12604j A Bendigo Church 12604k Spectators at a procession Charing Cross Bendigo 12604l St Aidan's Orphanage Bendigo 12604m Old Bendigo Showgrounds (Tom Flood Centre) 12604n Old Bendigo Showgrounds (Tom Flood Centre) 12604o Kangaroos and emu at the Botanical Gardens 12604o The Benevolent Home (Anne Caudel Centre) 12604q The Benevolent Home looking towards White Hills 12604r The Benevolent Home (Anne Caudel Centre) 12604s Bendigo Town Hall 12604t Bendigo Senior Citizens Club - at the rear of the library 12604u Bendigo Art Gallery in View Street 12604v Bendigo old show grounds (Tom Flood Centre) 12604w Former Bendigo Teachers College Osborne Street 12604x Charing Cross from High Street 12604y Lake Weeroona 12604z Looking over the old Municipal Pool and Barnard Street towards North Bendigo 12604za The Benevolent Home (Anne Caudle Centre) 12604zb The Benevolent Home (Anne Caudle Centre) 12604zc From the lookout looking towards White Hills...This item contains the following photos: 12604 Colour photo of the slide box 12604a The Queen Elizabeth Oval from the lookout tower; football match in progress 12604b A holden car going up a hill besides a park 12604c View of Bendigo from the lookout in Rosalind Park 12604d The old post office and law courts in Pall Mall 12604e Looking up Mitchell Street, the fountain, an Eaglehawk bound tram and the Fountain Plaza 12604f Mirradong Home for the Blind, McIvor Road Bendigo 12604g Wildflower 12604h View overlooking East Bendigo in the distance 12604i The Sacred Heart Cathedral front from McKenzie Street 12604j A Bendigo Church 12604k Spectators at a procession Charing Cross Bendigo 12604l St Aidan's Orphanage Bendigo 12604m Old Bendigo Showgrounds (Tom Flood Centre) 12604n Old Bendigo Showgrounds (Tom Flood Centre) 12604o Kangaroos and emu at the Botanical Gardens 12604o The Benevolent Home (Anne Caudel Centre) 12604q The Benevolent Home looking towards White Hills 12604r The Benevolent Home (Anne Caudel Centre) 12604s Bendigo Town Hall 12604t Bendigo Senior Citizens Club - at the rear of the library 12604u Bendigo Art Gallery in View Street 12604v Bendigo old show grounds (Tom Flood Centre) 12604w Former Bendigo Teachers College Osborne Street 12604x Charing Cross from High Street 12604y Lake Weeroona 12604z Looking over the old Municipal Pool and Barnard Street towards North Bendigo 12604za The Benevolent Home (Anne Caudle Centre) 12604zb The Benevolent Home (Anne Caudle Centre) 12604zc From the lookout looking towards White Hills Photograph Ken Hesse Collection: Photos of Bendigo ...Ken Hesse was a former president of the Bendigo Rotary Club and in 1997 the Bendigo Rotary club unveiled a memorial plaque at the corner of Sydney Myer Place and Midland Highway , Rosiland Park.A box of twenty-eight photographic slides containing various views of Bendigo. Included are buildings and streetscapes. Item part of Mr. Ken Hesse Collection. This item contains the following photos: 12604 Colour photo of the slide box 12604a The Queen Elizabeth Oval from the lookout tower; football match in progress 12604b A holden car going up a hill besides a park 12604c View of Bendigo from the lookout in Rosalind Park 12604d The old post office and law courts in Pall Mall 12604e Looking up Mitchell Street, the fountain, an Eaglehawk bound tram and the Fountain Plaza 12604f Mirradong Home for the Blind, McIvor Road Bendigo 12604g Wildflower 12604h View overlooking East Bendigo in the distance 12604i The Sacred Heart Cathedral front from McKenzie Street 12604j A Bendigo Church 12604k Spectators at a procession Charing Cross Bendigo 12604l St Aidan's Orphanage Bendigo 12604m Old Bendigo Showgrounds (Tom Flood Centre) 12604n Old Bendigo Showgrounds (Tom Flood Centre) 12604o Kangaroos and emu at the Botanical Gardens 12604o The Benevolent Home (Anne Caudel Centre) 12604q The Benevolent Home looking towards White Hills 12604r The Benevolent Home (Anne Caudel Centre) 12604s Bendigo Town Hall 12604t Bendigo Senior Citizens Club - at the rear of the library 12604u Bendigo Art Gallery in View Street 12604v Bendigo old show grounds (Tom Flood Centre) 12604w Former Bendigo Teachers College Osborne Street 12604x Charing Cross from High Street 12604y Lake Weeroona 12604z Looking over the old Municipal Pool and Barnard Street towards North Bendigo 12604za The Benevolent Home (Anne Caudle Centre) 12604zb The Benevolent Home (Anne Caudle Centre) 12604zc From the lookout looking towards White Hills.history, bendigo, bendigo home and hospital for the aged, bendigo anne caudle centre, ken hesse collection