Showing 39 items matching "box hill plaza"
-
 Box Hill Historical Society
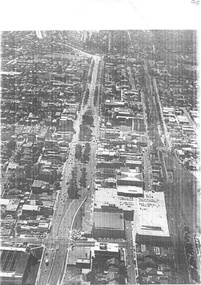
Photograph - Box Hill Shopping Centre between Whitehorse Road, Nelson Road and Railway line - Aerial view, Simon Fox, 1/12/1994 12:00:00 AM
... ...Box Hill Plaza...Aerial view of central Box Hill looking east from Nelson road, showing Box Hill Plaza and Box Hill Ten-pin Bowling Alley....Box Hill Historical Society Box Hill Heritage Centre Suite 7 Town Hall Hub Box Hill melbourne Aerial view of central Box Hill looking east from Nelson road, showing Box Hill Plaza and Box Hill Ten-pin Bowling Alley. ...Aerial view of central Box Hill looking east from Nelson road, showing Box Hill Plaza and Box Hill Ten-pin Bowling Alley.B&w photowhitehorse road, nelson road, box hill plaza, ten-pin bowling, aerial photographs -
 Box Hill Historical Society
Photograph - Whitehorse Plaza, Sweeney Studios, 1/05/1974 12:00:00 AM
... Looking across Box Hill Plaza...Whitehorse Plaza Construction 1.5.74 Looking across Box Hill Plaza Photograph Whitehorse Plaza Sweeney Studios ...Looking across Box Hill Plaza1.5.74whitehorse plaza, construction -
Box Hill Historical Society
Article, Mister Clothes sells stock, 1994
... Box Hill...Whitehorse Plaza...Box Hill Historical Society Box Hill Heritage Centre Suite 7 Town Hall Hub Box Hill melbourne Liversidge> John Liversidge> Sue Mister Clothes Whitehorse Road Box Hill Whitehorse Plaza Box Hill Cenral Station Street Railway crossings Businesses Clothing stores Clothing and dress John and Sue Liversidge opened Mister Clothes in 1972. ...John and Sue Liversidge opened Mister Clothes in 1972. In 1976 they purchased 948 Whitehorse Road and have run the business from there, since then. John has been associated with the clothing business since the age of 12. After 23 years of trading they have decided to close the business. Photo.non-fictionliversidge> john, liversidge> sue, mister clothes, whitehorse road, box hill, whitehorse plaza, box hill cenral, station street, railway crossings, businesses, clothing stores, clothing and dress -
 Box Hill Historical Society
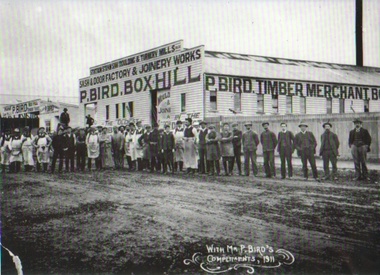
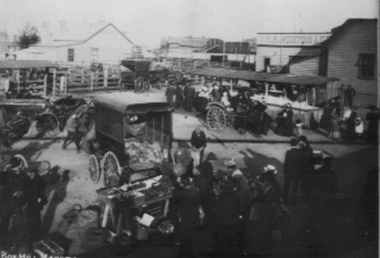
Photograph - Businesses - Saw Mills, 1911
... Bird, Timber merchant, Clisby Street, Box Hill (site of Box Hill Plaza Shopping Centre) taken in 1911. ...Box Hill Historical Society Box Hill Heritage Centre Suite 7 Town Hall Hub Box Hill melbourne The premises and employees of P. Bird, Timber merchant, Clisby Street, Box Hill (site of Box Hill Plaza Shopping Centre) taken in 1911. ...The premises and employees of P. Bird, Timber merchant, Clisby Street, Box Hill (site of Box Hill Plaza Shopping Centre) taken in 1911. See Page 17 "The days before Yesterday". One version of the photograph appears to have been used in some sort of advertising either a flyer or newspaper advertisement. B&w photo; & Bromide2 copies of same photograph with different inscriptions: (a) 'With Mr P. Bird's Compliments, 1911',(b) 'Ring Up Tel. 120 Canterbury, Send for Price List' clisby street, industries, businesses, bird> p., bird's timber yard, whitehorse plaza, timber yards, advertising, "the days before yesterday", timber industry establishments -
Box Hill Historical Society
Photograph - Aerial Photographs
... Aerial photograph showing Nelson Road, Whitehorse Road, Box Hill Hospital, Whitehorse Plaza, Box Hill Brickworks and Surrey Park. ...Box Hill Historical Society Box Hill Heritage Centre Suite 7 Town Hall Hub Box Hill melbourne Aerial photograph showing Nelson Road, Whitehorse Road, Box Hill Hospital, Whitehorse Plaza, Box Hill Brickworks and Surrey Park. ...Aerial photograph showing Nelson Road, Whitehorse Road, Box Hill Hospital, Whitehorse Plaza, Box Hill Brickworks and Surrey Park. See also B0076.aerial photographs, whitehorse road, nelson road, whitehorse plaza, hospitals, shopping centres, brickworks, surrey park -
Box Hill Historical Society
Photograph - Aerial Photographs, Simon Fox, 1/12/1994
... Aerial view looking south and showing Box Hill Hospital, Whitehorse Plaza, Surrey Park, Water Tower and the Brickworks....Box Hill Historical Society Box Hill Heritage Centre Suite 7 Town Hall Hub Box Hill melbourne Aerial view looking south and showing Box Hill Hospital, Whitehorse Plaza, Surrey Park, Water Tower and the Brickworks. ...Aerial view looking south and showing Box Hill Hospital, Whitehorse Plaza, Surrey Park, Water Tower and the Brickworks.aerial photographs, hospitals, whitehorse plaza, surrey park, water towers, brickworks, shopping centres -
 Ballarat Tramway Museum
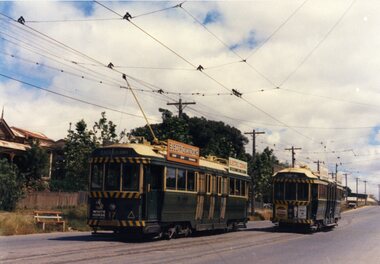
Slide - 35mm slide/s - set of 23, Noel Simons, 26/02/1972 12:00:00 AM
... Hill. Has the Ezywalkin and the Beehive buildings in the background. 1205.20 - as for 1205.19, but a few moments later. Adjacent pole has a "NO ROAD" letter in reflectors vertically. 1205.21 - Charing Cross with Nos. 25, 21, 26 and 7, looking south from Pall Mall end. 1205.22 - No. 24 crossing Mitchell St. en route for Golden Square, showing 'special' with the Beehive and Ezywalkin buildings in the background. 1205.23 - Charing Cross with Nos. 24, 21 and 7 in the photo and Fountain Plaza in the background. Print of 1205.7 - stored in box...Hill. Has the Ezywalkin and the Beehive buildings in the background. 1205.20 - as for 1205.19, but a few moments later. Adjacent pole has a "NO ROAD" letter in reflectors vertically. 1205.21 - Charing Cross with Nos. 25, 21, 26 and 7, looking south from Pall Mall end. 1205.22 - No. 24 crossing Mitchell St. en route for Golden Square, showing 'special' with the Beehive and Ezywalkin buildings in the background. 1205.23 - Charing Cross with Nos. 24, 21 and 7 in the photo and Fountain Plaza in the background. Print of 1205.7 - stored in box ...Set of 23 transparencies taken on 26/2/1972 on Kodak mounts. 1205.1 - Bendigo No. 25 on a special tour at Fire Station Loop, en route to Golden Square. 1205.2 - No. 21 and 25 crossing at Fire Station Loop, note photographers on the ground. No. 21 bound for North Bendigo. 1205.3 - as for 1205.3, but with trams departing loop and fire station in the background. 1205.4 - No. 25 at Golden Square Hotel with 'Rodda's Golden Square Hotel' in the background. Tram on a special tour, but showing destination of North Bendigo. 1205.5 - as for 1205.4 - but showing special. Has the end of the track in the photograph. 1205.6 - Nos. 7 and 25 (on a special tour) crossing at Myrtle St. Loop. 1205.7 - No. 7 leaving Myrtle St. loop with the mine poppet head in the background. Photo taken after tram has passed photographer. (Print made of this slide 10/2001 for use in the Gold Gold Gold exhibition of 10/2001 - See Reg. item 1979. 1205.8 - No. 25 entering depot. Tram showing 'special'. Tennis court on right has players. Photo taken after tram has passed photographer. 1205.9 - No. 24 (showing 'special') and No. 20 (showing 'Long Gully') at Bendigo Depot. 1205.10 - No. 24 on a special charter, leaving Bendigo depot. Tram has two 'Johnnie Walker' roof ads. 1205.11 - Bendigo depot with 29, 25 and a bogie car inside the depot doors. 1205.12 - As for 1205.11, but with 28 and 29. 1205.13 - No. 24 standing at front entrance of Bendigo depot with No. 20 in the background. 1205.14 - No. 24 running out into McCrae St showing special, with conductor on front step. 1205.15 - No. 24 in Caledonia St. at corner of Thunder St with the Gasworks in the background. 1205.16 - No. 5 en route for Quarry Hill at Charing cross with No. 26 (en route for Eaglehawk) about to arrive. Has former crossover at this location in the foreground. Has the Ezywalkin building in the background. 1205.17 - No. 5 and 26 at Charing Cross, with the Alexandra Fountain in the foreground and the Beehive and Ezywalkin buildings in the background. No.26 has two SEC roof ads. 1205.18 - Charing Cross looking along Pall Mall with trams 7 and 21 and 26 in the picture. 1205.19 - Charing Cross, with 21 departing for Golden Square and No. 5 heading for Quarry Hill. Has the Ezywalkin and the Beehive buildings in the background. 1205.20 - as for 1205.19, but a few moments later. Adjacent pole has a "NO ROAD" letter in reflectors vertically. 1205.21 - Charing Cross with Nos. 25, 21, 26 and 7, looking south from Pall Mall end. 1205.22 - No. 24 crossing Mitchell St. en route for Golden Square, showing 'special' with the Beehive and Ezywalkin buildings in the background. 1205.23 - Charing Cross with Nos. 24, 21 and 7 in the photo and Fountain Plaza in the background. Print of 1205.7 - stored in box D1.Information written on in blue ink and date stamped on purple ink. 1205.1 - "No. 25 at Fire Station Loop High Street, Golden Square." 1205.2 - "Nos. 25 and 21 crossing at Fire Station Loop, near Golden Square." 1205.3 - "Nos. 25 and 21 crossing at Fire Station Loop, near Golden Square." 1205.4 - "No. 25 at Golden Square terminus." 1205.5 - "No. 25 at Golden Square terminus." 1205.6 - "Nos. 7 and 25 crossing at Myrtle St. Loop." 1205.7 - "No. 7 leaving Myrtle St. Loop." 1205.8 - "No 25, entering Bendigo Depot." 1205.9 - "Nos. 20 and 24 at Bendigo Depot." 1205.10 - "No. 24 at Bendigo Depot." 1205.11 - "Nos. 25 and 29 at Bendigo Depot." 1205.12 - "Birney cars 29 and 28 at Bendigo Depot." 1205.13 - "No. 24 (with 20 beyond) at Bendigo Depot." 1205.14 - "No. 24 entering McCrae St. from Arnold St." 1204.15 - "No. 24 in Caledonia St. at cnr of Thunder St." 1204.16 - "No. 5 waits at Charing Cross as No. 26 arrives from Quarry Hill. Note remains of crossover abandoned on relocation in 1965." 1204.17 - "Nos. 5 and 26 at Charing Cross." 1204.18 - "Nos. 26, 7 and 21 at Charing Cross (No. 5 just visible behind No. 26)." 1204.19 - "No. 21 leaves Charing Cross for Golden Square as No. 5 starts off for Quarry Hill." 1204.20 - "No. 21 swings onto the single track Golden Square line as No. 5 heads into Mitchell St. towards Quarry Hill." 1204.21 - "Nos. 25, 21 and 26 watch No. 7 arrive at Charing Cross from Golden Square." 1204.22 - "No. 24 at Charing Cross crossing Mitchell St." 1204.23 - "Nos. 24, 21 and 7 at Charing Cross."tramways, trams, bendigo, golden square, myrtle st., fire station, depot, charing cross, tram 5, tram 7, tram 20, tram 21, tram 24, tram 25, tram 28, tram 29 -
 Ballarat Tramway Museum
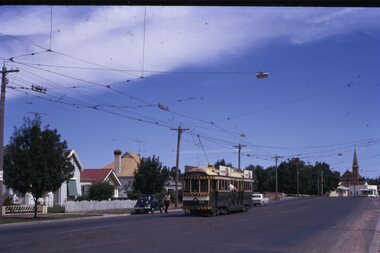
Photograph - Colour Photograph/s, 23/11/1962 12:00:00 AM
... Plaza theatre sign in photo above tram. On right hand side, is a van marked "Carrier M. Slattery". Tram has destination of "Quarry Hill" in rear box. 967.3 - Colour postcard size print of SEC Bendigo tram 19 on the North Bendigo line. ...Plaza theatre sign in photo above tram. On right hand side, is a van marked "Carrier M. Slattery". Tram has destination of "Quarry Hill" in rear box. 967.3 - Colour postcard size print of SEC Bendigo tram 19 on the North Bendigo line. ...967.1 - Colour postcard size print of SEC Bendigo trams 4 and 17 at a crossing Loop on the Eaglehawk line. Photo dated 21.11.1962. Printed on AGFA paper. Both trams fitted with dash canopy lighting, but no large white strip under the driver's windows. 17 showing destination of "Eaglehawk", has two SEC ads on the side re Electric Cook and a White Horse whiskey ad on front panel. Tram 4 showing destination of "Quarry Hill", has two ad panels on roof and two ads on front panel including one Cohn's' Drinks. 967.2 - Colour postcard size print of SEC Bendigo tram 26 in Mitchell St. crossing Hargreaves St. heading for Charing Cross. Photo dated 21.11.1962. Printed on AGFA paper. Trams fitted with dash canopy lighting, but no large white strip under the driver's windows. Has two roof ads and one ad on rear drivers panel. In background of photo are the buildings along Mitchell St. looking down along Mitchell St and into View St. Has Plaza theatre sign in photo above tram. On right hand side, is a van marked "Carrier M. Slattery". Tram has destination of "Quarry Hill" in rear box. 967.3 - Colour postcard size print of SEC Bendigo tram 19 on the North Bendigo line. Photo dated 21.11.1962. Printed on AGFA paper. Trams fitted with dash canopy lighting, but no large white strip under the driver's windows. Has destination "Nth Bendigo" and SEC roof ads and drivers panel ad for Briquettes.On rear top left hand corner "21.11.62" in very wavy handwriting typical of an aged person.bendigo, eaglehawk, mitchell st., north bendigo, tram 4, tram 17, tram 26, tram 19 -
Box Hill Historical Society
Photograph - Aerial photographs
... Box Hill Historical Society Box Hill Heritage Centre Suite 7 Town Hall Hub Box Hill melbourne Aerial photograph of Box Hill, showing Nelson Road, Station Street, Box Hill Brickworks and Whitehorse Road Nelson Road Station Street Brickworks Whitehorse Plaza Aerial photographs Photograph Aerial photographs ...Aerial photograph of Box Hill, showing Nelson Road, Station Street, Box Hill Brickworks and Whitehorse Roadnelson road, station street, brickworks, whitehorse plaza, aerial photographs -
Box Hill Historical Society
Photograph - Aerial photograph of Whitehorse Plaza
... Box Hill Historical Society Box Hill Heritage Centre Suite 7 Town Hall Hub Box Hill melbourne Aerial photographs Shopping centres Whitehorse Plaza Photograph Aerial photograph of Whitehorse Plaza ...aerial photographs, shopping centres, whitehorse plaza -
Box Hill Historical Society
Photograph - Aerial Photographs
... Aerial photograph of Bank street, Box Hill - looking west - showing the ANZ Bank on the corner of Station Street and Main Street, and Whitehorse Plaza in the background. ...Box Hill Historical Society Box Hill Heritage Centre Suite 7 Town Hall Hub Box Hill melbourne Aerial photograph of Bank street, Box Hill - looking west - showing the ANZ Bank on the corner of Station Street and Main Street, and Whitehorse Plaza in the background. ...Aerial photograph of Bank street, Box Hill - looking west - showing the ANZ Bank on the corner of Station Street and Main Street, and Whitehorse Plaza in the background. C.1970's. Railway line visible through the trees. The water tower in Elgar Road and the communications tower in Canterbury Road is visible.whitehorse plaza, anz bank, bank street, station street, main street, shopping centres, banks, transport, water towers, telecommunications equipment, aerial photographs -
Box Hill Historical Society
Book, Finch.Freeman, Consultancy advice on Whitehorse Plaza Shopping Centre prepared for City of Box Hill, 1/02/1990
... Consultancy advice on Whitehorse Plaza Shopping Centre prepared for City of Box Hill....Whitehorse Plaza Shopping Centre...City of Box Hill...Box Hill Historical Society Box Hill Heritage Centre Suite 7 Town Hall Hub Box Hill melbourne Whitehorse Plaza Shopping Centre City of Box Hill Box Hill Central Shopping Centre Shopping centres Main Street Market Street Land use Town planning A report prepared for the City of Box Hill on the viability of continuing to improve Whitehorse Plaza. 78p. ...A report prepared for the City of Box Hill on the viability of continuing to improve Whitehorse Plaza.78p. Includes copies of the lease and supplementary lease, site plan, sales performance. Index.A report prepared for the City of Box Hill on the viability of continuing to improve Whitehorse Plaza. whitehorse plaza shopping centre, city of box hill, box hill central shopping centre, shopping centres, main street, market street, land use, town planning -
Box Hill Historical Society
Book, City of Box Hill, Box Hill Community Plan 1987-88, 1/09/1987 12:00:00 AM
... Plaza...Guides...Country Women's Association...Burwood Bulletin...Box Hill...Box Hill Historical Society Box Hill Heritage Centre Suite 7 Town Hall Hub Box Hill melbourne Surrey Hills Women's Christian Temperance Union Whitehorse Plaza Guides Country Women's Association Burwood Bulletin Box Hill and District Kennel Clubs Inner East Foster Care Dry Area Town planning Community Plan A Community Plan developed to invite 'feedback' from the community was first begun in 1984. ...A Community Plan developed to invite 'feedback' from the community was first begun in 1984. This document contains the views of residents responding to the community plan discussion paper and public meetings held in July 1987. There is a range of subjects covered from family and community life, arts, environment, organisations, sister cities, and administrative services.surrey hills women's christian temperance union, whitehorse plaza, guides, country women's association, burwood bulletin, box hill and district kennel clubs, inner east foster care, dry area, town planning, community plan -
Box Hill Historical Society
Photograph - Aerial photograph of Box Hill
... Box Hill Historical Society Box Hill Heritage Centre Suite 7 Town Hall Hub Box Hill melbourne Aerial view looking south and showing Whitehorse Plaza, Surrey Park and the brickworks. ...Aerial view looking south and showing Whitehorse Plaza, Surrey Park and the brickworks.aerial photographs, whitehorse road, surrey park, shopping centres, brickworks -
 Box Hill Historical Society
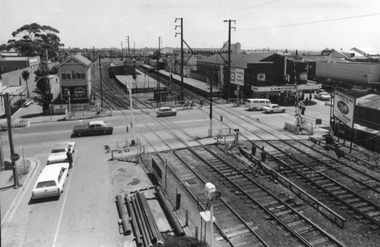
Photograph - Railways, Sweeney Studios
... Box Hill Station...Signal boxes...Real estate agents...ANZ Bank...P. B. Fielding...Lawfords...Whitehorse Plaza...Box Hill Historical Society Box Hill Heritage Centre Suite 7 Town Hall Hub Box Hill melbourne View of Station Street, Box Hill Railway Station and level crossing with boom gates taken from Rutland Road looking west-north-west. Lawfords furniture store can be seen on the corner of Station and Main Street. Shows signal box. Station Street Rutland Road Railway crossings Railway gates Railways Box Hill Station Signal boxes Real estate agents ANZ Bank P. B. Fielding Lawfords Whitehorse Plaza ...View of Station Street, Box Hill Railway Station and level crossing with boom gates taken from Rutland Road looking west-north-west. Lawfords furniture store can be seen on the corner of Station and Main Street. Shows signal box.B&w photostation street, rutland road, railway crossings, railway gates, railways, box hill station, signal boxes, real estate agents, anz bank, p. b. fielding, lawfords, whitehorse plaza, motor vehicles -
Box Hill Historical Society
Photograph - Whitehorse Plaza, Sweeney Studios, 3/06/1974
... Box Hill Historical Society Box Hill Heritage Centre Suite 7 Town Hall Hub Box Hill melbourne Whitehorse Plaza construction site Whitehorse Plaza Construction Photograph Whitehorse Plaza Sweeney Studios ...Whitehorse Plaza construction sitewhitehorse plaza, construction -
 Box Hill Historical Society
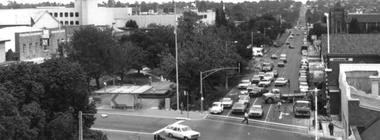
Photograph - Streetscapes - Whitehorse Road, Susan Johns, c1970's
... Looking West along Whitehorse Road, Box Hill from Station Street in the foreground. You can see cars parked on the top of the Whitehorse Plaza (in the middle of the picture)....Box Hill Historical Society Box Hill Heritage Centre Suite 7 Town Hall Hub Box Hill melbourne Looking West along Whitehorse Road, Box Hill from Station Street in the foreground. You can see cars parked on the top of the Whitehorse Plaza ...Looking West along Whitehorse Road, Box Hill from Station Street in the foreground. You can see cars parked on the top of the Whitehorse Plaza (in the middle of the picture).B&w photowhitehorse road, station street, transport, businesses, state savings bank of victoria, whitehorse plaza -
 Box Hill Historical Society
Photograph - Streetscapes, c.1970s
... Streetscape Prospect Street, Box Hill, showing building construction of Whitehorse Plaza...Box Hill Historical Society Box Hill Heritage Centre Suite 7 Town Hall Hub Box Hill melbourne Streetscape Prospect Street, Box Hill, showing building construction of Whitehorse Plaza Building industry Construction sites Prospect Road Whitehorse Plaza 1970s B&w photo Photograph Streetscapes ...Streetscape Prospect Street, Box Hill, showing building construction of Whitehorse PlazaB&w photobuilding industry, construction sites, prospect road, whitehorse plaza, 1970s -
 Box Hill Historical Society
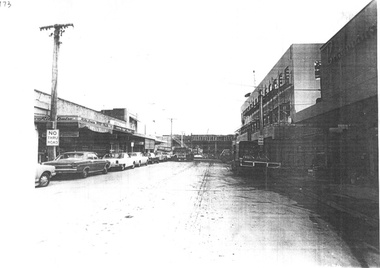
Photograph - Main Street
... Box Hill Historical Society Box Hill Heritage Centre Suite 7 Town Hall Hub Box Hill melbourne Main Street looking towards Clisby Street. Construction of Whitehorse Plaza ...Main Street looking towards Clisby Street. Construction of Whitehorse PlazaB&w photoclisby street, main street, whitehorse plaza, shops, rita louise, bradmans, motor vehicles -
Box Hill Historical Society
Photograph - Shops
... Photograph of corner of Main Street and Market Street, Box Hill, showing the Bradman's building and the construction of Whitehorse Plaza. ...Box Hill Historical Society Box Hill Heritage Centre Suite 7 Town Hall Hub Box Hill melbourne Photograph of corner of Main Street and Market Street, Box Hill, showing the Bradman's building and the construction of Whitehorse Plaza. ...Photograph of corner of Main Street and Market Street, Box Hill, showing the Bradman's building and the construction of Whitehorse Plaza. Taxis, cars and buses parked along the street.main street, market street, world travel service, bradmans, shops, transport, motor vehicles -
 Box Hill Historical Society
Photograph - Whitehorse Plaza
... Construction of Whitehorse Plaza in Whitehorse Road, Box Hill. Looking east along Whitehorse Road...Box Hill Historical Society Box Hill Heritage Centre Suite 7 Town Hall Hub Box Hill melbourne Construction of Whitehorse Plaza in Whitehorse Road, Box Hill. ...Construction of Whitehorse Plaza in Whitehorse Road, Box Hill. Looking east along Whitehorse RoadB&w photowhitehorse plaza, whitehorse road, building construction -
 Whitehorse Historical Society Inc.
Pamphlet, 'Boosting Box Hill'
... Pamphlet describing vision for a revitalised Box Hill including plans for Carrington Road, Market Street Mall, Blank facades of Whitehorse Plaza, Prospect street, Whitehorse Road median, tramline extension to Mall Area....Whitehorse Historical Society Inc. 2-10 Deep Creek Road Mitcham melbourne box hill carrington road Pamphlet describing vision for a revitalised Box Hill including plans for Carrington Road, Market Street Mall, Blank facades of Whitehorse Plaza, Prospect street, Whitehorse Road median, tramline extension to Mall Area. ...Pamphlet describing vision for a revitalised Box Hill including plans for Carrington Road, Market Street Mall, Blank facades of Whitehorse Plaza, Prospect street, Whitehorse Road median, tramline extension to Mall Area.box hill carrington road -
 Melbourne Tram Museum
Newsletter, Yarra Trams, "Tram 109", 2001 - 2003
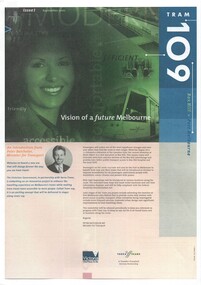
... Box Hill... Mont Albert... Superstops... Tram Stops... Opening... St Vincent's Plaza...Melbourne Tram Museum 8 Wallen Road Hawthorn melbourne Trams tramways Yarra Trams Route 109 Box Hill Mont Albert Superstops Tram Stops Opening St Vincent's Plaza Set of three A4 printed newsletters, stapled in top left hand corner, titled "Tram 109" and two associated pamphlets. .1 - 4 pages - issue 1 - September 2001 - with introduction by Minister for Transport Peter Batchelor introducing the new route 109, Hubert Guyot (CEO Yarra Trams) about the Superstops, details of the new low floor trams and details of the extension to Box Hill along with time line. .2 - 4 pages - issue 2 - Autumn 2002 - message from CEO, diagrammatic map and attributes, and a general update on progress, including a timeline. .3 - single folded A3 sheet printed both sides - Issue 4 - Summer 2003 - noting the wheel chair access to tram, opening on 2/5/2003, message from CEO and launch details, including notes on patronage increase. .4 - Pamphlet - DL four fold - printed on gloss paper full colour dated Autumn 2002 with message from Minister for Transport Peter Batchelor, diagrammatic map of extension showing tram stop facilities and locations of important places, low floor trams and contact details for further information. .5 - Pamphlet - DL five fold - printed on gloss paper full colour dated c mid 2001 with message from Minister for Transport Peter Batchelor, details of Yarra Trams, why the extension and project map. ...Set of three A4 printed newsletters, stapled in top left hand corner, titled "Tram 109" and two associated pamphlets. .1 - 4 pages - issue 1 - September 2001 - with introduction by Minister for Transport Peter Batchelor introducing the new route 109, Hubert Guyot (CEO Yarra Trams) about the Superstops, details of the new low floor trams and details of the extension to Box Hill along with time line. .2 - 4 pages - issue 2 - Autumn 2002 - message from CEO, diagrammatic map and attributes, and a general update on progress, including a timeline. .3 - single folded A3 sheet printed both sides - Issue 4 - Summer 2003 - noting the wheel chair access to tram, opening on 2/5/2003, message from CEO and launch details, including notes on patronage increase. .4 - Pamphlet - DL four fold - printed on gloss paper full colour dated Autumn 2002 with message from Minister for Transport Peter Batchelor, diagrammatic map of extension showing tram stop facilities and locations of important places, low floor trams and contact details for further information. .5 - Pamphlet - DL five fold - printed on gloss paper full colour dated c mid 2001 with message from Minister for Transport Peter Batchelor, details of Yarra Trams, why the extension and project map. Has Harry the Yarra Trams Infrastructure Mascot. .6 - Pamphlet - 4 fold A4 landscape - printed both sides, issue 3, noting the need for universal access, St Vincent's plaza upgrade and tram stop options.trams, tramways, yarra trams, route 109, box hill, mont albert, superstops, tram stops, opening, st vincent's plaza -
 Melbourne Tram Museum
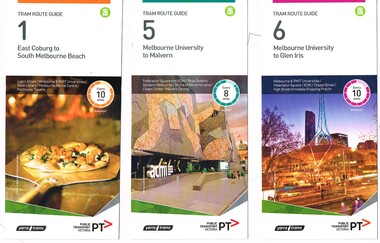
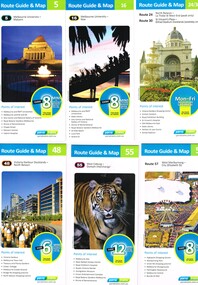
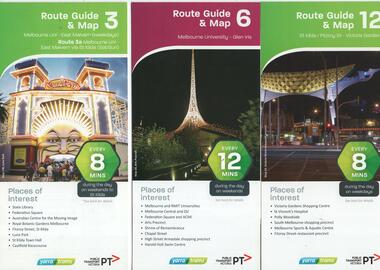
Ephemera - Tram Route Guides, Public Transport Victoria (PTV), "Tram Route Guide", Feb. 2016
... Plaza... Victoria Gardens... East Brighton... North Richmond... Balaclava... Bundoora... East Brunswick... West Preston... Kew... North Balwyn... Carnegie... Box Hill...Each comprises a vertical DL folded sheet, full colour for the nominated routes, with Yarra Trams and PTV logos, listing the stops, interchanges with bus and other tram services, ticketing zones, estimated frequencies with adverts for Night tram services, TramTracker and Myki tickets. .1 - Route 1 - East Coburg to South Melbourne Beach .2 - Route 5 - Melbourne University to Malvern .3 - Route 6 - Melbourne University to Glen Iris .4 - Route 8 - Moreland to Toorak .5 -Route 57 - West Maribyrnong to Flinders St Station (2 copies) .6 - Route 70 - Wattle Park to Waterfront City Docklands .7 - Route 72 - Melbourne University to Camberwell .8 - Route 75 - Vermont South to Etihad Stadium / Bourke St Docklands .9 - Route 82 - Footscray to Moonee Ponds .10 - Route 19 - North Coburg to Flinders St Station .11 - Route 55 - West Coburg to Domain Interchange (two copies held) .12 - Route 59 - Airport West to Flinders St Station .13 - Route 30 - St Vincent's Plaza to Ethida Stadium Docklands .14 - Route 12 - Victoria Gardens to St Kilda / Fitzroy St .15 - Route 64 - Melbourne University to East Brighton .16 - Route 78 - North Richmond to Balaclava (via Prahran) .17 - Route 86 - Bundoora (RMIT) to Waterfront City Docklands .18 - Route 96 - East Brunswick to St Kilda Beach .19 - Route 11 - West Preston to Victoria Harbour Docklands ,20 - Route 16 - Melbourne University to Kew via St Kilda .21 - Route 48 - North Balwyn to Victoria Harbour Docklands .22 - Route 67 - Melbourne University to Carnegie .23 - Route 109 - Box Hill to Port Melbourne See Reg Item 2396 for 2012, 2939 for 2015 and 2940 for 2014 versions Items .13 to .18 added 2/9/18...Melbourne Tram Museum 8 Wallen Road Hawthorn melbourne Trams tramways Timetables Maps Route 1 Route 5 Route 6 Route 8 Route 11 Route 16 Route 132 Route 19 Route 30 Route 48 Route 55 Route 57 Route 59 Route 64 Route 67 Route 70 Route 72 Route 75 Route 78 Route 82 Route 86 Route 96 Route 109 East Coburg West Coburg Airport West North Coburg South Melbourne Malvern Glen Iris Moreland Toorak West Maribyrnong Wattle Park Docklands Camberwell Vermont South Footscray Moonee Ponds St Vincent's Plaza Victoria Gardens East Brighton North Richmond Balaclava Bundoora East Brunswick West Preston Kew North Balwyn Carnegie Box Hill Item 11 has the "5" changed to "8" in Texta - see history of object. ...Set of 18 Tram Route Guides, published during 2016. Each comprises a vertical DL folded sheet, full colour for the nominated routes, with Yarra Trams and PTV logos, listing the stops, interchanges with bus and other tram services, ticketing zones, estimated frequencies with adverts for Night tram services, TramTracker and Myki tickets. .1 - Route 1 - East Coburg to South Melbourne Beach .2 - Route 5 - Melbourne University to Malvern .3 - Route 6 - Melbourne University to Glen Iris .4 - Route 8 - Moreland to Toorak .5 -Route 57 - West Maribyrnong to Flinders St Station (2 copies) .6 - Route 70 - Wattle Park to Waterfront City Docklands .7 - Route 72 - Melbourne University to Camberwell .8 - Route 75 - Vermont South to Etihad Stadium / Bourke St Docklands .9 - Route 82 - Footscray to Moonee Ponds .10 - Route 19 - North Coburg to Flinders St Station .11 - Route 55 - West Coburg to Domain Interchange (two copies held) .12 - Route 59 - Airport West to Flinders St Station .13 - Route 30 - St Vincent's Plaza to Ethida Stadium Docklands .14 - Route 12 - Victoria Gardens to St Kilda / Fitzroy St .15 - Route 64 - Melbourne University to East Brighton .16 - Route 78 - North Richmond to Balaclava (via Prahran) .17 - Route 86 - Bundoora (RMIT) to Waterfront City Docklands .18 - Route 96 - East Brunswick to St Kilda Beach .19 - Route 11 - West Preston to Victoria Harbour Docklands ,20 - Route 16 - Melbourne University to Kew via St Kilda .21 - Route 48 - North Balwyn to Victoria Harbour Docklands .22 - Route 67 - Melbourne University to Carnegie .23 - Route 109 - Box Hill to Port Melbourne See Reg Item 2396 for 2012, 2939 for 2015 and 2940 for 2014 versions Items .13 to .18 added 2/9/18Item 11 has the "5" changed to "8" in Texta - see history of object.trams, tramways, timetables, maps, route 1, route 5, route 6, route 8, route 11, route 16, route 132, route 19, route 30, route 48, route 55, route 57, route 59, route 64, route 67, route 70, route 72, route 75, route 78, route 82, route 86, route 96, route 109, east coburg, west coburg, airport west, north coburg, south melbourne, malvern, glen iris, moreland, toorak, west maribyrnong, wattle park, docklands, camberwell, vermont south, footscray, moonee ponds, st vincent's plaza, victoria gardens, east brighton, north richmond, balaclava, bundoora, east brunswick, west preston, kew, north balwyn, carnegie, box hill -
 Melbourne Tram Museum
Magazine, Yarra Trams, "Yarra Connections", Dec. 2003
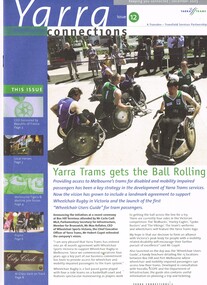
... Plaza... Line Officers... Box Hill...Issue 2 – April 2000 – 12 pages – launch of the new Yarra Trams livery, ticket validation, Open Tennis event, F1 event, marketing and the 2000 New Year event. issue 4 - Jan 2001 - 4 pages - new uniforms, CEO message, park and ride, Control centre operators Ron Peach and Con Evagrou, and driving at Christmas issue 6 - August 2001 - 6 pages - low floor trams coming, Camberwell Road works, rail rubber boots, kew depot issue 7 - December 2001 - 4 pages - new trams launch, route 109, TV advert, and authorised officers. issue 8 - April 2002 - Grand Prix, Box Hill update, Citadis update, Collins and Spring superstop, Australia Open, Fare Evasion and track joints. Issue 9 - magazine - 3 fold A4 - issue 9, dated Nov. 2002, Notes the construction of Route 109, W class, St Vincent's Plaza, Gordon Atkins, Docklands tram services, explorer program, Feedback, Line Officers, Corporate Report and Melbourne Museum tram. issue 10, undated - Australian Open tennis, Eurotram comes to Melbourne, Docklands joins the City Circle, route 109, Box Hill extension and what is a substation. issue 11 - August 2003 - 8 pages - opening of Box Hill line, Harry the Wombat, trams in the press, Welcome to Dennis Cliche, B class seating trial, Metlink, Docklands, trial information at tram stops (early TramTracker) project and route 75. ...Issue 2 – April 2000 – 12 pages – launch of the new Yarra Trams livery, ticket validation, Open Tennis event, F1 event, marketing and the 2000 New Year event. issue 4 - Jan 2001 - 4 pages - new uniforms, CEO message, park and ride, Control centre operators Ron Peach and Con Evagrou, and driving at Christmas issue 6 - August 2001 - 6 pages - low floor trams coming, Camberwell Road works, rail rubber boots, kew depot issue 7 - December 2001 - 4 pages - new trams launch, route 109, TV advert, and authorised officers. issue 8 - April 2002 - Grand Prix, Box Hill update, Citadis update, Collins and Spring superstop, Australia Open, Fare Evasion and track joints. Issue 9 - magazine - 3 fold A4 - issue 9, dated Nov. 2002, Notes the construction of Route 109, W class, St Vincent's Plaza, Gordon Atkins, Docklands tram services, explorer program, Feedback, Line Officers, Corporate Report and Melbourne Museum tram. issue 10, undated - Australian Open tennis, Eurotram comes to Melbourne, Docklands joins the City Circle, route 109, Box Hill extension and what is a substation. issue 11 - August 2003 - 8 pages - opening of Box Hill line, Harry the Wombat, trams in the press, Welcome to Dennis Cliche, B class seating trial, Metlink, Docklands, trial information at tram stops (early TramTracker) project and route 75. ...Demonstrates a Yarra Trams staff newsletter.Issue 1 dated October 1999 with a forward by the CEO Steve Macdonald , Camberwell depot, Deputy CEO Hubert Guyot, new logo designs, reduction in tram stops, tennis trams, family day, Docklands route 70 extension and competition. Issue 2 – April 2000 – 12 pages – launch of the new Yarra Trams livery, ticket validation, Open Tennis event, F1 event, marketing and the 2000 New Year event. issue 4 - Jan 2001 - 4 pages - new uniforms, CEO message, park and ride, Control centre operators Ron Peach and Con Evagrou, and driving at Christmas issue 6 - August 2001 - 6 pages - low floor trams coming, Camberwell Road works, rail rubber boots, kew depot issue 7 - December 2001 - 4 pages - new trams launch, route 109, TV advert, and authorised officers. issue 8 - April 2002 - Grand Prix, Box Hill update, Citadis update, Collins and Spring superstop, Australia Open, Fare Evasion and track joints. Issue 9 - magazine - 3 fold A4 - issue 9, dated Nov. 2002, Notes the construction of Route 109, W class, St Vincent's Plaza, Gordon Atkins, Docklands tram services, explorer program, Feedback, Line Officers, Corporate Report and Melbourne Museum tram. issue 10, undated - Australian Open tennis, Eurotram comes to Melbourne, Docklands joins the City Circle, route 109, Box Hill extension and what is a substation. issue 11 - August 2003 - 8 pages - opening of Box Hill line, Harry the Wombat, trams in the press, Welcome to Dennis Cliche, B class seating trial, Metlink, Docklands, trial information at tram stops (early TramTracker) project and route 75. Issue 12 - Magazine - 8 pages, full colour, centre stapled, printed on recycled paper, titled "Yarra Connections Issue 12, December 2003", published by Yarra Trams. Notes the launch of the "Wheelchair users guide" for tram passenger, Yarra Trams support for Wheelchair Rugby, planning for Vermont South extension, French award for CEO, Hubert Guyot, photo exhibition featuring employees by Georgia Metaxas, Boroondara residents and Travelsmart, Metlink Team Tigers Basketball, Ikea store in Richmond, pram friendly trams, feedback and return of W class trams to route 30. New track maintenance vehicle -"scrubber truck". Letter on Yarra Trams letterhead, addressed to Ron Wilson of Orange Grove Bayswater, signed by Paul Matthews Marketing Manager forwarding a copy of the magazine to Ron, noting highlights. Gives address details. issue 13 - April 2004 - Australian Open tram service, Collins and Spencer Superstop, tram services, feedback, Metlink, Channel 10 - The Secret life of us, PTC Cricket Squad. trams, tramways, yarra trams, w class, disability services, vermont south, awards, metlink, route 30, camberwell depot, docklands, route 70, st vincent's plaza, line officers, box hill, route 109, b class, superstops, cricket, tennis, tramtracker, route 75, city circle, new trams, c class, camberwell junction, authorised officers -
 Melbourne Tram Museum
Ephemera - Tram Route Guides, Public Transport Victoria (PTV), "Tram Route Guide", Oct. 2011 to Oct 2012
... Plaza... Preston... Wattle Park... Bundoora... Museum... South Melbourne Beach... East Coburg... East Malvern... Glen Iris... Toorak... Moreland... East Brighton... Carnegie... Camberwell... Box Hill...Melbourne Tram Museum 8 Wallen Road Hawthorn melbourne Trams tramways Timetables Maps Route 1 Route 3/3a Route 5 Route 6 Route 8 Route 11 Route 16 Route 24 Route 30 Route 31 Route 48 Route 55 Route 57 Route 59 Route 64 Route 67 Route 70 Route 72 Route 75 Route 78 Route 79 Route 82 Route 86 Route 95 Route 96 Route 109 Route 112 East Coburg South Melbourne Malvern West Maribyrnong Airport West Docklands North Balwyn West Coburg Domain Interchange North Richmond Prahran East Brunswick St Kilda Vermont South Footscray Moonee Ponds Kew St Vincent's Plaza Preston Wattle Park Bundoora Museum South Melbourne Beach East Coburg East Malvern Glen Iris Toorak Moreland East Brighton Carnegie Camberwell Box Hill Port Melbourne Set of 23 Tram Route Guides, published during 2011 or 2012. ...Set of 23 Tram Route Guides, published during 2011 or 2012. Each comprises a vertical DL folded sheet, full colour for the nominated routes, with Yarra Trams, Myki and TramTracker logos, listing the stops, interchanges with bus and other tram services, ticketing zones, estimated frequencies with adverts for Night tram services, TramTracker and Myki tickets. .1 - Route 5 - Melbourne University to Malvern .2 - Route 16 - Melbourne University to Kew .3 - Route 24 and 30 - North Balwyn - Latrobe St and St Vincent's Plaza - Etihad Stadium .4 - Route 48 - North Balwyn - Victoria Harbour Docklands .5 - Route 55 - West Coburg - Domain Interchange .6 - Route 57 - West Maribyrnong to Flinders St Station .7 - Route 59 - Airport West - City .8 - Route 75 - City - Vermont South .9 - Route 78 and 79 - North Richmond - Prahran or St Kilda Beach .10 - Route 82 - Footscray to Moonee Ponds .11 - Route 96 - East Brunswick - St Kilda Beach .12 - ditto .13 - Route 112/11 - West Preston - St Kilda, West Preston - Victoria Harbour Docklands .14 - Route 70 - Wattle Park - Waterfront City Docklands .15 - Route 86/95 - Bundoora - Waterfront City Docklands and Melbourne Museum - City .16 - Route 1 - East Coburg - South Melbourne Beach .17 - Route 3/3a - Melbourne University to East Malvern .18 - Route 6 - Melbourne University to - Glen Iris .19 - Route 8 - Moreland to Toorak .20 - Route 64 - Melbourne University to East Brighton .21 - Route 67 - Melbourne University to Carnegie .22 - Route 72 - Melbourne University to Camberwell .23 - Route 109 - Box Hill - Port Melbourne and Route 31 - Hoddle St - Victoria Harbour - Docklands .24 - Route 75 - Vermont South - dated 10/2011 See Reg Item 2278 for 2016 versionstrams, tramways, timetables, maps, route 1, route 3/3a, route 5, route 6, route 8, route 11, route 16, route 24, route 30, route 31, route 48, route 55, route 57, route 59, route 64, route 67, route 70, route 72, route 75, route 78, route 79, route 82, route 86, route 95, route 96, route 109, route 112, east coburg, south melbourne, malvern, west maribyrnong, airport west, docklands, north balwyn, west coburg, domain interchange, north richmond, prahran, east brunswick, st kilda, vermont south, footscray, moonee ponds, kew, st vincent's plaza, preston, wattle park, bundoora, museum, south melbourne beach, east coburg, east malvern, glen iris, toorak, moreland, east brighton, carnegie, camberwell, box hill, port melbourne -
 Melbourne Tram Museum
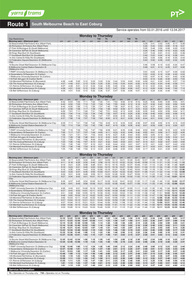
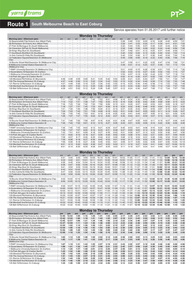
Ephemera - Timetable/s, Public Transport Victoria (PTV), Set of 25 digital timetables - Yarra Trams, 2016
... Route 1 - East Coburg - South Melbourne Beach Route 3 and 3A - Melbourne University - East Malvern - and via St Kilda Beach Route 5 - Melbourne University - Malvern Route 6 - Melbourne University - Glen Iris Route 8 - Moreland - Toorak Route 11 - West Preston - Victoria Harbour Docklands Route 12 - Victoria Gardens - St Kilda Route 16 - Melbourne University - Kew Via St Kilda Route 19 - North Coburg - Flinders St Route 30 - St Vincent's Plaza - Etihad Stadium Docklands Route 35 - City Circle Route 48 - North Balwyn - Victoria Harbour Docklands Route 55 - West Coburg - Domain Interchange Route 57 - West Maribyrnong - Flinders St Route 59 - Airport West - Flinders St Route 64 - East Brighton - Melbourne University Route 67 - Carnegie - Melbourne University Route 70 - Wattle Park - Waterfront City Docklands Route 72 - Camberwell - Melbourne University Route 75 - Vermont South - Etihad Stadium Docklands Route 78 - North Richmond - Balaclava via Prahran Route 82 - Footscray - Moonee Ponds Route 86 - Bundoora RMIT - Waterfront City Docklands Route 96 - East Brunswick - St Kilda Beach Route 109 - Box Hill - Port Melbourne...Route 1 - East Coburg - South Melbourne Beach Route 3 and 3A - Melbourne University - East Malvern - and via St Kilda Beach Route 5 - Melbourne University - Malvern Route 6 - Melbourne University - Glen Iris Route 8 - Moreland - Toorak Route 11 - West Preston - Victoria Harbour Docklands Route 12 - Victoria Gardens - St Kilda Route 16 - Melbourne University - Kew Via St Kilda Route 19 - North Coburg - Flinders St Route 30 - St Vincent's Plaza - Etihad Stadium Docklands Route 35 - City Circle Route 48 - North Balwyn - Victoria Harbour Docklands Route 55 - West Coburg - Domain Interchange Route 57 - West Maribyrnong - Flinders St Route 59 - Airport West - Flinders St Route 64 - East Brighton - Melbourne University Route 67 - Carnegie - Melbourne University Route 70 - Wattle Park - Waterfront City Docklands Route 72 - Camberwell - Melbourne University Route 75 - Vermont South - Etihad Stadium Docklands Route 78 - North Richmond - Balaclava via Prahran Route 82 - Footscray - Moonee Ponds Route 86 - Bundoora RMIT - Waterfront City Docklands Route 96 - East Brunswick - St Kilda Beach Route 109 - Box Hill - Port Melbourne Set of 25 digital timetables - Yarra Trams Ephemera Timetable/s Public Transport Victoria (PTV) ...Set of 25 digital timetables generally applicable 2016 to 13/4/2017. Similar timetables ran during 13/4/2017 and 1/5/2017 over the Easter Holiday period up to when Route 58 (from route 8 and route 55) introduced and route 6 modified - see Reg item 2212 for details. List major stops only. All downloaded from the PTV website 9-4-17 as pdf files. Image files are htd2211iRx - x being the route number. Route 1 - East Coburg - South Melbourne Beach Route 3 and 3A - Melbourne University - East Malvern - and via St Kilda Beach Route 5 - Melbourne University - Malvern Route 6 - Melbourne University - Glen Iris Route 8 - Moreland - Toorak Route 11 - West Preston - Victoria Harbour Docklands Route 12 - Victoria Gardens - St Kilda Route 16 - Melbourne University - Kew Via St Kilda Route 19 - North Coburg - Flinders St Route 30 - St Vincent's Plaza - Etihad Stadium Docklands Route 35 - City Circle Route 48 - North Balwyn - Victoria Harbour Docklands Route 55 - West Coburg - Domain Interchange Route 57 - West Maribyrnong - Flinders St Route 59 - Airport West - Flinders St Route 64 - East Brighton - Melbourne University Route 67 - Carnegie - Melbourne University Route 70 - Wattle Park - Waterfront City Docklands Route 72 - Camberwell - Melbourne University Route 75 - Vermont South - Etihad Stadium Docklands Route 78 - North Richmond - Balaclava via Prahran Route 82 - Footscray - Moonee Ponds Route 86 - Bundoora RMIT - Waterfront City Docklands Route 96 - East Brunswick - St Kilda Beach Route 109 - Box Hill - Port Melbournetrams, tramways, timetables, yarra trams, route 1, route 3, route 5, route 6, route 8, route 11, route 12, route 16, route 19, route 30, route 35, route 48, route 55, route 57, route 59, route 64, route 67, route 70, route 72, route 75, route 78, route 82, route 86, route 96, route 109 -
 Melbourne Tram Museum
Ephemera - Timetable/s, Public Transport Victoria (PTV), Set of 24 digital timetables - Yarra trams, 2016
... Plaza - Etihad Stadium Docklands Route 35 - City Circle Route 48 - North Balwyn - Victoria Harbour Docklands Route 57 - West Maribyrnong - Flinders St Route 58 - Toorak - West Coburg via William St. Route 59 - Airport West - Flinders St Route 64 - East Brighton - Melbourne University Route 67 - Carnegie - Melbourne University Route 70 - Wattle Park - Waterfront City Docklands Route 72 - Camberwell - Melbourne University Route 75 - Vermont South - Etihad Stadium Docklands Route 78 - North Richmond - Balaclava via Prahran Route 82 - Footscray - Moonee Ponds Route 86 - Bundoora RMIT - Waterfront City Docklands Route 96 - East Brunswick - St Kilda Beach Route 109 - Box Hill - Port Melbourne...Plaza - Etihad Stadium Docklands Route 35 - City Circle Route 48 - North Balwyn - Victoria Harbour Docklands Route 57 - West Maribyrnong - Flinders St Route 58 - Toorak - West Coburg via William St. Route 59 - Airport West - Flinders St Route 64 - East Brighton - Melbourne University Route 67 - Carnegie - Melbourne University Route 70 - Wattle Park - Waterfront City Docklands Route 72 - Camberwell - Melbourne University Route 75 - Vermont South - Etihad Stadium Docklands Route 78 - North Richmond - Balaclava via Prahran Route 82 - Footscray - Moonee Ponds Route 86 - Bundoora RMIT - Waterfront City Docklands Route 96 - East Brunswick - St Kilda Beach Route 109 - Box Hill - Port Melbourne Set of 24 digital timetables - Yarra trams Ephemera Timetable/s Public Transport Victoria (PTV) ...Set of 24 digital timetables generally applicable 1/4/2017 to end 2017 Introduced when Route 58 (from route 8 and route 55) amalgamated and route 6 modified - see Reg item 2212 for details. All downloaded from the PTV website 9-4-17 as pdf files, except for routes 6 and 58 which had not been published as of that date. Timetables list major stops. Routes 6 and 58 files added 6-6-2017. Image files are htd2213iRx - x being the route number. Route 1 - East Coburg - South Melbourne Beach Route 3 and 3A - Melbourne University - East Malvern - and via St Kilda Beach Route 5 - Melbourne University - Malvern Route 6 - Moreland - Glen Iris Route 11 - West Preston - Victoria Harbour Docklands Route 12 - Victoria Gardens - St Kilda Route 16 - Melbourne University - Kew Via St Kilda Route 19 - North Coburg - Flinders St Route 30 - St Vincent's Plaza - Etihad Stadium Docklands Route 35 - City Circle Route 48 - North Balwyn - Victoria Harbour Docklands Route 57 - West Maribyrnong - Flinders St Route 58 - Toorak - West Coburg via William St. Route 59 - Airport West - Flinders St Route 64 - East Brighton - Melbourne University Route 67 - Carnegie - Melbourne University Route 70 - Wattle Park - Waterfront City Docklands Route 72 - Camberwell - Melbourne University Route 75 - Vermont South - Etihad Stadium Docklands Route 78 - North Richmond - Balaclava via Prahran Route 82 - Footscray - Moonee Ponds Route 86 - Bundoora RMIT - Waterfront City Docklands Route 96 - East Brunswick - St Kilda Beach Route 109 - Box Hill - Port Melbournetrams, tramways, timetables, yarra trams, route 1, route 3, route 5, route 6, route 11, route 12, route 16, route 19, route 30, route 35, route 48, route 57, route 58, route 59, route 64, route 67, route 70, route 72, route 75, route 78, route 82, route 86, route 96, route 109 -
 Melbourne Tram Museum
Ephemera - Tram Route Guides, Public Transport Victoria (PTV), "Tram Route Guide and Map", Oct. 13 to July 14
... Each comprises a vertical DL folded sheet, full colour for the nominated routes, with Yarra Trams and PTV logos, listing the stops, interchanges with bus and other tram services, ticketing zones, estimated frequencies with adverts for Night tram services, TramTracker and Myki tickets. .1 - Route 3 - East Malvern - Melbourne Uni and 3A via St Kilda (Sat and Sun) .2 - Route 6 - Melbourne University to Glen Iris .3 - Route 12 - St Kilda - Victoria Gardens .4 - Route 16 - Kew via St Kilda .5 -Route 30 - St Vincent's Plaza - Etihad Stadium .6 - Route 55 - West Coburg - Domain Interchange .7 - Route 59 - Airport West - City (Elizabeth St) .8 - Route 64 - Melbourne University - East Brighton .9 - Route 70 - Wattle Park to Waterfront City Docklands .10 - Route 75 - Docklands - Vermont South .11 - Route 78 - North Richmond - Balaclava .12 - Route 82 - Moonee Ponds - Footscray .13 - Route 86 - Bundoora - Waterfront City .14 - Route 96 - East Brunswick - St Kilda Beach .15 - Route 109 - Box Hill - Port Melbourne .16 - Route 112 and 11 - West Preston - St Kilda and West Preston - Victoria Harbour Docklands .17 - Route 24 - North Balwyn to Etihad Stadium See Reg Item 2396 for 2012, 2278 for 2016 and 2939 for 2015 versions...Each comprises a vertical DL folded sheet, full colour for the nominated routes, with Yarra Trams and PTV logos, listing the stops, interchanges with bus and other tram services, ticketing zones, estimated frequencies with adverts for Night tram services, TramTracker and Myki tickets. .1 - Route 3 - East Malvern - Melbourne Uni and 3A via St Kilda (Sat and Sun) .2 - Route 6 - Melbourne University to Glen Iris .3 - Route 12 - St Kilda - Victoria Gardens .4 - Route 16 - Kew via St Kilda .5 -Route 30 - St Vincent's Plaza - Etihad Stadium .6 - Route 55 - West Coburg - Domain Interchange .7 - Route 59 - Airport West - City (Elizabeth St) .8 - Route 64 - Melbourne University - East Brighton .9 - Route 70 - Wattle Park to Waterfront City Docklands .10 - Route 75 - Docklands - Vermont South .11 - Route 78 - North Richmond - Balaclava .12 - Route 82 - Moonee Ponds - Footscray .13 - Route 86 - Bundoora - Waterfront City .14 - Route 96 - East Brunswick - St Kilda Beach .15 - Route 109 - Box Hill - Port Melbourne .16 - Route 112 and 11 - West Preston - St Kilda and West Preston - Victoria Harbour Docklands .17 - Route 24 - North Balwyn to Etihad Stadium See Reg Item 2396 for 2012, 2278 for 2016 and 2939 for 2015 versions "Tram Route Guide and Map" Ephemera Tram Route Guides Public Transport Victoria (PTV) ...Set of 17 Tram Route Maps, published during 2013 and 2014. Each comprises a vertical DL folded sheet, full colour for the nominated routes, with Yarra Trams and PTV logos, listing the stops, interchanges with bus and other tram services, ticketing zones, estimated frequencies with adverts for Night tram services, TramTracker and Myki tickets. .1 - Route 3 - East Malvern - Melbourne Uni and 3A via St Kilda (Sat and Sun) .2 - Route 6 - Melbourne University to Glen Iris .3 - Route 12 - St Kilda - Victoria Gardens .4 - Route 16 - Kew via St Kilda .5 -Route 30 - St Vincent's Plaza - Etihad Stadium .6 - Route 55 - West Coburg - Domain Interchange .7 - Route 59 - Airport West - City (Elizabeth St) .8 - Route 64 - Melbourne University - East Brighton .9 - Route 70 - Wattle Park to Waterfront City Docklands .10 - Route 75 - Docklands - Vermont South .11 - Route 78 - North Richmond - Balaclava .12 - Route 82 - Moonee Ponds - Footscray .13 - Route 86 - Bundoora - Waterfront City .14 - Route 96 - East Brunswick - St Kilda Beach .15 - Route 109 - Box Hill - Port Melbourne .16 - Route 112 and 11 - West Preston - St Kilda and West Preston - Victoria Harbour Docklands .17 - Route 24 - North Balwyn to Etihad Stadium See Reg Item 2396 for 2012, 2278 for 2016 and 2939 for 2015 versionstrams, tramways, timetables, maps, route 3, route 6, route 11, route 12, route 16, route 24, route 30, route 55, route 59, route 64, route 70, route 75, route 78, route 82, route 86, route 96, route 109, route 112, east malvern, glen iris, victoria gardens, kew, st vincent's plaza, west coburg, airport west, east brighton, wattle park, vermont south, north richmond, moonee ponds, footscray, st kilda, docklands, west preston, victoria harbour, north balwyn, etihad stadium -
 Melbourne Tram Museum
Ephemera - Timetable/s, Public Transport Victoria (PTV), Set of 25 digital timetables, 2018
... Route 1 - East Coburg - South Melbourne Beach Route 3 and 3A - Melbourne University - East Malvern - and via St Kilda Beach Route 5 - Melbourne University - Malvern Route 6 - Melbourne University - Glen Iris Route 8 - Moreland - Toorak Route 11 - West Preston - Victoria Harbour Docklands Route 12 - Victoria Gardens - St Kilda Route 16 - Melbourne University - Kew Via St Kilda Route 19 - North Coburg - Flinders St Route 30 - St Vincent's Plaza - Etihad Stadium Docklands Route 35 - City Circle Route 48 - North Balwyn - Victoria Harbour Docklands Route 55 - West Coburg - Domain Interchange Route 57 - West Maribyrnong - Flinders St Route 59 - Airport West - Flinders St Route 64 - East Brighton - Melbourne University Route 67 - Carnegie - Melbourne University Route 70 - Wattle Park - Waterfront City Docklands Route 72 - Camberwell - Melbourne University Route 75 - Vermont South - Etihad Stadium Docklands Route 78 - North Richmond - Balaclava via Prahran Route 82 - Footscray - Moonee Ponds Route 86 - Bundoora RMIT - Waterfront City Docklands Route 96 - East Brunswick - St Kilda Beach Route 109 - Box Hill - Port Melbourne...Route 1 - East Coburg - South Melbourne Beach Route 3 and 3A - Melbourne University - East Malvern - and via St Kilda Beach Route 5 - Melbourne University - Malvern Route 6 - Melbourne University - Glen Iris Route 8 - Moreland - Toorak Route 11 - West Preston - Victoria Harbour Docklands Route 12 - Victoria Gardens - St Kilda Route 16 - Melbourne University - Kew Via St Kilda Route 19 - North Coburg - Flinders St Route 30 - St Vincent's Plaza - Etihad Stadium Docklands Route 35 - City Circle Route 48 - North Balwyn - Victoria Harbour Docklands Route 55 - West Coburg - Domain Interchange Route 57 - West Maribyrnong - Flinders St Route 59 - Airport West - Flinders St Route 64 - East Brighton - Melbourne University Route 67 - Carnegie - Melbourne University Route 70 - Wattle Park - Waterfront City Docklands Route 72 - Camberwell - Melbourne University Route 75 - Vermont South - Etihad Stadium Docklands Route 78 - North Richmond - Balaclava via Prahran Route 82 - Footscray - Moonee Ponds Route 86 - Bundoora RMIT - Waterfront City Docklands Route 96 - East Brunswick - St Kilda Beach Route 109 - Box Hill - Port Melbourne Set of 25 digital timetables Ephemera Timetable/s Public Transport Victoria (PTV) ...Set of 25 digital timetables generally applicable from 20-05-2018 following the introduction of more frequent services on many routes. Image files are htd2860iRx - x being the route number. Route 1 - East Coburg - South Melbourne Beach Route 3 and 3A - Melbourne University - East Malvern - and via St Kilda Beach Route 5 - Melbourne University - Malvern Route 6 - Melbourne University - Glen Iris Route 8 - Moreland - Toorak Route 11 - West Preston - Victoria Harbour Docklands Route 12 - Victoria Gardens - St Kilda Route 16 - Melbourne University - Kew Via St Kilda Route 19 - North Coburg - Flinders St Route 30 - St Vincent's Plaza - Etihad Stadium Docklands Route 35 - City Circle Route 48 - North Balwyn - Victoria Harbour Docklands Route 55 - West Coburg - Domain Interchange Route 57 - West Maribyrnong - Flinders St Route 59 - Airport West - Flinders St Route 64 - East Brighton - Melbourne University Route 67 - Carnegie - Melbourne University Route 70 - Wattle Park - Waterfront City Docklands Route 72 - Camberwell - Melbourne University Route 75 - Vermont South - Etihad Stadium Docklands Route 78 - North Richmond - Balaclava via Prahran Route 82 - Footscray - Moonee Ponds Route 86 - Bundoora RMIT - Waterfront City Docklands Route 96 - East Brunswick - St Kilda Beach Route 109 - Box Hill - Port Melbournetrams, tramways, timetables, yarra trams, route 1, route 3, route 5, route 6, route 8, route 11, route 12, route 16, route 19, route 30, route 35, route 48, route 55, route 57, route 59, route 64, route 67, route 70, route 72, route 75, route 78, route 82, route 86, route 96, route 109