
Showing 4 items matching "canadian military vehicles"
-
 4th/19th Prince of Wales's Light Horse Regiment Unit History Room
Book, Maintenance Manual Canadian Military Pattern Vehicles, Apr 1942
... Maintenance Manual Canadian Military Pattern Vehicles......Canadian military vehicles...Maintenance manual Canadian military vehicles MB-C1, The logo of General Motors Canada Soft covered maintenance manual for the 15 cwt 4x2, the 15 cwt, 30 cwt, Heavy Duty and Field Artillery Tractor 4x4 Chevrolet Maintenance Manual Canadian Military Pattern Vehicles Book ...Soft covered maintenance manual for the 15 cwt 4x2, the 15 cwt, 30 cwt, Heavy Duty and Field Artillery Tractor 4x4 Chevrolet MB-C1, The logo of General Motors Canadamaintenance manual, canadian military vehicles -
 Bendigo Military Museum
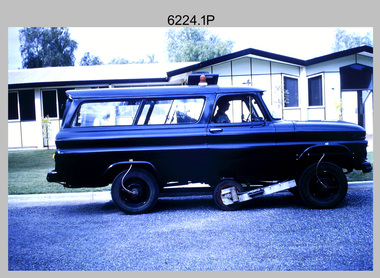
Photograph - Johnson Ground Elevation Meter (JGEM) Survey Vehicle - Army Survey Regiment, Fortuna, Bendigo, c1960s
... Canada’s mapping agencies, RA Svy and National Mapping (Natmap). The GEM was a four-wheel drive, four-wheel steer vehicle. Four-wheel steering was necessary to avoid systematic errors caused by non-tracking of front and rear wheels on conventionally steered vehicles. The manufacturer substituted the rear axle with a front axle and connected them to form the four-wheel steering mechanism. The two Australian GEM vehicles, referred to as Johnson GEMs (JGEMs) were converted into right-hand drive. After delivery in 1964, acceptance Natmap and RA Svy testing and operator training was undertaken at the Army's School of Military...Canada’s mapping agencies, RA Svy and National Mapping (Natmap). The GEM was a four-wheel drive, four-wheel steer vehicle. Four-wheel steering was necessary to avoid systematic errors caused by non-tracking of front and rear wheels on conventionally steered vehicles. The manufacturer substituted the rear axle with a front axle and connected them to form the four-wheel steering mechanism. The two Australian GEM vehicles, referred to as Johnson GEMs (JGEMs) were converted into right-hand drive. After delivery in 1964, acceptance Natmap and RA Svy testing and operator training was undertaken at the Army's School of Military ...This is a set of 16 photograph of the Royal Australian Survey Corps’ Johnson Ground Elevation Meter (JGEM) Survey Vehicle taken at the Army Survey Regiment, Fortuna, Bendigo. The JGEM vehicle was extensively used by RA Svy within Australia from the late 1960s. A limited number of Ground Elevation Meter (GEM) station wagon type vehicles were manufactured by General Motors Corporation (GMC) in the USA for the United States Geological Survey, Canada’s mapping agencies, RA Svy and National Mapping (Natmap). The GEM was a four-wheel drive, four-wheel steer vehicle. Four-wheel steering was necessary to avoid systematic errors caused by non-tracking of front and rear wheels on conventionally steered vehicles. The manufacturer substituted the rear axle with a front axle and connected them to form the four-wheel steering mechanism. The two Australian GEM vehicles, referred to as Johnson GEMs (JGEMs) were converted into right-hand drive. After delivery in 1964, acceptance Natmap and RA Svy testing and operator training was undertaken at the Army's School of Military Survey located at Balcombe, Victoria. A small fifth wheel was mounted on a cantilever arm suspension midway between the front and rear wheels on the right side of the vehicle. It was lowered to and raised from its operating position by use of a constant pressure air cylinder. A telescopic bar, suspended between the front and rear axles, provided the reference datum for the angle measurement. The wheel provided the velocity or distance signal through a pulse generator system. A sensitive pendulum mounted on this bar provided the angle measurement for each minute distance traversed. The JGEM contained electromechanical instruments used to determine relative elevations, by trigonometric principles, along a traversed path. These relative elevations were obtained through apparatus which measures the instantaneous angle of inclination of the road and the instantaneous velocity of the meter along such a path. Road routes over which the JGEM operated were planned so that each started and ended as near as practicable to an existing point of known elevation (formally referred to as a level traverse bench mark). The difference in height from the bench mark and the road surface alongside the JGEM’s fifth wheel was measured with a level and staff. Along each route, mapping control photo reference points where new elevation values were required were identified on aerial photographs. Under favourable conditions it was possible to survey as much as 160km in an ordinary working day. The first of RA Svy’s JGEM operations was undertaken in 1:250,000 scale map areas of Queensland. CPL John Hook was the JGEM’s main operator in the early 1970s undertaking operations covering 1:250,000 scale map blocks over northern Victoria and central NSW, each requiring 36 points (9 runs of photography and 4 points across. SPR Lyn Thompson and SPR Bob McDonagh teamed with CPL Hook on some of these JGEM operations. When RA Svy was integrated into the Royal Australian Engineers in 1996, the JGEM vehicle with the Survey Corps collection was donated to its museum. It is believed to be the last of the original manufactured fleet in existence. The JGEM has undergone extensive refurbishment to achieve roadworthiness and is currently housed at The Australian Army Museum of Military Engineering, Hoslworthy Barracks, NSW. It can be viewed by making an appointment with the museum’s curator.This is a set of 16 photograph of the Royal Australian Survey Corps’ Johnson Ground Elevation Meter (JGEM) Survey Vehicle taken at the Army Survey Regiment, Fortuna, Bendigo. The photographs were on 35mm slide film and were scanned at 96 dpi. They are part of the Army Survey Regiment’s Collection. .1) - Photo, colour, c1960s, Johnson Ground Elevation Meter (JGEM) Survey Vehicle .2) - Photo, colour, c1960s, JGEM instrumentation, on-board computer. .3) - Photo, colour, c1960s, JGEM instrumentation. .4) - Photo, colour, c1960s, JGEM instrumentation, on-board computer. .5) - Photo, colour, c1960s, JGEM tyre pressure controller .6) - Photo, colour, c1960s, JGEM rear doors, SGT Geoff Briggs. .7) - Photo, colour, c1960s, JGEM 5th wheel distance/angle measurement device in lowered position, SGT Geoff Briggs. .8) - Photo, colour, c1960s, JGEM 5th wheel distance/angle measurement device in lowered position. .9) & .10) - Photo, colour, c1960s, JGEM tyre pressure system, SGT Geoff Briggs. .11) - Photo, colour, c1960s, JGEM tyre pressure system. SGT Geoff Briggs. .12) - Photo, colour, c1960s, JGEM levelling scope, levelling staff, unidentified technicians. .13) & .14) - Photo, colour, c1960s, JGEM levelling scope, unidentified technician. .15) & .16) - Photo, colour, c1960s, probably survey operation adjusted height plotted on block base sheet. .1P to .16P - Some of the equipment is annotated on the frame of the 35mm slides.royal australian survey corps, rasvy, army survey regiment, army svy regt, fortuna, asr, surveying -
 The Beechworth Burke Museum
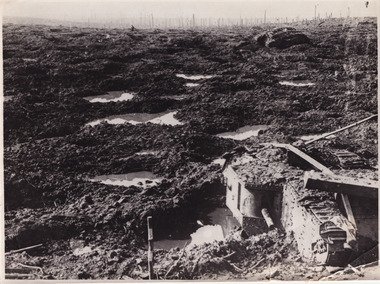
Photograph, c. 1917
... The troops were finally exhausted and could do no more; by 15 November they handed over to the Canadians. military album burke museum beechworth military vehicle trenches trench warfare wwi world war one world war 1 ypres belgium Reverse: 6523/ (A copyright and reproduction notice from the Australian War Museum, printed upside-down in blue ink)/ Black and white rectangular reproduced photograph printed on mate photographic paper Photograph Photograph ...This photograph depicts the third battle of Ypres (Battle of Passchendaele). Depicted is a trench battlefield that has been turned to mud. Two army tank vehicles have been buried in the mud of the trenches. A single soldier stands in the background surveying the battlefield.After mid-1917, and following mutinies in the over-strained French Army, the British Forces had to assume an even greater role in the war on the Western Front. For Field Marshal Sir Douglas Haig, the British commander-in-chief, this provided an opportunity to launch an offensive that he had long wanted. Attacking from Ypres in Belgium, he planned to drive the Germans from the surrounding dominant ridges and even hoped to reach the Belgian coast. Following on the success at Messines in June, he unleashed his great attack on 31 July 1917. Fighting went on, often in appalling weather and despite crippling losses, until November. Finally, with the army stuck in muddy fields churned up by the artillery fire, the bloody offensive came to an untidy close. Many would afterwards call this offensive, actually a series of battles, after the name of the village that had become the last objective – 'Passchendaele'. In the Battle off Passchendaele, the 1st, 2nd and 3rd Australian Divisions captured Broodseinde Ridge on 4 October 1917. It was a vital victory. But, then it began to rain. Five days later the 2nd Australian Division suffered heavily in a further attack in the mud. Finally, on 12 October, another attack, involving the 3rd Division assisted by the 4th, was made against the village of Passchendaele atop the main ridge. In the face of heavy fire, the men fought in the mire while struggling to keep up with their artillery barrages. Ground was taken but it could not be held. In wretched conditions, with casualties mounting at an appalling rate, the Australians had to fall back. The troops were finally exhausted and could do no more; by 15 November they handed over to the Canadians.Black and white rectangular reproduced photograph printed on mate photographic paperReverse: 6523/ (A copyright and reproduction notice from the Australian War Museum, printed upside-down in blue ink)/military album, burke museum, beechworth, military vehicle, trenches, trench warfare, wwi, world war one, world war 1, ypres, belgium -
 The Beechworth Burke Museum
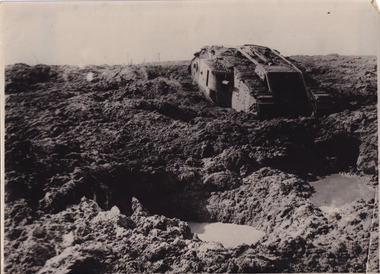
Photograph
... The troops were finally exhausted and could do no more; by 15 November they handed over to the Canadians. military album burke museum beechworth military vehicle trenches trench warfare wwi world war one world war 1 ypres belgium Reverse: 6524/ (A copyright and reproduction notice from the Australian War Museum, printed upside-down in blue ink)/ Black and white rectangular reproduced photograph printed on mate photographic paper Photograph Photograph ...This photograph depicts the third battle of Ypres (Battle of Passchendaele). Depicted is a trench battlefield that has been turned to mud. One army tank vehicle has become stuck in the mud of the battlefield.After mid-1917, and following mutinies in the over-strained French Army, the British Forces had to assume an even greater role in the war on the Western Front. For Field Marshal Sir Douglas Haig, the British commander-in-chief, this provided an opportunity to launch an offensive that he had long wanted. Attacking from Ypres in Belgium, he planned to drive the Germans from the surrounding dominant ridges and even hoped to reach the Belgian coast. Following on the success at Messines in June, he unleashed his great attack on 31 July 1917. Fighting went on, often in appalling weather and despite crippling losses, until November. Finally, with the army stuck in muddy fields churned up by the artillery fire, the bloody offensive came to an untidy close. Many would afterwards call this offensive, actually a series of battles, after the name of the village that had become the last objective – 'Passchendaele'. In the Battle off Passchendaele, the 1st, 2nd and 3rd Australian Divisions captured Broodseinde Ridge on 4 October 1917. It was a vital victory. But, then it began to rain. Five days later the 2nd Australian Division suffered heavily in a further attack in the mud. Finally, on 12 October, another attack, involving the 3rd Division assisted by the 4th, was made against the village of Passchendaele atop the main ridge. In the face of heavy fire, the men fought in the mire while struggling to keep up with their artillery barrages. Ground was taken but it could not be held. In wretched conditions, with casualties mounting at an appalling rate, the Australians had to fall back. The troops were finally exhausted and could do no more; by 15 November they handed over to the Canadians.Black and white rectangular reproduced photograph printed on mate photographic paperReverse: 6524/ (A copyright and reproduction notice from the Australian War Museum, printed upside-down in blue ink)/military album, burke museum, beechworth, military vehicle, trenches, trench warfare, wwi, world war one, world war 1, ypres, belgium
