Showing 20 items matching "eaglehawk junction"
-
 Federation University Historical Collection
Book, Glenfine South and South Berry Journal
... ...eaglehawk junction...Gift of the Squire Family glenfine south south berry sleemans mining gold mining glenfine consols reef weights of quartz blacksmiths tools Australian and eagle davies south east reef drive brawns eaglehawk junction simons letter machinery puddlng plant poppet heads winding plant creswick mosquito creek frenchmans gully spring hill A. ...This Book is associated with former Ballarat School of Mines Student Richard Squire (1875-1876). Gift of the Squire FamilyGreen water marked linen covered journal with maroon spine with red feint lined blue pages. Label on front cover is cream with black printing JOURNAL with handwritten DATA RISIS GLENFINE SOUTH -SOUTH BERRY G.S & S.B Hand written in black and red ink. Plan in back with scale 20 chains to one inch - Has an index. Handwritten on title page in black ink Address of sawmiller T. J. Brown, Mount Rowan D. W. Hambly 317 Ligar St, Ballarat J. Freeman, C/O Mrs H Simons, Lynch St, Footscray Sleemans Prescription for the bladder in 19009 Mixture No 55983 Tabloids No 55982glenfine south, south berry, sleemans, mining, gold mining, glenfine consols, reef, weights of quartz, blacksmiths tools, australian and eagle, davies south east reef drive, brawns, eaglehawk junction, simons letter, machinery, puddlng plant, poppet heads, winding plant, creswick, mosquito creek, frenchmans gully, spring hill, a. h. welsh, squire, petticoat gully -
 Bendigo Historical Society Inc.
Document - H.A. & S.R. WILKINSON COLLECTION: CONTRACT OF SALE
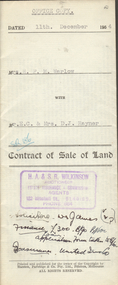
... Rayner for land being Crown allotment 6 section 25 at Eaglehawk described in certificate of title volume 1217 folio 243293, situate in Junction Street Eaglehawk. ...Rayner for land being Crown allotment 6 section 25 at Eaglehawk described in certificate of title volume 1217 folio 243293, situate in Junction Street Eaglehawk. ...This business was owned by father and son, Henry Archibald Wilkinson and Samuel Ronald "Ron" Wilkinson. Henry (1882-1954) was born in Shepparton and died in Bendigo. He was married to Grace Hovendon in 1908. Samuel Ronald "Ron" (1914-1995), Henry's son, was married to Florence Jean McKerlie in 1937.Contract of sale of land dated 11th December, 1954 between Mrs. H.F.M. Warlow (seller) and Mr. E.C. & Mrs. D.J. Rayner for land being Crown allotment 6 section 25 at Eaglehawk described in certificate of title volume 1217 folio 243293, situate in Junction Street Eaglehawk. Together with brick and weatherboard dwelling and all sundry. Price 700 poundsorganization, business, h.a. & s.r wilkinson real estate -
 Bendigo Historical Society Inc.
Newspaper - JENNY FOLEY COLLECTION: WARES
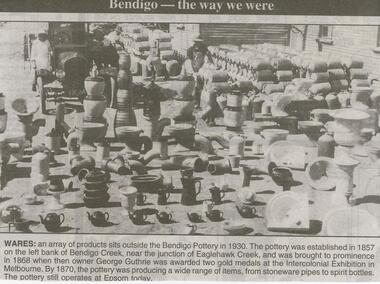
... The pottery was established in 1857 on the left bank of Bendigo Creek, near the junction of Eaglehawk Creek, and was brought to prominence in 1968 when then owner George Guthrie was awarded two gold medals at the Intercolonial Exhibition in Melbourne. ...The pottery was established in 1857 on the left bank of Bendigo Creek, near the junction of Eaglehawk Creek, and was brought to prominence in 1968 when then owner George Guthrie was awarded two gold medals at the Intercolonial Exhibition in Melbourne. ...Bendigo Advertiser ''The way we were'' from 2000. Wares: an array of products sits outside the Bendigo Pottery in 1930. The pottery was established in 1857 on the left bank of Bendigo Creek, near the junction of Eaglehawk Creek, and was brought to prominence in 1968 when then owner George Guthrie was awarded two gold medals at the Intercolonial Exhibition in Melbourne. By 1870, the pottery was producing a wide range of items, from stoneware pipes to spirit bottles. The pottery still operates at Epsom today. The clip is in a folder.newspaper, bendigo advertiser, the way we were -
 Bendigo Historical Society Inc.
Document - LONG GULLY HISTORY GROUP COLLECTION: INCURSION 1/11/1935 TO -/5/1936
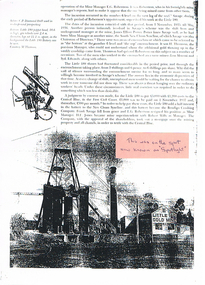
... Written on the back is - this was sitting where Spotlight is now.. Junction of Marong Eaglehawk Rd. A pink sticker on the photo has written on it - this was on the spot now known as Spotlight....Written on the back is - this was sitting where Spotlight is now.. Junction of Marong Eaglehawk Rd. A pink sticker on the photo has written on it - this was on the spot now known as Spotlight. ...BHS CollectionPhotocopy of a page with photo of the Little 180 Gold Mine N. L. and a C. P. Diamond Drill used in underground prospecting. Article mentions an incursion which took place between 1/11/1935 to -/5/1936 between the Little 180 and Central Blue. It mentions the people involved and the Court judgement that was made. Written on the back is - this was sitting where Spotlight is now.. Junction of Marong Eaglehawk Rd. A pink sticker on the photo has written on it - this was on the spot now known as Spotlight.bendigo, history, long gully history group, the long gully history group - incursion 1/11/1935 to -/5/1936, e g robertson, savage, little 180, james elliot potter, south new chum syncline, h thompson, lou moroni, syd edwards, central blue, new chum syncline, bendigo crushing company, frank savage, h e jones, robert wills, spotlight, m thomson -
 Federation University Historical Collection
Plan, Underground Survey of Mines, Ballarat District, Creswick and Kingston Mines, 1888, 06/1888
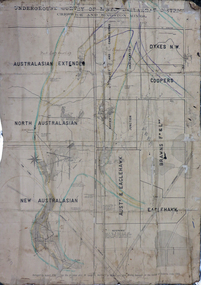
... A paper plan on linen showing the following mines: Australasian Extended, North Australasian, Davis and Charlesons Amalgamated, Davies Junction, Dykes N.W., Coopers, F & L Holding, New Australasian, Australasian and Eaglehawk, Brawns...Gift of the Squire Family creswick kingston berry australasian plan mining robert allen richard squire Written above Australian Extended "West Berry Consols Coy" Written near Davis' and Charlesons Amalgamated "West Berry Consols Coy" A paper plan on linen showing the following mines: Australasian Extended, North Australasian, Davis and Charlesons Amalgamated, Davies Junction, Dykes N.W., Coopers, F & L Holding, New Australasian, Australasian and Eaglehawk, Brawns Underground Survey of Mines, Ballarat District, Creswick and Kingston Mines, 1888 Plan Robert Allan ...This plan is associated with former Ballarat School of Mines Student Richard Squire (1875-1876). Gift of the Squire FamilyA paper plan on linen showing the following mines: Australasian Extended, North Australasian, Davis and Charlesons Amalgamated, Davies Junction, Dykes N.W., Coopers, F & L Holding, New Australasian, Australasian and Eaglehawk, BrawnsWritten above Australian Extended "West Berry Consols Coy" Written near Davis' and Charlesons Amalgamated "West Berry Consols Coy"creswick, kingston, berry, australasian, plan, mining, robert allen, richard squire -
 Bendigo Historical Society Inc.
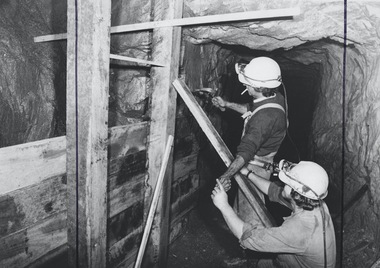
Photograph - AUSTIN COLLECTION: timbering a drive Williams United Gold Mine, Eaglehawk, 1987
... The Williams United Shaft (New Chum Reef) is a significant historical gold mining site in Eaglehawk, a suburb of Bendigo, Victoria. Located at the end of Junction Street, this heritage-listed site contains remnants of mining infrastructure, including a poppet head, compressor beds, and a winder bed, amidst old open-cut workings and mullock heaps. ...History House 11 Mackenzie Street Bendigo goldfields The Williams United Shaft (New Chum Reef) is a significant historical gold mining site in Eaglehawk, a suburb of Bendigo, Victoria. Located at the end of Junction Street, this heritage-listed site contains remnants of mining infrastructure, including a poppet head, compressor beds, and a winder bed, amidst old open-cut workings and mullock heaps. ...The Williams United Shaft (New Chum Reef) is a significant historical gold mining site in Eaglehawk, a suburb of Bendigo, Victoria. Located at the end of Junction Street, this heritage-listed site contains remnants of mining infrastructure, including a poppet head, compressor beds, and a winder bed, amidst old open-cut workings and mullock heaps. The mine was part of the rich Bendigo goldfield and is recognized on the Victorian Heritage Inventory. In the 1980s, a company, Bendigo Mining NL, proposed a re- development of the mine with an opencut and underground workings, leading to environmental assessments and the collection of photographs of the decaying underground infrastructure.Black and white photograph: two miners timbering a drive at Williams United Gold Mine, Eaglehawk. Miner in background hammering a nail in, with hand extended to miner squatting on floor of drive, who is handing up a nail. Miner, holding the hammer, is smoking a cigarette.gold mining, underground, williams united gold mine, eaglehawk, western mining gmc, timbering -
 Ballarat Tramway Museum
Photograph - Digital image Set of 20, 1971-72
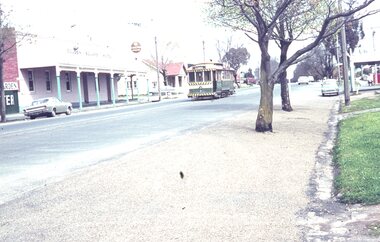
... Also a Newsagent with The Sun, The Bendigo Advertiser and The Age signs on the building, High St .13 - No. 29 Mt Korong Rd, with the railway overbridge in the background. .14 - interior photo of Birney tram roof .15 - interior view of controls of Birney at Eaglehawk .16 - No. 29 outbound at the Depot Junction McCrae St. .17 - No. 18 at the Eaglehawk terminus .18 - close up view of No. 29 front. .19 - No. 29 in Nolan St, crossing the bridge, outbound. .20 - No. 18 at the Eaglehawk terminus with the Eaglehawk Town Hall, Post Office in the background. ...Also a Newsagent with The Sun, The Bendigo Advertiser and The Age signs on the building, High St .13 - No. 29 Mt Korong Rd, with the railway overbridge in the background. .14 - interior photo of Birney tram roof .15 - interior view of controls of Birney at Eaglehawk .16 - No. 29 outbound at the Depot Junction McCrae St. .17 - No. 18 at the Eaglehawk terminus .18 - close up view of No. 29 front. .19 - No. 29 in Nolan St, crossing the bridge, outbound. .20 - No. 18 at the Eaglehawk terminus with the Eaglehawk Town Hall, Post Office in the background. ...Set of 20 digital images of Bendigo Tramways, 1972 at or before closure while on a tram tour by Stuart Lodington. .1 - No. 7 at Golden Square terminus .2 - ditto .3 - No. 26 in bound on the Eaglehawk line with a crossing loop behind. .4 - Birney crossing the bridge by the tram depot. .5 - No. 29 running a special on the Eaglehawk line with a HBA billboard in the background. .6 - No. 29 with a driver walking in front of the tram at the above location. .7 - No. 29 on the Eaglehawk line .8 - ditto waiting for a tram at Manchester Loop with poppet head in the background. .9 - No. 29 on the Eaglehawk line .10 - Eaglehawk Town Hall at night. .11 - No. 7 at the depot junction in McCrae St, with Golden Square destination. .12 - No. 29 with the Camp Hotel Eaglehawk in the background. Also a Newsagent with The Sun, The Bendigo Advertiser and The Age signs on the building, High St .13 - No. 29 Mt Korong Rd, with the railway overbridge in the background. .14 - interior photo of Birney tram roof .15 - interior view of controls of Birney at Eaglehawk .16 - No. 29 outbound at the Depot Junction McCrae St. .17 - No. 18 at the Eaglehawk terminus .18 - close up view of No. 29 front. .19 - No. 29 in Nolan St, crossing the bridge, outbound. .20 - No. 18 at the Eaglehawk terminus with the Eaglehawk Town Hall, Post Office in the background. Has a circus banner on the side.trams, tramways, bendigo, eaglehawk, quarry hill, golden square, depot, mccrae st, nolan st, tram 7, tram 26, tram 29, tram 18 -
 Ballarat Tramway Museum
Slide - 35mm slide/s, Noel Simons, 21/11/1962 12:00:00 AM
... Junction... Charing Cross... View St.... Eaglehawk...Junction McCrae and Arnold St. with driver/conductor changing points. 1188.2 - Bendigo No. 4 at Charing Cross, side on photo, with City Club Hotel and Alexandra Fountain in the background. Tram has Castrol and SEC 'Electric Cooking' ads. 1188.3 - Bendigo No. 4 climbing View St. after tram has passed photographer. Tram has Streets Ice Cream and Cohns Soft Drinks ad on rear dash panel. In the background are the buildings in View St., including the Princess Theatre. Tram has destination of Eaglehawk...Eaglehawk route) 1188.14 - "Birney car No. 11 leaving Bendigo depot. Scrubber car at rear" 1188.15 - "No. 21 at North Bendigo Terminus" 1188.16 - "Birney car No. 11 in High St. Bendigo at intersection with Old High Street (Golden Square Route)" 1188.17 - "Birney Car No. 11 at Golden Square terminus, High St., Bendigo". Set of 17 transparencies taken on 21/11/1962 on Kodak mounts. 1188.1 - Bendigo No. 11 at Depot Junction ...Set of 17 transparencies taken on 21/11/1962 on Kodak mounts. 1188.1 - Bendigo No. 11 at Depot Junction McCrae and Arnold St. with driver/conductor changing points. 1188.2 - Bendigo No. 4 at Charing Cross, side on photo, with City Club Hotel and Alexandra Fountain in the background. Tram has Castrol and SEC 'Electric Cooking' ads. 1188.3 - Bendigo No. 4 climbing View St. after tram has passed photographer. Tram has Streets Ice Cream and Cohns Soft Drinks ad on rear dash panel. In the background are the buildings in View St., including the Princess Theatre. Tram has destination of Eaglehawk. 1188.4 - Trams 2 and 4 crossing at the California Gully or Thorpe St Loop. 1188.5 - Bendigo 4 in Mt Korong Road. Tram inbound with destination of Quarry Hill, just leaving Garden Gully Loop. 1188.6 - Bendigo 4 and 17 crossing at the Hayes St. or Iron Bark Gully Loop. No. 17 bound for Eaglehawk, No. 4, Quarry Hill. 17 has two SEC roof ads and a white horse whiskey ad. 1188.7 - No. 17 bound for Eaglehawk, soon after leaving California Gully. Has large mullock heap in background. 1188.8 - Bendigo 2 and 17 crossing at the Thorpe St. or California Gully Loop. Has butchers shop in background. 1188.9 - Bendigo 17 at the Eaglehawk terminus. Has destination of Quarry Hill. In background is the hotel and shops at the terminus, showing ads for "Melbourne Bitter". Tram has two SEC 'Electric Cooking' ads. Driver and conductor about to assist two lady passengers with a pram and baby. 1188.10 - No. 17 at Eaglehawk terminus, awaiting departure. Has Eaglehawk Town Hall and Post Office in background. Tram has a Whitehorse Whiskey ad on the front dash panel. 1188.11 - No. 3 in High St. Eaglehawk, with destination of Eaglehawk. Has the shops on the south side of High St. in the background, including the Eaglehawk fish shop. Tram has two roof ads, one an SEC roof ad, and Cohns Drinks and Streets Ice cream ads on front dash panel. 1188.12 - as above, but after tram has passed photographer. Note the centre of the road poles. 1188.13 - No. 2 outbound for Eaglehawk at the intersection of Mt. Korong Road and the Calder Highway. Photo taken after the tram has passed the photographer. Has an Ampol service station in the background. 1188.14 - No. 11 leaving the Bendigo depot, crossing the bridge, with the Scrubber car in the background. 1188.15 - No. 21 at the North Bendigo terminus. Tram has destination of Golden Square and Cohns drink ad on front dash and two roof ads on side. 1188.16 - No. 11 on Golden Square route, in High St. at intersection with Old High St. 1188.17 - No. 11 at the Golden Square terminus, conductor turning the pole. Hotel on the left side of the photo. Note the road works barrier and red flag behind the tram. Slide has an end of roll mark on the right hand side of the image.Information written on in black ink and date stamped on purple ink. 1188.1 - "Birney car No. 11 in McCrae St. at Cnr of Arnold about to run into depot, Bendigo" 1188.2 - "No. 4 at Alexandra Fountain, Charing Cross Bendigo" 1188.3 - "No. 4 climbing the View St. Hill from Charing Cross, Bendigo (Eaglehawk Route)" 1188.4 - "No. 4 and 2 at Thorpe St. Loop, California Gully" 1188.5 - "No. 4 in Mt Korong Rd., Long Gully, Near Havilah Rd. (Bendigo) (Eaglehawk Route)" 1188.6 - "Nos. 17 and 4 crossing on Hayes St. Loop, Ironbark, Bendigo" 1188.7 - "No. 17 soon after leaving California Gully (Eaglehawk Route)" 1188.8 - "No.2 and 17 crossing on Thorpe St. Loop, California Gully (Eaglehawk Route)" 1188.9 - "No. 17 at Eaglehawk terminus" 1188.10 - "No. 17 at Eaglehawk terminus" 1188.11 - "No. 3 in High St. Eaglehawk" 1188.12 - "No. 3 nearing Eaglehawk terminus" 1188.13 - "No. 2 in Mt. Korong Rd., Ironbark. Calder highway on left (Eaglehawk route) 1188.14 - "Birney car No. 11 leaving Bendigo depot. Scrubber car at rear" 1188.15 - "No. 21 at North Bendigo Terminus" 1188.16 - "Birney car No. 11 in High St. Bendigo at intersection with Old High Street (Golden Square Route)" 1188.17 - "Birney Car No. 11 at Golden Square terminus, High St., Bendigo". tramways, trams, bendigo, depot junction, charing cross, view st., eaglehawk, north bendigo, golden square, tram 2, tram 3, tram 4, tram 11, tram 17, tram 21, tram scrubber -
 Ballarat Tramway Museum
Slide - 35mm slide/s - set of 4, Noel Simons, 24/05/1971 12:00:00 AM
... junction with old High St., near Fire Station Loop. Tram has two SEC roof ads. 1199.2 - No. 21 in High St. between Shamrock and Thistle Sts. Photo taken after the tram has passed the photographer. 1199.3 - Photo of a green box containing timetables for the four Bendigo routes. Located at Charing Cross. 1199.4 - Bendigo No. 23 en route to Eaglehawk...junction with old High St., near Fire Station Loop. Tram has two SEC roof ads. 1199.2 - No. 21 in High St. between Shamrock and Thistle Sts. Photo taken after the tram has passed the photographer. 1199.3 - Photo of a green box containing timetables for the four Bendigo routes. Located at Charing Cross. 1199.4 - Bendigo No. 23 en route to Eaglehawk ...Set of 4 transparencies taken on 24/5/1971 on Kodak mounts. 1199.1 - No. 21 in High St. at junction with old High St., near Fire Station Loop. Tram has two SEC roof ads. 1199.2 - No. 21 in High St. between Shamrock and Thistle Sts. Photo taken after the tram has passed the photographer. 1199.3 - Photo of a green box containing timetables for the four Bendigo routes. Located at Charing Cross. 1199.4 - Bendigo No. 23 en route to Eaglehawk at Charing Cross, with two SEC roof ads 'Everything's fine in my all electric kitchen' and "Switch to electric cooking'. Has the Ezywalkin building and the Beehive building in the background. Information written on in black ink and date stamped on purple ink. 1199.1 - "No. 21 in High St. at junction with old High St., near Fire Station Loop." 1199.2 - "No. 21 in High St. between Shamrock and Thistle Sts." 1199.3 - "Bendigo Tramways timetable at Alexandra Fountain Charing Cross." 1199.4 - "No. 23 at Alexandra Fountain Charing Cross, Bendigo." tramways, trams, bendigo, timetables, charing cross, high st., tram 21, tram 23 -
 Ballarat Tramway Museum
Slide - 35mm slide/s - set of 13, Noel Simons, 24/05/1971 12:00:00 AM
... Has two SEC roof ads 'Everything's fine in my all electric kitchen' and 'Electricity best for cooking'. 1200.10 - No. 5 at Eaglehawk terminus, with canon, war memorial outside Town Hall and Leo A Hughes Photographer advertisement on building in background. 1200.11 - No. 5 in McCrae St. about to enter Arnold St. and depot. Tram showing depot, has driver changing points. 1200.12 - No. 5 in Arnold St. Photo taken looking up the centre of the access track - shows the overhead at depot junction...Has two SEC roof ads 'Everything's fine in my all electric kitchen' and 'Electricity best for cooking'. 1200.10 - No. 5 at Eaglehawk terminus, with canon, war memorial outside Town Hall and Leo A Hughes Photographer advertisement on building in background. 1200.11 - No. 5 in McCrae St. about to enter Arnold St. and depot. Tram showing depot, has driver changing points. 1200.12 - No. 5 in Arnold St. Photo taken looking up the centre of the access track - shows the overhead at depot junction ...Set of 13 transparencies taken on 24/5/1971 on Kodak mounts. 1200.1 - No. 7 en route to Golden Square turning from Bridge St. into Nolan St. Photo taken after tram has passed photographer. Tram has a briquettes roof ad. 1200.2 - No. 21 in McCrae St. just before Nolan St. Photo taken after tram has passed photographer. 1200.3 - No. 7 in Nolan St at corner with McCrae St. Passenger boarding tram at a tram stop. 1200.4 - No 7 turning from Nolan into McCrae St. with Golden Fleece service station in background. 1200.5 - No. 7 in Thunder St en route to North Bendigo. Photo taken after tram has passed photographer. 1200.6 - No. 5 en route to Eaglehawk just after leaving Needle Loop between Long Gully and California Gully. 1200.7 - No. 5 at the start of the double track in High St. Eaglehawk. 1200.8 - No. 5 at Eaglehawk terminus showing "Depot" with Leo A Hughes Photographer advertisement on building in background. 1200.9 - No. 5 at Eaglehawk terminus. Has two SEC roof ads 'Everything's fine in my all electric kitchen' and 'Electricity best for cooking'. 1200.10 - No. 5 at Eaglehawk terminus, with canon, war memorial outside Town Hall and Leo A Hughes Photographer advertisement on building in background. 1200.11 - No. 5 in McCrae St. about to enter Arnold St. and depot. Tram showing depot, has driver changing points. 1200.12 - No. 5 in Arnold St. Photo taken looking up the centre of the access track - shows the overhead at depot junction. 1200.13 - Depot entrance with signage at depot entrance and depot building in background.Information written on in black ink and date stamped on purple ink. 1200.1 - "No. 7 entering Nolan St. from Bridge St." 1200.2 -"No. 21 in McRae St. about to turn into Nolan St." 1200.3 - "No. 7 in Nolan St. at corner of McRae St." 1200.4 - "No. 7 turning from Nolan St. into McRae St." 1200.5 - "No. 7 in Thunder St. just after turning from Caledonia St." 1200.6 - "No. 5 just after leaving Needle Loop between Long Gully and California Gully. 1200.7 - "No. 5 in High St. Eaglehawk at start of double track." 1200.8 - "No. 5 at Eaglehawk terminus" 1200.9 - "No. 5 at Eaglehawk terminus" 1200.10 - "No. 5 at Eaglehawk terminus."\ 1200.11 - "No. 5 in McCrae St. about to enter Arnold St." 1200.12 - "No. 5 in Arnold St." 1200.13 - "Entrance to Bendigo Tram Depot, No. 5 running into shed."tramways, trams, bendigo, mccrae st, north bendigo, california gully, eaglehawk, depot, tram 5, tram 7, tram 21 -
 Ballarat Tramway Museum
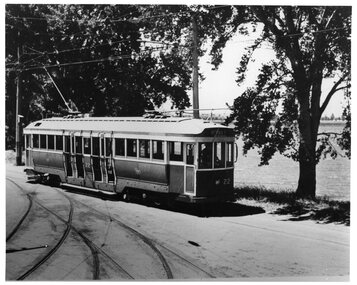
Photograph - Black & White Photograph/s - set of 2, State Electricity Commission of Victoria (SECV), c1950
... Black and white photograph of SEC (bogie No. 22), in Wendouree Parade passing depot junction, has destination of Victoria St. Tram later renumbered to 37 in 1951. (See Destination Eaglehawk, p7) Original of photograph, SEC held by Alan Bradley has been cropped. ...Tram 22 37 Black and white photograph of SEC (bogie No. 22), in Wendouree Parade passing depot junction, has destination of Victoria St. Tram later renumbered to 37 in 1951. (See Destination Eaglehawk, p7) Original of photograph, SEC held by Alan Bradley has been cropped. ...Yields information about one of the first two maximum traction bogie trams in Ballarat in October 1945 after it had been repainted for use in Ballarat by the SEC and the Lake / depot area at the time.Black and white photograph of SEC (bogie No. 22), in Wendouree Parade passing depot junction, has destination of Victoria St. Tram later renumbered to 37 in 1951. (See Destination Eaglehawk, p7) Original of photograph, SEC held by Alan Bradley has been cropped. Had a canoe on the right hand side, which is referred to in the interpretation panel at the Gardens Loop 474.1 - shows the canoe. Additional copy of .1 added 21/3/20201,trams, tramways, ballarat, secv, bogie trams, depot junction. , tram 22, 37 -
 Ballarat Tramway Museum
Slide - 35mm slide/s - set of 20, Eldon Hogan, 22/05/1971 12:00:00 AM
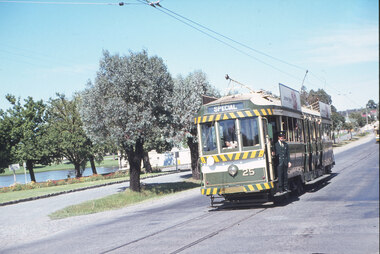
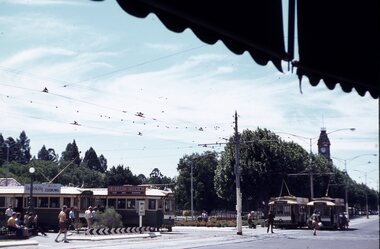
... Tramways trams Bendigo Lake Weeroona Pall Mall Golden Square Eaglehawk Quarry Hill tram 25 tram 30 tram 29 tram 5 tram 18 tram 19 tram 24 tram 25 Set of 20 35mm Agfa colour blue and white plastic mount slide - featuring photos taken during an Association of Railway Enthusiasts Tour by Eldon Hogan. Folder had the date "22/5/1971" on it. Scanned on the Canon scanner at the depot 15/12/2005 at the time of the installation of the scanner. .1 - No. 25 in Nolan St with Lake Weeroona in the background. .2 - Three Birneys at the Depot junction, 30 and 29 with Conoles Hotel, McCrae St in the background. .3 - No. 5 in front of the Shamrock Hotel, Pall Mall .4 - No. 29 in front of the Shamrock Hotel with Stonemasons sign in the background. .5 - No. 18 ditto .6 - No. 30 and another Birney at the Quarry Hill terminus .7 - No. 24 southbound High St at the Violet St intersection with a "Mine Open" sign in the foreground and the Cathedral in the background. .8 - No. 19 at the Golden Square terminus, with the Golden Square Hotel in the background. .9 - No. 29 - side on view, North Bendigo line? ...Set of 20 35mm Agfa colour blue and white plastic mount slide - featuring photos taken during an Association of Railway Enthusiasts Tour by Eldon Hogan. Folder had the date "22/5/1971" on it. Scanned on the Canon scanner at the depot 15/12/2005 at the time of the installation of the scanner. .1 - No. 25 in Nolan St with Lake Weeroona in the background. .2 - Three Birneys at the Depot junction, 30 and 29 with Conoles Hotel, McCrae St in the background. .3 - No. 5 in front of the Shamrock Hotel, Pall Mall .4 - No. 29 in front of the Shamrock Hotel with Stonemasons sign in the background. .5 - No. 18 ditto .6 - No. 30 and another Birney at the Quarry Hill terminus .7 - No. 24 southbound High St at the Violet St intersection with a "Mine Open" sign in the foreground and the Cathedral in the background. .8 - No. 19 at the Golden Square terminus, with the Golden Square Hotel in the background. .9 - No. 29 - side on view, North Bendigo line? Thunder St? .10 - No. 30 crossing the railway overbridge, inbound from Eaglehawk with a number of photographers in the foreground. .11 - No. 29? ditto .12 - No. 5 outbound - side on view, Thunder St, North Bendigo line? .13 - No. 29 and 30 at the intersection of High St and Brazier St with Church or School hall in the background. .14 - ditto .15 - ditto .16 - No. 25 and the two Birneys at the Eaglehawk terminus. .17 - No. 29 and two other trams at ditto .18 - No. 30 and 19 adjacent to the Lake View Hotel, McCrae St .19 - No. 5 and 25 crossing on the Eaglehawk Line, Ironbark? .20 - No. 29 at Quarry Hilltramways, trams, bendigo, lake weeroona, pall mall, golden square, eaglehawk, quarry hill, tram 25, tram 30, tram 29, tram 5, tram 18, tram 19, tram 24, tram 25 -
 Ballarat Tramway Museum
Slide - 35mm slide/s - set of 11, Eldon Hogan, mid 1960's to early 1970's
... junction. .3 - 21 and 29 Quarry Hill route? .4 - 29 ditto .5 - 24 at Golden Square terminus - photo taken from the city side - note all the little shops and buildings on the left hand side of the photograph. .6 - 29, 21 and 25 at Eaglehawk .7 - 29 - side on view - Eaglehawk line? ...Tramways trams Bendigo Eaglehawk Charing Cross Golden Square tram 21 tram 29 tram 25 tram 19 Set of 11 Agfa Plastic mounted slides - from the Eldon Hogan collection - featuring an ARE tour with Nos. 21, 29 and 25 to Bendigo, mid 1960's. Scanned on the Canon scanner at the depot 15/12/1971 at the time of the installation of the scanner. .1 - four trams at Charing Cross - includes 19 and 25. .2 - 21 and 25 at the depot junction. .3 - 21 and 29 Quarry Hill route? ...Set of 11 Agfa Plastic mounted slides - from the Eldon Hogan collection - featuring an ARE tour with Nos. 21, 29 and 25 to Bendigo, mid 1960's. Scanned on the Canon scanner at the depot 15/12/1971 at the time of the installation of the scanner. .1 - four trams at Charing Cross - includes 19 and 25. .2 - 21 and 25 at the depot junction. .3 - 21 and 29 Quarry Hill route? .4 - 29 ditto .5 - 24 at Golden Square terminus - photo taken from the city side - note all the little shops and buildings on the left hand side of the photograph. .6 - 29, 21 and 25 at Eaglehawk .7 - 29 - side on view - Eaglehawk line? .8 - ditto with 21 .9 - 29 - North Bendigo line? - side on view .10 - 29 and 21 - vacant paddocks - Eaglehawk line .11 - 29 crossing the railway overbridge, Eaglehawk line, in bound. Trams have SEC roof advertisements. tramways, trams, bendigo, eaglehawk, charing cross, golden square, tram 21, tram 29, tram 25, tram 19 -
 Ballarat Tramway Museum
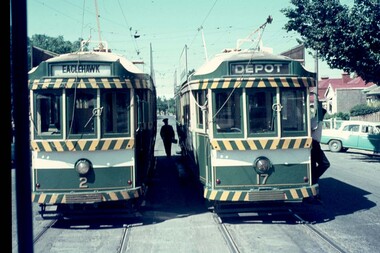
Slide - 35mm slide/s, Travis Jeffrey, late 1960's or early 1970's
... Agfa plastic mount (blue base, white cover) with a photo of Bendigo Nos. 2 and 17 at the area of Depot Junction, swapping crews. No. 2 showing Eaglehawk and No. 17, Depot. ...Tramways trams Bendigo Crews Depot Junction tram 2 tram 17 "BES 42" in pencil Agfa plastic mount (blue base, white cover) with a photo of Bendigo Nos. 2 and 17 at the area of Depot Junction, swapping crews. No. 2 showing Eaglehawk and No. 17, Depot. ...Agfa plastic mount (blue base, white cover) with a photo of Bendigo Nos. 2 and 17 at the area of Depot Junction, swapping crews. No. 2 showing Eaglehawk and No. 17, Depot. Note differences in the destination blinds or rolls, white on black, or the later form, black on white. Photo taken late 1960's early 1970's from the window of another tram."BES 42" in penciltramways, trams, bendigo, crews, depot junction, tram 2, tram 17 -
 Ballarat Tramway Museum
Slide - 35mm slide/s - set of 13, Carolyn Dean, 24/09/1970 12:00:00 AM
... Piece of rail alongside tram. .3 - "7" - No. 7 crossing No. 29 at start of double track with Hotel in background .4 - "8" - No. 29 running special at depot junction. .5 - "9" - No. 29 turning from Nolan into Bridge St. .6 - "10" - ditto, passing old loop .7 - "12" - ditto, turning from Caledonia into Thunder St .8 - "13" - ditto, southbound in Pall Mall near Bull St. .9 - "16" - ditto, crossing bridge into tram depot, with tram depot in background. .10 - "17" - ditto, entering depot. .11 - "18" - No. 26 entering the Eaglehawk terminus, High St. with Leo A Hughes photographer shop in background. .12 - "19" - No. 26 at terminus, showing "Quarry Hill", with High St in the background. .13 - "21" - No. 26 after leaving terminus, travelling in High St with shops n the background....Piece of rail alongside tram. .3 - "7" - No. 7 crossing No. 29 at start of double track with Hotel in background .4 - "8" - No. 29 running special at depot junction. .5 - "9" - No. 29 turning from Nolan into Bridge St. .6 - "10" - ditto, passing old loop .7 - "12" - ditto, turning from Caledonia into Thunder St .8 - "13" - ditto, southbound in Pall Mall near Bull St. .9 - "16" - ditto, crossing bridge into tram depot, with tram depot in background. .10 - "17" - ditto, entering depot. .11 - "18" - No. 26 entering the Eaglehawk terminus, High St. with Leo A Hughes photographer shop in background. .12 - "19" - No. 26 at terminus, showing "Quarry Hill", with High St in the background. .13 - "21" - No. 26 after leaving terminus, travelling in High St with shops n the background. ...Set of photographs of operations, including special tram, track work by SEC prior to the Bendigo system closing closing.Set of 13 Agfa slides, blue and white plastic base of Bendigo trams. Taken 24.9.1970 by Carolyn Dean. .1 - "5" - No. 7 at Golden Square terminus, with Golden Square Hotel in background. .2 - "6" - No. 7 passing SEC workmen replacing a broken joint, in McCrae St. Piece of rail alongside tram. .3 - "7" - No. 7 crossing No. 29 at start of double track with Hotel in background .4 - "8" - No. 29 running special at depot junction. .5 - "9" - No. 29 turning from Nolan into Bridge St. .6 - "10" - ditto, passing old loop .7 - "12" - ditto, turning from Caledonia into Thunder St .8 - "13" - ditto, southbound in Pall Mall near Bull St. .9 - "16" - ditto, crossing bridge into tram depot, with tram depot in background. .10 - "17" - ditto, entering depot. .11 - "18" - No. 26 entering the Eaglehawk terminus, High St. with Leo A Hughes photographer shop in background. .12 - "19" - No. 26 at terminus, showing "Quarry Hill", with High St in the background. .13 - "21" - No. 26 after leaving terminus, travelling in High St with shops n the background.Each slide has in corner a number in pencil and the first one the date of "24-9-70".tramways, trams, bendigo, tram 7, tram 29, tram 26 -
 Ballarat Tramway Museum
Negative, Bruce Herbert, "Bendigo and Ballarat Trams (AETA Convention) 30 Mar 1975", 30/03/1975 12:00:00 AM
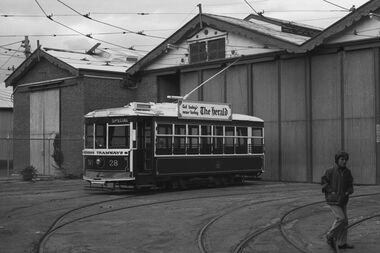
... The junction trackwork for the Eaglehawk lines remain in position. 21 - No. 30 northbound, with the City Family Hotel and other shops in the background. 22 - ditto and the cenotaph, 23 - B74 on a train at Spencer St. ...The junction trackwork for the Eaglehawk lines remain in position. 21 - No. 30 northbound, with the City Family Hotel and other shops in the background. 22 - ditto and the cenotaph, 23 - B74 on a train at Spencer St. ...Negative folder - made by ROW1 International of West Germany containing 40 No. 35 mm negatives of the AETA 1975 Convention visit to Ballarat and Bendigo on 30-3-1975. 17 photos of Ballarat and 23 of Bendigo. Bendigo photos: 1 - No. 28 at the depot 2 - ditto 3 - 24 and another bogie tram in side the depot 4 - No. 3? inside the depot 5 - 12, scrubber - 17 and two bogie trams 6 - scrubber and other bogie trams. 7 - general view with 24 and other bogie trams 8 - ditto 9 - Four trams at the Gold Mine, lead by 28. 10 - 19 at the Gold Mine 11 - single trucker with "tram tours" sign on the front 12 - 28 and two other cars at the Joss House, North Bendigo 13 - 19 and two other cars at the Joss House 14 - 30 at depot junction and loop 15 - 28 and 18 16 - 18 in the loop 17 - 28 and 18 McCrae St 18 - 28, 18 and 30 ditto 19 - 19 20 - No. 18 and 28 in Pall Mall with The Beehive in the background. Outside the building is an American Doughnut Kitchen van. The junction trackwork for the Eaglehawk lines remain in position. 21 - No. 30 northbound, with the City Family Hotel and other shops in the background. 22 - ditto and the cenotaph, 23 - B74 on a train at Spencer St. trams, tramways, btps, ballarat, aeta, bendigo, bendigo trust, depot, mccrae st, tram 28 tram 19 tram 30 tram 18 tram 24 tram 3 tram 12 tram 17 tram scrubber -
 Bendigo Historical Society Inc.
Newspaper - Cheers Bendigo - A Bendigo Advertiser special supplement
... Eaglehawk 20) brougham Arms hotel, Bendigo 21) Junction hotel, Mandurang 22) Tyson reef hotel, Weeroona Ave. 23) Hopetoun hotel, corner Mitchell and wills St. 24) Queen's Head, Lockwood 25) Blomquists Wine Hall, Bendigo-Fosterville Rd. 26) Metropolitan hotel, corner Hargreaves and Bull Streets 27) European hotel, High St. ...Eaglehawk 20) brougham Arms hotel, Bendigo 21) Junction hotel, Mandurang 22) Tyson reef hotel, Weeroona Ave. 23) Hopetoun hotel, corner Mitchell and wills St. 24) Queen's Head, Lockwood 25) Blomquists Wine Hall, Bendigo-Fosterville Rd. 26) Metropolitan hotel, corner Hargreaves and Bull Streets 27) European hotel, High St. ...A eight pages Bendigo Advertiser supplement titled "Cheers Bendigo." Inside a collection of photographs of hotels in the Greater Bendigo area. The photos were provided by John Waterworth, regional manager of the Liquor Licensing Commission. The hotels are: 1) Caledonian hotel in Golden Square 2) Cumberland hotel Williamson Street 3) Terminus hotel Mitchell Street 4) Bendigo hotel corner Bridge St. and Park Rd 5) View point hotel in View point 6) Commercial hotel, Goornong 7) Eastman's Goornong hotel 8) Ramblers, Bridge St. 9) Campbells Forest hotel 10) Lightning Hill hotel, Whipstick Rd. 11) Limerick hotel, McIvor rd. 12) Prince Patrick hotel, Eaglehawk 13) Reservoir hotel, Kennington 14) Acotts hotel, McIvor Hwy, Axedale 15) Shamrock hotel, Bendigo 16) Niagra hotel corner McCrae and Mundy St. 17) Bath hotel, Charing Cross 18) Blue Bell hotel, corner Don and high St. 19) Pioneer hotel, Sailors Gully Rd. Eaglehawk 20) brougham Arms hotel, Bendigo 21) Junction hotel, Mandurang 22) Tyson reef hotel, Weeroona Ave. 23) Hopetoun hotel, corner Mitchell and wills St. 24) Queen's Head, Lockwood 25) Blomquists Wine Hall, Bendigo-Fosterville Rd. 26) Metropolitan hotel, corner Hargreaves and Bull Streets 27) European hotel, High St. Bendigo 28) Royal hotel, Millers flat rd. Whipstick 29) unicorn hotel, Forest St. 30) Camp hotel, corner Victoria and High streets Eaglehawk There is no date on the paperbendigo advertiser, bendigo hotels -
 Bendigo Historical Society Inc.
Photograph - Robert Green Collection - Photos of Bendigo Tramways - Sheet 1 of 8, 1960s
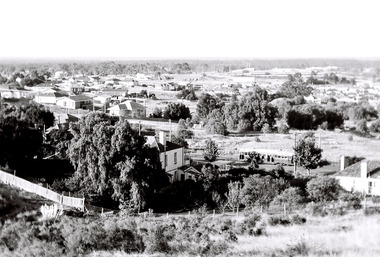
... Houses in the foreground, on the left is 245 Eaglehawk Road and on the right 241 Eaglehawk Road. 11147.1e No 28 Birney Car Special 11147.1f No 28 Birney Car Special and No 2 possibly in Eaglehawk 11147.1g No 18 roars up Eaglehawk Road into Iron Bark 11147.1h Tram crossing the railway at Jobs Gully, on its way to Bendigo 11147.1i Tram crossing the railway at Jobs Gully, on its way to Eaglehawk 11147.1j Central Deborah Gold Mine 11147.1k The intersection of Reginald and Houston St, with the Cemetery on the left. 11147.1l Tram Stop on Pall Mall opposite Ezywalkins Conrner of Mitchell St 11147.1m Electrical Cable junction box 11147.1n Electrical Cable junction box 11147.1o No 18 at Canterbury Park Terminus Eaglehawk 11147.1p No 26 at the top of Mitchell St on its way to Quarry Hill 11147.1q Nos 26 and 18 at the Railway Station stop in Mitchell St 11147.1r No 18 coming down Mitchell St 11147.1s No 5 possibly in Carpenter St 11147.1t No 5 at the Cemetery Gates ready to depart the terminus 11147.1u No 5 at the Cemetery Gates ready to depart the terminus 11147.1v No 5 at the Cemetery Gates ready to depart the terminus 11147.1w Nos 18 and 5 crossover at the Fountain 11147.1x Nos 18 and 5 crossover at the Fountain 11147.1y Nos 18 and 5 crossover at the Fountain 11147.1z Heading into Long Gully past the Manchester Arms Hotel 11147.1aa No 5 loading passengers at the Eaglehawk Terminus next to Canterbury Park 11147.1ab Traffic conjestion at the loop on the way back to Bendigo 11147.1ac The Eaglehawk Terminus next to Canterbury Park 11147.1ad The Eaglehawk Terminus next to Canterbury Park 11147.1ae The Eaglehawk Terminus next to Canterbury Park 11147.1af The Eaglehawk Terminus next to Canterbury Park...Houses in the foreground, on the left is 245 Eaglehawk Road and on the right 241 Eaglehawk Road. 11147.1e No 28 Birney Car Special 11147.1f No 28 Birney Car Special and No 2 possibly in Eaglehawk 11147.1g No 18 roars up Eaglehawk Road into Iron Bark 11147.1h Tram crossing the railway at Jobs Gully, on its way to Bendigo 11147.1i Tram crossing the railway at Jobs Gully, on its way to Eaglehawk 11147.1j Central Deborah Gold Mine 11147.1k The intersection of Reginald and Houston St, with the Cemetery on the left. 11147.1l Tram Stop on Pall Mall opposite Ezywalkins Conrner of Mitchell St 11147.1m Electrical Cable junction box 11147.1n Electrical Cable junction box 11147.1o No 18 at Canterbury Park Terminus Eaglehawk 11147.1p No 26 at the top of Mitchell St on its way to Quarry Hill 11147.1q Nos 26 and 18 at the Railway Station stop in Mitchell St 11147.1r No 18 coming down Mitchell St 11147.1s No 5 possibly in Carpenter St 11147.1t No 5 at the Cemetery Gates ready to depart the terminus 11147.1u No 5 at the Cemetery Gates ready to depart the terminus 11147.1v No 5 at the Cemetery Gates ready to depart the terminus 11147.1w Nos 18 and 5 crossover at the Fountain 11147.1x Nos 18 and 5 crossover at the Fountain 11147.1y Nos 18 and 5 crossover at the Fountain 11147.1z Heading into Long Gully past the Manchester Arms Hotel 11147.1aa No 5 loading passengers at the Eaglehawk Terminus next to Canterbury Park 11147.1ab Traffic conjestion at the loop on the way back to Bendigo 11147.1ac The Eaglehawk Terminus next to Canterbury Park 11147.1ad The Eaglehawk Terminus next to Canterbury Park 11147.1ae The Eaglehawk Terminus next to Canterbury Park 11147.1af The Eaglehawk Terminus next to Canterbury Park Photograph Robert Green Collection - Photos of Bendigo Tramways - Sheet 1 of 8 ...This collection contains eight archive sheets (Sheet 1 to Sheet 8) of strips of original 35mm black and white negatives of photographs taken by Robert green during the 1960s and early 1970s of the Bendigo State Electricty Commission of Victoria Tramways prior to their abandonment. The collection also includes two archive quality sheets (Sheet A and Sheet B) of original 35mm colour slides taken by Robert Green during the same period. Sheet B also contains one slide taken by Robert's friend Keigh S King (1928-2019) who was the author of the book 'The Bendigo Tramways an illustrated history, published by the Australian Railway Historical Society Victorian Division Melbourne in February 1972; BHS Item no. 5052. The collection also includes one USB stick which contains images of all photographs described above, except for one colour slide taken by Keith S Kings. Sixteen black and white prints from the images are also included.Robert Green Collection, this item contains 33 Black and White Negatives of the trams at various locations around Bendigo. Photos: 11147.1a and 11147.1b Tram on its way out of Long Gully along Mt Korong (Eaglehawk) Road towards Eaglehawk. Houses in the foreground, on the left is 245 Eaglehawk Road and on the right 241 Eaglehawk Road. 11147.1c Birney Car Tram on its way out of Long Gully along Mt Korong (Eaglehawk) Road towards Eaglehawk, looking back ove the Long Gully township. 11147.1d Birney Car Tram on its way out of Long Gully along Mt Korong (Eaglehawk) Road towards Eaglehawk. Houses in the foreground, on the left is 245 Eaglehawk Road and on the right 241 Eaglehawk Road. 11147.1e No 28 Birney Car Special 11147.1f No 28 Birney Car Special and No 2 possibly in Eaglehawk 11147.1g No 18 roars up Eaglehawk Road into Iron Bark 11147.1h Tram crossing the railway at Jobs Gully, on its way to Bendigo 11147.1i Tram crossing the railway at Jobs Gully, on its way to Eaglehawk 11147.1j Central Deborah Gold Mine 11147.1k The intersection of Reginald and Houston St, with the Cemetery on the left. 11147.1l Tram Stop on Pall Mall opposite Ezywalkins Conrner of Mitchell St 11147.1m Electrical Cable junction box 11147.1n Electrical Cable junction box 11147.1o No 18 at Canterbury Park Terminus Eaglehawk 11147.1p No 26 at the top of Mitchell St on its way to Quarry Hill 11147.1q Nos 26 and 18 at the Railway Station stop in Mitchell St 11147.1r No 18 coming down Mitchell St 11147.1s No 5 possibly in Carpenter St 11147.1t No 5 at the Cemetery Gates ready to depart the terminus 11147.1u No 5 at the Cemetery Gates ready to depart the terminus 11147.1v No 5 at the Cemetery Gates ready to depart the terminus 11147.1w Nos 18 and 5 crossover at the Fountain 11147.1x Nos 18 and 5 crossover at the Fountain 11147.1y Nos 18 and 5 crossover at the Fountain 11147.1z Heading into Long Gully past the Manchester Arms Hotel 11147.1aa No 5 loading passengers at the Eaglehawk Terminus next to Canterbury Park 11147.1ab Traffic conjestion at the loop on the way back to Bendigo 11147.1ac The Eaglehawk Terminus next to Canterbury Park 11147.1ad The Eaglehawk Terminus next to Canterbury Park 11147.1ae The Eaglehawk Terminus next to Canterbury Park 11147.1af The Eaglehawk Terminus next to Canterbury Parkkeith s king, bendigo, trams, robert green -
 Ballarat Tramway Museum
Photograph - SECV Bendigo 13 in McCrae St, 3/10/1950
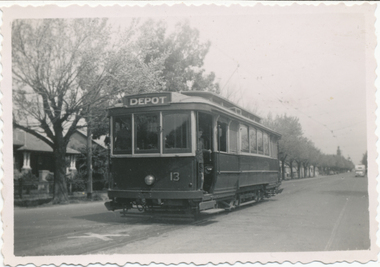
... Photograph contained within the Wal Jack Bendigo and Geelong Album, see Reg Item 5003 for more details Yields information about Bendigo 13 and the vicinity of depot junction. trams tramways Eaglehawk Bendigo Depot tram 13 On the rear in red ink "Sunday morning, Eaglehawk car, returning depot 3/10/50". ...Photo of No. 13 in McCrae St about to enter the depot. Tram has the depot destination showing. Photo taken by an unknown person, dated 3-10-1950. Photograph contained within the Wal Jack Bendigo and Geelong Album, see Reg Item 5003 for more detailsYields information about Bendigo 13 and the vicinity of depot junction.Black and White print with notes on the rear. Printed on paper with a serrated edge.On the rear in red ink "Sunday morning, Eaglehawk car, returning depot 3/10/50".trams, tramways, eaglehawk, bendigo, depot, tram 13 -
 Bendigo Historical Society Inc.
Slide - Images by Arthur Pulfer, 1800s
... Ham 7795.1b Digger's Auction Eaglehawk Bendigo - Artist S.T. Gill 7795.1c Junction of Pegleg and Sailors Gully Bendigo - Artist (engravers ?) ...Ham 7795.1b Digger's Auction Eaglehawk Bendigo - Artist S.T. Gill 7795.1c Junction of Pegleg and Sailors Gully Bendigo - Artist (engravers ?) ...Arthur William Pulfer was born on 18 April 1918, in Bendigo, Victoria, Australia, his father, Harold Victor Pulfer, was 30 and his mother, Elsie Maud Rumball, was 26. He married Norma Stewart in Bendigo, Victoria, Australia. He died on 6 March 2001, in his hometown, at the age of 82, and was buried in the Bendigo Cemetery.Many images from by Arthur Pulfer copied to slides. Eighteen Slides from various paintings and engravings of 1800s Sandhurst and Bendigo. This item includes the following slides: 7795.1a Examining the day's work - engraving by Tho. Ham 7795.1b Digger's Auction Eaglehawk Bendigo - Artist S.T. Gill 7795.1c Junction of Pegleg and Sailors Gully Bendigo - Artist (engravers ?) Hullmandel and Walton 7795.1d On Bendigo Creek - Artist S.T. Gill 7795.1e Diggers on the way to Bendigo - Artist S.T. Gill 7795.1f Iron Bark Gully - Artist S.T. Gill 7795.1g At Bendigo Mill June 1852 - Artist S.T. Gill 7795.1h View of Sandhurst Victoria Australia A.J. Stopps Engraving 7795.1i View of Sandhurst Victoria Australia A.J. Stopps Engraving 7795.1j Post Office Sandhurst - artist unknown 7795.1k St Andrews Denominational or common school, 'Scotch' school, Myers Street Bendigo. 7795.1l Eaglehawk Gully Bendigo 1853, artist Angus G.F. 7795.1m Shamrock Hotel 7795.1n McPhersons Store Bendigo Victoria - artist unknown 7795.1o George Lacy, the first gathering of the Bendigo Caledonian Society 2nd January 1860 from the National Library of Australia 7795.1p A painting by F. Tayler - appears to be a view looking towards Mt Alexander. 7795.1q Rear of a painting by F. Tayler - appears to be a view looking towards Mt Alexandra. history, bendigo, james lerk collection, mt alexander, st andrews bendigo, s.t. gill, sandhurst, eaglehawk, bendigo caledonian society, shamrock hotel bendigo, arthur pulfer