Showing 224 items matching "eaglehawk road bendigo"
-
 Bendigo Historical Society Inc.
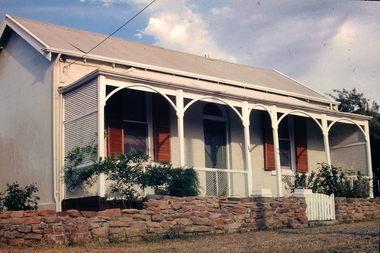
Slide - Eaglehawk Road Bendigo Early Cottage
... Eaglehawk Road Bendigo Early Cottage......eaglehawk road bendigo...Eaglehawk Road Bendigo Early Cottage - Exact address unlnown...History House 11 Mackenzie Street Bendigo goldfields history bendigo national trust collection bendigo eaglehawk road bendigo Eaglehawk Road Bendigo Early Cottage - Exact address unlnown Slide Eaglehawk Road Bendigo Early Cottage ...Eaglehawk Road Bendigo Early Cottage - Exact address unlnownhistory, bendigo, national trust collection bendigo, eaglehawk road bendigo -
 Bendigo Historical Society Inc.
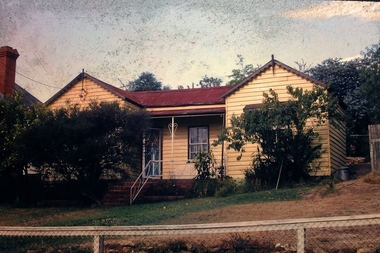
Slide - 112 Eaglehawk Road Bendigo
... 112 Eaglehawk Road Bendigo......112 Eaglehawk Road Bendigo...112 Eaglehawk Road Bendigo - an Edwardian Cottage. A google search on street view shows a newer home built on this site....Slide 112 Eaglehawk Road Bendigo ...112 Eaglehawk Road Bendigo - an Edwardian Cottage. A google search on street view shows a newer home built on this site.history, bendigo, national trust collection bendigo, 112 eaglehawk road bendigo -
 Bendigo Historical Society Inc.
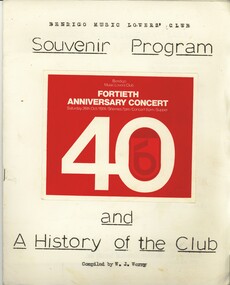
Book - BENDIGO MUSIC LOVERS' CLUB COLLECTION: 40TH. ANNIVERSARY PROGRAM, 1974
... Name on telegram ' Miss Webster, 2 Eaglehawk Road, Bendigo.' Book celebrates 40th. Anniversary of club and the history of the club....Name on telegram ' Miss Webster, 2 Eaglehawk Road, Bendigo.' Book celebrates 40th. Anniversary of club and the history of the club. ...Bendigo Music Lovers' Club 40th Anniversary Program contains telegrams and letter inside envelope within book. 8 pages in book. Name on telegram ' Miss Webster, 2 Eaglehawk Road, Bendigo.' Book celebrates 40th. Anniversary of club and the history of the club.W R Werryclubs, music, bendigo music lovers club, bendigo, bendigo music lovers club. 40 th. anniversary program. -
 Bendigo Historical Society Inc.
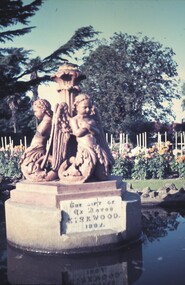
Slide - BENDIGO & EASTER FAIR, 1968
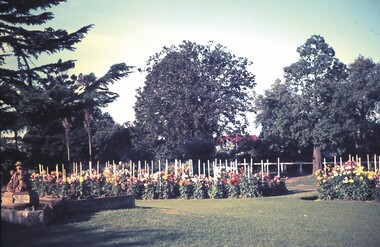
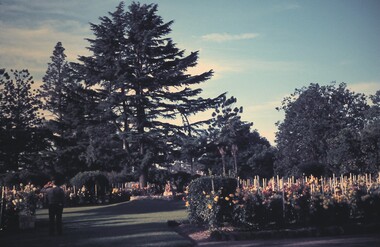
... Fountain at Canterbury Park, Sailors Gully Road, Eaglehawk (Bendigo)....History House 11 Mackenzie Street Bendigo goldfields SLIDE Bendigo canterbury park Fountain Canterbury Park Eaglehawk Bendigo Fountain at Canterbury Park, Sailors Gully Road, Eaglehawk (Bendigo). ...Fountain at Canterbury Park, Sailors Gully Road, Eaglehawk (Bendigo).slide, bendigo, canterbury park, fountain, canterbury park, eaglehawk, bendigo -
 Bendigo Historical Society Inc.
Slide - BENDIGO & EASTER FAIR, c1968
... Dahlias, Canterbury Park, Sailors Gully Road, Eaglehawk (Bendigo)....History House 11 Mackenzie Street Bendigo goldfields SLIDE Bendigo canterbury park Canterbury Park Eaglehawk Bendigo Dahlias, Canterbury Park, Sailors Gully Road, Eaglehawk (Bendigo). ...Dahlias, Canterbury Park, Sailors Gully Road, Eaglehawk (Bendigo).slide, bendigo, canterbury park, canterbury park, eaglehawk, bendigo -
 Bendigo Historical Society Inc.
Slide - BENDIGO & EASTER FAIR, c1968
... Dahlias, Canterbury Park, Sailors Gully Road, Eaglehawk, Bendigo....History House 11 Mackenzie Street Bendigo goldfields SLIDE Bendigo canterbury park Dahlias Canterbury Park EaglehawK Dahlias, Canterbury Park, Sailors Gully Road, Eaglehawk, Bendigo. ...Dahlias, Canterbury Park, Sailors Gully Road, Eaglehawk, Bendigo.slide, bendigo, canterbury park, dahlias canterbury park eaglehawk -
 Bendigo Historical Society Inc.
Document - MINING REPORTS - KING OF PRUSSIA MINE
... KING OF PRUSSIA MINE WHIPSTICK ROAD EAGLEHAWK NORTH, GREATER BENDIGO CITY Place ID 8444 Location WHIPSTICK ROAD EAGLEHAWK NORTH, GREATER BENDIGO CITY Municipality GREATER BENDIGO CITY Heritage Listing Victorian Heritage Inventory Level of significance Heritage Inventory Site Heritage Inventory (HI) Number H7724-0141...History House 11 Mackenzie Street Bendigo goldfields KING OF PRUSSIA MINE WHIPSTICK ROAD EAGLEHAWK NORTH, GREATER BENDIGO CITY Place ID 8444 Location WHIPSTICK ROAD EAGLEHAWK NORTH, GREATER BENDIGO CITY Municipality GREATER BENDIGO CITY Heritage Listing Victorian Heritage Inventory Level of significance Heritage Inventory Site Heritage Inventory (HI) Number H7724-0141 Gold mining reports Mining Reports Kinf of Prussia Mine B M L Production Statistics Brief handwritten notes by Albert Richardson, with typed copy of same, on the King of Prussia Mine on the Lightning Hill Line. ...KING OF PRUSSIA MINE WHIPSTICK ROAD EAGLEHAWK NORTH, GREATER BENDIGO CITY Place ID 8444 Location WHIPSTICK ROAD EAGLEHAWK NORTH, GREATER BENDIGO CITY Municipality GREATER BENDIGO CITY Heritage Listing Victorian Heritage Inventory Level of significance Heritage Inventory Site Heritage Inventory (HI) Number H7724-0141Brief handwritten notes by Albert Richardson, with typed copy of same, on the King of Prussia Mine on the Lightning Hill Line. Notes give the depth, crushings, gold yield, commenced 1876 and closed 1877.gold, mining reports, mining reports, kinf of prussia mine, b m l production statistics -
 Bendigo Historical Society Inc.
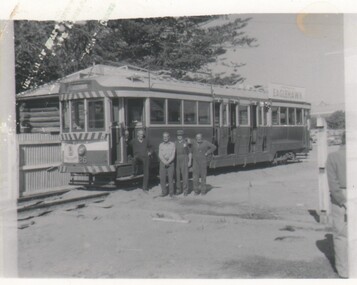
Photograph - HARRY BIGGS COLLECTION: NO. 26 TRAM
... Photograph of No. 26 Tram beside the log lock up in Sailors Gully Road, Eaglehawk (Bendigo). The destination board reads Eaglehawk and this is also on a large sign on top of the tram. ...bendigo tramways. No. 26 Tram Eaglehawk Photograph of No. 26 Tram beside the log lock up in Sailors Gully Road, Eaglehawk (Bendigo). ...Photograph of No. 26 Tram beside the log lock up in Sailors Gully Road, Eaglehawk (Bendigo). The destination board reads Eaglehawk and this is also on a large sign on top of the tram. There is a man with his foot on the boarding step and another three men standing beside the tramorganization, public utility, bendigo tramways., no. 26 tram, eaglehawk -
 Bendigo Historical Society Inc.
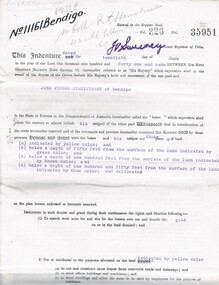
Document - MCCOLL, RANKIN AND STANISTREET COLLECTION: EAST CLARENCE GOLD MINING CO - LEASE 11161, 1941
... Bendigo. Includes plan of lease area Whipstick Road Eaglehawk. No. 11161 Bendigo....Bendigo. Includes plan of lease area Whipstick Road Eaglehawk. No. 11161 Bendigo. ...Document; East Clarence Gold Mining Co - Lease 11161. Lease document for Crown Land No. 11161 Bendigo. Includes plan of lease area Whipstick Road Eaglehawk. No. 11161 Bendigo.MCCOLL RANKIN & STANISTREETorganization, business, gold mining lease, mccoll rankin & stanistreet -
 Bendigo Historical Society Inc.
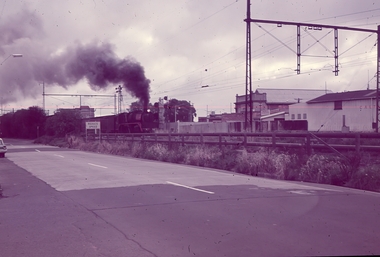
Slide - Bendigo Trams and Trains, 1972
... This item contains the following 11 slides: 8670a Engine R766 races out of Melbourne towards Bendigo 8670b R766 as a tourist attraction in the Victorian Railway's Institute Gardens near the Bendigo Station 8670c Trams from Quarry Hill and Eaglehawk meeting at Charing Cross Bendigo 8670d R766 heads out of Melbourne towards Bendigo 8670e Eaglehawk Road Bendigo 8670f The Tram Terminus North Bendigo 8670g Bendigo Coach at the Beechworth Museum 8670h The North Bendigo and Golden Square trams meeting at the Charing Cross Bendigo, tram to Quarry Hill in the background 8670i Tourist attraction R766 in the Victorian Railway's Institute Gradens near the Bendigo Station 8670j The North Bendigo and Golden Square trams meeting at the Charing Cross Bendigo 8670k The tram changing direction at the terminus opposite the Eaglehawk Town Hall, post office on the left and mechanics Intitute right....This item contains the following 11 slides: 8670a Engine R766 races out of Melbourne towards Bendigo 8670b R766 as a tourist attraction in the Victorian Railway's Institute Gardens near the Bendigo Station 8670c Trams from Quarry Hill and Eaglehawk meeting at Charing Cross Bendigo 8670d R766 heads out of Melbourne towards Bendigo 8670e Eaglehawk Road Bendigo 8670f The Tram Terminus North Bendigo 8670g Bendigo Coach at the Beechworth Museum 8670h The North Bendigo and Golden Square trams meeting at the Charing Cross Bendigo, tram to Quarry Hill in the background 8670i Tourist attraction R766 in the Victorian Railway's Institute Gradens near the Bendigo Station 8670j The North Bendigo and Golden Square trams meeting at the Charing Cross Bendigo 8670k The tram changing direction at the terminus opposite the Eaglehawk Town Hall, post office on the left and mechanics Intitute right. ...Roy J Mitchell was born in Williamstown in 1935 and grew up in Ballarat. He was the son of Horace Mitchell, a railway man, and Catherine Donovan whose father James Donovan was himself a railway man. Roy worked for the Victorian Railways also, until this era finished and worked into the MET era. Roy never lived in Bendigo but visited often, many times taking his daughter Rebekah with him, drawn in by the historical trams. His passions in life were his family, dogs, trains and trams and photography. His cousin Frank O'Meara, said "Roy always had his camera with him. He Took it everywhere". Roy's ancestors came from Maldon, Mt Edgerton, Trentham, Ballarat, Creswick, Berringa and Geelong.Coloured slides of Bendigo Trams and Trains taken by Roy J Mitchell. This item contains the following 11 slides: 8670a Engine R766 races out of Melbourne towards Bendigo 8670b R766 as a tourist attraction in the Victorian Railway's Institute Gardens near the Bendigo Station 8670c Trams from Quarry Hill and Eaglehawk meeting at Charing Cross Bendigo 8670d R766 heads out of Melbourne towards Bendigo 8670e Eaglehawk Road Bendigo 8670f The Tram Terminus North Bendigo 8670g Bendigo Coach at the Beechworth Museum 8670h The North Bendigo and Golden Square trams meeting at the Charing Cross Bendigo, tram to Quarry Hill in the background 8670i Tourist attraction R766 in the Victorian Railway's Institute Gradens near the Bendigo Station 8670j The North Bendigo and Golden Square trams meeting at the Charing Cross Bendigo 8670k The tram changing direction at the terminus opposite the Eaglehawk Town Hall, post office on the left and mechanics Intitute right.history, bendigo, bendigo trams, roy j mitchell, bendigo r766 steam engine -
 Bendigo Historical Society Inc.
Document - National Trust Collection: two-page nominating 15 properties to retain their cast-iron verandahs, 22/08/1968
... Goldmines Hotel, Marong Road, Bendigo 14. Manchester Arms, 302 Eaglehawk Road, Bendigo 15. ...Goldmines Hotel, Marong Road, Bendigo 14. Manchester Arms, 302 Eaglehawk Road, Bendigo 15. ...historic significant post verandahsNational Trust - preserving verandahs of significance. Two-page letter between the Central Victorian Branch of the National Trust and the Bendigo District Tourist Association referencing a report to be submitted to the Bendigo city Council, recommending an alteration to the By-Law referring to the removal of verandahs (post type) to exclude certain cast iron verandahs on 15 properties: 1. Shamrock Hotel, 85 Pall Mall Bendigo 2. Dr. Long's Surgery, cnr Mundy & McCrae Street, Bendigo 3. Mrs. RE. Batchelder, 346 Pall Mall, Bendigo 4. F. E. Favaloro, 139 Pall Mall, Bendigo 5. Bendigo Jockey Club, Pall Mall, Bendigo 6. View Point Hotel, View Point Bendigo 7. L. Johnson, Butcher, 247 High Street, Bendigo 8. Hopetoun Hotel, 147 Mitchell Street, Bendigo 9. Cumberland Hotel, 279 Williamson Street, Bendigo 10. Limerick Castle Hotel, Williamson Street, Bendigo 11. B.U.F.S. Dispensary, 75 View Street, Bendigo 12. Rifle Brigade Hotel, 137 View Street, Bendigo 13. Goldmines Hotel, Marong Road, Bendigo 14. Manchester Arms, 302 Eaglehawk Road, Bendigo 15. Victoria Hotel, 48 High Street, Eaglehawk.removal of non-cantilever verandahs and replacement with cantilever verandahs, list of 15 properties recommended to save their post/cast-iron verandahs -
 Bendigo Military Museum
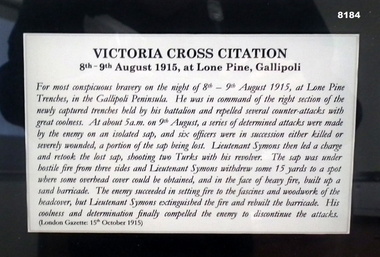
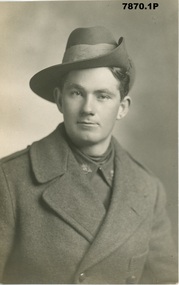
Print - FRAMED PRINT, LT SYMONS VC, Unknown
... Bendigo District RSL Havilah Road. Brsl smirsl bdrslinc Symons VC “W SYMONS VC 7th Infantry Bn 1st AIF (Eaglehawk)” Photograph framed, timber frame brown colour, dark background with central photo in an oval shape of a soldier in a side on portrait position, an inset on white is his name and unit, under that the Rising Sun Badge left, centre is the citation re the award of the Victoria Cross, on the right is an image of a VC. ...Lieutenant William Symons VC. Refer to photo for his citation. This item is on display in the Bendigo District RSL Havilah Road.Photograph framed, timber frame brown colour, dark background with central photo in an oval shape of a soldier in a side on portrait position, an inset on white is his name and unit, under that the Rising Sun Badge left, centre is the citation re the award of the Victoria Cross, on the right is an image of a VC.“W SYMONS VC 7th Infantry Bn 1st AIF (Eaglehawk)”brsl, smirsl, bdrslinc, symons, vc -
 Bendigo Military Museum
Postcard - PHOTOGRAPHIC POSTCARDS WW1, Edgar Dawson collection : Battalion comrades, 1915-1919
... Bendigo and Eaglehawk. These postcards are from his personal album. Many are annotated in Dawson's hand with explanatory notes on the subject. Refer to Cat No 893 for his service details. Items originally in album cat. no. 207P Service details available through the NAA. Postcards 57th Battalion Edgar Dawson DCM 1. On verso "L.Cpl J Richards, St Killians Road ...This six-postcard group is the third in a series of records of items in the collection of Edgar Dawson DCM. Dawson was the Regimental Sergeant Major of 57th Battalion, AIF. The 57th had a company of men largely from Bendigo and Eaglehawk. These postcards are from his personal album. Many are annotated in Dawson's hand with explanatory notes on the subject. Refer to Cat No 893 for his service details. Items originally in album cat. no. 207P Service details available through the NAA. Physical description Collection of six photo postcards B+W 1. Portrait of Richards, John 3593 57th Btn 2. Portrait of Moore, Charles 4593 57th Btn 3. Portrait of Mitchell, Leslie Fenen 4854 57th Btn 4. Portrait of Hutson, Herbert Spence 3540 57th Btn 5. Portrait of Steele, Leslie William 2737 57th Btn 6. Portrait of Spinks, William Edward 2239 57 Btn1. On verso "L.Cpl J Richards, St Killians Road, White Hills Bendigo Victoria 6-10-17" 2. On verso, "Chas Moore, 9-9-17" 3. On verso "Pt L.F. Mitchell, No 4854, 13th reinforcements, 29th Battalion, AIF Abroad" 4. On verso "This is one of our gallant runners France 1917" "Herbert S. Hutson, Lemon Grove, Heathcote Victoria" 5. On verso "With best wishes L Steele 10-2-18", "L. Steele, Balmoral Street, Essendon, Melbourne Australia" 6. On verso "W.E.Spinks, Templeton Street, Euroa, Victoria, Australia"postcards, 57th battalion, edgar dawson dcm -
 Bendigo Military Museum
Postcard - PHOTOGRAPHIC POSTCARDS WW1, Edgar Dawson Collection : Assorted postcards
... Eaglehawk and Bendigo. The postcards are from his personal album, and many are annotated in Dawson's hand with explanatory notes on the subject. Refer to Cat No 893 for his service details. Items originally in album cat. no. 207P Postcards 57th Battalion Edgar Dawson DCM 1. "To Heck, yours sincerely, Lyn" Heck was Edgar Dawson's nickname 2. "Yours sincerely, Private A. Langford" 3. "This is Davo's mate in the orderly room. Taken at the same place as mine" 4. "Votre Amis Checker and Bobbie, Belgium 18-2-18 273 Punt Road ...This six-postcard group is the eleventh in a series of records of items in the collection of Edgar Dawson DCM. Dawson was the Regimental Sergeant Major of 57th Battalion, AIF. C Company of the 57th was composed of men drawn from Echuca, Eaglehawk and Bendigo. The postcards are from his personal album, and many are annotated in Dawson's hand with explanatory notes on the subject. Refer to Cat No 893 for his service details. Items originally in album cat. no. 207P 1. Unidentified soldier 'Lyn' 2. Private A. Langford. There are no unit marking so could be a number of men from region. No A. Langford served in the 57th Battalion. 3. 'B.J.K' 4. Frances Hughes on right, 4521 57th Battalion, with "Checker" The address on the back of the card belongs to Annie Branchflower, mother of Adye Branchflower, MM of the 31st Battalion 1. "To Heck, yours sincerely, Lyn" Heck was Edgar Dawson's nickname 2. "Yours sincerely, Private A. Langford" 3. "This is Davo's mate in the orderly room. Taken at the same place as mine" 4. "Votre Amis Checker and Bobbie, Belgium 18-2-18 273 Punt Road Richmond" postcards, 57th battalion, edgar dawson dcm -
 Bendigo Military Museum
Postcard - PHOTOGRAPHIC POSTCARDS WW1, Edgar Dawson Collection : Sergeants of the 57th Battalion group photos
... Eaglehawk and Bendigo. The postcards are from his personal album, and many are annotated in Dawson's hand with explanatory notes on the subject. Refer to Cat No 893 for his service details. Items originally in album cat. no. 207P Postcards 57th Battalion Edgar Dawson DCM 1. Names on verso 2. "Yours sincerely, J.W. Brown Sgt, 57th Battalion, A.I.F pt address Etonia, Coorigil Road ...This four-postcard group is the ninth in a series of records of items in the collection of Edgar Dawson DCM. Dawson was the Regimental Sergeant Major of 57th Battalion, AIF. C Company of the 57th was composed of men drawn from Echuca, Eaglehawk and Bendigo. The postcards are from his personal album, and many are annotated in Dawson's hand with explanatory notes on the subject. Refer to Cat No 893 for his service details. Items originally in album cat. no. 207P 1. From left, lower: Ross, Angus John William 4584 Wilkinson, Albert James 4627 Wheaton, Stanley 4631 Shearer, Robert John Lesley 2896 Macken, Charles Anthony 2007 Howard, Ray Septimus 3556 Rogers, Ernest 1764 Harris, Alfred George 1959 Cockram, Louis 955 Short, Stanley 2684 Rex King (number not traced) 2. Unidentified group of sergeants, 57th Battalion 3. A Company sergeants, 57th Battalion 4. B company sergeants, 57th Battalion 1. Names on verso 2. "Yours sincerely, J.W. Brown Sgt, 57th Battalion, A.I.F pt address Etonia, Coorigil Road Murrumbeena Victoria" 3. "These are the sergeants of A company of our battalion" 4. "This is B company sergeants of our battalion. The three in front came over on the boat with me" postcards, 57th battalion, edgar dawson dcm -
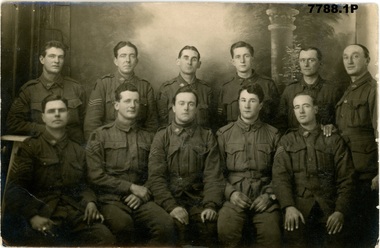
 Bendigo Military Museum
Photograph
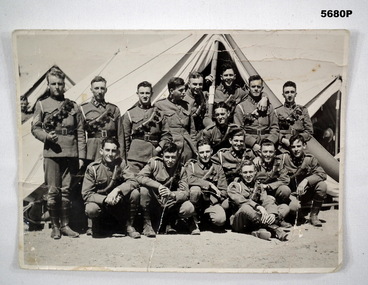
... Photo was found under a house at "165 Eaglehawk Road, Long Gully" with no context. Possibly Bendigo people at camp. ...Bendigo Military Museum 37 - 39 Pall Mall Bendigo goldfields Photo was found under a house at "165 Eaglehawk Road, Long Gully" with no context. ...Photo was found under a house at "165 Eaglehawk Road, Long Gully" with no context. Possibly Bendigo people at camp. Timeline from Boer War to WW1 going by the uniform which is possibly Light Horse.Black and white original photo of sixteen young soldiers in uniform, standing outside a tent. light horse, photo, soldiers in uniform -
 Bendigo Historical Society Inc.
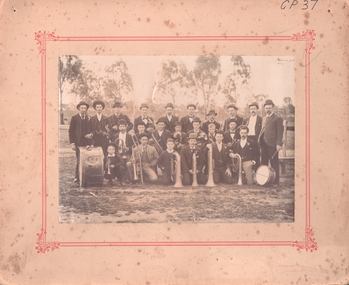
Photograph - EAGLEHAWK BOROUGH BRASS BAND 1896
... Road, Eaglehawk. On back, rubber stamp 'Royal Historical Society of Victoria, Bendigo Branch'. ...Bendigo goldfields PERSON Group band Sepia photograph of brass band, (mounted on cream board with printed red border). Band on oval (paddock) with scattered trees and fence in background. Twenty adult males, two boys in group. Six kneeling, seven seated and remainder standing with various instruments with drum inscribed BBB 1896. Inscriptions: on front - 'GP37'. Back - J ? Oswald, 53 Peg Leg Road, Eaglehawk ...Sepia photograph of brass band, (mounted on cream board with printed red border). Band on oval (paddock) with scattered trees and fence in background. Twenty adult males, two boys in group. Six kneeling, seven seated and remainder standing with various instruments with drum inscribed BBB 1896. Inscriptions: on front - 'GP37'. Back - J ? Oswald, 53 Peg Leg Road, Eaglehawk. On back, rubber stamp 'Royal Historical Society of Victoria, Bendigo Branch'. History: (HJG Biggs) Borough Brass Band 1896, Eaglehawk. Eaglehawk Borough Brass Band in 1896 with its preponderance of Cornish members (BHS Inc). Previous Acc. No. GP 37.person, group, band -
 Bendigo Historical Society Inc.
Photograph - STEWARDS BREWERY
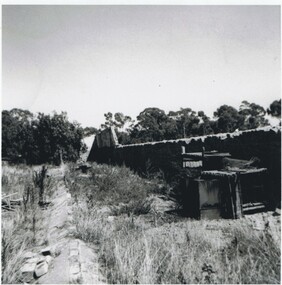
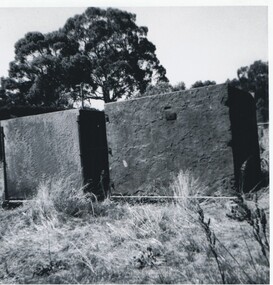
... History House 11 Mackenzie Street Bendigo goldfields ORGANIZATION Business stewards brewery Black and white photo. Brick fence overgrown with weeds. Box with chicken wire in front. Fence of Stewards Brewery, Letheby Road, Eaglehawk ...Black and white photo. Brick fence overgrown with weeds. Box with chicken wire in front. Fence of Stewards Brewery, Letheby Road, Eaglehawk.organization, business, stewards brewery -
 Bendigo Historical Society Inc.
Photograph - STEWARDS BREWERY VATS
... For notes on Stewards Brewery, see 'Bendigo Historic Buildings/ page 129. On Back in pencil 'Stewards Brewery, Letheby Road, Eaglehawk. ...History House 11 Mackenzie Street Bendigo goldfields Miners Stewards Brewery Letheby Road Eaglehawk Small black and white photo of cement rendered walls, suggested vats for brewery. ...Small black and white photo of cement rendered walls, suggested vats for brewery. For notes on Stewards Brewery, see 'Bendigo Historic Buildings/ page 129. On Back in pencil 'Stewards Brewery, Letheby Road, Eaglehawk. Vats. 'miners, stewards brewery, letheby road eaglehawk -
 Bendigo Historical Society Inc.
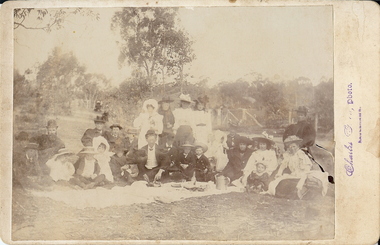
Photograph - PICNIC GROUP
... Bendigo goldfields PERSON Group picnic group Charles G --------- Eaglehawk sepia photograph mounted on cream board. Group of adults and children in country side, having a picnic. Tablecloths on ground. 13 children, 4 adolescent girls at back, 7 adults. Trees and bush in background. Post and wire fence along road ...sepia photograph mounted on cream board. Group of adults and children in country side, having a picnic. Tablecloths on ground. 13 children, 4 adolescent girls at back, 7 adults. Trees and bush in background. Post and wire fence along road at centre. On board at RH side stamped in purple ink ' Charles G ... Photo/EaglehawkCharles G --------- Eaglehawkperson, group, picnic group -
 Bendigo Historical Society Inc.
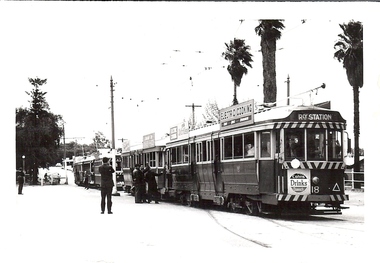
Photograph - BASIL MILLER COLLECTION: 4 TRAMS, EAGLEHAWK
... History House 11 Mackenzie Street Bendigo goldfields PERSON Individual basil miller Black and white photo of 4 trams, 3 bogie cars and 1 burnie safety car, stopped on Sailors Gully Road near Canterbury Park. No 18 Tram in lead, destined for Railway Station. Photograph BASIL MILLER COLLECTION: 4 TRAMS, EAGLEHAWK ...Black and white photo of 4 trams, 3 bogie cars and 1 burnie safety car, stopped on Sailors Gully Road near Canterbury Park. No 18 Tram in lead, destined for Railway Station.person, individual, basil miller -
 Bendigo Historical Society Inc.
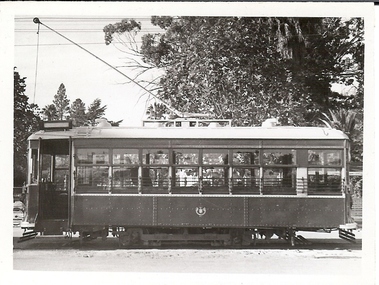
Photograph - BASIL MILLER COLLECTION: BURNIE SAFETY CAR
... History House 11 Mackenzie Street Bendigo goldfields PERSON Individual basil miller Black and white photo of Burnie Car stopped in front of Canterbury Park on Sailors Gully Road, Eaglehawk. ...Black and white photo of Burnie Car stopped in front of Canterbury Park on Sailors Gully Road, Eaglehawk.person, individual, basil miller -
 Bendigo Historical Society Inc.
Photograph - HORSFIELD, TAYLOR ENGINEERING WORKS, LONG GULLY, c1900-1910
... History House 11 Mackenzie Street Bendigo goldfields ORGANIZATION Business foundry Sepia photo of engineering workers and possibly Foundry owner/managers. 5 rows of men in front of Foundry building, 41 men in photo. Parts manufacturer. Address: 420 Backhaus Street, Long Gully (Now known as Eaglehawk Road ...Sepia photo of engineering workers and possibly Foundry owner/managers. 5 rows of men in front of Foundry building, 41 men in photo. Parts manufacturer. Address: 420 Backhaus Street, Long Gully (Now known as Eaglehawk Road). Ref: Sands & McDougall's Bendgio Directory 1901-1908. Physical Description: Mounted on grey cardboard. Inscriptions/Markings: 'Horsfield's Foundry, Long Gully' hand written on back.organization, business, foundry -
 Bendigo Historical Society Inc.
Document - BASIL MILLER COLLECTION: TRAMS, RAILWAY PICNICS, c1961
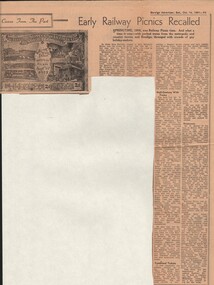
... Eaglehawk. The fare was 2d. On the back a Beehive advertisement. 'Half-Century With Trams' is a history as remembered by Mr W J Evans of Mt. Korong Road, California Gully. 'Boisterous' is a history as remembered by Mr W Bolton of the firm of Bolton Bros. recalled the early picnics as 'boisterous' affairs. 'riff-raff' used to gather at Spencer St Station, arriving in Bendigo...Eaglehawk. The fare was 2d. On the back a Beehive advertisement. 'Half-Century With Trams' is a history as remembered by Mr W J Evans of Mt. Korong Road, California Gully. 'Boisterous' is a history as remembered by Mr W Bolton of the firm of Bolton Bros. recalled the early picnics as 'boisterous' affairs. 'riff-raff' used to gather at Spencer St Station, arriving in Bendigo ...Newspaper clipping. Bendigo Advertiser. Saturday October 14, 1961. Early Railway Picnics Recalled. Article includes photo of souvenir tram ticket number 3588. Springtime, 1905 was Railway picnic time. And what a time it was - with packed trains from the metropolis and country towns, and Bendigo, thronged with the crowds of gay holiday-makers. Souvenir ticket belongs to rear Mrs. A. Bolitho, 5 Webster Street, Bendigo, issued by Electric Supply Coy. Of Victoria Ltd., Bendigo Tramways. Railway Picnic September 16, 1905. The ticket belong to Mrs Bolitho's father, the late Mr J H P Ellis, who lived in McIntyre Street. Post card size, printed in sepia on cream, bears photographs of the power house, engine room, a tram (we presume one of the first models) and the boiler room. Down the sides are listed cemetery, railway station, Rodney St, Charing Cross, through to California Gully Bridge and Eaglehawk. The fare was 2d. On the back a Beehive advertisement. 'Half-Century With Trams' is a history as remembered by Mr W J Evans of Mt. Korong Road, California Gully. 'Boisterous' is a history as remembered by Mr W Bolton of the firm of Bolton Bros. recalled the early picnics as 'boisterous' affairs. 'riff-raff' used to gather at Spencer St Station, arriving in Bendigo-after having spent the night drinking. The picnicers certainly had a right royal time in those early days. Railway Picnic was also boronia time, Mr Bolton said - and bunches of fragrant West Australian borania were sold on the streets. Bolton Bros always printed the tram tickets in Bendigo in those early years. A report in the 'Bendigonian' of the 1903 Railway Picnic period told that 20 special trams came to Bendigo on Saturday morning, September 15, 1903. Railway Picnic Committee: J Southern, Mrs Tait, Mrs Hudson, Mrs Fitzpatrick, Cr J H Curnow, Sir John Quick and many members of parliament. Fare from Melbourne costing 5/ for a day return, or 7/6 for the week.organization, business, bendigo trams -
 Bendigo Historical Society Inc.
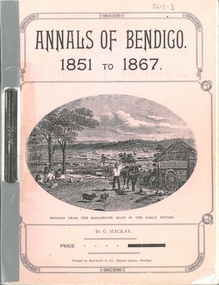
Book - ANNALS OF BENDIGO 1851 - 1867 VOLUME 1, 1912
... Picture of 'Bendigo from the Eaglehawk Road in the early fifties' on front. ...Picture of 'Bendigo from the Eaglehawk Road in the early fifties' on front. ...Loose leaf copy of Annals of Bendigo 1851 - 1867' on front cover. Pink cover. Picture of 'Bendigo from the Eaglehawk Road in the early fifties' on front. Price one shilling. Held together with metal clip. Silver duct tape on spine.G. Mackay. Printed by Mackay & Co. Market Square, Bendigobendigo, history, annals of bendigo, mining, culture, industry -
 Bendigo Historical Society Inc.
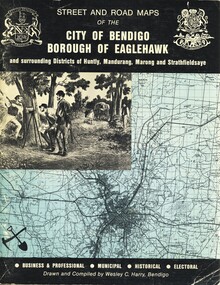
Book - STREET AND ROAD MAPS OF THE CITY OF BENDIGO BOROUGH OF EAGLEHAWK, c1980
... STREET AND ROAD MAPS OF THE CITY OF BENDIGO BOROUGH OF EAGLEHAWK...Street and Road Maps of the City of Bendigo Borough of Eaglehawk and surrounding Districts of Huntly, Mandurang, Marong and Strathfieldsaye, in color. ...Information on the five Wards of Bendigo, and their councilors. Book STREET AND ROAD MAPS OF THE CITY OF BENDIGO BOROUGH OF EAGLEHAWK ...Street and Road Maps of the City of Bendigo Borough of Eaglehawk and surrounding Districts of Huntly, Mandurang, Marong and Strathfieldsaye, in color. Drawn and compiled by Wesley C Harry, Bendigo. Publisher: Cambridge Press, Bendigo. ISBN: 9598608.2.2. 68 pages. Photographs, Illustrations & maps. Photos include: Bendigo buildings, scenery mines, streetscapes, parades, pioneer leaders of Bendigo. Many advertisements throughout. List of Justices of the Peace, hospitals, homes for the aged, schools, churches. Page 58: Copy of ''Freedom of the City to the Australian Survey Regiment'' proclamation, 14th June 1970. Maps cover an area of some 169 sq. miles (43,772 hectares). Origin of the name Bendigo. Information on the five Wards of Bendigo, and their councilors.Wesley C Harrybook, bendigo, bendigo & district maps, bendigo and districts map, buildings, streetscapes, historical pictures, advertisements, historical information, commisioners camp, sandhurst -
 Bendigo Historical Society Inc.
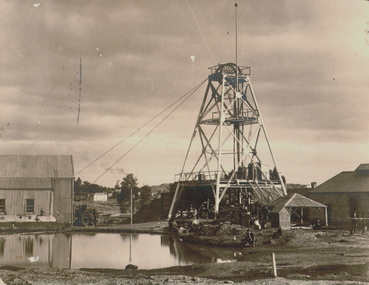
Photograph - CLARENCE UNITED MINE, EAGLEHAWK, c.1870
... History House 11 Mackenzie Street Bendigo goldfields Clarence United Gold Mine Eaglehawk Black and while photograph of Clarence United Mine, Sailor's Gully Road, Eaglehawk. ...Black and while photograph of Clarence United Mine, Sailor's Gully Road, Eaglehawk. Poppet head beside settling pond. Large building to left. James Lerk 20 July, 2000.clarence united gold mine, eaglehawk -
 Bendigo Historical Society Inc.
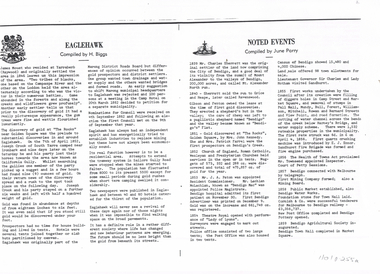
Document - LONG GULLY HISTORY GROUP COLLECTION: EAGLEHAWK & NOTED EVENTS
... Eaglehawk from the Marong District Roads Board, Nominations for Council and Newspapers. Noted Events compiled by June Parry mention events from 1839 to 1876 and some in 1928. These included early settlement, gold discovery at The Rocks, Churches, hospital, Bendigo...History House 11 Mackenzie Street Bendigo goldfields BENDIGO History long gully history group The Long Gully History Group - Eaglehawk & Noted Events H Biggs June Parry James Mouat Joseph Crook Marong District Roads Board Camp Hotel Charles Sherratt Mt Alexander North Run Grice and Heape Ravenswood Gibson and Fenton Mrs John Kennedy Mrs Patrick Farrel MR J A Paton Mr Lachlan McLachlan (Bendigo Mac) Bendigo Hospital Bendigo Advertiser Theatre Royal Lieutenant Governor Sir Charles and Lady Hotham Harney's Bridge E J Ennor Sandhurst Fire Brigade Mr Townsend Bendigo Water Works Cornish & Co Post Office Bendigo Pottery Bendiog Agricultural Society Benevolent Asylum Bendigo Gas Company Cattle yards Coliban Water Supply Scheme Cr W V Simons J Mouat Sir Henry Barkly Sandhurst Borough Eaglehawk Borough Cr John McIntyre Duke of Edinburgh Latham and Watson's Mine Galatea (model ship) St Paul's Church of England Rev G P Despard Bendog Rifle Association Strathfieldsaye Shire Hall Corporate High School Bendigonian Society Richard Andrews Easter Fair G Aspinall J Burnsides Viscount Canterbury (Sir H Manners sutton) Beehive Stores Mining Exchanges Annual Waverley Prize Bendigo Water Works City Fire Brigade City Family Hotel Bendigo United Friendly Society Medical Institute and Dispensary Jewish Synagogue Masonic Hall School of Mines J H Abbott Australian Natives Association Temperance Hall Royal Princess Theatre Albion Hall Central State School High School Gravel Hill State School Early Trams Electricity Commission Notes on Eaglehawk compiled by H Biggs mentions early settlement, discovery of gold, separation of Eaglehawk from the Marong District Roads Board, Nominations for Council and Newspapers. ...Notes on Eaglehawk compiled by H Biggs mentions early settlement, discovery of gold, separation of Eaglehawk from the Marong District Roads Board, Nominations for Council and Newspapers. Noted Events compiled by June Parry mention events from 1839 to 1876 and some in 1928. These included early settlement, gold discovery at The Rocks, Churches, hospital, Bendigo Advertiser, Theatre Royal, Police Office, Post Office, Census, First Council Works, Telegraph, Mining Company, Mining Board, Public Market, various buildings built, Rates, Schools, and very early trams.bendigo, history, long gully history group, the long gully history group - eaglehawk & noted events, h biggs, june parry, james mouat, joseph crook, marong district roads board, camp hotel, charles sherratt, mt alexander north run, grice and heape, ravenswood, gibson and fenton, mrs john kennedy, mrs patrick farrel, mr j a paton, mr lachlan mclachlan (bendigo mac), bendigo hospital, bendigo advertiser, theatre royal, lieutenant governor sir charles and lady hotham, harney's bridge, e j ennor, sandhurst fire brigade, mr townsend, bendigo water works, cornish & co, post office, bendigo pottery, bendiog agricultural society, benevolent asylum, bendigo gas company, cattle yards, coliban water supply scheme, cr w v simons, j mouat, sir henry barkly, sandhurst borough, eaglehawk borough, cr john mcintyre, duke of edinburgh, latham and watson's mine, galatea (model ship), st paul's church of england, rev g p despard, bendog rifle association, strathfieldsaye shire hall, corporate high school, bendigonian society, richard andrews, easter fair, g aspinall, j burnsides, viscount canterbury (sir h manners sutton), beehive stores, mining exchanges, annual waverley prize, bendigo water works, city fire brigade, city family hotel, bendigo united friendly society medical institute and dispensary, jewish synagogue, masonic hall, school of mines, j h abbott, australian natives association, temperance hall, royal princess theatre, albion hall, central state school, high school, gravel hill state school, early trams, electricity commission -
 Bendigo Historical Society Inc.
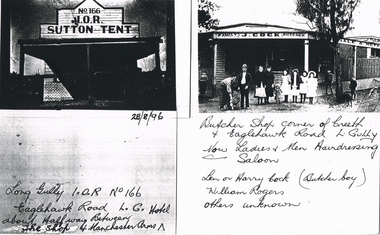
Photograph - LONG GULLY HISTORY GROUP COLLECTION: I. O. R. SUTTON TENT & J COCK
... BENDIGO History long gully history group The Long Gully History Group - I. O. R. Sutton Tent & J Cock Manchester Arms Len or Harry Cock William Rogers Page with copies of two black and white photos. One is a very dark photo of a shop front with a veranda. Above the veranda is No 166 I. O. R. Sutton Tent. Written underneath is 28/8/96 Long Gully I. O. R. No 166 Eaglehawk Road ...Page with copies of two black and white photos. One is a very dark photo of a shop front with a veranda. Above the veranda is No 166 I. O. R. Sutton Tent. Written underneath is 28/8/96 Long Gully I. O. R. No 166 Eaglehawk Road L.G. Hotel about half way Between the Shop and Manchester Arms. The second photo is the photo of J Cock Family Butcher Shop. Shop has name painted above the edges of the veranda. There are a number of people and children standing in front of the shop. Written under the photo is: Butcher Shop corner of Creeth & Eaglehawk Road L. Gully. Now Ladies & Men Hairdressing Saloon. Len or Harry Cock (Butcher boy) William Rogers. Others unknown.bendigo, history, long gully history group, the long gully history group - i. o. r. sutton tent & j cock, manchester arms, len or harry cock, william rogers -
 Bendigo Historical Society Inc.
Photograph - LONG GULLY HISTORY GROUP COLLECTION: EAGLEHAWK ROAD
... BENDIGO...History...long gully history group...The Long Gully History Group - Eaglehawk Road...Eaglehawk Road. Photo shows businesses along the left side of the road. One is a Dr J Sibley and the other the Commercial (last word is very blurry). In the centre of the picture is a short railing fence. The foreground is bare with a culvert on the right. Written on a sticker on the photo is: Looking up Eaglehawk Rd towards Bendigo...History House 11 Mackenzie Street Bendigo goldfields BENDIGO History long gully history group The Long Gully History Group - Eaglehawk Road Long Gully Creek Dr J Sibley Commercial Two copies of a black and white photo of Eaglehawk Road. ...Two copies of a black and white photo of Eaglehawk Road. Photo shows businesses along the left side of the road. One is a Dr J Sibley and the other the Commercial (last word is very blurry). In the centre of the picture is a short railing fence. The foreground is bare with a culvert on the right. Written on a sticker on the photo is: Looking up Eaglehawk Rd towards Bendigo. Long Gully Creek in foreground.bendigo, history, long gully history group, the long gully history group - eaglehawk road, long gully creek, dr j sibley, commercial