Showing 22 items matching "earthenware plate"
-
 Hymettus Cottage & Garden Ballarat
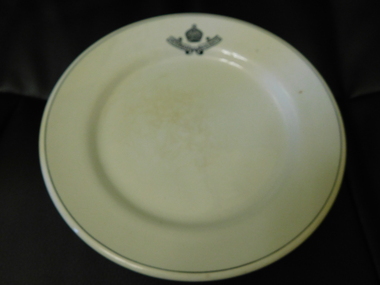
Functional object - Plate, Belleek earthenware plate
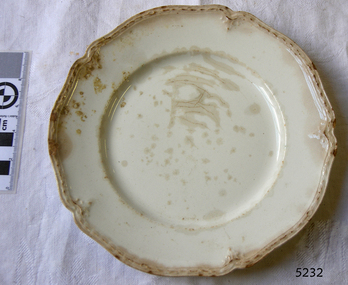
... Belleek earthenware plate...An early Irish earthenware plate from c. 1870s made at the Belleek factory. ...Belleek pottery in Co Fermanagh, Ireland produced functional pottery such as this from it's earliest period, this piece bears the first period mark, 1863-1890 before producing its more famous fine eggshell porcelain.An early Irish earthenware plate from c. 1870s made at the Belleek factory. A large proportion of Ballarat's goldfields population including the families at Hymettus cottage were Irish immigrants.Indistinct registration lozenge and transfer printed logo of Irish wolfhound with word Belleek to underside.belleek, ireland -
 Flagstaff Hill Maritime Museum and Village
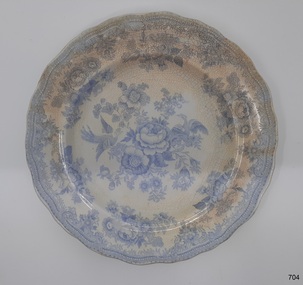
Domestic object - Dinner plate, William Adams, before 1863-1875
... ...earthenware plate...Plate recovered from the wreck of the Loch Ard. Earthenware dinner plate with blue and white transfer design (Asiatic Pheasant) with a clear over-glaze. ...Earthenware dinner plate with blue and white transfer design (Asiatic Pheasant) with a clear over-glaze. ...The Asiatic Pheasant pattern is a transfer design and was the most popular design of the 18th & 19th centuries and is still being produced today. The design was produced as high quality, decorative dinnerware by the potters in the Staffordshire area of England, from the late 1830’s, but no-one is sure exactly who the original designer was. This particular example was made by William Adams of Tunstall, Stoke-on-Trent, Staffordshire at the Greengates Potteries probably after or around 1863 and is believed to have been part of a passengers goods. The Adams family have a long line of making pottery since 1584 until 1966 when they were acquired by the Wedgewood group of companies. But this items pattern is attributed to the Adams potteries. History of the Loch Ard: The Loch Ard got its name from ”Loch Ard” a loch which lies to the west of Aberfoyle, and the east of Loch Lomond. It means "high lake" in Scottish Gaelic. The vessel belonged to the famous Loch Line which sailed many vessels from England to Australia. The Loch Ard was built in Glasgow by Barclay, Curle & Co. in 1873, the vessel was a three-masted square-rigged iron sailing ship that measured 79.87 meters in length, 11.58 m in width, and 7 m in depth with a gross tonnage of 1693 tons with a mainmast that measured a massive 45.7 m in height. Loch Ard made three trips to Australia and one trip to Calcutta before its fateful voyage. Loch Ard left England on March 2, 1878, under the command of 29-year-old Captain Gibbs, who was newly married. The ship was bound for Melbourne with a crew of 37, plus 17 passengers. The general cargo reflected the affluence of Melbourne at the time. Onboard were straw hats, umbrella, perfumes, clay pipes, pianos, clocks, confectionery, linen and candles, as well as a heavier load of railway irons, cement, lead and copper. There were other items included that were intended for display in the Melbourne International Exhibition of 1880. The voyage to Port Phillip was long but uneventful. Then at 3 am on June 1, 1878, Captain Gibbs was expecting to see land. But the Loch Ard was running into a fog which greatly reduced visibility. Captain Gibbs was becoming anxious as there was no sign of land or the Cape Otway lighthouse. At 4 am the fog lifted and a lookout aloft announced that he could see breakers. The sheer cliffs of Victoria's west coast came into view, and Captain Gibbs realised that the ship was much closer to them than expected. He ordered as much sail to be set as time would permit and then attempted to steer the vessel out to sea. On coming head-on into the wind, the ship lost momentum, the sails fell limp and Loch Ard's bow swung back towards land. Gibbs then ordered the anchors to be released in an attempt to hold its position. The anchors sank some 50 fathoms - but did not hold. By this time the ship was among the breakers and the tall cliffs of Mutton Bird Island rose behind. Just half a mile from the coast, the ship's bow was suddenly pulled around by the anchor. The captain tried to tack out to sea, but the ship struck a reef at the base of Mutton Bird Island, near Port Campbell. Waves subsequently broke over the ship and the top deck became loosened from the hull. The masts and rigging came crashing down knocking passengers and crew overboard. When a lifeboat was finally launched, it crashed into the side of Loch Ard and capsized. Tom Pearce, who had launched the boat, managed to cling to its overturned hull and shelter beneath it. He drifted out to sea and then on the flood tide came into what is now known as Lochard Gorge. He swam to shore, bruised and dazed, and found a cave in which to shelter. Some of the crew stayed below deck to shelter from the falling rigging but drowned when the ship slipped off the reef into deeper water. Eva Carmichael a passenger had raced onto the deck to find out what was happening only to be confronted by towering cliffs looming above the stricken ship. In all the chaos, Captain Gibbs grabbed Eva and said, "If you are saved Eva, let my dear wife know that I died like a sailor". That was the last Eva Carmichael saw of the captain. She was swept off the ship by a huge wave. Eva saw Tom Pearce on a small rocky beach and yelled to attract his attention. He dived in and swam to the exhausted woman and dragged her to shore. He took her to the cave and broke the open case of brandy which had washed up on the beach. He opened a bottle to revive the unconscious woman. A few hours later Tom scaled a cliff in search of help. He followed hoof prints and came by chance upon two men from nearby Glenample Station three and a half miles away. In a complete state of exhaustion, he told the men of the tragedy. Tom then returned to the gorge while the two men rode back to the station to get help. By the time they reached Loch Ard Gorge, it was cold and dark. The two shipwreck survivors were taken to Glenample Station to recover. Eva stayed at the station for six weeks before returning to Ireland by steamship. In Melbourne, Tom Pearce received a hero's welcome. He was presented with the first gold medal of the Royal Humane Society of Victoria and a £1000 cheque from the Victorian Government. Concerts were performed to honour the young man's bravery and to raise money for those who lost family in the disaster. Of the 54 crew members and passengers on board, only two survived: the apprentice, Tom Pearce and the young woman passenger, Eva Carmichael, who lost her family in the tragedy. Ten days after the Lochard tragedy, salvage rights to the wreck were sold at auction for £2,120. Cargo valued at £3,000 was salvaged and placed on the beach, but most washed back into the sea when another storm developed. The wreck of Lochard still lies at the base of Mutton Bird Island. Much of the cargo has now been salvaged and some items were washed up into Lochard Gorge. Cargo and artefacts have also been illegally salvaged over many years before protective legislation was introduced in March 1982. One of the most unlikely pieces of cargo to have survived the shipwreck was a Minton majolica peacock- one of only nine in the world. The peacock was destined for the Melbourne 1880 International Exhibition in. It had been well packed, which gave it adequate protection during the violent storm. Today the Minton peacock can be seen at the Flagstaff Hill Maritime Museum in Warrnambool. From Australia's most dramatic shipwreck it has now become Australia's most valuable shipwreck artifact and is one of very few 'objects' on the Victorian State Heritage Register. The shipwreck of the Loch Ard is of significance for Victoria and is registered on the Victorian Heritage Register ( S 417). Flagstaff Hill has a varied collection of artefacts from Loch Ard and its collection is significant for being one of the largest accumulation of artefacts from this notable Victorian shipwreck of which the subject items are a small part. The collections objects give us a snapshot of how we can interpret the story of this tragic event. The collection is also archaeologically significant as it represents aspects of Victoria's shipping history that allows us to interpret Victoria's social and historical themes of the time. Through is associated with the worst and best-known shipwreck in Victoria's history. Plate recovered from the wreck of the Loch Ard. Earthenware dinner plate with blue and white transfer design (Asiatic Pheasant) with a clear over-glaze. The outer rim is scalloped. Stickers with inscriptions "Rec 373 A" "L 102" "From Loch Ard Wreck (1878) - - -" Design logo [Floral wreath with ribbon and text "Asiatic Pheasant" and text below "- - - -"}flagstaff hill, warrnambool, flagstaff hill maritime museum, shipwreck coast, flagstaff hill maritime village, great ocean road, loch line, loch ard, captain gibbs, eva carmichael, tom pearce, glenample station, mutton bird island, loch ard gorge, asiatic pheasant, china dinner plate, earthenware plate, w adams potteries -
 Flagstaff Hill Maritime Museum and Village
Domestic object - Plate
... White earthenware dinner plate. Crazing evident all over....https://firebirdstudios.com.au/the-process-of-making-pottery/ Ceramics have evolved over thousands of years. flagstaff hill warrnambool shipwrecked-coast flagstaff-hill flagstaff-hill-maritime-museum maritime-museum shipwreck-coast flagstaff-hill-maritime-village Ceramics Tableware Backstamped ‘Made in England S LTD’ White earthenware dinner plate. Crazing evident all over. Domestic object Plate ...The Process of Making Pottery Decorating, Firing, Glazing, Making, Technical There is a rhythm and flow to clay. It can’t be done all at once! Even the making process! It can take weeks to get everything done, especially if you can only work on your pottery once a week! Even though we have three hour classes, it’s often just not enough time! Here is an overview of some of the processes so you have a bit more grasp on some of the technical stuff! Step One – Design There are SO many ideas out there for making stuff in clay! From delicate porcelain jewellery, through to heavy sculptural work and everything in between. Deciding your direction is sometimes not that easy – when you first start, try everything, you will naturally gravitate to the style that you enjoy! The options and variations are endless and can get a wee bit overwhelming too! Check in with me before you start to ensure your ideas will work, what order you might do things, how you could achieve the look you are seeking and any other technical data required! Step Two – Making Clay is thixotropic. This means that as you work with it, the clay first gets sloppier and wetter, before is begins to dry in the atmosphere. For most things, you simply can’t do all parts of the project at once. An example of work order might look like: Get last weeks work out from the shelves Prepare clay for today’s work – roll your clay, prepare balls for throwing, make the first stage of a pinch pot) Clean up last week’s work and put it on the shelf for bisque firing Check that you have any glazing to do – and do enough of it that you will have time to finish your main project Do the next step of your next project – there might be a further step that can’t be complete immediately, in that case, wrap your work well and put onto the shelves. Letting your work rest for a while can really help keep your work clean and professional looking. Many things require bagging under plastic to keep it ready for work the next week – put your name on the outside of the bag so you can find your work easily. We have stickers and markers. Consider how you want to decorate your work – coloured slip can be applied at a fairly wet stage (remembering that it will make your work even wetter!). Trying to apply slip to dry clay won’t work! If you want to do sgraffito – you will need to keep the work leather hard (a state of dryness where you can still work the clay with a little effort and a little water and care). Step Three – Drying Most of the time your work can go into the rack uncovered to let it dry out for the following week. If you want to continue forming or shaping you will need to double bag your work – put your work on a suitable sized bat and put the bat in a bag so the base of the bag is under the bat, then put another bag over the top of the work and tuck the top of the bag under the bat. If you want to trim (or turn) your thrown work the following week, it should also be double bagged. If your work is large, delicate, or of uneven thicknesses, you should lightly cover your work for drying. When considering the drying process, bare in mind the weather, humidity and wind! The hotter and dryer, the faster things dry and work can dry unevenly in the shelves – this can lead to cracking – another time to lightly cover your work for drying. Step Four – Trimming and Cleaning Up Your work is dry! It is called greenware now and it is at it’s most fragile! Handle everything with two hands. I often refer to soft hands – keep everything gentle and with your fingers spread as much as possible. Try to not pick up things like plates too much, and always with both hands! Before your work can be bisque fired it should be “cleaned up”. You work won’t go into the kiln if it has sharp edges – when glazed, sharp edges turn into razor blades! Use a piece of fly wire to rub the work all over – this will scratch a little so be light handed. Use a knife or metal kidney to scrape any areas that require a bit more dynamic treatment than the fly wire offers! Finally, a very light wipe over with a slightly damp sponge can help soften and soothe all of your edges and dags! Trimming thrown work: If you are planning to trim (or turn) your thrown work (and you should be), make sure you bag it well – your work should be leather hard to almost dry for easiest trimming. Use this step to finish the work completely – use a metal kidney to polish the surface, or a slightly damp sponge to give a freshly thrown look. Wipe the sponge around the rim after trimming, and check the inside of the pot for dags! Trimming slip cast work: Usually I will trim the rims of your work on the wheel the following day to make that stage easier, however you will still need to check your work for lumps and bumps. Last but not least – check that your name is still clearly on the bottom of your work. Step Five – Bisque Firing When the work is completely dry it can go into the bisque kiln. The bisque kiln is fired to 1000°C. This process burns off the water in the clay as well as some of the chemically bound water. The structure of the clay is not altered that much at this temperature. Inside the bisque kiln, the work is stacked a little, small bowl inside a larger bowl and onto a heavy plate. Smaller items like decorations or drink coasters might get stacked several high. Consideration is paid to the weight of the stack and shape of the work. A bisque kiln can fire about one and a half times the amount of work that the glaze kiln can fire. The firing takes about 10 hours to complete the cycle and about two days to cool down. Once it has been emptied the work is placed in the glaze room ready for you to decorate! Step Six – Glazing Decorating your work with colour can be a lot of fun – and time consuming! There are three main options for surface treatment at this stage: Oxide Washes Underglazes Glazes Washes and underglazes do not “glaze” the work – It will still need a layer of glaze to fully seal the clay (washes don’t need glaze on surfaces not designed for food or liquid as they can gloss up a little on their own). Underglazes are stable colourants that turn out pretty much how they look in the jar. They can be mixed with each other to form other colours and can be used like water colours to paint onto your work. Mostly they should have a clear glaze on top to seal them. Oxides are a different species – the pink oxide (cobalt) wash turns out bright blue for instance. They don’t always need a glaze on top, and some glazes can change the colour of the wash! The glazes need no other “glaze” on top! Be careful of unknown glaze interactions – you can put any combination of glaze in a bowl or on a plate, but only a single glaze on the outside of any vertical surface! Glazes are a chemical reaction under heat. We don’t know the exact chemicals in the Mayco glazes we use. I can guess by the way they interact with each other, however, on the whole, you need to test every idea you have, and not run the test on a vertical surface! Simply put, glaze is a layer of glass like substance that bonds with the clay underneath. Clay is made of silica, alumina and water. Glaze is made of mostly silica. Silica has a melting point of 1700°C and we fire to 1240°C. The silica requires a “flux” to help it melt at the lower temperature. Fluxes can be all sorts of chemicals – a common one is calcium – calcium has a melting point of 2500°C, however, together they both melt at a much lower temperature! Colourants are metal oxides like cobalt (blue), chrome (green through black), copper (green, blue, even red!), manganese (black, purple and pink) iron (red brown), etc. Different chemicals in the glaze can have dramatic effects. for example, barium carbonate (which we don’t use) turns manganese bright pink! Other elements can turn manganese dioxide brown, blue, purple and reddish brown. Manganese dioxide is a flux in and of itself as well. So, glazes that get their black and purple colours, often interact with other glazes and RUN! Our mirror black is a good example – it mixes really well with many glazes because it fluxes them – causes them to melt faster. It will also bring out many beautiful colours in the glazes because it’s black colouring most definitely comes from manganese dioxide! Glaze chemistry is a whole subject on it’s own! We use commercial Mayco glazes on purpose – for their huge range of colour possibilities, stability, cool interactions, artistic freedom with the ability to easily brush the glazes on and ease of use. We currently have almost 50 glazes on hand! A major project is to test the interactions of all glazes with each other. That is 2,500 test tiles!!!! I’m going to make the wall behind the wheels the feature wall of pretty colours! Step Seven – Glaze (Gloss or sometimes called “Glost”) Firing Most of the time this is the final stage of making your creation (but not always!) The glaze kiln goes to 1240°C. This is called cone 6, or midrange. It is the low end of stoneware temperatures. Stoneware clays and glazes are typically fired at cone 8 – 10, that is 1260 – 1290°C. The energy requirement to go from 1240°C to 1280°C is almost a 30% more! Our clay is formulated to vitrify (mature, turn “glass-like”) at 1240°, as are our glazes. A glaze kiln take around 12 hours to reach temperature and two to three days to cool down. Sometimes a third firing process is required – this is for decoration that is added to work after the glaze firing. For example – adding precious metals and lustres. this firing temperature is usually around 600 – 800°C depending upon the techniques being used. There are many students interested in gold and silver trims – we will be doing this third type of firing soon! After firing your work will be in the student finished work shelves. Remember to pay for it before you head out the door! There is a small extra charge for using porcelain clay (it’s more than twice the price of regular clay), and for any third firing process! Once your work has been fired it can not turn back into clay for millennia – so don’t fire it if you don’t like it! Put it in the bucket for recycling. https://firebirdstudios.com.au/the-process-of-making-pottery/Ceramics have evolved over thousands of years.White earthenware dinner plate. Crazing evident all over.Backstamped ‘Made in England S LTD’flagstaff hill, warrnambool, shipwrecked-coast, flagstaff-hill, flagstaff-hill-maritime-museum, maritime-museum, shipwreck-coast, flagstaff-hill-maritime-village, ceramics, tableware -
 Flagstaff Hill Maritime Museum and Village
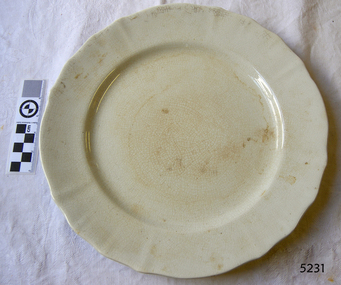
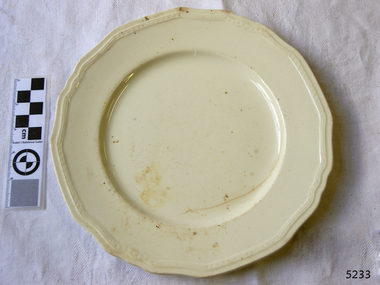
Domestic object - Plate, Alfred Meakin
... Earthenware dessert plate, cream colour. Made by Alfred Meakin, England. ...https://firebirdstudios.com.au/the-process-of-making-pottery/ Ceramics have evolved over thousands of years. flagstaff hill warrnambool shipwrecked-coast flagstaff-hill flagstaff-hill-maritime-museum maritime-museum shipwreck-coast flagstaff-hill-maritime-village Alfred Meakin Ceramics Earthenware Kitchenware Backstamped ‘Alfred Meakin England’. Earthenware dessert plate, cream colour. Made by Alfred Meakin, England. ...The Process of Making Pottery Decorating, Firing, Glazing, Making, Technical There is a rhythm and flow to clay. It can’t be done all at once! Even the making process! It can take weeks to get everything done, especially if you can only work on your pottery once a week! Even though we have three hour classes, it’s often just not enough time! Here is an overview of some of the processes so you have a bit more grasp on some of the technical stuff! Step One – Design There are SO many ideas out there for making stuff in clay! From delicate porcelain jewellery, through to heavy sculptural work and everything in between. Deciding your direction is sometimes not that easy – when you first start, try everything, you will naturally gravitate to the style that you enjoy! The options and variations are endless and can get a wee bit overwhelming too! Check in with me before you start to ensure your ideas will work, what order you might do things, how you could achieve the look you are seeking and any other technical data required! Step Two – Making Clay is thixotropic. This means that as you work with it, the clay first gets sloppier and wetter, before is begins to dry in the atmosphere. For most things, you simply can’t do all parts of the project at once. An example of work order might look like: Get last weeks work out from the shelves Prepare clay for today’s work – roll your clay, prepare balls for throwing, make the first stage of a pinch pot) Clean up last week’s work and put it on the shelf for bisque firing Check that you have any glazing to do – and do enough of it that you will have time to finish your main project Do the next step of your next project – there might be a further step that can’t be complete immediately, in that case, wrap your work well and put onto the shelves. Letting your work rest for a while can really help keep your work clean and professional looking. Many things require bagging under plastic to keep it ready for work the next week – put your name on the outside of the bag so you can find your work easily. We have stickers and markers. Consider how you want to decorate your work – coloured slip can be applied at a fairly wet stage (remembering that it will make your work even wetter!). Trying to apply slip to dry clay won’t work! If you want to do sgraffito – you will need to keep the work leather hard (a state of dryness where you can still work the clay with a little effort and a little water and care). Step Three – Drying Most of the time your work can go into the rack uncovered to let it dry out for the following week. If you want to continue forming or shaping you will need to double bag your work – put your work on a suitable sized bat and put the bat in a bag so the base of the bag is under the bat, then put another bag over the top of the work and tuck the top of the bag under the bat. If you want to trim (or turn) your thrown work the following week, it should also be double bagged. If your work is large, delicate, or of uneven thicknesses, you should lightly cover your work for drying. When considering the drying process, bare in mind the weather, humidity and wind! The hotter and dryer, the faster things dry and work can dry unevenly in the shelves – this can lead to cracking – another time to lightly cover your work for drying. Step Four – Trimming and Cleaning Up Your work is dry! It is called greenware now and it is at it’s most fragile! Handle everything with two hands. I often refer to soft hands – keep everything gentle and with your fingers spread as much as possible. Try to not pick up things like plates too much, and always with both hands! Before your work can be bisque fired it should be “cleaned up”. You work won’t go into the kiln if it has sharp edges – when glazed, sharp edges turn into razor blades! Use a piece of fly wire to rub the work all over – this will scratch a little so be light handed. Use a knife or metal kidney to scrape any areas that require a bit more dynamic treatment than the fly wire offers! Finally, a very light wipe over with a slightly damp sponge can help soften and soothe all of your edges and dags! Trimming thrown work: If you are planning to trim (or turn) your thrown work (and you should be), make sure you bag it well – your work should be leather hard to almost dry for easiest trimming. Use this step to finish the work completely – use a metal kidney to polish the surface, or a slightly damp sponge to give a freshly thrown look. Wipe the sponge around the rim after trimming, and check the inside of the pot for dags! Trimming slip cast work: Usually I will trim the rims of your work on the wheel the following day to make that stage easier, however you will still need to check your work for lumps and bumps. Last but not least – check that your name is still clearly on the bottom of your work. Step Five – Bisque Firing When the work is completely dry it can go into the bisque kiln. The bisque kiln is fired to 1000°C. This process burns off the water in the clay as well as some of the chemically bound water. The structure of the clay is not altered that much at this temperature. Inside the bisque kiln, the work is stacked a little, small bowl inside a larger bowl and onto a heavy plate. Smaller items like decorations or drink coasters might get stacked several high. Consideration is paid to the weight of the stack and shape of the work. A bisque kiln can fire about one and a half times the amount of work that the glaze kiln can fire. The firing takes about 10 hours to complete the cycle and about two days to cool down. Once it has been emptied the work is placed in the glaze room ready for you to decorate! Step Six – Glazing Decorating your work with colour can be a lot of fun – and time consuming! There are three main options for surface treatment at this stage: Oxide Washes Underglazes Glazes Washes and underglazes do not “glaze” the work – It will still need a layer of glaze to fully seal the clay (washes don’t need glaze on surfaces not designed for food or liquid as they can gloss up a little on their own). Underglazes are stable colourants that turn out pretty much how they look in the jar. They can be mixed with each other to form other colours and can be used like water colours to paint onto your work. Mostly they should have a clear glaze on top to seal them. Oxides are a different species – the pink oxide (cobalt) wash turns out bright blue for instance. They don’t always need a glaze on top, and some glazes can change the colour of the wash! The glazes need no other “glaze” on top! Be careful of unknown glaze interactions – you can put any combination of glaze in a bowl or on a plate, but only a single glaze on the outside of any vertical surface! Glazes are a chemical reaction under heat. We don’t know the exact chemicals in the Mayco glazes we use. I can guess by the way they interact with each other, however, on the whole, you need to test every idea you have, and not run the test on a vertical surface! Simply put, glaze is a layer of glass like substance that bonds with the clay underneath. Clay is made of silica, alumina and water. Glaze is made of mostly silica. Silica has a melting point of 1700°C and we fire to 1240°C. The silica requires a “flux” to help it melt at the lower temperature. Fluxes can be all sorts of chemicals – a common one is calcium – calcium has a melting point of 2500°C, however, together they both melt at a much lower temperature! Colourants are metal oxides like cobalt (blue), chrome (green through black), copper (green, blue, even red!), manganese (black, purple and pink) iron (red brown), etc. Different chemicals in the glaze can have dramatic effects. for example, barium carbonate (which we don’t use) turns manganese bright pink! Other elements can turn manganese dioxide brown, blue, purple and reddish brown. Manganese dioxide is a flux in and of itself as well. So, glazes that get their black and purple colours, often interact with other glazes and RUN! Our mirror black is a good example – it mixes really well with many glazes because it fluxes them – causes them to melt faster. It will also bring out many beautiful colours in the glazes because it’s black colouring most definitely comes from manganese dioxide! Glaze chemistry is a whole subject on it’s own! We use commercial Mayco glazes on purpose – for their huge range of colour possibilities, stability, cool interactions, artistic freedom with the ability to easily brush the glazes on and ease of use. We currently have almost 50 glazes on hand! A major project is to test the interactions of all glazes with each other. That is 2,500 test tiles!!!! I’m going to make the wall behind the wheels the feature wall of pretty colours! Step Seven – Glaze (Gloss or sometimes called “Glost”) Firing Most of the time this is the final stage of making your creation (but not always!) The glaze kiln goes to 1240°C. This is called cone 6, or midrange. It is the low end of stoneware temperatures. Stoneware clays and glazes are typically fired at cone 8 – 10, that is 1260 – 1290°C. The energy requirement to go from 1240°C to 1280°C is almost a 30% more! Our clay is formulated to vitrify (mature, turn “glass-like”) at 1240°, as are our glazes. A glaze kiln take around 12 hours to reach temperature and two to three days to cool down. Sometimes a third firing process is required – this is for decoration that is added to work after the glaze firing. For example – adding precious metals and lustres. this firing temperature is usually around 600 – 800°C depending upon the techniques being used. There are many students interested in gold and silver trims – we will be doing this third type of firing soon! After firing your work will be in the student finished work shelves. Remember to pay for it before you head out the door! There is a small extra charge for using porcelain clay (it’s more than twice the price of regular clay), and for any third firing process! Once your work has been fired it can not turn back into clay for millennia – so don’t fire it if you don’t like it! Put it in the bucket for recycling. https://firebirdstudios.com.au/the-process-of-making-pottery/Ceramics have evolved over thousands of years.Earthenware dessert plate, cream colour. Made by Alfred Meakin, England. Backstamped ‘Alfred Meakin England’. flagstaff hill, warrnambool, shipwrecked-coast, flagstaff-hill, flagstaff-hill-maritime-museum, maritime-museum, shipwreck-coast, flagstaff-hill-maritime-village, alfred meakin, ceramics, earthenware, kitchenware -
 Clunes Museum
Domestic object - PLATE, J & G MEAKIN
... .1 WHITE EARTHENWARE SOUP PLATE, SOME DECORATION ON THE MOLDED EDGE .2 WHITE EARTHENWARE SOUP PLATE, SOME DECORATION ON THE MOLDED EDGE .3 WHITE DINNER PLATE WITH SIMPLE MOLDED EDGE AT THE RIM...Clunes Museum 36 Fraser Street enter building through Collins Place Clunes goldfields SOUP PLATE DINNER PLATE .1 BACK STAMP IN GREEN - UNABLE TO IDENTIFY DUE TO POOR QUALITY .2 BACK STAMP IN BLACK: J&G MEAKIN HANLEY ENGLAND. IN TEXTA: 106 .3 BACK STAMP IN GREEN: JOHNSON BROS ENGLAND .1 WHITE EARTHENWARE SOUP PLATE, SOME DECORATION ON THE MOLDED EDGE .2 WHITE EARTHENWARE SOUP PLATE, SOME DECORATION ON THE MOLDED EDGE .3 WHITE DINNER PLATE WITH SIMPLE MOLDED EDGE AT THE RIM Domestic object PLATE J & G MEAKIN JOHNSON BROTHERS ....1 WHITE EARTHENWARE SOUP PLATE, SOME DECORATION ON THE MOLDED EDGE .2 WHITE EARTHENWARE SOUP PLATE, SOME DECORATION ON THE MOLDED EDGE .3 WHITE DINNER PLATE WITH SIMPLE MOLDED EDGE AT THE RIM.1 BACK STAMP IN GREEN - UNABLE TO IDENTIFY DUE TO POOR QUALITY .2 BACK STAMP IN BLACK: J&G MEAKIN HANLEY ENGLAND. IN TEXTA: 106 .3 BACK STAMP IN GREEN: JOHNSON BROS ENGLANDsoup plate, dinner plate -
 Flagstaff Hill Maritime Museum and Village
Domestic object - Plate, Johnson Bros
... A white earthenware side plate with a gadroon edge. Has water marks and chips on front....https://firebirdstudios.com.au/the-process-of-making-pottery/ Ceramics have evolved over thousands of years. flagstaff hill warrnambool shipwrecked-coast flagstaff-hill flagstaff-hill-maritime-museum maritime-museum shipwreck-coast flagstaff-hill-maritime-village Johnson Bros Ceramics Tableware ‘Johnson Bros England Reg No 15587’ A white earthenware side plate with a gadroon edge. Has water marks and chips on front. ...The Process of Making Pottery Decorating, Firing, Glazing, Making, Technical There is a rhythm and flow to clay. It can’t be done all at once! Even the making process! It can take weeks to get everything done, especially if you can only work on your pottery once a week! Even though we have three hour classes, it’s often just not enough time! Here is an overview of some of the processes so you have a bit more grasp on some of the technical stuff! Step One – Design There are SO many ideas out there for making stuff in clay! From delicate porcelain jewellery, through to heavy sculptural work and everything in between. Deciding your direction is sometimes not that easy – when you first start, try everything, you will naturally gravitate to the style that you enjoy! The options and variations are endless and can get a wee bit overwhelming too! Check in with me before you start to ensure your ideas will work, what order you might do things, how you could achieve the look you are seeking and any other technical data required! Step Two – Making Clay is thixotropic. This means that as you work with it, the clay first gets sloppier and wetter, before is begins to dry in the atmosphere. For most things, you simply can’t do all parts of the project at once. An example of work order might look like: Get last weeks work out from the shelves Prepare clay for today’s work – roll your clay, prepare balls for throwing, make the first stage of a pinch pot) Clean up last week’s work and put it on the shelf for bisque firing Check that you have any glazing to do – and do enough of it that you will have time to finish your main project Do the next step of your next project – there might be a further step that can’t be complete immediately, in that case, wrap your work well and put onto the shelves. Letting your work rest for a while can really help keep your work clean and professional looking. Many things require bagging under plastic to keep it ready for work the next week – put your name on the outside of the bag so you can find your work easily. We have stickers and markers. Consider how you want to decorate your work – coloured slip can be applied at a fairly wet stage (remembering that it will make your work even wetter!). Trying to apply slip to dry clay won’t work! If you want to do sgraffito – you will need to keep the work leather hard (a state of dryness where you can still work the clay with a little effort and a little water and care). Step Three – Drying Most of the time your work can go into the rack uncovered to let it dry out for the following week. If you want to continue forming or shaping you will need to double bag your work – put your work on a suitable sized bat and put the bat in a bag so the base of the bag is under the bat, then put another bag over the top of the work and tuck the top of the bag under the bat. If you want to trim (or turn) your thrown work the following week, it should also be double bagged. If your work is large, delicate, or of uneven thicknesses, you should lightly cover your work for drying. When considering the drying process, bare in mind the weather, humidity and wind! The hotter and dryer, the faster things dry and work can dry unevenly in the shelves – this can lead to cracking – another time to lightly cover your work for drying. Step Four – Trimming and Cleaning Up Your work is dry! It is called greenware now and it is at it’s most fragile! Handle everything with two hands. I often refer to soft hands – keep everything gentle and with your fingers spread as much as possible. Try to not pick up things like plates too much, and always with both hands! Before your work can be bisque fired it should be “cleaned up”. You work won’t go into the kiln if it has sharp edges – when glazed, sharp edges turn into razor blades! Use a piece of fly wire to rub the work all over – this will scratch a little so be light handed. Use a knife or metal kidney to scrape any areas that require a bit more dynamic treatment than the fly wire offers! Finally, a very light wipe over with a slightly damp sponge can help soften and soothe all of your edges and dags! Trimming thrown work: If you are planning to trim (or turn) your thrown work (and you should be), make sure you bag it well – your work should be leather hard to almost dry for easiest trimming. Use this step to finish the work completely – use a metal kidney to polish the surface, or a slightly damp sponge to give a freshly thrown look. Wipe the sponge around the rim after trimming, and check the inside of the pot for dags! Trimming slip cast work: Usually I will trim the rims of your work on the wheel the following day to make that stage easier, however you will still need to check your work for lumps and bumps. Last but not least – check that your name is still clearly on the bottom of your work. Step Five – Bisque Firing When the work is completely dry it can go into the bisque kiln. The bisque kiln is fired to 1000°C. This process burns off the water in the clay as well as some of the chemically bound water. The structure of the clay is not altered that much at this temperature. Inside the bisque kiln, the work is stacked a little, small bowl inside a larger bowl and onto a heavy plate. Smaller items like decorations or drink coasters might get stacked several high. Consideration is paid to the weight of the stack and shape of the work. A bisque kiln can fire about one and a half times the amount of work that the glaze kiln can fire. The firing takes about 10 hours to complete the cycle and about two days to cool down. Once it has been emptied the work is placed in the glaze room ready for you to decorate! Step Six – Glazing Decorating your work with colour can be a lot of fun – and time consuming! There are three main options for surface treatment at this stage: Oxide Washes Underglazes Glazes Washes and underglazes do not “glaze” the work – It will still need a layer of glaze to fully seal the clay (washes don’t need glaze on surfaces not designed for food or liquid as they can gloss up a little on their own). Underglazes are stable colourants that turn out pretty much how they look in the jar. They can be mixed with each other to form other colours and can be used like water colours to paint onto your work. Mostly they should have a clear glaze on top to seal them. Oxides are a different species – the pink oxide (cobalt) wash turns out bright blue for instance. They don’t always need a glaze on top, and some glazes can change the colour of the wash! The glazes need no other “glaze” on top! Be careful of unknown glaze interactions – you can put any combination of glaze in a bowl or on a plate, but only a single glaze on the outside of any vertical surface! Glazes are a chemical reaction under heat. We don’t know the exact chemicals in the Mayco glazes we use. I can guess by the way they interact with each other, however, on the whole, you need to test every idea you have, and not run the test on a vertical surface! Simply put, glaze is a layer of glass like substance that bonds with the clay underneath. Clay is made of silica, alumina and water. Glaze is made of mostly silica. Silica has a melting point of 1700°C and we fire to 1240°C. The silica requires a “flux” to help it melt at the lower temperature. Fluxes can be all sorts of chemicals – a common one is calcium – calcium has a melting point of 2500°C, however, together they both melt at a much lower temperature! Colourants are metal oxides like cobalt (blue), chrome (green through black), copper (green, blue, even red!), manganese (black, purple and pink) iron (red brown), etc. Different chemicals in the glaze can have dramatic effects. for example, barium carbonate (which we don’t use) turns manganese bright pink! Other elements can turn manganese dioxide brown, blue, purple and reddish brown. Manganese dioxide is a flux in and of itself as well. So, glazes that get their black and purple colours, often interact with other glazes and RUN! Our mirror black is a good example – it mixes really well with many glazes because it fluxes them – causes them to melt faster. It will also bring out many beautiful colours in the glazes because it’s black colouring most definitely comes from manganese dioxide! Glaze chemistry is a whole subject on it’s own! We use commercial Mayco glazes on purpose – for their huge range of colour possibilities, stability, cool interactions, artistic freedom with the ability to easily brush the glazes on and ease of use. We currently have almost 50 glazes on hand! A major project is to test the interactions of all glazes with each other. That is 2,500 test tiles!!!! I’m going to make the wall behind the wheels the feature wall of pretty colours! Step Seven – Glaze (Gloss or sometimes called “Glost”) Firing Most of the time this is the final stage of making your creation (but not always!) The glaze kiln goes to 1240°C. This is called cone 6, or midrange. It is the low end of stoneware temperatures. Stoneware clays and glazes are typically fired at cone 8 – 10, that is 1260 – 1290°C. The energy requirement to go from 1240°C to 1280°C is almost a 30% more! Our clay is formulated to vitrify (mature, turn “glass-like”) at 1240°, as are our glazes. A glaze kiln take around 12 hours to reach temperature and two to three days to cool down. Sometimes a third firing process is required – this is for decoration that is added to work after the glaze firing. For example – adding precious metals and lustres. this firing temperature is usually around 600 – 800°C depending upon the techniques being used. There are many students interested in gold and silver trims – we will be doing this third type of firing soon! After firing your work will be in the student finished work shelves. Remember to pay for it before you head out the door! There is a small extra charge for using porcelain clay (it’s more than twice the price of regular clay), and for any third firing process! Once your work has been fired it can not turn back into clay for millennia – so don’t fire it if you don’t like it! Put it in the bucket for recycling. https://firebirdstudios.com.au/the-process-of-making-pottery/Ceramics have evolved over thousands of years.A white earthenware side plate with a gadroon edge. Has water marks and chips on front.‘Johnson Bros England Reg No 15587’flagstaff hill, warrnambool, shipwrecked-coast, flagstaff-hill, flagstaff-hill-maritime-museum, maritime-museum, shipwreck-coast, flagstaff-hill-maritime-village, johnson bros, ceramics, tableware -
Dutch Australian Heritage Centre Victoria
Commemorative Plate
... Earthenware plate decorated to commemorate the 50year reign of Queen Wilhelmina. ...Zuid Holland Gouda. Plazuid. Earthenware plate decorated to commemorate the 50year reign of Queen Wilhelmina. ...Queen Wilhelmina reigned from her 18th birthday in 1918 until she abdicated in favour of her daughter Juliana 50 years later.Such plates would have been readily available in 1948 and an important part of the celebrations.Earthenware plate decorated to commemorate the 50year reign of Queen Wilhelmina. Her picture in the centre is surrounded by oranges. Her portrait is surmounted by her coat of arms. Below the portrait are the Dutch and Orange flags and her initial. The plate is designed to be hung.Wilhelmina 1898 Koningin der Nederlanden 1948. On the back N.V. Koninklijke Plateelbakkerij. Zuid Holland Gouda. Plazuid. -
 Flagstaff Hill Maritime Museum and Village
Ceramic - Plate, Minton Potteries, before 1878
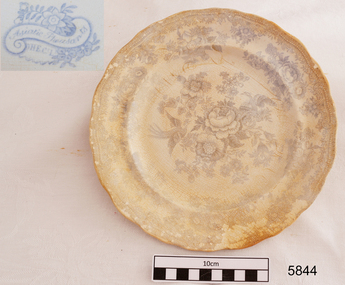
... This earthenware dinner plate was donated by Lorna Jensen. ...Plate, earthenware dinner plate recovered from the wreck of the Loch Ard. ...This earthenware dinner plate was donated by Lorna Jensen. ...This earthenware dinner plate was donated by Lorna Jensen. It had belonged to her father Wally O’Brien, who was a cyclist and had ridden in the long Melbourne to Warrnambool Cycle Classic twice. Wally was given this plate by a diving friend who had recovered it from the wreck of the LOCH ARD, on the southwest coast of Victoria. The plate had been sitting in Lorna’s mum’s china cabinet until recently when she and her husband drove to Warrnambool to donate it to Flagstaff Hill Maritime Village. When they stopped at a friend’s home along the way the friend removed it from its plastic bag and tea towel and carefully wrapped it in protective packaging for the rest of its journey. The plate is very similar to other plates recovered from the wreck of the LOCH ARD. It is uncertain whether the plates were personal belongings or part of the cargo. The Asiatic Pheasant pattern is a transfer design and was the most popular design of the 19th-century Victorian era. It is still being produced today. The design was produced as high-quality, decorative dinnerware by the potters in the Staffordshire, England, area from the late 1830s, but no one is sure exactly who the original designer was. The industrial age made the production of this design more affordable to the ordinary person who purchased and proudly displayed settings in their homes. The high demand for production resulted in the loss of quality in both potting and design, particularly between 1860-1914 when the design reached its height of popularity, and the results were often a poor match for the earlier pieces’ quality and detail. Some engravers would make copies of the Asiatic Pheasant design (and other designs) onto copper plates and sell them to more than one pottery producer (the Copyright Act of 1842 was intended to control this very thing). Consequently, the list of Makers’ Marks associated with the Asiatic Pheasant is well over 100. A single pottery factory could have several owners, all with their own Marks. These factors all make the dating of pieces difficult. Also, after 1891, pieces produced for export were required to be stamped with “ENGLAND”, but pieces produced for the domestic market in England did not need this stamp, so early pieces and pieces produced for the domestic market would all be without the “ENGLAND” stamp, confusing the matter. Over time the body shape of the pieces changed, the feathered, curved and fluted edges giving way to simpler, cheaper oblong shapes. The LOCH ARD belonged to the famous Loch Line which sailed many ships from England to Australia. Built in Glasgow by Barclay, Curdle and Co. in 1873, the LOCH ARD was a three-masted square-rigged iron sailing ship. The ship measured 262ft 7" (79.87m) in length, 38ft (11.58m) in width, 23ft (7m) in depth and had a gross tonnage of 1693 tons. The LOCH ARD's main mast measured a massive 150ft (45.7m) in height. LOCH ARD made three trips to Australia and one trip to Calcutta before its final voyage. LOCH ARD left England on March 2, 1878, under the command of Captain Gibbs, a newly married, 29-year-old. She was bound for Melbourne with a crew of 37, plus 17 passengers and a load of cargo. The general cargo reflected the affluence of Melbourne at the time. On board were straw hats, umbrellas, perfumes, clay pipes, pianos, clocks, confectionary, linen and candles, as well as a heavier load of railway irons, cement, lead and copper. There were items included that were intended for display in the Melbourne International Exhibition in 1880. The voyage to Port Phillip was long but uneventful. At 3 am on June 1, 1878, Captain Gibbs was expecting to see land and the passengers were becoming excited as they prepared to view their new homeland in the early morning. But LOCH ARD was running into a fog which greatly reduced visibility. Captain Gibbs was becoming anxious as there was no sign of land or the Cape Otway lighthouse. At 4 am the fog lifted. A man aloft announced that he could see breakers. The sheer cliffs of Victoria's west coast came into view, and Captain Gibbs realised that the ship was much closer to them than expected. He ordered as much sail to be set as time would permit and then attempted to steer the vessel out to sea. On coming head-on into the wind, the ship lost momentum, the sails fell limp and LOCH ARD's bow swung back. Gibbs then ordered the anchors to be released in an attempt to hold their position. The anchors sank some 50 fathoms - but did not hold. By this time LOCH ARD was among the breakers and the tall cliffs of Mutton Bird Island rose behind the ship. Just half a mile from the coast, the ship's bow was suddenly pulled around by the anchor. The captain tried to tack out to sea, but the ship struck a reef at the base of Mutton Bird Island, near Port Campbell. Waves broke over the ship and the top deck was loosened from the hull. The masts and rigging came crashing down knocking passengers and crew overboard. When a lifeboat was finally launched, it crashed into the side of LOCH ARD and capsized. Tom Pearce, who had launched the boat, managed to cling to its overturned hull and shelter beneath it. He drifted out to sea and then on the flood tide came into what is now known as LOCH ARD Gorge. He swam to shore, bruised and dazed, and found a cave in which to shelter. Some of the crew stayed below deck to shelter from the falling rigging but drowned when the ship slipped off the reef into deeper water. Eva Carmichael had raced onto deck to find out what was happening only to be confronted by towering cliffs looming above the stricken ship. In all the chaos, Captain Gibbs grabbed Eva and said, "If you are saved Eva, let my dear wife know that I died like a sailor". That was the last Eva Carmichael saw of the captain. She was swept off the ship by a huge wave. Eva saw Tom Pearce on a small rocky beach and yelled to attract his attention. He dived in and swam to the exhausted woman and dragged her to shore. He took her to the cave and broke open a case of brandy which had washed up on the beach. He opened a bottle to revive the unconscious woman. A few hours later Tom scaled a cliff in search of help. He followed hoof prints and came by chance upon two men from nearby Glenample Station three and a half miles away. In a state of exhaustion, he told the men of the tragedy. Tom returned to the gorge while the two men rode back to the station to get help. By the time they reached LOCH ARD Gorge, it was cold and dark. The two shipwreck survivors were taken to Glenample Station to recover. Eva stayed at the station for six weeks before returning to Ireland, this time by steamship. In Melbourne, Tom Pearce received a hero's welcome. He was presented with the first gold medal of the Royal Humane Society of Victoria and a £1000 cheque from the Victorian Government. Concerts were performed to honour the young man's bravery and to raise money for those who lost family in the LOCH ARD disaster. Of the 54 crew members and passengers on board, only two survived: the apprentice, Tom Pearce and the young woman passenger, Eva Carmichael, who lost all of her family in the tragedy. Ten days after the LOCH ARD tragedy, salvage rights to the wreck were sold at auction for £2,120. Cargo valued at £3,000 was salvaged and placed on the beach, but most washed back into the sea when another storm developed. The wreck of LOCH ARD still lies at the base of Mutton Bird Island. Much of the cargo has now been salvaged and some were washed up into what is now known as LOCH ARD Gorge. Cargo and artefacts have also been illegally salvaged over many years before protective legislation was introduced. One of the most unlikely pieces of cargo to have survived the shipwreck was a Minton porcelain peacock - one of only nine in the world. The peacock was destined for the Melbourne International Exhibition in 1880. It had been well packed, which gave it adequate protection during the violent storm. Today, the Minton peacock can be seen at the Flagstaff Hill Maritime Museum in Warrnambool. From Australia's most dramatic shipwreck, it has now become Australia's most valuable shipwreck artefact and is one of very few 'objects' on the Victorian State Heritage Register.Flagstaff Hill’s collection of artefacts from LOCH ARD is significant for being one of the largest collections of artefacts from this shipwreck in Victoria. It is significant for its association with the shipwreck, which is on the Victorian Heritage Register (VHR S417). The collection is significant because of the relationship between the objects, as together they have a high potential to interpret the story of the LOCH ARD. The LOCH ARD collection is archaeologically significant as the remains of a large international passenger and cargo ship. The LOCH ARD collection is historically significant for representing aspects of Victoria’s shipping history and its potential to interpret sub-theme 1.5 of Victoria’s Framework of Historical Themes (living with natural processes). The collection is also historically significant for its association with the LOCH ARD, which was one of the worst and best known shipwrecks in Victoria’s history.Plate, earthenware dinner plate recovered from the wreck of the Loch Ard. Blue transfer design (Asiatic Pheasant) with a clear over-glaze. The outer rim is scalloped. Printed within cartouche on underside of plate "_ H E C L " Printed within cartouche on plate "_ H E C L "flagstaff hill, warrnambool, flagstaff hill maritime museum and village, shipwreck coast, great ocean road, tom pearce, eva carmichael, loch ard, asiatic pheasant design, dinnerware, ceramic plate, wally o’brien, dinner plate -
 Flagstaff Hill Maritime Museum and Village
Plate, before 1878
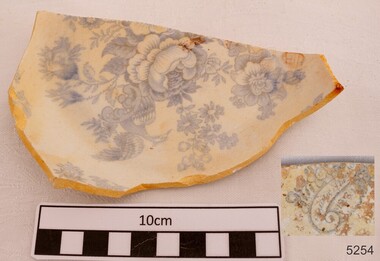
... This earthenware dinner plate fragment is very similar to others recovered from the wreck of the LOCH ARD. ...Fragment of earthenware dinner plate recovered from the wreck of the Loch Ard. ...Flagstaff Hill Maritime Museum and Village 89 Merri Street Warrnambool great-ocean-road This earthenware dinner plate fragment is very similar to others recovered from the wreck of the LOCH ARD. ...This earthenware dinner plate fragment is very similar to others recovered from the wreck of the LOCH ARD. It is uncertain whether the plates were personal belongings or part of the cargo. The Asiatic Pheasant pattern is a transfer design and was the most popular design of the 19th century Victorian era. It is still being produced today. The design was produced as high quality, decorative dinnerware by the potters in the Staffordshire, England, area from the late 1830’s, but no-one is sure exactly who the original designer was. The industrial age made production of this design more affordable to the ordinary person who purchased and proudly displayed settings in their homes. The high demand for production resulted in loss of quality in both potting and design, particularly between 1860-1914 when the design reached its height of popularity, and the results were often a poor match for the earlier pieces’ quality and detail. Some engravers would make copies of the Asiatic Pheasant design (and other designs) onto copper plates and sell them to more than one pottery producer (the Copyright Act of 1842 was intended to control this very thing). Consequently the list of Makers’ Marks associated with the Asiatic Pheasant is well over 100. A single pottery factory could have several owners, all with their own Marks. These factors all make the dating of pieces difficult. Also, after 1891, pieces produced for the export were required to be stamped with “ENGLAND”, but pieces produced for the domestic market in England did not need this stamp, so early pieces and pieces produced for the domestic marked would all be without the “ENGLAND” stamp, confusing the matter. Over time the body shape of the pieces changed, the feathered, curved and fluted edges giving way to the simpler, cheaper oblong shapes. The LOCH ARD belonged to the famous Loch Line which sailed many ships from England to Australia. Built in Glasgow by Barclay, Curdle and Co. in 1873, the LOCH ARD was a three-masted square rigged iron sailing ship. The ship measured 262ft 7" (79.87m) in length, 38ft (11.58m) in width, 23ft (7m) in depth and had a gross tonnage of 1693 tons. The LOCH ARD's main mast measured a massive 150ft (45.7m) in height. LOCH ARD made three trips to Australia and one trip to Calcutta before its final voyage. LOCH ARD left England on March 2, 1878, under the command of Captain Gibbs, a newly married, 29 year old. She was bound for Melbourne with a crew of 37, plus 17 passengers and a load of cargo. The general cargo reflected the affluence of Melbourne at the time. On board were straw hats, umbrella, perfumes, clay pipes, pianos, clocks, confectionary, linen and candles, as well as a heavier load of railway irons, cement, lead and copper. There were items included that intended for display in the Melbourne International Exhibition in 1880. The voyage to Port Phillip was long but uneventful. At 3am on June 1, 1878, Captain Gibbs was expecting to see land and the passengers were becoming excited as they prepared to view their new homeland in the early morning. But LOCH ARD was running into a fog which greatly reduced visibility. Captain Gibbs was becoming anxious as there was no sign of land or the Cape Otway lighthouse. At 4am the fog lifted. A man aloft announced that he could see breakers. The sheer cliffs of Victoria's west coast came into view, and Captain Gibbs realised that the ship was much closer to them than expected. He ordered as much sail to be set as time would permit and then attempted to steer the vessel out to sea. On coming head on into the wind, the ship lost momentum, the sails fell limp and LOCH ARD's bow swung back. Gibbs then ordered the anchors to be released in an attempt to hold its position. The anchors sank some 50 fathoms - but did not hold. By this time LOCH ARD was among the breakers and the tall cliffs of Mutton Bird Island rose behind the ship. Just half a mile from the coast, the ship's bow was suddenly pulled around by the anchor. The captain tried to tack out to sea, but the ship struck a reef at the base of Mutton Bird Island, near Port Campbell. Waves broke over the ship and the top deck was loosened from the hull. The masts and rigging came crashing down knocking passengers and crew overboard. When a lifeboat was finally launched, it crashed into the side of LOCH ARD and capsized. Tom Pearce, who had launched the boat, managed to cling to its overturned hull and shelter beneath it. He drifted out to sea and then on the flood tide came into what is now known as LOCH ARD Gorge. He swam to shore, bruised and dazed, and found a cave in which to shelter. Some of the crew stayed below deck to shelter from the falling rigging but drowned when the ship slipped off the reef into deeper water. Eva Carmichael had raced onto deck to find out what was happening only to be confronted by towering cliffs looming above the stricken ship. In all the chaos, Captain Gibbs grabbed Eva and said, "If you are saved Eva, let my dear wife know that I died like a sailor". That was the last Eva Carmichael saw of the captain. She was swept off the ship by a huge wave. Eva saw Tom Pearce on a small rocky beach and yelled to attract his attention. He dived in and swam to the exhausted woman and dragged her to shore. He took her to the cave and broke open case of brandy which had washed up on the beach. He opened a bottle to revive the unconscious woman. A few hours later Tom scaled a cliff in search of help. He followed hoof prints and came by chance upon two men from nearby Glenample Station three and a half miles away. In a state of exhaustion, he told the men of the tragedy. Tom returned to the gorge while the two men rode back to the station to get help. By the time they reached LOCH ARD Gorge, it was cold and dark. The two shipwreck survivors were taken to Glenample Station to recover. Eva stayed at the station for six weeks before returning to Ireland, this time by steamship. In Melbourne, Tom Pearce received a hero's welcome. He was presented with the first gold medal of the Royal Humane Society of Victoria and a £1000 cheque from the Victorian Government. Concerts were performed to honour the young man's bravery and to raise money for those who lost family in the LOCH ARD disaster. Of the 54 crew members and passengers on board, only two survived: the apprentice, Tom Pearce and the young woman passenger, Eva Carmichael, who lost all of her family in the tragedy. Ten days after the LOCH ARD tragedy, salvage rights to the wreck were sold at auction for £2,120. Cargo valued at £3,000 was salvaged and placed on the beach, but most washed back into the sea when another storm developed. The wreck of LOCH ARD still lies at the base of Mutton Bird Island. Much of the cargo has now been salvaged and some was washed up into what is now known as LOCH ARD Gorge. Cargo and artefacts have also been illegally salvaged over many years before protective legislation was introduced. One of the most unlikely pieces of cargo to have survived the shipwreck was a Minton porcelain peacock - one of only nine in the world. The peacock was destined for the Melbourne International Exhibition in 1880. It had been well packed, which gave it adequate protection during the violent storm. Today, the Minton peacock can be seen at the Flagstaff Hill Maritime Museum in Warrnambool. From Australia's most dramatic shipwreck it has now become Australia's most valuable shipwreck artefact and is one of very few 'objects' on the Victorian State Heritage Register. [References: Flagstaff Hill Maritime Village information sheets and documents, http://www.asiaticpheasants.co.uk/index.html ]Flagstaff Hill’s collection of artefacts from LOCH ARD is significant for being one of the largest collections of artefacts from this shipwreck in Victoria. It is significant for its association with the shipwreck, which is on the Victorian Heritage Register (VHR S417). The collection is significant because of the relationship between the objects, as together they have a high potential to interpret the story of the LOCH ARD. The LOCH ARD collection is archaeologically significant as the remains of a large international passenger and cargo ship. The LOCH ARD collection is historically significant for representing aspects of Victoria’s shipping history and its potential to interpret sub-theme 1.5 of Victoria’s Framework of Historical Themes (living with natural processes). The collection is also historically significant for its association with the LOCH ARD, which was one of the worst and best known shipwrecks in Victoria’s history. Fragment of earthenware dinner plate recovered from the wreck of the Loch Ard. White glazed porcelain with blue Asiatic Pheasant design; this piece shows a pheasant. Sticker underneath has blue pen handwriting "L/58". Asiatic Pheasant Cartouche has Maker’s name (hard to decipher). Stamped underneath "0 1 2 8 1 (or 9)" Sticker underneath has blue pen handwriting "L/58". Asiatic Pheasant Cartouche has Maker’s name (hard to decipher). Stamped underneath "0 1 2 8 1 (or 9)" flagstaff hill, warrnambool, shipwrecked coast, flagstaff hill maritime museum, maritime museum, shipwreck coast, flagstaff hill maritime village, great ocean road, loch line, loch ard, captain gibbs, eva carmichael, tom pearce, glenample station, mutton bird island, loch ard gorge, dinner plate, asiatic pheasant, loch ard, plate -
 Flagstaff Hill Maritime Museum and Village
Domestic object - Plate, Johnson Bros, Early 20th century
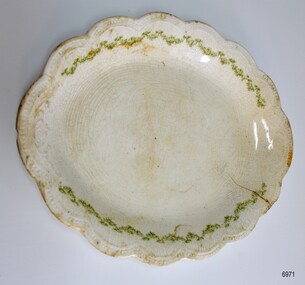
... plate...platter...chinaware...plateware...crockery...chine...porcelain...earthenware...Plate, oval, earthenware, scalloped edge with impressed pattern and border of small green leaves. ...Flagstaff Hill Warrnambool Maritime Museum Maritime Village Great Ocean Road Shipwreck Coast dinnerware serving plate Johnson Bros English serving plate green leaf border oval plate platter chinaware plateware crockery chine porcelain earthenware Maker's Mark; [Crown symbol] above "JOHNSON BROS, ENGLAND" "PATD APRIL 15TH 1902" Plate, oval, earthenware, scalloped edge with impressed pattern and border of small green leaves. ...This white oval plate with a dainty green border and self-pattern was made by the famous ceramics manufacturer Johnson Brothers of England. The pattern was patented on April 15th 1902. The serving plate is typical of dinnerware brought into Australia by migrants or importers of pottery and used in Australian households, giving many years of service. The Johnson Brothers firm was established by Frederick Johnson in 1883, at works in Hanley, Stoke-on-Trent. Frederick was later joined by his brothers Henry and Robert. The company's focus was to supply the export market. In 1968 the company became part of the Wedgewood Group. J. & G. Meakin Eagle Pottery temporarily took over the tableware division in 2000, and China took over all Johnson Bros. products in 2003. All of the Wedgewood Group was taken over by Fiskers in 2015, who discontinued the Johnson Brothers line of products. This serving plate is an example of domestic crockery used in Australia in the late 19th and early 20th centuries. It originated from England and was made by a well-known ceramic manufacturer.Plate, oval, earthenware, scalloped edge with impressed pattern and border of small green leaves. Maker's mark and name is on reverse. Pattern was patented on April 15th 1902. Made by Johnson Bros. of England.Maker's Mark; [Crown symbol] above "JOHNSON BROS, ENGLAND" "PATD APRIL 15TH 1902"flagstaff hill, warrnambool, maritime museum, maritime village, great ocean road, shipwreck coast, dinnerware, serving plate, johnson bros, english serving plate, green leaf border, oval plate, platter, chinaware, plateware, crockery, chine, porcelain, earthenware -
 Flagstaff Hill Maritime Museum and Village
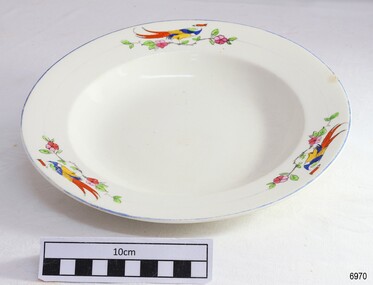
Domestic object - Plate, W. H. GRINDLEY & Co. Ltd, 1914-1925
... China plate, earthenware, round, off-white colour with fine blue rim and three transfer decals spaced around the rim. ...ENGLAND" China plate, earthenware, round, off-white colour with fine blue rim and three transfer decals spaced around the rim. ...The Maker’s Mark stamped on the back of this plate, a green laurel wreath with “W. H. Gringley & Co. Ltd, England” below, was used by the company between 1914-1925, according to Kroker and Goundry, authors of a paper “ARCHAEOLOGICAL MONITORING AND MITIGATION OF THE ASSINIBOINE RIVERFRONT QUAY”. The company used different Marks at other times during their operation. The design on this plate is transferware. The company used this more economical process of adding a transfer rather than employing artists to handprint them onto their dinnerware. William Henry Grindley and Alfred Meakin established the company at Tunstall, Stoke-on-Trent, in 1880. The company produced their wares for export to countries that included Australia.This ceramic plate is an example of dinnerware imported from England. The plate was made between 1914 and 1925 . The popular 'bird of paradise' design on the plate is an example of transferware, which made decorative dinnerware more affordable. China plate, earthenware, round, off-white colour with fine blue rim and three transfer decals spaced around the rim. Decals each have a bird of paradise on a flowering branch. The centre of the plate is plain. The maker’s stamp is an open green laurel wreath enclosing a decorative horizontal line, above the name. Made by W H Grindley & Co. Ltd of England.On underside; logo "[green wreath] above W. H. GRINDLEY & Co. Ltd. ENGLAND"flagstaff hill, warrnambool, shipwrecked coast, flagstaff hill maritime museum, maritime museum, shipwreck coast, flagstaff hill maritime village, great ocean road, plate, dinnerware, w. h. grindley, english, plateware, bird of paradise, transferware -
 Flagstaff Hill Maritime Museum and Village
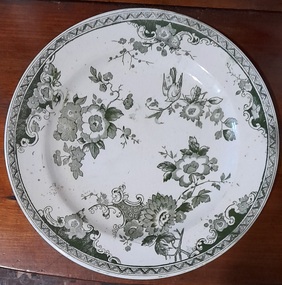
Ceramic - Serving Plate, Edward Challinor, Circa1862-1891
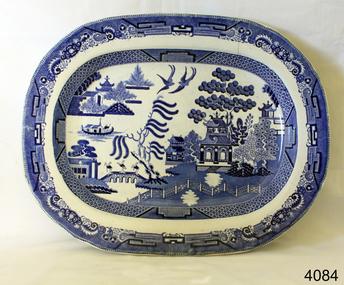
... Earthenware...Ceramic...Willow Pattern...Serving Plate...An early piece of earthenware pottery made in England for the Australian colonial market around the mid to late 19th century. warrnambool shipwrecked-coast flagstaff-hill flagstaff-hill-maritime-museum shipwreck-coast flagstaff-hill-maritime-village Earthenware Ceramic Willow Pattern Serving Plate E & C Challinor Potteries Rope knot motif printed on back in blue with letters EC Serving plate white body, smooth rim, and blue oriental design Ceramic Serving Plate Edward Challinor ...The pottery was at Fenton, Stoke on Trent, Staffordshire UK and was established in 1825, by C J & GM Mason, they were succeeded by Mr. Samuel Boyle from whom the works passed into the hands of E & C Challinor, formally E Challinor & Co. Of Sandyford and Tunstall. The partners in Sandyford and Tunstall works are recorded as Edward Challinor Jnr and Charles Challinor Jnr and is presumably they are the sons of the partners of the Fenton pottery business. They produced china of white granite, printed sponged common earthenware for the American, Australian, and other foreign and colonial markets. The main goods produced were tea, coffee, breakfast, dinner, and toilet ceramic sets as well as other earthenware goods. Their pottery marks were the Staffordshire rope knot with or without E & C Challinor or just E C. An early piece of earthenware pottery made in England for the Australian colonial market around the mid to late 19th century.Serving plate white body, smooth rim, and blue oriental designRope knot motif printed on back in blue with letters EC warrnambool, shipwrecked-coast, flagstaff-hill, flagstaff-hill-maritime-museum, shipwreck-coast, flagstaff-hill-maritime-village, earthenware, ceramic, willow pattern, serving plate, e & c challinor, potteries -
 Flagstaff Hill Maritime Museum and Village
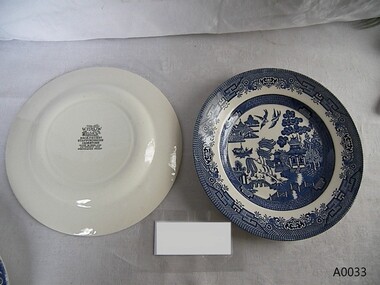
Ceramic - Two plates, Broadhurst Staffordshire Ironstone Pottery, 1950-1960
... earthenware. In 1897 "& Sons" was added to the company name and "Ltd" from C.1922. The full name, James Broadhurst & Sons Ltd. appears from 1957. In 1984 James Broadhurst & Sons Ltd became Churchill Tableware Ltd. Items made around 1950s or slightly later that are now collectors items made by one of the founders of ironstone pottery in England. flagstaff hill museum ceramics pottery plates domestic items kitchen ware dinner sets staffordshire ironstone pottery staffordshire england The back is stamped "WILLOW BROADHURST STAFFORDSHIRE IRONSTONE Made in England Detergent and Dishwasher Proof" Two Staffordshire ironstone dinner plates willow pattern Ceramic Two plates Broadhurst Staffordshire Ironstone Pottery ...Broadhurst China was established in 1862 the firm was based at the Crown Pottery, Longton, Staffordshire until 1870 where James Broadhurst made a range of gold and silver lusterwares. In 1870 the firm moved to the Portland Pottery at Fenton, Staffordshire and continued to produce good quality earthenware. In 1897 "& Sons" was added to the company name and "Ltd" from C.1922. The full name, James Broadhurst & Sons Ltd. appears from 1957. In 1984 James Broadhurst & Sons Ltd became Churchill Tableware Ltd.Items made around 1950s or slightly later that are now collectors items made by one of the founders of ironstone pottery in England.Two Staffordshire ironstone dinner plates willow patternThe back is stamped "WILLOW BROADHURST STAFFORDSHIRE IRONSTONE Made in England Detergent and Dishwasher Proof"flagstaff hill museum, ceramics, pottery, plates, domestic items, kitchen ware, dinner sets, staffordshire ironstone pottery, staffordshire england -
 City of Moorabbin Historical Society (Operating the Box Cottage Museum)
Domestic object - Kitchen Equipment, crockery 'Real Old Willow', Early 20th Century
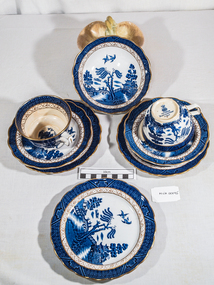
... Earthenware, 2 teacups, 2 saucers, 2 side plates and 1 cereal bowl with side plate in 'Real Old Willow' pattern. ...Earthenware, 2 teacups, 2 saucers, 2 side plates and 1 cereal bowl with side plate in 'Real Old Willow' pattern. ...Earthenware, 2 teacups, 2 saucers, 2 side plates and 1 cereal bowl with side plate in 'Real Old Willow' pattern. Traditional dark blue Willow Pattern, with hand-painted gold rims. Small Willow Pattern cameo at the base inside each cup.Pattern Number 8025. Small Willow Pattern cameo at the base inside each cup.ornaments, earthenware, booths pty ltd, tunstall, england, early settlers, pioneers, moorabbin, bentleigh, cheltenham, ormond, market gardeners -
Glenelg Shire Council Cultural Collection
Souvenir - Plate - Bicentenary of Australia, c. 1970
... earthenware, made of clay mixed with feldspar. Patented in 1813 by Charles James Mason in Staffordshire, England, it was an immediate success, and ironstone blanks were decorated with transfer patterns or hand painting to imitate Chinese porcelain. celebration souvenir Australian souvenir 1970 1770 bicentenary ironstone English ironstone Front: 'To commemorate the Bi-Centenary of the Discovery of Australia 1770-1970' - black, around inner rim Back: Short history of James Cook's voyage to Australia. History of HMB 'Endeavour'. Makers mark. Alpine white English ironstone Wood & Sons, plate ...Ironstone is a porous earthenware, made of clay mixed with feldspar. Patented in 1813 by Charles James Mason in Staffordshire, England, it was an immediate success, and ironstone blanks were decorated with transfer patterns or hand painting to imitate Chinese porcelain.Alpine white English ironstone Wood & Sons, plate commemorating bicentenary of Australia, 1770-1970. Black and white depiction of HMS 'ENDEAVOUR', Capt. James Cook, Coats of Arms for states of Australia, Australian Coat of Arms; background of state floral emblems.Front: 'To commemorate the Bi-Centenary of the Discovery of Australia 1770-1970' - black, around inner rim Back: Short history of James Cook's voyage to Australia. History of HMB 'Endeavour'. Makers mark.celebration, souvenir, australian souvenir, 1970, 1770, bicentenary, ironstone, english ironstone -
 Dutch Australian Heritage Centre Victoria
Commemorative Plate (Gedenkbord), Royal Sphinx Regout, 1923
... earthenware. Many factories in Maastricht are still making ceramics. The plate was created to celebrate the silver jubilee of Queen Wilhelmina in 1923. ...Maastricht, Holland, was the city where Petrus Regout established the De Sphinx pottery in 1836. De Sphinx operated under the name Petrus Regout & Co. until 1899. The firm was noted for its transfer-printed earthenware. Many factories in Maastricht are still making ceramics. The plate was created to celebrate the silver jubilee of Queen Wilhelmina in 1923.A ceramic plate decorated in blue with pictures and words. Central to the image is a coat of arms featuring a central lion and 4 identical hunting horns. The whole is surmounted by a crown. The rim is decorated with orange blossoms.The words read: "Mijn schilt en de betrouwen Syt Ghy O God myn Heer. Op U soo wil ick bouwen Verlaat my nimmermeer." These are words from the second verse of the National Anthem recorded in Old Dutch. The dates 1898-1923 also feature on the front of the plate. The back bears the maker's stamp, an imprint of a small arrow, an imprint of ¾ and the words "Made in Holland". The maker's stamp reads: "Petrus Regout & Co Maastricht". It is surmounted by a sphinx. There are also two holes in the rim to enable hanging of the plate. -
Clunes Museum
Domestic object - PLATE
... Clunes Museum 36 Fraser Street enter building through Collins Place Clunes goldfields local history ceramic earthenware TRA----717021 IMPRINT IN BASE CREAM RECTANGULAR PLATE. SMALL BLUE FLOWERS ALONG OUTSIDE EDGE WITH BLACK TRIM PATTERN. ...CREAM RECTANGULAR PLATE. SMALL BLUE FLOWERS ALONG OUTSIDE EDGE WITH BLACK TRIM PATTERN.TRA----717021 IMPRINT IN BASElocal history, ceramic, earthenware -
Clunes Museum
Domestic object - CHINA PLATE
... Clunes Museum 36 Fraser Street enter building through Collins Place Clunes goldfields local history ceramic earthenware NO "122" ETCHED IN BASE BEFORE FIRING. OVAL CREAM CHINA DISH WITH GREEN FLOWER, BROWN EDGE PATTERN. Domestic object CHINA PLATE ...OVAL CREAM CHINA DISH WITH GREEN FLOWER, BROWN EDGE PATTERN.NO "122" ETCHED IN BASE BEFORE FIRING.local history, ceramic, earthenware -
 Puffing Billy Railway
Bread Plate, Victorian Railways Black & White, June 1953 "6-53" = "month-year"
... Victorian Railways Bread Plate - Black & White Maker : W H Grindley & Co (Ltd) Earthenware manufacturer at the Newfield Pottery and then the Woodfield Pottery, Tunstall, Stoke-on-Trent The company was founded at the Newfield Pottery in 1880 by William Harry Grindley (princliple partner) and Mr Turner (the '& Co.') ...Puffing Billy Railway 1 old monbulk road Belgrave yarra-valley-and-the-dandenong-ranges Victorian Railways Bread Plate - Black & White Maker : W H Grindley & Co (Ltd) Earthenware manufacturer at the Newfield Pottery and then the Woodfield Pottery, Tunstall, Stoke-on-Trent The company was founded at the Newfield Pottery in 1880 by William Harry Grindley (princliple partner) and Mr Turner (the '& Co.') ...Victorian Railways Bread Plate - Black & White Maker : W H Grindley & Co (Ltd) Earthenware manufacturer at the Newfield Pottery and then the Woodfield Pottery, Tunstall, Stoke-on-Trent The company was founded at the Newfield Pottery in 1880 by William Harry Grindley (princliple partner) and Mr Turner (the '& Co.') They produced Earthenware and Ironstone China - particularly for the Canadian, United States, South American and Australian markets. In 1891 the company moved to the Woodfield Pottery, Woodland Street, Tunstall. In 1960 the business was purchased by Alfred Clough Ltd. In 1978 renamed Grindley of Stoke (ceramics) Ltd. Federated Potteries Co. Ltd. took them over in 1982 and in 1988 the business was re-purchase by W. H. Grindley. 1991 saw the company in the hands of the receivers. and the same year they were taken over by Woodlands Pottery. DURALINE (trade mark) printed mark used by Grindley Hotel Ware Co Ltd c.1930's onwards The Number i.e "6-53" = "month-year" Supplier to Victorian railways : Loftus Moran, Melbourne: Mr Loftus Henry Moran was well known in the tea trade. Originally employed by Griffiths Bros Ltd, he started his own business, Loftus Moran Pty Ltd, in 1909 In 1913 he purchased the tea business of Mcintyre Bros, and later' that of Steele Bros, and absorbed them in his own company. He had a wide business connection among hotels and guest houses for supplying crockery and other supplies. Ref: DEATH OF MR LOFTUS MORAN (1944, May 27). The Argus (Melbourne, Vic. : 1848 - 1957), p. 4. http://nla.gov.au/nla.news-article11809686 1st Advertisement of the Plates in the papers: CHIPPED CROCKERY. Nothing is more objectionable than chipped crockery--besides its use is illegal. DURALINE Plates, manufactured by The Grindley Hotel Ware Co., are tough as raw-hide. This is why they are used by practically every hotel and institution in Australia. Obtainable only from LOFTUS MORAN PTY. LTD., Hotel Supply Specialists, 131 Queen's Bridge Street, Melbourne South Advertising (29 March 1933, ). The Argus (Melbourne, Vic. ), p. 7. http://nla.gov.au/nla.news-article4726734Historic - Victorian Railways - Refreashment Services crockery - plateceramic Victorian Railways Bread Plate - Black & White Victorian Railways ( in black on fount of plate ) "DURALINE" ( in Black on back of plate ) super Vitrified GRINDLEY HotelWare Co England Loftus Moran Pty Ld Melbourne 8 -53puffing billy, victorian railways, crockery, plate -
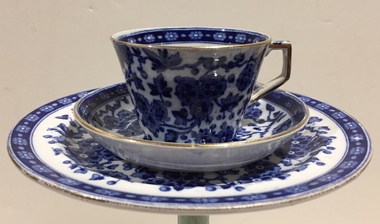 Kew Historical Society Inc
Domestic object - Tea Cup, Saucer & Plate, Ridgways, c.1880
... Glazed earthenware tea cup, saucer and plate with transfer printed decoration, using the 'Hawthornden' pattern by Ridgways. ...William Woollard was a councillor and mayor while Herbert Woollard was also a councillor and a member of the local Labor Party Branch dinnerware ridgways (1879-1920) earthernware staffordshire ceramics hawthornden pattern - reg. april 1880 Glazed earthenware tea cup, saucer and plate with transfer printed decoration, using the 'Hawthornden' pattern by Ridgways. ...Item of family crockery donated by a Jean Woollard, KHS member, and Kew resident. Her family, residents of Kew since the 1860s, was highly involved in the political life of Kew. William Woollard was a councillor and mayor while Herbert Woollard was also a councillor and a member of the local Labor Party BranchGlazed earthenware tea cup, saucer and plate with transfer printed decoration, using the 'Hawthornden' pattern by Ridgways. The underneath of each item bears the maker's mark and a pattern registration date for April 1880.dinnerware, ridgways (1879-1920), earthernware, staffordshire ceramics, hawthornden pattern - reg. april 1880 -
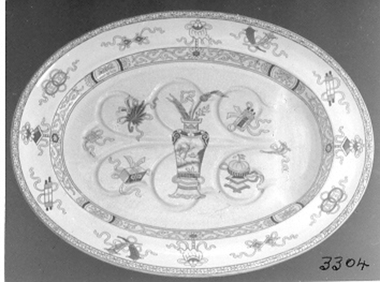 Whitehorse Historical Society Inc.
Domestic object - Plate, c 1875
... earthenware oval dish decorated with blue and black motifs. Centre of dish has recessed design in shape of Xmas tree to receive turkey juices. Domestic object Plate ...Oriental motifs c 1860, were the greatest influence on cheaper wares of Minton Ware from 1870's. Mary McGowan brought the item out from England in 1934Large earthenware oval dish decorated with blue and black motifs. Centre of dish has recessed design in shape of Xmas tree to receive turkey juices.Porcelain Marks Goddens|Mintons BBdomestic items, crockery -
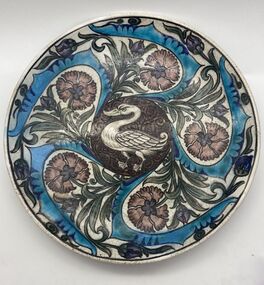 Hymettus Cottage & Garden Ballarat
Ceramic - Plate, Persian Style design plate, 1890s
... plate is an example of the Persian Ware produced by De Morgan. English potter, tile designer and novelist De Morgan designed tiles, stained glass and furniture for Morris & Co. from 1863 to 1872. His work often recalled medieval or Islamic design patterns. In his espousal of the arts and crafts ideology he was one influence on Australian art potters like Gladys Reynell. Charles Passenger Pottery Earthenware ...Created by William de Morgan & Co c.1890 and painted by Charles Passenger this small plate is an example of the Persian Ware produced by De Morgan.Arts & Crafts movement 1880sA stylised duck central surrounded by a carnation pattern.WDE.MORGAN & CO in painted in black with CP all in blue and turquoise concentric circles on verso.charles passenger, pottery, earthenware, arts and crafts, william morris