Showing 511 items matching "fire calls"
-
 Marysville & District Historical Society
THE TRIANGLE NEWS-VOL 27 NO 14-14 APRIL 2000
... ...fire calls...Marysville & District Historical Society 39 Darwin Street Marysville yarra-valley-and-the-dandenong-ranges marysville victoria australia cameron says thank you hart walkers buxton & marysville primary schools marysville & district lions club fire brigade news australian expert services overseas program murrindindi regional tourism awards 2000 advertisments happy birthday murrindindi volunteer recognition awards 2000 if microsoft made cars buxton progress assocn lake eildon summer marketing campaign fire calls THE TRIANGLE NEWS-VOL 27 NO 14-14 APRIL 2000 ...marysville, victoria, australia, cameron says thank you, hart walkers, buxton & marysville primary schools, marysville & district lions club, fire brigade news, australian expert services overseas program, murrindindi regional tourism awards 2000, advertisments, happy birthday, murrindindi volunteer recognition awards 2000, if microsoft made cars, buxton progress assocn, lake eildon summer marketing campaign, fire calls -
Marysville & District Historical Society
THE TRIANGLE NEWS-VOL 27 NO 43-3 NOVEMBER 2000
... ...fire calls...Marysville & District Historical Society 39 Darwin Street Marysville yarra-valley-and-the-dandenong-ranges marysville victoria australia our link with history keppel family marysville & district historical society the australia hotel australia day 2001 lions club diary dates mystic mountains tourism marysville & district ratepayers' & residents' assocn advertising rates advertising deadline narbethong fire brigade marysville & district horse riders novelty & games day fire calls murrindindi shire council time out travel healesville advertisements church notices mops old yarra track tea rooms 2001 kinder enrolments street stall community carols minefield campaign igloo roadhouse fm 88 smooth jazz marysville art exhibition golf report cricket club duck race marysville country club bowls section gardening corner flower plot farm nursery mystic mountains open gardens festival murrindindi community health services remembrance day fire brigade news murrindindi valley economic project councillor lyn gunter comments vic roads bike ride grants to boost lake eildon summer fire safety strategy country touch marysville s.e.s. news n.y.e. gallipoli park public notices for sale rural & lifestyle property marketing triangle property news THE TRIANGLE NEWS-VOL 27 NO 43-3 NOVEMBER 2000 ...marysville, victoria, australia, our link with history, keppel family, marysville & district historical society, the australia hotel, australia day 2001, lions club, diary dates, mystic mountains tourism, marysville & district ratepayers' & residents' assocn, advertising rates, advertising deadline, narbethong fire brigade, marysville & district horse riders, novelty & games day, fire calls, murrindindi shire council, time out travel healesville, advertisements, church notices, mops, old yarra track tea rooms, 2001 kinder enrolments, street stall, community carols, minefield campaign, igloo roadhouse, fm 88 smooth jazz, marysville art exhibition, golf report, cricket club, duck race, marysville country club, bowls section, gardening corner, flower plot farm nursery, mystic mountains open gardens festival, murrindindi community health services, remembrance day, fire brigade news, murrindindi valley economic project, councillor lyn gunter comments, vic roads bike ride, grants to boost lake eildon, summer fire safety strategy, country touch, marysville s.e.s. news, n.y.e. gallipoli park, public notices, for sale, rural & lifestyle property marketing, triangle property news -
Marysville & District Historical Society
THE TRIANGLE NEWS-VOL 33 NO 1-JANUARY 20 2006
... ...fire calls...Marysville & District Historical Society 39 Darwin Street Marysville yarra-valley-and-the-dandenong-ranges marysville victoria australia australia day jazz the queen's baton three ambassadors across shire mops thank you christmas appeal church notices women of hope marysville cricket weight loss inspirational story diary dates scottish country & morris dancing advertising rates deadline thornton marysville r.s.l. sub branch disclaimer fire calls what's on when informative ladies black spur inn narbethong annual buxton community christmas bbq football lions club THE TRIANGLE NEWS-VOL 33 NO 1-JANUARY 20 2006 ...marysville, victoria, australia, australia day, jazz, the queen's baton, three ambassadors across shire, mops, thank you christmas appeal, church notices, women of hope, marysville cricket, weight loss inspirational story, diary dates, scottish country & morris dancing, advertising rates, deadline, thornton marysville r.s.l. sub branch, disclaimer, fire calls, what's on when, informative ladies, black spur inn, narbethong, annual buxton community christmas bbq, football, lions club -
Marysville & District Historical Society
THE TRIANGLE NEWS-VOL 33 NO 45-NOVEMBER 24 2006
... ...fire calls...Marysville & District Historical Society 39 Darwin Street Marysville yarra-valley-and-the-dandenong-ranges marysville victoria australia rogaining competition long distance cross country navigation crystal journey marysville & district historical society christmas lunch the cumquat tree important dates in november deadline advertising rates cricket training murrindindi shire council ceo visiting schedule disclaimer fire calls drought strategy committee update friends of marysville walks payment of rate installment manical mechanics church notices mops specialist fire rappel crews women of hope bible quote marysville golf report igloo roadhouse advertisements carols by candlelight lions park marysville cricket club news marysville cultural community keppels cafe new garbage service mayor's chair marysville bowls report letter to the editor health & wellbeing bushfire drought frost black spur inn narbethong yea clinic centre upper goulburn food and wine culture group exhibition mmt inc christmas party marysville craft market restaurant advertisements daryl hull new year's eve party crossways country inn councillor comment twilight remembrance service bamford chapel alexandra murrindindi drought strategy committee lions christmas cakes public notices marysville country real estate THE TRIANGLE NEWS-VOL 33 NO 45-NOVEMBER 24 2006 ...marysville, victoria, australia, rogaining competition, long distance cross country navigation, crystal journey, marysville & district historical society christmas lunch, the cumquat tree, important dates in november, deadline, advertising rates, cricket training, murrindindi shire council, ceo visiting schedule, disclaimer, fire calls, drought strategy committee update, friends of marysville walks, payment of rate installment, manical mechanics, church notices, mops, specialist fire rappel crews, women of hope, bible quote, marysville golf report, igloo roadhouse, advertisements, carols by candlelight, lions park, marysville cricket club news, marysville cultural community, keppels cafe, new garbage service, mayor's chair, marysville bowls report, letter to the editor, health & wellbeing, bushfire drought frost, black spur inn narbethong, yea clinic centre, upper goulburn food and wine culture group, exhibition, mmt inc christmas party, marysville craft market, restaurant advertisements, daryl hull, new year's eve party, crossways country inn, councillor comment, twilight remembrance service, bamford chapel alexandra, murrindindi drought strategy committee, lions christmas cakes, public notices, marysville country real estate -
Marysville & District Historical Society
THE TRIANGLE NEWS-VOL 35 NO 6-FEBRUARY 23 2007
... ...fire calls...Marysville & District Historical Society 39 Darwin Street Marysville yarra-valley-and-the-dandenong-ranges marysville victoria australia a special sunday in buxton buxton pub diary dates deadline advertising rates narbethong community & tourism group community consultation disclaimer fire calls murrindindi shire council ceo visiting schedule farewell val jefferys bohemian nights concert cafe concert series church notices mops marysville scottish country & english morris dancing group world day of prayer women of hope marysville medical clinic community health services outreach services mitchell community health barefoot bowls yea wetlands freshwater fish taggerty on little river wirreanda festival marysville & district cricket club triva night kooringa indoor bowling complex marysville golf report alexandra cinema hairdressers advertisements hw greenham & sons water restrictions 6th marysville reunion crossways cabaret cambarville sawmill commuity reunion youth disco advertisements anglican priest leaving marysville police news parks victoria advises fox control restaurant advertisements mayor's chair combined taggerty clearing sale health & wellbeing for sale public notices THE TRIANGLE NEWS-VOL 35 NO 6-FEBRUARY 23 2007 ...marysville, victoria, australia, a special sunday in buxton, buxton pub, diary dates, deadline, advertising rates, narbethong community & tourism group, community consultation, disclaimer, fire calls, murrindindi shire council, ceo visiting schedule, farewell val jefferys, bohemian nights concert, cafe concert series, church notices, mops, marysville scottish country & english morris dancing group, world day of prayer, women of hope, marysville medical clinic, community health services, outreach services, mitchell community health, barefoot bowls, yea wetlands, freshwater fish, taggerty on little river, wirreanda festival, marysville & district cricket club, triva night, kooringa indoor bowling complex, marysville golf report, alexandra cinema, hairdressers advertisements, hw greenham & sons, water restrictions, 6th marysville reunion, crossways cabaret, cambarville sawmill commuity reunion, youth disco, advertisements, anglican priest leaving, marysville police news, parks victoria advises, fox control, restaurant advertisements, mayor's chair, combined taggerty clearing sale, health & wellbeing, for sale, public notices -
Marysville & District Historical Society
THE TRIANGLE NEWS-VOL 34 NO 18-MAY 25 2007
... ...fire calls...Marysville & District Historical Society 39 Darwin Street Marysville yarra-valley-and-the-dandenong-ranges marysville victoria australia viewers choice vote eco-switch local inventor wins competition dairy dates deadline advertising rates buxton progress assocn results anzac appeal for r.s.l. disclaimer murrindindi shire council ceo visiting schedule fire calls thanks for volunteering bpa update church notices mops dedication of christ church window christ church marysville ladies' guild annual luncheon vacation bible school holiday programme women of hope village hall marysville wilbur the pig at marysville market charlotte's web star pig edgar's mission farm open garden success advertisements mayor's chair opening el kanah work for the dole scheme project nominated for award prime minister's work for the dole achievement award community health services outreach services property numbering squash business opportunity health & wellbeing mental illness & good mental health mystic mountains tourism newsletter bookkeeper alexandra cinema youth night at kooringa wild dog control access to inclusion plan payment of rate installment restaurant advertisements aluminium cans for cash buxton hotel cottage to rent advert/public notice bendigo bank yarra track stopping places marysville medical clinic THE TRIANGLE NEWS-VOL 34 NO 18-MAY 25 2007 ...marysville, victoria, australia, viewers choice vote, eco-switch, local inventor wins competition, dairy dates, deadline, advertising rates, buxton progress assocn, results anzac appeal for r.s.l., disclaimer, murrindindi shire council, ceo visiting schedule, fire calls, thanks for volunteering, bpa update, church notices, mops, dedication of christ church window, christ church marysville ladies' guild annual luncheon, vacation bible school holiday programme, women of hope, village hall marysville, wilbur the pig at marysville market, charlotte's web star pig, edgar's mission farm, open garden success, advertisements, mayor's chair, opening el kanah work for the dole scheme, project nominated for award, prime minister's work for the dole achievement award, community health services, outreach services, property numbering, squash, business opportunity, health & wellbeing, mental illness & good mental health, mystic mountains tourism newsletter, bookkeeper, alexandra cinema, youth night at kooringa, wild dog control, access to inclusion plan, payment of rate installment, restaurant advertisements, aluminium cans for cash, buxton hotel, cottage to rent, advert/public notice, bendigo bank, yarra track stopping places, marysville medical clinic -
Marysville & District Historical Society
THE TRIANGLE NEWS-VOL 35 NO 2-JANUARY 25 2008
... ...fire calls...Marysville & District Historical Society 39 Darwin Street Marysville yarra-valley-and-the-dandenong-ranges marysville victoria australia marysville australia day lions park uppbeats band buxton hall the elderly bros band diary dates deadline advertising rates flags australia day parade buxton progress assocn murrindindi shire council ceo visiting schedule disclaimer fire calls terra cotta room regional food & wine centre marysville village walk mops church notices marysville under 12 cricket marysville start school dates best decorated bike thank you bendigo bank marysville medical clinic bible quote community kitchens advertisements mayor's chair paradise bead & craft centre wirreanda festival 2008 marysville & district historical society automotive needs public notice temporary road closure australia day mystic mountains outdoors community health services outreach services murrindindi business development calendar community events employing people workshop wilks creek & andersons sawmills alexandra clearance sale for sale real estate THE TRIANGLE NEWS-VOL 35 NO 2-JANUARY 25 2008 ...marysville, victoria, australia, marysville australia day, lions park, uppbeats band, buxton hall, the elderly bros band, diary dates, deadline, advertising rates, flags, australia day parade, buxton progress assocn, murrindindi shire council, ceo visiting schedule, disclaimer, fire calls, terra cotta room, regional food & wine centre, marysville village walk, mops, church notices, marysville under 12 cricket, marysville start school dates, best decorated bike, thank you bendigo bank, marysville medical clinic, bible quote, community kitchens, advertisements, mayor's chair, paradise bead & craft centre, wirreanda festival 2008, marysville & district historical society, automotive needs, public notice, temporary road closure australia day, mystic mountains outdoors, community health services, outreach services, murrindindi business development calendar, community events, employing people workshop, wilks creek & andersons sawmills, alexandra clearance sale, for sale, real estate -
Marysville & District Historical Society
THE TRIANGLE NEWS-VOL 36 NO 4-FEBRUARY 6 2009
... ...fire calls...Marysville & District Historical Society 39 Darwin Street Marysville yarra-valley-and-the-dandenong-ranges marysville victoria australia dr lachlan fraser running australian ultramarathon runners assocn deadline advertising rates diary dates snippets from history gallipoli park joe white alex white kerami guest house wandsworth kerami crescent environmental forum disclaimer fire calls indidj art gallery australian & aboriginal art church notices mops women of hope bible quote men's fellowship breakfast life centre alexandra falls family fellowship mount cathedral baptist church buxton 10th anniversary founding fellowship ivor & yvonne jones buxton memorial hall buxton weather graphs marysville fire brigade children's services team trash & treasure stall holders wirreanda festival mystic mountains tourism marysville golfers alexandra cinema narby day narbethong hall bushdance & dinner outreach services murrindindi shire brewers choice home brew david kitchen gluten free beer community health services maryor's chair energy efficient homes councillor comment health & wellbeing new shire officer environment strategy yarra valley grape grazing country touch t.a.c. road safety planning permit notice of application payment of rates & charges marysville real estate marysville medical clinic THE TRIANGLE NEWS-VOL 36 NO 4-FEBRUARY 6 2009 ...marysville, victoria, australia, dr lachlan fraser, running, australian ultramarathon runners assocn, deadline, advertising rates, diary dates, snippets from history, gallipoli park, joe white, alex white, kerami guest house, wandsworth, kerami crescent, environmental forum, disclaimer, fire calls, indidj art gallery, australian & aboriginal art, church notices, mops, women of hope, bible quote, men's fellowship breakfast, life centre alexandra, falls family fellowship, mount cathedral baptist church buxton, 10th anniversary founding fellowship, ivor & yvonne jones, buxton memorial hall, buxton weather graphs, marysville fire brigade, children's services team, trash & treasure stall holders, wirreanda festival, mystic mountains tourism, marysville golfers, alexandra cinema, narby day, narbethong hall, bushdance & dinner, outreach services, murrindindi shire, brewers choice home brew, david kitchen, gluten free beer, community health services, maryor's chair, energy efficient homes, councillor comment, health & wellbeing, new shire officer, environment strategy, yarra valley grape grazing, country touch, t.a.c. road safety, planning permit notice of application, payment of rates & charges, marysville real estate, marysville medical clinic -
Marysville & District Historical Society
THE TRIANGLE NEWS-VOL 34 NO 27-JULY 27 2007
... ...fire calls...Marysville & District Historical Society 39 Darwin Street Marysville yarra-valley-and-the-dandenong-ranges marysville victoria australia dingo care network diary dates deadline advertising rates marysville cricket club meeting mystic mountains tourism agm murrindindi shire council disclaimer fire calls ceo visiting schedule marysville golf report marysville & district chamber of commerce advertisements marysville medical clinic outreach services church notices mops osaka alexandra library watato children's choir bible quote women of hope deepest sympathies marysville girl guide award 2007 murrindindi regional tourism awards recover your health naturally murrindindi regional tourism assocn agm restaurant advertisements THE TRIANGLE NEWS-VOL 34 NO 27-JULY 27 2007 ...marysville, victoria, australia, dingo care network, diary dates, deadline, advertising rates, marysville cricket club meeting, mystic mountains tourism agm, murrindindi shire council, disclaimer, fire calls, ceo visiting schedule, marysville golf report, marysville & district chamber of commerce, advertisements, marysville medical clinic, outreach services, church notices, mops, osaka alexandra library, watato children's choir, bible quote, women of hope, deepest sympathies, marysville girl guide award, 2007 murrindindi regional tourism awards, recover your health naturally, murrindindi regional tourism assocn agm, restaurant advertisements -
 Melton City Libraries
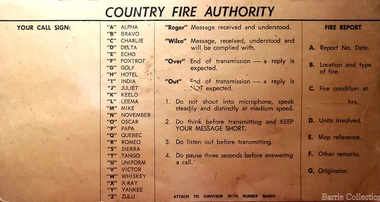
Card, Mount Cottrell Rural Fire Brigade Call Sign documents, Unknown
... Mount Cottrell Rural Fire Brigade Call Sign documents...Communications (Telephone) Fire calls over a number years the following people monitored the Fire Call Jack and Lila Gilliland-Postmasters Vera Radford Ernie and Betty Abraham Ken and Lil Young...Melton City Libraries 31 McKenzie Street Melton melbourne Communications (Telephone) Fire calls over a number years the following people monitored the Fire Call Jack and Lila Gilliland-Postmasters Vera Radford Ernie and Betty Abraham Ken and Lil Young Emergency Services local identies These documents belonged to Melton Fire Brigade Mount Cottrell Rural Fire Brigade Call Sign documents Card Barrie Collection ...Communications (Telephone) Fire calls over a number years the following people monitored the Fire Call Jack and Lila Gilliland-Postmasters Vera Radford Ernie and Betty Abraham Ken and Lil YoungThese documents belonged to Melton Fire Brigadeemergency services, local identies -
 Wonga Park Community Cottage History Group
Newspaper - A newspaper cutting from Warrandyte Diary September 2023 Page 6, “Wonga Park CFA Awards Dinner”
... A newspaper cutting from Warrandyte Diary September 2023 Page 6 “Wonga Park CFA Awards Dinner” Awards: Most Fire Call John Greenwood-Smith, Community Safety John Greenwood-Smith, Rookie of the Year Jake Lisle and firefighter of the Year Paul Fernando...Wonga Park Community Cottage History Group Unit 1, 9 – 13 Old Yarra Road Wonga Park melbourne A newspaper cutting from Warrandyte Diary September 2023 Page 6 “Wonga Park CFA Awards Dinner” Awards: Most Fire Call John Greenwood-Smith, Community Safety John Greenwood-Smith, Rookie of the Year Jake Lisle and firefighter of the Year Paul Fernando “Wonga Park CFA Awards Dinner” Newspaper A newspaper cutting from Warrandyte Diary September 2023 Page 6 ...A newspaper cutting from Warrandyte Diary September 2023 Page 6 “Wonga Park CFA Awards Dinner” Awards: Most Fire Call John Greenwood-Smith, Community Safety John Greenwood-Smith, Rookie of the Year Jake Lisle and firefighter of the Year Paul Fernando -
Tarnagulla History Archive
Tarnagulla Fire Brigade Book, 1926-1934
... Brigade Book of the Country Fire Brigades Board, Tarnagulla Fire Brigade. Contains records of call-outs to fires ((1930s), roll calls/attendance records for meetings and training (1926-1934) and financial records (1926 to 1934). ...Tarnagulla History Archive Tarnagulla Public Hall 69-71 Commercial Rd Tarnagulla goldfields Murray Comrie Collection. tarnagulla fire brigade fire fighting emergency workers volunteers CFA CFBB Brigade Book of the Country Fire Brigades Board, Tarnagulla Fire Brigade. Contains records of call-outs to fires ((1930s), roll calls/attendance records for meetings and training (1926-1934) and financial records (1926 to 1934). ...Murray Comrie Collection. Brigade Book of the Country Fire Brigades Board, Tarnagulla Fire Brigade. Contains records of call-outs to fires ((1930s), roll calls/attendance records for meetings and training (1926-1934) and financial records (1926 to 1934). tarnagulla, fire, brigade, fire fighting, emergency workers, volunteers, cfa, cfbb -
 Bendigo Military Museum
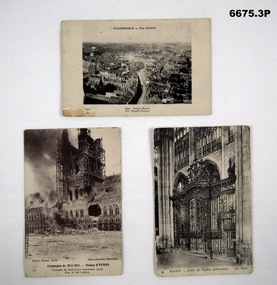
Postcard - POSTCARDS WW1, PHOTOGRAPHIC, C.1914 - 1918
... B & W photo of ruins of Cathedral in Ypres from WW1 called "Fire of the Belfrey". 3. B & W photo of the gate of Saint Oven Church in Rouen Church....Fire of Belfrey. 3. Titled "Rouen - Grille De I'Eglise Saint-Oven (Gate of St Oven Church). 1. B & W photo of aerial view town of Hazebrouck at time of WW1. 2. B & W photo of ruins of Cathedral in Ypres from WW1 called ...Postcard photos of locations in Northern France relating to Battlefields in WW1.1. B & W photo of aerial view town of Hazebrouck at time of WW1. 2. B & W photo of ruins of Cathedral in Ypres from WW1 called "Fire of the Belfrey". 3. B & W photo of the gate of Saint Oven Church in Rouen Church.1. Headed "Hazebrouck - Vue Generale" - on back is filled in Letter to "Louie". 2. Titled Campagne De 1914-15 - Ruines D' Ypres - Fire of Belfrey. 3. Titled "Rouen - Grille De I'Eglise Saint-Oven (Gate of St Oven Church).passchendaele barracks trust, postcards, france, ww1 -
 National Vietnam Veterans Museum (NVVM)
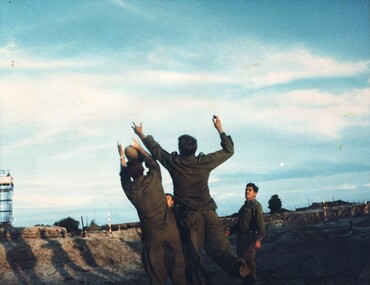
Photograph, Gibbons, Denis, Aussie Rules
... The game was played close by their 105mm Howitzer in case a sudden fire mission is called....The game was played close by their 105mm Howitzer in case a sudden fire mission is called. Aussie Rules Photograph Gibbons, Denis ...Denis Gibbons (1937 – 2011) Trained with the Australian Army, before travelling to Vietnam in January 1966, Denis stayed with the 1st Australian Task Force in Nui Dat working as a photographer. For almost five years Gibbons toured with nine Australian infantry battalions, posting compelling war images from within many combat zones before being flown out in late November 1970 after sustaining injuries. The images held within the National Vietnam Veterans Museum make up the Gibbons Collection.A coloured photograph of Diggers with an Artillery Battery located at a forward Fire Support Base, Phuoc Tuy Province, South Vietnam, enjoy a late afternoon game of Aussie Rules Football. The game was played close by their 105mm Howitzer in case a sudden fire mission is called.photograph, fire support base, phuoc tuy province, 105mm howitzer, gibbons collection catalogue, diggers, aussie rules football, 105 pack howitzer, denis gibbons -
 Eltham District Historical Society Inc
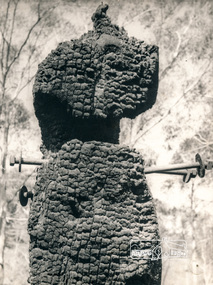
Photograph, George W. Bell, Diamond Creek, 1969, 1969
... Mr Harrington said that the first fire call in the town was received at 10.45 am. ...Mr Harrington said that the first fire call in the town was received at 10.45 am. ...Canberra Times (ACT : 1926 - 1995), Thursday 9 January 1969, page 1 A day of century heat, 13 KILLED IN VICTORIAN FIRES ...About thirty houses and a public hall were destroyed by fire in the township of Diamond Creek. The group officer of the Diamond Creek Fire Brigade, Mr Tom Harrington, said tonight that he thought it was a "miracle" that no-one lost their lives in the fires. A relief centre for the homeless was set up by the Diamond Valley Shire Council. Mr Harrington said that the first fire call in the town was received at 10.45 am. "Within 20 minutes there were five more fires and it seemed like the whole town was alight", he said. "It was a chaotic day. All our best plans for fighting the fires became disorganised. "As 60-mile-an-hour winds swept fires through different parts of the town many fire fighters were unable to get from one fire to another. ," Black and white photograph of charred fire remnant Diamond Creek 1969diamond creek, fire, george w bell collection, bushfire, charred, burnt timber -
 Bendigo Historical Society Inc.
Document - LONG GULLY HISTORY GROUP COLLECTION: CFA REPORT OF FIRE OR ALARM NO 65
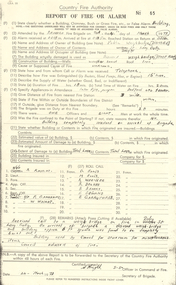
... Copy of a Country Fire Authority Report of Fire or Alarm No 65, dated March 1973 when the fire brigade was called to a fire at a disused weighbridge in Daly St, Long Gully. ...History House 11 Mackenzie Street Bendigo goldfields BENDIGO History long gully history group The Long Gully History Group - CFA Report of Fire or Alarm No 65 Public Weighbridge S Knight F Gannaway W Waight G Ellis M Ellis R Wee-Hee R Delves B Brooks R Boland E Carruthers Council Copy of a Country Fire Authority Report of Fire or Alarm No 65, dated March 1973 when the fire brigade was called to a fire at a disused weighbridge in Daly St, Long Gully. ...Copy of a Country Fire Authority Report of Fire or Alarm No 65, dated March 1973 when the fire brigade was called to a fire at a disused weighbridge in Daly St, Long Gully. When the brigade arrived the weighbridge with its contents were completely burnt out. The Council used it for a storeroom. Firemen who attended were: S Knight, F Gannaway, W Waight, G Ellis, M Ellis, R Wee-Hee, R Delves, B Brooks, R Boland and E Carruthers. Report signed by S Knight.bendigo, history, long gully history group, the long gully history group - cfa report of fire or alarm no 65, public weighbridge, s knight, f gannaway, w waight, g ellis, m ellis, r wee-hee, r delves, b brooks, r boland, e carruthers, council -
 Blacksmith's Cottage and Forge
Iron, Flat, 1800 (estimated); 19th. century
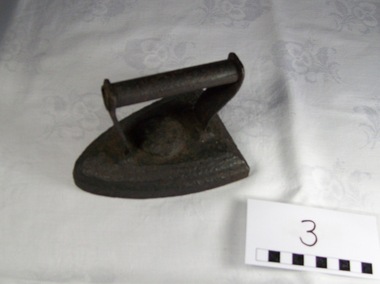
... They were thick slabs of cast iron, delta - shaped and with a handle, heated in a fire. These were also called flat irons. Another solution was to employ a cluster of solid irons that were heated from the single source: as the iron currently in use cools down, it could be quickly replaced by another one that is hot. ...They were thick slabs of cast iron, delta - shaped and with a handle, heated in a fire. These were also called flat irons. Another solution was to employ a cluster of solid irons that were heated from the single source: as the iron currently in use cools down, it could be quickly replaced by another one that is hot. ...From the 17th century, sadirons or sad irons (from an old word meaning solid) began to be used. They were thick slabs of cast iron, delta - shaped and with a handle, heated in a fire. These were also called flat irons. Another solution was to employ a cluster of solid irons that were heated from the single source: as the iron currently in use cools down, it could be quickly replaced by another one that is hot. Source: www.wikipedia.orgLocal social history, domestic itemBlack cast iron with handleon top plate but not decipherabledomestic, iron, work, womens, laundry -
 Uniting Church Archives - Synod of Victoria
Photograph, Rev. L. Farquhar Gunn, 1976
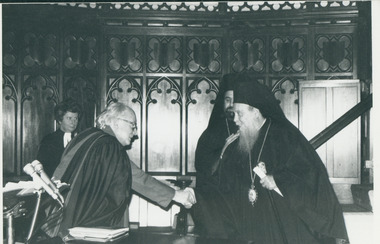
... He was awarded the MBE for devotion to duty and recovering wounded soldiers across a minefield under mortar fire. He was called to St Andrew's Gardiner in 1955 and became the Stated Clerk of the Assembly in 1969, and in 1970 was also Stated Clerk of the General Assembly of Australia. ...He was awarded the MBE for devotion to duty and recovering wounded soldiers across a minefield under mortar fire. He was called to St Andrew's Gardiner in 1955 and became the Stated Clerk of the Assembly in 1969, and in 1970 was also Stated Clerk of the General Assembly of Australia. ...Gunn was Stated Clerk of the Victorian Presbyterian Assembly until 1976. In 1986 he had been ordained 50 years. Gunn was ordained on February 12, 1936 in New Zealand. He served in three parishes before chaplaincy with the 20th Armoured Regiment in WW2. He was awarded the MBE for devotion to duty and recovering wounded soldiers across a minefield under mortar fire. He was called to St Andrew's Gardiner in 1955 and became the Stated Clerk of the Assembly in 1969, and in 1970 was also Stated Clerk of the General Assembly of Australia. He was Moderator of Victoria in 1965 and 1967. He chaired the Joint Constituional Council and the commission set up to prepare the interim constituion of the Uniting Church. He presided over the inaugural assembly of the UCA on June 22 1977 and made the declaration of inauguration.Gunn meets Greek Orthodox leaders at the Victorian Presbyterian Assembly 19 October 1976.Name.gunn, l. farquhar, victorian presbyterian assembly, general assembly of australia -
 Uniting Church Archives - Synod of Victoria
Photograph, Rev. L. Farquhar Gunn, Undated
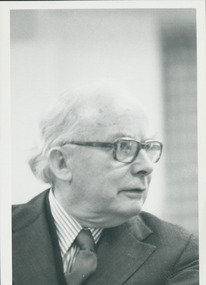
... He was awarded the MBE for devotion to duty and recovering wounded soldiers across a minefield under mortar fire. He was called to St Andrew's Gardiner in 1955 and became the Stated Clerk of the Assembly in 1969, and in 1970 was also Stated Clerk of the General Assembly of Australia. ...He was awarded the MBE for devotion to duty and recovering wounded soldiers across a minefield under mortar fire. He was called to St Andrew's Gardiner in 1955 and became the Stated Clerk of the Assembly in 1969, and in 1970 was also Stated Clerk of the General Assembly of Australia. ...Gunn was Stated Clerk of the Victorian Presbyterian Assembly until 1976. In 1986 he had been ordained 50 years. Gunn was ordained on February 12, 1936 in New Zealand. He served in three parishes before chaplaincy with the 20th Armoured Regiment in WW2. He was awarded the MBE for devotion to duty and recovering wounded soldiers across a minefield under mortar fire. He was called to St Andrew's Gardiner in 1955 and became the Stated Clerk of the Assembly in 1969, and in 1970 was also Stated Clerk of the General Assembly of Australia. He was Moderator of Victoria in 1965 and 1967. He chaired the Joint Constituional Council and the commission set up to prepare the interim constituion of the Uniting Church. He presided over the inaugural assembly of the UCA on June 22 1977 and made the declaration of inauguration.Head & shoulders of Gunn looking to his left.Name.gunn, l. farquhar, victorian presbyterian assembly, general assembly of australia -
 Uniting Church Archives - Synod of Victoria
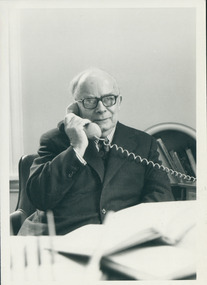
Photograph, Rev. L. Farquhar Gunn, Undated
... He was awarded the MBE for devotion to duty and recovering wounded soldiers across a minefield under mortar fire. He was called to St Andrew's Gardiner in 1955 and became the Stated Clerk of the Assembly in 1969, and in 1970 was also Stated Clerk of the General Assembly of Australia. ...He was awarded the MBE for devotion to duty and recovering wounded soldiers across a minefield under mortar fire. He was called to St Andrew's Gardiner in 1955 and became the Stated Clerk of the Assembly in 1969, and in 1970 was also Stated Clerk of the General Assembly of Australia. ...Gunn was Stated Clerk of the Victorian Presbyterian Assembly until 1976. In 1986 he had been ordained 50 years. Gunn was ordained on February 12, 1936 in New Zealand. He served in three parishes before chaplaincy with the 20th Armoured Regiment in WW2. He was awarded the MBE for devotion to duty and recovering wounded soldiers across a minefield under mortar fire. He was called to St Andrew's Gardiner in 1955 and became the Stated Clerk of the Assembly in 1969, and in 1970 was also Stated Clerk of the General Assembly of Australia. He was Moderator of Victoria in 1965 and 1967. He chaired the Joint Constituional Council and the commission set up to prepare the interim constituion of the Uniting Church. He presided over the inaugural assembly of the UCA on June 22 1977 and made the declaration of inauguration.Gunn seated at his desk holding the telephone.Name.gunn, l. farquhar, victorian presbyterian assembly, general assembly of australia -
 Uniting Church Archives - Synod of Victoria
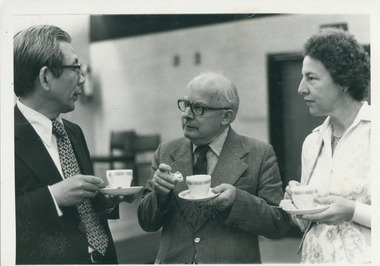
Photograph, Rev. L. Farquhar Gunn, 07/1986
... He was awarded the MBE for devotion to duty and recovering wounded soldiers across a minefield under mortar fire. He was called to St Andrew's Gardiner in 1955 and became the Stated Clerk of the Assembly in 1969, and in 1970 was also Stated Clerk of the General Assembly of Australia. ...He was awarded the MBE for devotion to duty and recovering wounded soldiers across a minefield under mortar fire. He was called to St Andrew's Gardiner in 1955 and became the Stated Clerk of the Assembly in 1969, and in 1970 was also Stated Clerk of the General Assembly of Australia. ...Gunn was Stated Clerk of the Victorian Presbyterian Assembly until 1976. In 1986 he had been ordained 50 years. Gunn was ordained on February 12, 1936 in New Zealand. He served in three parishes before chaplaincy with the 20th Armoured Regiment in WW2. He was awarded the MBE for devotion to duty and recovering wounded soldiers across a minefield under mortar fire. He was called to St Andrew's Gardiner in 1955 and became the Stated Clerk of the Assembly in 1969, and in 1970 was also Stated Clerk of the General Assembly of Australia. He was Moderator of Victoria in 1965 and 1967. He chaired the Joint Constituional Council and the commission set up to prepare the interim constituion of the Uniting Church. He presided over the inaugural assembly of the UCA on June 22 1977 and made the declaration of inauguration.Gunn holding tea cup and talking to two people also holding tea cups, at the celebration of his 50 years of ordination.Name.gunn, l. farquhar, victorian presbyterian assembly, general assembly of australia -
 City of Melbourne Libraries
Photograph, Bull, Hugh Jones, 1897-1993, Fire at Cathedral Hotel, Swanston Street, Melbourne
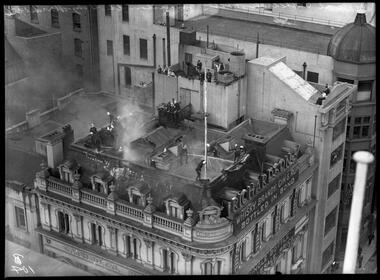
... These red fire alarm call boxes were typically installed on street corners, and when the knob was turned, a pulsed electric signal corresponding to the box’s number was received at fire headquarters. ...These red fire alarm call boxes were typically installed on street corners, and when the knob was turned, a pulsed electric signal corresponding to the box’s number was received at fire headquarters. ...Fire at the Cathedral Hotel! Bird’s eye view These firemen on the roof of the Cathedral Hotel are very bold in their approach to firefighting! One heroically aims a firehose at the roof while another holds onto the flagpole with one hand as he walks around the narrow edge, three storeys up! Onlookers from adjacent buildings make the most of their front row view, and The Age reported that on street level, hundreds of people gathered to watch, enthralled by “a thrilling spectacle when three firemen walked along the stone coping on the top floor of the building and, despite the clouds of smoke and sheets of flame which shot through the roof they ripped off the hot slate tiles and provided an outlet for the flames”. The Cathedral Hotel was built in 1883 and demolished in 1966 to make way for the City Square. Featured in "Newsworthy: Melbourne in photographs 1933-1936" exhibition at East Melbourne Library, October to December 2023. Exhibition caption by project volunteer, Louise McKenzie. Photographer notations on slide: "Fire at Cathedral Hotel Swanston St City March 1936 B104" Description: View looking down on roof of the Cathedral Hotel showing 16 firefighters battling a fire. There is smoke coming through the roof. Onlookers watch from adjoining buildings, not perturbed by the proximity of the fire. The firemen look bold and impressive in their brass helmets. Research by project volunteer, Louise McKenzie: The Age reported on 4 March 1936 that the fire broke out in rubbish between the roof space and wooden ceiling of the Cathedral Hotel at 4.30 pm. “The Eastern Hill fire brigade was notified by telephone, and an almost simultaneous call was also received at fire brigade headquarters from a street alarm.” These red fire alarm call boxes were typically installed on street corners, and when the knob was turned, a pulsed electric signal corresponding to the box’s number was received at fire headquarters. A large detachment of firemen with full fire-fighting equipment, including two large extension ladders, were quickly on the scene, pouring vast quantities of water into the hotel, causing several hundred pounds of damage to hotel and guest property, but quickly bringing the fire under control. Lengths of hose had to be carried through the front entrance and up several flights of stairs. On street level hundreds of people gathered to watch, but were controlled by police in order to keep them at a safe distance and ensure that tram and motor traffic was not seriously disorganised. The crowd were enthralled by “a thrilling spectacle when three firemen walked along the stone coping on the top floor of the building and, despite the clouds of smoke and sheets of flame which shot through the roof, they ripped off the hot slate tiles and provided an outlet for the flames”. The firemen are noteworthy for their highly polished brass helmets, known as Merryweather helmets, based on those of French sapeurs-pompiers and introduced to the British Metropolitan Fire Brigade in London in 1868. Metal helmets are conductive, a safety issue as the use of electricity became widespread, so a composite cork and rubber helmet was introduced in London from 1936. In Queensland, traditional brass helmets remained in service until 1970. The firemen are very bold in their actions – one heroically aiming a fire hose at the roof of the building, another holding onto the flagpole with one hand as he walks around the narrow top edge of the roof, three storeys up! The onlookers from adjoining buildings are interested in the spectacle, rather than dismayed by the fire. Lettering around the building exterior reads "Cathedral Hotel - Erected 1883". Prominent signage for “Richardson’s whisky, brandy, gin & rum" sits along the edge of the roof. The Cathedral Hotel was located on the corner of Swanston Street and Flinders Lane. It was built in 1883, and its name derived from St Paul’s Cathedral on the south side of Flinders Lane. It was demolished in 1966 as Melbourne City Council wished to create a City Square. Robyn Annear notes that at the time, the development was referred to as “Whelan’s Square” due to the large number of buildings which needed to be demolished to create the Square. Ironically the Hotel had been the victim of a previous fire in 1917, when its then licensee, also named Whelan, was charged with two failed arson attempts. References: No title (1936, March 4). The Age (Melbourne, Vic. : 1854 - 1954), p. 13. Retrieved February 5, 2024, from http://nla.gov.au/nla.news-article205256255 FIRE AT A CITY HOTEL. (1936, March 4). The Age (Melbourne, Vic. : 1854 - 1954), p. 12. Retrieved February 5, 2024, from http://nla.gov.au/nla.news-article205256231 FIRE IN ROOF OF CITY HOTEL (1936, March 4). The Argus (Melbourne, Vic. : 1848 - 1957), p. 8. Retrieved February 5, 2024, from http://nla.gov.au/nla.news-article11018696 Hotel Roof Fire Draws Crowd (1936, March 4). Examiner (Launceston, Tas. : 1900 - 1954), p. 8 (DAILY). Retrieved February 5, 2024, from http://nla.gov.au/nla.news-article52000751 'Flinders Lane Melbourne 1966', Peter Andrew Barrett, Facebook, 12 June 2020, https://www.facebook.com/120943481324886/photos/a.512123662206864/3025002490918956/?type=3 Fire Alarm Call Box, Wikipedia, https://en.wikipedia.org/wiki/Fire_alarm_call_box Research notes, 'A city lost and found', Robyn Annear, https://robynannear.com/docs/whelan-the-wrecker-notes.pdfPhotographer notations on slide: "Fire at Cathedral Hotel Swanston St City March 1936 B104".fires, hotels, 1930-1939 -
 Eltham District Historical Society Inc
Document - Archive Box, 1570 Main Road, Research (Research Primary School)
... News Paper Cuttings (Folder 2) News Paper Cuttings • Diamond Valley News - 23 Oct 1984-Centenary Plans - Folklore surrounding Research Township • Diamond Valley News 23 September 1986 - The Teacher who had cut can but never used one (4 copies) • Diamond Valley News- 20 October 1987 - When push bikes were made for touring (2 copies) • Diamond Valley News-14 January 1969 - They lost their homes (Historical places go at Research) • Diamond Valley News- 14 January 1969 - Bush Havoc ( 10 houses burnt at Warrandyte) • The Age - 24 January 1984- Eltham before the Mud Brick • Diamond Valley News - 14 January 1969- First Fire Call came at 10:25 am • Diamond Valley News - 14 January 1969 - Black Wednesday • The Advertiser- 25 July 1930- Research Affairs and add Research Bakery • Evelyn Observer - 26 March 1897 - Research State School part of a district schools expedition to Mordialloc (2 copies) • Diamond Valley News- 21 October 1986- Facing good and bad times with enthusiasm • Diamond Valley News- 14 January 1969 -Obituary David Leslie Mitchener • Diamond Valley News- 25 August 1987 - Eltham - the historic haven (2 copies) • Diamond Valley News-14 January 1969 - Research fire victim still in hospital 1.15. ...News Paper Cuttings (Folder 2) News Paper Cuttings • Diamond Valley News - 23 Oct 1984-Centenary Plans - Folklore surrounding Research Township • Diamond Valley News 23 September 1986 - The Teacher who had cut can but never used one (4 copies) • Diamond Valley News- 20 October 1987 - When push bikes were made for touring (2 copies) • Diamond Valley News-14 January 1969 - They lost their homes (Historical places go at Research) • Diamond Valley News- 14 January 1969 - Bush Havoc ( 10 houses burnt at Warrandyte) • The Age - 24 January 1984- Eltham before the Mud Brick • Diamond Valley News - 14 January 1969- First Fire Call came at 10:25 am • Diamond Valley News - 14 January 1969 - Black Wednesday • The Advertiser- 25 July 1930- Research Affairs and add Research Bakery • Evelyn Observer - 26 March 1897 - Research State School part of a district schools expedition to Mordialloc (2 copies) • Diamond Valley News- 21 October 1986- Facing good and bad times with enthusiasm • Diamond Valley News- 14 January 1969 -Obituary David Leslie Mitchener • Diamond Valley News- 25 August 1987 - Eltham - the historic haven (2 copies) • Diamond Valley News-14 January 1969 - Research fire victim still in hospital 1.15. ...Contents: 1. Andrew Lemon's Working File of Return to Research Andrew Lemon's Working File for his 1989 book, “Return to Research: A Centenary History of Research Primary School" (EDHS_00867). Includes a disassembled copy of the book. (All other documentation and photos passed to Research Primary School 3 September 2013) 1.1. EDHS_05004 - Cassette Tape of "Afternoon Tea with Senior Residents Nov 1st 1984" Reminiscences, chit chat and banter between group of senior citizens at an afternoon tea held for them at Research Primary School. 1.2. School Register 1935-1994 (Box 1) Photocopy of Research Primary School register from 1935 to 1994 (originals held at school) From 1994 onwards registrations were made online via the Education Department CASES system. 1.3. School Register A-Z 1935-1987 (Box 2) Computer print-out of alphabetized register 1935-87 (Research Primary School) (Done by David and Sue Grigg in 1987 from the register) Contains some extra details/corrections/current addresses Plus disks containing this data (not housed in box – there is a separate floppy disc box containing several 5 ¾” and 3 ½” floppy disks which are not readable as no hardware/software to support) 1.4. Research Locality History (Yellow Folder 1) Research Locality History Newspaper cuttings, Photocopies etc Collection for Research Primary School History 1989 Contents • 3 x photocopies (A3) regarding sale of Raglan Estate, Research [2 x A3 and 1 x composite A3 colour photocopy] • Souvenir Map of area with pictures of historical items and wild life - A Visitor's Guide Map; ELTHAM, WARRANDYTE and Environs (see also EDHS_01633-1) • EO article 26 Mar 1897 "Research State School picnic expedition to Mordialloc" • TA article 25 Jul 30" Research Affairs" plus an add for J Ingram's Research Bakery • DVN articles 14 Jan 69 (2 pages) "Research Fire Victim (Bill Pelling) still in hospital" • DVN 14 Jan 69 Page of Deaths, In Memories, Obituaries, Church Notices, Public Notices and Notices • Age article 24 Jan 84 "Eltham before the Mud Bricks" • DVN article 21 Oct 86 "Facing Good and Bad Times with enthusiasm - Keith Maxwell" • DVN article 29 Aug 87 "Eltham - the historic haven" • DVN article 25 Aug 87 "Eltham - a piece of living history, (the historic haven cont…)" • DVN article 20 Oct 87 "When push bikes were made for touring - Sam Howard" • 6 x pages of what appear to be various student's workbooks/ projects from 1944/45 era • ''They lost their homes- Historical places go at Research" plus other articles on fires 8 Jan 69 [Located in Folder 2] • DVN articles 23 Oct 84 "Centenary Plans" & Folklore surrounds Research township" [Located in Folder 2] • DVN article 23 Sep 86 "The teacher who had cut cane but never used one" Frank Sheehan (3 copies) [Located in Folder 2] • 2 x copies of booklet "Memories of Eltham" [Located in Folder 3] • Photocopy of subdivision Parish of Nillumbik [Located in Folder 4] DVN = Diamond Valley News, EO = Evelyn Observer TA= The Advertiser 1.5. Copies of items held by Public Records Office Victoria (Yellow Folder 2) Copies of items held by Public Records Office Photos and display items from Research Primary School Centenary August 19, 1989 • Laminated photocopy: “State School No. 2959, Copy of the above school property,” signed Henry L. Cole 18.6.91 • Photocopy: Petition for a school at Research, 13/11/1888; Public Record Office Victoria School Building File – School 2959 CUPRS 795/1717 • Photocopy: Negotiation to buy school site – part of Allotment 2, owned by the West family (copy attached to letter) 15/1/1890; Public Record Office Victoria School Building File – School 2959 CUPRS 795/1717 • Photocopy: Frank Scott, Head Teacher Research 1904-1907, letter of explanation (first page) to Department re poor results by pupils at the school, 24/8/1907; Public Record Office Victoria School Building File – 640 / School 2959 • Photocopy: Anton Brinkkotter’s Certificate for Regular Attendance 1908 (This was ‘traded in’ in 1911 for a certificate to mark six years without missing a day of school; Public Record Office Victoria School Building File – 640 / School 2959 for 1911 • Photocopy: Education Department Memorandum 1949 re need for extensions and improvements; Public Record Office Victoria School Building File – 795 / School 2959 • Photocopy: Looking to the future about expanding site for additional land for play space, 1950, Education Department Inspector to Department; Public Record Office Victoria School Building File – 795 / School 2959 • Photocopy (laminated, 2 sheets) First School Fire -1953 copy of Police Report. The old school building was badly damaged but repaired. It burnt down in 1976; Public Record Office Victoria School Building File – 795 / School 2959 • Photocopy: The Argus (28 July 1953) & the (Sun 28 July 1953) Two newspaper cuttings and notes re school fire 1953; Public Record Office Victoria School Building File – / School 2959 • Photocopy: Head Teacher Reg Jackman expresses concern to Education Department about conditions as he takes charge of Research State School, 1957; Public Record Office Victoria School Building File – 640 / School 2959 • Photo print (x2) of Education Department Qualifications and Certificates, Lyla Dickson, State School. (1) Print missing (2) Education department Victoria, Merit Certificate, This is to certify that Lyla Dickson has completed satisfactorily the Course of Study presented for the Eight Grade in Elementary Schools, dated at research Elementary School, this 20th day of November A.D. 1923 • Copy of original photo owned by Nell Howard “Fancy dress night in the school house – 1920s”, black and white print, 10.5 x 18 cm, attached to A4 photocopy of photo with names inscribed10.5 x 18 cm • Copy of original photo (stamped Reynolds Collection), black and white print, 24.5 x 16 cm, attached to paper sheet 37.6 x 25.5 cm, inscribed “Miss Doney” and “Elizabeth Doney and her family owned and ran Research’s Store and Post Office for many years after buying the property from the wests. This land surrounded the school site and includes today’s [1989] Kanandah Ct, Raglan St and shops” • Black and white photo print, 20 x 25 cm, Reconstruction of Main Road in front of Research Primary School, August 1989 • Black and white photo print, 20 x 25 cm, Eastern end of old oval, Research Primary School, 1989 • Black and white photo print, 20 x 25 cm, Portable Buildings, Research Primary School, 1989 • Black and white photo print, 20 x 25 cm, Gymnasium, Research Primary School, 1989 • Black and white photo print, 20 x 25 cm, Administrative Art Building, Research Primary School, c.1989 • Black and white photo print, 20 x 25 cm, Betty Kicker, Cleaner at Research Primary School, c.1989. Betty worked at the school from early 1970s to 1990s 1.6. ‘Memories of Research 1951-1968’ (Yellow Folder 3) Interview by Sue Grigg of Florence Egglestone for publication in Return to Research. Original handwritten notes, ‘Memories of Research 1951-1968’ 1.7. Centenary Committee Minutes & Newsletters (Yellow Folder 4) Centenary Committee Minutes and Newsletters Information regarding attendance of 100th anniversary including lists of staff contact details 1983-1986 Request (1985) to Shire of Eltham Historical Society for information and memorabilia • Letter: Ann Bouchier, Convenor – Centenary Committee, Research Primary School to R. Yeoman, Shire of Eltham Historical Society, 15 October 1985; enquiring about memorabilia etc that could be used in a proposed compilation on the “History of the School.” • Minutes of Meeting, Centenary Sub-Committee, Research Primary School Council o 17 June 1985. Also includes a list of general aim, specific aims and methods for the research Primary School Centenary - 1989 o 15 October 1985. o 17 September 1986. o 20 August 1987. o 2 May 1988. o 9 June 1988. o 22 August 1988. o 12 October 1988. o 24 November 1988. o 17 April 1989. o 24 July 1989. • Outline of Historical Events 1884-1954 (3 pages) • Centenary Newsletters o Number 1 (1989) o Number 2 (1989) o Number 3 (1989) o Newsletter (c. Aug. 1989) • Information re attendance of 100th Anniversary, Research Primary School, 19 August 1989 o Research Primary School – Staff 1984 (includes Name, Address, Telephone) o Research Primary School – Staff 1985 (includes Name, Address, Telephone) o Research Primary School – Staff 1986 (includes Name, Address, Telephone) o Emergency Teacher List 1983 o Emergency Teacher List 1986 o Previous teachers 1984 on • Quotation No. 733, Major Graphics for Engraved Brass Commemorative Plaque for opening of School Gymnasium • Centenary Invitation; Program and Souvenir and Chicken & Champagne Supper order forms • Various Centenary Invitation lists with notations, and various returned RSVPs • Centenary Program and map • Photocopy: 11 pages typed with hand corrections, draft manuscript for Andrew Lemon’s book, Return to Research (pages 13-24) • Bulletin: “I’m an Aussie” Week – 15th-19th April 10/4/85 • Bulletin: Research Centenary 26/4/88 • Bulletin: Official Centenary Logo For Research Primary School 15/12/88 • Bulletin: Centenary School Activity – “Colonial School” 23/5/89 • Bulletin: Centenary Activity Days – Monday, 14th August, Tuesday, 15th August 7/8/89 • Advertisement: A3 photocopy, Centenary Bush Dance, Sat. 4th March featuring “Paradiddle” Bush Band • Photocopy Master: Invitation (blank) to attend “Return to Research” celebration and Official Opening of the School Gymnasium on Saturday, August 19th from 1.00p.m. to 5.00p.m. and attached RSVP (also includes yellow paper sample -blank) • Photocopy Master: Tickets for Centenary Chicken & Champagne Supper, Friday, 18th August 1989, 7.30p.m., $5.00 per head (2 yellow paper samples marked on reverse ‘13’ and ‘55’) • Photocopy Master: Centenary Gift Donated by slips including multiple blank samples • Promotional Notices o Letter, Robert Wenn, Principal, 29 November 1988 for placement of “HELP WANTED” in Public Notices of The Age o Information provided to Ian Reid Real Estate Agent for Board to promote Centenary Bush Dance Paradiddle Band, Saturday 4 March 1989 o Notice Board promoting ‘Old Time’ Gala Fete Saturday 17 June 1989 o Letter, Robert Wenn, Principal, 24 August 1989 to Ian Reid Real Estate thanking for support of Centenary celebration and successful book launch and seeking further support for next event being school musical production “Spirit of Research” written by Andrew Lemon to be performed December 7th. 1.8. 1989 Research Primary School Centenary Visitors Register and Sue Grigg Correspondence (Red Folder) Sue Grigg’s Folder of Visitors to 1989 Centenary Celebrations and correspondence to Sue Grigg as organiser of Centenary Celebrations • 22 A3 Sheets of 1989 Research Primary School Centenary Visitors Register (approx. 238 entries) • Correspondence to Sue Grigg as Organizer of Centenary Celebrations o Trace B? – Ingram, Dunolly, 30 January 1990 re photo of Ingrams Road. Includes hand drawn map of various buildings on Ingrams Road. Also black and white print copy (12.5 x 17.5 cm) of photo of Ingrams and Main Road (possibly one sent to her) – see SEPP_0511 o Barbara Booth (nee Coles); thanks for wonderful celebration o Len and Marlene Parsons, 21 August 1989 o Mrs R. Towers, n.d. thanks for school photo ordered o Winifred L. Lade, 7 August 1989, gg grandparents William and Mary Crozier, daughter Sarah married Thomas Baillie (her g grandparents). Thomas Baillie was one of the petitioners for the school o Winifred L. Lade, n.d., thanks for photo and map o Carol Mathews, thanks for celebrations and payments for photos. Written on reverse of Sue Grigg’s letter to her of 19 September 1989 o Kenneth Ingram, Monday 14th, thanks for invitation but unable to attend • Photo of Ingrams and Main Road 1.9. Student Photos c.1970s (Buff Folder 1) [Not in Archive Box] Quantity of photos of students taken by Mrs Avril Baker (Staff Member) In 1970s 1.10. 1989 Centenary Questionnaires (Buff Folder 2) Research Primary School, 1989 Centenary Questionnaires from school families (approx. 190 responses) 1.11. Archive and Class Photos 1890s-1961 (Buff Folder 3) • Archive photographs of Research and District; 10 x 15 cm prints and digital files on thumb drive (copied to Collection catalogue) o RPS 1- Henry Cole Head Teacher 1891 to 1903. Photo from Mrs E. Williams o RPS 2 - Mary Jane Cole with eldest daughter Doris c 1905 o RPS 3 - Wedding Photo Mary Jane Rodda and Henry Cole o RPS 4 - Joseph Rodda of Chun Grove, Research o RPS 5 - Walter Rodda 1917 son of Joseph Rodda o RPS 6- Henry Cole and Pupils 1897 (Reynolds Collection) o RPS 7 - Elizabeth Doney (Reynolds Collections) o RPS 8 - Doney's Store early 1960's o RPS 9 - Main Road Research to Left, lngrams Road to Right o RPS 10- Main Road Eltham from Griggs family o RPS 11- Eltham near Station from Griggs family o RPS 12 - The Main Street Eltham from Griggs family (Rose Series 4344) o RPS 13 - The Rev and Mrs Thomas Cole. Parents of Henry Cole o RPS 14- Henry Cole as a boy with older brother Tom. From Mrs E. Williams. o RPS 15- Mary Jane Rodda as Mrs Henry Cole, Sewing Mistress Research State School 1891 to 1897 o RPS 16 - Etta Rodda Sewing Mistress Research State School 1897 -1904 o RPS 17 - Frederick Rodda son of Joseph Rodda o RPS 18- Bush Fires 1963 o RPS 19 - The view to the northeast from the top of the School Grounds 1989 o RPS 20- Edwin Rodda son of Joseph Rodda • Class and Staff photos, some with lists and names for identification [see separate folder of digital files – no hard copies in folder] Decade Years Represented 1890-1899 1897 1900-1909 1900, 1904 1910-1919 1910 1920-1929 1922, 1925 1930-1939 1930, 1932, 1937 1940-1949 1940, 1942 1950-1959 1950, 1951, 1952, 1953, 1954, 1955, 1956, 1957, 1958 1960-1969 1960, 1961, 1969 1970-1979 1970, 1971, 1972, 1973, 1975, 1976, 1977, 1978, 1979 Staff: 1971, 1976, 1978, 1979 1980-1989 1980, 1981, 1982, 1983, 1984, 1985, 1986, 1987, 1988, 1989 Staff: 1981, 1982, 1985, 1986, 1987, 1988, 1989 1990-1999 1990, 1991, 1994, 1995, 1996, 1997, 1998, 1999 Staff: 1990, 1994, 1995, 1996, 1998, 1999 2000-2009 2000, 2001, 2002, 2003, 2004, 2005, 2006, 2007, 2008, 2009 Staff: 2000, 2002, 2003, 2004, 2005, 2006, 2007, 2008, 2009 2010-2019 2010, 2011, 2012, 2013, 2014 Staff: 2010, 2011, 2012, 2013, 2014 • Class names; 4 pages handwritten and 2 numbered diagrams of Class names: o 1942 whole school o 1975 Grade 1 o 1976 Grade 2-3 o 1977 Grade 3 o 1978 Grade 4 o 1979 Grade 5 o 1980 Grade 6 • Negatives of photographs, 1 x roll of 36 and contact prints, copied at or for the Centenary 1989 o Neg. S – same as Neg. 27 o Neg. 1 – 1961 2/3 o Neg. 2 – 1960 5/6 o Neg. 3 – 1960 2/3 o Neg. 4 – 1960 Prep o Neg. 5 – 1957 Gr 2 o Neg. 6 – 1956 1A & II o Neg. 7 – Prep & I o Neg. 8 - 1955 o Neg. 9 – 1955 I & II o Neg. 10 – 1958 Gr II o Neg. 11 - 1960 3A & 4 o Neg. 12 – 1961 4 & 5 o Neg. 13 – same as Neg. 17 o Neg. 14 - 1925 o Neg. 15 - 1930 o Neg. 16 - 1942 o Neg. 17 – 1927 whole school o Neg. 18 - 1937 o Neg. 19 - 1932 o Neg. 20 - 1953 o Neg. 21 – 1951 Prep - 3 o Neg. 22 - 1954 o Neg. 23 - 1952 o Neg. 24 – Gr 4-7 o Neg. 25 – 1956 V & VI o Neg. 26 - 1940 o Neg. 27 – 1961 Gr 1 & 2 o Neg. 28 – SEPP_0610 (and 12.5 x 17.5 cm black and white print) o Neg. 29 – SEPP_0611 (and 12.5 x 17.5 cm black and white print) o Neg. 30 – SEPP_0612 o Neg. 31 – SEPP_0516 o Neg. 32 – SEPP_0509 (and 12.5 x 17.5 cm black and white print) o Neg. 33 – SEPP_0510 o Neg. 34 – SEPP_0511 o Neg. 35 – SEPP_0513 • Requests for copies of photos including explanation from Andrew Lemon that copies were made by camera of original photos provided by their owners • Colour photo print (copy of original), 12.5 x 17.5 cm, Doney’s Store, Main Road, Research, early 1960s including black and white photocopy of original print showing slightly wider field of view • Colour photo print, 10 x 15 cm, marked on reverse “19A” and “1 copy”, Aerial view of Research Primary School, c.1989 • Black and white print, 9 x 9 cm, Burnt out houses Ingrams Road Research near Cassell's Road after 1963 bushfire • Black and white print, 9 x 9 cm, Sight see-ers Ingrams Road Research near Cassell's Road after 1963 bushfire • Black and white photo print (copy of original), 20 x 25 cm, A memento of the Eltham Higher Elementary School Past Pupils Association Ball, Research Hall, 9 October 1966; inscribed and stamped on reverse “Reynolds Collection” • Colour photo print (copy of original), Kodak A4 photo paper, Pittaways cnr Main Road and Parsons Road c.1968 • Colour photo print (copy of original), Kodak A4 photo paper, Pittaways cnr Main Road and Parsons Road, my dad’s boat, c.1970, • Black and white photocopies of photos from Reynolds Collection o EDHS_00799-20 - The Research Hotel o EDHS_00799-22 - General Store, Research o EDHS_00799-27 – Plumtree Creek, Blashik family home, Ingrams Road o EDHS_00799-30 - Research o EDHS_00799-34 - Research Gully Bridge, Research Gully Road, c.1895 o EDHS_00799-35 - Research o EDHS_00799-37 - Waiting for the taxi-bus, Main Road, Research o SEPP_0524 - A Bush Home - Research, Vic.. 1.12. Research Primary School Centenary 1989 Display Photos (Buff Folder 4) 7 display pages, 37.8 x 25.5 cm, with 10 x 15 cm sepia coloured reproduction photographs attached and handwritten notations [some have come loose or missing] • Henry Cole, Head Teacher, Research, 1891-1903 o RPS-14 Henry Cole as a boy with his older brother Tom o 2 photos as a young man (missing) • Rodda Family, Jospeh B Rodda and two of his daughters o RPS-4 Joseph Rodda of Chun Grove Research o RPS-15 Mary Jane Rodda as Mrs Henry Cole, Sewing Mistress, Research State School, 1891-1897 o RPS-16 Ettie Rodda, Sewing Mistress, Research State School, 1897-1904 • Cole Family o Henry Cole, Head Teacher, 1891-1903 o RPS-3 Wedding photo 1894, Mary Jane Rodda and Henry Cole (missing) o RPS-2 Mary Jane Cole with eldest daughter, Doris, c.1905 (missing) • Cole Family; The Rev. and Mrs Thomas Cole, parents of Henry Cole o Rev. Thomas Cole o Mrs Thomas Cole o RPS-13 The Rev & Mrs Thomas Cole parents of Henry Cole • Cole Family o Reg Cole, O.B.E., as Town Clerk of Hobart meeting Queen Elizabeth and Prince Phillip, 1954. HJR (Reg) Cole was the eldest child of Henry and Mary Jane Cole, and was a pupil at Research State School c.1900-1903 • Sons of Joseph B. Rodda of ‘Chune Grove’, Research o RPS-17 Frederick Rodda o RPS-20 Edwin Rodda o RPS-5 Walter Rodda, 1917 • The Aqueduct (20 x 25 cm black and white reproduction print); built for opening in 1891 to take water from Maroondah to Reservoir (Reynolds Collection) 1.13. Class Photos (photocopies) - with names identified at Centenary 1989 (Buff Folder 5) [Not in Archive Box] Research Primary School- Class Photos (photocopies) -with names identified at Centenary 1989 1964 - 1984 1.14. News Paper Cuttings (Folder 2) News Paper Cuttings • Diamond Valley News - 23 Oct 1984-Centenary Plans - Folklore surrounding Research Township • Diamond Valley News 23 September 1986 - The Teacher who had cut can but never used one (4 copies) • Diamond Valley News- 20 October 1987 - When push bikes were made for touring (2 copies) • Diamond Valley News-14 January 1969 - They lost their homes (Historical places go at Research) • Diamond Valley News- 14 January 1969 - Bush Havoc ( 10 houses burnt at Warrandyte) • The Age - 24 January 1984- Eltham before the Mud Brick • Diamond Valley News - 14 January 1969- First Fire Call came at 10:25 am • Diamond Valley News - 14 January 1969 - Black Wednesday • The Advertiser- 25 July 1930- Research Affairs and add Research Bakery • Evelyn Observer - 26 March 1897 - Research State School part of a district schools expedition to Mordialloc (2 copies) • Diamond Valley News- 21 October 1986- Facing good and bad times with enthusiasm • Diamond Valley News- 14 January 1969 -Obituary David Leslie Mitchener • Diamond Valley News- 25 August 1987 - Eltham - the historic haven (2 copies) • Diamond Valley News-14 January 1969 - Research fire victim still in hospital 1.15. Reminiscences (Folder 3) • Memories of Eltham (Multiple authors) (2 copies) • List of names of children who attended Research Primary School as recalled by Kenneth Ingram (b.1907) provided in 1987 by his niece Grace Burrows (nee Ingram) including names of students and teachers she recalled from her time at school 1936-1941 • Photocopy of Interview by Sue Grigg of Florence Egglestone for publication in Return to Research, ‘Memories of Research 1951-1968’. [Original handwritten version in Yellow Folder 3.] 1.16. School Site and Buildings (Folder 4) • 3 x photocopies of photos of early school building • Raglan Estate Research • Plan of subdivisions Research 1920s • 1981 Education Department Building Operation process to be followed in the event of criminal damage 1.17. School Historical Documents (Folder 5) School Historical Documents • Certificate of Merit Ernest Reynolds • Inventory of Books and Equipment 1891 • Letter from Teacher Frank Scott explain poor results • Letter from Henry Cole recommending appointment of Mary Jane Rodda as Sewing Mistress • Special Certificate for Regular Attendance Anton Brinkkotter (2 copies • Certificate of Merit Anton Brinkkotter 1911 • Merit Certificate Lyla Dickson 1922 • Special Certificate for Regular Attendance Margery Palmer 1927 • Letter from Head teacher Reg Jackman 1957 • Petition to Education Dept 1884 from Research Gully to open a school • Joseph Mankey's complaints about temporary classroom 1890 • Research 1890 - Plan of one acre site to be purchased by education Dept for permanent school • List of buildings and dates • Need for extensions and improvements 1949 • Looking to the Future 1950 • Negotiations to buy school site 1890 2. Magenta Folio 1. USB drive containing • Class photos 1897-2014 • Class photo names • List of head teachers/Principals 1989-2014 • List of Infant Productions 2001-2010 • School photo names typed up identified at centenary reunion 1925-1984 • List of school camps 1964-2014 • List of Senior Productions 1986-2014 • Staff list 1989-2014 • List of grades by year taught by Mrs Avril Baker 1976-2010 2. CD of School and Class Photos 2013-2014 including laminated print of school photo 2014 3. 2 x CD of photos of Research Remembered. CD 1 containing 20 images of various activities from Centenary Celebrations and CD 2 containing 12 images of various student activities (1990s) 3. Clear Folio 1. Additional RPS Material • History of Research State School No. 2959; F.P. Sheehan (Principal) and Mrs M. Allwood (Historian) – duplicate copy of EDHS_03095-1570 held in Main Road property file. • Invitation; The Official Opening of 4 New Classrooms & Library Extension • Program; The Official Opening of 4 New Classrooms & Library Extension, 27 April 1996 • News clipping; Remember Sleepy Swipers Gully? Diamond Valley News, July 22, 1980, pp28-29 • Site plan of building layouts • Colour photo paper print of Rob Wenn’s retirement, June 1999 • Email from former teacher Brett Barnett sent March 2008 (teacher 1967-1980) with references to pet python that students would look after, and which perished when original school building used as a library burnt down • 2 letters (2009) from Peta McGinley offering some papers and photos for school archives. Her father, Rix McGinley was Principal for 1984 till his retirement in 1987. She was also a casual Relief Teacher in her first year of teaching in 1984. • List of 60 names associated with engraved bricks 2. 100th Anniversary 1989 • News clipping; Celebrations and nostalgia at school, Diamond Valley News, Tuesday, August 29, 1989, p28 3. 120th Anniversary 2009 • Notes of contact details of some former students who expressed interest in a reunion 4. 125th Anniversary 24 August 2014 • 3 pages handwritten of reminiscences of a group of mums whose children attended RPS during the 1980s. • 2 pages dated 29 March 2014 typed by Janet Page (nee Zambra) of reminiscences of her years at school (1948-1954) in support of 125th Anniversary Reunion (24 August 2014) sent to Joy Pagan with some queries noted by Maggie Sakko • Reminisces (single sheet double sided handwritten) of teacher Mrs Jacqui Edwards 1989-2001 retired and Casual Relief Teacher 2001-2014 sent to Maggie Sakko in support for 125th Anniversary book and follow up queries from Maggie Sakko (18 July 2014) • List of regular Casual Relief Teachers established by Brooke and Maria for Maggie Sakko • Two pages of working notes • News clipping: Ring in the years, Diamond Valley Leader, Wednesday, August 27, 2014, p1 – Illustrated – “Koray, Aidan and Lasenya helped ring in the 125th anniversary of Research Primary School. A huge reunion brought together past and present students and staff who reminisced about their school days. Report Page 14” • News clipping: School back to the past, Diamond Valley Leader, Wednesday, August 27, 2014, p14 – Illustrated (2 copies) • Poster: Arbor Week June 23-29 (2008) – Arbor Week is the same age as Research Primary School – note written on poster to possibly include tree planting as part of 125th celebrations 5. Centenary of Federation Medal presented to students of Research Primary School (2001) by former student, Miss Ivy Reynolds • Letter: Ivy Reynolds to staff and children, May 22, 2001, letter of thanks for privilege of sharing the celebrations with her • 9 x laminated paper colour prints of students with medals and Ivy Reynolds 6. Newspaper and Magazine Articles • Newspaper Article: Grand designs at Research Primary School by James Poyner; Manningham and Nillumbik Bulletin, February 2022, p8 • Newspaper Article: School’s reconciliation in action by Fiona Vale; Manningham and Nillumbik Bulletin, September 2022main road, property, research (vic.), research state school no. 2959, caledonian gold field, swiper's gully, wallaby town, research gully, discovery gold plenty ranges, fountain of friendship hotel, ray morris, alice russell, norma family, bettison family, reynolds family, william west, joseph m makey, henry james cole, mary jane rodda, florissa milton, f p sheehan, m allwood, research hotel -
 Flagstaff Hill Maritime Museum and Village
Domestic object - Plate
... Step Seven – Glaze (Gloss or sometimes called “Glost”) Firing Most of the time this is the final stage of making your creation (but not always!) ...Step Seven – Glaze (Gloss or sometimes called “Glost”) Firing Most of the time this is the final stage of making your creation (but not always!) ...The Process of Making Pottery Decorating, Firing, Glazing, Making, Technical There is a rhythm and flow to clay. It can’t be done all at once! Even the making process! It can take weeks to get everything done, especially if you can only work on your pottery once a week! Even though we have three hour classes, it’s often just not enough time! Here is an overview of some of the processes so you have a bit more grasp on some of the technical stuff! Step One – Design There are SO many ideas out there for making stuff in clay! From delicate porcelain jewellery, through to heavy sculptural work and everything in between. Deciding your direction is sometimes not that easy – when you first start, try everything, you will naturally gravitate to the style that you enjoy! The options and variations are endless and can get a wee bit overwhelming too! Check in with me before you start to ensure your ideas will work, what order you might do things, how you could achieve the look you are seeking and any other technical data required! Step Two – Making Clay is thixotropic. This means that as you work with it, the clay first gets sloppier and wetter, before is begins to dry in the atmosphere. For most things, you simply can’t do all parts of the project at once. An example of work order might look like: Get last weeks work out from the shelves Prepare clay for today’s work – roll your clay, prepare balls for throwing, make the first stage of a pinch pot) Clean up last week’s work and put it on the shelf for bisque firing Check that you have any glazing to do – and do enough of it that you will have time to finish your main project Do the next step of your next project – there might be a further step that can’t be complete immediately, in that case, wrap your work well and put onto the shelves. Letting your work rest for a while can really help keep your work clean and professional looking. Many things require bagging under plastic to keep it ready for work the next week – put your name on the outside of the bag so you can find your work easily. We have stickers and markers. Consider how you want to decorate your work – coloured slip can be applied at a fairly wet stage (remembering that it will make your work even wetter!). Trying to apply slip to dry clay won’t work! If you want to do sgraffito – you will need to keep the work leather hard (a state of dryness where you can still work the clay with a little effort and a little water and care). Step Three – Drying Most of the time your work can go into the rack uncovered to let it dry out for the following week. If you want to continue forming or shaping you will need to double bag your work – put your work on a suitable sized bat and put the bat in a bag so the base of the bag is under the bat, then put another bag over the top of the work and tuck the top of the bag under the bat. If you want to trim (or turn) your thrown work the following week, it should also be double bagged. If your work is large, delicate, or of uneven thicknesses, you should lightly cover your work for drying. When considering the drying process, bare in mind the weather, humidity and wind! The hotter and dryer, the faster things dry and work can dry unevenly in the shelves – this can lead to cracking – another time to lightly cover your work for drying. Step Four – Trimming and Cleaning Up Your work is dry! It is called greenware now and it is at it’s most fragile! Handle everything with two hands. I often refer to soft hands – keep everything gentle and with your fingers spread as much as possible. Try to not pick up things like plates too much, and always with both hands! Before your work can be bisque fired it should be “cleaned up”. You work won’t go into the kiln if it has sharp edges – when glazed, sharp edges turn into razor blades! Use a piece of fly wire to rub the work all over – this will scratch a little so be light handed. Use a knife or metal kidney to scrape any areas that require a bit more dynamic treatment than the fly wire offers! Finally, a very light wipe over with a slightly damp sponge can help soften and soothe all of your edges and dags! Trimming thrown work: If you are planning to trim (or turn) your thrown work (and you should be), make sure you bag it well – your work should be leather hard to almost dry for easiest trimming. Use this step to finish the work completely – use a metal kidney to polish the surface, or a slightly damp sponge to give a freshly thrown look. Wipe the sponge around the rim after trimming, and check the inside of the pot for dags! Trimming slip cast work: Usually I will trim the rims of your work on the wheel the following day to make that stage easier, however you will still need to check your work for lumps and bumps. Last but not least – check that your name is still clearly on the bottom of your work. Step Five – Bisque Firing When the work is completely dry it can go into the bisque kiln. The bisque kiln is fired to 1000°C. This process burns off the water in the clay as well as some of the chemically bound water. The structure of the clay is not altered that much at this temperature. Inside the bisque kiln, the work is stacked a little, small bowl inside a larger bowl and onto a heavy plate. Smaller items like decorations or drink coasters might get stacked several high. Consideration is paid to the weight of the stack and shape of the work. A bisque kiln can fire about one and a half times the amount of work that the glaze kiln can fire. The firing takes about 10 hours to complete the cycle and about two days to cool down. Once it has been emptied the work is placed in the glaze room ready for you to decorate! Step Six – Glazing Decorating your work with colour can be a lot of fun – and time consuming! There are three main options for surface treatment at this stage: Oxide Washes Underglazes Glazes Washes and underglazes do not “glaze” the work – It will still need a layer of glaze to fully seal the clay (washes don’t need glaze on surfaces not designed for food or liquid as they can gloss up a little on their own). Underglazes are stable colourants that turn out pretty much how they look in the jar. They can be mixed with each other to form other colours and can be used like water colours to paint onto your work. Mostly they should have a clear glaze on top to seal them. Oxides are a different species – the pink oxide (cobalt) wash turns out bright blue for instance. They don’t always need a glaze on top, and some glazes can change the colour of the wash! The glazes need no other “glaze” on top! Be careful of unknown glaze interactions – you can put any combination of glaze in a bowl or on a plate, but only a single glaze on the outside of any vertical surface! Glazes are a chemical reaction under heat. We don’t know the exact chemicals in the Mayco glazes we use. I can guess by the way they interact with each other, however, on the whole, you need to test every idea you have, and not run the test on a vertical surface! Simply put, glaze is a layer of glass like substance that bonds with the clay underneath. Clay is made of silica, alumina and water. Glaze is made of mostly silica. Silica has a melting point of 1700°C and we fire to 1240°C. The silica requires a “flux” to help it melt at the lower temperature. Fluxes can be all sorts of chemicals – a common one is calcium – calcium has a melting point of 2500°C, however, together they both melt at a much lower temperature! Colourants are metal oxides like cobalt (blue), chrome (green through black), copper (green, blue, even red!), manganese (black, purple and pink) iron (red brown), etc. Different chemicals in the glaze can have dramatic effects. for example, barium carbonate (which we don’t use) turns manganese bright pink! Other elements can turn manganese dioxide brown, blue, purple and reddish brown. Manganese dioxide is a flux in and of itself as well. So, glazes that get their black and purple colours, often interact with other glazes and RUN! Our mirror black is a good example – it mixes really well with many glazes because it fluxes them – causes them to melt faster. It will also bring out many beautiful colours in the glazes because it’s black colouring most definitely comes from manganese dioxide! Glaze chemistry is a whole subject on it’s own! We use commercial Mayco glazes on purpose – for their huge range of colour possibilities, stability, cool interactions, artistic freedom with the ability to easily brush the glazes on and ease of use. We currently have almost 50 glazes on hand! A major project is to test the interactions of all glazes with each other. That is 2,500 test tiles!!!! I’m going to make the wall behind the wheels the feature wall of pretty colours! Step Seven – Glaze (Gloss or sometimes called “Glost”) Firing Most of the time this is the final stage of making your creation (but not always!) The glaze kiln goes to 1240°C. This is called cone 6, or midrange. It is the low end of stoneware temperatures. Stoneware clays and glazes are typically fired at cone 8 – 10, that is 1260 – 1290°C. The energy requirement to go from 1240°C to 1280°C is almost a 30% more! Our clay is formulated to vitrify (mature, turn “glass-like”) at 1240°, as are our glazes. A glaze kiln take around 12 hours to reach temperature and two to three days to cool down. Sometimes a third firing process is required – this is for decoration that is added to work after the glaze firing. For example – adding precious metals and lustres. this firing temperature is usually around 600 – 800°C depending upon the techniques being used. There are many students interested in gold and silver trims – we will be doing this third type of firing soon! After firing your work will be in the student finished work shelves. Remember to pay for it before you head out the door! There is a small extra charge for using porcelain clay (it’s more than twice the price of regular clay), and for any third firing process! Once your work has been fired it can not turn back into clay for millennia – so don’t fire it if you don’t like it! Put it in the bucket for recycling. https://firebirdstudios.com.au/the-process-of-making-pottery/Ceramics have evolved over thousands of years.White earthenware dinner plate. Crazing evident all over.Backstamped ‘Made in England S LTD’flagstaff hill, warrnambool, shipwrecked-coast, flagstaff-hill, flagstaff-hill-maritime-museum, maritime-museum, shipwreck-coast, flagstaff-hill-maritime-village, ceramics, tableware -
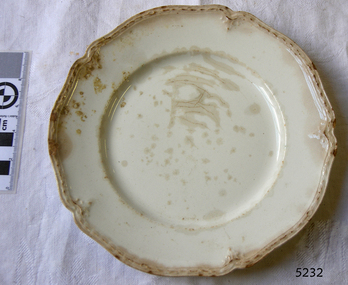 Flagstaff Hill Maritime Museum and Village
Domestic object - Plate, Johnson Bros
... Step Seven – Glaze (Gloss or sometimes called “Glost”) Firing Most of the time this is the final stage of making your creation (but not always!) ...Step Seven – Glaze (Gloss or sometimes called “Glost”) Firing Most of the time this is the final stage of making your creation (but not always!) ...The Process of Making Pottery Decorating, Firing, Glazing, Making, Technical There is a rhythm and flow to clay. It can’t be done all at once! Even the making process! It can take weeks to get everything done, especially if you can only work on your pottery once a week! Even though we have three hour classes, it’s often just not enough time! Here is an overview of some of the processes so you have a bit more grasp on some of the technical stuff! Step One – Design There are SO many ideas out there for making stuff in clay! From delicate porcelain jewellery, through to heavy sculptural work and everything in between. Deciding your direction is sometimes not that easy – when you first start, try everything, you will naturally gravitate to the style that you enjoy! The options and variations are endless and can get a wee bit overwhelming too! Check in with me before you start to ensure your ideas will work, what order you might do things, how you could achieve the look you are seeking and any other technical data required! Step Two – Making Clay is thixotropic. This means that as you work with it, the clay first gets sloppier and wetter, before is begins to dry in the atmosphere. For most things, you simply can’t do all parts of the project at once. An example of work order might look like: Get last weeks work out from the shelves Prepare clay for today’s work – roll your clay, prepare balls for throwing, make the first stage of a pinch pot) Clean up last week’s work and put it on the shelf for bisque firing Check that you have any glazing to do – and do enough of it that you will have time to finish your main project Do the next step of your next project – there might be a further step that can’t be complete immediately, in that case, wrap your work well and put onto the shelves. Letting your work rest for a while can really help keep your work clean and professional looking. Many things require bagging under plastic to keep it ready for work the next week – put your name on the outside of the bag so you can find your work easily. We have stickers and markers. Consider how you want to decorate your work – coloured slip can be applied at a fairly wet stage (remembering that it will make your work even wetter!). Trying to apply slip to dry clay won’t work! If you want to do sgraffito – you will need to keep the work leather hard (a state of dryness where you can still work the clay with a little effort and a little water and care). Step Three – Drying Most of the time your work can go into the rack uncovered to let it dry out for the following week. If you want to continue forming or shaping you will need to double bag your work – put your work on a suitable sized bat and put the bat in a bag so the base of the bag is under the bat, then put another bag over the top of the work and tuck the top of the bag under the bat. If you want to trim (or turn) your thrown work the following week, it should also be double bagged. If your work is large, delicate, or of uneven thicknesses, you should lightly cover your work for drying. When considering the drying process, bare in mind the weather, humidity and wind! The hotter and dryer, the faster things dry and work can dry unevenly in the shelves – this can lead to cracking – another time to lightly cover your work for drying. Step Four – Trimming and Cleaning Up Your work is dry! It is called greenware now and it is at it’s most fragile! Handle everything with two hands. I often refer to soft hands – keep everything gentle and with your fingers spread as much as possible. Try to not pick up things like plates too much, and always with both hands! Before your work can be bisque fired it should be “cleaned up”. You work won’t go into the kiln if it has sharp edges – when glazed, sharp edges turn into razor blades! Use a piece of fly wire to rub the work all over – this will scratch a little so be light handed. Use a knife or metal kidney to scrape any areas that require a bit more dynamic treatment than the fly wire offers! Finally, a very light wipe over with a slightly damp sponge can help soften and soothe all of your edges and dags! Trimming thrown work: If you are planning to trim (or turn) your thrown work (and you should be), make sure you bag it well – your work should be leather hard to almost dry for easiest trimming. Use this step to finish the work completely – use a metal kidney to polish the surface, or a slightly damp sponge to give a freshly thrown look. Wipe the sponge around the rim after trimming, and check the inside of the pot for dags! Trimming slip cast work: Usually I will trim the rims of your work on the wheel the following day to make that stage easier, however you will still need to check your work for lumps and bumps. Last but not least – check that your name is still clearly on the bottom of your work. Step Five – Bisque Firing When the work is completely dry it can go into the bisque kiln. The bisque kiln is fired to 1000°C. This process burns off the water in the clay as well as some of the chemically bound water. The structure of the clay is not altered that much at this temperature. Inside the bisque kiln, the work is stacked a little, small bowl inside a larger bowl and onto a heavy plate. Smaller items like decorations or drink coasters might get stacked several high. Consideration is paid to the weight of the stack and shape of the work. A bisque kiln can fire about one and a half times the amount of work that the glaze kiln can fire. The firing takes about 10 hours to complete the cycle and about two days to cool down. Once it has been emptied the work is placed in the glaze room ready for you to decorate! Step Six – Glazing Decorating your work with colour can be a lot of fun – and time consuming! There are three main options for surface treatment at this stage: Oxide Washes Underglazes Glazes Washes and underglazes do not “glaze” the work – It will still need a layer of glaze to fully seal the clay (washes don’t need glaze on surfaces not designed for food or liquid as they can gloss up a little on their own). Underglazes are stable colourants that turn out pretty much how they look in the jar. They can be mixed with each other to form other colours and can be used like water colours to paint onto your work. Mostly they should have a clear glaze on top to seal them. Oxides are a different species – the pink oxide (cobalt) wash turns out bright blue for instance. They don’t always need a glaze on top, and some glazes can change the colour of the wash! The glazes need no other “glaze” on top! Be careful of unknown glaze interactions – you can put any combination of glaze in a bowl or on a plate, but only a single glaze on the outside of any vertical surface! Glazes are a chemical reaction under heat. We don’t know the exact chemicals in the Mayco glazes we use. I can guess by the way they interact with each other, however, on the whole, you need to test every idea you have, and not run the test on a vertical surface! Simply put, glaze is a layer of glass like substance that bonds with the clay underneath. Clay is made of silica, alumina and water. Glaze is made of mostly silica. Silica has a melting point of 1700°C and we fire to 1240°C. The silica requires a “flux” to help it melt at the lower temperature. Fluxes can be all sorts of chemicals – a common one is calcium – calcium has a melting point of 2500°C, however, together they both melt at a much lower temperature! Colourants are metal oxides like cobalt (blue), chrome (green through black), copper (green, blue, even red!), manganese (black, purple and pink) iron (red brown), etc. Different chemicals in the glaze can have dramatic effects. for example, barium carbonate (which we don’t use) turns manganese bright pink! Other elements can turn manganese dioxide brown, blue, purple and reddish brown. Manganese dioxide is a flux in and of itself as well. So, glazes that get their black and purple colours, often interact with other glazes and RUN! Our mirror black is a good example – it mixes really well with many glazes because it fluxes them – causes them to melt faster. It will also bring out many beautiful colours in the glazes because it’s black colouring most definitely comes from manganese dioxide! Glaze chemistry is a whole subject on it’s own! We use commercial Mayco glazes on purpose – for their huge range of colour possibilities, stability, cool interactions, artistic freedom with the ability to easily brush the glazes on and ease of use. We currently have almost 50 glazes on hand! A major project is to test the interactions of all glazes with each other. That is 2,500 test tiles!!!! I’m going to make the wall behind the wheels the feature wall of pretty colours! Step Seven – Glaze (Gloss or sometimes called “Glost”) Firing Most of the time this is the final stage of making your creation (but not always!) The glaze kiln goes to 1240°C. This is called cone 6, or midrange. It is the low end of stoneware temperatures. Stoneware clays and glazes are typically fired at cone 8 – 10, that is 1260 – 1290°C. The energy requirement to go from 1240°C to 1280°C is almost a 30% more! Our clay is formulated to vitrify (mature, turn “glass-like”) at 1240°, as are our glazes. A glaze kiln take around 12 hours to reach temperature and two to three days to cool down. Sometimes a third firing process is required – this is for decoration that is added to work after the glaze firing. For example – adding precious metals and lustres. this firing temperature is usually around 600 – 800°C depending upon the techniques being used. There are many students interested in gold and silver trims – we will be doing this third type of firing soon! After firing your work will be in the student finished work shelves. Remember to pay for it before you head out the door! There is a small extra charge for using porcelain clay (it’s more than twice the price of regular clay), and for any third firing process! Once your work has been fired it can not turn back into clay for millennia – so don’t fire it if you don’t like it! Put it in the bucket for recycling. https://firebirdstudios.com.au/the-process-of-making-pottery/Ceramics have evolved over thousands of years.A white earthenware side plate with a gadroon edge. Has water marks and chips on front.‘Johnson Bros England Reg No 15587’flagstaff hill, warrnambool, shipwrecked-coast, flagstaff-hill, flagstaff-hill-maritime-museum, maritime-museum, shipwreck-coast, flagstaff-hill-maritime-village, johnson bros, ceramics, tableware -
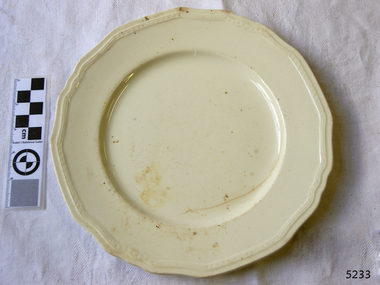 Flagstaff Hill Maritime Museum and Village
Domestic object - Plate, Alfred Meakin
... Step Seven – Glaze (Gloss or sometimes called “Glost”) Firing Most of the time this is the final stage of making your creation (but not always!) ...Step Seven – Glaze (Gloss or sometimes called “Glost”) Firing Most of the time this is the final stage of making your creation (but not always!) ...The Process of Making Pottery Decorating, Firing, Glazing, Making, Technical There is a rhythm and flow to clay. It can’t be done all at once! Even the making process! It can take weeks to get everything done, especially if you can only work on your pottery once a week! Even though we have three hour classes, it’s often just not enough time! Here is an overview of some of the processes so you have a bit more grasp on some of the technical stuff! Step One – Design There are SO many ideas out there for making stuff in clay! From delicate porcelain jewellery, through to heavy sculptural work and everything in between. Deciding your direction is sometimes not that easy – when you first start, try everything, you will naturally gravitate to the style that you enjoy! The options and variations are endless and can get a wee bit overwhelming too! Check in with me before you start to ensure your ideas will work, what order you might do things, how you could achieve the look you are seeking and any other technical data required! Step Two – Making Clay is thixotropic. This means that as you work with it, the clay first gets sloppier and wetter, before is begins to dry in the atmosphere. For most things, you simply can’t do all parts of the project at once. An example of work order might look like: Get last weeks work out from the shelves Prepare clay for today’s work – roll your clay, prepare balls for throwing, make the first stage of a pinch pot) Clean up last week’s work and put it on the shelf for bisque firing Check that you have any glazing to do – and do enough of it that you will have time to finish your main project Do the next step of your next project – there might be a further step that can’t be complete immediately, in that case, wrap your work well and put onto the shelves. Letting your work rest for a while can really help keep your work clean and professional looking. Many things require bagging under plastic to keep it ready for work the next week – put your name on the outside of the bag so you can find your work easily. We have stickers and markers. Consider how you want to decorate your work – coloured slip can be applied at a fairly wet stage (remembering that it will make your work even wetter!). Trying to apply slip to dry clay won’t work! If you want to do sgraffito – you will need to keep the work leather hard (a state of dryness where you can still work the clay with a little effort and a little water and care). Step Three – Drying Most of the time your work can go into the rack uncovered to let it dry out for the following week. If you want to continue forming or shaping you will need to double bag your work – put your work on a suitable sized bat and put the bat in a bag so the base of the bag is under the bat, then put another bag over the top of the work and tuck the top of the bag under the bat. If you want to trim (or turn) your thrown work the following week, it should also be double bagged. If your work is large, delicate, or of uneven thicknesses, you should lightly cover your work for drying. When considering the drying process, bare in mind the weather, humidity and wind! The hotter and dryer, the faster things dry and work can dry unevenly in the shelves – this can lead to cracking – another time to lightly cover your work for drying. Step Four – Trimming and Cleaning Up Your work is dry! It is called greenware now and it is at it’s most fragile! Handle everything with two hands. I often refer to soft hands – keep everything gentle and with your fingers spread as much as possible. Try to not pick up things like plates too much, and always with both hands! Before your work can be bisque fired it should be “cleaned up”. You work won’t go into the kiln if it has sharp edges – when glazed, sharp edges turn into razor blades! Use a piece of fly wire to rub the work all over – this will scratch a little so be light handed. Use a knife or metal kidney to scrape any areas that require a bit more dynamic treatment than the fly wire offers! Finally, a very light wipe over with a slightly damp sponge can help soften and soothe all of your edges and dags! Trimming thrown work: If you are planning to trim (or turn) your thrown work (and you should be), make sure you bag it well – your work should be leather hard to almost dry for easiest trimming. Use this step to finish the work completely – use a metal kidney to polish the surface, or a slightly damp sponge to give a freshly thrown look. Wipe the sponge around the rim after trimming, and check the inside of the pot for dags! Trimming slip cast work: Usually I will trim the rims of your work on the wheel the following day to make that stage easier, however you will still need to check your work for lumps and bumps. Last but not least – check that your name is still clearly on the bottom of your work. Step Five – Bisque Firing When the work is completely dry it can go into the bisque kiln. The bisque kiln is fired to 1000°C. This process burns off the water in the clay as well as some of the chemically bound water. The structure of the clay is not altered that much at this temperature. Inside the bisque kiln, the work is stacked a little, small bowl inside a larger bowl and onto a heavy plate. Smaller items like decorations or drink coasters might get stacked several high. Consideration is paid to the weight of the stack and shape of the work. A bisque kiln can fire about one and a half times the amount of work that the glaze kiln can fire. The firing takes about 10 hours to complete the cycle and about two days to cool down. Once it has been emptied the work is placed in the glaze room ready for you to decorate! Step Six – Glazing Decorating your work with colour can be a lot of fun – and time consuming! There are three main options for surface treatment at this stage: Oxide Washes Underglazes Glazes Washes and underglazes do not “glaze” the work – It will still need a layer of glaze to fully seal the clay (washes don’t need glaze on surfaces not designed for food or liquid as they can gloss up a little on their own). Underglazes are stable colourants that turn out pretty much how they look in the jar. They can be mixed with each other to form other colours and can be used like water colours to paint onto your work. Mostly they should have a clear glaze on top to seal them. Oxides are a different species – the pink oxide (cobalt) wash turns out bright blue for instance. They don’t always need a glaze on top, and some glazes can change the colour of the wash! The glazes need no other “glaze” on top! Be careful of unknown glaze interactions – you can put any combination of glaze in a bowl or on a plate, but only a single glaze on the outside of any vertical surface! Glazes are a chemical reaction under heat. We don’t know the exact chemicals in the Mayco glazes we use. I can guess by the way they interact with each other, however, on the whole, you need to test every idea you have, and not run the test on a vertical surface! Simply put, glaze is a layer of glass like substance that bonds with the clay underneath. Clay is made of silica, alumina and water. Glaze is made of mostly silica. Silica has a melting point of 1700°C and we fire to 1240°C. The silica requires a “flux” to help it melt at the lower temperature. Fluxes can be all sorts of chemicals – a common one is calcium – calcium has a melting point of 2500°C, however, together they both melt at a much lower temperature! Colourants are metal oxides like cobalt (blue), chrome (green through black), copper (green, blue, even red!), manganese (black, purple and pink) iron (red brown), etc. Different chemicals in the glaze can have dramatic effects. for example, barium carbonate (which we don’t use) turns manganese bright pink! Other elements can turn manganese dioxide brown, blue, purple and reddish brown. Manganese dioxide is a flux in and of itself as well. So, glazes that get their black and purple colours, often interact with other glazes and RUN! Our mirror black is a good example – it mixes really well with many glazes because it fluxes them – causes them to melt faster. It will also bring out many beautiful colours in the glazes because it’s black colouring most definitely comes from manganese dioxide! Glaze chemistry is a whole subject on it’s own! We use commercial Mayco glazes on purpose – for their huge range of colour possibilities, stability, cool interactions, artistic freedom with the ability to easily brush the glazes on and ease of use. We currently have almost 50 glazes on hand! A major project is to test the interactions of all glazes with each other. That is 2,500 test tiles!!!! I’m going to make the wall behind the wheels the feature wall of pretty colours! Step Seven – Glaze (Gloss or sometimes called “Glost”) Firing Most of the time this is the final stage of making your creation (but not always!) The glaze kiln goes to 1240°C. This is called cone 6, or midrange. It is the low end of stoneware temperatures. Stoneware clays and glazes are typically fired at cone 8 – 10, that is 1260 – 1290°C. The energy requirement to go from 1240°C to 1280°C is almost a 30% more! Our clay is formulated to vitrify (mature, turn “glass-like”) at 1240°, as are our glazes. A glaze kiln take around 12 hours to reach temperature and two to three days to cool down. Sometimes a third firing process is required – this is for decoration that is added to work after the glaze firing. For example – adding precious metals and lustres. this firing temperature is usually around 600 – 800°C depending upon the techniques being used. There are many students interested in gold and silver trims – we will be doing this third type of firing soon! After firing your work will be in the student finished work shelves. Remember to pay for it before you head out the door! There is a small extra charge for using porcelain clay (it’s more than twice the price of regular clay), and for any third firing process! Once your work has been fired it can not turn back into clay for millennia – so don’t fire it if you don’t like it! Put it in the bucket for recycling. https://firebirdstudios.com.au/the-process-of-making-pottery/Ceramics have evolved over thousands of years.Earthenware dessert plate, cream colour. Made by Alfred Meakin, England. Backstamped ‘Alfred Meakin England’. flagstaff hill, warrnambool, shipwrecked-coast, flagstaff-hill, flagstaff-hill-maritime-museum, maritime-museum, shipwreck-coast, flagstaff-hill-maritime-village, alfred meakin, ceramics, earthenware, kitchenware -
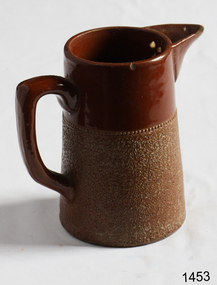 Flagstaff Hill Maritime Museum and Village
Domestic object - Jug
... Step Seven – Glaze (Gloss or sometimes called “Glost”) Firing Most of the time this is the final stage of making your creation (but not always!) ...Step Seven – Glaze (Gloss or sometimes called “Glost”) Firing Most of the time this is the final stage of making your creation (but not always!) ...The Process of Making Pottery Decorating, Firing, Glazing, Making, Technical There is a rhythm and flow to clay. It can’t be done all at once! Even the making process! It can take weeks to get everything done, especially if you can only work on your pottery once a week! Even though we have three hour classes, it’s often just not enough time! Here is an overview of some of the processes so you have a bit more grasp on some of the technical stuff! Step One – Design There are SO many ideas out there for making stuff in clay! From delicate porcelain jewellery, through to heavy sculptural work and everything in between. Deciding your direction is sometimes not that easy – when you first start, try everything, you will naturally gravitate to the style that you enjoy! The options and variations are endless and can get a wee bit overwhelming too! Check in with me before you start to ensure your ideas will work, what order you might do things, how you could achieve the look you are seeking and any other technical data required! Step Two – Making Clay is thixotropic. This means that as you work with it, the clay first gets sloppier and wetter, before is begins to dry in the atmosphere. For most things, you simply can’t do all parts of the project at once. An example of work order might look like: Get last weeks work out from the shelves Prepare clay for today’s work – roll your clay, prepare balls for throwing, make the first stage of a pinch pot) Clean up last week’s work and put it on the shelf for bisque firing Check that you have any glazing to do – and do enough of it that you will have time to finish your main project Do the next step of your next project – there might be a further step that can’t be complete immediately, in that case, wrap your work well and put onto the shelves. Letting your work rest for a while can really help keep your work clean and professional looking. Many things require bagging under plastic to keep it ready for work the next week – put your name on the outside of the bag so you can find your work easily. We have stickers and markers. Consider how you want to decorate your work – coloured slip can be applied at a fairly wet stage (remembering that it will make your work even wetter!). Trying to apply slip to dry clay won’t work! If you want to do sgraffito – you will need to keep the work leather hard (a state of dryness where you can still work the clay with a little effort and a little water and care). Step Three – Drying Most of the time your work can go into the rack uncovered to let it dry out for the following week. If you want to continue forming or shaping you will need to double bag your work – put your work on a suitable sized bat and put the bat in a bag so the base of the bag is under the bat, then put another bag over the top of the work and tuck the top of the bag under the bat. If you want to trim (or turn) your thrown work the following week, it should also be double bagged. If your work is large, delicate, or of uneven thicknesses, you should lightly cover your work for drying. When considering the drying process, bare in mind the weather, humidity and wind! The hotter and dryer, the faster things dry and work can dry unevenly in the shelves – this can lead to cracking – another time to lightly cover your work for drying. Step Four – Trimming and Cleaning Up Your work is dry! It is called greenware now and it is at it’s most fragile! Handle everything with two hands. I often refer to soft hands – keep everything gentle and with your fingers spread as much as possible. Try to not pick up things like plates too much, and always with both hands! Before your work can be bisque fired it should be “cleaned up”. You work won’t go into the kiln if it has sharp edges – when glazed, sharp edges turn into razor blades! Use a piece of fly wire to rub the work all over – this will scratch a little so be light handed. Use a knife or metal kidney to scrape any areas that require a bit more dynamic treatment than the fly wire offers! Finally, a very light wipe over with a slightly damp sponge can help soften and soothe all of your edges and dags! Trimming thrown work: If you are planning to trim (or turn) your thrown work (and you should be), make sure you bag it well – your work should be leather hard to almost dry for easiest trimming. Use this step to finish the work completely – use a metal kidney to polish the surface, or a slightly damp sponge to give a freshly thrown look. Wipe the sponge around the rim after trimming, and check the inside of the pot for dags! Trimming slip cast work: Usually I will trim the rims of your work on the wheel the following day to make that stage easier, however you will still need to check your work for lumps and bumps. Last but not least – check that your name is still clearly on the bottom of your work. Step Five – Bisque Firing When the work is completely dry it can go into the bisque kiln. The bisque kiln is fired to 1000°C. This process burns off the water in the clay as well as some of the chemically bound water. The structure of the clay is not altered that much at this temperature. Inside the bisque kiln, the work is stacked a little, small bowl inside a larger bowl and onto a heavy plate. Smaller items like decorations or drink coasters might get stacked several high. Consideration is paid to the weight of the stack and shape of the work. A bisque kiln can fire about one and a half times the amount of work that the glaze kiln can fire. The firing takes about 10 hours to complete the cycle and about two days to cool down. Once it has been emptied the work is placed in the glaze room ready for you to decorate! Step Six – Glazing Decorating your work with colour can be a lot of fun – and time consuming! There are three main options for surface treatment at this stage: Oxide Washes Underglazes Glazes Washes and underglazes do not “glaze” the work – It will still need a layer of glaze to fully seal the clay (washes don’t need glaze on surfaces not designed for food or liquid as they can gloss up a little on their own). Underglazes are stable colourants that turn out pretty much how they look in the jar. They can be mixed with each other to form other colours and can be used like water colours to paint onto your work. Mostly they should have a clear glaze on top to seal them. Oxides are a different species – the pink oxide (cobalt) wash turns out bright blue for instance. They don’t always need a glaze on top, and some glazes can change the colour of the wash! The glazes need no other “glaze” on top! Be careful of unknown glaze interactions – you can put any combination of glaze in a bowl or on a plate, but only a single glaze on the outside of any vertical surface! Glazes are a chemical reaction under heat. We don’t know the exact chemicals in the Mayco glazes we use. I can guess by the way they interact with each other, however, on the whole, you need to test every idea you have, and not run the test on a vertical surface! Simply put, glaze is a layer of glass like substance that bonds with the clay underneath. Clay is made of silica, alumina and water. Glaze is made of mostly silica. Silica has a melting point of 1700°C and we fire to 1240°C. The silica requires a “flux” to help it melt at the lower temperature. Fluxes can be all sorts of chemicals – a common one is calcium – calcium has a melting point of 2500°C, however, together they both melt at a much lower temperature! Colourants are metal oxides like cobalt (blue), chrome (green through black), copper (green, blue, even red!), manganese (black, purple and pink) iron (red brown), etc. Different chemicals in the glaze can have dramatic effects. for example, barium carbonate (which we don’t use) turns manganese bright pink! Other elements can turn manganese dioxide brown, blue, purple and reddish brown. Manganese dioxide is a flux in and of itself as well. So, glazes that get their black and purple colours, often interact with other glazes and RUN! Our mirror black is a good example – it mixes really well with many glazes because it fluxes them – causes them to melt faster. It will also bring out many beautiful colours in the glazes because it’s black colouring most definitely comes from manganese dioxide! Glaze chemistry is a whole subject on it’s own! We use commercial Mayco glazes on purpose – for their huge range of colour possibilities, stability, cool interactions, artistic freedom with the ability to easily brush the glazes on and ease of use. We currently have almost 50 glazes on hand! A major project is to test the interactions of all glazes with each other. That is 2,500 test tiles!!!! I’m going to make the wall behind the wheels the feature wall of pretty colours! Step Seven – Glaze (Gloss or sometimes called “Glost”) Firing Most of the time this is the final stage of making your creation (but not always!) The glaze kiln goes to 1240°C. This is called cone 6, or midrange. It is the low end of stoneware temperatures. Stoneware clays and glazes are typically fired at cone 8 – 10, that is 1260 – 1290°C. The energy requirement to go from 1240°C to 1280°C is almost a 30% more! Our clay is formulated to vitrify (mature, turn “glass-like”) at 1240°, as are our glazes. A glaze kiln take around 12 hours to reach temperature and two to three days to cool down. Sometimes a third firing process is required – this is for decoration that is added to work after the glaze firing. For example – adding precious metals and lustres. this firing temperature is usually around 600 – 800°C depending upon the techniques being used. There are many students interested in gold and silver trims – we will be doing this third type of firing soon! After firing your work will be in the student finished work shelves. Remember to pay for it before you head out the door! There is a small extra charge for using porcelain clay (it’s more than twice the price of regular clay), and for any third firing process! Once your work has been fired it can not turn back into clay for millennia – so don’t fire it if you don’t like it! Put it in the bucket for recycling. https://firebirdstudios.com.au/the-process-of-making-pottery/The form of the jug has been in use for many centuries.Stoneware jug. Two tone brown glaze with pierced lip behind spout. Spout chipped.None.flagstaff hill, warrnambool, shipwrecked-coast, flagstaff-hill, flagstaff-hill-maritime-museum, maritime-museum, shipwreck-coast, flagstaff-hill-maritime-village, jug, ceramic jug -
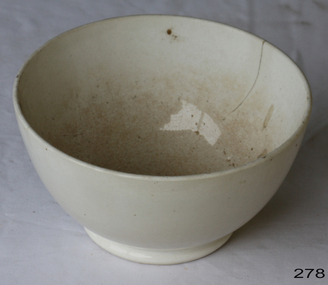 Flagstaff Hill Maritime Museum and Village
Domestic object - Bowl, Late 19th or early 20th Century
... Step Seven – Glaze (Gloss or sometimes called “Glost”) Firing Most of the time this is the final stage of making your creation (but not always!) ...Step Seven – Glaze (Gloss or sometimes called “Glost”) Firing Most of the time this is the final stage of making your creation (but not always!) ...The Process of Making Pottery Decorating, Firing, Glazing, Making, Technical There is a rhythm and flow to clay. It can’t be done all at once! Even the making process! It can take weeks to get everything done, especially if you can only work on your pottery once a week! Even though we have three hour classes, it’s often just not enough time! Here is an overview of some of the processes so you have a bit more grasp on some of the technical stuff! Step One – Design There are SO many ideas out there for making stuff in clay! From delicate porcelain jewellery, through to heavy sculptural work and everything in between. Deciding your direction is sometimes not that easy – when you first start, try everything, you will naturally gravitate to the style that you enjoy! The options and variations are endless and can get a wee bit overwhelming too! Check in with me before you start to ensure your ideas will work, what order you might do things, how you could achieve the look you are seeking and any other technical data required! Step Two – Making Clay is thixotropic. This means that as you work with it, the clay first gets sloppier and wetter, before is begins to dry in the atmosphere. For most things, you simply can’t do all parts of the project at once. An example of work order might look like: Get last weeks work out from the shelves Prepare clay for today’s work – roll your clay, prepare balls for throwing, make the first stage of a pinch pot) Clean up last week’s work and put it on the shelf for bisque firing Check that you have any glazing to do – and do enough of it that you will have time to finish your main project Do the next step of your next project – there might be a further step that can’t be complete immediately, in that case, wrap your work well and put onto the shelves. Letting your work rest for a while can really help keep your work clean and professional looking. Many things require bagging under plastic to keep it ready for work the next week – put your name on the outside of the bag so you can find your work easily. We have stickers and markers. Consider how you want to decorate your work – coloured slip can be applied at a fairly wet stage (remembering that it will make your work even wetter!). Trying to apply slip to dry clay won’t work! If you want to do sgraffito – you will need to keep the work leather hard (a state of dryness where you can still work the clay with a little effort and a little water and care). Step Three – Drying Most of the time your work can go into the rack uncovered to let it dry out for the following week. If you want to continue forming or shaping you will need to double bag your work – put your work on a suitable sized bat and put the bat in a bag so the base of the bag is under the bat, then put another bag over the top of the work and tuck the top of the bag under the bat. If you want to trim (or turn) your thrown work the following week, it should also be double bagged. If your work is large, delicate, or of uneven thicknesses, you should lightly cover your work for drying. When considering the drying process, bare in mind the weather, humidity and wind! The hotter and dryer, the faster things dry and work can dry unevenly in the shelves – this can lead to cracking – another time to lightly cover your work for drying. Step Four – Trimming and Cleaning Up Your work is dry! It is called greenware now and it is at it’s most fragile! Handle everything with two hands. I often refer to soft hands – keep everything gentle and with your fingers spread as much as possible. Try to not pick up things like plates too much, and always with both hands! Before your work can be bisque fired it should be “cleaned up”. You work won’t go into the kiln if it has sharp edges – when glazed, sharp edges turn into razor blades! Use a piece of fly wire to rub the work all over – this will scratch a little so be light handed. Use a knife or metal kidney to scrape any areas that require a bit more dynamic treatment than the fly wire offers! Finally, a very light wipe over with a slightly damp sponge can help soften and soothe all of your edges and dags! Trimming thrown work: If you are planning to trim (or turn) your thrown work (and you should be), make sure you bag it well – your work should be leather hard to almost dry for easiest trimming. Use this step to finish the work completely – use a metal kidney to polish the surface, or a slightly damp sponge to give a freshly thrown look. Wipe the sponge around the rim after trimming, and check the inside of the pot for dags! Trimming slip cast work: Usually I will trim the rims of your work on the wheel the following day to make that stage easier, however you will still need to check your work for lumps and bumps. Last but not least – check that your name is still clearly on the bottom of your work. Step Five – Bisque Firing When the work is completely dry it can go into the bisque kiln. The bisque kiln is fired to 1000°C. This process burns off the water in the clay as well as some of the chemically bound water. The structure of the clay is not altered that much at this temperature. Inside the bisque kiln, the work is stacked a little, small bowl inside a larger bowl and onto a heavy plate. Smaller items like decorations or drink coasters might get stacked several high. Consideration is paid to the weight of the stack and shape of the work. A bisque kiln can fire about one and a half times the amount of work that the glaze kiln can fire. The firing takes about 10 hours to complete the cycle and about two days to cool down. Once it has been emptied the work is placed in the glaze room ready for you to decorate! Step Six – Glazing Decorating your work with colour can be a lot of fun – and time consuming! There are three main options for surface treatment at this stage: Oxide Washes Underglazes Glazes Washes and underglazes do not “glaze” the work – It will still need a layer of glaze to fully seal the clay (washes don’t need glaze on surfaces not designed for food or liquid as they can gloss up a little on their own). Underglazes are stable colourants that turn out pretty much how they look in the jar. They can be mixed with each other to form other colours and can be used like water colours to paint onto your work. Mostly they should have a clear glaze on top to seal them. Oxides are a different species – the pink oxide (cobalt) wash turns out bright blue for instance. They don’t always need a glaze on top, and some glazes can change the colour of the wash! The glazes need no other “glaze” on top! Be careful of unknown glaze interactions – you can put any combination of glaze in a bowl or on a plate, but only a single glaze on the outside of any vertical surface! Glazes are a chemical reaction under heat. We don’t know the exact chemicals in the Mayco glazes we use. I can guess by the way they interact with each other, however, on the whole, you need to test every idea you have, and not run the test on a vertical surface! Simply put, glaze is a layer of glass like substance that bonds with the clay underneath. Clay is made of silica, alumina and water. Glaze is made of mostly silica. Silica has a melting point of 1700°C and we fire to 1240°C. The silica requires a “flux” to help it melt at the lower temperature. Fluxes can be all sorts of chemicals – a common one is calcium – calcium has a melting point of 2500°C, however, together they both melt at a much lower temperature! Colourants are metal oxides like cobalt (blue), chrome (green through black), copper (green, blue, even red!), manganese (black, purple and pink) iron (red brown), etc. Different chemicals in the glaze can have dramatic effects. for example, barium carbonate (which we don’t use) turns manganese bright pink! Other elements can turn manganese dioxide brown, blue, purple and reddish brown. Manganese dioxide is a flux in and of itself as well. So, glazes that get their black and purple colours, often interact with other glazes and RUN! Our mirror black is a good example – it mixes really well with many glazes because it fluxes them – causes them to melt faster. It will also bring out many beautiful colours in the glazes because it’s black colouring most definitely comes from manganese dioxide! Glaze chemistry is a whole subject on it’s own! We use commercial Mayco glazes on purpose – for their huge range of colour possibilities, stability, cool interactions, artistic freedom with the ability to easily brush the glazes on and ease of use. We currently have almost 50 glazes on hand! A major project is to test the interactions of all glazes with each other. That is 2,500 test tiles!!!! I’m going to make the wall behind the wheels the feature wall of pretty colours! Step Seven – Glaze (Gloss or sometimes called “Glost”) Firing Most of the time this is the final stage of making your creation (but not always!) The glaze kiln goes to 1240°C. This is called cone 6, or midrange. It is the low end of stoneware temperatures. Stoneware clays and glazes are typically fired at cone 8 – 10, that is 1260 – 1290°C. The energy requirement to go from 1240°C to 1280°C is almost a 30% more! Our clay is formulated to vitrify (mature, turn “glass-like”) at 1240°, as are our glazes. A glaze kiln take around 12 hours to reach temperature and two to three days to cool down. Sometimes a third firing process is required – this is for decoration that is added to work after the glaze firing. For example – adding precious metals and lustres. this firing temperature is usually around 600 – 800°C depending upon the techniques being used. There are many students interested in gold and silver trims – we will be doing this third type of firing soon! After firing your work will be in the student finished work shelves. Remember to pay for it before you head out the door! There is a small extra charge for using porcelain clay (it’s more than twice the price of regular clay), and for any third firing process! Once your work has been fired it can not turn back into clay for millennia – so don’t fire it if you don’t like it! Put it in the bucket for recycling. https://firebirdstudios.com.au/the-process-of-making-pottery/ The bowl is an example of kitchenware used in the 19th century and still in use today.Bowl white ceramic. Crack on side. Badly stained.Backstamp very faint and unable to be read.flagstaff hill, warrnambool, shipwrecked-coast, flagstaff-hill, flagstaff-hill-maritime-museum, maritime-museum, shipwreck-coast, flagstaff-hill-maritime-village, mixing bowl, food preparation, kitchen equipment, ceramic -
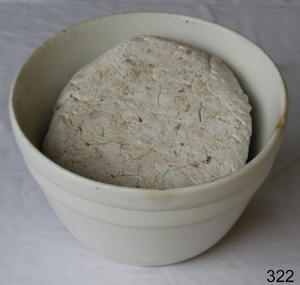 Flagstaff Hill Maritime Museum and Village
Domestic object - Bowl
... Step Seven – Glaze (Gloss or sometimes called “Glost”) Firing Most of the time this is the final stage of making your creation (but not always!) ...Step Seven – Glaze (Gloss or sometimes called “Glost”) Firing Most of the time this is the final stage of making your creation (but not always!) ...The Process of Making Pottery Decorating, Firing, Glazing, Making, Technical There is a rhythm and flow to clay. It can’t be done all at once! Even the making process! It can take weeks to get everything done, especially if you can only work on your pottery once a week! Even though we have three hour classes, it’s often just not enough time! Here is an overview of some of the processes so you have a bit more grasp on some of the technical stuff! Step One – Design There are SO many ideas out there for making stuff in clay! From delicate porcelain jewellery, through to heavy sculptural work and everything in between. Deciding your direction is sometimes not that easy – when you first start, try everything, you will naturally gravitate to the style that you enjoy! The options and variations are endless and can get a wee bit overwhelming too! Check in with me before you start to ensure your ideas will work, what order you might do things, how you could achieve the look you are seeking and any other technical data required! Step Two – Making Clay is thixotropic. This means that as you work with it, the clay first gets sloppier and wetter, before is begins to dry in the atmosphere. For most things, you simply can’t do all parts of the project at once. An example of work order might look like: Get last weeks work out from the shelves Prepare clay for today’s work – roll your clay, prepare balls for throwing, make the first stage of a pinch pot) Clean up last week’s work and put it on the shelf for bisque firing Check that you have any glazing to do – and do enough of it that you will have time to finish your main project Do the next step of your next project – there might be a further step that can’t be complete immediately, in that case, wrap your work well and put onto the shelves. Letting your work rest for a while can really help keep your work clean and professional looking. Many things require bagging under plastic to keep it ready for work the next week – put your name on the outside of the bag so you can find your work easily. We have stickers and markers. Consider how you want to decorate your work – coloured slip can be applied at a fairly wet stage (remembering that it will make your work even wetter!). Trying to apply slip to dry clay won’t work! If you want to do sgraffito – you will need to keep the work leather hard (a state of dryness where you can still work the clay with a little effort and a little water and care). Step Three – Drying Most of the time your work can go into the rack uncovered to let it dry out for the following week. If you want to continue forming or shaping you will need to double bag your work – put your work on a suitable sized bat and put the bat in a bag so the base of the bag is under the bat, then put another bag over the top of the work and tuck the top of the bag under the bat. If you want to trim (or turn) your thrown work the following week, it should also be double bagged. If your work is large, delicate, or of uneven thicknesses, you should lightly cover your work for drying. When considering the drying process, bare in mind the weather, humidity and wind! The hotter and dryer, the faster things dry and work can dry unevenly in the shelves – this can lead to cracking – another time to lightly cover your work for drying. Step Four – Trimming and Cleaning Up Your work is dry! It is called greenware now and it is at it’s most fragile! Handle everything with two hands. I often refer to soft hands – keep everything gentle and with your fingers spread as much as possible. Try to not pick up things like plates too much, and always with both hands! Before your work can be bisque fired it should be “cleaned up”. You work won’t go into the kiln if it has sharp edges – when glazed, sharp edges turn into razor blades! Use a piece of fly wire to rub the work all over – this will scratch a little so be light handed. Use a knife or metal kidney to scrape any areas that require a bit more dynamic treatment than the fly wire offers! Finally, a very light wipe over with a slightly damp sponge can help soften and soothe all of your edges and dags! Trimming thrown work: If you are planning to trim (or turn) your thrown work (and you should be), make sure you bag it well – your work should be leather hard to almost dry for easiest trimming. Use this step to finish the work completely – use a metal kidney to polish the surface, or a slightly damp sponge to give a freshly thrown look. Wipe the sponge around the rim after trimming, and check the inside of the pot for dags! Trimming slip cast work: Usually I will trim the rims of your work on the wheel the following day to make that stage easier, however you will still need to check your work for lumps and bumps. Last but not least – check that your name is still clearly on the bottom of your work. Step Five – Bisque Firing When the work is completely dry it can go into the bisque kiln. The bisque kiln is fired to 1000°C. This process burns off the water in the clay as well as some of the chemically bound water. The structure of the clay is not altered that much at this temperature. Inside the bisque kiln, the work is stacked a little, small bowl inside a larger bowl and onto a heavy plate. Smaller items like decorations or drink coasters might get stacked several high. Consideration is paid to the weight of the stack and shape of the work. A bisque kiln can fire about one and a half times the amount of work that the glaze kiln can fire. The firing takes about 10 hours to complete the cycle and about two days to cool down. Once it has been emptied the work is placed in the glaze room ready for you to decorate! Step Six – Glazing Decorating your work with colour can be a lot of fun – and time consuming! There are three main options for surface treatment at this stage: Oxide Washes Underglazes Glazes Washes and underglazes do not “glaze” the work – It will still need a layer of glaze to fully seal the clay (washes don’t need glaze on surfaces not designed for food or liquid as they can gloss up a little on their own). Underglazes are stable colourants that turn out pretty much how they look in the jar. They can be mixed with each other to form other colours and can be used like water colours to paint onto your work. Mostly they should have a clear glaze on top to seal them. Oxides are a different species – the pink oxide (cobalt) wash turns out bright blue for instance. They don’t always need a glaze on top, and some glazes can change the colour of the wash! The glazes need no other “glaze” on top! Be careful of unknown glaze interactions – you can put any combination of glaze in a bowl or on a plate, but only a single glaze on the outside of any vertical surface! Glazes are a chemical reaction under heat. We don’t know the exact chemicals in the Mayco glazes we use. I can guess by the way they interact with each other, however, on the whole, you need to test every idea you have, and not run the test on a vertical surface! Simply put, glaze is a layer of glass like substance that bonds with the clay underneath. Clay is made of silica, alumina and water. Glaze is made of mostly silica. Silica has a melting point of 1700°C and we fire to 1240°C. The silica requires a “flux” to help it melt at the lower temperature. Fluxes can be all sorts of chemicals – a common one is calcium – calcium has a melting point of 2500°C, however, together they both melt at a much lower temperature! Colourants are metal oxides like cobalt (blue), chrome (green through black), copper (green, blue, even red!), manganese (black, purple and pink) iron (red brown), etc. Different chemicals in the glaze can have dramatic effects. for example, barium carbonate (which we don’t use) turns manganese bright pink! Other elements can turn manganese dioxide brown, blue, purple and reddish brown. Manganese dioxide is a flux in and of itself as well. So, glazes that get their black and purple colours, often interact with other glazes and RUN! Our mirror black is a good example – it mixes really well with many glazes because it fluxes them – causes them to melt faster. It will also bring out many beautiful colours in the glazes because it’s black colouring most definitely comes from manganese dioxide! Glaze chemistry is a whole subject on it’s own! We use commercial Mayco glazes on purpose – for their huge range of colour possibilities, stability, cool interactions, artistic freedom with the ability to easily brush the glazes on and ease of use. We currently have almost 50 glazes on hand! A major project is to test the interactions of all glazes with each other. That is 2,500 test tiles!!!! I’m going to make the wall behind the wheels the feature wall of pretty colours! Step Seven – Glaze (Gloss or sometimes called “Glost”) Firing Most of the time this is the final stage of making your creation (but not always!) The glaze kiln goes to 1240°C. This is called cone 6, or midrange. It is the low end of stoneware temperatures. Stoneware clays and glazes are typically fired at cone 8 – 10, that is 1260 – 1290°C. The energy requirement to go from 1240°C to 1280°C is almost a 30% more! Our clay is formulated to vitrify (mature, turn “glass-like”) at 1240°, as are our glazes. A glaze kiln take around 12 hours to reach temperature and two to three days to cool down. Sometimes a third firing process is required – this is for decoration that is added to work after the glaze firing. For example – adding precious metals and lustres. this firing temperature is usually around 600 – 800°C depending upon the techniques being used. There are many students interested in gold and silver trims – we will be doing this third type of firing soon! After firing your work will be in the student finished work shelves. Remember to pay for it before you head out the door! There is a small extra charge for using porcelain clay (it’s more than twice the price of regular clay), and for any third firing process! Once your work has been fired it can not turn back into clay for millennia – so don’t fire it if you don’t like it! Put it in the bucket for recycling. https://firebirdstudios.com.au/the-process-of-making-pottery/ This bowl is an example of kitchenware used in the 19th century and still in use today.Bowl white ceramic plain that has two sets of edging around lip. Inside bowl has plaster designed to look like cooking mixture.flagstaff hill, warrnambool, shipwrecked-coast, flagstaff-hill, flagstaff-hill-maritime-museum, maritime-museum, shipwreck-coast, flagstaff-hill-maritime-village, kitchen equipment, ceramic -
 Flagstaff Hill Maritime Museum and Village
Domestic object - Bowl, J & G Meakin, Late 19th or early 20th Century
... Step Seven – Glaze (Gloss or sometimes called “Glost”) Firing Most of the time this is the final stage of making your creation (but not always!) ...Step Seven – Glaze (Gloss or sometimes called “Glost”) Firing Most of the time this is the final stage of making your creation (but not always!) ...The Process of Making Pottery Decorating, Firing, Glazing, Making, Technical There is a rhythm and flow to clay. It can’t be done all at once! Even the making process! It can take weeks to get everything done, especially if you can only work on your pottery once a week! Even though we have three hour classes, it’s often just not enough time! Here is an overview of some of the processes so you have a bit more grasp on some of the technical stuff! Step One – Design There are SO many ideas out there for making stuff in clay! From delicate porcelain jewellery, through to heavy sculptural work and everything in between. Deciding your direction is sometimes not that easy – when you first start, try everything, you will naturally gravitate to the style that you enjoy! The options and variations are endless and can get a wee bit overwhelming too! Check in with me before you start to ensure your ideas will work, what order you might do things, how you could achieve the look you are seeking and any other technical data required! Step Two – Making Clay is thixotropic. This means that as you work with it, the clay first gets sloppier and wetter, before is begins to dry in the atmosphere. For most things, you simply can’t do all parts of the project at once. An example of work order might look like: Get last weeks work out from the shelves Prepare clay for today’s work – roll your clay, prepare balls for throwing, make the first stage of a pinch pot) Clean up last week’s work and put it on the shelf for bisque firing Check that you have any glazing to do – and do enough of it that you will have time to finish your main project Do the next step of your next project – there might be a further step that can’t be complete immediately, in that case, wrap your work well and put onto the shelves. Letting your work rest for a while can really help keep your work clean and professional looking. Many things require bagging under plastic to keep it ready for work the next week – put your name on the outside of the bag so you can find your work easily. We have stickers and markers. Consider how you want to decorate your work – coloured slip can be applied at a fairly wet stage (remembering that it will make your work even wetter!). Trying to apply slip to dry clay won’t work! If you want to do sgraffito – you will need to keep the work leather hard (a state of dryness where you can still work the clay with a little effort and a little water and care). Step Three – Drying Most of the time your work can go into the rack uncovered to let it dry out for the following week. If you want to continue forming or shaping you will need to double bag your work – put your work on a suitable sized bat and put the bat in a bag so the base of the bag is under the bat, then put another bag over the top of the work and tuck the top of the bag under the bat. If you want to trim (or turn) your thrown work the following week, it should also be double bagged. If your work is large, delicate, or of uneven thicknesses, you should lightly cover your work for drying. When considering the drying process, bare in mind the weather, humidity and wind! The hotter and dryer, the faster things dry and work can dry unevenly in the shelves – this can lead to cracking – another time to lightly cover your work for drying. Step Four – Trimming and Cleaning Up Your work is dry! It is called greenware now and it is at it’s most fragile! Handle everything with two hands. I often refer to soft hands – keep everything gentle and with your fingers spread as much as possible. Try to not pick up things like plates too much, and always with both hands! Before your work can be bisque fired it should be “cleaned up”. You work won’t go into the kiln if it has sharp edges – when glazed, sharp edges turn into razor blades! Use a piece of fly wire to rub the work all over – this will scratch a little so be light handed. Use a knife or metal kidney to scrape any areas that require a bit more dynamic treatment than the fly wire offers! Finally, a very light wipe over with a slightly damp sponge can help soften and soothe all of your edges and dags! Trimming thrown work: If you are planning to trim (or turn) your thrown work (and you should be), make sure you bag it well – your work should be leather hard to almost dry for easiest trimming. Use this step to finish the work completely – use a metal kidney to polish the surface, or a slightly damp sponge to give a freshly thrown look. Wipe the sponge around the rim after trimming, and check the inside of the pot for dags! Trimming slip cast work: Usually I will trim the rims of your work on the wheel the following day to make that stage easier, however you will still need to check your work for lumps and bumps. Last but not least – check that your name is still clearly on the bottom of your work. Step Five – Bisque Firing When the work is completely dry it can go into the bisque kiln. The bisque kiln is fired to 1000°C. This process burns off the water in the clay as well as some of the chemically bound water. The structure of the clay is not altered that much at this temperature. Inside the bisque kiln, the work is stacked a little, small bowl inside a larger bowl and onto a heavy plate. Smaller items like decorations or drink coasters might get stacked several high. Consideration is paid to the weight of the stack and shape of the work. A bisque kiln can fire about one and a half times the amount of work that the glaze kiln can fire. The firing takes about 10 hours to complete the cycle and about two days to cool down. Once it has been emptied the work is placed in the glaze room ready for you to decorate! Step Six – Glazing Decorating your work with colour can be a lot of fun – and time consuming! There are three main options for surface treatment at this stage: Oxide Washes Underglazes Glazes Washes and underglazes do not “glaze” the work – It will still need a layer of glaze to fully seal the clay (washes don’t need glaze on surfaces not designed for food or liquid as they can gloss up a little on their own). Underglazes are stable colourants that turn out pretty much how they look in the jar. They can be mixed with each other to form other colours and can be used like water colours to paint onto your work. Mostly they should have a clear glaze on top to seal them. Oxides are a different species – the pink oxide (cobalt) wash turns out bright blue for instance. They don’t always need a glaze on top, and some glazes can change the colour of the wash! The glazes need no other “glaze” on top! Be careful of unknown glaze interactions – you can put any combination of glaze in a bowl or on a plate, but only a single glaze on the outside of any vertical surface! Glazes are a chemical reaction under heat. We don’t know the exact chemicals in the Mayco glazes we use. I can guess by the way they interact with each other, however, on the whole, you need to test every idea you have, and not run the test on a vertical surface! Simply put, glaze is a layer of glass like substance that bonds with the clay underneath. Clay is made of silica, alumina and water. Glaze is made of mostly silica. Silica has a melting point of 1700°C and we fire to 1240°C. The silica requires a “flux” to help it melt at the lower temperature. Fluxes can be all sorts of chemicals – a common one is calcium – calcium has a melting point of 2500°C, however, together they both melt at a much lower temperature! Colourants are metal oxides like cobalt (blue), chrome (green through black), copper (green, blue, even red!), manganese (black, purple and pink) iron (red brown), etc. Different chemicals in the glaze can have dramatic effects. for example, barium carbonate (which we don’t use) turns manganese bright pink! Other elements can turn manganese dioxide brown, blue, purple and reddish brown. Manganese dioxide is a flux in and of itself as well. So, glazes that get their black and purple colours, often interact with other glazes and RUN! Our mirror black is a good example – it mixes really well with many glazes because it fluxes them – causes them to melt faster. It will also bring out many beautiful colours in the glazes because it’s black colouring most definitely comes from manganese dioxide! Glaze chemistry is a whole subject on it’s own! We use commercial Mayco glazes on purpose – for their huge range of colour possibilities, stability, cool interactions, artistic freedom with the ability to easily brush the glazes on and ease of use. We currently have almost 50 glazes on hand! A major project is to test the interactions of all glazes with each other. That is 2,500 test tiles!!!! I’m going to make the wall behind the wheels the feature wall of pretty colours! Step Seven – Glaze (Gloss or sometimes called “Glost”) Firing Most of the time this is the final stage of making your creation (but not always!) The glaze kiln goes to 1240°C. This is called cone 6, or midrange. It is the low end of stoneware temperatures. Stoneware clays and glazes are typically fired at cone 8 – 10, that is 1260 – 1290°C. The energy requirement to go from 1240°C to 1280°C is almost a 30% more! Our clay is formulated to vitrify (mature, turn “glass-like”) at 1240°, as are our glazes. A glaze kiln take around 12 hours to reach temperature and two to three days to cool down. Sometimes a third firing process is required – this is for decoration that is added to work after the glaze firing. For example – adding precious metals and lustres. this firing temperature is usually around 600 – 800°C depending upon the techniques being used. There are many students interested in gold and silver trims – we will be doing this third type of firing soon! After firing your work will be in the student finished work shelves. Remember to pay for it before you head out the door! There is a small extra charge for using porcelain clay (it’s more than twice the price of regular clay), and for any third firing process! Once your work has been fired it can not turn back into clay for millennia – so don’t fire it if you don’t like it! Put it in the bucket for recycling. https://firebirdstudios.com.au/the-process-of-making-pottery/This bowl was made by renowned pottery company J & G Meakin of England. The firm was established in the mid-1800's. The bowl is an example of kitchenware used in the 19th century and still in use today.Bowl; white ceramic, round and tapering inwards towards base. Made by J and G Meakin England.On base, 'Ironstone China Reg SOL 391413' with symbolflagstaff hill, flagstaff hill maritime museum and village, warrnambool, maritime museum, maritime village, great ocean road, shipwreck coast, mixing bowl, food preparation, j & g meakin, pottery, stoke-on-trent, kitchen equipment, ceramic