Showing 69 items matching "firing techniques"
-
 4th/19th Prince of Wales's Light Horse Regiment Unit History Room
Booklet, Royal Australian Armoured Corps Training Vol 2 Firing Techniques Pam No 4. The Application of Fire from Light Armoured Fighting Vehicles, 1972
... Royal Australian Armoured Corps Training Vol 2 Firing Techniques Pam No 4. The Application of Fire from Light Armoured Fighting Vehicles...Firing techniques...Royal Australian Armoured Corps Training Vol 2 Firing Techniques Pam No 4. The Application of Fire from Light Armoured Fighting Vehicles Booklet ...Soft covered booklet.DSN 7610-66-049-4468firing techniques, afv's -
4th/19th Prince of Wales's Light Horse Regiment Unit History Room
Document (3 copies), Royal Australian Armoured Corps. Corps Training Notes Vol 2 Firing Techniques and Armaments. Pam No 6 Light AFV Armament. Application of Fire, 1993
... Corps Training Notes Vol 2 Firing Techniques and Armaments. Pam No 6 Light AFV Armament. ...Corps Training Notes Vol 2 Firing Techniques and Armaments. Pam No 6 Light AFV Armament. ...A loose leaf interim publication to provide the information necessary for instructors and vehicle commanders to conduct initial and continued training for crews -
 4th/19th Prince of Wales's Light Horse Regiment Unit History Room
Booklet (2 copies), Royal Australian Armoured Corps Training Vol 3 Firing Techniques Pam No 2 Open Range Practices and Range Safety 1971, 1971
... Royal Australian Armoured Corps Training Vol 3 Firing Techniques Pam No 2 Open Range Practices and Range Safety 1971...4th/19th Prince of Wales's Light Horse Regiment Unit History Room 4/19 PWLH Regiment, Building 78 Simpson Barracks Macleod melbourne tank gunnery range practices DSN 7610-66-039-4908 Soft covered booklet Royal Australian Armoured Corps Training Vol 3 Firing Techniques Pam No 2 Open Range Practices and Range Safety 1971 Booklet (2 copies) ...Soft covered bookletDSN 7610-66-039-4908tank gunnery, range practices -
4th/19th Prince of Wales's Light Horse Regiment Unit History Room
Booklet, Royal Australian Armoured Corps Training Vol 2 Firing Techniques Pam 1 Techniques of Shooting from AFVs General Principles 1971, 1971
... Royal Australian Armoured Corps Training Vol 2 Firing Techniques Pam 1 Techniques of Shooting from AFVs General Principles 1971...4th/19th Prince of Wales's Light Horse Regiment Unit History Room 4/19 PWLH Regiment, Building 78 Simpson Barracks Macleod melbourne gunnery afv's DSN 7610-66-044-7030 A soft covered booklet covering the fundamentals of AFV gunnery, weapons and their characteristics, ammunition, theory of fire, and various types of shooting Royal Australian Armoured Corps Training Vol 2 Firing Techniques Pam 1 Techniques of Shooting from AFVs General Principles 1971 Booklet ...A soft covered booklet covering the fundamentals of AFV gunnery, weapons and their characteristics, ammunition, theory of fire, and various types of shooting DSN 7610-66-044-7030gunnery afv's -
4th/19th Prince of Wales's Light Horse Regiment Unit History Room
Booklet, Manual of Land Warfare Part 2 Armour Training Vol 2 Firing Techniques Pam 1 Techniques of Shooting from AFV General Principles 1983, 1983
... Manual of Land Warfare Part 2 Armour Training Vol 2 Firing Techniques Pam 1 Techniques of Shooting from AFV General Principles 1983...Manual of Land Warfare Part 2 Armour Training Vol 2 Firing Techniques Pam 1 Techniques of Shooting from AFV General Principles 1983 Booklet ...A soft covered booklet covering the fundamentals of AFV gunnery, basic ballistics, theory of fire, range determination, fire discipline, types of shooting etc. DSN 7610-66-108-8456armour, gunnery -
4th/19th Prince of Wales's Light Horse Regiment Unit History Room
Booklet, Department of Defence, RAAC Training Vol 2 Firing Techniques Pam 4A: The Application of Fire from FSV (Scorpion), 1978
... RAAC Training Vol 2 Firing Techniques Pam 4A: The Application of Fire from FSV (Scorpion) ...RAAC Training Vol 2 Firing Techniques Pam 4A: The Application of Fire from FSV (Scorpion) Booklet Department of Defence ...A loose leaf photo copy of the publication.gunnery, fire support vehicle, scorpion -
4th/19th Prince of Wales's Light Horse Regiment Unit History Room
Booklet, RAAC Training Vol 2 Firing Techniques Pam 4: The Application of Fire from Light Armoured fighting Vehicles, 1972
... RAAC Training Vol 2 Firing Techniques Pam 4: The Application of Fire from Light Armoured fighting Vehicles ...4th/19th Prince of Wales's Light Horse Regiment Unit History Room 4/19 PWLH Regiment, Building 78 Simpson Barracks Macleod melbourne Light AFV application of fire DSN 7610-66-049-4468 A soft covered booklet dealing with the application of fire from the light AFV's in use at the time (M113 family -including Light Reconnaissance Vehicle, Armoured Personnel Carrier and Fire Support Vehicle) RAAC Training Vol 2 Firing Techniques Pam 4: The Application of Fire from Light Armoured fighting Vehicles Booklet ...A soft covered booklet dealing with the application of fire from the light AFV's in use at the time (M113 family -including Light Reconnaissance Vehicle, Armoured Personnel Carrier and Fire Support Vehicle)DSN 7610-66-049-4468light afv, application of fire -
4th/19th Prince of Wales's Light Horse Regiment Unit History Room
Booklet (2 copies), RAAC Training Vol 2 Firing Techniques Pam 1: The Techniques of Shooting from Armoured Fighting Vehicles General Principles, 1971
... RAAC Training Vol 2 Firing Techniques Pam 1: The Techniques of Shooting from Armoured Fighting Vehicles General Principles...4th/19th Prince of Wales's Light Horse Regiment Unit History Room 4/19 PWLH Regiment, Building 78 Simpson Barracks Macleod melbourne AV Gunnery DSN 7610-66-044-7030 Soft covered booklet RAAC Training Vol 2 Firing Techniques Pam 1: The Techniques of Shooting from Armoured Fighting Vehicles General Principles Booklet (2 copies) ...Soft covered bookletDSN 7610-66-044-7030av gunnery -
 Kiewa Valley Historical Society
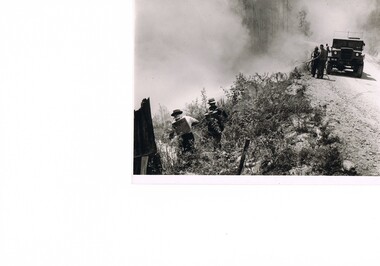
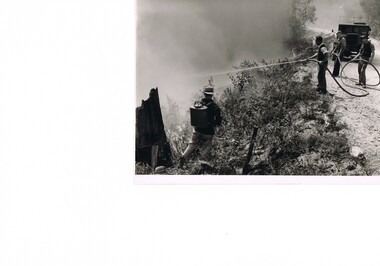
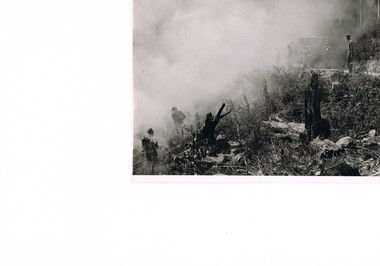
Photograph Fire Prevention Victorian Alps, Burning, Circa 1950
... This photograph, in late 1950s, shows an Alpine Fire Prevention technique of "burning off" low levels of scrub to reduce the level of available fuel against any possible summer bush fires. ...This black and white photograph shows an Alpine Fire Prevention technique of "burning off" low levels of scrub. ...Kiewa Valley Historical Society Mount Beauty Information Centre 31 Bogong High Plains Rd Mt Beauty high-country This photograph, in late 1950s, shows an Alpine Fire Prevention technique of "burning off" low levels of scrub to reduce the level of available fuel against any possible summer bush fires. ...This photograph, in late 1950s, shows an Alpine Fire Prevention technique of "burning off" low levels of scrub to reduce the level of available fuel against any possible summer bush fires. The Alpine regions accumulate high levels of potential fuel (undergrowth and small shrubs) which if not reduced has the potential of breaking into a dangerous bush fire. The men in this photograph are not wearing any protective clothing. Their visibility to other firefighters is severely reduced by smoke. This photo is a snap shot in time when Occupational Health and Safety Legislation was in its infancy stage.This photograph details the fire prevention activities in the Victorian Alps under the management of the SEC Victoria. The level of undergrowth within the Australian bush needs to be kept under control to avoid the possibility of lightning strikes (during summer storms) igniting dry forests resulting in a major bush fire. Controlled fires within alpine regions are required not only to reduce the level of dry undergrowth but also to provide those various plant species requiring fire for regenerate. This method was used by the original inhabitants (Aborigines) as limited scrub fires were used to flush game and bird population for eating with the side benefit to those plants requiring the fire for regeneration.This black and white photograph shows an Alpine Fire Prevention technique of "burning off" low levels of scrub. The photograph is on 200gsm paper but it is not photographic paper. It can be assumed that the photo is not the original but a copy. alpine fire prevention, sec fire prevention -
 Kiewa Valley Historical Society
Photograph Fire Prevention Victorian Alps, Burning, Circa 1950
... This photograph, in late 1950s, shows an Alpine Fire Prevention technique of "burning off" low levels of scrub to reduce the level of available fuel against any possible summer bush fires. ...This black and white photograph shows an Alpine Fire Prevention technique of "burning off" low levels of scrub. ...Kiewa Valley Historical Society Mount Beauty Information Centre 31 Bogong High Plains Rd Mt Beauty high-country This photograph, in late 1950s, shows an Alpine Fire Prevention technique of "burning off" low levels of scrub to reduce the level of available fuel against any possible summer bush fires. ...This photograph, in late 1950s, shows an Alpine Fire Prevention technique of "burning off" low levels of scrub to reduce the level of available fuel against any possible summer bush fires. The Alpine regions accumulate high levels of potential fuel (undergrowth and small shrubs) which if not reduced has the potential of breaking into a dangerous bush fire. The men in this photograph are not wearing any protective clothing. Their visibility to other firefighters is severely reduced by smoke. This photo is a snap shot in time when Occupational Health and Safety Legislation was in its infancy stage.This photograph details the fire prevention activities in the Victorian Alps under the management of the SEC Victoria. The level of undergrowth within the Australian bush needs to be kept under control to avoid the possibility of lightning strikes (during summer storms) igniting dry forests resulting in a major bush fire. Controlled fires within alpine regions are required not only to reduce the level of dry undergrowth but also to provide those various plant species requiring fire for regenerate. This method was used by the original inhabitants (Aborigines) as limited scrub fires were used to flush game and bird population for food, with a side benefit to those plants requiring the fire for regeneration.This black and white photograph shows an Alpine Fire Prevention technique of "burning off" low levels of scrub. The photograph is on 200gsm paper but it is not photographic paper. It can be assumed that the photo is not the original but a copy. See also KVHS 0413 and KVHS 0415 for other similar photos.kiewa valley tourism, victorian alps, alternate energy supplies, alpine population growth -
 Kiewa Valley Historical Society
Photograph Fire Prevention Victorian Alps, Burning, Circa 1950
... This photograph, from the 1950s, shows an Alpine Fire Prevention technique of "burning off" low levels of scrub to reduce the level of available fuel against any possible summer bush fires.The Alpine regions accumulate high levels of potential fuel (undergrowth and small shrubs) which if not reduced has the potential of breaking into a dangerous bush fire. ...This black and white photograph shows an Alpine Fire Prevention technique of "burning off" low levels of scrub. ...Kiewa Valley Historical Society Mount Beauty Information Centre 31 Bogong High Plains Rd Mt Beauty high-country This photograph, from the 1950s, shows an Alpine Fire Prevention technique of "burning off" low levels of scrub to reduce the level of available fuel against any possible summer bush fires.The Alpine regions accumulate high levels of potential fuel (undergrowth and small shrubs) which if not reduced has the potential of breaking into a dangerous bush fire. ...This photograph, from the 1950s, shows an Alpine Fire Prevention technique of "burning off" low levels of scrub to reduce the level of available fuel against any possible summer bush fires.The Alpine regions accumulate high levels of potential fuel (undergrowth and small shrubs) which if not reduced has the potential of breaking into a dangerous bush fire. The men in this photograph are not wearing any protective clothing. Their visibility to other firefighters is severely reduced by smoke. This photo is a snap shot in time when Occupational Health and Safety Legislation was in its infancy stage.This photograph details the fire prevention activities in the Victorian Alps under the management of the SEC Victoria. The level of undergrowth within the Australian bush needs to be under control to avoid the possibility of lightning strikes (during summer storms) igniting dry forests resulting in a major bush fire. Controlled fires within alpine regions are required not only to reduce the level of dry undergrowth but also to provide those various plant species requiring fire for regenerate. This method was used by the original inhabitants (Aborigines) as limited scrub fires were used to flush game and bird population for eating with the side benefit to those plants requiring that fire for regeneration.This black and white photograph shows an Alpine Fire Prevention technique of "burning off" low levels of scrub. The photograph is on 200gsm paper but it is not photographic paper. It can be assumed that the photo is not the original but a copy produced by the SEC Vic. See also KVHS 0413 and KVHS 0414 for other similar photos.kiewa valley tourism, victorian alps, alternate energy supplies, alpine population growth -
4th/19th Prince of Wales's Light Horse Regiment Unit History Room
Booklet (3 copies), US Government Printing Office, Browning Machine Gun Caliber 0.50 HB M2, Dec 1955
... Soft covered booklet which arranges a step by step progressive training layout of familiarisation, mechanics, crew drills and techniques of fire of the gun. Two copies have Appendix VII, Designation Crews. ...4th/19th Prince of Wales's Light Horse Regiment Unit History Room 4/19 PWLH Regiment, Building 78 Simpson Barracks Macleod melbourne 50 Caliber Machine Gun FM 23-65 Soft covered booklet which arranges a step by step progressive training layout of familiarisation, mechanics, crew drills and techniques of fire of the gun. Two copies have Appendix VII, Designation Crews. ...Soft covered booklet which arranges a step by step progressive training layout of familiarisation, mechanics, crew drills and techniques of fire of the gun. Two copies have Appendix VII, Designation Crews. Printed in May 1956FM 23-6550 caliber machine gun -
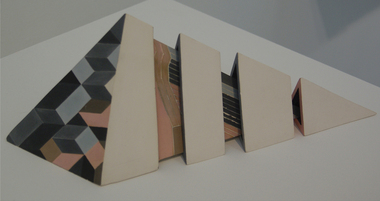 Federation University Art Collection
Ceramic - Artwork - Ceramics, "Four Part Triangular Form' by Kingsley Marks, 1984, c1984
... Upon his retirement in 1985, he moved to Brentwood near Minlaton and established the Brentwood Pottery, specialising in sculptural work using a range of forming, decorative and firing techniques. (https://www.flickr.com/groups/1281707@N21/discuss/72157641492795284/)
Kingsley Marks was a guest at Strezleckie Spotkanie in 1984....Upon his retirement in 1985, he moved to Brentwood near Minlaton and established the Brentwood Pottery, specialising in sculptural work using a range of forming, decorative and firing techniques. (https://www.flickr.com/groups/1281707@N21/discuss/72157641492795284/)
Kingsley Marks was a guest at Strezleckie Spotkanie in 1984. ...Kingsley MARKS (1929 - ) Kingsley Marks trained at the South Australian School of Art before teaching secondary schools. He became interested in pottery after attending a class one night a week at the John Martins building in Adelaide. He received grants to travel and study ceramics in Mexico the US and Canada, then taught for twenty years at the Torrens and South Australian Colleges of Advanced Education. Upon his retirement in 1985, he moved to Brentwood near Minlaton and established the Brentwood Pottery, specialising in sculptural work using a range of forming, decorative and firing techniques. (https://www.flickr.com/groups/1281707@N21/discuss/72157641492795284/) Kingsley Marks was a guest at Strezleckie Spotkanie in 1984. This work is part of the Jan Feder Memorial Ceramics Collection. Jan Feder was an alumna of the Gippsland Campus who studied ceramics on the campus. She passed away in the mid 1980s. Her student peers raised funds to buy ceramic works in her memory. They bought works from visiting lecturers who became leading ceramic artists around the world, as well as from many of the staff who taught there.Electric kiln-fired slipcast decorated earthenware. Kevin Marks uses the mark "K" on his work. Gift of the Artist, 1984ceramics, kingsley marks, artwork, gippsland campus, churchill, brentwood pottery, artist, jan feder memorial ceramics collection -
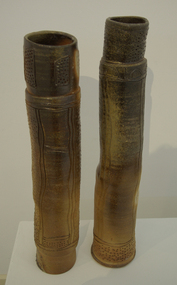 Federation University Art Collection
Ceramic, Tony Nankervis, 'Woodfired Cylindrical Vessels' by Tony Nankervis, 1986, 1986
... Tony NANKERVIS A graduate student from the Gippsland Centre for Art and Design (GCAD), Tony Nankervis has been a pioneer of the long wood-fired ceramics technique in Australia. He retired from lecturing at Southern Cross University after working there for 19 years in 2004. ...Federation University Art Collection Artworks are displayed at Federation University Australia campuses at Ballarat, Gippsland (Churchill), Stawell and Horsham. goldfields Tony NANKERVIS A graduate student from the Gippsland Centre for Art and Design (GCAD), Tony Nankervis has been a pioneer of the long wood-fired ceramics technique in Australia. He retired from lecturing at Southern Cross University after working there for 19 years in 2004. ...Tony NANKERVIS A graduate student from the Gippsland Centre for Art and Design (GCAD), Tony Nankervis has been a pioneer of the long wood-fired ceramics technique in Australia. He retired from lecturing at Southern Cross University after working there for 19 years in 2004. He describes his work as 'one-off functional table ware', which includes highly-individualised everyday table items. Nankervis prefers the pre-Industrial Revolution method of firing pottery, involving heating the kiln by burning wood for five days, to the modern, quicker methods using gas or electricity. The distinctive surfacing in wood-fired ceramics is generated by the ash and volatile salts from the burning wood. The wood ash and salts blush the ceramic pieces in the kiln, with finished work taking on the nature of the firing process, which has been described as painting with fire.Two woodfired earthernware cylindrical forms by Tony Nankervis. tony nankervis, woodfire, jan feder memorial collection, jan feder, ceramics, gippsland campus, jan feder memorial ceramics collection, alumni -
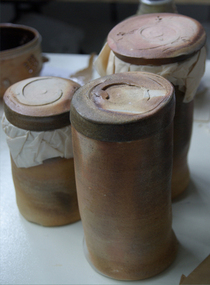 Federation University Art Collection
Ceramic, Tony Nankervis, Three Lidded Woodfired Cylinders by Tony Nankervis, 1986
... Nankervis was a pioneer of the long wood-fired ceramics technique in Australia: a technique he has been practising since the late 1970s Nankervis prefers the pre-Industrial Revolution method of firing pottery, involving heating the kiln by burning wood for five days, to the modern, quicker methods using gas or electricity. ...Nankervis was a pioneer of the long wood-fired ceramics technique in Australia: a technique he has been practising since the late 1970s Nankervis prefers the pre-Industrial Revolution method of firing pottery, involving heating the kiln by burning wood for five days, to the modern, quicker methods using gas or electricity. ...Nankervis prefers the pre-Industrial Revolution method of firing pottery, involving heating the kiln by burning wood for five days, to the modern, quicker methods using gas or electricity. The distinctive surfacing in wood-fired ceramics is generated by the ash and volatile salts from the burning wood. "Because the wood ash and salts blush the ceramic pieces in the kiln, the finished work tends to take on the nature of the firing process," he said. "One colleague has described the process as painting with fire."(https://www.strathnairn.com.au/studios/artist-in-residence/montessa-maack-ursula-burgoyne-jen-lyall-and-vicki-grima-5ndd6, accessed 09 July 2021)Tony NANKERVIS Tony Nankervis taught ceramics from 1984 when the university was the Northern Rivers College of Advanced Education from 1984. before moving to Southern Cross University (SCU) in 1994. He retired from full time teaching in 2004. Nankervis was a pioneer of the long wood-fired ceramics technique in Australia: a technique he has been practising since the late 1970s Nankervis prefers the pre-Industrial Revolution method of firing pottery, involving heating the kiln by burning wood for five days, to the modern, quicker methods using gas or electricity. The distinctive surfacing in wood-fired ceramics is generated by the ash and volatile salts from the burning wood. "Because the wood ash and salts blush the ceramic pieces in the kiln, the finished work tends to take on the nature of the firing process," he said. "One colleague has described the process as painting with fire. There are particular qualities that only come from firing in that way, he said. "If you see some of these older ceramics, particularly from Asia, the surface qualities are discernible from the surfaces generated by post-Industrial fuels." (https://www.scu.edu.au/engage/news/latest-news/2004/leading-australian-potter-who-paints-with-fire-retires-from-lecturing-at-scu-after-19-years.php, accessed 09 July 2019)Three Lidded Woodfired Cylinders ceramics, jan feder memorial ceramics collection, tony nankervis, tony nankervic -
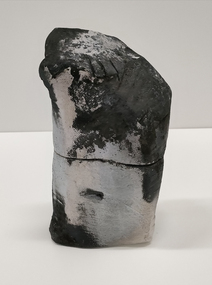 Federation University Art Collection
Ceramic, Tony Nankervis, Dry Glazed Lidded Form by Tony Nankervis, 1986
... Nankervis was a pioneer of the long wood-fired ceramics technique in Australia: a technique he has been practising since the late 1970s Nankervis prefers the pre-Industrial Revolution method of firing pottery, involving heating the kiln by burning wood for five days, to the modern, quicker methods using gas or electricity. ...Nankervis was a pioneer of the long wood-fired ceramics technique in Australia: a technique he has been practising since the late 1970s Nankervis prefers the pre-Industrial Revolution method of firing pottery, involving heating the kiln by burning wood for five days, to the modern, quicker methods using gas or electricity. ...Nankervis prefers the pre-Industrial Revolution method of firing pottery, involving heating the kiln by burning wood for five days, to the modern, quicker methods using gas or electricity. The distinctive surfacing in wood-fired ceramics is generated by the ash and volatile salts from the burning wood. "Because the wood ash and salts blush the ceramic pieces in the kiln, the finished work tends to take on the nature of the firing process," he said. "One colleague has described the process as painting with fire."(https://www.strathnairn.com.au/studios/artist-in-residence/montessa-maack-ursula-burgoyne-jen-lyall-and-vicki-grima-5ndd6, accessed 09 July 2021)Tony NANKERVIS Tony Nankervis taught ceramics from 1984 when the university was the Northern Rivers College of Advanced Education from 1984. before moving to Southern Cross University (SCU) in 1994. He retired from full time teaching in 2004. Nankervis was a pioneer of the long wood-fired ceramics technique in Australia: a technique he has been practising since the late 1970s Nankervis prefers the pre-Industrial Revolution method of firing pottery, involving heating the kiln by burning wood for five days, to the modern, quicker methods using gas or electricity. The distinctive surfacing in wood-fired ceramics is generated by the ash and volatile salts from the burning wood. "Because the wood ash and salts blush the ceramic pieces in the kiln, the finished work tends to take on the nature of the firing process," he said. "One colleague has described the process as painting with fire. There are particular qualities that only come from firing in that way, he said. "If you see some of these older ceramics, particularly from Asia, the surface qualities are discernible from the surfaces generated by post-Industrial fuels." (https://www.scu.edu.au/engage/news/latest-news/2004/leading-australian-potter-who-paints-with-fire-retires-from-lecturing-at-scu-after-19-years.php, accessed 09 July 2019)Presented by the artistLidded Raku fired box, dry glazedceramics, jan feder memorial ceramics collection, tony nankervis, tony nankervic -
4th/19th Prince of Wales's Light Horse Regiment Unit History Room
Booklet, B & M Ltd, Infantry training Vol II Infantry Heavy Weapons Pam 21, 3 inch Mortar, 1951
... A soft covered booklet containing the knowledge and instructional technique which an instructor will need to train a soldier in the handling of the mortar as a member of a crew. It also contains the principles of fire control and observation which is taught to officers and NCOs . ...4th/19th Prince of Wales's Light Horse Regiment Unit History Room 4/19 PWLH Regiment, Building 78 Simpson Barracks Macleod melbourne 3 inch mortar WO Code No 8594 A soft covered booklet containing the knowledge and instructional technique which an instructor will need to train a soldier in the handling of the mortar as a member of a crew. It also contains the principles of fire control and observation which is taught to officers and NCOs . ...A soft covered booklet containing the knowledge and instructional technique which an instructor will need to train a soldier in the handling of the mortar as a member of a crew. It also contains the principles of fire control and observation which is taught to officers and NCOs . Includes amdt 1WO Code No 85943 inch mortar -
4th/19th Prince of Wales's Light Horse Regiment Unit History Room
Booklet, Manual of Land Warfare Part 2 Armour Training Vol 2 Pam 2 Application of Fire from MBT Leopard AS1, 1983
... 4th/19th Prince of Wales's Light Horse Regiment Unit History Room 4/19 PWLH Regiment, Building 78 Simpson Barracks Macleod melbourne Tank Gunnery Leopard 7610-66-108-8325 A soft covered booklet dealing with the principles and techniques of Leopard gunnery Manual of Land Warfare Part 2 Armour Training Vol 2 Pam 2 Application of Fire from MBT Leopard AS1 Booklet ...A soft covered booklet dealing with the principles and techniques of Leopard gunnery7610-66-108-8325tank gunnery leopard -
4th/19th Prince of Wales's Light Horse Regiment Unit History Room
Booklet (2 copies), Manual of Land Warfare Part 2 Armour Training Vol 2 Pam 3 Application of Fire from FSV, 1984
... A soft covered booklet covering the principles and techniques governing the application of fire from the Fire Support Vehicle...4th/19th Prince of Wales's Light Horse Regiment Unit History Room 4/19 PWLH Regiment, Building 78 Simpson Barracks Macleod melbourne Gunnery fire support vehicle 7610-66-108-8326 A soft covered booklet covering the principles and techniques governing the application of fire from the Fire Support Vehicle Manual of Land Warfare Part 2 Armour Training Vol 2 Pam 3 Application of Fire from FSV Booklet (2 copies) ...A soft covered booklet covering the principles and techniques governing the application of fire from the Fire Support Vehicle7610-66-108-8326gunnery fire support vehicle -
 Federation University Historical Collection
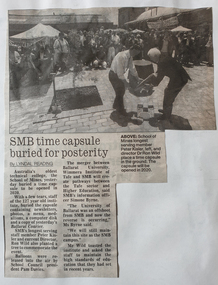
Book - Scrap Book, Ballarat School of Mines Scrapbook, 21 October 1997 to 31 December 1997, 21/10/1997-31/12-1997
... Clippings include Shae McDonald, Women's Lifestyle Expo. 3BBB Ready for big move, last Founders' Day, Founders' Day Cake, Peter Hiscock, Ararat Campus, Geoff Fisken, Peter Bailey wins Skills Olympics, Safeway Food Hygiene Contract, Alison Lanigan, Food handling, Gary Allen, Koala-Catching technique, Andrew Vassiou, Dave Knowles, Fire Protection Australia, Creswick Forestry School, TAFE cute, China links, Shenzhen Polytechnic, Ron Wild, David James, Camp Street revamp, SMB Farewell. ...Clippings include Shae McDonald, Women's Lifestyle Expo. 3BBB Ready for big move, last Founders' Day, Founders' Day Cake, Peter Hiscock, Ararat Campus, Geoff Fisken, Peter Bailey wins Skills Olympics, Safeway Food Hygiene Contract, Alison Lanigan, Food handling, Gary Allen, Koala-Catching technique, Andrew Vassiou, Dave Knowles, Fire Protection Australia, Creswick Forestry School, TAFE cute, China links, Shenzhen Polytechnic, Ron Wild, David James, Camp Street revamp, SMB Farewell. ...This is the last Ballarat School of Mines (SMB) scrapbook. In 1998 SMB merged with the University of Ballarat, a predecessor institution of Federation University Australia. Yellow covered Spirex Sketch Book with news clippings relating to the Ballarat School of Mines. Clippings include Shae McDonald, Women's Lifestyle Expo. 3BBB Ready for big move, last Founders' Day, Founders' Day Cake, Peter Hiscock, Ararat Campus, Geoff Fisken, Peter Bailey wins Skills Olympics, Safeway Food Hygiene Contract, Alison Lanigan, Food handling, Gary Allen, Koala-Catching technique, Andrew Vassiou, Dave Knowles, Fire Protection Australia, Creswick Forestry School, TAFE cute, China links, Shenzhen Polytechnic, Ron Wild, David James, Camp Street revamp, SMB Farewell. Heather Durant, Faye Hunt, Peter Ryan, Ian Pym, Pam Davies, Ann Kerr, HEather Dixon, Bill Gribble, Kaye McFarlaneballarat school of mines scrapbook, ballarat school of mines, time capsule, merger -
Federation University Historical Collection
Book - Book - Scrapbook, Ballarat Institute of Advanced Education: Scrapbook of newspaper cutting, Book 2; February 1970 to September 1970
... fire...orientation ball in wendouree hall...jean mckenzie at smb art and design course...g mainwarring...festival radio cover to be curtailed...scheme helping ballarat widows...students win scholarships...robert gray...robert norman...cheque from students...smb launch $400000 appeal...$11m from government for smb...political opponents inspect bts...closure of gaols...overnight hike...state colleges get $25m varsity image...political advertisement...smb could attract new industries...punch card technique...The cuttings cover the period from 25 February 1970 to 9 September 1970. ballarat institute of advanced education biae employment advertisements senate team visit biae minister of education visit lindsay thompson 3ba comes under fire orientation ball in wendouree hall jean mckenzie at smb art and design course g mainwarring festival radio cover to be curtailed scheme helping ballarat widows students win scholarships robert gray robert norman cheque from students smb launch $400000 appeal $11m from government for smb political opponents inspect bts closure of gaols overnight hike state colleges get $25m varsity image political advertisement smb could attract new industries punch card technique four-letter word thrills audience school news "quadrangle" alp opens election campaign alp candidates address teachers new home for smb degree courses now being considered electromagnet first stage of mt helen acceleration of scientific progress stephen donald motor mechanic apprentice degree course for institute conditions in school 'almost unbelievable' silk screen printing smb apprentices presentation john davidson wins builders award scholarship election statements clarified jack barker address by myra roper some names to remember centenary appeal for smb biae request for street light agreed to members of the biae motor cycle club gas scholarships of $100 philip walker and noel shillito a g cutts no ballarat case for fourth uni dr r shrieke and mr b shearer lecturers at biae $5000 to smb appeal experts aid students re careers Book with grey cover, front. ...Newspaper cuttings relating to Ballarat Institute of Advanced Education. These are from various newspapers and include The Age, Ballarat Courier, The Australian, The Herald. The cuttings cover the period from 25 February 1970 to 9 September 1970. Book with grey cover, front. Spiral boundballarat institute of advanced education, biae, employment advertisements, senate team visit biae, minister of education visit, lindsay thompson, 3ba comes under fire, orientation ball in wendouree hall, jean mckenzie at smb art and design course, g mainwarring, festival radio cover to be curtailed, scheme helping ballarat widows, students win scholarships, robert gray, robert norman, cheque from students, smb launch $400000 appeal, $11m from government for smb, political opponents inspect bts, closure of gaols, overnight hike, state colleges get $25m varsity image, political advertisement, smb could attract new industries, punch card technique, four-letter word thrills audience, school news, "quadrangle", alp opens election campaign, alp candidates address teachers, new home for smb, degree courses now being considered, electromagnet, first stage of mt helen, acceleration of scientific progress, stephen donald motor mechanic apprentice, degree course for institute, conditions in school 'almost unbelievable', silk screen printing, smb apprentices presentation, john davidson wins builders award scholarship, election statements clarified, jack barker, address by myra roper, some names to remember, centenary appeal for smb, biae request for street light agreed to, members of the biae motor cycle club, gas scholarships of $100, philip walker and noel shillito, a g cutts, no ballarat case for fourth uni, dr r shrieke and mr b shearer lecturers at biae, $5000 to smb appeal, experts aid students re careers -
 The Beechworth Burke Museum
Photograph - Lantern Slide, c1900
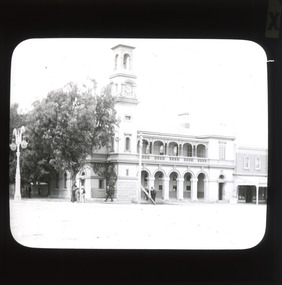
... techniques. This glass slide captures social and historical significance as it displays the Old Beechworth Post Office in 1900, a building that demonstrates the prosperity and growth of Beechworth as a town during this time period. This slide also holds a level of aesthetic significance due to the Italianate style building that is featured in its image; a style that became very popular during the nineteenth-century. Burke Museum Beechworth Lantern Slide Slide Glass Slide Plate Burke Museum Collection Photograph Monochrome Beechworth Post Office Beechworth Post Office Kelly Gang 1900 1900 Beechworth growth of Beechworth 1867 Beechworth fire ...This glass slide presents an image of the Old Beechworth Post Office and was taken in the year 1900. The building displayed within the image is not that of the post office in its original form; the post office originally consisted of only a simple wooden building. With the establishment and growth of new towns across Victoria, as well as an increased need for more consistent communications with the City of Melbourne, this modest building was soon deemed inadequate. In 1858 it was brought into the style of the changing times, with the tall clock tower added in 1865. This transition aligned with a pattern of refurbishment and conversion of many Beechworth buildings (which could be seen during the 1860s-70s), aiding in the growth and prosperity of the town. Early makeshift homes were turned into more substantial dwellings, featuring elements such as weatherboard, brick, and granites materials, and gabled or hipped roofs with iron lacework fringing the verandah. These refurbishments were temporarily halted in March of 1867 when a fire swept through the town, damaging many buildings including the post office. This led to further reconstructions on the building, including heightening of the clock tower, and in 1870 the two-storey Italianate style building was completed. The Old Beechworth Post Office itself also holds significance due to its connection with one of Australia's most infamous families. It reportedly played an important role in communicating the news of the 1880 murders of police at Stringybark Creek by the Kelly Gang. Lantern slides, sometimes called 'magic lantern' slides, are glass plates on which an image has been secured for the purpose of projection. Glass slides were etched or hand-painted for this purpose from the Eighteenth Century but the process became more popular and accessible to the public with the development of photographic-emulsion slides used with a 'Magic Lantern' device in the mid-Nineteenth Century. Photographic lantern slides comprise a double-negative emulsion layer (forming a positive image) between thin glass plates that are bound together. A number of processes existed to form and bind the emulsion layer to the base plate, including the albumen, wet plate collodion, gelatine dry plate and woodburytype techniques. Lantern slides and magic lantern technologies are seen as foundational precursors to the development of modern photography and film-making techniques. This glass slide captures social and historical significance as it displays the Old Beechworth Post Office in 1900, a building that demonstrates the prosperity and growth of Beechworth as a town during this time period. This slide also holds a level of aesthetic significance due to the Italianate style building that is featured in its image; a style that became very popular during the nineteenth-century. Thin translucent sheet of glass with a square image printed on the front and framed in a black backing. It is held together by metal strips to secure the edges of the slide.Obverse: x / burke museum, beechworth, lantern slide, slide, glass slide, plate, burke museum collection, photograph, monochrome, beechworth post office, beechworth post office kelly gang, 1900, 1900 beechworth, growth of beechworth, 1867 beechworth fire, old beechworth post office, beechworth post office reconstructions, italianate style, italianate style buildings, italianate style beechworth post office -
 Flagstaff Hill Maritime Museum and Village
Functional object - Crucible, The Patent Plumbago Crucible Company, circa 1873
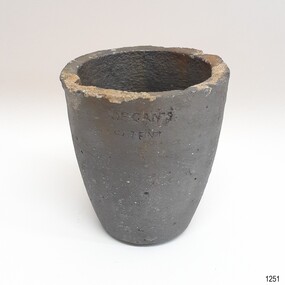
... The addition of graphite to the traditional firing clays greatly enhanced the durability of industrial crucibles this technique was pioneered by the Morgan Bros thereby making a significant technological advance in foundry technology and metallurgy. ...The addition of graphite to the traditional firing clays greatly enhanced the durability of industrial crucibles this technique was pioneered by the Morgan Bros thereby making a significant technological advance in foundry technology and metallurgy. ...Crucibles are used for heating and pouring molten metal. The set of six crucibles was raised from the wreck of the Loch Ard and includes a range of sizes, now in the Flagstaff Hill collection. All were manufactured by the Morgan brothers who founded the Patent Plumbago Crucible Company in 1856, making crucibles in a small factory in Battersea London. A crucible is a container used for purifying and melting metals so that they can be cast in a mould to a predetermined shape and use. They must withstand extremely high temperatures, and abrupt cooling, and shed their contents with minimal adherence. The addition of graphite to the traditional firing clays greatly enhanced the durability of industrial crucibles this technique was pioneered by the Morgan Bros thereby making a significant technological advance in foundry technology and metallurgy. The Morgans first noticed the advantages of graphite crucibles at the Great Exhibition held in London in 1851. Initially, they contracted to be sole selling agents for the American-made products of Joseph Dixon and Co. from New Jersey, but in 1856 they obtained that firm's manufacturing rights and began producing their graphite crucibles from the South London site. The Morgans imported crystalline graphite in 4-5 cwt casks from the British colony of Ceylon (now Sri Lanka) and mixed it with conventional English (Stourbridge) clays to be fired in kilns. Their products were purchased by the Royal Mints in London and India and exported to official mints in France and Germany. They were successful exhibitors of their crucibles and furnaces at the London Exhibition held in 1861 (Class 1, Mining, quarrying, metallurgy and mineral products, Exhibit 265, Patent Plumbago Crucible Co). The range of sizes represented by the six crucibles retrieved from the Loch Ard suggests they may have been part of a sample shipment intended for similar promotion in the Australian colonies or at Melbourne's International Exhibition to be held in 1880. A newspaper account of an 1864 tour of the Morgan brothers' 'Black Potteries' at Battersea indicates: "All the pots were numbered according to their contents, each number standing for one kilogram or a little over two pounds; a No. 2 crucible contains two kilograms; a No. 3, three kilograms, and so on." These numbers are obscured by marine sediment on three of the crucibles in the Flagstaff Hill collection, but those legible on the remaining three are 5, 6, and 8. None of the six is of the same size. A brief history of the Loch Ard (1873-1878): - The sailing ship Loch Ard was one of the famous Loch Line of ships that sailed the long voyage from England to Australia. Barclay, Curdle and Co. built the three-masted iron vessel in Glasgow in 1873. It had sailed three trips to Australia and one trip to Calcutta before its fateful voyage. Loch Ard left England on March 2, 1878, under the command of recently married, 29-year-old Captain Gibbs. It was bound for Melbourne with a crew of 37, plus 17 passengers. The general cargo reflected the affluence of Melbourne at the time. Onboard were straw hats, umbrellas, perfumes, clay pipes, pianos, clocks, confectionery, linen and candles, and a heavier load of railway irons, cement, lead and copper. Other cargo included items intended for display in the Melbourne International Exhibition of 1880. The Loch Ard had been sailing for three months and was close to its destination on June 1, 1878. Captain Gibbs had expected to see land at about 3 am but the Loch Ard ran into a fog that greatly reduced visibility and there was no sign of land or the Cape Otway lighthouse. The fog lifted at 4 am and the sheer cliffs of Victoria's west coast were much closer to them than Captain Gibbs expected. He tried to manage the vessel but failed and the ship struck a reef at the base of Mutton Bird Island, near Port Campbell. The top deck loosened from the hull, and the masts and rigging crashed down, knocking passengers and crew overboard. The lifeboat was launched by Tom Pearce but crashed into the side of Loch Ard and capsized. He clung onto its overturned hull and sheltered under it. He drifted out to sea and the tide brought him back to what is now called Loch Ard Gorge. He swam to shore and found a cave for shelter. A passenger, Eva Carmichael, had raced onto the deck to find out what was happening and was confronted by towering cliffs above the ship. She was soon swept off the ship by a huge wave. Eva saw Tom Pearce on a small rocky beach and yelled to attract his attention. He swam out and dragged her to the shelter of the cave. He revived her with a bottle of brandy from a case that had washed up on the beach. Tom scaled a cliff in search of help and followed some horse hoof prints. He came from two men from Glenample Station, three and a half miles away. He told the men of the tragedy and then returned to the gorge while the two men rode back to the station to get help. They reached Loch Ard Gorge and took the two shipwreck survivors to Glenample Station to recover. Eva stayed at the station for six weeks before returning to Ireland by steamship. In Melbourne, Tom Pearce received a hero's welcome and was presented with a medal and some money. Of the 54 crew members and passengers on board, only two survived: the apprentice, Tom Pearce and the young woman passenger, Eva Carmichael, who lost her family in the tragedy. The shipwreck of the Loch Ard is of significance for Victoria and is registered on the Victorian Heritage Register ( S 417). Flagstaff Hill has a varied collection of artefacts from Loch Ard and its collection is significant for being one of the largest accumulation of artefacts from this notable Victorian shipwreck of which the subject items are a small part. The collection's objects give us a snapshot of how we can interpret the story of this tragic event. The collection is also archaeologically significant as it represents aspects of Victoria's shipping history that allows us to interpret Victoria's social and historical themes of the time. Through is associated with the worst and best-known shipwreck in Victoria's history.This crucible is the smallest of three nested crucibles, or fluxing pots, numbered according to their size. These containers rise slightly from a smaller flat base to a wider open top with a lip for pouring. They were recovered from the wreck of the Loch Ard. The crucibles have a coating of sediment that obscures some of their numerical specifications of size and capacity. Made by the Patent Plumbago Crucible Company at the Battersea Works in London. The number on this crucible is obscured by the sticker.Stamped into side "MORGAN'S PATENT" Stemped into base "MORGAN'S PATENT" "THE PATENT PLUMBAGO CRUCIBLE COMPANY" Sticker "L 96"flagstaff hill, warrnambool, graphite crucible, plumbago crucible, morgan's crucible company, loch ard, morgan potteries, crucible, fluxing pot, nested crucibles, heat proof container, metal worker, maritime museum, shipwreck coast, flagstaff hill maritime village, great ocean road, loch line, morgans crucible company, flagstaff hill maritime museum and village, fluxing pots, morgan’s patent, morgan brothers, patent plumbago crucible co, battersea works, london, loch ard gorge, port campbell -
 Flagstaff Hill Maritime Museum and Village
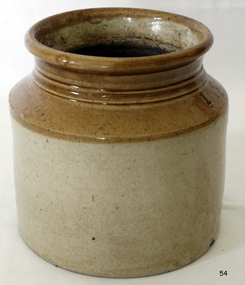
Ceramic - Stoneware Container, 1900 to 1940
... firing, but 800 °C was more typical. Stoneware also needs certain types of clays, more specific than those able to make earthenware, but can be made from a much wider range than porcelain. A domestic item used to store food products as glazing makes the container non-porous, often used for pickling. Or larger containers for kitchen flour. Items age is difficult to determine given the same techniques...firing, but 800 °C was more typical. Stoneware also needs certain types of clays, more specific than those able to make earthenware, but can be made from a much wider range than porcelain. A domestic item used to store food products as glazing makes the container non-porous, often used for pickling. Or larger containers for kitchen flour. Items age is difficult to determine given the same techniques ...Stoneware is a rather broad term for pottery or other ceramics that is fired at a relatively high temperature. A modern technical definition is a vitreous or semi-vitreous ceramic made primarily from stoneware clay or non-refractory fire clay. Whether vitrified or not, it is non-porous, it may or may not be glazed. Historically, across the world, it has been developed after earthenware and before porcelain and has often been used for high-quality as well as utilitarian wares. As a rough guide, modern earthen wares are normally fired in a kiln at temperatures in the range of about 1,000°C (1,830 °F) to 1,200 °C (2,190 °F); stoneware's at between about 1,100 °C (2,010 °F) to 1,300 °C (2,370 °F); and porcelains at between about 1,200 °C (2,190 °F) to 1,400 °C (2,550 °F). Historically, reaching high temperatures was a long-lasting challenge, and temperatures somewhat below these were used for a long time. Earthenware can be fired effectively as low as 600°C, achievable in primitive pit firing, but 800 °C was more typical. Stoneware also needs certain types of clays, more specific than those able to make earthenware, but can be made from a much wider range than porcelain. A domestic item used to store food products as glazing makes the container non-porous, often used for pickling. Or larger containers for kitchen flour. Items age is difficult to determine given the same techniques for making stoneware are in use today. Stoneware containers were made by many potteries in Australia and England. They were in common domestic use before plastics were invented around 1940 to store goods so this subject item is probably from around 1900 to the 1940s. Item's significance is difficult to determine given it is not associated with a place, person, historic event, or manufacturer. Its significance lies with its use as a domestic object giving today a view into our social past.Stoneware circular container with wide opening, brown top and off white base glazed finish Marked "1" on brown glazed rimflagstaff hill, warrnambool, shipwrecked coast, flagstaff hill maritime museum, shipwreck coast, flagstaff hill maritime village, great ocean road, container, stoneware container, kitchen storage, kitchen ware -
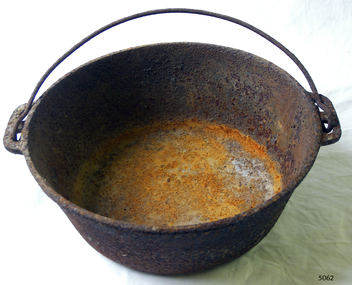 Flagstaff Hill Maritime Museum and Village
Domestic object - Cooking Pot
... fire or ‘cranes’ that could be swung in and out for easier and safer access to the pots that hung from them. These cooking systems may seem rudimentary, but a skilled cook knew how to manage pots, pans, cauldrons and pokers and expose them to the right type of heat by positioning them in various parts of the fireplace. They were also very versatile, enabling multiple cooking techniques...fire or ‘cranes’ that could be swung in and out for easier and safer access to the pots that hung from them. These cooking systems may seem rudimentary, but a skilled cook knew how to manage pots, pans, cauldrons and pokers and expose them to the right type of heat by positioning them in various parts of the fireplace. They were also very versatile, enabling multiple cooking techniques ...Modern iron cooking ‘ranges’ were being introduced from the late 18th century; however, a vast number of people cooked in open fireplaces, well into the 1800s. Generally, they were fitted with iron rods suspended above the fire or ‘cranes’ that could be swung in and out for easier and safer access to the pots that hung from them. These cooking systems may seem rudimentary, but a skilled cook knew how to manage pots, pans, cauldrons and pokers and expose them to the right type of heat by positioning them in various parts of the fireplace. They were also very versatile, enabling multiple cooking techniques – boiling, stewing, frying, roasting, toasting – all at the same time, using different types of vessels and utensils.This type of item was used extensively over the centuries over open fires. It is still used in camping.Metal cooking pot with swinging handle, designed to hang the pot over an open fire. The cast iron pot has two lugs with holes for fitting the handle.flagstaff hill, warrnambool, shipwrecked-coast, flagstaff-hill, flagstaff-hill-maritime-museum, maritime-museum, shipwreck-coast, flagstaff-hill-maritime-village, kitchenware, cooking, open hearth cookery -
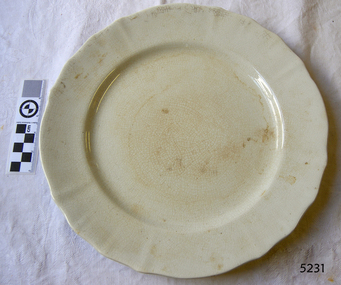 Flagstaff Hill Maritime Museum and Village
Domestic object - Plate
... For example – adding precious metals and lustres. this firing temperature is usually around 600 – 800°C depending upon the techniques being used. ...For example – adding precious metals and lustres. this firing temperature is usually around 600 – 800°C depending upon the techniques being used. ...The Process of Making Pottery Decorating, Firing, Glazing, Making, Technical There is a rhythm and flow to clay. It can’t be done all at once! Even the making process! It can take weeks to get everything done, especially if you can only work on your pottery once a week! Even though we have three hour classes, it’s often just not enough time! Here is an overview of some of the processes so you have a bit more grasp on some of the technical stuff! Step One – Design There are SO many ideas out there for making stuff in clay! From delicate porcelain jewellery, through to heavy sculptural work and everything in between. Deciding your direction is sometimes not that easy – when you first start, try everything, you will naturally gravitate to the style that you enjoy! The options and variations are endless and can get a wee bit overwhelming too! Check in with me before you start to ensure your ideas will work, what order you might do things, how you could achieve the look you are seeking and any other technical data required! Step Two – Making Clay is thixotropic. This means that as you work with it, the clay first gets sloppier and wetter, before is begins to dry in the atmosphere. For most things, you simply can’t do all parts of the project at once. An example of work order might look like: Get last weeks work out from the shelves Prepare clay for today’s work – roll your clay, prepare balls for throwing, make the first stage of a pinch pot) Clean up last week’s work and put it on the shelf for bisque firing Check that you have any glazing to do – and do enough of it that you will have time to finish your main project Do the next step of your next project – there might be a further step that can’t be complete immediately, in that case, wrap your work well and put onto the shelves. Letting your work rest for a while can really help keep your work clean and professional looking. Many things require bagging under plastic to keep it ready for work the next week – put your name on the outside of the bag so you can find your work easily. We have stickers and markers. Consider how you want to decorate your work – coloured slip can be applied at a fairly wet stage (remembering that it will make your work even wetter!). Trying to apply slip to dry clay won’t work! If you want to do sgraffito – you will need to keep the work leather hard (a state of dryness where you can still work the clay with a little effort and a little water and care). Step Three – Drying Most of the time your work can go into the rack uncovered to let it dry out for the following week. If you want to continue forming or shaping you will need to double bag your work – put your work on a suitable sized bat and put the bat in a bag so the base of the bag is under the bat, then put another bag over the top of the work and tuck the top of the bag under the bat. If you want to trim (or turn) your thrown work the following week, it should also be double bagged. If your work is large, delicate, or of uneven thicknesses, you should lightly cover your work for drying. When considering the drying process, bare in mind the weather, humidity and wind! The hotter and dryer, the faster things dry and work can dry unevenly in the shelves – this can lead to cracking – another time to lightly cover your work for drying. Step Four – Trimming and Cleaning Up Your work is dry! It is called greenware now and it is at it’s most fragile! Handle everything with two hands. I often refer to soft hands – keep everything gentle and with your fingers spread as much as possible. Try to not pick up things like plates too much, and always with both hands! Before your work can be bisque fired it should be “cleaned up”. You work won’t go into the kiln if it has sharp edges – when glazed, sharp edges turn into razor blades! Use a piece of fly wire to rub the work all over – this will scratch a little so be light handed. Use a knife or metal kidney to scrape any areas that require a bit more dynamic treatment than the fly wire offers! Finally, a very light wipe over with a slightly damp sponge can help soften and soothe all of your edges and dags! Trimming thrown work: If you are planning to trim (or turn) your thrown work (and you should be), make sure you bag it well – your work should be leather hard to almost dry for easiest trimming. Use this step to finish the work completely – use a metal kidney to polish the surface, or a slightly damp sponge to give a freshly thrown look. Wipe the sponge around the rim after trimming, and check the inside of the pot for dags! Trimming slip cast work: Usually I will trim the rims of your work on the wheel the following day to make that stage easier, however you will still need to check your work for lumps and bumps. Last but not least – check that your name is still clearly on the bottom of your work. Step Five – Bisque Firing When the work is completely dry it can go into the bisque kiln. The bisque kiln is fired to 1000°C. This process burns off the water in the clay as well as some of the chemically bound water. The structure of the clay is not altered that much at this temperature. Inside the bisque kiln, the work is stacked a little, small bowl inside a larger bowl and onto a heavy plate. Smaller items like decorations or drink coasters might get stacked several high. Consideration is paid to the weight of the stack and shape of the work. A bisque kiln can fire about one and a half times the amount of work that the glaze kiln can fire. The firing takes about 10 hours to complete the cycle and about two days to cool down. Once it has been emptied the work is placed in the glaze room ready for you to decorate! Step Six – Glazing Decorating your work with colour can be a lot of fun – and time consuming! There are three main options for surface treatment at this stage: Oxide Washes Underglazes Glazes Washes and underglazes do not “glaze” the work – It will still need a layer of glaze to fully seal the clay (washes don’t need glaze on surfaces not designed for food or liquid as they can gloss up a little on their own). Underglazes are stable colourants that turn out pretty much how they look in the jar. They can be mixed with each other to form other colours and can be used like water colours to paint onto your work. Mostly they should have a clear glaze on top to seal them. Oxides are a different species – the pink oxide (cobalt) wash turns out bright blue for instance. They don’t always need a glaze on top, and some glazes can change the colour of the wash! The glazes need no other “glaze” on top! Be careful of unknown glaze interactions – you can put any combination of glaze in a bowl or on a plate, but only a single glaze on the outside of any vertical surface! Glazes are a chemical reaction under heat. We don’t know the exact chemicals in the Mayco glazes we use. I can guess by the way they interact with each other, however, on the whole, you need to test every idea you have, and not run the test on a vertical surface! Simply put, glaze is a layer of glass like substance that bonds with the clay underneath. Clay is made of silica, alumina and water. Glaze is made of mostly silica. Silica has a melting point of 1700°C and we fire to 1240°C. The silica requires a “flux” to help it melt at the lower temperature. Fluxes can be all sorts of chemicals – a common one is calcium – calcium has a melting point of 2500°C, however, together they both melt at a much lower temperature! Colourants are metal oxides like cobalt (blue), chrome (green through black), copper (green, blue, even red!), manganese (black, purple and pink) iron (red brown), etc. Different chemicals in the glaze can have dramatic effects. for example, barium carbonate (which we don’t use) turns manganese bright pink! Other elements can turn manganese dioxide brown, blue, purple and reddish brown. Manganese dioxide is a flux in and of itself as well. So, glazes that get their black and purple colours, often interact with other glazes and RUN! Our mirror black is a good example – it mixes really well with many glazes because it fluxes them – causes them to melt faster. It will also bring out many beautiful colours in the glazes because it’s black colouring most definitely comes from manganese dioxide! Glaze chemistry is a whole subject on it’s own! We use commercial Mayco glazes on purpose – for their huge range of colour possibilities, stability, cool interactions, artistic freedom with the ability to easily brush the glazes on and ease of use. We currently have almost 50 glazes on hand! A major project is to test the interactions of all glazes with each other. That is 2,500 test tiles!!!! I’m going to make the wall behind the wheels the feature wall of pretty colours! Step Seven – Glaze (Gloss or sometimes called “Glost”) Firing Most of the time this is the final stage of making your creation (but not always!) The glaze kiln goes to 1240°C. This is called cone 6, or midrange. It is the low end of stoneware temperatures. Stoneware clays and glazes are typically fired at cone 8 – 10, that is 1260 – 1290°C. The energy requirement to go from 1240°C to 1280°C is almost a 30% more! Our clay is formulated to vitrify (mature, turn “glass-like”) at 1240°, as are our glazes. A glaze kiln take around 12 hours to reach temperature and two to three days to cool down. Sometimes a third firing process is required – this is for decoration that is added to work after the glaze firing. For example – adding precious metals and lustres. this firing temperature is usually around 600 – 800°C depending upon the techniques being used. There are many students interested in gold and silver trims – we will be doing this third type of firing soon! After firing your work will be in the student finished work shelves. Remember to pay for it before you head out the door! There is a small extra charge for using porcelain clay (it’s more than twice the price of regular clay), and for any third firing process! Once your work has been fired it can not turn back into clay for millennia – so don’t fire it if you don’t like it! Put it in the bucket for recycling. https://firebirdstudios.com.au/the-process-of-making-pottery/Ceramics have evolved over thousands of years.White earthenware dinner plate. Crazing evident all over.Backstamped ‘Made in England S LTD’flagstaff hill, warrnambool, shipwrecked-coast, flagstaff-hill, flagstaff-hill-maritime-museum, maritime-museum, shipwreck-coast, flagstaff-hill-maritime-village, ceramics, tableware -
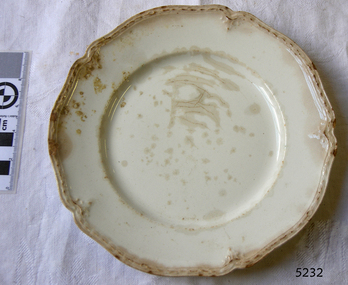 Flagstaff Hill Maritime Museum and Village
Domestic object - Plate, Johnson Bros
... For example – adding precious metals and lustres. this firing temperature is usually around 600 – 800°C depending upon the techniques being used. ...For example – adding precious metals and lustres. this firing temperature is usually around 600 – 800°C depending upon the techniques being used. ...The Process of Making Pottery Decorating, Firing, Glazing, Making, Technical There is a rhythm and flow to clay. It can’t be done all at once! Even the making process! It can take weeks to get everything done, especially if you can only work on your pottery once a week! Even though we have three hour classes, it’s often just not enough time! Here is an overview of some of the processes so you have a bit more grasp on some of the technical stuff! Step One – Design There are SO many ideas out there for making stuff in clay! From delicate porcelain jewellery, through to heavy sculptural work and everything in between. Deciding your direction is sometimes not that easy – when you first start, try everything, you will naturally gravitate to the style that you enjoy! The options and variations are endless and can get a wee bit overwhelming too! Check in with me before you start to ensure your ideas will work, what order you might do things, how you could achieve the look you are seeking and any other technical data required! Step Two – Making Clay is thixotropic. This means that as you work with it, the clay first gets sloppier and wetter, before is begins to dry in the atmosphere. For most things, you simply can’t do all parts of the project at once. An example of work order might look like: Get last weeks work out from the shelves Prepare clay for today’s work – roll your clay, prepare balls for throwing, make the first stage of a pinch pot) Clean up last week’s work and put it on the shelf for bisque firing Check that you have any glazing to do – and do enough of it that you will have time to finish your main project Do the next step of your next project – there might be a further step that can’t be complete immediately, in that case, wrap your work well and put onto the shelves. Letting your work rest for a while can really help keep your work clean and professional looking. Many things require bagging under plastic to keep it ready for work the next week – put your name on the outside of the bag so you can find your work easily. We have stickers and markers. Consider how you want to decorate your work – coloured slip can be applied at a fairly wet stage (remembering that it will make your work even wetter!). Trying to apply slip to dry clay won’t work! If you want to do sgraffito – you will need to keep the work leather hard (a state of dryness where you can still work the clay with a little effort and a little water and care). Step Three – Drying Most of the time your work can go into the rack uncovered to let it dry out for the following week. If you want to continue forming or shaping you will need to double bag your work – put your work on a suitable sized bat and put the bat in a bag so the base of the bag is under the bat, then put another bag over the top of the work and tuck the top of the bag under the bat. If you want to trim (or turn) your thrown work the following week, it should also be double bagged. If your work is large, delicate, or of uneven thicknesses, you should lightly cover your work for drying. When considering the drying process, bare in mind the weather, humidity and wind! The hotter and dryer, the faster things dry and work can dry unevenly in the shelves – this can lead to cracking – another time to lightly cover your work for drying. Step Four – Trimming and Cleaning Up Your work is dry! It is called greenware now and it is at it’s most fragile! Handle everything with two hands. I often refer to soft hands – keep everything gentle and with your fingers spread as much as possible. Try to not pick up things like plates too much, and always with both hands! Before your work can be bisque fired it should be “cleaned up”. You work won’t go into the kiln if it has sharp edges – when glazed, sharp edges turn into razor blades! Use a piece of fly wire to rub the work all over – this will scratch a little so be light handed. Use a knife or metal kidney to scrape any areas that require a bit more dynamic treatment than the fly wire offers! Finally, a very light wipe over with a slightly damp sponge can help soften and soothe all of your edges and dags! Trimming thrown work: If you are planning to trim (or turn) your thrown work (and you should be), make sure you bag it well – your work should be leather hard to almost dry for easiest trimming. Use this step to finish the work completely – use a metal kidney to polish the surface, or a slightly damp sponge to give a freshly thrown look. Wipe the sponge around the rim after trimming, and check the inside of the pot for dags! Trimming slip cast work: Usually I will trim the rims of your work on the wheel the following day to make that stage easier, however you will still need to check your work for lumps and bumps. Last but not least – check that your name is still clearly on the bottom of your work. Step Five – Bisque Firing When the work is completely dry it can go into the bisque kiln. The bisque kiln is fired to 1000°C. This process burns off the water in the clay as well as some of the chemically bound water. The structure of the clay is not altered that much at this temperature. Inside the bisque kiln, the work is stacked a little, small bowl inside a larger bowl and onto a heavy plate. Smaller items like decorations or drink coasters might get stacked several high. Consideration is paid to the weight of the stack and shape of the work. A bisque kiln can fire about one and a half times the amount of work that the glaze kiln can fire. The firing takes about 10 hours to complete the cycle and about two days to cool down. Once it has been emptied the work is placed in the glaze room ready for you to decorate! Step Six – Glazing Decorating your work with colour can be a lot of fun – and time consuming! There are three main options for surface treatment at this stage: Oxide Washes Underglazes Glazes Washes and underglazes do not “glaze” the work – It will still need a layer of glaze to fully seal the clay (washes don’t need glaze on surfaces not designed for food or liquid as they can gloss up a little on their own). Underglazes are stable colourants that turn out pretty much how they look in the jar. They can be mixed with each other to form other colours and can be used like water colours to paint onto your work. Mostly they should have a clear glaze on top to seal them. Oxides are a different species – the pink oxide (cobalt) wash turns out bright blue for instance. They don’t always need a glaze on top, and some glazes can change the colour of the wash! The glazes need no other “glaze” on top! Be careful of unknown glaze interactions – you can put any combination of glaze in a bowl or on a plate, but only a single glaze on the outside of any vertical surface! Glazes are a chemical reaction under heat. We don’t know the exact chemicals in the Mayco glazes we use. I can guess by the way they interact with each other, however, on the whole, you need to test every idea you have, and not run the test on a vertical surface! Simply put, glaze is a layer of glass like substance that bonds with the clay underneath. Clay is made of silica, alumina and water. Glaze is made of mostly silica. Silica has a melting point of 1700°C and we fire to 1240°C. The silica requires a “flux” to help it melt at the lower temperature. Fluxes can be all sorts of chemicals – a common one is calcium – calcium has a melting point of 2500°C, however, together they both melt at a much lower temperature! Colourants are metal oxides like cobalt (blue), chrome (green through black), copper (green, blue, even red!), manganese (black, purple and pink) iron (red brown), etc. Different chemicals in the glaze can have dramatic effects. for example, barium carbonate (which we don’t use) turns manganese bright pink! Other elements can turn manganese dioxide brown, blue, purple and reddish brown. Manganese dioxide is a flux in and of itself as well. So, glazes that get their black and purple colours, often interact with other glazes and RUN! Our mirror black is a good example – it mixes really well with many glazes because it fluxes them – causes them to melt faster. It will also bring out many beautiful colours in the glazes because it’s black colouring most definitely comes from manganese dioxide! Glaze chemistry is a whole subject on it’s own! We use commercial Mayco glazes on purpose – for their huge range of colour possibilities, stability, cool interactions, artistic freedom with the ability to easily brush the glazes on and ease of use. We currently have almost 50 glazes on hand! A major project is to test the interactions of all glazes with each other. That is 2,500 test tiles!!!! I’m going to make the wall behind the wheels the feature wall of pretty colours! Step Seven – Glaze (Gloss or sometimes called “Glost”) Firing Most of the time this is the final stage of making your creation (but not always!) The glaze kiln goes to 1240°C. This is called cone 6, or midrange. It is the low end of stoneware temperatures. Stoneware clays and glazes are typically fired at cone 8 – 10, that is 1260 – 1290°C. The energy requirement to go from 1240°C to 1280°C is almost a 30% more! Our clay is formulated to vitrify (mature, turn “glass-like”) at 1240°, as are our glazes. A glaze kiln take around 12 hours to reach temperature and two to three days to cool down. Sometimes a third firing process is required – this is for decoration that is added to work after the glaze firing. For example – adding precious metals and lustres. this firing temperature is usually around 600 – 800°C depending upon the techniques being used. There are many students interested in gold and silver trims – we will be doing this third type of firing soon! After firing your work will be in the student finished work shelves. Remember to pay for it before you head out the door! There is a small extra charge for using porcelain clay (it’s more than twice the price of regular clay), and for any third firing process! Once your work has been fired it can not turn back into clay for millennia – so don’t fire it if you don’t like it! Put it in the bucket for recycling. https://firebirdstudios.com.au/the-process-of-making-pottery/Ceramics have evolved over thousands of years.A white earthenware side plate with a gadroon edge. Has water marks and chips on front.‘Johnson Bros England Reg No 15587’flagstaff hill, warrnambool, shipwrecked-coast, flagstaff-hill, flagstaff-hill-maritime-museum, maritime-museum, shipwreck-coast, flagstaff-hill-maritime-village, johnson bros, ceramics, tableware -
 Flagstaff Hill Maritime Museum and Village
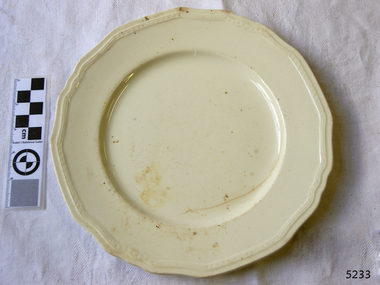
Domestic object - Plate, Alfred Meakin
... For example – adding precious metals and lustres. this firing temperature is usually around 600 – 800°C depending upon the techniques being used. ...For example – adding precious metals and lustres. this firing temperature is usually around 600 – 800°C depending upon the techniques being used. ...The Process of Making Pottery Decorating, Firing, Glazing, Making, Technical There is a rhythm and flow to clay. It can’t be done all at once! Even the making process! It can take weeks to get everything done, especially if you can only work on your pottery once a week! Even though we have three hour classes, it’s often just not enough time! Here is an overview of some of the processes so you have a bit more grasp on some of the technical stuff! Step One – Design There are SO many ideas out there for making stuff in clay! From delicate porcelain jewellery, through to heavy sculptural work and everything in between. Deciding your direction is sometimes not that easy – when you first start, try everything, you will naturally gravitate to the style that you enjoy! The options and variations are endless and can get a wee bit overwhelming too! Check in with me before you start to ensure your ideas will work, what order you might do things, how you could achieve the look you are seeking and any other technical data required! Step Two – Making Clay is thixotropic. This means that as you work with it, the clay first gets sloppier and wetter, before is begins to dry in the atmosphere. For most things, you simply can’t do all parts of the project at once. An example of work order might look like: Get last weeks work out from the shelves Prepare clay for today’s work – roll your clay, prepare balls for throwing, make the first stage of a pinch pot) Clean up last week’s work and put it on the shelf for bisque firing Check that you have any glazing to do – and do enough of it that you will have time to finish your main project Do the next step of your next project – there might be a further step that can’t be complete immediately, in that case, wrap your work well and put onto the shelves. Letting your work rest for a while can really help keep your work clean and professional looking. Many things require bagging under plastic to keep it ready for work the next week – put your name on the outside of the bag so you can find your work easily. We have stickers and markers. Consider how you want to decorate your work – coloured slip can be applied at a fairly wet stage (remembering that it will make your work even wetter!). Trying to apply slip to dry clay won’t work! If you want to do sgraffito – you will need to keep the work leather hard (a state of dryness where you can still work the clay with a little effort and a little water and care). Step Three – Drying Most of the time your work can go into the rack uncovered to let it dry out for the following week. If you want to continue forming or shaping you will need to double bag your work – put your work on a suitable sized bat and put the bat in a bag so the base of the bag is under the bat, then put another bag over the top of the work and tuck the top of the bag under the bat. If you want to trim (or turn) your thrown work the following week, it should also be double bagged. If your work is large, delicate, or of uneven thicknesses, you should lightly cover your work for drying. When considering the drying process, bare in mind the weather, humidity and wind! The hotter and dryer, the faster things dry and work can dry unevenly in the shelves – this can lead to cracking – another time to lightly cover your work for drying. Step Four – Trimming and Cleaning Up Your work is dry! It is called greenware now and it is at it’s most fragile! Handle everything with two hands. I often refer to soft hands – keep everything gentle and with your fingers spread as much as possible. Try to not pick up things like plates too much, and always with both hands! Before your work can be bisque fired it should be “cleaned up”. You work won’t go into the kiln if it has sharp edges – when glazed, sharp edges turn into razor blades! Use a piece of fly wire to rub the work all over – this will scratch a little so be light handed. Use a knife or metal kidney to scrape any areas that require a bit more dynamic treatment than the fly wire offers! Finally, a very light wipe over with a slightly damp sponge can help soften and soothe all of your edges and dags! Trimming thrown work: If you are planning to trim (or turn) your thrown work (and you should be), make sure you bag it well – your work should be leather hard to almost dry for easiest trimming. Use this step to finish the work completely – use a metal kidney to polish the surface, or a slightly damp sponge to give a freshly thrown look. Wipe the sponge around the rim after trimming, and check the inside of the pot for dags! Trimming slip cast work: Usually I will trim the rims of your work on the wheel the following day to make that stage easier, however you will still need to check your work for lumps and bumps. Last but not least – check that your name is still clearly on the bottom of your work. Step Five – Bisque Firing When the work is completely dry it can go into the bisque kiln. The bisque kiln is fired to 1000°C. This process burns off the water in the clay as well as some of the chemically bound water. The structure of the clay is not altered that much at this temperature. Inside the bisque kiln, the work is stacked a little, small bowl inside a larger bowl and onto a heavy plate. Smaller items like decorations or drink coasters might get stacked several high. Consideration is paid to the weight of the stack and shape of the work. A bisque kiln can fire about one and a half times the amount of work that the glaze kiln can fire. The firing takes about 10 hours to complete the cycle and about two days to cool down. Once it has been emptied the work is placed in the glaze room ready for you to decorate! Step Six – Glazing Decorating your work with colour can be a lot of fun – and time consuming! There are three main options for surface treatment at this stage: Oxide Washes Underglazes Glazes Washes and underglazes do not “glaze” the work – It will still need a layer of glaze to fully seal the clay (washes don’t need glaze on surfaces not designed for food or liquid as they can gloss up a little on their own). Underglazes are stable colourants that turn out pretty much how they look in the jar. They can be mixed with each other to form other colours and can be used like water colours to paint onto your work. Mostly they should have a clear glaze on top to seal them. Oxides are a different species – the pink oxide (cobalt) wash turns out bright blue for instance. They don’t always need a glaze on top, and some glazes can change the colour of the wash! The glazes need no other “glaze” on top! Be careful of unknown glaze interactions – you can put any combination of glaze in a bowl or on a plate, but only a single glaze on the outside of any vertical surface! Glazes are a chemical reaction under heat. We don’t know the exact chemicals in the Mayco glazes we use. I can guess by the way they interact with each other, however, on the whole, you need to test every idea you have, and not run the test on a vertical surface! Simply put, glaze is a layer of glass like substance that bonds with the clay underneath. Clay is made of silica, alumina and water. Glaze is made of mostly silica. Silica has a melting point of 1700°C and we fire to 1240°C. The silica requires a “flux” to help it melt at the lower temperature. Fluxes can be all sorts of chemicals – a common one is calcium – calcium has a melting point of 2500°C, however, together they both melt at a much lower temperature! Colourants are metal oxides like cobalt (blue), chrome (green through black), copper (green, blue, even red!), manganese (black, purple and pink) iron (red brown), etc. Different chemicals in the glaze can have dramatic effects. for example, barium carbonate (which we don’t use) turns manganese bright pink! Other elements can turn manganese dioxide brown, blue, purple and reddish brown. Manganese dioxide is a flux in and of itself as well. So, glazes that get their black and purple colours, often interact with other glazes and RUN! Our mirror black is a good example – it mixes really well with many glazes because it fluxes them – causes them to melt faster. It will also bring out many beautiful colours in the glazes because it’s black colouring most definitely comes from manganese dioxide! Glaze chemistry is a whole subject on it’s own! We use commercial Mayco glazes on purpose – for their huge range of colour possibilities, stability, cool interactions, artistic freedom with the ability to easily brush the glazes on and ease of use. We currently have almost 50 glazes on hand! A major project is to test the interactions of all glazes with each other. That is 2,500 test tiles!!!! I’m going to make the wall behind the wheels the feature wall of pretty colours! Step Seven – Glaze (Gloss or sometimes called “Glost”) Firing Most of the time this is the final stage of making your creation (but not always!) The glaze kiln goes to 1240°C. This is called cone 6, or midrange. It is the low end of stoneware temperatures. Stoneware clays and glazes are typically fired at cone 8 – 10, that is 1260 – 1290°C. The energy requirement to go from 1240°C to 1280°C is almost a 30% more! Our clay is formulated to vitrify (mature, turn “glass-like”) at 1240°, as are our glazes. A glaze kiln take around 12 hours to reach temperature and two to three days to cool down. Sometimes a third firing process is required – this is for decoration that is added to work after the glaze firing. For example – adding precious metals and lustres. this firing temperature is usually around 600 – 800°C depending upon the techniques being used. There are many students interested in gold and silver trims – we will be doing this third type of firing soon! After firing your work will be in the student finished work shelves. Remember to pay for it before you head out the door! There is a small extra charge for using porcelain clay (it’s more than twice the price of regular clay), and for any third firing process! Once your work has been fired it can not turn back into clay for millennia – so don’t fire it if you don’t like it! Put it in the bucket for recycling. https://firebirdstudios.com.au/the-process-of-making-pottery/Ceramics have evolved over thousands of years.Earthenware dessert plate, cream colour. Made by Alfred Meakin, England. Backstamped ‘Alfred Meakin England’. flagstaff hill, warrnambool, shipwrecked-coast, flagstaff-hill, flagstaff-hill-maritime-museum, maritime-museum, shipwreck-coast, flagstaff-hill-maritime-village, alfred meakin, ceramics, earthenware, kitchenware -
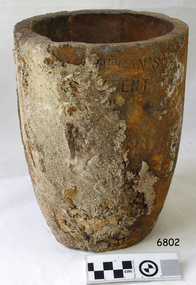 Flagstaff Hill Maritime Museum and Village
Functional object - Crucible, The Patent Plumbago Crucible Company, circa 1873
... The addition of graphite to the traditional firing clays greatly enhanced the durability of industrial crucibles this technique was pioneered by the Morgan Bros thereby making a significant technological advance in foundry technology and metallurgy. ...The addition of graphite to the traditional firing clays greatly enhanced the durability of industrial crucibles this technique was pioneered by the Morgan Bros thereby making a significant technological advance in foundry technology and metallurgy. ...This crucible was raised from the wreck of the Loch Ard. It is one of six similar relics, in a range of sizes, now in the Flagstaff Hill collection. All were manufactured by the Morgan brothers who founded the Patent Plumbago Crucible Company in 1856, making crucibles in a small factory in Battersea London. A crucible is a container used for purifying and melting metals so that they can be cast in a mold to a predetermined shape and use. They must withstand extremely high temperatures, abrupt cooling, and shed their contents with minimal adherence. The addition of graphite to the traditional firing clays greatly enhanced the durability of industrial crucibles this technique was pioneered by the Morgan Bros thereby making a significant technological advance in foundry technology and metallurgy. The Morgans first noticed the advantages of graphite crucibles at the Great Exhibition held in London in 1851. Initially, they contracted to be sole selling agents for the American-made products of Joseph Dixon and Co. from New Jersey, but in 1856 they obtained that firm's manufacturing rights and began producing their graphite crucibles from the South London site. The Morgans imported crystalline graphite in 4-5 cwt casks from the British colony of Ceylon (now Sri Lanka) and mixed it with conventional English (Stourbridge) clays to be fired in kilns. Their products were purchased by the Royal Mints in London and India and exported to official mints in France and Germany. They were successful exhibitors of their crucibles and furnaces at the London Exhibition held in 1861 (Class 1, Mining, quarrying, metallurgy and mineral products, Exhibit 265, Patent Plumbago Crucible Co). The range of sizes represented by the six crucibles retrieved from the Loch Ard suggests they may have been part of a sample shipment intended for similar promotion in the Australian colonies or at Melbourne's International Exhibition to be held in 1880. A newspaper account of an 1864 tour of the Morgan brothers' 'Black Potteries' at Battersea indicates: "All the pots were numbered according to their contents, each number standing for one kilogram, or a little over two pounds; a No. 2 crucible contains two kilograms; a No. 3, three kilograms, and so on." These numbers are obscured by marine sediment on three of the crucibles in the Flagstaff Hill collection, but those legible on the remaining three are 5, 6, and 8. None of the six is of the same size. (For more information on the Loch Ard wreck see note sec this document) The shipwreck of the Loch Ard is of significance for Victoria and is registered on the Victorian Heritage Register ( S 417). Flagstaff Hill has a varied collection of artefacts from Loch Ard and its collection is significant for being one of the largest accumulation of artefacts from this notable Victorian shipwreck of which the crucible is a small part. The collections objects give us a snapshot of how we can interpret the story of this tragic event. The collection is also archaeologically significant as it represents aspects of Victoria's shipping history that allows us to interpret Victoria's social and historical themes of the time. Through is associated with the worst and best-known shipwreck in Victoria's history.A medium size crucible, or fluxing pot, for heating and pouring molten metal. The container rises in a slight curve from a smaller flat base to a wider open top with a lip for pouring. It was recovered from the wreck of the LOCH ARD. The crucible has a coating of sediment that obscures its numerical specifications of size and capacity. The markings that remain visible indicate it is a Morgan’s crucible, made with graphite to prevent cracking and provide a smooth non-adhesive inner surface. .On base: “…ORGAN’S …ENT”flagstaff hill, warrnambool, flagstaff-hill-maritime-museum, shipwreck-coast, flagstaff-hill-maritime-village, graphite crucible, plumbago crucible, morgan's crucible company, loch ard, morgan potteries, crucible, fluxing pot -
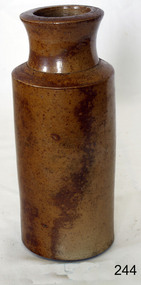 Flagstaff Hill Maritime Museum and Village
Ceramic - Stoneware Bottle, 1890-1940
... firing, but 800 °C was more typical. Stoneware also needs certain types of clays, more specific than those able to make earthenware, but can be made from a much wider range than porcelain. A domestic item used to store food products as glazing makes the container non-porous, often used for pickling. Or larger containers for kitchen flour. Items age is difficult to determine given the same techniques...firing, but 800 °C was more typical. Stoneware also needs certain types of clays, more specific than those able to make earthenware, but can be made from a much wider range than porcelain. A domestic item used to store food products as glazing makes the container non-porous, often used for pickling. Or larger containers for kitchen flour. Items age is difficult to determine given the same techniques ...Stoneware is a rather broad term for pottery or other ceramics that is fired at a relatively high temperature. A modern technical definition is a vitreous or semi-vitreous ceramic made primarily from stoneware clay or non-refractory fire clay. Whether vitrified or not, it is non-porous, it may or may not be glazed. Historically, across the world, it has been developed after earthenware and before porcelain and has often been used for high-quality as well as utilitarian wares. As a rough guide, modern earthen wares are normally fired in a kiln at temperatures in the range of about 1,000°C (1,830 °F) to 1,200 °C (2,190 °F); stoneware's at between about 1,100 °C (2,010 °F) to 1,300 °C (2,370 °F); and porcelains at between about 1,200 °C (2,190 °F) to 1,400 °C (2,550 °F). Historically, reaching high temperatures was a long-lasting challenge, and temperatures somewhat below these were used for a long time. Earthenware can be fired effectively as low as 600°C, achievable in primitive pit firing, but 800 °C was more typical. Stoneware also needs certain types of clays, more specific than those able to make earthenware, but can be made from a much wider range than porcelain. A domestic item used to store food products as glazing makes the container non-porous, often used for pickling. Or larger containers for kitchen flour. Items age is difficult to determine given the same techniques for making stoneware are in use today. Stoneware containers were made by many potteries in Australia and England. They were in common domestic use before plastics were invented around 1940 to store goods so this subject item is probably from around 1900 to the 1940s.Item's significance is difficult to determine given it is not associated with a place, person, historic event, or manufacturer. Its significance lies with its use as a domestic object giving today a view into our social past.Brown salt glaze stoneware bottle None (possibly made by Royal Doulton UK)flagstaff hill, warrnambool, flagstaff hill maritime museum, maritime museum, flagstaff hill maritime village, great ocean road, bottle, stoneware bottle, storage, kitchen ware, salt glazed, stoneware, shipwreck coast