Showing 168 items matching "flange"
-
 Ballarat Tramway Museum
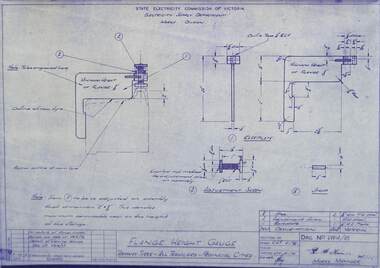
Drawing - VW4/18, State Electricity Commission of Victoria (SECV), Flange Height Gauge. Tramway Typres - All Tramcars - Provincial Cities, 12/01/1954
... Flange Height Gauge. Tramway Typres - All Tramcars - Provincial Cities....SEC drawing number VW4/18, "Flange Height Gauge. Tramway Typres - All Tramcars - Provincial Cities.". ...Yields information regarding the Tramway Tyres Flange Height Gauge. Electricity Supply Department SECV Works Division Provincial Tramways Tramway Tyres Tramways Flanges Copy of original. ...Produced by the SECV to document the Tram Tyre (wheel) specifications.Yields information regarding the Tramway Tyres Flange Height Gauge.SEC drawing number VW4/18, "Flange Height Gauge. Tramway Typres - All Tramcars - Provincial Cities.". Drawn 12/01/1954. Beige paper copy of original dyeline print. Copy of original.electricity supply department, secv, works division, provincial tramways, tramway tyres, tramways, flanges -
 Ballarat Tramway Museum
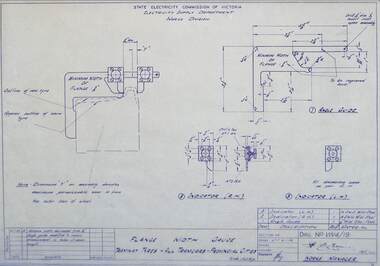
Drawing - VW4/19, State Electricity Commission of Victoria (SECV), Flange Width Gauge. Tramway Typres - All Tramcars - Provincial Cities, 14/01/1955
... Flange Width Gauge. Tramway Typres - All Tramcars - Provincial Cities....SEC drawing number VW4/19, "Flange Width Gauge. Tramway Typres - All Tramcars - Provincial Cities.". ...Yields information regarding the Tramway Tyres Flange Width Gauge. Electricity Supply Department SECV Works Division Provincial Tramways Tramway Tyres Tramways Flanges Copy of original. ...Produced by the SECV to document the Tram Tyre (wheel) specifications.Yields information regarding the Tramway Tyres Flange Width Gauge.SEC drawing number VW4/19, "Flange Width Gauge. Tramway Typres - All Tramcars - Provincial Cities.". Drawn 14/01/1955. Beige paper copy of original dyeline print. Copy of original.electricity supply department, secv, works division, provincial tramways, tramway tyres, tramways, flanges -
 Flagstaff Hill Maritime Museum and Village
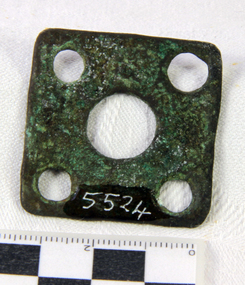
Flange
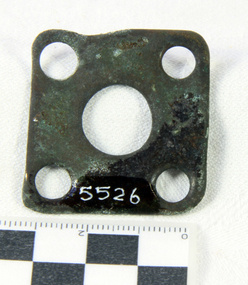
... Flange......flange...Small square brass Flange with four corner holes and one larger centre hole. ...Recovered from the wreck of the Loch Ard. Flange ...Ref LA 3 32 256 HISTORY OF THE LOCH ARD The LOCH ARD belonged to the famous Loch Line which sailed many ships from England to Australia. Built in Glasgow by Barclay, Curdle and Co. in 1873, the LOCH ARD was a three-masted square rigged iron sailing ship. The ship measured 262ft 7" (79.87m) in length, 38ft (11.58m) in width, 23ft (7m) in depth and had a gross tonnage of 1693 tons. The LOCH ARD's main mast measured a massive 150ft (45.7m) in height. LOCH ARD made three trips to Australia and one trip to Calcutta before its final voyage. LOCH ARD left England on March 2, 1878, under the command of Captain Gibbs, a newly married, 29 year old. She was bound for Melbourne with a crew of 37, plus 17 passengers and a load of cargo. The general cargo reflected the affluence of Melbourne at the time. On board were straw hats, umbrella, perfumes, clay pipes, pianos, clocks, confectionary, linen and candles, as well as a heavier load of railway irons, cement, lead and copper. There were items included that intended for display in the Melbourne International Exhibition in 1880. The voyage to Port Phillip was long but uneventful. At 3am on June 1, 1878, Captain Gibbs was expecting to see land and the passengers were becoming excited as they prepared to view their new homeland in the early morning. But LOCH ARD was running into a fog which greatly reduced visibility. Captain Gibbs was becoming anxious as there was no sign of land or the Cape Otway lighthouse. At 4am the fog lifted. A man aloft announced that he could see breakers. The sheer cliffs of Victoria's west coast came into view, and Captain Gibbs realised that the ship was much closer to them than expected. He ordered as much sail to be set as time would permit and then attempted to steer the vessel out to sea. On coming head on into the wind, the ship lost momentum, the sails fell limp and LOCH ARD's bow swung back. Gibbs then ordered the anchors to be released in an attempt to hold its position. The anchors sank some 50 fathoms - but did not hold. By this time LOCH ARD was among the breakers and the tall cliffs of Mutton Bird Island rose behind the ship. Just half a mile from the coast, the ship's bow was suddenly pulled around by the anchor. The captain tried to tack out to sea, but the ship struck a reef at the base of Mutton Bird Island, near Port Campbell. Waves broke over the ship and the top deck was loosened from the hull. The masts and rigging came crashing down knocking passengers and crew overboard. When a lifeboat was finally launched, it crashed into the side of LOCH ARD and capsized. Tom Pearce, who had launched the boat, managed to cling to its overturned hull and shelter beneath it. He drifted out to sea and then on the flood tide came into what is now known as LOCH ARD Gorge. He swam to shore, bruised and dazed, and found a cave in which to shelter. Some of the crew stayed below deck to shelter from the falling rigging but drowned when the ship slipped off the reef into deeper water. Eva Carmichael had raced onto deck to find out what was happening only to be confronted by towering cliffs looming above the stricken ship. In all the chaos, Captain Gibbs grabbed Eva and said, "If you are saved Eva, let my dear wife know that I died like a sailor". That was the last Eva Carmichael saw of the captain. She was swept off the ship by a huge wave. Eva saw Tom Pearce on a small rocky beach and yelled to attract his attention. He dived in and swam to the exhausted woman and dragged her to shore. He took her to the cave and broke open case of brandy which had washed up on the beach. He opened a bottle to revive the unconscious woman. A few hours later Tom scaled a cliff in search of help. He followed hoof prints and came by chance upon two men from nearby Glenample Station three and a half miles away. In a state of exhaustion, he told the men of the tragedy. Tom returned to the gorge while the two men rode back to the station to get help. By the time they reached LOCH ARD Gorge, it was cold and dark. The two shipwreck survivors were taken to Glenample Station to recover. Eva stayed at the station for six weeks before returning to Ireland, this time by steamship. In Melbourne, Tom Pearce received a hero's welcome. He was presented with the first gold medal of the Royal Humane Society of Victoria and a £1000 cheque from the Victorian Government. Concerts were performed to honour the young man's bravery and to raise money for those who lost family in the LOCH ARD disaster. Of the 54 crew members and passengers on board, only two survived: the apprentice, Tom Pearce and the young woman passenger, Eva Carmichael, who lost all of her family in the tragedy. Ten days after the LOCH ARD tragedy, salvage rights to the wreck were sold at auction for £2,120. Cargo valued at £3,000 was salvaged and placed on the beach, but most washed back into the sea when another storm developed. The wreck of LOCH ARD still lies at the base of Mutton Bird Island. Much of the cargo has now been salvaged and some was washed up into what is now known as LOCH ARD Gorge. Cargo and artefacts have also been illegally salvaged over many years before protective legislation was introduced. One of the most unlikely pieces of cargo to have survived the shipwreck was a Minton porcelain peacock - one of only nine in the world. The peacock was destined for the Melbourne International Exhibition in 1880. It had been well packed, which gave it adequate protection during the violent storm. Today, the Minton peacock can be seen at the Flagstaff Hill Maritime Museum in Warrnambool. From Australia's most dramatic shipwreck it has now become Australia's most valuable shipwreck artefact and is one of very few 'objects' on the Victorian State Heritage Register. Flagstaff Hill’s collection of artefacts from LOCH ARD is significant for being one of the largest collections of artefacts from this shipwreck in Victoria. It is significant for its association with the shipwreck, which is on the Victorian Heritage Register (VHR S417). The collection is significant because of the relationship between the objects, as together they have a high potential to interpret the story of the LOCH ARD. The LOCH ARD collection is archaeologically significant as the remains of a large international passenger and cargo ship. The LOCH ARD collection is historically significant for representing aspects of Victoria’s shipping history and its potential to interpret sub-theme 1.5 of Victoria’s Framework of Historical Themes (living with natural processes). The collection is also historically significant for its association with the LOCH ARD, which was one of the worst and best known shipwrecks in Victoria’s history. Small square brass Flange with four corner holes and one larger centre hole. Artefact Reg No LA/25. Recovered from the wreck of the Loch Ard.flagstaff hill, warrnambool, shipwrecked coast, flagstaff hill maritime museum, maritime museum, shipwreck coast, flagstaff hill maritime village, great ocean road, loch line, loch ard, captain gibbs, eva carmichael, tom pearce, glenample station, mutton bird island, loch ard gorge, flange -
 Flagstaff Hill Maritime Museum and Village
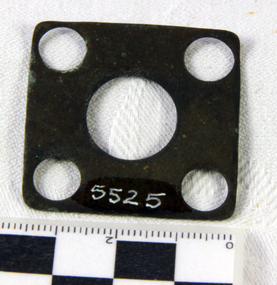
Flange
... Flange......flange...Small square brass Flange with four corner holes and one larger centre hole. ...Recovered from the wreck of the Loch Ard. Flange ...Ref LA 3 32 257 HISTORY OF THE LOCH ARD The LOCH ARD belonged to the famous Loch Line which sailed many ships from England to Australia. Built in Glasgow by Barclay, Curdle and Co. in 1873, the LOCH ARD was a three-masted square rigged iron sailing ship. The ship measured 262ft 7" (79.87m) in length, 38ft (11.58m) in width, 23ft (7m) in depth and had a gross tonnage of 1693 tons. The LOCH ARD's main mast measured a massive 150ft (45.7m) in height. LOCH ARD made three trips to Australia and one trip to Calcutta before its final voyage. LOCH ARD left England on March 2, 1878, under the command of Captain Gibbs, a newly married, 29 year old. She was bound for Melbourne with a crew of 37, plus 17 passengers and a load of cargo. The general cargo reflected the affluence of Melbourne at the time. On board were straw hats, umbrella, perfumes, clay pipes, pianos, clocks, confectionary, linen and candles, as well as a heavier load of railway irons, cement, lead and copper. There were items included that intended for display in the Melbourne International Exhibition in 1880. The voyage to Port Phillip was long but uneventful. At 3am on June 1, 1878, Captain Gibbs was expecting to see land and the passengers were becoming excited as they prepared to view their new homeland in the early morning. But LOCH ARD was running into a fog which greatly reduced visibility. Captain Gibbs was becoming anxious as there was no sign of land or the Cape Otway lighthouse. At 4am the fog lifted. A man aloft announced that he could see breakers. The sheer cliffs of Victoria's west coast came into view, and Captain Gibbs realised that the ship was much closer to them than expected. He ordered as much sail to be set as time would permit and then attempted to steer the vessel out to sea. On coming head on into the wind, the ship lost momentum, the sails fell limp and LOCH ARD's bow swung back. Gibbs then ordered the anchors to be released in an attempt to hold its position. The anchors sank some 50 fathoms - but did not hold. By this time LOCH ARD was among the breakers and the tall cliffs of Mutton Bird Island rose behind the ship. Just half a mile from the coast, the ship's bow was suddenly pulled around by the anchor. The captain tried to tack out to sea, but the ship struck a reef at the base of Mutton Bird Island, near Port Campbell. Waves broke over the ship and the top deck was loosened from the hull. The masts and rigging came crashing down knocking passengers and crew overboard. When a lifeboat was finally launched, it crashed into the side of LOCH ARD and capsized. Tom Pearce, who had launched the boat, managed to cling to its overturned hull and shelter beneath it. He drifted out to sea and then on the flood tide came into what is now known as LOCH ARD Gorge. He swam to shore, bruised and dazed, and found a cave in which to shelter. Some of the crew stayed below deck to shelter from the falling rigging but drowned when the ship slipped off the reef into deeper water. Eva Carmichael had raced onto deck to find out what was happening only to be confronted by towering cliffs looming above the stricken ship. In all the chaos, Captain Gibbs grabbed Eva and said, "If you are saved Eva, let my dear wife know that I died like a sailor". That was the last Eva Carmichael saw of the captain. She was swept off the ship by a huge wave. Eva saw Tom Pearce on a small rocky beach and yelled to attract his attention. He dived in and swam to the exhausted woman and dragged her to shore. He took her to the cave and broke open case of brandy which had washed up on the beach. He opened a bottle to revive the unconscious woman. A few hours later Tom scaled a cliff in search of help. He followed hoof prints and came by chance upon two men from nearby Glenample Station three and a half miles away. In a state of exhaustion, he told the men of the tragedy. Tom returned to the gorge while the two men rode back to the station to get help. By the time they reached LOCH ARD Gorge, it was cold and dark. The two shipwreck survivors were taken to Glenample Station to recover. Eva stayed at the station for six weeks before returning to Ireland, this time by steamship. In Melbourne, Tom Pearce received a hero's welcome. He was presented with the first gold medal of the Royal Humane Society of Victoria and a £1000 cheque from the Victorian Government. Concerts were performed to honour the young man's bravery and to raise money for those who lost family in the LOCH ARD disaster. Of the 54 crew members and passengers on board, only two survived: the apprentice, Tom Pearce and the young woman passenger, Eva Carmichael, who lost all of her family in the tragedy. Ten days after the LOCH ARD tragedy, salvage rights to the wreck were sold at auction for £2,120. Cargo valued at £3,000 was salvaged and placed on the beach, but most washed back into the sea when another storm developed. The wreck of LOCH ARD still lies at the base of Mutton Bird Island. Much of the cargo has now been salvaged and some was washed up into what is now known as LOCH ARD Gorge. Cargo and artefacts have also been illegally salvaged over many years before protective legislation was introduced. One of the most unlikely pieces of cargo to have survived the shipwreck was a Minton porcelain peacock - one of only nine in the world. The peacock was destined for the Melbourne International Exhibition in 1880. It had been well packed, which gave it adequate protection during the violent storm. Today, the Minton peacock can be seen at the Flagstaff Hill Maritime Museum in Warrnambool. From Australia's most dramatic shipwreck it has now become Australia's most valuable shipwreck artefact and is one of very few 'objects' on the Victorian State Heritage Register. Flagstaff Hill’s collection of artefacts from LOCH ARD is significant for being one of the largest collections of artefacts from this shipwreck in Victoria. It is significant for its association with the shipwreck, which is on the Victorian Heritage Register (VHR S417). The collection is significant because of the relationship between the objects, as together they have a high potential to interpret the story of the LOCH ARD. The LOCH ARD collection is archaeologically significant as the remains of a large international passenger and cargo ship. The LOCH ARD collection is historically significant for representing aspects of Victoria’s shipping history and its potential to interpret sub-theme 1.5 of Victoria’s Framework of Historical Themes (living with natural processes). The collection is also historically significant for its association with the LOCH ARD, which was one of the worst and best known shipwrecks in Victoria’s history. Small square brass Flange with four corner holes and one larger centre hole. Artefact Reg No LA/26. Recovered from the wreck of the Loch Ard.flagstaff hill, warrnambool, shipwrecked coast, flagstaff hill maritime museum, maritime museum, shipwreck coast, flagstaff hill maritime village, great ocean road, loch line, loch ard, captain gibbs, eva carmichael, tom pearce, glenample station, mutton bird island, loch ard gorge, flange -
 Flagstaff Hill Maritime Museum and Village
Flange
... Flange......flange...Small square brass Flange with four corner holes and one larger centre hole. ...Recovered from the wreck of the Loch Ard. Flange ...Ref LA 3 32 258 HISTORY OF THE LOCH ARD The LOCH ARD belonged to the famous Loch Line which sailed many ships from England to Australia. Built in Glasgow by Barclay, Curdle and Co. in 1873, the LOCH ARD was a three-masted square rigged iron sailing ship. The ship measured 262ft 7" (79.87m) in length, 38ft (11.58m) in width, 23ft (7m) in depth and had a gross tonnage of 1693 tons. The LOCH ARD's main mast measured a massive 150ft (45.7m) in height. LOCH ARD made three trips to Australia and one trip to Calcutta before its final voyage. LOCH ARD left England on March 2, 1878, under the command of Captain Gibbs, a newly married, 29 year old. She was bound for Melbourne with a crew of 37, plus 17 passengers and a load of cargo. The general cargo reflected the affluence of Melbourne at the time. On board were straw hats, umbrella, perfumes, clay pipes, pianos, clocks, confectionary, linen and candles, as well as a heavier load of railway irons, cement, lead and copper. There were items included that intended for display in the Melbourne International Exhibition in 1880. The voyage to Port Phillip was long but uneventful. At 3am on June 1, 1878, Captain Gibbs was expecting to see land and the passengers were becoming excited as they prepared to view their new homeland in the early morning. But LOCH ARD was running into a fog which greatly reduced visibility. Captain Gibbs was becoming anxious as there was no sign of land or the Cape Otway lighthouse. At 4am the fog lifted. A man aloft announced that he could see breakers. The sheer cliffs of Victoria's west coast came into view, and Captain Gibbs realised that the ship was much closer to them than expected. He ordered as much sail to be set as time would permit and then attempted to steer the vessel out to sea. On coming head on into the wind, the ship lost momentum, the sails fell limp and LOCH ARD's bow swung back. Gibbs then ordered the anchors to be released in an attempt to hold its position. The anchors sank some 50 fathoms - but did not hold. By this time LOCH ARD was among the breakers and the tall cliffs of Mutton Bird Island rose behind the ship. Just half a mile from the coast, the ship's bow was suddenly pulled around by the anchor. The captain tried to tack out to sea, but the ship struck a reef at the base of Mutton Bird Island, near Port Campbell. Waves broke over the ship and the top deck was loosened from the hull. The masts and rigging came crashing down knocking passengers and crew overboard. When a lifeboat was finally launched, it crashed into the side of LOCH ARD and capsized. Tom Pearce, who had launched the boat, managed to cling to its overturned hull and shelter beneath it. He drifted out to sea and then on the flood tide came into what is now known as LOCH ARD Gorge. He swam to shore, bruised and dazed, and found a cave in which to shelter. Some of the crew stayed below deck to shelter from the falling rigging but drowned when the ship slipped off the reef into deeper water. Eva Carmichael had raced onto deck to find out what was happening only to be confronted by towering cliffs looming above the stricken ship. In all the chaos, Captain Gibbs grabbed Eva and said, "If you are saved Eva, let my dear wife know that I died like a sailor". That was the last Eva Carmichael saw of the captain. She was swept off the ship by a huge wave. Eva saw Tom Pearce on a small rocky beach and yelled to attract his attention. He dived in and swam to the exhausted woman and dragged her to shore. He took her to the cave and broke open case of brandy which had washed up on the beach. He opened a bottle to revive the unconscious woman. A few hours later Tom scaled a cliff in search of help. He followed hoof prints and came by chance upon two men from nearby Glenample Station three and a half miles away. In a state of exhaustion, he told the men of the tragedy. Tom returned to the gorge while the two men rode back to the station to get help. By the time they reached LOCH ARD Gorge, it was cold and dark. The two shipwreck survivors were taken to Glenample Station to recover. Eva stayed at the station for six weeks before returning to Ireland, this time by steamship. In Melbourne, Tom Pearce received a hero's welcome. He was presented with the first gold medal of the Royal Humane Society of Victoria and a £1000 cheque from the Victorian Government. Concerts were performed to honour the young man's bravery and to raise money for those who lost family in the LOCH ARD disaster. Of the 54 crew members and passengers on board, only two survived: the apprentice, Tom Pearce and the young woman passenger, Eva Carmichael, who lost all of her family in the tragedy. Ten days after the LOCH ARD tragedy, salvage rights to the wreck were sold at auction for £2,120. Cargo valued at £3,000 was salvaged and placed on the beach, but most washed back into the sea when another storm developed. The wreck of LOCH ARD still lies at the base of Mutton Bird Island. Much of the cargo has now been salvaged and some was washed up into what is now known as LOCH ARD Gorge. Cargo and artefacts have also been illegally salvaged over many years before protective legislation was introduced. One of the most unlikely pieces of cargo to have survived the shipwreck was a Minton porcelain peacock - one of only nine in the world. The peacock was destined for the Melbourne International Exhibition in 1880. It had been well packed, which gave it adequate protection during the violent storm. Today, the Minton peacock can be seen at the Flagstaff Hill Maritime Museum in Warrnambool. From Australia's most dramatic shipwreck it has now become Australia's most valuable shipwreck artefact and is one of very few 'objects' on the Victorian State Heritage Register. Flagstaff Hill’s collection of artefacts from LOCH ARD is significant for being one of the largest collections of artefacts from this shipwreck in Victoria. It is significant for its association with the shipwreck, which is on the Victorian Heritage Register (VHR S417). The collection is significant because of the relationship between the objects, as together they have a high potential to interpret the story of the LOCH ARD. The LOCH ARD collection is archaeologically significant as the remains of a large international passenger and cargo ship. The LOCH ARD collection is historically significant for representing aspects of Victoria’s shipping history and its potential to interpret sub-theme 1.5 of Victoria’s Framework of Historical Themes (living with natural processes). The collection is also historically significant for its association with the LOCH ARD, which was one of the worst and best known shipwrecks in Victoria’s history. Small square brass Flange with four corner holes and one larger centre hole. Has slight bend one side. Artefact Reg No LA/27. Recovered from the wreck of the Loch Ard.flagstaff hill, warrnambool, shipwrecked coast, flagstaff hill maritime museum, maritime museum, shipwreck coast, flagstaff hill maritime village, great ocean road, loch line, loch ard, captain gibbs, eva carmichael, tom pearce, glenample station, mutton bird island, loch ard gorge, flange, brass flange -
 Moorabbin Air Museum
Manual (item) - Parts Catalog PC-203-2 Avco Lycoming O-320 B and D Series, High Compression Wide Cylinder Flange Model Aircraft Engines
... High Compression Wide Cylinder Flange Model Aircraft Engines...Moorabbin Air Museum Moorabbin Airport 12 First Street Moorabbin melbourne High Compression Wide Cylinder Flange Model Aircraft Engines Manual Parts Catalog PC-203-2 Avco Lycoming O-320 B and D Series ... -
 Moorabbin Air Museum
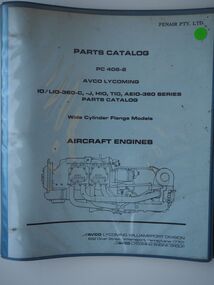
Manual (item) - Parts Catalog PC 406-2 Avco Lycoming IO/LIO-360-C, -J, HIO, TIO, AEIO-360 Series Parts Catalog, Wide Cylinder Flange Models Aircraft Engines
... Wide Cylinder Flange Models Aircraft Engines ...Moorabbin Air Museum Moorabbin Airport 12 First Street Moorabbin melbourne Wide Cylinder Flange Models Aircraft Engines Manual Parts Catalog PC 406-2 Avco Lycoming IO/LIO-360-C, -J, HIO, TIO, AEIO-360 Series Parts Catalog ... -
 Whitehorse Historical Society Inc.
Tool - Flanging tool
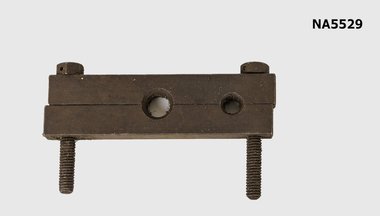
... Flanging tool used for plumbing....Steel flanging tool with two metal bars with two screws either end, and two different sized holes to flange copper pipe....Whitehorse Historical Society Inc. 2-10 Deep Creek Road Mitcham melbourne Flanging tool used for plumbing. Plumbing Tool Flanging tool Steel flanging tool with two metal bars with two screws either end, and two different sized holes to flange copper pipe. ...Flanging tool used for plumbing.Steel flanging tool with two metal bars with two screws either end, and two different sized holes to flange copper pipe.plumbing, tool, flanging tool -
 Royal Australian and New Zealand College of Obstetricians & Gynaecologists (RANZCOG)
Duke's stem pessary associated with Dr Frank Forster
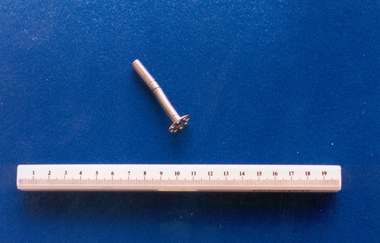
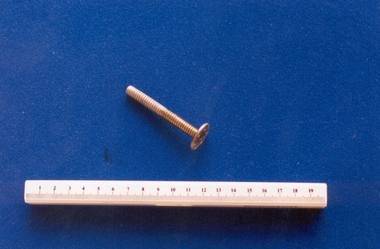
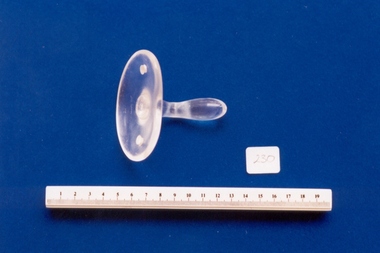
... The device consisted of a stem which is introduced into the uterus, the stem was then attached to an ovoid flange or ball, on which the cervix uteri then rested. ...Metal pessary with hollow stem, and a rounded flange at one end. The flange has eight small holes surrounding the central hole. ...Metal pessary with hollow stem, and a rounded flange at one end. The flange has eight small holes surrounding the central hole. ...Part of the collection of Dr Frank Forster. The philosophy of this object was to keep the uterus dilated. It was commonly believed at this time that the cervix was the cause of dysmenorrhoea. The stem pessary was an object used to rectify uterine displacements - either anteversion or retroversion. The device consisted of a stem which is introduced into the uterus, the stem was then attached to an ovoid flange or ball, on which the cervix uteri then rested. Connected to this flange was an external part or wire frame, which in turn was attached at one extremity to a flat tubular portion, passing into the vagina. This was then fixed to the intrauterine portion. The wire frame was then made to press on to the pubis, so that the pessary could be kept in position in utero.Pessary, Duke's stem design. Metal pessary with hollow stem, and a rounded flange at one end. The flange has eight small holes surrounding the central hole. The stem is flexible and is made from coiled metal which has then been attached (perhaps by soldering) to the flange.pessary, intrauterine device -
 Royal Australian and New Zealand College of Obstetricians & Gynaecologists (RANZCOG)
Duke's stem pessary associated with Dr Frank Forster
... The device consisted of a stem which is introduced into the uterus, the stem was then attached to an ovoid flange or ball, on which the cervix uteri then rested. ...Metal pessary with hollow stem, and a rounded flange at one end. The flange has six small holes surrounding the central hole. ...Metal pessary with hollow stem, and a rounded flange at one end. The flange has six small holes surrounding the central hole. ...Part of the collection of Dr Frank Forster. The philosophy of this object was to keep the uterus dilated. It was commonly believed at this time that the cervix was the cause of dysmenorrhoea. The stem pessary was an object used to rectify uterine displacements - either anteversion or retroversion. The device consisted of a stem which is introduced into the uterus, the stem was then attached to an ovoid flange or ball, on which the cervix uteri then rested. Connected to this flange was an external part or wire frame, which in turn was attached at one extremity to a flat tubular portion, passing into the vagina. This was then fixed to the intrauterine portion. The wire frame was then made to press on to the pubis, so that the pessary could be kept in position in utero.Pessary, Duke's stem design. Metal pessary with hollow stem, and a rounded flange at one end. The flange has six small holes surrounding the central hole. The stem is flexible and is made from coiled metal which has then been attached (perhaps by soldering) to the flange.pessary, intrauterine device -
 National Wool Museum
Catalogue, Loom and warping beam flanges
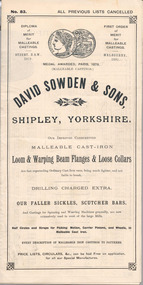
... Catalogue, "Loom and warping beam flanges and loose collars" - David Sowden & Sons, Shipley. ...Catalogue, "Loom and warping beam flanges and loose collars" - David Sowden & Sons, Shipley....Loom and warping beam flanges Catalogue ...Catalogue, "Loom and warping beam flanges and loose collars" - David Sowden & Sons, Shipley. Among items from Yarra Falls Mill.Catalogue, "Loom and warping beam flanges and loose collars" - David Sowden & Sons, Shipley.textile machinery weaving, yarra falls mill david sowden & sons, weaving looms, weaving machinery, textile machinery, weaving -
 Melbourne Tram Museum
Functional object - Rail Section - grooved or flanged tram rail
... Rail possibly 96lbs/yard, used on street based tramways, rolled with a heavy check or flange for use on curves. Matches BS Section 1C - see item 3292 of the Ballarat Tramway Museum. ...Rail Section - grooved or flanged tram rail cut from rolled rail....Demonstrates a rail section used on street based tramways. tramways rails rail section Rail Section - grooved or flanged tram rail cut from rolled rail. Functional object Rail Section - grooved or flanged tram rail ...Rail possibly 96lbs/yard, used on street based tramways, rolled with a heavy check or flange for use on curves. Matches BS Section 1C - see item 3292 of the Ballarat Tramway Museum. Demonstrates a rail section used on street based tramways.Rail Section - grooved or flanged tram rail cut from rolled rail.tramways, rails, rail section -
 Vision Australia
Image
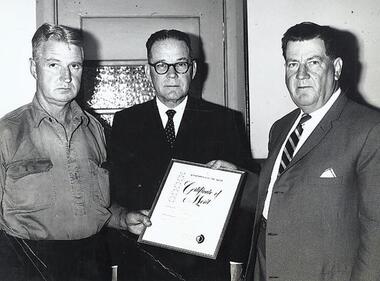
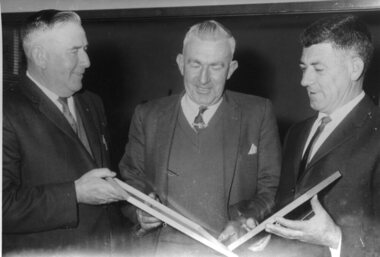
... Bendigo page 3" (illegible) Photo No. 14 #85 Flanges top and bottom...Three men hold the certificate; two in suits, one in a workshirt and pants. association for the blind Bendigo page 3" (illegible) Photo No. 14 #85 Flanges top and bottom 1 x B/W photograph Image ...A Certificate of Merit from the AFB is presented to an unknown Bendigo organisation (possibly a corrections institution). Three men hold the certificate; two in suits, one in a workshirt and pants.1 x B/W photographBendigo page 3" (illegible) Photo No. 14 #85 Flanges top and bottomassociation for the blind -
 Royal Australian and New Zealand College of Obstetricians & Gynaecologists (RANZCOG)
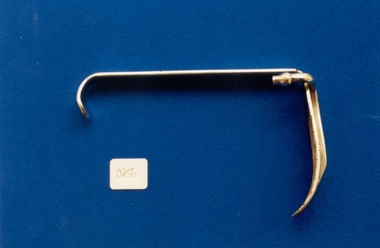
Furgusson-style fetal stethoscope associated with midwife Mary Howlett, c. 1866 - 1920
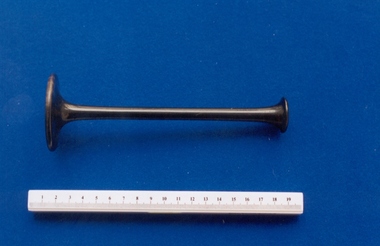
... Fetal stethoscope consisting of an ebony tube with flanges at each end. The large flange would be placed onto the abdomen and the small flange would be placed to the ear to hear the fetal heart beat....Diagnostic instruments Midwifery Fetal stethoscope consisting of an ebony tube with flanges at each end. The large flange would be placed onto the abdomen and the small flange would be placed to the ear to hear the fetal heart beat. ...The Furgusson stethoscope was in use from 1866. It is made all in one piece and has no attachments.Mary Howlett (1840-1922) began practising as a country midwife in 1866 in the western district of Victoria. She qualified as a 'ladies monthly nurse' in 1887 and continued to practise as a nurse and midwife until 1920. She began her six months training at the Melbourne Lying-In Hospital. She was known by many as 'Auntie', and her career spanned more than 50 years. Mrs Howlett's midwifery box and contents were given to Dr Frank Forster, and he donated them to the museum collection in 1993.Fetal stethoscope consisting of an ebony tube with flanges at each end. The large flange would be placed onto the abdomen and the small flange would be placed to the ear to hear the fetal heart beat.diagnostic instruments, midwifery -
 Royal Australian and New Zealand College of Obstetricians & Gynaecologists (RANZCOG)
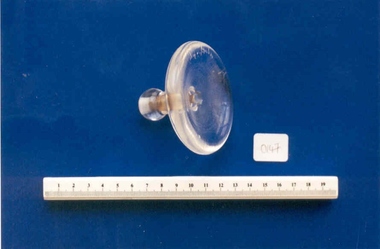
Pessary used by Dr Olga Bolitho, and associated with Dame Ella MacKnight
... Pessary is circular, with a wide flange and a short stem. The stem is attached to the flange, rather than the pessary being moulded as one piece. ...Pessary is circular, with a wide flange and a short stem. The stem is attached to the flange, rather than the pessary being moulded as one piece. ...This pessary belonged to Dr Olga Bolitho who inherited it from Dame Ella MacKnight. Used by Olga Bolitho once or twice, according to correspondence dated 14/5/00 from Olga Bolitho [held with the donation form] Dame Ella Macknight was an obstetrician and gynaecologist who worked at the Queen Victoria Hospital, Melbourne. She was appointed as a Dame Commander of the Order of the British Empire on 1 January 1969 for services to medicine. She gained her MB BS in 1928 from the University of Melbourne. After qualifying as an obstetrician and gynaecologist, (MD, Melb.1931, DGO Melb 1936), she was associated with the Queen Victoria Hospital from 1935-1977. Her appointments included honorary obstetrician and gynaecologist from 1935-1964; vice-president of the Committee of Management for 1963-1971 and president from 1971-1977. She was president of the Council of the Royal College of Gynaecologists from 1970-1972.After her death in 1996, her family set up a post graduate scholarship in her honour with the Royal College of Gynaecologists & Obstetricians.Clear plastic pessary. Pessary is circular, with a wide flange and a short stem. The stem is attached to the flange, rather than the pessary being moulded as one piece. There are two small holes in the flange, either side of the stem.intrauterine device, pessary -
 Vision Australia
Photograph - Image, Ballarat Courier, Three men looking at framed certificates in Ballarat, 1955-1965
... Ballarat Page No. 3 3" include all in full clip #85 flanges to and bottom Ballarat Courier press photograph...Association for the Blind Ballarat Ballarat Page No. 3 3" include all in full clip #85 flanges to and bottom Ballarat Courier press photograph B/W photograph of three men Three men looking at framed certificates in Ballarat Photograph Image Ballarat Courier ...Circa 1960's, three men hold certificates towards the man in the middle.B/W photograph of three menBallarat Page No. 3 3" include all in full clip #85 flanges to and bottom Ballarat Courier press photographassociation for the blind, ballarat -
 Anglesea and District Historical Society
Tailwaggers Club Identification Tag
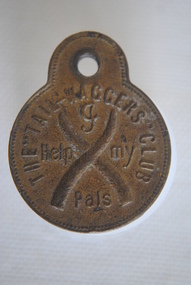
... Circular medallion with flange at top with hole (for attachment)....Circular medallion with flange at top with hole (for attachment). Tailwaggers Club Identification Tag ...Circular medallion with flange at top with hole (for attachment).Front: (Centre) If I'm / lost ring / FB3626 / 59027 / is my / registered / no. (edge) Latham House, 234 Swanston St, Melb. Back: (Centre) Crossed Tails / J / Help my / Pals (edge) The Tail-Waggers Club.tailwaggers, registered no 59027 -
 Ballarat Tramway Museum
Photograph - Colour Photograph/s - set 8, Warren Doubleday, 4/07/2001 12:00:00 AM
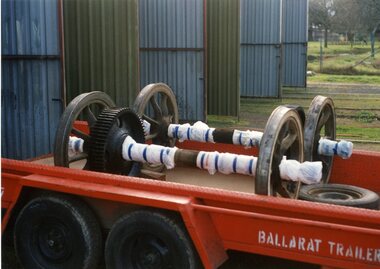
... On AGFA paper. .1 - Wheels loaded on the trailer .2 - flange - gear side of No. 2 axle .3 - wheel depth - gear side of No. 2 axle .4 - flange - non gear side, No. 2 axle .5 - ditto .6 - flange - non gear side of No. 1 axle .7 - flange - gear side of No. 1 axle .8 - ditto...Ballarat Tramway Museum South Gardens Reserve Wendouree Parade Ballarat Ballarat goldfields BTM Wheels Flanges Wear tram 27 Set of 8 photographs of the wheels and their flange details of those of BTM tram No. 27 prior to transporting to AETM St. ...Set of 8 photographs of the wheels and their flange details of those of BTM tram No. 27 prior to transporting to AETM St. Kilda, Adelaide, on 4 July 2001. On AGFA paper. .1 - Wheels loaded on the trailer .2 - flange - gear side of No. 2 axle .3 - wheel depth - gear side of No. 2 axle .4 - flange - non gear side, No. 2 axle .5 - ditto .6 - flange - non gear side of No. 1 axle .7 - flange - gear side of No. 1 axle .8 - dittobtm, wheels, flanges, wear, tram 27 -
 Vision Australia
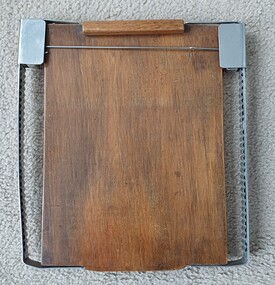
Equipment - Object, Wooden Braille board
... 1 wooden back board with metal flanges either side...Royal Victorian Institute for the Blind Braille equipment 1 wooden back board with metal flanges either side Wooden Braille board Equipment Object ...Wooden braille board with wooden header, hinged with brass hinges and small pins to clamp the paper to the board. Metal frames on each side hold a rod across the front of the board. The rod is fixed to two moveable parts which can go up or down the board as required.1 wooden back board with metal flanges either sideroyal victorian institute for the blind, braille equipment -
 Blacksmith's Cottage and Forge
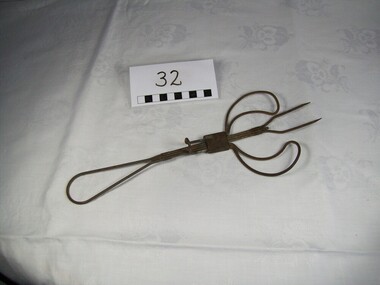
Fork, toasting
... Adjustable two tines/prongs toasting fork with side holding flanges...Blacksmith's Cottage and Forge 100 Main Street Bacchus Marsh goldfields Domestic item that has been hand made for a specific purpose for toasting food over coals or an open flame. domestic kitchen item food toast wire cutlery fork homemade Adjustable two tines/prongs toasting fork with side holding flanges Fork, toasting ...Domestic item that has been hand made for a specific purpose for toasting food over coals or an open flame. Adjustable two tines/prongs toasting fork with side holding flangesdomestic, kitchen, item, food, toast, wire, cutlery, fork, homemade -
 Queenscliffe Maritime Museum
Stop Valve
... In line stop valve (possibly for steam) 14 cm flange. Brass...Queenscliffe Maritime Museum 2 Wharf St Queenscliff geelong-and-the-bellarine-peninsula In line stop valve (possibly for steam) 14 cm flange. Brass Stop Valve ...In line stop valve (possibly for steam) 14 cm flange. Brass -
 Geoffrey Kaye Museum of Anaesthetic History
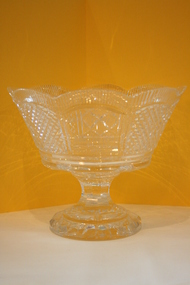
Decorative object - Fruit bowl, Waterford Crystal
... A cut Waterford crystal fruit bowl with flanged top on stamped platform base....crystal bowl fruit fruit bowl Waterford crystal Waterford A cut Waterford crystal fruit bowl with flanged top on stamped platform base. Decorative object Fruit bowl Waterford Crystal ...A cut Waterford crystal fruit bowl with flanged top on stamped platform base.crystal, bowl, fruit, fruit bowl, waterford crystal, waterford -
 Federation University Art Collection
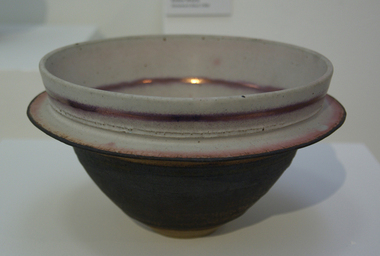
Ceramic, Bowl by Robin Welch, 1980
... Stoneware bowl with split flange, glazed with matt white, black and a touch of copper red ...After a couple of years of world travel, including working in Australia from 1962 to1965 helping Ian Sprague set up his Mungeribar Pottery and exhibiting in Melbourne, Robin Welch returned to England setting up Stadbroke Pottery in Eye, Suffolk in 1965. jan feder memorial ceramics collection ceramics robin welch gippsland campus jan feder Tobin Welch stamped on base Stoneware bowl with split flange, glazed with matt white, black and a touch of copper red Bowl by Robin Welch Ceramic Robin Welch ...Robin WELCH ( 23 July 1936-5 December 2019) Born Nuneaton, Warwickshire, England Robin Welch is one of the most highly respected contemporary British potters. The full range of his work includes large vessels with related paintings, fine drawings, and distinctive bowls and vases which explore colour, surface texture, form, detail of edge, and line. He is one of small group of significant British potters who expanded the language of throwing pots on the wheel through post-wheel additions and alteration. This gave his generally cylindrical forms a more organic and sculptural aspect, but their heavily coloured and textured surfaces were as much about painting, too, as Robin sought an integration of the visual disciplines he enjoyed. As he once wrote: “There’s no divide between art or craft. You decide to be an artist and you’ll use anything. If marooned on a desert island you’d use driftwood.” (https://www.theguardian.com/artanddesign/2019/dec/27/robin-welch-obituary, accessed 23 March 2021) When not in his Suffolk studio Robin Welch spent much time in Australia where he appreciated the outback’s arid earth and brilliant light, its grittier textures and luminous colour, qualities he sought to convey in-the-round and on canvas. Apart from his studion work Robnin Welch was a skilled designer for industry including Wedgwood, Midwinter and Denby. Initially studying at Penzance School of Art under Michael Leach (son of Bernard Leach) and the Central School of Art, London Robin Welch then worked part-time at the Leach Pottery between 1953 and 1959 before opening his own pottery in London's west end (1960 to 1962). After a couple of years of world travel, including working in Australia from 1962 to1965 helping Ian Sprague set up his Mungeribar Pottery and exhibiting in Melbourne, Robin Welch returned to England setting up Stadbroke Pottery in Eye, Suffolk in 1965.Stoneware bowl with split flange, glazed with matt white, black and a touch of copper red Tobin Welch stamped on basejan feder memorial ceramics collection, ceramics, robin welch, gippsland campus, jan feder -
 Friends of Westgarthtown
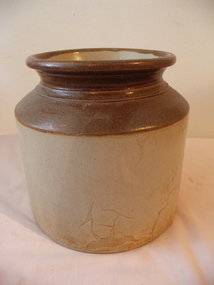
Domestic object - Jar
... Salt-glazed terracotta jar with flanged rim on opening. Two toned brown colouring....Salt-glazed terracotta jar with flanged rim on opening. Two toned brown colouring. ...Salt-glazed terracotta jar with flanged rim on opening. Two toned brown colouring.S.S written in black marker on base. No 1 27 1/2 engraved on base.domestic items, food storage and preservation, jar, terracotta, two-toned, domestic. -
 Friends of Westgarthtown
Domestic object - Jar
... Salt-glazed terracotta jar with flanged rim on opening. Two toned brown colouring....Salt-glazed terracotta jar with flanged rim on opening. Two toned brown colouring. ...Salt-glazed terracotta jar with flanged rim on opening. Two toned brown colouring.QT imprinted on shoulder.domestic items, food storage and preservation, jar, terracotta, two-toned, domestic. -
 Royal Australian and New Zealand College of Obstetricians & Gynaecologists (RANZCOG)
Tool - Tongue depressor with anaesthetic tube attachment used by Dr Lorna Lloyd-Green
... There is a short metal tube alongside the proximal flange, attached to the upper section of the flange, which is turned inwards and down with a small bulb on the end. ...There is a short metal tube alongside the proximal flange, attached to the upper section of the flange, which is turned inwards and down with a small bulb on the end. ...Metal tongue depressor with anaesthetic tube attachment. Consists of proximal and distal blades, and a blade shaft. "4" marking on the upper distal end of the blade. There is a short metal tube alongside the proximal flange, attached to the upper section of the flange, which is turned inwards and down with a small bulb on the end. Plastic or rubber tubing can be attached to this bulb. There is a smaller rounded flange at the distal end of the shaft. -
 Ballarat Tramway Museum
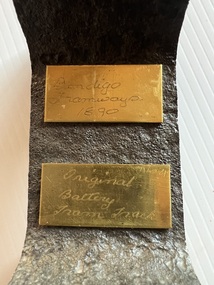
Functional object - Section of Rail - Bendigo Battery Tram, 1890
... Section of flanged steel rail, sawn, fitted with two engraved gold colour plastic signs. ...Demonstrates a light weight section of tram rail used in Bendigo. tramways Bendigo rail Battery Trams Engraved on the signs or plaques - "Bendigo Tramways 1890" and "Original Battery Tram Rail, No. 4" Section of flanged steel rail, sawn, fitted with two engraved gold colour plastic signs. ...Bendigo first commenced tramway operation in 1890 using battery trams. These were not successful. The rail, approx 36lb/yard or about 38kg/m has been sawn from an original length and collected.Demonstrates a light weight section of tram rail used in Bendigo.Section of flanged steel rail, sawn, fitted with two engraved gold colour plastic signs. Engraved on the signs or plaques - "Bendigo Tramways 1890" and "Original Battery Tram Rail, No. 4"tramways, bendigo, rail, battery trams -
 Royal Australian and New Zealand College of Obstetricians & Gynaecologists (RANZCOG)
Gellhorn mushroom pessary associated with Dr Frank Forster
... Clear plastic pessary consisting of three sections including a wide flange, short stem and bulb. ...Royal Australian and New Zealand College of Obstetricians & Gynaecologists (RANZCOG) 1 Bowen Crescent Naarm (Melbourne) melbourne Part of the collection of Dr Frank Forster Intrauterine device Pessary Clear plastic pessary consisting of three sections including a wide flange, short stem and bulb. Gellhorn mushroom pessary associated with Dr Frank Forster ...Part of the collection of Dr Frank ForsterClear plastic pessary consisting of three sections including a wide flange, short stem and bulb. intrauterine device, pessary -
 Royal Australian and New Zealand College of Obstetricians & Gynaecologists (RANZCOG)
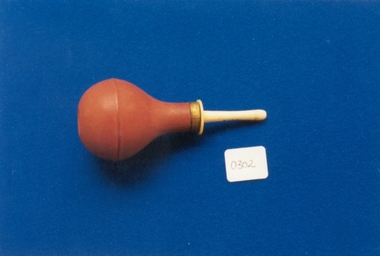
Infant enema syringe associated with Dr Frank Forster
... Consists of red rubber bulb attached to a white bone flange attachment....Consists of red rubber bulb attached to a white bone flange attachment. Infant enema syringe associated with Dr Frank Forster ...Enema syringe for infants. Consists of red rubber bulb attached to a white bone flange attachment. -
 Ballarat Tramway Museum
Document, State Electricity Commission of Victoria (SECV), "Notes on Tramway rail and tyre wear", c1962
... Document titled "Notes on Tramway rail and tyre wear", undated, looking at the wear patterns of tramway wheels and rails, wear on check rails, width of the flanges, increased by 1/16 of an inch in 1958, flange height, wheels running on the top of the groove, flange running through special work, and groove clearance. ...Ballarat Tramway Museum South Gardens Reserve Wendouree Parade Ballarat Ballarat goldfields Document titled "Notes on Tramway rail and tyre wear", undated, looking at the wear patterns of tramway wheels and rails, wear on check rails, width of the flanges, increased by 1/16 of an inch in 1958, flange height, wheels running on the top of the groove, flange running through special work, and groove clearance. ...Document titled "Notes on Tramway rail and tyre wear", undated, looking at the wear patterns of tramway wheels and rails, wear on check rails, width of the flanges, increased by 1/16 of an inch in 1958, flange height, wheels running on the top of the groove, flange running through special work, and groove clearance. Report prepared for both Ballarat and Bendigo. Possibly c1962. See also item 10062.Yields information about the wear on tramway wheels and rails.Document - three foolscap sheets, stapled in top left hand corner.tramways, trackwork, reports, track materials, tram track construction, rails, profiles, wheels, tyres, tramcars