Showing 5 items matching "food mid-1800’s"
-
 Flagstaff Hill Maritime Museum and Village
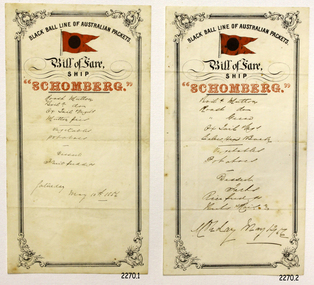
Document - Menu, Bill of Fare ship Schomberg, circa 1855 - May 12 1856
... ...food mid-1800’s...Criterion C: Potential to yield information that will contribute to an understanding of Victoria’s cultural history. warrnambool peterborough shipwrecked coast shipwreck coast flagstaff hill maritime museum flagstaff hill maritime village maritime museum great ocean road flagstaff hill sailing ship schomberg shipwreck schomberg black ball line of australian packets bill of fare schomberg menu schomberg 1856 food mid-1800’s food on ships mid-1800’s menu may 10, 1856 may 12, 1856 Printed on the pages ““BLACK BALL LINE OF AUSTRALIAN PACKETS.” ...A “Bill of Fare” is a menu or list of food offered for a meal. This Bill of Fare from the sailing ship Schomberg is handwritten in pen in hard-to-read script on the printed pages specifically for the Schomberg ship, of the Black Ball Line of Australian Packets. (‘Packets’ were vessels that had a regular trade run of cargo, passengers and mail; the sailing ship Schomberg was designed for long voyages between England and Australia.) These menus posed a puzzle as they have the handwritten dates of, May 10 and 12, 1856, by which time the Schomberg had sunk (she sunk on December 26, 1855). The donor of these pages of Bill of Fare is a stamp collector from Melbourne. He came across the menus in a package that he bought in 1980 at a stamp auction in Tasmania. He decided to give the menus to Flagstaff Hill this year during his annual family holiday in Warrnambool. A 1981 newspaper article about this donation included an interview with Flagstaff Hill’s curator Mr Peter Ronald, who said that the stationery of these menus is genuine. He went on to say that there would have been much stationery printed for use on the Schomberg although she sank on her maiden voyage. These menus could have been written at a dated late because the surplus Schomberg stationery could have been used for menus on other ships. We will probably never be sure of the answer but none-the-less the pages are still connected to the Schomberg. Below is what we believe the menu consists of although some of the writing is indecipherable - - - - - - - - - - - - - - - - - - - - - - - - - - - - - - - - - - - - - (first menu) Roast Mutton Boiled Mutton? Ox Tail Mulligatawny? Or possibly Ox Tail Vegetables? Mutton Pies? ------------------------------- Vegetables Potatoes ---------------------------------- Dessert Fruit Puddings? Saturday May 10, 1856 - - - - - - - - - - - - - - - - - - - - - - - - - - - - - - - - - - - - AND - - - - - - - - - - - - - - - - - - - - - - - - - - - - - - - - - - - - (second menu) Boiled Mutton Roast Mutton? Roast Geese? Ox Tail?? Calves Head Broth? ------------------------------- Vegetables Potatoes ------------------------------- Dessert Tarts? Rice Pudding? ?...Maids?? Monday May 12, 1856 - - - - - - - - - - - - - - - - - - - - - - - - - - - - - - - - - - - - Background of “SCHOMBERG” When SCHOMBERG was launched in July, 1855, she was considered the “Noblest ship that ever floated on water.” SCHOMBERG’s owners, the Black Ball Line (one of three companies by that name), commissioned the ship for their fleet of passenger liners. She was built by Alexander Hall of Aberdeen, UK at a cost of £43,103. She was constructed with 3 skins: one planked fore and aft, and two diagonally planked, fastened together with screw threaded trunnels (wooden rails). Her first class accommodation was luxurious: velvet pile carpets; large mirrors; rosewood; birds-eye maple; mahogany; soft furnishings of gold satin damask; an oak-lined library; and a piano. Overall she had accommodation for 1000 passengers. SCHOMBERG’s 34 year old master, Captain James ‘Bully’ Forbes, had promised Melbourne in 60 days at the launch, "with or without the help of God." James Nicol Forbes was born in Aberdeen in 1821 and rose to fame with his record-breaking voyages on the famous Black Ball Line ships MARCO POLO and LIGHTNING. In 1852 in the MARCO POLO he made the record passage from London to Melbourne in 68 days. There were 53 deaths on the voyage but the great news was of the record passage by the master. In 1954 Captain Forbes took the clipper LIGHTNING to Melbourne in 76 days and back in 63 days, this was never beaten by a sailing ship. He often drove his crew and ship to breaking point to beat his own records. He cared little for the comfort of the passengers. On this, the SCHOMBERG’s maiden voyage, he was going to break records. SCHOMBERG departed Liverpool on her maiden voyage on 6 October 1855 flying the sign “Sixty Days to Melbourne”. She departed with 430 passengers and 3000 tons cargo including iron rails and equipment intended to build the Melbourne to Geelong Railway as well as a bridge over the Yarra from Melbourne to Hawthorn. She also carried a cow for fresh milk, pens for fowls and pigs, and 90,000 gallons of water for washing and drinking. SCHOMBERG also carried 17,000 letters and 31,800 newspapers. The ship and cargo was insured for $300,000, a fortune for the time. The winds were poor as she sailed across the equator, slowing SCHOMBERG’s journey considerably. Land was first sighted on Christmas Day, at Cape Bridgewater near Portland, and Captain Forbes followed the coastline towards Melbourne. Forbes was said to be playing cards when called by the Third Mate Henry Keen, who reported land about 3 miles off. Due in large part to Forbes regarding a card game as more important than his ship, SCHOMBERG eventually ran aground on a sand spit near Curdie's Inlet (about 56 km west of Cape Otway) on 26 December 1855, 78 days after leaving Liverpool. The sand spit and the currents were not marked on Forbes’s map. Overnight, the crew launched a lifeboat to find a safe place to land the ship’s passengers. The scouting party returned to SCHOMBERG and advised Forbes that it was best to wait until morning because the rough seas could easily overturn the small lifeboats. The ship’s Chief Officer spotted the steamer SS QUEEN at dawn and signalled it. The master of the SS QUEEN approached the stranded vessel and all of SCHOMBERG’s passengers and crew were able to disembark safely. The SCHOMBERG was lost and with her, Forbes’ reputation. The Black Ball Line’s Melbourne agent sent a steamer to retrieve the passengers’ baggage from the SCHOMBERG. Other steamers helped unload her cargo until the weather changed and prevented the salvage teams from accessing the ship. Later one plunderer found a case of Wellington boots, but alas, all were for the left foot! Local merchants Manifold & Bostock bought the wreck and cargo, but did not attempt to salvage the cargo still on board the ship. They eventually sold it on to a Melbourne businessman and two seafarers. In 1864 salvage efforts were abandoned after two men drowned when they tried to reach SCHOMBERG. Parts of the SCHOMBERG were washed ashore on the south island of New Zealand in 1870, nearly 15 years after the wreck. The wreck of the SCHOMBERG lies in almost 9 metres of water. Although the woodwork is mostly disintegrated, the shape of the ship can still be seen due to the remaining railway irons, girders and the ship’s frame. A variety of goods and materials can be seen surrounding the wreck, by divers. Flagstaff Hill holds many items salvaged from the SCHOMBERG including a ciborium (in which a diamond ring was concealed in concretion), communion set, ship fittings and equipment, personal effects, a lithograph, tickets and photograph from the SCHOMBERG. These Bills of Fare are significant due to their connection to Flagstaff Hill’s collection of artefacts from the Schomberg, which is significant for its association with the Victorian Heritage Registered shipwreck S612. The collection is primarily significant because of the relationship between the objects, as together they have a high potential to interpret the story of the Schomberg. The Schomberg collection is archaeologically significant as the remains of an international passenger ship. The shipwreck collection is historically significant for representing aspects of Victoria’s shipping history and its potential to interpret sub-theme 1.5 of Victoria’s Framework of Historical Themes (living with natural processes). The collection is also historically significant for its association with the shipwreck and the ship, which was designed to be fastest and most luxurious of its day. The Schomberg collection meets the following criteria for assessment: Criterion A: Importance to the course, or pattern, of Victoria’s cultural history. Criterion B: Possession of uncommon, rare or endangered aspects of Victoria’s cultural history. Criterion C: Potential to yield information that will contribute to an understanding of Victoria’s cultural history. Menu, or Bill of Fare, on cream coloured stationery from the sailing vessel “Schomberg”. Two rectangular pieces of paper, each bears the printed words “Black Ball Line of Australian Packets, Bill of Fare, Ship, Schomberg”, a printed symbol of the Black Ball line (a black ball on a red flag) and a decorative border. Both pages are handwritten, in similar but different sized writing, with a Bill of Fare and a date, Page (1) dated May 10th 1856 and (2) dated May 12th ’56, (Both dates are AFTER the Schomberg sank in December 26th 1855.) Both pages have three fold lines spaced across their width. To be used for the return voyage.Printed on the pages ““BLACK BALL LINE OF AUSTRALIAN PACKETS.” “Bill of Fare, / SHIP / “SCHOMBERG”.” Handwritten list of food, and on one page “Saturday May 10 1856” and on the other page “Monday May 12” warrnambool, peterborough, shipwrecked coast, shipwreck coast, flagstaff hill maritime museum, flagstaff hill maritime village, maritime museum, great ocean road, flagstaff hill, sailing ship schomberg, shipwreck schomberg, black ball line of australian packets, bill of fare schomberg, menu schomberg 1856, food mid-1800’s, food on ships mid-1800’s, menu, may 10, 1856, may 12, 1856 -
 Kiewa Valley Historical Society
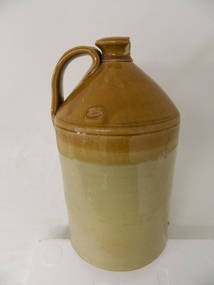
Jar/ Demi John Stone Ware, Circa 1860
... 1800's to the mid 1900's. These were times when household refrigeration, if available, would be from the "block ice" coolers or "cool" storage nooks and crannies within farmhouse locations. household liquid jar container 1800's food storage kiln fired glazed pottery manufacturer's seal "GEORGE SKEY WILNECOTE TAMWORTH" This large "stone ware" glazed Demi John, alias Carboy has a capacity of over 20 litres. ...This kiln glazed container for liquid's, was the type used in the 1700's to mid 1900's to contain fluids mainly for human consumption which needed to retain liquid that could be affected by sunlight and or required to be maintained at a cooler temperatures. Ginger beer and other "brews" for human consumption were the prime target. The ability to refill these vessels were of the utmost importance to the consumer. Over time these containers were reduced in size and produced for "special" liquids e.g. alcoholic Port. This Demi John stone ware was manufactured in Tamworth (England) and imported into Australia during a period when the majority of "quality" domestic items were sourced from "the Mother Country" and the ties between the still "colonial" outpost were very strong. This bondage remained longer in rural communities than in the cities. The "multi-culturalism of the post World War II era resulted in the lessening of the earlier ties. The growing of nationalism, the Aussie evolution, was brought about by the increased social and business/commercial interactions between Australia and the United States of America, post World War II.This container(jug) is very significant to the Kiewa Valley, a rural region that required these type of liquid storage vessels, especially in the late 1800's to the mid 1900's. These were times when household refrigeration, if available, would be from the "block ice" coolers or "cool" storage nooks and crannies within farmhouse locations.This large "stone ware" glazed Demi John, alias Carboy has a capacity of over 20 litres. It has a conical smooth lipped neck top with a wide, flat(three to four finger) carry and poring handle. The top third portion of the jug is caramel in colour and the bottom a darker cream. It has a manufacturer's seal stamped into the surface before glazing. This item would have been corked and then sealed (air tight) with wax.manufacturer's seal "GEORGE SKEY WILNECOTE TAMWORTH"household liquid jar container, 1800's food storage, kiln fired glazed pottery -
 Kiewa Valley Historical Society
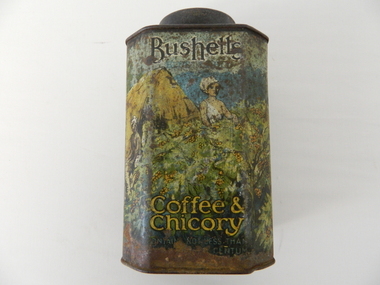
Tin Coffee and Chicory, circa mid to late 1900's
... In the late 1800's and early 1900's road freight had to contend with dirt roads, flooded roads, bush fires and grazing cattle/sheep in rural areas. The easier access that city households had with regard to replenishment of food and drink products, up until the mid 1900's, was severely retarded in rural areas. chicory / coffee drinks tin hydrated drink rural food and drink consumption patterns tinned food and drink "Bushells Coffee & Chicory", "NET 1-Ib. weight", " No. 144" "Under the Pure Food Act N.S.W. 1938" "by Bushells Ltd. ...Chicory was mixed with coffee to reduce the amount of coffee bean required to be used. This coffee "substitute" was due to the repeated fluctuations in availability of coffee beans (and price fluctuations) in the USA in the late 1800s and early 1900s resulting in the search for substitutes and additives to bulk out the available supplies. This was especially so during times of the major World Wars. Chicory was an excellent choice of fillers as it did not greatly influence the strong coffee bean taste. The first choice in USA households was coffee not tea and the influence of the American servicemen's thirst for coffee was a major thrust into the Australian "colonial" preference for a "cuppa" tea. Rural areas took longer to acquire a coffee "break" but with more and more subliminal advertising through "American" films the rural regions developed a growing preference for coffee, however the tea break alias "smoko" has lingered on.This coffee and chicory blend tin container is very significant to the Kiewa Valley in that it demonstrates that even in rural regions of Australia tastes and drinking preferences have changed by subliminal advertising as time goes by. The American "influence" whether by the "invasion" of friendly troops during the major wars or the avalanche of "American films" has altered some of the "dinky-di" Australian "true blue" tastes and mores. The availability of "straight " coffee supplies to rural areas was also in proportion to the level of all weather transport routes. In the late 1800's and early 1900's road freight had to contend with dirt roads, flooded roads, bush fires and grazing cattle/sheep in rural areas. The easier access that city households had with regard to replenishment of food and drink products, up until the mid 1900's, was severely retarded in rural areas. This extensively rusted tin of "Bushells Blue Label" Coffee and Chicory has an octagonal shaped body with a "push/pull" lid(tin).Three sides has reproduced painted ladies in "Roman dress" ladies picking the coffee beans. There is no reproduction of any chicory roots. There are two "Indian dressed" field workers(pickers) with turban head dress. On one side of the tin is "directions of use, net weight and manufacturer details."Bushells Coffee & Chicory", "NET 1-Ib. weight", " No. 144" "Under the Pure Food Act N.S.W. 1938" "by Bushells Ltd. No 144"chicory / coffee drinks, tin hydrated drink, rural food and drink consumption patterns, tinned food and drink -
 Bendigo Historical Society Inc.
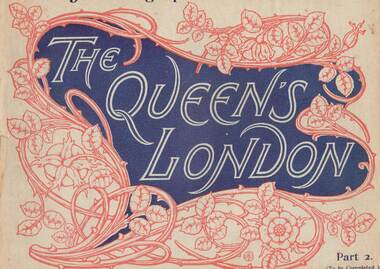
Photograph - FOUR BOOKS: 'THE QUEEN'S LONDON '
... Four books -'The Queen's London ' - 32 Photographic Views for 6d , Cassell & Company , Limited ; London , Paris & Melbourne ( parts 6, 5, 4, 2 to be completed in 12 parts) ) / paper covers --'The Queen's London ' -surrounded by flowers , damaged , containing black and white photos -mid to late 1800's , inside front cover advert for 'Mellin's infant Food , G. ...History House 11 Mackenzie Street Bendigo goldfields PHOTOGRAPH Person male / female Mellin's Infant Food / Gustav Mellin /Baron Justis Von Liebig a famous Dutch Chemist Four books -'The Queen's London ' - 32 Photographic Views for 6d , Cassell & Company , Limited ; London , Paris & Melbourne ( parts 6, 5, 4, 2 to be completed in 12 parts) ) / paper covers --'The Queen's London ' -surrounded by flowers , damaged , containing black and white photos -mid to late 1800's , inside front cover advert for 'Mellin's infant Food , G. ...Four books -'The Queen's London ' - 32 Photographic Views for 6d , Cassell & Company , Limited ; London , Paris & Melbourne ( parts 6, 5, 4, 2 to be completed in 12 parts) ) / paper covers --'The Queen's London ' -surrounded by flowers , damaged , containing black and white photos -mid to late 1800's , inside front cover advert for 'Mellin's infant Food , G. Mellin's Food Works , Peckham , London , S.E. / inside rear cover shows an advert for Mellin’s Emulsion of Cod Liver oil , Food Biscuits and Lacto -Glucose / rear page shows photos of three infants and the words 'the following portraits are a few specimens of many thousands of strong healthy children reared on Mellin's Foods photos include - Temple bar , Harrow school, London bridge / architects drawing for ' Levels for Hanro Knitting Mills dated 20.6.26, Stamp showing 'Hanro' Australia Bendigo Knitting Mills Pty Ltd, stamp showing 'William Bocklie, consulting engineer 422-428 Collins St. Melboune.photograph, person, male / female, mellin's infant food / gustav mellin /baron justis von liebig, a famous dutch chemist -
 Flagstaff Hill Maritime Museum and Village
Domestic object - Bowl, J & G Meakin, Late 19th or early 20th Century
... mid-1800's. The bowl is an example of kitchenware used in the 19th century and still in use today. Flagstaff Hill Flagstaff Hill Maritime Museum and Village Warrnambool Maritime Museum Maritime Village Great Ocean Road Shipwreck Coast mixing bowl food preparation J & G Meakin pottery Stoke-on-Trent kitchen equipment Ceramic On base, 'Ironstone China Reg SOL 391413' with symbol Bowl; white ceramic, round and tapering inwards towards base. ...The Process of Making Pottery Decorating, Firing, Glazing, Making, Technical There is a rhythm and flow to clay. It can’t be done all at once! Even the making process! It can take weeks to get everything done, especially if you can only work on your pottery once a week! Even though we have three hour classes, it’s often just not enough time! Here is an overview of some of the processes so you have a bit more grasp on some of the technical stuff! Step One – Design There are SO many ideas out there for making stuff in clay! From delicate porcelain jewellery, through to heavy sculptural work and everything in between. Deciding your direction is sometimes not that easy – when you first start, try everything, you will naturally gravitate to the style that you enjoy! The options and variations are endless and can get a wee bit overwhelming too! Check in with me before you start to ensure your ideas will work, what order you might do things, how you could achieve the look you are seeking and any other technical data required! Step Two – Making Clay is thixotropic. This means that as you work with it, the clay first gets sloppier and wetter, before is begins to dry in the atmosphere. For most things, you simply can’t do all parts of the project at once. An example of work order might look like: Get last weeks work out from the shelves Prepare clay for today’s work – roll your clay, prepare balls for throwing, make the first stage of a pinch pot) Clean up last week’s work and put it on the shelf for bisque firing Check that you have any glazing to do – and do enough of it that you will have time to finish your main project Do the next step of your next project – there might be a further step that can’t be complete immediately, in that case, wrap your work well and put onto the shelves. Letting your work rest for a while can really help keep your work clean and professional looking. Many things require bagging under plastic to keep it ready for work the next week – put your name on the outside of the bag so you can find your work easily. We have stickers and markers. Consider how you want to decorate your work – coloured slip can be applied at a fairly wet stage (remembering that it will make your work even wetter!). Trying to apply slip to dry clay won’t work! If you want to do sgraffito – you will need to keep the work leather hard (a state of dryness where you can still work the clay with a little effort and a little water and care). Step Three – Drying Most of the time your work can go into the rack uncovered to let it dry out for the following week. If you want to continue forming or shaping you will need to double bag your work – put your work on a suitable sized bat and put the bat in a bag so the base of the bag is under the bat, then put another bag over the top of the work and tuck the top of the bag under the bat. If you want to trim (or turn) your thrown work the following week, it should also be double bagged. If your work is large, delicate, or of uneven thicknesses, you should lightly cover your work for drying. When considering the drying process, bare in mind the weather, humidity and wind! The hotter and dryer, the faster things dry and work can dry unevenly in the shelves – this can lead to cracking – another time to lightly cover your work for drying. Step Four – Trimming and Cleaning Up Your work is dry! It is called greenware now and it is at it’s most fragile! Handle everything with two hands. I often refer to soft hands – keep everything gentle and with your fingers spread as much as possible. Try to not pick up things like plates too much, and always with both hands! Before your work can be bisque fired it should be “cleaned up”. You work won’t go into the kiln if it has sharp edges – when glazed, sharp edges turn into razor blades! Use a piece of fly wire to rub the work all over – this will scratch a little so be light handed. Use a knife or metal kidney to scrape any areas that require a bit more dynamic treatment than the fly wire offers! Finally, a very light wipe over with a slightly damp sponge can help soften and soothe all of your edges and dags! Trimming thrown work: If you are planning to trim (or turn) your thrown work (and you should be), make sure you bag it well – your work should be leather hard to almost dry for easiest trimming. Use this step to finish the work completely – use a metal kidney to polish the surface, or a slightly damp sponge to give a freshly thrown look. Wipe the sponge around the rim after trimming, and check the inside of the pot for dags! Trimming slip cast work: Usually I will trim the rims of your work on the wheel the following day to make that stage easier, however you will still need to check your work for lumps and bumps. Last but not least – check that your name is still clearly on the bottom of your work. Step Five – Bisque Firing When the work is completely dry it can go into the bisque kiln. The bisque kiln is fired to 1000°C. This process burns off the water in the clay as well as some of the chemically bound water. The structure of the clay is not altered that much at this temperature. Inside the bisque kiln, the work is stacked a little, small bowl inside a larger bowl and onto a heavy plate. Smaller items like decorations or drink coasters might get stacked several high. Consideration is paid to the weight of the stack and shape of the work. A bisque kiln can fire about one and a half times the amount of work that the glaze kiln can fire. The firing takes about 10 hours to complete the cycle and about two days to cool down. Once it has been emptied the work is placed in the glaze room ready for you to decorate! Step Six – Glazing Decorating your work with colour can be a lot of fun – and time consuming! There are three main options for surface treatment at this stage: Oxide Washes Underglazes Glazes Washes and underglazes do not “glaze” the work – It will still need a layer of glaze to fully seal the clay (washes don’t need glaze on surfaces not designed for food or liquid as they can gloss up a little on their own). Underglazes are stable colourants that turn out pretty much how they look in the jar. They can be mixed with each other to form other colours and can be used like water colours to paint onto your work. Mostly they should have a clear glaze on top to seal them. Oxides are a different species – the pink oxide (cobalt) wash turns out bright blue for instance. They don’t always need a glaze on top, and some glazes can change the colour of the wash! The glazes need no other “glaze” on top! Be careful of unknown glaze interactions – you can put any combination of glaze in a bowl or on a plate, but only a single glaze on the outside of any vertical surface! Glazes are a chemical reaction under heat. We don’t know the exact chemicals in the Mayco glazes we use. I can guess by the way they interact with each other, however, on the whole, you need to test every idea you have, and not run the test on a vertical surface! Simply put, glaze is a layer of glass like substance that bonds with the clay underneath. Clay is made of silica, alumina and water. Glaze is made of mostly silica. Silica has a melting point of 1700°C and we fire to 1240°C. The silica requires a “flux” to help it melt at the lower temperature. Fluxes can be all sorts of chemicals – a common one is calcium – calcium has a melting point of 2500°C, however, together they both melt at a much lower temperature! Colourants are metal oxides like cobalt (blue), chrome (green through black), copper (green, blue, even red!), manganese (black, purple and pink) iron (red brown), etc. Different chemicals in the glaze can have dramatic effects. for example, barium carbonate (which we don’t use) turns manganese bright pink! Other elements can turn manganese dioxide brown, blue, purple and reddish brown. Manganese dioxide is a flux in and of itself as well. So, glazes that get their black and purple colours, often interact with other glazes and RUN! Our mirror black is a good example – it mixes really well with many glazes because it fluxes them – causes them to melt faster. It will also bring out many beautiful colours in the glazes because it’s black colouring most definitely comes from manganese dioxide! Glaze chemistry is a whole subject on it’s own! We use commercial Mayco glazes on purpose – for their huge range of colour possibilities, stability, cool interactions, artistic freedom with the ability to easily brush the glazes on and ease of use. We currently have almost 50 glazes on hand! A major project is to test the interactions of all glazes with each other. That is 2,500 test tiles!!!! I’m going to make the wall behind the wheels the feature wall of pretty colours! Step Seven – Glaze (Gloss or sometimes called “Glost”) Firing Most of the time this is the final stage of making your creation (but not always!) The glaze kiln goes to 1240°C. This is called cone 6, or midrange. It is the low end of stoneware temperatures. Stoneware clays and glazes are typically fired at cone 8 – 10, that is 1260 – 1290°C. The energy requirement to go from 1240°C to 1280°C is almost a 30% more! Our clay is formulated to vitrify (mature, turn “glass-like”) at 1240°, as are our glazes. A glaze kiln take around 12 hours to reach temperature and two to three days to cool down. Sometimes a third firing process is required – this is for decoration that is added to work after the glaze firing. For example – adding precious metals and lustres. this firing temperature is usually around 600 – 800°C depending upon the techniques being used. There are many students interested in gold and silver trims – we will be doing this third type of firing soon! After firing your work will be in the student finished work shelves. Remember to pay for it before you head out the door! There is a small extra charge for using porcelain clay (it’s more than twice the price of regular clay), and for any third firing process! Once your work has been fired it can not turn back into clay for millennia – so don’t fire it if you don’t like it! Put it in the bucket for recycling. https://firebirdstudios.com.au/the-process-of-making-pottery/This bowl was made by renowned pottery company J & G Meakin of England. The firm was established in the mid-1800's. The bowl is an example of kitchenware used in the 19th century and still in use today.Bowl; white ceramic, round and tapering inwards towards base. Made by J and G Meakin England.On base, 'Ironstone China Reg SOL 391413' with symbolflagstaff hill, flagstaff hill maritime museum and village, warrnambool, maritime museum, maritime village, great ocean road, shipwreck coast, mixing bowl, food preparation, j & g meakin, pottery, stoke-on-trent, kitchen equipment, ceramic