Showing 111 items matching "junction box"
-
 Moorabbin Air Museum
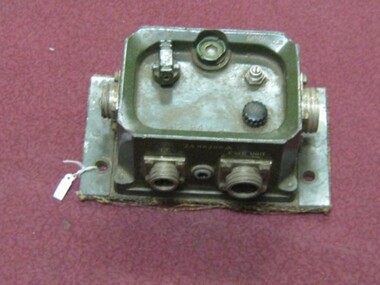
Manual (Item) - RAAF Power Junction Box Manual, Royal Australian Air Force Power Junction Box DR41 Series
... RAAF Power Junction Box Manual...Royal Australian Air Force Power Junction Box DR41 Series...Moorabbin Air Museum Moorabbin Airport 12 First Street Moorabbin melbourne RAAF Royal Australian Air Force Power Junction Box DR41 Series Manual RAAF Power Junction Box Manual ...RAAF -
4th/19th Prince of Wales's Light Horse Regiment Unit History Room
Junction Box 4 Way, 1950s - 60s
... Junction Box 4 Way...junction box...Four way junction box of aluminium construction used as a cable splitter in a wireless control harness....Junction Box 4 Way ...Equipment used by the RegimentFour way junction box of aluminium construction used as a cable splitter in a wireless control harness.ZA 46982junction box, wireless control harness -
4th/19th Prince of Wales's Light Horse Regiment Unit History Room
Junction Distribution Box No 9, 1950s - 60s
... Junction Distribution Box No 9...junction box...Junction box, wireless control harness...Junction Distribution Box No 9 ...Equipment used by the RegimentBox of aluminium construction with couplings and controls for the management of up to three radio sets.Junction box, wireless control harnessjunction box, wireless control harness -
4th/19th Prince of Wales's Light Horse Regiment Unit History Room
Junction Box J1, 1950s - 60s
... Junction Box J1...junction box...Junction Distribution box J1. Box of aluminium construction with couplings and controls used in both 'A' and 'B' harnesses as a rebroadcast facility....4th/19th Prince of Wales's Light Horse Regiment Unit History Room 4/19 PWLH Regiment, Building 78 Simpson Barracks Macleod melbourne Equipment used by the Regiment junction box j1 wireless harness 5820-99-949-1011 Junction Distribution box J1. ...Equipment used by the RegimentJunction Distribution box J1. Box of aluminium construction with couplings and controls used in both 'A' and 'B' harnesses as a rebroadcast facility.5820-99-949-1011junction box, j1, wireless harness -
4th/19th Prince of Wales's Light Horse Regiment Unit History Room
Junction Box No 2 (J2), 1950s - 1960s
... Junction Box No 2 (J2)......junction box...It is the focal point for a wireless harness to which everything is connected Junction Box No 2 (J2) ...Equipment used by the RegimentControl box of aluminium construction. It is the focal point for a wireless harness to which everything is connected ZA 46286radio control harness, junction box -
4th/19th Prince of Wales's Light Horse Regiment Unit History Room
Junction Distribution Box No 8
... Junction Distribution Box No 8...Junction Distribution Box No8...4th/19th Prince of Wales's Light Horse Regiment Unit History Room 4/19 PWLH Regiment, Building 78 Simpson Barracks Macleod melbourne Part of the radio control harness for tanks using the larkspur radio system As used by the Regiment in a previous life as a Tank Regiment control box radio harness jd 8 Junction Distribution Box No8 Aluminium box with three coupling positions with a volume control and call switch Junction Distribution Box No 8 ...Part of the radio control harness for tanks using the larkspur radio systemAs used by the Regiment in a previous life as a Tank RegimentAluminium box with three coupling positions with a volume control and call switchJunction Distribution Box No8control box, radio harness, jd 8 -
 Running Rabbits Military Museum operated by the Upwey Belgrave RSL Sub Branch
Junction Box
... Junction Box...Used in Vietnam in Armoured Vehicles, Made by Racal England 1960 Junction Box ...J2. Used in Vietnam in Armoured Vehicles, Made by Racal England 1960equipment, vietnam, army -
 Melbourne Tram Museum
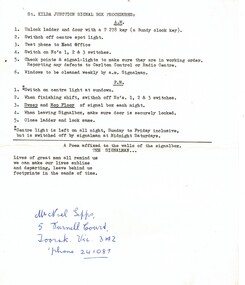
Document - Instruction, Noel Gipps, "St Kilda Junction Signal Box Procedures", c1970?
... "St Kilda Junction Signal Box Procedures"...Typed instruction - quarto sheet - "St Kilda Junction Signal Box Procedures" - could be a copy of the actual instructions provided in the signal box - gives what the AM and PM shifts were required to undertake. ...box. On the bottom section has the address of Mr. Noel Gipps "St Kilda Junction Signal Box Procedures" Document Instruction Noel Gipps Noel Gipps ...Typed instruction - quarto sheet - "St Kilda Junction Signal Box Procedures" - could be a copy of the actual instructions provided in the signal box - gives what the AM and PM shifts were required to undertake. Has a poem on the based that was affixed to the wall of the signal box. On the bottom section has the address of Mr. Noel Gippstrams, tramways, st kilda junction, instructions, signalmen, signals, poem -
 Melbourne Tram Museum
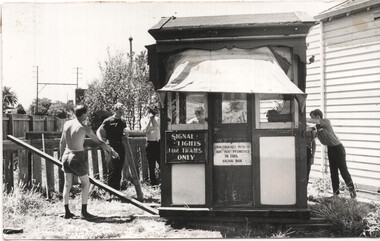
Photograph - Moving the St Kilda Junction signal box, Bob Prentice, 19/1/1969
... Moving the St Kilda Junction signal box....box...St Kilda Junction...Photograph Moving the St Kilda Junction signal box. Bob Prentice ...The photograph shows TMSV Members and workers moving the former St Kilda Junction signal cabin into position for storage during Jan. 1969.Yields information about the relocation of the former St Kilda Junction signal box for storage. It is understood it was later demolished.Black and white photograph with notes on the rear in ink. On rear in ink "Ground at Murrumbeena, the St Kilda Junction signal cabin is manhandled into its final storage area (L to R), members John Ford & Dave Macartney, non-members David Woodward and Robert McCutchen, members who are on the rear of the cabin are Bill Fuller, and Graeme Breydon. Sunday 19th January 1969. Photo Bob Prentice"tramways, signal box, st kilda junction, tmsv -
4th/19th Prince of Wales's Light Horse Regiment Unit History Room
Top Tray Harness Assembly, 1950s - 1960s
... Top wireless mounting tray incorporating a 'B' harness assembly incorporating J2, R and 4 way junction box....4th/19th Prince of Wales's Light Horse Regiment Unit History Room 4/19 PWLH Regiment, Building 78 Simpson Barracks Macleod melbourne Equipment used by the Regiment Radio equipment mounting tray J2 - ZA466286, 'R' Box - ZA 46292, 4 way box - ZA 46982 Top wireless mounting tray incorporating a 'B' harness assembly incorporating J2, R and 4 way junction box. Top Tray Harness Assembly ...Equipment used by the RegimentTop wireless mounting tray incorporating a 'B' harness assembly incorporating J2, R and 4 way junction box.J2 - ZA466286, 'R' Box - ZA 46292, 4 way box - ZA 46982radio equipment, mounting tray -
 Parks Victoria - Wilsons Promontory Lightstation
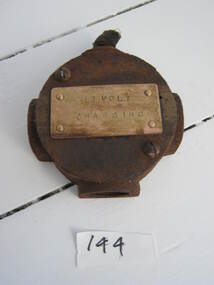
Part, electrical
... Used as a junction box for metal conduit in RAAF power house....Parks Victoria - Wilsons Promontory Lightstation Lighthouse track Wilsons Promontory National Park 3960 gippsland Used as a junction box for metal conduit in RAAF power house. ...Used as a junction box for metal conduit in RAAF power house.This technical item has second level significance because their use is likely to be directly linked to WWII communications activity at the lightstation:Round metal piece with protrusions and with "12 VOLT / CHARGING" stamped on a metal plate on the front."12 VOLT / CHARGING" -
 Melbourne Tram Museum
Slide - Set of 3, Keith Caldwell, 11/3/1960
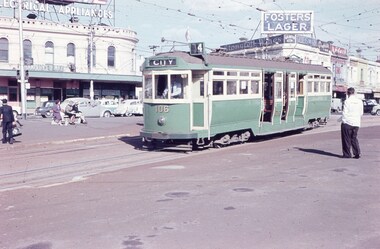
... Junction... Signal box...Melbourne Tram Museum 8 Wallen Road Hawthorn melbourne Trams tramways St Kilda Junction Signal box L class W3 class tram 106 tram 926 tram 668 SW6 class Wellington St MMTB Route 4 Route 64 route 15 All hand stamped "11 Mar '60"; .1 "L" in ink and .3 "W3" in ink written on. ...Set of 3 Agfa Colour slide, cardboard mount, by Keith Caldwell of 11 March 1960 of trams at St Kilda Junction. .1 - L 106 arriving at the junction from Wellington St. Tram has the destination of City, route 4. Signals for the trams can been seen on a pole on the left hand side of the photo. .2 - SW6 - as for .1 .3 - W3 668 ditto, from Fitzroy St, showing Moreland, route 15. Has an advert for 3AW. In the background in all photos are adverts for Speedie electrical appliances, Fosters Lager, Stonefell wines, Gilbeys Gin, Penfolds, Stockdale's Bread, Hamburger Max Snack bar, Ardath, Brooks Books.All hand stamped "11 Mar '60"; .1 "L" in ink and .3 "W3" in ink written on.trams, tramways, st kilda junction, signal box, l class, w3 class, tram 106, tram 926, tram 668, sw6 class, wellington st, mmtb, route 4, route 64, route 15 -
 Melbourne Tram Museum
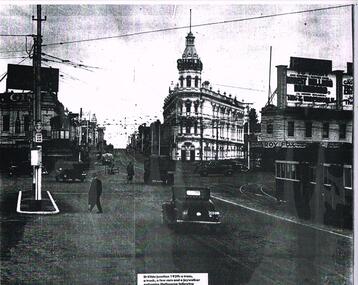
Photograph, St Kilda Junction, original 1939c
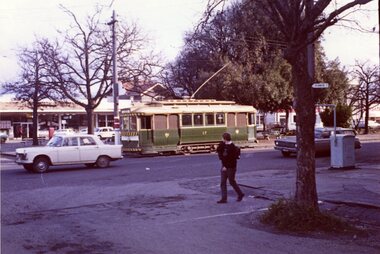
... Junction... Signal box...Laminated photograph - A3 size - St Kilda Junction looking south at the end of St Kilda Road - with the signal box - 1939. ...Melbourne Tram Museum 8 Wallen Road Hawthorn melbourne Trams tramways St Kilda Junction Signal box Hotels Tram Stops Laminated photograph - A3 size - St Kilda Junction looking south at the end of St Kilda Road - with the signal box - 1939. ...Laminated photograph - A3 size - St Kilda Junction looking south at the end of St Kilda Road - with the signal box - 1939. Shows the building, tram stop, hotels, motor vehicles. Has a W2 inbound on the right hand side of the photograph. Caption "St Kilda Junction 1939s. a tram, a truck, a few cars and a jaywalker epitomise Melbourne following"trams, tramways, st kilda junction, signal box, hotels, tram stops -
 Melbourne Tram Museum
Postcard - St Kilda Junction - cable tram 123, 1910s
... Junction...Signal box...Photo of St Kilda Road, from the junction looking north with tram 123 standing opposite the signal box. The tram is sign written for "St Kilda to Queensberry St. ...box and the tramcar. There are several motor cars in view, along with one horse-drawn cart. Second copy - actual postcard - "Rose Series P.3387 St Kilda Road, from The Junction, St Kilda Vic" Yields information about St Kilda Junction, and cable tram operations. tramways trams cable tram St Kilda St Kilda Road St Kilda Junction Signal box tram 123 Rose Series In pencil on the rear "St Kilda Rd from the junction" Black and White Photograph postcard format, divided back with note on rear. ...Photo of St Kilda Road, from the junction looking north with tram 123 standing opposite the signal box. The tram is sign written for "St Kilda to Queensberry St. The signal box has signs advising that "All traffic keep to the left of this box". A uniformed employee is standing between the box and the tramcar. There are several motor cars in view, along with one horse-drawn cart. Second copy - actual postcard - "Rose Series P.3387 St Kilda Road, from The Junction, St Kilda Vic"Yields information about St Kilda Junction, and cable tram operations.Black and White Photograph postcard format, divided back with note on rear. Two copies held.In pencil on the rear "St Kilda Rd from the junction"tramways, trams, cable tram, st kilda, st kilda road, st kilda junction, signal box, tram 123, rose series -
4th/19th Prince of Wales's Light Horse Regiment Unit History Room
Mounting Tray MT-1029/VRC, abt 1970's
... The top tray has a junction box for connecting radio and harness cablings, and two clamping devices to hold the radio ...The top tray has a junction box for connecting radio and harness cablings, and two clamping devices to hold the radio Mounting Tray MT-1029/VRC ...Used as part of the radio harness of all M113 vehicles and truck and ground stations Equipment used by The RegimentRadio mounting tray as used in all M113 family of vehicles. Consists of a base tray and a top tray on anti-vibration mounts. The top tray has a junction box for connecting radio and harness cablings, and two clamping devices to hold the radio MT-1029/VRC No 6731Bradio mounting tray -
 Ballarat Tramway Museum
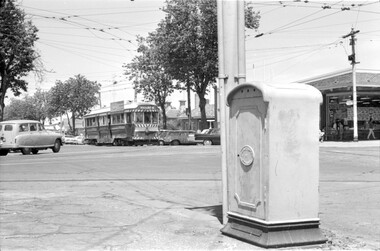
Photograph - SECV Ballarat 41 & ESCo box Sturt and Drummond Sts, Mal Rowe, 22/11/1969
... The photograph shows Ballarat No. 41 northbound at Hospital Corner, Sturt and Drummond Streets, with an ESCo switch or junction box in the foreground. The tram has the destination of Lydiard St North. ...Ballarat Tramway Museum South Gardens Reserve Wendouree Parade Ballarat Ballarat goldfields The photograph shows Ballarat No. 41 northbound at Hospital Corner, Sturt and Drummond Streets, with an ESCo switch or junction box in the foreground. The tram has the destination of Lydiard St North. ...The photograph shows Ballarat No. 41 northbound at Hospital Corner, Sturt and Drummond Streets, with an ESCo switch or junction box in the foreground. The tram has the destination of Lydiard St North. Photo by Mal Rowe, 22/11/1969.Yields information about the corner of Sturt and Lydiard Sts and an ESCo junction or switch box.Black and white photograph notes on rear.Mal Rowe copyright stamp with number 118,13, and "Corner Drummond St South and Sturt Street"tramcars, tramways, hospital corner, sturt st, drummond st sth, tram 41, electrical equipment, electrical switching -
 Ballarat Tramway Museum
Photograph - Colour Photograph/s, Travis Jeffrey, 14/08/1971 12:00:00 AM
... A SEC/ESCo electrical junction box appears in the photo on the right hand side. ...A SEC/ESCo electrical junction box appears in the photo on the right hand side. ...Colour photograph of Ballarat No. 17 approaching the intersection of Sturt St and Drummond St from Sturt St. West. Shows the tram stop pole. A SEC/ESCo electrical junction box appears in the photo on the right hand side. Photo on Agfa Paper and taken on Friday 14 August 1971.Stamps with faded green ink: "Photo by Chris Jeffrey / Number" with number "104PC/12" in blue ink and date stamp "Friday 14 August 1971" also in faded green ink.drummond st, sturt st, electrical equipment, tram 17 -
 Ballarat Tramway Museum
Slide - 35mm slide/s, late 1960's
... Note the ESCo electrical switch/junction box in the photograph, to the left of the tram. ...Note the ESCo electrical switch/junction box in the photograph, to the left of the tram. ...Agfa plastic mount (blue base, white cover) of a photograph of No. 43 turning from Drummond St South into Sturt St at Hospital corner. Has the shops on the south west corner in the background. Photo taken late 1960's. Tramcar has an SEC roof advertisement. Note the ESCo electrical switch/junction box in the photograph, to the left of the tram. A single truck tram is in the background and the short stubby tram stop pole in Drummond St. South. The slide appears to be a copy slide, given the nature of the colour and the additional number WP415. Photographer could be Bill Pearce (WP). Slide rescanned at 3200 dpi 25-10-2020, jpg replaced, tiff file retained. This file was scanned in 2003 and may show colour changes."BAS 55 in penciltramways, trams, hospital corner, drummond st, sturt st, tram 43 -
 Bendigo Historical Society Inc.
Photograph - Robert Green Collection - Photos of Bendigo Tramways - Sheet 1 of 8, 1960s
... Houses in the foreground, on the left is 245 Eaglehawk Road and on the right 241 Eaglehawk Road. 11147.1e No 28 Birney Car Special 11147.1f No 28 Birney Car Special and No 2 possibly in Eaglehawk 11147.1g No 18 roars up Eaglehawk Road into Iron Bark 11147.1h Tram crossing the railway at Jobs Gully, on its way to Bendigo 11147.1i Tram crossing the railway at Jobs Gully, on its way to Eaglehawk 11147.1j Central Deborah Gold Mine 11147.1k The intersection of Reginald and Houston St, with the Cemetery on the left. 11147.1l Tram Stop on Pall Mall opposite Ezywalkins Conrner of Mitchell St 11147.1m Electrical Cable junction box 11147.1n Electrical Cable junction box 11147.1o No 18 at Canterbury Park Terminus Eaglehawk 11147.1p No 26 at the top of Mitchell St on its way to Quarry Hill 11147.1q Nos 26 and 18 at the Railway Station stop in Mitchell St 11147.1r No 18 coming down Mitchell St 11147.1s No 5 possibly in Carpenter St 11147.1t No 5 at the Cemetery Gates ready to depart the terminus 11147.1u No 5 at the Cemetery Gates ready to depart the terminus 11147.1v No 5 at the Cemetery Gates ready to depart the terminus 11147.1w Nos 18 and 5 crossover at the Fountain 11147.1x Nos 18 and 5 crossover at the Fountain 11147.1y Nos 18 and 5 crossover at the Fountain 11147.1z Heading into Long Gully past the Manchester Arms Hotel 11147.1aa No 5 loading passengers at the Eaglehawk Terminus next to Canterbury Park 11147.1ab Traffic conjestion at the loop on the way back to Bendigo 11147.1ac The Eaglehawk Terminus next to Canterbury Park 11147.1ad The Eaglehawk Terminus next to Canterbury Park 11147.1ae The Eaglehawk Terminus next to Canterbury Park 11147.1af The Eaglehawk Terminus next to Canterbury Park...Houses in the foreground, on the left is 245 Eaglehawk Road and on the right 241 Eaglehawk Road. 11147.1e No 28 Birney Car Special 11147.1f No 28 Birney Car Special and No 2 possibly in Eaglehawk 11147.1g No 18 roars up Eaglehawk Road into Iron Bark 11147.1h Tram crossing the railway at Jobs Gully, on its way to Bendigo 11147.1i Tram crossing the railway at Jobs Gully, on its way to Eaglehawk 11147.1j Central Deborah Gold Mine 11147.1k The intersection of Reginald and Houston St, with the Cemetery on the left. 11147.1l Tram Stop on Pall Mall opposite Ezywalkins Conrner of Mitchell St 11147.1m Electrical Cable junction box 11147.1n Electrical Cable junction box 11147.1o No 18 at Canterbury Park Terminus Eaglehawk 11147.1p No 26 at the top of Mitchell St on its way to Quarry Hill 11147.1q Nos 26 and 18 at the Railway Station stop in Mitchell St 11147.1r No 18 coming down Mitchell St 11147.1s No 5 possibly in Carpenter St 11147.1t No 5 at the Cemetery Gates ready to depart the terminus 11147.1u No 5 at the Cemetery Gates ready to depart the terminus 11147.1v No 5 at the Cemetery Gates ready to depart the terminus 11147.1w Nos 18 and 5 crossover at the Fountain 11147.1x Nos 18 and 5 crossover at the Fountain 11147.1y Nos 18 and 5 crossover at the Fountain 11147.1z Heading into Long Gully past the Manchester Arms Hotel 11147.1aa No 5 loading passengers at the Eaglehawk Terminus next to Canterbury Park 11147.1ab Traffic conjestion at the loop on the way back to Bendigo 11147.1ac The Eaglehawk Terminus next to Canterbury Park 11147.1ad The Eaglehawk Terminus next to Canterbury Park 11147.1ae The Eaglehawk Terminus next to Canterbury Park 11147.1af The Eaglehawk Terminus next to Canterbury Park Photograph Robert Green Collection - Photos of Bendigo Tramways - Sheet 1 of 8 ...This collection contains eight archive sheets (Sheet 1 to Sheet 8) of strips of original 35mm black and white negatives of photographs taken during the 1960s and early 1970s by Robert Green, of the Bendigo State Electricty Commission of Victoria Tramways prior to their abandonment The collection also includes two archive quality sheets (Sheet A and Sheet B) of original 35mm colour slides taken by Robert Green during the same period. Sheet B also contains one slide taken by Robert's friend Keigh S King (1928-2019) who was the author of the book 'The Bendigo Tramways an illustrated history, published by the Australian Railway Historical Society Victorian Division Melbourne in February 1972; BHS Item no. 5052. The collection also includes one USB stick which contains images of all photographs described above, except for one colour slide taken by Keith S Kings. Sixteen black and white prints from the images are also included.Robert Green Collection, this item contains thirty three Black and White Negatives of trams at various locations around Bendigo. Photos: 11147.1a and 11147.1b Tram on its way out of Long Gully along Mt Korong (Eaglehawk) Road towards Eaglehawk. Houses in the foreground, on the left is 245 Eaglehawk Road and on the right 241 Eaglehawk Road. 11147.1c Birney Car Tram on its way out of Long Gully along Mt Korong (Eaglehawk) Road towards Eaglehawk, looking back ove the Long Gully township. 11147.1d Birney Car Tram on its way out of Long Gully along Mt Korong (Eaglehawk) Road towards Eaglehawk. Houses in the foreground, on the left is 245 Eaglehawk Road and on the right 241 Eaglehawk Road. 11147.1e No 28 Birney Car Special 11147.1f No 28 Birney Car Special and No 2 possibly in Eaglehawk 11147.1g No 18 roars up Eaglehawk Road into Iron Bark 11147.1h Tram crossing the railway at Jobs Gully, on its way to Bendigo 11147.1i Tram crossing the railway at Jobs Gully, on its way to Eaglehawk 11147.1j Central Deborah Gold Mine 11147.1k The intersection of Reginald and Houston St, with the Cemetery on the left. 11147.1l Tram Stop on Pall Mall opposite Ezywalkins Conrner of Mitchell St 11147.1m Electrical Cable junction box 11147.1n Electrical Cable junction box 11147.1o No 18 at Canterbury Park Terminus Eaglehawk 11147.1p No 26 at the top of Mitchell St on its way to Quarry Hill 11147.1q Nos 26 and 18 at the Railway Station stop in Mitchell St 11147.1r No 18 coming down Mitchell St 11147.1s No 5 possibly in Carpenter St 11147.1t No 5 at the Cemetery Gates ready to depart the terminus 11147.1u No 5 at the Cemetery Gates ready to depart the terminus 11147.1v No 5 at the Cemetery Gates ready to depart the terminus 11147.1w Nos 18 and 5 crossover at the Fountain 11147.1x Nos 18 and 5 crossover at the Fountain 11147.1y Nos 18 and 5 crossover at the Fountain 11147.1z Heading into Long Gully past the Manchester Arms Hotel 11147.1aa No 5 loading passengers at the Eaglehawk Terminus next to Canterbury Park 11147.1ab Traffic conjestion at the loop on the way back to Bendigo 11147.1ac The Eaglehawk Terminus next to Canterbury Park 11147.1ad The Eaglehawk Terminus next to Canterbury Park 11147.1ae The Eaglehawk Terminus next to Canterbury Park 11147.1af The Eaglehawk Terminus next to Canterbury Parkkeith s king, bendigo, trams, robert green -
 Ballarat Tramway Museum
Magazine, Melbourne and Metropolitan Tramways Board (MMTB), "MMTB News", 1966
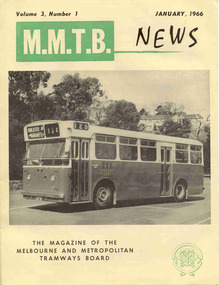
... Box, visit of SPER members to Melbourne, memories of Malvern Depot, sports and social club news. 2720.6 - Vol. 3, No. 6 - 16 pages, July - August 1966 with a photo of the view from the St Kilda Junction signal box, more trams for Russia, retirements of 31 Employees, a contest to win an old W2, St Kilda Road Junction box - and how it works - signalling and interlocking, closure of Port Melbourne bus depot, sports and social club news. 2720.7 - Vol. 3, No. 7 - 16 pages, September - October 1966 with a photo of 610 on the Maribyrnong River Bridge, during the SPER tour, "Public Transport in Big Cities" - R. ...Box, visit of SPER members to Melbourne, memories of Malvern Depot, sports and social club news. 2720.6 - Vol. 3, No. 6 - 16 pages, July - August 1966 with a photo of the view from the St Kilda Junction signal box, more trams for Russia, retirements of 31 Employees, a contest to win an old W2, St Kilda Road Junction box - and how it works - signalling and interlocking, closure of Port Melbourne bus depot, sports and social club news. 2720.7 - Vol. 3, No. 7 - 16 pages, September - October 1966 with a photo of 610 on the Maribyrnong River Bridge, during the SPER tour, "Public Transport in Big Cities" - R. ...Eight issues of "MMTB News" - The Magazine of the Melbourne and Metropolitan Tramways Board. Two copies of issues 1 to 6 held. Second copy added 31/8/2004. All issues printed with an cream colour paper cover with the rest of the magazine white gloss paper. 2720.1 - Vol. 3, No. 1 - 16 pages, January 1966, with a photo of the Mark VI bus No. 702 on the front cover, notes on Traffic Congestion, motor cars and supermarkets, depot masters, engineering, bus maintenance, sports and social club news. On rear cover includes a photo of a Christmas function with past senior employees - left to right - H. R. Steains (architect), H. S. McComb (Chief Surveyor), Mr. Aird, Mr. P. M. Ireland (Rolling stock engineer), J Fisher (Civil Engineer) and H. A. Warner (Secretary) 2720.2 - Vol. 3, No. 2 - 16 pages, February 1966, with a photo of counting decimal coins, Tribute to the W2 class tram written by Norm Cross, (with photo), Hawthorn Clothing Depot, retirement of Harry Munroe, introduction of decimal currency, donation of 1B bogies to SPER, tramways band, death of Neil Olsen, sports and social club news. See btm2720i9.jpg for image of the Norm Cross photograph. 2720.3 - Vol. 3, No. 3 - 12 pages, March - April 1966, with a photo of Tramways Bowl Tournament presentation on the front cover, Recent developments in public transport in North America, Vera Cruz Mexico, cable cars at Rushworth, sports and social club news and photo of the Melbourne bogies under Sydney tram. 2720.4 - Vol. 3, No. 4 - 16 pages, May 1966, with a photo of W2 321being overhauled at Preston Workshops, change over to decimal currency for accounting machines, "Tram Driver Salutes the L class tram" - written by A. Bailey, Melbourne's New Trams, retirement of Gordon Wilson, sports and social club news. 2720.5 - Vol. 3, No. 5 - 16 pages, June 1966, with a photo of the track relaying in Camberwell Rd with Camberwell fire station in background, Melbourne cable tram routes, opening and closing dates, retirement of G. H. Box, visit of SPER members to Melbourne, memories of Malvern Depot, sports and social club news. 2720.6 - Vol. 3, No. 6 - 16 pages, July - August 1966 with a photo of the view from the St Kilda Junction signal box, more trams for Russia, retirements of 31 Employees, a contest to win an old W2, St Kilda Road Junction box - and how it works - signalling and interlocking, closure of Port Melbourne bus depot, sports and social club news. 2720.7 - Vol. 3, No. 7 - 16 pages, September - October 1966 with a photo of 610 on the Maribyrnong River Bridge, during the SPER tour, "Public Transport in Big Cities" - R. Risson - with photo - see image i10, MMTB Ambulance division, new trams, trams or buses, death of Harry Hood, Chas Samuels, retirement of Jack Ferguson, Reg Maxwell, manufacture of trackwork, cable tram working, sports and social club news. 2720.8 - Vol. 3, No. 8 - 16 pages, November - December 1966 with a photo of a wedding party on a tram (Richards / Fuller), apprenticeship training, Christmas message from the Chairman, tramway canteens, art of rostering by R. Drummond, Wattle Park Chalet, clock and instrument shop at North Fitzroy, tramways band, sports and social club news.Each issue has stamped on the front cover or inside "The Australian Railway Historical Society (S.A. Branch).trams, tramways, mmtb, sper, wattle park, port melbourne, st kilda junction, decimal currency, w2 class, l class, hawthorn -
 Melbourne Tram Museum
Magazine, Melbourne & Metropolitan Tramways Board (MMTB), "MMTB News", 1966
... Box, visit of SPER members to Melbourne, memories of Malvern Depot, sports and social club news. Death of A L Robertson, rostering, sports, Sydney trams, Safety and excuses for accidents. Full pdf copy added 28/8/2019 1723.6 - Vol. 3, No. 6 - 16 pages, July - August 1966 with a photo of the view from the St Kilda Junction signal box, more trams for Russia, retirements of 31 Employees, a contest to win an old W2, St Kilda Road Junction box - and how it works - signalling and interlocking, closure of Port Melbourne bus depot, sports and social club news. 1723.7 - Vol. 3, No. 7 - 16 pages, September - October 1966 with a photo of 610 on the Maribyrnong River Bridge, during the SPER tour, "Public Transport in Big Cities" - R. ...Box, visit of SPER members to Melbourne, memories of Malvern Depot, sports and social club news. Death of A L Robertson, rostering, sports, Sydney trams, Safety and excuses for accidents. Full pdf copy added 28/8/2019 1723.6 - Vol. 3, No. 6 - 16 pages, July - August 1966 with a photo of the view from the St Kilda Junction signal box, more trams for Russia, retirements of 31 Employees, a contest to win an old W2, St Kilda Road Junction box - and how it works - signalling and interlocking, closure of Port Melbourne bus depot, sports and social club news. 1723.7 - Vol. 3, No. 7 - 16 pages, September - October 1966 with a photo of 610 on the Maribyrnong River Bridge, during the SPER tour, "Public Transport in Big Cities" - R. ...Eight issues of "MMTB News" - The Magazine of the Melbourne and Metropolitan Tramways Board. Two copies of each issue held. All issues printed with an cream colour paper cover with the rest of the magazine white glass paper. 1723.1 - Vol. 3, No. 1 - 16 pages, January 1966, with a photo of the Mark VI bus No. 702 on the front cover, notes on Traffic Congestion, motor cars and supermarkets, depot masters, engineering, bus maintenance, sports and social club news. On rear cover includes a photo of a Christmas function with past senior employees - left to right - H. R. Steains (architect), H. S. McComb (Chief Surveyor), Mr. Aird, Mr. P. M. Ireland (Rolling stock engineer), J Fisher (Civil Engineer) and H. A. Warner (Secretary) 1723.2 - Vol. 3, No. 2 - 16 pages, February 1966, with a photo of counting decimal coins, Tribute to the W2 class tram written by Norm Cross, (with photo), Hawthorn Clothing Depot, retirement of Harry Munroe, introduction of decimal currency, donation of 1B bogies to SPER, tramways band, death of Neil Olsen, sports and social club news. See btm2720i9.jpg for image of the Norm Cross photograph. 1723.3 - Vol. 3, No. 3 - 12 pages, March - April 1966, with a photo of Tramways Bowl Tournament presentation on the front cover, Recent developments in public transport in North America, Vera Cruz Mexico, cable cars at Rushworth, sports and social club news and photo of the Melbourne bogies under Sydney tram. 1723.4 - Vol. 3, No. 4 - 16 pages, May 1966, with a photo of W2 321being overhauled at Preston Workshops, change over to decimal currency for accounting machines, "Tram Driver Salutes the L class tram" - written by A. Bailey, Melbourne's New Trams, retirement of Gordon Wilson, sports and social club news. 1723.5 - Vol. 3, No. 5 - 16 pages, June 1966, with a photo of the track relaying in Camberwell Rd with Camberwell fire station in background, Melbourne cable tram routes, opening and closing dates, retirement of G. H. Box, visit of SPER members to Melbourne, memories of Malvern Depot, sports and social club news. Death of A L Robertson, rostering, sports, Sydney trams, Safety and excuses for accidents. Full pdf copy added 28/8/2019 1723.6 - Vol. 3, No. 6 - 16 pages, July - August 1966 with a photo of the view from the St Kilda Junction signal box, more trams for Russia, retirements of 31 Employees, a contest to win an old W2, St Kilda Road Junction box - and how it works - signalling and interlocking, closure of Port Melbourne bus depot, sports and social club news. 1723.7 - Vol. 3, No. 7 - 16 pages, September - October 1966 with a photo of 610 on the Maribyrnong River Bridge, during the SPER tour, "Public Transport in Big Cities" - R. Risson - with photo - see image i10, MMTB Ambulance division, new trams, trams or buses, death of Harry Hood, Chas Samuels, retirement of Jack Ferguson, Reg Maxwell, manufacture of trackwork, cable tram working, sports and social club news. 1723.8 - Vol. 3, No. 8 - 16 pages, November - December 1966 with a photo of a wedding party on a tram (Richards / Fuller), apprenticeship training, Christmas message from the Chairman, tramway canteens, art of rostering by R. Drummond, Wattle Park Chalet, clock and instrument shop at North Fitzroy, tramways band, sports and social club news.trams, tramways, mmtb, carlton control, buses, pcc 980, ballarat, new trams, are, tmsv -
 Melbourne Tram Museum
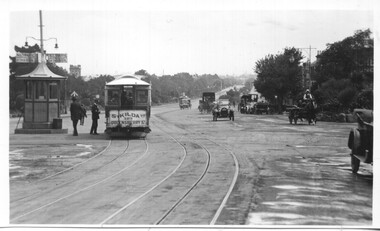
Slide - Set of 2, Keith Kings, 17/10/1959 12:00:00 AM
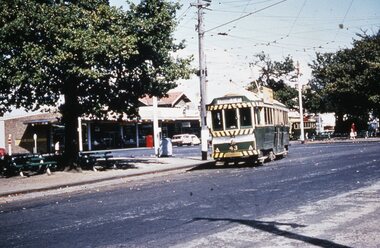
... Junction... Overhead... Tower Wagon... Welding Truck... Signal box...Set of two Colour slides, Kodak, white cardboard mount of track laying and reconstruction at St Kilda Junction during Oct. 1959. .1 - St Kilda Junction during reconstruction looking south with the junction arrangements shown. Has in the background, the Signal box, the junction hotel and the Corner Hotel, all with adverts for Penfold Wines, Fly ANA, Shell, Sepletts wins and Gilbeys Gin. ...Has in the background, the Signal box, the junction hotel and the Corner Hotel, all with adverts for Penfold Wines, Fly ANA, Shell, Sepletts wins and Gilbeys Gin. ...Set of two Colour slides, Kodak, white cardboard mount of track laying and reconstruction at St Kilda Junction during Oct. 1959. .1 - St Kilda Junction during reconstruction looking south with the junction arrangements shown. Has in the background, the Signal box, the junction hotel and the Corner Hotel, all with adverts for Penfold Wines, Fly ANA, Shell, Sepletts wins and Gilbeys Gin. Shows the vertical curves and the nature of the trackwork at this location. Photo 17/10/1959. .2 - ditto, but further back, with track welding, overhead work, tower wagon and a welding truck. In the background in addition to .1 are signs for Fosters Lager and Goodyear tyres. Dated 18/10/1959. Slide Number K(l)(293) and K(i)(293).Extensive handwriting on rear in ink and that it was photographed at 1/125 f4 and 1/125 f5.6trams, tramways, st kilda junction, overhead, tower wagon, welding truck, signal box, trackwork -
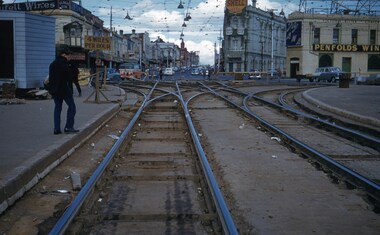
 Sunshine and District Historical Society Incorporated
Archive - Sunshine Railways and Trains, Various
... Dated 24 July 1979|Letter and Photocopy of Steam Locomotive 3801 at Anderson Road Level Crossing 23 April 1973|Drawing of Footscray Junction to Sunbury listing opening and closing dates|Large Drawing of Braybrook Junction Signal box tracks|Brochure for Steamrail Victoria The Vintage Train Mystery Tour on 1 July 1984|Bridge Inspection report for Devonshire Road Foot Bridge dated 26 March 1992|Complaint about goats tresspassing dated 7 July 1868|Drawing Footscray Junction Proposed alterations to Signal Arrangements 19 February 1900|Newspaper article Brimbank Messenger 8 September 1998 Technology signals new rail era about the closing of Sunshine Signal Box|Letter for amendment to 1994 Book of rules and Operating Procedures for Sunshine. ...Dated 24 July 1979|Letter and Photocopy of Steam Locomotive 3801 at Anderson Road Level Crossing 23 April 1973|Drawing of Footscray Junction to Sunbury listing opening and closing dates|Large Drawing of Braybrook Junction Signal box tracks|Brochure for Steamrail Victoria The Vintage Train Mystery Tour on 1 July 1984|Bridge Inspection report for Devonshire Road Foot Bridge dated 26 March 1992|Complaint about goats tresspassing dated 7 July 1868|Drawing Footscray Junction Proposed alterations to Signal Arrangements 19 February 1900|Newspaper article Brimbank Messenger 8 September 1998 Technology signals new rail era about the closing of Sunshine Signal Box|Letter for amendment to 1994 Book of rules and Operating Procedures for Sunshine. ...Postcard Railway Museum North Williamstown|List of Railway Stations from Footscray - Sunshine and when they opened and closed|Letter regarding historic railway wagons dated 24 July 1979|Letter from Victorian Railways regarding QR wagon donation Dated 20 August 1979|Letter from Historical Society regarding wagons manufactured at Qright and Edwards Works. Dated 24 July 1979|Letter and Photocopy of Steam Locomotive 3801 at Anderson Road Level Crossing 23 April 1973|Drawing of Footscray Junction to Sunbury listing opening and closing dates|Large Drawing of Braybrook Junction Signal box tracks|Brochure for Steamrail Victoria The Vintage Train Mystery Tour on 1 July 1984|Bridge Inspection report for Devonshire Road Foot Bridge dated 26 March 1992|Complaint about goats tresspassing dated 7 July 1868|Drawing Footscray Junction Proposed alterations to Signal Arrangements 19 February 1900|Newspaper article Brimbank Messenger 8 September 1998 Technology signals new rail era about the closing of Sunshine Signal Box|Letter for amendment to 1994 Book of rules and Operating Procedures for Sunshine. Drawing of signalling Diagram included dated 19th May 1996 Sunshine Issue of Caution Orders|Photocopy of The Victorian Railways Magazine dated Aug 1929 Australias Highest Railway Bridge|Photocopy of Spencer Street - Sunshine showing extra train commencing Tuesday 3 May Dated 30 April 1921|Correspondene from Secretary of the Victorian Railways Books Series 422|Photocopy of Special Train Circular S2966 Special Funeral train for HV McKay funeral on 22 May 1926|Newspaper Article The Advocate Tracking History showing photograph of Tom Rigg dated 29 April 1998|Photocopy of Victorian Railways Timetable Dec 1865|Newspaper Article about Paddy Doyle an old locomotive Dated 20 May 1925|Extract from a book about the Big Bridge across the Maribyrnong River September 1927|Newspaper Article about Project Albion Maltese Club Dated 2 September 1992|Newspaper Article about Paddy Doyle and Patsy Dooley Dated 1925|Letter and a list in chronological events for the Braybrook Junction in 1908 smash dated 12 April 1988|Photocopy of the persons employed by the Melbourne and Hobsons Bay United Railway Company on 30 June 1878|Photocopy of Tom Riggs speech as a guest speaker at the Sunshine Historical Society dated 14 August 1988|Newspaper Articl e remembering Australias second worst rail disaster 90 years after dated 13 May 1997|Photocopy of the List of the Dead and addresses for the Rail disaster 27 April 1908|Photocopy of Selection of Names for S Class Locomotives|Photocopy of Maroona to Ararat Station Details|Notes about railway guages in Australia|Photocopy of a Letter regarding Main Road St Albans Railway Station Crossing Dated 6 May 2001|Brochure St Albans to Sydenham Rail Electrification Project Bulletin 2 May 2001|Brochure St Albans to Sydenham Rail Electrification Project Bulletin 3 December 2001|Brochure St Albans to Sydenham Rail Electrification Project Bulletin 4 January 2002|Newspaper Article Star Plainly its Keilor showing photograph of Keilor Plains Dated 18 December 2001|Newspaper Article Brimbank Leader showing All aboard for Keilor Plains Dated 18 December 2001|Media release regarding St Albans to Sydenham dated 12 December 2001|Brochure Its Steam Day Tours 1984|May of Victorian Railway|Brochure of North Williamstown Railway Museum|Photocopy of Map from Footscray and Bacchus March Line 12 June 2003|Newspaper Article Brimbank Independent Residents angry over freight rail decision dated 3 February 1998|Newspaper Article Advocate Greater respect urged for dead and rescuers Dated 16 December 1998|Extract Railway intercommunication Between Werribee and Braybook Junction|Newspaper Article Star Mixed Blessings for the HV McKay building in Devonshire Road added to Victorian Heritage register dated 16 April 2002|Newspaper Article Star Sydenham rail its electifying dated 18 December 2001|Newspaper Article Herald Sun Rail Horror at Sunshine Dated 27 May 1999railways -
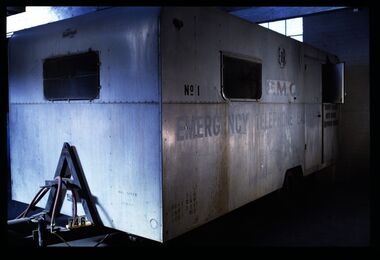 National Communication Museum
Vehicle - Mobile Telephone Exchange, c. 1965
... box containing papers circuit drawings etc (.29-.93), paper lists off wall (.94,.95). Books, record books etc (.96-.103). Manila folder (.104) containing circuit drawings (105-.124). Wooden drawer (.125), metal drawer containing subscribers master cards, record of faults cards, particular switchboards connected, Junction line cards (.126). ...box containing papers circuit drawings etc (.29-.93), paper lists off wall (.94,.95). Books, record books etc (.96-.103). Manila folder (.104) containing circuit drawings (105-.124). Wooden drawer (.125), metal drawer containing subscribers master cards, record of faults cards, particular switchboards connected, Junction line cards (.126). ...Manufactured in the 1960s, this mobile emergency telephone exchange was fitted into a caravan. Part of the Shepparton Division State Disaster Plan, the caravan could be towed to areas affected by disasters to enable communications to recommence. The caravan remained in service until approximately 1974.Mobile infrastructure plays an important role in Australian communications, owing to the often remote and hostile environments in which Australians live and work. Exchanges such as this facilitated phone calls in the aftermath of an emergency, particularly for hospitals, police and other emergency services. Today, Mobile Exchange on Wheels (MEOWs), Cell on Wheels (CoW) and Satellite Cell on Wheels (SatCOW) - which provide temporary landline and broadband services, mobile phone coverage and service in areas without communications infrastructure respectively - are a critical part of emergency response procedures for natural disasters such as fire and flood. Though technology has progressed, the need for rapid service in remote areas remains a present concern of the communications service providers in Australia. This mobile service infrastructure is historically significant as an early example of a service which has evolved over decades, yet is still needed today. The exchange, as a representative example of a vehicle which would provide early-response in a disaster, is socially significant as a facilitator of critical communications needs in devastated communities: access to emergency services and contact with family and friends. The exchange itself, intact from its period of use, provides an insight into technology of the 1970s.Mobile emergency exchange housed in a caravan trailer on 2 wheel base, duralin body, steel tow bar, Caravan divided into 3 sections; the exchange room; the relay room and the main frame room. The exchange room contains 3 switchboards, a folding table, cupboards, benches and switch rack (.1). table (.2), steel bar for attaching the table (.3), back boards of switchboards (.4-.6), switches (.7-.16), box of switches (.17). There is a wall phone magneto, 300 type handset on wall and 2 skylights with wire screens. .11? hat pegs and shelf; there are 2 fluorescent tubes for lighting, all in exchange section. The floor is covered with 2 tone grey tiles and there are wire mesh on outside of windows and a geometric curtain inside behind switch rack. There is a flywire screen door as well as exterior door. The relay room has a sectioned door so half can open at a time. Room contains a cupboard with folding bench top beneath a curtained window. The opposite wall has a bank of batteries and transmission condensers; there is a shelf above window, one fluorescent tube and fuse boxes. Tiles on floor also. The main frame room contains many metres of coiled black covered cable, a black covered magneto wall telephone with 300 type handset; grey plastic jumper cords, a rack of termination points and wire with wasp nests attached. There is a small iron step under door, a fluorescent tube on wall and 3 hat hooks. Roll of Paper Handtowels (.18), cord and handle (.19), red exchange cords and plugs (.20-.22), plastic aluminium runners (.23,.24), headset (.25,.26), logbook (.27), battery readings (.28), box containing papers circuit drawings etc (.29-.93), paper lists off wall (.94,.95). Books, record books etc (.96-.103). Manila folder (.104) containing circuit drawings (105-.124). Wooden drawer (.125), metal drawer containing subscribers master cards, record of faults cards, particular switchboards connected, Junction line cards (.126). Box of valves (.127), box of clamps (.128). Box of 2000 type rack fuses, red 1 1/2 AMPS, black 3 AMP, blue 1/2 AMP (.129). Box of sleeves for covering wire joints (.130), plastic beakers (.131,.132), soap (.133), box of white plastic squares (.134), time switch "Venner BF/43 time switch" Made in England (.135), box of bolts, knobs etc (.136), box of switchboard number indicators (.137), fuse (.138), fuse wire (.139), football card (.140). Box of cartridge fuse 6 AMP (.141). Envelope of drawing pins, rubber bands (.142), black plastic, paper tape centres (.143-.152), metal plug (.153), 2 signs "Beware of vehicles" (.154-.155). Paper listing Naringal East automatic conversion (.156). Green Commonwealth of Australia note pad (.157). Wiring plug for tail lights (.158). Black fuse plugs (.159,.160). Box of bolts (.161). 2 sections of blue plastic coated wires (.162,.163). Gloves used for working on batteries (.164-.167). Wasp nests (.168,.169). White fuse (.170). Photographs of van in use (.171,.172)..1 on front: "ANOTHER / MOBILETRAIL / PRODUCT" "MAX SPEED / 25MPH" "TRAILER BRAKES / --- / " On sides: "EMERGENCY TELEPHONE EXCHANGE" "NO 1" "PMG" "TCQ / GROSS 250 / TARE 182 / LOAD 162" "6" "COUNTRY BRANCH / NORTH REGION / [SHEPPARTON DIVISION]" "LAW'S SIGNS" "Telecom Australia" On back: "DANGER / LONG LOAD" "MQA 3787" .133: "FIR OIL" "AUSTRALIA"mobile telephone exchanges, mobile telecommunications trailers, trailers, transport, natural disaster, black saturday, bushfires, floods, emergency communications -
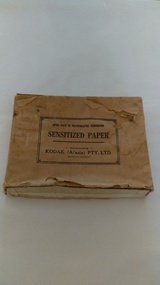 Kiewa Valley Historical Society
Photographs of small box originally used to contain sensitized photographic paper
... Photographic paper box; State Electricity Commission of Victoria; Official photographer; Kiewa Hydro Electric Scheme; Clover Power Station; Junction Dam; Bogong Village...Junction Dam were part of the Kiewa Hydro Electric Scheme constructed by the State Electricity Commission of Victoria. SECV official photographers took photographs of most stages of construction of the Hydro Electric Scheme and referenced each photo with a number and dating system as an historical record and for reference for other projects. This provided a thorough history of the construction of the Hydro Electric Scheme, some of the workers involved in its construction and the infrastructure supporting its construction, such a Bogong Village. Photographic paper box ...The Junction Dam and Clover Dam Power Station, stages of the Kiewa Hydro-Electric Scheme, were needed to meet the increased power demands of the wartime industry in Victoria. Clover added 26 megawatts to the grid. Junction Dam was completed and ready to hold water by September 1943, but was emptied in December 1943 and not filled again until May 1944. Construction of Clover Power Station commenced in July 1941 and both turbines were in service by May 1945.Clover Power Station and Junction Dam were part of the Kiewa Hydro Electric Scheme constructed by the State Electricity Commission of Victoria. SECV official photographers took photographs of most stages of construction of the Hydro Electric Scheme and referenced each photo with a number and dating system as an historical record and for reference for other projects. This provided a thorough history of the construction of the Hydro Electric Scheme, some of the workers involved in its construction and the infrastructure supporting its construction, such a Bogong Village.Small light brown cardboard box originally containing sensitized photographic paper, now containing a range of black and white photographs of the Kiewa Hydro Electric System taken by the official SECV photographer Box has some damage – Front panel on lid is missing. Top has a puncture in top right corner and some peeling of paper along sides and at edges. Printed on the top of the box in black ink: OPEN ONLY IN PHOTOGRAPHIC DARK ROOM SENSITIZED PAPER Manufactured by – KODAK (A/asia) PTY. LTD. Melbourne Australia Green and white sticker on right side of lid and bottom right side of box, torn at join 1. 1B1 Single Weight Soft. Available in Soft (1) Medium (2) Contrast (3) Extra Contrast (4) Single and Double Weight Stamped at bottom of sticker in grey ink G8087 CK photographic paper box; state electricity commission of victoria; official photographer; kiewa hydro electric scheme; clover power station; junction dam; bogong village -
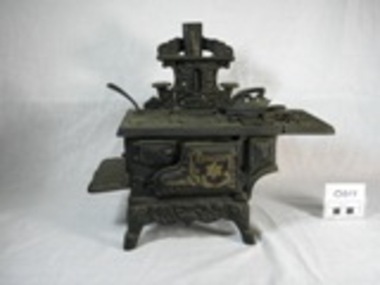 Upper Yarra Museum
Stove, Miniature
... Upper Yarra Museum Old Railway Station 2415C Warburton Highway Yarra Junction yarra-valley-and-dandenong-ranges Story to be placed here - Available to public wood iron tin cast stove black cast iron star solid fuel chimney flat iron stand flat stand hot plates frying pan bolt screws legs toy miniature crescent made in taiwan taiwan wood box crescent, star, scrolls, Minature cast iron, Black Solid Wood Stove with miniature utensils. ...Story to be placed here - Available to publicMinature cast iron, Black Solid Wood Stove with miniature utensils. The stove is on legs with left hand extension for pots, right hand extension with holes, removeable hot plates [4 round 1 rectangle] tin chimney with folded join and seperate decorative cover with pot stands x2 , front door opens on hinges with internal gold pan with gold crescent logo. Frying pan, hot plate handle and "swan flat iron on stand. Solid fuel space with tin base. 2 screws and bolts used to assemble stove. 14 removeable parts.crescent, star, scrolls, wood, iron, tin, cast, stove, black, cast iron, star, solid, fuel, chimney, flat iron stand, flat, stand, hot plates, frying, pan, bolt, screws, legs, toy, miniature, crescent, made in taiwan, taiwan, wood box -
Upper Yarra Museum
Food Safe, Untitled
... Upper Yarra Museum Old Railway Station 2415C Warburton Highway Yarra Junction yarra-valley-and-dandenong-ranges http://museumvictoria.com.au/discoverycentre/infosheets/the-coolgardie-safe/ http://en.wikipedia.org/wiki/Coolgardie_safe The Coolgardie Safe is a low-tech refrigeration unit which uses the heat transfer which occurs during evaporation of water. It was named after the place where it was invented — the small mining town of Coolgardie, Western Australia, near Kalgoorlie-Boulder. http://www.biggles.com.au/ The Coolgardie Safe was simply a wire framed box with wheat sack strips hanging down the sides, which were kept wet by the process of osmosis from a dish or small tank of water. ...http://museumvictoria.com.au/discoverycentre/infosheets/the-coolgardie-safe/ http://en.wikipedia.org/wiki/Coolgardie_safe The Coolgardie Safe is a low-tech refrigeration unit which uses the heat transfer which occurs during evaporation of water. It was named after the place where it was invented — the small mining town of Coolgardie, Western Australia, near Kalgoorlie-Boulder. http://www.biggles.com.au/ The Coolgardie Safe was simply a wire framed box with wheat sack strips hanging down the sides, which were kept wet by the process of osmosis from a dish or small tank of water. The food inside the Safe was kept cool due to the principle that evaporation takes away heat; the wet hessian strips experience evaporation from the wind and the sun and thus you have a refrigerator. http://www.whitehat.com.au/australia/Inventions/InventionsA.html Coolgardie Safe made from galvanised iron with hessian drapped over 4 sides, rectangular on 4 legs. 2 trays inside, 3rd tray inserted in top as cover, metal meshing on callapsable sides and door. Stands in tray. The tray assists with pest control as it was filled with water.kitchen galvanised iron coolgardie safe hessian food preservation pest control water -
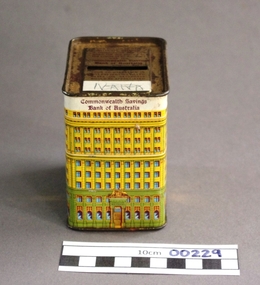 Upper Yarra Museum
Money box
... Upper Yarra Museum Old Railway Station 2415C Warburton Highway Yarra Junction yarra-valley-and-dandenong-ranges This money box is a copy of the Commonwealth Savings Bank of Australia's Martin Place, Sydney Branch Building, the money boxes were produced c 1970's, (earlier money boxes were in the shape of a cash register or till.) ...This money box is a copy of the Commonwealth Savings Bank of Australia's Martin Place, Sydney Branch Building, the money boxes were produced c 1970's, (earlier money boxes were in the shape of a cash register or till.) When you filled the money box you returned it to the bank, the would put the contents into your savings account and issue you with a new tin.box, commonwealth, money, tin, bank, saving -
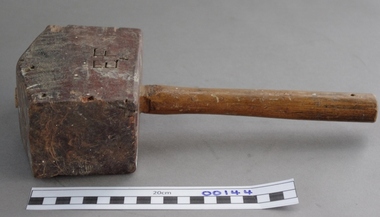 Upper Yarra Museum
Mallet, Wooden
... Upper Yarra Museum Old Railway Station 2415C Warburton Highway Yarra Junction yarra-valley-and-dandenong-ranges A wooden Mallet could be found in most homes, and nearly all tradesmans tool box or bag, its most common use was working with wooden handled wood Chisels, because they did not damage the end of the chisel like a steel headed hammer,also they were used to fit joints of wood together as they would not damage the timber like steel hammers......Wooden mallets were also used by stone masons back to the time of the pyramids, but they were usually shaped differently wood mallet tradesman carpenter cabinet maker Wooden Mallet A handmade wooden mallet with a handle with a rectangular head. ...A wooden Mallet could be found in most homes, and nearly all tradesmans tool box or bag, its most common use was working with wooden handled wood Chisels, because they did not damage the end of the chisel like a steel headed hammer,also they were used to fit joints of wood together as they would not damage the timber like steel hammers......Wooden mallets were also used by stone masons back to the time of the pyramids, but they were usually shaped differentlyWooden Mallet A handmade wooden mallet with a handle with a rectangular head. Carved ET on sidewood, mallet, tradesman, carpenter, cabinet maker -
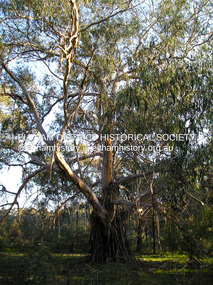 Eltham District Historical Society Inc
Photograph, Fay Bridge, Yellow Box Gum tree near junction of Main Yarra Trail and Mullum-Mullum Trail, Templestowe, 7 July 2019
... Yellow Box Gum tree near junction of Main Yarra Trail and Mullum-Mullum Trail, Templestowe...Fay Bridge Collection Sweeneys Flats 2019-07-07 Major Charles Newman Mullum mullum creek Pontville Homestead Significant tree Yellow Box Gum (Eucalyptus Melliodora) 1 image - born digital Yellow Box Gum tree near junction of Main Yarra Trail and Mullum-Mullum Trail, Templestowe Photograph Photograph Fay Bridge ...Situated in the wetlands on the trail opposite the Pontville Homestead, former home of Major Charles Newman and across the Yarra River from Sweeneys Flats, Eltham. Newman also purchased Allotment 5, Section 2 (in Ely Street, Eltham) at public autction on 17 September 1851. It was the only Section 2 allotment purchased at the firts Elthan Town Allotments public auction.fay bridge collection, sweeneys flats, 2019-07-07, major charles newman, mullum mullum creek, pontville homestead, significant tree, yellow box gum (eucalyptus melliodora)