Showing 11 items matching "loch ard paintings"
-
 Flagstaff Hill Maritime Museum and Village
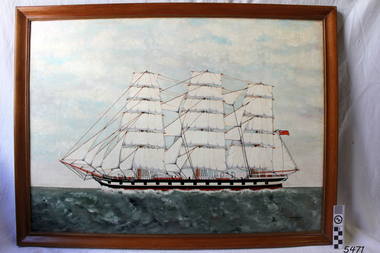
Painting - Maritime painting, C. W. Veale, Loch Ard, c. 1978
... ...loch ard paintings...The label on the back of the painting comments on whether the ship would be in full sail at the time of the wreck. History of the Loch Ard: The Loch Ard got its name from "Loch Ard" a loch that lies to the west of Aberfoyle, and the east of Loch Lomond. ...Painting in brown-stained wooden frame. Depicts three-masted vessel 'Loch Ard' in full sail on moderate seas. ... has typed description of the Loch Ard and a comment. Loch Ard Painting Maritime painting Australia Great Ocean Road Victoria Colac C. ...This painting is believed to have been created by an amateur artist C W Veale of Colac, who established an early bus service in about 1923, known at the time as the Blue Bus Service, which operated from Colac. This service was available for special trips within the Colac region. The Blue Bus Service became very popular with travellers to Lorne via the Deans Marsh Road. The label on the back of the painting comments on whether the ship would be in full sail at the time of the wreck. History of the Loch Ard: The Loch Ard got its name from "Loch Ard" a loch that lies to the west of Aberfoyle, and the east of Loch Lomond. It means "high lake" in Scottish Gaelic. The vessel belonged to the famous Loch Line which sailed many vessels from England to Australia. The Loch Ard was built in Glasgow by Barclay, Curle & Co. in 1873, the vessel was a three-masted square-rigged iron sailing ship that measured 79.87 meters in length, 11.58 m in width, and 7 m in depth with a gross tonnage of 1693 tons with a mainmast that measured a massive 45.7 m in height. Loch Ard made three trips to Australia and one trip to Calcutta before its fateful voyage. Loch Ard left England on March 2, 1878, under the command of 29-year-old Captain Gibbs, who was newly married. The ship was bound for Melbourne with a crew of 37, plus 17 passengers. The general cargo reflected the affluence of Melbourne at the time. Onboard were straw hats, umbrellas, perfumes, clay pipes, pianos, clocks, confectionery, linen, and candles, as well as a heavier load of railway irons, cement, lead, and copper. There were other items included that were intended for display in the Melbourne International Exhibition of 1880. The voyage to Port Phillip was long but uneventful. Then at 3 am on June 1, 1878, Captain Gibbs was expecting to see land. But the Loch Ard was running into a fog which greatly reduced visibility. Captain Gibbs was becoming anxious as there was no sign of land or the Cape Otway lighthouse. At 4 am the fog lifted and a lookout aloft announced that he could see breakers. The sheer cliffs of Victoria's west coast came into view, and Captain Gibbs realised that the ship was much closer to them than expected. He ordered as much sail to be set as time would permit and then attempted to steer the vessel out to sea. On coming head-on into the wind, the ship lost momentum, the sails fell limp and Loch Ard's bow swung back towards land. Gibbs then ordered the anchors to be released in an attempt to hold their position. The anchors sank some 50 fathoms - but did not hold. By this time the ship was among the breakers and the tall cliffs of Mutton Bird Island rose behind. Just half a mile from the coast, the ship's bow was suddenly pulled around by the anchor. The captain tried to tack out to sea, but the ship struck a reef at the base of Mutton Bird Island, near Port Campbell. Waves subsequently broke over the ship and the top deck became loosened from the hull. The masts and rigging came crashing down knocking passengers and crew overboard. When a lifeboat was finally launched, it crashed into the side of Loch Ard and capsized. Tom Pearce, who had launched the boat, managed to cling to its overturned hull and shelter beneath it. He drifted out to sea and then on the flood tide came into what is now known as Loch Ard Gorge. He swam to shore, bruised and dazed, and found a cave in which to shelter. Some of the crew stayed below deck to shelter from the falling rigging but drowned when the ship slipped off the reef into deeper water. Eva Carmichael a passenger had raced onto the deck to find out what was happening only to be confronted by towering cliffs looming above the stricken ship. In all the chaos, Captain Gibbs grabbed Eva and said, "If you are saved Eva, let my dear wife know that I died like a sailor". That was the last Eva Carmichael saw of the captain. She was swept off the ship by a huge wave. Eva saw Tom Pearce on a small rocky beach and yelled to attract his attention. He dived in and swam to the exhausted woman and dragged her to shore. He took her to the cave and broke the open case of brandy that had washed up on the beach. He opened a bottle to revive the unconscious woman. A few hours later Tom scaled a cliff in search of help. He followed hoof prints and came by chance upon two men from nearby Glenample Station three and a half miles away. In a complete state of exhaustion, he told the men of the tragedy. Tom then returned to the gorge while the two men rode back to the station to get help. By the time they reached Loch Ard Gorge, it was cold and dark. The two shipwreck survivors were taken to Glenample Station to recover. Eva stayed at the station for six weeks before returning to Ireland by steamship. In Melbourne, Tom Pearce received a hero's welcome. He was presented with the first gold medal of the Royal Humane Society of Victoria and a £1000 cheque from the Victorian Government. Concerts were performed to honour the young man's bravery and to raise money for those who lost families in the disaster. Of the 54 crew members and passengers on board, only two survived: the apprentice, Tom Pearce, and the young woman passenger, Eva Carmichael, who lost her family in the tragedy. Ten days after the Loch Ard tragedy, salvage rights to the wreck were sold at auction for £2,120. Cargo valued at £3,000 was salvaged and placed on the beach, but most washed back into the sea when another storm developed. The wreck of Loch Ard still lies at the base of Mutton Bird Island. Much of the cargo has now been salvaged and some items were washed up into Loch Ard Gorge. Cargo and artefacts have also been illegally salvaged over many years before protective legislation was introduced in March 1982. One of the most unlikely pieces of cargo to have survived the shipwreck was a Minton majolica peacock- one of only nine in the world. The peacock was destined for the Melbourne 1880 International Exhibition. It had been well packed, which gave it adequate protection during the violent storm. Today the Minton peacock can be seen at the Flagstaff Hill Maritime Museum in Warrnambool. From Australia's most dramatic shipwreck it has now become Australia's most valuable shipwreck artefact and is one of very few 'objects' on the Victorian State Heritage Register.The shipwreck of the Loch Ard is of significance for Victoria and is registered on the Victorian Heritage Register ( S 417). Flagstaff Hill has a varied collection of artefacts from Loch Ard and its collection is significant for being one of the largest accumulation of artefacts from this notable Victorian shipwreck of which the subject items are a small part. The collection's objects give us a snapshot of how we can interpret the story of this tragic event. The collection is also archaeologically significant as it represents aspects of Victoria's shipping history that allows us to interpret Victoria's social and historical themes of the time. Through is associated with the worst and best-known shipwreck in Victoria's history.Painting in brown-stained wooden frame. Depicts three-masted vessel 'Loch Ard' in full sail on moderate seas. Ship has figurehead, figures on board, and a Union Jack flag on red background. Ship's hull is black with white stripe, and is red on waterline. Ship's name is on hull. Artist C. W. Veale, painted in 1978, signed on bottom right. Label on back of painting has typed description of the Loch Ard and a comment.Signature "C W Veale / 1978" Text on hull "LOCH ARD" Label on back; " "LOCH ARD" / The clipper ship Loch Ard was wrecked on the 1st June 1878. / Of 54 people on board only two survived : Eva Carmichael and Tom Pearce. / Pearce became hero of the wreck for saving Miss Carmichael. / This picture shows the Loch Ard in full sail in moderate seas. / When approaching Cape Otway from the west, she would be in rough water and would presumably not be in full sail."flagstaff hill maritime museum, colac bus services, blue bus service, cw veale, loch ard paintings, loch ard, veale, warrnambool, great ocean road, eva carmichael, tom pearce, thomas pearce, cape otway, cargo ship 1878 -
 Flagstaff Hill Maritime Museum and Village
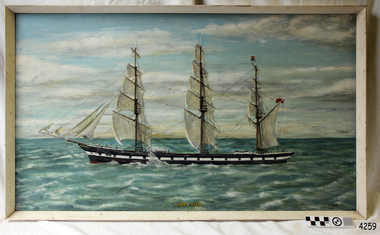
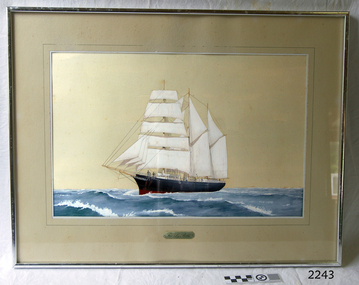
Painting - Vessel, Sailing Ship, C Smith, artist, Loch Ard, late 20th century
... loch ard...captain gibbs...eva carmichael...tom pearce...loch ard gorge...maritime oil painting...Painting of 1873 sailing ship the "Loch Ard". Oil painting on board behind glass, framed in white painted timber. ...Smith" "Loch Ard" Painting of 1873 sailing ship the "Loch Ard". ...HISTORY OF THE LOCH ARD The LOCH ARD belonged to the famous Loch Line which sailed many ships from England to Australia. Built in Glasgow by Barclay, Curdle and Co. in 1873, the LOCH ARD was a three-masted square rigged iron sailing ship. The ship measured 262ft 7" (79.87m) in length, 38ft (11.58m) in width, 23ft (7m) in depth and had a gross tonnage of 1693 tons. The LOCH ARD's main mast measured a massive 150ft (45.7m) in height. LOCH ARD made three trips to Australia and one trip to Calcutta before its final voyage. LOCH ARD left England on March 2, 1878, under the command of Captain Gibbs, a newly married, 29 year old. She was bound for Melbourne with a crew of 37, plus 17 passengers and a load of cargo. The general cargo reflected the affluence of Melbourne at the time. On board were straw hats, umbrella, perfumes, clay pipes, pianos, clocks, confectionary, linen and candles, as well as a heavier load of railway irons, cement, lead and copper. There were items included that intended for display in the Melbourne International Exhibition in 1880. The voyage to Port Phillip was long but uneventful. At 3am on June 1, 1878, Captain Gibbs was expecting to see land and the passengers were becoming excited as they prepared to view their new homeland in the early morning. But LOCH ARD was running into a fog which greatly reduced visibility. Captain Gibbs was becoming anxious as there was no sign of land or the Cape Otway lighthouse. At 4am the fog lifted. A man aloft announced that he could see breakers. The sheer cliffs of Victoria's west coast came into view, and Captain Gibbs realised that the ship was much closer to them than expected. He ordered as much sail to be set as time would permit and then attempted to steer the vessel out to sea. On coming head on into the wind, the ship lost momentum, the sails fell limp and LOCH ARD's bow swung back. Gibbs then ordered the anchors to be released in an attempt to hold its position. The anchors sank some 50 fathoms - but did not hold. By this time LOCH ARD was among the breakers and the tall cliffs of Mutton Bird Island rose behind the ship. Just half a mile from the coast, the ship's bow was suddenly pulled around by the anchor. The captain tried to tack out to sea, but the ship struck a reef at the base of Mutton Bird Island, near Port Campbell. Waves broke over the ship and the top deck was loosened from the hull. The masts and rigging came crashing down knocking passengers and crew overboard. When a lifeboat was finally launched, it crashed into the side of LOCH ARD and capsized. Tom Pearce, who had launched the boat, managed to cling to its overturned hull and shelter beneath it. He drifted out to sea and then on the flood tide came into what is now known as LOCH ARD Gorge. He swam to shore, bruised and dazed, and found a cave in which to shelter. Some of the crew stayed below deck to shelter from the falling rigging but drowned when the ship slipped off the reef into deeper water. Eva Carmichael had raced onto deck to find out what was happening only to be confronted by towering cliffs looming above the stricken ship. In all the chaos, Captain Gibbs grabbed Eva and said, "If you are saved Eva, let my dear wife know that I died like a sailor". That was the last Eva Carmichael saw of the captain. She was swept off the ship by a huge wave. Eva saw Tom Pearce on a small rocky beach and yelled to attract his attention. He dived in and swam to the exhausted woman and dragged her to shore. He took her to the cave and broke open case of brandy which had washed up on the beach. He opened a bottle to revive the unconscious woman. A few hours later Tom scaled a cliff in search of help. He followed hoof prints and came by chance upon two men from nearby Glenample Station three and a half miles away. In a state of exhaustion, he told the men of the tragedy. Tom returned to the gorge while the two men rode back to the station to get help. By the time they reached LOCH ARD Gorge, it was cold and dark. The two shipwreck survivors were taken to Glenample Station to recover. Eva stayed at the station for six weeks before returning to Ireland, this time by steamship. In Melbourne, Tom Pearce received a hero's welcome. He was presented with the first gold medal of the Royal Humane Society of Victoria and a £1000 cheque from the Victorian Government. Concerts were performed to honour the young man's bravery and to raise money for those who lost family in the LOCH ARD disaster. Of the 54 crew members and passengers on board, only two survived: the apprentice, Tom Pearce and the young woman passenger, Eva Carmichael, who lost all of her family in the tragedy. Ten days after the LOCH ARD tragedy, salvage rights to the wreck were sold at auction for £2,120. Cargo valued at £3,000 was salvaged and placed on the beach, but most washed back into the sea when another storm developed. The wreck of LOCH ARD still lies at the base of Mutton Bird Island. Much of the cargo has now been salvaged and some was washed up into what is now known as LOCH ARD Gorge. Cargo and artefacts have also been illegally salvaged over many years before protective legislation was introduced. One of the most unlikely pieces of cargo to have survived the shipwreck was a Minton porcelain peacock - one of only nine in the world. The peacock was destined for the Melbourne International Exhibition in 1880. It had been well packed, which gave it adequate protection during the violent storm. Today, the Minton peacock can be seen at the Flagstaff Hill Maritime Museum in Warrnambool. From Australia's most dramatic shipwreck it has now become Australia's most valuable shipwreck artefact and is one of very few 'objects' on the Victorian State Heritage Register. Flagstaff Hill’s collection of artefacts from LOCH ARD is significant for being one of the largest collections of artefacts from this shipwreck in Victoria. It is significant for its association with the shipwreck, which is on the Victorian Heritage Register (VHR S417). The collection is significant because of the relationship between the objects, as together they have a high potential to interpret the story of the LOCH ARD. The LOCH ARD collection is archaeologically significant as the remains of a large international passenger and cargo ship. The LOCH ARD collection is historically significant for representing aspects of Victoria’s shipping history and its potential to interpret sub-theme 1.5 of Victoria’s Framework of Historical Themes (living with natural processes). The collection is also historically significant for its association with the LOCH ARD, which was one of the worst and best known shipwrecks in Victoria’s history. Painting of 1873 sailing ship the "Loch Ard". Oil painting on board behind glass, framed in white painted timber. Artist is C Smith. Inscription on back. "Loch Ard launched 1873, sunk near Pt Campbell, with loss of 52 lives 1878" "C. Smith" "Loch Ard" flagstaff hill, warrnambool, shipwrecked coast, flagstaff hill maritime museum, maritime museum, shipwreck coast, flagstaff hill maritime village, great ocean road, loch line, loch ard, captain gibbs, eva carmichael, tom pearce, loch ard gorge, maritime oil painting, c. smith, sailing vessel -
 Flagstaff Hill Maritime Museum and Village
Artwork, other - Framed poster, Tim Walker, Loch Ard Shipwreck, circa 2010
... Loch Ard’ shipwreck. The images also include two small items from the 1981 ‘Fiji’ shipwreck. Local professional artist Timothy “Tim” Walker was born in Britain in 1970. He was self-taught had the desire to use his talents for full-time work. He specialised in painting...painting by Tim Walker, gilt frame, behind glass. Subject is a group of objects, most of which are connected with the 1878 shipwreck Loch Ard, such as items recovered from the shipwreck and the famous ‘Loch Ard Peacock’. ...Loch Ard’ shipwreck. The images also include two small items from the 1981 ‘Fiji’ shipwreck. Local professional artist Timothy “Tim” Walker was born in Britain in 1970. He was self-taught had the desire to use his talents for full-time work. He specialised in painting ...Tim Walker’s work is an eye-catching array of shipwreck artefacts and associated items. They help tell the story of the 19th century ships that travelled across the world full of people and cargo that are now part of our history. The work was commissioned especially for Flagstaff Hill and highlights the famous story of the 1878 ‘Loch Ard’ shipwreck. The images also include two small items from the 1981 ‘Fiji’ shipwreck. Local professional artist Timothy “Tim” Walker was born in Britain in 1970. He was self-taught had the desire to use his talents for full-time work. He specialised in painting local scenes, landscape and people of Warrnambool and district after he moved there in 1990. As he worked at the location of his subjects, people often told him interesting and amusing stories. He soon became involved in the Warrnambool and District Artists’ Society, where he has served for a period as President. In 2010 Warrnambool Art Gallery hosted an exhibition “Nine Lives” with works from nine local artists including Tim Walker. The ‘LOCH ARD’ 1873-1878 - brief history The clipper ship ‘Loch Ard’ was a built in Scotland in 1873. In 1978 the ship was sailing to Melbourne with 54 people on board as well as a mixed cargo of items, some of which were bound for the 1880 International Exhibition in Melbourne. On June 1st 1878 it was very close to its destination when it crashed into Mutton Bird Island, east of Port Campbell. Only two people survived. The wreck was re-discovered in 1967, almost a century later, and the site continues to provide evidence of the range of goods imported into the Colony of Victoria in the post-Gold Rush era. Flagstaff Hill divers in the 1970s reported finds of “Bottles of champagne, window panes, rolls of zinc, barrels of cement, iron rails, clocks, lead shot, corrugated iron, lead, marble, salad oil bottles, ink bottles, copper wire, gin bottles, rolls of carpet, floor tiles, copper rivets, gas light fittings, pocket knives, toys, crystal chandeliers, beer mugs, cutlery, candles sticks, wick scissors, cow bells, and sauce bottles.” The famous Loch Ard Peacock was also on board. The ‘FIJI’ 1875-1891 – brief history The barque ‘Fiji’ was built in Ireland in 1875. The sailing ship left Hamburg in May 1891, bound for Melbourne with a crew of twenty-five plus the captain. The ‘Fiji’ had almost reached her destination after a trip of 100 days at sea when, on September 5th 1891, she struck rock 300 metres from the shore at Moonlight Head, near Cape Otway. Eleven men lost their lives but with the help of locals including members of the Rocket Rescue Crew, the rest of the men were saved. In anticipation of Christmas, the cargo had included a wide variety of children’s toys, amongst which were dolls with china limbs, wooden rocking horses, miniature ships, and red and white rubber balls. There were also cases of dynamite, pig iron, steel goods, spirits, sailcloth, tobacco, fencing wire, concrete, 400 German pianos, concertinas and other musical instruments, artists’ supplies, porcelain, furniture, china and candles. This artwork has historical significance as it shows a small sample of the variety of items on board the late 19th century ships bound for Australia in the Colonial and late God Rush period. The cargo contained personal luggage, items intended as gifts, and goods ordered for domestic, commercial or industrial use. The wreck sites of both vessels, ‘Loch Ard’ and ‘Fiji’ are classified on the Victorian Heritage Register as significant and are now protected by government law. The sites are popular with divers and provide interpretive material regarding social and maritime history. Framed poster of a watercolour painting by Tim Walker, gilt frame, behind glass. Subject is a group of objects, most of which are connected with the 1878 shipwreck Loch Ard, such as items recovered from the shipwreck and the famous ‘Loch Ard Peacock’. Two items are from the wreck of the ‘Fiji’. Inscriptions on ingot, a handwritten letter, bell, clear bottle, and small plaque.On ingot: “PONTIFEX & WOOD. LONDON”. On letter: “Presented to Mr. Thomas Pearce”. On small ingot: “TIM WALKER”. On bell: “LOCH ARD”. On clear bottle “THE SINGER MANUFACTURING COMPANY“. On plaque: TIM WALKER”.warrnambool, flagstaff hill maritime museum, maritime museum, shipwreck coast, flagstaff hill maritime village, great ocean road, flagstaff hill, loch ard, fiji, watercolour, timothy walker, tim walker, warrnambool & district artists’ society, warrnambool art gallery, poster, henna street picture framers, cargo, print -
 Flagstaff Hill Maritime Museum and Village
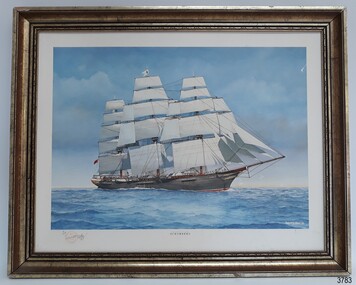
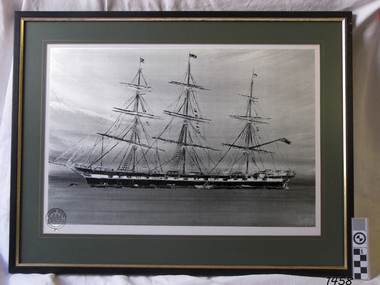
Print - Maritme, Colonial Clipper Schomberg, 1992
... ABOUT THE ARTIST – Philip James Gray “Philip is one of Australia’s leading maritime artists and his meticulous research and social commentary paintings of ships, such as, the Loch Ard and Schomberg form an important part of Warrnambool’s Flagstaff Hill Maritime Museum.” ...ABOUT THE ARTIST – Philip James Gray “Philip is one of Australia’s leading maritime artists and his meticulous research and social commentary paintings of ships, such as, the Loch Ard and Schomberg form an important part of Warrnambool’s Flagstaff Hill Maritime Museum.” ...This framed print of the famous clipper ship “Schomberg” is associated with Flagstaff Hill’s collection of artefacts from the wreck of the “Schomberg”. The original was painted in 1992 by maritime artist Philip J. Gray. This limited edition print is number 9/1000. ABOUTH THE SUBJECT – “Schomberg” The Schomberg was a luxury ship built in 1855 to bring immigrants from the UK to Australia in superior comfort. The voyage could take three months or longer but Captain ‘Bully’ Forbes thought that he could sail the Schomberg from Liverpool to Melbourne in a record time of 60 days. On October 6th 1855 the Schomberg left Liverpool on its maiden voyage. She carried 430 passengers plus 3000 tons cargo including rail lines for Geelong and iron for a bridge in Melbourne. After 78 days at sea, on December 27th, Schomberg ran aground near Peterborough, Victoria. All on board were rescued the next day by the passing steamer SS Queen. Gray is well known for his depiction of maritime history. His meticulous attention to detail shows the enormity of the immigrant clipper with its huge billowing sails compared to the tiny figures at work on the deck. The busy crew can be seen attending to the rigging, as can a group of sailors working on the bow under supervision. He identifies the company logo of the Black Ball Ship Line by the flapping white flag with its black circle. Divers from Flagstaff Hill including Peter Ronald (former director) salvaged artefacts and personal effects from the wreck, to be preserved and displayed. Amongst these is the famous Schomberg Diamond ring. ABOUT THE ARTIST – Philip James Gray “Philip is one of Australia’s leading maritime artists and his meticulous research and social commentary paintings of ships, such as, the Loch Ard and Schomberg form an important part of Warrnambool’s Flagstaff Hill Maritime Museum.” [ref. Dr Marion Manifold, Artist and Art Historian, 2014] Philip James Gray was born in London but has lived most of his life in Australia. He graduated from a London school of art as an illustrator, specialising in technical and scientific illustration as well as other commercial and applied art. He was also a student for a time of Fyffe Christie - British figurative artist, mural painter and humanitarian – who had a great influence on his career. Philip has always worked as a professional artist and illustrator. Many publications on maritime history have featured his work. His paintings have been released and sold all over the world as limited edition prints. The State Library of Victoria’s ‘Latrobe Collection’ holds two of his paintings. His street painting of ‘The Ashes Contest’ decorates the brick wall of Old Bakery Laneway in Sunbury and a Sunbury café owner commissioned him to paint the ‘Sunbury Pop Festival’ as a remembrance of local history. [ref. Sunbury Leader, Nov 15 2013] Philip has been an active member of the Sunbury Art Society in Victoria for several years, serving on the committee for some of that time and being involved in exhibitions. He enjoys helping new artists and sharing his skills and experience. The subject of the sailing ship “Schomberg” is significant for is connection with the 1800s vessel “Schomberg” and the historic role the ship, and other similar ships, played to transport migrants and goods into Australia. The print is significant as it is a limited edition of an Australian maritime artist. Print in gilt timber frame. "The Colonial Clipper Schomberg" by Australian maritime artist Philip J Gray, 1992. Signed and numbered, Limited Edition print 9/1000. Depicts clipper ship “Schomberg”, in full sail at sea with land in background. Backing of frame has illegible adhesive label and pencilled text. Stamp In pencil “FLAGSTAFF HILL” and “FLAGSTAFF C”. Illegible text on adhesive label. Signature [Philip J Gray] Stamped as a limited edition of SCHOMBERG Handwritten edition "9/1000"flagstaff hill, warrnambool, shipwrecked coast, flagstaff hill maritime museum, maritime museum, shipwreck coast, flagstaff hill maritime village, great ocean road, sailing ships, schomberg, clipper ship, colonial clipper, limited edition print, 9/1000, philip j gray, marine artist -
 Flagstaff Hill Maritime Museum and Village
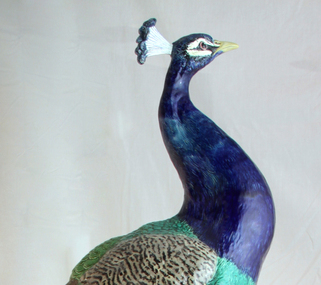
Decorative object - Peacock, Minton Majolica life-size model, Paul Comolera, artist, Designed: c. 1873; Made: c. 1875
... Loch Ard peacock' was almost forgotten and mistaken with other Minton peacocks around the world. Miss Florence Miller tried to sell the peacock due to financial difficulties in the 1930s but was unsuccessful. While attempting to sell her Loch Ard relic, it was displayed in the window of the old Argus newspaper office, which was at 76 Collins Street, Melbourne; the Argus had relocated to the corner of Elizabeth and La Trobe Streets in 1926. Between 1935 and 1939, the old Argus building was occupied by the Joshua N. McClelland Print Room, which sold not only paintings...Loch Ard peacock' was almost forgotten and mistaken with other Minton peacocks around the world. Miss Florence Miller tried to sell the peacock due to financial difficulties in the 1930s but was unsuccessful. While attempting to sell her Loch Ard relic, it was displayed in the window of the old Argus newspaper office, which was at 76 Collins Street, Melbourne; the Argus had relocated to the corner of Elizabeth and La Trobe Streets in 1926. Between 1935 and 1939, the old Argus building was occupied by the Joshua N. McClelland Print Room, which sold not only paintings ...This majestic peacock embodies the technical achievement, skill and ingenuity of artisans during the 19th century. It is now known as the 'Loch Ard Peacock' and was designed and modelled in 1873 by Paul Comolera (1818-1897) and fired in one piece at the Minton factory at Stoke-on-Trent in the United Kingdom in 1875. The peacock has been portrayed in symbolic motifs and has figured heavily in folktales and fables since antiquity, and many cultures around the world see it as a symbol of beauty, rebirth and power. Wealthy Victorians loved majolica, and the large peacock would have been the ultimate home accessory as a conservatory ornament – combining their desire for nature, the exotic and vibrant colours. The peacock model was listed in catalogues by Minton & Co. for a retail price of 35 guineas or sold as a pair for 90 guineas. Minton & Co. was founded in 1793 by Thomas Minton (1765–1836) and became a famous pottery and porcelain manufacturer. Comolera was a French artist and sculptor, renowned for dramatic naturalistic forms and life-size renditions of birds and animals that won him admiration in public and artistic circles. He was employed by Minton & Co. from 1873 to 1880, and the life-sized peacock became his best-known work. Comolera kept a live peacock loaned from the nearby Duke of Sutherland's Trentham Hall Estate in his studio to create a life-size model of fine buff earthenware model, which was then hand painted in brilliantly coloured green and blue glazes to mimic the peafowl’s dazzling plumage. There are no surviving production records, but according to documents in the Minton Archive, nine peacocks were made by Comolera. However, today, some historians now believe that twelve were fired at the Minton factory; research is ongoing. These peacocks were so admired that Minton & Co. used them as exhibition showpieces at International Exhibitions in London, Paris, and the United States of America, ensuring the company had a worldwide reputation. So, when Melbourne hosted an International Exposition in 1880, Minton & Co. sent out ceramics and tiles, and in particular, this peacock was intended to be part of their exhibit in the British Court in the Exhibition Building, built in the Carlton Gardens. The early dispatch date (1878) indicates that the company may have intended to exhibit their wares, including the peacock, at the 1879 Sydney International Exhibition, but the company did not take up this option. The ship that Minton & Co. used to bring the peacock and their other wares to the Australian colonies was the ill-fated Loch Ard, which sunk after striking Mutton Bird Island near Port Campbell, Victoria, in calm foggy weather in June 1878 on the final leg of the ship's journey to Melbourne. The loss of 52 lives made it one of Victoria’s worst shipwrecks. Therefore, this peacock never made it to the grand exposition in Melbourne, as Minton & Co. had planned. Charles McGillivray dragged this peacock, still in its original packing case, onto the beach in the gorge just two days after the Loch Ard went down. The peacock was rescued unscathed apart from a chip on its beak (only repaired in 1988). After a disagreement with a Melbourne Customs Officer, Joseph Daish, McGillivray stopped his salvage operations, leaving the peacock on the beach. The second salvagers were James Miller and Thomas Keys. Miller was a member of the firm Howarth, Miller and Matthews, Geelong, who had brought the salvage rights to the Loch Ard wreck on 10 June. When Miller and Keys arrived at the wreck site, a storm had washed many of the salvaged goods, including this peacoc,k back into the sea. The two men found the peacock in its case ‘bobbing along in the water’ and pulled it back to the beach. To ensure the peacock wasn't washed out to sea again, Miller and Keys hauled the packing case containing the peacock up the gorge's cliff face to the top, ready to be transported. In an interview in 1928, Keys claimed that at the time of the rescue, the head had broken from the body. This account was proven to be true in 1988, following the birds' display in Brisbane. This peacock began its life in Australia, not in the grandeur of an International Exhibition as intended, but in the hallway of a simple domestic house in Geelong. It appears Minton & Co. did not attempt to buy this peacock back. Florence Miller, daughter of James Miller (Loch Ard salvage rights holder), later remarked that the only item of real value rescued from the wreck had been the peacock and that this had been kept by her father in the family home at Malvern for many years and became a treasured family possession. As such, this 'Loch Ard peacock' was almost forgotten and mistaken with other Minton peacocks around the world. Miss Florence Miller tried to sell the peacock due to financial difficulties in the 1930s but was unsuccessful. While attempting to sell her Loch Ard relic, it was displayed in the window of the old Argus newspaper office, which was at 76 Collins Street, Melbourne; the Argus had relocated to the corner of Elizabeth and La Trobe Streets in 1926. Between 1935 and 1939, the old Argus building was occupied by the Joshua N. McClelland Print Room, which sold not only paintings and prints but also antiques and authentic replicas, as well as hosting exhibitions. Miss Florence Miller loaned her peacock for display at the Victorian Historical Exhibition held in the National Gallery on 1st June 1935, the 57th anniversary of the Loch Ard wreck. As a result, the peacock attracted public attention in books, newspapers and magazine articles that told the story of its survival from a shipwreck. Miss Florence Miller was keen to sell the peacock, even writing overseas to Captain Blain on November 30th, 1938, about the possibility of a sale, but this became no longer possible due to the outbreak of war. Recent information points to the Loch Ard peacock being owned by John S R Heath before its sale to Frank Ridley-Lee in May 1941. Research is ongoing, but it seems likely that John Samuel Robert Heath, a leading Melbourne dentist with a practice in Collins Street, and his wife, a dental mechanic, had purchased Miss Miller’s Loch Ard peacock before its sale in 1941. They were lovers of fine arts, music, wine and food. The peacock in the window of the old Argus building could have attracted their attention as they had already purchased the old stone Presbyterian Church on Warrigal Road, Oakleigh, in 1933 and had converted its interior. The home, renamed The Studio, even included Melbourne’s first all-electric kitchen. The peacock was perfect for display in the Studio’s entrance. A magazine article published after the conversion was completed included photographs of the interior. The picture of the ‘portico’ had a caption below that stated, “Some of her [Mrs Heath’s] finest pottery was salvaged from the Loch Ard Wreck”. In 2025, Heath’s two remaining sons remember running around in the entrance with the peacock standing there, oblivious to its value. Heath was an accomplished artist, studying under Max Meldrum. He painted and exhibited his works at The Studio and in a public exhibition, and he was a finalist eight times in the coveted Archibald Prize portrait competition, including the submission of his self-portrait that is now part of his grandson’s collection. The next owner of the Loch Ard Peacock was Frank Ridley-Lee. He displayed it at his home in Ivanhoe after buying it at an auction in May 1941. The peacock remained in the hands of the Ridley-Lee family until it was offered for sale by auction in 1975 as part of an art collection belonging to Mrs Ridley-Lee's estate. The peacock was not sold at this time, as the reserve price of $4500 was not met. This news was passed on to the board of the newly created Flagstaff Hill Maritime Village. Urgent efforts were made to collect the necessary money through fundraising by the Warrnambool City Council and public donations. The Fletcher Jones Company and the Victorian Government contributed half the cost. On 9 September 1975, the Loch Ard peacock was purchased by Flagstaff Hill Maritime Village, and it found a new home at the maritime museum. Since then, it has only left Warrnambool twice. Firstly, in 1980, at the centenary celebrations of the Royal Exhibition Building in Melbourne, and secondly, in 1988, the peacock was given pride of place at the entrance to the Victorian Pavilion at the Brisbane World Expo, acknowledging that this Minton Majolica peacock is the most significant shipwreck object in Australia. The Minton majolica peacock is considered of historical social and aesthetic significance to Victoria and is one of only a few 'objects' registered on the Victorian Heritage Register (H 2132), as it is a most notable and rare object associated with the Minton factory of the 1870s and works by the celebrated sculptor Paul Comolera along with the wreck of the Loch Ard on the Victorian coastline. This Minton peacock is historically significant for its rarity; it was one of only 9-12 known to exist. The shipwreck of the Loch Ard is also of significance for Victoria and is registered on the Victorian Heritage Register Ref (S 417). Flagstaff Hill has a varied collection of artefacts from Loch Ard and its collection is significant for being one of the largest accumulation of artefacts from this notable Victorian shipwreck. The collections object is to also give us a snapshot into history so we can interpret the story of this tragic event. The collection is also archaeologically significant as it represents aspects of Victoria's shipping history that allows us to interpret Victoria's early social and historical themes. The collection is historically significant is that it is associated, unfortunately with the worst and best-known shipwreck in Victoria's history. The peacock, resplendent in polychrome glaze, stands perched on a rocky plinth decorated with vines, leaves, flowers, blackberries and wild mushrooms. The peacock’s breast is cobalt blue; the wings and legs are in naturalistic colours. The tail is a mass of feathers coloured in green, ochre blue and brown — a fantastic display of artistry and Minton expertise. Inscribed at the base :P Comolera, and a Minton & Co. design number: 2045.flagstaff hill, warrnambool, maritime museum, shipwreck coast, loch ard, loch ard gorge, peacock, paul comolera, victorian heritage register, minton peacock, minton & co., stoke upon trent, bird figures, mintons, ceramics, international expositions, majolica, naturalistic, staffordshire, john samuel robert heath, peacock statue, loch ard peacock, majorca peacock -
 Flagstaff Hill Maritime Museum and Village
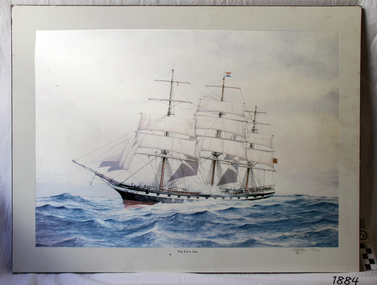
Print, Loch Ard
... Reproduction 0620 of 1000 taken from the original painting of the Loch Ard by Neil Savage....LOCH ARD, which was one of the worst and best known shipwrecks in Victoria’s history. Flagstaff Hill Warrnambool Shipwrecked coast Flagstaff Hill Maritime Museum Maritime Museum Shipwreck coast Flagstaff Hill Maritime Village Great Ocean Road Loch Line LOCH ARD Captain Gibbs Eva Carmichael Tom Pearce Glenample Station Mutton Bird Island LOCH ARD Gorge Photograph neil savage Reproduction 0620 of 1000 taken from the original painting of the Loch Ard by Neil Savage. ...HISTORY OF THE LOCH ARD The LOCH ARD belonged to the famous Loch Line which sailed many ships from England to Australia. Built in Glasgow by Barclay, Curdle and Co. in 1873, the LOCH ARD was a three-masted square rigged iron sailing ship. The ship measured 262ft 7" (79.87m) in length, 38ft (11.58m) in width, 23ft (7m) in depth and had a gross tonnage of 1693 tons. The LOCH ARD's main mast measured a massive 150ft (45.7m) in height. LOCH ARD made three trips to Australia and one trip to Calcutta before its final voyage. LOCH ARD left England on March 2, 1878, under the command of Captain Gibbs, a newly married, 29 year old. She was bound for Melbourne with a crew of 37, plus 17 passengers and a load of cargo. The general cargo reflected the affluence of Melbourne at the time. On board were straw hats, umbrella, perfumes, clay pipes, pianos, clocks, confectionary, linen and candles, as well as a heavier load of railway irons, cement, lead and copper. There were items included that intended for display in the Melbourne International Exhibition in 1880. The voyage to Port Phillip was long but uneventful. At 3am on June 1, 1878, Captain Gibbs was expecting to see land and the passengers were becoming excited as they prepared to view their new homeland in the early morning. But LOCH ARD was running into a fog which greatly reduced visibility. Captain Gibbs was becoming anxious as there was no sign of land or the Cape Otway lighthouse. At 4am the fog lifted. A man aloft announced that he could see breakers. The sheer cliffs of Victoria's west coast came into view, and Captain Gibbs realised that the ship was much closer to them than expected. He ordered as much sail to be set as time would permit and then attempted to steer the vessel out to sea. On coming head on into the wind, the ship lost momentum, the sails fell limp and LOCH ARD's bow swung back. Gibbs then ordered the anchors to be released in an attempt to hold its position. The anchors sank some 50 fathoms - but did not hold. By this time LOCH ARD was among the breakers and the tall cliffs of Mutton Bird Island rose behind the ship. Just half a mile from the coast, the ship's bow was suddenly pulled around by the anchor. The captain tried to tack out to sea, but the ship struck a reef at the base of Mutton Bird Island, near Port Campbell. Waves broke over the ship and the top deck was loosened from the hull. The masts and rigging came crashing down knocking passengers and crew overboard. When a lifeboat was finally launched, it crashed into the side of LOCH ARD and capsized. Tom Pearce, who had launched the boat, managed to cling to its overturned hull and shelter beneath it. He drifted out to sea and then on the flood tide came into what is now known as LOCH ARD Gorge. He swam to shore, bruised and dazed, and found a cave in which to shelter. Some of the crew stayed below deck to shelter from the falling rigging but drowned when the ship slipped off the reef into deeper water. Eva Carmichael had raced onto deck to find out what was happening only to be confronted by towering cliffs looming above the stricken ship. In all the chaos, Captain Gibbs grabbed Eva and said, "If you are saved Eva, let my dear wife know that I died like a sailor". That was the last Eva Carmichael saw of the captain. She was swept off the ship by a huge wave. Eva saw Tom Pearce on a small rocky beach and yelled to attract his attention. He dived in and swam to the exhausted woman and dragged her to shore. He took her to the cave and broke open case of brandy which had washed up on the beach. He opened a bottle to revive the unconscious woman. A few hours later Tom scaled a cliff in search of help. He followed hoof prints and came by chance upon two men from nearby Glenample Station three and a half miles away. In a state of exhaustion, he told the men of the tragedy. Tom returned to the gorge while the two men rode back to the station to get help. By the time they reached LOCH ARD Gorge, it was cold and dark. The two shipwreck survivors were taken to Glenample Station to recover. Eva stayed at the station for six weeks before returning to Ireland, this time by steamship. In Melbourne, Tom Pearce received a hero's welcome. He was presented with the first gold medal of the Royal Humane Society of Victoria and a £1000 cheque from the Victorian Government. Concerts were performed to honour the young man's bravery and to raise money for those who lost family in the LOCH ARD disaster. Of the 54 crew members and passengers on board, only two survived: the apprentice, Tom Pearce and the young woman passenger, Eva Carmichael, who lost all of her family in the tragedy. Ten days after the LOCH ARD tragedy, salvage rights to the wreck were sold at auction for £2,120. Cargo valued at £3,000 was salvaged and placed on the beach, but most washed back into the sea when another storm developed. The wreck of LOCH ARD still lies at the base of Mutton Bird Island. Much of the cargo has now been salvaged and some was washed up into what is now known as LOCH ARD Gorge. Cargo and artefacts have also been illegally salvaged over many years before protective legislation was introduced. One of the most unlikely pieces of cargo to have survived the shipwreck was a Minton porcelain peacock - one of only nine in the world. The peacock was destined for the Melbourne International Exhibition in 1880. It had been well packed, which gave it adequate protection during the violent storm. Today, the Minton peacock can be seen at the Flagstaff Hill Maritime Museum in Warrnambool. From Australia's most dramatic shipwreck it has now become Australia's most valuable shipwreck artefact and is one of very few 'objects' on the Victorian State Heritage Register. Flagstaff Hill’s collection of artefacts from LOCH ARD is significant for being one of the largest collections of artefacts from this shipwreck in Victoria. It is significant for its association with the shipwreck, which is on the Victorian Heritage Register (VHR S417). The collection is significant because of the relationship between the objects, as together they have a high potential to interpret the story of the LOCH ARD. The LOCH ARD collection is archaeologically significant as the remains of a large international passenger and cargo ship. The LOCH ARD collection is historically significant for representing aspects of Victoria’s shipping history and its potential to interpret sub-theme 1.5 of Victoria’s Framework of Historical Themes (living with natural processes). The collection is also historically significant for its association with the LOCH ARD, which was one of the worst and best known shipwrecks in Victoria’s history. Reproduction 0620 of 1000 taken from the original painting of the Loch Ard by Neil Savage.flagstaff hill, warrnambool, shipwrecked coast, flagstaff hill maritime museum, maritime museum, shipwreck coast, flagstaff hill maritime village, great ocean road, loch line, loch ard, captain gibbs, eva carmichael, tom pearce, glenample station, mutton bird island, loch ard gorge, photograph, neil savage -
 Flagstaff Hill Maritime Museum and Village
Painting - Maritime painting, The La Bella, 1980s
... Gray “Philip is one of Australia’s leading maritime artists and his meticulous research and social commentary paintings of ships, such as, the Loch Ard and Schomberg form an important part of Warrnambool’s Flagstaff Hill Maritime Museum.” ...Gray “Philip is one of Australia’s leading maritime artists and his meticulous research and social commentary paintings of ships, such as, the Loch Ard and Schomberg form an important part of Warrnambool’s Flagstaff Hill Maritime Museum.” ...This painting of the “La Bella” is associated with Flagstaff Hill’s collection of artefacts from the wreck of the “La Bella”. It was painted around the 1980s by maritime artist Philip J. Gray. Some 15 – 17 ships are believed to have sunk in Lady Bay, but only two have been discovered on the seafloor; the “La Bella” and the “Edinburgh Castle”. Both wrecks are popular diving sites and are preserved as significant historical marine and marine archaeological sites. The Kosnar Picture Framing and Mirrors Shop identified the "GRAY 3135, Y04/111" as their job number for the framing and said that the label "ANOTHER KOSNAR FEATURE" was last used before about 1990. About artist Philip J. Gray “Philip is one of Australia’s leading maritime artists and his meticulous research and social commentary paintings of ships, such as, the Loch Ard and Schomberg form an important part of Warrnambool’s Flagstaff Hill Maritime Museum.” [Dr Marion Manifold, Artist and Art Historian, 2014] Philip James Gray was born in London but has lived most of his life in Australia. He graduated from a London school of art as an illustrator, specialising in technical and scientific illustration as well as other commercial and applied art. He was also a student for a time of Fyffe Christie - British figurative artist, mural painter and humanitarian – who had a great influence on his career. Philip has always worked as a professional artist and illustrator. Many publications on maritime history have featured his work. His paintings have been released and sold all over the world as limited edition prints. The State Library of Victoria’s ‘Latrobe Collection’ holds two of his paintings. His street painting of ‘The Ashes Contest’ decorates the brick wall of Old Bakery Laneway in Sunbury and a Sunbury café owner commissioned him to paint the ‘Sunbury Pop Festival’ as a remembrance of local history. Philip has been an active member of the Sunbury Art Society in Victoria for several years, serving on the committee for some of that time and being involved in exhibitions. He enjoys helping new artists and sharing his skills and experience. About the “La Bella” The wreck of the La Bella lies at the bottom of the Warrnambool Harbour in Lady Bay. Some 15 ships are believed to have been wrecked there but only two have been discovered on the sea floor; the La Bella and the Edinburgh Castle. Both wrecks are popular diving sites and are preserved as significant historical marine and marine archaeological sites. The story of the final voyage of the La Bella is summarised as follows … The ship from which the sailors were rescued was the three-masted, iron and steel barquentine the La Bella, built in Norway in 1893. She was one of two iron and steel ships by Johan Smith, the company being one of the leading shipping families in Tvedestrand, Norway. She was significant to Norwegian shipping, being one of only 27 iron and steel ships ever built in Norway. La Bella was registered in New Zealand and engaged from 1902 in inter-colonial trading of timber in the pacific, between New Zealand and Australia and was often in Port Phillip Bay, Victoria. On 5th October 1905 the twelve year old La Bella left Lyttleton, New Zealand carrying a cargo of timber bound for Warrnambool, Australia . She was manned by a crew of twelve: the Master, (Captain Mylius, previously 1st Mate of La Bella, appointed Captain to La Bella on 6th February 1903) 2 Mates, Cook, six able seamen, one ordinary seaman and a boy. Bad weather en-route caused her to shelter at Burnie on Tasmania's North West coast. On November 10th, the 37th day of her journey, La Bella approached Warrnambool. Captain Mylius steered her towards Lady Bay Channel in heavy south-west seas and evening mist. He ordered the helmsman to steer for the light. As the ship came round, a tremendous sea struck her on the port quarter, causing her to breach broadside in a north-westerly direction into breakers. The helm was brought round twice more, but each time heavy seas broke over her, the third time throwing the La Bella on to a submerged reef in Lady Bay now known as La Bella Reef (about 100 yards from the Warrnambool breakwater). The sea was so rough that it even wrenched a one-and-a-half ton anchor from its fastenings and into the sea. As Captain Mylius headed to the steel wheelhouse, intending to send up a rocket flare, a huge sea slammed the steel door into him (resulting in massive bruising front and back) Despite his injuries he still managed to set off a blue light, which he held up in his hands. La Bella’s lifeboats were filled with sea water and broke up on their chocks. The blue light was the first indication to people on shore that there was a ship in distress. The Harbour Master, Captain Roe (who lived in the Harbour Master’s House opposite Flagstaff Hill), organised a group of volunteers to crew the lifeboat because the trained crew was unavailable; the crewmen were working on a steamer in Port Fairy at the time. He then poured oil onto the water to try and smooth the sea. At around 11pm three of the crew took shelter in the steel forecastle but the sea crashed into it and broke it up. While the rest of the crew and onlookers watched helplessly in the moonlight the bodies were washed away into the sea, never to be seen again. Some of the crew lashed themselves to the weather rail to keep from being washed away. Watson, the ordinary seaman, became tangled in the rigging lines and was too weak to move, so the 2nd Mate, Robertson, put a line onto him so that he wouldn’t wash off. Around 11pm three of the crew were unconscious from exhaustion. The situation on La Bella was becoming dangerous. The 2nd Mate moved to the ‘house’ and soon afterwards the ship slipped in the heavy sea. The lashings of the 1st Mate and the ‘boy’ Denham had kept them safe until about 2am when they were washed overboard; no one was able to help. One by one, the exhausted crew were being washed overboard, too weak to hold on any longer. During the night the La Bella had broken into two and the deckhouse ran out towards the sea. Two more men drowned when trying to reach the lifeboat. By sunrise the only survivors of the twelve were the Master, 2nd Mate and three seamen. Early in the morning Captain Roe used the rocket apparatus on shore to try and shoot a line to the ship for a safer rescue but each attempt fell short of the target. Several attempts were made by the lifeboat to rescue the stricken sailors, but the rough conditions made this difficult for the boat to get close enough to the ship and the lifeboat had to return to shore. During a final attempt to reach the ship Captain Mylius ordered his men to jump into the sea. Leonard Robertson, 2nd mate, jumped and swam towards the lifeboat, taking hold of the boat hook offered to him. Oscar Rosenholme managed to reach the boat floating on a piece of timber from the ship’s load and a third survivor, Noake, also made the boat. Along with the lifeboat rescue crew, 25 year old William Ferrier rowed his small dingy through the heavy seas and managed to rescue the Captain, whom he landed on the breakwater. Ferrier then returned to the ship to attempt a final rescue, losing his oars and rowlocks into the high sea. Using just a spare paddle he skulled towards the La Bella, reaching her stern in time to cut loose the lone surviving sailor, Payne, from the lashing that held him to the ship; the terrified sailor dropped from the ship and into the dingy. Shortly after the last man was rescued, the La Bella was lifted by a huge wave and crashed back down on the reef; she broke up and sank. The ordeal had lasted ten hours. The survivors were taken to the nearby Bay View Hotel and gratefully received warm food and clothing, medical attention and a place to sleep. In the following days an unidentified body of a young person was washed ashore; it was either Watson or Denham. The body was buried in the Warrnambool cemetery with an appropriate gravestone and inscription. William Ferrier became a national hero as news of the daring rescue spread. In recognition of his bravery in the two daring rescues he was awarded the Silver Medal for Bravery by the Royal Humane Society and was honoured in the letter from the Prime Minister and the Parliament of the Commonwealth, telegrams and a cheque for £20 from the Governor General, over £150 subscribed by the public, including Warrnambool and district and readers of The Argus, and a gold medal from the Glenelg Dinghy Club of South Australia. Ferrier’s rescue efforts are one of the most heroic in Victoria’s shipwreck history. (William Ferrier’s son, Frank, received a similar award almost fifty years later, when he helped rescue four members of the crew on the yacht Merlan, after it ran on to a reef near the Point Lonsdale Lighthouse. ) The wreck of La Bella now lies on her port side in 13 metres of sheltered water inside the reef she struck. The bow section is relatively intact and part of the stern has drifted north-easterly towards the mouth of the Hopkins River. The reef the La Bella struck now bears its name. Those five rescued from the La Bella were Captain George Mylius, Leonard Robertson (2nd Mate, 21 years old), R. Payne, Oscar Rosenholme and Jack Noake. Those seven who lost their lives were Mr Coulson (1st mate), Charles Jackman (cook) Gustave Johnson, Pierre Johann and Robert Gent (all able seamen), Harry Watson (ordinary seaman) and Jack Denham (ship’s boy). Captain Mylius was found guilty of careless navigation; he had sailed into the bay without the services of a pilot. His Master Certificate was suspended for twelve months. Later he was also charged with manslaughter of one of the crew who had died when the La Bella was wrecked, but found not guilty. The event’s adverse publicity and damage to his career took a toll on his health and he died of a heart attack six months after the wreck; he was only thirty-seven. His body was buried in the Melbourne General Cemetery. The La Bella was “the best documented of all sailing ships owned in New Zealand”. Her record books, ship logs, correspondence and supporting papers are still available. At the time of the tragedy she was owned by Messers David C.Turnbull and Co. of Timaru, New Zealand timber merchants and shipping agents, who had purchased her on 13th December 1901. A detailed account of the last journey of La Bella can be read in “Leonard Robertson, the Whangaroa & La Bella” written by Jack Churchouse, published in 1982 by Millwood Press Ltd, Wellington, NZ.This painting of the La Bella by Philip J. Gray is part of the La Bella Collection and is significant at both a local and state level. Its connection to the La Bella shipwreck and the rescue of five survivors highlights the dangers of Victoria’s Shipwreck Coast. The painting connects with other objects and artefacts associated with the wreck of the La Bella. This painting is significant because of its association with the sailing ship “La Bella” . the “La Bella” is of local and state and national significance. It is one of the only two shipwrecks discovered in Lady Bay, Warrnambool, out of the 15-17 shipwrecks in the bay. Large framed painting of the three masted barquentine "La Bella" fully rigged. Painted by Phillip J Gray. A fine printed line squares off the painting. Beneath painting and line is a gold plate with black copper plate designating "La Bella" is encased in glass, surrounded by a silver-metal frame. Yellow and brown paper label is adhered to back of painting. Picture framed by Kosnar in Melbourne."The La Bella" on gold plaque Logo of "K" inside a brown square. "GRAY 3135, Y04/111", "ANOTHER KOSNAR FEATURE" flagstaff hill, warrnambool, shipwrecked-coast, flagstaff-hill, flagstaff-hill-maritime-museum, maritime-museum, shipwreck-coast, flagstaff-hill-maritime-village, painting, la bella, artist phillip j gray, maritime painting, lady bay warrnambool -
 Flagstaff Hill Maritime Museum and Village
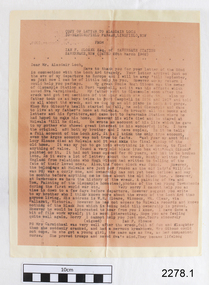
Letter
... LOCH ARD shipwreck in 1878. The letter is in reply to an earlier inquiry for information about the LOCH ARD tragedy from Alasdair Loch, 10 Beaconsfield Parade, Lindfield NSW. Most of the letter consists of tantalising asides: about trips to Glenample in 1916 and 1917 and the digging up of an old piano at Loch Ard Gorge; the possession of his uncle’s personal account of the shipwreck and its aftermath; the existence of a painting of Eva when she was staying at the Glenample homestead in 1878; and the disputed ownership of “a very old black iron box” containing letters from relatives of the shipwreck victims (who Hugh Gibson had written to advising of their unhappy fate). ...LOCH ARD shipwreck in 1878. The letter is in reply to an earlier inquiry for information about the LOCH ARD tragedy from Alasdair Loch, 10 Beaconsfield Parade, Lindfield NSW. Most of the letter consists of tantalising asides: about trips to Glenample in 1916 and 1917 and the digging up of an old piano at Loch Ard Gorge; the possession of his uncle’s personal account of the shipwreck and its aftermath; the existence of a painting of Eva when she was staying at the Glenample homestead in 1878; and the disputed ownership of “a very old black iron box” containing letters from relatives of the shipwreck victims (who Hugh Gibson had written to advising of their unhappy fate). ...This letter is a photographed copy of a typed transcript of an original. It is dated 28 March 1962 and was written by Ian F. Sloane Esq. of Savernake Station, NSW. Sloane’s great uncle, Hugh Gibson, was the owner of Glenample Station, Vic., where Eva Carmichael stayed to recuperate from her ordeal as the only female survivor of the LOCH ARD shipwreck in 1878. The letter is in reply to an earlier inquiry for information about the LOCH ARD tragedy from Alasdair Loch, 10 Beaconsfield Parade, Lindfield NSW. Most of the letter consists of tantalising asides: about trips to Glenample in 1916 and 1917 and the digging up of an old piano at Loch Ard Gorge; the possession of his uncle’s personal account of the shipwreck and its aftermath; the existence of a painting of Eva when she was staying at the Glenample homestead in 1878; and the disputed ownership of “a very old black iron box” containing letters from relatives of the shipwreck victims (who Hugh Gibson had written to advising of their unhappy fate). Unfortunately the letter, written in haste prior to Sloane’s departure overseas, contains no substantive information. However it concludes with an interesting footnote concerning Eva’s emotional recovery at Glenample. Sloane’s postscript states: “Miss Carmichael was very well after the wreck, full of fun and laughter, until she suddenly cracked, and had a nervous breakdown…Mrs Gibson…got a young girl, the same age as Eva, as her companion[…She] proved trumps and saved Eva’s mind. They became lifelong friends. Both wrote to my aunt till they died. Miss Carmichael stayed about 6 months at Glenample I think.” The shipwreck of the LOCH ARD is of State significance ― Victorian Heritage Number S417A photographic copy of a typed letter-transcript. The original letter was written to Alasdair Loch, Lindfield NSW, and is from Ian F. Sloane Esq. of Savernake Station NSW. It is dated 28 March 1962 and is two pages long.flagstaff hill, warrnambool, shipwrecked-coast, flagstaff-hill, flagstaff-hill-maritime-museum, maritime-museum, shipwreck-coast, flagstaff-hill-maritime-village, letter, alasdair loch, ian f sloane, sloane, loch ard, hugh gibson, eva carmichael, glenample station, tom pearce, glenample homestead -
 Flagstaff Hill Maritime Museum and Village
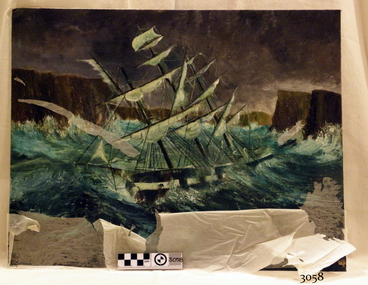
Painting
... LOCH ARD...Captain Gibbs...Eva Carmichael...Tom Pearce...Glenample Station...Mutton Bird Island...LOCH ARD Gorge...painting...Painting of The Loch Ard oil on board depicting wreck. ... Painting of The Loch Ard oil on board depicting wreck. ...HISTORY OF THE LOCH ARD The LOCH ARD belonged to the famous Loch Line which sailed many ships from England to Australia. Built in Glasgow by Barclay, Curdle and Co. in 1873, the LOCH ARD was a three-masted square rigged iron sailing ship. The ship measured 262ft 7" (79.87m) in length, 38ft (11.58m) in width, 23ft (7m) in depth and had a gross tonnage of 1693 tons. The LOCH ARD's main mast measured a massive 150ft (45.7m) in height. LOCH ARD made three trips to Australia and one trip to Calcutta before its final voyage. LOCH ARD left England on March 2, 1878, under the command of Captain Gibbs, a newly married, 29 year old. She was bound for Melbourne with a crew of 37, plus 17 passengers and a load of cargo. The general cargo reflected the affluence of Melbourne at the time. On board were straw hats, umbrella, perfumes, clay pipes, pianos, clocks, confectionary, linen and candles, as well as a heavier load of railway irons, cement, lead and copper. There were items included that intended for display in the Melbourne International Exhibition in 1880. The voyage to Port Phillip was long but uneventful. At 3am on June 1, 1878, Captain Gibbs was expecting to see land and the passengers were becoming excited as they prepared to view their new homeland in the early morning. But LOCH ARD was running into a fog which greatly reduced visibility. Captain Gibbs was becoming anxious as there was no sign of land or the Cape Otway lighthouse. At 4am the fog lifted. A man aloft announced that he could see breakers. The sheer cliffs of Victoria's west coast came into view, and Captain Gibbs realised that the ship was much closer to them than expected. He ordered as much sail to be set as time would permit and then attempted to steer the vessel out to sea. On coming head on into the wind, the ship lost momentum, the sails fell limp and LOCH ARD's bow swung back. Gibbs then ordered the anchors to be released in an attempt to hold its position. The anchors sank some 50 fathoms - but did not hold. By this time LOCH ARD was among the breakers and the tall cliffs of Mutton Bird Island rose behind the ship. Just half a mile from the coast, the ship's bow was suddenly pulled around by the anchor. The captain tried to tack out to sea, but the ship struck a reef at the base of Mutton Bird Island, near Port Campbell. Waves broke over the ship and the top deck was loosened from the hull. The masts and rigging came crashing down knocking passengers and crew overboard. When a lifeboat was finally launched, it crashed into the side of LOCH ARD and capsized. Tom Pearce, who had launched the boat, managed to cling to its overturned hull and shelter beneath it. He drifted out to sea and then on the flood tide came into what is now known as LOCH ARD Gorge. He swam to shore, bruised and dazed, and found a cave in which to shelter. Some of the crew stayed below deck to shelter from the falling rigging but drowned when the ship slipped off the reef into deeper water. Eva Carmichael had raced onto deck to find out what was happening only to be confronted by towering cliffs looming above the stricken ship. In all the chaos, Captain Gibbs grabbed Eva and said, "If you are saved Eva, let my dear wife know that I died like a sailor". That was the last Eva Carmichael saw of the captain. She was swept off the ship by a huge wave. Eva saw Tom Pearce on a small rocky beach and yelled to attract his attention. He dived in and swam to the exhausted woman and dragged her to shore. He took her to the cave and broke open case of brandy which had washed up on the beach. He opened a bottle to revive the unconscious woman. A few hours later Tom scaled a cliff in search of help. He followed hoof prints and came by chance upon two men from nearby Glenample Station three and a half miles away. In a state of exhaustion, he told the men of the tragedy. Tom returned to the gorge while the two men rode back to the station to get help. By the time they reached LOCH ARD Gorge, it was cold and dark. The two shipwreck survivors were taken to Glenample Station to recover. Eva stayed at the station for six weeks before returning to Ireland, this time by steamship. In Melbourne, Tom Pearce received a hero's welcome. He was presented with the first gold medal of the Royal Humane Society of Victoria and a £1000 cheque from the Victorian Government. Concerts were performed to honour the young man's bravery and to raise money for those who lost family in the LOCH ARD disaster. Of the 54 crew members and passengers on board, only two survived: the apprentice, Tom Pearce and the young woman passenger, Eva Carmichael, who lost all of her family in the tragedy. Ten days after the LOCH ARD tragedy, salvage rights to the wreck were sold at auction for £2,120. Cargo valued at £3,000 was salvaged and placed on the beach, but most washed back into the sea when another storm developed. The wreck of LOCH ARD still lies at the base of Mutton Bird Island. Much of the cargo has now been salvaged and some was washed up into what is now known as LOCH ARD Gorge. Cargo and artefacts have also been illegally salvaged over many years before protective legislation was introduced. One of the most unlikely pieces of cargo to have survived the shipwreck was a Minton porcelain peacock - one of only nine in the world. The peacock was destined for the Melbourne International Exhibition in 1880. It had been well packed, which gave it adequate protection during the violent storm. Today, the Minton peacock can be seen at the Flagstaff Hill Maritime Museum in Warrnambool. From Australia's most dramatic shipwreck it has now become Australia's most valuable shipwreck artefact and is one of very few 'objects' on the Victorian State Heritage Register. Flagstaff Hill’s collection of artefacts from LOCH ARD is significant for being one of the largest collections of artefacts from this shipwreck in Victoria. It is significant for its association with the shipwreck, which is on the Victorian Heritage Register (VHR S417). The collection is significant because of the relationship between the objects, as together they have a high potential to interpret the story of the LOCH ARD. The LOCH ARD collection is archaeologically significant as the remains of a large international passenger and cargo ship. The LOCH ARD collection is historically significant for representing aspects of Victoria’s shipping history and its potential to interpret sub-theme 1.5 of Victoria’s Framework of Historical Themes (living with natural processes). The collection is also historically significant for its association with the LOCH ARD, which was one of the worst and best known shipwrecks in Victoria’s history. Painting of The Loch Ard oil on board depicting wreck. It shows stormy sea and coastline in background. Ship appears to be capsized.flagstaff hill, warrnambool, shipwrecked coast, flagstaff hill maritime museum, maritime museum, shipwreck coast, flagstaff hill maritime village, great ocean road, loch line, loch ard, captain gibbs, eva carmichael, tom pearce, glenample station, mutton bird island, loch ard gorge, painting -
 Flagstaff Hill Maritime Museum and Village
Print, The Loch Ard, 1993
... ABOUT THE ARTIST – Philip James Gray “Philip is one of Australia’s leading maritime artists and his meticulous research and social commentary paintings of ships, such as, the Loch Ard and Schomberg form an important part of Warrnambool’s Flagstaff Hill Maritime Museum.” ...Flagstaff Hill Maritime Museum and Village 89 Merri Street Warrnambool great-ocean-road ABOUT THE ARTIST – Philip James Gray “Philip is one of Australia’s leading maritime artists and his meticulous research and social commentary paintings of ships, such as, the Loch Ard and Schomberg form an important part of Warrnambool’s Flagstaff Hill Maritime Museum.” ...ABOUT THE ARTIST – Philip James Gray “Philip is one of Australia’s leading maritime artists and his meticulous research and social commentary paintings of ships, such as, the Loch Ard and Schomberg form an important part of Warrnambool’s Flagstaff Hill Maritime Museum.” [ref. Dr Marion Manifold, Artist and Art Historian, 2014] Philip James Gray was born in London but has lived most of his life in Australia. He graduated from a London school of art as an illustrator, specialising in technical and scientific illustration as well as other commercial and applied art. He was also a student for a time of Fyffe Christie - British figurative artist, mural painter and humanitarian – who had a great influence on his career. Philip has always worked as a professional artist and illustrator. Many publications on maritime history have featured his work. His paintings have been released and sold all over the world as limited edition prints. The State Library of Victoria’s ‘Latrobe Collection’ holds two of his paintings. His street painting of ‘The Ashes Contest’ decorates the brick wall of Old Bakery Laneway in Sunbury and a Sunbury café owner commissioned him to paint the ‘Sunbury Pop Festival’ as a remembrance of local history. [ref. Sunbury Leader, Nov 15 2013] Philip has been an active member of the Sunbury Art Society in Victoria for several years, serving on the committee for some of that time and being involved in exhibitions. He enjoys helping new artists and sharing his skills and experience. [other references: Sunbury Art Society Inc. Oct-Nov 2012] HISTORY OF THE LOCH ARD The LOCH ARD belonged to the famous Loch Line which sailed many ships from England to Australia. Built in Glasgow by Barclay, Curdle and Co. in 1873, the LOCH ARD was a three-masted square rigged iron sailing ship. The ship measured 262ft 7" (79.87m) in length, 38ft (11.58m) in width, 23ft (7m) in depth and had a gross tonnage of 1693 tons. The LOCH ARD's main mast measured a massive 150ft (45.7m) in height. LOCH ARD made three trips to Australia and one trip to Calcutta before its final voyage. LOCH ARD left England on March 2, 1878, under the command of Captain Gibbs, a newly married, 29 year old. She was bound for Melbourne with a crew of 37, plus 17 passengers and a load of cargo. The general cargo reflected the affluence of Melbourne at the time. On board were straw hats, umbrella, perfumes, clay pipes, pianos, clocks, confectionary, linen and candles, as well as a heavier load of railway irons, cement, lead and copper. There were items included that intended for display in the Melbourne International Exhibition in 1880. The voyage to Port Phillip was long but uneventful. At 3am on June 1, 1878, Captain Gibbs was expecting to see land and the passengers were becoming excited as they prepared to view their new homeland in the early morning. But LOCH ARD was running into a fog which greatly reduced visibility. Captain Gibbs was becoming anxious as there was no sign of land or the Cape Otway lighthouse. At 4am the fog lifted. A man aloft announced that he could see breakers. The sheer cliffs of Victoria's west coast came into view, and Captain Gibbs realised that the ship was much closer to them than expected. He ordered as much sail to be set as time would permit and then attempted to steer the vessel out to sea. On coming head on into the wind, the ship lost momentum, the sails fell limp and LOCH ARD's bow swung back. Gibbs then ordered the anchors to be released in an attempt to hold its position. The anchors sank some 50 fathoms - but did not hold. By this time LOCH ARD was among the breakers and the tall cliffs of Mutton Bird Island rose behind the ship. Just half a mile from the coast, the ship's bow was suddenly pulled around by the anchor. The captain tried to tack out to sea, but the ship struck a reef at the base of Mutton Bird Island, near Port Campbell. Waves broke over the ship and the top deck was loosened from the hull. The masts and rigging came crashing down knocking passengers and crew overboard. When a lifeboat was finally launched, it crashed into the side of LOCH ARD and capsized. Tom Pearce, who had launched the boat, managed to cling to its overturned hull and shelter beneath it. He drifted out to sea and then on the flood tide came into what is now known as LOCH ARD Gorge. He swam to shore, bruised and dazed, and found a cave in which to shelter. Some of the crew stayed below deck to shelter from the falling rigging but drowned when the ship slipped off the reef into deeper water. Eva Carmichael had raced onto deck to find out what was happening only to be confronted by towering cliffs looming above the stricken ship. In all the chaos, Captain Gibbs grabbed Eva and said, "If you are saved Eva, let my dear wife know that I died like a sailor". That was the last Eva Carmichael saw of the captain. She was swept off the ship by a huge wave. Eva saw Tom Pearce on a small rocky beach and yelled to attract his attention. He dived in and swam to the exhausted woman and dragged her to shore. He took her to the cave and broke open case of brandy which had washed up on the beach. He opened a bottle to revive the unconscious woman. A few hours later Tom scaled a cliff in search of help. He followed hoof prints and came by chance upon two men from nearby Glenample Station three and a half miles away. In a state of exhaustion, he told the men of the tragedy. Tom returned to the gorge while the two men rode back to the station to get help. By the time they reached LOCH ARD Gorge, it was cold and dark. The two shipwreck survivors were taken to Glenample Station to recover. Eva stayed at the station for six weeks before returning to Ireland, this time by steamship. In Melbourne, Tom Pearce received a hero's welcome. He was presented with the first gold medal of the Royal Humane Society of Victoria and a £1000 cheque from the Victorian Government. Concerts were performed to honour the young man's bravery and to raise money for those who lost family in the LOCH ARD disaster. Of the 54 crew members and passengers on board, only two survived: the apprentice, Tom Pearce and the young woman passenger, Eva Carmichael, who lost all of her family in the tragedy. Ten days after the LOCH ARD tragedy, salvage rights to the wreck were sold at auction for £2,120. Cargo valued at £3,000 was salvaged and placed on the beach, but most washed back into the sea when another storm developed. The wreck of LOCH ARD still lies at the base of Mutton Bird Island. Much of the cargo has now been salvaged and some was washed up into what is now known as LOCH ARD Gorge. Cargo and artefacts have also been illegally salvaged over many years before protective legislation was introduced. One of the most unlikely pieces of cargo to have survived the shipwreck was a Minton porcelain peacock - one of only nine in the world. The peacock was destined for the Melbourne International Exhibition in 1880. It had been well packed, which gave it adequate protection during the violent storm. Today, the Minton peacock can be seen at the Flagstaff Hill Maritime Museum in Warrnambool. From Australia's most dramatic shipwreck it has now become Australia's most valuable shipwreck artefact and is one of very few 'objects' on the Victorian State Heritage Register. Flagstaff Hill’s collection of artefacts from LOCH ARD is significant for being one of the largest collections of artefacts from this shipwreck in Victoria. It is significant for its association with the shipwreck, which is on the Victorian Heritage Register (VHR S417). The collection is significant because of the relationship between the objects, as together they have a high potential to interpret the story of the LOCH ARD. The LOCH ARD collection is archaeologically significant as the remains of a large international passenger and cargo ship. The LOCH ARD collection is historically significant for representing aspects of Victoria’s shipping history and its potential to interpret sub-theme 1.5 of Victoria’s Framework of Historical Themes (living with natural processes). The collection is also historically significant for its association with the LOCH ARD, which was one of the worst and best known shipwrecks in Victoria’s history. Print of the sailing ship Loch Ard by artist Philip J. Gray, 1993. Depicts the Loch Ard in full sail at sea, figures on deck. Limited Edition number 54/925. Print is adhered to a piece of chipboard and is stamped by the framer, Ian's Picture Framing of Warrnambool.Signature of "Philip J. Gray" , "54/925" Stamped on back "IAN'S PICTURE FRAMING, 48 KEPLER STREET, WARRNAMBOOL 3280, PH: (055) 628 022, FAX: (055) 628 145"flagstaff hill, warrnambool, shipwrecked coast, flagstaff hill maritime museum, maritime museum, shipwreck coast, flagstaff hill maritime village, great ocean road, loch line, loch ard, captain gibbs, eva carmichael, tom pearce, glenample station, mutton bird island, loch ard gorge, print, philip j. gray -
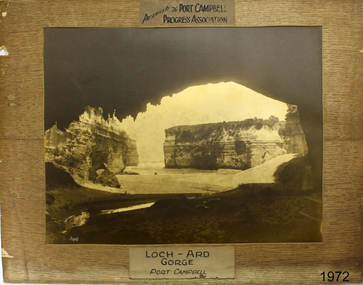 Flagstaff Hill Maritime Museum and Village
Photograph - Coastal Scene, Foyle Photographic Studio, Loch Ard Gorge Port Campbell, 1889-1919
... Loch Ard Gorge, which is located along the Great Ocean Road in Victoria, near Port Campbell. The gorge is named after the famous sailing ship, the LOCH ARD, that was wrecked there in 1878. Only two of the 54 passengers and crew survived. FOYLE “Foyle” written on the photograph is the name of Foyle’s Photographic studio. At the time of the photograph, the studio was owned by both Charles and Lilian Foyle (sometimes known as Lillian or Lily), either of whom could have taken this photograph. They also worked together at a later date on the photographs, sketches and paintings...Loch Ard Gorge, which is located along the Great Ocean Road in Victoria, near Port Campbell. The gorge is named after the famous sailing ship, the LOCH ARD, that was wrecked there in 1878. Only two of the 54 passengers and crew survived. FOYLE “Foyle” written on the photograph is the name of Foyle’s Photographic studio. At the time of the photograph, the studio was owned by both Charles and Lilian Foyle (sometimes known as Lillian or Lily), either of whom could have taken this photograph. They also worked together at a later date on the photographs, sketches and paintings ...The photograph shows the popular tourist attraction, Loch Ard Gorge, which is located along the Great Ocean Road in Victoria, near Port Campbell. The gorge is named after the famous sailing ship, the LOCH ARD, that was wrecked there in 1878. Only two of the 54 passengers and crew survived. FOYLE “Foyle” written on the photograph is the name of Foyle’s Photographic studio. At the time of the photograph, the studio was owned by both Charles and Lilian Foyle (sometimes known as Lillian or Lily), either of whom could have taken this photograph. They also worked together at a later date on the photographs, sketches and paintings of the famous and historical Pioneers’ Honour Board, which is currently on view in the Warrnambool Library. Foyles Photography was the studio of James Charles Foyle. He owned “Foyle’s Photo Card Studios” in Liebig St, Warrnambool, which operated between 1889 – 1919. A letter to the editor (by Mr Edward Vidler) in the Melbourne Argus, 3rd August 1907, mentions that in that year Warrnambool would celebrate the 60th anniversary of its proclamation as a town, and that talented local artist Miss Lily Foyle would paint 200 portraits in watercolour of the pioneers who settled in the district prior to 1860. The Pioneer Honour Board can still be seen on display in the Warrnambool Library. In the Warrnambool Standard, Dec. 1917, “Mr Foyle’s studio was awarded the contract to decorate rail cars on newly opened Trans-Continental railway, assisted by his sister, Miss Findlay.” HISTORY OF THE LOCH ARD The LOCH ARD belonged to the famous Loch Line which sailed many ships from England to Australia. Built-in Glasgow by Barclay, Curdle and Co. in 1873, the LOCH ARD was a three-masted square-rigged iron sailing ship. The ship measured 262ft 7" (79.87m) in length, 38ft (11.58m) in width, 23ft (7m) in depth and had a gross tonnage of 1693 tons. The LOCH ARD's main mast measured a massive 150ft (45.7m) in height. LOCH ARD made three trips to Australia and one trip to Calcutta before its final voyage. LOCH ARD left England on March 2, 1878, under the command of Captain Gibbs, a newly married, 29-year-old. She was bound for Melbourne with a crew of 37, plus 17 passengers and a load of cargo. The general cargo reflected the affluence of Melbourne at the time. Onboard were straw hats, umbrella, perfumes, clay pipes, pianos, clocks, confectionary, linen and candles, as well as a heavier load of railway irons, cement, lead and copper. There were items included that intended for display in the Melbourne International Exhibition in 1880. The voyage to Port Phillip was long but uneventful. At 3 am on June 1, 1878, Captain Gibbs was expecting to see land and the passengers were becoming excited as they prepared to view their new homeland in the early morning. But LOCH ARD was running into a fog which greatly reduced visibility. Captain Gibbs was becoming anxious as there was no sign of land or the Cape Otway lighthouse. At 4 am the fog lifted. A man aloft announced that he could see breakers. The sheer cliffs of Victoria's west coast came into view, and Captain Gibbs realised that the ship was much closer to them than expected. He ordered as much sail to be set as time would permit and then attempted to steer the vessel out to sea. On coming head-on into the wind, the ship lost momentum, the sails fell limp and LOCH ARD's bow swung back. Gibbs then ordered the anchors to be released in an attempt to hold its position. The anchors sank some 50 fathoms - but did not hold. By this time LOCH ARD was among the breakers and the tall cliffs of Mutton Bird Island rose behind the ship. Just half a mile from the coast, the ship's bow was suddenly pulled around by the anchor. The captain tried to tack out to sea, but the ship struck a reef at the base of Mutton Bird Island, near Port Campbell. Waves broke over the ship and the top deck was loosened from the hull. The masts and rigging came crashing down knocking passengers and crew overboard. When a lifeboat was finally launched, it crashed into the side of LOCH ARD and capsized. Tom Pearce, who had launched the boat, managed to cling to its overturned hull and shelter beneath it. He drifted out to sea and then on the flood tide came into what is now known as LOCH ARD Gorge. He swam to shore, bruised and dazed, and found a cave in which to shelter. Some of the crew stayed below deck to shelter from the falling rigging but drowned when the ship slipped off the reef into deeper water. Eva Carmichael had raced onto the deck to find out what was happening only to be confronted by towering cliffs looming above the stricken ship. In all the chaos, Captain Gibbs grabbed Eva and said, "If you are saved Eva, let my dear wife know that I died like a sailor". That was the last Eva Carmichael saw of the captain. She was swept off the ship by a huge wave. Eva saw Tom Pearce on a small rocky beach and yelled to attract his attention. He dived in and swam to the exhausted woman and dragged her to shore. He took her to the cave and broke and opened the case of brandy, which had washed up on the beach. He opened a bottle to revive the unconscious woman. A few hours later Tom scaled a cliff in search of help. He followed hoof prints and came by chance upon two men from nearby Glenample Station three and a half miles away. In a state of exhaustion, he told the men of the tragedy. Tom returned to the gorge while the two men rode back to the station to get help. By the time they reached LOCH ARD Gorge, it was cold and dark. The two shipwreck survivors were taken to Glenample Station to recover. Eva stayed at the station for six weeks before returning to Ireland, this time by steamship. In Melbourne, Tom Pearce received a hero's welcome. He was presented with the first gold medal of the Royal Humane Society of Victoria and a £1000 cheque from the Victorian Government. Concerts were performed to honour the young man's bravery and to raise money for those who lost family in the LOCH ARD disaster. Of the 54 crew members and passengers on board, only two survived: the apprentice, Tom Pearce and the young woman passenger, Eva Carmichael, who lost all of her family in the tragedy. Ten days after the LOCH ARD tragedy, salvage rights to the wreck were sold at auction for £2,120. Cargo valued at £3,000 was salvaged and placed on the beach, but most washed back into the sea when another storm developed. The wreck of LOCH ARD still lies at the base of Mutton Bird Island. Much of the cargo has now been salvaged, and some of it was washed up into what is now known as LOCH ARD Gorge. Cargo and artefacts have also been illegally salvaged over many years before protective legislation was introduced. One of the most unlikely pieces of cargo to have survived the shipwreck was a Minton porcelain peacock - one of only nine in the world. The peacock was destined for the Melbourne International Exhibition in 1880. It had been well packed, which gave it adequate protection during the violent storm. Today, the Minton peacock can be seen at the Flagstaff Hill Maritime Museum in Warrnambool. From Australia's most dramatic shipwreck it has now become Australia's most valuable shipwreck artefact and is one of very few 'objects' on the Victorian State Heritage Register.Flagstaff Hill’s collection of artefacts from LOCH ARD is significant for being one of the largest collections of artefacts from this shipwreck in Victoria. It is significant for its association with the shipwreck, which is on the Victorian Heritage Register (VHR S417). The collection is significant because of the relationship between the objects, as together they have a high potential to interpret the story of the LOCH ARD. The LOCH ARD collection is archaeologically significant as the remains of a large international passenger and cargo ship. The LOCH ARD collection is historically significant for representing aspects of Victoria’s shipping history and its potential to interpret sub-theme 1.5 of Victoria’s Framework of Historical Themes (living with natural processes). The collection is also historically significant for its association with the LOCH ARD, which was one of the worst and best-known shipwrecks in Victoria’s history. Foyle's photographs date from the late 19th century to the early 20th century, representing a time of growth in the Warrnambool district and a time when the still relatively new technology of photography was more available to the community.Photograph of Loch Ard Gorge. This sepia coloured rectangular photograph is mounted on a brown cardboard backing that has a wood grain pattern. The photograph has an inscription above it, below it, and in the bottom left corner. It was made for the purpose of a presentation by the Port Campbell Progress Association. Printed above the photograph "PRESENTED BY THE PORT CAMPBELL / PROGRESS ASSOCIATION". Printed below the photograph "LOCH ARD GORGE / PORT CAMPBELL". Hand written on bottom left corner "Foyle". flagstaff hill, warrnambool, shipwrecked coast, flagstaff hill maritime museum, maritime museum, shipwreck coast, flagstaff hill maritime village, great ocean road, loch line, loch ard, captain gibbs, eva carmichael, tom pearce, glenample station, mutton bird island, loch ard gorge, photograph, port campbell, port campbell progress association, foyle photograph, foyle photographic studio warrnambool, warrnambool photo studio