Showing 304 items matching maritime light
-
 Flagstaff Hill Maritime Museum and Village
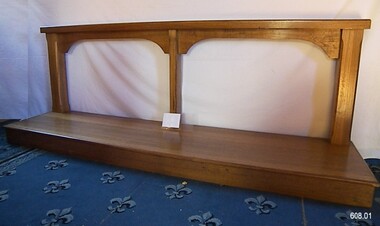
Furniture - Rail and Base, circa 1944
This pair of kneeling rails was part of the original furnishings of the St Nicholas' Mission to Seamen's Church at 139 Nelson Place, Williamstown, Victoria. A kneeling rail is part of the furniture of a church and is used during religious prayer, assisting the person to be in the position of kneeling. A padded kneeling mat or cushion would also be provided for comfort. THE MISSIONS TO SEAMEN (Brief History: for more, see our Reg. No. 611, Set of Pews) The Missions to Seamen, an Anglican charity, has served seafarers of the world since 1856 in Great Britain. It symbol is a Flying Angel, inspired by a Bible verse. Today there are centr4es in over 200 ports world-wide where seamen of all backgrounds are offered a warm welcome and provided with a wide range of facilities. In Victoria the orgainsation began in Williamstown in 1857. It was as a Sailors’ Church, also known as ‘Bethel’ or the ‘Floating Church’. Its location was an old hulk floating in Hobson’s Bay, Port of Melbourne. It soon became part of the Missions to Seamen, Victoria. In the year 2000 the organisation, now named Mission to Seafarers, still operated locally in Melbourne, Portland, Geelong and Hastings. The Ladies’ Harbour Lights Guild was formed in 1906 to support the Missions to Seamen in Melbourne and other centres such as Williamstown. Two of the most significant ladies of the Guild were founder Ethel Augusta Godfrey and foundation member Alice Sibthorpe Tracy (who established a branch of the Guild in Warrnambool in 1920). The Guild continued its work until the 1960s. In 1943 a former Williamstown bank was purchased for the Missions to Seaman Club. The chapel was named St Nicholas’ Seamen’s Church and was supported by the Ladies’ Harbour Lights Guild, the Williamstown Lightkeepers’ Auxiliary and the League of Soldiers’ and Sailors’ Friends. It ceased operation in 1966. A Missions to Seamen Chapel and Recreation Room was a significant feature of ports during the late 1800s and into the 1900s. It seemed appropriate for Flagstaff Hill to include such a representation within the new Maritime Village, so the Melbourne Board of Management of Missions to Seamen Victoria gave its permission on 21st May 1979 for the entire furnishings of the Williamstown chapel to be transferred to Flagstaff Hill. The St Nicholas Seamen’s Church was officially opened on October 11, 1981 and closely resembles the Williamstown chapel. This pair of kneeling rails is significant through its association with the St Nicholas' Mission to Seamen Church in Williamstown, Melbourne, established in 1857. The items in our collection from the Missions to Seamen in Williamstown, Victoria, have historical and social significance. They show that people of the 1800s and 1900s cared about the seafarers’ religious, moral, and social welfare, no matter what the religion, social status or nationality. It had its origins in Bristol, England when a Seamen's Mission was formed in 1837. The first Australian branch was started in 1856 by the Rev. Kerr Johnston, a Church of England clergyman, and operated from a hulk moored in Hobson’s Bay; later the Mission occupied buildings in Williamstown and Port Melbourne. Rail and base; pair of two. Three varnished wood pillars and cap rail, mounted on a rectangular box-shaped base. A kneeling rail used in religious worship. This is a pair of original items in our St Nicholas Seamen's Church Williamstown Collection.-flagstaff hill, warrnambool, shipwrecked-coast, flagstaff-hill, flagstaff-hill-maritime-museum, maritime-museum, shipwreck-coast, flagstaff-hill-maritime-village, rail for kneeling, rail, kneeling rail, religion, religious service, sailors rest, bethel sailors’ church, bethel floating church, ladies harbour light guild, missions to seamen victoria, mission to seafarers, st nicholas seaman’s church williamstown, st nicholas mission to seamen church williamstown, mission to seamen williamstown, st nicholas seamen’s church flagstaff hill, 139 nelson place williamstown, church furniture, religious furniture, religious worship, flying angel club, altar rail, kneeler, prayer, ceremonial furniture -
 Flagstaff Hill Maritime Museum and Village
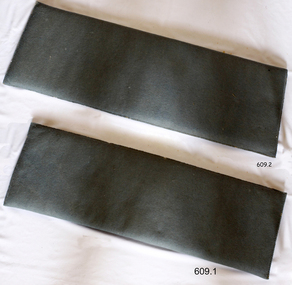
Ceremonial object - Mat
This pair of kneeling mats was part of the original furnishings of the St Nicholas' Mission to Seamen's Church at 139 Nelson Place, Williamstown, Victoria. THE MISSIONS TO SEAMEN (Brief History: for more, see our Reg. No. 611, Set of Pews) The Missions to Seamen, an Anglican charity, has served seafarers of the world since 1856 in Great Britain. It symbol is a Flying Angel, inspired by a Bible verse. Today there are centr4es in over 200 ports world-wide where seamen of all backgrounds are offered a warm welcome and provided with a wide range of facilities. In Victoria the orgainsation began in Williamstown in 1857. It was as a Sailors’ Church, also known as ‘Bethel’ or the ‘Floating Church’. Its location was an old hulk floating in Hobson’s Bay, Port of Melbourne. It soon became part of the Missions to Seamen, Victoria. In the year 2000 the organisation, now named Mission to Seafarers, still operated locally in Melbourne, Portland, Geelong and Hastings. The Ladies’ Harbour Lights Guild was formed in 1906 to support the Missions to Seamen in Melbourne and other centres such as Williamstown. Two of the most significant ladies of the Guild were founder Ethel Augusta Godfrey and foundation member Alice Sibthorpe Tracy (who established a branch of the Guild in Warrnambool in 1920). The Guild continued its work until the 1960s. In 1943 a former Williamstown bank was purchased for the Missions to Seaman Club. The chapel was named St Nicholas’ Seamen’s Church and was supported by the Ladies’ Harbour Lights Guild, the Williamstown Lightkeepers’ Auxiliary and the League of Soldiers’ and Sailors’ Friends. It ceased operation in 1966. A Missions to Seamen Chapel and Recreation Room was a significant feature of ports during the late 1800s and into the 1900s. It seemed appropriate for Flagstaff Hill to include such a representation within the new Maritime Village, so the Melbourne Board of Management of Missions to Seamen Victoria gave its permission on 21st May 1979 for the entire furnishings of the Williamstown chapel to be transferred to Flagstaff Hill. The St Nicholas Seamen’s Church was officially opened on October 11, 1981 and closely resembles the Williamstown chapel. This pair of kneeling mats is significant historically for its origin in the St Nicholas Mission to Seamen's Church in Williamstown, established in 1857 to cater for the physical, social, and spiritual needs of seafarers. It originated in Bristol, England when a Seamen's Mission was formed in 1837. The pair of kneeling mats is historically significant for its connection to the Ladies Lightkeepers’ Auxiliary, an organisation of women, formed to support seafarers. The connection of this pair of kneeling mats to the Mission to Seamen and to the Ladies Lightkeepers’ Auxiliary highlights the strong community awareness of the life of people at sea, their dangers and hardships, and their need for physical, financial, spiritual and moral support. Mat, quantity of two. Kneeling mats used during prayer. Rectangular blue cloth with sewn edges and padding inside. This is pair of original items in our ‘St Nicholas Seamen's Church Williamstown Collection’.flagstaff hill, warrnambool, shipwrecked coast, flagstaff hill maritime museum, maritime museum, shipwreck coast, flagstaff hill maritime village, great ocean road, religion, religious service, sailors rest, bethel sailors’ church, bethel floating church, ladies harbour light guild, lightkeepers’ auxiliary, missions to seamen victoria, mission to seafarers, flying angel’s club, st nicholas seaman’s church williamstown, st nicholas mission to seamen church williamstown, mission to seamen williamstown, st nicholas seamen’s church flagstaff hill, 139 nelson place williamstown, religious worship, anglican church, prayer accessory, kneeling mat, prayer mat -
 Flagstaff Hill Maritime Museum and Village
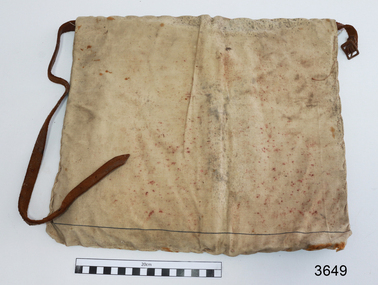
X-Ray Apron
This X-Ray apron was donated to Flagstaff Hill Maritime Village by the family of Doctor William Roy Angus, Surgeon and Oculist. It is part of the “W.R. Angus Collection” that includes historical medical equipment, surgical instruments and material once belonging to Dr Edward Ryan and Dr Thomas Francis Ryan, (both of Nhill, Victoria) as well as Dr Angus’ own belongings. The Collection’s history spans the medical practices of the two Doctors Ryan, from 1885-1926 plus that of Dr Angus, up until 1969. ABOUT THE “W.R.ANGUS COLLECTION” Doctor William Roy Angus M.B., B.S., Adel., 1923, F.R.C.S. Edin.,1928 (also known as Dr Roy Angus) was born in Murrumbeena, Victoria in 1901 and lived until 1970. He qualified as a doctor in 1923 at University of Adelaide, was Resident Medical Officer at the Royal Adelaide Hospital in 1924 and for a period was house surgeon to Sir (then Mr.) Henry Simpson Newland. Dr Angus was briefly an Assistant to Dr Riddell of Kapunda, then commenced private practice at Curramulka, Yorke Peninsula, SA, where he was physician, surgeon and chemist. In 1926, he was appointed as new Medical Assistant to Dr Thomas Francis Ryan (T.F. Ryan, or Tom), in Nhill, Victoria, where his experiences included radiology and pharmacy. In 1927 he was Acting House Surgeon in Dr Tom Ryan’s absence. Dr Angus had become engaged to Gladys Forsyth and they decided he would take time to further his studies overseas in the UK in 1927. He studied at London University College Hospital and at Edinburgh Royal Infirmary and in 1928, was awarded FRCS (Fellow from the Royal College of Surgeons), Edinburgh. He worked his passage back to Australia as a Ship’s Surgeon on the on the Australian Commonwealth Line’s T.S.S. Largs Bay. Dr Angus married Gladys in 1929, in Ballarat. (They went on to have one son (Graham 1932, born in SA) and two daughters (Helen (died 12/07/1996) and Berenice (Berry), both born at Mira, Nhill ) Dr Angus was a ‘flying doctor’ for the A.I.M. (Australian Inland Ministry) Aerial Medical Service in 1928 . The organisation began in South Australia through the Presbyterian Church in that year, with its first station being in the remote town of Oodnadatta, where Dr Angus was stationed. He was locum tenens there on North-South Railway at 21 Mile Camp. He took up this ‘flying doctor’ position in response to a call from Dr John Flynn; the organisation was later known as the Flying Doctor Service, then the Royal Flying Doctor Service. A lot of his work during this time involved dental surgery also. Between 1928-1932 he was surgeon at the Curramulka Hospital, Yorke Peninsula, South Australia. In 1933 Dr Angus returned to Nhill where he’d previously worked as Medical Assistant and purchased a share of the Nelson Street practice and Mira hospital from Dr Les Middleton one of the Middleton Brothers, the current owners of what was once Dr Tom Ryan’s practice. Dr L Middleton was House Surgeon to the Nhill Hospital 1926-1933, when he resigned. [Dr Tom Ryan’s practice had originally belonged to his older brother Dr Edward Ryan, who came to Nhill in 1885. Dr Edward saw patients at his rooms, firstly in Victoria Street and in 1886 in Nelson Street, until 1901. The Nelson Street practice also had a 2 bed ward, called Mira Private Hospital ). Dr Edward Ryan was House Surgeon at the Nhill Hospital 1884-1902 . He also had occasions where he successfully performed veterinary surgery for the local farmers too. Dr Tom Ryan then purchased the practice from his brother in 1901. Both Dr Edward and Dr Tom Ryan work as surgeons included eye surgery. Dr Tom Ryan performed many of his operations in the Mira private hospital on his premises. He too was House Surgeon at the Nhill Hospital 1902-1926. Dr Tom Ryan had one of the only two pieces of radiology equipment in Victoria during his practicing years – The Royal Melbourne Hospital had the other one. Over the years Dr Tom Ryan gradually set up what was effectively a training school for country general-practitioner-surgeons. Each patient was carefully examined, including using the X-ray machine, and any surgery was discussed and planned with Dr Ryan’s assistants several days in advance. Dr Angus gained experience in using the X-ray machine there during his time as assistant to Dr Ryan. Dr Tom Ryan moved from Nhill in 1926. He became a Fellow of the Royal Australasian College of Surgeons in 1927, soon after its formation, a rare accolade for a doctor outside any of the major cities. He remained a bachelor and died suddenly on 7th Dec 1955, aged 91, at his home in Ararat. Scholarships and prizes are still awarded to medical students in the honour of Dr T.F. Ryan and his father, Dr Michael Ryan, and brother, John Patrick Ryan. ] When Dr Angus bought into the Nelson Street premises in Nhill he was also appointed as the Nhill Hospital’s Honorary House Surgeon 1933-1938. His practitioner’s plate from his Nhill surgery states “HOURS Daily, except Tuesdays, Fridays and Saturday afternoons, 9-10am, 2-4pm, 7-8pm. Sundays by appointment”. This plate is now mounted on the doorway to the Port Medical Office at Flagstaff Hill Maritime Village, Warrnambool. Dr Edward Ryan and Dr Tom Ryan had an extensive collection of historical medical equipment and materials spanning 1884-1926 and when Dr Angus took up practice in their old premises he obtained this collection, a large part of which is now on display at the Port Medical Office at Flagstaff Hill Maritime Village in Warrnambool. During his time in Nhill Dr Angus was involved in the merging of the Mira Hospital and Nhill Public Hospital into one public hospital and the property titles passed on to Nhill Hospital in 1939. In 1939 Dr Angus and his family moved to Warrnambool where he purchased “Birchwood,” the 1852 home and medical practice of Dr John Hunter Henderson, at 214 Koroit Street. (This property was sold in1965 to the State Government and is now the site of the Warrnambool Police Station. ). The Angus family was able to afford gardeners, cooks and maids; their home was a popular place for visiting dignitaries to stay whilst visiting Warrnambool. Dr Angus had his own silk worm farm at home in a Mulberry tree. His young daughter used his centrifuge for spinning the silk. Dr Angus was appointed on a part-time basis as Port Medical Officer (Health Officer) in Warrnambool and held this position until the 1940’s when the government no longer required the service of a Port Medical Officer in Warrnambool; he was thus Warrnambool’s last serving Port Medical Officer. (The duties of a Port Medical Officer were outlined by the Colonial Secretary on 21st June, 1839 under the terms of the Quarantine Act. Masters of immigrant ships arriving in port reported incidents of diseases, illness and death and the Port Medical Officer made a decision on whether the ship required Quarantine and for how long, in this way preventing contagious illness from spreading from new immigrants to the residents already in the colony.) Dr Angus was a member of the Australian Medical Association, for 35 years and surgeon at the Warrnambool Base Hospital 1939-1942, He served as a Surgeon Captain during WWII1942-45, in Ballarat, Victoria, and in Bonegilla, N.S.W., completing his service just before the end of the war due to suffering from a heart attack. During his convalescence he carved an intricate and ‘most artistic’ chess set from the material that dentures were made from. He then studied ophthalmology at the Royal Melbourne Eye and Ear Hospital and created cosmetically superior artificial eyes by pioneering using the intrascleral cartilage. Angus received accolades from the Ophthalmological Society of Australasia for this work. He returned to Warrnambool to commence practice as an ophthalmologist, pioneering in artificial eye improvements. He was Honorary Consultant Ophthalmologist to Warrnambool Base Hospital for 31 years. He made monthly visits to Portland as a visiting surgeon, to perform eye surgery. He represented the Victorian South-West subdivision of the Australian Medical Association as its secretary between 1949 and 1956 and as chairman from 1956 to 1958. In 1968 Dr Angus was elected member of Spain’s Barraquer Institute of Barcelona after his research work in Intrasclearal cartilage grafting, becoming one of the few Australian ophthalmologists to receive this honour, and in the following year presented his final paper on Living Intrasclearal Cartilage Implants at the Inaugural Meeting of the Australian College of Ophthalmologists in Melbourne In his personal life Dr Angus was a Presbyterian and treated Sunday as a Sabbath, a day of rest. He would visit 3 or 4 country patients on a Sunday, taking his children along ‘for the ride’ and to visit with him. Sunday evenings he would play the pianola and sing Scottish songs to his family. One of Dr Angus’ patients was Margaret MacKenzie, author of a book on local shipwrecks that she’d seen as an eye witness from the late 1880’s in Peterborough, Victoria. In the early 1950’s Dr Angus, painted a picture of a shipwreck for the cover jacket of Margaret’s book, Shipwrecks and More Shipwrecks. She was blind in later life and her daughter wrote the actual book for her. Dr Angus and his wife Gladys were very involved in Warrnambool’s society with a strong interest in civic affairs. Their interests included organisations such as Red Cross, Rostrum, Warrnambool and District Historical Society (founding members), Wine and Food Society, Steering Committee for Tertiary Education in Warrnambool, Local National Trust, Good Neighbour Council, Housing Commission Advisory Board, United Services Institute, Legion of Ex-Servicemen, Olympic Pool Committee, Food for Britain Organisation, Warrnambool Hospital, Anti-Cancer Council, Boys’ Club, Charitable Council, National Fitness Council and Air Raid Precautions Group. He was also a member of the Steam Preservation Society and derived much pleasure from a steam traction engine on his farm. He had an interest in people and the community He and his wife Gladys were both involved in the creation of Flagstaff Hill, including the layout of the gardens. After his death (28th March 1970) his family requested his practitioner’s plate, medical instruments and some personal belongings be displayed in the Port Medical Office surgery at Flagstaff Hill Maritime Village, and be called the “W. R. Angus Collection”. The W.R. Angus Collection is significant for still being located at the site it is connected with, Doctor Angus being the last Port Medical Officer in Warrnambool. The collection of medical instruments and other equipment is culturally significant, being an historical example of medicine from late 19th to mid-20th century. Dr Angus assisted Dr Tom Ryan, a pioneer in the use of X-rays and in ocular surgery. X-Ray apron, light coloured canvas cover over flexible metal sheet, brown leather belt and buckle attached. Canvas is hand stitched; has a hole in it. Hand printed in black "X-RAY APRON" (W.R. Angus Collection) flagstaff hill, warrnambool, shipwrecked coast, flagstaff hill maritime museum, maritime museum, shipwreck coast, flagstaff hill maritime village, great ocean road, dr w r angus, dr ryan, surgical instrument, t.s.s. largs bay, warrnambool base hospital, nhill base hospital, mira hospital, flying doctor, medical treatment, medical history, medical education, medical text book, x-ray apron, x0ray protection, e-ray equipment -
 Flagstaff Hill Maritime Museum and Village
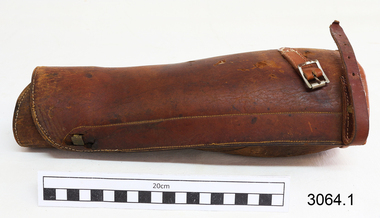
Clothing - Leather Leggings, 1899 to 1918
The subject leather leggings are associated with mounted troops known as the Australian Light Horse that served in the South African War from 1899 to 1902. After the war, Britain wanted to use fewer mounted troops and restructured its force around a style of combat that needed more infantry. But the defence of Australia still relied upon mounted military units as these were more mobile than infantry and could travel faster over long distances. Light Horse brigades in the Australian Imperial Force (AIF) mostly contained recruits who served in the Light Horse regiments of the Citizen Forces. Many young men from rural areas of Australia volunteered for the Light Horse regiments. They had to pass a riding test to join, this test was easier for men from the bush because horses were still the main method of transport on farms and in country towns. The army did not officially accept First Australians into the AIF until May 1917 when enlistment standards were relaxed to include 'half-castes' with a parent of European origin. Indigenous soldiers served as valuable members of the Light Horse and many possessed excellent horse handling skills and specialist tracking knowledge.The subject items are part of the uniform for the Light Horse Units that served in the Australian army from 1899 until 1918. These leggings were worn by soldiers on horseback and are significant as they represent a noteworthy time in Australia's early military history. It was a time when many young men gave their lives during the South African and First World Wars in the defence of the then British Empire as part of the Imperial Forces that were gathered from many British-controlled Colonial countries.A pair of two Leather Leggings used by Mounted Australian soldiers during the first world war. The leggings are dark tan in colour with stitching to attach buckles and fastener straps. The strap buckles are made of brass and the leather legging straps are of same leather as leggings. Noneflagstaff hill, warrnambool, flagstaff hill maritime museum, shipwreck coast, flagstaff hill maritime village, great ocean road, leggings, leather leggings, protective leggings, protective clothing, australian mounted light horse units, military equipment -
 Flagstaff Hill Maritime Museum and Village
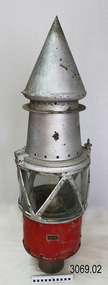
Functional object - Marine Navigation Light, Early 20th century
Breakwater navigation lights are placed at the end of the breakwaters to warn incoming vessels of the end of the structure, as a marine safety measure. The subject item was such a light believed to have been placed at the end of Warrnambool's breakwater around 1915 when it was extended. The light had remained in place for many years until it was probably removed when the structure was undergoing rock armouring repairs to the end of the breakwater in 1975. The light had been placed in a council storage shed probably from the time when the structure was undergoing these repairs in 1975. In 2014 the light was removed from the storage shed and donated to Flagstaff Hill museum. History: Warrnambool breakwater plans were drawn up by 1874 and approval was given for preliminary construction work to start but when the money ran out, the works stopped. With a number of quick changes of government the “Warrnambool” breakwater project was kicked from one Victorian state government to another. Then finally in 1879, the eminent British harbour engineer Sir John Coode was asked to design a breakwater. His first design was for a 1800 feet long structure but that was scaled back to 900 feet and construction finally began in 1884. This structure was attributed in causing major siltation of Lady bay, as a consequence the breakwater was again extended in 1915. In 1975, the rock armouring at the end of the breakwater was added but by 1979 another impact study was calling for the breakwater to be removed altogether. The Heritage Council Victoria, regard the Warrnambool breakwater is of historical significance to the state as one of the most important maritime engineering projects that was undertaken in Victoria during the late nineteenth century. The light is also as part of this structure regarded as a significant item of historical interest.Marker light or navigation light. Round light stand with conical top piece (2 separate pieces). Metal base painted red, clear glass middle section enclosed by metal frame, metal cone shaped top section painted silver. Electrical wiring can be seen inside centre section. Pole that light would have been on to elevate it is missing.Has metal plate screwed onto side of base engraved "23". flagstaff hill, warrnambool, shipreck coast, flagstaff hill maritime museum, maritime museum, great ocean road, warrnambool breakwater, marker light, naviagtion light, breakwater navigation light -
 Flagstaff Hill Maritime Museum and Village
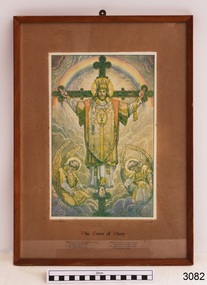
Print - Religious Print, T. Noyes Lewis, The Cross of Glory, Mid to late 19th century for the print, the reframing appears to date from the 1960's
The picture was framed by business, Leighton House, paint and art merchants at 346 Little Collins Street, Melbourne. It was made to order, number 6777. The business was also called The Leighton Gallery of Art and was owned by W & G Dean Pty Ltd. The phone number on the label "MU 8291" indicates that the picture was framed circa the 1960s or earlier, during the time that Melbourne was using 6-0digit alpha-numeric numbers. Below the picture is an excerpt of a hymn "The Head that Once was Crowned with Thorns" by Thomas Kelly: The head that once was crowned with thorns Is crowned with glory now; A royal diadem adorns The mighty Victor's brow. The Cross He bore is life and heath, Though shame and death to Him; His people's hope, his people's wealth, Their everlasting theme. This picture was part of the original furnishings of the St Nicholas' Mission to Seamen's Church at 139 Nelson Place, Williamstown, Victoria. THE MISSIONS TO SEAMEN (Brief History: for more, see our Reg. No. 611, Set of Pews) The Missions to Seamen, an Anglican charity, has served seafarers of the world since 1856 in Great Britain. It symbol is a Flying Angel, inspired by a Bible verse. Today there are centr4es in over 200 ports world-wide where seamen of all backgrounds are offered a warm welcome and provided with a wide range of facilities. In Victoria the orgainsation began in Williamstown in 1857. It was as a Sailors’ Church, also known as ‘Bethel’ or the ‘Floating Church’. Its location was an old hulk floating in Hobson’s Bay, Port of Melbourne. It soon became part of the Missions to Seamen, Victoria. In the year 2000 the organisation, now named Mission to Seafarers, still operated locally in Melbourne, Portland, Geelong and Hastings. The Ladies’ Harbour Lights Guild was formed in 1906 to support the Missions to Seamen in Melbourne and other centres such as Williamstown. Two of the most significant ladies of the Guild were founder Ethel Augusta Godfrey and foundation member Alice Sibthorpe Tracy (who established a branch of the Guild in Warrnambool in 1920). The Guild continued its work until the 1960s. In 1943 a former Williamstown bank was purchased for the Missions to Seaman Club. The chapel was named St Nicholas’ Seamen’s Church and was supported by the Ladies’ Harbour Lights Guild, the Williamstown Lightkeepers’ Auxiliary and the League of Soldiers’ and Sailors’ Friends. It ceased operation in 1966. A Missions to Seamen Chapel and Recreation Room was a significant feature of ports during the late 1800s and into the 1900s. It seemed appropriate for Flagstaff Hill to include such a representation within the new Maritime Village, so the Melbourne Board of Management of Missions to Seamen Victoria gave its permission on 21st May 1979 for the entire furnishings of the Williamstown chapel to be transferred to Flagstaff Hill. The St Nicholas Seamen’s Church was officially opened on October 11, 1981 and closely resembles the Williamstown chapel. This picture is significant through its association with the St Nicholas' Mission to Seamen Church in Williamstown, Melbourne, established in 1857. The items in our collection from the Missions to Seamen in Williamstown, Victoria, have historical and social significance. They show that people of the 1800s and 1900s cared about the seafarers’ religious, moral, and social welfare, no matter what the religion, social status or nationality. It had its origins in Bristol, England when a Seamen's Mission was formed in 1837. The first Australian branch was started in 1856 by the Rev. Kerr Johnston, a Church of England clergyman, and operated from a hulk moored in Hobson’s Bay; later the Mission occupied buildings in Williamstown and Port Melbourne. Picture, print of "The Cross of Glory", rectangular, framed print on matt. It depicts Jesus Christ on a cross with an angel on each side, at his feet. He is wearing priestly robes and a gold crown on top of thorns on his head. In the background there is a rainbow and clouds. The text below the picture includes "From the picture by T. Noyes Lewis". Lines from a hymn are also printed below the picture. The back of the picture has pencilled numbers in three places plus a printed label with the framer's details. "From the picture by T. Noyes Lewis". Backing paper has pencil "6777" in two places. Label has bencil "677-" flagstaff hill, warrnambool, shipwrecked coast, flagstaff hill maritime museum, maritime museum, shipwreck coast, flagstaff hill maritime village, great ocean road, the cross of glory, print, t. noyes lewis, leighton house, home decoration, religioius picture, church furnishing, w & g dean pty ltd, leighton gallery of art, religion, religious service, sailors rest, bethel sailors’ church, bethel floating church, ladies harbour light guild, missions to seamen victoria, mission to seafarers, flying angles club, st nicholas mission to seamen church williamstown, mission to seamen williamstown, st nicholas seamen’s church flagstaff hill, 139 nelson place williamstown -
 Flagstaff Hill Maritime Museum and Village
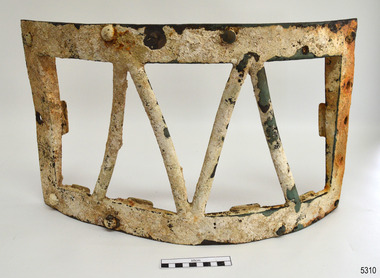
Functional object - Skylight frame, Alexander Stephen and Sons, 1869
This skylight frame would have been fitted on the Newfield’s poop deck (or raised deck that forms the roof of a cabin at the aft or rear of the ship). It would have covered and protected a glass pane that allowed light to enter the area below desk. The glass pane from the skylight is missing. The Newfield was a three-masted iron and steel barque, built in Dundee, Scotland, in 1869 by Alexander Stephen and Sons. It was owned by the Newfield Ship Company in 1890 and later that year It was registered in Liverpool to owners Brownells and Co. The Newfield left Sharpness, Scotland, on 28th May 1892 with a crew of 25 under the command of Captain George Scott and on 1st June left Liverpool. She was bound for Brisbane, Australia, with a cargo of 1850 tons of fine rock salt. On the night of 28 August 1892, the Captain mistook the Cape Otway light for that of Cape Wickham (King Island) and altered tack to the north and east putting the vessel on a collision course with the Victorian coast. At around 3:40 am the Newfield struck rocks about 100 yards from shore, and 5 feet of water filled the holds immediately. The captain gave orders to lower the boats which caused a disorganised scramble for safety among the crew. The starboard lifeboat was cleared for lowering with two seamen and two apprentices in her, but almost as soon as she touched the water she was smashed to bits against the side of the vessel, and only one of the four reached safety ashore, able seaman McLeod. The rough sea made the job of launching lifeboats very difficult. The first two lifeboats launched by the crew were smashed against the side of the ship and some men were crushed or swept away. The third lifeboat brought eight men to shore. It capsized when the crew tried to return it to the ship for further rescue The rescue was a difficult operation. The Port Campbell Rocket Crew arrived and fired four rocket lines, none of which connected with the ship. Peter Carmody, a local man, volunteered to swim about one mile offshore to the ship with a line to guide the fourth and final lifeboat safely to shore. He was assisted by James McKenzie and Gerard Irvine. Seventeen men survived the shipwreck but the captain and eight of his crew perished. The Newfield remained upright on the reef with sails set for a considerable time as the wind slowly ripped the canvas to shreds and the sea battered the hull to pieces. The Marine Board inquiry found the wreck was caused by a "one-man style of navigation" and that the Captain had not heeded the advice of his crew. For his heroic efforts, Peter Carmody was awarded the Bramley-Moore medal by the Liverpool Shipwreck and Humane Society for Saving Life at sea on January 21st 1893. The medal and a letter of congratulations were donated to Flagstaff Hill Maritime Museum by Peter Carmody's granddaughter Norma Bracken and her son Stuart Bracken on 25th May 2006. Flagstaff Hill’s collection of artefacts from the Newfield is significant for its association with the shipwreck Newfield, which is listed on the Victorian Heritage Registry. The collection is additionally significant because of the medal awarded to a local man Peter Carmody. The Newfield collection historically also represents aspects of Victoria's shipping history and its association with the shipwreck.Skylight, frame only. The heavily encrusted brass framework has eight bolts around the long side, and four metal bars forming two ‘v’ shapes across the centre. The frame is, slightly concave towards the inner side. The shorter ends of the frame each have a ‘U’ shaped bracket attached in the centre. The shorter ends are wider on one end and taper towards the other end to about a quarter of the thickness. The frame was recovered from the wreck of the NEWFIELD.Noneflagstaff hill maritime museum, newfield ship wreck, alexander stephen & sons, brownells & co, captain george scott, great ocean road ship wreck, peter carmody, bramley-moore medal, liverpool shipwreck and humane society, skylight cover, skylight frame, ship fitting, light cover, newfield -
 Flagstaff Hill Maritime Museum and Village
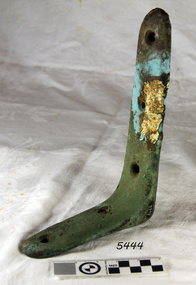
Bracket, On or before 1889, when the Newfield was built
This bracket was recovered from the wreck of the Newfield. The barque Newfield left Liverpool on 1st June 1892 with a cargo of 1850 tons of fine rock salt for Brisbane. About six weeks later the ship ran into very heavy weather approaching the Australian coast. On 28th August at about 9pm her master, Captain George Scott, observed between the heavy squalls the Cape Otway light on the mainland of Victoria, but due apparently to a navigational error (the chronometers were incorrect), he mistook it for Cape Wickham on King Island, some 40 miles south. He altered course to the north expecting to run through the western entrance of Bass Strait, but instead, at about 1:30am, the ship ran aground about about 100 yards from shore, one mile east of Curdies River. The vessel struck heavily three times before grounding on an inner shoal with six feet of water in the holds. The Newfield remained upright on the reef with sails set for a considerable time as the wind slowly ripped the canvas to shreds and the sea battered the hull to pieces. Seventeen men survived the shipwreck but the captain and eight of his crew perishedFlagstaff Hill’s collection of artefacts from the Newfield is significant for its association with the shipwreck Newfield, which is listed on the Victorian Heritage Registry. The collection is significant because of the relationship between the objects. The Newfield collection is archaeologically significant as the remains of an international cargo ship. The Newfield collection is historically significant for representing aspects of Victoria’s shipping history and its association with the shipwreck.‘L’ bracket, copper, 3 holes on one side, 2 holes on the other1893, shipwrecks, shipwrecked coast, flagstaff hill, flagstaff hill maritime museum, maritime museum, shipwrecked artefact, flagstaff hill maritime village, shipwreck coast, warrnambool, newfield, 1892, 28 august 1892, port campbell, nineteenth century, victorian shipwrecks, barque, norma bracken, peterborough, 29 august 1892, peter ronald, curdies river, bracket -
 Flagstaff Hill Maritime Museum and Village
Deck light, On or before 1889
This deck light was recovered from the wreck of the Newfield in 1973. The barque Newfield left Liverpool on 1st June 1892 with a cargo of 1850 tons of fine rock salt for Brisbane. About six weeks later the ship ran into very heavy weather approaching the Australian coast. On 28th August at about 9pm her master, Captain George Scott, observed between the heavy squalls the Cape Otway light on the mainland of Victoria, but due apparently to a navigational error (the chronometers were incorrect), he mistook it for Cape Wickham on King Island, some 40 miles south. He altered course to the north expecting to run through the western entrance of Bass Strait, but instead, at about 1:30am, the ship ran aground about about 100 yards from shore, one mile east of Curdies River. The vessel struck heavily three times before grounding on an inner shoal with six feet of water in the holds. The Newfield remained upright on the reef with sails set for a considerable time as the wind slowly ripped the canvas to shreds and the sea battered the hull to pieces. Seventeen men survived the shipwreck but the captain and eight of his crew perished. Local man Peter Carmody was recognised for risking his life in order to help save the lives of the ship's crew. In 1893 he received a letter and accompanying limited edition of the Bramley-Moore medal for saving life at sea; 1872" medal and certificate from the Liverpool Shipwreck and Humane Society. Flagstaff Hill’s collection of artefacts from the Newfield is significant for its association with the shipwreck Newfield, which is listed on the Victorian Heritage Registry. The collection is significant because of the relationship between the objects. The Newfield collection is archaeologically significant as the remains of an international cargo ship. The Newfield collection is historically significant for representing aspects of Victoria’s shipping history and its association with the shipwreckDeck light recovered from the wreck of the sailing ship “Newfield. Oval semi-spherical shape of clear thick glass.warrnambool, shipwrecked coast, flagstaff hill, flagstaff hill maritime museum, maritime museum, shipwreck coast, flagstaff hill maritime village, shipwrecked artefact, 1892, 1893, 28 august 1892, 29 august 1892, barque, curdie's river, deck light, newfield, nineteenth century, peter ronald, peterborough, port campbell, shipwrecks, victorian shipwrecks -
 Flagstaff Hill Maritime Museum and Village
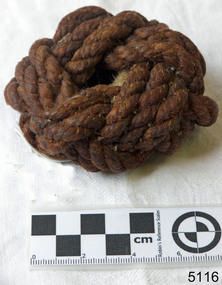
Textile - Rope Sample, After September 1891
The light line or rope used to construct this Turk’s Head knot was part of the line line-throwing apparatus used by the Rocket Rescue Crew. In normal operation a rocket carrying the line was fired over a ship, fastened to the ship, then hauled by the crew to pull a heavier rope from shore, which would have a canvas ‘breaches buoy’ attached to it. A tripod or triangle would be used to keep it free from breakers and rocks. One by one the crew on the wreck would sit in the buoy and be hauled safely back to shore. The three-masted iron barque Fiji had been built in Belfast, Ireland, in 1875 by Harland and Wolfe for a Liverpool based shipping company. The ship departed Hamburg on 22nd May 1891 bound for Melbourne, under the command of Captain William Vickers with a crew of 25. The ship’s manifest shows that she was loaded with a cargo of 260 cases of dynamite, pig iron, steel goods, spirits (whisky, schnapps, gin, brandy), sailcloth, tobacco, coiled fencing wire, concrete, 400 German pianos (Sweet Hapsburg), concertinas and other musical instruments, artists supplies including brushes, porcelain, furniture, china, and general cargo including candles. There were also toys in anticipation for Christmas, including wooden rocking horses, miniature ships, dolls with china limbs and rubber balls. On September 5th, one hundred days out from Hamburg in squally and boisterous south west winds the Cape Otway light was sighted on a bearing differing from Captain Vickers’ calculation of his position. At about 2:30am, Sunday 6th September 1891 land was reported 4-5 miles off the port bow. The captain tried to put the ship on the other tack, but she would not respond. He then tried to turn her the other way but just as the manoeuvre was being completed the Fiji struck rock only 300 yards (274 metres) from shore. The place is known as Wreck Bay, Moonlight Head. Blue lights were burned and rockets fired whilst an effort was made to lower boats but all capsized or swamped and smashed to pieces. Two of the younger crewmen volunteered to swim for the shore, taking a line. One, a Russian named Daniel Carkland, drowned after he was swept away when the line broke. The other, 17 year old able seaman Julius Gebauhr, a German, reached shore safely on his second attempt but without the line, which he had cut lose with his sheath-knife when it become tangled in kelp. He rested on the beach a while then climbed the steep cliffs in search of help. At about 10am on the Sunday morning a party of land selectors - including F. J. Stansmore, Leslie Dickson (or Dixon) and Mott - found Gebauhr. They were near Ryans Den, on their travels on horseback from Princetown towards Moonlight Head, and about 5km from the wreck. Gebauhr was lying in the scrub in a poor state, bleeding and dressed only in singlet, socks and a belt with his sheath-knife, ready for all emergencies. At first they were concerned about his wild and shaggy looking state and what seemed to be gibberish speech, taking him to be an escaped lunatic. They were reassured after he threw his knife away and realised that he was speaking half-English, half-German. They gave him food and brandy and some clothing and were then able to gain information about the wreck. Some of the men took him to Rivernook, a nearby guest house owned by John Evans, where he was cared for. Stansmore and Dickson rode off to try and summon help. Others went down to the site of the wreck. Messages for rescuing the rest of the crew were sent both to Port Campbell for the rocket rescue crew and to Warrnambool for the lifeboat. The S.S. Casino sailed from Portland towards the scene. After travelling the 25 miles to the scene, half of the Port Campbell rocket crew and equipment arrived and set up the rocket tripod on the beach below the cliffs. By this time the crew of the Fiji had been clinging to the jib-boom for almost 15 hours, calling frantically for help. Mr Tregear from the Rocket Crew fired the line. The light line broke and the rocket was carried away. A second line was successfully fired across the ship and made fast. The anxious sailors then attempted to come ashore along the line but, with as many as five at a time, the line sagged considerably and some were washed off. Others, nearly exhausted, had to then make their way through masses of seaweed and were often smothered by waves. Only 14 of the 24 who had remained on the ship made it to shore. Many onlookers on the beach took it in turns to go into the surf and drag half-drowned seamen to safety. These rescuers included Bill (William James) Robe, Edwin Vinge, Hugh Cameron, Fenelon Mott, Arthur Wilkinson and Peter Carmody. (Peter Carmody was also involved in the rescue of men from the Newfield.) Arthur Wilkinson, a 29 year old land selector, swam out to the aid of one of the ship’s crewmen, a carpenter named John Plunken. Plunken was attempting to swim from the Fiji to the shore. Two or three times both men almost reached the shore but were washed back to the wreck. A line was thrown to them and they were both hauled aboard. It was thought that Wilkinson struck his head on the anchor before s they were brought up. He remained unconscious. The carpenter survived this ordeal but Wilkinson later died and his body was washed up the next day. It was 26 year old Bill Robe who hauled out the last man, the captain, who had become tangled in the kelp. The wreck of the Fiji was smashed apart within 20 minutes of the last man being brought ashore, and it settled in about 6m of water. Of the 26 men on the Fiji, 11 in total lost their lives. The remains of 7 bodies were washed onto the beach and their coffins were made from timbers from the wrecked Fiji. They were buried on the cliff top above the wreck. The survivors were warmed by fires on the beach then taken to Rivernook and cared for over the next few days. Funds were raised by local communities soon after the wreck in aid of the sufferers of the Fiji disaster. Captain Vickers was severely reprimanded for his mishandling of the ship. His Masters Certificate was suspended for 12 months. At the time there was also a great deal of public criticism at the slow and disorganised rescue attempt to save those on board. The important canvas ‘breech buoy’ or ‘bucket chair’ and the heavy line from the Rocket Rescue was in the half of the rocket outfit that didn’t make it in time for the rescue: they had been delayed at the Gellibrand River ferry. Communications to Warrnambool were down so the call for help didn’t get through on time and the two or three boats that had been notified of the wreck failed to reach it in time. Much looting occurred of the cargo that washed up on the shore, with nearly every visitor leaving the beach with bulky pockets. One looter was caught with a small load of red and white rubber balls, which were duly confiscated and he was ‘detained’ for 14 days. Essence of peppermint mysteriously turned up in many settlers homes. Sailcloth was salvaged and used for horse rugs and tent flies. Soon after the wreck “Fiji tobacco” was being advertised around Victoria. A Customs officer, trying to prevent some of the looting, was assaulted by looters and thrown over a steep cliff. He managed to cling to a bush lower down until rescued. In 1894 some coiled fencing wire was salvaged from the wreck. Hundreds of coils are still strewn over the site of the wreck, encrusted and solidified. The hull is broken but the vessel’s iron ribs can be seen along with some of the cargo of concrete and pig iron. Captain Vickers presented Bill Robe with his silver-cased pocket watch, the only possession that he still had, as a token for having saved his life and the lives of some of the crew. (The pocket watch came with 2 winding keys, one to wind it and one to change the hands.) Years later Bill passed the watch to his brother-in-law Gib (Gilbert) Hulands as payment of a debt and it has been passed down the family to Gilbert Hulands’ grandson, John Hulands. Seaman Julius Gebauhr later gave his knife, in its hand crafted leather sheath, to F. J. Stansmore for caring for him when he came ashore. The knife handle had a personal inscription on it. A marble headstone on the 200m high cliffs overlooking Wreck Beach, west of Moonlight Head, paying tribute to the men who lost their lives when Fiji ran aground. The scene of the wreck is marked by the anchor from the Fiji, erected by Warrnambool skin divers in 1967.This rope is part of the collection of artefacts from the wreck of the Fiji. Flagstaff Hill’s Fiji collection is of historical significance at a State level because of its association with the wreck Fiji, which is on the Victorian Heritage Register VHR S259. The Fiji is archaeologically significant as the wreck of a typical 19th century international sailing ship with cargo. It is educationally and recreationally significant as one of Victoria's most spectacular historic shipwreck dive sites with structural features and remains of the cargo evident. It also represents aspects of Victoria’s shipping history and its potential to interpret sub-theme 1.5 of Victoria’s Framework of Historical Themes (living with natural processes). The Fiji collection meets the following criteria for assessment: Criterion A: Importance to the course, or pattern, of Victoria’s cultural history. Criterion B: Possession of uncommon, rare or endangered aspects of Victoria’s cultural history Criterion C: Potential to yield information that will contribute to an understanding of Victoria’s cultural history. Rope salvaged from the distress rocket rope line used in the rescue of the crew of the sailing ship “Fiji”. The light-weight brown rope has been crafted into a decorative 'Monkey fist' or 'Turk’s head' knot using three interwoven strands. 1891, shipwrecked coast, flagstaff hill, flagstaff hill maritime museum, maritime museum, shipwrecked artefact, flagstaff hill maritime village, shipwreck coast, warrnambool, rope, moonlight head, wreck bay, distress rocket, line, light line, rocket rescue apparatus, rocket equipment, rocket line -
 Flagstaff Hill Maritime Museum and Village
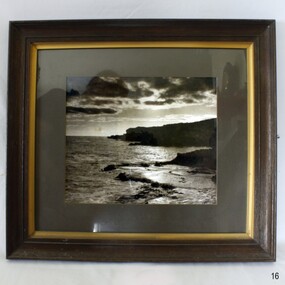
Photograph - Costal View, A. Wilkins, c.1950-1983
Item believed to be of modern creation used to augment a room display A modern item produced after 1950 that is not associated with a historic event, person or place therefore is regarded as having no significance for Flagstaff Hill museum collectionPhotograph of coastal scene in dim light. Frame is dark wood with gold edging around photograph. Inscription. Marked A. Wilkins.Marked, bottom right; "A. Wilkins"flagstaff hill, warrnambool, maritime museum, maritime village, great ocean road, shipwreck coast, sea scape, a. wilkins -
 Flagstaff Hill Maritime Museum and Village
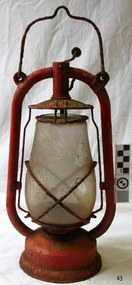
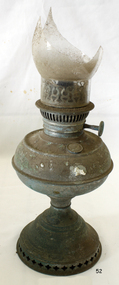
Functional object - Lamp, Carl Hermann Nier, 1928-1932
Carl Hermann Nier in 1877 a silverware maker started to produce miners lamps and household lanterns in Beierfeld, Saxonia, East Germany. In January 1902 he established the Nier-Feuerh and company in his home town to produce kerosene lanterns. Carl's three sons Bruno, Curt and Woldemar Nier made the company into the largest lantern producer in the 1930s with Bruno Nier holding many patents for lamps. Lantern production was interrupted by World War II and ceased at the end of 1944 because of the shortage of materials and the advancing Russian army. After the Second World War the company restart the lantern production in 1947 at Luedenscheid and Hohenlockstedt north of Hamburg and fully re-establishing the company in 1950. A domestic item with an interesting history that now is sought after by collectors giving an insight into how hurricane kerosene lamps came into being from a manufacturer in Germany that held numerous patents for oil lamps from 1902 until 1940.Kerosene lamp with handle, red in colour, badly rusted. Lamp shade has lever to lift so you can light it.Marked "Feuerhand Nr 327" "Made in Germany".flagstaff hill, warrnambool, shipwrecked coast, flagstaff hill maritime museum, shipwreck coast, flagstaff hill maritime village, great ocean road, lamp, kerosene lamp, hurricane lamp, nier-feuerh, carl hermann nier -
 Flagstaff Hill Maritime Museum and Village
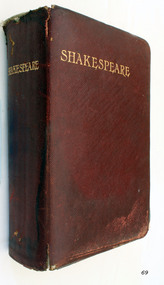
Literary work - Book, Ward. Lock & Co., Limited, The Complete Works of William Shakespeare, 1908
William Shakespeare 1564 to 1616 was an English playwright, poet, and actor, widely regarded as the greatest writer in the English language and the world's greatest dramatist. He is often called England's national poet and the "Bard of Avon" . His extant works, including collaborations, consist of some 39 plays, 154 sonnets, three long narrative poems, and a few other verses, some of uncertain authorship. His plays have been translated into every major living language and are performed more often than those of any other playwright. They also continue to be studied and reinterpreted. Shakespeare was born and raised in Stratford-upon-Avon, Warwickshire. At the age of 18, he married Anne Hathaway, with whom he had three children: Susanna and twins Hamnet and Judith. Sometime between 1585 and 1592, he began a successful career in London as an actor, writer, and part-owner of a playing company called the Lord Chamberlain's Men, later known as the King's Men. At age 49 (around 1613), he appears to have retired to Stratford, where he died three years later. Shakespeare produced most of his known works between 1589 and 1613. His early plays were primarily comedies and histories and are regarded as some of the best work produced in these genres. He then wrote mainly tragedies until 1608, among them Hamlet, Romeo and Juliet, Othello, King Lear, and Macbeth, all considered to be among the finest works in the English language. In the last phase of his life, he wrote tragicomedies (also known as romances) and collaborated with other playwrights. Many of Shakespeare's plays were published in editions of varying quality and accuracy in his lifetime. However, in 1623, two fellow actors and friends of Shakespeare's, John Heminges and Henry Condell, published a more definitive text known as the First Folio, a posthumous collected edition of Shakespeare's dramatic works that included all but two of his plays. The volume was prefaced with a poem by Ben Jonson, in which Jonson presciently hailed Shakespeare in a now-famous quote as "not of an age, but for all time.A book published in 1908 of Shakespeare works and significant as yet another reinterpreted of his plays only reinforcing that he was not only of his time but as his friend once said Shakespeare's works are for all time.The cover is burgundy coloured leather with embossed lettering and the inside covers are a dark green with a light symmetrical pattern. The edges of the pages are gilt.“The Complete Works of William Shakespeare” with introduction by Barry Cornwall (Bryan Walter Procter). Published by Ward, Lock and Co. Limited, London, New York and Melbourne. The book has an introduction by Barry Cornwall (Bryan Walter Proctor).flagstaff hill, warrnambool, shipwrecked coast, flagstaff hill maritime museum, maritime museum, shipwreck coast, flagstaff hill maritime village, great ocean road, complete works of shakespeare, book, complete works of william shakespeare, barry cornwall -
 Flagstaff Hill Maritime Museum and Village
Functional object - Lamp, Bradley & Hubbard, 1900-1919
One of the most common centre draft kerosene lamps one can find in the USA and Canada is the Rayo. Large and sturdy, simple to use, but also notorious for being a fuel hog. This lamp was made by Bradley and Hubbard Metalworks in Chicago also Bradley and Hubbard made the “Perfection” brand lamps that look like the Rayo and are pretty much the same lamp with all parts interchangeable. The Rayo was given away to customers for free as a promotional item by the Standard Oil Company. The lamp’s huge appetite for fuel meant a hefty increase in sales of kerosene for the company and increased profits. The Rayo is a classic centre draft lamp that uses a widely available tubular wick that measures 62mm flat. It employs a simple and reliable mechanism for securing wicks in the burner along with a brass tube with many small teeth at its end. The tube is attached to the toothed rack that’s moved up and down by the adjuster knob.This type of lamp was used in most households and on rural properties before the introduction of electricity and is an early example of a promotional. The lamp was given away to customers of Kerosene oil as a means of increasing the Standard Oil Company sales of Kerosene during the late19th to early 20th century.Lamp of metal without shade. Mantle burner, plated light metal base. Ornate shade holder. Broken glass.Marked "Rayo Junior"flagstaff hill, warrnambool, flagstaff hill maritime museum, shipwreck coast, flagstaff hill maritime village, great ocean road, lamp, mantle lamp, metal lamp, lighting, oil lamp, bradley & hubbard -
 Flagstaff Hill Maritime Museum and Village
Gun Emplacement, 1890's
The Warrnambool Battery on Flagstaff Hill has embankments for 3 guns. Those on the left and right still have cannon in place but in the centre is an empty embankment, apart from this concrete ring with metal threaded studs. In 1898 a 5 inch breech loading gun (BL) was installed here. The gun had a hydro-pneumatic disappearing carriage (hence the sign on the concrete wall "5" BL HP").. This type of gun was faster to load and fire that the 80 pound RML’s installed on either side of it. Its arrival spelt the end of the 80 pound RML guns’ useful life, although they continued to be used for practice sessions. The 5 inch BL was the main defensive weapon of the Warrnambool Battery until the Battery was downgraded in importance. It was removed in 1904 and recalled to Melbourne in 1910. The gun emplacement ring is all that remains of the mounting for a 5 inch Armstrong rifled breech loading gun. HISTOR of the WARRNAMBOOL GUNS & CANNON In the years following the Crimean War (1854-1857J) there was a great concern in the Colony that Imperial Russia would attempt an invasion. Coastal defences in the colony of Victoria were greatly strengthened by the Government as a result. Warrnambool was originally protected by cannons at Cannon Hill, approximately 1 kilometer west of the Flagstaff Hill Fortifications. The cannons included two 1866 guns, both 80 Pound Rifled Muzzle Loaders (RML) purchased by Victoria’s Colonial Government. They were part of a shipment of 26 such guns sent from England in December 1866. They are registered as No. 23 (80cwt-2qr-0lbs) - Gun 1, and No.13 (81cwt-1qr-12lbs) - Gun 2. They were cast at the Royal Gun Factory, Woolwich Arsenal, in 1866 and have a 6.3 inch bore. Both barrels carry the Royal Cypher of Queen Victoria, Insignia of the Royal Engineers, within the Garter and Motto surmounted by the Crown, with the Royal Cypher of Queen Victoria within the Garter (letters in centre “VR”, motto “HONI SOIT QUI MAL Y PENSE”, "Shame be to him who thinks evil of it."). The guns were originally supplied with wooden carriages. (The Royal Arsenal at Woolwich, England, was established eleven years after the Restoration of King Charles II. It was the principal supplier of armaments to the British and Empire Governments. At the height of its operations during World War One the factory covered 1300 acres and employed very nearly 80,000 workers. Woolwich was the Headquarters of the Royal Artillery since the raising of that Regiment in 1716. The Arsenal was closed in the late 1960’s.) These two 80pdr cannons were transferred to the Warrnambool Garrison Artillery Battery Fortifications erected at Flagstaff Hill in 1887 as part of Victoria’s Coastal Defences. The original wooden carriages were subsequently replaced with the present iron garrison carriages in 1888. They are a “C” pivot. The ‘racers’ or curved track set into the floor of the gun emplacement (which enabled the guns to be traversed more quickly) are as specified for guns up to 10 inch, being of wrought iron 2.78 inches wide. A temporary third gun, now no longer on Flagstaff Hill’s site, was the 5 inch Rifled Breech Loading (BL) Armstrong gun mounted on an Elswick hydro pneumatic disappearing carriage and installed in this very concrete base or pad. The State of Victoria took over the ownership of the guns at the time of Australian Federation in 1901. In about 1901/1902 the Garrison Battery was converted to the Warrnambool Battery of the Australian Field Artillery (No 4 Field Battery). It was equipped with 4.7 inch naval guns mounted on field carriages. They were now a mobile unit but continued to use the Warrnambool Garrison area at Flagstaff Hill for practice. When the Fortifications were declared obsolete the two 80 Pounder RML were relocated to Cannon Hill in 1910. On the outbreak of World War One the 4.7 inch guns were recalled to Melbourne, and the Battery was disbanded. Most of the personnel probably re-enlisted in the local 4th Australian Light Horse Regiment. The two 80 Pounder RML were moved back to the Fortifications in 1973. They were both fully restored by Army First Year Apprentices at the Ordinance Factory in Bendigo in time for the centenary year of the fortifications in 1987. The guns are capable of firing 80 pound (32.3kg) armour piercing exploding shells 3.65kms out to sea. They were originally manned by volunteers before a paid Garrison was established. Now the Guns are again fired by volunteers on Special Event days. Since restoration the Gun Number 1 had been fired on a regular basis but Gun Number 2 hadn’t been fired since the mid 1990’s. In April 2015 Gun Number 2 was serviced in preparation for the firing of both cannons on the ANZAC Centenary commemorations on April 25th 2015. Other guns from the original Cannon Hill location were obsolete by the time the 1887 Warrnambool Garrison Artillery Battery was built. These guns are (1) a 32 Pounder Muzzle Loading Smooth Bore (SB) cast in 1813 at the famous Carron Foundry, number 80837 and now located in the Warrnambool Botanic Gardens. It is now mounted on a replica carriage due to the original carriage being in a fragile condition (the original carriage stored under cover at Flagstaff Hill). (2) a 68 Pounder Muzzle Loading Smooth Bore cast in 1861 at the equally august Low Moor Foundry, number 10310 and now located on the lawn area at the entrance to Flagstaff Hill Maritime Village. It is still mounted on its original wooden garrison carriage. Its wooden slide compressor mechanism is fragile and now kept in Flagstaff Hill’s storage. There are only seven 32 Pounder SB made by Carron and fifteen 68 Pounder SB made at Low Moor known to exist in the State of Victoria [references; Flagstaff Hill Maritime Village interpretation boards, information sheets and other documents; South Western Victoria Guns and Cannon report, May 2008, ref W/F/08] The Gun embankment is contained within the heritage listed Lady Bay Lighthouse Comples, on the Victorian Heritage Register VHR H1520. The gun emplacement base is evidence of the last defences installed on this stretch of coastline. The Warrnambool Garrison has been added to the Victorian Heritage Register H1250 “for its intact battery and guns, a strong reminder of Victoria’s wealth and determination to protect itself from the perceived threat of invasion in the 1880’s.” The City of Warrnambool is one of several custodians of a collection of artillery pieces of heritage significance at a state, national and international level. These pieces are directly related to the defence of south-west Victoria in the 19th century. The care and preservation come under the Heritage Act 1995. Gun emplacement; the remains of the mounting platform of a temporary third gun installed in 1898 in the centre of the battery. This consists of a circular concrete well or sump surrounded by two rings of mounting bolts, the inner of 10 and the outer of 20. The base once held a 5 inch Armstrong rifled breech loading gun with hydro-pneumatic disappearing. In the centre of the ring on the ground is a keyhole shaped space. The gun was removed in 1904. flagstaff hill, warrnambool, shipwrecked coast, flagstaff hill maritime museum, maritime museum, shipwreck coast, flagstaff hill maritime village, great ocean road, colonial defences, victoria’s coastal defences, warrnambool fortification, warrnambool garrison battery, warrnambool volunteer corps, ordinance, armaments, cannon hill fortifications, flagstaff hill fortifications, 4th australian light horse regiment, garrison gun, 5 inch breech loading gun, emplacement for hydro-pneumatic disappearing carriage, gun emplacement -
 Flagstaff Hill Maritime Museum and Village
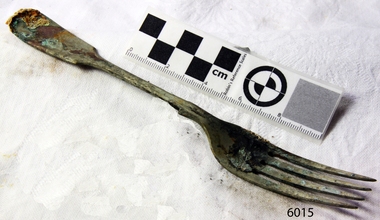
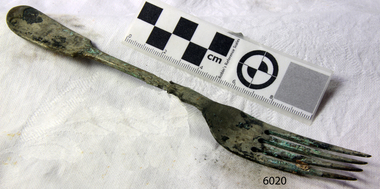
Fork
Silver plated copper alloy table forks - entrée from the wreck of the Loch Ard. Some verdigris and silver oxide. Light encrustation on fork. Hallmark partly visible.flagstaff hill, warrnambool, shipwrecked-coast, flagstaff-hill, flagstaff-hill-maritime-museum, maritime-museum, shipwreck-coast, flagstaff-hill-maritime-village, fork, loch ard -
 Flagstaff Hill Maritime Museum and Village
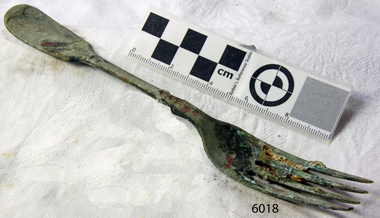
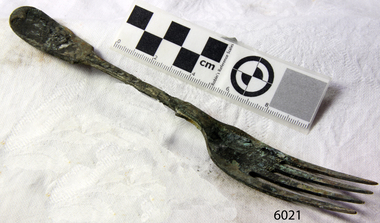
Fork
HISTORY OF THE LOCH ARD The LOCH ARD belonged to the famous Loch Line which sailed many ships from England to Australia. Built in Glasgow by Barclay, Curdle and Co. in 1873, the LOCH ARD was a three-masted square rigged iron sailing ship. The ship measured 262ft 7" (79.87m) in length, 38ft (11.58m) in width, 23ft (7m) in depth and had a gross tonnage of 1693 tons. The LOCH ARD's main mast measured a massive 150ft (45.7m) in height. LOCH ARD made three trips to Australia and one trip to Calcutta before its final voyage. LOCH ARD left England on March 2, 1878, under the command of Captain Gibbs, a newly married, 29 year old. She was bound for Melbourne with a crew of 37, plus 17 passengers and a load of cargo. The general cargo reflected the affluence of Melbourne at the time. On board were straw hats, umbrella, perfumes, clay pipes, pianos, clocks, confectionary, linen and candles, as well as a heavier load of railway irons, cement, lead and copper. There were items included that intended for display in the Melbourne International Exhibition in 1880. The voyage to Port Phillip was long but uneventful. At 3am on June 1, 1878, Captain Gibbs was expecting to see land and the passengers were becoming excited as they prepared to view their new homeland in the early morning. But LOCH ARD was running into a fog which greatly reduced visibility. Captain Gibbs was becoming anxious as there was no sign of land or the Cape Otway lighthouse. At 4am the fog lifted. A man aloft announced that he could see breakers. The sheer cliffs of Victoria's west coast came into view, and Captain Gibbs realised that the ship was much closer to them than expected. He ordered as much sail to be set as time would permit and then attempted to steer the vessel out to sea. On coming head on into the wind, the ship lost momentum, the sails fell limp and LOCH ARD's bow swung back. Gibbs then ordered the anchors to be released in an attempt to hold its position. The anchors sank some 50 fathoms - but did not hold. By this time LOCH ARD was among the breakers and the tall cliffs of Mutton Bird Island rose behind the ship. Just half a mile from the coast, the ship's bow was suddenly pulled around by the anchor. The captain tried to tack out to sea, but the ship struck a reef at the base of Mutton Bird Island, near Port Campbell. Waves broke over the ship and the top deck was loosened from the hull. The masts and rigging came crashing down knocking passengers and crew overboard. When a lifeboat was finally launched, it crashed into the side of LOCH ARD and capsized. Tom Pearce, who had launched the boat, managed to cling to its overturned hull and shelter beneath it. He drifted out to sea and then on the flood tide came into what is now known as LOCH ARD Gorge. He swam to shore, bruised and dazed, and found a cave in which to shelter. Some of the crew stayed below deck to shelter from the falling rigging but drowned when the ship slipped off the reef into deeper water. Eva Carmichael had raced onto deck to find out what was happening only to be confronted by towering cliffs looming above the stricken ship. In all the chaos, Captain Gibbs grabbed Eva and said, "If you are saved Eva, let my dear wife know that I died like a sailor". That was the last Eva Carmichael saw of the captain. She was swept off the ship by a huge wave. Eva saw Tom Pearce on a small rocky beach and yelled to attract his attention. He dived in and swam to the exhausted woman and dragged her to shore. He took her to the cave and broke open case of brandy which had washed up on the beach. He opened a bottle to revive the unconscious woman. A few hours later Tom scaled a cliff in search of help. He followed hoof prints and came by chance upon two men from nearby Glenample Station three and a half miles away. In a state of exhaustion, he told the men of the tragedy. Tom returned to the gorge while the two men rode back to the station to get help. By the time they reached LOCH ARD Gorge, it was cold and dark. The two shipwreck survivors were taken to Glenample Station to recover. Eva stayed at the station for six weeks before returning to Ireland, this time by steamship. In Melbourne, Tom Pearce received a hero's welcome. He was presented with the first gold medal of the Royal Humane Society of Victoria and a £1000 cheque from the Victorian Government. Concerts were performed to honour the young man's bravery and to raise money for those who lost family in the LOCH ARD disaster. Of the 54 crew members and passengers on board, only two survived: the apprentice, Tom Pearce and the young woman passenger, Eva Carmichael, who lost all of her family in the tragedy. Ten days after the LOCH ARD tragedy, salvage rights to the wreck were sold at auction for £2,120. Cargo valued at £3,000 was salvaged and placed on the beach, but most washed back into the sea when another storm developed. The wreck of LOCH ARD still lies at the base of Mutton Bird Island. Much of the cargo has now been salvaged and some was washed up into what is now known as LOCH ARD Gorge. Cargo and artefacts have also been illegally salvaged over many years before protective legislation was introduced. One of the most unlikely pieces of cargo to have survived the shipwreck was a Minton porcelain peacock - one of only seven in the world. The peacock was destined for the Melbourne International Exhibition in 1880. It had been well packed, which gave it adequate protection during the violent storm. Today, the Minton peacock can be seen at the Flagstaff Hill Maritime Museum in Warrnambool. From Australia's most dramatic shipwreck it has now become Australia's shipwreck artefact and is one of very few 'objects' on the Victorian State Heritage Register most valuable. The LOCH ARD shipwreck is of State significance – Victorian Heritage Register S 417 Flagstaff Hill’s collection of artefacts from LOCH ARD is significant for being one of the largest collections of artefacts from this shipwreck in Victoria. It is significant for its association with the shipwreck, which is on the Victorian Heritage Register (VHR S417). The collection is significant because of the relationship between the objects, as together they have a high potential to interpret the story of the LOCH ARD. The LOCH ARD collection is archaeologically significant as the remains of a large international passenger and cargo ship. The LOCH ARD collection is historically significant for representing aspects of Victoria’s shipping history and its potential to interpret sub-theme 1.5 of Victoria’s Framework of Historical Themes (living with natural processes). The collection is also historically significant for its association with the LOCH ARD, which was one of the worst and best known shipwrecks in Victoria’s history. Silver plated copper alloy table forks - entrèe, from the wreck of the Loch Ard. Some verdigris and silver oxide. Light encrustation on tines. Hallmark visible.flagstaff hill, warrnambool, shipwrecked coast, flagstaff hill maritime museum, maritime museum, shipwreck coast, flagstaff hill maritime village, great ocean road, loch line, loch ard, captain gibbs, eva carmichael, tom pearce, glenample station, mutton bird island, loch ard gorge, electroplated cutlery, fork -
 Flagstaff Hill Maritime Museum and Village
Fork
The LOCH ARD shipwreck is of State significance – Victorian Heritage Register S 417 Flagstaff Hill’s collection of artefacts from LOCH ARD is significant for being one of the largest collections of artefacts from this shipwreck in Victoria. It is significant for its association with the shipwreck, which is on the Victorian Heritage Register (VHR S417). The collection is significant because of the relationship between the objects, as together they have a high potential to interpret the story of the LOCH ARD. The LOCH ARD collection is archaeologically significant as the remains of a large international passenger and cargo ship. The LOCH ARD collection is historically significant for representing aspects of Victoria’s shipping history and its potential to interpret sub-theme 1.5 of Victoria’s Framework of Historical Themes (living with natural processes). The collection is also historically significant for its association with the LOCH ARD, which was one of the worst and best known shipwrecks in Victoria’s history. Silver plated copper alloy table forks - entrée from the wreck of the Loch Ard. Some verdigris and silver oxide. Light encrustation on tines and back of fork.flagstaff hill, warrnambool, shipwrecked coast, flagstaff hill maritime museum, maritime museum, shipwreck coast, flagstaff hill maritime village, great ocean road, loch line, loch ard, captain gibbs, eva carmichael, tom pearce, glenample station, mutton bird island, loch ard gorge, electroplated cutlery, fork -
 Flagstaff Hill Maritime Museum and Village
Fork
HISTORY OF THE LOCH ARD The LOCH ARD belonged to the famous Loch Line which sailed many ships from England to Australia. Built in Glasgow by Barclay, Curdle and Co. in 1873, the LOCH ARD was a three-masted square rigged iron sailing ship. The ship measured 262ft 7" (79.87m) in length, 38ft (11.58m) in width, 23ft (7m) in depth and had a gross tonnage of 1693 tons. The LOCH ARD's main mast measured a massive 150ft (45.7m) in height. LOCH ARD made three trips to Australia and one trip to Calcutta before its final voyage. LOCH ARD left England on March 2, 1878, under the command of Captain Gibbs, a newly married, 29 year old. She was bound for Melbourne with a crew of 37, plus 17 passengers and a load of cargo. The general cargo reflected the affluence of Melbourne at the time. On board were straw hats, umbrella, perfumes, clay pipes, pianos, clocks, confectionary, linen and candles, as well as a heavier load of railway irons, cement, lead and copper. There were items included that intended for display in the Melbourne International Exhibition in 1880. The voyage to Port Phillip was long but uneventful. At 3am on June 1, 1878, Captain Gibbs was expecting to see land and the passengers were becoming excited as they prepared to view their new homeland in the early morning. But LOCH ARD was running into a fog which greatly reduced visibility. Captain Gibbs was becoming anxious as there was no sign of land or the Cape Otway lighthouse. At 4am the fog lifted. A man aloft announced that he could see breakers. The sheer cliffs of Victoria's west coast came into view, and Captain Gibbs realised that the ship was much closer to them than expected. He ordered as much sail to be set as time would permit and then attempted to steer the vessel out to sea. On coming head on into the wind, the ship lost momentum, the sails fell limp and LOCH ARD's bow swung back. Gibbs then ordered the anchors to be released in an attempt to hold its position. The anchors sank some 50 fathoms - but did not hold. By this time LOCH ARD was among the breakers and the tall cliffs of Mutton Bird Island rose behind the ship. Just half a mile from the coast, the ship's bow was suddenly pulled around by the anchor. The captain tried to tack out to sea, but the ship struck a reef at the base of Mutton Bird Island, near Port Campbell. Waves broke over the ship and the top deck was loosened from the hull. The masts and rigging came crashing down knocking passengers and crew overboard. When a lifeboat was finally launched, it crashed into the side of LOCH ARD and capsized. Tom Pearce, who had launched the boat, managed to cling to its overturned hull and shelter beneath it. He drifted out to sea and then on the flood tide came into what is now known as LOCH ARD Gorge. He swam to shore, bruised and dazed, and found a cave in which to shelter. Some of the crew stayed below deck to shelter from the falling rigging but drowned when the ship slipped off the reef into deeper water. Eva Carmichael had raced onto deck to find out what was happening only to be confronted by towering cliffs looming above the stricken ship. In all the chaos, Captain Gibbs grabbed Eva and said, "If you are saved Eva, let my dear wife know that I died like a sailor". That was the last Eva Carmichael saw of the captain. She was swept off the ship by a huge wave. Eva saw Tom Pearce on a small rocky beach and yelled to attract his attention. He dived in and swam to the exhausted woman and dragged her to shore. He took her to the cave and broke open case of brandy which had washed up on the beach. He opened a bottle to revive the unconscious woman. A few hours later Tom scaled a cliff in search of help. He followed hoof prints and came by chance upon two men from nearby Glenample Station three and a half miles away. In a state of exhaustion, he told the men of the tragedy. Tom returned to the gorge while the two men rode back to the station to get help. By the time they reached LOCH ARD Gorge, it was cold and dark. The two shipwreck survivors were taken to Glenample Station to recover. Eva stayed at the station for six weeks before returning to Ireland, this time by steamship. In Melbourne, Tom Pearce received a hero's welcome. He was presented with the first gold medal of the Royal Humane Society of Victoria and a £1000 cheque from the Victorian Government. Concerts were performed to honour the young man's bravery and to raise money for those who lost family in the LOCH ARD disaster. Of the 54 crew members and passengers on board, only two survived: the apprentice, Tom Pearce and the young woman passenger, Eva Carmichael, who lost all of her family in the tragedy. Ten days after the LOCH ARD tragedy, salvage rights to the wreck were sold at auction for £2,120. Cargo valued at £3,000 was salvaged and placed on the beach, but most washed back into the sea when another storm developed. The wreck of LOCH ARD still lies at the base of Mutton Bird Island. Much of the cargo has now been salvaged and some was washed up into what is now known as LOCH ARD Gorge. Cargo and artefacts have also been illegally salvaged over many years before protective legislation was introduced. One of the most unlikely pieces of cargo to have survived the shipwreck was a Minton porcelain peacock - one of only seven in the world. The peacock was destined for the Melbourne International Exhibition in 1880. It had been well packed, which gave it adequate protection during the violent storm. Today, the Minton peacock can be seen at the Flagstaff Hill Maritime Museum in Warrnambool. From Australia's most dramatic shipwreck it has now become Australia's shipwreck artefact and is one of very few 'objects' on the Victorian State Heritage Register most valuable. The LOCH ARD shipwreck is of State significance – Victorian Heritage Register S 417 Flagstaff Hill’s collection of artefacts from LOCH ARD is significant for being one of the largest collections of artefacts from this shipwreck in Victoria. It is significant for its association with the shipwreck, which is on the Victorian Heritage Register (VHR S417). The collection is significant because of the relationship between the objects, as together they have a high potential to interpret the story of the LOCH ARD. The LOCH ARD collection is archaeologically significant as the remains of a large international passenger and cargo ship. The LOCH ARD collection is historically significant for representing aspects of Victoria’s shipping history and its potential to interpret sub-theme 1.5 of Victoria’s Framework of Historical Themes (living with natural processes). The collection is also historically significant for its association with the LOCH ARD, which was one of the worst and best known shipwrecks in Victoria’s history. Silver plated copper alloy table forks - entrée from the wreck of the Loch Ard. Some verdigris and silver oxide. Light encrustation on fork.flagstaff hill, warrnambool, shipwrecked coast, flagstaff hill maritime museum, maritime museum, shipwreck coast, flagstaff hill maritime village, great ocean road, loch line, loch ard, captain gibbs, eva carmichael, tom pearce, glenample station, mutton bird island, loch ard gorge, electroplated cutlery, fork -
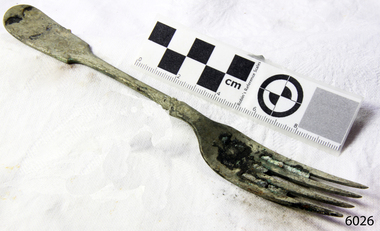 Flagstaff Hill Maritime Museum and Village
Fork
Silver-plated copper alloy table fork - entrèe from the wreck of the Loch Ard. Some verdigris and silver oxide. Light encrustation on the fork. Hallmark visible.flagstaff hill, warrnambool, shipwrecked-coast, flagstaff-hill, flagstaff-hill-maritime-museum, maritime-museum, shipwreck-coast, flagstaff-hill-maritime-village, fork, loch ard -
 Flagstaff Hill Maritime Museum and Village
Fork
Silver-plated copper alloy table forks - entrèe from the wreck of the Loch Ard.Some verdigris and silver oxide. Light encrustation on the fork. Hallmark visible.flagstaff hill, warrnambool, shipwrecked-coast, flagstaff-hill, flagstaff-hill-maritime-museum, maritime-museum, shipwreck-coast, flagstaff-hill-maritime-village, fork, loch ard -
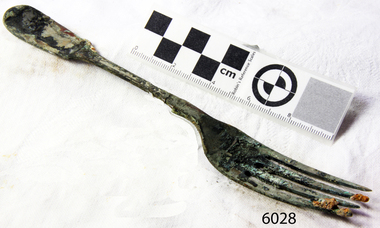 Flagstaff Hill Maritime Museum and Village
Fork
Silver-plated copper alloy table forks - entrèe from the wreck of the Loch Ard." Some verdigris and silver oxide. Light encrustation on the fork. Hallmark visible.flagstaff hill, warrnambool, shipwrecked-coast, flagstaff-hill, flagstaff-hill-maritime-museum, maritime-museum, shipwreck-coast, flagstaff-hill-maritime-village, fork, loch ard -
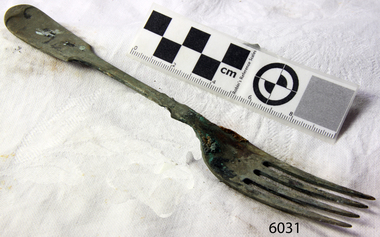 Flagstaff Hill Maritime Museum and Village
Fork
HISTORY OF THE LOCH ARD The LOCH ARD belonged to the famous Loch Line which sailed many ships from England to Australia. Built in Glasgow by Barclay, Curdle and Co. in 1873, the LOCH ARD was a three-masted square rigged iron sailing ship. The ship measured 262ft 7" (79.87m) in length, 38ft (11.58m) in width, 23ft (7m) in depth and had a gross tonnage of 1693 tons. The LOCH ARD's main mast measured a massive 150ft (45.7m) in height. LOCH ARD made three trips to Australia and one trip to Calcutta before its final voyage. LOCH ARD left England on March 2, 1878, under the command of Captain Gibbs, a newly married, 29 year old. She was bound for Melbourne with a crew of 37, plus 17 passengers and a load of cargo. The general cargo reflected the affluence of Melbourne at the time. On board were straw hats, umbrella, perfumes, clay pipes, pianos, clocks, confectionary, linen and candles, as well as a heavier load of railway irons, cement, lead and copper. There were items included that intended for display in the Melbourne International Exhibition in 1880. The voyage to Port Phillip was long but uneventful. At 3am on June 1, 1878, Captain Gibbs was expecting to see land and the passengers were becoming excited as they prepared to view their new homeland in the early morning. But LOCH ARD was running into a fog which greatly reduced visibility. Captain Gibbs was becoming anxious as there was no sign of land or the Cape Otway lighthouse. At 4am the fog lifted. A man aloft announced that he could see breakers. The sheer cliffs of Victoria's west coast came into view, and Captain Gibbs realised that the ship was much closer to them than expected. He ordered as much sail to be set as time would permit and then attempted to steer the vessel out to sea. On coming head on into the wind, the ship lost momentum, the sails fell limp and LOCH ARD's bow swung back. Gibbs then ordered the anchors to be released in an attempt to hold its position. The anchors sank some 50 fathoms - but did not hold. By this time LOCH ARD was among the breakers and the tall cliffs of Mutton Bird Island rose behind the ship. Just half a mile from the coast, the ship's bow was suddenly pulled around by the anchor. The captain tried to tack out to sea, but the ship struck a reef at the base of Mutton Bird Island, near Port Campbell. Waves broke over the ship and the top deck was loosened from the hull. The masts and rigging came crashing down knocking passengers and crew overboard. When a lifeboat was finally launched, it crashed into the side of LOCH ARD and capsized. Tom Pearce, who had launched the boat, managed to cling to its overturned hull and shelter beneath it. He drifted out to sea and then on the flood tide came into what is now known as LOCH ARD Gorge. He swam to shore, bruised and dazed, and found a cave in which to shelter. Some of the crew stayed below deck to shelter from the falling rigging but drowned when the ship slipped off the reef into deeper water. Eva Carmichael had raced onto deck to find out what was happening only to be confronted by towering cliffs looming above the stricken ship. In all the chaos, Captain Gibbs grabbed Eva and said, "If you are saved Eva, let my dear wife know that I died like a sailor". That was the last Eva Carmichael saw of the captain. She was swept off the ship by a huge wave. Eva saw Tom Pearce on a small rocky beach and yelled to attract his attention. He dived in and swam to the exhausted woman and dragged her to shore. He took her to the cave and broke open case of brandy which had washed up on the beach. He opened a bottle to revive the unconscious woman. A few hours later Tom scaled a cliff in search of help. He followed hoof prints and came by chance upon two men from nearby Glenample Station three and a half miles away. In a state of exhaustion, he told the men of the tragedy. Tom returned to the gorge while the two men rode back to the station to get help. By the time they reached LOCH ARD Gorge, it was cold and dark. The two shipwreck survivors were taken to Glenample Station to recover. Eva stayed at the station for six weeks before returning to Ireland, this time by steamship. In Melbourne, Tom Pearce received a hero's welcome. He was presented with the first gold medal of the Royal Humane Society of Victoria and a £1000 cheque from the Victorian Government. Concerts were performed to honour the young man's bravery and to raise money for those who lost family in the LOCH ARD disaster. Of the 54 crew members and passengers on board, only two survived: the apprentice, Tom Pearce and the young woman passenger, Eva Carmichael, who lost all of her family in the tragedy. Ten days after the LOCH ARD tragedy, salvage rights to the wreck were sold at auction for £2,120. Cargo valued at £3,000 was salvaged and placed on the beach, but most washed back into the sea when another storm developed. The wreck of LOCH ARD still lies at the base of Mutton Bird Island. Much of the cargo has now been salvaged and some was washed up into what is now known as LOCH ARD Gorge. Cargo and artefacts have also been illegally salvaged over many years before protective legislation was introduced. One of the most unlikely pieces of cargo to have survived the shipwreck was a Minton porcelain peacock - one of only seven in the world. The peacock was destined for the Melbourne International Exhibition in 1880. It had been well packed, which gave it adequate protection during the violent storm. Today, the Minton peacock can be seen at the Flagstaff Hill Maritime Museum in Warrnambool. From Australia's most dramatic shipwreck it has now become Australia's shipwreck artefact and is one of very few 'objects' on the Victorian State Heritage Register most valuable. The LOCH ARD shipwreck is of State significance – Victorian Heritage Register S 417 Flagstaff Hill’s collection of artefacts from LOCH ARD is significant for being one of the largest collections of artefacts from this shipwreck in Victoria. It is significant for its association with the shipwreck, which is on the Victorian Heritage Register (VHR S417). The collection is significant because of the relationship between the objects, as together they have a high potential to interpret the story of the LOCH ARD. The LOCH ARD collection is archaeologically significant as the remains of a large international passenger and cargo ship. The LOCH ARD collection is historically significant for representing aspects of Victoria’s shipping history and its potential to interpret sub-theme 1.5 of Victoria’s Framework of Historical Themes (living with natural processes). The collection is also historically significant for its association with the LOCH ARD, which was one of the worst and best known shipwrecks in Victoria’s history. Silver plated copper alloy table forks - entrée from the wreck of the Loch Ard. Some verdigris and silver oxide. Light encrustation on fork. Hallmark visible.flagstaff hill, warrnambool, shipwrecked coast, flagstaff hill maritime museum, maritime museum, shipwreck coast, flagstaff hill maritime village, great ocean road, loch line, loch ard, captain gibbs, eva carmichael, tom pearce, glenample station, mutton bird island, loch ard gorge, fork, entrée fork -
 Flagstaff Hill Maritime Museum and Village
Fork
HISTORY OF THE LOCH ARD The LOCH ARD belonged to the famous Loch Line which sailed many ships from England to Australia. Built in Glasgow by Barclay, Curdle and Co. in 1873, the LOCH ARD was a three-masted square rigged iron sailing ship. The ship measured 262ft 7" (79.87m) in length, 38ft (11.58m) in width, 23ft (7m) in depth and had a gross tonnage of 1693 tons. The LOCH ARD's main mast measured a massive 150ft (45.7m) in height. LOCH ARD made three trips to Australia and one trip to Calcutta before its final voyage. LOCH ARD left England on March 2, 1878, under the command of Captain Gibbs, a newly married, 29 year old. She was bound for Melbourne with a crew of 37, plus 17 passengers and a load of cargo. The general cargo reflected the affluence of Melbourne at the time. On board were straw hats, umbrella, perfumes, clay pipes, pianos, clocks, confectionary, linen and candles, as well as a heavier load of railway irons, cement, lead and copper. There were items included that intended for display in the Melbourne International Exhibition in 1880. The voyage to Port Phillip was long but uneventful. At 3am on June 1, 1878, Captain Gibbs was expecting to see land and the passengers were becoming excited as they prepared to view their new homeland in the early morning. But LOCH ARD was running into a fog which greatly reduced visibility. Captain Gibbs was becoming anxious as there was no sign of land or the Cape Otway lighthouse. At 4am the fog lifted. A man aloft announced that he could see breakers. The sheer cliffs of Victoria's west coast came into view, and Captain Gibbs realised that the ship was much closer to them than expected. He ordered as much sail to be set as time would permit and then attempted to steer the vessel out to sea. On coming head on into the wind, the ship lost momentum, the sails fell limp and LOCH ARD's bow swung back. Gibbs then ordered the anchors to be released in an attempt to hold its position. The anchors sank some 50 fathoms - but did not hold. By this time LOCH ARD was among the breakers and the tall cliffs of Mutton Bird Island rose behind the ship. Just half a mile from the coast, the ship's bow was suddenly pulled around by the anchor. The captain tried to tack out to sea, but the ship struck a reef at the base of Mutton Bird Island, near Port Campbell. Waves broke over the ship and the top deck was loosened from the hull. The masts and rigging came crashing down knocking passengers and crew overboard. When a lifeboat was finally launched, it crashed into the side of LOCH ARD and capsized. Tom Pearce, who had launched the boat, managed to cling to its overturned hull and shelter beneath it. He drifted out to sea and then on the flood tide came into what is now known as LOCH ARD Gorge. He swam to shore, bruised and dazed, and found a cave in which to shelter. Some of the crew stayed below deck to shelter from the falling rigging but drowned when the ship slipped off the reef into deeper water. Eva Carmichael had raced onto deck to find out what was happening only to be confronted by towering cliffs looming above the stricken ship. In all the chaos, Captain Gibbs grabbed Eva and said, "If you are saved Eva, let my dear wife know that I died like a sailor". That was the last Eva Carmichael saw of the captain. She was swept off the ship by a huge wave. Eva saw Tom Pearce on a small rocky beach and yelled to attract his attention. He dived in and swam to the exhausted woman and dragged her to shore. He took her to the cave and broke open case of brandy which had washed up on the beach. He opened a bottle to revive the unconscious woman. A few hours later Tom scaled a cliff in search of help. He followed hoof prints and came by chance upon two men from nearby Glenample Station three and a half miles away. In a state of exhaustion, he told the men of the tragedy. Tom returned to the gorge while the two men rode back to the station to get help. By the time they reached LOCH ARD Gorge, it was cold and dark. The two shipwreck survivors were taken to Glenample Station to recover. Eva stayed at the station for six weeks before returning to Ireland, this time by steamship. In Melbourne, Tom Pearce received a hero's welcome. He was presented with the first gold medal of the Royal Humane Society of Victoria and a £1000 cheque from the Victorian Government. Concerts were performed to honour the young man's bravery and to raise money for those who lost family in the LOCH ARD disaster. Of the 54 crew members and passengers on board, only two survived: the apprentice, Tom Pearce and the young woman passenger, Eva Carmichael, who lost all of her family in the tragedy. Ten days after the LOCH ARD tragedy, salvage rights to the wreck were sold at auction for £2,120. Cargo valued at £3,000 was salvaged and placed on the beach, but most washed back into the sea when another storm developed. The wreck of LOCH ARD still lies at the base of Mutton Bird Island. Much of the cargo has now been salvaged and some was washed up into what is now known as LOCH ARD Gorge. Cargo and artefacts have also been illegally salvaged over many years before protective legislation was introduced. One of the most unlikely pieces of cargo to have survived the shipwreck was a Minton porcelain peacock - one of only seven in the world. The peacock was destined for the Melbourne International Exhibition in 1880. It had been well packed, which gave it adequate protection during the violent storm. Today, the Minton peacock can be seen at the Flagstaff Hill Maritime Museum in Warrnambool. From Australia's most dramatic shipwreck it has now become Australia's shipwreck artefact and is one of very few 'objects' on the Victorian State Heritage Register most valuable. The LOCH ARD shipwreck is of State significance – Victorian Heritage Register S 417 Flagstaff Hill’s collection of artefacts from LOCH ARD is significant for being one of the largest collections of artefacts from this shipwreck in Victoria. It is significant for its association with the shipwreck, which is on the Victorian Heritage Register (VHR S417). The collection is significant because of the relationship between the objects, as together they have a high potential to interpret the story of the LOCH ARD. The LOCH ARD collection is archaeologically significant as the remains of a large international passenger and cargo ship. The LOCH ARD collection is historically significant for representing aspects of Victoria’s shipping history and its potential to interpret sub-theme 1.5 of Victoria’s Framework of Historical Themes (living with natural processes). The collection is also historically significant for its association with the LOCH ARD, which was one of the worst and best known shipwrecks in Victoria’s history. Silver plated copper alloy table forks - entrè from the wreck of the Loch Ard. Some verdigris and silver oxide. Light encrustation on fork. Hallmark visible.flagstaff hill, warrnambool, shipwrecked coast, flagstaff hill maritime museum, maritime museum, shipwreck coast, flagstaff hill maritime village, great ocean road, loch line, loch ard, captain gibbs, eva carmichael, tom pearce, glenample station, mutton bird island, loch ard gorge, forks - entrè, fork, entrè fork -
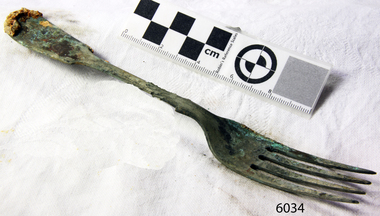 Flagstaff Hill Maritime Museum and Village
Fork
HISTORY OF THE LOCH ARD The LOCH ARD belonged to the famous Loch Line which sailed many ships from England to Australia. Built in Glasgow by Barclay, Curdle and Co. in 1873, the LOCH ARD was a three-masted square rigged iron sailing ship. The ship measured 262ft 7" (79.87m) in length, 38ft (11.58m) in width, 23ft (7m) in depth and had a gross tonnage of 1693 tons. The LOCH ARD's main mast measured a massive 150ft (45.7m) in height. LOCH ARD made three trips to Australia and one trip to Calcutta before its final voyage. LOCH ARD left England on March 2, 1878, under the command of Captain Gibbs, a newly married, 29 year old. She was bound for Melbourne with a crew of 37, plus 17 passengers and a load of cargo. The general cargo reflected the affluence of Melbourne at the time. On board were straw hats, umbrella, perfumes, clay pipes, pianos, clocks, confectionary, linen and candles, as well as a heavier load of railway irons, cement, lead and copper. There were items included that intended for display in the Melbourne International Exhibition in 1880. The voyage to Port Phillip was long but uneventful. At 3am on June 1, 1878, Captain Gibbs was expecting to see land and the passengers were becoming excited as they prepared to view their new homeland in the early morning. But LOCH ARD was running into a fog which greatly reduced visibility. Captain Gibbs was becoming anxious as there was no sign of land or the Cape Otway lighthouse. At 4am the fog lifted. A man aloft announced that he could see breakers. The sheer cliffs of Victoria's west coast came into view, and Captain Gibbs realised that the ship was much closer to them than expected. He ordered as much sail to be set as time would permit and then attempted to steer the vessel out to sea. On coming head on into the wind, the ship lost momentum, the sails fell limp and LOCH ARD's bow swung back. Gibbs then ordered the anchors to be released in an attempt to hold its position. The anchors sank some 50 fathoms - but did not hold. By this time LOCH ARD was among the breakers and the tall cliffs of Mutton Bird Island rose behind the ship. Just half a mile from the coast, the ship's bow was suddenly pulled around by the anchor. The captain tried to tack out to sea, but the ship struck a reef at the base of Mutton Bird Island, near Port Campbell. Waves broke over the ship and the top deck was loosened from the hull. The masts and rigging came crashing down knocking passengers and crew overboard. When a lifeboat was finally launched, it crashed into the side of LOCH ARD and capsized. Tom Pearce, who had launched the boat, managed to cling to its overturned hull and shelter beneath it. He drifted out to sea and then on the flood tide came into what is now known as LOCH ARD Gorge. He swam to shore, bruised and dazed, and found a cave in which to shelter. Some of the crew stayed below deck to shelter from the falling rigging but drowned when the ship slipped off the reef into deeper water. Eva Carmichael had raced onto deck to find out what was happening only to be confronted by towering cliffs looming above the stricken ship. In all the chaos, Captain Gibbs grabbed Eva and said, "If you are saved Eva, let my dear wife know that I died like a sailor". That was the last Eva Carmichael saw of the captain. She was swept off the ship by a huge wave. Eva saw Tom Pearce on a small rocky beach and yelled to attract his attention. He dived in and swam to the exhausted woman and dragged her to shore. He took her to the cave and broke open case of brandy which had washed up on the beach. He opened a bottle to revive the unconscious woman. A few hours later Tom scaled a cliff in search of help. He followed hoof prints and came by chance upon two men from nearby Glenample Station three and a half miles away. In a state of exhaustion, he told the men of the tragedy. Tom returned to the gorge while the two men rode back to the station to get help. By the time they reached LOCH ARD Gorge, it was cold and dark. The two shipwreck survivors were taken to Glenample Station to recover. Eva stayed at the station for six weeks before returning to Ireland, this time by steamship. In Melbourne, Tom Pearce received a hero's welcome. He was presented with the first gold medal of the Royal Humane Society of Victoria and a £1000 cheque from the Victorian Government. Concerts were performed to honour the young man's bravery and to raise money for those who lost family in the LOCH ARD disaster. Of the 54 crew members and passengers on board, only two survived: the apprentice, Tom Pearce and the young woman passenger, Eva Carmichael, who lost all of her family in the tragedy. Ten days after the LOCH ARD tragedy, salvage rights to the wreck were sold at auction for £2,120. Cargo valued at £3,000 was salvaged and placed on the beach, but most washed back into the sea when another storm developed. The wreck of LOCH ARD still lies at the base of Mutton Bird Island. Much of the cargo has now been salvaged and some was washed up into what is now known as LOCH ARD Gorge. Cargo and artefacts have also been illegally salvaged over many years before protective legislation was introduced. One of the most unlikely pieces of cargo to have survived the shipwreck was a Minton porcelain peacock - one of only seven in the world. The peacock was destined for the Melbourne International Exhibition in 1880. It had been well packed, which gave it adequate protection during the violent storm. Today, the Minton peacock can be seen at the Flagstaff Hill Maritime Museum in Warrnambool. From Australia's most dramatic shipwreck it has now become Australia's shipwreck artefact and is one of very few 'objects' on the Victorian State Heritage Register most valuable. The LOCH ARD shipwreck is of State significance – Victorian Heritage Register S 417 Flagstaff Hill’s collection of artefacts from LOCH ARD is significant for being one of the largest collections of artefacts from this shipwreck in Victoria. It is significant for its association with the shipwreck, which is on the Victorian Heritage Register (VHR S417). The collection is significant because of the relationship between the objects, as together they have a high potential to interpret the story of the LOCH ARD. The LOCH ARD collection is archaeologically significant as the remains of a large international passenger and cargo ship. The LOCH ARD collection is historically significant for representing aspects of Victoria’s shipping history and its potential to interpret sub-theme 1.5 of Victoria’s Framework of Historical Themes (living with natural processes). The collection is also historically significant for its association with the LOCH ARD, which was one of the worst and best known shipwrecks in Victoria’s history. Silver plated copper alloy table fork - entrée, from the wreck of the Loch Ard. Length 7⅛ " Some verdigris and silver oxide. Light encrustation on fork. Hallmark visible.flagstaff hill, warrnambool, shipwrecked coast, flagstaff hill maritime museum, maritime museum, shipwreck coast, flagstaff hill maritime village, great ocean road, loch line, loch ard, captain gibbs, eva carmichael, tom pearce, glenample station, mutton bird island, loch ard gorge, table fork - entrée, table fork, loch ard, entrée fork -
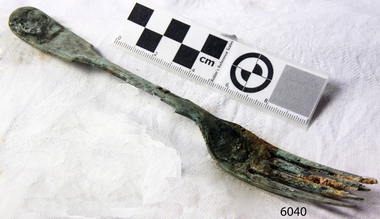 Flagstaff Hill Maritime Museum and Village
Fork
HISTORY OF THE LOCH ARD The LOCH ARD belonged to the famous Loch Line which sailed many ships from England to Australia. Built in Glasgow by Barclay, Curdle and Co. in 1873, the LOCH ARD was a three-masted square rigged iron sailing ship. The ship measured 262ft 7" (79.87m) in length, 38ft (11.58m) in width, 23ft (7m) in depth and had a gross tonnage of 1693 tons. The LOCH ARD's main mast measured a massive 150ft (45.7m) in height. LOCH ARD made three trips to Australia and one trip to Calcutta before its final voyage. LOCH ARD left England on March 2, 1878, under the command of Captain Gibbs, a newly married, 29 year old. She was bound for Melbourne with a crew of 37, plus 17 passengers and a load of cargo. The general cargo reflected the affluence of Melbourne at the time. On board were straw hats, umbrella, perfumes, clay pipes, pianos, clocks, confectionary, linen and candles, as well as a heavier load of railway irons, cement, lead and copper. There were items included that intended for display in the Melbourne International Exhibition in 1880. The voyage to Port Phillip was long but uneventful. At 3am on June 1, 1878, Captain Gibbs was expecting to see land and the passengers were becoming excited as they prepared to view their new homeland in the early morning. But LOCH ARD was running into a fog which greatly reduced visibility. Captain Gibbs was becoming anxious as there was no sign of land or the Cape Otway lighthouse. At 4am the fog lifted. A man aloft announced that he could see breakers. The sheer cliffs of Victoria's west coast came into view, and Captain Gibbs realised that the ship was much closer to them than expected. He ordered as much sail to be set as time would permit and then attempted to steer the vessel out to sea. On coming head on into the wind, the ship lost momentum, the sails fell limp and LOCH ARD's bow swung back. Gibbs then ordered the anchors to be released in an attempt to hold its position. The anchors sank some 50 fathoms - but did not hold. By this time LOCH ARD was among the breakers and the tall cliffs of Mutton Bird Island rose behind the ship. Just half a mile from the coast, the ship's bow was suddenly pulled around by the anchor. The captain tried to tack out to sea, but the ship struck a reef at the base of Mutton Bird Island, near Port Campbell. Waves broke over the ship and the top deck was loosened from the hull. The masts and rigging came crashing down knocking passengers and crew overboard. When a lifeboat was finally launched, it crashed into the side of LOCH ARD and capsized. Tom Pearce, who had launched the boat, managed to cling to its overturned hull and shelter beneath it. He drifted out to sea and then on the flood tide came into what is now known as LOCH ARD Gorge. He swam to shore, bruised and dazed, and found a cave in which to shelter. Some of the crew stayed below deck to shelter from the falling rigging but drowned when the ship slipped off the reef into deeper water. Eva Carmichael had raced onto deck to find out what was happening only to be confronted by towering cliffs looming above the stricken ship. In all the chaos, Captain Gibbs grabbed Eva and said, "If you are saved Eva, let my dear wife know that I died like a sailor". That was the last Eva Carmichael saw of the captain. She was swept off the ship by a huge wave. Eva saw Tom Pearce on a small rocky beach and yelled to attract his attention. He dived in and swam to the exhausted woman and dragged her to shore. He took her to the cave and broke open case of brandy which had washed up on the beach. He opened a bottle to revive the unconscious woman. A few hours later Tom scaled a cliff in search of help. He followed hoof prints and came by chance upon two men from nearby Glenample Station three and a half miles away. In a state of exhaustion, he told the men of the tragedy. Tom returned to the gorge while the two men rode back to the station to get help. By the time they reached LOCH ARD Gorge, it was cold and dark. The two shipwreck survivors were taken to Glenample Station to recover. Eva stayed at the station for six weeks before returning to Ireland, this time by steamship. In Melbourne, Tom Pearce received a hero's welcome. He was presented with the first gold medal of the Royal Humane Society of Victoria and a £1000 cheque from the Victorian Government. Concerts were performed to honour the young man's bravery and to raise money for those who lost family in the LOCH ARD disaster. Of the 54 crew members and passengers on board, only two survived: the apprentice, Tom Pearce and the young woman passenger, Eva Carmichael, who lost all of her family in the tragedy. Ten days after the LOCH ARD tragedy, salvage rights to the wreck were sold at auction for £2,120. Cargo valued at £3,000 was salvaged and placed on the beach, but most washed back into the sea when another storm developed. The wreck of LOCH ARD still lies at the base of Mutton Bird Island. Much of the cargo has now been salvaged and some was washed up into what is now known as LOCH ARD Gorge. Cargo and artefacts have also been illegally salvaged over many years before protective legislation was introduced. One of the most unlikely pieces of cargo to have survived the shipwreck was a Minton porcelain peacock - one of only seven in the world. The peacock was destined for the Melbourne International Exhibition in 1880. It had been well packed, which gave it adequate protection during the violent storm. Today, the Minton peacock can be seen at the Flagstaff Hill Maritime Museum in Warrnambool. From Australia's most dramatic shipwreck it has now become Australia's shipwreck artefact and is one of very few 'objects' on the Victorian State Heritage Register most valuable. The LOCH ARD shipwreck is of State significance – Victorian Heritage Register S 417 Flagstaff Hill’s collection of artefacts from LOCH ARD is significant for being one of the largest collections of artefacts from this shipwreck in Victoria. It is significant for its association with the shipwreck, which is on the Victorian Heritage Register (VHR S417). The collection is significant because of the relationship between the objects, as together they have a high potential to interpret the story of the LOCH ARD. The LOCH ARD collection is archaeologically significant as the remains of a large international passenger and cargo ship. The LOCH ARD collection is historically significant for representing aspects of Victoria’s shipping history and its potential to interpret sub-theme 1.5 of Victoria’s Framework of Historical Themes (living with natural processes). The collection is also historically significant for its association with the LOCH ARD, which was one of the worst and best known shipwrecks in Victoria’s history. Silver plated copper alloy table fork - entrée from the wreck of the Loch Ard. Some verdigris and silver oxide. Light encrustation on tines. Hallmark visible.flagstaff hill, warrnambool, shipwrecked coast, flagstaff hill maritime museum, maritime museum, shipwreck coast, flagstaff hill maritime village, great ocean road, loch line, loch ard, captain gibbs, eva carmichael, tom pearce, glenample station, mutton bird island, loch ard gorge, fork, loch ard, electroplated cutlery -
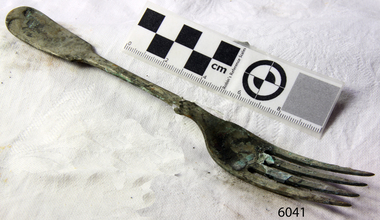 Flagstaff Hill Maritime Museum and Village
Fork
HISTORY OF THE LOCH ARD The LOCH ARD belonged to the famous Loch Line which sailed many ships from England to Australia. Built in Glasgow by Barclay, Curdle and Co. in 1873, the LOCH ARD was a three-masted square rigged iron sailing ship. The ship measured 262ft 7" (79.87m) in length, 38ft (11.58m) in width, 23ft (7m) in depth and had a gross tonnage of 1693 tons. The LOCH ARD's main mast measured a massive 150ft (45.7m) in height. LOCH ARD made three trips to Australia and one trip to Calcutta before its final voyage. LOCH ARD left England on March 2, 1878, under the command of Captain Gibbs, a newly married, 29 year old. She was bound for Melbourne with a crew of 37, plus 17 passengers and a load of cargo. The general cargo reflected the affluence of Melbourne at the time. On board were straw hats, umbrella, perfumes, clay pipes, pianos, clocks, confectionary, linen and candles, as well as a heavier load of railway irons, cement, lead and copper. There were items included that intended for display in the Melbourne International Exhibition in 1880. The voyage to Port Phillip was long but uneventful. At 3am on June 1, 1878, Captain Gibbs was expecting to see land and the passengers were becoming excited as they prepared to view their new homeland in the early morning. But LOCH ARD was running into a fog which greatly reduced visibility. Captain Gibbs was becoming anxious as there was no sign of land or the Cape Otway lighthouse. At 4am the fog lifted. A man aloft announced that he could see breakers. The sheer cliffs of Victoria's west coast came into view, and Captain Gibbs realised that the ship was much closer to them than expected. He ordered as much sail to be set as time would permit and then attempted to steer the vessel out to sea. On coming head on into the wind, the ship lost momentum, the sails fell limp and LOCH ARD's bow swung back. Gibbs then ordered the anchors to be released in an attempt to hold its position. The anchors sank some 50 fathoms - but did not hold. By this time LOCH ARD was among the breakers and the tall cliffs of Mutton Bird Island rose behind the ship. Just half a mile from the coast, the ship's bow was suddenly pulled around by the anchor. The captain tried to tack out to sea, but the ship struck a reef at the base of Mutton Bird Island, near Port Campbell. Waves broke over the ship and the top deck was loosened from the hull. The masts and rigging came crashing down knocking passengers and crew overboard. When a lifeboat was finally launched, it crashed into the side of LOCH ARD and capsized. Tom Pearce, who had launched the boat, managed to cling to its overturned hull and shelter beneath it. He drifted out to sea and then on the flood tide came into what is now known as LOCH ARD Gorge. He swam to shore, bruised and dazed, and found a cave in which to shelter. Some of the crew stayed below deck to shelter from the falling rigging but drowned when the ship slipped off the reef into deeper water. Eva Carmichael had raced onto deck to find out what was happening only to be confronted by towering cliffs looming above the stricken ship. In all the chaos, Captain Gibbs grabbed Eva and said, "If you are saved Eva, let my dear wife know that I died like a sailor". That was the last Eva Carmichael saw of the captain. She was swept off the ship by a huge wave. Eva saw Tom Pearce on a small rocky beach and yelled to attract his attention. He dived in and swam to the exhausted woman and dragged her to shore. He took her to the cave and broke open case of brandy which had washed up on the beach. He opened a bottle to revive the unconscious woman. A few hours later Tom scaled a cliff in search of help. He followed hoof prints and came by chance upon two men from nearby Glenample Station three and a half miles away. In a state of exhaustion, he told the men of the tragedy. Tom returned to the gorge while the two men rode back to the station to get help. By the time they reached LOCH ARD Gorge, it was cold and dark. The two shipwreck survivors were taken to Glenample Station to recover. Eva stayed at the station for six weeks before returning to Ireland, this time by steamship. In Melbourne, Tom Pearce received a hero's welcome. He was presented with the first gold medal of the Royal Humane Society of Victoria and a £1000 cheque from the Victorian Government. Concerts were performed to honour the young man's bravery and to raise money for those who lost family in the LOCH ARD disaster. Of the 54 crew members and passengers on board, only two survived: the apprentice, Tom Pearce and the young woman passenger, Eva Carmichael, who lost all of her family in the tragedy. Ten days after the LOCH ARD tragedy, salvage rights to the wreck were sold at auction for £2,120. Cargo valued at £3,000 was salvaged and placed on the beach, but most washed back into the sea when another storm developed. The wreck of LOCH ARD still lies at the base of Mutton Bird Island. Much of the cargo has now been salvaged and some was washed up into what is now known as LOCH ARD Gorge. Cargo and artefacts have also been illegally salvaged over many years before protective legislation was introduced. One of the most unlikely pieces of cargo to have survived the shipwreck was a Minton porcelain peacock - one of only seven in the world. The peacock was destined for the Melbourne International Exhibition in 1880. It had been well packed, which gave it adequate protection during the violent storm. Today, the Minton peacock can be seen at the Flagstaff Hill Maritime Museum in Warrnambool. From Australia's most dramatic shipwreck it has now become Australia's shipwreck artefact and is one of very few 'objects' on the Victorian State Heritage Register most valuable. The LOCH ARD shipwreck is of State significance – Victorian Heritage Register S 417 Flagstaff Hill’s collection of artefacts from LOCH ARD is significant for being one of the largest collections of artefacts from this shipwreck in Victoria. It is significant for its association with the shipwreck, which is on the Victorian Heritage Register (VHR S417). The collection is significant because of the relationship between the objects, as together they have a high potential to interpret the story of the LOCH ARD. The LOCH ARD collection is archaeologically significant as the remains of a large international passenger and cargo ship. The LOCH ARD collection is historically significant for representing aspects of Victoria’s shipping history and its potential to interpret sub-theme 1.5 of Victoria’s Framework of Historical Themes (living with natural processes). The collection is also historically significant for its association with the LOCH ARD, which was one of the worst and best known shipwrecks in Victoria’s history. Silver plated copper alloy table forks - entrée from the wreck of the Loch Ard. Some verdigris and silver oxide. Light encrustation on tines. Hallmark visible.flagstaff hill, warrnambool, shipwrecked coast, flagstaff hill maritime museum, maritime museum, shipwreck coast, flagstaff hill maritime village, great ocean road, loch line, loch ard, captain gibbs, eva carmichael, tom pearce, glenample station, mutton bird island, loch ard gorge, fork, electroplated cutlery -
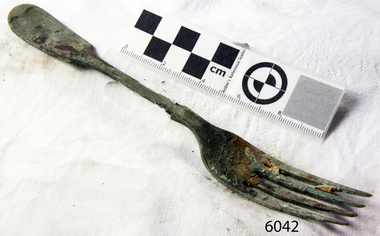 Flagstaff Hill Maritime Museum and Village
Fork
HISTORY OF THE LOCH ARD The LOCH ARD belonged to the famous Loch Line which sailed many ships from England to Australia. Built in Glasgow by Barclay, Curdle and Co. in 1873, the LOCH ARD was a three-masted square rigged iron sailing ship. The ship measured 262ft 7" (79.87m) in length, 38ft (11.58m) in width, 23ft (7m) in depth and had a gross tonnage of 1693 tons. The LOCH ARD's main mast measured a massive 150ft (45.7m) in height. LOCH ARD made three trips to Australia and one trip to Calcutta before its final voyage. LOCH ARD left England on March 2, 1878, under the command of Captain Gibbs, a newly married, 29 year old. She was bound for Melbourne with a crew of 37, plus 17 passengers and a load of cargo. The general cargo reflected the affluence of Melbourne at the time. On board were straw hats, umbrella, perfumes, clay pipes, pianos, clocks, confectionary, linen and candles, as well as a heavier load of railway irons, cement, lead and copper. There were items included that intended for display in the Melbourne International Exhibition in 1880. The voyage to Port Phillip was long but uneventful. At 3am on June 1, 1878, Captain Gibbs was expecting to see land and the passengers were becoming excited as they prepared to view their new homeland in the early morning. But LOCH ARD was running into a fog which greatly reduced visibility. Captain Gibbs was becoming anxious as there was no sign of land or the Cape Otway lighthouse. At 4am the fog lifted. A man aloft announced that he could see breakers. The sheer cliffs of Victoria's west coast came into view, and Captain Gibbs realised that the ship was much closer to them than expected. He ordered as much sail to be set as time would permit and then attempted to steer the vessel out to sea. On coming head on into the wind, the ship lost momentum, the sails fell limp and LOCH ARD's bow swung back. Gibbs then ordered the anchors to be released in an attempt to hold its position. The anchors sank some 50 fathoms - but did not hold. By this time LOCH ARD was among the breakers and the tall cliffs of Mutton Bird Island rose behind the ship. Just half a mile from the coast, the ship's bow was suddenly pulled around by the anchor. The captain tried to tack out to sea, but the ship struck a reef at the base of Mutton Bird Island, near Port Campbell. Waves broke over the ship and the top deck was loosened from the hull. The masts and rigging came crashing down knocking passengers and crew overboard. When a lifeboat was finally launched, it crashed into the side of LOCH ARD and capsized. Tom Pearce, who had launched the boat, managed to cling to its overturned hull and shelter beneath it. He drifted out to sea and then on the flood tide came into what is now known as LOCH ARD Gorge. He swam to shore, bruised and dazed, and found a cave in which to shelter. Some of the crew stayed below deck to shelter from the falling rigging but drowned when the ship slipped off the reef into deeper water. Eva Carmichael had raced onto deck to find out what was happening only to be confronted by towering cliffs looming above the stricken ship. In all the chaos, Captain Gibbs grabbed Eva and said, "If you are saved Eva, let my dear wife know that I died like a sailor". That was the last Eva Carmichael saw of the captain. She was swept off the ship by a huge wave. Eva saw Tom Pearce on a small rocky beach and yelled to attract his attention. He dived in and swam to the exhausted woman and dragged her to shore. He took her to the cave and broke open case of brandy which had washed up on the beach. He opened a bottle to revive the unconscious woman. A few hours later Tom scaled a cliff in search of help. He followed hoof prints and came by chance upon two men from nearby Glenample Station three and a half miles away. In a state of exhaustion, he told the men of the tragedy. Tom returned to the gorge while the two men rode back to the station to get help. By the time they reached LOCH ARD Gorge, it was cold and dark. The two shipwreck survivors were taken to Glenample Station to recover. Eva stayed at the station for six weeks before returning to Ireland, this time by steamship. In Melbourne, Tom Pearce received a hero's welcome. He was presented with the first gold medal of the Royal Humane Society of Victoria and a £1000 cheque from the Victorian Government. Concerts were performed to honour the young man's bravery and to raise money for those who lost family in the LOCH ARD disaster. Of the 54 crew members and passengers on board, only two survived: the apprentice, Tom Pearce and the young woman passenger, Eva Carmichael, who lost all of her family in the tragedy. Ten days after the LOCH ARD tragedy, salvage rights to the wreck were sold at auction for £2,120. Cargo valued at £3,000 was salvaged and placed on the beach, but most washed back into the sea when another storm developed. The wreck of LOCH ARD still lies at the base of Mutton Bird Island. Much of the cargo has now been salvaged and some was washed up into what is now known as LOCH ARD Gorge. Cargo and artefacts have also been illegally salvaged over many years before protective legislation was introduced. One of the most unlikely pieces of cargo to have survived the shipwreck was a Minton porcelain peacock - one of only seven in the world. The peacock was destined for the Melbourne International Exhibition in 1880. It had been well packed, which gave it adequate protection during the violent storm. Today, the Minton peacock can be seen at the Flagstaff Hill Maritime Museum in Warrnambool. From Australia's most dramatic shipwreck it has now become Australia's shipwreck artefact and is one of very few 'objects' on the Victorian State Heritage Register most valuable. The LOCH ARD shipwreck is of State significance – Victorian Heritage Register S 417 Flagstaff Hill’s collection of artefacts from LOCH ARD is significant for being one of the largest collections of artefacts from this shipwreck in Victoria. It is significant for its association with the shipwreck, which is on the Victorian Heritage Register (VHR S417). The collection is significant because of the relationship between the objects, as together they have a high potential to interpret the story of the LOCH ARD. The LOCH ARD collection is archaeologically significant as the remains of a large international passenger and cargo ship. The LOCH ARD collection is historically significant for representing aspects of Victoria’s shipping history and its potential to interpret sub-theme 1.5 of Victoria’s Framework of Historical Themes (living with natural processes). The collection is also historically significant for its association with the LOCH ARD, which was one of the worst and best known shipwrecks in Victoria’s history. Silver plated copper alloy table fork - entrée from the wreck of the Loch Ard. Some verdigris and silver oxide. Light encrustation on tines. Hallmark visible.flagstaff hill, warrnambool, shipwrecked coast, flagstaff hill maritime museum, maritime museum, shipwreck coast, flagstaff hill maritime village, great ocean road, loch line, loch ard, captain gibbs, eva carmichael, tom pearce, glenample station, mutton bird island, loch ard gorge, fork, electroplated cutlery -
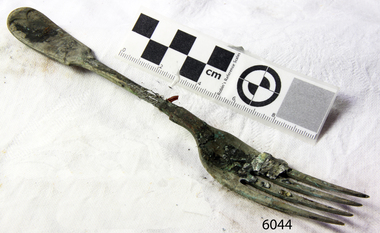 Flagstaff Hill Maritime Museum and Village
Fork
HISTORY OF THE LOCH ARD The LOCH ARD belonged to the famous Loch Line which sailed many ships from England to Australia. Built in Glasgow by Barclay, Curdle and Co. in 1873, the LOCH ARD was a three-masted square rigged iron sailing ship. The ship measured 262ft 7" (79.87m) in length, 38ft (11.58m) in width, 23ft (7m) in depth and had a gross tonnage of 1693 tons. The LOCH ARD's main mast measured a massive 150ft (45.7m) in height. LOCH ARD made three trips to Australia and one trip to Calcutta before its final voyage. LOCH ARD left England on March 2, 1878, under the command of Captain Gibbs, a newly married, 29 year old. She was bound for Melbourne with a crew of 37, plus 17 passengers and a load of cargo. The general cargo reflected the affluence of Melbourne at the time. On board were straw hats, umbrella, perfumes, clay pipes, pianos, clocks, confectionary, linen and candles, as well as a heavier load of railway irons, cement, lead and copper. There were items included that intended for display in the Melbourne International Exhibition in 1880. The voyage to Port Phillip was long but uneventful. At 3am on June 1, 1878, Captain Gibbs was expecting to see land and the passengers were becoming excited as they prepared to view their new homeland in the early morning. But LOCH ARD was running into a fog which greatly reduced visibility. Captain Gibbs was becoming anxious as there was no sign of land or the Cape Otway lighthouse. At 4am the fog lifted. A man aloft announced that he could see breakers. The sheer cliffs of Victoria's west coast came into view, and Captain Gibbs realised that the ship was much closer to them than expected. He ordered as much sail to be set as time would permit and then attempted to steer the vessel out to sea. On coming head on into the wind, the ship lost momentum, the sails fell limp and LOCH ARD's bow swung back. Gibbs then ordered the anchors to be released in an attempt to hold its position. The anchors sank some 50 fathoms - but did not hold. By this time LOCH ARD was among the breakers and the tall cliffs of Mutton Bird Island rose behind the ship. Just half a mile from the coast, the ship's bow was suddenly pulled around by the anchor. The captain tried to tack out to sea, but the ship struck a reef at the base of Mutton Bird Island, near Port Campbell. Waves broke over the ship and the top deck was loosened from the hull. The masts and rigging came crashing down knocking passengers and crew overboard. When a lifeboat was finally launched, it crashed into the side of LOCH ARD and capsized. Tom Pearce, who had launched the boat, managed to cling to its overturned hull and shelter beneath it. He drifted out to sea and then on the flood tide came into what is now known as LOCH ARD Gorge. He swam to shore, bruised and dazed, and found a cave in which to shelter. Some of the crew stayed below deck to shelter from the falling rigging but drowned when the ship slipped off the reef into deeper water. Eva Carmichael had raced onto deck to find out what was happening only to be confronted by towering cliffs looming above the stricken ship. In all the chaos, Captain Gibbs grabbed Eva and said, "If you are saved Eva, let my dear wife know that I died like a sailor". That was the last Eva Carmichael saw of the captain. She was swept off the ship by a huge wave. Eva saw Tom Pearce on a small rocky beach and yelled to attract his attention. He dived in and swam to the exhausted woman and dragged her to shore. He took her to the cave and broke open case of brandy which had washed up on the beach. He opened a bottle to revive the unconscious woman. A few hours later Tom scaled a cliff in search of help. He followed hoof prints and came by chance upon two men from nearby Glenample Station three and a half miles away. In a state of exhaustion, he told the men of the tragedy. Tom returned to the gorge while the two men rode back to the station to get help. By the time they reached LOCH ARD Gorge, it was cold and dark. The two shipwreck survivors were taken to Glenample Station to recover. Eva stayed at the station for six weeks before returning to Ireland, this time by steamship. In Melbourne, Tom Pearce received a hero's welcome. He was presented with the first gold medal of the Royal Humane Society of Victoria and a £1000 cheque from the Victorian Government. Concerts were performed to honour the young man's bravery and to raise money for those who lost family in the LOCH ARD disaster. Of the 54 crew members and passengers on board, only two survived: the apprentice, Tom Pearce and the young woman passenger, Eva Carmichael, who lost all of her family in the tragedy. Ten days after the LOCH ARD tragedy, salvage rights to the wreck were sold at auction for £2,120. Cargo valued at £3,000 was salvaged and placed on the beach, but most washed back into the sea when another storm developed. The wreck of LOCH ARD still lies at the base of Mutton Bird Island. Much of the cargo has now been salvaged and some was washed up into what is now known as LOCH ARD Gorge. Cargo and artefacts have also been illegally salvaged over many years before protective legislation was introduced. One of the most unlikely pieces of cargo to have survived the shipwreck was a Minton porcelain peacock - one of only seven in the world. The peacock was destined for the Melbourne International Exhibition in 1880. It had been well packed, which gave it adequate protection during the violent storm. Today, the Minton peacock can be seen at the Flagstaff Hill Maritime Museum in Warrnambool. From Australia's most dramatic shipwreck it has now become Australia's shipwreck artefact and is one of very few 'objects' on the Victorian State Heritage Register most valuable. The LOCH ARD shipwreck is of State significance – Victorian Heritage Register S 417 Flagstaff Hill’s collection of artefacts from LOCH ARD is significant for being one of the largest collections of artefacts from this shipwreck in Victoria. It is significant for its association with the shipwreck, which is on the Victorian Heritage Register (VHR S417). The collection is significant because of the relationship between the objects, as together they have a high potential to interpret the story of the LOCH ARD. The LOCH ARD collection is archaeologically significant as the remains of a large international passenger and cargo ship. The LOCH ARD collection is historically significant for representing aspects of Victoria’s shipping history and its potential to interpret sub-theme 1.5 of Victoria’s Framework of Historical Themes (living with natural processes). The collection is also historically significant for its association with the LOCH ARD, which was one of the worst and best known shipwrecks in Victoria’s history. Silver plated copper alloy table fork - entrée from the wreck of the Loch Ard. Some verdigris and silver oxide. Light encrustation on tines. Hallmark visible.flagstaff hill, warrnambool, shipwrecked coast, flagstaff hill maritime museum, maritime museum, shipwreck coast, flagstaff hill maritime village, great ocean road, loch line, loch ard, captain gibbs, eva carmichael, tom pearce, glenample station, mutton bird island, loch ard gorge, fork, loch ard, electroplated cutlery -
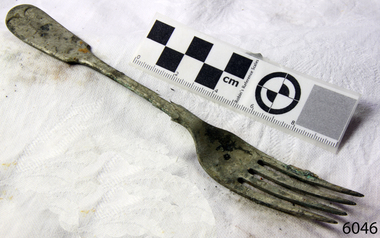 Flagstaff Hill Maritime Museum and Village
Fork
HISTORY OF THE LOCH ARD The LOCH ARD belonged to the famous Loch Line which sailed many ships from England to Australia. Built in Glasgow by Barclay, Curdle and Co. in 1873, the LOCH ARD was a three-masted square rigged iron sailing ship. The ship measured 262ft 7" (79.87m) in length, 38ft (11.58m) in width, 23ft (7m) in depth and had a gross tonnage of 1693 tons. The LOCH ARD's main mast measured a massive 150ft (45.7m) in height. LOCH ARD made three trips to Australia and one trip to Calcutta before its final voyage. LOCH ARD left England on March 2, 1878, under the command of Captain Gibbs, a newly married, 29 year old. She was bound for Melbourne with a crew of 37, plus 17 passengers and a load of cargo. The general cargo reflected the affluence of Melbourne at the time. On board were straw hats, umbrella, perfumes, clay pipes, pianos, clocks, confectionary, linen and candles, as well as a heavier load of railway irons, cement, lead and copper. There were items included that intended for display in the Melbourne International Exhibition in 1880. The voyage to Port Phillip was long but uneventful. At 3am on June 1, 1878, Captain Gibbs was expecting to see land and the passengers were becoming excited as they prepared to view their new homeland in the early morning. But LOCH ARD was running into a fog which greatly reduced visibility. Captain Gibbs was becoming anxious as there was no sign of land or the Cape Otway lighthouse. At 4am the fog lifted. A man aloft announced that he could see breakers. The sheer cliffs of Victoria's west coast came into view, and Captain Gibbs realised that the ship was much closer to them than expected. He ordered as much sail to be set as time would permit and then attempted to steer the vessel out to sea. On coming head on into the wind, the ship lost momentum, the sails fell limp and LOCH ARD's bow swung back. Gibbs then ordered the anchors to be released in an attempt to hold its position. The anchors sank some 50 fathoms - but did not hold. By this time LOCH ARD was among the breakers and the tall cliffs of Mutton Bird Island rose behind the ship. Just half a mile from the coast, the ship's bow was suddenly pulled around by the anchor. The captain tried to tack out to sea, but the ship struck a reef at the base of Mutton Bird Island, near Port Campbell. Waves broke over the ship and the top deck was loosened from the hull. The masts and rigging came crashing down knocking passengers and crew overboard. When a lifeboat was finally launched, it crashed into the side of LOCH ARD and capsized. Tom Pearce, who had launched the boat, managed to cling to its overturned hull and shelter beneath it. He drifted out to sea and then on the flood tide came into what is now known as LOCH ARD Gorge. He swam to shore, bruised and dazed, and found a cave in which to shelter. Some of the crew stayed below deck to shelter from the falling rigging but drowned when the ship slipped off the reef into deeper water. Eva Carmichael had raced onto deck to find out what was happening only to be confronted by towering cliffs looming above the stricken ship. In all the chaos, Captain Gibbs grabbed Eva and said, "If you are saved Eva, let my dear wife know that I died like a sailor". That was the last Eva Carmichael saw of the captain. She was swept off the ship by a huge wave. Eva saw Tom Pearce on a small rocky beach and yelled to attract his attention. He dived in and swam to the exhausted woman and dragged her to shore. He took her to the cave and broke open case of brandy which had washed up on the beach. He opened a bottle to revive the unconscious woman. A few hours later Tom scaled a cliff in search of help. He followed hoof prints and came by chance upon two men from nearby Glenample Station three and a half miles away. In a state of exhaustion, he told the men of the tragedy. Tom returned to the gorge while the two men rode back to the station to get help. By the time they reached LOCH ARD Gorge, it was cold and dark. The two shipwreck survivors were taken to Glenample Station to recover. Eva stayed at the station for six weeks before returning to Ireland, this time by steamship. In Melbourne, Tom Pearce received a hero's welcome. He was presented with the first gold medal of the Royal Humane Society of Victoria and a £1000 cheque from the Victorian Government. Concerts were performed to honour the young man's bravery and to raise money for those who lost family in the LOCH ARD disaster. Of the 54 crew members and passengers on board, only two survived: the apprentice, Tom Pearce and the young woman passenger, Eva Carmichael, who lost all of her family in the tragedy. Ten days after the LOCH ARD tragedy, salvage rights to the wreck were sold at auction for £2,120. Cargo valued at £3,000 was salvaged and placed on the beach, but most washed back into the sea when another storm developed. The wreck of LOCH ARD still lies at the base of Mutton Bird Island. Much of the cargo has now been salvaged and some was washed up into what is now known as LOCH ARD Gorge. Cargo and artefacts have also been illegally salvaged over many years before protective legislation was introduced. One of the most unlikely pieces of cargo to have survived the shipwreck was a Minton porcelain peacock - one of only seven in the world. The peacock was destined for the Melbourne International Exhibition in 1880. It had been well packed, which gave it adequate protection during the violent storm. Today, the Minton peacock can be seen at the Flagstaff Hill Maritime Museum in Warrnambool. From Australia's most dramatic shipwreck it has now become Australia's shipwreck artefact and is one of very few 'objects' on the Victorian State Heritage Register most valuable. The LOCH ARD shipwreck is of State significance – Victorian Heritage Register S 417 Flagstaff Hill’s collection of artefacts from LOCH ARD is significant for being one of the largest collections of artefacts from this shipwreck in Victoria. It is significant for its association with the shipwreck, which is on the Victorian Heritage Register (VHR S417). The collection is significant because of the relationship between the objects, as together they have a high potential to interpret the story of the LOCH ARD. The LOCH ARD collection is archaeologically significant as the remains of a large international passenger and cargo ship. The LOCH ARD collection is historically significant for representing aspects of Victoria’s shipping history and its potential to interpret sub-theme 1.5 of Victoria’s Framework of Historical Themes (living with natural processes). The collection is also historically significant for its association with the LOCH ARD, which was one of the worst and best known shipwrecks in Victoria’s history Silver plated copper alloy table fork - entrée from the wreck of the Loch Ard. Some verdigris and silver oxide. Light encrustation on tines. Hallmark visible.flagstaff hill, warrnambool, shipwrecked coast, flagstaff hill maritime museum, maritime museum, shipwreck coast, flagstaff hill maritime village, great ocean road, loch line, loch ard, captain gibbs, eva carmichael, tom pearce, glenample station, mutton bird island, loch ard gorge, fork, lock ard, electroplated cutlery