
Showing 1113 items matching "museum station"
-
 Melbourne Tram Museum
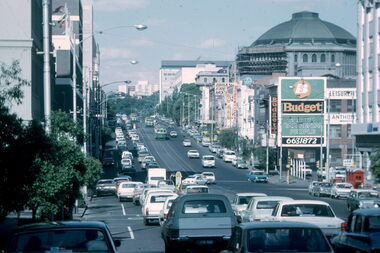
Slide - La Trobe St prior to Museum Station work, Warren Doubleday, 3/12/1972
... La Trobe St prior to Museum Station work......Museum station...Set of 2 colour slides of La Trobe St looking East from near Elizabeth St prior to the construction work for the future Museum or Melbourne Central station commenced. Shows the buildings along the south side of the street between Elizabeth and Swanston St. ...Yields information about La Trobe St prior to the construction of Melbourne Central station work commencing. tramways La Trobe St Museum station Has in pencil slide number "26/72/29 & 30" Colour slide - Kodak cardboard mount - set of 2 Slide La Trobe St prior to Museum Station work Warren Doubleday ...Set of 2 colour slides of La Trobe St looking East from near Elizabeth St prior to the construction work for the future Museum or Melbourne Central station commenced. Shows the buildings along the south side of the street between Elizabeth and Swanston St. Trams are in the view, Has offices or signs for Budget rent cars, Empire Hotel, Kodak, City Central, Brian Freyen Motors and the State Library.Yields information about La Trobe St prior to the construction of Melbourne Central station work commencing.Colour slide - Kodak cardboard mount - set of 2Has in pencil slide number "26/72/29 & 30"tramways, la trobe st, museum station -
 Port Melbourne Historical & Preservation Society
Poster - Immigration Museum, "Station Pier, Gateway to a New Life", Exhibition promotion, 2004
... Immigration Museum, "Station Pier, Gateway to a New Life", Exhibition promotion...station pier...immigration museum...Station Pier - "Gateway to a New Life" Poster for exhibition from 4/10/2004 to 11/09/2005.at the Immigration Museum ...piers and wharves - station pier immigration museum heritage council victoria Station Pier - "Gateway to a New Life" Poster for exhibition from 4/10/2004 to 11/09/2005.at the Immigration Museum Poster Immigration Museum, "Station Pier, Gateway to a New Life", Exhibition promotion ...Station Pier - "Gateway to a New Life" Poster for exhibition from 4/10/2004 to 11/09/2005.at the Immigration Museum piers and wharves - station pier, immigration museum, heritage council victoria -
 Melbourne Tram Museum
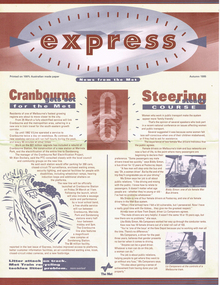
Newsletter - Set of 8, The Met, Public Transport Corporation, "Express - News from The Met, Summer 1994 to Summer 1996
... ...Museum station...Has stories about the Cranbourne electrification, female traffic staff on the buses and trams, refurbishment of W class trams, METROL, punctuality, history dates, railways, CSE's and a list of Melbourne events. 2 - as above - Express - News from The Met - Summer `1995/96" - rail timetable changes, night rider buses, police, fares and a list of Melbourne events. 3 - as above - Express - News from The Met - Autumn 1996"- Grand Prix, Franklin St terminus replaced by Melbourne University Superstops, railway power supply and a list of Melbourne events. 4 - Express - Summer 1994 - Opening of Museum station, Metcard, CSEs, Student travel, Cranbourne, and Dandenong stations 5 - Winter 1995 - traffic records, increased spending on projects, safety, tictile tiles, city circle tram, short trips tickets, lost property 6 - Summer 1995 - PTC report card, Bundoora extension, transit police, 7 - Spring 1996 - more people using public transport, City Circle, recycling 8 - Summer 1996/97 - Museum station to open on Sundays, change of name to Central, Richmond station, final message from Alan Brown, conductors, Metcards, and sprinter railcars....Trams tramways The Met Women CSE Customer Service Employees Railways W Class Buses Fares Police Security Franklin St Victoria St Melbourne University Grand Prix Museum station 1 - Newsletter, large format, special size titled "Express - News from The Met - Autumn 1995", four pages. ...Yields information about Victorian public transport news.1 - Newsletter, large format, special size titled "Express - News from The Met - Autumn 1995", four pages. Has stories about the Cranbourne electrification, female traffic staff on the buses and trams, refurbishment of W class trams, METROL, punctuality, history dates, railways, CSE's and a list of Melbourne events. 2 - as above - Express - News from The Met - Summer `1995/96" - rail timetable changes, night rider buses, police, fares and a list of Melbourne events. 3 - as above - Express - News from The Met - Autumn 1996"- Grand Prix, Franklin St terminus replaced by Melbourne University Superstops, railway power supply and a list of Melbourne events. 4 - Express - Summer 1994 - Opening of Museum station, Metcard, CSEs, Student travel, Cranbourne, and Dandenong stations 5 - Winter 1995 - traffic records, increased spending on projects, safety, tictile tiles, city circle tram, short trips tickets, lost property 6 - Summer 1995 - PTC report card, Bundoora extension, transit police, 7 - Spring 1996 - more people using public transport, City Circle, recycling 8 - Summer 1996/97 - Museum station to open on Sundays, change of name to Central, Richmond station, final message from Alan Brown, conductors, Metcards, and sprinter railcars.trams, tramways, the met, women, cse, customer service employees, railways, w class, buses, fares, police, security, franklin st, victoria st, melbourne university, grand prix, museum station -
 Melbourne Tram Museum
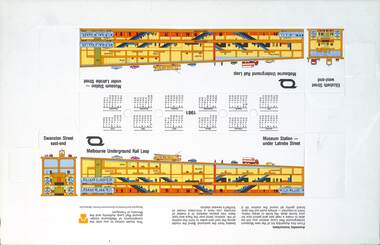
Ephemera - Fold up calendar - MURLA, Melbourne Underground Rail Loop Authority (MURLA), late 1981
... ...Museum Station...Shows a cross section through the Museum Station under La Trobe St (later Melbourne Central), showing trams, stairs, trains of the then new underground station. ...Demonstrates a calendar produced by MURLA to show the Museum Station in cross section. MURLA Museum Station diagrams Printed card with punched out folds and 1981 calendar. ...Shows a cross section through the Museum Station under La Trobe St (later Melbourne Central), showing trams, stairs, trains of the then new underground station. Published by the Melbourne Underground Rail Loop Authority and Ministry of Transport, late 1980. The station was opened in Jan. 1981 see reference. Note the Z class trams with incorrect doors given the trolley pole and silver or Hitachi trains.Demonstrates a calendar produced by MURLA to show the Museum Station in cross section.Printed card with punched out folds and 1981 calendar. Two copies held.murla, museum station, diagrams -
 Melbourne Tram Museum
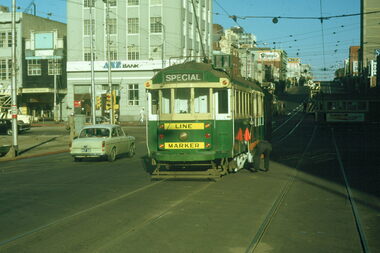
Slide - Melbourne tram works La Trobe and Elizabeth Sts, Warren Doubleday, 5/73
... ...Museum station...Set of 3 colour slides of overhead and tram track line marking at the intersection of Elizabeth and La Trobe St as part of the work for the future work on Melbourne Museum station and the removal of buildings along La Trobe St and the connecting curve between La Trobe and Elizabeth Sts. ...Set of 3 colour slides of overhead and tram track line marking at the intersection of Elizabeth and La Trobe St as part of the work for the future work on Melbourne Museum station and the removal of buildings along La Trobe St and the connecting curve between La Trobe and Elizabeth Sts. ...Set of 3 colour slides of overhead and tram track line marking at the intersection of Elizabeth and La Trobe St as part of the work for the future work on Melbourne Museum station and the removal of buildings along La Trobe St and the connecting curve between La Trobe and Elizabeth Sts. Early May 1973. Has the line marker tram W2 233 in operations and photos of the overhead trucks. In the background are the ANZ Bank and the Argus buildings,Yields information about La Trobe St prior to the construction of Melbourne Central station work commencing.Colour slide - Kodak cardboard mount - set of 3Has in pencil slide number "5/7/8 to 10"tramways, la trobe st, museum station, elizabeth st, overhead, w2 class, line marking, tram 233 -
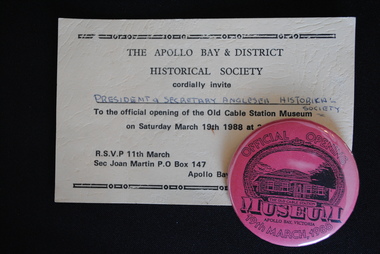 Anglesea and District Historical Society
Invitation Card, 1988
... ...old cable station museum...Invitation to opening of the Old Cable Station Museum in Apollo Bay on March 19, 1988 at 2pm. ...THE APOLLO BAY & DISTRICT / HISTORICAL SOCIETY / cordially invite / PRESIDENT & SECRETARY ANGLESEA HISTORICAL SOCIETY / To the official opening of the Old Cable Station Museum / on Saturday March 19th 1988 at 2 pm...apollo bay & district historial society old cable station museum 1988 THE APOLLO BAY & DISTRICT / HISTORICAL SOCIETY / cordially invite / PRESIDENT & SECRETARY ANGLESEA HISTORICAL SOCIETY / To the official opening of the Old Cable Station Museum / on Saturday March 19th 1988 at 2 pm. / R.S.V.P. 11 March / Sec: Joan Martin P.O Box 147 / Apollo Bay. ...Invitation to opening of the Old Cable Station Museum in Apollo Bay on March 19, 1988 at 2pm. The invitation is printed in black on a yellow card. Included is a pink round pin with a picture of the museum and opening details.THE APOLLO BAY & DISTRICT / HISTORICAL SOCIETY / cordially invite / PRESIDENT & SECRETARY ANGLESEA HISTORICAL SOCIETY / To the official opening of the Old Cable Station Museum / on Saturday March 19th 1988 at 2 pm. / R.S.V.P. 11 March / Sec: Joan Martin P.O Box 147 / Apollo Bay. Pink pin with picture of museum.apollo bay & district historial society, old cable station museum, 1988 -
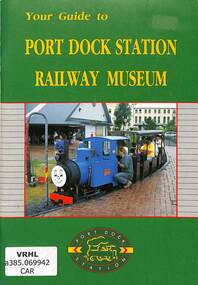 Victorian Railway History Library
Book, Carter, Mark, Port Dock Station Railway Museum, 1992
... Port Dock Station Railway Museum...Port Dock Station Railway Museum (S.A.) Inc Publications... Railway Museum Book Carter, Mark R. Sampson Port Dock Station Railway Museum (S.A.) ...Details about the Port Dock railway museum in Adelaide South Australia and the collection of rollingstock and railway memorabiliaill, p.40.non-fictionDetails about the Port Dock railway museum in Adelaide South Australia and the collection of rollingstock and railway memorabiliarailway and tramway preservation - australia, mile end railway museum - south australia -
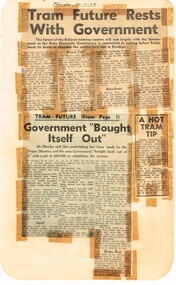 Ballarat Tramway Museum
Newspaper, State Electricity Commission of Victoria (SEC) and The Courier Ballarat, Tram future rests with Government, Feb. 1962
... Museum... Power Station...Closure Letter To The Editor Editorial SEC Rehabilitation Staff Buses Concession Fares Museum Power Station Ballarat A Power Station Botanical Gardens Set of three Foolscap sheet of plain paper, with rounded corners, with newspaper cuttings, concerning the mooted closure of the Ballarat Tram system 20 Feb and 22 Feb 1962. ...Yields information about the views of various letter writers, views of the Courier, union views, rehabilitation costs Geelong, public meetings and meetings with SEC.Set of three Foolscap sheet of plain paper, with rounded corners, with newspaper cuttings, concerning the mooted closure of the Ballarat Tram system 20 Feb and 22 Feb 1962. All from The Courier, unless noted otherwise. 7940.1 1 - "Tram future rests with Government" - 22-2-62 - news report about the SEC being insistent on tabling the motion to close in Parliament, price of replacement trams. Attending Mr K L Murray, Mr Linaker, Mr A V Mawby of the SEC, Cr. A Pittard and Town Clerk Mr. H H Maddern. 2 - "Government "Bought itself out" - continuation from above, quoting Mr Mawby about the rehabilitation of the system in 1934 by the Government, discussions about fares, losses, time of travel from Sebastopol compared to buses. Also notes Cr Tuppen of Sebastopol. 3 - "A hot tram tip" - 22-2-62 - suggestion by Cr Cooper suggested the tram be retained around the lake for Historical reasons, Mr Murray of the SEC, sell/give to the Historical Society, Cr W E Roff replied about not wanting them and put them in a tip. 7940.2 1 - "SEC Not to sell this - 20-2-62 - photo of the power house in Ripon St, with the caption that the SEC did not propose to sell the property, but would be selling the tram depot site. 2 - "The talk was trams" - 22-2-62 - photo of Mr Mawby, Cr A D Mason, H Linaker and Mr K L Murray at the meeting with Council the previous day. 3 - "Save our Trams" - 21-2-62 - long letter - about the closing the trams and railway losses including building, new rail lines being built. 4 - "Tram fight" - letter by R Courtney Union Secretary, about the formation of a Committee to oppose closure. 7940.3 "Sound Shell Plan+ - 21-2-62 - Long editorial about the construction of a Sound Shell and council discussions and inability to make a decision.closure, letter to the editor, editorial, sec, rehabilitation, staff, buses, concession fares, museum, power station, ballarat a power station, botanical gardens -
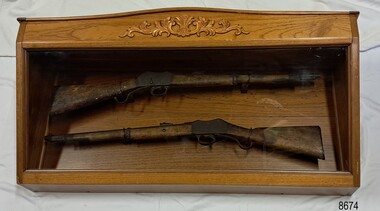 Flagstaff Hill Maritime Museum and Village
Weapon - Historic Rifles, Royal Small Arms Factory, 1877-1900
... Museum...Warrnambool Police Station...Station. In 2025, these items were formally deaccessioned by the Victoria Police Museum, and ownership was transferred to the Warrnambool Police Station. ...Station. In 2025, these items were formally deaccessioned by the Victoria Police Museum, and ownership was transferred to the Warrnambool Police Station. ...Martini-Henry Artillery Carbin rifles were made by the Royal Small Arms Factory at Enfield, Britain, from 1877 until 1900. Many were distributed to the British Colonies, including this pair, which was allocated to the Woodford Police, Victoria Police District of Warrnambool, Southwest Victoria. The Carbine model rifles were shorter than the standard rifles and more suited to mounted police and troopers. It is likely that in the early 20th century, Victoria Police replaced the two carbines with more modern firearms, and the outdated guns were stored in the stables. The rifles were left there and likely forgotten about due to changes in police staff. In 1915, police authorities announced that they would be replacing patrol horses with bicycles and would also close some smaller police stations. This affected Woodford Police Station, which closed in 1917. The forgotten firearms remained in the stables and were noticed by schoolboy Robert Jellie in 1940 and seen again in 1946. In 1995, the property was sold by the Education Department to a private owner. The Woodford Community donated the pair of Martini-Henry Carbines to the Victoria Police Museum in the late 1990s for mounting and display, which was funded by the Victoria Police Historical Society Inc. The decorative wood and glass display case and frame were designed to preserve the significant history of the guns. On November 1st 1999, the display was presented to Warrnambool Police and the local community due to the historical significance of the Woodford Police Station. In 2025, these items were formally deaccessioned by the Victoria Police Museum, and ownership was transferred to the Warrnambool Police Station. On March 10th, 2025, the display was transferred to Flagstaff Hill Maritime Museum and Village, where the historical story of the Martini-Henry Carbines could continue to be preserved and accessed by local families, the community, visitors to the area, and online visitors. WOODFORD POLICE: - The small settlement at Woodford was established in the 1840s around the Merri River where there was a ford across the water and a bridge from 1848 to 1851. The area was settled very early in Victoria’s history, and the river crossing provided travellers with access to the early route between Port Fairy (named Belfast at that time), Warrnambool and Melbourne. Occasionally, a Warrnambool police trooper would ride through Woodford and the district. In December 1854, Woodford Police barracks and stables were built on the hill by the Merri River on Bridge Road east, where Jubilee Park now stands. A local mounted trooper kept law and order in the area. In 1856, a lock-up was installed, and the first Woodford Police Station was in action in 1857. By 1871, the police station had been moved from the hill to land across the Merri River bridge, on the southern side of Bridge Road west, near Mill Street. In 1890, the police residence there was replaced by a stone Edwardian-style building with the stables and lock-up behind it and the old police station at the rear. The police continued to have a presence in Woodford until it was closed by the Police Commissioner in July 1917 for economic reasons. The residence was used for government housing until 1923, when it was taken over by the Education Department for the school teacher’s home. In 1995, it became privately owned. THE MARTINI-HENRY ARTILLERY CARBINE: - The Martini-Henry rifles were made in Britain from 1871 at the Royal Small Arms factory at Enfield and were stamped with the symbol of the Royal Cipher (Crown over VR) over ENFIELD to identify their origin. They were named after two of several people who helped design this method: Swiss Friederich von Martini and Scotsman Alexander Henry. The design was breech-loaded, and the inner barrel was rifled. A thumb rest was incorporated into the top right of the bullet receiver’s chamber. The small teardrop lever on the right side of the rifle showed whether the rifle was ready to be shot. In 1877, the shorter, lighter-weight Carbine version of the firearm was produced for mounted troops and artillery. Its official name was “Carbine, B.L., Rifled, Martini-Henry.” The bullets were slightly lighter in weight than those used for the longer rifle. The sight position was adjusted for the shorter gun, and wings were added to the sight on the tip, making it easier to slide the rifle back into a saddle bag. Some of the later Carbines also had leather sight covers screwed to the stock to prevent them from catching on the saddle bags. The Carbines had accessories available, such as barrel extensions with bayonets and swivels for adding slings. The Martini-Henry Carbine designs were later modified to fire the British .303 ammunition. Eventually, by 1900, the Martini-Henry Carbines were replaced by the Lee Enfield gun design. The pair of Martini-Henry Carbine firearms represents policing in the early pre-1900 days of colonial settlement; Woodford was one of the first townships settled in Victoria, and it had a police presence from 1854 until 1917. The rifles and display provide a historic connection between the location of Woodford and relatives and associates. The carbine rifles show a stage in the evolution of weapon design, adapted to suit mounted troops, and adding features to streamline use and storage. The ammunition was also improved during this progression. The carbines are important for their connection to policing law and order in a remote area. They are significant for their association with the township of Woodford, which was important to travel in the southwest Victoria district, providing access across a river for a road between Port Fairy and Melbourne, and later Warrnambool, and supplying food, goods and accommodation for the travellers. A pair of mounted rifles is mounted behind glass in a timer case, accompanied by a framed display of two photographs and an account of the rifles’ history. The case and display each have a horizontal board with a gently curved edge and carved decorations added. The identical firearms are British-made Martini Henry Carbine breach-loaded rifled guns, supplied by Britain to its Colonial troops from around 1877. The rifles are lever-action, single-shot .500 calibre weapons. They have a teardrop lever on their right side. They were used by Victoria Police mounted troops at the Woodford Police Station, Victoria. The black and white photographs were taken in 1946. The left photograph has a circled area; the right photograph is an enlarged view of the circled area, showing the Woodford Police Station in detail. The printed text is on textured paper with the Victoria Police watermark. It gives a summary of the rifle’s history. There is an inscription on the left photograph. Left photograph, handwritten in white pen: “WOODFORD” Document’s print: “During the late 1840s the small town of Woodford grew around the crossing of the Merri River on the Melbourne/Port Fairy Rad. Woodford was proclaimed a township in 1854 and a police quarters was established there in 1857. The police station remained until 1917 when it was closed and police service from then on was provided from Warrnambool. The building was then used as a school residence and is now privately owned. In !940 Robert JELLIE, then a schoolboy, observed two rifles mounted on the wall of the disused stable at the rear of the old police building. Following the devastating flood of 1946 (see photograph above) the rifles were again seen in the room next to the stable but were not seen again until the building was sold by the Education Department many years later. It was a recognition of the historical value of the rifles which led to their donation to the Warrnambool Police Complex. The rifles have been authenticated by the Victoria Police Armoury as being Victoria Police issue some time before 1900. The rifles are an identical pair of the famous British-made Martini Henry, a .500 inch calibre military weapon widely used by British Colonial troops. Victoria Police and the wider community of Warrnambool are indebted to the members of the Woodford community for their fine gesture in donating the rifles for mounting so that their historical importance can be preserved and they can be displayed for generations to come. This display was funded by the Victoria Police Historical Society Incorporated, and presented on the first day of November, 1999.”flagstaff hill maritime museum and village, great ocean road, shipwreck coast, martini henry, victoria police, woodford police station, rifle, carbine, display case, british, martini henry carbine, breech-loaded, rifled, colonial, single-shot, .500 calibre, weapon, gun, 1877, troops, mounted troops, merri river, victoria police woodford, victoria police warrnambool, victoria police melbourne, police quarters, robert jellie, school residence, stable, 1946 flood, victoria police armoury, identical pair, british colonial troops, victoria police historical society incorporated, woodford, bicycles, found by a schoolboy, edwardian-style building, victoria police museum, warrnambool police station -
Tatura Irrigation & Wartime Camps Museum
Folder, Major Outlet Waranga Basin Upgrading 1999, 1999
... ...research station...museum...Also contains photos of Research Station and Tatura Museum with new fence in 1999...Also contains photos of Research Station and Tatura Museum with new fence in 1999 photographs waranga basin old railway bridge research station museum tatura photography photograph rural industry irrigation Red plastic cover, white label, black writing Major Outlet Waranga Basin Upgrading 1999 Folder ...Photos of various stages of upgrading construction of Waranga Basin. Also contains photos of Research Station and Tatura Museum with new fence in 1999Red plastic cover, white label, black writingphotographs, waranga basin, old railway bridge, research station, museum, tatura, photography, photograph, rural, industry, irrigation -
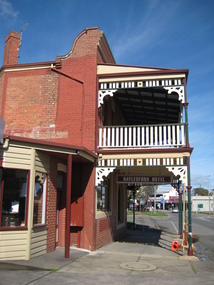 Ballarat Heritage Services
Photograph - Digital photographs, L.J. Gervasoni, Daylesford Hotel, 2013, c2012-2016
... museum...daylesford police station...vincent street daylesford shops streetscape snow weather climate winter daylesford museum daylesford police station daylesford hotel Digital images of snow in Daylesford. ...Digital images of snow in Daylesford. vincent street, daylesford, shops, streetscape, snow, weather, climate, winter, daylesford museum, daylesford police station, daylesford hotel -
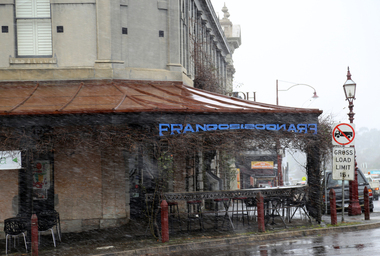 Ballarat Heritage Services
Photograph - Digital photographs, L.J. Gervasoni, Snow in the Main Street of Daylesford, Victoria, c2012-2016
... museum...daylesford police station...vincent street daylesford shops streetscape snow weather climate winter daylesford museum daylesford police station daylesford hotel Digital images of snow in Daylesford. ...Digital images of snow in Daylesford. vincent street, daylesford, shops, streetscape, snow, weather, climate, winter, daylesford museum, daylesford police station, daylesford hotel -
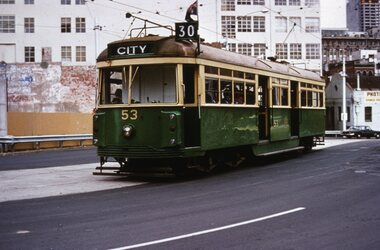 Melbourne Tram Museum
Slide, Tramway Museum Society of Victoria (TMSV), Tram VR 53 La Trobe St, c1974
... Colour slide of VR class tram 53, route 30, westbound in La Trobe St on the bypass built to enable the construction of the Melbourne Central or Museum station between Dec 1973 and 1978 - see reference. ...Colour slide of VR class tram 53, route 30, westbound in La Trobe St on the bypass built to enable the construction of the Melbourne Central or Museum station between Dec 1973 and 1978 - see reference. ...Colour slide of VR class tram 53, route 30, westbound in La Trobe St on the bypass built to enable the construction of the Melbourne Central or Museum station between Dec 1973 and 1978 - see reference. The concrete looks relatively new in the photograph. The tram was originally built by the Victorian Railways for their St Kilda Brighton tramway in 1942. It is currently on display at the Melbourne Tram Museum. Many of the buildings in the background have since been demolished. The former Myer warehouse can be seen in the top right-hand corner of the photo.Yields information about VR tram 53 and Latrobe St c1974.Kodachrome colour slides, cardboard mount.Has "MP146" in pencil and stamped "Tramways Museum Society Victoria" on rear.tramways, vr class, tram 53, route 30, latrobe st -
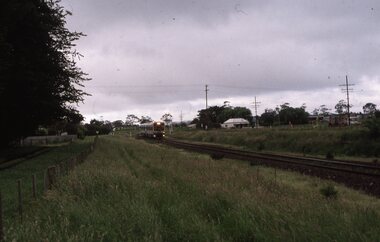 Ballarat Tramway Museum
Slide - Set of 2 - COTMA 2000 Visit to Bungaree, David Verrier, 20-11-2000
... Set of two slides taken during the 2000 COTMA Conference visit to the Ballarat Tramway Museum Bungaree station site of Sprinter rail cars 7008 & 7022 on Down Ballarat service at the former Bungaree station site on 20-11-2000...Set of two slides taken during the 2000 COTMA Conference visit to the Ballarat Tramway Museum Bungaree station site of Sprinter rail cars 7008 & 7022 on Down Ballarat service at the former Bungaree station site on 20-11-2000 Demonstrates rail services through the former Bungaree Rail station Ballarat Specials COTMA BTM Bungaree Sprinter rail cars Each slide has details written on it. ...Set of two slides taken during the 2000 COTMA Conference visit to the Ballarat Tramway Museum Bungaree station site of Sprinter rail cars 7008 & 7022 on Down Ballarat service at the former Bungaree station site on 20-11-2000Demonstrates rail services through the former Bungaree Rail stationSet of two Kodak colour slides - white plastic mountEach slide has details written on it.ballarat, specials, cotma, btm, bungaree, sprinter rail cars -
 Ballarat Tramway Museum
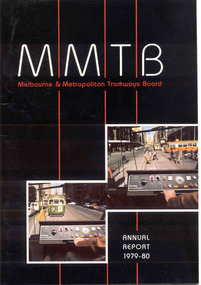
Document - Report, Melbourne and Metropolitan Tramways Board (MMTB), MMTB Reports 1979 to 1981, 1980 to 1982
... Photos include images of a z class crossing the Maribyrnong bridge, Footscray bus workshops, track renewals, a wedding at Wattle Park, a W2 arriving at Museum Station, Clifton Hill interchange, buses, Z class in Elizabeth St (Nos 158 and 43), Z89 in Mt Alexander Road North Essendon and a W2 loaded on a truck for New Zealand....Photos include images of a z class crossing the Maribyrnong bridge, Footscray bus workshops, track renewals, a wedding at Wattle Park, a W2 arriving at Museum Station, Clifton Hill interchange, buses, Z class in Elizabeth St (Nos 158 and 43), Z89 in Mt Alexander Road North Essendon and a W2 loaded on a truck for New Zealand. ...Three copies of the Annual report of the MMTB for the years end 1980, 1981 and 1982 3953.1 - "Annual Report 1979-80" - white gloss paper with colour card covers with 36 pages, gloss, on inside giving details of the MMTB Board, Officers, Operations report, schedule of debenture, investments, Auditors reports, record of Annual traffic receipts, passengers, miles etc, tram and bus routes operated, statistical information, graphs and photographs. Photos include; Z 117 in Bourke St, Z 31 Burwood terminus, new safety tower wagon, Z118 in Bourke St, W2 528 High St Kew, reconstruction of High St Kew, Z3 120, cable and electric trams at Flemington Bridge, Z3 117, fitting trams to bogies at Preston workshops, Queens Bridge roundabout, MAN bus, Burwood substation, Z111 in Bourke St and Z's enter Elizabeth St service and Z3 129 on rear cover at night. 3953.2 - "Annual Report 1980-81" - white gloss paper with colour card covers with 36 pages, on inside giving details of the MMTB Board, Officers, Operations report, schedule of debenture, investments, Auditors reports, record of Annual traffic receipts, passengers, miles etc, tram and bus routes operated, statistical information, graphs and photographs. Photos include; image of Park St, Domain Road Jtn before changes, Museum station entrance, Flinders and Swanston St, CDB City Ring bus service, Swanston St, Westgate bus route, Park St, new substation, Swanston and Flinders St, Flinders land, and give way to buses pulling out of stops. 3953.2 - "Annual Report 1981-82" - white gloss paper with colour card covers with 36 pages, on inside giving details of the MMTB Board, Officers, Operations report, schedule of debenture, investments, Auditors reports, record of Annual traffic receipts, passengers, miles etc, tram and bus routes operated, statistical information, graphs and photographs. Photos include images of a z class crossing the Maribyrnong bridge, Footscray bus workshops, track renewals, a wedding at Wattle Park, a W2 arriving at Museum Station, Clifton Hill interchange, buses, Z class in Elizabeth St (Nos 158 and 43), Z89 in Mt Alexander Road North Essendon and a W2 loaded on a truck for New Zealand.3951.1 - has Graeme Breydon's address stamp on front cover., 3951.2 - ditto, 3951.3 - ditto and on inside of front cover., 3951.6 - "G. Breydon" in pencil on front cover and pencil comments on balance sheet., 3951.7 - dittotrams, tramways, mmtb, melbourne, annual reports, operations, trackwork -
 Puffing Billy Railway
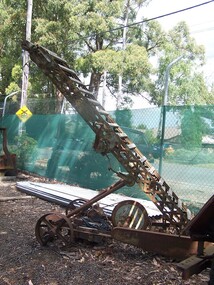
Machine - Conveyor / Loader, Munro Engineers Pty Ltd, 1955
... Munro Engineers Pty Ltd, Handilift Stacker & Loader' The Land on which the Menzies Creek railway station and Museum are built on was once apart of James Hermon's & his son William Hermon's property on which this Munro Handilift Stacker & Loader was used. ...Munro Engineers Pty Ltd, Handilift Stacker & Loader' The Land on which the Menzies Creek railway station and Museum are built on was once apart of James Hermon's & his son William Hermon's property on which this Munro Handilift Stacker & Loader was used. ...Munro Engineers Pty Ltd, Handilift Stacker & Loader' The Land on which the Menzies Creek railway station and Museum are built on was once apart of James Hermon's & his son William Hermon's property on which this Munro Handilift Stacker & Loader was used. Historic -Industrial Tool - Handilift Stacker & Loader - used on Jame's Hermon's property on which the Menzies Creek Railway is built on Munro Engineers Pty Ltd, Handilift Stacker & Loader made of steel and wood and wrought ironMunro Engineers Pty ( symbol map of Australia ) Ltd, Ballarat Vic. On side - No. 3147 On wheel - no, 2052puffing billy, munro engineers, handilift stacker & loader, hermon, menzies creek -
 Ballarat Tramway Museum
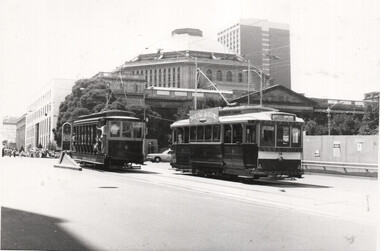
Photograph - BTPS tram 14 La Trobe St, 31/1/1979
... In the background is the State Library and hoardings for the construction of Museum or Melbourne Central Station. See reference. See item 8158 for another photograph. ...In the background is the State Library and hoardings for the construction of Museum or Melbourne Central Station. See reference. See item 8158 for another photograph. ...The photograph shows BTPS tram 14 and V 214 in La Trobe St during the 1979 Transport Cavalcade. In the background is the State Library and hoardings for the construction of Museum or Melbourne Central Station. See reference. See item 8158 for another photograph. Photographer unknown.Yields information about the visit of BTPS tram 14 to Melbourne for the 1979 Transport Cavalcade.Black and white photograph with plain back.tramways, tramcars, tram 14, tram 214, la trobe st, museum, transport cavalcade -
 Puffing Billy Railway
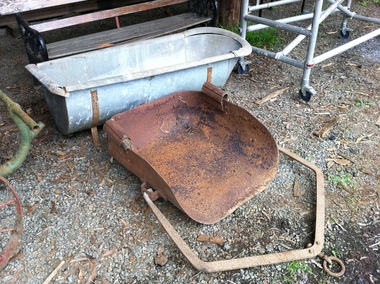
Horse drawn scoop from Hermon’s nursery
... The Land on which the Menzies Creek railway station and Museum are built on was once apart of James Hermon's & his son William Hermon's property on which Horse drawn scoops of this type would have been used. ...The Land on which the Menzies Creek railway station and Museum are built on was once apart of James Hermon's & his son William Hermon's property on which Horse drawn scoops of this type would have been used. ...Metal Horse drawn scoop from Hermon’s nursery at Menzies Creek. The Land on which the Menzies Creek railway station and Museum are built on was once apart of James Hermon's & his son William Hermon's property on which Horse drawn scoops of this type would have been used. Historic - industrial Farm equipment used on the farm of James Hermon & his son William Hermon on which the museum is built Horse drawn scoop from Hermon’s nursery made of Metal West Footscray Engineering Works Pty Ltdpuffing billy, menzies creek, scoop, hermon -
 Puffing Billy Railway
Tool - Drag Saw, New Record Drag Saw, circa 1920s
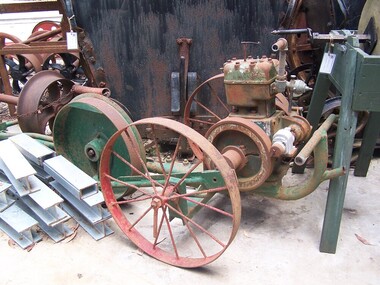
... It was mainly used cross cutting felled logs The Land on which the Menzies Creek railway station and Museum are built on was once apart of James Hermon's & his son William Hermon's property on which this Drag Saw was used. ...It was mainly used cross cutting felled logs The Land on which the Menzies Creek railway station and Museum are built on was once apart of James Hermon's & his son William Hermon's property on which this Drag Saw was used. ...Circa 1920s petrol driven cross saw. It was mainly used cross cutting felled logs The Land on which the Menzies Creek railway station and Museum are built on was once apart of James Hermon's & his son William Hermon's property on which this Drag Saw was used. reference : Jinkers and Whims: A Pictorial History of Timber-Getting By Jack BradshawHistoric - Industrial Timber working petrol driven cross saw - Drag SawLarge, mechanical saw mounted on a steel shaft connected to tin fuel and water containers. The machine has two large spoked wheels, a rotating Crankshaft and an extended arm/rod attached to a crank and flywheel.New Record puffing billy, drag saw, timber cutting, early mechanical equipment, james hermon & sons, menzies creek, 1920s -
 Eltham District Historical Society Inc
Photograph - Digital Photograph, Russell Yeoman, Beechworth Jusice Precinct, 2005
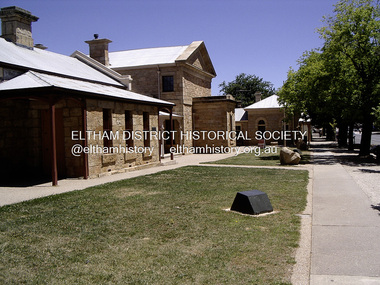
... Located primarily around Ford and Camp Streets, it features honey-coloured granite architecture from the 1850s gold rush era, including the Telegraph Station, Burke Museum, and Powder Magazine. Key Components of the Justice & Administrative Precinct: Beechworth Courthouse (1859): Famously hosted over 40 hearings for the Kelly Gang, including Ned Kelly’s committal hearing in 1880. ...Located primarily around Ford and Camp Streets, it features honey-coloured granite architecture from the 1850s gold rush era, including the Telegraph Station, Burke Museum, and Powder Magazine. Key Components of the Justice & Administrative Precinct: Beechworth Courthouse (1859): Famously hosted over 40 hearings for the Kelly Gang, including Ned Kelly’s committal hearing in 1880. ...Comparitive example from the mid 1880s with the Eltham Justice Precinct of 1859/1860. AI Overview - The Beechworth Historic Precinct is a nationally significant, well-preserved 19th-century collection of government buildings, including the Old Beechworth Gaol and courthouse in Victoria, Australia. Located primarily around Ford and Camp Streets, it features honey-coloured granite architecture from the 1850s gold rush era, including the Telegraph Station, Burke Museum, and Powder Magazine. Key Components of the Justice & Administrative Precinct: Beechworth Courthouse (1859): Famously hosted over 40 hearings for the Kelly Gang, including Ned Kelly’s committal hearing in 1880. Old Beechworth Gaol (1859–1864): A major prison structure that held many notorious bushrangers and criminals; now listed on the National Heritage List. Police Station & Chinese Protectorate Office (1858): Crucial buildings reflecting the governance of the 1850s gold rush, with the Chinese Protectorate being a rare surviving example. Telegraph Station (1858): A vital communications hub in the pre-internet era.beechworth jusice precinct, russell yeoman collection -
 Parks Victoria - Point Hicks Lightstation
Lid, Ship tank
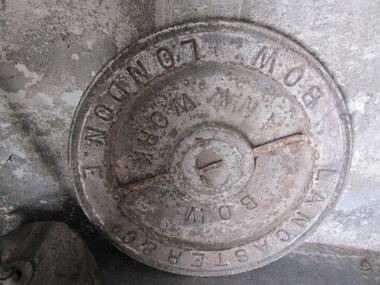
... It was possibly preceded by the company, Lancaster & Bawn, which ran between the 1870s and 1890s.Pearson has collected a list of Lancaster & Co tank lids that he and others have sighted at various locations in Australia including Coolgardie, WA; Gulgong Museum, NSW; the Quarantine Station, Sydney NSW; Blundell’s Cottage, NSW; and Woolmers homestead complex, TAS. ...It was possibly preceded by the company, Lancaster & Bawn, which ran between the 1870s and 1890s.Pearson has collected a list of Lancaster & Co tank lids that he and others have sighted at various locations in Australia including Coolgardie, WA; Gulgong Museum, NSW; the Quarantine Station, Sydney NSW; Blundell’s Cottage, NSW; and Woolmers homestead complex, TAS. ...The circular cast iron object is a lid that was originally fastened into a ship tank. This particular lid is cast with the name ‘Lancaster & Co Bow London E’ in capitals in a continuous circle on the outer edge of the lid face, and has the words ‘Bow Tank Works’ on the inner circle. It is the same type of round heavy lid that was made by tank manufacturer John Bellamy although it may be a younger example. According to Pearson, the Lancaster & Co firm produced tanks between 1910 and 1930 from their works in Bow, East London. It was possibly preceded by the company, Lancaster & Bawn, which ran between the 1870s and 1890s.Pearson has collected a list of Lancaster & Co tank lids that he and others have sighted at various locations in Australia including Coolgardie, WA; Gulgong Museum, NSW; the Quarantine Station, Sydney NSW; Blundell’s Cottage, NSW; and Woolmers homestead complex, TAS. In addition, Lewis has identified lids at Ayrdale, NSW, and the shearing shed at Murndal homestead, Western Victoria. It is most likely that more than three lids survive in Victoria and more will be identified, however, as noted by Pearson, ‘surviving lids are far less numerous than the tanks themselves, presumably because the uses to which the tanks were put did not require the lid to be retained’.Parks Victoria has identified five tank lids in the lightstation collections. There is another Lancaster & Co lid at Cape Otway and possibly a second example there as well. In addition there are Bellamy lids at Point Hicks and Cape Otway and an unidentified lid at Wilsons Promontory, and a tank without a lid at Wilsons Promontory. The Lancaster & Co ship tank lid has first level contributory significance for its historic values.Circular cast-iron disc, with raised outer ridge with inscription and inner depression with inscription. One metal section forms a handle over an inner depression.Around perimeter of outer edge "BOW LONDON.E LANCASTER & CO " Around inner area "BOW ANK WORK" -
 Flagstaff Hill Maritime Museum and Village
Document - License, Marine Board of Launceston, Launch Master's Licence, 13-02-1920
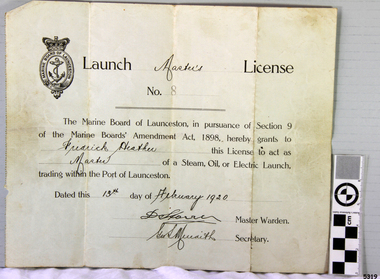
... Fredrick’s son is one of the volunteers at the Low Head Pilot Station Museum, Frederick Heather is also related to a Harry Heather from Tasmania and was also a ship master, one of his ships being the "Alma Doepel", a sailing schooner built in 1903 and sailed by Harry for about 21 years until his death in 1937. ...Fredrick’s son is one of the volunteers at the Low Head Pilot Station Museum, Frederick Heather is also related to a Harry Heather from Tasmania and was also a ship master, one of his ships being the "Alma Doepel", a sailing schooner built in 1903 and sailed by Harry for about 21 years until his death in 1937. ...The Launch Master Frederick Heather was licensed to be Master of Launches within the Port of Launceston. Amongst the vessels that he captained was the S.S. ROWITTA. Fredrick’s son is one of the volunteers at the Low Head Pilot Station Museum, Frederick Heather is also related to a Harry Heather from Tasmania and was also a ship master, one of his ships being the "Alma Doepel", a sailing schooner built in 1903 and sailed by Harry for about 21 years until his death in 1937. Flagstaff Hill’s collection includes a painting of the Alma Doepel. SS ROWITTA: - The 1909 steam ferry, SS Rowitta, was installed as an exhibit at Flagstaff Hill in 1975 and was enjoyed by many visitors for 40 years. Rowitta was a timber steam ferry built in Hobart in 1909 using planks of Huon and Karri wood. It was a favourite of sightseeing passengers along Tasmania’s Tamar and Derwent rivers for 30 years. Rowitta was also known as Tarkarri and Sorrento and had worked as a coastal trading vessel between Devonport and Melbourne, and Melbourne Queenscliff and Sorrento. In 1974 Rowitta was purchased by Flagstaff Hilt to convert into a representation of the Speculant, a historic and locally significant sailing ship listed on the Victorian Heritage Database. (The Speculant was built in Scotland in 1895 and traded timber between the United Kingdom and Russia. Warrnambool’s P J McGennan & Co. then bought the vessel to trade pine timber from New Zealand to Victorian ports and cargo to Melbourne. It was the largest ship registered with Warrnambool as her home port, playing a key role in the early 1900s in the Port of Warrnambool. In 1911, on her way to Melbourne, it was wrecked near Cape Otway. None of the nine crew lost their lives.) The promised funds for converting Rowitta into the Speculant were no longer available, so it was restored back to its original configuration. The vessel represented the importance of coastal traders to transport, trade and communication in Australia times before rail and motor vehicles. Sadly, in 2015 the time had come to demolish the Rowitta due to her excessive deterioration and the high cost of ongoing repairs. The vessel had given over 100 years of service and pleasure to those who knew her. The licence is significant for its association with the Tasmanian early to mid-1900s passenger ferry, the S.S. Rowitta. It is connected to the history of the Rowitta, which was a large exhibit on display at Flagstaff Hill Maritime Village from the museum’s early beginnings until the vessel’s end of life 40 years later. The display was used as an aid to maritime education. The Rowitta represents the importance of coastal traders to transport, trade and communication along the coast of Victoria, between states, and in Australia before rail and motor vehicles. The vessel was an example of a ferry built in the early 20th century that served many different roles over its lifetime of over 100 years. Launch Master's License No 8 issued to Fredrick Heather to act as Master of a steam, oil or electric launch trading within the Port of Launceston. Date issued 13th February 1920. The license is printed with hand written details added.Handwritten on License "Master's" "Frederick Heather" "Master" "13th February 1920" Also two signatures (indecipherable) of Master Warden and Secretary.flagstaff hill, flagstaff hill maritime museum and village, warrnambool, maritime museum, maritime village, great ocean road, shipwreck coast, launch master's licence, rowitta, frederick heather, port of launceston, launch master's license, marine board of launceston, tarkarri, speculant, purdon & featherstone of hobart, passenger ferry 1909, vessel, charles street wharf launceston, sorrento -
 Melbourne Tram Museum
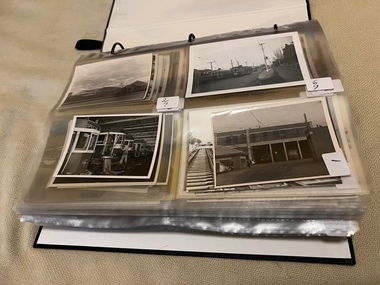
Album - Charles Craig - part 1 of 2, 1950s to 1970s
... CC265 Sydney – 1610 at Circular Quay CC266 Brisbane 99 and 468 CC267 Sydney with bridge behind CC268 Steam tram Paramatta Park – 103 CC269 Sydney – Museum Station =- Elizabeth St CC270 Sydney – weed burner 137S at a loop ...CC265 Sydney – 1610 at Circular Quay CC266 Brisbane 99 and 468 CC267 Sydney with bridge behind CC268 Steam tram Paramatta Park – 103 CC269 Sydney – Museum Station =- Elizabeth St CC270 Sydney – weed burner 137S at a loop Demonstrates the work of Charles Craig in photography and collection of prints. ...Photo - see pdf file for further information. Number Brief Description CC1 S178 at Elsternwick level crossing track works CC2 Building East Preston Depot 1955 CC3 Camberwell depot – post WW2 – lots of trams and a black cat CC4 W2 584 and SW6 958 northbound – Chapel St and Brighton Road CC5 W2 357 – southbound, Chapel St Brighton Road CC6 Pascoe Vale Road, Raceday working – note the signal CC7 The Preston Workshops - The Argus, post WW2, 223, 647 et al CC8 923 or is it 922 being built at Preston – The Argus photo - CC8A 832 being positioned onto trucks at Preston after an overhaul – Argus Photo – see also CC306 CC9 Footscray depot` CC10 W5 797 in St Kilda Road during track works – 1950s CC11 W2 457 at Kew Post Office CC12 Wellington Parade – W2 432, 492 and 337 – special event CC13 Swan St line up of trams – football? Or other special event – Sinclair’s bus on the right side. CC14 W2 630 being washed at a depot – The Argus photo CC15 Royal Park line at Flemington Road – W2 355 and W5 786 CC16 Nicholson St track construction from a tram cab CC17 T181 on tour at Gordon St CC18 T181 on Maribyrnong Bridge CC19 Ditto at River St just off bridge CC20 As for CC18 CC21 At Raleigh Rd CC22 T181 at Footscray depot CC23 Track construction, Nicholson, just north of Gertrude CC24 Commissioning overhead Bourke St tram 988 CC25 Queens Parade – 997 and 994 CC26 Swapping trolley wheel to skid – commissioning CC27 Track construction in Gertrude St CC28 985 in Queens Parade running special CC29 997 in Queens Parade CC30 1033 at North Fitzroy – AETA Special CC31 Bourke St at Elizabeth St – has passengers on board CC32 W6 985, 996 Queens Parade, Mk 3 bus 333 CC33 As above CC34 Showing construction at Nicholson & Gertrude – Bourke St CC35 W2 223 on Burnley temporary bridge – VR track expansion CC36 W5 823 – ditto CC37 Tram on old bridge prior to removal CC38 W2 433 on temporary bridge with new bridge beams and old track CC39 Looking down showing temporary single track – Swan St CC40 Tait train passing under tram bridge CC41 SW6 on single line – off loading CC42 W2 547 at City Road Junction CC43 City Road Jtn – 1969 – 596 and 771 CC44 City Road Jtn – 1969 – 596 and 771 (same as CC45 438 in Flinders St CC46 355 somewhere CC47 552 somewhere CC47A 364 at Preston Workshops? CC48 W2 334 on Traverser – Preston Workshops CC49 Wellington pade – large line up of trams, c1950 925, and 611 CC50 W2 493 Franklin st – advertising for Savings Certificates CC51 Possibly 551 with advertising for fund raising for Blind institute CC52 249 at Hawthorn – Riversdale Junction – with a Tally Ho and Village Fair Aux. board CC53 MMTB Postcard of 511 CC54 Wattle Park terminus with Single line warning sign CC55 Wattle Park Duplication CC56 36 at Domain Junction – 833 CC57 36 at Domain Junction CC58 36 at Domain Junction with 810 and 833 CC59 36 in Swanston by Flinders St Station CC60 36 in Spencer St at A’Beckett CC61 36 crossing Collins St CC62 36 crossing Collins St CC63 36 northbound in St Kilda Road with Shrine in background CC64 36 northbound in Swanston St at Flinders St CC65 Postcard – Ballarat 36 in Domain Road CC66 Postcard - Stampshow – Hawthorn Horse tram CC67 Postcard - Stampshow – Peace cable tram CC68 Postcard - 1041 and cable car set 1 at Preston CC69 Postcard - Colins & Elizabeth – greetings from old Melbourne CC70 Postcard - Cable car set at Preston CC71 Postcard - Twentyman’s cable cars CC72 Postcard - Nu-color-vue – horse tram 256 CC73 Cable car set – Market & Flinders CC74 Cable trams at Twentymans’ in their shed CC75 Cable tram track at Bourke & Spencer prior to removal CC76 Cable tram bogie at Preston Workshops – used as a dolly CC77 Cable trams at Twentymans’ CC78 Postcard - Valentines – Bourke looking west from Swanston CC79 Postcard - Rose 3938 – Bourke at Swanston – the Leviathan building CC80 Postcard - Valentines – Elizabeth St looking south from Collins – No. 19 CC81 Postcard - Rose P4765 – Bourke St Melbourne CC82 Postcard - Rose 4090 – cable tram passing Parliament house CC83 Postcard - Valentines – GPO Elizabeth St CC84 Interior of cable trailer with clothing on a set CC85 Elizabeth St looking north CC86 Cigarette card - Collins St No. 41- WD HO Wills CC87 Postcard - Rialto building with cable set CC88 Postcard - Valentines - Swanston at Flinders looking north CC89 CC90 Q 150 Hanna St – dated on rear CC91 176 turning – photo ex Alan Jungworth CC92 161 on Princes Bridge – minimum fare 4d sign and Inspector CC93 459 at Point Ormond CC94 158 at Gordon St – side on view CC95 X 217 in Swanston St CC96 X 217 in Swanston St with an East Brighton destination CC97 T177 CC98 T177 Peel St – no destination roll – being transferred? CC99 X1 462 in Glenhuntly Road to Point Ormond CC100 X1 462 in Glenhuntly Road to Elsternwick Rly Station CC101 X1 462 in Glenhuntly Road to Point Ormond CC102 Q 150 Hanna St CC103 190 at Camberwell Depot CC104 T182 at Footscray CC105 X1 466 and W2 at Footscray CC106 190 at Camberwell Depot CC107 X1 467 Barkly St Footscray CC108 X2 679 turning into William St from La Trobe St CC109 X2 677 Glenhuntly Road with Point Ormond Destination CC110 Postcard T180 CC111 Postcard format – X1 467 on a truck – see also CC178 CC112 Postcard format – X1 467 at Wantirna South CC113 Q200 and SW6 896 at Thornbury – has labels on rear CC114 T177, Ballarat Road – has labels on rear CC115 T178 at Point Ormond CC116 Postcard X1 465 and 466 CC117 Postcard – X2 676 CC118 Postcard – TMSV X2 217 CC119 810 on temporary bridging – 24-12-67 CC120 W2 575 – Queens Parade junction in, still temporary bridging, substation under construction CC121 Forming Queens Parade Junction base slab CC122 W2 596 prior to tramway works – all tracks still in position CC123 It’s a mass of reinforcing – bridging being formed CC124 Looking north with substation being built CC125 Looking east with some rather tight curves, Wellington St still in use CC126 SW6 958 ex Wellington St with all tracks and signal box and buildings. CC127 Victoria Pde at Gisborne looking east – at least 4 cars CC128 SW6 893? With dash canopy lights and SW6 862 and a man with a newspaper CC129 SW6 894 on the S curves, with tram in Wellington St CC130 Similar photo CC131 W2 564 turning into Wellington St – the concrete tracks are not that old CC132 W2 552 running out of Wellington St CC133 W5 732 from Fitzroy St into St Kilda Road with next iteration in position – very wonky CC134 W5 764 turning into Fitzroy St CC135 SW6 947 turning from Wellington St CC136 W2 586 running out of High St CC137 W2 500 turning into Wellington St CC138 W2 543 in Wellington St inbound CC139 L103 with St Kilda Junction destination, and a tower truck on right CC140 Workmen – new track in Queensway in use CC141 Ditto CC142 L103 in Queensway, and another car in bound CC143 Looking east along Wellington St which has been taken out of use. Also a MMTB Roller CC144 W5 824 and a W2 and all types of wobbly temporary track CC145 W2 354 to High St CC146 Sw6 947 on the S bends CC147 W2 500 looking north – tram on the S bends CC148 SW6 896 leaving the S bend CC149 W2 357 and a MMTB City bus with trees/gardens on the side CC150 W5 817 Elliot Ave – see also CC302 CC151 W2 552 – note the large trolley bridge CC152 W2 550 at depot or workshops CC153 1B truck CC154 SW2 432 CC155 W2 155 at Glenhuntly CC156 SW6 937 on AETA tour? CC157 X2 677 on Footscray service – Ballarat Rd? CC158 W2 641 – High St Kew? CC159 SW6 847 – Power St Hawthorn CC160 Simpson St – big line up CC161 W2 546 truck No. 1? CC162 W2s at Glenhuntly depot CC163 No. 15 truck under 899 CC164 206 and other junk at Preston Workshops CC165 W in Swanston St Melbourne – Rose series card CC166 Y1 613 Batman Ave?? or William St at Collins CC167 Tram plans CC168 X 217 Swanston St – see also 95 and 96 CC169 217 in Swanston St – same as 95 CC169A 192 in St Kilda Road at Princes bridge CC170 192 in St Kilda Road at Princes bridge CC171 Bendigo 3 arriving Malvern depot – being unloaded CC172 Ditto CC173 T180 at a depot CC174 X1 463 wheel set CC175 C30 – dog car side view – close up CC176 C30 dog car CC177 206 and 30 at Preston Workshops CC178 X1 467 on a truck – see CC111 also CC179 42 CC180 42 at a depot, no destination box CC181 W2 556 1A type truck CC182 Flinders St Station – Rose Series CC183 W7 1035 Spring – Nicholson St CC184 W7 1022 MMTB Post Card CC185 Adelaide 178 – has on rear – R. Lilburn 4/82 CC186 Adelaide 175 – has on rear – R. Lilburn 4/82 CC187 Y1 610 on AETA tour CC188 Y1 610 on AETA tour with large group – Point Ormond CC189 AETA display – has GH55-32 in pencil on rear CC190 AETA display – has GH55-29 in pencil on rear CC191 Y1 610 on AETA tour with large group – Point Ormond CC192 VR 53 at Footscray CC193 VR cars 40 and 34 at Elwood wash dock CC194 W7 1024 as the 1970 Christmas tram CC195 Geelong – loading a set of 22E trucks CC196 Geelong 10 and 23 running an AETA special CC197 Geelong – AETA special CC198 Geelong 7 at Junction CC199 Geelong 10, in the city CC200 Geelong 33 with Belmont destination CC201 Geelong 15 Eastern Park destination 29-3-1948 CC202 Geelong 23 at Railway Station – 29-3-1948 CC203 Geelong 23 at Railway Station – 29-3-1948 CC204 Geelong – loading a bogie tram CC205 Geelong – loading a bogie tram CC206 Geelong 40 – loaded on truck CC207 Geelong 40 – on jacks CC208 Geelong 40 on jacks – 19 behind CC209 Geelong 38 with two workers on either side CC210 – 214 Australian Historic Tramways stamp folder and set CC215 Bendigo 17 at depot – has dup JBS on rear CC216 Bendigo 20, 29 bogie and straight sill car at Charing Cross CC217 Bendigo one man bogie Pall Mall CC218 Bendigo – Bogie 23, other cars and welding truck at depot CC219 Bendigo 7 with Quarry Hill destination CC220 Bendigo 21 with Lake Weerona destination CC221 ESCo 18 Ballarat CC222 Ballarat bogie 22 on AETA special CC223 Ditto CC224 Ballarat 34 at Stones Corner – R Lilburn CC225 Ballarat 15 in Bridge St – R Lilburn CC226 Ballarat 40 at Gardens – R Lilburn CC227 Ballarat 37 running out of depot – R Lilburn CC228 Postcard – Valentines – Sturt St with loaded horse tram trailer CC229 AETA Geelong tram tour ticket – 29-3-1948 CC230 Postcard – Geelong – Valentine 2114 – T&G building CC231 Postcard – PMTT ! – High St Malvern CC232 Postcard – Empire – Glenferrie Road, Malvern at Wattletree Rd CC233 Postcard Y469, MMTB CC234 Postcard Z2 Spring St CC235 Postcard – Z1 MMTB CC236 Postcard – Stamp Show W1 431 CC237 Postcard – Stamp show B2005 CC238 Postcard – Stamp show W6 982 CC239 Postcard – Valentines 1264 – Johnstone Park with tram in distance CC240 Postcard – Rose 10711 – Swanston and Lonsdale – Hospital and W232 CC241 Postcard – Rose 4827 – Fitzroy St St Kilda W2 362 and 548 CC242 Postcard – Valentines – 939 – St Kilda War Memorial, W and a R? CC243 Postcard – Valentines – 572 – St Kilda War Memorial, W 413 and 140? CC244 Postcard – Valentines – 938 – Uper and Lower Esplanade – L 104 CC245 Postcard – St Kilda Rd at Princes Bridge Y1 and W CC246 Postcard – Biscay BG82 – W5 814 - CC247 Postcard – Biscay 796112 – Bourke St looking west CC248 Postcard – Biscay 796109 – Bourke St looking east CC249 Postcard – Biscay 2AUS58 – Z5 Bourke St CC250 Postcard – Biscay BG 249 – Swanston St CC251 Postcard – National View – St Kilda Rd – shrine and Prince Henrys W2 405 CC252 Postcard – Nu color vue – 11 ML 156 – St Kilda Rd CC253 Postcard – Nu color vue – 11 ML 153 – Swanston St CC254 Postcard – Nu Color vue – Collins St 442 CC255 Postcard – Pitt card – Adelaide – H 364 at Victoria St CC256 Postcard – SPER L/P 154 CC257 Postcard – BTMS – 550 CC258 Postcard – SPER – Brisbane 295 CC259 Adelaide 131 at Burnside – has R Lilburn on card, c1911 CC260 Adelaide 194 CC261 Adelaide 235, with two crew, The News photo CC262 Rockhampton, outside post office – has source of photo details CC263 Sydney – 2086 and 2062 arriving Circular Quay CC264 Sydney – P class – Pitt St? CC265 Sydney – 1610 at Circular Quay CC266 Brisbane 99 and 468 CC267 Sydney with bridge behind CC268 Steam tram Paramatta Park – 103 CC269 Sydney – Museum Station =- Elizabeth St CC270 Sydney – weed burner 137S at a loop Demonstrates the work of Charles Craig in photography and collection of prints.Assembled album in a black presentation folder of 270 photographs from the Charles Craig Collection - 86 sleeves - part 1 of 2. All photographs have been scanned and placed on the Museum's G drive. A list of all photographs with details where possible has been compiled. Victorian Provincial, Launceston, Hobart and Sydney tram photos have been transferred to other Museums, image files retained.melbourne, tramways, tramcars, trams, charles craig, st kilda junction, trackworks -
 Flagstaff Hill Maritime Museum and Village
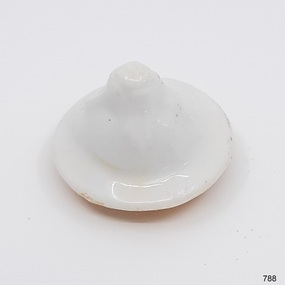
Leisure object - Toy, Circa 1878
... museum...shipwreck coast...flagstaff hill maritime village...great ocean road...loch line...loch ard...captain gibbs...eva carmichael...tom pearce...glenample station...Through is associated with the worst and best-known shipwreck in Victoria's history. flagstaff hill warrnambool flagstaff hill maritime museum shipwreck coast flagstaff hill maritime village great ocean road loch line loch ard captain gibbs eva carmichael tom pearce glenample station mutton bird island loch ard gorge toy child's tea set toy lid Toy; a white ceramic lid from a child's tea set. ...This ceramic lid is part of a child's tea set, perhaps from a sugar bowl or tea pot. It was recovered from the wreck of the Loch Ard. The Loch Ard got its name from "Loch Ard" a loch that lies to the west of Aberfoyle, and the east of Loch Lomond. It means "high lake" in Scottish Gaelic. The vessel belonged to the famous Loch Line which sailed many vessels from England to Australia. The Loch Ard was built in Glasgow by Barclay, Curle & Co. in 1873, the vessel was a three-masted square-rigged iron sailing ship that measured 79.87 meters in length, 11.58 m in width, and 7 m in depth with a gross tonnage of 1693 tons with a mainmast that measured a massive 45.7 m in height. Loch Ard made three trips to Australia and one trip to Calcutta before its fateful voyage. Loch Ard left England on March 2, 1878, under the command of 29-year-old Captain Gibbs, who was newly married. The ship was bound for Melbourne with a crew of 37, plus 17 passengers. The general cargo reflected the affluence of Melbourne at the time. Onboard were straw hats, umbrellas, perfumes, clay pipes, pianos, clocks, confectionery, linen, and candles, as well as a heavier load of railway irons, cement, lead, and copper. There were other items included that were intended for display in the Melbourne International Exhibition of 1880. The voyage to Port Phillip was long but uneventful. Then at 3 am on June 1, 1878, Captain Gibbs was expecting to see land. But the Loch Ard was running into a fog which greatly reduced visibility. Captain Gibbs was becoming anxious as there was no sign of land or the Cape Otway lighthouse. At 4 am the fog lifted and a lookout aloft announced that he could see breakers. The sheer cliffs of Victoria's west coast came into view, and Captain Gibbs realised that the ship was much closer to them than expected. He ordered as much sail to be set as time would permit and then attempted to steer the vessel out to sea. On coming head-on into the wind, the ship lost momentum, the sails fell limp and Loch Ard's bow swung back towards land. Gibbs then ordered the anchors to be released in an attempt to hold their position. The anchors sank some 50 fathoms - but did not hold. By this time the ship was among the breakers and the tall cliffs of Mutton Bird Island rose behind. Just half a mile from the coast, the ship's bow was suddenly pulled around by the anchor. The captain tried to tack out to sea, but the ship struck a reef at the base of Mutton Bird Island, near Port Campbell. Waves subsequently broke over the ship and the top deck became loosened from the hull. The masts and rigging came crashing down knocking passengers and crew overboard. When a lifeboat was finally launched, it crashed into the side of Loch Ard and capsized. Tom Pearce, who had launched the boat, managed to cling to its overturned hull and shelter beneath it. He drifted out to sea and then on the flood tide came into what is now known as Lochard Gorge. He swam to shore, bruised and dazed, and found a cave in which to shelter. Some of the crew stayed below deck to shelter from the falling rigging but drowned when the ship slipped off the reef into deeper water. Eva Carmichael a passenger had raced onto the deck to find out what was happening only to be confronted by towering cliffs looming above the stricken ship. In all the chaos, Captain Gibbs grabbed Eva and said, "If you are saved Eva, let my dear wife know that I died like a sailor". That was the last Eva Carmichael saw of the captain. She was swept off the ship by a huge wave. Eva saw Tom Pearce on a small rocky beach and yelled to attract his attention. He dived in and swam to the exhausted woman and dragged her to shore. He took her to the cave and broke the open case of brandy that had washed up on the beach. He opened a bottle to revive the unconscious woman. A few hours later Tom scaled a cliff in search of help. He followed hoof prints and came by chance upon two men from nearby Glenample Station three and a half miles away. In a complete state of exhaustion, he told the men of the tragedy. Tom then returned to the gorge while the two men rode back to the station to get help. By the time they reached Loch Ard Gorge, it was cold and dark. The two shipwreck survivors were taken to Glenample Station to recover. Eva stayed at the station for six weeks before returning to Ireland by steamship. In Melbourne, Tom Pearce received a hero's welcome. He was presented with the first gold medal of the Royal Humane Society of Victoria and a £1000 cheque from the Victorian Government. Concerts were performed to honour the young man's bravery and to raise money for those who lost families in the disaster. Of the 54 crew members and passengers on board, only two survived: the apprentice, Tom Pearce, and the young woman passenger, Eva Carmichael, who lost her family in the tragedy. Ten days after the Lochard tragedy, salvage rights to the wreck were sold at auction for £2,120. Cargo valued at £3,000 was salvaged and placed on the beach, but most washed back into the sea when another storm developed. The wreck of Lochard still lies at the base of Mutton Bird Island. Much of the cargo has now been salvaged and some items were washed up into Lochard Gorge. Cargo and artifacts have also been illegally salvaged over many years before protective legislation was introduced in March 1982. One of the most unlikely pieces of cargo to have survived the shipwreck was a Minton majolica peacock- one of only nine in the world. The peacock was destined for the Melbourne 1880 International Exhibition. It had been well packed, which gave it adequate protection during the violent storm. Today the Minton peacock can be seen at the Flagstaff Hill Maritime Museum in Warrnambool. From Australia's most dramatic shipwreck, it has now become Australia's most valuable shipwreck artifact and is one of very few 'objects' on the Victorian State Heritage Register. The shipwreck of the Loch Ard is of significance for Victoria and is registered on the Victorian Heritage Register ( S 417). Flagstaff Hill has a varied collection of artifacts from Loch Ard and its collection is significant for being one of the largest accumulation of artifacts from this notable Victorian shipwreck of which the subject items are a small part. The collection's objects give us a snapshot of how we can interpret the story of this tragic event. The collection is also archaeologically significant as it represents aspects of Victoria's shipping history that allows us to interpret Victoria's social and historical themes of the time. Through is associated with the worst and best-known shipwreck in Victoria's history.Toy; a white ceramic lid from a child's tea set. The underside is hollow. The lid is glazed and the surface of the lid is uneven under the glaze.flagstaff hill, warrnambool, flagstaff hill maritime museum, shipwreck coast, flagstaff hill maritime village, great ocean road, loch line, loch ard, captain gibbs, eva carmichael, tom pearce, glenample station, mutton bird island, loch ard gorge, toy, child's tea set, toy lid -
 Flagstaff Hill Maritime Museum and Village
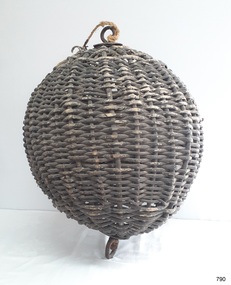
Equipment - Distant Signal, 1897-1931
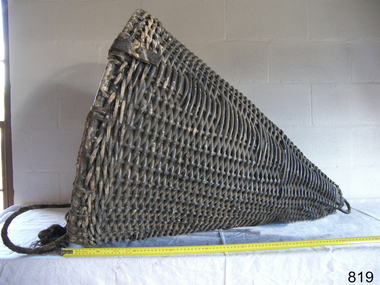
... Museum...Maritime Village...Great Ocean Road...Shipwreck Coast...distant signal...signal...maritime signal...ball signal...signal shape...flagstaff signal...signal station...Flagstaff Hill Flagstaff Hill Maritime Museum and Village Warrnambool Maritime Museum Maritime Village Great Ocean Road Shipwreck Coast distant signal signal maritime signal ball signal signal shape flagstaff signal signal station masthead signal communications marine technology signals marine signals flaghoists International Marine Conference International Code of Signals signal codes marine safety signal flags day shape daymark day symbol navigation Warrnambool flagstaff 1854 1857 1931 1887 1897 Distant Signal Ball, part of a Flagstaff signal set. ...This three-dimensional Distant Signal is part of a Flagstaff Signal set of ball, cone and drum shapes. It has been woven and then fabricated with strong metal swivel fittings and loops for suspending from a high point on a flagstaff at a signal station or on a ship’s masthead. The cane signal was constructed to withstand all weather and to be visible from a long distance. The gaps between the woven cane allow air to pass through, minimising possible swaying. Similar sets were made from rope or fabric. Warrnambool's Flagstaff was erected in 1854. Its primary use was to display visual signals that could convey messages between land and sea. It was also used to notify the local population of the approach of ships. One of the popular signalling codes in use in the early-to-mid 1800s was the Marryat’s Code but there were others in use as well; there was no one standard code. In 1857 the International Marine Conference adopted an International Code of Signals as a standard communications system for all vessels that could be understood in many different languages. The Normanby Advertiser reported on June 5th 1857 a query from the Post Master General as to whether the request of the Chief Harbour Master would be carried out, in that Warrnambool would receive a new flagstaff and a set of Marryatt’s signal flags. The Table of Codes was published, showing how to use combinations of these flags to send messages. The Code was revised in 1887 to cover situations where distance, light, wind and weather conditions affected the visibility of the flags and prevented clear communication. The first report of the International Code of Signals Committee of 1897 warned signalmen not to rely on ordinary semaphore flags and introduced a Distant Signal Code using either particular semaphore flags or the three-dimensional shapes of a ball, cone and drum that aligned with the semaphore flag shapes of a circle, pennant and square. International Code of Signals In 1931, after World War I’s experiences in using signal codes, the International Code of Signals conference in Washington revised and published the rules for the conduct of signalling. One of the changes was that “the use of the Distant Signals and of fixed semaphore was abandoned”. It is of interest to know that modern marine law in many countries insists that a set of Day Shapes must be carried onboard vessels of a certain size. These highly visible geometric shapes are used at sea in daylight to communicate messages between vessels. They are used in a similar way to the Distant Signals, in that different combinations of shapes represent different messages. The set of shapes includes a ball, cylinder, cone and diamond. The shapes are hung between the top of the vessel’s foremast and the front of the vessel. They are only coloured black and are about 1.5 metres high. The vertical line of shapes can mean messages such as Boat not under command, Fishing, and Under sail and power.Distant Signals were an important means of marine communication from the late 1880s to the early 1930s, including during World War I. They were an advancement to the International Shipping Codes and safety. The cane signals’ shapes appear to be the same from whatever direction they are viewed, removing confusion about the message they convey. The same shapes continue to be used today for the sets of Day Shapes used as marine navigational signals that are mandatory on certain-sized vessels.Distant Signal Ball, part of a Flagstaff signal set. A round woven cane ball, painted black, with a metal rod passing through the centre. The rod has a loop at each end, then a concave, octagonal metal plate that rests on the outside surface of the ball, serving as a washer. The rod has swivels at each end.flagstaff hill, flagstaff hill maritime museum and village, warrnambool, maritime museum, maritime village, great ocean road, shipwreck coast, distant signal, signal, maritime signal, ball signal, signal shape, flagstaff signal, signal station, masthead signal, communications, marine technology, signals, marine signals, flaghoists, international marine conference, international code of signals, signal codes, marine safety, signal flags, day shape, daymark, day symbol, navigation, warrnambool flagstaff, 1854, 1857 1931, 1887, 1897 -
 Flagstaff Hill Maritime Museum and Village
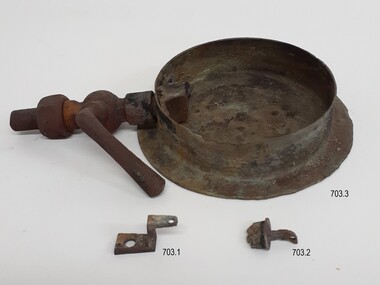
Instrument - Pressure Gauge, Barclay Curle & Co shipbuilders, Circa 1873
... museum...shipwreck coast...flagstaff hill maritime village...great ocean road...loch line...loch ard...captain gibbs...eva carmichael...tom pearce...glenample station...Through is associated with the worst and best-known shipwreck in Victoria's history. flagstaff hill warrnambool shipwrecked coast flagstaff hill maritime museum maritime museum shipwreck coast flagstaff hill maritime village great ocean road loch line loch ard captain gibbs eva carmichael tom pearce glenample station mutton bird island loch ard gorge pressure gauge mechanical instrument Pressure gauge; round brass instrument with brass fittings: gate valve and handle. ...The Loch Ard got its name from "Loch Ard" a loch that lies to the west of Aberfoyle, and the east of Loch Lomond. It means "high lake" in Scottish Gaelic. The vessel belonged to the famous Loch Line which sailed many vessels from England to Australia. The Loch Ard was built in Glasgow by Barclay, Curle & Co. in 1873, the vessel was a three-masted square-rigged iron sailing ship that measured 79.87 meters in length, 11.58 m in width, and 7 m in depth with a gross tonnage of 1693 tons with a mainmast that measured a massive 45.7 m in height. Loch Ard made three trips to Australia and one trip to Calcutta before its fateful voyage. Loch Ard left England on March 2, 1878, under the command of 29-year-old Captain Gibbs, who was newly married. The ship was bound for Melbourne with a crew of 37, plus 17 passengers. The general cargo reflected the affluence of Melbourne at the time. Onboard were straw hats, umbrellas, perfumes, clay pipes, pianos, clocks, confectionery, linen, and candles, as well as a heavier load of railway irons, cement, lead, and copper. There were other items included that were intended for display in the Melbourne International Exhibition of 1880. The voyage to Port Phillip was long but uneventful. Then at 3 am on June 1, 1878, Captain Gibbs was expecting to see land. But the Loch Ard was running into a fog which greatly reduced visibility. Captain Gibbs was becoming anxious as there was no sign of land or the Cape Otway lighthouse. At 4 am the fog lifted and a lookout aloft announced that he could see breakers. The sheer cliffs of Victoria's west coast came into view, and Captain Gibbs realised that the ship was much closer to them than expected. He ordered as much sail to be set as time would permit and then attempted to steer the vessel out to sea. On coming head-on into the wind, the ship lost momentum, the sails fell limp and Loch Ard's bow swung back towards land. Gibbs then ordered the anchors to be released in an attempt to hold their position. The anchors sank some 50 fathoms - but did not hold. By this time the ship was among the breakers and the tall cliffs of Mutton Bird Island rose behind. Just half a mile from the coast, the ship's bow was suddenly pulled around by the anchor. The captain tried to tack out to sea, but the ship struck a reef at the base of Mutton Bird Island, near Port Campbell. Waves subsequently broke over the ship and the top deck became loosened from the hull. The masts and rigging came crashing down knocking passengers and crew overboard. When a lifeboat was finally launched, it crashed into the side of Loch Ard and capsized. Tom Pearce, who had launched the boat, managed to cling to its overturned hull and shelter beneath it. He drifted out to sea and then on the flood tide came into what is now known as Lochard Gorge. He swam to shore, bruised and dazed, and found a cave in which to shelter. Some of the crew stayed below deck to shelter from the falling rigging but drowned when the ship slipped off the reef into deeper water. Eva Carmichael a passenger had raced onto the deck to find out what was happening only to be confronted by towering cliffs looming above the stricken ship. In all the chaos, Captain Gibbs grabbed Eva and said, "If you are saved Eva, let my dear wife know that I died like a sailor". That was the last Eva Carmichael saw of the captain. She was swept off the ship by a huge wave. Eva saw Tom Pearce on a small rocky beach and yelled to attract his attention. He dived in and swam to the exhausted woman and dragged her to shore. He took her to the cave and broke the open case of brandy that had washed up on the beach. He opened a bottle to revive the unconscious woman. A few hours later Tom scaled a cliff in search of help. He followed hoof prints and came by chance upon two men from nearby Glenample Station three and a half miles away. In a complete state of exhaustion, he told the men of the tragedy. Tom then returned to the gorge while the two men rode back to the station to get help. By the time they reached Loch Ard Gorge, it was cold and dark. The two shipwreck survivors were taken to Glenample Station to recover. Eva stayed at the station for six weeks before returning to Ireland by steamship. In Melbourne, Tom Pearce received a hero's welcome. He was presented with the first gold medal of the Royal Humane Society of Victoria and a £1000 cheque from the Victorian Government. Concerts were performed to honour the young man's bravery and to raise money for those who lost families in the disaster. Of the 54 crew members and passengers on board, only two survived: the apprentice, Tom Pearce, and the young woman passenger, Eva Carmichael, who lost her family in the tragedy. Ten days after the Lochard tragedy, salvage rights to the wreck were sold at auction for £2,120. Cargo valued at £3,000 was salvaged and placed on the beach, but most washed back into the sea when another storm developed. The wreck of Lochard still lies at the base of Mutton Bird Island. Much of the cargo has now been salvaged and some items were washed up into Lochard Gorge. Cargo and artifacts have also been illegally salvaged over many years before protective legislation was introduced in March 1982. One of the most unlikely pieces of cargo to have survived the shipwreck was a Minton majolica peacock- one of only nine in the world. The peacock was destined for the Melbourne 1880 International Exhibition. It had been well packed, which gave it adequate protection during the violent storm. Today the Minton peacock can be seen at the Flagstaff Hill Maritime Museum in Warrnambool. From Australia's most dramatic shipwreck it has now become Australia's most valuable shipwreck artifact and is one of very few 'objects' on the Victorian State Heritage Register.The shipwreck of the Loch Ard is of significance for Victoria and is registered on the Victorian Heritage Register ( S 417). Flagstaff Hill has a varied collection of artifacts from Loch Ard and its collection is significant for being one of the largest accumulation of artifacts from this notable Victorian shipwreck of which the subject items are a small part. The collection's objects give us a snapshot of how we can interpret the story of this tragic event. The collection is also archaeologically significant as it represents aspects of Victoria's shipping history that allows us to interpret Victoria's social and historical themes of the time. Through is associated with the worst and best-known shipwreck in Victoria's history.Pressure gauge; round brass instrument with brass fittings: gate valve and handle. The two separate parts include a small bracket. Encrustations are on the surface. The flat side has been lacquered. Recovered from the wreck of the Loch Ard.flagstaff hill, warrnambool, shipwrecked coast, flagstaff hill maritime museum, maritime museum, shipwreck coast, flagstaff hill maritime village, great ocean road, loch line, loch ard, captain gibbs, eva carmichael, tom pearce, glenample station, mutton bird island, loch ard gorge, pressure gauge, mechanical instrument -
 Flagstaff Hill Maritime Museum and Village
Equipment - Distant Signal, 1897-1931
... Museum and village...Shipwreck Coast...Marine Navigation...Marine communications...Communication Signal...Lifesaving...ship at sea...day shape...masthead signal...day signal...day mark signals...marine technology...safety equipment...navigation equipment...marine day shape...day marker...cane day shape...signal cone...day signal cone...cone signal...cone day shape...distant signal...flagstaff signal...signal station...The same shapes continue to be used today for the sets of Day Shapes used as marine navigational signals that are mandatory on certain-sized vessels. flagstaff hill warrnambool flagstaff Hill Maritime Museum and village Shipwreck Coast Marine Navigation Marine communications Communication Signal Lifesaving ship at sea day shape masthead signal day signal day mark signals marine technology safety equipment navigation equipment marine day shape day marker cane day shape signal cone day signal cone cone signal cone day shape distant signal flagstaff signal signal station communications signals marine signals flaghoists International Marine Conference International Code of Signals signal codes marine safety signal flags daymark day symbol navigation Warrnambool flagstaff 1854 1857 1931 1887 1897 Distant Signal Cone, part of a Flagstaff signal set. ...This three-dimensional Distant Signal is part of a Flagstaff Signal set of ball, cone and drum shapes. It has been woven and then fabricated with strong metal swivel fittings and loops for suspending from a high point on a flagstaff at a signal station or on a ship’s masthead. The cane signal was constructed to withstand all weather and to be visible from a long distance. The gaps between the woven cane allow air to pass through, minimising possible swaying. Similar sets were made from rope or fabric. Warrnambool's Flagstaff was erected in 1854. Its primary use was to display visual signals that could convey messages between land and sea. It was also used to notify the local population of the approach of ships. One of the popular signalling codes in use in the early-to-mid 1800s was the Marryat’s Code but there were others in use as well; there was no one standard code. In 1857 the International Marine Conference adopted an International Code of Signals as a standard communications system for all vessels that could be understood in many different languages. The Normanby Advertiser reported on June 5th 1857 a query from the Post Master General as to whether the request of the Chief Harbour Master would be carried out, in that Warrnambool would receive a new flagstaff and a set of Marryatt’s signal flags. The Table of Codes was published, showing how to use combinations of these flags to send messages. The Code was revised in 1887 to cover situations where distance, light, wind and weather conditions affected the visibility of the flags and prevented clear communication. The first report of the International Code of Signals Committee of 1897 warned signalmen not to rely on ordinary semaphore flags and introduced a Distant Signal Code using either particular semaphore flags or the three-dimensional shapes of a ball, cone and drum that aligned with the semaphore flag shapes of a circle, pennant and square. International Code of Signals In 1931, after World War I’s experiences in using signal codes, the International Code of Signals conference in Washington revised and published the rules for the conduct of signalling. One of the changes was that “the use of the Distant Signals and of fixed semaphore was abandoned”. It is of interest to know that modern marine law in many countries insists that a set of Day Shapes must be carried onboard vessels of a certain size. These highly visible geometric shapes are used at sea in daylight to communicate messages between vessels. They are used in a similar way to the Distant Signals, in that different combinations of shapes represent different messages. The set of shapes includes a ball, cylinder, cone and diamond. The shapes are hung between the top of the vessel’s foremast and the front of the vessel. They are only coloured black and are about 1.5 metres high. The vertical line of shapes can mean messages such as Boat not under command, Fishing, and Under sail and power.Distant Signals were an important means of marine communication from the late 1880s to the early 1930s, including during World War I. They were an advancement to the International Shipping Codes and safety. The cane signals’ shapes appear to be the same from whatever direction they are viewed, removing confusion about the message they convey. The same shapes continue to be used today for the sets of Day Shapes used as marine navigational signals that are mandatory on certain-sized vessels.Distant Signal Cone, part of a Flagstaff signal set. A woven cane cone, painted black, with a metal rod passing through the centre and two crossed metal bars at the base. The central rod has a loop at the top and passes through the bars at the base, finishing in a metal loop. The rod has swivels at each end.flagstaff hill, warrnambool, flagstaff hill maritime museum and village, shipwreck coast, marine navigation, marine communications, communication signal, lifesaving, ship at sea, day shape, masthead signal, day signal, day mark signals, marine technology, safety equipment, navigation equipment, marine day shape, day marker, cane day shape, signal cone, day signal cone, cone signal, cone day shape, distant signal, flagstaff signal, signal station, communications, signals, marine signals, flaghoists, international marine conference, international code of signals, signal codes, marine safety, signal flags, daymark, day symbol, navigation, warrnambool flagstaff, 1854, 1857 1931, 1887, 1897 -
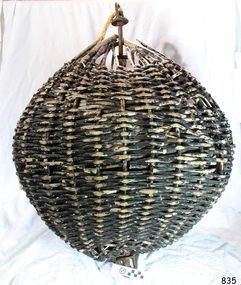 Flagstaff Hill Maritime Museum and Village
Equipment - Distant Signal, 1897-1931
... Museum and village...Shipwreck Coast...Marine Navigation...Marine communications...Communication Signal...Lifesaving...ship at sea...day shape...masthead signal...day signal...day mark signals...marine technology...safety equipment...navigation equipment...marine day shape...day marker...cane day shape...signal ball...day signal ball...Ball signal...ball day shape...distant signal...flagstaff signal...signal station...The same shapes continue to be used today for the sets of Day Shapes used as marine navigational signals that are mandatory on certain-sized vessels. flagstaff hill warrnambool flagstaff Hill Maritime Museum and village Shipwreck Coast Marine Navigation Marine communications Communication Signal Lifesaving ship at sea day shape masthead signal day signal day mark signals marine technology safety equipment navigation equipment marine day shape day marker cane day shape signal ball day signal ball Ball signal ball day shape distant signal flagstaff signal signal station communications signals marine signals flaghoists International Marine Conference International Code of Signals signal codes marine safety signal flags daymark day symbol navigation Warrnambool flagstaff 1854 1857 1931 1887 1897 Distant Signal Ball, part of a Flagstaff signal set. ...This three-dimensional Distant Signal is part of a Flagstaff Signal set of ball, cone and drum shapes. It has been woven and then fabricated with strong metal swivel fittings and loops for suspending from a high point on a flagstaff at a signal station or on a ship’s masthead. The cane signal was constructed to withstand all weather and to be visible from a long distance. The gaps between the woven cane allow air to pass through, minimising possible swaying. Similar sets were made from rope or fabric. Warrnambool's Flagstaff was erected in 1854. Its primary use was to display visual signals that could convey messages between land and sea. It was also used to notify the local population of the approach of ships. One of the popular signalling codes in use in the early-to-mid 1800s was the Marryat’s Code but there were others in use as well; there was no one standard code. In 1857 the International Marine Conference adopted an International Code of Signals as a standard communications system for all vessels that could be understood in many different languages. The Normanby Advertiser reported on June 5th 1857 a query from the Post Master General as to whether the request of the Chief Harbour Master would be carried out, in that Warrnambool would receive a new flagstaff and a set of Marryatt’s signal flags. The Table of Codes was published, showing how to use combinations of these flags to send messages. The Code was revised in 1887 to cover situations where distance, light, wind and weather conditions affected the visibility of the flags and prevented clear communication. The first report of the International Code of Signals Committee of 1897 warned signalmen not to rely on ordinary semaphore flags and introduced a Distant Signal Code using either particular semaphore flags or the three-dimensional shapes of a ball, cone and drum that aligned with the semaphore flag shapes of a circle, pennant and square. International Code of Signals In 1931, after World War I’s experiences in using signal codes, the International Code of Signals conference in Washington revised and published the rules for the conduct of signalling. One of the changes was that “the use of the Distant Signals and of fixed semaphore was abandoned”. It is of interest to know that modern marine law in many countries insists that a set of Day Shapes must be carried onboard vessels of a certain size. These highly visible geometric shapes are used at sea in daylight to communicate messages between vessels. They are used in a similar way to the Distant Signals, in that different combinations of shapes represent different messages. The set of shapes includes a ball, cylinder, cone and diamond. The shapes are hung between the top of the vessel’s foremast and the front of the vessel. They are only coloured black and are about 1.5 metres high. The vertical line of shapes can mean messages such as Boat not under command, Fishing, and Under sail and power.Distant Signals were an important means of marine communication from the late 1880s to the early 1930s, including during World War I. They were an advancement to the International Shipping Codes and safety. The cane signals’ shapes appear to be the same from whatever direction they are viewed, removing confusion about the message they convey. The same shapes continue to be used today for the sets of Day Shapes used as marine navigational signals that are mandatory on certain-sized vessels.Distant Signal Ball, part of a Flagstaff signal set. A round woven cane ball, painted black, with a metal rod passing through the centre. The rod has a loop at each end, then a concave, octagonal metal plate that rests on the outside surface of the ball, serving as a washer. The rod has swivels at each end.flagstaff hill, warrnambool, flagstaff hill maritime museum and village, shipwreck coast, marine navigation, marine communications, communication signal, lifesaving, ship at sea, day shape, masthead signal, day signal, day mark signals, marine technology, safety equipment, navigation equipment, marine day shape, day marker, cane day shape, signal ball, day signal ball, ball signal, ball day shape, distant signal, flagstaff signal, signal station, communications, signals, marine signals, flaghoists, international marine conference, international code of signals, signal codes, marine safety, signal flags, daymark, day symbol, navigation, warrnambool flagstaff, 1854, 1857 1931, 1887, 1897 -
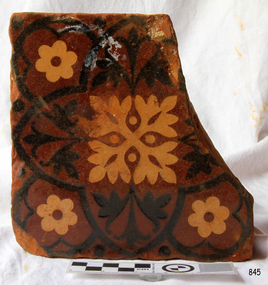 Flagstaff Hill Maritime Museum and Village
Ceramic - Tile, circa 1878
... museum...shipwreck coast...flagstaff hill maritime village...great ocean road...loch line...loch ard...captain gibbs...eva carmichael...tom pearce...glenample station...The collection is also historically significant for its association with the LOCH ARD, which was one of the worst and best-known shipwrecks in Victoria’s history. flagstaff hill warrnambool shipwrecked coast flagstaff hill maritime museum maritime museum shipwreck coast flagstaff hill maritime village great ocean road loch line loch ard captain gibbs eva carmichael tom pearce glenample station mutton bird island loch ard gorge encaustic tile melbourne international exhibition floor tile Minton floor tile On the back, or base, of the tile is inscribed the number “46” and the letters “Minton & Co Patent Stoke upon Trent”. ...This Minton floor tile is from the wreck of the LOCH ARD along with other examples of this manufacture recovered from the wreck site and form part of the collection at Flagstaff Hill. The iron-hulled clipper ship from the Loch Line was heading for Port Phillip from London when it ran into the cliffs of Mutton Bird Island near Port Campbell and was wrecked on June 1st, 1878. The LOCH ARD was laden with high-value cargo including luxury goods intended for display at the Melbourne International Exhibition in 1880. One notable survivor from the ship’s freight manifest was the well-packed Minton porcelain peacock, a two-metre-high ceramic masterpiece of vivid glazed colours. The almost total loss of life and property from the LOCH ARD registered as a shocking tragedy for the Colony of Victoria, at a time when social confidence and economic optimism were otherwise high. The wealth generated from Gold and Wool was increasingly being spent on grandiose private residences and imposing public buildings. The demand for quality furnishings and fittings was therefore strong. Among the products consigned to burgeoning colonial markets by the Milton Pottery at Stoke upon Trent, were their new range of colourfully patterned but very durable floor tiles – ideal for the high-traffic spaces in the large civic buildings then being constructed in Australia and America. These new floor tiles were “encaustic”, meaning that their designs and colours were encased “within” the depth of the tile. Rather than their decorative patterns being glazed onto the surface of the tile, their inlaid designs were created during the manufacturing process, as “coloured slips” (or liquid clay) were poured into a deep pre-moulded casting. When fired, the resulting tile was colour-fast and design-fast. A brief history of the Loch Ard (1873-1878): - The sailing ship Loch Ard was one of the famous Loch Line ships that sailed from England to Australia. Barclay, Curdle and Co. built the three-masted iron vessel in Glasgow in 1873. It had sailed three trips to Australia and one trip to Calcutta before its fateful voyage. Loch Ard left England on March 2, 1878, under the command of recently married, 29-year-old Captain Gibbs. It was bound for Melbourne with a crew of 37, plus 17 passengers. The general cargo reflected the affluence of Melbourne at the time. Onboard were straw hats, umbrellas, perfumes, clay pipes, pianos, clocks, confectionery, linen and candles, and a heavier load of railway irons, cement, lead and copper. Other cargo included items intended for display in the Melbourne International Exhibition of 1880. The Loch Ard had been sailing for three months and was close to its destination on June 1, 1878. Captain Gibbs had expected to see land at about 3 am but the Loch Ard ran into a fog that greatly reduced visibility and there was no sign of land or the Cape Otway lighthouse. The fog lifted at 4 am and the sheer cliffs of Victoria's west coast were much closer to them than Captain Gibbs expected. He tried to manage the vessel but failed and the ship struck a reef at the base of Mutton Bird Island, near Port Campbell. The top deck loosened from the hull, and the masts and rigging crashed down, knocking passengers and crew overboard. The lifeboat was launched by Tom Pearce but crashed into the side of Loch Ard and capsized. He clung onto its overturned hull and sheltered under it. He drifted out to sea and the tide brought him back to what is now called Loch Ard Gorge. He swam to shore and found a cave for shelter. A passenger, Eva Carmichael, had raced onto the deck to find out what was happening and was confronted by towering cliffs above the ship. She was soon swept off the ship by a huge wave. Eva saw Tom Pearce on a small rocky beach and yelled to attract his attention. He swam out and dragged her to the shelter of the cave. He revived her with a bottle of brandy from a case that had washed up on the beach. Tom scaled a cliff in search of help and followed some horse hoof prints. He came from two men from Glenample Station, three and a half miles away. He told the men of the tragedy and then returned to the gorge while the two men rode back to the station to get help. They reached Loch Ard Gorge and took the two shipwreck survivors to Glenample Station to recover. Eva stayed at the station for six weeks before returning to Ireland by steamship. In Melbourne, Tom Pearce received a hero's welcome and was presented with a medal and some money. Of the 54 crew members and passengers on board, only two survived: the apprentice, Tom Pearce and the young woman passenger, Eva Carmichael, who lost her family in the tragedy. One of the most unlikely pieces of cargo to have survived the shipwreck was a Minton porcelain peacock - one of only nine in the world. The peacock was destined for the Melbourne International Exhibition in 1880. It had been well packed, which gave it adequate protection during the violent storm. Today, the Minton peacock can be seen at the Flagstaff Hill Maritime Museum in Warrnambool. From Australia's most dramatic shipwreck, it has now become Australia's most valuable shipwreck artefact and is one of very few 'objects' on the Victorian State Heritage Register. The Minton floor tile is significant for its hard-wearing yet attractive design. The shipwreck of the LOCH ARD is of State significance. Victorian Heritage Register S417. Flagstaff Hill’s collection of artefacts from LOCH ARD is significant for being one of the largest collections of artefacts from this shipwreck in Victoria. It is significant for its association with the shipwreck, which is on the Victorian Heritage Register (VHR S417). The collection is significant because of the relationship between the objects, as together they have a high potential to interpret the story of the LOCH ARD. The LOCH ARD collection is archaeologically significant as the remains of a large international passenger and cargo ship. The LOCH ARD collection is historically significant for representing aspects of Victoria’s shipping history and its potential to interpret sub-theme 1.5 of Victoria’s Framework of Historical Themes (living with natural processes). The collection is also historically significant for its association with the LOCH ARD, which was one of the worst and best-known shipwrecks in Victoria’s history. A square Minton floor tile with a black and apricot pattern against a chocolate brown background. There is a large chip missing. This decorative floor tile was recovered from the shipwreck of the LOCH ARD. On the back, or base, of the tile is inscribed the number “46” and the letters “Minton & Co Patent Stoke upon Trent”.flagstaff hill, warrnambool, shipwrecked coast, flagstaff hill maritime museum, maritime museum, shipwreck coast, flagstaff hill maritime village, great ocean road, loch line, loch ard, captain gibbs, eva carmichael, tom pearce, glenample station, mutton bird island, loch ard gorge, encaustic tile, melbourne international exhibition, floor tile, minton floor tile -
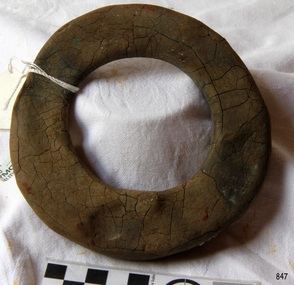 Flagstaff Hill Maritime Museum and Village
Functional object - Rubber Washer, Ca. 1878
... museum...shipwreck coast...flagstaff hill maritime village...great ocean road...loch line...loch ard...captain gibbs...eva carmichael...tom pearce...glenample station...The collection is also historically significant for its association with the LOCH ARD, which was one of the worst and best known shipwrecks in Victoria’s history. flagstaff hill warrnambool shipwrecked coast flagstaff hill maritime museum maritime museum shipwreck coast flagstaff hill maritime village great ocean road loch line loch ard captain gibbs eva carmichael tom pearce glenample station mutton bird island loch ard gorge rubber washer rubber ring Rubber washer, brown ring, non-uniformed shape, has a crack through it. ...HISTORY OF THE LOCH ARD The LOCH ARD belonged to the famous Loch Line which sailed many ships from England to Australia. Built in Glasgow by Barclay, Curdle and Co. in 1873, the LOCH ARD was a three-masted square rigged iron sailing ship. The ship measured 262ft 7" (79.87m) in length, 38ft (11.58m) in width, 23ft (7m) in depth and had a gross tonnage of 1693 tons. The LOCH ARD's main mast measured a massive 150ft (45.7m) in height. LOCH ARD made three trips to Australia and one trip to Calcutta before its final voyage. LOCH ARD left England on March 2, 1878, under the command of Captain Gibbs, a newly married, 29 year old. She was bound for Melbourne with a crew of 37, plus 17 passengers and a load of cargo. The general cargo reflected the affluence of Melbourne at the time. On board were straw hats, umbrella, perfumes, clay pipes, pianos, clocks, confectionary, linen and candles, as well as a heavier load of railway irons, cement, lead and copper. There were items included that intended for display in the Melbourne International Exhibition in 1880. The voyage to Port Phillip was long but uneventful. At 3am on June 1, 1878, Captain Gibbs was expecting to see land and the passengers were becoming excited as they prepared to view their new homeland in the early morning. But LOCH ARD was running into a fog which greatly reduced visibility. Captain Gibbs was becoming anxious as there was no sign of land or the Cape Otway lighthouse. At 4am the fog lifted. A man aloft announced that he could see breakers. The sheer cliffs of Victoria's west coast came into view, and Captain Gibbs realised that the ship was much closer to them than expected. He ordered as much sail to be set as time would permit and then attempted to steer the vessel out to sea. On coming head on into the wind, the ship lost momentum, the sails fell limp and LOCH ARD's bow swung back. Gibbs then ordered the anchors to be released in an attempt to hold its position. The anchors sank some 50 fathoms - but did not hold. By this time LOCH ARD was among the breakers and the tall cliffs of Mutton Bird Island rose behind the ship. Just half a mile from the coast, the ship's bow was suddenly pulled around by the anchor. The captain tried to tack out to sea, but the ship struck a reef at the base of Mutton Bird Island, near Port Campbell. Waves broke over the ship and the top deck was loosened from the hull. The masts and rigging came crashing down knocking passengers and crew overboard. When a lifeboat was finally launched, it crashed into the side of LOCH ARD and capsized. Tom Pearce, who had launched the boat, managed to cling to its overturned hull and shelter beneath it. He drifted out to sea and then on the flood tide came into what is now known as LOCH ARD Gorge. He swam to shore, bruised and dazed, and found a cave in which to shelter. Some of the crew stayed below deck to shelter from the falling rigging but drowned when the ship slipped off the reef into deeper water. Eva Carmichael had raced onto deck to find out what was happening only to be confronted by towering cliffs looming above the stricken ship. In all the chaos, Captain Gibbs grabbed Eva and said, "If you are saved Eva, let my dear wife know that I died like a sailor". That was the last Eva Carmichael saw of the captain. She was swept off the ship by a huge wave. Eva saw Tom Pearce on a small rocky beach and yelled to attract his attention. He dived in and swam to the exhausted woman and dragged her to shore. He took her to the cave and broke open case of brandy which had washed up on the beach. He opened a bottle to revive the unconscious woman. A few hours later Tom scaled a cliff in search of help. He followed hoof prints and came by chance upon two men from nearby Glenample Station three and a half miles away. In a state of exhaustion, he told the men of the tragedy. Tom returned to the gorge while the two men rode back to the station to get help. By the time they reached LOCH ARD Gorge, it was cold and dark. The two shipwreck survivors were taken to Glenample Station to recover. Eva stayed at the station for six weeks before returning to Ireland, this time by steamship. In Melbourne, Tom Pearce received a hero's welcome. He was presented with the first gold medal of the Royal Humane Society of Victoria and a £1000 cheque from the Victorian Government. Concerts were performed to honour the young man's bravery and to raise money for those who lost family in the LOCH ARD disaster. Of the 54 crew members and passengers on board, only two survived: the apprentice, Tom Pearce and the young woman passenger, Eva Carmichael, who lost all of her family in the tragedy. Ten days after the LOCH ARD tragedy, salvage rights to the wreck were sold at auction for £2,120. Cargo valued at £3,000 was salvaged and placed on the beach, but most washed back into the sea when another storm developed. The wreck of LOCH ARD still lies at the base of Mutton Bird Island. Much of the cargo has now been salvaged and some was washed up into what is now known as LOCH ARD Gorge. Cargo and artefacts have also been illegally salvaged over many years before protective legislation was introduced. One of the most unlikely pieces of cargo to have survived the shipwreck was a Minton porcelain peacock - one of only nine in the world. The peacock was destined for the Melbourne International Exhibition in 1880. It had been well packed, which gave it adequate protection during the violent storm. Today, the Minton peacock can be seen at the Flagstaff Hill Maritime Museum in Warrnambool. From Australia's most dramatic shipwreck it has now become Australia's most valuable shipwreck artefact and is one of very few 'objects' on the Victorian State Heritage Register. Flagstaff Hill’s collection of artefacts from LOCH ARD is significant for being one of the largest collections of artefacts from this shipwreck in Victoria. It is significant for its association with the shipwreck, which is on the Victorian Heritage Register (VHR S417). The collection is significant because of the relationship between the objects, as together they have a high potential to interpret the story of the LOCH ARD. The LOCH ARD collection is archaeologically significant as the remains of a large international passenger and cargo ship. The LOCH ARD collection is historically significant for representing aspects of Victoria’s shipping history and its potential to interpret sub-theme 1.5 of Victoria’s Framework of Historical Themes (living with natural processes). The collection is also historically significant for its association with the LOCH ARD, which was one of the worst and best known shipwrecks in Victoria’s history. Rubber washer, brown ring, non-uniformed shape, has a crack through it. Recovered from the wreck of the Loch Ard. flagstaff hill, warrnambool, shipwrecked coast, flagstaff hill maritime museum, maritime museum, shipwreck coast, flagstaff hill maritime village, great ocean road, loch line, loch ard, captain gibbs, eva carmichael, tom pearce, glenample station, mutton bird island, loch ard gorge, rubber washer, rubber ring
