Showing 7 items matching "signals head set"
-
 Wangaratta RSL Sub Branch
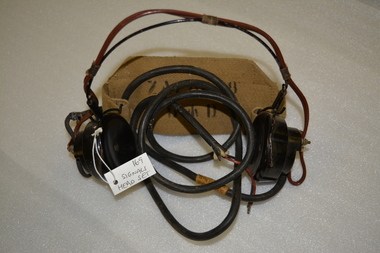
Equipment - Signals Head Set
... Signals Head Set......head set...signals...1942 Signals Head Set. Two black bakelite earpieces attached to black wire headpiece. ...Wangaratta RSL Sub Branch 2-4 Templeton Street Wangaratta high-country wwii head set signals head set bakelite ZA28658 D ^ D 1942 Signals Head Set. ...1942 Signals Head Set. Two black bakelite earpieces attached to black wire headpiece. Brown electrical cord is attached to wire and bakelite. Thick black rubber cord is attached to one earpiece. Has khaki canvas material attached to go around back of head.ZA28658 D ^ Dwwii, head set, signals head set, bakelite -
 Flagstaff Hill Maritime Museum and Village
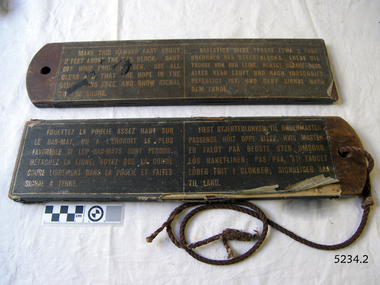
Equipment - Tally Board, 1860s
... Flagstaff Hill Maritime Museum and Village Flagstaff Hill Maritime Museum Maritime Village Warrnambool Great Ocean Road Lady Bay Warrnambool Harbour Port of Warrnambool Tramway Jetty Breakwater shipwreck life-saving lifesaving rescue crew rescue rocket rescue rocket crew lifeboat men beach rescue line rescue rescue equipment rocket firing equipment rocket rescue equipment maritime accidents shipwreck victim rocket equipment Marine technology rescue boat lifeboat volunteer lifesavers volunteer crew life saving rescue crew lifesaving rescue crew rocket apparatus rocket rescue method shore to ship rocket apparatus rescue stranded vessel line throwing mortar mortar rocket rescue apparatus line thrower line throwing Lifeboat Warrnambool beach apparatus rocket machine rocket head rocket launcher rocket line beach rescue set rocket set tally board rescue instructions Text (English) "MAKE THIS HAWSER FAST ABOUT 2 FEET ABOVE THE TAIL BLOCK. CAST OFF WHIP FROM HAWSER. SEE ALL CLEAR AND THAT THE ROPE IN THE BLOCK RUNS FREE, AND SHOW SIGNAL ...The boards each have instructions adhered to each side, printed in four languages (English, French, Dutch and German). At the beginning of a shore-to-ship rescue the instructions are sent to the distressed vessel after the first rocket line was received by them. The stranded people on the vessel follow the instructions to assist the life saving rescue crew in saving their lives. Saving lives in Warrnambool – The coastline of South West Victoria is the site of over 600 shipwrecks and many lost lives; even in Warrnambool’s Lady Bay there were around 16 known shipwrecks between 1850 and 1905, with eight lives lost. Victoria’s Government responded to the need for lifesaving equipment and, in 1858, the provision of rocket and mortar apparatus was approved for the lifeboat stations. In 1859 the first Government-built lifeboat arrived at Warrnambool Harbour and a shed was soon built for it on the Tramway Jetty, followed by a rocket house in 1864 to safely store the rocket rescue equipment. In 1878 the buildings were moved to the Breakwater (constructed from 1874-1890), and in 1910 the new Lifeboat Warrnambool arrived with its ‘self-righting’ design. For almost a hundred years the lifesaving and rescue crews, mostly local volunteers, trained regularly to rehearse and maintain their rescue skills. They were summoned when needed by alarms, gunshots, ringing bells and foghorns. In July 1873 a brass bell was erected at Flagstaff Hill specifically to call the rescue crew upon news of a shipwreck. Some crew members became local heroes but all served an important role. Rocket apparatus was used as recently as the 1950s. Rocket Rescue Method - Rocket rescue became the preferred lifesaving method of the rescue crews, being much safer that using a lifeboat in rough seas and poor conditions. The Government of Victoria adopted lifesaving methods based on Her Majesty’s Coast Guard in Great Britain. It authorised the first line-throwing rescue system in 1858. Captain Manby’s mortar powered a projectile connected to rope, invented in 1808. The equipment was updated to John Dennett’s 8-foot shaft and rocket method that had a longer range of about 250 yards. From the 1860s the breeches buoy and traveller block rocket rescue apparatus was in use. It was suspended on a hawser line and manually pulled to and from the distressed vessel carrying passengers and items. In the early 1870s Colonel Boxer’s rocket rescue method became the standard in Victoria. His two-stage rockets, charged by a gunpowder composition, could fire the line up to 500-600 yards, although 1000 yards range was possible. Boxer’s rocket carried the light line, which was faked, or coiled, in a particular way between pegs in a faking box to prevent twists and tangles when fired. The angle of firing the rocket to the vessel in distress was measured by a quadrant-type instrument on the side of the rocket machine. Decades later, in 1920, Schermuly invented the line-throwing pistol that used a small cartridge to fire the rocket. . The British Board of Trade regularly published instructions for both the beach rescue crew and ship’s crew. It involved setting up the rocket launcher on shore at a particular angle, determined by the Head of the crew and measured by the quadrant, inserting a rocket that had a light-weight line threaded through its shaft, and then firing it across the stranded vessel, the line issuing freely from the faking board. A continuous whip line was then sent out to the ship’s crew, who hauled it in then followed the instructions – in four languages - on the attached tally board. The survivors would haul on the line to bring out the heavier, continuous whip line with a tail block connected to it. They then secured the block to the mast or other strong part the ship. The rescue crew on shore then hauled out a stronger hawser line, which the survivors fixed above the whip’s tail block. The hawser was then tightened by the crew pulling on it, or by using the hooked block on the shore end of the whip and attaching it to a sand anchor. The breeches buoy was attached to the traveller block on the hawser, and the shore crew then used the whip line to haul the breeches buoy to and from the vessel, rescuing the stranded crew one at a time. The rescue crew wore scarlet, numbered armbands and worked on a numerical rotation system, swapping members out to rest themThis pair of tally board is significant for its connection with local history, maritime history and marine technology. Lifesaving has been an important part of the services performed from Warrnambool's very early days, supported by State and Local Government, and based on the methods and experience of Great Britain. Hundreds of shipwrecks along the coast are evidence of the rough weather and rugged coastline. Ordinary citizens, the Harbour employees, and the volunteer boat and rescue crew, saved lives in adverse circumstances. Some were recognised as heroes, others went unrecognised. In Lady Bay, Warrnambool, there were around 16 known shipwrecks between 1850 and 1905. Many lives were saved but tragically, eight lives were lost.Tally boards, two, rectangular wooden boards, both with a hole drilled into one short end. Instructions are glued onto the boards. They were printed in light letters onto dark canvas in four languages (English, French, Dutch and German). Text (English) "MAKE THIS HAWSER FAST ABOUT 2 FEET ABOVE THE TAIL BLOCK. CAST OFF WHIP FROM HAWSER. SEE ALL CLEAR AND THAT THE ROPE IN THE BLOCK RUNS FREE, AND SHOW SIGNAL TO THE SHORE."flagstaff hill maritime museum and village, flagstaff hill, maritime museum, maritime village, warrnambool, great ocean road, lady bay, warrnambool harbour, port of warrnambool, tramway jetty, breakwater, shipwreck, life-saving, lifesaving, rescue crew, rescue, rocket rescue, rocket crew, lifeboat men, beach rescue, line rescue, rescue equipment, rocket firing equipment, rocket rescue equipment, maritime accidents, shipwreck victim, rocket equipment, marine technology, rescue boat, lifeboat, volunteer lifesavers, volunteer crew, life saving rescue crew, lifesaving rescue crew, rocket apparatus, rocket rescue method, shore to ship, rocket apparatus rescue, stranded vessel, line throwing mortar, mortar, rocket rescue apparatus, line thrower, line throwing, lifeboat warrnambool, beach apparatus, rocket machine, rocket head, rocket launcher, rocket line, beach rescue set, rocket set, tally board, rescue instructions -
 Ringwood and District Historical Society
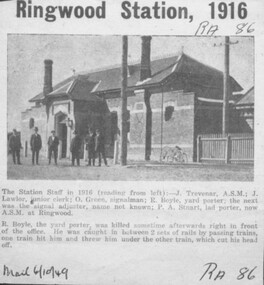
Newspaper - Newspaper Clipping, 1949 newspaper clipping featuring 1916 photograph of Ringwood Railway Station staff - J. Trevenar, A.S.M.; J. Lawlor, junior clerk; O. Green, signalman; R. Boyle, yard porter; the next was the signal adjuster, name not known; P.A. Stuart, lad porter, later A>S>M> at Ringwood S.M. at Ringwood. The accompanying article also describes a later accident in which R. Boyle was killed
... signal adjuster, name not known; P.A. Stuart, lad porter, now A.S.M. at Ringwood. R. Boyle, the yard porter, was killed sometime afterwards right in front of the office. He was caught in between 2 sets of rails by passing trains, one train hit him and threw him under the other train, which cut his head off." ...signal adjuster, name not known; P.A. Stuart, lad porter, now A.S.M. at Ringwood. R. Boyle, the yard porter, was killed sometime afterwards right in front of the office. He was caught in between 2 sets of rails by passing trains, one train hit him and threw him under the other train, which cut his head off." ...Heading of article reads, "Ringwood Station, 1916". Article reads, "The Station Staff in 1916 (reading from left):- J. Trevenar, A.S.M.; J. Lawlor, junior clerk; O. Green, signalman; R. Boyle, yard porter; the next was the signal adjuster, name not known; P.A. Stuart, lad porter, now A.S.M. at Ringwood. R. Boyle, the yard porter, was killed sometime afterwards right in front of the office. He was caught in between 2 sets of rails by passing trains, one train hit him and threw him under the other train, which cut his head off." "Mail 6/10/49". -
 Ballarat Tramway Museum
Slide - Bendigo trams - Quarry Hill - Eaglehawk route - set of 6, Warren Doubleday, 13/9/1970
... Set of six slides of Bendigo trams taken by Warren Doubleday on 13/9/1970 during an ARHS tour to Bendigo - 1 - tram 30 at the head of a long line up at the railway station 2 - tram 19 - part of the convoy 3 - tram 25 - turning into View St 4 - tram 24 leaving a loop on the Eaglehawk line - note the signals on the pole with one showing a green light. 5 - tram 26 outbound to Eaglehawk 6 - tram 3 inbound about to enter a loop - note the red signal on the pole....Ballarat Tramway Museum South Gardens Reserve Wendouree Parade Ballarat Ballarat goldfields Set of six slides of Bendigo trams taken by Warren Doubleday on 13/9/1970 during an ARHS tour to Bendigo - 1 - tram 30 at the head of a long line up at the railway station 2 - tram 19 - part of the convoy 3 - tram 25 - turning into View St 4 - tram 24 leaving a loop on the Eaglehawk line - note the signals on the pole with one showing a green light. 5 - tram 26 outbound to Eaglehawk 6 - tram 3 inbound about to enter a loop - note the red signal on the pole. ...Set of six slides of Bendigo trams taken by Warren Doubleday on 13/9/1970 during an ARHS tour to Bendigo - 1 - tram 30 at the head of a long line up at the railway station 2 - tram 19 - part of the convoy 3 - tram 25 - turning into View St 4 - tram 24 leaving a loop on the Eaglehawk line - note the signals on the pole with one showing a green light. 5 - tram 26 outbound to Eaglehawk 6 - tram 3 inbound about to enter a loop - note the red signal on the pole.Yields information about the Bendigo tram system and the tram used on a tour in Sept. 1970.Colour Slide - Anscochrome GAF plastic mounts - set of 6Have the photographer's slide number written on them.bendigo, charing cross, eaglehawk, quarry hill, tram 30, tram 19, tram 25, tram 24, tram 26, tram 3, signals -
 Ballarat Tramway Museum
Photograph - B&W print of donated negative, John Webster, 11/4/1953
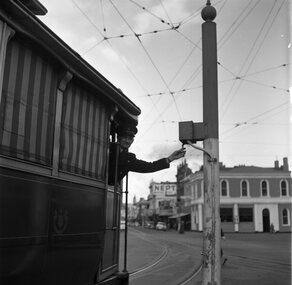
... Black and digital white print from a scan of a donated negative of a driver leaning out from a single trucker to set the switch on the signal for either the Victoria St or Mt Pleasant routes. Has the Bucks Head Hotel in the background. ...Ballarat Tramway Museum South Gardens Reserve Wendouree Parade Ballarat Ballarat goldfields Yields information about the Bucks Head Hotel and demonstrates the way the signals were set in Bridge St for either the Mt Pleasant or Victoria St routes tramways trams Sturt St Grenville St Signals Bridge St On left hand side of the negative in ink is "EI 35". ...Yields information about the Bucks Head Hotel and demonstrates the way the signals were set in Bridge St for either the Mt Pleasant or Victoria St routesBlack and digital white print from a scan of a donated negative of a driver leaning out from a single trucker to set the switch on the signal for either the Victoria St or Mt Pleasant routes. Has the Bucks Head Hotel in the background. Shows the pole the signal controller or switch was mounted on. Black and White print made from scan of negative. Original Negative stored with Negatives. Image rescanned from copy neg and updated 31/5/2020. See On this basis, the envelope and marking matches that of Reg Item 4158, photo of No. 40, by John Webster and assumed taken on the same day as Item 4157, 4158, 4168, 4178 - 11/4/1953. Contained within Envelope No. 33.On left hand side of the negative in ink is "EI 35".tramways, trams, sturt st, grenville st, signals, bridge st -
 Melbourne Tram Museum
Negative - Set of 2, Wal Jack, 30/08/1941 12:00:00 AM
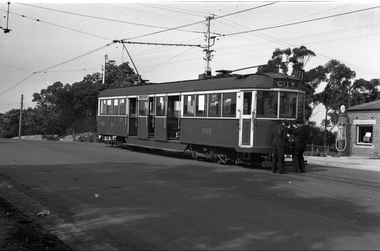
... Set of two Black and white negatives, by Wal Jack, of CW5 685 (City, Route 71) at the intersection of Warragul Road and Riversdale Road. The first photo shows two crewmen looking at the headlight on the tram. The second photo shows it is fitted with a war time head light mask and shows a crewman walking out of the building - a service station with Shell pumps. Above the tram on a pole is a tram signal...Set of two Black and white negatives, by Wal Jack, of CW5 685 (City, Route 71) at the intersection of Warragul Road and Riversdale Road. The first photo shows two crewmen looking at the headlight on the tram. The second photo shows it is fitted with a war time head light mask and shows a crewman walking out of the building - a service station with Shell pumps. Above the tram on a pole is a tram signal ...Set of two Black and white negatives, by Wal Jack, of CW5 685 (City, Route 71) at the intersection of Warragul Road and Riversdale Road. The first photo shows two crewmen looking at the headlight on the tram. The second photo shows it is fitted with a war time head light mask and shows a crewman walking out of the building - a service station with Shell pumps. Above the tram on a pole is a tram signal for the single line operation between Warragul Road and the Wattle Park terminus. See also item 6771 for a photo of the pole itself. Photo dated 30-8-1941, in the Wal Jack album.trams, tramways, cw5 class, wattle park, riversdale road, headlight mask, route 71, tram 685 -
 National Vietnam Veterans Museum (NVVM)
Photograph, Home Away From Home
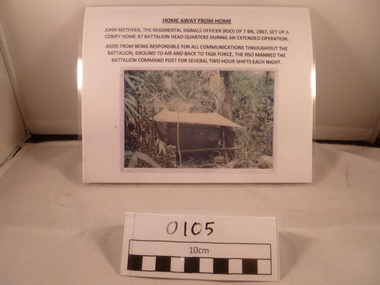
... John Methven, The Regimental Signals Officer (RSO) of 7BN, 1967 set up a comfy home at Battalion Head Quarters during an extended operation....Photograph 7th Battalion 7 RAR John Methven RSO Regimental Signals Officer Battalion Headquarters John Methven, The Regimental Signals Officer (RSO) of 7BN, 1967 set up a comfy home at Battalion Head Quarters during an extended operation. ...This item is one of many that have been donated by John David Methven. Lt John Methven 37604 served with the Royal Australian Infantry Corps. He served with the 7th Batalion with The Royal Australian regiment from April 67 to April 1968.A reprint colour photograph of s small shed surrounded by bamboos. The picture and texts are on a white paper and laminated. Written above the photograph. HOME AWAY FROM HOME John Methven, the Regimental Signals Officer (RSO) of 7Bn, 1967, set up a comfy home at Battalion Headquarters during an extended operation. Aside from being responsible for all communications throughout the Battalion, ground to air and back to task force, the RSO manned the Battalion Command post for several two hour shifts each night.John Methven, The Regimental Signals Officer (RSO) of 7BN, 1967 set up a comfy home at Battalion Head Quarters during an extended operation.photograph, 7th battalion, 7 rar, john methven, rso, regimental signals officer, battalion headquarters