Unions Ballarat
General incoming correspondence of the Ballarat Trades and Labour Council, 1884-1923; 1925; 1931; 1937; 1938; 1949-1950; 1952-1955
Paper/letters stored in two boxes.
Arranged in separate folders by year. The lists below are alphabetical. Located by year and number.
1884 - J.W. Graham, Secretary
18. Amalgamated Mining Engine Drivers' Association - regarding appointing a delegate to Council. 12 December 1884.
14. Bendigo Amalgamated Miners' Association, Mr Phillips, Secretary - regarding formation of a Bendigo Trades and Labor Council. 22 July 1884.
1. B? Secretary for Lands, Victoria - regarding deputation from Council to him. 8 January 1884.
15. A.R. Davie - regarding half holiday Union appointing delegates to Council. 77 July 1884.
8. D.M. Davies - regarding deputation to Minister for Lands, Victoria. 11 January 1884.
7. J.L. Dowe - regarding deputation to Minister for Lands, Victoria. 11 January 1884.
6. F.R. Fincham - regarding deputation to Minister for Lands, Victoria. 11 January 1884.
16. J.W. Grahame - regarding leave of absence. 10 October 1884.
17. W. Hosking - regarding alteration of rule 14. n.d.
2. J. Kline - regarding apologies for absence from Council meeting. 10 January 1884. A copy of a letter to The Courier is attached.
4. Painters' Union (Geoff Ludbrook) - regarding assisting at Eight Hour Anniversary. 11 January 1884.
13. J. Pearce - regarding apologies for absence from Council. 11 July 1884.
12. G. Rasy? - regarding apologies for absence from Council. 9 May 1884.
3. J.R. Richardson - regarding presence on deputation to Minister for Lands. 10 January 1884.
10. R.D. Reid - regarding apologies for absence from Council. 11 January 1884.
9. A. Sutherland - regarding presence on deputation to Minister for Lands. 10 January 1884.
11. Specifications for stamping marbles for Council. n.d.
5. A. Young - deputation to Minister for Lands. 10 January 1884.
1885 - J.L. Anderson, Secretary
8. Amalgamated Mining Engine Drivers' Association - regarding delegates to Council. 8 May 1885.
11. J. Anderson (Secretary of Council) to H. Uren MLA - regarding amalgamation of the Council with the City Free Library. 10 August 1885.
24. Ballarat Cricket Club - regarding using the oval for Eight Hour Anniversary. 9 December 1885.
7. Ballarat Woollen Mills Operative Union - regarding giving name of Union, list of Union members. 8 May 1885.
4. Ballarat Typographical Association - regarding printing of Council material. 8 May 1885.
2. J. Binner - regarding prizes given at Eight Hour Anniversary. 26 April 1885.
19. Cabmens Union, Ballarat - regarding delegate to Council. 8 October 1885.
12. Carpenters and Joiners Trade Society - regarding delegate to Council. 7 September 1885.
23. Carpenters and Joiners Trade Society - forwarding a copy of rules. 8 December 1885.
14. H. Clotz, et al - regarding Friday half holiday for hairdressers. 10 September 1885.
1. Eight Hours Anniversary Programme. 21 April 1885.
15. Friendly Society of Ironmoulders of Victoria, Ballarat Branch - new Secretary of same. 11 September 1885.
17. Friendly Society of Ironmoulders of Victoria, Ballarat Branch - regarding delegate to Council. 7 October 1885.
21. Friendly Society of Ironmoulders of Victoria, Ballarat Branch - regarding delegate to Council. 22 November 1885.
5. E. Ingram - regarding losses incurred at Eight Hour Anniversary. 8 May 1885.
20. L. Mills - regarding apologies for absence. 9 October 1885.
3. Painters' Union - regarding delegates to Council. 4 May 1885.
18. Painters' Union - regarding delegates to Council. 8 October 1885.
25. J. Pearce - regarding apologies for absence. 11 December 1885.
26. C. Salter - regarding donations to Eight Hours Anniversary. 14 December 1885.
6. A. Smith - regarding apologies for absence. 8 May 1885.
9. E.H. Swifte - regarding amalgamation of Council with Free City Library. 13 July 1885.
10. E.H. Swifte - regarding amalgamation of Council with Free City Library. 7 August 1885.
13. Tanners and Curriers of Ballarat - regarding forming a branch of the Union in Ballarat. 8 September 1885.
16. Trades and Labor Council, Brisbane - regarding formation of same. 8 November 1885.
7. J. Treloar - regarding apologies for absence. 8 May 1885.
1886 - J.L. Anderson, Secretary
7. Amalgamated Miners' Association of Australasia - regarding Delegates to Council. 8 May 1886.
3. Amalgamated Mining Engine Drivers Association, Ballarat Branch - regarding Delegates to Council. 7 May 1886.
5. Amalgamated Society of Engineers - regarding Delegates to Council. 11 May 1886.
1. Half Holiday Union, Ballarat - regarding Delegates to Council. 7 May 1886.
6. Operative Bakers' Society - regarding Delegates to Council. 11 May 1886.
4. Painters' Union - regarding Delegates to Council. 11 May 1886.
2. Victorian Operative Bootmakers Union, Ballarat Branch - regarding delegates to Council. 12 May 1886.
8. Ballarat United Friendly Societies' Dispensary - accepting an offer of a deputation to special meeting of General Committee.
1887 - T. Bayley, Secretary
Nil.
1888 - T.S. Bayley, Secretary
24. Amalgamated Miners' Association of Australasia - regarding meeting to hear Dr Siscs on the Worn out Miners Sustentation Fund. 6 December 1888.
7. Australian Natives' Association, Ballarat Branch - regarding alienation of portion of public park. 21 June 1888.
19. Ballarat Trades and Labour Council (to various unions) - regarding support of direct labor representation in Parliament from Ballarat West. 20 October 1888.
11. Ballarat Typographical Society - regarding room for meeting. 6 July 1888.
22. A. Callaway (Chief Secretary for A. Deakin) - regarding names submitted for Commission of the Peace. 19 November 1888.
9. Eight Hours' Anniversary Committee - regarding money for tickets sold. 27 June 1888.
15. W.F. Emery - regarding apologies for absence. 14 September 1888.
6. Gillies (for the Victorian Premier) - regarding Chinese immigrants. 8 May 1888.
1. Grocers Association of Geelong - regarding joining Council. 14 April 1888.
5. Half Holiday Union - regarding delegates to Council. 3 May 1888.
18. Intercolonial Trades and Labor Union Congress, 6th, Hobart, 5-8 February 1888 (Hugh Kirk, Secretary of Hobart Trades and Labor Council) - regarding printed invitations to the Congress. 27 October 1888.
13. Ironworkers Assistants' Society of Victoria, Ballarat Branch - regarding delegates to Council. 8 August 1888.
14. Ironworkers Assistants' Society of Victoria, Ballarat Branch - regarding delegates to Council. 4 September 1888.
23. Ironworkers Assistants' Society of Victoria, Ballarat Branch - regarding delegates to Council. 14 December 1888.
8. H. Jones - regarding Major Dane's lectures. 25 June 1888.
2. Locomotive Engine Drivers and Firemen's Association - regarding delegates to Council. 17 April 1888.
17. A. McKenzie - regarding apologies for absence. n.d.
3. V.M. Pearson - regarding organisation of a trades union in Colac. 14 April 1888.
10. John Shiels - regarding overdraft of Council. 6 July 1888.
21. Tanners and Curriers Union, Ballarat Branch - regarding delegates to Council. 12 November 1888.
20. Trades Hall Council, Geelong - thanking for assistance from Council. 11 November 1888.
4. Trades Hall Council, Melbourne. (David Bennett, Secretary) - regarding new regulations by-laws and standing orders. 17 April 1888.
16. Victorian Operative Bricklayers Society - regarding end of dispute. 14 September 1888.
12. John Wilson - regarding Report of Committee on opening of the new Trades Hall. 13 July 1888.
1889 - J. Wilson, Secretary
8. Ballarat Woollen and Worsted Company - regarding support of products by working class. 2 November 1889.
9. Butchers Employees' Association - regarding delegate to Council. 2 December 1889.
1A. Copy of an award of the arbitration in the dispute between Messrs Whitten and Cairns and the Ballarat Bootmakers' Union. 14 February 1889.
10. Half Holiday Union - regarding delegate to Council. 3 December 1889.
1-6. Ironworkers Assistants' Society of Victoria, Ballarat Branch - regarding Phoenix Foundry dispute. 20 March 1889-29 March 1889.
11. Painters' Union - regarding formation of a non-union society. 4 December 1889.
13. Painters' Union - regarding formation of a non-union society. 6 December 1889.
12. Messers Stansfield, Bush and Shepphard, Decorators - accuses Painters' Union of instigating a strike. 5 December 1889.
7. Working Men's College and Trades Hall Council, Melbourne - regarding memorial to the late Hon. Francis Ormond. n.d.
1890 - J. Wilson, Secretary
81. James Alexander - regarding request for financial assistance. 30 October 1890.
21. Amalgamated Millers, Engine Drivers and Mill Employees' Association of Australasia - regarding supplying list of firms employing union labour. 4 June 1890.
2. Amalgamated Miners of Australasia (W.C. Spence, Secretary) - thanking Council for their supportive letter. March 1890.
52. Amalgamated Miners of Australasia, Ballarat Branch - regarding suggestion to canvass Ballarat district for funds for strikers.
88. Amalgamated Miners of Australasia (W.G. Spence) - regarding donation from residents of Clementston for Ballarat men out of work and not receiving funds from Council.
15. Amalgamated Society of Engineers, Ballarat Branch - regarding supplying list of shops employing Union labour. 28 April 1890.
44. Amalgamated Society of Engineers, Ballarat Branch - regarding giving numbers of men out of work. 30 September 1890.
69. Amalgamated Society of Engineers, Ballarat Branch - regarding approving members of their union being placed on the relief list. 23 October 1890.
70. T. Bailey - regarding apology for being unable to canvas for strike fund. 23 October 1990.
102. Balance sheet of strike fund of the Council and bundle of receipts.
18. Ballarat Plumbers' Union - regarding supplying a list of firms employing union labour. 6 June 1890.
16. Ballarat Saddle Harness and Collar Makers' Society - regarding supplying a list of firms employing union labour. 5 May 1890.
42. Ballarat Tailoresses' Union - regarding donation to strike fund. 25 September 1890.
45. Ballarat Town Council Employees - regarding donation to strike fund. n.d.
12. Ballarat Typographical Society - regarding supplying name of Secretary and list of firms employing union labour. 19 April 1990.
5. Ballarat Woollen Mills Operative's Union - regarding seeking advice on how to get men to join the union. 22 April 1890.
26B. E. Batterly - regarding apology for being unable to come to mass meeting about strike. 11 September 1890.
46. E. Blayney (hotel owner) - regarding donation to strike fund. n.d.
56. G. Blyman - regarding donation to strike fund. 8 October 1890.
55. J. Brady - regarding donation to strike fund. 6 October 1890.
76. J. Braidie et al - querying reason for getting no strike pay. 27 October 1890.
22. M. Bregazzi - regarding donation to strike fund. 2 September 1890.
34. M. Bregazzi - regarding donation to strike fund. 12 September 1980.
40. M. Bregazzi - regarding donation to strike fund. 23 September 1890.
72. M. Bregazzi - regarding donation to strike fund. 24 October 1890.
57. J. Clement - regarding donations from residents of Clementston for use in Ballarat. 9 October 1890.
3A. D.M. Davies (Minister of Mines, Victoria) - regarding cannot come to mass meeting in Ballarat (telegram). 12 September 1890.
53. W Davies et al - regarding seeking financial from Council though not members of a union. 6 October 1890.
59. W. Davies - objecting to refusal of financial assistance. 10 October 1890.
94. Hugh Dunlop - regarding request for financial assistance. 28 November 1890.
32. John Dunn - regarding apologies for unable to attend mass meeting. 12 September 1890.
60. John Dunn - regarding donation to strike fund. 11 October 1890.
71. W. Evans - regarding resignation as Treasurer and member from strike committee. 24 October 1890.
48. Fitzgerald Bros (Drapers) - regarding donation to strike fund. 1 October 1890.
63. Friendly Society of Ironmoulders of Victoria, Ballarat Branch - recommending financial assistance for a member of their Union. 13 October 1890.
29. J. Hancock - regarding being able to attend mass meeting (telegram). 12 September 1890.
74. Horse Drivers' Union, Ballarat - regarding request for financial help for a union member. 25 October 1890.
64. W. Howat - regarding letting of Academy of Music Ballarat for a meeting. 14 October 1890.
50. Hughes and Opie (Drapers) - donation to strike fund. 3 October 1890.
66. J. Hurst (Bucks Head Hotel owner) - regarding donation to strike fund. 18 October 1890.
25. Iron Founders' Society - regarding a request for financial assistance for out of work members. 9 September 1890.
87. Iron Founders' Trade Union, Ballarat - regarding request for financial help for out of work members. 23 September 1890.
39. Ironworkers' Assistants' Society of Victoria, Ballarat Branch (Mr Sheldon, Secretary) - regarding request for financial help for out of work members. 23 September 1890.
79. Ironworkers' Assistants' Society of Victoria, Ballarat Branch (Mr Sheldon, Secretary) -regarding request for financial help. 30 October 1890.
84. Ironworkers' Assistants' Society of Victoria, Ballarat Branch (Mr Sheldon, Secretary) - regarding eligibility of a member to be placed on the strike relief list. 6 November 1890.
89. Ironworkers' Assistants' Society of Victoria, Ballarat Branch (Mr Sheldon, Secretary) -regarding payment to Council of levies on working members for strike fund. 20 November 1890.
98. W. Kean (tobacconist) - regarding suggesting a concert to be held to help the strike relief fund and his offer to help. n.d.
61. W. Kenna (Warrenheip Breweries) - regarding donation to strike fund. 13 October 1890.
38. Joseph Kirtin (Auctioneer) - regarding donation to strike fund. 22 September 1890.
17. Labourers' Protective and Building Society - regarding names of contractors who employ union men. 12 May 1890.
62. D. Lessels - regarding recommendation of J. David for relief. 13 October 1890.
65. List of machinists out of work at the Phoenix Foundry, Ballarat. 14 October 1890.
78. John Lynch - regarding request for financial help. 27 October 1890.
85. John McAuly - regarding dispute settled at Horsham. 10 November 1980.
9. Jas Martin - regarding list of shops employing union men. 14 April 1890.
49. Jas Martin - regarding declaration of being out of work and needing financial help. 2 October 1890.
10. Masons' Society - regarding name of Secretary and list of shops employing union men. 15 April 1890.
58. Master Tailors' Association, Ballarat - regarding donation to strike fund. 10 October 1890.
90. W. Meher - regarding expression of thanks for money given. 24 November 1890.
27. W.E. Murphy - regarding able to come to mass meeting (telegram). 11 September 1890.
30. W.E. Murphy - regarding missed the train (telegram). 12 September 1890.
77. W.E. Murphy - regarding arranging a meeting (telegram). 27 October 1890.
83. W.E. Murphy - regarding thanks for money given. 31 October 1890.
3. Officers of the Ballarat Gas Company - regarding non-union bricklayer working for same. 8 March 1890.
19. Operative Bakers' Society - regarding list of employers using union labour. n.d.
20. Painters' Union - list of shops employing union men. n.d.
23. Painters' Union - regarding suggestion to call a meeting in support of Melbourne strikers. 6 September 1890.
24. Painters' Union - regarding donation to maritime strike, Melbourne. 6 September 1890.
51. Painters' Union - regarding donation to maritime strike, Melbourne. 5 October 1890.
86. G. Philbrook - regarding request for financial assistance. 18 November 1890.
97. G. Philbrook - regarding request for financial assistance. 22 December 1980.
82. T. Porter - regarding apology for absence. n.d.
35. Resolutions (passed at meeting) and list of movers and seconders. 12 September 1890.
41. Saddle, Harness and Collar Makers Society, Ballarat - regarding donation to strike fund. 25 September 1890.
4. Sandhurst and District Trades and Labour Council - regarding thanks for helping them obtain a building for use of their Council. 10 March 1890.
36. John Sayers (hotel owner) - regarding donation to strike fund. 17 September 1890.
93. (?), Sheldon - regarding receipt for money received from emergency fund. 28 November 1890.
26. W. Smith - regarding thanks for invitation to mass meeting (telegram). 10 September 1890.
99. T. (?) Stephen - financial help for members of his union. n.d.
100. Subscription list in aid of the strikers for Unionism by the shareholders and 'employees' of the Jubilee Mine, Long Gully, Black Ball, Scarsdale. n.d.
6. Tanners and Curriers, Ballarat Branch - regarding list of employers using union labour. 3 April 1890.
101. D. Temple (Secretary, Amalgamated Shearers' Union) - regarding request for copy of newspapers publishing correspondence between sheep owners and the Union. n.d.
37. Trades Hall Council, Melbourne. Committee of finance and control - regarding thanks to Ballarat Council for efforts to assist the cause of Labour. 18 September 1890.
43. Trades Hall Council, Melbourne. Committee of finance and control - regarding advice to Ballarat Council to distribute its own funds and applications for financial help. 29 September 1890.
67. Trades Hall Council, Melbourne. Committee of finance and control - regarding seeking continued financial aid from Council. 21 October 1890.
91. Trades Hall Council, Melbourne. (Secretary, D. Bennett) - regarding thanks to Ballarat Council for donation. 24 November 1890.
92. Trades Hall Council Melbourne, Committee of finance and control - regarding acknowledging receipt of money from Ballarat Council. 27 November 1890.
95. Trades Hall Council, Melbourne. (Secretary, D. Bennett) - regarding thanks to Ballarat Council for donation. 2 December 1890.
96. Trades Hall Council, Melbourne. (Secretary, D. Bennett) - regarding thanks to Ballarat Council for donation and explaining why amounts received to not appear in the "Age". 20 December 1890.
68. W. Treloar - regarding public meeting at Buninyong. 21 October 1890.
11. United Society of Boilermakers and Iron Shipbuilders of Victoria, Ballarat Branch - regarding list of shops employing union men. 10 April 1890.
26c. W.H. Uren (MLA) - regarding inability to come to mass meeting (telegram). 11 September 1890.
75. United Society of Boilermakers and Iron Shipbuilders of Victoria, Ballarat Branch - regarding request for funds for out of work members as own funds exhausted. 27 October 1890.
8. Victorian Operative Bootmakers' Union, Ballarat Branch - regarding giving name of union, list of shops using union men. 10 April 1890.
13. Victorian Operative Bricklayers' Society, Ballarat Branch - giving list of shops using union men. 24 April 1890.
14. Victorian Operative Bricklayers' Society, Ballarat Branch - giving name of Secretary. 24 April 1890.
33. N. Wanliss (Solicitor, Ballarat) - regarding donation to strike fund. 12 September 1890.
1. A.C. Whitten - regarding reply to charges of working a percentage system in his boot factory and men taking work home. 17 January 1890.
26a. A. Young (MLA) - regarding inability to attend mass meeting. 11 September 1890.
1891 - J. Wilson, Secretary
2. W.L. Anderson (Secretary, Ironmoulders Society) to W. Stokeld (Secretary, Ballarat Branch of Ironmoulders Society) - regarding conference with employers about wages and recognised public holidays. 18 May 1891.
3. W.L. Anderson (Secretary, Ironmoulders Society) to W. Stokeld (Secretary, Ballarat Branch of Ironmoulders Society) - regarding conference with employers about wages, striking and donation to shearers. 20 June 1890.
1. F. Meagher and E. Hobson - regarding The Industrial Labor League (newspaper cutting from the Ballarat Courier). 21 April 1891.
6. J. Verty - regarding asking J. Wilson (Secretary, Ballarat Trades and Labour Council) to come and speak at Allendale. 3 October 1891.
4. Victoria Reform League - regarding forwarding manifesto for Council's consideration. 21 September 1891.
5. P. (?) Wallis - regarding asking J. Wilson to come and speak at public meeting. Enclosed circular (not there). 21 September 1891.
7. J. Wilson - circular to Ironmoulders Society regarding money for Congress (7th Intercolonial) and refers to the Draft Scheme of Federation. n.d.
8. J. Wilson - circular to Ironmoulders Society regarding Eight Hour demonstration. n.d.
1892 – J. Wilson, Secretary
Nil.
1893 - John Wilson, Secretary
9. W. Bannow - regarding seeking information about the Ballarat Trades and Labour Council constitution and affiliated unions. 11 April 1893.
1. Bendigo Miners' Association - regarding unemployment in Bendigo. 16 January 1893.
10. Bendigo and District Trades and Labour Council - suggesting a resolution to call Parliament together regarding unemployment and use of credit notes as legal tender. 16 May 1893.
3. Builders Labourers' Union - regarding stopping their meetings in the Ballarat Trades and Labour Council. 1 February 1893.
17.W.S. Curzon-Siggers - regarding Ballarat Relief Society Fund closed. 8 September 1893.
12. Doctor's certificate. 5 March 1893.
11. Henry Douglass - regarding difficulties of the Woollen Mills Union. 5 July 1893.
13. Federated Seamen's Union of Victoria - regarding visits to Ballarat, Creswick asking for financial help. 28 July 1893.
18. E. Hobson - regarding electoral support for H. Porter (Progressive Political League). n.d.
2. W.J. Lormer and S. Mauger - regarding inaugural meeting of the Protection Liberal and Federation Alliance. 30 January 1893.
6. Operative Bakers' Society, Ballarat - regarding non-union workers. 24 March 1893.
19. Operative Bootmakers' Union, Ballarat Branch - regarding employment of non-union foreman. 14 December 1893.
4. Painters' Union, Ballarat district - regarding its organisation. n.d. (missing)
5. Painters' Union, Ballarat district - regarding village settlements in Ballarat district. n.d.
14. Railway Department - regarding employment on lines. 4 August 1893.
15. Railway Department - regarding Ballarat men employed on railways. 16 August 1893.
8. John Wilson - regarding notice of motion to withdraw certificate of registration of the organisation from the Register. 8 April 1893.
16. John Wilson - regarding weavers’ strike and seeking donations from the Ironmoulders’ union. 22 August 1893.
7. Women's Christian Temperance Union of Victoria - regarding liquor consumption. 5 April 1893.
1894 - John Wilson, Secretary until his death in April
5. W. Anderson - regarding meeting about Parliament assembling. 26 February 1894.
8. H.J. Armytage - regarding meeting about Parliament assembling. 27 February 1894.
21. Balance sheet of the Council. 16 July 1894.
17. J. Barret, Secretary of Melbourne Trades Hall Council - regarding death of J. Wilson. 4 May 1894.
20. Joseph Barret (not the above) - regarding Chinese furniture. 11 August 1894.
31. Bendigo and District Cooperative Movement Society - regarding cooperative movement. 2 February 1894.
9. D.M. Davies – meeting regarding Parliament assembling. 27 February 1894.
15. John Dunn – meeting regarding Parliament assembling. 1 March 1894.
14. John Dunn – cannot come to meeting. n.d.
6. J.W. Kirton – meeting regarding Parliament assembling. 26 February 1894.
12. E. Murphy – meeting regarding Parliament assembling. 1 March 1894.
18. Operative Bootmakers’ Union, Ballarat Branch – regarding evening work. 28 June 1894.
16. To J.B. Patterson, Premier of Victoria, from Council – regarding resolutions passed at meeting about unemployment. 5 March 1894.
7. A.J. Peacock – meeting regarding Parliament assembling. 26 February 1894.
10. A.J. Peacock – telegram to advise non-attendance. 5 March 1894.
13. T. Porter – meeting regarding Parliament assembling. 5 March 1894.
1. Trades and Labor Council of Otago – regarding unionism in New Zealand. 23 January 1894.
19. United Labor and Liberal Party - regarding request for donations. 16 July 1894.
4. A.T. Vale - regarding meeting about Parliament assembling. 26 February 1894.
38. John Wilson - regarding request to Ironmoulders for donation to Eight Hour Sports Fund. 6 February 1894.
11. Alex Young - regarding meeting about Parliament assembling. 1 March 1894.
1895 – W. Hurtsfield, Secretary
1. J. Barret (Secretary of Melbourne Trades and Labor Council) - regarding pensioners working. 15 February 1895.
2. EP Date - regarding university extension lectures. 9 June 1895.
3. Agreement (unsigned) between the Trustees of the Ironmoulders' Society and the members thereof. n.d.
1896 - W. Hurtsfield, Secretary
10. Amalgamated Miners' Association - regarding dispute between BHP and miners. 9 October 1896.
4. Amalgamated Miners' Association, district - regarding aid for miners. 4 May 1896.
12. Ballarat Typographical Society - regarding request for Council to meet on Saturdays. 13 November 1896.
2. J. Barrett - regarding press for a Bill for Conciliation and Compulsory Arbitration. 22 July 1896.
7. J. Barrett - regarding cooperation, Labor-Liberal Party arbitration. 22 July 1896.
9. J. Barrett - regarding Employers' Law Liability Amendment Act. 26 August 1896.
9A. Bendigo Trades and Labor Council (A. Campbell, Secretary) - regarding opening of Hall. 31 August 1896.
11. Bendigo Trades and Labor Council (A. Campbell, Secretary) - Employers' Liability Amendment Act. 9 November 1896.
14. F.H. Bromly - regarding raising finance for W.A. Trenwith, M.P. n.d.
1. M. Campbell - regarding support for the People's Party. 5 February 1896.
3. H.M. Champion - regarding May Day Demonstration. March 1896.
6. Cigar Makers' Union - regarding employing non-union labor. 1 June 1896.
5. L. Corstorphan (Secretary, Woollen Mills' Union) - regarding new name of Union (Ballarat Operative Weavers' Union). 23 May 1896.
13. R. Surtees - impressions of W.A. 9 November 1896.
12. T. Young (Secretary, Ballarat Typographical Society) - regarding BHP and miners' dispute. 13 November 1896.
1897 - W. Hurtsfield, Secretary
1. S. Barker - regarding leaflet about International Labor Day. 2 May 1897.
4. J. Barrett - regarding Ben Tillet's visit to Victoria. 23 August 1897.
5. J. Barrett - regarding Ben Tillet's visit to Victoria. 23 August 1897.
6. J. Barrett - regarding subscription for Ben Tillet's visit. n.d.
2. Bendigo District Trades and Labor Council (H. Hanton, Secretary) - regarding corn and flour duties. 7 June 1897.
3. C. Harris - regarding Eight Hours' monies. 21 July 1897.
7. J.P. Jones - regarding finance for Tocsin. 30 August 1897.
1898 - W. Hurtsfield, Secretary
11. Adelaide Labor Conference 1898 - invitation. 8 August 1898.
1. J. Barrett - regarding conference of Labor bodies. 7 March 1898.
10. J. Barrett - private to Hurdsfield regarding resolutions of Melbourne Trades and Labor Council. 19 September 1898.
13. T. McCoates - regarding Ballarat Benevolent Asylum and Lying in Hospital and Ben Tillet. 22 November 1898.
3. Findley, E. - regarding finance of "Tocsin". 27 March 1898.
4. Findley, E. - regarding finance of "Tocsin". 24 March 1898.
2. P.J. Mullaney - regarding May Day, 1898. 27 March 1898.
6. A.C. Nichols - regarding Rating Reform League. 30 July 1898.
7. A.C. Nichols - regarding printed invitation to a public meeting to support R.R.L. 30 July 1898.
8. A.C. Nichols - printed leaflet from Single Tax League, Victoria. 8 July 1898. 8 July 1898.
9. A.C. Nichols - printed leaflet from Rating Reform League. n.d.
5. James Oldham - regarding portrait of James Stephens. 22 September 1898.
12. Wanliss and Gray (Solicitors) - regarding agreement. 22 September 1898.
1899 - W. Hurtsfield, Secretary
3. S. Barker and Dr Wm Moloney - regarding May Day, 1899. n.d.
8. J. Barrett - regarding Eight-Hours Bill. 29 August 1899.
9. J. Barrett - regarding draft scheme for Intercolonial Labor Federation. 30 May 1899.
7. T. Campbell - regarding resignation.18 August 1899.
6. Denmark - regarding printed material on lock out in Denmark; appeal for help. 2 May 1899.
1. H. Hanton - regarding People's Party, Bendigo. 13 February 1899.
2. H. Hanton - regarding People's Party, Bendigo. 16 February 1899.
5. M. Hirsch - regarding Committee of the Convention on unemployment. 25 April 1899.
4. J.B. Meier - regarding Victorian Tobacco Operatives Association and unemployment. 18 May 1899.
1900 - W. Hurtsfield, Secretary
9. Amalgamated Engine Drivers' Association, Bendigo Branch - regarding boycotting and dismissal of union men. 2 March 1900.
25. Amalgamated Miners' Association of Victoria, head office - regarding printed report of executive council meeting regarding Chiltern dispute. 25 September 1900.
26. Amalgamated Miners' Association of Victoria, head office - regarding covering letter for "25" (above).
15. Anti-Sweating League of Victoria - regarding list of office bearers. 26 July 1900.
1. John Barrett - regarding support for candidates of the United Labor Party. 17 January 1900.
2. John Barrett - regarding Australasian Labor Federation. 28 February 1900.
8. John Barrett - regarding fund for the family of late John Hancock, MLA. 13 February 1900.
19. John Barrett - regarding contesting seats in the coming State election and possibly in a Federal election. 18 July 1900.
21. Bootmakers' Union, Ballarat - regarding inspectors not using factories regarding infringements of Act. 31 July 1900.
17. J. Cairns - regarding late shopping. 3 July 1900.
10. Coach Makers Society - regarding branch of Union formed in Ballarat. 16 June 1900.
11. Coach Makers Society - regarding petition about wages. n.d.
12-13. Coach Makers Society - regarding petition about wages. 7 July 1900. (one document)
14. Coach Makers Society - regarding petition about wages. 17 July 1900.
22. J. Hume Cook, MLA - regarding old age pensions. 15 August 1900.
23. J. Hume Cook, MLA - regarding Herald newspaper cutting written by Cook on old age pensions. 13 August 1900.
18. J. Lemmon - regarding Woollen Mills Operatives' Union. 11 July 1900.
16. Master Butchers' Association, Ballarat and District - regarding printed notice regarding hours of business. 14 June 1900.
3-4. Melbourne Typographical Society - regarding subscriptions for the late J. Hancock's family. 15 January 1900. (one document)
20. O. Rees - regarding women's franchise. 19 July 1900.
24. United Council for Women's suffrage - women's franchise. 24 August 1900.
6. Victorian Amalgamated Butchers' Union - regarding photograph of John Hancock and about Mr Williams not being a delegate of the Union. 2 June 1900.
7. Victorian Amalgamated Butchers' Union - regarding photograph of John Hancock. 1 July 1900.
5. Tom Williams - regarding photograph of John Hancock. 5 May 1900.
1901 - W. Hurtsfield, Secretary
1. Ballarat Operative Bootmakers' Union - regarding resignation of Secretary, J. Eva. 2 April 1901.
2. Receipts, hiring agreement for a light generator. 2 August 1901.
1902 – W. Hurtsfield, Secretary
Nil
1903 - W. Hurdsfield, Secretary
2. Amalgamated Miners' Association, Creswick Branch - regarding visit of Tom Mann to Creswick and Allendale. 8 May 1903.
3. Amalgamated Miners' Association, Creswick Branch - regarding visit of Tom Mann (telegram). 8 May 1903.
18. Ballarat Trades and Labour Council - Christmas card. 1903-1904.
11. Bendigo Trades and Labor Council - regarding request for Council's rules and standing orders. 24 October 1903.
1A. Andrew Christie - regarding visit of Tom Mann to Berringa. 5 April 1903.
9. Alfred Deakin - regarding thanks to Council for support. 28 September 1903.
12. Alfred Deakin - regarding meeting Council to discuss Arbitration Bill. 27 October 1903.
6. Eight Hour Demonstration Committee - regarding invitation to H. Brooks. 21 October 1903.
1B. Eight Hours Monument Fund - regarding unveiling of the monument. 3 April 1903.
14-16. Andrew Gray - regarding cooperative venture in mining coal at Outtrim. 9 November 1903.
10. Political Labour League (J. Eva, Secretary) - regarding deputation to Prime Minister for early introduction of an Arbitration and Conciliation Bill. 23 October 1903.
17. Protectionist Association of Victoria (S. Mauger, Secretary) - regarding distribution of their literature. 7 December 1903.
4. W.H. Rees - regarding visit of Tom Mann to Maryborough. 7 May 1903.
5C. Soldiers' Statue Fund, Ballarat - regarding meeting of Committee. 18 August 1903.
7. Trades Hall Council, Melbourne (Stephen Barker, Secretary) - regarding protesting dropping of Conciliation and Arbitration Bill. 16 September 1903.
8. Trades Hall Council, Melbourne (Stephen Barker, Secretary) - regarding petition regarding State Reform Bill. 19 September 1903.
5A. Trades Hall Council, Melbourne (Stephen Barker, Secretary) - regarding position occupied during late railway strike. ca 1 June 1903.
5B. Trades Hall Council, Melbourne (Stephen Barker, Secretary) - regarding petition about Conciliation and Arbitration Bill. 2 June 1903.
5D. Trades Hall Council, Melbourne (Stephen Barker, Secretary) - regarding helping Tinsmiths' Union. 7 July 1903.
13. Frank Tudor - regarding why there was a delay in answering a letter from the Council. 2 November 1903.
1904 - W. Hurtsfield, Secretary
4. Amalgamated Society of Engineers, Ballarat Branch - regarding iron trade and tariffs. 1 July 1904.
9-9A. P. Brandt - regarding Brandt's system of absolute majority vote. 30 July 1904.
12. Alfred Deakin - regarding details of imports and exports of iron and steel. 20 August 1904.
13, 13A, 13B. Alfred Deakin - regarding Arbitration Bill. 17 August 1904.
6. Eight Hours Celebration Union, Adelaide - invitation. July 1904.
14. Eureka Stockade Celebration - regarding celebration of the fiftieth anniversary. 1 September 1904.
11. Operative Bootmakers' Union - regarding delegates to Council. 12 August 1904.
7. Political Labor League - regarding raising funds for striking miners at Outtrim. 25 July 1904.
8. Political Labor League - regarding raising funds for striking miners at Outtrim. 29 July 1904.
15. Australian Workers Union - regarding raising funds for striking miners at Outtrim. n.d.
19. Preferential Trade with Great Britain - invitation to public meeting. 17 November 1904.
5. Robert Rogers (Secretary to the Premier of Victoria) - regarding acknowledgement of receiving letter. 22 July 1904.
21. Tom Mann Organisation Fund - printed balance sheet. 9 August 1904.
2. Edward Meagher - regarding high wages and their exploitation (printed pamphlet). 31 May 1904.
3. Trades Hall Council, Melbourne - regarding conference. 24 June 1904.
16. Trades Hall Council, Melbourne - regarding resolution submitted for consideration. 14 October 1904.
18. Trades Hall Council, Melbourne - regarding interstate Eight Hours Day. November 1904.
20, 20A. Trades Hall Council, Melbourne - regarding federal tariffs. 1904.
17. Victorian Agricultural Implement and Machine Makers' Society - regarding Sunshine Harvesting Works. 29 October 1904.
1. R. Williams (Town Clerk, Ballarat) - regarding Galloway monument as a drinking fountain. 28 April 1904.
1905 - W. Hurtsfield, Secretary
4. S.M. Bull - regarding gold saving machine. 3 August 1905.
1. Eight Hours Anniversary Union, Brisbane - regarding sympathy with fellow artisans in Russia. 26 January 1905.
10. Federal Labor Party - regarding Workers Trade Mark (union label). 18 December 1905.
2. National Progress Newspaper Society Ltd - establishment of new daily paper in Melbourne. 10 February 1905.
3. Secretary for Lands - regarding excising of part of common lands by Golf Club. 15 June 1905.
5. Secretary for Mines - regarding providing work for unemployed miners. 7 August 1905.
6. Secretary for Mines - regarding providing work for unemployed miners. 9 August 1905.
7. Secretary for Mines - regarding providing work for unemployed miners. 21 August 1905.
8. Trades Hall Council - regarding sweating in the tailoring trade. 16 August 1905.
9. Chas Vaughan and Co. - regarding whether trustees will comply with their request. 30 November 1905.
1906 - W. Hurtsfield, Secretary
1. Castlemaine Hibernian Sports Programme. 26 December 1906.
1907 - W. Hurtsfield, Secretary
1. Church of Christ - regarding renting the Council Hall. 7 August 1907.
2. R. McGregor - regarding interview with the Chief Secretary. 19 December 1907.
3. Timber Workers Relief Fund - regarding acknowledgement of donation. 21 May 1907.
1908 - W. Hurtsfield, Secretary
1. Federated Saw Mill, Timber Yard and General Woodworkers Employees' Association - regarding delegates to Council. 4 August 1908.
1909 – W. Hurtsfield, Secretary
Nil.
1910 – W. Hurtsfield, Secretary
Nil.
1911 – W. Keane, Secretary
Nil.
1912 – W. Keane, Secretary
Nil.
1913 – W. Keane, Secretary
Nil.
1914 – W. Keane, Secretary
Nil.
1915 – W. Keane, Secretary
Nil.
1916 – W. Keane, Secretary
1. Interstate Trades Union Congress - regarding report of proceedings. 15-18 May 1916.
2. Resolutions of executive meeting. January 1916.
3. Australian Builders Laborers Federation, Victorian Branch - regarding establishing a Labor Daily for Victoria. 15 November 1916.
1917 - W.J. Kean, Secretary
1. Australian Boot Trade Employees' Association - regarding delegates to Council. 25 January 1917.
2. Ballarat Typographical Society - regarding delegates to Council. 22 January 1917.
3. W. Kean - to editor of The Courier regarding employees of Lucus and Co. not being allowed to join a union. 14 July 1917.
4. Newspaper cuttings from The Courier - Kean v. "contented" on class (n.d.); Kean v. Price Lucus and Co (see 3, above). 16 July 1917.
5. United Grocers, Tea and Dairy Produce Employees' Union - regarding applying for permission to hold annual conference of Victorian Branch at the Trades Hall. 24 January 1917.
6. Victorian Railways Union - circular regarding the strike ballot (printed). 14 March 1917.
7. From W. Kean to Mr. R. Rose - regarding W. Hughes' attempt at political party organisation in Ballarat. 12 March 1917.
1918 - W.J. Kean, Secretary
3. Agreement regarding Ballarat Trades and Labour Council building. 26 October 1918.
2. Citizens' Loyalist Committee - regarding meetings and fact the committee is not affiliated with any political party. 25 April 1918.
1. Newspaper cutting from Ballarat Courier - regarding Loyalist Meeting at Alfred Hall. 4 April 1918.
1919 - W. Kean, Secretary
1. E.J. Hogan, State Parliament House to W. Kean - regarding work at Ballarat North workshops. 10 January 1919.
1920 – W. Keane, Secretary
Nil.
1921 – W. Keane, Secretary
1. Federated Moulders' (Metals) Union of Australia - regarding Report of the Federal Council Conference (printed). 17 January 1921.
2. Ironmoulders' Board - determination (printed). 6 April 1921.
1922 - W.J. McAdam, Secretary
1. Trades Hall Council, Melbourne. (E.J. Holloway, Secretary) - regarding report of Eight Hours Committee of Enquiry. 24 October 1922.
1923 – Secretary, Mr WJ McAdam
1. From FJ Jones, Secretary, Australian Timber Workers Union to Mr McAdam - Affiliation dues. 3 April 1923.
2. From Mr W. Powe to Mr McAdam – Union membership and request for Mr McAdam to visit Clunes and meet with him. 3 April 1923.
1924 – Secretary, W.J. McAdam
Nil.
1925 – Secretary, W.J. McAdam
Nil.
1926 – Secretary, S. Miller
Nil.
1927 – Secretary, S. Miller
Nil.
1928 – Secretary, S. Miller
Nil.
1929 - Secretary, S. Miller
Nil.
1930 - Secretary, S. Miller
Nil.
1931 – Secretary, Mr S Miller
1. From John Jeanes, Assistant Registrar, Offices of the Registrar General and Registrar of Titles to Mr Miller. 8 October 1931.
1932 – Secretary, Mr S Miller
Nil.
1933– Secretary, Mr S Miller
Nil.
1934– Secretary, Mr S Miller
Nil.
1935– Secretary, Mr S Miller
Nil.
1936 – Secretary, Mr S Miller
Nil.
1937 – Secretary, Mr S Miller
1. From Mr Miller to Managing Director, Ballarat Brewing Company – Requesting donation for BTLC Picnic Sports Meeting. 2 March 1937.
1938 – Secretary, Mr S Miller
1. From C. Knight, Secretary, Law Department to no addressee – Advising that Mr William Henry Green is authorised to take declarations etc under the Evidence act. 7 June 1938.
1939 – Secretary, Mr S Miller
Nil.
1940 – Secretary, Mr S Miller
Nil.
1941 – Secretary, Mr S Miller
Nil.
1942 – Secretary, Mr S Miller/Mr WJ McAdam
Nil.
1943 – Secretary, Mr WJ McAdam
Nil.
1944 – Secretary, Mr WJ McAdam
Nil.
1945 – Secretary, Mr WJ McAdam
Nil.
1946 – Secretary, Mr WJ McAdam
Nil.
1947 – Secretary, Mr WJ McAdam
Nil.
1948 – Secretary, Mr WJ McAdam
1. From Mr/Ms Healy, Labour Council, Brisbane to Secretary Labour Council, Ballarat - telegram stamped 415 regarding current industrial action and unions being undermined by Premier Hanlon's Industrial Law Amendment Bill. 10 March 1948
2. From Accountant, Head Office, The Ballarat Brewing Co Ltd, to Mr WJ Mc Adam, Secretary, Ballarat Eight Hours Anniversary Committee - regarding donation of £2.2.0 to the Annual Eights Hours Celebrations. 23 April 1948
3. From Miss M Zacharin, Secretary, Jewish to Combat Fascism and Anti-Semitism to Secretary, Trades Hall, Ballarat - forwarding a copy of the pamphlet "Israel Reborn" (no longer attached, but can be viewed online at https://tinyurl.com/jccfas48) by Mrs. Evelyn Rothfield. Requests assistance with distribution of the pamphlet. 26 July, 1948
4. From Mrs A.W. Nicholson (signed Beryl Nicholson), Co-Secretary, Ballarat Baby Health Centres' Ladies Committee to Mr WJ McAdam, Secretary, Trades and Labor Council, Ballarat - Requesting partial rebate of rent paid for the Hall for a fundraising lecture/recital. 9 November 1948
1949 – Secretary, Mr WJ McAdam
1. From JS Toohey, Chairman and MB Duffy, Secretary, Industrial Printing and Publicity Co. Ltd., circular to Trade Union and ALP Branch Secretaries - Emphasising the need for "Labor Call" (previously Tocsin) to continue and encouraging subscriptions and/or bulk ordering.
2. From Thomas E. Carter, Ballarat ALP to Secretary, TLC, Ballarat - Regarding a deputation to the Premier about the Essential Services Act. 25 January 1949
3. From Russell Jones to "To Whom it May Concern", The Courier - Regarding Painters Union debate at BTLC on 25 August 1949; clarifying about severe censure of Mr TE Carter. 17 September 1949
4. Decisions of the ACTU Congress held Sydney, September 19 to 23, 1949
5. From William?, office of the Bishop of Ballarat to Mr WJ McAdam, Secretary, BTLC - Thanking WJ McAdam for his apology for an event at Craig's Hotel about slum conditions, offering to show films at BTLC and present a lecture. 6 October 1949
6. From William? office of the Bishop of Ballarat to Mr WJ McAdam, Secretary, BTLC - Thanking WJ McAdam for making the Hall available for an event the previous evening. 11 November 1949
1950 - Secretary Mr WJ McAdam
1. From H. Crutch, Property Officer, Department of the Interior to Mr McAdam – Lease of accommodation for Mr RT Pollard, MHR, no longer required. 20 January 1950.
2. From unnamed author to Mr D Aronson, Solicitor, Ballarat – Seeking legal opinion/interpretation of rules relating to provincial delegates on VTHC (with enclosures).
23 May 1950.
3. From Mr McAdam to Mr C Ellis, Secretary, Plasterer’s Union – Affiliation fees. 15 September 1950.
1951 – Secretary, Mr WJ McAdam
Nil.
1952 – Secretary, Mr WJ McAdam
1. From Mr McAdam, Secretary, BTLC to Miss Wilkins, Philharmonic Singers - use of Trades Hall, insurance risk and care of the Hall piano. 10 September 1952.
1953 Secretary – Mr WJ McAdam
1. From AW Nicholson and RG Caddell, Greater Ballarat Association to Mr McAdam – Royal Tour decorations and lighting. 28 January 1953.
2. From Sunshine Biscuit Company to Mr McAdam – Supply of biscuits. 5 March 1953.
3. From L. Higgins, Secretary, Vehicle Builders Employees Federation to Mr McAdam – Donation to Ballarat Labor Day Appeal. 5 March 1953.
4. From Secretary, Clothing and Allied Trades Union of Australia to Mr McAdam – Donation to repair BTLC building (24 Camp Street, Ballarat). 5 March 1953.
5. From WJ Morrison, Manager, International Bookshop to “Dear Sir” – Complimentary copies of a pamphlet “Ballarat Riggers at Work” pamphlet (pamphlet copy not included). 5 March 1953.
6. From Mrs D Hughes to Mr McAdam – Regarding terms and entitlements relating to her dismissal. Letter From the Department of Labour about pay rights is attached. 7 March 1953.
7. From the State Secretary, The Victorian Potato, Onion and Vegetable Growers Association to Mr McAdam – Regarding an appointment for Mr Kinsella to address BTLC. 10 March 1953.
8. From Mr McAdam to JJ Sheehan, MLA – Workers Compensation Act – pressing for provision of compensation to parents of workers who die at work. 16 March 1953.
9. From Ballarat Brewing Company Ltd to Mr McAdam – Donation to Labor Day celebrations. 16 March 1953.
10. From Mr Arrowsmith, Campaign Director for Frank Hardy to Mr McAdam – Seeking permission for Frank Hardy, Communist Party candidate to address Council. 23 March 1953.
11. From ? to JV Stout, Secretary, VTHC – ACTU delegates provincial councils – protesting the method of counting votes. 9 April 1953.
12. From Fibson to BTLC – Telegram requesting advice about how much notice a temporary teacher needs to provide to their employer. 14 April 1953.
13. From Mr McAdam to Mr JV Stout, Secretary, VTHC – ACTU Delegates Provincial Council – nominations. 18 April 1953.
14. From the Town Clerk, Town Hall, Ballaarat to Mr McAdam – Requesting a list of executive officers at BTLC (list attached with reply). 23 April 1953.
15. From Mr McAdam to [blank] – Representation from the Society of Carpenters and Joiners and the Building Workers Industrial Union on BTLC. 2 May 1953.
16. From Mr McAdam to Mr G Hall, Secretary, ATMO Employees Association – Congratulating the Union of their successful campaign on behalf of tram conductors.
6 March 1953.
(Back: General Board (Cake Ornament Section) pay determination.)
17. From Mr McAdam to Mr Maddern, City Clerk, City Hall, Ballarat – Seating needs in Ballarat Civic Hall. 6 May 1953.
(Back: Victorian Government Gazette, 16 May 1951.)
18. From Mr McAdam to Mr Maddern, City Clerk, City Hall, Ballarat – Enforcement of the Weights and Measures Act by Ballarat Council. 6 May 1953.
(Back: Wage rates Printing-Ink Grinders 1951.)
19. From Mr McAdam to Mr Bartrop, President Begonia Festival Committee – Enquiry about distribution of profits of Begonia Festival. 8 May 1953.
(Back: Letterhead with beginning of a draft of this letter.)
20. From Mr McAdam to JV Stout, Secretary, VTHC – Eureka Centenary celebrations. 15 May 1953.
21. From Mr McAdam to ? - Recommendation of Council Executive seeking meeting of the rank and file – towards reaching agreement within the industry. 20 May 1953.
22. From Mr McAdam to the Hon W Galvin, MLA, Acting Premier – Resolution regarding Ballarat North railway workshops. Concern about outsourcing to private enterprise. Seeking improvement of work and a public enquiry. 10 June 1953.
(Back: Government Gazette, 25 November 1952.)
23. From Mr McAdam to the Hon PL Coleman, MLA, Minister for Transport – Forwarding a Council motion supporting workers’ right to strike and the Minister’s interference in that. 10 June 1953.
24. From Mr McAdam to Mr JJ Sheehan, MLA – Letter of resolution: thanking him for assistance to the railway unions and requesting further help in training of railway engineers in Ballarat Railway Workshops. 12 June 1953.
(Back: Government Gazette, 13 November 1952.)
25. From Mr McAdam to Mr Linaker, State Electricity Commission – Request that the timetable should synchronise with the train timetable on Sundays. 19 June 1953.
(Back: Tar and Bitumen Board, Pay Department, 30 January 1951.)
26. From Mr McAdam to Mr Dawson, State Accident Insurance Officer – Workers compensation payment criteria – how payment corresponds with incremental pay rises. 19 June 1953.
(Back: General Board – Blue Print Section. Pay rate determinations.)
27. From Mr Mc Adam to Mr JV Stout, Secretary, VTHC – Funding of provincial trades and labour council delegates to attend the ACTU congress in Sydney. 20 June 1953.
28. From LJ Buchanan, Honourable Secretary, Victorian Teachers Union to Mr McAdam – Typewritten and handwritten copies of same correspondence – reply to BTLC. Regarding children’s participation in the 1953 Begonia Festival. 23 June 1953.
(Back: Extraordinary Government Gazette, 30 March 1953.)
29. From Mr McAdam to Mr Connell, Secretary, Fibrous Plasterers Union – Regarding overdue affiliation fees to BTLC. 25 June 1953.
(Back: pay determinations sports grounds staff.)
30. From Mr JA Connell, Secretary, Fibrous Plasterers Union to Mr McAdam – Cheque for outstanding BTLC affiliation fees. 10 July 1953.
31. Circular from JT Long, Organising Secretary, Australian Convention on Peace and War to various recipients – Information on Peace and War Convention – pamphlet and A5 flyer attached. 14 July 1953.
32. From H Booley to Mr WJ McAdam – Resigning as BTLC delegate to VTHC. 19 July 1953.
33. No author or addressee – Election of Executive Committee, BTLC, financial position, delegates to Peace and War Convention, installation of new President. (Includes photocopies of the same document.)
34. No author or addressee – Peace Convention delegates’ expenses. August/September 1953.
(Back: Government Gazette, 26 February 1953.)
35. From Mr McAdam to JV Stout, Secretary, VTHC – Advising resignation of Mr Booley as BTLC to VTHC; Mr Booley to be replaced by Mr JJ Brown. 11 August 1953.
36. From Mr McAdam to Mr JJ Brown, Unity Hall – Advising that the addressee was successful in his nomination as BTLC delegate to VTHC. N.d.
(Back: Ballot paper, 20 September 1953.)
37. From Mr McAdam to Dr Evatt, MHR, Leader ALP – Requesting support in stopping the Menzies government interference in Amalgamated Engineering Union elections. 12 August 1953.
37A. From Dr Evatt, MHR, Leader ALP – Reply from Dr Evatt expressing legal inability to assist the Amalgamated Engineering Union. 24 August 1953.
37B. Mr McAdam to Mr R Joshua, MHR – Seeking Mr Joshua’s assistance by raising the above matter in parliament. 7 September 1953.
(Back: Ballot paper, Trades and Labour Council Elections, 21 September 1953.)
38. From Mr McAdam to Mr JJ Sheehan, MLA – Requesting a date for a deputation from the Metal Trades Unions about pay rates. 12 August 1953.
(Back: Ballot paper, Trades and Labour Council Elections, 21 September 1953.)
39. From Mr McAdam to Mr Maddern, City Clerk, Ballaarat – Road quality and pedestrian access in Ballarat North. 12 August 1953.
(Back: Ballot paper, Trades and Labour Council Elections, 21 September 1953.)
40. From Mr McAdam to Mr Broadby, Secretary of the ACTU – Seeking support of the ACTU to resist government interference in Amalgamated Engineering Union’s elections. 12 August 1953.
(Back: Trades and Labour Council elections, 1952.)
41. From Mr McAdam to Mr Buchanan, Secretary, Teachers Union – Regarding Teachers Union correspondence about children’s participation in the Begonia Festival. 13 August 1953.
(Back: Regulations Weights and Measures Act.)
42. From Mr McAdam to Hon PL Coleman, MLC, Minister of Transport – Seeking clarification about abolition of penalty rates. 14 August 1953.
(Back: Trades and Labour Council elections, 1952.)
43. From Mr McAdam to JV Stout, Secretary, VTHC – Requesting fifty copies of all ACTU reports in future. 24 August 1953.
(Back: Trades and Labour Council elections, 1952.)
44. From Mr McAdam to Minister for Railways, Hobart. Regarding abolition of weekend penalty rates. 24 August 1953.
(Back: Trades and Labour Council elections, 1952.)
45. From Mr McAdam to Minister for Railways, Adelaide. Regarding abolition of weekend penalty rates. 24 August 1953.
(Back: Trades and Labour Council elections, 1952.)
46. From Mr McAdam to Minister for Railways, Sydney. Regarding abolition of weekend penalty rates. 24 August 1953.
(Back: Trades and Labour Council elections, 1952.)
47. From Mr McAdam to Hon W Calvin, MLA, Chief Secretary, Melbourne – Seeking clarification of Workers’ Compensation Act; in particular, the clause regarding average weekly payments at the time of injury.
(Back: Trades and Labour Council elections, 1952.)
48. From Mr McAdam to Cr JC Rowe, Chairman, By-laws Committee, City Hall, Ballarat – seeking a meeting of BTLC with the Town Hall by-laws committee about traffic hazards on Creswick Road and other parts. 24 August 1953.
(Back: Trades and Labour Council elections, 1952.)
49. From Mr McAdam to Hon W Galvin, MLA, Chief Secretary, Melbourne - Seeking amendment of Workers Compensation Act so that workers may appeal decisions. Further, seeks that the government ensures payments are made once a fortnight as required in the regulations. 24 August 1953.
(Back: Trades and Labour Council elections, 1952.)
50. From Mr McAdam to Hon J Cain, MLA, Premier of Victoria – Requesting government’s attention to dispensing of level crossings in Victoria. 24 August 1953.
(Back: Trades and Labour Council elections, 1952.)
51. From Mr McAdam to JJ Sheehan, MLA – Seeking support to include craft unions/FEDFA members in the service agreement at Ballarat Base Hospital. 28 August 1953.
52. Council of Aboriginal Rights – Bulletin #2 (i) Sentence of hanging in WA (ii) Aboriginal Co-op Marble Bar (iii) Use of pidgin English (iv) Affiliation (v) Conditions at Dubbo NSW and Victoria. 8 September 1953.
53. From Mr McAdam to Mr GW Harris, Secretary, Convening Unions – Sending a copy of Council rules. 21 September 1953.
(Back: Australian Theatrical and Amusement Employees’ Association – New wage agreement, 30 June 1953.)
54. From FJ Riley, Secretary, The Manufacturing Grocers Employees’ Federation to unspecified addressee. Regarding Match Industry Report; excises on matches and cigarette lighters. 21 September 1953.
55. Circular – Peace or War Convention. N.d.
(Back: Trades and Labour Council elections, 1952.)
56. From Austin McCallum, President, Ballarat Y’s Men’s Club to Secretary, BTLC – Support for a play centre for mentally ill children. 26 September 1953.
57. Meeting 1 October 1953
- Carriers delivering on weekends.
- Erection of crematorium in Ballarat.
- Resolution opposing wages’ freeze.
- Protesting manner that railway shop matters are dealt with by the Minister for Transport.
(Back: Australian Theatrical and Amusement Employees’ Association – New wage agreement, 30 June 1953.)
58. From Mr McAdam to Hon J Cain, Premier of Victoria – Regarding action about service grants for Metal Trades Railwaymen. 2 October 1953.
(Back: Financial statement 1/1/51-30/6/51.)
59. From Mr McAdam to Hon J Cain, Premier of Victoria – Protesting the Minister of Transport’s decision to have shop matters of Railwaymen dealt with by the ARU. 2 October 1953.
(Back: Financial statement 1/1/51-30 June 1951.)
60. From Mr McAdam to Hon WP Barry, MLA – Urging that erection of the Ballarat New Cemetery proceeds as soon as possible. 2 October 1953.
(Back: BWIU Investigation – conduct of election.)
61. From J Collins and W Vance to the President, BTLC – Apology regarding vandalism to BTLC building. N.d.
62. From JW Wilson, Association for Advancement of the Blind to Mr McAdam – Request for donation. 6 October 1953.
63. From Mr RJ Lightfoot, Secretary, Blind Workers Union to Mr McAdam – Melbourne Cup Sweep. 9 October 1953.
64. From Mr K Liversidge to BTLC – Sick leave entitlements. October 1953.
65. From Mrs Mary Haddow, Wonthaggi Old Age and Invalid Pensioners, to addressee not specified – Seeking assistance to improve income and other conditions for pensioners. 12 October 1953.
66. From Mr McAdam to Mr Maddern, City Clerk, Ballarat – Need for traffic lights (various sites) including safety issues and enforcement. 19 October 1953.
(Back: flyer, “Are You A Trade Unionist?”)
67. From Mr McAdam to Hon J Cain, Premier of Victoria – Addressing dangerous level crossings. 19 October 1953.
(Back: Ballot paper 21 September 1953.)
68. From Mr McAdam to Hon J Cain, Premier of Victoria – Thanking the Premier for the Long Service Leave Bill. 19 October 1953.
(Back: flyer, “Are You A Trade Unionist?”)
69. From Mr McAdam to Mr JJ Sheehan, MLA – Crematorium in Ballarat New Cemetery. 20 October 1953.
(Back: Ballot paper 21 September 1953.)
70. From F. Cutts, Mayor to no addressee. Public meeting regarding Centre for Mentally Retarded Children. 21 October 1953.
71. From Mr McAdam to Mr Swenson, Organiser, Begonia Festival - Regarding combined sports meeting on Labor Day 1953. 23 October 1953.
(Back: Ballot paper 21 September 1953.)
72. From Doepal, Lilley and Taylor to Mr McAdam – Renewal workplace insurance (including yellow slip – explanation of Increased Bonus Distribution). 26 October 1953.
73. From Dick Diamond, Actors and Announcers Equity Association of Australia to Mr McAdam – Payment by “Ashton Varieties” to members who were stood down.
27 October 1953.
74. From Alexander, General Secretary, Actors Equity to Mr McAdam – Telegram urging BTLC to black ban Ashton’s follies show. 29 October 1953.
75. From A Wallace, Ministering Children’s League to Mr McAdam – A thank you for donation to the Ministering Children’s League. 29 October 1953.
76. From RA Hunt, State Electricity Commission to Mr EO Allan, c/- Mr McAdam – Inviting BTLC to purchase securities of 10-15 years. Prospectus attached.
29 October 1953.
77. From Mr RW Richards, Principal School of Mines and Industries, Ballarat – Seeking the continuing support of the School’s Prize Fund. 31 October 1953.
78. From Secretary, Kingsville Yarraville Citizens’ Band to Mr McAdam – Payment for use of Trades Hall space. 2 November 1953.
79. From Dick Diamond, Victorian Divisional Secretary, Actors and Announcers Equity Association of Australia to Mr McAdam – Thanking BTLC for support in relation to the dispute with Ashton’s Varieties. 4 November 1953.
80. From Mr Ritchie, Hon Secretary, Ballarat Fine Art Public Gallery Association to Mr McAdam – Declining BTLC’s offer to loan a portrait of Cardinal Manning. 4 November 1953.
81. Circular from Mrs N Stephens and Mrs B Ferguson, The Queen Elizabeth Benevolent Home – Seeking donation for Christmas gifts for elderly patients.
5 November 1953.
82. From Mr Maddern, Town Clerk, City of Ballarat to Mr McAdam- Declining request to install traffic lights at various sites. 10 November 1953.
83. From Mr Maddern, Town Clerk, City of Ballarat to Mr McAdam- Reply. Undertaking to inspect roads and footpaths in Ballarat North. 10 November 1953.
84. BTLC – Meeting 12 November 1953
- erection of crematorium
- long service leave entitlements
- workplace illnesses, including asbestosis
- traffic control, Ballarat
(Back: Ballot Paper, 21 September 1953.)
85. From Mr McAdam to Mr JJ Brown – Thanking him for report to Council regarding dust nuisance and health impacts. 16 November 1953.
86. From Mr McAdam to Mr W Gray, Secretary, Pensioners League Ballarat – Forwarding copy of letter from Wonthaggi Pensioners for opinion. 16 November 1953.
(Back: Plastic Moulding Board Determination.)
87. From Mr W Gray, Secretary, Pensioners League Ballarat to Mr McAdam– Reply to BTLC regarding Wonthaggi Pensioners. 18 November 1953.
88. From Mrs N Stephens, President, Queen Elizabeth Benevolent Home Ladies’ Auxiliary – Christmas Tree Appeal – thanking BTLC for its donation. 19 November 1953.
89. From S Murray-Smith, Organising Secretary, Australian Peace Council to Mr McAdam – Thanking BTLC for its interest in the peace movement. Participation by ex-senator in a six-month fact finding mission abroad. 25 November 1953.
90. From Doepel, Lilley and Taylor to Mr McAdam – Request for BTLC to pay excess premium amount. 27 November 1953.
91. From CH Frampton, National Poultry Farmers Association to Mr McAdam – Wheat stabilisation – campaign for subsidy. 27 November 1953.
92. From WL Rowe, Secretary, Department of Health, to Mr McAdam – Deferred consideration of proposal to build crematorium until end of the financial year. 27 November 1953.
93. From WL Rowe, Secretary, Department of Health, to Hon J Jones, MLC – Deferred consideration of proposal to build crematorium until end of the financial year. 27 November 1953.
94. From Bruce Wallace, Hon Secretary, Ballaarat Begonia Festival to Mr McAdam - Reply. Ballarat Begonia Festival. Unable to combine with a sports meeting.
30 November 1953.
95. From RF Mayberry, Secretary, Mentally Retarded Children’s Welfare Association – no addressee – Confirmation that special school/playground has been trialled and will continue. Invitation to BTLC to become a member of the Association. 2 December 1953.
96. From Mr McAdam to Mr Styles, Secretary, Bendigo Trades Hall Council – Re-establishment of Provincial Councils Association and nominees from BTLC. 4 December 1953.
(Back: Ballot Paper 21 September 1953.)
97. From RW Richards, School of Mines and Industries, Ballarat to Mr McAdam – Appreciation of money donated to the annual School of Mines prize. 14 December 1953.
98. From WK McMahon to Mr McAdam – Resignation as Trades and Labour Council representative on Ballarat Youth Council. 18 December 1953.
99. WJ McAdam – Secretary’s Report notes. N.d.
100. No author – Notes of BTLC meeting. n.d.
1954 Secretary – Mr WJ Mc Adam
1. BTLC - BTLC 1/7/53-31/12/53 Financial statement, Auditor’s Report. 21 January 1954.
2. WJ McAdam, Secretary, BTLC to PJ Hill, Secretary, Sheet Metal Workers’ Union – Regarding poor attendance of SMWU delegates at Council. 8 January 1954.
3. LA Chung to President, BTLC – Consent by LA Chung to be nominated as BTLC auditor. 12 January 1954.
4. William K. Moore, Ballarat Youth Centre to WJ McAdam, Secretary, BTLC – Request for financial support for Ballarat Youth Centre. 14 January 1954.
5. From ? to Mr Leslie Ashton, Sydney – Regarding matter referred to Industrial Registry. 14 January 1954.
6. From WJ McAdam to Hon John Cain, Premier of Victoria – Requesting the Premier that wages boards include a “preference unionists” clause in their judgements. 18 January 1954.
(Other side: Government Gazette Victoria, 31 July 1953.)
7. From WJ McAdam, Secretary, BTLC to Mr Fogarty, Secretary of Central Gippsland Trades and Labour Council – Requesting most recent rules of Central Gippsland Trades and Labour Council. 20 January 1954.
8. From WJ McAdam, Secretary, BTLC to Mr GG Styles, Secretary of Bendigo Trades Hall Council – Regarding possible breach of BTLC rules. Status of Mr Walsh as delegate for Bendigo. 24 January 1954.
(Other side: Ballot Paper 1953 Provincial Trades Hall Council Delegates at ACTU Congress.)
9. From WJ McAdam, Secretary, BTLC to Mr J Walsh, Ballarat - Seeking explanation about Mr Walsh’s nomination as a delegate for Bendigo Trades Hall. 25 January 1954.
(Other side: Ballot Paper 1953 Provincial Trades Hall Council Delegates at ACTU Congress.)
10. From D. Diamond, Actors and Announcers Equity Association of Australia – Regarding whether there is a ban on Mr Ashton’s show in Ballarat. 28 January 1954.
11. From Mr McAdam, Secretary BTLC to Actors and Announcers Equity Association of Australia – Reply about black ban of Ashton’s show in Ballarat. 3 February 1954.
12. From JJ Browne, Armadale to Mr McAdam, Secretary, BTLC – Meetings of VTHC report. Concern about ALP’s sending in nominees for Clerks Union delegates to VTHC. 8 February 1954.
13. From K.E. Rash, Signwriter, Ballarat to Mr McAdam, Secretary, BTLC – Submission of design and quotation for window decoration for Queen’s visit to Ballarat. 17 February 1954.
14. From GV Stafford, Department of Health to Mr McAdam, Secretary, BTLC – Electrical defects at BTLC requiring attention. 18 February 1954.
15. From Mr McAdam, BTLC to GV Stafford, Department of Health – Advising that electrical defects at BTLC were rectified. 20 February 1954.
(Other side: Ballot Paper 1953 Provincial Trades Hall Council Delegates at ACTU Congress.)
15A. From JW Wilson, Managing Secretary, Association for Advancement of the Blind to Mr McAdam – Request for donation. 22 February 1954.
16. From Mr McAdam, Secretary, BTLC to JJ Sheehan, MLA – Regarding protest from the Australian Tramways and Motor Omnibus Employees’ Association about the Hon. P.L. Coleman’s (MLC) using private enterprise to undermine the Tramway’s Union. 26 February 1954.
(Other side: Ballot Paper 1953 Provincial Trades Hall Council Delegates at ACTU Congress.)
17. From GV Stafford, Department of Health to Mr McAdam, Secretary, BTLC – Advising that the Health Inspector will visit when next in Ballarat. 2 March 1954.
17A. From Colin Williams, Secretary, May Day Committee to no addressee – Circular. Regarding meeting of May Day Committee and requesting names of BTLC delegates who will attend. 17 March 1954.
18. From Mr McAdam, Secretary, BTLC to Mr JV Stout, ACTU – Interstate Executive support of ACTU. 18 March 1954.
(Other side: Ballot Paper 1953 Provincial Trades Hall Council Delegates at ACTU Congress.)
19. From Mr McAdam, Secretary, BTLC to Senator Cooper, Minister for Repatriation – Protesting closure of repatriation ward at Ballarat Hospital. 18 March 1954.
20. From MP Brown, Secretary of BWIU to Mr McAdam, Secretary, BTLC – Advising that Mr S King is the delegate to Council for the Building Workers’ Industrial Union. 24 March 1954.
21. From unknown author, Secretary, Local Branch, Federated Engine Drivers and Firemen’s Association of Australia to Mr McAdam, Secretary, BTLC – Request for BTLC’s support of legislative change ensuring safety of engineers and foremen operating machinery and engines. 24 March 1954.
22. From Mr McAdam, Secretary, BTLC to Mr VG Delmenico, Trades Hall, Castlemaine – Regarding Labor Day celebrations – RSVP. 26 March 1954.
(Other side: Determinations by the Shops Board, Brushmakers Board and Saddlery and Harness Board.)
23. ? - Proposed process for election of officers to BTLC Executive Committee. 1954.
(Back: Government Gazette, 23 November 1951.)
24. From Mr McAdam to the Hon John Cain, MLA Premier of Victoria – Intention of the State Government to remove the authority of the Mines Department to issue certificates to members of their Association. 29 March 1954.
25. From Mr McAdam to Mr McDonald, Secretary, Trades Hall Council, Geelong – Nominations and delegates to represent Geelong Trades Hall Council and Ballarat Trades Hall Council. 20 April 1954.
(Back: BTLC Financial Statement 1 January-30 June 1951)
26. From Mr McAdam to JJ Healey, Secretary, Cold Storage and Meat Preserving Employee’s Union – Dairy employees in Ballarat – rectifying underpayment. 22 April
(Back: Financial Statement 1 January-30 June 1951)
27. From Mr McAdam to Mr R. Joshua, MHR – Regarding the Postal Department’s hiring a detective to make enquiry into a member's sick leave. 4 April 1954.
28. From Mr McAdam to Mr WC Robertson, President, RSS and AILA – Regarding closure of the repatriation ward, Ballarat Hospital. 5 April 1954.
(Back: Financial Statement 1 January-30 June 1951)
29. From Mr McAdam to Mr C. McDonald, Secretary, Trades Hall Council, Geelong – Offer to assist Geelong Trades Hall Council to campaign and elect Hon J Dedman for the seat of Corio. 22 April 1954.
30. From Mr McAdam to Mr Mac Sween, Secretary, Clothing Trades Union – Sending a newspaper clipping about TCU Congress in Ballarat, encouraging TCU to change the venue to BTLC. (Clipping not included.)
(Back: Financial Statement 1 January-30 June 1951)
31. From Ballarat Trades and Labour Council - Policy of BTLC on stabilisation of wheat. N.d.
32. Mr McAdam to Mr TE Carter, Eureka Centenary Committee – Requesting BTLC representation on the Ballarat Centenary Celebrations’ Committee. 17 May 1954.
33. Ballarat Trades and Labour Council – Motion about the quality of bread. 20 May 1954.
34. Mr McAdam to the Hon John Cain, MLA, Premier – Advising the Premier of BTLC support for the Deputation by the Metal Trade Unions to the Minister of Transport requesting a 5/- per day payrise. 24 May 1954.
(Back: Government Gazette, Victoria 27 July 1953)
35. Mr McAdam to the Hon John Cain, MLA, Premier – Advising a motion from BTLC regarding improved standard of bread. 24 May 1954.
(Back: Determinations Nickelward Board, Agricultural Implements Board, Shops Board)
36. From Jack Wood to Mr McAdam – Resolution by the ALP Federal Executive in June 1952 declaring News Weekly an anti-Labour Party organ. 4 June 1954.
37. From JV Stout, Secretary, VTHC to Mr McAdam – Visit by JN Stephen, St Bernardo’s Homes. 16 June 1954.
38. From Mr McAdam to Mr. MB John, Ballarat Base Hospital – Equity of service grants between members of the Artisans’ Union and the Hospital Employee’s Union. 18 June 1954.
39. From Mr McAdam to The Chief Inspector, Commonwealth Arbitration Inspectors – Request for Arbitration Inspector to visit Ballarat more regularly after three months of non-attendance. 23 June 1954.
(Back: Determinations of the Commercial Clerks Board and the Shops Board (Fish and Poultry).)
40. From Mr McAdam to the Hon Slater, MLA – Refusal of management committee of Hospitals and Benevolent Homes to meet deputations from BTLC. 5 July 1954.
41. From Mr McAdam to Mr TW Carter, Secretary, Eureka Centenary Celebrations – Eureka Centenary programme. Noted that it does not include a pilgrimage to the statue of Peter Lalor. 20 July 1954.
(Back: Wage rates Storemen and Packer 1953.)
42. From Mr McAdam to JV Stout, Secretary, VTHC – Union coverage and poaching of members by other unions. 20 July 1954.
43. From The Town Clerk, Ballarat Town Hall to BTLC – Letter including cutting (a description of BTLC) from the last Mayoral Annual Report. Requests current information about BTLC for the next report. 25 July 1954.
44. From Ministering Children’s League President to Mr McAdam – Requesting support for annual appeal. 28 July 1954.
45. From W. Carter to Mr McAdam – Meeting apology. 29 July 1954.
46. From Mr Brown, Secretary, Anti-Communist Union Movement to ??? (addressee name has been cut out) – Election of Theatrical Employees Union delegate to BTLC – ballot in progress. 3 August 1954.
47. From TE Carter, Eureka Centenary Committee to Mr McAdam – Pilgrimage to Peter Lalor’s Statue is now in the Centenary Program. 7 August 1954.
48. From Mr McAdam to TE Carter, Secretary, Eureka Centenary Committee – Requesting eight copies of the Centenary Program. 16 August 1954.
49. From JN Stephen, St Bernardo’s Homes to Mr McAdam – Regarding promulgation of leaflets about Dr Bernardo’s Homes. 17 August 1954.
50. From Mr McAdam to Mr Linaker, Manager, State Electricity Commission – Regarding income from Department of the Army. 23 August 1954.
51. From Mr Mc Adam to ? Regional Trades and Labour Councils – Eureka Centenary Celebrations. 31 August 1954.
51A. From VE Walmsley, Industrial Finance Department, Commonwealth Bank of Australia - Commonwealth Bank Industrial Travelling Scholarships- circular. N.d.
52. From Mr McAdam to Mr CJ O’Brien – Raising money for the widow of Jack Henry. 2 September 1954.
53. From Mr McAdam to the Hon S Merrifield, MLA, Minister of Public Works – Rate paying immigrants not granted a vote at the Wendouree election despite being on the roll. 14 September 1954.
(Back: Nurserymen’s Board wage rates.)
54. From Mr McAdam to Mr Maddern, City Clerk, Ballarat – Improvement of traffic lights in Ballarat. 14 September 1954.
55. From Mr McAdam to Mr Dawson, Workers’ Compensation Board – Delay in workers’ compensation payment. 14 September 1954.
56. From Mr McAdam to Mr R Joshua, MHR – Closing of the Ballarat Telegraph Office at 5pm. 14 September 1954.
(Back: Hairdressers’ Board pay rates 1953.)
57. From Mr McAdam to Mr Dawson, Workers’ Compensation Board – Eligibility for workers’ compensation. 14 September 1954.
58. From Mr McAdam to JV Stout, Secretary, VTHC – Exclusion of Dr Evatt at the Petrov Inquiry, preventing full disclosure of events. Seeking support. 16 September 1954.
(Back: Opticians’ Board, pay rates 1953.)
59. From Town Clerk, Town Hall, Ballaarat to Mr McAdam – Unsatisfactory control of traffic in Ballarat (reply to correspondence). 21 September 1954.
60. From the Minister of Transport and Railway Administration Offices to Mr JJ Sheehan Esq, MLA – Train stops between Ballarat and Ballan. 27 September 1954.
60A. From JV Stout, Secretary, VTHC to all unions – Judgement by Privy Council regarding workers’ compensation award to Mrs D Sharpe; copy of determination and handwritten notes and a covering memo. 14 October 1954.
61. From the Secretary, the Ballarat Water Commissioners to Mr McAdam – Regarding loan of trucks to BTLC for the Eureka Celebrations Pageant. 18 October 1954.
62. From GE Davis, Licencing Department, Australasian Performing Rights Association Ltd to Mr McAdam – Overdue account (form of application for licence attached). 18 October 1954.
63. From LC Garner, Head Master, School of Mines to Mr McAdam – Talk to students by BTLC. 18 October 1954.
64. From TE Byrne, Barristers and Solicitors to Secretary, BTLC - Application for determination – JR Orchard. (Application not included.) 20 October 1954.
(Back: Shops Board No. 9 (Drapers and Men’s Clothing pay rates.)
65A. Mr McAdam (Secretary) to the Victorian Secretary for Labor (Victoria) - seeking interpretation of clause 7 of the Factories and Shops (Long Service Leave Act)
65. From Mr McAdam to Mr JJ Sheehan, MLA - Resolution of appreciation for assistance given in securing service increments for craft unionists (FEDFA members). 10 November 1954.
66. From Mr McAdam to Mr JJ Sheehan, MLA – Protesting requirement to produce birth certificates as a prerequisite to a child’s commencing school. 19 November 1954.
(Back: Federated Storemen and Packers Union, Metal Trades Award, pay rates 1953.)
67. From Mr McAdam to Mr O’Donoghue, Command Paymaster, Southern Command, Albert Park – Overpayment of £52 for Army rental of space at BTLC. 23 December 1954.
(Back: Shops Board No. 19 (Confectionary, Pastry, Fruit and Vegetables, pay rates 1954.)
68. From Mr McAdam (?) to “The Editor” – Regarding long service leave entitlements. N.d.
69. From Mr McAdam (?) to Mr W Robertson, Secretary, Municipal Employees Union – Financial standing – CJ O’Brien. N.d.
70. Authors to “The Editor”: (a) John R. Steele (b) WJ McAdam (c) CT Collins (d) John R. Steele (e) WJ McAdam (f) WJ Mc Adam (g) WJ Mc Adam (h) no author – Productivity wages. N.d.
(Back: Determinations Tanners Board, Jam Trade Board, Horsehair Board, Shops Board No. 15 (Grocers).
71. Motion negating decisions of the ACTU regarding non-productive workers, right to prosecute for unpaid union dues, union power at wages boards and National Service. N.d.
1955 Secretary – Mr W.J. Mc Adam
1. From Secretary of BTLC to JJ Sheehan, MLA - Seeking information about utilisation of funds allotted to the CRB. 25 March 1955.
2. From ? to The Honourable John Cain, MLA, Premier’s Office – Crematorium for Ballarat and funding to go with it. 6 April 1955
(Other side: Painters Board pay rates.)
3. From Secretary of BTLC to Dr HV Evatt – Labor Day dinner, Ballarat, 21 April 1955. 12 April 1955.
4. From JJ Sheehan, Minister for Housing to WJ McAdam, Secretary BTLC – Provisional acceptance to Eight Hours’ Anniversary 21 April 1955. From JJ Sheehan to WJ McAdam, Secretary BTLC. 19 April 1955.
5. From Secretary of BTLC to Mr Wishart, Chairman, Railway Commissioners - Request for attachment of a buffet car to the Melbourne: Horsham train. 20 May 1955.
(Other side: Meat Industry Employers’ Union – Work Vote for Workers’ Candidates flyer.)
6. From unknown to Mr W Robertson, Secretary, Municipal Employees’ Union – Regarding MEU tickets to Labor Day Dinner. 20 May 1955.
(Other side: Shops Board No. 21: Booksellers and Newsagents pay rates.)
7. From H. Hatfield, Ballarat, to Mr McAdam, BTLC Secretary – Regarding union dues from Mr Krikmann. 21 May 1955.
8. From Secretary of BTLC to JV Stout – Regarding Secretary of BTLC’S sick leave provisions. 27 May 1955.
(Other side: Meat Industry Employers’ Union – Work Vote for Workers’ Candidates flyer.)
9. From Secretary of BTLC TO Mr Krikmann – Contributions to the union. 30 May 1955.
10. From ? to Mr Schellenberger, Hospital Employees Federation – Awards and conditions at Ballarat Orphanage. 2 June 1955.
(Other side: Amendment to conditions – Cork Trade Board.)
11. Affiliation fees, BWIU – From Secretary of BTLC to Mr JC Chandler, Secretary, BWIU. 2 June 1955.
(Other side: gardeners’ pay rates.)
12. Regarding Mr Robert Charles Morgan – clarification about workers’ compensation payment – from ? to Mr J Wilkinson, Workers’ Compensation Board, Melbourne. 4 June 1955.
13. Appointment of Commonwealth Arbitration Court Inspector for Ballarat – from Secretary of BTLC to Mr AE Urch, Secretary, Engine Drivers and Firemen’s Association. 15 July 1955.
(Other side: Egg Packing Establishments pay rates.)
14. Regarding resolution recommending nationalisation of all transport systems – from Secretary of BTLC to Dr HV Evatt, MHR. 15 July 1955.
15. A. Regarding termination of lease at Trades Hall by the Army – from the Secretary of BTLC to Mr FJ Doolan, Department of the Interior. 15 July 1955.
B. Final account for heating used by the Department of Army – from the Secretary of BTLC to FJ Doolan, Department of the Interior. 9 August 1955.
(Other side: Hospitality workers’ pay rates.)
16. Appointment of inspector to police federal awards in Ballarat – Secretary of BTLC to Hon HE Holt, Minister for Labor. 15 July 1955.
(Other side: Storemen and Packer’s pay rates.)
17. Requesting extension of Tradesmen’s Rights Act (due to expire) – Secretary of BTLC to Hon HE Holt, Minister for Labor. 18 July 1955.
18. Breach of the Musician’s Award, pay rates - ? to State Secretary of Labor, Melbourne. 19 July 1955.
(Other side: Meat Industry Employers’ Union – Work Vote for Workers’ Candidates flyer.)
19. Regarding fine to the Boilermakers Union for raising funds to assist striking Ironmakers Union members – requesting that it be quashed – from Secretary of BTLC to Hon HE Holt, Minister of Labor. 19 July 1955.
(Other side: Meat Industry Employers’ Union – Work Vote for Workers’ Candidates flyer.)
20. Regarding Workers Compensation claim by Mrs Tieman, St Patrick’s College – BTLC to the Principal of St Patrick’s College. 28 July 1955.
(Other side: Meat Industry Employers’ Union – Work Vote for Workers’ Candidates flyer.)
21. Regarding motions of Council supporting price and rent control. Requests that the state government lends its support – from Secretary of BTLC to Hon Rylah, MLA. 29 July 1955.
(Other side: Meat Industry Employers’ Union – Work Vote for Workers’ Candidates flyer.)
22. Regarding Long Service Leave Act – Secretary of BTLC to Mr Rylah, MLA. 29 July 1955.
(Other side: Meat Industry Employers’ Union – Work Vote for Workers’ Candidates flyer.)
23. Regarding visit to Ballarat by Mr Stephen of Dr Bernardo’s Homes and donations to this organisation – from Secretary of BTLC to ? 3 August 1955.
(Other side: Meat Industry Employers’ Union – Work Vote for Workers’ Candidates flyer.)
24. Regarding increase in railway fares and freight costs – Council resolution – from Secretary of BTLC to Hon HE Bolte, Premier of Victoria. 15 August 1955.
(Other side: Garden Employees Board, pay rates.)
25. Regarding excess profits by GMH Co and underpayment of workers – from Secretary of BTLC to Right Hon. RG Menzies (PM Australia). 15 August 1955.
(Other side: BTLC letter head and partial first draft of the above letter.)
26. Regarding control of business monopolies and consideration of graduated tax on profits – from Secretary of BTLC to Right Hon. RG Menzies (PM Australia). 16 August 1955.
27. Request for Premier to lift wages freeze and about restoration of quarterly cost of living adjustments – Secretary of BTLC to Hon HE Bolte, MLA (Premier of Victoria). 16 August 1955.
28. Regarding assistance for Tramway Employers’ Union of Geelong Trades Hall Council. Establishing government authority to control transport in Geelong – from Secretary of BTLC to Mr Poyser, Secretary, Geelong Trades and Labour Council. 16 August 1955.
(Other side: Storemen and Packers’ pay rates.)
1956-1976 – Secretary, A.C. Williams
1976-1982 – Secretary, J. Burns
1982-1984 – Secretary, F.S. Knight
1984 – Secretary, G.A. Shearer
1985 – Secretary, G.A. Shearer
1986 – Secretary, G.A. Shearer
1. From F.S. Knight (Frazza), BTLC to Mr RB Yates, Assistant Secretary, Wages and Employment Conditions Policy Branch - Regarding the wages Accord and need for review of wage structures. 14 February 1986
2. From F.S. Knight (Frazza) to Mr J.J. Brown, Federal Industrial Officer, Unity Hall - Regarding work value of car and wagon painters, train examiners and
1987 – Secretary, G.A. Shearer
1. Authored by FS Knight - Speech delivered in 1987(?) - unsure of the occasion/launch - at which Bob Hawke (Prime Minister) and (John Cain) were present. References to the ALP, unions and communism. 1987(?)
1988 – Secretary, G.A. Shearer
1989 – Secretary, G.A. Shearer
1990 – Secretary, G.A. Shearer
1991 – Secretary, G.A. Shearer
1. From Mr F.S. Knight to Mrs Joan Kirner, Premier of Victoria - Regarding a fair deal for working class people especially in Victoria. F.S. Knight was a member of the ARU, Secretary of Ballarat Trades and Labour Council, a member of the Ballarat North ALP and long-time party supporter. 4 December 1991
2. From Mr F.S. Knight to The Editor, Herald-Sun Newspaper - Regarding immigration, ineffective management of industry and community needs. 4 December 1991
3. From Mr F.S. Knight to Mr John Halfpenny, Secretary, Victorian Trades Hall Council - Regarding terms and conditions for transport drivers and traffic management/roads in Ballarat. 5 December 1991
4. From F.S. Knight (?) to Senator Gareth Evans - Regarding the federal Labor Government's policies on poverty, Beijing massacre, foreign policy, Indonesia and ALP's electoral fortunes. 17 December 1991
1992 – Secretary, G.A. Shearer
1. From John Halfpenny, Secretary, Victorian Trades Hall Council to Mr Francis S. Knight - In response to Mr Knight's letter in 1991 about road transport; Mr Knight's concerns referred to the Transport Workers Union. 14 January 1992
1993 – Secretary, G.A. Shearer
1994 – Secretary, G.A. Shearer
1995 – Secretary, G.A. Shearer
1996 – Secretary, G.A. Shearer
1997 – Secretary, G.A. Shearer
1998 – Secretary, G.A. Shearer
1999 – Secretary, G.A. Shearer
2000 – Secretary, G.A. Shearer
2001 – Secretary, G.A. Shearer
2002 – Secretary, G.A. Shearer
2003 – Secretary, G.A. Shearer
2004 – Secretary, G.A. Shearer
2005 – Secretary, G.A. Shearer
2006 – Secretary, G.A. Shearer
2007 – Secretary, G.A. Shearer
2008 – Secretary, G.A. Shearer
2009 – Secretary, G.A. Shearer
2009-2014 – Secretary, P.R. Clempson
2014 - Secretary, B. Edgington
The correspondence is a core historical source of information from the inception of BTLC, and represents the history of unionism in the Ballarat region. Correspondence relates to industrial campaigns, social justice and is of political significance to the region. Paper/letters stored in two boxes.correspondence, btlc, ballarat trades and labour council, eight hours anniversary committee, unions, ballarat trades hall, amalgamated mining engine drivers' association, bendigo amalgamated miners' association, lands, victoria, a.r. davie, delegates, d.m. davies, j.l. dowe, f.r. fincham, j.w. grahame, w. hosking, council rules, rules, j. kline, painters union, eight hour anniversary, j. pearce, g. rasy?, r.d. reid, h. richardson, a. sutherland, a. young, specifications, stamping marbles, j.l. anderson, h. uren, ballarat cricket club, city free library, membership, ballarat woollen mills operative union, ballarat typographical association, j. binner, cabmen union, carpenters and joiners trade society, h. clotz, hairdressers, friendly society of ironmoulders of victoria, e. ingram, l. mills, painters' union, c. salter, a. smith, e.h. swifte, tanners and curriers of ballarat, trades and labor council, brisbane, j. treloar, donations, free city library, amalgamated miners' association of australasia, amalgamated society of engineers, half holiday union, operative bakers' society, victorian operative bookmakers union, ballarat branch, t.s. bailey, dr siscs, worn out miners sustentation fund, parks, australian natives association, major dane, colac, overdraft, tanners and curriers union, trades hall council, melbourne, david bennett, victorian operative bricklayers society, industrial disputes, john wilson, ballarat woollen and worsted company, butchers employees' association, awards, ballarat bootmakers' union, whitten, cairns, stansfield, bush, shepphard, working men's college, francis ormond, phoenix foundry dispute, john alexander, amalgamated millers, engine drivers, and mill employees' association of australasia, amalgamated miners of australasia, w.g. spence, w.l. anderson, friendly ironmoulders' society, w. stokeld, wages, clementston, strike funds, t. bailey, ballarat plumbers union, ballarat saddle harness and collar makers' society, ballarat tailoresses' union, ballarat town council employees, e. batterly, e. blayney, g. blyman, m. bregazzi, j. clement, minister for mines, victoria, w. davies, hugh dunlop, john dunn, w. evans, fitzgerald bros, j. hancock, horse drivers' union ballarat, hughes and opie, academy of music ballarat, j. hurst, w. kean, w. kenna, warrenheip breweries, joseph kirton, labourers' protective and building society, d. lessels, john lynch, john mcauly, jas martin, masons' society, master tailors' association, ballarat, w. meher, j. david, w.e. murphy, ballarat gas company, g. philbrook, t. porter, maritime strike, saddle, harness and collar makers society, sandhurst and district trades and labour council, john sayers, sheldon, w. smith, t (?) stephen, jubilee mine, long gully, black ball, scarsdale, amalgamated shearers' union, sheep owners, united society of boilermakers and iron shipbuilders of victoria, w.h. uren, n. wanliss, a.c. whitten, f. meagher, e. hobson, p. (?) wallis, the industrial labour league, w. bannow, bendigo miners' association, bendigo and district trades and labour council, builders labourers' union, w.s. curzon-sniggers, henry douglass, federated seamans' union of victoria, w.j. lormer, s. mauger, railway department, h. porter, non-union workers, women's christian temperance union of victoria, j. barret, joseph barret, bendigo and district cooperative movement society, united labor and liberal party, alex young, e.p. date, w. herdafield, amalgamated miners' association barrier branch, eight hour sports fund, pensioners, bhp, broken hill proprietary, amalgamated miners' association hunter district, j. barrett, a. campbell, f.h. bromly, m. campbell, h.m. champion, w.a. trenwith, people's party, may day demonstration, cigar makers' union, l. corstorphan, r. surtees, t. young, s. barker, w. hurdsfield, h. hanton, c. harris, j.p. jones, ballarat operative weavers' union, international labor day, ben tillet, tocsin, adelaide labor conference, t. mccoates, e. findley, p.j. mullaney, ballarat benevolent asylum and lying in hospital, rating reform league, r.r.l., single tax league, victoria, james oldham, wanliss and gray, dr wm moloney, t. campbell, denmark, m. hirsch, james stephens, intercolonial labor federation, denmark lock out, people's party bendigo, committee of the convention on unemployment, j.b. meier, amalgamated engine drivers' association, bendigo branch, anti-sweating league of victoria, victorian tobacco operations association, chiltern dispute, united labour party, australasian labor federaton, elections, j. cairns, coach makers' society, j. hume cook, j. lemmon, master butchers' association, ballarat and district, o. rees, united council for women's suffrace, women's franchise, old age pensions, tom williams, amalgamated miners' association, creswick branch, tom mann, j. eva, andrew christie, alfred deakin, eight hour demonstration committee, eigh hours monument fund, andrew gray, protectionist association of victoria, soldiers' statue fund, ballarat, arbitration bill, h. brooks, arbitration and conciliation bill, stephen barker, state reform bill, tinsmiths' union, p. brandt, tariffs, eight hours celebration union, adelaide, eureka stockade, eureka stockade celebration, preferential trade with great britain, robert rogers, tom mann organisation fund, edward tregear, outtrim, victorian agricultural implement and machine makers' society, r. williams, s.m. bull, eight hours anniversary union, brisbane, federal labor party, national progress newspaper society ltd., sunshine harvesting works, galloway monument, gold saving machine, workers trade mark, union label, secretary for mines, chas vaughan and co., castlemaine hibernian sports programme, church of christ, r. mcgregor, timber workers relief fund, federated saw mill timber yard and general woodworkers employees' association, interstate trades union congress, australian builders labourers federation, united grocers, tea and dairy produce employees' union, victorian railways union, the courier, ballots, r. rose, w. hughes, citizens loyalist committee, e.j. hogan, e.j. holloway, eight hours committee of enquiry, minister for lands, wilkins, miss, philharmonic singers, f.s. knight
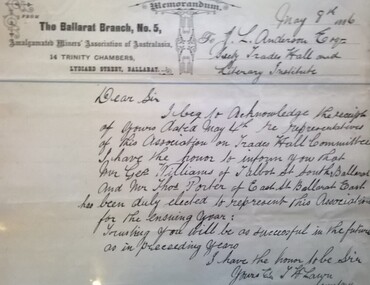 Unions Ballarat
 Ballarat Heritage Services
 Mt Dandenong & District Historical Society Inc.
 Wangaratta High School
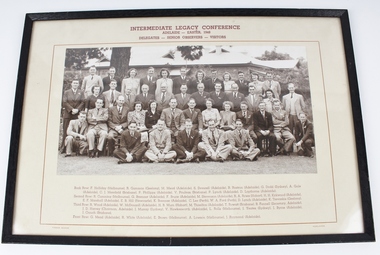 Melbourne Legacy
 Ballarat Tramway Museum
 Ballarat Tramway Museum
 Queenscliffe Maritime Museum
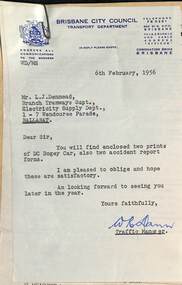 Ballarat Tramway Museum
 Bacchus Marsh & District Historical Society
 Melbourne Legacy
 Mission to Seafarers Victoria
 Mission to Seafarers Victoria
 Ballarat Tramway Museum
 Melbourne Tram Museum
 Melbourne Tram Museum
 Melbourne Tram Museum
 Melbourne Tram Museum
 Melbourne Tram Museum
 Ballarat Tramway Museum
 Dandenong/Cranbourne RSL Sub Branch
 Melbourne Tram Museum