Showing 93 items matching " golden city hotel"
-
 Ballarat Tramway Museum
Photograph - Black & White Photograph/s - set of 3, Charles Craig, Aug. 1971
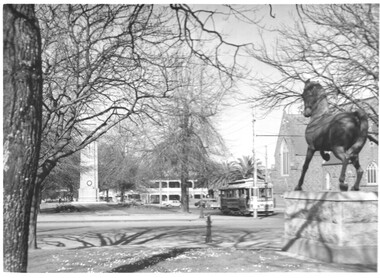
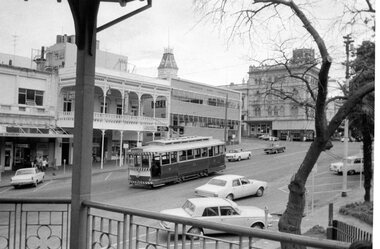
... , Lyons St, with the Golden City Hotel and St Patrick's Cathedral... - Single trucker outbound, Lyons St, with the Golden City Hotel ...Yields information about the intersection of Lyons St and Sturt St and statues in the median strip.Set of three Black and White photographs of trams near the intersection of Sturt St and Lyons St. .1 - Single trucker outbound, Lyons St, with the Golden City Hotel and St Patrick's Cathedral in the view, along with the Cenotaph and the Adam Lindsay Gordon Statue of a Horse (1969) (See reference for city of Ballarat document) .2 - 43 - with St Patrick's Cathedral. .3 - 30 (determined from a high res scan), with the Town Hall and the Cenotaph in the background. Photo by Charles Craig August 1971. See http://www.ballarat.vic.gov.au/media/499947/sturt%20street%20gardens%20calm%20plan.pdf - accessed 2-2-2017. trams, tramways, sturt st, statues, town hall, st patricks, lyons st, tram 43, tram 30 -
 Ballarat Tramway Museum
Negative - Set of 5, Campbell Duncan, 10/08/1971 12:00:00 AM
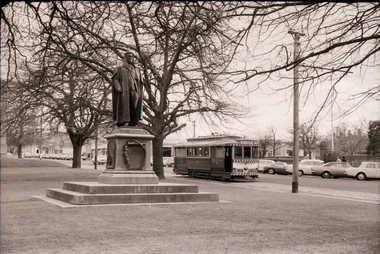
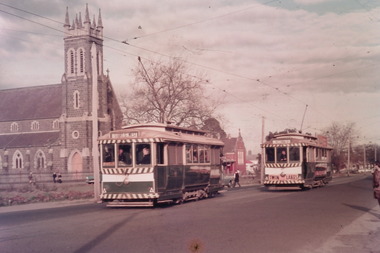
... crossing Dawson St with the Golden City Hotel in the background... crossing Dawson St with the Golden City Hotel in the background ...Yields information about tram operations and the street views in Sturt St near Lyons St.Set of 5 photographs taken on 10/8/1971 by Campbell Duncan of trams in Sturt St near Lyons St. .1 - No. 27 inbound with a Twin Lakes and destination of Mt Pleasant, passing the Peter Lalor statue in the median strip. .2 - No. 34 outbound crossing Dawson St with the Golden City Hotel in the background. .3 - No. 21 outbound with St Patrick's Cathedral in the background and the Adam Lindsay Gordon statue (1969) memorial to the horses killed in the First World War. 4. ditto .5 - No. 13 inbound with a Twin Lakes sign and destination of Victoria St, crossing Lyons St, with St Andrews Kirk in the background. For notes on the statues see: http://www.ballarat.vic.gov.au/media/499947/sturt%20street%20gardens%20calm%20plan.pdf (accessed 11/12/16)trams, tramways, sturt st, dawson st, lyons st, statues, tram 27 tram 34 tram 21 -
 Ballarat Tramway Museum
Slide - 35mm slide/s, early 1960's
... with passengers in the tramcar. Has the Golden City Hotel.... Has the Golden City Hotel in the background. Photo taken ...Agfa plastic mount (blue base, white cover) of a photograph of No. 18 using the Dawson St Crossover, the wrong way, to its normal expected use. Appears to be on a tour special with passengers in the tramcar. Has the Golden City Hotel in the background. Photo taken early 1960's. Tramcar has an SEC "Use Electricity for Cooking" roof advertisement and an Age newspaper advertisement on back dash panel. Note the lining of No. 18, using the wide gold lining. The slide appears to be a copy slide, given the nature of the colour and the additional number WP413. Photographer could be Bill Pearce (WP). Slide rescanned at 3200 dpi 25-10-2020, jpg replaced, tiff file retained. This file was scanned in 2003 and may show colour changes."BAS 54 in penciltramways, trams, dawson st, tours, sturt st, tram 18 -
 Ballarat Tramway Museum
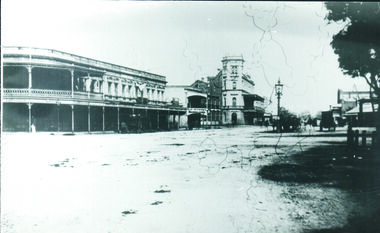
Photograph - Black and White photograph/s - mounted, Victorian Railways (VR), 1938?
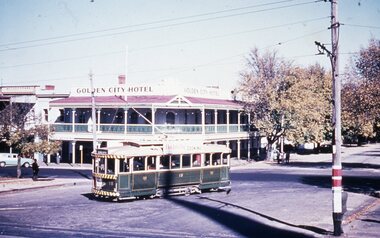
... . In the photo are a street side Garage, a bakery, Golden City Hotel... are a street side Garage, a bakery, Golden City Hotel, Town Hall, St ...Black and White photograph mounted onto heavy cardboard, original Victorian Railways Print, of Sturt St, looking east from the Ballarat City Fire Station tower, late 1930's, 1938? Photo has two trams east bound in the photo, along with a few motor vehicles. In the photo are a street side Garage, a bakery, Golden City Hotel, Town Hall, St. Patricks Church and Harry Davies & Co. Drapers and importers. Has title "Sturt Street, Ballarat" printed onto a label and fixed to the print. Victorian Railways Photograph - now held by State Library. Original photo will have copyright provisions. On rear of photograph, notes print ex ARHS, ex carriage 30AV, and in top right hand corner date 1938. On rear of photograph in top right hand corner "1938", central area of photo "725" in pencil, and lower central portion of the photo (in Warren Doubleday hand writing), "From A.R.H.S ex 30 AV".trams, tramways, sturt st, gold city hotel, st patricks, victorian railways -
 Bendigo Historical Society Inc.
Photograph - CHARING CROSS, 1876
... Golden Square. 'City Family' Hotel is the main feature... Golden Square. 'City Family' Hotel is the main feature ...Black and White Photo of Charing Cross, looking towards Golden Square. 'City Family' Hotel is the main feature, and is in the centre of the picture. H. & A. Hannon Saddlery. Light stand. Established tree on right side with protective fence. Horse drawn cab to right of light. Off centre left is the City Club Hotel.buildings, hotel, city family, charing cross, city family hotel, hotels, hotel -
 Federation University Historical Collection
Photograph - Photograph Album, Photographs of Ballarat Buildings, 1967, 1967
... .9) Golden City Hotel (GCs) .10) Golden City Hotel (GCs) .11... Lydiard and Mair Streets .9) Golden City Hotel (GCs) .10) Golden ...When these photos were taken Geoffrey Biddington was highly involved with the Ballarat Branch of the National Trust. At one time Her Majesty's Theatre was known as the Memorial Theatre. Lenaghan of Tourello "Master Dan Lenaghan, eldest son of Mr. and Mrs. R. Lenaghan, of Tourello, has been successful in obtaining a Government scholarship, tenable for four years at St. Patrick's College, Ballarat.(Melbourne Advocate, 02 March 1939) Two Black folders of Ballarat photographs as follows: .1) Interior of Ballarat Railway Station .2) Interior of Ballarat Railway Station .3) Craig's Hotel .4) Craig's Hotel .5) Craig's Hotel .6) Craig's Hotel .7) Ballarat Fine Art Gallery later Art Gallery of Ballarat .8) Cuthberts, corner Lydiard and Mair Streets .9) Golden City Hotel (GCs) .10) Golden City Hotel (GCs) .11) Reid's Coffee Palace .12) Alexandria Tea Rooms, neighbouring Old Colonists' Club, Ballarat, Lydiard Street North .13) ? .14 Caste iron drink fountain, corner of Strurt and Drummond Streets, October 1967 .15) Lal Lal Blast Furnace .16) Ballarat Botanical Garden Gates .17) Ballaarat Old Cemetery Gates .18) Novar gate .19) Ballaarat Old Cemetery Gates .20) ? .21) Webster Street .22) Doveton Street South .23) ? .24) ? .25) .26) .27) Iron hitching Rail .28) Iron hitching Rail .30) Postal Box, Corner or Armstrong Street South and Eyre Street, October 1967 .31) Iron Drinking Fountain in the Ballarat Botanical Gardens .32) Iron Drinking Fountain in the Ballarat Botanical Gardens .33) Killarney, Warrenheip .34) Killarney, Warrenheip .35) Killarney, Warrenheip .36) Killarney, Warrenheip .37) Bailey's Mansion, Drummond Street .38) Bailey's Mansion, Drummond Street .39) Beaufort House .40) Beaufort House .41) ? .42) ? .43) ? .44) ? .45) ? .46) ? .47) ? .48) Lenaghan's Tourello, February 1968 .49) Lenaghan's Tourello, February 1968 .50) ? .51) ? .52) ? .53) ? .54) ? .55) ? .56) ? .57) ? .58) ? .59) ? .70) Her Majesty's Theatre, Lydiard Street .71) Her Majesty's Theatre, Lydiard Street .72) Dana Street Primary School, September 1967 .73) Ballarat School of Mines Administration Building, September 1967 .74) Eureka Street Primary School ? .75) Selkirk Brick Chimney? .76) Grigsby's Foundry, Mair Street, September 1967 .77) Pratt's Warehouse, Camp Street .78) Premises of R. And R.A. Williams, Mair Street, September 1967 .79) City Oval Grandstand, with fire training tower in the background, .80) City Oval Grandstand .81) City Oval Grandstand .82) Smythesdale Post Office, October 1967 .83) Court House Hotel. Smythesdale, October 1967 .84) Smythesdale, October 1967ballarat, buildings, bluestone, iron, architecture, biddington, geoff biddington, railway, old colonists, lal lal blast furnace, beaufort house, her majesty's theatre, craig's hotel, botanical gardens, bailey, cuthbert, lenaghan, tourello, smythesdale post office, court house hotel, smythesdale, smythesdale, alexandria tea rooms, cast iron, eureka street primary school, dana street primary school, ballarat school of mines administration building, grigsby brass founder, foundry, pratt's warehouse, selkirk bricks, grandstand, court house hotel -
 Ballarat Tramway Museum
Slide - 35mm slide/s - set of 15, Eldon Hogan, 20/08/1971 12:00:00 AM
... , with the Golden City Hotel in the background. .10 - ditto .11 - Grant St..., with the Golden City Hotel in the background. .10 - ditto .11 - Grant St ...Set of 15 35mm Agfa colour blue and white plastic mount slide - of a private tour using No. 37 in Ballarat, on 28/8/1971 (WAD photo collection has one photo of the tram on tour on that date.) No. 37 has an SEC roof advertisement, 'Everything is under control in my all electric kitchen". Photo Eldon Hogan Scanning errors on .9, which have resulted in distortions. 3038.1 - At Lydiard St North terminus. .2 - Sturt St, near Doveton St with Town Hall and Myers Store in background. .3 - At the Sebastopol terminus, with the Sebastopol Royal Mail Hotel in the background. .4 - with the service car behind No. 37. .5 - ditto .6 - crossing Albert St, near Ophir St. .7 - northbound along Albert St .8 - Turning from North Side of Sturt St at Hospital Corner into Drummond St Sth, with Shell service station in background at Hospital Corner. .9 - Using the Dawson St crossing, with the Golden City Hotel in the background. .10 - ditto .11 - Grant St. loop, Barkly St, Mt Pleasant, 39 crossing in bound service car. .12 - ditto with 37 in the picture. .13 - 37 at Mt. Pleasant Terminus .14 - 37, 39 and another single trucker at Grant St. loop .15 - ditto High Res image of i13 added 8/5/2019 from Peter Lambert.tramways, trams, lydiard st nth, sebastopol, albert st, sturt st, dawson st, mt pleasant, grant st, barkly st, tram 37, tram 39 -
 Ballarat Tramway Museum
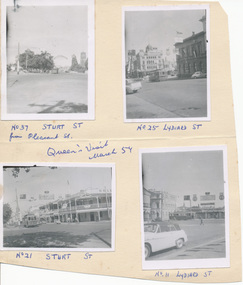
Photograph - Digital image, Wal Jack, Mar. 1954
... - No. 21 - Sturt St at Dawson St with Golden City Hotel... City Hotel in the background - see Neg 992 4 - No. 17 Lydiard ...Yields information on the decorations and tramcars and street scenes at the time of the Queens visit to Ballarat.Digital image from the Wal Jack Ballarat Album of a series of four small black and white photographs taken during the Queen Elizabeth II visit to Ballarat, March 1954. Captions under each photograph in ink. 1 - No. 37 at Pleasant St, looking east along Sturt St. - see Neg 993 2 - No. 25 at Lydiard St with the National Mutual Building in the background - see Neg 991. 3 - No. 21 - Sturt St at Dawson St with Golden City Hotel in the background - see Neg 992 4 - No. 17 Lydiard St taken from the railway station car park - see also Reg Item 5300 for a better photograph and Wal's notes on rear which says No. 17, not 11 - see Neg 994 All photographs include some of the decorations for the Royal Visit. Photographer - not stated, but sheet in Wal's handwriting. May not be Wal Jack based on the negative size, smaller than 120 which Wal used at the time. See image i2 for rear of photograph. See image i3 for hi res scan of print. See image i4 for hi res scan of negative N993 See image i5 for hi res scan of negative N994 See image i6 for hi res scan of negative N995 See image i7 for hi res scan of negative N996 On rear of the Manila sheet which has been cut from another sheet are "No. 11 Victoria St terminus 25-6-57".trams, tramways, royal visit, lydiard st, pleasant st, sturt st, tram 37, tram 25, tram 21, tram 17 -
 Ballarat Tramway Museum
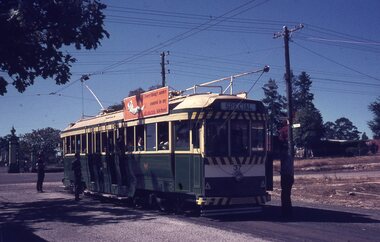
Photograph - Digital image Set of 10, George Coop, 1968 - 1970
... with Town Hall and the Golden City Hotel in the view. Tram has... with Town Hall and the Golden City Hotel in the view. Tram has ...Yields information about the tram operations and the landscape views of the Sturt St median strip.Ten (10) Digital images taken by George Coop during the period 1968 - 1970, of SEC trams in Sturt St, between the City and Pleasant Streets. .1 - Tram 26 climbing the Sturt St hill to Lydiard St, with the Cook's Private Hotel, the Commonwealth Bank and the National Mutual Life building in the background. Photo taken from the Titanic Bandstand. .2 - Tram 40 Sturt St, enough to Lydiard St North just before Raglan St. Has a lady passenger by the tram stop. .3 - Tram 30 - Sturt St north side, near Armstrong St, - has a blue framing line around the photograph. .4 - Tram 39, Sturt St, near Doveton St, shows the rotunda in the median strip. .5 - Tram 18, with median step in view. .6 - Tram 31, with two Johnnie Walker whiskey roof adverts, outside the National Mutual Life building with the Alan Bros Jewellers and Golden Star Chinese Cafe in the view. .7 - Tram 31, Sturt St south side with Town Hall and the Golden City Hotel in the view. Tram has destination of Gardens via Drummond North. .8 - Tram 41 - ditto - going to Sebastopol. .9 - Tram 13, south side, Gardens via Sturt West, about , near Ripon St, with the Ampol service station in the background and about to pick up a lady passenger .10 - Tram 17, near Doveton St. Has a Twin Lakes sign and a Wilkinson Sword Razor Bladese roof advert. trams, tramways, sturt st, raglan st, passengers, doveton st, tram 26, tram 40, tram 30, tram 39, tram 18, tram 31, tram 41, tram 13, tram 17 -
 Ballarat Tramway Museum
Photograph - Digital image Set of 10, Tony Smith, 1971
... side of Dawson St. Has the Ritzy cafe and the Golden City... and the Golden City hotel in the background. Tram appears to be well ...Yields information about Ballarat Tramways and trams prior to the closure of the tramway system.Set of 10 digital images of Ballarat trams prior to closure, scanned from original slides by Tony Smith, 1971 prior to closure of the system. The following photos have suffered colour change and showing some deterioration - fungal growth. .1 - 35 (Sebastopol), with the Town Hall and Gemmola's chemist in the background. Tram waiting at the tram stop. .2 - 27 at Victoria St loop, showing Gardens via Drummond St Nth. .3 - 35 at Armstrong St inbound showing Lydiard St Nth. Has the Commonwealth bank in the background. .4 - 32 westbound in Sturt St between Dawson and Lyon Streets, tram has the destination of Gardens via Drummond Nth. Has the Town Hall and other buildings in the background. .5 - 17 inbound at Dawson St. Tram has destination of Mt Pleasant. .6 - 39 picking up passengers at the tram stop on the west side of Dawson St. Has the Ritzy cafe and the Golden City hotel in the background. Tram appears to be well loaded with lady passengers and has a "Everything under my control in my all electric kitchen" SEC roof ad. .7 - 37 using the Dawson St crossover - has St Patricks Cathedral in the background. .8 - 21 entering the depot with Lake Wendouree in the background. .9 - 11 sitting in 0 road at the depot. .10 - 41 at the depot on 2 road. Tram has two Johnny Walker Whiskey roof adverts.trams, tramways, sturt st, victoria st, dawson st, lake wendouree, wendouree parade, depot, tram 35, tram 27, tram 32, tram 17, tram 39, tram 37, tram 21, tram 11, tram 41 -
 Ballarat Tramway Museum
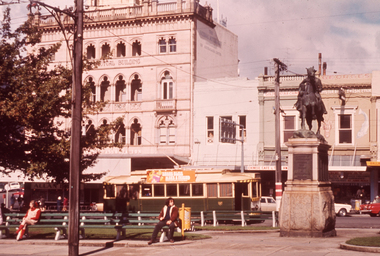
Photograph - Colour Photograph/s - set of 15', Austin Brehaut, 1/04/2000 12:00:00 AM
... former Golden City Hotel - 6/4/2000 .11 - From Grenville St - up... St (site of crossover) towards former Golden City Hotel - 6/4 ...Yields information about various locations in Ballarat in March 2000 for comparison with previous photographs.Set of 15 colour photographs taken by Austin Brehaut in April 2000 showing various locations that Ballarat trams once ran in, for use in a BTM presentation, named "Ballarat Past and Present" at the COTMA 2000 Ballarat Conference. All on Fujicolour Crystal Archive Paper. On rear in blue ink is the date, location and where relevant a reference number to photo locations that the author of the presentation had requested. Letter from Austin, filed with this worksheet. 1772.1 - Sebastopol terminus, 4/4/2000 .2 - Albert St. Sebastopol near "crossover" - 4/4/2000 .3 - Old depot site, 5/4/2000 .4 - From depot site at Depot junction - 5/4/2000 .5 - Albert St. Sebastopol, looking south above loop site - 5/4/2000 .6 - Mt. Pleasant line, in Barkly St. towards terminus - 5/4/2000 .7 - Mt. Pleasant terminus, Cobden Cnr. - 5/4/2000 .8 - Wendouree Parade at Macarthur St. - 5/4/2000 .9 - Site of old Power Station Cnr Ripon St. Wendouree Parade .10 - Sturt St. at Dawson St (site of crossover) towards former Golden City Hotel - 6/4/2000 .11 - From Grenville St - up Sturt St. hill - 6/4/2000 .12 - Lower Sturt St. toward Grenville St - 6/4/2000 .13 - Railway Station from Signal box - 27/4/2000 .14 - Lower Sturt St. toward Grenville St - 6/4/2000 .15 - Railway Station from Signal box - 27/4/2000 For 2010 comparisons see 4645 and 4646. See Aboveballarat, sebastopol, albert st, sec depot, railway station, mt pleasant, dawson st, sturt st -
 Ballarat Tramway Museum
Slide - 35mm slide/s - set of 13, Noel Simons, 28/04/1971 12:00:00 AM
... . with Golden City Hotel and the Ritzy Cafe in the background. Can see.... with Golden City Hotel and the Ritzy Cafe in the background. Can see ...Set of 13 transparencies taken on 28/4/1971 on PAKON mounts. 1168.1 - No. 21 at City terminus - taken from North side of street. Has Boer War statue on right side and National Mutual building in the background. 1168.2 - No. 34 with destination "Sebastopol" in Sturt St., outside Town Hall, with National Mutual building in background. 1168.3 - No. 18 at corner of Sturt and Lydiard Sts with National Mutual building and Craigs Hotel in background. 1168.4 - 18 at intersection of Sturt and Dawson St. 1168.5 - No. 30 at intersection of Armstrong St and Sturt St. with Fletcher Jones building in background. 1168.6 - No. 14 at City Terminus, showing destination of "Victoria St." with Town Hall in the background. 1168.7 - No. 11 bound for Mt Pleasant, opposite Titanic Bandstand in Sturt St. Has a Twin Lakes advertisement on the front dash panel and an unknown roof advertisement. 1168.8 - No. 21 at bottom of Sturt St. approaching the Grenville St. junction, with Dickins Food Store and the Spot Cafe in the background. Tram has destination of "Victoria St". and a roof advertisement for a cigarette? company. 1168.9 - No. 26 and three other trams in City Loop, looking west along Sturt St., just after a heavy hail storm. 1168.10 - No. 21 at the intersection of Sturt St and Dawson St. with Golden City Hotel and the Ritzy Cafe in the background. Can see the Dawson St. crossover track, just after a heavy hail storm. 1168.11 - No. 21 and three other trams at City Loop looking east along the south side of Sturt St. See also image 1168i1a - cleaned up and edited by Peter Waugh April 2024 - used in the April 2024 issue of Fares Please. 1168.12 - No. 14 entering the South side of Sturt St. from Bridge St. with Dickins Store in the background and the Grenville St. shelter alongside the tram. 1168.13 - No. 37 at Sturt and Dawson St., eastbound, showing "Lydiard St. Nth" Has SEC roof advertisement on the side of the tram.1168.1 -"Sturt & Lydiard Sts" 1168.2 - "Town Hall" 1168.3 - "Sturt St & Dawson Sts" 1168.4 - "Sturt and Lydiard Sts" 1168.5 - "Sturt St." 1168.6 - "Sturt and Lydiard Sts" 1168.7 - "Sturt St." 1168.8 - "Bridge St." 1168.9 - "City Loop" 1168.10 -"Dawson & Sturt Sts." 1168.11 - "City Loop" 1168.12 - "Bridge St." All have date stamp of "28 Apr 1971" in purple ink on base. All blue ink unless otherwise noted.tramways, trams, town hall, sturt st., dawson st, armstrong st., grenville st, bridge st., titanic bandstand, tram 11, tram 14, tram 18, tram 21, tram 26, tram 30, tram 34, tram 37 -
 Ballarat Tramway Museum
Slide - 35mm slide/s - set of 5, Noel Simons, 19/11/1962 12:00:00 AM
... - Bendigo 19 leaving Charing Cross for Golden Square with City Club... for Golden Square with City Club Hotel alongside and other buildings ...Set of 5 transparencies taken on 19/11/1962 on Kodak mounts. 1186.1 - Bendigo 21 bound for Golden Square at Charing Cross with The Beehive buildings and shops in Pall Mall in the background. Trams has an ad for Cohns drinks on front bumper, SEC Best for Cooking roof ad. and Mamouney's furniture roof ad. Two women passengers boarding. 1186.2 - Bendigo 26 crossing Pall Mall from Mitchell St. bound for Eaglehawk with "Ezywalkin" shop in background. Tram has an SEC 'Electric Cooking' roof ad and a 'Streets Ice cream' ad on front dash. 1186.3 - Bendigo 7 arriving at the Charing Cross stop, bound for North Bendigo. Has a Huttons dash panel ad, a Castrol roof ad. Buildings as for 1186.1. Passengers waiting at the stop. 1186.4 - Bendigo 19 leaving Charing Cross for Golden Square with City Club Hotel alongside and other buildings as for 1186.1 in the background. Tram has Briquettes ad on front dash and SEC 'Electric Cooking' roof ad. 1186.5 - Bendigo 21in High St. at corner of Short St. heading for Charing Cross. Destination half way between Depot and Railway Station. Tram has ads for Cohns Drinks on dash panel, SEC 'Cook with Electricity' and a Sandhurst Milk roof ads.Information written on in black ink and date stamped in purple ink. 1186.1 - "No. 21 in Pall Mall at Charing Cross, Bendigo" 1186.2 - "No. 26 arriving at Alexandra Fountain, Charing Cross, Bendigo" 1186.3 - "No. 7 in Pall Mall at Charing Cross, Bendigo" 1186.4 - "No. 19 in High St., Bendigo, leaving Charing Cross for Golden Square" 1186.5 - "No. 21 in High St. Bendigo, at corner of Short St." tramways, trams, bendigo, charing cross, pall mall, high st., tram 7, tram 19, tram 21, tram 26 -
 Federation University Historical Collection
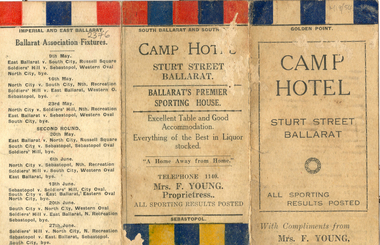
Card, Berry, Anderson & Co, Ballarat Football League Fixtures, 1925, 1925
The Football Fixture relates to the Ballarat Association of Australian Rules Football.Double sided card with black and white printing and coloured borders. It is a Ballarat Football League fixture from Mrs F. Young of Camp Hotel, Sturt Street, Ballarat. The colours relate to the following football teams: Golden Point, South Ballarat, Imperial and East Ballarat, Ararat, Maryborough and North City, Ballarat and Soldiers' Hillfootball, ballarat, australian rules football, young, camp hotel, football fixture, vfl, bfl, afl -
 Bendigo Historical Society Inc.
Book - BOOKLET: BENDIGO IN 74
48 paged booklet - ''Bendigo in 74 - The Tourist Centre of Victoria'' - compiled as a community service by Bendigo Jaycees. Comprehensive information about Bendigo and attractions - Index: Accommodation; Additional information; An introduction to Bendigo; Aquarium; Art Gallery; Bendigo Trust; Caravan parks; Dai Gum San; Directory; Eaglehawk Museum; Entertainment; Emergency services; Joss House; Lake Eppalock; National Trust classified buildings; Natural history; Map of Bendigo; Map of city centre; Pottery; Picnic areas; sporting facilities; 'Talking Trams'; Thanks; Tours; Tourist attractions; Victoria Hill; What's on in Bendigo.Bendigo Jaycees. Espress Printers Bendigo.bendigo, tourism, guide 1974, bendigo jaycees, radio 3bo, city family hotel, don murray's hotel motel, cambrian hotel, charlies craft & lifestyle store, powneys authorised newsagent, the bendigo trust, white hills panel works, bendigo pottery, bendigo racecourse, homestead motor inn, peter wade, the persian room, sandhurst trading co. pty. ltd., bendigo air services, bendigo sec, geo. r. innes & sons, cohns, the copper pot, sandhurst travel service. golden hills motel, welcome stranger motel, brian boru hotel, john lindsay's pharmacy & photographic centre, alf morris motors -
 Bendigo Historical Society Inc.
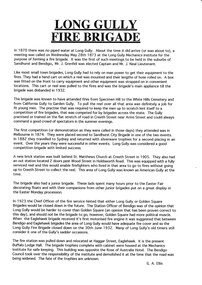
Document - LONG GULLY HISTORY GROUP COLLECTION: LONG GULLY FIRE BRIGADE
Short history of the Long Gully Fie Brigade by G A Ellis. The brigade started in 1873 and was disbanded in 1932. The brigades's main appliance was a cart or reel pulled by the men. The men used to practice in Creeth Street and later there were competitions with other brigades. A new station was built in 1905. It was decided to close Long Gully and keep Golden Square Brigade.bendigo, history, long gully history group, the long gully history group - long gully fire brigade, long gully mechanics institute, mr j grenfell, mr j neal, white hills cemetery, sandhurst city brigade, st matthews church, american gully, easter fair, buffalo lodge hall, rose of australia hotel, bendigo council, g a ellis -
 Bendigo Historical Society Inc.
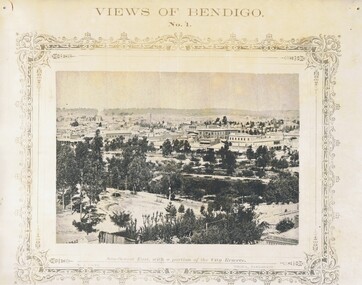
Photograph - VIEWS OF BENDIGO: COPIES OF 52 PHOTOS, 1850 - 1900
Copies of Photographs from - Views of Bendigo by Nicholas Caire Originals in Box 13 No.1 Sandhurst east/ City Reserve x 2 No 2 New Chum Line of Reef No 3 Sandhurst to North from top of Masonic Hall No.4 Hustler's Line of Reef No.5 Battery of stampers for crushing quartz x 2 No.6 View Sandhurst from top of Masonic Hall x 2 No.7 Excavation Quartz Reef, Ironbark Hill. No 8 St. Paul's Church. No.9 View Camp Reserve from Court House. No.10 View of Nth. Old Chum. No.11 View Camp Hill near the Lodge x 2 No.12 Garden Gully. No.13 Shamrock Hotel, Sandhurst. No.14 View from Court House, east end Pall Mall. No.15 Wesleyan Church, Golden Square x 2 No.16 Savings Bank, Sandhurst No.17 Bendigo District Hospital. No.18 Interior Wesleyan Church x 2 No.19 View Golden Square township. No.20 The Town Hall, Sandhurst. No 21 The City Hotel,Sandhurst. No 22 Pall Mall Sandhurst, No 23 Sandhurst City Market No 24 Pall Mall looking west x 2 No 25 Camp Hill x 2 No 26 Charing Cross No 27 View Sandhurst. x 2 No 28 Long Gully. No 29 Railway station and sheds No 30 Cemetery Back Ck. No 31 Kock's Pioneer Quartz Crushing Plant Long Gully. No 32 Masonic Hall. No 33 Bendigo Benevolent Asylum. No 34 Bendigo Flat. No 35 Old Chum Hill x 2 No 36 New Chum Gully No 37 Township of Eaglehawk No 38 From St Paul's tower looking west No 39 Tunnel Big Hill. No 40 From St Paul's tower looking south x 2 No 41 From St Paul's tower looking eastward x 2 No 42 From St Paul's tower looking north west x 2 No 43 Great Extended Hustlers Quartz Mining Claim No 44 Big Hill Rail line x 2 No 45 From St Paul's tower looking westward x 2 No 46 From St Paul's tower looking north west No 47 Big Hill Ranges Buick. x 2 No 48 St.Paul's Tower x 2 No 49 Eaglehawk township. No 50 Mitchell Street No 51 Botanical gardens, White Hills x 2 No 52 View Point, Sandhurst. .N.J. Caire.place, bendigo, bendigo area., views of bendigo. -
 Bendigo Historical Society Inc.
Photograph - NICHOLAS CAIRE VIEWS OF BENDIGO
Full set (52 photos) of Nicholas Caire ''Views of Bendigo'' photographs. 1) Sandhurst East with a portion of the City Reserve. 2) New Chum line of reef. 3) Sandhurst-North part as seen from the top of the Masonic Hall. 4) The Hustler's line of reef seen from Redan Hill. 5) Battery of stampers for crushing quartz 6) View of Sandhurst as seen from the top of the New Masonic Hall. 7) Excavation of quartz reef near Ironbark Hill. 8) St. Paul's Church, tower and belfry. 9) View of the Camp Reserve as seen from the Court House. 10) View of North Old Chum showing surface excavations. 11) View as seen from the Camp Hill near the lodge. 12) Garden Gully amalgamated claims. 13) Shamrock Hotel, Sandhurst. 14) View as seen from Court House showing the willows & East Pall Mall. 15) Wesleyan Church, Golden Square. 16) Savings bank, Sandhurst. 17) The Bendigo district hospital. 18) Interior of the Wesleyan Church, Golden Square. 19) View of Golden Square township. 20) The Town Hall, City of Sandhurst. 21) The City Hotel, Sandhurst. 22) Pall Mall, Sandhurst. 23) Sandhurst City Market. 24) Pall Mall, Sandhurst looking west. 25) View from Camp Hill looking north - east 26) View of Charing Cross, Sandhurst. 27) View of Sandhurst as seen from Knipe's Castle. 28) Township of Long Gully. 29) View taken from St. Paul's tower. 30) View of the Sandhurst cemetery at back creek. 31) Kock's pioneer quartz crushing plant, Long Gully. 32) The New Masonic Hall, Sandhurst. 33) The Bendigo benevolent asylum and industrial school. 34) Bendigo flat as seen from Wattle Hill. 35) View of Old Chum Hill. 36) New Chum Gully as seen from Specimen Hill. 37) Township of Eaglehawk. 38) View from St. Paul's tower looking south west. 39) View of the railway tunnel through the Big Hill, near Mt. Herbert. 40) View taken from St. Paul's looking south. 41) Scene taken from St. Paul's tower looking eastward. 42) View of Sandhurst from St. Paul's tower looking north-west. 43) The great extended Hustler's co's. quartz mining claim. 44) View from the Big Hill showing the line of railway to Melbourne. 45) View from St. Paul's Church tower looking westward. 46) View from St. Paul's Church tower looking north-west. 47) Scene near the Big Hill ranges taken from Mr. Buick's residence. 48) View from St. Paul's Church tower looking north eastward. 49) Township of Eaglehawk 50) View of Mitchell Street, Sandhurst. 51) Botanical gardens near the White Hills. 52) View Point, Sandhurst.bendigo, streetscape, various views, nicholas cairne -
 Bendigo Historical Society Inc.
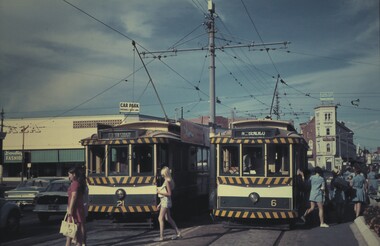
Slide - BENDIGO & EASTER FAIR, 1972
... , Bendigo. Fountain Plaza and Bendigo City Family Hotel... Fountain Plaza City Family Hotel 2 Bendigo Trams at Alexandra ...2 Bendigo Trams at Alexandra Fountain, Charring Cross, Bendigo. Fountain Plaza and Bendigo City Family Hotel in background. Golden Square tram on left, North Bendigo tram on right with school girls disembarking.slide, bendigo, bendigo trams., bendigo trams charring cross fountain plaza city family hotel -
 Bendigo Historical Society Inc.
Newspaper - JENNY FOLEY COLLECTION: FAWN'S BREWERY
Bendigo Advertiser "The way we were" from 1999. Fawns Brewery, High Street, circa 1860. James Fawns arrived on the Bendigo diggings in 1853 and soon established a brewery near the Foundry Arms Hotel in Old High Street, Golden Square. He later closed this brewery and erected an establishment in High Street known as the London Brewery. After Fawns death in 1891, the brewery became incorporated with the adjacent City Brewery.newspaper, bendigo advertiser, the way we were -
 Bendigo Historical Society Inc.
Document - CONNELLY, TATCHELL, DUNLOP COLLECTION: ACCOUNTS ESTATE OF ESTHER ISABELLE CANNING, 1893 - 1894
Document. Accounts Estate of Esther Isabelle Canning. 1 - 1894 - Ac from Mackay & Co, Bendigo Advertiser Office. 2 - 1893 - Ac from Transton Geo, Wholesale Tobacconist, Bath Buildings Bendigo. 3 - 1894 - City of Bendigo Rate Account to Gourlay, Mary Ann for property in High St. 4 - 1893 - Note from McKenzie Rosa stating she received from Canning two weeks wages from the Golden Age Hotel. Attached accounts from the Kent Brewery Co, Bendigo and Hunter Bros, MCCrae St Bendigo. 5 - 1894 - Receipt from Phoenix Fire Office of London, Victorian Branch. 60 Market Street Melbourne. Received from Storie H. Executors late E I Canning. 6 - 1894 - Account from Hinchcliffe Edwin, M. D. View St, Bendigo dated July 20th 1894. 7 - 1894 - Account from W Beebe & Son, Steam Granite, Marble & Stone Sawing Works. Mitchell St and Lyttleton Terrace for fixing headstone and re gilding old inscription etc. Dated Oct 1894. 8 - 1893 - Receipt from Phoenix Fire Office of London, Victorian Agency - Phoenix Chambers 52 Market St Melbourne dated Feb 2 and Feb 4 1893. 9 - 1894 - Ac from Hinchcliffe Edwin, M. D. View St Bendigo for professional attendance. Estate of the late Mrs Canning Golden Square, Golden Age Hotel, dated Jan 11th 1894 (document torn. 10 - Various receipts pinned together. 1893 - 1894 from City Brewery Company, High St, Bendigo, Ale and Porter Brewers Thros Canning, Golden Square. Also memorandum from Johnston & Illingworth?, City Brewery Co, Golden Square to solicitors requesting payment of accounts in the estate of the late Mrs Canning of Golden Square.cottage, miners, connelly, tatchell & dunlop, mackay & co, bendigo advertiser office, transton geo, city of bendigo, gourlay mary ann, mckenzie rosa, golden age hotel, kent brewery co, hunter bros, phoenix fire office of london, storie h, hinchcliffe edwin, w beebe & son -
 Bendigo Historical Society Inc.
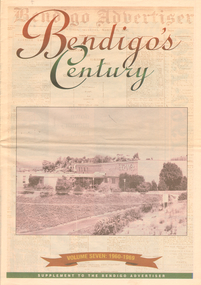
Newspaper - LONG GULLY HISTORY GROUP COLLECTION: BENDIGO'S CENTURY VOLUME SEVEN: 1960 - 1969
Supplement to the Bendigo Advertiser, December 15, 1999 Volume Seven: 1960-1969 titled Bendigo's Century. The front has a photo of the BCV 8 Studio. Contains photos and local news, council matters, planning, Who's Who, Weather, Sport and Business and some Advertisements. Photos include Early stages in the construction of the Eppalock tower and bridge pillars, Christine Wiseman, TV8's first news reader Ron Alderton, Dr Albert L Beischer, Advertiser buiding, fire at the Advertiser building, Oscar Flight, Bendigo Town Hall, William Basil Ashman, Lake Eppalock, Premier Henry Bolte, Que O'Hoy, Sandhurst Guest House, The Lyric Theatre, E C Thompson, The elm tree in Market Square, Leslie Galvin, The original Myer Store, The Joss House, Sidney Myer, Bendigo Police Barracks, Bunratty Castle, Albert Vivian Gray, The Victoria Hill site, Architects drawing of the new council administrative offices and Noel Beaton MHR.bendigo, history, long gully history group, the long gully history group - bendigo's century volume seven: 1960 - 1969, bendigo advertiser, bcv 8, eppalock dam, premier henry bolte, the criterion hotel, mccarthy family, teachers training college, bendigo original teachers college, long gully state school, stramit, bendigo university site committee, mrs christine wiseman, bendigo city council, the broadcasting control board, general television pty ltd, bendigo central victoria telecasters pty ltd, mr davidson, bennett's arcade, woolworth's, white hills swimming pool, herb elliott, sailor's guide, toni riley pharmacies, rising sun hotel, ron alderton, dr albert l beischer, channel 8, melbourne herald, 3bo, bendigo advertiser officeslyceum theatre, junior technical school white hills, mount alvernia hospital, most reverend dr b d stewart, sisters of the franciscan missionaries of the divine motherhood, lazarus family, bendigo's tramways, state electricity commission, george pethard, lance pethard, bendigo advertiser fire 29/7/1962, riverine herald, the herald and weekly times, bendigo art gallery, oscar flight, hollands foundry, eaglehawk u.f.s. dispensary, gillies famous pies, william basil ashman, golden gate hotel, grieves family, bendigo town hall, mr r r anderson, mr e h brown, cr neville oliver, cr tom flood, traffic commission, lansell family, abev-1, bendigo ordnance factory, actu, bendigo trades hall council, the ramsay report, bendigo benevolent home, bendigo home and hospital for the aged, princess theatre, amoco, lake eppalock, bendigo training prison, bendigo police station lock-up, shamrock hotel, rifle brigade hotel, hopetoun hotel, anz bank, marong shire offices, sir rohan delacombe, st paul's church, que o'hoy, waldron family, windermere hotel, aids & appliance shop, anne caudle centre, e c thompson, mayfair hams, sandhurst guest house, lyric theatre, chinese joss house, ordnance factory, sir john jenson, bridge street chinese quarter, bendigo city hall, cr r f turner, cr tom flood, victorian inland meat authority, new zealand insurance co, mrtropolitan security service, bendigo easter fair society, golden square high school, eaglehawk high school, bendigo technical college, mr ralph w birrell, bendigo fountain plaza, the bethlehem home for the aged, dick hazeldene, victorian egg board, bendigo united cricket club, south bendigo united cricket club, western mining corporation, les priest, alexandra fountain, bendigo advertiser, cr w cambridge, bendigo council, eaglehawk council, strathfieldsaye shire, huntly shire, marong shire, david thomas, senator john gorton, bendigo's college of advanced education, bank of new south wales, harp and shamrock hotel, the honorable leslie william galvin, kurmala, cain government, hanro knitting mills, myer store, sidney myer, davey brothers grocery store, national trust, myer emporium, myer's ltd, cox bros (australia) ltd, dame merlyn myer, baillieu myer, frank greenaway, institute of technology, gas & fuel corporation, bendigo railway station, anz bank, city family hotel, tab branch, senior constable alfred herbert wright, senior constable allan raymond brown, victorian football league, bendigo police barracks, camp hill state school, state electricity commission, the country party, the labor party, transport regulation board, stuart anderson, grose family, jean theodore de ravin, kyneton shire, sir william mcdonald, mines department, the loddon hospitals region group laundry and central linen service, kevin wynne, albert vivian gray, bradford cotton mills ltd, bradmill industries ltd, victoria hill, bendigo and district tourist association, professor brian lewis, melbourne university, victorian chinese community, loong, sun loong, stafford ellinson, coles' store, north deborah mining company nl, noel beaton mhr, durham ox hotel, taylor family -
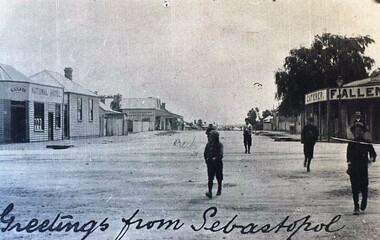 City of Ballarat Libraries
Postcard - Card Box Photographs, Greetings from Sebastopol, 1898
This postcard shows Victoria Street. Pictured is L. (Bub) Jenkins author of 'The Golden Chain'. The two business in the photo are F. Allen Caterer and C.Clark National Hotel.victoria street, sebastopol, streetscape, buildings, commerical, l. (bub) jenkins, f. allen caterer, national hotel -
 Ballarat Tramway Museum
Postcard, Valentine & Sons Publishing Co, "Lydiard Street showing George Hotel Ballarat", 1931
Valentine Series postcard of the early 1930s of No. 27 inbound in Lydiard St Nth. Valentine series No. 1492, with the caption "Lydiard Street showing George Hotel, Ballarat". See page 59 of The Golden City and its Tramways and for the photo itself. Photo shows the wooden centre poles, street lighting, tram 27 in ESCo colour scheme, and buildings on the west side of Lydiard St North, including the George Hotel, A.M. Palmer & Co Chemist, Wm Hiscock Dentist and other buildings. A horse-drawn cart and two motor cars parked at the kerb. See 3893 for a digital image and reproduction photograph.Yields information about Lydiard St Nth in the 1930's, the centre poles, traffic and the appearance of the trams.Postcard black and white, divided back. Card No. 1492Has on the rear in pencil "KT" and "to be copied" tramways, trams, tram 27, lydiard st nth, george hotel, centre poles -
 Ballarat Tramway Museum
Slide - 35mm slide/s, Noel Simons, 21/11/1962 12:00:00 AM
Set of 17 transparencies taken on 21/11/1962 on Kodak mounts. 1188.1 - Bendigo No. 11 at Depot Junction McCrae and Arnold St. with driver/conductor changing points. 1188.2 - Bendigo No. 4 at Charing Cross, side on photo, with City Club Hotel and Alexandra Fountain in the background. Tram has Castrol and SEC 'Electric Cooking' ads. 1188.3 - Bendigo No. 4 climbing View St. after tram has passed photographer. Tram has Streets Ice Cream and Cohns Soft Drinks ad on rear dash panel. In the background are the buildings in View St., including the Princess Theatre. Tram has destination of Eaglehawk. 1188.4 - Trams 2 and 4 crossing at the California Gully or Thorpe St Loop. 1188.5 - Bendigo 4 in Mt Korong Road. Tram inbound with destination of Quarry Hill, just leaving Garden Gully Loop. 1188.6 - Bendigo 4 and 17 crossing at the Hayes St. or Iron Bark Gully Loop. No. 17 bound for Eaglehawk, No. 4, Quarry Hill. 17 has two SEC roof ads and a white horse whiskey ad. 1188.7 - No. 17 bound for Eaglehawk, soon after leaving California Gully. Has large mullock heap in background. 1188.8 - Bendigo 2 and 17 crossing at the Thorpe St. or California Gully Loop. Has butchers shop in background. 1188.9 - Bendigo 17 at the Eaglehawk terminus. Has destination of Quarry Hill. In background is the hotel and shops at the terminus, showing ads for "Melbourne Bitter". Tram has two SEC 'Electric Cooking' ads. Driver and conductor about to assist two lady passengers with a pram and baby. 1188.10 - No. 17 at Eaglehawk terminus, awaiting departure. Has Eaglehawk Town Hall and Post Office in background. Tram has a Whitehorse Whiskey ad on the front dash panel. 1188.11 - No. 3 in High St. Eaglehawk, with destination of Eaglehawk. Has the shops on the south side of High St. in the background, including the Eaglehawk fish shop. Tram has two roof ads, one an SEC roof ad, and Cohns Drinks and Streets Ice cream ads on front dash panel. 1188.12 - as above, but after tram has passed photographer. Note the centre of the road poles. 1188.13 - No. 2 outbound for Eaglehawk at the intersection of Mt. Korong Road and the Calder Highway. Photo taken after the tram has passed the photographer. Has an Ampol service station in the background. 1188.14 - No. 11 leaving the Bendigo depot, crossing the bridge, with the Scrubber car in the background. 1188.15 - No. 21 at the North Bendigo terminus. Tram has destination of Golden Square and Cohns drink ad on front dash and two roof ads on side. 1188.16 - No. 11 on Golden Square route, in High St. at intersection with Old High St. 1188.17 - No. 11 at the Golden Square terminus, conductor turning the pole. Hotel on the left side of the photo. Note the road works barrier and red flag behind the tram. Slide has an end of roll mark on the right hand side of the image.Information written on in black ink and date stamped on purple ink. 1188.1 - "Birney car No. 11 in McCrae St. at Cnr of Arnold about to run into depot, Bendigo" 1188.2 - "No. 4 at Alexandra Fountain, Charing Cross Bendigo" 1188.3 - "No. 4 climbing the View St. Hill from Charing Cross, Bendigo (Eaglehawk Route)" 1188.4 - "No. 4 and 2 at Thorpe St. Loop, California Gully" 1188.5 - "No. 4 in Mt Korong Rd., Long Gully, Near Havilah Rd. (Bendigo) (Eaglehawk Route)" 1188.6 - "Nos. 17 and 4 crossing on Hayes St. Loop, Ironbark, Bendigo" 1188.7 - "No. 17 soon after leaving California Gully (Eaglehawk Route)" 1188.8 - "No.2 and 17 crossing on Thorpe St. Loop, California Gully (Eaglehawk Route)" 1188.9 - "No. 17 at Eaglehawk terminus" 1188.10 - "No. 17 at Eaglehawk terminus" 1188.11 - "No. 3 in High St. Eaglehawk" 1188.12 - "No. 3 nearing Eaglehawk terminus" 1188.13 - "No. 2 in Mt. Korong Rd., Ironbark. Calder highway on left (Eaglehawk route) 1188.14 - "Birney car No. 11 leaving Bendigo depot. Scrubber car at rear" 1188.15 - "No. 21 at North Bendigo Terminus" 1188.16 - "Birney car No. 11 in High St. Bendigo at intersection with Old High Street (Golden Square Route)" 1188.17 - "Birney Car No. 11 at Golden Square terminus, High St., Bendigo". tramways, trams, bendigo, depot junction, charing cross, view st., eaglehawk, north bendigo, golden square, tram 2, tram 3, tram 4, tram 11, tram 17, tram 21, tram scrubber -
 Ballarat Tramway Museum
Slide - 35mm slide/s - set of 24, Noel Simons, 20/05/1971 12:00:00 AM
Set of 24 transparencies taken on 20/5/1971 on Kodak mounts. 1195.1 - Bendigo 19 arriving at Charing Cross en route to North Bendigo with Fountain Plaza and the City Family Hotel in the background. No. 19 has two roof ads for the SEC. -'Electricity better for cooking' and 'Everything's under control in my all electric kitchen' 1195.2 - as above, but standing at the Charing cross stop, with the Beehive Stores and other buildings along the east side of Pall Mall in the background. 1195.3 - No 21 ex Golden Square crossing View St. trackwork in front of No. 25 waiting to depart for Quarry Hill. No.21 has two roof ads (as for No.19 in 1195.1) and No.25 has one SEC roof ad and another. Ezywalkin sign in the background, and Fountain Plaza. 1195.4 - as for 1195.3, but after 21 has arrived and 25 left for Quarry Hill. Has Ezywalkin store and the Beehive store in the background. 1195.5 - No. 5 at the Eaglehawk terminus. Photo taken with a cannon in foreground looking along High St. Eaglehawk. Has shops on the west side of High St. in the background. 1195.6 - No. 5 at the Eaglehawk terminus, close up of the rear of the tram - note tow bar arrangement. Has destination of Quarry Hill. 1195.7-Nos.25 and 5 crossing at the Thorpe St. Loop, California Gully. No. 25 bound for Eaglehawk (has SEC Briquette and electric cooking roof ads) and 5 en route for Quarry Hill with a SEC and Cinzano roof ad. 1195.8 - as for 1195.7, but after trams have passed each other. Has Borough Auto Service building in the background. 1195.9 - No. 5 in Mt Korong Road, towards Bamard Street, photo taken after tram has passed photographer. 1195.10 - No. 30 at the Golden Square terminus with the Milk Bar on the right hand side of the photograph. 1195.11 - No. 30 inbound at Fire Station Loop, High St. Golden Square. Has old fire station in the background. Passengers are boarding the tramcar. 1195.12 - No. 30 in High St, bound for North Bendigo between Vine and Wattle Streets. 1195.13 - No. 5 bound for Eaglehawk waits at Iron Bark Gully Loop, at Hayes St. 1195.14 - No. 5 and No. 2 crossing at Iron Bark Gully Loop. 1195.15 - No. 5 bound for Eaglehawk leaving the Manchester Loop, Long gully. 1195.16 - No. 5 passing William Street, Long Gully en route to Eaglehawk. 1195.17 - No. 5 just before the California Gully Crossing Loop. 1195.18 - Nos. 5 and 26 crossing at California Gully crossing Loop. No. 5 heading to Eaglehawk, 26, Quarry Hill. 1195.19 - No. 5 in High St. Eaglehawk with Bob Moyle's Victoria Hotel and the TAB in the background. 1195.20 - No. 5 in High St. Eaglehawk approaching the terminus. Photo taken after the tram has passed the photographer. Has Foodland store and J. Best Fruit supply in the background, along with Eaglehawk Town Hall. 1195.21 - No. 5 at the Eaglehawk terminus, photo taken along seldom used track along High St. 1195.22 - as for 1195.22 - but at the very end of the track. 1195.23 - No. 5 en route for Quarry Hill climbs High St. Eaglehawk with the Victoria Hotel and Eaglehawk Town Hall in the background. 1195.24 - No. 5 and 25 crossing at Jobs Gully Loop. Note 25 has a black on white destination roll, while No. 5 has a white on black destination roll. Information written on in black ink and date stamped on purple ink. 1195.1 - "No. 19 arrives at Charing Cross Bendigo from Golden Square" 1195.2 - "No. 19 about to leave Charing Cross for North Bendigo" 1195.3 - "No. 25 awaiting departure for Quarry Hill, watches No. 21 arrive at Charring Cross from Golden Square" 1195.4 - "No. 21 on North Bendigo service and No. 25 on Quarry Hill run await departure at Charing Cross" 1195.5 - "No. 5 at Eaglehawk terminus" 1195.6 - "No. 5 at Eaglehawk terminus" 1195.7 - "Nos. 5 and 25 crossing at Thorpe St. Loop, California". 1195.8 - "Nos. 25 and 5 crossing Thorpe St. Loop, California Gully". 1195.9 - "No. 5 descending Mt Korong Rd. towards Bamard St." 1195.10 - "Birney car No. 30 at Golden Square terminus" 1195.11 - "Birney car No. 30 in High Street near Thistle Street (Fire Station Loop)" 1195.12 - "No. 30 in High St. between vine and Wattle Streets" 1195.13 - "No. 25 at Hayes Street Loop Iron Bark". 1195.14 - "Nos. 2 and 5 crossing at Hayes Street Loop Iron Bark" 1195.15 - "No. 5 at Manchester Loop opposite Havilah Road, Long Gully" 1195.16 - "No. 5 passing William Street, Long Gully". 1195.17 - "No. 5 at California Gully" 1195,18 - "Nos. 26 and 5 at Thorpe St. Loop, California Gully". 1195.19 - "No. 5 in High St. Eaglehawk". 1195.20 - "No. 5 approaching Eaglehawk terminus" 1195.21 - "No. 5 at Eaglehawk terminus" 1195.22 - "No. 5 at Eaglehawk terminus" 1195.23 - "No. 5 in High St. Eaglehawk" tramways, trams, bendigo, charing cross, eaglehawk, california gully, golden square, iron bark gully, jobs gully, tram 2, tram 5, tram 19, tram 21, tram 25, tram 26, tram 30 -
 Ballarat Tramway Museum
Slide - 35mm slide/s - set of 25, Noel Simons, 26/02/1972 12:00:00 AM
Set of 25 transparencies taken on 26/2/1972 on Kodak mounts. 1204.1 - Bendigo No. 5 - just arrived at Manchester Loop near Havilah Road, Long Gully. Photo taken after tram has passed photographer. 1204.2 - No. 26 in Backhaus St. Long Gully passing William St, en route to Quarry Hill. Photo taken after tram has passed photographer. 1204.3 - No. 5 climbing the High St. Hill Eaglehawk, heading for Quarry Hill with the buildings on the West side of High St. in the background, including the Eaglehawk Town Hall. 1204.4 - as for 1204.3, but tram close up. 1204.5 - as for 1204.3, but after tram has passed photographer. 1204.6 - No. 5 at intersection of Mt Korong Road Ironbark and Calder Highway, with the AMPOL service 'station in the background. Photo taken after tram has passed photographer. 1204.7 - No. 26 en route to Quarry Hill shortly after leaving Needle Loop, passing William St., Long Gully. 1204.8 - No. 5 at California Gully Loop, picking up a passenger, with the shops at Long Gully in the background. Photo taken after tram has passed photographer. 1204.9 - No. 5 in Long Gully, en route to Quarry Hill. Photo taken after tram has passed photographer. 1204.10 - No. 2 at Eaglehawk terminus with the Eaglehawk Town Hall and Post Office in the background. Tram has two SEC roof ads. 1204.11 - No. 2 at Eaglehawk terminus, close up. 1204.12 - as for 1204.11, but through the park gates. 1204.13 - as for 1204.11, but with tram stop shelters in the foreground and buildings on the West side of High St in the background. 1204.14 - No. 2 in Mt. Korong Rd, midway between California Gully Loop and Needle Loop. Photo taken after tram has passed photographer. 1204.15 - No. 5 in Long Gully, en route to Quarry Hill. 1204.16 - as for 1204.15, but with trams departed loop. Has an ESSO service station in the background. 1204.17 - No. 26 leaves Charing Cross up View St.. Photo taken after tram has passed photographer. Has Armstrong Tyre Service, Cohns Drinks ad on a building and the T&G building in the background. Also Firestone ads on the tyre service building. 1204.18 - No. 5 waits at Charing Cross with the Alexandra Fountain in the background. Tram has two SEC roof ads, 'Everything s fine in my all electric kitchen' and 'Electricity Best for Cooking'. Has RACV, Colonial Mutual Life buildings in the background and the planting areas around Charing Cross gardens in the foreground. 1204.19 - No. 21 en route to North Bendigo arrives at Charing Cross, with passengers waiting to board. No. 5 in the background. In the background is the Fountain Gate Plaza building and the City Family Hotel. 1204.20 - as for 1204.19, but with No. 7 en route to Golden Square. 1204.21 - as for 1204.19, but closer up. 1204.22 - as for 1204.18 1204.23 - No. 25 in Nolan St. near the crossing of Bendigo Creek, running a special tram tour. 1204.24 - No. 25 on a special charter, in Weeroona Ave. at Cnr of Caledonia St. passing the Gas works. 1204.25 - Nos. 25 (showing Golden Square), 7 and 26 at Charing Cross. Has fountain in the background.Information written on in blue ink and date stamped on purple ink. 1204.1 - "No. 5 at Manchester Loop, near Havilah Rd. Long Gully." 1204.2 - "No. 26 in Backhaus St. Long Gully passing William St." 1204.3 - "No. 5 in High St. Eaglehawk." 1204.4 - "No. 5 in High St. Eaglehawk." 1204.5 - "No. 5 in High St. Eaglehawk." 1204.6 - "No. 5 in Mt. Korong Rd., Ironbark, passing Calder Highway Junctn." 1204.7 - "No. 26 shortly after leaving Needle Loop, passing William St., Long Gully. No. 5 cresting hill in distance." 1204.8 - "No. 5 at California Gully Loop." 1204.9 - "No. 5 in Long Gully" 1204.10 - "No. 2 at Eaglehawk terminus." 1204.11 - "No. 2 at Eaglehawk terminus." 1204.12 - "No. 2 at Eaglehawk terminus." 1204.13 - "No. 2 at Eaglehawk terminus." 1204.14 - "No. 2 in Mt. Korong Rd, midway between California Gully Loop and Needle Loop. 1204.15 - "Nos. 2 and 26 crossing at Long Gully." 1204.16 - "No. 26 leaves Long Gully loop for Eaglehawk as No. 2 pulls out of the far end towards Bendigo" 1204.17 - "No. 26 beginning the climb up View St. from Charing Cross." 1204.18 - "No. 5 at Charing Cross." 1204.19 - "No 21 arrives at Charing Cross from Golden Square while No. 5 awaits departure time for Eaglehawk." 1204.20 - "Nos. 7, 21, and 2 (behind which is No. 5) at Charing Cross." 1204.21 - "Nos. 7, 21, and 2 at Charing Cross." 1204.22 - "No. 5 at Charing Cross." 1204.23 - "No. 25 in Nolan St. near Bendigo creek crossing" 1204.24 - "No. 25 in Weeroona Ave. at cnr of Caledonia St." 1204.25 - "Nos. 25, 7, 26 and 2 (behind 26) at Charing Cross."tramways, trams, bendigo, eaglehawk, long gully, california gully, charing cross, north bendigo, tram 2, tram 5, tram 7, tram 21, tram 25, tram 26 -
 Ballarat Tramway Museum
Slide - 35mm slide/s - set of 6, Noel Simons, 28 Feb. 1972
Set of 6 transparencies taken on 28/2/1972 on Kodak mounts. 1206.1 - Bendigo No. 5 at Hayes St. Loop, en route for Quarry Hill. 1206.2 - No. 5 at Garden Gully Loop, Mt. Korong road, Ironbark. en route to Quarry Hill. Note the water column in the background. 1206.3 - No. 5 in View St. Bendigo, with the Commodore Motel in the background. 1206.4 - No. 6 en route for Golden Square in Fire Station loop, with the fire station building in the background. Photo taken after tram has passed photographer. 1206.5 - No. 6 in High St., running through Golden Square Shopping Centre, en route for Golden Square. Photo taken after tram has passed photographer. 1206.6 - No. 6 arriving at Charing Cross, bound for North Bendigo, with the City Family Hotel, ANZ bank and the Cenotaph (war memorial) in the background.Information written on in blue ink and date stamped on purple ink. 1206.1 - "No. 5 at Hayes Loop, Ironbark." 1206.2 - "No. 5 at Garden Gully Loop, Mt. Korong road, Ironbark." 1206.3 - "No. 5 in View St. just after start of double track near Barnard St." 1206.4 - "No. 6 in High St. at Fire Station loop." 1206.5 - "No. 6 in High St. running through Golden Square shopping centre." 1206.6 - "No. 6 arriving at Charing Cross from Golden Square."tramways, trams, bendigo, hayes st. loop, garden gully loop, view st., golden square, charing cross, tram 5, tram 6 -
 Ballarat Tramway Museum
Slide - 35mm slide/s - set of 12, Noel Simons, 28 Feb. 1972
Set of 12 transparencies taken on 28/2/1972 on Kodak mounts. 1207.1 - Bendigo 26 and 2 at Charing Cross. 26 en route for Eaglehawk, 2 for Quarry Hill. Has the Colonial Mutual Life, Armstrong Tyre Service, and Australian Mutual Provident Society buildings and a Cohns Drinks ad. in the background. 1207.2 - as for 1207.1 but with Alexandra fountain in the foreground. 1207.3 - No. 2 in Mitchell St. heading for Quarry Hill. Photo taken after tram has passed photographer. Has buildings on either side of Mitchell St. in the background, including the Plaza Theatre. 1207.4 - No. 6 en route for Golden Square departing Charing Cross. Has the RACV and ANZ bank in the background. 1207.5 - No. 2 crossing Pall Mall to enter Charing Cross ex Quarry Hill, with the Fountain Plaza in the background. 1207.6 - No. 6 arriving Charing Cross ex Golden Square with No. 21 alongside. No. 21 has the SEC ad. 'Everything's fine in my all electric kitchen.' Has the City Family Hotel and the Fountain Plaza shopping centre in the background. 1207.7 - No. 5 at Charing Cross en route for Quarry Hill with No. 2 behind. No. 2 has two SEC roof ads, 'Everything s fine in my all electric kitchen' and 'Electricity best for cooking'. RACV building in the background. Tram crews are discussing the day in the front of the tram. 1207. 8 - No. 21 in High St. Bendigo with the Cathedral in the background. No. 21 has two SEC roof ads, 'Everything's fine in my all electric kitchen' and 'Electricity best for cooking'. 1207.9 - No. 6 in High St. Bendigo with the Cathedral in the background. 1207.10 - No. 6 in High St. Bendigo, just past Wattle St. Photo taken after the tram has passed the photographer from within the Highway Car Sales yard. 1207.11 - No. 26 bound for Eaglehawk at the end of the double track in View St., note signal contactors, tram stop and section signs mounted on pole. 1207.12 - No. 26 turning from View St. into Barnard St.Information written on in blue ink and date stamped on purple ink. 1207. 1- "Nos. 26 and 2 at Charing Cross." 1207.2 - "Nos. 26 and 2 at Charing Cross." 1207.3 - "No. 2 in Mitchell St. just after leaving Charing Cross." 1207.4 - "No.6 leaving Charing Cross for Golden Square." 1207.5 - "No. 2 arriving at Charing Cross from Quarry Hill." 1207.6 - "No. 21 waits at Charing Cross as No. 6 arrives from Golden Square." 1207.7 - "No 5 at Charing Cross with No. 2 lurking behind." 1207.8 - "No. 21 in High St. at cnr of Wattle St." 1207.9 - "No. 6 in High St. at cnr of Wattle St." 1207.10 - "No. 6 in High St. between Wattle and Vine Sts." 1207.11 - "No. 26 at end of double track in View St. near Barnard. St. 1207.12 - "No. 26 seen at dusk turning from View St. into Barnard St."tramways, trams, bendigo, charing cross, high st, view st., tram 2, tram 5, tram 6, tram 21, tram 26 -
 Ballarat Tramway Museum
Slide - 35mm slide/s - set of 4, Noel Simons, Apr. 1972
Set of 4 transparencies - copy slides - possibly ARE film strip dated March 1972. 1209.2 and 1209.4 on Kodak Readymount mounts. 1209.1 - Bendigo 5, 6 and 28 on a special tram service in bound to the City on a tour in Caledonia St. about to enter Lucan St, or White Hills Road or Weeroona Ave. (mis match in names in various maps). Gas works in the background. No. 5 has a white disk on the rear of the tram. 1209.2 - Nos 2 and 26 at Charing Cross with the Fountain Plaza in the background. Both trams have the destination of Quarry Hill, though 26 is on the Eaglehawk bound track. 1209.3 - No. 19 at the Golden Square terminus, with the conductor or driver swinging the pole and Billy Rodda's Golden Square hotel in the background. 1209.4 - No. 7 at Fire Station loop, en route to North Bendigo, picking up a passenger with a pram. Part of a set of 20 slides made by the Association of Railway Enthusiast Provincial Tramways film strip. Reference Item 2560 details the ARE Film Strip and provide references to other slides.Information written on in blue ink and date stamped on purple ink. 1209.1 - "Nos 5, 6 and 28 in Caledonia St. about to enter Weeroona Ave." 1209.2 - "Nos 2 and 26 at Charing Cross." 1209.3 - "Swinging the pole on No. 19 at Golden Square Terminus." 1209.4 - "No. 7 inward bound from Golden Square stops at Fire Station Loop."tramways, trams, bendigo, charing cross, golden square, gas works, special trams, tram 2, tram 5, tram 6, tram 7, tram 19, tram 28