Showing 79 items
matching tram 1 tram 37
-
 Ballarat Tramway Museum
Document - Tramcar Record - SEC No. 37 (2nd), Wal Jack, 1950's
Tamcar record for SEC Ballarat No. 37, builder, system location, short history and work in Ballarat. This was the second tram in Ballarat to carry this number. Was Bendigo 1 and swapped for two single truckers during 1960. See item 5548 for the first No. 37.Yields information about the history of individual tramcars in Ballarat.Handwritten note on foolscap lined sheet outlining the history of Ballarat Tramcar No. 37, the 2nd tram with this number, who built for, date to Ballarat, painting and other changes to the tramcar as compiled by Wal Jack. Part of a series on each SEC Ballarat operated tramcar, except for the ESCo trams. Contained within Reg Item 5507 - Foolscap binder with green covers, black binding edge, and metal clips. See image 7764 for the arrival of No. 1 ex-Bendigo.trams, tramways, ballarat, tramcars, tramcars of ballarat, tram 37 -
Ballarat Tramway Museum
Newspaper, The Courier Ballarat, "Woman, Child Hurt in Tram Mishap", 1962
Yields information about a derailment of a tram in Ballarat and subsequent injury to passengers.Newspaper Clipping from The Courier titled "Woman, Child Hurt in Tram Mishap", about an accident involving the derailment of Ballarat No. 37 on 4/1/1962 at the intersection of Wendouree Parade and Macarthur St which involved injuries after the tram collided with a pole. Wal's notes the damage to the tram and when it was returned to service. Contained within Reg Item 5507 - Foolscap binder with green covers, black binding edge and metal clips. derailments, accidents, 37, macarthur st -
 Ballarat Tramway Museum
Ephemera, Wal Jack, Wal Jack notebook, 1940's
Demonstrates Wal Jack's records, hand written in a recycled notebook. Note - several sheets have been cut from the book - appear to be done before use by Wal. The crossed out sheets have not been imaged - these have been transferred by Wal to Reg Item 5507 and re-ordered. Image 30 shows a sample of a crossed out page. See related documents for a pdf file of the contents. Scan No. BTM5623iX Page No. Title or Subject Notes 1 Front 2 Inside Cover Addresses for Jack McLean, John Buckland Trooper Larsen Inside front cover. 3 1 Note re NSWT steam tram motor, MMTB PCC import issues, Peter Duckett seeking info and Photo of Julien’s battery tram on test in Melbourne 4 2 MMTB No. 8, 4, photos, Tyrell’s of Sydney photos, Perth 63 dimensions and MMTB plans for Domain Road & St Kilda Rd Jtn. 5 3 Notes re NSWGR P32, VR locos at Wodonga 13/10/1941, SAR V Class V143, SAR locos – W and Wx 6 4 NSW Private locos, Woy Woy quarry and AGL at Mortlake 5 Blank 6 Blank 7 7 First cable trams – links to photos T154, 29, 154 (Adelaide) 8 8 T156, Powelltown, Ray Pearson Negs 9 9 QR B18 ¼ locos, Ray Pearson’s scrap book, PMTT Zeppelin style trams, MMTB T class locations and 178/179 rebuilding. 10 10 Hawthorn horse tramway, VR Black Rock terminus sketch 11 11 NSW Tramways, Ryde, MMTB L class, Geelong tramway notes 12 12 Locomotive “Ballarat” in WA, Brisbane and various contacts. 13 13 Notes re VR News – 1943, H class, derailments, max speeds, Koondrook tramway and Geelong level crossing. Individual typed sheets pasted onto page – loose within book. 14 to 17 14/17 List of MMTB trams to 877 and work trams Some errors noted. 18 18 Newspaper cutting – Tram Record Day revenue (Brisbane 10/1943), Steam Trams at Journey’s end – Sydney – 6/1943 list of equipment being sold by Sydney Ferries, at Parramatta, 6/1943. MMTB Tram crossings in Melbourne, list of Sydney photos sent to Wal. Cuttings and Individual typed sheets pasted onto page. 19 19 Midland locos WA, VR open wagon stencils and a siding at Mt. Evelyn. Individual typed sheets pasted onto page. 20 20 Note re Sydney four wheel tourist trams and Hawthorn Max. Traction cars locations c1945. 21 to 23 21/23 Notes on Geelong Bogie trams and carrying flags for declaration of Newtown and Chilwell as a city – 1/10/1949 (See also Reg Item 5641) 24 to 26 24/26 Notes on Wellington Corporation Tramcars 37 27 Kelburn – Karoi cable line Wellington 28 to 29 28/29 Auckland Tramway Board tramcars notes 30/31 Blank 30 32/33 Notes on Ballarat tramcars – ESCo Crossed out 34/37 Ditto – SEC Crossed out 38 Music for the people notes Crossed out 39 Notes on Ballarat trams with tail lights Crossed out 40/43 Notes on Ballarat bogie trams Crossed out 44/45 Notes on SEC tram controllers, dead man and truck lengths. Crossed out 31 45 List of Ballarat Destination roll – Dec 1949 32, 33 46/47 Notes on Bendigo Bogie Trams – 1940’s 34 48 Bendigo Destination roll on a Birney tram Easter 1950, notes on tram tail lights and fares on the Bendigo system. 49 Blank – though headed “Bendigo Birney Trams” 50 Notes trams used on special days in Ballarat Crossed out 51 Ditto and No. 24 and 23 Crossed out 52 Ditto, 15, 11, 23 and Gold tram Crossed out 53 Notes on 34 caused delays, 5/1950, and use of 23 as gold tram Crossed out 54 Notes on repair to track at Sturt and Drummond 6/1951 Crossed out - see Reg Item 7720. 55 Notes on track work in Ballarat early 1950’s Crossed out 56/57 Notes on 33, 37, pay as you enter signs and 1953 special workings Crossed out 58/60 Notes trams used on special days in Ballarat Crossed out 61/64 Blank 35 65 “Salute to the Cable Tram” – transcription of text from Truck and Bus Transportation (July 1948) 36, 37 66/67 Continued from above and list cable tram routes, opening, closing, length and route colours. 38 68 List of photos in Truck and Bus Transportation, Anniversary Issue July 1948 of cable trams. 69 Blank 39 70 Notes on Brunswick TT, Fitzroy TT colours, Adelaide Service trams and MMTB route lengths. 40 71 Notes on HTT colours, tramcars, PMTT trams and colours and NMETL colours, trams and route destination signs 41 72 Notes on MMTB routes, cable and other Melbourne tram disposals, and sale of cable trams and storage at Brunswick. 42 73 Blank - page was headed Lugarno, Switzerland and Italian border 42 Handwritten sheet – photos to get – R. Field and Peter Duckett. 43, 44 74/75 Listing of trains on all lines leaving Ballarat and days run. 45 77 Listing of negatives sent to K. Rogers in 1944 and list of MMTB Max. Traction bogie trams 117 to 138 and disposal 46 77 Listing of MMTB trams, - appears to be something to do with photos or negs held. 47 78 Listing of Ray’s (Pearson) negs /photos of Brisbane trams and other railway photos. 79 Blank 48 80 Prices of pine timber in 4/1942, list of photos “I want”, notes re VR Train length, Ironbark Gully bridge, 3817 in Harden smash 7/1948 and 1948 Ballarat destination roll. Partly crossed out. Rear Cover. Has a strong association with Wal Jack, his work to collect and record both railway and tramway information. Yields information about tramways in Ballarat, Bendigo, Geelong and other cities tramways and railways.Grey covered book with black binding containing 40 lined sheets (80 pages) with handwritten notes with the front cover partly cut out and the words "Jewellery & Engraving" book written in. Contains some newspaper clippings and pasted typed notes as listed below. The image number of each sheet is given. See individual pdf files. trams, tramways, mmtb, ballarat, bendigo, sydney, brisbane, railways, geelong, new zealand, victorian railways, sec, esco -
 Ballarat Tramway Museum
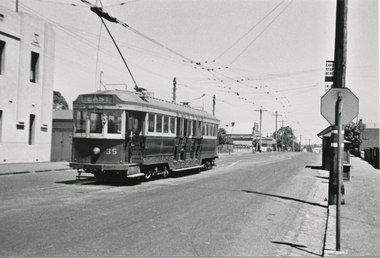
Postcard, SEC Geelong Tram No. 35
Yields information about the Melbourne N class trams and their use on Provincial systems.Black and white photograph, printed on a postcard back format of SEC Geelong Tram No. 35 at the West terminus, showing terminal arrangements. Tram has the destination of "East" Photo taken mid 1950's. On the rear in ink and pencil "HTT13, MMTB 119, Bend 1, Geel 35, Ball 37 SPER"trams, tramways, geelong, west -
 Ballarat Tramway Museum
Photograph - Digital image Set of 10, Tony Smith, 1971
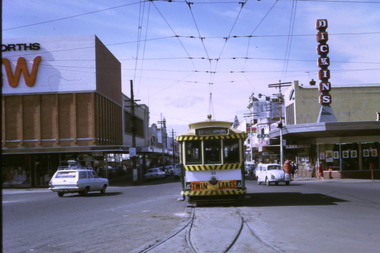
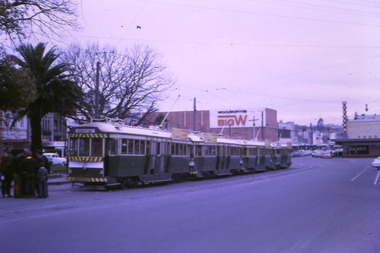
Yields information about Ballarat Tramways and trams prior to the closure of the tramway system.Set of 10 digital images of Ballarat trams prior to closure, scanned from original slides by Tony Smith, 1971 prior to closure of the system. .1 - 41 and four other single truckers in the City Loop - Sturt St - has Dickins, Gear Chemist, Egments - Hartleys in the background. .2 - 33 northbound in Drummond St North with a large semi trailer behind it. .3 - Scrubber tram on 0 road at the depot. .4 - 43 in Lydiard St North .5 - 37? at Sebastopol terminus with the Royal Hotel in the Background. .6 - 37, Albert St, south of Ophir St crossover, northbound - photo not in focus. .7 - 37 at the Grey St loop, northbound. .8 - 37 and 34? - Urquhart St loop? - not in focus. .9 - 11 - Sturt St, showing Victoria St destination. .10 - 37 - climbing the Lydiard St hill, tram showing Sebastopol.trams, tramways, city loop, sturt st, lydiard st north, drummond st nth, depot, grey st loop, albert st, urquhart st, tram 41, tram 33, tram scrubber, tram 43, tram 37, tram 34, tram 11 -
 Ballarat Tramway Museum
Photograph - Digital image Set of 10, Tony Smith, 1971
Yields information about Ballarat Tramways and trams prior to the closure of the tramway system.Set of 10 digital images of Ballarat trams prior to closure, scanned from original slides by Tony Smith, 1971 prior to closure of the system. .1 - 37 at the Lydiard St North terminus, with the shelter in the background. .2 - 33 at the Mount Pleasant terminus, has the corner store with a "The Sun" advertisement and the general store on the right side of the road in the background. Has signs for Streets Ice Cream and Coca Cola. Also has the tram stop signs - painted pole and enamel sign. .3 -33 arriving at the Mt Pleasant terminus with the conductor stepping off the back step, a lady walking across to the tram. Tram has a Twin Lakes sign. .4 - 11 at Victoria St terminus, with conductor turning the pole. Tram has a Twin Lakes sign. IN the background is the rail bridge over the Eureka line and a shelter. .5 - 11 in bound from Victoria St, shows the bleakness of the street at the time. Tram has Twin Lakes and a SEC Briquettes signs. .6 - 12 outbound to Mt Pleasant in Main St and the corner with Humffray St. Tram has a Twin Lakes sign. .7 - 11 in bound from Victoria St, in Bridge St, with junction in background. Tram has Twin Lakes and a SEC Briquettes signs. In the background are Rodda's, C.W. Pennant wall papers and Gill and O'Keffe footwear stores. .8 - 21 in Wendouree Parade, in bound to Victoria St, with the Lake in the background, near Macarthur St. .9 - 21 ditto, nearing the Macarthur St junction. Has the shelter and tram stop signage for View Point in the background. .10 - 34 sitting on the depot fan, 2 road, ready to run out. Has Mt Pleasant as the destination.trams, tramways, lydiard st north, mount pleasant terminus, victoria st, main st, bridge st, wendouree parade, macarthur st, view point, depot, tram 37, tram 33, tram 11, tram 12, tram 21, tram 34 -
 Ballarat Tramway Museum
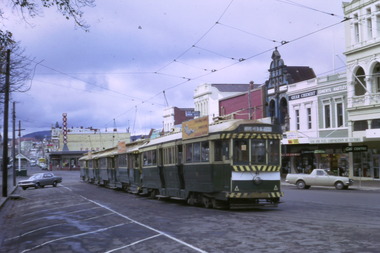
Photograph - Digital image Set of 10, Tony Smith, 1971
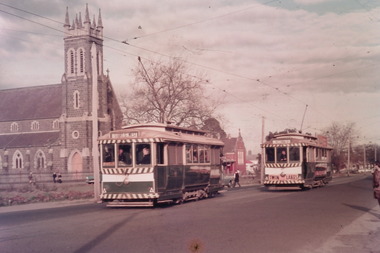
Yields information about Ballarat Tramways and trams prior to the closure of the tramway system.Set of 10 digital images of Ballarat trams prior to closure, scanned from original slides by Tony Smith, 1971 prior to closure of the system. .1 - 33 leaving Bridge St at Grenville St. Tram has destination of Gardens via Sturt St West and a Twin Lakes advert. Has Dickins and Woolworths in the background. .2 - 31 and another single trucker at the Victoria St terminus. Has the widened highway beyond the terminus in the background and Meagher's Hotel. .3 - 21 on the Dawson St cross over (has the destination of Mt Pleasant) with 37 in Sturt St, enroute to Lydiard St Nth. Has St Patrick's Cathedral in the background. .4 - 21 on crossover. .5 - 21 on crossover, waiting for 34 to pass by. .6 - 21 at Stones Corner, Bridge St., has Gear Chemist in the background, along with Bank of NSW. Tram has the destination of Mt Pleasant. .7 - 27 descending the Victoria St hill to Stones Corner, Main St junction. Tram has the destination of Gardens via Drummond St Nth. Has the Viscount ambassador Caravans site in the background. .8 - 21 outbound to Mt Pleasant at the Grant St loop in Barkly St. .9 - 21 and 34 at Grant St loop in Barkly St. .10 - 21 at Mt Pleasant terminus, showing Special. Has a person standing alongside the tram. On the adjacent shop is a "The Sun" sign.trams, tramways, grenville st, sturt st, victoria st, sturt st, dawson st, bridge st, stones corner, mt pleasant, grant st, barkly st, tram 33, tram 31, tram 21, tram 37, tram 34 -
 Ballarat Tramway Museum
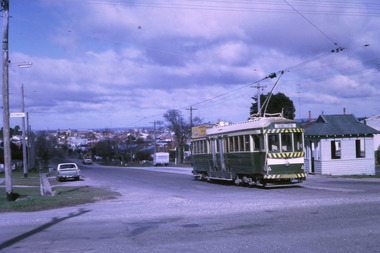
Photograph - Digital image Set of 10, Tony Smith, 1971
Yields information about Ballarat Tramways and trams prior to the closure of the tramway system.Set of 10 digital images of Ballarat trams prior to closure, scanned from original slides by Tony Smith, 1971 prior to closure of the system. The following photos have suffered colour change and showing some deterioration - fungal growth. .1 - 13 (Sturt St West) and 27 (Victoria St with Twin Lakes sign) crossing at King St loop with St Alipius church in the background. .2 - 13 (Sturt St West) and 17? (Mt Pleasant) crossing at Parker St loop, with the Ballarat College in the background. .3 - Single trucker, inbound, approaching the Parker St Loop, showing Mt Pleasant. .4 - 30 in Sturt St, descending the hill to Grenville St, with other trams in the background, including Woolworths Big W and the Dickins Store. Also has the 8 hour monument. 30 showing City. .5 - 37 running Special, no passengers, crossing Lydiard St Nth, heading for Grenville St. Has the Titanic bandstand, Mechanics Institute in the background. .6 - 33 and three other single truckers in the City Loop - has the Ballarat Gas Co and other buildings in the background. .7 - 37 showing Special passing 33 and other trams parked in the City Loop. Has Dickins, Ballarat Gas Co, Edmonds, Patersons store in the background. .8 - 17 crossing Lydiard St Nth in Sturt St. 17 has destination of Gardens via Drummond Nth, and a Twin Lakes sign. Includes the T&G sign in the background. .9 - 31, a single trucker and bogie tram crossing at Depot loop, Wendouree Parade - 31 showing Victoria St. .10 - 17 waiting in Gardens Loop, showing Mt Pleasant.trams, tramways, king st, victoria st, sturt st west, sturt st, grenville st, city loop, gardens loop, wendouree parade, tram 13, tram 27, tram 30, tram 37, tram 33, tram 17, tram 31 -
 Ballarat Tramway Museum
Photograph - Digital image Set of 10, Tony Smith, 1971
Yields information about Ballarat Tramways and trams prior to the closure of the tramway system.Set of 10 digital images of Ballarat trams prior to closure, scanned from original slides by Tony Smith, 1971 prior to closure of the system. The following photos have suffered colour change and showing some deterioration - fungal growth. .1 - 35 (Sebastopol), with the Town Hall and Gemmola's chemist in the background. Tram waiting at the tram stop. .2 - 27 at Victoria St loop, showing Gardens via Drummond St Nth. .3 - 35 at Armstrong St inbound showing Lydiard St Nth. Has the Commonwealth bank in the background. .4 - 32 westbound in Sturt St between Dawson and Lyon Streets, tram has the destination of Gardens via Drummond Nth. Has the Town Hall and other buildings in the background. .5 - 17 inbound at Dawson St. Tram has destination of Mt Pleasant. .6 - 39 picking up passengers at the tram stop on the west side of Dawson St. Has the Ritzy cafe and the Golden City hotel in the background. Tram appears to be well loaded with lady passengers and has a "Everything under my control in my all electric kitchen" SEC roof ad. .7 - 37 using the Dawson St crossover - has St Patricks Cathedral in the background. .8 - 21 entering the depot with Lake Wendouree in the background. .9 - 11 sitting in 0 road at the depot. .10 - 41 at the depot on 2 road. Tram has two Johnny Walker Whiskey roof adverts.trams, tramways, sturt st, victoria st, dawson st, lake wendouree, wendouree parade, depot, tram 35, tram 27, tram 32, tram 17, tram 39, tram 37, tram 21, tram 11, tram 41 -
 Ballarat Tramway Museum
Photograph - Digital image Set of 7, Tony Smith, 19/09/1971 12:00:00 AM
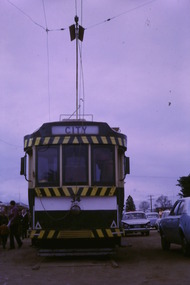
Yields information about Ballarat Tramways and trams prior to the closure of the tramway system.Set of 7 digital images of Ballarat trams prior to closure, scanned from original slides by Tony Smith, 1971 prior to closure of the system. This set of slides appears to be the last day of operations - 19/9/1971 .1 - 34 at the Sebastopol terminus - shows the trolley pole guide in the overhead. .2 - 34 and another bogie tram at Sebastopol with the driver and conductor posing with a family. Also note the bus stop sign on the pole by the front tram. .3 - 35 at the Sebastopol terminus .4 - 39 southbound in Drummond St south at the Bell St loop .5 - 39 passing roadworks in Bell St. .6 - 37 parked in city Loop showing Special .7 - front end of an ex HTT bogie tram in Sturt St, with Gear Chemist and Edments Hartleys store in the background.trams, tramways, sebastopol, trolley wire, albert st, drummond st, bell st, closure, tram 34, tram 35, tram 39 -
 Ballarat Tramway Museum
Photograph - Digital image Set of 7, Tony Smith, 19/09/1971 12:00:00 AM
Yields information about Ballarat Tramways and trams prior to the closure of the tramway system.Set of 7 digital images of Ballarat trams prior to closure, scanned from original slides by Tony Smith, 1971 prior to closure of the system. This set of slides appears to be the last day of operations - 19/9/1971 .1 - Four bogie trams parked in city loop with Woolworth's Big W and Dickins in the background. Not well focused. first tram 37 - see Reg Item 6158.6. .2 - 42 at Sturt and Lydiard St, north side, night photo with crew standing by the tram stop sign. Has the post office in the background. .3 - bogie tram at the south side, night photo, has the Commonwealth Bank in the background. .4 - 39 (at the rear of the four bogie trams parked in the City loop), night photo, looking west. .5 - 42 at Sebastopol terminus with the Royal Mail Hotel in the background - night photo. .6 - bogie tram and 39 parked in the city loop - two have now departed. Has Dickins, Gear Chemist and Edments Hartleys stores in the background. .7 - 34 at Sturt and Lydiard St north side.trams, tramways, closure, night photo, city loop, post office, tram 37, tram 42, tram 39, tram 34 -
 Ballarat Tramway Museum
Photograph - Black & White Photograph/s, Lloyd Rogers, 21/03/1962 12:00:00 AM
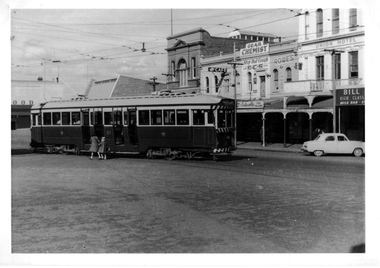
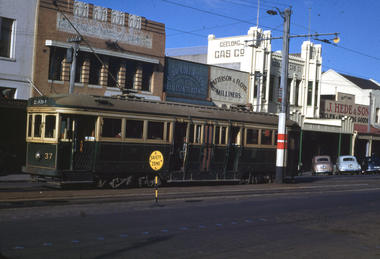
Yields information about the appearance of SEC trams early 1960's in Sturt near Lydiard Sts and the streetscape.Black and white photograph of Ballarat trams 37 and 31 at Sturt and Lydiard Sts. Dated 21/3/1962. Printed on Agfa Gevaert paper in a postcard format. No. 37 has the destination of Lydiard St Nth. The Town hall is in the background with scaffolding around the town section. Photo by Lloyd Rogers.In ink "Cars 37 & 21 in Sturt St near Lydiard St 21/3/1962 and 1/25"trams, tramways, sturt st, lydiard st, tram 37, tram 31 -
 Ballarat Tramway Museum
Photograph - Digital image, Wal Jack, Mar. 1954
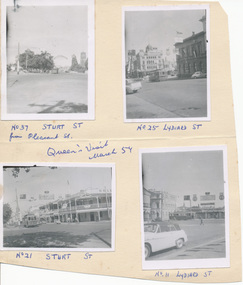
Yields information on the decorations and tramcars and street scenes at the time of the Queens visit to Ballarat.Digital image from the Wal Jack Ballarat Album of a series of four small black and white photographs taken during the Queen Elizabeth II visit to Ballarat, March 1954. Captions under each photograph in ink. 1 - No. 37 at Pleasant St, looking east along Sturt St. - see Neg 993 2 - No. 25 at Lydiard St with the National Mutual Building in the background - see Neg 991. 3 - No. 21 - Sturt St at Dawson St with Golden City Hotel in the background - see Neg 992 4 - No. 17 Lydiard St taken from the railway station car park - see also Reg Item 5300 for a better photograph and Wal's notes on rear which says No. 17, not 11 - see Neg 994 All photographs include some of the decorations for the Royal Visit. Photographer - not stated, but sheet in Wal's handwriting. May not be Wal Jack based on the negative size, smaller than 120 which Wal used at the time. See image i2 for rear of photograph. See image i3 for hi res scan of print. See image i4 for hi res scan of negative N993 See image i5 for hi res scan of negative N994 See image i6 for hi res scan of negative N995 See image i7 for hi res scan of negative N996 On rear of the Manila sheet which has been cut from another sheet are "No. 11 Victoria St terminus 25-6-57".trams, tramways, royal visit, lydiard st, pleasant st, sturt st, tram 37, tram 25, tram 21, tram 17 -
 Ballarat Tramway Museum
Photograph - Digital image, Wal Jack, 1/07/1961 12:00:00 AM
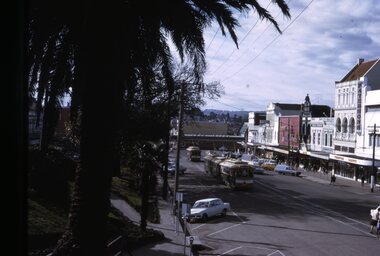
Yields information about the development of the development of the Main and Victoria St intersection, bogie trams and Stones Corner in 1961.Digital image from the Wal Jack Ballarat Album of a photograph of No.37 in bound from Mt Pleasant, in Main St, about to arrive at Stones Corner. Tram has the destination of Gardens via Drummond North. Photo Wal Jack taken on 1-7-1961. In the background are Stones, Treadwell carpets and Verna Cake shop. The mark on the photograph is from a photo corner that was stuck to the surface and the time of the scanning, after it became loose. See image i2 for rear of photograph.On rear of photograph in ink "SEC, Ballarat No. 37 (ex Bendigo No. 1) Main St, Ballarat East 1-7-61"trams, tramways, stones corner, main st, tram 37 -
 Ballarat Tramway Museum
Photograph - Digital image, Wal Jack, 12/08/1961 12:00:00 AM
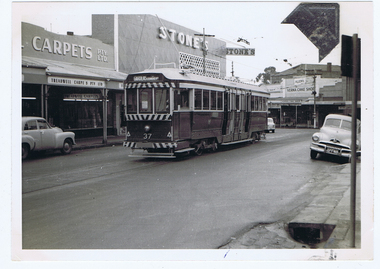
Yields information about the tram operation in 1961 and the appearance of the Sturt St east end.Digital image from the Wal Jack Ballarat Album of a photograph of No. 37 in Sturt St, after crossing Grenville St. Has two young children alongside the tram. In the background are the shops at the south east end of Sturt St, including Gear Chemist, Rowes for Cakes, Lascotte Tea Rooms, Union Hotel and Bill? High Class Milk Bar. Photo Wal Jack 12-8-1961. See image i2 for rear of photograph. See image i3 for hi res scan of print. See image i4 for hi res scan of negativeOn rear of photograph in ink "SEC, Ballarat 2nd No. 37 ex Bendigo No. 1 bogies, Sturt St 12-8-61" and Wal Jack stamp in top right hand corner with number "T1262" written in.trams, tramways, sturt st, grenville st, tram 37 -
 Ballarat Tramway Museum
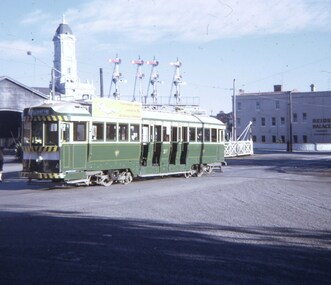
Slide - 27 mm sq slide/s - set of 3, Andrew Howlett, Lydiard St North level crossing, March 1969?
Yields information about the Lydiard St Nth line, the level crossing and the terminus.Set of three Colour slides, Kodak white cardboard mount, developed Mar 1969 of No. 37 .1 - while running a special crossing at the Lydiard St North level crossing at the Railway Station. Has the Reid's Coffee Palace and Railway Station in the background. .2 - No. 37 and a single trucker carrying a "Trotting at Bray Raceway" auxiliary board, at the Lydiard St North terminus. Has the shelter on the right-hand side. .3 - No. 37 waiting at the terminus. See Reg Items 7675, 7678, 7681, 7684, 7686, 7705 and 7713.ballarat, tramways, trams, lydiard st nth, railway station, shelters, level crossings, tram 37 -
 Ballarat Tramway Museum
Photograph - Series of 7 colour photographs 9/1971 - trams ex SEC Ballarat
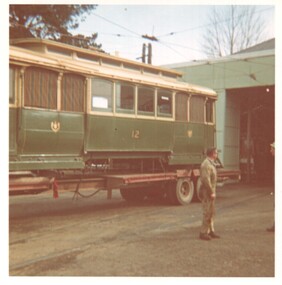
Photographs by Stan Lakey, SEC Deport Foreman. Shows some of the Ballarat fleet being loaded prior to going to other locations. Provided to donor at the time. Yields information about the transport of former Ballarat trams to their new "homes" or other tramway Museumstram Series of seven colour prints of SEC Ballarat trams loaded onto trucks for transport to their "new" homes, September 1971. .1 - Tram 12 - for the Sydney Tramway Museum - 8/9/1971 .2 - Tram 17 - for the TMSV Bylands - 20/9/1971 .3 - Tram 21 - for the AETM or St Kilda Tramway Museum Adelaide 21/9/1971 .4 - Tram 33 - for the Hamilton Transport Museum, with the depot crew standing in front of the tram 1/9/1971 .5 - Tram 36 - for transport to Preston Workshops and then Ballarat Tourism Week running in Melbourne 14/9/1971 .6 - Tram 37 - for the Sydney Tramway Museum 27/9/1971 .7 - Scrubber - for the TMSV Bylands 21/9/1971On rear has the photographers name and details written in by donor.ballarat, depot, tram disposal, tram transport, sec ballarat tramways, tram 12, tram 17, tram 21, tram 33, tram 36, tram 37, scrubber tram, trams, tramways -
 Ballarat Tramway Museum
Photograph - Black & White Photograph/s, Chris Phillips, early 1970's
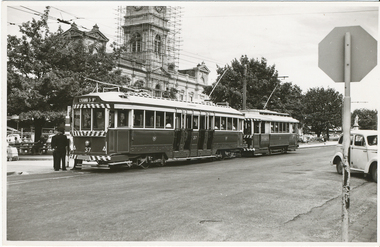
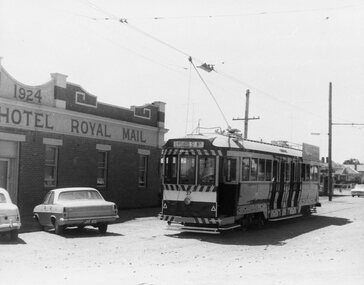
Bogie tram 37 at the Sebastopol terminus, about 1971. Tram ready to depart for Lydiard St. North, has Royal Mail Hotel in view, with two cars (Holden and a Vauxhall?) in photo, shows overhead and pan quite well. No borders on photo. Copies details: copy 1 - has borders, copy 2 ditto and laminated. Hi Res scan of the negative added 8/5/2020.trams, tramways, ballarat, sebastopol, royal mail hotel , tram 37 -
 Ballarat Tramway Museum
Slide - 35mm slide/s, Keith Kings, 3/11/1953 12:00:00 AM
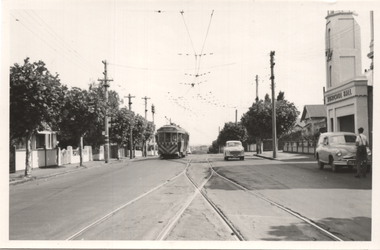
Geelong No. 37 at Corner of Ryrie and Moorabool Streets 3/11/1953, showing 'East' on destination. Tram not well exposed. Stopped by a centre of the road pole marked as a tram stop, with 'Safety Zone' sign in foreground. Outside Mayfair School of Dancing building. Photo by Keith Kings.In Blue ink 'Geelong was closed early 1956' in top left hand corner. In base 'Geelong No. 37, on 'EAST' Cr Ryrie &b Moorabool Sts City, 3/11/53, Maximum traction 1/50 f11' Stamped on top edge, 'K.S.Kings No. K(a)(7)'tramways, trams, geelong, ryrie st, maximum traction, tram 37 -
 Ballarat Tramway Museum
Slide - Set of 7, Warren Doubleday, Ballarat - last weekday of full operations, 20/8/1971
Photos taken on the last weekday of full operations by the SECV in Ballarat prior to the first closure of the Victoria St line on 22/8/1971. 1 - tram 30 arriving at Victoria St with school children and others alighting. 2 - tram 30 waiting to return to Gardens via Sturt St west. 3 - tram 13 at Stones Corner, Bridge and Victoria St on its way to Victoria St. Has buildings / advertisements for Schonell cycles, Gear chemist, Phillip Howard, The Sun, AVCO, ANZ, Roddas, CS Pennant, Top 4, State Savings Bank and H Whitefield Hair dresser. 4 - trams 30 and 13 crossing at the King St loop in Victoria St. 5 - tram 37 in Sturt St arriving at the City stop 6 - tram 43 southbound in Lydiard St crossing Mair St - note the traffic lights, one of the first installations in Ballarat. Has adverts for Peter's, and Speedee cleaners. 7 - track cleaner with broom with tram No. 12 behind, with the destination of City. Has the Chinese cafe, seafood bar, Kodak advert, Town Hall, and tramway shelter in the view.Yields information about the last full week day of SEC Tramway operations in Ballarat and has a strong association with the archivist. Set of 7 Kodachrome colour slides - cardboard mountsHave the photographer's slide numbers written on them.trams, tramways, closure, depot, victoria st, sturt st, lydiard st, tram 13, tram 30, tram 12, tram 37, tram 43 -
 Ballarat Tramway Museum
Slide - Set of 9, Warren Doubleday, Ballarat - last weekday of full operations, 20/8/1971
Photos taken on the last weekday of full operations by the SECV in Ballarat prior to the first closure of the Victoria St line on 22/8/1971. 1 - trams 33, 13, 30, and 12 in the City loop. Has the Dickins food store, Thomas Jewellers, Gear Chemist, Patersons stores in the view. 2 - tram 37 running a Special passing the trams above in the City Loop. Also has the Hartley's and the T& G buildings in the view. 3 - tram 27 descending the Lydiard St hill about to pass the Titanic Bandstand. 4 - tram 35 turns from Sturt St into Lydiard St north with the Town Hall in the background. 5 - tram 27, Victoria St inbound in Wendouree Parade near Haddon St. Has the tram stop shelter in the view. 6 - tram 39 climbing the Lydiard St North hill. 7 - tram 32 in bound in Sturt St west passing a 40mph speed limit sign. 8 - trams 21 and 34 crossing at the Grant St loop on the Mt Pleasant line. 9 - tram 37 inbound in Lydiard St North with the Ballarat Station building in the background and the signal gantry.Yields information about the last full week day of SEC Tramway operations in Ballarat and has a strong association with the archivist. Set of 9 Kodachrome colour slides - cardboard mountsHave the photographer's slide numbers written on them.trams, tramways, closure, sturt st, lydiard st, tram 13, tram 30, tram 12, tram 37, tram 43 -
 Ballarat Tramway Museum
Photograph - Geelong 37 Pakington at Aphrasia Sts, Keith Kings, Jan. 1956
Photo shows the track layout and operation at the corner of Pakington St and Aphrasia St looking south from the passing loop. Shows Geelong tram 37, ex Chilwell swinging out before entering the loop. Photographer notes the Newtown turns right at this location shown in the trolley wire. The Municipal Hall and fire station tower are on the right. Photo by Keith Kings 8/1/1956, photo number Q(w)(7). Yields information about the junction of the Chillwell and Newtown tram routes in Geelong.Black and white photograph with notes on rear.See rear image and context.trams, tramways, pakington st, geelong, tram 37, newtown, aphrasia st -
 Ballarat Tramway Museum
Album - Postcards & Photographs - Vic Solomons and others - Australian Tramways, Vic Solomons, 2023
Contains 184 images of postcards and photographs collected primarily by Vic Solomons of Sydney, with others from the collection of Wal Jack and Warren Doubleday. Covers almost all of Australia's tramway systems. 1 Post Card Hay St Perth Looking East No 3 Unknown Perth 2 Post Card Cars 30 & 90 both on Route 19 pass in Barrack St looking South Perth WA 1935.02.18 Perth 3 Post Card Hay St Looking East Perth WA Unknown Perth 4 Post Card William St Perth WA Unknown Perth 5 Post Card Perth from Shaftsbury Hotel Unknown Perth 6 Post Card Hay St Perth WA Looking East Unknown Perth 7 Post Card Barrack St Perth Unknown Perth 8 Post Card Murray Views No 3 High St Showing Town Hall Fremantle WA Unknown Fremantle 9 Post Card High St Fremantle WA Unknown Fremantle 10 Post Card View of Bolder City Golden Mile in the Background (Section No 1) 1908.08.20 Kalgoolie 11 Post Card Hannan St Kalgoolie 1900.08.19 Kalgoolie 12 Post Card Hannan St Kalgoolie WA (No 2) Unknown Kalgoolie 13 Post Card Intersection Hannan & Maritana Sts Kalgoolie WA Unknown Kalgoolie 14 Post Card Hannan St Kalgoolie Unknown Kalgoolie 15 Post Card Lane Street Bolder City Unknown Kalgoolie 16 Post Card Hobart Double Deck Tram Unknown Hobart 17 Post Card Macquarie St Hobart Unknown Hobart 18 Photo Liverpool Street Hobart Unknown Hobart 19 Photo Hobart 21 Unknown Hobart 20 Photo Hobart 14 in Elizabeth St Hobart Unknown Hobart 21 Post Card Macquarie St Hobart Unknown Hobart 22 Post Card Macquarie St Hobart Tas Unknown Hobart 23 Photo Double Decker Tram 3 at G.P.O. Hobart Tas No 31 Unknown Hobart 24 Post Card Double Decker Tram 19 Hobart Tas A B Series No 24 Unknown Hobart 25 Photo Hobart Municipal Tramways Tas No 95 Unknown Hobart 26 Post Card Elizabeth St Hobart Unknown Hobart 27 Post Card Elizabeth St Hobart Unknown Hobart 28 Post Card Elizabeth St Hobart Unknown Hobart 29 Post Card Elizabeth St Hobart Tas Unknown Hobart 30 Post Card HMT 21 with crew at Beach Road Terminus Unknown Hobart 31 Post Card HMT 9 & another with crew at Beach Road Terminus. Front cover photo of Destination GPO 1921.01.00 Hobart 32 Post Card Cascade Road and Mount Wellington Hobart Unknown Hobart 33 Post Card Elizabeth St Hobart Unknown Hobart 34 Post Card Elizabeth St Hobart Unknown Hobart 35 Post Card Elizabeth St Hobart 1915.04.07 Hobart 36 Post Card Macquarie St Hobart Tas Unknown Hobart 37 Post Card Macquarie St showing Post Office Hobart 1908.03.12 Hobart 38 Post Card Hobart Municipal Tramways 21 Unknown Hobart 39 Post Card Elizabeth St Hobart Tas Unknown Hobart 40 Post Card Liverpool Street Hobart Unknown Hobart 41 Post Card Electric Tram Launceston Tas 446 W J Little Photo 1919.02.08 Launbceston 42 Post Card Launceston Tram no 3 1911.08.30 Launbceston 43 Post Card Launceston Tram no 3 passes tram No 1 Unknown Launbceston 44 Post Card Tram 6 at Trevallyn a popular suburb Launceston Tasmania Unknown Launbceston 45 Post Card Tram 7 at Trevallyn Road Terminus Launceston Tasmania Unknown Launbceston 46 Post Card Tram 4 in Brisbane St Launceston Unknown Launbceston 47 Post Card Tram 9 in Brisbane St Launceston Tasmania Unknown Launbceston 48 Post Card Camerom Street Launceston Tasmania Unknown Launbceston 49 Post Card Murray Views No 15 Jetty Road Glenelg Terminus 1962-02-08 Adelaide 50 Post Card Bay Tram at Jetty Road Terminus Glenelg SA Unknown Adelaide 51 Post Card Tram 3 in King William Street Adelaide S Aust Unknown Adelaide 52 Post Card Valentine Series No 3065 The Old Horse Tram Victor Harbour Unknown Victor Harbour 53 Post Card Bourke Street Melbourne with Cable Car Looking East 1904.04.25 Melbourne 54 Post Card Opening of New Electric Tramway Elsternwick 1913-11-13 Melbourne 55 Post Card Cable trams in Clarendon St Sth Melb Unknown Melbourne 56 Post Card Pall Mall from Charing Cross Bendigo Unknown Bendigo 57 Post Card Tram 4 & 7 pass at The Fountain and Mitchell Street Bendigo Vic Rose Series P 3198 Unknown Bendigo 58 Post Card M&MTB 133 at Charing Cross bound for Eaglehawk Bendigo Vic Murray Views No 45 Unknown Bendigo 59 Post Card Pall Mall Bendigo Vic Unknown Bendigo 60 Post Card Charing Cross & Mitchell St Bendigo Trams passing 1919.00.00 Bendigo 61 Post Card Pall Mall Looking East Unknown Bendigo 62 Post Card Electric Trams and City Hotel Bendigo Vic Unknown Bendigo 63 Post Card Moorabool Street Geelong V 23 Unknown Geelong 64 Post Card Murray Views No 3 Moorabool Street Geelong Vic Unknown Geelong 65 Post Card The Rose Series P 2487 Ryrie Street Geelong Vic Unknown Geelong 66 Post Card Southern Cross Series 2696 Ryrie Stret Geelong Vic Unknown Geelong 67 Post Card The Rose Series P 1490 Ryrie Street Geelong Vic 1920-03-04 Geelong 68 Post Card Valentine Series No 1568 Lower Sturt Street Ballarat Unknown Ballarat 69 Post Card Rose Series P 1710 Sturt Street Ballarat Victoria Unknown Ballarat 70 Post Card Sturt Street Ballarat Victoria Unknown Ballarat 71 Post Card Horse Tram In Sturt Street Ballarat 1905.11.10 Ballarat 72 Post Card Sturt Street Ballarat Looking North-West Unknown Ballarat 73 Post Card Shoppes Square Sturt Street Ballarat Looking North Unknown Ballarat 74 Post Card Junction Sturt and Lydiard Streets Ballarat 1909-09-01 Ballarat 75 Post Card The Electric Supply Co Souvenir Tram Ticket No 3085of the opening of Electric System August 18 1905 1905.08.18 Ballarat 76 Post Card Sturt Street Ballarat Victoria 1907.11.25 Ballarat 77 Post Card Off to the Gardens Electric Tram Ballarat Unknown Ballarat 78 Post Card Sturt Street Ballarat 1907.04.16 Ballarat 79 Post Card Sturt Street Ballarat Looking East Electric tram with Double Deck Trailer 1911.04.17 Ballarat 80 Post Card Sturt Street Ballarat Looking East Unknown Ballarat 81 Post Card Sturt Street Ballarat Looking West 1911.03.01 Ballarat 82 Post Card Town Hall and Sturt Street Ballarat Unknown Ballarat 83 Post Card Lydiard Street Ballarat 1906.11.23 Ballarat 84 Post Card Looking North along Adelaide Street from George Street Brisbane Sidues Series No 764 Unknown Brisbane 85 Post Card Looking South along Queen Street from the Creek Street Intersection Brisbane Qld Sirues Series No 1379 Unknown Brisbane 86 Post Card George Street from near Supreme Court Brisbane Unknown Brisbane 87 Post Card Queen and Eagle Streets Brisbane 1907.07.04 Brisbane 88 Post Card Queen Street showing His Majesty’s Theatre Brisbane Unknown Brisbane 89 Post Card Queen Street Treasury Building 1908.01.20 Brisbane 90 Post Card G P O and Queen Street Brisbane Unknown Brisbane 91 Post Card Queen Street Brisbane Looking from Wharf Street Unknown Brisbane 92 Post Card Customs House Brisbane 1905.02.16 Brisbane 93 Post Card Queen St Brisbane 1905.09.16 Brisbane 94 Post Card Queen St Brisbane 1907.11.19 Brisbane 95 Post Card Treasury Buildings Brisbane Unknown Brisbane 96 Post Card Queen and Eagle Streets Brisbane Unknown Brisbane 97 Post Card The Valley Corner Brisbane Unknown Brisbane 98 Post Card Brisbane Queen Street opposite General Post Office Unknown Brisbane 99 Post Card North Quay and Milton Beach Brisbane Q Unknown Brisbane 100 Post Card Victoria Bridge Brisbane South Side 1907.08.14 Brisbane 101 Post Card Victoria Bridge Brisbane Unknown Brisbane 102 Post Card Breakfast Creek Bridge Brisbane Q Unknown Brisbane 103 Post Card Melbourne Street Station South Brisbane Queensland Unknown Brisbane 104 Post Card General Post Office Queen Street Brisbane 1955.09.23 Brisbane 105 Post Card Customs House Brisbane 1904.11.04 Brisbane 106 Post Card Queen St Brisbane 1919.11.00 Brisbane 107 Post Card Queen St Brisbane Sidues Series No 627 Unknown Brisbane 108 Post Card Creek Street Brisbane Queensland Unknown Brisbane 109 Post Card Customs House and Garden Reach Brisbane Queensland 1910.00.08 Brisbane 110 Post Card Queen and Creek Streets Brisbane 1909.06.07 Brisbane 111 Post Card Queensland National Bank andd Queen Street Brisbane Queensland Unknown Brisbane 112 Post Card Queen Street and Treasury Buildings Brisbane 0000.09.07 Brisbane 113 Post Card Queen Street showing “Courier” Buildings Brisbane Unknown Brisbane 114 Post Card Intersection George & Roma Streets Brisbane Q 1916.05.11 Brisbane 115 Post Card Adelaide Street Brisbane Q Unknown Brisbane 116 Post Card G P O Queen Street Brisbane Q Unknown Brisbane 117 Post Card Treasury Building Brisbane 1906.03-20 Brisbane 118 Post Card Queen and Eagle Streets Brisbane 1907.02.01 Brisbane 119 Post Card Queen St Brisbane Unknown Brisbane 120 Post Card Queen St Brisbane Q Unknown Brisbane 121 Post Card Victoria Bridge Brisbane 1906.07.30 Brisbane 122 Post Card An Unusual View showing Head of Queen Street Victoria Bridge & South SideSuburbs Brisbane Q Unknown Brisbane 123 Post Card Petries Bight Brisbane Q Unknown Brisbane 124 Post Card South End Victoria Bridge Brisbane Q Unknown Brisbane 125 Post Card Customs House Brisbane Unknown Brisbane 126 Post Card Photo of toastrack car circa 1910 Unknown Brisbane 127 Post Card Treasury Buildings Brisbane Unknown Brisbane 128 Post Card East Street Rockhampton with Steam Tram & trailer Unknown Rockhampton 129 Post Card Post Office Rockhampton with steam tram Unknown Rockhampton 130 Post Card East Street Rockhampton with Steam Trams Rose Series P 7154 Unknown Rockhampton 131 Post Card William Street Rockhampton Rose Series P 7156 Unknown Rockhampton 132 Post Card Central East Street Rockhampton Q with Steam Trams Unknown Rockhampton 133 Photo Sturt St Ballarat Unknown Ballarat 134 Photo Bridge Street Ballarat Unknown Ballarat 135 Post Card George St Sydney Unknown Sydney 136 Post Card Elizabeth St Sydney Unknown Sydney 137 Post Card Railway Square Unknown Sydney 138 Post Card Sydney Harbor Bridge - pending receipt 139 Post Card Kings Cross - Mowbray Series with description on rear from C Roy G Field Unknown Sydney 140 Post Card Kings Cross - Mowbray Series with description on rear from C Roy G Field Unknown Sydney 141 Post Card Central Railway Station Sydney - Rose Series P6033 1954-01-26 Sydney 142 Post card William Street Darlinghurst looking towards City - Rose Series P6602 unknown Sydney 143 Post Card Circular Quay Sydney - Rose Series P6680 Unknown Sydney 144 Post Card View at Manly NSW - Rose Series B1003 Unknown Sydney 145 Post Card Hunter St Newcastle NSW - Rose Series P7843 Unknown Newcastle 146 Post Card Bank Corner Newcastle NSW - Mowbray Series No. 155 Unknown Newcastle 147 Post Card Hunter St Newcastle NSW Unknown Newcastle 148 Post Card Criterion Hotel Hunter St Newcastle NSW Unknown Newcastle 149 Photo Horse tram at Newtown Station 1894 to 1898 - PTC photo c1894 Newtown 150 Photo Steam tram motor No 3 at Railway Square 1879 1879 Sydney 151 Photo Railway steam tram c1900 with a horse drawn double deck bus c1900 Sydney 152 Photo Steam motor 5A and doubled deck bus Unknown Sydney 153 Photo Steam motor 53A with detail notes on rear 1922 Sydney 154 Photo Cable tram set at Milsons Point ferry terminal c1900 Sydney 155 Photo Early Sydney electric car - Ocean St - Rose Bay Unknown Sydney 156 Photo George St looking souoth c1905 c1905 Sydney 157 Photo Tram 165 at Circular Quay Unknown Sydney 158 Photo Tramcar ferry or transporter at The Spit Unknown Sydney 159 Photo tram 882 George St at Marti Place, 1937 1937 Sydney 160 Photo Tram 826 Railway Sq area Unknown Sydney 161 Photo Railway Sq in background, Broadway with double decker bus and toastrack car late 1930s Sydney 162 Photo Coupled St Pitt St? - photo Ben Parle Feb. 1950 Sydney 163 Photo Electric tram No. 2 - North Sydney with side trolley pole running Unknown Sydney 164 Photo George St - Horden's Corner Unknown Sydney 165 Photo George St at Martin Place c1920 Sydney 166 Photo Castlereagh St Sydney c1928 c1928 Sydney 167 Photo Railway Sqare c1920 c1920 Sydney 168 Photo Darling St Countereweight Unknown Sydney 169 Photo Trolley bus depot Unknown Sydney 170 Photo Trolley bus No. 14 Unknown Sydney 171 Photo Newcastle Railway Station with steam tram - Wharf Road?? Unknown Newcastle 172 Photo High St West Maitland - steam tram Unknown Maitland 173 Photo High St West Maitland - steam tram Unknown Maitland 174 Post Card Argent St near tram terminal Broken Hill NSW c1900 Broken Hill 175 postcard Argent St looking south Broken Hill - with Ken Magor's notes on rear Unknown Broken Hill 176 Photo Toronto - steam tram 61A Unknown Toronto 177 Photo 124A trial run 1911? Sutherland - Cronulla line 1911 Sutherland 178 Photo 103A at a tram stop Unknown Sydney 179 Photo Cable tram set at Crows Nest terminus grip car 12, trailer 22 Unknown Sydney 180 Photo Cable tram Queens Square Sydney 1903 Sydney 181 Photo cars 2078 and 2077 Chatswood late 1950s Sydney 182 Photo car 1877 Balmain area late 1950s Sydney 183 Photo Trolley bus - Rockdale destination Late 1950s Sydney 184 Photo Broken Hill steam tram - motor 18A North Tram Unknown Broken Hill 185 Photo Millars Point Sydney NSW - ferry/tram interchange, unknown Sydney All items imaged including the rear or back where there was writing of information. All files stored on the Museum's Photo Collections directory. Demonstrates through the medium of many images, Australian tramway systems and Ballarat's place in them.Album - heavy card covers, plastic lined with postcard or 6x4 photo sleeves.australia, tramways, postcards, photographs, steam trams, horse trams, cable trams, trolley buses -
 Melbourne Tram Museum
Photograph - Set of 6 colour prints of trams at Corner of Flinders and Swanston Streets, George Bishop, c1999
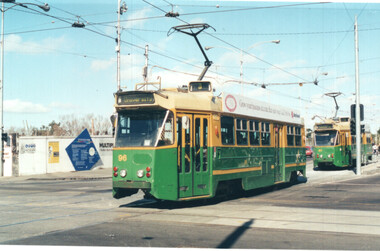
Set of six colour photographs of trams at the corner of Swanston and Flinders Streets. In the background can be seen the construction of the Federation Square project which commenced in 1999. 1 - Z 96 (Route 3, University) at Flinders and Swanston Streets. 2 - Z 37 (University route 5) 3 - SW6 888, City Circle, westbound. 4 - Z3 140 (East Coburg Route 1) - would appear that the car is not doing their hook turn properly 5 - B2 2037 westbound (Route 70, City Flinders St) 6 - Z 41 (Route 72, University)Yields information about the operation of Melbourne trams during the late 1990s.Set of six Colour prints printed on Kodak paperDetails of the photograph and photographer on the rear in ink.trams, tramways, z3 class, z class, tram 96, tram 37, city circle, tram 888, hook turns, tram 140, b2 class, tram 2037 -
 Bendigo Historical Society Inc.
Photograph - BASIL MILLER COLLECTION: TRAM ON PALL MALL, 1950's
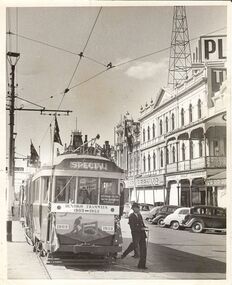
Black and white picture, tram on Pall Mall. Beehive building on right. Copy of Bendigo Advertiser photo - DP 1`37 printed on back of photo. Tram has Bendigo Tramways - 1903 - 1953 on front, with picture of miner and mine shaft below. Small label in window 'Australian Electric Traction Association - special car'.Bendigo Advertiserbasil miller, bendigo tramways -
 Ballarat Tramway Museum
Photograph - Black & White Photograph/s, Bob Lilburn, 17/01/1969 12:00:00 AM
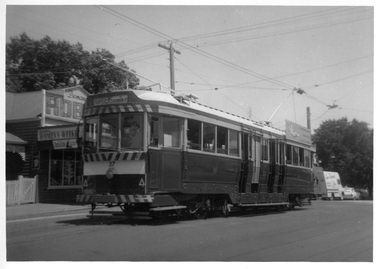
Black and white photograph of Ballarat tram No. 37 at the Mt Pleasant terminus. Tram has destination of "Gardens via Drummond Nth.", roof advertisement for the SEC "Everything's under control in my all electric kitchen". Shop on the left hand side of the photo has Robur Tea company, Coca Cola and Women's Weekly advertisements. High Res image added 8/5/2019 from Peter Lambert. 2nd print - dates the photo as 17-1-1969 a photo by Bob Lilburn.On rear of 2nd image - "2nd Ballarat 37, Mt Pleasant, Ex Bendigo 1, Ex Geelong 35" and "ex MMTB 119, 17-1-69"trams, tramways, mt pleasant, barkly st, tram 37 -
 Ballarat Tramway Museum
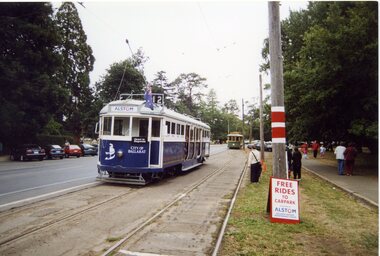
Photograph - Colour Photograph/s - set of 37, Warren Doubleday, 7/03/2004 12:00:00 AM
Set of 37 photographs taken or arranged by Warren Doubleday on 7/3/2004 during the 2004 Begonia Festival, which was sponsored by Alstom, featuring on the destination boxes, stop signs and tramcars and clothing worn by BTM staff. All taken in Wendouree Parade. .1 - 671 waiting for 27 to enter the crossing loop .2 - 671 and 27 in loop .3 - ditto .4 - people boarding No. 27 with Carolyn Dean observing .5 - ditto, with Peter Winspur in background .6 - 671 in loop .7 - 27 and 671 in loop, with people leaving 671 .8 - 661 in Wendouree Parade, at pedestrian crossing .9 - 671, 27 and 661 in loop .10 - ditto with people leaving 661 .11- 661 in loop passengers boarding, John Clowes in photo .12 - 33 and 671 at pedestrian crossing .13 - ditto .14 - 27 side on .15 - 33, 671, 661 and 27 in or near loop .16 - ditto .17 - 33 at pedestrian crossing .18 - 661 side on .19 - 33 at pedestrian crossing with people board .20 - 33 side on .21 - ditto .22 - 661 near crossing .23 - 27 side on .24 - 27 in loop with people leaving .25 - 27 in loop with people waiting to board .26 - Robert Paroissien standing by 27 with 671 in background .27 - ditto .28 - Sam Boon issuing tickets inside 33 .29 - ditto .30 - Sam Boon giving bells .31 - Len Millar and 27 at Depot Junction .32 - 671 at depot junction .33 - Len Millar at 33 at Depot Junction .34 - 33 at Carlton St, with Ben Shields .35 - 27 at Carlton St from the Prisoners of War memorial .36 - ditto .37 - as for .25btm, begonia festival, alstom, wendouree parade, tram 33, tram 27, tram 661, tram 671 -
 Melbourne Tram Museum
Ephemera - Timetable/s, Melbourne & Metropolitan Tramways Board (MMTB), "MMTB Tram Timetables", 1977 to 1978
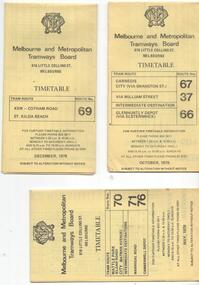
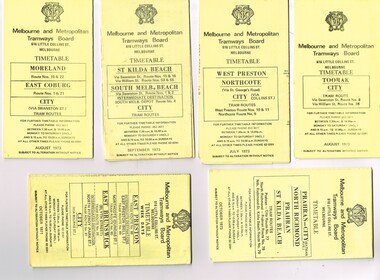
Set of 6 MMTB Tram timetables, folded sheets, 8 sections, providing timetables for specific routes, day of week giving information on tram times at specific time points, route map, sections and fares and organisation address - 616 Little Collins St. Melbourne. All printed on yellow paper. 1. - Route 67, 37 and 66 - Carnegie - City via Swanston St (67), via William St (37) and Glenhuntly Depot (66) - dated Oct. 1978. .2 - Route 69 - Kew Cotham Road - St Kilda Beach dated Dec. 1978 .3 - Route 70, 71 and 76 - Wattle Park - Batman Ave, Arraign Road (Route 71) and Camberwell Depot (Route 76), dated May 1978 .4 - Route 72, 32 and 73 - Camberwell City via Swanston St (72), via William St (32) and Camberwell Junction (73) dated Sept, 1978. .5 - Route 82 - Moonee Ponds - Footscray - Highpoint West - dated Sept. 1977 .6 - Route 88, 14, 89 and 90, 96, 95 and 97 - East Preston via Bourke St (88), via Latrobe St (14), East Preston Bell St (89) and Northcote Dundas St (90) to the city and East Brunswick (96), Exhibition (95) and North Fitzroy (Park St), dated May 1978. .7 - Routes 48, 24, 40, 41, 29, 74, 76. 28 - July 1978 .8 - ditto - Weekends, July 1978, printed on green paper. .9 - Bus routes 284 (East Kew - Doncaster North) and 270 (East Kew - Shoppingtown) - dated August 1978trams, tramways, mmtb, timetables, melbourne, fares, route 14, route 32, route 37, route 66, route 67, route 69, route 70, route 71, route 72, route 73, route 76, route 82, route 88, route 89, route 90, route 95, route 96, route 97, route 48, route 24, route 40, route 41, route 29, route 74, route 76, route 28, route 284, route 270 -
 Melbourne Tram Museum
Ephemera - Timetable/s, Melbourne & Metropolitan Tramways Board (MMTB), "MMTB Tram Timetables", 1971 and 1973
Set of 20 MMTB Tram timetables, folded sheets, generally 10 sections, providing timetables for specific routes, day of week giving information on tram times at specific time points, route map, sections and fares and organisation address - 616 Little Collins St. Melbourne. All printed on yellow paper unless noted otherwise. .1 - Route 8 and 38, Toorak - City - August 1973 .2 - Route 9, 10 and 11, West Preston, Northcote - City - July 1973 .3 - Route - 1, 2, 4, 15, 16, 53, 55 - St Kilda Beach, south Melbourne Beach - City - September 1973 .4 - Route 1, 21, 15, 22 - Moreland, East Coburg - City - August 1973 .5 - Route 77, 78, 79 - Prahran - City, North Richmond, St Kilda Beach - October 1973 .6 - Route 88, 89, 90, 97 - East Preston, East Brunswick - City - October 1971 .7 - ditto - printed on green paper for Saturdays and Sundays. .8 - Route 59 - Essendon - City - June 1961 .9 - Route 8 - Toorak - City - Oct 1961, printed on yellow paper .10 - Routes 48, 40, 41, 37 and 74, 75, 76, 28 - North Balwyn or Burwood to City - March 1972 lists all the short routes by name and printed on yellow paper. .11 - Route 55, 56 and 68 - West Coburg - City or Domain Road - March 1972 - printed on yellow paper. .12 - Routes 48, 24, 40, 41, 29, 74, 75, 76 and 28 - North Balwyn or Burwood to City - March 1976 - printed on yellow paper. .13 - as for .12, Saturdays and Sundays - printed on green paper, ,14. - Route 19, 20 and 18 - Coburg - March 1972 - includes connecting bus to Upfield ,15 - Routes 1, 21, 15 and 22 - Moreland and East Coburg - March 1972 .16 - Routes 64, 65, 62 and 61 - East Brighton - June 1973 .17 - Route 3 - East Malvern - June 1973 ,18 - Route 5, 35 - June 1973 .19 - Route 82 - Footscray - Moonee Ponds - Oct. 1974 - bus Saturday afternoons and Sundays .20 - Route 67, 37 and 66 - Carnegie - June 1973trams, tramways, mmtb, timetables, melbourne, upfield, fares, route 1, route 2, route 3, route 4, route 5, route 8, route 9, route 10, route 11, route 15, route 16, route 18, route 19, route 20, route 21, route 22, route 38, route 35, route 37, route 53, route 55, route 66, route 67, route 77, route 78, route 79, route 88, route 89, route 90, route 96, route 97, route 59, route 48, route 40, route 41, route 37, route 74, route 75, route 76, route 82, route 28, route 55, route 56, route 68, route 29, route 24 -
 Melbourne Tram Museum
Ephemera - Timetable/s, Melbourne & Metropolitan Tramways Board (MMTB), "MMTB Tram Timetables", 1974
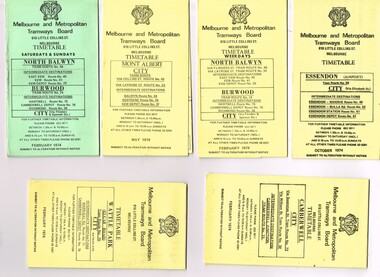
Set of 6 MMTB Tram timetables, folded sheets, generally 10 sections, providing timetables for specific routes, day of week giving information on tram times at specific time points, route map, sections and fares and organisation address - 616 Little Collins St. Melbourne. All printed on yellow paper unless noted otherwise. .1 - Route 48, 41, 40, 29, 74, 75, 76, 28 - North Balwyn and Burwood - City - Saturdays and Sundays - Feb. 1974, printed on green paper. .2 - Route 42, 23, 44, 45 and 37, Mont Albert - City - May 1974 .3 - Route 48, 41, 40, 29, 74, 75, 76, 28 - North Balwyn and Burwood - City - Feb. 1974 .4 -Route 59, 49, 52, 51, 81 - Essendon Airport - City - Oct. 1974 .5 - Route 70, 71 and 76 - Wattle Park - City - Feb. 1974 .6 - Route 72, 32 and 73 - Camberwell - City - Feb. 1974trams, tramways, mmtb, timetables, melbourne, fares, route 23, route 24, route 28, route 29, route 32, route 37, route 40, route 41, route 42, route 44, route 45, route 48, route 49, route 51, route 52, route 59, route 70, route 71, route 72, route 73, route 75, route 76, route 81