Showing 64 items
matching caltex service station
-
 Greensborough Historical Society
Advertisement - Digital Image, Calmont Service Station 1968, 25/08/1968
... Advertisement for Calmont (Caltex) Service Station...) Service Station of Rattray Road Montmorency. Proprietor Barry ...Advertisement for Calmont (Caltex) Service Station of Rattray Road Montmorency. Proprietor Barry Dobson. Copied from a Diamond Valley Football League football record from 1968.Digital copy of advertisement from booklet.diamond valley football league, calmont service station, rattray road montmorency, barry dobson -
 Ballarat Tramway Museum
Photograph - Digital image, c1971
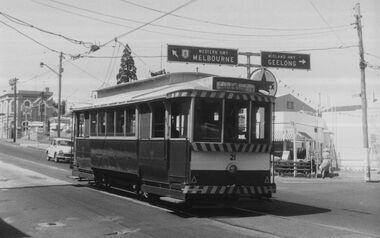
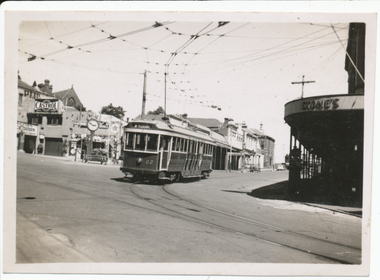
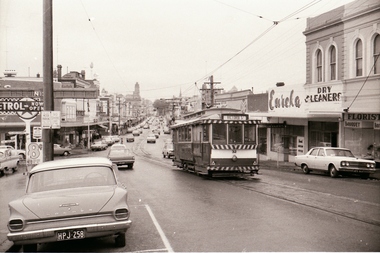
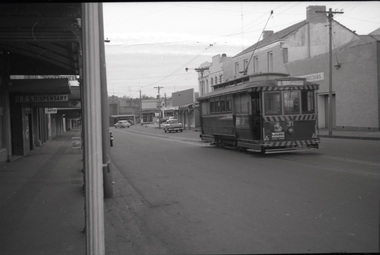
... to the Gardens via Sturt St West. Has the Caltex service station... to the Gardens via Sturt St West. Has the Caltex service station ...Yields information about Ballarat streetscape and its trams in the closing days of the SEC tramway system.Digital image from a black and white print of tram 21 at the intersection of Bridge, Victoria Streets and Main Road, inbound to the Gardens via Sturt St West. Has the Caltex service station, the Munster Arms Hotel in the background. CRB Road signage for Melbourne and Geelong over the tram. At Stones Corner. Photo by Marc Dahlstrom c1971. On rear is the Marc Dahlstrom stamp.trams, tramways, bridge st, victoria st, main st, stones corner, tram 21 -
 Ballarat Tramway Museum
Negative - Geelong tram at Balliang St loop in Moorabool St, Laurie Gallop, early 1956
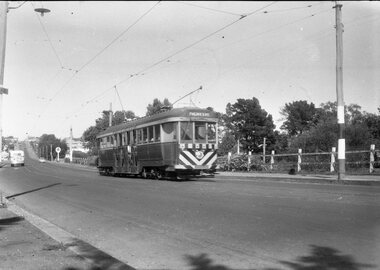
... is a Caltex Service station and a bus. See also item 8299... is a Caltex Service station and a bus. See also item 8299 ...Photo shows a Geelong tram to North in Moorabool St at the Balliang St / Forser St loop in Moorabool St. In the background is a Caltex Service station and a bus. See also item 8299 for the trailing photograph.Yields information about the Geelong operations toward the closure of the tram system.Black and white Negative - 120 sizetramways, geelong, belmont, moorabool st, crossing loop -
 Greensborough Historical Society
Photograph - Digital Image, Lower Plenty Garage, 1950s
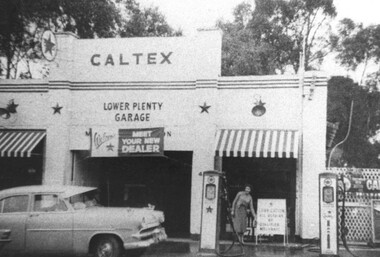
... Lower Plenty Garage (a Caltex service station) on Main Road... service station) on Main Road Lower Plenty (previously Old Eltham ...Lower Plenty Garage (a Caltex service station) on Main Road Lower Plenty (previously Old Eltham Road) in the 1950s. This photograph shows the garage with petrol pumps out front and a Caltex sign above door.Digital copy of black and white photographlower plenty, lower plenty garage, main road lower plenty, old eltham road lower plenty, caltex garage lower plenty -
 Ballarat Tramway Museum
Photograph - Black & White Photograph/s, David Clark, 17/02/1971 12:00:00 AM
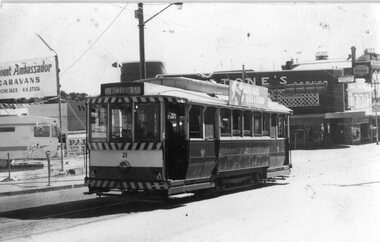
... to the left of the tram having replaced the Caltex Service Station... replaced the Caltex Service Station on this location. Tram has ...Yields information about the Ballarat's tramcars in the months before closure and the appearance then of Stones Corner.Black and white photograph of Ballarat No. 21 in Victoria St, looking back to Stones Corner building. Photo by David Clark 17/2/1971. Tram has just left Bridge St. Stones Corner building in the background, and Viscount Ambassador Caravans to the left of the tram having replaced the Caltex Service Station on this location. Tram has the destination of Victoria St.On the rear in ink "Tram No. 21 in Victoria St, near Bridge St, looking to Sturt St. 17/2/71. Ballarat Tramways, Photo 30, Taken by David Clark", with David's address stamp "4 Adeney Ave Kew 3101" with "Melbourne" underneath.tramways, trams, victoria st, stones corner, bridge st, tram 21 -
 Ballarat Tramway Museum
Photograph - Digital image, Peter Bruce, "Bridge St", 1970s
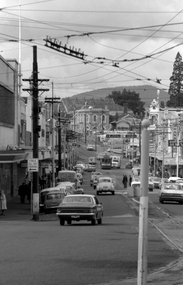
... of the street in view. In the far distance is the Caltex service... of the street in view. In the far distance is the Caltex service station ...Yields information about the Bridge St landscape looking east.Digital image of a view looking east along Barkly St from Grenville St showing a tram a the intersection of the Mt Pleasant and Victoria St lines (Stones Corner). Has the shops on both side of the street in view. In the far distance is the Caltex service station. Photo taken by Peter Bruce 1970's and 1971, prior to the closure of the Ballarat tramway system. Peter's Title of image: "Bridge St"trams, tramways, ballarat, bridge st -
 Ballarat Tramway Museum
Photograph - Digital image, Wal Jack, 29/12/1945 12:00:00 AM
... / Caltex service station with clock in the background and Stones... into Main St 29-12-1945. Has the Castrol / Caltex service station ...Yields information about the early use of Ballarat's first bogie tram after it had been re-numbered and Stones Corner.Digital image from the Wal Jack Ballarat Album of No. 22 turning from Bridge St into Main St 29-12-1945. Has the Castrol / Caltex service station with clock in the background and Stones Corner building. Tram proceeding to Mt Pleasant. See image i2 for rear of photograph. See image i3 for hi res scan of print. See image i4 for hi res scan of negativeIn ink on rear " SEC Ballarat Tramways bogie. 22, turning out of Bridge St into Main St, Ballarat East Post Office in background in Main St. 29-12-45" with number "T547" within Wal Jack photo stamp.trams, tramways, bridge st, stones corner, main st, bogie trams, tram 22 -
 Melbourne Tram Museum
Photograph - Four colour slides - Wattle Park Single Line, Warren Doubleday, 1-8-1970
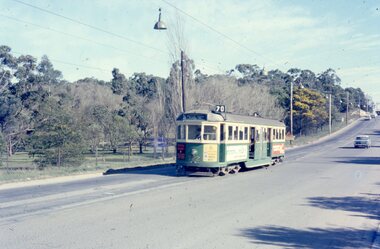
... park and the Caltex Service Station sign.... - shows the gates to Wattle park and the Caltex Service Station ...Set of four photographs taken at the time of the conversion of the Wattle Park route, in Riversdale Road from single line to double track between Warragul Road and the terminus, alongside Wattle Park itself. Yields information on the single line operation of the Wattle Park line prior the conversion to double track operation.Set of four colour Anscochrome slides, of single line operations on the Wattle Park line. .1 - W5 722 on Wattle Park single line, Sat. p.m. .2 - W2 388 meets W2 344 on Wattle park loop - shows the commencement of roadworks. .3 - SW5 853 from the park .4 - W5 738 at Warragul Road - shows the gates to Wattle park and the Caltex Service Station sign.Has photographers slide numbers on each slide.wattle park, route 70, riversdale rd, w2 class, w5 class, sw5 class, trackwork, tram 722, tram 388, tram 853, tram 738, trams, tramways -
 Ballarat Tramway Museum
Photograph - Digital Image, Peter Knife, Trams 18 and 17 - Stones Corner, 24/7/1971
... intersection. In the background are the Caltex Service Station... Service Station, a clothing shop, paint shop, dry cleaners ...Digital image of Trams 17 (ex Victoria St) crossing tram 18 (Mt Pleasant) at Stones Corner - the intersection of Bridge St, Victoria St and Main Road. Shows a busy and somewhat congested intersection. In the background are the Caltex Service Station, a clothing shop, paint shop, dry cleaners and parking meters. Photo by Peter Knife 24/7/1971.Yields information about tram operations in Ballarat, some two months before closure of the SEC operated tram system.Digital image of a colour slide.tramways, tramcars, ballarat, tram 17, tram 18, bridge st, stones corner -
 Melbourne Tram Museum
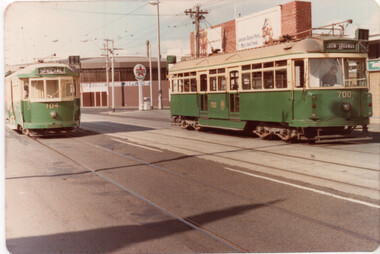
Photograph - Set of two photographs - Union Road - Ascot Vale VR700 and L104, 1-3-1980
... and a Caltex Service Station. In the second photo, W5 685 inbound.... In the background are Showgrounds buildings and a Caltex Service Station ...Set of two colour photos showing VR class tram 700 and L class 104 on the ARHS & TMSV tour 1-3-1980. L104 is on the Showgrounds siding, with tram 700 in Union Road, just to the north of Epsom Road. In the background are Showgrounds buildings and a Caltex Service Station. In the second photo, W5 685 inbound to the city is seen between the two trams. Yields information the history of ARHS and TMSV tours.Set of two colour prints on Kodak paper, dated Mar. 1980tramways, trams, vr class, w5 class, tram 700, tram 104, tours, tram 685, l class, showgrounds -
 Ballarat Tramway Museum
Photograph - Black & White Photograph/s set of 2, Charles Craig, 1950s
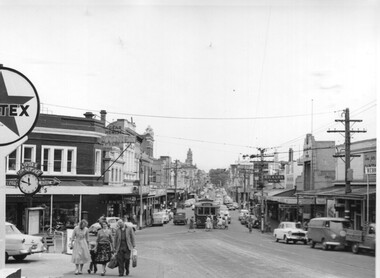
... in the background. Includes the Caltex services station, the Listers... the Caltex services station, the Listers for Service clock ...Yields information about the traffic and appearance of Bridge St during the 1950's.Set of two black and white photographs of trams in Bridge St at the intersection with Main Road and Victoria St .1 - tram at the intersection with Stones Corner and other shops in the background. Includes the Caltex services station, the Listers for Service clock and direction sign, with many people leaving the tram and walking along Victoria St. Has the Gear Chemist, Ricksha Paint and other shops in the view. .2 - No. 28 - for Gardens via Sturt St West and the intersection. Photo possibly early 1950's. Both photos by Charles Craig trams, tramways, bridge st, main road, victoria st, tram 28 -
 Ballarat Tramway Museum
Photograph - Colour Photograph/s, Jim Seletto, c1960
... front. Caltex service station sign on right side of photograph... on cab front. Caltex service station sign on right side ...Colour Photograph of SEC tram No. 11, prior to fitting of dash Canopy lighting, c1960, at the intersection of Bridge and Main Streets. Tram No. 11 is arriving from Victoria St. and is about to cross the junction with the Mt. Pleasant line. Trams stops are visible on poles, as is the overhead arrangement, shops on both sides. Tram has large reflective triangles on cab front. Caltex service station sign on right side of photograph. On pole with tram stop sign is a sign with the Olympic rings, pointing way to Lake Wendouree.ballarat, bridge st, victoria st, olympics, tram 11 -
 Ballarat Tramway Museum
Photograph - Black & White Photograph/s, Peter Bruce, c1970
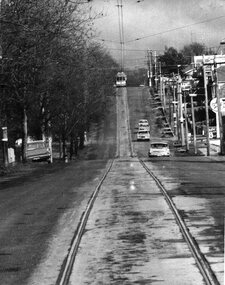
... . Sign of Caltex Service station on right side of photograph... towards photographer. Sign of Caltex Service station on right side ...Black and white photograph of Barkly St. Mt Pleasant taken with a long telephoto lens. Single truck Tram on the top of a hill at terminus, with the photographer on or near the top of the`next hill in centre of track. Four cars travelling towards photographer. Sign of Caltex Service station on right side of photograph. with trees on left. Shows nature of street construction - deep gutters with "bridge" crossings. See also item No. 559, possibly tram No. 31. Would appear to be taken at about the same time, not parked Holden station wagon on left hand side of photo.trams, tramways, ballarat, barkly st, mt pleasant -
 Ballarat Tramway Museum
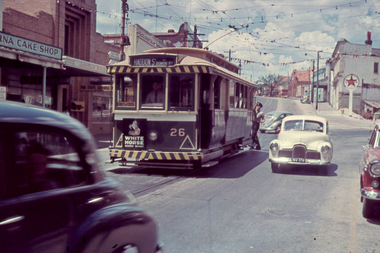
Slide - 35mm slide/s, Travis Jeffrey, 1961
... of Victoria and Caltex Service station in the background.. Tram... of Victoria and Caltex Service station in the background.. Tram ...Agfa plastic mount (blue base, white cover) of a photograph of No. 26 at the junction of Bridge and Victoria St. turning pole, with destination of Haddon St, with the Verna Cake shop, State Savings Bank of Victoria and Caltex Service station in the background.. Tram is in the process of being fitted with dash canopy lights and tiger strips and White Horse Whiskey advertisement on the back dash panel. Photo taken early 1961. Slide rescanned at 3200 dpi 24-10-2020, jpg replaced, tiff file retained. This file was scanned in 2003 and may show colour changes."BAS 18" in penciltramways, trams, bridge st, haddon st, victoria st, tram 26 -
 Ballarat Tramway Museum
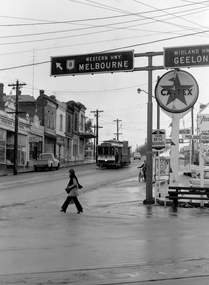
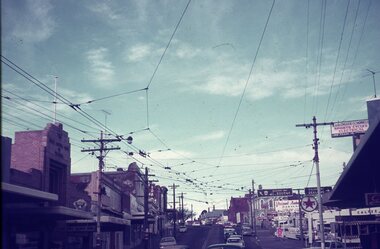
Photograph - Digital image, 1970s
... service station in the foreground. Has a lady with slacks walking... the Bakery Hill Victoria St and the Caltex Service Station. Trams ...Yields information about the Bakery Hill Victoria St and the Caltex Service Station.Digital image, black and white, of No. 26 descending Bakery Hill to Stone's Corner, Victoria and Main St with the Caltex service station in the foreground. Has a lady with slacks walking across the road and a boy wheeling a bike down the footpath. Note the Highway direction signs and service station signage. O'Brien Motors and a book and record shop on the north side Bakery Hill Victoria St. shops. See Reg 4603 for the subsequent photo at this location. Photo taken by Peter Bruce 1970's and 1971, prior to the closure of the Ballarat tramway system. Peter's Title of image: "No. 26 Bridge and Vic1"trams, tramways, victoria st, main st, stones corner, bakery hill, tram 26 -
 Kew Historical Society Inc
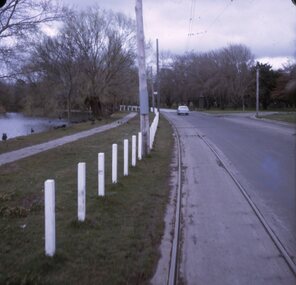
Photograph - California Motel, Barkers Road, Ron Setford, 1961
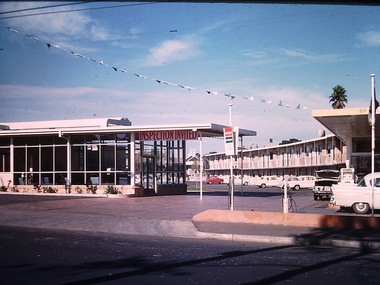
... feature of the motel, was the Caltex Service Station at its..., was the Caltex Service Station at its entrance. The building was closed ...Ron Setford and his wife Grace Setford lived in Tanner Avenue, East Kew, from c.1946 to c.1995. A keen photographer, he recorded the changing face of Kew over a 20 year period. Apart from 30 photographs of built structures and places in Kew dating from 1960 and 1961, 145 of his 35mm colour slides chronicle the development of the Eastern Freeway through the Yarra Valley over a five year period from c.1972 to c.1977. This important collection was donated to the Society by his granddaughter in 2025.This collection of 175 35mm slides is of local and statewide significance, owing to its subject matter, particularly the major development of road transport infrastructure during the 1970s with the construction of the Eastern Freeway. The photographer also took care to annotate and date most of his slides which enable the researcher to pinpoint temporal and spatial locations.Opened in 1960, the California Motel at 138 Barkers Road, Hawthorn, was located opposite the entrance to Xavier College and built on the site of the former Barker railway station of the closed Kew branch line. The motel was advertised as “away from the hustle and bustle of the city and offering affordable accommodation for the business or leisure traveller”. Special amenities included air-conditioning, a business centre, and swimming pool. The motel had 82 suites. A possibly forgotten, but perhaps essential feature of the motel, was the Caltex Service Station at its entrance. The building was closed in April 2008, extensively vandalised and finally demolished in 2013."California Motel"ron setford, photographs -- kew (vic.) -- 1960s, california motel -- barkers road -- hawthorn (vic.) -
 Kew Historical Society Inc
Photograph - California Motel, Barkers Road, Kew, Ron Setford, 1961
... feature of the motel, was the Caltex Service Station at its..., was the Caltex Service Station at its entrance. The building was closed ...Ron Setford and his wife Grace Setford lived in Tanner Avenue, East Kew, from c.1946 to c.1995. A keen photographer, he recorded the changing face of Kew over a 20 year period. Apart from 30 photographs of built structures and places in Kew dating from 1960 and 1961, 145 of his 35mm colour slides chronicle the development of the Eastern Freeway through the Yarra Valley over a five year period from c.1972 to c.1977. This important collection was donated to the Society by his granddaughter in 2025.This collection of 175 35mm slides is of local and statewide significance, owing to its subject matter, particularly the major development of road transport infrastructure during the 1970s with the construction of the Eastern Freeway. The photographer also took care to annotate and date most of his slides which enable the researcher to pinpoint temporal and spatial locations.Opened in 1960, the California Motel at 138 Barkers Road, Hawthorn, was located opposite the entrance to Xavier College and built on the site of the former Barker railway station of the closed Kew branch line. The motel was advertised as “away from the hustle and bustle of the city and offering affordable accommodation for the business or leisure traveller”. Special amenities included air-conditioning, a business centre, and swimming pool. The motel had 82 suites. A possibly forgotten, but perhaps essential feature of the motel, was the Caltex Service Station at its entrance. The building was closed in April 2008, extensively vandalised and finally demolished in 2013.Nilron setford, photographs -- kew (vic.) -- 1960s, california hotel -- barkers road -- hawthorn (vic.), california motel -- barkers road -
 Glenelg Shire Council Cultural Collection
Souvenir - Drink Coaster, n.d
... advertising Caltex Western Star Service Station, corner Richmond... Star Service Station, corner Richmond and Julia Streets ...White cardboard coaster, square, rounded corners, red print advertising Caltex Western Star Service Station, corner Richmond and Julia Streets, Portland. -
 Ballarat Tramway Museum
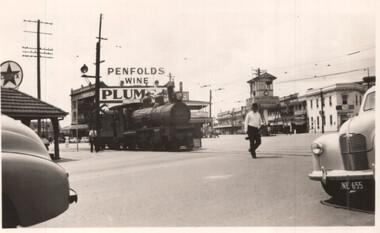
Photograph - QGR locomotive at Woolloongabba Brisbane, Keith Kings, 10/1/1951
... and a large Penfolds Wines advert on a building, a Caltex service... service station and an advert for Plume petrol. Demonstrates ...Wal Jack swapped photographs with his correspondents. This photo by Keith Kings, a railway photograph of QGR locomotive 748 crossing the complex arrangements of tracks at Woolloongabba - three tram tracks, one trolley bus route. The photographer noted that trains could block all tram lines at times. Trains were always proceeded by a man carrying a red flag and ringing a bell. Has the tramway signal box in the background and a large Penfolds Wines advert on a building, a Caltex service station and an advert for Plume petrol.Demonstrates a photograph that would have been sent to Wal Jack by Keith Kings.Black and white photograph of QGR locomotive 748Has extensive details of the photograph on the rear. Keith Kings photo number E(k)(vii)letter, wal jack, keith kings, qgr, railways, woolloongabba -
 Ballarat Tramway Museum
Slide - 35mm slide/s - set of 4, Dave Simpson, late 1960's early 1970's
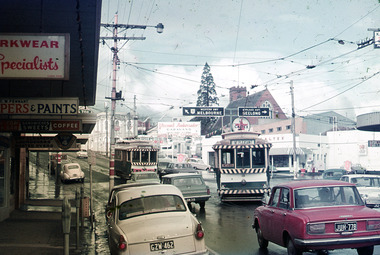
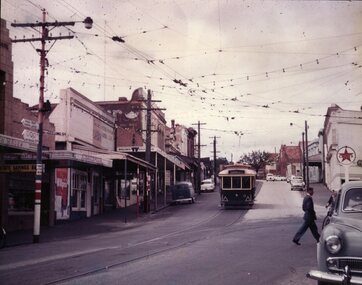
... to enter Bridge St from Main Road. Has the Caltex service station... to enter Bridge St from Main Road. Has the Caltex service station ...Yields information about Stones Corner and the traffic situation in Bridge St.Set of four 35mm slides - Anscochrome white plastic mounts of Stones Corner, corner of Bridge St, Victoria St and Main Road. .1 - shows the overhead arrangements, with a tram about to enter Bridge St from Main Road. Has the Caltex service station in the background, also advert or roof signs for Viscount Ambassador Caravans, K&O (Digger) Schonell Sports Cycles and Electrical store. .2 - No. 26 inbound with many passengers - showing Mt Pleasant - could be running a Special. .3 - ditto with many cars in the photograph. .4 - tram 39 about to enter Bridge St from Main Road - has a red letter box on corner.tramways, trams, main road, bridge st, victoria st, stones corner, tram 26, tram 39 -
 Ballarat Tramway Museum
Photograph - Set of four black and white negatives of Ballarat trams, Warren Doubleday, 20-4-1968
... with Caltex Service Station in the background. Tram leaving Main Road... with Caltex Service Station in the background. Tram leaving Main Road ...Photos 25-4-69, of: .1 - Ballarat 17 at Stones Corner with Caltex Service Station in the background. Tram leaving Main Road before joining Bridge St. .2 - No. 28 running from Bridge Street into Sturt Street with a "Trotting at Bray Raceway Tonight" Auxillary board. Tram has the destination of Gardens via Sturt St West. In the background are the Big W and the Dickins Store. .3 - Tram 43 on "0" road at the SEC Ballarat Depot. .4 - Tram 13 at the Gardens Loop in Wendouree Parade. Tram has an ANA Hospital and Medical Benefits (Australian Natives Association) Advertising Board.Yields information about the operation of the Ballarat tramway system that was operated by the State Electricity Commission of Victoria.Set of four black and white negatives of Ballarat Tramways, 120 size. ballarat, trams, tramways, sturt street, tram 17, main road, bridge street, tram 28, bray raceway, dickins, big w, tram 13, ana health, wendouree parade, gardens loop, depot, tram 43, stones corner, caltex -
 Ballarat Tramway Museum
Slide - 27 mm sq slide/s - set of 9 - Victoria St and crews, Lilian Butler, Aug. 1971
... in the background. .8 - as for .5, but looking east with the Caltex service... in the background. .8 - as for .5, but looking east with the Caltex service ...Yields information about the streetscapes of Ballarat on the Gardens to Victoria St route and in particular buildings and people that crewed the trams.Set of nine Colour 27 x 27 mm slide in a Kodachrome cardboard mount. .1 - R. Williams (Motorman) and Danny Powell (badge 30) standing in front of a tram at Victoria St. The tram has the destination of Gardens via Sturt St West. .2 - view of No. 113 Victoria St - now Ardenlee B&B. .3 - Sunshine Biscuit Factory .4 - Mack's Hotel .5 - Stones Corner - intersection of Victoria and Mt Pleasant routes .6 - Crossing Grenville St .7 - No. 30 at the City terminus, Lydiard St with Racey's and the SEC office in the background. .8 - as for .5, but looking east with the Caltex service station in the background. .9 - No. 30 at the Victoria St terminus. Slide mount date August 1971. Photo from the collection of Lilian Butler.ballarat, tramways, trams, victoria st, bridge st, stones corner, tram 30 -
 Ballarat Tramway Museum
Negative - Set of 5, Campbell Duncan, 2/07/1971 12:00:00 AM
... , for Victoria St. In the view are Eureka Dry Cleaners, Caltex Service.... In the view are Eureka Dry Cleaners, Caltex Service Station, Stones ...Yields information about tram operations and the street views at Stones Corner.Set of 4 photographs taken on 28/2/1971 by Campbell Duncan of trams at Stones Corner - Bridge St, Victoria St and Main Road. .1 - No. 32 leaving Bridge St, climbing Victoria St, for Victoria St. In the view are Eureka Dry Cleaners, Caltex Service Station, Stones Corner and a busy Bridge St. .2 - No. 27? City bound in Bridge St with Stones Corner buildings, K&O (Digger) Schonell Sports Cycles Electrical store, Kodak, Gear Chemist, State Savings Bank of Victoria. .3 - No. 34 for Mt Pleasant, as above and with H. Whitefield Hair Dresser shop in the view. .4 - ditto with tram at the junction and a passenger alighting. .5 - ditto with tram turning the corner for Mt Pleasant.trams, tramways, bridge st, stones corner, victoria st, tram 32 tram 27? tram 34 -
 Orbost & District Historical Society
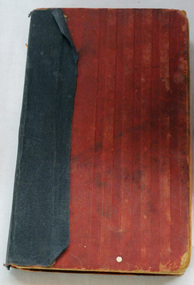
book, The Cost of a Promise, c 1914
... & Billiard Room in Nicholson Street (where the Caltex Service Station... & Billiard Room in Nicholson Street (where the Caltex Service Station ...In the early 1950's Lionel Nowlan had a Hairdresser & Billiard Room in Nicholson Street (where the Caltex Service Station stands today). A circulating library is a small library with books lent for a small fee to subscribers and was often inside an existing business. Circulating libraries were common before a more substantial local library was established. Circulating libraries offered an alternative to the large number of readers who could not afford the price of new books in the nineteenth century but also wanted new material. Circulating libraries rented out bestsellers in large numbers, allowing publishers and authors to increase their readership and increase their earnings. They were also profitable for those businesses that established them. Nowlan's, Marshall's and McCoys were circulating libraries which operated in Orbost in the first half of the 20th century.Circulating libraries offered an alternative to the large number of readers who could not afford the price of new books in the nineteenth century but also wanted new material. It was common for them to stock the latest novels.A red cloth covered hard back book with a repaired black spine. It is titled "The Cost of a Promise" and is a novel in Three Parts by Mrs Baille Reynolds.Stamped on some pages - McCoy's Circulating Library On inside front cover - No 249 Contains a sticker for Nowlan's Library Orbost Stamped - Marshall's Circulating Library McCoy's Circulating Librarythe-cost-of-a-promise reynolds-baillie libraries-orbost circulating-libraries -
 Ballarat Tramway Museum
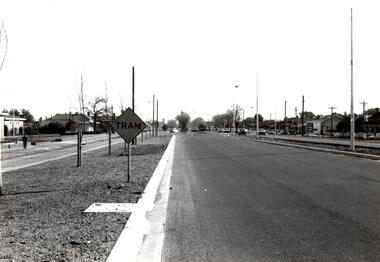
Photograph - Black & White Photograph/s - set of 5 - tram operations on the Victoria St, Richard Gilbert, c August 1971
... service station and Viscount Ambassador caravans.... in the background along with the Caltex service station and Viscount ...Yields information about the appearance of the Victoria St line shortly before the closure of the Victoria St line. Series of 5 Black and white photographs of tram operations on the Victoria St line prior to its closure in August 1971. .1 - View of the Victoria St terminus as you arrive in Ballarat from Melbourne, with the divided highway and a tram warning sign. Has a tram at the terminus. .2 - Tram 39, running a special tour with St Alipius church in the background. A new bus stop sing has been positioned. Another tram has departed the King St loop. .3 - No. 13, (Gardens via Sturt St West and a Twin Lakes sign) entering the King St loop. .4 - No. 31 (to Gardens crossing No. 39) at the King St loop. .5 - No. 31 leaving Stones Corner for Victoria St with Stones Corner building in the background along with the Caltex service station and Viscount Ambassador caravans.trams, tramways, victoria st, king st, stones corner, tram 39, tram 13, tram 31 -
 Ballarat Tramway Museum
Photograph - B&W print of donated negative, Ron E. Fluck, 23/06/1962 12:00:00 AM
... . and the Caltex service station in the background on Main Road and Bridge.... and the Caltex service station in the background on Main Road and Bridge ...Black and white print of a donated negative. Print made 8/1998. Photo of SEC tram no. 31 in Main St, Ballarat East, with destination of "Gardens via Drummond St." Tram has been fitted with dash canopy lighting, but not the large white strip under the lighting. Has small triangles on the panels. Also has a small ad for White Horse whisky. Shows buildings on either side of Main St. and the Caltex service station in the background on Main Road and Bridge St. Photo taken 23-6-1962. Copy made Oct. 2001 for the "gold, Gold GOLD" temporary exhibition - colour laser print onto card, with Velcro dots on rear. Stored in box D1 (Display Box) 02/2003. High Res scan of negative added 17/1/2019.tramways, trams, main st, 31, ballarat, tram 31 -
 Ballarat Tramway Museum
Slide - 35mm slide/s - set of 32, Noel Simons, 25/02/1971 12:00:00 AM
... Golden Square. Has a Caltex Service station in the background... in High St. near Golden Square. Has a Caltex Service station ...Set of 31 transparencies taken on 25/2/1972 on Kodak mounts. 1201.1 - Bendigo No. 26 in Bond St. just after leaving Long Gully en route for Quarry Hill. Has Norris Supermarket in background. Has two SEC roof ads. 1201.2 - No. 26 climbing View St. from Charing Cross en route to Eaglehawk. Has ANZ bank and AMOCO service station in background. 1201.3 - as for 1201.3, but after tram has passed photographer. Has buildings west of Mackenzie St. in photograph. 1201.4 - Tram stop and centre of the road pole with two "CARS STOP BY REQUEST" signs mounted on pole at the corner of Mackenzie St. 1201.5 - same position as for 1201.3, but with No. 5 descending the street. 1201.6 - same position as for 1201.2, but with No. 5 descending the street. Photo taken after tram has passed photographer. 1201.7 - No. 7 in Nolan St. from across the park at Lake Weeroona. 1201.8 - No. 7 entering McCrae St from Nolan St. - distant view. Note "TRAM "sign on left hand side under tree and overhead in McCrae St. from former track that once was in this street. 1201.9 - No. 7 in High St. with Cathedral in background. Tram en route to North Bendigo. Note scaffolding around Cathedral main spire area. 1201.10 - No. 7 crossing Bendigo Creek bridge in High St. near Golden Square. Has a Caltex Service station in the background. 1201.11 - No. 7 at Golden Square terminus with Sunburst Fruit Juices and a Peters Ice cream delivery vans alongside. 1201.12 - as for 1201.11 but photo taken from behind tram, with the end of the rails in the photograph. 1201.13 - No. 7 and 21 in Pall Mall at Charing Cross with No. 5 in the background. Taken some distance away from the location. 1201.14 - No. 7 at Golden Square terminus, taken a short distance from the tram terminus. Shows Milk Bar on right hand side and the hotel on the left hand side. Taken from the south side of the roadway. 1201.15 - as from 1201.14 but taken from the north side of the roadway. 1201.16 - No 5 waiting at California Gully loop. Distant photo showing surrounds 1201.17 - No. 5 en route for Quarry Hill crossing No. 26 at California Gully. 1201.18 - No. 26 at Eaglehawk terminus with Eaglehawk Town Hall and Post Office in background. 1201.19 - No. 21 arriving at Charing Cross en route to North Bendigo. Has Alexandra Fountain in the background, ANZ bank RACV building, and other buildings on the north side of Pall Mall or Nolan St. 1201.20 - No. 26 en route for Quarry Hill at Charing Cross, with crew standing by front door. Has Colonial Mutual life building, Armstrong Tyre Service (Firestone) and a sign for Cohns Drinks in the background. 1201.21 - as for 1201.20 but with No. 5 en route to Eaglehawk now in photograph. 1201.22 - No. 26 at Quarry Hill terminus. 1201.23 - No. 26 at Quarry Hill terminus, view of front portion of tram only from a gate at the Bendigo cemetery. 1201.24 - Track at the end of the Quarry Hill line showing the point blades of the former "Y" terminus and the overhead for this. 1201.25 - No. 2 at the Quarry Hill terminus, looking along the former Trackwork. 1201.26 - as for 1201.25 1201.27 - number not used. 1201.28 - Golden Square terminus from some distance from the actual terminus, showing the Warning sign "TRAM" for motorists from the south. No. 7 at the terminus. 1201.29 - No. 7 passing through the Golden Square shopping centre. Numerous cars and pedestrians. Tram en route for North Bendigo. 1201.30 - No. 7 in High St. Golden Square, en route for North Bendigo. Photo taken after tram has passed photographer. 1201.31 - No. 7 in High St. just past Wattle St. with the Cathedral in the background. Tram has two SEC roof ads good side on photo, 'Everything's fine in my all electric kitchen' and 'Electrical cooking - clean, quick, economical'. 1201.32 - No. 7 in High St. nearing Wattle St. Has Cathedral in the background. Photo taken after tram has passed photographer.Information written on in black ink and date stamped on purple ink. 1201.1 - "No. 26 in Bond St just after leaving Long Gully" 1201.2 - "No. 26 climbing View St. from Charing Cross" 1201.3 - "No. 26 ascending View St. from Charing Cross (At Mackenzie St.)" 1201.4 - "View St. & Mackenzie St." 1201.5 - "No. 5 in View St. near Mackenzie St." 1201.6 - "No. 5 in View St. nearing Charing Cross." 1201.7 - "No. 7 in Nolan St. seen from Lake Weeroona Park." 1201.8 - "No. 7 entering McRae St. from Nolan St. Note "TRAM" warning sign on left. 1201.9 - "No. 7 in High St. passing Short St." 1201.10 - "No. 7 crossing Bendigo Creek bridge in High St. near Golden Square." 1201.11 - "No. 7 at Golden Square terminus" 1201.12 - "No. 7 at Golden Square terminus" 1201.13 - "No 7, 21 and 5 at Charing Cross" 1201.14 - "No. 7 at Golden Square terminus" 1201.15 - "No. 7 at Golden Square terminus" 1201.16 - "No 5 waiting at California Gully loop." 1201.17 - "Nos. 5 and 26 crossing at California Gully loop" 1201.18 - "No. 26 at Eaglehawk terminus" 1201.19 - "No. 21 arriving at Charing Cross from Golden Square" 1201.20 - "No. 26 at Charing Cross" 1201.21 - "Nos. 5 and 26 at Charing Cross." 1201.22 - "No. 26 at Quarry Hill terminus" 1201.23 - "No. 26 at Quarry Hill terminus seen through the gates of the Bendigo Cemetery." 1201.24 - "Quarry Hill terminus showing remains for former double track layout abandoned before 1964." 1201.25 - "No. 2 at Quarry Hill terminus" 1201.26 - "No. 2 at Quarry Hill terminus" 1201.28 - "The Southern approach to Golden Square with No. 7 standing at the terminus, "TRAM" warning sign on the left. 1201.29 - "No. 7 passing through Golden Square Shopping Centre" 1201.30 - "No. 7 in High St. Golden Square" 1201.31 - "No. 7 in High St. passing Wattle St." 1201.32 - "No. 7 in High St. nearing Wattle St."tramways, trams, bendigo, bond st., view st., nolan st., high st., eaglehawk, california gully, charing cross, quarry hill, trackwork, tram 2, tram 5, tram 7, tram 21, tram 26 -
 Ballarat Tramway Museum
Film - Movie Film & Box, Kodak, 1960
... service station,. 17:37 31 inbound approaching Bakery Hill... with an overhead shot, shows clock at the Caltex service station,. 17:37 ...Yields information in movie film format of Ballarat trams in 1960, how the system operated and was used by people., Yields information in movie film format of Ballarat trams in 1960, how the system operated and was used by people.Movie film - 8mm, approx. 30mins, with leader strip on a plastic reel, within a black and white plastic box, titled "Ballarat No. 1. 1960". Has been transferred to DVD - see Reg item 4100 as Segment No. 2. Made by Ben Parle. Also transferred to DVD by Rod Cook Oct. 2015, via Roger Greenwood for use in his DVD, "The City of Ballarat Trams, Gardens & Gold" of 2016. See Reg Item 6883. Synopsis: based on time. 0:00 View of typed introduction, noting that this is a pictorial record of Ballarat. 0:10 Title “The Tramways of Ballarat 1960, Part 1” 0:16 13, showing “View Point” at Stones Corner, Bridge St, east end, with trolley pole being turned, while another single trucker heads out towards Mt Pleasant. 0:25 13 leaving Stones Corner, short approach and then longer trailing shot of the tram going towards the City in Bridge St. 0:44 View out of front of tram in Bridge St heading towards the City, with cars in the photo, then passing through city Loop, no trams in the loop and running up to Lydiard St Nth and crossing the road. 1:22 Running up Sturt St from Armstrong St, passes over Dawson St X-over and up to the next intersection, Lyons St. 1:54 Title “The View Point Line” 1:59 19 inbound, in Ripon St, from crossing Mair St, towards camera and then passing away and turning into Sturt St. 2:49 View of a “Warning Oncoming Trams” sign 2:52 19 in Ripon St, going to View Point, crossing Webster St towards camera, then going away through the disconnected Victoria Ave loop, pass the “Warning Oncoming Trams” sign. Note very windy scene with people running across roads. 3:17 19 in Wendouree Parade, in bound, though showing destination View Point, going away from the camera, past the View Point Hotel. 3:39 19 coming towards camera near Excerpt or Devon St and then going away towards the terminus. 4:04 19 at the terminus, stationary, with a single trucker 3?, passing from Macarthur St into Wendouree Parade, behind 19. 4:20 33 coming towards camera in Wendouree Parade from St Aidans Drive, stopping to pick up passenger at Forest St and then going away towards the City, photographed from near the depot, on a wet and windy day. 4:54 35 in Wendouree Parade, coming towards the Camera from St Aidans Drive and then going away with the Gardens Loop area in the background. Tram stops at stop to let a passenger off. 5:28 21 leaving Gardens Loop for the City via the Depot, green light in signal can be seen. 5:43 28?, closely followed by 26 turn from Drummond St South into Sturt St. 6:18 Scene opens with shot of “Sebastopol” destination on a bogie tram. 6:21 Title “The Sebastopol Line” 6:24 21 turning from Sturt St into Drummond St Sth with destination of Bell St and then going away from the camera. 6:55 38 in Drummond St Sth, coming towards the camera and then passing the camera with Sturt St just in the view. 7:10 21, showing Gregory St, in Drummond St Sth, approaching and then going away, entering the Urquhart St Loop, 7:39 34 in Drummond St Sth (location check required (Latrobe?)), approaches camera, picks up passengers and the goes away. 8:09 39 at ? Street, turns from Drummond St Sth into Skipton St, after picking up and setting down passengers, bound for Sebastopol 8:55 35 inbound in Skipton St passes through the Bell Street Loop, and then goes away from the camera. 9:33 42 outbound in Skipton St, approaches the camera, passes and then crosses over the half the road into Albert St. 10:00 39 inbound in Albert St – location? 10:31 34 outbound for Sebastopol, approaches camera and just starts to pass by. 10:36 34 in Grey St crossing loop, crosses 42 inbound. 10:59 39 outbound in Albert St, with shopping centre in bound, approaches camera, passes and then crosses over Albert St. Mid morning scene. 11:39 39 inbound, Albert St south, approaches camera and then passes and the crosses over Albert St. 12:16 41 outbound in Albert St passes the camera, and pulls into the terminus with the conductor getting out on the back bumper to pull the pole down as the tram stops and a passenger walks into the Royal Hotel. 12:39 Title “The Lydiard Street North Line” 12:44 Filmed from the Hotel balcony, 21 inbound in Lydiard St Nth passes over Mair St, stops while 33 passes in the other direction. 13:18 With the red light showing on the Seymour St loop signal, 33 inbound for Sebastopol stops and picks up many passengers, passes the camera and runs past the VRI building in the background and through the loop. Possibly filmed on a Sunday given the ladies dresses and quieter streets. 14:01 30 outbound, passes the camera and stops at Macarthur St. Filmed alongside the brick wall of the cutting. 14:28 30 inbound arrives, passes through the Gregory St loop and then proceeds past the camera, making a stop to pick up passengers. 15:14 28 in Lydiard St Nth – location?, approaches and goes away from the camera, north of Gregory St. 15:34 28 ditto location? 15:53 21 arrives at the terminus with passengers getting on and off. 16:11 View of the a vertical positioned “End of Section” sign on a pole at the terminus and then lifting the camera to see the timetable board and the stop sign. 16:33 31 in Bridge St passing Morseheads and then turning into Sturt St, stops at the Grenville St stop, while another single trucker comes down to the stop from the City. 16:58 31 outbound in Bridge St, with destination of Victoria St. 17:14 Title “The Victoria Street Line” 17:18 31 outbound to Victoria St from Stones Corner. Starts with an overhead shot, shows clock at the Caltex service station,. 17:37 31 inbound approaching Bakery Hill and then descending to the junction after it passes camera. 18:09 25 climbing outbound in Victoria St, passing the camera, to then pass through the King St loop. 18:47 25 inbound in Victoria St, passing the camera, then pass through the King St loop, with St Alypius Church in the background. 19:36 14 approaching the rail bridge in Victoria St and stopping at the 2nd last stop to left of passengers. 20:01 14 leaving the terminus and approaching the camera and the a short sequence going away, to the next stop to pick up quite a few passengers. 20:14 “Trams Stop Here” sign, metal wrap around on a steel pole. 20:16 Title “The Mount Pleasant Line” 20:21 11 inbound in Main St, with a passenger leaping off the tramcar and another getting off just before the junction. 20:45 11 passes the junction and then proceeds away from the camera in Bridge St. 21:04 30 outbound in Main St, then turns into Barkly St, a bus (Eclipse Motors) passes in Main St just before the sequence ends. 21:31 30 inbound near Steinfield St. (exact location?) 21:49 25 approaches the camera, then proceeds away and passes through the Grant St. loop. 22:29 25 inbound, windy day, between Grant and Cobden, (exact location?), with a horse drawn bread van in the view and the breadman walking behind the tram as it passes. 23:02 11 outbound in Barkly St, (exact location?) 23:37 11 inbound in Barkly St (exact location?) 23:44 Mt Pleasant terminus signage 23:50 30 approaches the terminus and then stops with the conductor alighting turning the pole, passengers getting on and off and the driver appearing at the other end. 24:32 Title “The Gardens Via Sturt St. West Line” 24:35 21 outbound in Sturt St near Raglan St, approaches and passes the Camera. 25:09 12, showing City Oval, approaches and passes the camera, outbound near Windermere St. 25:33 13 showing View Point, goes away from the camera – location? 25:44 12 comes from St. West, inbound passes the camera and then stop as the next stop next Talbot St? 26:21 Short sequence of a “Warning Oncoming Trams” sign 26:28 42 inbound in Sturt St West, just before Ripon St, view coming towards camera and then going away to cross Ripon St. 27:10 34 passes through the Parker St loop 27:25 35 or 39 inbound past the college in Sturt St West 28:04 41 outbound at the Russell St curve, passes away from the camera. 28:11 35? inbound passes away from the camera through the Victoria Park or Morrison St loop, swinging out into the roadway. 28:29 View of timetable sign at Hamilton Ave. 28:37 35 turning from Sturt St West into Hamilton Ave, can see the conductor changing over the barrier rails. 29:11 42 inbound, crosses another bogie tram (35?) at Carlton St loop then passes the camera and goes past the Olympic rings monument. 29:42 12 approaches the Carlton St gates. 30:07 12 outbound, crosses a bogie tram in the loop with both trams then leaving the loop. 30:20 Title “End of Part One” Written labels giving title information on outside of box.trams, tramways, ballarat, sebastopol, lydiard st north, victoria st, mt pleasant, sturt st west -
 City of Moorabbin Historical Society (Operating the Box Cottage Museum)
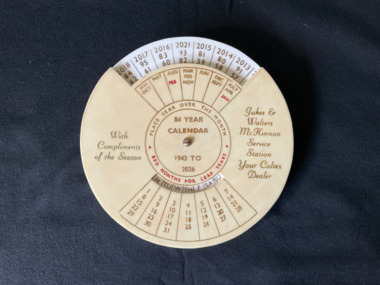
84 Year Calendar 1943 to 2026, Circular Calendar, 1950's
... Jukes & Walters McKinnon Service Station Your Caltex Dealer... Jukes & Walters McKinnon Service Station Your Caltex Dealer ...Jukes & Walters McKinnon Service Station was situated at 257 Jasper Road, McKinnon.Circular 84 year Calendar - made of resin. Two circular disks that are joined in the centre and can be rotated to give the date of a particular day with in a 84 year period from 1943 to 2026.Jukes & Walters McKinnon Service Station Your Caltex Dealer. With Compliments of the Seasonmckinnon, service station, jasper road, moorabbin, calendar -
 Bendigo Historical Society Inc.
Document - GOLD RUSHES AROUND BENDIGO
Typed and hand written notes on 'Gold Rushes around Bendigo', Eaglehawk Police Station, Bells In and Around Bendigo, Bendigo Historical Society Newsletter, Mr Henry Jones - Gold Buyer, and Sir John Quick. Gold Rushes Around Bendigo tells of some gold finds around Bendigo. Eaglehawk Police Station tells of the Building of the Log Lockups at Eaglehawk and White Hills and where the idea came from. Also the cost of building and source of logs. Bells In and Around Bendigo tell of a tram employee ringing a bell and shouting to all that the tram terminus at the Railway Station was discontinued. When this was sufficiently known the bell went to the Bridge Street Methodist Church. The BHS Newsletter mentions business men's names and connection with their trade. Mr Henry jones - Gold Buyer mentions where his office was and that you could buy gold and money could be exchanged as well. Sir John Quick page tells of the early life of Sir John Quick and his self-education, of the A. N. A. opening in Victoria.document, names of bendigo pioneers, bendigo goldfields, gold rushes around bendigo, caltex oil co, matt egan, thos fleck, knight's brick kiln, water commission, work shops, l king, r king, j mumberry, a kelly, 'auld dart', robert fallon, mrs jane stinton, joch, vol 1 gold nuggets literary society files (manuscript written 1852-1882.), john o'c hattam, eaglehawk police station, mr w perry, log lock-ups, john fry, charles fry, bendigo advertiser 30/3/1949, alex h stone, bendigo advertiser 20/41949, milburn's coffee palace, shell service station, bridge street methodist church, mr don hargreaves, bendigo historical society newsletter, mr buzza, mr ankle, mr foote, mr scales, mr bull, mr mutton, mr body, mr satori, mr tankard, mr punch, mr snowball, mr sweet, mr goody, mr pallett, mr frame, mr henry jones, bendigo advertiser centenary of bendigo supplement 1951, sir john quick, a w llewelyn, australian natives association, friendly society, virginia battery, commonwealth parliament, federation league, mr alfred deakin, mr d'esterre taylor, mr peacock, mr barret, mr george reid, corowa conference 1893, poet gay, bendigo cemetery, centenary history ana 1871-1971, john e menadue