Showing 555 items
matching charring cross
-
 Ballarat Tramway Museum
Photograph - Black & White Photograph/s, The Bendigonian, Jan. 2005
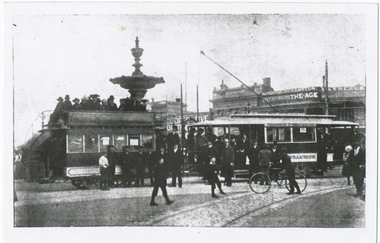
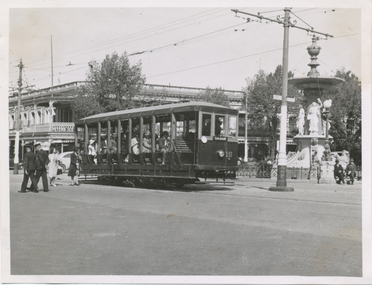
... . Photo of Charring cross looking from Pall Mall towards High St... at Charring Cross" Copied ex "The Bendigonian 3/1/1905."... Charing Cross ESCo On rear in ink " SA776 Bendigo A 3 window ...Black and White copy print contained within the Wal Jack Bendigo and Geelong Album, see Reg Item 5003 for more details. Photo of Charring cross looking from Pall Mall towards High St and the south west corner buildings in the photograph. Features a three window ESCo. tramcar In the background are the buildings on the south west corner of Charing Cross, featuring an advertisement for The Age, Cooperative Distribution centre, Warrens View Point Hotel, Hamptons Newsagency and Connelly & Co. Copied by Keith Kings from The Bendigonian 3/1/1905. On rear in ink " SA776 Bendigo A 3 window saloon at Charring Cross" Copied ex "The Bendigonian 3/1/1905."trams, tramways, bendigo, charing cross, esco -
 Ballarat Tramway Museum
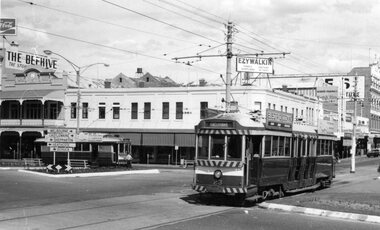
Photograph - Black & White Photograph/s, George Bishop, Dec. 1971
... at Charing Cross 12/1971. No. 23 has destination of Eaglehawk... (Bendigo System) at Charing Cross. / G. Bishop photo."... Charing Cross Pall Mall tram 19 tram 23 On the back of the photo ...Black and white photographs of Bendigo No. 23 and 19 at Charing Cross 12/1971. No. 23 has destination of Eaglehawk. The Beehive and Ezywalkin buildings in the background. No. 19 in the distance. Both trams have SEC Electric Cooking Roof Advertisements. Photos by George Bishop. .On the back of the photo in ink "SEC trams No. 19 and 23 (Bendigo System) at Charing Cross. / G. Bishop photo."tramways, trams, bendigo, charing cross, pall mall, tram 19, tram 23 -
 Ballarat Tramway Museum
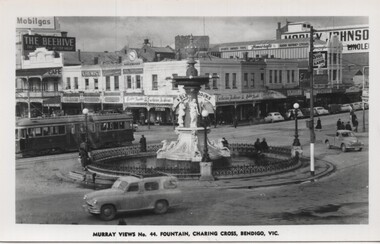
Postcard, Murray Views, "Murray Views No. 44 Fountain, Charing Cross Bendigo Vic", early 1950's
... Fountain, Charing Cross Bendigo Vic". Shows an ex Hawthorn Bogie...On the rear in ink "Bendigo Charing Cross and Victoria... Charing Cross Bogie Trams On the rear in ink "Bendigo Charing ...Postcard - most likely a reproduction of the original as it does not have a postcard back - titled "Murray Views No. 44 Fountain, Charing Cross Bendigo Vic". Shows an ex Hawthorn Bogie tram possibly on its way to Quarry Hill. In the background are the Beehive building, A G. Treloar Watchmaker, Melba Frocks, R. White, Edments, Hartleys, Astor Radio, Homecrafts store, and Morley Johnson building.On the rear in ink "Bendigo Charing Cross and Victoria Fountain" and the Keith Kings stamp.trams, tramways, bendigo, charing cross, bogie trams -
 Ballarat Tramway Museum
Slide - 35mm slide/s - set of 12, Noel Simons, 28 Feb. 1972
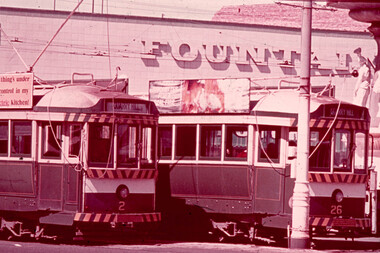
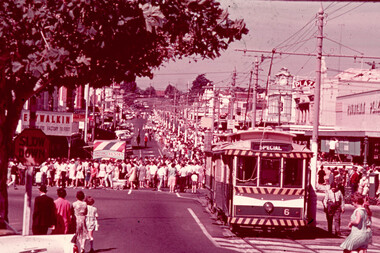
... mounts. 1207.1 - Bendigo 26 and 2 at Charing Cross. 26 en route... on purple ink. 1207. 1- "Nos. 26 and 2 at Charing Cross." 1207.2... Charing Cross High St View St. tram 2 tram 5 tram 6 tram 21 tram ...Set of 12 transparencies taken on 28/2/1972 on Kodak mounts. 1207.1 - Bendigo 26 and 2 at Charing Cross. 26 en route for Eaglehawk, 2 for Quarry Hill. Has the Colonial Mutual Life, Armstrong Tyre Service, and Australian Mutual Provident Society buildings and a Cohns Drinks ad. in the background. 1207.2 - as for 1207.1 but with Alexandra fountain in the foreground. 1207.3 - No. 2 in Mitchell St. heading for Quarry Hill. Photo taken after tram has passed photographer. Has buildings on either side of Mitchell St. in the background, including the Plaza Theatre. 1207.4 - No. 6 en route for Golden Square departing Charing Cross. Has the RACV and ANZ bank in the background. 1207.5 - No. 2 crossing Pall Mall to enter Charing Cross ex Quarry Hill, with the Fountain Plaza in the background. 1207.6 - No. 6 arriving Charing Cross ex Golden Square with No. 21 alongside. No. 21 has the SEC ad. 'Everything's fine in my all electric kitchen.' Has the City Family Hotel and the Fountain Plaza shopping centre in the background. 1207.7 - No. 5 at Charing Cross en route for Quarry Hill with No. 2 behind. No. 2 has two SEC roof ads, 'Everything s fine in my all electric kitchen' and 'Electricity best for cooking'. RACV building in the background. Tram crews are discussing the day in the front of the tram. 1207. 8 - No. 21 in High St. Bendigo with the Cathedral in the background. No. 21 has two SEC roof ads, 'Everything's fine in my all electric kitchen' and 'Electricity best for cooking'. 1207.9 - No. 6 in High St. Bendigo with the Cathedral in the background. 1207.10 - No. 6 in High St. Bendigo, just past Wattle St. Photo taken after the tram has passed the photographer from within the Highway Car Sales yard. 1207.11 - No. 26 bound for Eaglehawk at the end of the double track in View St., note signal contactors, tram stop and section signs mounted on pole. 1207.12 - No. 26 turning from View St. into Barnard St.Information written on in blue ink and date stamped on purple ink. 1207. 1- "Nos. 26 and 2 at Charing Cross." 1207.2 - "Nos. 26 and 2 at Charing Cross." 1207.3 - "No. 2 in Mitchell St. just after leaving Charing Cross." 1207.4 - "No.6 leaving Charing Cross for Golden Square." 1207.5 - "No. 2 arriving at Charing Cross from Quarry Hill." 1207.6 - "No. 21 waits at Charing Cross as No. 6 arrives from Golden Square." 1207.7 - "No 5 at Charing Cross with No. 2 lurking behind." 1207.8 - "No. 21 in High St. at cnr of Wattle St." 1207.9 - "No. 6 in High St. at cnr of Wattle St." 1207.10 - "No. 6 in High St. between Wattle and Vine Sts." 1207.11 - "No. 26 at end of double track in View St. near Barnard. St. 1207.12 - "No. 26 seen at dusk turning from View St. into Barnard St."tramways, trams, bendigo, charing cross, high st, view st., tram 2, tram 5, tram 6, tram 21, tram 26 -
 Ballarat Tramway Museum
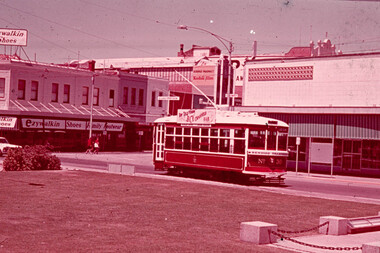
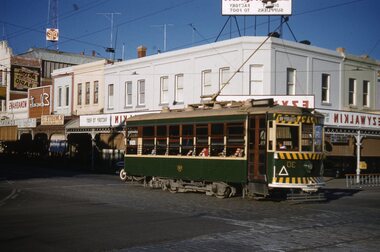
Slide - 35mm slide/s, Bob Wilson, Dec. 1972
... , such as Birney No. 30 at Charing Cross - Dec ' 72 (Bob Wilson) See... edge "No. 30 Charing Cross"... Charing Cross Bendigo Trust tram 30 Stamped on base of slide ...White cardboard mount, 35mm slide, from the Association of Railway Enthusiast's film strip titled "Provincial Tramway Film Strip" of a Bendigo Trust Birney tram, December 1972 at Charing Cross, outbound to the mine. Tram painted in the Bendigo Trust colour scheme and is fitted with a Bendigo Television BCV roof advertisement. "For Television BCV Channel 8 & 11" and underneath the roof advertisement a route sign "Gold Mine - Joss House". Photo has the Ezywalkin store in the background, Fountain Plaza in the foreground. The film strip notes (Reg. Item 2560), provided the following caption details: "The Bendigo Trust operates a tourist service over the former "NORTH BENDIGO" and part of the "GOLDEN SQUARE" lines using severally visually restored cars, such as Birney No. 30 at Charing Cross - Dec ' 72 (Bob Wilson) See image btm2598p.tif for high level scan of image. Stamped on base of slide "11808" and written in ink on top edge "No. 30 Charing Cross"tramways, trams, are, film strip, charing cross, bendigo trust, tram 30 -
 Ballarat Tramway Museum
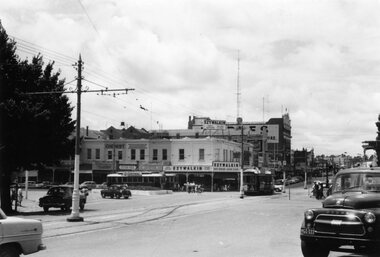
Photograph - Black & White Photograph/s, Ron Hann, Jan. 1963
... of a view of Bendigo Charing Cross tram terminal area from western...On rear in pencil "Charing Cross 1963" 2nd copy has label... the Charing Cross Bendigo tram terminal, and nature of the traffic ...Yields information about the Charing Cross Bendigo tram terminal, and nature of the traffic arrangements.Black and white print on heavy matt photographic paper of a view of Bendigo Charing Cross tram terminal area from western side. Has two single truckers in Pall Mall and a bogie tram. Shows the tram crossover in High St and a number of motor vehicles. Has the Ezywalkin building on the north east corner. 2nd copy - laser print - with date etc on rear - added 22/2/2010, copy from Ron Hann. Printed on Fujifilm, Fujicolour Crystal Archive for Frontier"On rear in pencil "Charing Cross 1963" 2nd copy has label "Reference 6/214/25" Photo by Ron Hann" and another label "Charing Cross Bendigo 01.63"tramways, trams, bendigo, charing cross -
 Federation University Historical Collection
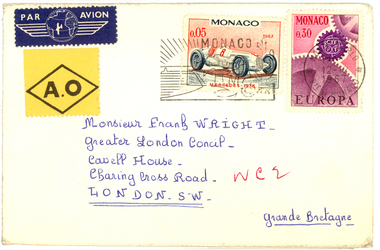
Envelope, Stamped envelope from La Scala, Monte Carlo, 1967, 1967
... London Concil Cavell House- Charing Cross Road- WC2 London-S W... House- Charing Cross Road- WC2 London-S W - grande Bretagne... House- Charing Cross Road- WC2 London-S W - Grande Bretagne ...Frank Wright was a renown resident of Smeaton, where he was born. He lived at Laura Villa, and attended Smeaton State School. His father William was a gold miner and his mother's name was Sarah. Their family won many singing and instrumental awards. Frank was tutored by Percy Code and was awarded a gold medal for the highest marks in the ALCM examinations in the British Colonies at the age of seventeen years. He became the Australian Open Cornet Champion by the age of eighteen. A year later, Frank conducted the City of Ballarat Band, and later the Ballarat Soldiers’ Memorial Band. He formed the Frank Wright Frisco Band and Frank Wright and his Coliseum Orchestra. These bands won many South Street awards, and Frank as conductor won many awards in the Australian Band Championship contest. In 1933 Frank Wright sailed to England to conduct the famous St Hilda’s Band and was later appointed Musical Director of the London County Council, where he organized many amazing concerts in parks, in and around the London district. He was made Professor of Brass and Military Band Scoring and conducted at the Guildhall of Music and Drama. Frank was often invited to adjudicate Brass Band Championships around Europe, in Australia, including South Street and in New Zealand. The Frank Wright Medal at the Royal South Street competition is awarded to an individual recognized as making an outstanding contribution to brass music in Australia.An envelope addressed to Monsieur Frank Wright Greater London Concil Cavell House- Charing Cross Road- WC2 London-S W - Grande Bretagne Printed on back - La Scala 208, Monte-Carlo Handwritten on front - Monsieur Frank Wright, Greater London Concil Cavell House- Charing Cross Road- WC2 London-S W - grande Bretagnefrank wright, monaco, stamps philately -
 Ballarat Tramway Museum
Photograph - Black & White Photograph/s, The Bendigonian, Jan. 2005
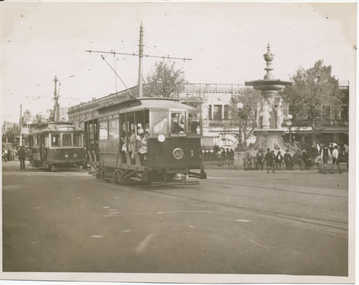
... . Photo of Charring cross looking from Pall Mall towards High St...On rear in ink " SA776 Tramcars at Charing Cross, Note" 3... Charing Cross ESCo On rear in ink " SA776 Tramcars at Charing ...Black and White copy print contained within the Wal Jack Bendigo and Geelong Album, see Reg Item 5003 for more details. Photo of Charring cross looking from Pall Mall towards High St and the south west corner buildings in the photograph. Features three ESCo trams, 2 x two window and 1 x 3 window at the location. In the background are the buildings on the south west corner of Charing Cross, featuring an advertisement for The Age, Cooperative Distribution centre, Warrens View Point Hotel, Hamptons Newsagency and Connelly & Co. Copied by Keith Kings from The Bendigonian 3/1/1905. On rear in ink " SA776 Tramcars at Charing Cross, Note" 3 window saloon" Copied ex "The Bendigonian 3/1/1905."trams, tramways, bendigo, charing cross, esco -
 Bendigo Historical Society Inc.
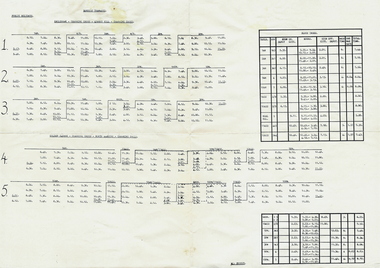
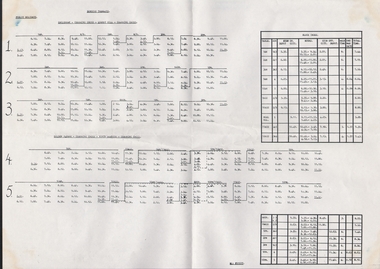
Document - BASIL MILLER COLLECTION: TIMETABLE, PUBLIC HOLIDAYS TRANSPORT
... Timetable - Eaglehawk, Charing Cross, Quarry Hill, Charing... - Eaglehawk, Charing Cross, Quarry Hill, Charing Cross. Golden Square ...Timetable - Eaglehawk, Charing Cross, Quarry Hill, Charing Cross. Golden Square, Charing Cross, North Bendigo, Charing Cross.Bendigo Tramwaysperson, individual, basil miller -
 Ballarat Tramway Museum
Slide - 35mm slide/s, Bob Wilson, May. 1972
... Strip" of Bendigo bogie tramcars Nos. 2 and 26 at Charing Cross... edge "No. 2 & 26 Charing Cross Bendigo"... Charing Cross Bendigo tram 2 tram 26 Stamped on base of slide ...White cardboard mount, 35mm slide, from the Association of Railway Enthusiast's film strip titled "Provincial Tramway Film Strip" of Bendigo bogie tramcars Nos. 2 and 26 at Charing Cross, with the Fountain Plaza building in the background. Both trams have the destination of "Quarry Hill" No. 26 has the older type of destination roll and is fitted with a SEC Briquettes roof advertisement. The film strip notes (Reg. Item 2560), provided the following caption details: "The hub of the Bendigo system was at Charing Cross, where the "Quarry HILL" - "EAGLEHAWK "and "'GOLDEN SQUARE" - "NORTH BENDIGO" routes crossed at right angles. It was customary for trams for all four routes to meet at the CROSS. Here cars 2 & 26 (showing a wrong dest- -ination) meet by the fountain. -Mar '72 (Bob Wilson)" See image btm2580p.tif for high level scan of image. Stamped on base of slide "11789" and written in ink on top edge "No. 2 & 26 Charing Cross Bendigo"tramways, trams, are, film strip, charing cross, bendigo, tram 2, tram 26 -
 Ballarat Tramway Museum
Photograph - Black & White Photograph/s, The Bendigonian, Sep. 2005
... horse tram as a trailer with the Fountain at Charing Cross... Ballarat d/d horse tram, Charing Cross. Note:- Compound Xover... Charing Cross Horse Trams Trailer On rear in ink " SA778 Bendigo ...Black and White copy print contained within the Wal Jack Bendigo and Geelong Album, see Reg Item 5003 for more details. Photo of an electric tram towing an ex Ballarat double deck horse tram as a trailer with the Fountain at Charing Cross in the background. In the background are the buildings on the south west corner of Charing Cross, featuring an advertisement for The Age. Copied by Keith Kings from The Bendigonian 19/9/1905. On rear in ink " SA778 Bendigo electric tram towing an ex Ballarat d/d horse tram, Charing Cross. Note:- Compound Xover at front of tram." Copied ex "The Bendigonian 19/9/1905."trams, tramways, bendigo, charing cross, horse trams, trailer -
 Ballarat Tramway Museum
Slide - 35mm slide/s, Noel Simons, Sep. 1971
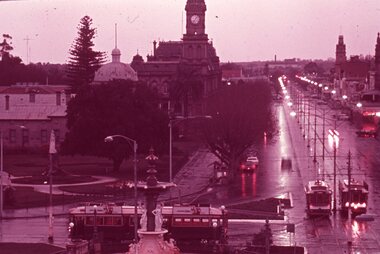
... September 1971 with a group of three trams at Charing Cross at dusk..."Rainy evening at Charing Cross" in blue ink and "Sept 1971... Parade Ballarat Ballarat goldfields Tramways trams Charing Cross ...One slide on a Kodak Ready Mount made from the Association of Railway Enthusiast Provincial Tramways film strip, during September 1971 with a group of three trams at Charing Cross at dusk. Taken from an elevated position (the tower in the City Family Hotel) over looking the Alexandra fountain and looking towards the North on a wet evening. Two single truckers (1 possibly No. 6) and one bogie car waiting to proceed."Rainy evening at Charing Cross" in blue ink and "Sept 1971" in purple ink using a hand stamp.tramways, trams, charing cross, bendigo, tram 6 -
 Bendigo Historical Society Inc.
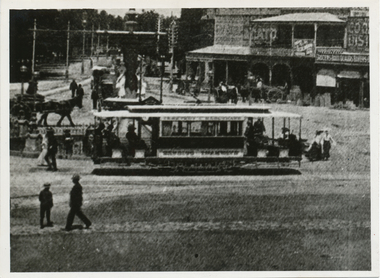
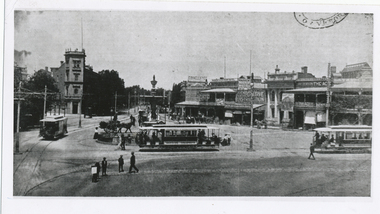
Photograph - Charing Cross and Pall Mall
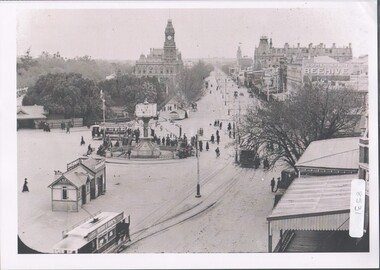
... View of Charing Cross and Pall Mall Bendigo, featuring...8531 A4 B&W photograph of Charing Cross and Pall Mall... of Charing Cross and Pall Mall Bendigo, featuring the Alexandra ...View of Charing Cross and Pall Mall Bendigo, featuring the Alexandra fountain still under construction. The fountain was jointly funded by the Bendigo Juvenile Industrial Exhibition in 1879, a 500 pound donation by George Lansell and a 700 pound grant from the Sandhurst City Council. The fountain was designed by William Vahland and was opened 5/7/1881. The fountain is 28 feet tall and sits in a 2 feet deep pond that is 50 feet in diameter. It was built with 22 tons of Harcourt granite, cast iron and painted stone.8531 A4 B&W photograph of Charing Cross and Pall Mall, Bendigo, in the late 1800s (prior to automobiles); taken from the City Family Hotel. Photograph shows work underway on the Alexandra Fountain at Charing Cross. Photo shows three trams, pedestrians and some horse drawn vehicles. Pall mall shows Post Office, Shamrock hotel and TAFE towers.charing cross, post office -
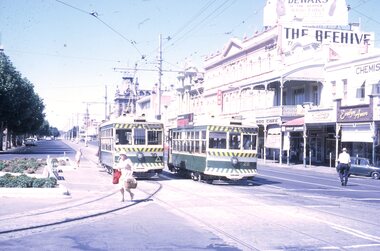 Ballarat Tramway Museum
Slide - 35mm slide/s - set of 4, Peter Moses, Jan. 1969
... Set of four colour slides taken at Charing Cross Bendigo... - "Bendigo Charing Cross" and in red ink "19" .2 - "Bendigo three... ink .1 - "Bendigo Charing Cross" and in red ink "19" .2 ...Set of four colour slides taken at Charing Cross Bendigo, Jan. 1969. .1 - Trams 30 and 28 travelling to North Bendigo and Golden Square respectively. Has the Beehive building in the background, along with W.M.I. Jones Chemist, Evelyn Amor shop, Dewars Whiskey rooftop advertisement. 28 has a SEC Briquettes roof advertisement. .2 - As above but with the front or bogie tram in the photo. Also has A. G. Treloar Optician's shop. Kodak cardboard mount slide, taken by Peter Moses, Jan. 1969. .3 - Close up photo of Birney No. 30, with 28 in the background. .4 - No. 28 leaving for Golden Square with the Plaza building, the Cenotaph, and the City Family Hotel in the background. Kodak cardboard mount slide, taken by Peter Moses, Jan. 1969.On the rear of all the slides "P. Moses" in black ink .1 - "Bendigo Charing Cross" and in red ink "19" .2 - "Bendigo three trams / Charing Cross" and in red ink "21" .3 - "Bendigo" and in red ink "23" .4 - "Bendigo Charing Cross" and in red ink "14". tramways, trams, bendigo, tram 28, tram 30 -
 Ballarat Tramway Museum
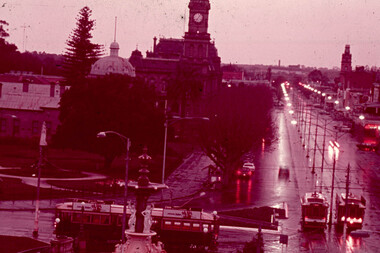
Slide - 35mm slide/s, Ray Marsh, Sept. 1971
... Strip" of the Charing Cross area on a rainy evening at sunset... edge "Charing Cross Bendigo"... Charing Cross Bendigo Pall Mall Night Photo Stamped on base ...White cardboard mount, 35mm slide, from the Association of Railway Enthusiast's film strip titled "Provincial Tramway Film Strip" of the Charing Cross area on a rainy evening at sunset. Features three trams, Pall Mall and the Bendigo Post Office building. The film strip notes (Reg. Item 2560), provided the following caption details: "A rainy evening sees a pair of single truckers on "GOLDEN SQUARE" - "NORTH BENDIGO" line meeting an outbound "EAGLEHAWK" car at the Cross. Sept. '71 (Ray Marsh)" See image btm2581p.tif for high level scan of image. Stamped on base of slide "11790" and written in ink on top edge "Charing Cross Bendigo"tramways, trams, are, film strip, charing cross, bendigo, pall mall, night photo -
 Ballarat Tramway Museum
Slide - 35mm slide/s, Keith Kings, 3/12/1961 12:00:00 AM
... Bendigo Birney tram No. 30 leaving Charing Cross for Quarry.../250 f4, 3/12/61, Bendigo Birney 30, Charing Cross'...), 1/250 f4, 3/12/61, Bendigo Birney 30, Charing Cross' Bendigo ...Bendigo Birney tram No. 30 leaving Charing Cross for Quarry Hill, taken after tram has passed, on 3-12-1961. Tram fitted with lights and warning stripes. Passing Ezywalkin stores. Shows stone sets in pavement. Has Quarry Hill destination. Photo by Keith Kings.Stamped on 'K.S.Kings etc.' and in blue ink, 'K(k)(359), 1/250 f4, 3/12/61, Bendigo Birney 30, Charing Cross'tramways, trams, bendigo, birney, tram 30 -
 Ballarat Tramway Museum
Slide - 35mm slide/s - set of 4, Noel Simons, 24/05/1971 12:00:00 AM
... . Located at Charing Cross. 1199.4 - Bendigo No. 23 en route... timetable at Alexandra Fountain Charing Cross." 1199.4 - "No. 23... Timetables Charing Cross High St. tram 21 tram 23 Information written ...Set of 4 transparencies taken on 24/5/1971 on Kodak mounts. 1199.1 - No. 21 in High St. at junction with old High St., near Fire Station Loop. Tram has two SEC roof ads. 1199.2 - No. 21 in High St. between Shamrock and Thistle Sts. Photo taken after the tram has passed the photographer. 1199.3 - Photo of a green box containing timetables for the four Bendigo routes. Located at Charing Cross. 1199.4 - Bendigo No. 23 en route to Eaglehawk at Charing Cross, with two SEC roof ads 'Everything's fine in my all electric kitchen' and "Switch to electric cooking'. Has the Ezywalkin building and the Beehive building in the background. Information written on in black ink and date stamped on purple ink. 1199.1 - "No. 21 in High St. at junction with old High St., near Fire Station Loop." 1199.2 - "No. 21 in High St. between Shamrock and Thistle Sts." 1199.3 - "Bendigo Tramways timetable at Alexandra Fountain Charing Cross." 1199.4 - "No. 23 at Alexandra Fountain Charing Cross, Bendigo." tramways, trams, bendigo, timetables, charing cross, high st., tram 21, tram 23 -
 Ballarat Tramway Museum
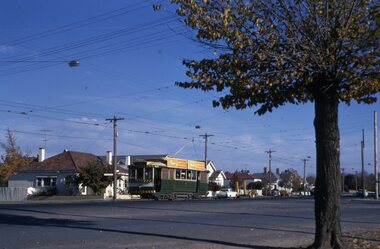
Slide - 35mm slide/s, Max Mitchell, Apr. 1969
... Strip" of Bendigo No. 6 and another single trucker at Charing... edge "No. 6 Charing Cross"... Charing Cross Bendigo Easter Fair tram 6 Stamped on base of slide ...White cardboard mount, 35mm slide, from the Association of Railway Enthusiast's film strip titled "Provincial Tramway Film Strip" of Bendigo No. 6 and another single trucker at Charing Cross, during the Bendigo Easter Fair Parade. The film strip notes (Reg. Item 2560), provided the following caption details: "Easter Monday afternoon in Bendigo was the traditional time for the float parade. Single truckers ran as second sections to the regular bogie cars on the "EAGLEHAWK" line until the commencement of the parade - which had to finish before they could proceed to the depot. - Apr. '69 (Max Mitchell)" See image btm2582p.tif for high level scan of image. Stamped on base of slide "11791" and written in ink on top edge "No. 6 Charing Cross"tramways, trams, are, film strip, charing cross, bendigo, easter fair, tram 6 -
 Bendigo Historical Society Inc.
Document - BASIL MILLER COLLECTION: TRAMS - BENDIGO TRAMWAYS TIMETABLE
... . Eaglehawk - Charing Cross - Quarry Hill - Charing Cross. Golden... with block index, photocopied. Eaglehawk - Charing Cross - Quarry ...Public Holiday timetable with block index, photocopied. Eaglehawk - Charing Cross - Quarry Hill - Charing Cross. Golden Square - Charing Cross - North Bendigo - Charing Cross. Reverse: Written in blue ink 'Bendigo Tramways Block Public Holidays'.person, individual, basil miller -
 Bendigo Historical Society Inc.
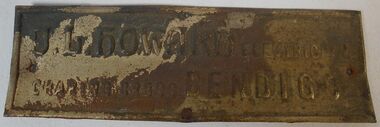
Sign - J.L. Howard Name Plate
... Building in Charing Cross, Bendigo. He also produced an advertising... in shape 6.5cm x 2.0cm. J.L HOWARD - Electrician Charing Cross... Building in Charing Cross, Bendigo. He also produced an advertising ...Joseph Lambert Howard was born in Albury, NSW in 1886 and died in Bendigo, Vic. in 1958. From the years 1915 - 1917 he advertised in the Bendigo Advertiser as an Electrical contractor and supplier of Electrical accessories, operating from the Lyric Building in Charing Cross, Bendigo. He also produced an advertising calendar for 1917.Small metal name plate possible tin - has holes Centre of each side. Front is Gold in parts with brown dirty spots - back shows embossing in reverse with some discoloration. Rectangular in shape 6.5cm x 2.0cm. J.L HOWARD - Electrician Charing Cross Bendigo.bendigo electrician, j.l. howard, charing cross bendigo -
 Bendigo Historical Society Inc.
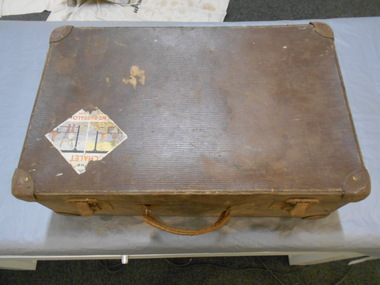
Functional object - Suitcase Made in Bendigo
... Corner, Charring Cross. He advertised in The Bendigo Advertiser... Saddler & Harness Maker Charing Cross BENDIGO The other is light..., Charring Cross. He advertised in The Bendigo Advertiser in 1892 ...G. Harper was a saddler and harness maker located at Bath Corner, Charring Cross. He advertised in The Bendigo Advertiser in 1892A brown suitcase with two metal clasps which could be locked. There are two travel stickers, ones a Victorian railways luggage Melbourne Albury which is partly missing, the other is The CHALET MT BUFFALO Nation Park. On the inside of the lid there are two labels one is black with gold letters G. HARPER NEW BAG SHOP Leather Goods & Ladies' Hand Bags Travelling Bags & Trunks Saddler & Harness Maker Charing Cross BENDIGO The other is light blue with black writing, QUALITY Guaranteed M.B. Fibre CASE.182 underlined made in bendigo, suitcase, g. harper saddler and harness maker -
 Bendigo Historical Society Inc.
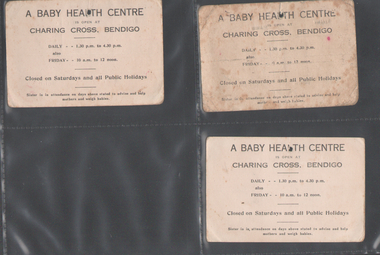
Administrative record - Charing Cross Baby Health Centre Cards
... offered two rooms at the Commonwealth Chambers, Charing Cross...Charing Cross Baby Health Centre: Three cards Noel Townsend... offered two rooms at the Commonwealth Chambers, Charing Cross ...In November 1921 the Bendigo Baby Health Centre was established in rooms at the Town Hall. By Dec. 1925, the council offered two rooms at the Commonwealth Chambers, Charing Cross to be used for the rapidly growing service. In October 1934, council proposed the need for a purpose built Centre and the site in Rosalind Park was chosen in December of that year. The new Centre opened 7/4/1936. Noel Blyth Townsend was born in 1937 and in 1959 married George Victor Rumbold.Charing Cross Baby Health Centre: Three cards Noel Townsend Years: 1937, 1939, 1940 Three cards, each has standard information in print on one side and ink written details on reverse sidecards, noel townsend -
 Ballarat Tramway Museum
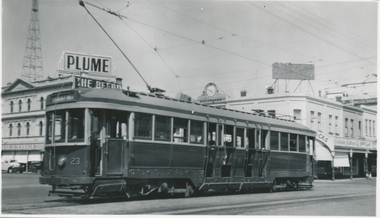
Photograph, Wal Jack, Bendigo No. 23 at Charing Cross, 3/01/1954
... Photo of No. 23 at Charing Cross with the destination... Hill at Fountain (Charing Cross) Bendigo 3-1-54" with Wal Jack... 23 in 1954 and Charing Cross. Trams tramways Bendigo Charing ...Photo of No. 23 at Charing Cross with the destination of Quarry Hill, photo by Wal Jack 3-1-1954. Has the Beehive in the background, a Plume petrol sign and the watchmaker's clock in the background. Printed on Ilford paper. Two prints held. See image i2 for rear of photograph. See image i3 for hi res scan of negative Yields information about Bendigo tram 23 in 1954 and Charing Cross.Black and White print contained within the Wal Jack Bendigo and Geelong Album, see Reg Item 5003 for more details. On the rear in blue ink "SEC Bendigo No 23 bogie to Quarry Hill at Fountain (Charing Cross) Bendigo 3-1-54" with Wal Jack copyright stamp in the top right hand corner and the number "T59PC" written in.trams, tramways, bendigo, charing cross, tram 23 -
 Ballarat Tramway Museum
Photograph - Black & White Photograph/s, Wal Jack, Easter 1941, Saturday
... of No. 18 at Charing Cross, Easter 1941. Tram has... at Charing Cross, Easter Saturday" and in bottom right hand corner... Fair Charing Cross tram 18 On rear in ink "T187, Bendigo ...Black and White print contained within the Wal Jack Bendigo and Geelong Album, see Reg Item 5003 for more details. Photo of No. 18 at Charing Cross, Easter 1941. Tram has the destination of Eaglehawk and is carrying a white disk. Has the City Club Hotel in the background, with a Peters Ice Cream sign on it. i1 - scan of print in the album i2 - rear of image i3 - scan of negative at 3200dpi added 6/6/2020. On rear in ink "T187, Bendigo Tramways, No. 18 Summer Car at Charing Cross, Easter Saturday" and in bottom right hand corner "Photo by W. Jack"trams, tramways, bendigo, easter fair, charing cross, tram 18 -
 Ballarat Tramway Museum
Slide - 35mm slide/s - set of 17, Noel Simons, 20/11/1962 12:00:00 AM
... photographer. 1187.10 - Bendigo Nos. 4 and 26 at Charing Cross in View...) 1187.10 - "4 and 26 at Alexandra Fountain, Charing Cross Bendigo... at Alexandra Fountain, Charing Cross Bendigo" 1187.11 - "Truck ...Set of 17 transparencies taken on 20/11/1962 on Kodak mounts. 1187.1 - Bendigo No. 2 at the Quarry Hill terminus, showing destination of Quarry Hill. Has Cohns Drinks and Streets Ice Cream ads on dash panel, a SEC 'electric cooking' roof ad and another roof ad. Shows the Y terminus at this location, but tram standing just before it. Overhead in position. 1187.2 - as above, but closer up. 1187.3 - as above, but from the north side, showing cemetery in the background. 1187.4 - Bendigo No.3 at Eaglehawk terminus. Tram showing destination of Quarry Hill. Has the various buildings at Eaglehawk in the background including the Foodland store. Has Streets Ice cream and White Horse Whiskey ads on the dash panel. 1187.5 - Bendigo No. 18 at Garden Gully crossing loop, in bound, with destination of Eaglehawk. Passengers waiting for an Eaglehawk tram at the stop. Has a white horse whiskey ad on dash panel and SEC roof ads. Conductor standing in doorway looking out. 1187.6 - Bendigo No. 7 inbound in Nolan St. at cnr of McCrae St. showing destination of Golden Square. Has Streets Ice cream ad on dash panel and a Castrol Roof ad. 1187.7 - Bendigo No. 19 at the North Bendigo terminus with railway level crossing in background. Tram has a Cohns Drinks ad and an SEC 'Electric Cooking' roof ad. 1187.8 - Bendigo No. 2 at the Quarry Hill terminus, looking back into Bendigo, showing destination of Eaglehawk. 1187.9 - Bendigo No. 21 in McCrae St, near Nolan St outbound for North Bendigo. Photo taken after tram has passed photographer. 1187.10 - Bendigo Nos. 4 and 26 at Charing Cross in View St. with fountain alongside and the Beehive, Ezywalkin Buildings in the background. No. 26 has a Sandhurst Milk and SEC 'Electric Cooking' roof ad. 1187.11 - close up of 22E maximum traction truck and folded footstep. 1187.12 - Bendigo No. 19 at Charing Cross terminus, after tram has passed photographer, showing destination of North Bendigo, with the Beehive building in the background and passengers boarding tram. 1187.13 - Bendigo No. 11, turning from View St. into Pall Mall, showing Special with the conductor holding point bar. Has the Beehive and Ezywalkin Buildings in the background. 1187.14 - No. 7 at Charing Cross terminus, in Pall Mall, bound for Golden Square. Has the Beehive and Ezywalkin buildings in the background and passengers waiting at the tram stop. 1187.15 - No. 18 at the Charing Cross terminus, bound for Eaglehawk. Has the Beehive and Ezywalkin buildings in the background and passengers waiting at the tram stop. Also has the 'Safety Zone' sign in the photograph. 1187.16 - No. 2 at Quarry Hill terminus, night or dusk photo. Tram showing destination of Depot. 1187.17 - No. 26 at Charing Cross, night photo. Tram has destination of Quarry Hill, but is on the line for Eaglehawk. Photo looks along Mitchell St. Also shows Safety Zone sign. Information written on in black ink and date stamped on purple ink. 1187.1 - "No. 2 at Quarry Hill terminus Bendigo" 1187.2 - "No. 2 at Quarry Hill terminus Bendigo" 1187.3 - "No. 2 at Quarry Hill terminus Bendigo" 1187.4 - "No. 3 at Eaglehawk terminus" 1187.5 - "No. 18 in Mt Korong Road, Long Gully at cnr of Havilah Road (Eaglehawk Route)" 1187.6 - "No. 7 in Nolan St. Bendigo, at Cnr of McCrae St., near lake Weeroona, (North Bendigo Route)' 1187.7 - "No. 19 at North Bendigo terminus" 1187.8 - "No. 2 at Quarry Hill terminus" 1187.9 - "No. 21 in McCrae St. Bendigo, near Nolan St. (North Bendigo Route) 1187.10 - "4 and 26 at Alexandra Fountain, Charing Cross Bendigo" 1187.11 - "Truck of Bogie Car, Bendigo Tramways" 1187.12 - "No. 19 in Pall Mall at Charing Cross, Bendigo" 1187.13 - "Birney car No. 11 entering Pall Mall from View St. at Charing Cross Bendigo" 1187.14 - "No. 7 in Pall Mall at Charing Cross, Bendigo" 1187.15 - "No. 18 at Alexandra Fountain, Charing Cross, Bendigo" 1187.16 - "No. 2 at Quarry Hill terminus, Bendigo" 1187.17 - "No. 26 at Alexandra Fountain, Charing Cross, Bendigo" tramways, trams, bendigo, quarry hill, eaglehawk, north bendigo, maximum traction, night photo, tram 2, tram 3, tram 4, tram 7, tram 11, tram 18, tram 19, tram 21, tram 26 -
 Ballarat Tramway Museum
Photograph - Black & White Photograph/s, Wal Jack, Easter Saturday 1941
... of ESCo tram No. 1 (carrying a white disc) and No. 2 at Charing... Class, No. 2 - ex MMTB A class, Charing Cross, Easter Saturday... SECV Charing Cross tram 1 tram 2 On rear in ink "T196, Bendigo ...Black and White print contained within the Wal Jack Bendigo and Geelong Album, see Reg Item 5003 for more details. Photograph of ESCo tram No. 1 (carrying a white disc) and No. 2 at Charing Cross, Easter Saturday 1941. No. 1 is on the "wrong line", about to run through the cross over in front of the tram. No. 2 has the destination of Quarry Hill. i1 - scan of print in the album i2 - rear of image i3 - scan of negative at 3200dpi added 6/6/2020. On rear in ink "T196, Bendigo Tramways, No. 1 Original Class, No. 2 - ex MMTB A class, Charing Cross, Easter Saturday 1941. Wal Jack Photo.trams, tramways, bendigo, esco, secv, charing cross, tram 1, tram 2 -
 Ballarat Tramway Museum
Slide - 35mm slide/s - set of 23, Noel Simons, 26/02/1972 12:00:00 AM
... at Charing Cross, with the Alexandra Fountain in the foreground...." 1204.16 - "No. 5 waits at Charing Cross as No. 26 arrives from... Square Myrtle St. Fire Station Depot Charing Cross tram 5 tram 7 ...Set of 23 transparencies taken on 26/2/1972 on Kodak mounts. 1205.1 - Bendigo No. 25 on a special tour at Fire Station Loop, en route to Golden Square. 1205.2 - No. 21 and 25 crossing at Fire Station Loop, note photographers on the ground. No. 21 bound for North Bendigo. 1205.3 - as for 1205.3, but with trams departing loop and fire station in the background. 1205.4 - No. 25 at Golden Square Hotel with 'Rodda's Golden Square Hotel' in the background. Tram on a special tour, but showing destination of North Bendigo. 1205.5 - as for 1205.4 - but showing special. Has the end of the track in the photograph. 1205.6 - Nos. 7 and 25 (on a special tour) crossing at Myrtle St. Loop. 1205.7 - No. 7 leaving Myrtle St. loop with the mine poppet head in the background. Photo taken after tram has passed photographer. (Print made of this slide 10/2001 for use in the Gold Gold Gold exhibition of 10/2001 - See Reg. item 1979. 1205.8 - No. 25 entering depot. Tram showing 'special'. Tennis court on right has players. Photo taken after tram has passed photographer. 1205.9 - No. 24 (showing 'special') and No. 20 (showing 'Long Gully') at Bendigo Depot. 1205.10 - No. 24 on a special charter, leaving Bendigo depot. Tram has two 'Johnnie Walker' roof ads. 1205.11 - Bendigo depot with 29, 25 and a bogie car inside the depot doors. 1205.12 - As for 1205.11, but with 28 and 29. 1205.13 - No. 24 standing at front entrance of Bendigo depot with No. 20 in the background. 1205.14 - No. 24 running out into McCrae St showing special, with conductor on front step. 1205.15 - No. 24 in Caledonia St. at corner of Thunder St with the Gasworks in the background. 1205.16 - No. 5 en route for Quarry Hill at Charing cross with No. 26 (en route for Eaglehawk) about to arrive. Has former crossover at this location in the foreground. Has the Ezywalkin building in the background. 1205.17 - No. 5 and 26 at Charing Cross, with the Alexandra Fountain in the foreground and the Beehive and Ezywalkin buildings in the background. No.26 has two SEC roof ads. 1205.18 - Charing Cross looking along Pall Mall with trams 7 and 21 and 26 in the picture. 1205.19 - Charing Cross, with 21 departing for Golden Square and No. 5 heading for Quarry Hill. Has the Ezywalkin and the Beehive buildings in the background. 1205.20 - as for 1205.19, but a few moments later. Adjacent pole has a "NO ROAD" letter in reflectors vertically. 1205.21 - Charing Cross with Nos. 25, 21, 26 and 7, looking south from Pall Mall end. 1205.22 - No. 24 crossing Mitchell St. en route for Golden Square, showing 'special' with the Beehive and Ezywalkin buildings in the background. 1205.23 - Charing Cross with Nos. 24, 21 and 7 in the photo and Fountain Plaza in the background. Print of 1205.7 - stored in box D1.Information written on in blue ink and date stamped on purple ink. 1205.1 - "No. 25 at Fire Station Loop High Street, Golden Square." 1205.2 - "Nos. 25 and 21 crossing at Fire Station Loop, near Golden Square." 1205.3 - "Nos. 25 and 21 crossing at Fire Station Loop, near Golden Square." 1205.4 - "No. 25 at Golden Square terminus." 1205.5 - "No. 25 at Golden Square terminus." 1205.6 - "Nos. 7 and 25 crossing at Myrtle St. Loop." 1205.7 - "No. 7 leaving Myrtle St. Loop." 1205.8 - "No 25, entering Bendigo Depot." 1205.9 - "Nos. 20 and 24 at Bendigo Depot." 1205.10 - "No. 24 at Bendigo Depot." 1205.11 - "Nos. 25 and 29 at Bendigo Depot." 1205.12 - "Birney cars 29 and 28 at Bendigo Depot." 1205.13 - "No. 24 (with 20 beyond) at Bendigo Depot." 1205.14 - "No. 24 entering McCrae St. from Arnold St." 1204.15 - "No. 24 in Caledonia St. at cnr of Thunder St." 1204.16 - "No. 5 waits at Charing Cross as No. 26 arrives from Quarry Hill. Note remains of crossover abandoned on relocation in 1965." 1204.17 - "Nos. 5 and 26 at Charing Cross." 1204.18 - "Nos. 26, 7 and 21 at Charing Cross (No. 5 just visible behind No. 26)." 1204.19 - "No. 21 leaves Charing Cross for Golden Square as No. 5 starts off for Quarry Hill." 1204.20 - "No. 21 swings onto the single track Golden Square line as No. 5 heads into Mitchell St. towards Quarry Hill." 1204.21 - "Nos. 25, 21 and 26 watch No. 7 arrive at Charing Cross from Golden Square." 1204.22 - "No. 24 at Charing Cross crossing Mitchell St." 1204.23 - "Nos. 24, 21 and 7 at Charing Cross."tramways, trams, bendigo, golden square, myrtle st., fire station, depot, charing cross, tram 5, tram 7, tram 20, tram 21, tram 24, tram 25, tram 28, tram 29 -
 Bendigo Historical Society Inc.
Document - MCCOLL, RANKIN AND STANISTREET COLLECTION: CENTRAL GARDEN GULLY
... McColl Rankin & Stanistreet, Charing Cross Bendigo..., Charing Cross Bendigo Manilla Folder containing correspondence ...Manilla Folder containing correspondence and applications for a mining lease on the Garden Gully Line known as Mumford's Claim, also contains maps of lease numbers 9993, 10173, and 10390 (all on the Garden Gully Line).McColl Rankin & Stanistreet, Charing Cross Bendigogold mining, miners' safety cage, central garden gully, mining, gold mines, bendigo, garden gully, mumfords claim -
 Bendigo Historical Society Inc.
Document - MCCOLL, RANKIN AND STANISTREET COLLECTION: TAMBOUR MAJOR LEASE, 1939/1940
... McColl Rankin & Stanistreet, Charing Cross Bendigo.... Tambour Major McColl Rankin & Stanistreet, Charing Cross Bendigo ...Manilla Folder containing Lease application and correspondence for lease No. 11007 (Tambour Major). Includes Map of lease. Also references to lease Numbers 10168 and 10899. Dated September 1939McColl Rankin & Stanistreet, Charing Cross Bendigo.gold mining, miners' safety cage, tambour major lease, gold mines, bendigo tambour major -
 Bendigo Historical Society Inc.
Document - MCCOLL, RANKIN AND STANISTREET COLLECTION: CONCORD LEASE, 1939
... McColl Rankin & Stanistreet, Charing Cross Bendigo.... Bendigo Mining Leases McColl Rankin & Stanistreet, Charing Cross ...Manilla Folder containing documents relating to Lease No. 10819. owned by My J. Hains of 46 Breen Street Bendigo. Mr Arthur Davies of 35 Sternberg Street wanted to prospect on the ground as the lease had not been worked for some considerable timeMcColl Rankin & Stanistreet, Charing Cross Bendigo.gold mining, miners' safety cage, concord lease, mining, gold mines, bendigo, mining leases