Showing 88 items matching "fire clay"
-
 Flagstaff Hill Maritime Museum and Village
Functional object - Bottle, c. 1850's - 1900's
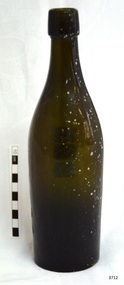
This is one of four bottles in our Collection that were recovered by a local diver from the quarantine area just inside the Port Phillip Heads. Ships were required to pull into this area to check for diseases etc before they could head up to Melbourne. Quite often they would drink and throw the bottles overboard. Handmade glass bottle, manufactured in 1850's - 1900's. Glass bottles and glass jars are in many households around the world. The first glass bottles were produced in south-east Asia around 100 B.C. and the Roman Empire around 1 AD. America's glass bottle and glass jar industry were born in the early 1600s when settlers in Jamestown built the first glass-melting furnace. The invention of the automatic glass bottle blowing machine in 1880 industrialized the process of making bottles. In 2019, plans were made to re-introduce milk glass bottle deliveries to Auckland in early 2020 The earliest bottles or vessels were made by ancient man. Ingredients were melted to make glass and then clay forms were dipped into the molten liquid. When the glass cooled off, the clay was chipped out of the inside leaving just the hollow glass vessel. This glass was very thin as the fire was not as hot as modern-day furnaces. The blowpipe was invented around 1 B.C. This allowed molten glass to be gathered at the end of the blowpipe and blown into the other end to create a hollow vessel. Eventually, the use of moulding was introduced, followed by the invention of the semi-automatic machine called the Press and Blow. In 1904 Michael Owens invented the automatic bottle machine. Before this time most glass bottles in England were hand blown. This is one of four bottles in our Collection that were recovered by a local diver from the quarantine area just inside the Port Phillip Heads. Ships were required to pull into this area to check for diseases etc before they could head up to Melbourne. Quite often they would drink and throw the bottles overboard. Handmade glass bottle, manufactured in the 1850s-1900s. The bottle gives a snapshot into history and a social life that occurred during the early days of Melbourne's development and the sea trade that visited the port in those days. Bottle, opaque brown glass, concave base, tapering slightly wider towards shoulder then inwards towards neck; ring of glass just below opening. Base is blown glass; pontil mark on base. "STUBBY 1850-1900 SMALL SIZE", ENGLISH 3 PIECE MOULD, HAND MADE TOP", "PAPER LABEL, CORK & WIRE SEAL $6flagstaff hill, warrnambool, shipwrecked coast, flagstaff hill maritime museum, maritime museum, shipwreck coast, flagstaff hill maritime village, great ocean road, brown glass bottle, handmade glass bottle, handmade beer bottle, handmade late 19th century bottle -
 Flagstaff Hill Maritime Museum and Village
Domestic object - Bottle, c. 1850's - 1900's
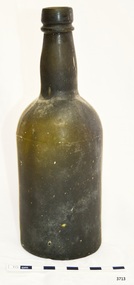
Glass bottles and glass jars are in many households around the world. The first glass bottles were produced in south-east Asia around 100 B.C. and the Roman Empire around 1 AD. America's glass bottle and glass jar industry were born in the early 1600s when settlers in Jamestown built the first glass-melting furnace. The invention of the automatic glass bottle blowing machine in 1880 industrialized the process of making bottles. In 2019, plans were made to re-introduce milk glass bottle deliveries to Auckland in early 2020 The earliest bottles or vessels were made by ancient man. Ingredients were melted to make glass and then clay forms were dipped into the molten liquid. When the glass cooled off, the clay was chipped out of the inside leaving just the hollow glass vessel. This glass was very thin as the fire was not as hot as modern-day furnaces. The blowpipe was invented around 1 B.C. This allowed molten glass to be gathered at the end of the blowpipe and blown into the other end to create a hollow vessel. Eventually, the use of moulding was introduced, followed by the invention of the semi-automatic machine called the Press and Blow. In 1904 Michael Owens invented the automatic bottle machine. Before this time most glass bottles in England were hand blown. This is one of four bottles in our Collection that were recovered by a local diver from the quarantine area just inside the Port Phillip Heads. Ships were required to pull into this area to check for diseases etc before they could head up to Melbourne. Quite often they would drink and throw the bottles overboard. Handmade glass bottle, manufactured in the 1850s-1900s. The bottle gives a snapshot into history and a social life that occurred during the early days of Melbourne's development and the sea trade that visited the port in those days. 1850's Pontiled Black Glass Stout/Porter/Ale Beer Bottle, solid colour brown glass,concave base with Pontil scar, tapering slightly wider towards shoulder then inwards towards neck; ring of glass just below opening cork and wire type.Label "c.1850's "Stubby ale" hand made in England flagstaff hill, warrnambool, shipwrecked coast, flagstaff hill maritime museum, maritime museum, shipwreck coast, flagstaff hill maritime village, great ocean road, brown glass bottle, handmade glass bottle, handmade beer bottle, handmade late 19th century bottle -
 Greensborough Historical Society
Functional object - Bricks, Hand made bricks from Partington house (Willis Vale) Greensborough, 1840c
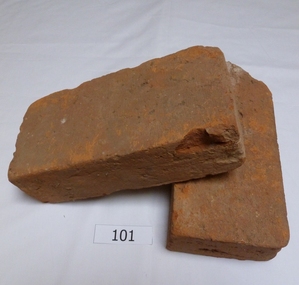
Bricks from "Willis Vale' home of the Partington family of Greensborough. Built in 1840, Willis Vale was owned by the Partington family from 1878 to 1947. It was a 2 storey house overlooking the Plenty River and set in 150 acres of farmland. The Partingtons moved out in 1947 and the house was vandalised shortly after. It was destroyed by fire in the 1960s.The bricks are a link to pioneer homes and farms in the area.Hand made clay bricks, light red in colour. All faces are flat.. One brick is chipped. Accompanying note: Hand made bricks from Partington house in Greensborough. Donated by Alan Partington.willis vale, partington family, greensborough, alan partington, bricks -
 Warrnambool and District Historical Society Inc.
Functional object - Brick, 94 Merri Street Warrnambool, Circa 1850
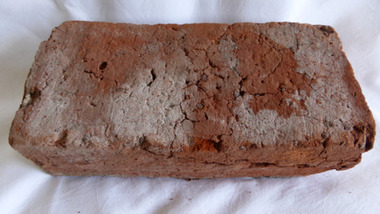
The building at 94 Merri St is amongst the earliest buildings in Warrnambool. It was possibly constructed before 1854 and maybe as early as 1848. The original building consisted of four main rooms under a hip roof. The outer walls were masonry , apparently rubble The Heritage Council indcate that on the balance of probabilities this was the general store of Richard Osbourne and John Moffat Chisholm built in 1847-48.The building at 94 Merri Street had historical and architectural significance to the state of Victoria. It was a rare example of surviving, pre separation building with associated interest in its materials and components It is associated with Richard Osbourne who founded the Warrnambool Examiner(1851_1889) and the town’s first historian. Architecturally, the significance of the house lay in the hand -wrought timber framing. All the major timbers in this building had been hand sawn. The Gold rush of the 1850’s saw this process mechanised. A kitchen fireplace in the rear skillion included a large block of Merri Creek Mudstone, a combination of “tufa” and clay that was used in the Warrnambool District as an excellent substitute for fire bricks. The house was demolished in 2011 and items of significance were salvaged, this brick being one. While some bricks were imported, there is evidence that there were a number of brick burning businesses in operation around this time. However it is difficult to ascertain to which group this brick belongs. Red clay rectangular brick. Contains some small gravel like material, possibly ferrous buckshot, grey mortar remnants on side and diagonal crack along one side.warrnambool, 94 merri street, richard osbourne, john moffat chisholm, hand sawn timber, brick, building materials -
 Flagstaff Hill Maritime Museum and Village
Ceramic - Tile, circa 1878
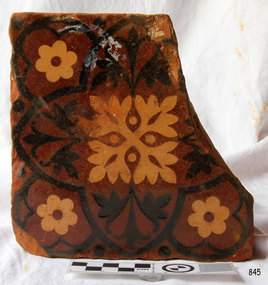
This Minton floor tile is from the wreck of the LOCH ARD along with other examples of this manufacture recovered from the wreck site and form part of the collection at Flagstaff Hill. The iron-hulled clipper ship from the Loch Line was heading for Port Phillip from London when it ran into the cliffs of Mutton Bird Island near Port Campbell and was wrecked on June 1st, 1878. The LOCH ARD was laden with high-value cargo including luxury goods intended for display at the Melbourne International Exhibition in 1880. One notable survivor from the ship’s freight manifest was the well-packed Minton porcelain peacock, a two-metre-high ceramic masterpiece of vivid glazed colours. The almost total loss of life and property from the LOCH ARD registered as a shocking tragedy for the Colony of Victoria, at a time when social confidence and economic optimism were otherwise high. The wealth generated from Gold and Wool was increasingly being spent on grandiose private residences and imposing public buildings. The demand for quality furnishings and fittings was therefore strong. Among the products consigned to burgeoning colonial markets by the Milton Pottery at Stoke upon Trent, were their new range of colourfully patterned but very durable floor tiles – ideal for the high-traffic spaces in the large civic buildings then being constructed in Australia and America. These new floor tiles were “encaustic”, meaning that their designs and colours were encased “within” the depth of the tile. Rather than their decorative patterns being glazed onto the surface of the tile, their inlaid designs were created during the manufacturing process, as “coloured slips” (or liquid clay) were poured into a deep pre-moulded casting. When fired, the resulting tile was colour-fast and design-fast. A brief history of the Loch Ard (1873-1878): - The sailing ship Loch Ard was one of the famous Loch Line ships that sailed from England to Australia. Barclay, Curdle and Co. built the three-masted iron vessel in Glasgow in 1873. It had sailed three trips to Australia and one trip to Calcutta before its fateful voyage. Loch Ard left England on March 2, 1878, under the command of recently married, 29-year-old Captain Gibbs. It was bound for Melbourne with a crew of 37, plus 17 passengers. The general cargo reflected the affluence of Melbourne at the time. Onboard were straw hats, umbrellas, perfumes, clay pipes, pianos, clocks, confectionery, linen and candles, and a heavier load of railway irons, cement, lead and copper. Other cargo included items intended for display in the Melbourne International Exhibition of 1880. The Loch Ard had been sailing for three months and was close to its destination on June 1, 1878. Captain Gibbs had expected to see land at about 3 am but the Loch Ard ran into a fog that greatly reduced visibility and there was no sign of land or the Cape Otway lighthouse. The fog lifted at 4 am and the sheer cliffs of Victoria's west coast were much closer to them than Captain Gibbs expected. He tried to manage the vessel but failed and the ship struck a reef at the base of Mutton Bird Island, near Port Campbell. The top deck loosened from the hull, and the masts and rigging crashed down, knocking passengers and crew overboard. The lifeboat was launched by Tom Pearce but crashed into the side of Loch Ard and capsized. He clung onto its overturned hull and sheltered under it. He drifted out to sea and the tide brought him back to what is now called Loch Ard Gorge. He swam to shore and found a cave for shelter. A passenger, Eva Carmichael, had raced onto the deck to find out what was happening and was confronted by towering cliffs above the ship. She was soon swept off the ship by a huge wave. Eva saw Tom Pearce on a small rocky beach and yelled to attract his attention. He swam out and dragged her to the shelter of the cave. He revived her with a bottle of brandy from a case that had washed up on the beach. Tom scaled a cliff in search of help and followed some horse hoof prints. He came from two men from Glenample Station, three and a half miles away. He told the men of the tragedy and then returned to the gorge while the two men rode back to the station to get help. They reached Loch Ard Gorge and took the two shipwreck survivors to Glenample Station to recover. Eva stayed at the station for six weeks before returning to Ireland by steamship. In Melbourne, Tom Pearce received a hero's welcome and was presented with a medal and some money. Of the 54 crew members and passengers on board, only two survived: the apprentice, Tom Pearce and the young woman passenger, Eva Carmichael, who lost her family in the tragedy. One of the most unlikely pieces of cargo to have survived the shipwreck was a Minton porcelain peacock - one of only nine in the world. The peacock was destined for the Melbourne International Exhibition in 1880. It had been well packed, which gave it adequate protection during the violent storm. Today, the Minton peacock can be seen at the Flagstaff Hill Maritime Museum in Warrnambool. From Australia's most dramatic shipwreck, it has now become Australia's most valuable shipwreck artefact and is one of very few 'objects' on the Victorian State Heritage Register. The Minton floor tile is significant for its hard-wearing yet attractive design. The shipwreck of the LOCH ARD is of State significance. Victorian Heritage Register S417. Flagstaff Hill’s collection of artefacts from LOCH ARD is significant for being one of the largest collections of artefacts from this shipwreck in Victoria. It is significant for its association with the shipwreck, which is on the Victorian Heritage Register (VHR S417). The collection is significant because of the relationship between the objects, as together they have a high potential to interpret the story of the LOCH ARD. The LOCH ARD collection is archaeologically significant as the remains of a large international passenger and cargo ship. The LOCH ARD collection is historically significant for representing aspects of Victoria’s shipping history and its potential to interpret sub-theme 1.5 of Victoria’s Framework of Historical Themes (living with natural processes). The collection is also historically significant for its association with the LOCH ARD, which was one of the worst and best-known shipwrecks in Victoria’s history. A square Minton floor tile with a black and apricot pattern against a chocolate brown background. There is a large chip missing. This decorative floor tile was recovered from the shipwreck of the LOCH ARD. On the back, or base, of the tile is inscribed the number “46” and the letters “Minton & Co Patent Stoke upon Trent”.flagstaff hill, warrnambool, shipwrecked coast, flagstaff hill maritime museum, maritime museum, shipwreck coast, flagstaff hill maritime village, great ocean road, loch line, loch ard, captain gibbs, eva carmichael, tom pearce, glenample station, mutton bird island, loch ard gorge, encaustic tile, melbourne international exhibition, floor tile, minton floor tile -
 Flagstaff Hill Maritime Museum and Village
Ceramic - Tile, circa 1878
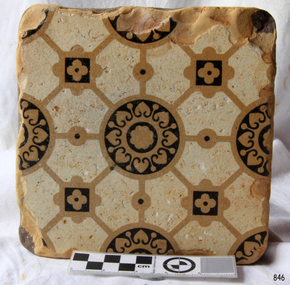
This Minton floor tile is from the wreck of the LOCH ARD. Other examples of this manufacture have been recovered from the wreck site and form part of the collection at Flagstaff Hill. The iron-hulled clipper ship from the Loch Line was heading for Port Phillip from London when it ran into the cliffs of Mutton Bird Island near Port Campbell and was wrecked on the early morning of June 1, 1878. The LOCH ARD was laden with high-value cargo including luxury goods intended for display at the Melbourne International Exhibition in 1880. One notable survivor from the ship’s freight manifest was the well-packed Minton porcelain peacock, a two-metre-high ceramic masterpiece of vivid glazed colours. The almost total loss of life and property from the LOCH ARD registered as a shocking tragedy for the Colony of Victoria, at a time when social confidence and economic optimism were otherwise high. The wealth generated from gold and wool was increasingly being spent on magnificent private residences and imposing public buildings. The demand for quality furnishings and fittings was therefore strong. Among the products consigned to burgeoning colonial markets by the Milton Pottery at Stoke upon Trent were their new range of colourfully patterned but very durable floor tiles – ideal for the high-traffic spaces in the large civic buildings then being constructed in Australia and America. These new floor tiles were “encaustic”, meaning that their designs and colours were encased within the depth of the tile. Rather than their decorative patterns being glazed onto the surface of the tile, their inlaid designs were created during the manufacturing process, as “coloured slips” (or liquid clay) that were poured into a deep pre-moulded casting. When fired, the resulting tile was colour-fast and design-fast.The Minton encaustic floor tile is significant for its method of manufacture which makes it durable as well as decorative. The shipwreck of the LOCH ARD is of State significance. Victorian Heritage Register S417. Flagstaff Hill’s collection of artefacts from LOCH ARD is significant for being one of the largest collections of artefacts from this shipwreck in Victoria. It is significant for its association with the shipwreck, which is on the Victorian Heritage Register (VHR S417). The collection is significant because of the relationship between the objects, as together they have a high potential to interpret the story of the LOCH ARD. The LOCH ARD collection is archaeologically significant as the remains of a large international passenger and cargo ship. The LOCH ARD collection is historically significant for representing aspects of Victoria’s shipping history and its potential to interpret sub-theme 1.5 of Victoria’s Framework of Historical Themes (living with natural processes). The collection is also historically significant for its association with the LOCH ARD, which was one of the worst and best-known shipwrecks in Victoria’s history.A square Minton floor tile with a black and beige pattern against a white base. This encaustic floor tile was recovered from the shipwreck of the LOCH ARD. On the back, or base, of the tile is inscribed the number “46” and the letters “Minton & Co Patent Stoke upon Trent”.flagstaff hill, warrnambool, shipwrecked coast, flagstaff hill maritime museum, maritime museum, shipwreck coast, flagstaff hill maritime village, great ocean road, loch line, loch ard, mutton bird island, loch ard gorge, minton floor tile, encaustic tile, melbourne international exhibition, floor tile -
 Flagstaff Hill Maritime Museum and Village
Ceramic - Floor Tile, circa 1878
This Minton floor tile is from the wreck of the Loch Ard and is currently on display in the Great Circle Gallery at Flagstaff Hill. The iron hulled clipper ship from the Loch Line was heading for Port Phillip from London, when it ran into the cliffs of Mutton Bird Island near Port Campbell. The Loch Ard was laden with a high value cargo including luxury goods intended for display at the Melbourne International Exhibition in 1880. One notable survivor from the ship’s freight manifest was the well packed Minton porcelain peacock, a two meter high ceramic masterpiece of vivid glazed colours. (This is also on display in the Great Circle Gallery). The almost total loss of life and property from the Loch Ard registered as a shocking tragedy for the Colony of Victoria, at a time when social confidence and economic optimism were otherwise high. Wealth generated from Gold and Wool was increasingly being spent on grandiose private residences and imposing public buildings. The demand for quality furnishings and fittings was therefore strong. Among the products consigned to burgeoning colonial markets by the Milton pottery at Stoke upon Trent, were their new range of colourfully patterned but very durable floor tiles ideal for the high-traffic spaces in the large civic buildings then being constructed in Australia and America. These new floor tiles were “encaustic”, meaning that their designs and colours were encased “within” the depth of the tile. Rather than their decorative patterns being glazed onto the surface of the tile, their inlaid designs were created during the manufacturing process, as “coloured slips” (or liquid clay) were poured into a deep pre-molded casting. When fired, the resulting tile was colours-fast and design-fast. The Minton floor tile is significant for its hard-wearing yet attractive design. The shipwreck of the Loch Ard is of significance for Victoria and is registered on the Victorian Heritage Register ( S 417). Flagstaff Hill has a varied collection of artefacts from Loch Ard and its collection is significant for being one of the largest accumulations of artefacts from this notable Victorian shipwreck of which the subject items are a small part. The collections of objects give us a snapshot of how we can interpret the story of this tragic event. The collection is also archaeologically significant as it represents aspects of Victoria's shipping history that allows us to interpret Victoria's social and historical themes of the time. Through is associated with the worst and best-known shipwreck in Victoria's history. A square Minton floor tile with a dark brown, beige and white pattern. The tile has a piece broken off along one side and some chipping along the edges. This ‘encaustic’ floor tile was recovered from the shipwreck of the LOCH ARD. Branded "... MINTON&CO Patent ..."flagstaff hill, warrnambool, flagstaff hill maritime museum, shipwreck coast, flagstaff hill maritime village, great ocean road, loch line, loch ard, captain gibbs, eva carmichael, tom pearce, glenample station, mutton bird island, minton floor tile, encaustic tile, melbourne international exhibition, floor tile -
 Flagstaff Hill Maritime Museum and Village
Ceramic - Teapot, First half of the 20th century
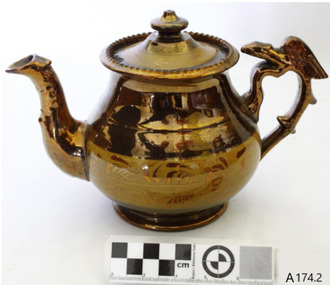
Lusterware is a type of pottery or porcelain with a metallic glaze that gives the effect of iridescence. The technique on pottery was first developed in Mesopotamia (modern Iraq) in the early 9th century. It is produced by metallic oxides in an overglaze finish, which is given a second firing at a lower temperature in a "muffle kiln", or a reduction kiln, excluding oxygen. The Lusterware effect is a final coating applied over the ceramic glaze, and fixed by a light second firing, applying small amounts of metallic compounds (generally of silver or copper) mixed with something to make it paintable (clay or ochre). This is then fired in a reducing atmosphere at a temperature high enough to "soften" the glaze from the first firing, and break down the metallic compounds, leaving a very thin ("perhaps 10 or 20 atoms thick") layer that is fused with the main glaze, but is mainly metal. Lusterware normally only uses one colour per piece, and the range is limited a "gold" derived from silver compounds was historically the most common. The process has always been expensive and rather unpredictable, always requiring two firings, and often the use of expensive materials such as silver and platinum. The very thin layer of luster is often delicate, and many types of Lusterware are easily damaged by scratching removing the metallic layer, or by contact with acids. Lusterware has therefore always been for display and occasional use, although by the 19th century it could be relatively cheap. Many pieces show the luster effect only working correctly on parts of the surface, or not at all. An item probably made in Staffordshire UK where this type of pottery was popular in the late 19th century by unknown pottery as the subject item has no marks. The teapot at this time cannot be associated with a historical event, person, or place, provenance regards manufacture is unknown, item assessed as a collection asset given it was produced before 1950.Teapot ceramic ornate copper lusterware abstract floral design handle has a protruding sculptured bird for thumb grip. Nonewarrnambool, flagstaff-hill, flagstaff-hill-maritime-museum, maritime-museum, shipwreck-coast, flagstaff-hill-maritime-village, teapot, tea set, kitchen ware, ceramic, lusterware, pottery, staffordshire uk, pottery finishes -
 Flagstaff Hill Maritime Museum and Village
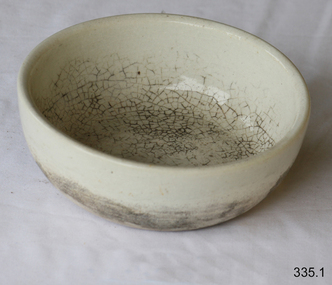
Domestic object - Bowl, Late 19th or early 20th Century
The Process of Making Pottery Decorating, Firing, Glazing, Making, Technical There is a rhythm and flow to clay. It can’t be done all at once! Even the making process! It can take weeks to get everything done, especially if you can only work on your pottery once a week! Even though we have three hour classes, it’s often just not enough time! Here is an overview of some of the processes so you have a bit more grasp on some of the technical stuff! Step One – Design There are SO many ideas out there for making stuff in clay! From delicate porcelain jewellery, through to heavy sculptural work and everything in between. Deciding your direction is sometimes not that easy – when you first start, try everything, you will naturally gravitate to the style that you enjoy! The options and variations are endless and can get a wee bit overwhelming too! Check in with me before you start to ensure your ideas will work, what order you might do things, how you could achieve the look you are seeking and any other technical data required! Step Two – Making Clay is thixotropic. This means that as you work with it, the clay first gets sloppier and wetter, before is begins to dry in the atmosphere. For most things, you simply can’t do all parts of the project at once. An example of work order might look like: Get last weeks work out from the shelves Prepare clay for today’s work – roll your clay, prepare balls for throwing, make the first stage of a pinch pot) Clean up last week’s work and put it on the shelf for bisque firing Check that you have any glazing to do – and do enough of it that you will have time to finish your main project Do the next step of your next project – there might be a further step that can’t be complete immediately, in that case, wrap your work well and put onto the shelves. Letting your work rest for a while can really help keep your work clean and professional looking. Many things require bagging under plastic to keep it ready for work the next week – put your name on the outside of the bag so you can find your work easily. We have stickers and markers. Consider how you want to decorate your work – coloured slip can be applied at a fairly wet stage (remembering that it will make your work even wetter!). Trying to apply slip to dry clay won’t work! If you want to do sgraffito – you will need to keep the work leather hard (a state of dryness where you can still work the clay with a little effort and a little water and care). Step Three – Drying Most of the time your work can go into the rack uncovered to let it dry out for the following week. If you want to continue forming or shaping you will need to double bag your work – put your work on a suitable sized bat and put the bat in a bag so the base of the bag is under the bat, then put another bag over the top of the work and tuck the top of the bag under the bat. If you want to trim (or turn) your thrown work the following week, it should also be double bagged. If your work is large, delicate, or of uneven thicknesses, you should lightly cover your work for drying. When considering the drying process, bare in mind the weather, humidity and wind! The hotter and dryer, the faster things dry and work can dry unevenly in the shelves – this can lead to cracking – another time to lightly cover your work for drying. Step Four – Trimming and Cleaning Up Your work is dry! It is called greenware now and it is at it’s most fragile! Handle everything with two hands. I often refer to soft hands – keep everything gentle and with your fingers spread as much as possible. Try to not pick up things like plates too much, and always with both hands! Before your work can be bisque fired it should be “cleaned up”. You work won’t go into the kiln if it has sharp edges – when glazed, sharp edges turn into razor blades! Use a piece of fly wire to rub the work all over – this will scratch a little so be light handed. Use a knife or metal kidney to scrape any areas that require a bit more dynamic treatment than the fly wire offers! Finally, a very light wipe over with a slightly damp sponge can help soften and soothe all of your edges and dags! Trimming thrown work: If you are planning to trim (or turn) your thrown work (and you should be), make sure you bag it well – your work should be leather hard to almost dry for easiest trimming. Use this step to finish the work completely – use a metal kidney to polish the surface, or a slightly damp sponge to give a freshly thrown look. Wipe the sponge around the rim after trimming, and check the inside of the pot for dags! Trimming slip cast work: Usually I will trim the rims of your work on the wheel the following day to make that stage easier, however you will still need to check your work for lumps and bumps. Last but not least – check that your name is still clearly on the bottom of your work. Step Five – Bisque Firing When the work is completely dry it can go into the bisque kiln. The bisque kiln is fired to 1000°C. This process burns off the water in the clay as well as some of the chemically bound water. The structure of the clay is not altered that much at this temperature. Inside the bisque kiln, the work is stacked a little, small bowl inside a larger bowl and onto a heavy plate. Smaller items like decorations or drink coasters might get stacked several high. Consideration is paid to the weight of the stack and shape of the work. A bisque kiln can fire about one and a half times the amount of work that the glaze kiln can fire. The firing takes about 10 hours to complete the cycle and about two days to cool down. Once it has been emptied the work is placed in the glaze room ready for you to decorate! Step Six – Glazing Decorating your work with colour can be a lot of fun – and time consuming! There are three main options for surface treatment at this stage: Oxide Washes Underglazes Glazes Washes and underglazes do not “glaze” the work – It will still need a layer of glaze to fully seal the clay (washes don’t need glaze on surfaces not designed for food or liquid as they can gloss up a little on their own). Underglazes are stable colourants that turn out pretty much how they look in the jar. They can be mixed with each other to form other colours and can be used like water colours to paint onto your work. Mostly they should have a clear glaze on top to seal them. Oxides are a different species – the pink oxide (cobalt) wash turns out bright blue for instance. They don’t always need a glaze on top, and some glazes can change the colour of the wash! The glazes need no other “glaze” on top! Be careful of unknown glaze interactions – you can put any combination of glaze in a bowl or on a plate, but only a single glaze on the outside of any vertical surface! Glazes are a chemical reaction under heat. We don’t know the exact chemicals in the Mayco glazes we use. I can guess by the way they interact with each other, however, on the whole, you need to test every idea you have, and not run the test on a vertical surface! Simply put, glaze is a layer of glass like substance that bonds with the clay underneath. Clay is made of silica, alumina and water. Glaze is made of mostly silica. Silica has a melting point of 1700°C and we fire to 1240°C. The silica requires a “flux” to help it melt at the lower temperature. Fluxes can be all sorts of chemicals – a common one is calcium – calcium has a melting point of 2500°C, however, together they both melt at a much lower temperature! Colourants are metal oxides like cobalt (blue), chrome (green through black), copper (green, blue, even red!), manganese (black, purple and pink) iron (red brown), etc. Different chemicals in the glaze can have dramatic effects. for example, barium carbonate (which we don’t use) turns manganese bright pink! Other elements can turn manganese dioxide brown, blue, purple and reddish brown. Manganese dioxide is a flux in and of itself as well. So, glazes that get their black and purple colours, often interact with other glazes and RUN! Our mirror black is a good example – it mixes really well with many glazes because it fluxes them – causes them to melt faster. It will also bring out many beautiful colours in the glazes because it’s black colouring most definitely comes from manganese dioxide! Glaze chemistry is a whole subject on it’s own! We use commercial Mayco glazes on purpose – for their huge range of colour possibilities, stability, cool interactions, artistic freedom with the ability to easily brush the glazes on and ease of use. We currently have almost 50 glazes on hand! A major project is to test the interactions of all glazes with each other. That is 2,500 test tiles!!!! I’m going to make the wall behind the wheels the feature wall of pretty colours! Step Seven – Glaze (Gloss or sometimes called “Glost”) Firing Most of the time this is the final stage of making your creation (but not always!) The glaze kiln goes to 1240°C. This is called cone 6, or midrange. It is the low end of stoneware temperatures. Stoneware clays and glazes are typically fired at cone 8 – 10, that is 1260 – 1290°C. The energy requirement to go from 1240°C to 1280°C is almost a 30% more! Our clay is formulated to vitrify (mature, turn “glass-like”) at 1240°, as are our glazes. A glaze kiln take around 12 hours to reach temperature and two to three days to cool down. Sometimes a third firing process is required – this is for decoration that is added to work after the glaze firing. For example – adding precious metals and lustres. this firing temperature is usually around 600 – 800°C depending upon the techniques being used. There are many students interested in gold and silver trims – we will be doing this third type of firing soon! After firing your work will be in the student finished work shelves. Remember to pay for it before you head out the door! There is a small extra charge for using porcelain clay (it’s more than twice the price of regular clay), and for any third firing process! Once your work has been fired it can not turn back into clay for millennia – so don’t fire it if you don’t like it! Put it in the bucket for recycling. https://firebirdstudios.com.au/the-process-of-making-pottery/ The bowl is an example of kitchenware used in the 19th century and still in use today.Bowl white ceramic. Crack on side. Badly stained.Backstamp very faint and unable to be read.flagstaff hill, warrnambool, shipwrecked-coast, flagstaff-hill, flagstaff-hill-maritime-museum, maritime-museum, shipwreck-coast, flagstaff-hill-maritime-village, mixing bowl, food preparation, kitchen equipment, ceramic -
 Flagstaff Hill Maritime Museum and Village
Domestic object - Bowl
The Process of Making Pottery Decorating, Firing, Glazing, Making, Technical There is a rhythm and flow to clay. It can’t be done all at once! Even the making process! It can take weeks to get everything done, especially if you can only work on your pottery once a week! Even though we have three hour classes, it’s often just not enough time! Here is an overview of some of the processes so you have a bit more grasp on some of the technical stuff! Step One – Design There are SO many ideas out there for making stuff in clay! From delicate porcelain jewellery, through to heavy sculptural work and everything in between. Deciding your direction is sometimes not that easy – when you first start, try everything, you will naturally gravitate to the style that you enjoy! The options and variations are endless and can get a wee bit overwhelming too! Check in with me before you start to ensure your ideas will work, what order you might do things, how you could achieve the look you are seeking and any other technical data required! Step Two – Making Clay is thixotropic. This means that as you work with it, the clay first gets sloppier and wetter, before is begins to dry in the atmosphere. For most things, you simply can’t do all parts of the project at once. An example of work order might look like: Get last weeks work out from the shelves Prepare clay for today’s work – roll your clay, prepare balls for throwing, make the first stage of a pinch pot) Clean up last week’s work and put it on the shelf for bisque firing Check that you have any glazing to do – and do enough of it that you will have time to finish your main project Do the next step of your next project – there might be a further step that can’t be complete immediately, in that case, wrap your work well and put onto the shelves. Letting your work rest for a while can really help keep your work clean and professional looking. Many things require bagging under plastic to keep it ready for work the next week – put your name on the outside of the bag so you can find your work easily. We have stickers and markers. Consider how you want to decorate your work – coloured slip can be applied at a fairly wet stage (remembering that it will make your work even wetter!). Trying to apply slip to dry clay won’t work! If you want to do sgraffito – you will need to keep the work leather hard (a state of dryness where you can still work the clay with a little effort and a little water and care). Step Three – Drying Most of the time your work can go into the rack uncovered to let it dry out for the following week. If you want to continue forming or shaping you will need to double bag your work – put your work on a suitable sized bat and put the bat in a bag so the base of the bag is under the bat, then put another bag over the top of the work and tuck the top of the bag under the bat. If you want to trim (or turn) your thrown work the following week, it should also be double bagged. If your work is large, delicate, or of uneven thicknesses, you should lightly cover your work for drying. When considering the drying process, bare in mind the weather, humidity and wind! The hotter and dryer, the faster things dry and work can dry unevenly in the shelves – this can lead to cracking – another time to lightly cover your work for drying. Step Four – Trimming and Cleaning Up Your work is dry! It is called greenware now and it is at it’s most fragile! Handle everything with two hands. I often refer to soft hands – keep everything gentle and with your fingers spread as much as possible. Try to not pick up things like plates too much, and always with both hands! Before your work can be bisque fired it should be “cleaned up”. You work won’t go into the kiln if it has sharp edges – when glazed, sharp edges turn into razor blades! Use a piece of fly wire to rub the work all over – this will scratch a little so be light handed. Use a knife or metal kidney to scrape any areas that require a bit more dynamic treatment than the fly wire offers! Finally, a very light wipe over with a slightly damp sponge can help soften and soothe all of your edges and dags! Trimming thrown work: If you are planning to trim (or turn) your thrown work (and you should be), make sure you bag it well – your work should be leather hard to almost dry for easiest trimming. Use this step to finish the work completely – use a metal kidney to polish the surface, or a slightly damp sponge to give a freshly thrown look. Wipe the sponge around the rim after trimming, and check the inside of the pot for dags! Trimming slip cast work: Usually I will trim the rims of your work on the wheel the following day to make that stage easier, however you will still need to check your work for lumps and bumps. Last but not least – check that your name is still clearly on the bottom of your work. Step Five – Bisque Firing When the work is completely dry it can go into the bisque kiln. The bisque kiln is fired to 1000°C. This process burns off the water in the clay as well as some of the chemically bound water. The structure of the clay is not altered that much at this temperature. Inside the bisque kiln, the work is stacked a little, small bowl inside a larger bowl and onto a heavy plate. Smaller items like decorations or drink coasters might get stacked several high. Consideration is paid to the weight of the stack and shape of the work. A bisque kiln can fire about one and a half times the amount of work that the glaze kiln can fire. The firing takes about 10 hours to complete the cycle and about two days to cool down. Once it has been emptied the work is placed in the glaze room ready for you to decorate! Step Six – Glazing Decorating your work with colour can be a lot of fun – and time consuming! There are three main options for surface treatment at this stage: Oxide Washes Underglazes Glazes Washes and underglazes do not “glaze” the work – It will still need a layer of glaze to fully seal the clay (washes don’t need glaze on surfaces not designed for food or liquid as they can gloss up a little on their own). Underglazes are stable colourants that turn out pretty much how they look in the jar. They can be mixed with each other to form other colours and can be used like water colours to paint onto your work. Mostly they should have a clear glaze on top to seal them. Oxides are a different species – the pink oxide (cobalt) wash turns out bright blue for instance. They don’t always need a glaze on top, and some glazes can change the colour of the wash! The glazes need no other “glaze” on top! Be careful of unknown glaze interactions – you can put any combination of glaze in a bowl or on a plate, but only a single glaze on the outside of any vertical surface! Glazes are a chemical reaction under heat. We don’t know the exact chemicals in the Mayco glazes we use. I can guess by the way they interact with each other, however, on the whole, you need to test every idea you have, and not run the test on a vertical surface! Simply put, glaze is a layer of glass like substance that bonds with the clay underneath. Clay is made of silica, alumina and water. Glaze is made of mostly silica. Silica has a melting point of 1700°C and we fire to 1240°C. The silica requires a “flux” to help it melt at the lower temperature. Fluxes can be all sorts of chemicals – a common one is calcium – calcium has a melting point of 2500°C, however, together they both melt at a much lower temperature! Colourants are metal oxides like cobalt (blue), chrome (green through black), copper (green, blue, even red!), manganese (black, purple and pink) iron (red brown), etc. Different chemicals in the glaze can have dramatic effects. for example, barium carbonate (which we don’t use) turns manganese bright pink! Other elements can turn manganese dioxide brown, blue, purple and reddish brown. Manganese dioxide is a flux in and of itself as well. So, glazes that get their black and purple colours, often interact with other glazes and RUN! Our mirror black is a good example – it mixes really well with many glazes because it fluxes them – causes them to melt faster. It will also bring out many beautiful colours in the glazes because it’s black colouring most definitely comes from manganese dioxide! Glaze chemistry is a whole subject on it’s own! We use commercial Mayco glazes on purpose – for their huge range of colour possibilities, stability, cool interactions, artistic freedom with the ability to easily brush the glazes on and ease of use. We currently have almost 50 glazes on hand! A major project is to test the interactions of all glazes with each other. That is 2,500 test tiles!!!! I’m going to make the wall behind the wheels the feature wall of pretty colours! Step Seven – Glaze (Gloss or sometimes called “Glost”) Firing Most of the time this is the final stage of making your creation (but not always!) The glaze kiln goes to 1240°C. This is called cone 6, or midrange. It is the low end of stoneware temperatures. Stoneware clays and glazes are typically fired at cone 8 – 10, that is 1260 – 1290°C. The energy requirement to go from 1240°C to 1280°C is almost a 30% more! Our clay is formulated to vitrify (mature, turn “glass-like”) at 1240°, as are our glazes. A glaze kiln take around 12 hours to reach temperature and two to three days to cool down. Sometimes a third firing process is required – this is for decoration that is added to work after the glaze firing. For example – adding precious metals and lustres. this firing temperature is usually around 600 – 800°C depending upon the techniques being used. There are many students interested in gold and silver trims – we will be doing this third type of firing soon! After firing your work will be in the student finished work shelves. Remember to pay for it before you head out the door! There is a small extra charge for using porcelain clay (it’s more than twice the price of regular clay), and for any third firing process! Once your work has been fired it can not turn back into clay for millennia – so don’t fire it if you don’t like it! Put it in the bucket for recycling. https://firebirdstudios.com.au/the-process-of-making-pottery/ This bowl is an example of kitchenware used in the 19th century and still in use today.Bowl white ceramic plain that has two sets of edging around lip. Inside bowl has plaster designed to look like cooking mixture.flagstaff hill, warrnambool, shipwrecked-coast, flagstaff-hill, flagstaff-hill-maritime-museum, maritime-museum, shipwreck-coast, flagstaff-hill-maritime-village, kitchen equipment, ceramic -
 Flagstaff Hill Maritime Museum and Village
Container - Bowl, Late 19th or early 20th Century
Human beings appear to have been making their own ceramics for at least 26,000 years, subjecting clay and silica to intense heat to fuse and form ceramic materials. The earliest found so far were in southern central Europe and were sculpted figures, not dishes. The earliest known pottery was made by mixing animal products with clay and baked in kilns at up to 800°C. While actual pottery fragments have been found up to 19,000 years old, it was not until about ten thousand years later that regular pottery became common. An early people that spread across much of Europe is named after its use of pottery, the Corded Ware culture. These early Indo-European peoples decorated their pottery by wrapping it with rope, while still wet. When the ceramics were fired, the rope burned off but left a decorative pattern of complex grooves on the surface. The invention of the wheel eventually led to the production of smoother, more even pottery using the wheel-forming technique, like the pottery wheel. Early ceramics were porous, absorbing water easily. It became useful for more items with the discovery of glazing techniques, coating pottery with silicon, bone ash, or other materials that could melt and reform into a glassy surface, making a vessel less pervious to water. https://en.wikipedia.org/wiki/CeramicThe discovery and development of ceramics in numerous shapes, form and materials, revolutionised the world.Plain cream ceramic bowl with flat bottom inside. Shiny glaze fades to flat texture towards base. Possibly hand thrown pottery. No backstamp. Bad crazing and staining.None.flagstaff hill, warrnambool, shipwrecked-coast, flagstaff-hill, flagstaff-hill-maritime-museum, maritime-museum, shipwreck-coast, flagstaff-hill-maritime-village, ceramics -
 Flagstaff Hill Maritime Museum and Village
Domestic object - Bowl, J & G Meakin, Late 19th or early 20th Century
The Process of Making Pottery Decorating, Firing, Glazing, Making, Technical There is a rhythm and flow to clay. It can’t be done all at once! Even the making process! It can take weeks to get everything done, especially if you can only work on your pottery once a week! Even though we have three hour classes, it’s often just not enough time! Here is an overview of some of the processes so you have a bit more grasp on some of the technical stuff! Step One – Design There are SO many ideas out there for making stuff in clay! From delicate porcelain jewellery, through to heavy sculptural work and everything in between. Deciding your direction is sometimes not that easy – when you first start, try everything, you will naturally gravitate to the style that you enjoy! The options and variations are endless and can get a wee bit overwhelming too! Check in with me before you start to ensure your ideas will work, what order you might do things, how you could achieve the look you are seeking and any other technical data required! Step Two – Making Clay is thixotropic. This means that as you work with it, the clay first gets sloppier and wetter, before is begins to dry in the atmosphere. For most things, you simply can’t do all parts of the project at once. An example of work order might look like: Get last weeks work out from the shelves Prepare clay for today’s work – roll your clay, prepare balls for throwing, make the first stage of a pinch pot) Clean up last week’s work and put it on the shelf for bisque firing Check that you have any glazing to do – and do enough of it that you will have time to finish your main project Do the next step of your next project – there might be a further step that can’t be complete immediately, in that case, wrap your work well and put onto the shelves. Letting your work rest for a while can really help keep your work clean and professional looking. Many things require bagging under plastic to keep it ready for work the next week – put your name on the outside of the bag so you can find your work easily. We have stickers and markers. Consider how you want to decorate your work – coloured slip can be applied at a fairly wet stage (remembering that it will make your work even wetter!). Trying to apply slip to dry clay won’t work! If you want to do sgraffito – you will need to keep the work leather hard (a state of dryness where you can still work the clay with a little effort and a little water and care). Step Three – Drying Most of the time your work can go into the rack uncovered to let it dry out for the following week. If you want to continue forming or shaping you will need to double bag your work – put your work on a suitable sized bat and put the bat in a bag so the base of the bag is under the bat, then put another bag over the top of the work and tuck the top of the bag under the bat. If you want to trim (or turn) your thrown work the following week, it should also be double bagged. If your work is large, delicate, or of uneven thicknesses, you should lightly cover your work for drying. When considering the drying process, bare in mind the weather, humidity and wind! The hotter and dryer, the faster things dry and work can dry unevenly in the shelves – this can lead to cracking – another time to lightly cover your work for drying. Step Four – Trimming and Cleaning Up Your work is dry! It is called greenware now and it is at it’s most fragile! Handle everything with two hands. I often refer to soft hands – keep everything gentle and with your fingers spread as much as possible. Try to not pick up things like plates too much, and always with both hands! Before your work can be bisque fired it should be “cleaned up”. You work won’t go into the kiln if it has sharp edges – when glazed, sharp edges turn into razor blades! Use a piece of fly wire to rub the work all over – this will scratch a little so be light handed. Use a knife or metal kidney to scrape any areas that require a bit more dynamic treatment than the fly wire offers! Finally, a very light wipe over with a slightly damp sponge can help soften and soothe all of your edges and dags! Trimming thrown work: If you are planning to trim (or turn) your thrown work (and you should be), make sure you bag it well – your work should be leather hard to almost dry for easiest trimming. Use this step to finish the work completely – use a metal kidney to polish the surface, or a slightly damp sponge to give a freshly thrown look. Wipe the sponge around the rim after trimming, and check the inside of the pot for dags! Trimming slip cast work: Usually I will trim the rims of your work on the wheel the following day to make that stage easier, however you will still need to check your work for lumps and bumps. Last but not least – check that your name is still clearly on the bottom of your work. Step Five – Bisque Firing When the work is completely dry it can go into the bisque kiln. The bisque kiln is fired to 1000°C. This process burns off the water in the clay as well as some of the chemically bound water. The structure of the clay is not altered that much at this temperature. Inside the bisque kiln, the work is stacked a little, small bowl inside a larger bowl and onto a heavy plate. Smaller items like decorations or drink coasters might get stacked several high. Consideration is paid to the weight of the stack and shape of the work. A bisque kiln can fire about one and a half times the amount of work that the glaze kiln can fire. The firing takes about 10 hours to complete the cycle and about two days to cool down. Once it has been emptied the work is placed in the glaze room ready for you to decorate! Step Six – Glazing Decorating your work with colour can be a lot of fun – and time consuming! There are three main options for surface treatment at this stage: Oxide Washes Underglazes Glazes Washes and underglazes do not “glaze” the work – It will still need a layer of glaze to fully seal the clay (washes don’t need glaze on surfaces not designed for food or liquid as they can gloss up a little on their own). Underglazes are stable colourants that turn out pretty much how they look in the jar. They can be mixed with each other to form other colours and can be used like water colours to paint onto your work. Mostly they should have a clear glaze on top to seal them. Oxides are a different species – the pink oxide (cobalt) wash turns out bright blue for instance. They don’t always need a glaze on top, and some glazes can change the colour of the wash! The glazes need no other “glaze” on top! Be careful of unknown glaze interactions – you can put any combination of glaze in a bowl or on a plate, but only a single glaze on the outside of any vertical surface! Glazes are a chemical reaction under heat. We don’t know the exact chemicals in the Mayco glazes we use. I can guess by the way they interact with each other, however, on the whole, you need to test every idea you have, and not run the test on a vertical surface! Simply put, glaze is a layer of glass like substance that bonds with the clay underneath. Clay is made of silica, alumina and water. Glaze is made of mostly silica. Silica has a melting point of 1700°C and we fire to 1240°C. The silica requires a “flux” to help it melt at the lower temperature. Fluxes can be all sorts of chemicals – a common one is calcium – calcium has a melting point of 2500°C, however, together they both melt at a much lower temperature! Colourants are metal oxides like cobalt (blue), chrome (green through black), copper (green, blue, even red!), manganese (black, purple and pink) iron (red brown), etc. Different chemicals in the glaze can have dramatic effects. for example, barium carbonate (which we don’t use) turns manganese bright pink! Other elements can turn manganese dioxide brown, blue, purple and reddish brown. Manganese dioxide is a flux in and of itself as well. So, glazes that get their black and purple colours, often interact with other glazes and RUN! Our mirror black is a good example – it mixes really well with many glazes because it fluxes them – causes them to melt faster. It will also bring out many beautiful colours in the glazes because it’s black colouring most definitely comes from manganese dioxide! Glaze chemistry is a whole subject on it’s own! We use commercial Mayco glazes on purpose – for their huge range of colour possibilities, stability, cool interactions, artistic freedom with the ability to easily brush the glazes on and ease of use. We currently have almost 50 glazes on hand! A major project is to test the interactions of all glazes with each other. That is 2,500 test tiles!!!! I’m going to make the wall behind the wheels the feature wall of pretty colours! Step Seven – Glaze (Gloss or sometimes called “Glost”) Firing Most of the time this is the final stage of making your creation (but not always!) The glaze kiln goes to 1240°C. This is called cone 6, or midrange. It is the low end of stoneware temperatures. Stoneware clays and glazes are typically fired at cone 8 – 10, that is 1260 – 1290°C. The energy requirement to go from 1240°C to 1280°C is almost a 30% more! Our clay is formulated to vitrify (mature, turn “glass-like”) at 1240°, as are our glazes. A glaze kiln take around 12 hours to reach temperature and two to three days to cool down. Sometimes a third firing process is required – this is for decoration that is added to work after the glaze firing. For example – adding precious metals and lustres. this firing temperature is usually around 600 – 800°C depending upon the techniques being used. There are many students interested in gold and silver trims – we will be doing this third type of firing soon! After firing your work will be in the student finished work shelves. Remember to pay for it before you head out the door! There is a small extra charge for using porcelain clay (it’s more than twice the price of regular clay), and for any third firing process! Once your work has been fired it can not turn back into clay for millennia – so don’t fire it if you don’t like it! Put it in the bucket for recycling. https://firebirdstudios.com.au/the-process-of-making-pottery/This bowl was made by renowned pottery company J & G Meakin of England. The firm was established in the mid-1800's. The bowl is an example of kitchenware used in the 19th century and still in use today.Bowl; white ceramic, round and tapering inwards towards base. Made by J and G Meakin England.On base, 'Ironstone China Reg SOL 391413' with symbolflagstaff hill, flagstaff hill maritime museum and village, warrnambool, maritime museum, maritime village, great ocean road, shipwreck coast, mixing bowl, food preparation, j & g meakin, pottery, stoke-on-trent, kitchen equipment, ceramic -
 Flagstaff Hill Maritime Museum and Village
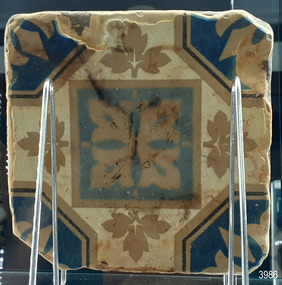
Ceramic - Floor Tile, circa 1878
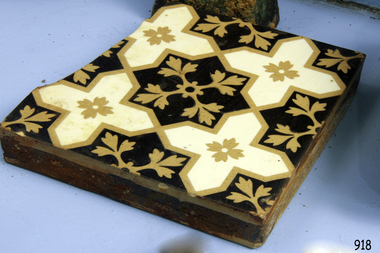
This Minton floor tile is from the wreck of the Loch Ard. The iron-hulled clipper ship from the Loch Line was heading for Port Phillip from London, when it ran into the cliffs of Mutton Bird Island near Port Campbell. The Loch Ard was laden with high-value cargo including luxury goods intended for display at the Melbourne International Exhibition in 1880. One notable survivor from the ship’s freight manifest was the well-packed Minton porcelain peacock, a two-meter high ceramic masterpiece of vivid glazed colours. (This is also on display in the Great Circle Gallery). The almost total loss of life and property from the Loch Ard registered as a shocking tragedy for the Colony of Victoria, at a time when social confidence and economic optimism were otherwise high. The wealth generated from Gold and Wool was increasingly being spent on grandiose private residences and imposing public buildings. The demand for quality furnishings and fittings was therefore strong. Among the products consigned to burgeoning colonial markets by the Milton Pottery at Stoke upon Trent, were their new range of colourfully patterned but very durable floor tiles ideal for the high-traffic spaces in the large civic buildings then being constructed in Australia and America. These floor tiles were “encaustic”, meaning that their designs and colours were encased “within” the depth of the tile. Rather than their decorative patterns being glazed onto the surface of the tile, their inlaid designs were created during the manufacturing process, as “coloured slips” (or liquid clay) were poured into a deep pre-moulded casting. When fired, the resulting tile was colour-fast and design-fast. The Minton floor tile is significant for its hard-wearing yet attractive design. The shipwreck of the Loch Ard is of significance for Victoria and is registered on the Victorian Heritage Register ( S 417). Flagstaff Hill has a varied collection of artefacts from Loch Ard and its collection is significant for being one of the largest accumulations of artefacts from this notable Victorian shipwreck of which the subject items are a small part. The collections of objects give us a snapshot of how we can interpret the story of this tragic event. The collection is also archaeologically significant as it represents aspects of Victoria's shipping history that allows us to interpret Victoria's social and historical themes of the time. Through is associated with the worst and best-known shipwreck in Victoria's history. A square Minton floor tile with a white background, and beige, dark blue, light blue and black geometric pattern as well as leaves in the design. The tile has corner broken off and some chipping along the edges. The reverse has five rows of five evenly spaced holes. The back of the tile has inscriptions. Made by Minton & Co. at Stoke upon Trent. This encaustic floor tile was recovered from the shipwreck of the LOCH ARD. Branded "... MINTON&CO / PATENT / STOKE UPON TRENT"flagstaff hill, warrnambool, flagstaff hill maritime museum, shipwreck coast, flagstaff hill maritime village, great ocean road, loch line, loch ard, captain gibbs, eva carmichael, tom pearce, glenample station, mutton bird island, minton floor tile, encaustic tile, melbourne international exhibition, floor tile, minton tile, minton & co., stoke upon trent -
 Glen Eira Historical Society
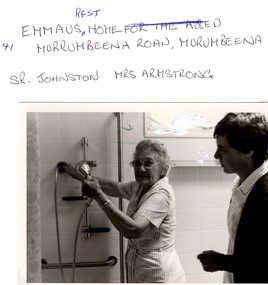
Letter - EMMAUS REST HOME
This file contains two items pertaining to Emmaus Rest Home: 1/A series of emails exchanged between local resident Mark Upton and John O’Callaghan of the Glen Eira Historical Society, dated 30/01/2008 and 31/01/2008, regarding the history of a derelict property situated at 41 Murrumbeena Road. In the first email, Upton refers to the property of ‘Oakdene’ Aged Care Facility and inquires as to whether the Society possesses any information on it. The next day, O’Callaghan replies that he will investigate. Later that day, Upton recommends O’Callaghan some information on the property he unearthed via Joanne (Jo) Antoni, Executive Assistant at Churches of Christ Community Care. The property turns out to have originally been a private residence owned by the Birtchnell family, sold on 24/01/1945, eventually acquired by the Church and converted into an aged care facility which closed on 16/07/1999 2/Three black-and-white photographs. Two of the photographs portray a resident of the Home, Mrs. Armstrong, and a staff member of the Home, Sr. Johnston, in a bathroom operating a shower. These photographs contain writing on the back identifying the persons. The remaining one portrays Mrs. Armstrong and another, unidentified resident of the Home seated in a bedroom. This one also contains writing on the back, but specifying the name only of the facility. None of the photographs are dated.emmaus, emmaus rest home, emmaus home for the aged, churches of christ community care, antoni joanne (jo), new cumloden grammar school, atkin william t., betheden, waghoo road, ‘oakdene’ aged care facility, carnegie, murrumbeena, upton mark, o’callaghan john, murrumbeena road, neerim road, dandenong road, birtchnell family, birtchnell james, birtchnell elizabeth, birtchnell harold, birtchnell olive, birtchnell kingsley, oakdene crescent, clay will h., johnson sr., armstrong mrs., anglican church, nursing homes, retirement homes, mansions, clocks, fires -
 Federation University Historical Collection
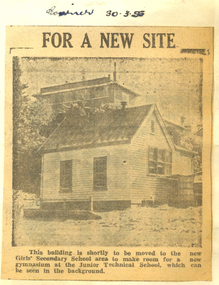
Book - Scrap Book, Ballarat School of Mines Scrap Book, 1954-1957, 1954-1957
The Ballarat School of Mines was the first school of mines in AustraliaA scrapbook of news clippings relating to the Ballarat School of MInes, including: 1954 - Barry Singleton 1954 - Neville Bunning 1954 - Victor Greenhalgh and his sculpture of King George V 1954 - Road Deviation in Hickman Street near White Flat 1954 - John Skuka naturalisation 1954 - Fire Danger in Vale Park 1954 - retirement of William J. Paterson from the staff of the Ballarat Junior Technical School 1954 - First pottery exhibition, featuring local clays. 1954 - New Technical school start in Ballarat North 1955 - Removal of caretaker's Cottage 1955 - Air Training Corps Cadets 1955 - Fluoridation 1955 - I.G. Witcher 1955 - Graham Willey, football 1955 - Image of L. Wilson, head teacher of the Ballarat North Technical School 1955 - Ballarat Girls' Technical School takes shape at White Flat. 1955 - Ballarat Junior Technical School Pine Plantation at Nerrina 1955 - Lake water test by W.G. Cornell 1955 - John Rowell 1956 - Geoffrey Mainwarring painting Lieutenant F.A. Reiter 1956 - Pittong Mine 1956 - Atom Bombs and rain 1956 - Ballarat Gaol and the Ballarat School of MInes 1956 - William Paterson and A.W. Steane of the Ballarat Junior Technical School 1957 - Ballarat "Junior Tech" Has a Bright History 1957 - Brelaz Scholarship for School of Mines (scrap book, ballarat school of mines, ballarat gaol, nerrina, caretaker's cottage, geoffrey mainwarring, gymnasium, noel flood, neville bunning, art lending library -
 Flagstaff Hill Maritime Museum and Village
Domestic object - Plate
The Process of Making Pottery Decorating, Firing, Glazing, Making, Technical There is a rhythm and flow to clay. It can’t be done all at once! Even the making process! It can take weeks to get everything done, especially if you can only work on your pottery once a week! Even though we have three hour classes, it’s often just not enough time! Here is an overview of some of the processes so you have a bit more grasp on some of the technical stuff! Step One – Design There are SO many ideas out there for making stuff in clay! From delicate porcelain jewellery, through to heavy sculptural work and everything in between. Deciding your direction is sometimes not that easy – when you first start, try everything, you will naturally gravitate to the style that you enjoy! The options and variations are endless and can get a wee bit overwhelming too! Check in with me before you start to ensure your ideas will work, what order you might do things, how you could achieve the look you are seeking and any other technical data required! Step Two – Making Clay is thixotropic. This means that as you work with it, the clay first gets sloppier and wetter, before is begins to dry in the atmosphere. For most things, you simply can’t do all parts of the project at once. An example of work order might look like: Get last weeks work out from the shelves Prepare clay for today’s work – roll your clay, prepare balls for throwing, make the first stage of a pinch pot) Clean up last week’s work and put it on the shelf for bisque firing Check that you have any glazing to do – and do enough of it that you will have time to finish your main project Do the next step of your next project – there might be a further step that can’t be complete immediately, in that case, wrap your work well and put onto the shelves. Letting your work rest for a while can really help keep your work clean and professional looking. Many things require bagging under plastic to keep it ready for work the next week – put your name on the outside of the bag so you can find your work easily. We have stickers and markers. Consider how you want to decorate your work – coloured slip can be applied at a fairly wet stage (remembering that it will make your work even wetter!). Trying to apply slip to dry clay won’t work! If you want to do sgraffito – you will need to keep the work leather hard (a state of dryness where you can still work the clay with a little effort and a little water and care). Step Three – Drying Most of the time your work can go into the rack uncovered to let it dry out for the following week. If you want to continue forming or shaping you will need to double bag your work – put your work on a suitable sized bat and put the bat in a bag so the base of the bag is under the bat, then put another bag over the top of the work and tuck the top of the bag under the bat. If you want to trim (or turn) your thrown work the following week, it should also be double bagged. If your work is large, delicate, or of uneven thicknesses, you should lightly cover your work for drying. When considering the drying process, bare in mind the weather, humidity and wind! The hotter and dryer, the faster things dry and work can dry unevenly in the shelves – this can lead to cracking – another time to lightly cover your work for drying. Step Four – Trimming and Cleaning Up Your work is dry! It is called greenware now and it is at it’s most fragile! Handle everything with two hands. I often refer to soft hands – keep everything gentle and with your fingers spread as much as possible. Try to not pick up things like plates too much, and always with both hands! Before your work can be bisque fired it should be “cleaned up”. You work won’t go into the kiln if it has sharp edges – when glazed, sharp edges turn into razor blades! Use a piece of fly wire to rub the work all over – this will scratch a little so be light handed. Use a knife or metal kidney to scrape any areas that require a bit more dynamic treatment than the fly wire offers! Finally, a very light wipe over with a slightly damp sponge can help soften and soothe all of your edges and dags! Trimming thrown work: If you are planning to trim (or turn) your thrown work (and you should be), make sure you bag it well – your work should be leather hard to almost dry for easiest trimming. Use this step to finish the work completely – use a metal kidney to polish the surface, or a slightly damp sponge to give a freshly thrown look. Wipe the sponge around the rim after trimming, and check the inside of the pot for dags! Trimming slip cast work: Usually I will trim the rims of your work on the wheel the following day to make that stage easier, however you will still need to check your work for lumps and bumps. Last but not least – check that your name is still clearly on the bottom of your work. Step Five – Bisque Firing When the work is completely dry it can go into the bisque kiln. The bisque kiln is fired to 1000°C. This process burns off the water in the clay as well as some of the chemically bound water. The structure of the clay is not altered that much at this temperature. Inside the bisque kiln, the work is stacked a little, small bowl inside a larger bowl and onto a heavy plate. Smaller items like decorations or drink coasters might get stacked several high. Consideration is paid to the weight of the stack and shape of the work. A bisque kiln can fire about one and a half times the amount of work that the glaze kiln can fire. The firing takes about 10 hours to complete the cycle and about two days to cool down. Once it has been emptied the work is placed in the glaze room ready for you to decorate! Step Six – Glazing Decorating your work with colour can be a lot of fun – and time consuming! There are three main options for surface treatment at this stage: Oxide Washes Underglazes Glazes Washes and underglazes do not “glaze” the work – It will still need a layer of glaze to fully seal the clay (washes don’t need glaze on surfaces not designed for food or liquid as they can gloss up a little on their own). Underglazes are stable colourants that turn out pretty much how they look in the jar. They can be mixed with each other to form other colours and can be used like water colours to paint onto your work. Mostly they should have a clear glaze on top to seal them. Oxides are a different species – the pink oxide (cobalt) wash turns out bright blue for instance. They don’t always need a glaze on top, and some glazes can change the colour of the wash! The glazes need no other “glaze” on top! Be careful of unknown glaze interactions – you can put any combination of glaze in a bowl or on a plate, but only a single glaze on the outside of any vertical surface! Glazes are a chemical reaction under heat. We don’t know the exact chemicals in the Mayco glazes we use. I can guess by the way they interact with each other, however, on the whole, you need to test every idea you have, and not run the test on a vertical surface! Simply put, glaze is a layer of glass like substance that bonds with the clay underneath. Clay is made of silica, alumina and water. Glaze is made of mostly silica. Silica has a melting point of 1700°C and we fire to 1240°C. The silica requires a “flux” to help it melt at the lower temperature. Fluxes can be all sorts of chemicals – a common one is calcium – calcium has a melting point of 2500°C, however, together they both melt at a much lower temperature! Colourants are metal oxides like cobalt (blue), chrome (green through black), copper (green, blue, even red!), manganese (black, purple and pink) iron (red brown), etc. Different chemicals in the glaze can have dramatic effects. for example, barium carbonate (which we don’t use) turns manganese bright pink! Other elements can turn manganese dioxide brown, blue, purple and reddish brown. Manganese dioxide is a flux in and of itself as well. So, glazes that get their black and purple colours, often interact with other glazes and RUN! Our mirror black is a good example – it mixes really well with many glazes because it fluxes them – causes them to melt faster. It will also bring out many beautiful colours in the glazes because it’s black colouring most definitely comes from manganese dioxide! Glaze chemistry is a whole subject on it’s own! We use commercial Mayco glazes on purpose – for their huge range of colour possibilities, stability, cool interactions, artistic freedom with the ability to easily brush the glazes on and ease of use. We currently have almost 50 glazes on hand! A major project is to test the interactions of all glazes with each other. That is 2,500 test tiles!!!! I’m going to make the wall behind the wheels the feature wall of pretty colours! Step Seven – Glaze (Gloss or sometimes called “Glost”) Firing Most of the time this is the final stage of making your creation (but not always!) The glaze kiln goes to 1240°C. This is called cone 6, or midrange. It is the low end of stoneware temperatures. Stoneware clays and glazes are typically fired at cone 8 – 10, that is 1260 – 1290°C. The energy requirement to go from 1240°C to 1280°C is almost a 30% more! Our clay is formulated to vitrify (mature, turn “glass-like”) at 1240°, as are our glazes. A glaze kiln take around 12 hours to reach temperature and two to three days to cool down. Sometimes a third firing process is required – this is for decoration that is added to work after the glaze firing. For example – adding precious metals and lustres. this firing temperature is usually around 600 – 800°C depending upon the techniques being used. There are many students interested in gold and silver trims – we will be doing this third type of firing soon! After firing your work will be in the student finished work shelves. Remember to pay for it before you head out the door! There is a small extra charge for using porcelain clay (it’s more than twice the price of regular clay), and for any third firing process! Once your work has been fired it can not turn back into clay for millennia – so don’t fire it if you don’t like it! Put it in the bucket for recycling. https://firebirdstudios.com.au/the-process-of-making-pottery/Ceramics have evolved over thousands of years.White earthenware dinner plate. Crazing evident all over.Backstamped ‘Made in England S LTD’flagstaff hill, warrnambool, shipwrecked-coast, flagstaff-hill, flagstaff-hill-maritime-museum, maritime-museum, shipwreck-coast, flagstaff-hill-maritime-village, ceramics, tableware -
 Flagstaff Hill Maritime Museum and Village
Domestic object - Plate, Johnson Bros
The Process of Making Pottery Decorating, Firing, Glazing, Making, Technical There is a rhythm and flow to clay. It can’t be done all at once! Even the making process! It can take weeks to get everything done, especially if you can only work on your pottery once a week! Even though we have three hour classes, it’s often just not enough time! Here is an overview of some of the processes so you have a bit more grasp on some of the technical stuff! Step One – Design There are SO many ideas out there for making stuff in clay! From delicate porcelain jewellery, through to heavy sculptural work and everything in between. Deciding your direction is sometimes not that easy – when you first start, try everything, you will naturally gravitate to the style that you enjoy! The options and variations are endless and can get a wee bit overwhelming too! Check in with me before you start to ensure your ideas will work, what order you might do things, how you could achieve the look you are seeking and any other technical data required! Step Two – Making Clay is thixotropic. This means that as you work with it, the clay first gets sloppier and wetter, before is begins to dry in the atmosphere. For most things, you simply can’t do all parts of the project at once. An example of work order might look like: Get last weeks work out from the shelves Prepare clay for today’s work – roll your clay, prepare balls for throwing, make the first stage of a pinch pot) Clean up last week’s work and put it on the shelf for bisque firing Check that you have any glazing to do – and do enough of it that you will have time to finish your main project Do the next step of your next project – there might be a further step that can’t be complete immediately, in that case, wrap your work well and put onto the shelves. Letting your work rest for a while can really help keep your work clean and professional looking. Many things require bagging under plastic to keep it ready for work the next week – put your name on the outside of the bag so you can find your work easily. We have stickers and markers. Consider how you want to decorate your work – coloured slip can be applied at a fairly wet stage (remembering that it will make your work even wetter!). Trying to apply slip to dry clay won’t work! If you want to do sgraffito – you will need to keep the work leather hard (a state of dryness where you can still work the clay with a little effort and a little water and care). Step Three – Drying Most of the time your work can go into the rack uncovered to let it dry out for the following week. If you want to continue forming or shaping you will need to double bag your work – put your work on a suitable sized bat and put the bat in a bag so the base of the bag is under the bat, then put another bag over the top of the work and tuck the top of the bag under the bat. If you want to trim (or turn) your thrown work the following week, it should also be double bagged. If your work is large, delicate, or of uneven thicknesses, you should lightly cover your work for drying. When considering the drying process, bare in mind the weather, humidity and wind! The hotter and dryer, the faster things dry and work can dry unevenly in the shelves – this can lead to cracking – another time to lightly cover your work for drying. Step Four – Trimming and Cleaning Up Your work is dry! It is called greenware now and it is at it’s most fragile! Handle everything with two hands. I often refer to soft hands – keep everything gentle and with your fingers spread as much as possible. Try to not pick up things like plates too much, and always with both hands! Before your work can be bisque fired it should be “cleaned up”. You work won’t go into the kiln if it has sharp edges – when glazed, sharp edges turn into razor blades! Use a piece of fly wire to rub the work all over – this will scratch a little so be light handed. Use a knife or metal kidney to scrape any areas that require a bit more dynamic treatment than the fly wire offers! Finally, a very light wipe over with a slightly damp sponge can help soften and soothe all of your edges and dags! Trimming thrown work: If you are planning to trim (or turn) your thrown work (and you should be), make sure you bag it well – your work should be leather hard to almost dry for easiest trimming. Use this step to finish the work completely – use a metal kidney to polish the surface, or a slightly damp sponge to give a freshly thrown look. Wipe the sponge around the rim after trimming, and check the inside of the pot for dags! Trimming slip cast work: Usually I will trim the rims of your work on the wheel the following day to make that stage easier, however you will still need to check your work for lumps and bumps. Last but not least – check that your name is still clearly on the bottom of your work. Step Five – Bisque Firing When the work is completely dry it can go into the bisque kiln. The bisque kiln is fired to 1000°C. This process burns off the water in the clay as well as some of the chemically bound water. The structure of the clay is not altered that much at this temperature. Inside the bisque kiln, the work is stacked a little, small bowl inside a larger bowl and onto a heavy plate. Smaller items like decorations or drink coasters might get stacked several high. Consideration is paid to the weight of the stack and shape of the work. A bisque kiln can fire about one and a half times the amount of work that the glaze kiln can fire. The firing takes about 10 hours to complete the cycle and about two days to cool down. Once it has been emptied the work is placed in the glaze room ready for you to decorate! Step Six – Glazing Decorating your work with colour can be a lot of fun – and time consuming! There are three main options for surface treatment at this stage: Oxide Washes Underglazes Glazes Washes and underglazes do not “glaze” the work – It will still need a layer of glaze to fully seal the clay (washes don’t need glaze on surfaces not designed for food or liquid as they can gloss up a little on their own). Underglazes are stable colourants that turn out pretty much how they look in the jar. They can be mixed with each other to form other colours and can be used like water colours to paint onto your work. Mostly they should have a clear glaze on top to seal them. Oxides are a different species – the pink oxide (cobalt) wash turns out bright blue for instance. They don’t always need a glaze on top, and some glazes can change the colour of the wash! The glazes need no other “glaze” on top! Be careful of unknown glaze interactions – you can put any combination of glaze in a bowl or on a plate, but only a single glaze on the outside of any vertical surface! Glazes are a chemical reaction under heat. We don’t know the exact chemicals in the Mayco glazes we use. I can guess by the way they interact with each other, however, on the whole, you need to test every idea you have, and not run the test on a vertical surface! Simply put, glaze is a layer of glass like substance that bonds with the clay underneath. Clay is made of silica, alumina and water. Glaze is made of mostly silica. Silica has a melting point of 1700°C and we fire to 1240°C. The silica requires a “flux” to help it melt at the lower temperature. Fluxes can be all sorts of chemicals – a common one is calcium – calcium has a melting point of 2500°C, however, together they both melt at a much lower temperature! Colourants are metal oxides like cobalt (blue), chrome (green through black), copper (green, blue, even red!), manganese (black, purple and pink) iron (red brown), etc. Different chemicals in the glaze can have dramatic effects. for example, barium carbonate (which we don’t use) turns manganese bright pink! Other elements can turn manganese dioxide brown, blue, purple and reddish brown. Manganese dioxide is a flux in and of itself as well. So, glazes that get their black and purple colours, often interact with other glazes and RUN! Our mirror black is a good example – it mixes really well with many glazes because it fluxes them – causes them to melt faster. It will also bring out many beautiful colours in the glazes because it’s black colouring most definitely comes from manganese dioxide! Glaze chemistry is a whole subject on it’s own! We use commercial Mayco glazes on purpose – for their huge range of colour possibilities, stability, cool interactions, artistic freedom with the ability to easily brush the glazes on and ease of use. We currently have almost 50 glazes on hand! A major project is to test the interactions of all glazes with each other. That is 2,500 test tiles!!!! I’m going to make the wall behind the wheels the feature wall of pretty colours! Step Seven – Glaze (Gloss or sometimes called “Glost”) Firing Most of the time this is the final stage of making your creation (but not always!) The glaze kiln goes to 1240°C. This is called cone 6, or midrange. It is the low end of stoneware temperatures. Stoneware clays and glazes are typically fired at cone 8 – 10, that is 1260 – 1290°C. The energy requirement to go from 1240°C to 1280°C is almost a 30% more! Our clay is formulated to vitrify (mature, turn “glass-like”) at 1240°, as are our glazes. A glaze kiln take around 12 hours to reach temperature and two to three days to cool down. Sometimes a third firing process is required – this is for decoration that is added to work after the glaze firing. For example – adding precious metals and lustres. this firing temperature is usually around 600 – 800°C depending upon the techniques being used. There are many students interested in gold and silver trims – we will be doing this third type of firing soon! After firing your work will be in the student finished work shelves. Remember to pay for it before you head out the door! There is a small extra charge for using porcelain clay (it’s more than twice the price of regular clay), and for any third firing process! Once your work has been fired it can not turn back into clay for millennia – so don’t fire it if you don’t like it! Put it in the bucket for recycling. https://firebirdstudios.com.au/the-process-of-making-pottery/Ceramics have evolved over thousands of years.A white earthenware side plate with a gadroon edge. Has water marks and chips on front.‘Johnson Bros England Reg No 15587’flagstaff hill, warrnambool, shipwrecked-coast, flagstaff-hill, flagstaff-hill-maritime-museum, maritime-museum, shipwreck-coast, flagstaff-hill-maritime-village, johnson bros, ceramics, tableware -
 Flagstaff Hill Maritime Museum and Village
Domestic object - Plate, Alfred Meakin
The Process of Making Pottery Decorating, Firing, Glazing, Making, Technical There is a rhythm and flow to clay. It can’t be done all at once! Even the making process! It can take weeks to get everything done, especially if you can only work on your pottery once a week! Even though we have three hour classes, it’s often just not enough time! Here is an overview of some of the processes so you have a bit more grasp on some of the technical stuff! Step One – Design There are SO many ideas out there for making stuff in clay! From delicate porcelain jewellery, through to heavy sculptural work and everything in between. Deciding your direction is sometimes not that easy – when you first start, try everything, you will naturally gravitate to the style that you enjoy! The options and variations are endless and can get a wee bit overwhelming too! Check in with me before you start to ensure your ideas will work, what order you might do things, how you could achieve the look you are seeking and any other technical data required! Step Two – Making Clay is thixotropic. This means that as you work with it, the clay first gets sloppier and wetter, before is begins to dry in the atmosphere. For most things, you simply can’t do all parts of the project at once. An example of work order might look like: Get last weeks work out from the shelves Prepare clay for today’s work – roll your clay, prepare balls for throwing, make the first stage of a pinch pot) Clean up last week’s work and put it on the shelf for bisque firing Check that you have any glazing to do – and do enough of it that you will have time to finish your main project Do the next step of your next project – there might be a further step that can’t be complete immediately, in that case, wrap your work well and put onto the shelves. Letting your work rest for a while can really help keep your work clean and professional looking. Many things require bagging under plastic to keep it ready for work the next week – put your name on the outside of the bag so you can find your work easily. We have stickers and markers. Consider how you want to decorate your work – coloured slip can be applied at a fairly wet stage (remembering that it will make your work even wetter!). Trying to apply slip to dry clay won’t work! If you want to do sgraffito – you will need to keep the work leather hard (a state of dryness where you can still work the clay with a little effort and a little water and care). Step Three – Drying Most of the time your work can go into the rack uncovered to let it dry out for the following week. If you want to continue forming or shaping you will need to double bag your work – put your work on a suitable sized bat and put the bat in a bag so the base of the bag is under the bat, then put another bag over the top of the work and tuck the top of the bag under the bat. If you want to trim (or turn) your thrown work the following week, it should also be double bagged. If your work is large, delicate, or of uneven thicknesses, you should lightly cover your work for drying. When considering the drying process, bare in mind the weather, humidity and wind! The hotter and dryer, the faster things dry and work can dry unevenly in the shelves – this can lead to cracking – another time to lightly cover your work for drying. Step Four – Trimming and Cleaning Up Your work is dry! It is called greenware now and it is at it’s most fragile! Handle everything with two hands. I often refer to soft hands – keep everything gentle and with your fingers spread as much as possible. Try to not pick up things like plates too much, and always with both hands! Before your work can be bisque fired it should be “cleaned up”. You work won’t go into the kiln if it has sharp edges – when glazed, sharp edges turn into razor blades! Use a piece of fly wire to rub the work all over – this will scratch a little so be light handed. Use a knife or metal kidney to scrape any areas that require a bit more dynamic treatment than the fly wire offers! Finally, a very light wipe over with a slightly damp sponge can help soften and soothe all of your edges and dags! Trimming thrown work: If you are planning to trim (or turn) your thrown work (and you should be), make sure you bag it well – your work should be leather hard to almost dry for easiest trimming. Use this step to finish the work completely – use a metal kidney to polish the surface, or a slightly damp sponge to give a freshly thrown look. Wipe the sponge around the rim after trimming, and check the inside of the pot for dags! Trimming slip cast work: Usually I will trim the rims of your work on the wheel the following day to make that stage easier, however you will still need to check your work for lumps and bumps. Last but not least – check that your name is still clearly on the bottom of your work. Step Five – Bisque Firing When the work is completely dry it can go into the bisque kiln. The bisque kiln is fired to 1000°C. This process burns off the water in the clay as well as some of the chemically bound water. The structure of the clay is not altered that much at this temperature. Inside the bisque kiln, the work is stacked a little, small bowl inside a larger bowl and onto a heavy plate. Smaller items like decorations or drink coasters might get stacked several high. Consideration is paid to the weight of the stack and shape of the work. A bisque kiln can fire about one and a half times the amount of work that the glaze kiln can fire. The firing takes about 10 hours to complete the cycle and about two days to cool down. Once it has been emptied the work is placed in the glaze room ready for you to decorate! Step Six – Glazing Decorating your work with colour can be a lot of fun – and time consuming! There are three main options for surface treatment at this stage: Oxide Washes Underglazes Glazes Washes and underglazes do not “glaze” the work – It will still need a layer of glaze to fully seal the clay (washes don’t need glaze on surfaces not designed for food or liquid as they can gloss up a little on their own). Underglazes are stable colourants that turn out pretty much how they look in the jar. They can be mixed with each other to form other colours and can be used like water colours to paint onto your work. Mostly they should have a clear glaze on top to seal them. Oxides are a different species – the pink oxide (cobalt) wash turns out bright blue for instance. They don’t always need a glaze on top, and some glazes can change the colour of the wash! The glazes need no other “glaze” on top! Be careful of unknown glaze interactions – you can put any combination of glaze in a bowl or on a plate, but only a single glaze on the outside of any vertical surface! Glazes are a chemical reaction under heat. We don’t know the exact chemicals in the Mayco glazes we use. I can guess by the way they interact with each other, however, on the whole, you need to test every idea you have, and not run the test on a vertical surface! Simply put, glaze is a layer of glass like substance that bonds with the clay underneath. Clay is made of silica, alumina and water. Glaze is made of mostly silica. Silica has a melting point of 1700°C and we fire to 1240°C. The silica requires a “flux” to help it melt at the lower temperature. Fluxes can be all sorts of chemicals – a common one is calcium – calcium has a melting point of 2500°C, however, together they both melt at a much lower temperature! Colourants are metal oxides like cobalt (blue), chrome (green through black), copper (green, blue, even red!), manganese (black, purple and pink) iron (red brown), etc. Different chemicals in the glaze can have dramatic effects. for example, barium carbonate (which we don’t use) turns manganese bright pink! Other elements can turn manganese dioxide brown, blue, purple and reddish brown. Manganese dioxide is a flux in and of itself as well. So, glazes that get their black and purple colours, often interact with other glazes and RUN! Our mirror black is a good example – it mixes really well with many glazes because it fluxes them – causes them to melt faster. It will also bring out many beautiful colours in the glazes because it’s black colouring most definitely comes from manganese dioxide! Glaze chemistry is a whole subject on it’s own! We use commercial Mayco glazes on purpose – for their huge range of colour possibilities, stability, cool interactions, artistic freedom with the ability to easily brush the glazes on and ease of use. We currently have almost 50 glazes on hand! A major project is to test the interactions of all glazes with each other. That is 2,500 test tiles!!!! I’m going to make the wall behind the wheels the feature wall of pretty colours! Step Seven – Glaze (Gloss or sometimes called “Glost”) Firing Most of the time this is the final stage of making your creation (but not always!) The glaze kiln goes to 1240°C. This is called cone 6, or midrange. It is the low end of stoneware temperatures. Stoneware clays and glazes are typically fired at cone 8 – 10, that is 1260 – 1290°C. The energy requirement to go from 1240°C to 1280°C is almost a 30% more! Our clay is formulated to vitrify (mature, turn “glass-like”) at 1240°, as are our glazes. A glaze kiln take around 12 hours to reach temperature and two to three days to cool down. Sometimes a third firing process is required – this is for decoration that is added to work after the glaze firing. For example – adding precious metals and lustres. this firing temperature is usually around 600 – 800°C depending upon the techniques being used. There are many students interested in gold and silver trims – we will be doing this third type of firing soon! After firing your work will be in the student finished work shelves. Remember to pay for it before you head out the door! There is a small extra charge for using porcelain clay (it’s more than twice the price of regular clay), and for any third firing process! Once your work has been fired it can not turn back into clay for millennia – so don’t fire it if you don’t like it! Put it in the bucket for recycling. https://firebirdstudios.com.au/the-process-of-making-pottery/Ceramics have evolved over thousands of years.Earthenware dessert plate, cream colour. Made by Alfred Meakin, England. Backstamped ‘Alfred Meakin England’. flagstaff hill, warrnambool, shipwrecked-coast, flagstaff-hill, flagstaff-hill-maritime-museum, maritime-museum, shipwreck-coast, flagstaff-hill-maritime-village, alfred meakin, ceramics, earthenware, kitchenware -
 Flagstaff Hill Maritime Museum and Village
Domestic object - Jug
The Process of Making Pottery Decorating, Firing, Glazing, Making, Technical There is a rhythm and flow to clay. It can’t be done all at once! Even the making process! It can take weeks to get everything done, especially if you can only work on your pottery once a week! Even though we have three hour classes, it’s often just not enough time! Here is an overview of some of the processes so you have a bit more grasp on some of the technical stuff! Step One – Design There are SO many ideas out there for making stuff in clay! From delicate porcelain jewellery, through to heavy sculptural work and everything in between. Deciding your direction is sometimes not that easy – when you first start, try everything, you will naturally gravitate to the style that you enjoy! The options and variations are endless and can get a wee bit overwhelming too! Check in with me before you start to ensure your ideas will work, what order you might do things, how you could achieve the look you are seeking and any other technical data required! Step Two – Making Clay is thixotropic. This means that as you work with it, the clay first gets sloppier and wetter, before is begins to dry in the atmosphere. For most things, you simply can’t do all parts of the project at once. An example of work order might look like: Get last weeks work out from the shelves Prepare clay for today’s work – roll your clay, prepare balls for throwing, make the first stage of a pinch pot) Clean up last week’s work and put it on the shelf for bisque firing Check that you have any glazing to do – and do enough of it that you will have time to finish your main project Do the next step of your next project – there might be a further step that can’t be complete immediately, in that case, wrap your work well and put onto the shelves. Letting your work rest for a while can really help keep your work clean and professional looking. Many things require bagging under plastic to keep it ready for work the next week – put your name on the outside of the bag so you can find your work easily. We have stickers and markers. Consider how you want to decorate your work – coloured slip can be applied at a fairly wet stage (remembering that it will make your work even wetter!). Trying to apply slip to dry clay won’t work! If you want to do sgraffito – you will need to keep the work leather hard (a state of dryness where you can still work the clay with a little effort and a little water and care). Step Three – Drying Most of the time your work can go into the rack uncovered to let it dry out for the following week. If you want to continue forming or shaping you will need to double bag your work – put your work on a suitable sized bat and put the bat in a bag so the base of the bag is under the bat, then put another bag over the top of the work and tuck the top of the bag under the bat. If you want to trim (or turn) your thrown work the following week, it should also be double bagged. If your work is large, delicate, or of uneven thicknesses, you should lightly cover your work for drying. When considering the drying process, bare in mind the weather, humidity and wind! The hotter and dryer, the faster things dry and work can dry unevenly in the shelves – this can lead to cracking – another time to lightly cover your work for drying. Step Four – Trimming and Cleaning Up Your work is dry! It is called greenware now and it is at it’s most fragile! Handle everything with two hands. I often refer to soft hands – keep everything gentle and with your fingers spread as much as possible. Try to not pick up things like plates too much, and always with both hands! Before your work can be bisque fired it should be “cleaned up”. You work won’t go into the kiln if it has sharp edges – when glazed, sharp edges turn into razor blades! Use a piece of fly wire to rub the work all over – this will scratch a little so be light handed. Use a knife or metal kidney to scrape any areas that require a bit more dynamic treatment than the fly wire offers! Finally, a very light wipe over with a slightly damp sponge can help soften and soothe all of your edges and dags! Trimming thrown work: If you are planning to trim (or turn) your thrown work (and you should be), make sure you bag it well – your work should be leather hard to almost dry for easiest trimming. Use this step to finish the work completely – use a metal kidney to polish the surface, or a slightly damp sponge to give a freshly thrown look. Wipe the sponge around the rim after trimming, and check the inside of the pot for dags! Trimming slip cast work: Usually I will trim the rims of your work on the wheel the following day to make that stage easier, however you will still need to check your work for lumps and bumps. Last but not least – check that your name is still clearly on the bottom of your work. Step Five – Bisque Firing When the work is completely dry it can go into the bisque kiln. The bisque kiln is fired to 1000°C. This process burns off the water in the clay as well as some of the chemically bound water. The structure of the clay is not altered that much at this temperature. Inside the bisque kiln, the work is stacked a little, small bowl inside a larger bowl and onto a heavy plate. Smaller items like decorations or drink coasters might get stacked several high. Consideration is paid to the weight of the stack and shape of the work. A bisque kiln can fire about one and a half times the amount of work that the glaze kiln can fire. The firing takes about 10 hours to complete the cycle and about two days to cool down. Once it has been emptied the work is placed in the glaze room ready for you to decorate! Step Six – Glazing Decorating your work with colour can be a lot of fun – and time consuming! There are three main options for surface treatment at this stage: Oxide Washes Underglazes Glazes Washes and underglazes do not “glaze” the work – It will still need a layer of glaze to fully seal the clay (washes don’t need glaze on surfaces not designed for food or liquid as they can gloss up a little on their own). Underglazes are stable colourants that turn out pretty much how they look in the jar. They can be mixed with each other to form other colours and can be used like water colours to paint onto your work. Mostly they should have a clear glaze on top to seal them. Oxides are a different species – the pink oxide (cobalt) wash turns out bright blue for instance. They don’t always need a glaze on top, and some glazes can change the colour of the wash! The glazes need no other “glaze” on top! Be careful of unknown glaze interactions – you can put any combination of glaze in a bowl or on a plate, but only a single glaze on the outside of any vertical surface! Glazes are a chemical reaction under heat. We don’t know the exact chemicals in the Mayco glazes we use. I can guess by the way they interact with each other, however, on the whole, you need to test every idea you have, and not run the test on a vertical surface! Simply put, glaze is a layer of glass like substance that bonds with the clay underneath. Clay is made of silica, alumina and water. Glaze is made of mostly silica. Silica has a melting point of 1700°C and we fire to 1240°C. The silica requires a “flux” to help it melt at the lower temperature. Fluxes can be all sorts of chemicals – a common one is calcium – calcium has a melting point of 2500°C, however, together they both melt at a much lower temperature! Colourants are metal oxides like cobalt (blue), chrome (green through black), copper (green, blue, even red!), manganese (black, purple and pink) iron (red brown), etc. Different chemicals in the glaze can have dramatic effects. for example, barium carbonate (which we don’t use) turns manganese bright pink! Other elements can turn manganese dioxide brown, blue, purple and reddish brown. Manganese dioxide is a flux in and of itself as well. So, glazes that get their black and purple colours, often interact with other glazes and RUN! Our mirror black is a good example – it mixes really well with many glazes because it fluxes them – causes them to melt faster. It will also bring out many beautiful colours in the glazes because it’s black colouring most definitely comes from manganese dioxide! Glaze chemistry is a whole subject on it’s own! We use commercial Mayco glazes on purpose – for their huge range of colour possibilities, stability, cool interactions, artistic freedom with the ability to easily brush the glazes on and ease of use. We currently have almost 50 glazes on hand! A major project is to test the interactions of all glazes with each other. That is 2,500 test tiles!!!! I’m going to make the wall behind the wheels the feature wall of pretty colours! Step Seven – Glaze (Gloss or sometimes called “Glost”) Firing Most of the time this is the final stage of making your creation (but not always!) The glaze kiln goes to 1240°C. This is called cone 6, or midrange. It is the low end of stoneware temperatures. Stoneware clays and glazes are typically fired at cone 8 – 10, that is 1260 – 1290°C. The energy requirement to go from 1240°C to 1280°C is almost a 30% more! Our clay is formulated to vitrify (mature, turn “glass-like”) at 1240°, as are our glazes. A glaze kiln take around 12 hours to reach temperature and two to three days to cool down. Sometimes a third firing process is required – this is for decoration that is added to work after the glaze firing. For example – adding precious metals and lustres. this firing temperature is usually around 600 – 800°C depending upon the techniques being used. There are many students interested in gold and silver trims – we will be doing this third type of firing soon! After firing your work will be in the student finished work shelves. Remember to pay for it before you head out the door! There is a small extra charge for using porcelain clay (it’s more than twice the price of regular clay), and for any third firing process! Once your work has been fired it can not turn back into clay for millennia – so don’t fire it if you don’t like it! Put it in the bucket for recycling. https://firebirdstudios.com.au/the-process-of-making-pottery/The form of the jug has been in use for many centuries.Stoneware jug. Two tone brown glaze with pierced lip behind spout. Spout chipped.None.flagstaff hill, warrnambool, shipwrecked-coast, flagstaff-hill, flagstaff-hill-maritime-museum, maritime-museum, shipwreck-coast, flagstaff-hill-maritime-village, jug, ceramic jug -
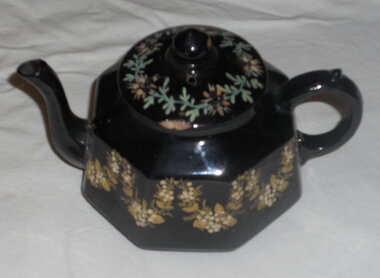 City of Moorabbin Historical Society (Operating the Box Cottage Museum)
Domestic object - Kitchen Equipment, Tea Pot, Between 1885 and 1905 after which the backstamp changed to G & S LTD
Earthenware is lightly fired, readily absorbs water if not glazed, and does not allow light to pass through it. Coarse earthenware is made from clay and grog (ground up fired pot). There are two main types of glazed earthenware: One is covered with a transparent lead glaze; when the earthenware body to which this glaze is applied has a cream colour, the product is called creamware. The second type, covered with an opaque white .in glaze, is variously called tin-enamelled, or tin-glazed, earthenware, majolica, faience, or delft. G&S marking could be Grove & Stark, Longton, England (1871-1884). In the 19th century, J. & G. Meakin ,1851 based in Hanley, Stoke-on-Trent, Staffordshire, was known for the vast quantities of cheap ironstone china it produced for the domestic English market and for export to Australia, Canada, New Zealand and the United States. Grove & Stark were taken over by Meakin early 20thC The Mark could also be Gibson & Sons (Ltd), were notably manufacturers of earthenware Burslem, Stoke-on-Trent. Founded around 1885 and traded until the mid 1970's. They were previously Gibson, Sudlow & Co. Manufactured between 1885 to 1905. Small earthen-ware, black-glazed tea-pot. 8 sided. The body of the tea-pot is decorated with hand-painted gold flowers and raised cream flowers. The lid is also hand -painted with green leaves and flowers. This floral pattern is named "Garland" The lid is not of the same pattern as the base. The spout was broken when brush tailed possum entered Cottage via chimney 27/4/2014. Can be repairedOn the base of the tea-pot. Makers Mark is G & S. "Garland". (Pattern), Rg. No. 175153. Also 'Made in England'. Under glaze there is the word: England.crockery, earthenwarre, gibson & son ltd, grove & stark ltd, pioneers, early settlers, bentleigh, market gardeners, moorabbin, cheltenham, pottery, stoke- on - trent, england, longton, burslem, wedgwood -
 Flagstaff Hill Maritime Museum and Village
Container - Bottle, 1850's - 1900
This bottle is sometimes referred to as a black glass 'Gallon' bottle. It is used for storing and transporting liquor such as port or madeira. Glass bottles and glass jars are in many households around the world. The first glass bottles were produced in south-east Asia around 100 B.C. and the Roman Empire around 1 AD. America's glass bottle and glass jar industry were born in the early 1600s when settlers in Jamestown built the first glass-melting furnace. The invention of the automatic glass bottle blowing machine in 1880 industrialized the process of making bottles. In 2019, plans were made to re-introduce milk glass bottle deliveries to Auckland in early 2020. The earliest bottles or vessels were made by ancient man. Ingredients were melted to make glass and then clay forms were dipped into the molten liquid. When the glass cooled off, the clay was chipped out of the inside leaving just the hollow glass vessel. This glass was very thin as the fire was not as hot as modern-day furnaces. The blowpipe was invented around 1 B.C. This allowed molten glass to be gathered at the end of the blowpipe and blown into the other end to create a hollow vessel. Eventually, the use of moulding was introduced, followed by the invention of the semi-automatic machine called the Press and Blow. In 1904 Michael Owens invented the automatic bottle machine. Before this time most glass bottles in England were hand blown. This is one of four bottles in Flagstaff Hill Maritime Museum collection that were recovered by a local diver from the quarantine area just inside the Port Phillip Heads. Ships were required to pull into this area to check for diseases and other medical issues before they could head up to Melbourne. Quite often they would drink and throw the bottles overboard. Handmade glass bottle, manufactured in the 1850s. The bottle gives a snapshot into history and a social life that occurred during the early days of Melbourne's development and the sea trade that visited the port in those days. Bottle, glass, solid dark purple (black), round, matt surface. Glass ring below mouth, neck is slightly bulbous, body tapers slightly inward from shoulder to base. Base is concave with pontil mark. Bottle has no inscription. Generally used for storing port.flagstaff hill, warrnambool, flagstaff hill maritime museum, maritime museum, shipwreck coast, flagstaff hill maritime village, great ocean road, handmade bottle, handmade english beer bottle, pontil bottle, black glass, gallon, purple bottle, ale bottle, porter bottle -
 Bendigo Historical Society Inc.
Document - BENDIGO POTTERY
Bendigo Pottery - a. Booklet (text by Eric Page - Mullaya Publication) - has good coverage of history of the pottery and sections relating to 'Bottle Kilns'', local clay' potter's skill, use of moulds, firing, ceramic tiles - includes photos and line sketches; b. Bendigo Trust flyer re pottery with tour times and summary of history on reverse side.A Mullaya Publication. Designed and published for Bendigo Pottery (Epsom) Pty Ltd., by Mullaya Publications, 17 Griotte Street, Canterbury, Victoria. Printed by Humphrey and formula Press. Line Drawings by Jan Neil.bendigo, tourism, bendigo pottery -
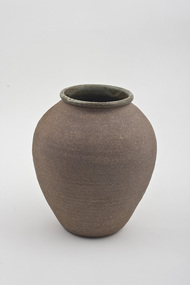 Nillumbik Shire Council
Pottery (vase): Joan Armfield, Joan Armfield, Vessel - Iron Clay, c.1975
Vessel - Iron Clay, is a wheel thrown vase that curves upwards from a narrow base to form a wide, rounded shoulder before concluding at a short, delicate rim. In contrast to the unglazed, rough texture of the exterior surface, the entrance to the vessel is smooth and shiny due to a tea leaf dust glaze. This is a low alumina tenmoku glaze, containing magnesium oxide which is responsible for the dark yellow/green striations of speckling which are formed during the slow cooling process of a reduction firing. This patterning is intermittent and dispersed with a grey/green pebbled effect. The stoneware vessel is built from clay with a high percentage of iron. -
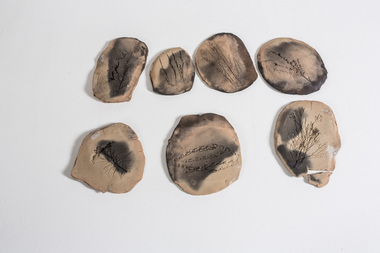 Nillumbik Shire Council
Clay: Leanne Mooney, Leanne Mooney, Tiles from the Boomerang Studio, 2002
'Tiles from the Boomerang Studio' is a prototype of the work 'Year 2052', created while Mooney was an Artist in Resident at Laughing Waters in the Boomerang studio in 2002. Records of flora were collected in and around the Gordon Ford garden in Laughing Waters Road. The work 'Year 2052' is made up of '77' tiles and was acquired by Geelong (Regional) Art Gallery in 2003. Whilst working at the Boomerang studio, local based artist Mooney noticed that “a battle raged in the bush between non-indigenous plants and indigenous plants”. She also noticed how humans “invade” land, changing the surrounding environment and causing irreversible damage. This work is an interpretation of the fragility and value of Nillumbik’s indigenous flora and of its conflict with introduced species. The title of the work (Year 2052) and look of these ‘fossilised specimens’ asks viewers to cast themselves into the future and to look back at today. “These tiles have been found; an incomplete record of flora collected in and around the Gordon Ford garden in Laughing Waters Road. The tiles appear to have been made at the beginning of the millennium. The viewer is asked to contemplate which species are missing”. Mooney works with collected indigenous items to emphasis the beauty of their natural shapes, while at the same time introducing selected materials of contrast or sympathy. Her work creates a great sense of “stillness and peace, of simplicity and connection with the natural world as well at the vanishing Australian bush.”This work is made up of seven handbuilt earthenware oval/round clay 'tiles' - (eight pieces - with one tile intentionally broken), brown in colour and bisque and blackware fired, giving a matt black ash coating on each of the tiles' surface. Each tile has an imprint of a floral specimen indigenous to the Laughing Waters area in Eltham. Each tile has an imprint of the following specimens: tiles, earthenware, flora, indigenous, bisque, boomerang, ford, laughing waters -
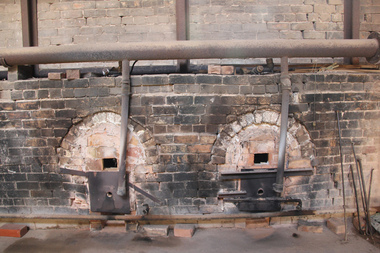 Ballarat Heritage Services
digital photographs, Lisa Gervasoni, Glenthompson Brickworks, c2010-2017
The Thompson brothers, George and Joseph, formerly of Ballarat and the new owners of Yallum Park, established the Glenthompson Brickworks in 1900. The entire process of creating a solid, pressed Glenthompson Brick happens on site, where red and cream clay is excavated. Brick presses dating back to 1940 are still in operation today, the kilns are stacked by hand to ensure specific needs are met and colour varieties are achieved. Refined oil is used to fire down draught kilns, which allows temperatures to be adjusted to ensure unique colour ranges are achieved.Colour photographs of kilns at Glenthompson Brickworks. building, heritage, glenthompson, industry, industrial heritage, brickworks, oven, glenthompson brickworks, george thompson, joseph thompson -
 Southern Sherbrooke Historical Society Inc.
Poster - Assorted posters
Assorted posters sent to the society. Contains: 0414 - Laminated poster promoting the history of Aboriginal station Coranderrk. 0415 - Poster commemorating the centenary of Federation. 0416 - Poster commemorating the centenary of Australian Federation. 0417 - Double-sided poster promoting the history of Federation in Australia in 1901. Highlights a snapshot of life in Australia in 1901. 0418 - Double-sided poster commemorating the centenary of Australian Federation. One side is a replica of a Federation poster in 1901, and the other side is a timeline of events leading to Federation in 1901. 0419 - Printed poster for the 'Fire Cycle' event held by the Dandenong Ranges Music Council, Inc. at Belgrave Heights Convention Centre on October 8th-9th 2005. Feature possum on a human's hand in front of a burnt landscape. 0422 - Poster of Station Pier. 0423 - Poster focusing on clay pipes from the shipwreck of "Victoria Tower" near Torquay in 1869. 0424 - 2 posters, one green and one blue, about the life of lyrebirds. -
 Bendigo Historical Society Inc.
Document - MERLE HALL COLLECTION: BENDIGO PERFORMANCE OF ''MUSIC THROUGH CLAY''
Poster for Bendigo Performance of ''Music through Clay'' - ''ceramic instrument making workshops'' at the Old Fire Station with Judy Lorraine. Note date provided for May/June workshops. ''Make your own ocarinas and drums''. City of Greater Bendigo Cultural Grants Program and arts Bendigo. -
 Surrey Hills Historical Society Collection
Book, Papers read before the Box Hill City Historical Society and some research notes Vol. IV 1974 - 1975, 1975
A collection of papers presented to the Box Hill Historical Society as talks, covering medical care, the clay industry, memories of Surrey Hills, the Brewer family, Box Hill Post Office, the sim family, tennis clubs, Girl Guides, Shire of Nunawading, Iris Roderick and the Bovill's of Balwyn. Deepdene crescent outer circle railway A collection of papers presented to the Box Hill Historical Society as talks, covering medical care, the clay industry, memories of Surry Hills, the Brewer family, Box Hill Post Office, the sim family, tennis clubs, Girl Guides, Shire of Nunawading, Iris Roderick and the Bovill's of Balwyn.box hill city historical society, (ms) iris roderick, bovills of balwyn, box hill, girl guides, tennis clubs, sport, surrey hills rose society, (mr) james henry simpson, beatrice avenue, (mr) james allan, (mr) thomas hogg, box hill post office, brewer family, surrey hills, clay industry, health services, (mr) john k blogg, (miss) kitty mcewan, empire day, festivals and celebrations, albany crescent, fires, 1935, box hill medical centre, (dr) (mr)john de la roche bragge, vaughan, alfred purdue (dr) (mr), (dr) (mr) walter joseph craig, fairbank hospital, (dr) b.n. gandevia -
 Surrey Hills Historical Society Collection
Book, Papers read before the Box Hill City Historical Society and some research notes Vol. IV 1974 - 1975, 1975
A collection of papers presented to the Box Hill Historical Society as talks, covering medical care, the clay industry, memories of Surry Hills, the Brewer family, Box Hill Post Office, the Sim family, tennis clubs, Girl Guides, Shire of Nunawading, Iris Roderick and the Bovill's of Balwyn.A collection of papers presented to the Box Hill Historical Society as talks, covering medical care, the clay industry, memories of Surry Hills, the Brewer family, Box Hill Post Office, the Sim family, tennis clubs, Girl Guides, Shire of Nunawading, Iris Roderick and the Bovill's of Balwyn.Title page: Alan Holtbox hill city historical society, (ms) iris roderick, bovills of balwyn, box hill, girl guides, tennis clubs, sport, surrey hills rose society, (mr) james henry simpson, beatrice avenue, (mr) james allan, (mr) thomas hogg, box hill post office, brewer family, surrey hills, clay industry, health services, (mr) john k blogg, (miss)kitty mcewan, empire day, festivals and celebrations, albany crescent, fires, 1935, box hill medical centre, (dr) (mr) john de la roche bragge, (dr) (mr) alfred purdue vaughan, (dr) (mr) walter joseph craig, fairbank hospital, (dr) b n gandevia, windsor crescent, deepdene outer circle railway -
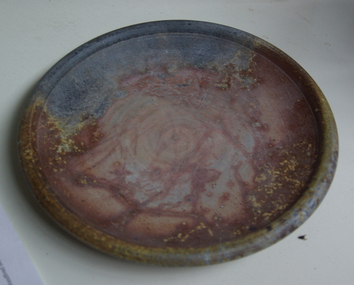 Federation University Art Collection
Ceramic - Artwork - Ceramics, Woodfired Stoneware Platter by Tim Holmes, c1983
Tim HOLMES Born Wales Tim Holmes first became interested in pottery on a visit to New Zealand in 1969. After returning home he studied at the local art school, then enrolled at the Harrow School of Art in 1973. While there, he was introduced to Gwyn Hanssen Pigott's work, and returned to Australia to help her set up a pottery in Tasmania. He established his own Garden Island Creek Pottery in 1977, and started making wood-fired pottery, digging and milling his own clay. He used a two- chambered kiln, firing raw- glazed domestic stoneware in the first chamber and earthenware garden pots in the second. In 1988, he moved his pottery to the Potter's Croft at Dunalley on the east coast of Tasmania. He and his wife Tammy now run the Potter's Croft as a bed and breakfast with a craft gallery, and he is still making pottery using a wood-fired kiln. Garden Island Creek Pottery had its own impressed stamp, and work may also be impressed 'TH' or incised 'T. Holmes'. Tim Holmes was a visiting visitor to Gippsland Institute of Advanced Education (later Federation University) in 1983. He was a lecturer at 'Woodfire 86'.Woodfired Stoneware Platter tim holmes, ceramics, artwork, jan feder memorial ceramics collection, gippsland campus, artists, woodfire 86, garden island creek pottery