Showing 86 items
matching hand brush
-
 Flagstaff Hill Maritime Museum and Village
Domestic object - Plate
The Process of Making Pottery Decorating, Firing, Glazing, Making, Technical There is a rhythm and flow to clay. It can’t be done all at once! Even the making process! It can take weeks to get everything done, especially if you can only work on your pottery once a week! Even though we have three hour classes, it’s often just not enough time! Here is an overview of some of the processes so you have a bit more grasp on some of the technical stuff! Step One – Design There are SO many ideas out there for making stuff in clay! From delicate porcelain jewellery, through to heavy sculptural work and everything in between. Deciding your direction is sometimes not that easy – when you first start, try everything, you will naturally gravitate to the style that you enjoy! The options and variations are endless and can get a wee bit overwhelming too! Check in with me before you start to ensure your ideas will work, what order you might do things, how you could achieve the look you are seeking and any other technical data required! Step Two – Making Clay is thixotropic. This means that as you work with it, the clay first gets sloppier and wetter, before is begins to dry in the atmosphere. For most things, you simply can’t do all parts of the project at once. An example of work order might look like: Get last weeks work out from the shelves Prepare clay for today’s work – roll your clay, prepare balls for throwing, make the first stage of a pinch pot) Clean up last week’s work and put it on the shelf for bisque firing Check that you have any glazing to do – and do enough of it that you will have time to finish your main project Do the next step of your next project – there might be a further step that can’t be complete immediately, in that case, wrap your work well and put onto the shelves. Letting your work rest for a while can really help keep your work clean and professional looking. Many things require bagging under plastic to keep it ready for work the next week – put your name on the outside of the bag so you can find your work easily. We have stickers and markers. Consider how you want to decorate your work – coloured slip can be applied at a fairly wet stage (remembering that it will make your work even wetter!). Trying to apply slip to dry clay won’t work! If you want to do sgraffito – you will need to keep the work leather hard (a state of dryness where you can still work the clay with a little effort and a little water and care). Step Three – Drying Most of the time your work can go into the rack uncovered to let it dry out for the following week. If you want to continue forming or shaping you will need to double bag your work – put your work on a suitable sized bat and put the bat in a bag so the base of the bag is under the bat, then put another bag over the top of the work and tuck the top of the bag under the bat. If you want to trim (or turn) your thrown work the following week, it should also be double bagged. If your work is large, delicate, or of uneven thicknesses, you should lightly cover your work for drying. When considering the drying process, bare in mind the weather, humidity and wind! The hotter and dryer, the faster things dry and work can dry unevenly in the shelves – this can lead to cracking – another time to lightly cover your work for drying. Step Four – Trimming and Cleaning Up Your work is dry! It is called greenware now and it is at it’s most fragile! Handle everything with two hands. I often refer to soft hands – keep everything gentle and with your fingers spread as much as possible. Try to not pick up things like plates too much, and always with both hands! Before your work can be bisque fired it should be “cleaned up”. You work won’t go into the kiln if it has sharp edges – when glazed, sharp edges turn into razor blades! Use a piece of fly wire to rub the work all over – this will scratch a little so be light handed. Use a knife or metal kidney to scrape any areas that require a bit more dynamic treatment than the fly wire offers! Finally, a very light wipe over with a slightly damp sponge can help soften and soothe all of your edges and dags! Trimming thrown work: If you are planning to trim (or turn) your thrown work (and you should be), make sure you bag it well – your work should be leather hard to almost dry for easiest trimming. Use this step to finish the work completely – use a metal kidney to polish the surface, or a slightly damp sponge to give a freshly thrown look. Wipe the sponge around the rim after trimming, and check the inside of the pot for dags! Trimming slip cast work: Usually I will trim the rims of your work on the wheel the following day to make that stage easier, however you will still need to check your work for lumps and bumps. Last but not least – check that your name is still clearly on the bottom of your work. Step Five – Bisque Firing When the work is completely dry it can go into the bisque kiln. The bisque kiln is fired to 1000°C. This process burns off the water in the clay as well as some of the chemically bound water. The structure of the clay is not altered that much at this temperature. Inside the bisque kiln, the work is stacked a little, small bowl inside a larger bowl and onto a heavy plate. Smaller items like decorations or drink coasters might get stacked several high. Consideration is paid to the weight of the stack and shape of the work. A bisque kiln can fire about one and a half times the amount of work that the glaze kiln can fire. The firing takes about 10 hours to complete the cycle and about two days to cool down. Once it has been emptied the work is placed in the glaze room ready for you to decorate! Step Six – Glazing Decorating your work with colour can be a lot of fun – and time consuming! There are three main options for surface treatment at this stage: Oxide Washes Underglazes Glazes Washes and underglazes do not “glaze” the work – It will still need a layer of glaze to fully seal the clay (washes don’t need glaze on surfaces not designed for food or liquid as they can gloss up a little on their own). Underglazes are stable colourants that turn out pretty much how they look in the jar. They can be mixed with each other to form other colours and can be used like water colours to paint onto your work. Mostly they should have a clear glaze on top to seal them. Oxides are a different species – the pink oxide (cobalt) wash turns out bright blue for instance. They don’t always need a glaze on top, and some glazes can change the colour of the wash! The glazes need no other “glaze” on top! Be careful of unknown glaze interactions – you can put any combination of glaze in a bowl or on a plate, but only a single glaze on the outside of any vertical surface! Glazes are a chemical reaction under heat. We don’t know the exact chemicals in the Mayco glazes we use. I can guess by the way they interact with each other, however, on the whole, you need to test every idea you have, and not run the test on a vertical surface! Simply put, glaze is a layer of glass like substance that bonds with the clay underneath. Clay is made of silica, alumina and water. Glaze is made of mostly silica. Silica has a melting point of 1700°C and we fire to 1240°C. The silica requires a “flux” to help it melt at the lower temperature. Fluxes can be all sorts of chemicals – a common one is calcium – calcium has a melting point of 2500°C, however, together they both melt at a much lower temperature! Colourants are metal oxides like cobalt (blue), chrome (green through black), copper (green, blue, even red!), manganese (black, purple and pink) iron (red brown), etc. Different chemicals in the glaze can have dramatic effects. for example, barium carbonate (which we don’t use) turns manganese bright pink! Other elements can turn manganese dioxide brown, blue, purple and reddish brown. Manganese dioxide is a flux in and of itself as well. So, glazes that get their black and purple colours, often interact with other glazes and RUN! Our mirror black is a good example – it mixes really well with many glazes because it fluxes them – causes them to melt faster. It will also bring out many beautiful colours in the glazes because it’s black colouring most definitely comes from manganese dioxide! Glaze chemistry is a whole subject on it’s own! We use commercial Mayco glazes on purpose – for their huge range of colour possibilities, stability, cool interactions, artistic freedom with the ability to easily brush the glazes on and ease of use. We currently have almost 50 glazes on hand! A major project is to test the interactions of all glazes with each other. That is 2,500 test tiles!!!! I’m going to make the wall behind the wheels the feature wall of pretty colours! Step Seven – Glaze (Gloss or sometimes called “Glost”) Firing Most of the time this is the final stage of making your creation (but not always!) The glaze kiln goes to 1240°C. This is called cone 6, or midrange. It is the low end of stoneware temperatures. Stoneware clays and glazes are typically fired at cone 8 – 10, that is 1260 – 1290°C. The energy requirement to go from 1240°C to 1280°C is almost a 30% more! Our clay is formulated to vitrify (mature, turn “glass-like”) at 1240°, as are our glazes. A glaze kiln take around 12 hours to reach temperature and two to three days to cool down. Sometimes a third firing process is required – this is for decoration that is added to work after the glaze firing. For example – adding precious metals and lustres. this firing temperature is usually around 600 – 800°C depending upon the techniques being used. There are many students interested in gold and silver trims – we will be doing this third type of firing soon! After firing your work will be in the student finished work shelves. Remember to pay for it before you head out the door! There is a small extra charge for using porcelain clay (it’s more than twice the price of regular clay), and for any third firing process! Once your work has been fired it can not turn back into clay for millennia – so don’t fire it if you don’t like it! Put it in the bucket for recycling. https://firebirdstudios.com.au/the-process-of-making-pottery/Ceramics have evolved over thousands of years.White earthenware dinner plate. Crazing evident all over.Backstamped ‘Made in England S LTD’flagstaff hill, warrnambool, shipwrecked-coast, flagstaff-hill, flagstaff-hill-maritime-museum, maritime-museum, shipwreck-coast, flagstaff-hill-maritime-village, ceramics, tableware -
 Flagstaff Hill Maritime Museum and Village
Domestic object - Plate, Johnson Bros
The Process of Making Pottery Decorating, Firing, Glazing, Making, Technical There is a rhythm and flow to clay. It can’t be done all at once! Even the making process! It can take weeks to get everything done, especially if you can only work on your pottery once a week! Even though we have three hour classes, it’s often just not enough time! Here is an overview of some of the processes so you have a bit more grasp on some of the technical stuff! Step One – Design There are SO many ideas out there for making stuff in clay! From delicate porcelain jewellery, through to heavy sculptural work and everything in between. Deciding your direction is sometimes not that easy – when you first start, try everything, you will naturally gravitate to the style that you enjoy! The options and variations are endless and can get a wee bit overwhelming too! Check in with me before you start to ensure your ideas will work, what order you might do things, how you could achieve the look you are seeking and any other technical data required! Step Two – Making Clay is thixotropic. This means that as you work with it, the clay first gets sloppier and wetter, before is begins to dry in the atmosphere. For most things, you simply can’t do all parts of the project at once. An example of work order might look like: Get last weeks work out from the shelves Prepare clay for today’s work – roll your clay, prepare balls for throwing, make the first stage of a pinch pot) Clean up last week’s work and put it on the shelf for bisque firing Check that you have any glazing to do – and do enough of it that you will have time to finish your main project Do the next step of your next project – there might be a further step that can’t be complete immediately, in that case, wrap your work well and put onto the shelves. Letting your work rest for a while can really help keep your work clean and professional looking. Many things require bagging under plastic to keep it ready for work the next week – put your name on the outside of the bag so you can find your work easily. We have stickers and markers. Consider how you want to decorate your work – coloured slip can be applied at a fairly wet stage (remembering that it will make your work even wetter!). Trying to apply slip to dry clay won’t work! If you want to do sgraffito – you will need to keep the work leather hard (a state of dryness where you can still work the clay with a little effort and a little water and care). Step Three – Drying Most of the time your work can go into the rack uncovered to let it dry out for the following week. If you want to continue forming or shaping you will need to double bag your work – put your work on a suitable sized bat and put the bat in a bag so the base of the bag is under the bat, then put another bag over the top of the work and tuck the top of the bag under the bat. If you want to trim (or turn) your thrown work the following week, it should also be double bagged. If your work is large, delicate, or of uneven thicknesses, you should lightly cover your work for drying. When considering the drying process, bare in mind the weather, humidity and wind! The hotter and dryer, the faster things dry and work can dry unevenly in the shelves – this can lead to cracking – another time to lightly cover your work for drying. Step Four – Trimming and Cleaning Up Your work is dry! It is called greenware now and it is at it’s most fragile! Handle everything with two hands. I often refer to soft hands – keep everything gentle and with your fingers spread as much as possible. Try to not pick up things like plates too much, and always with both hands! Before your work can be bisque fired it should be “cleaned up”. You work won’t go into the kiln if it has sharp edges – when glazed, sharp edges turn into razor blades! Use a piece of fly wire to rub the work all over – this will scratch a little so be light handed. Use a knife or metal kidney to scrape any areas that require a bit more dynamic treatment than the fly wire offers! Finally, a very light wipe over with a slightly damp sponge can help soften and soothe all of your edges and dags! Trimming thrown work: If you are planning to trim (or turn) your thrown work (and you should be), make sure you bag it well – your work should be leather hard to almost dry for easiest trimming. Use this step to finish the work completely – use a metal kidney to polish the surface, or a slightly damp sponge to give a freshly thrown look. Wipe the sponge around the rim after trimming, and check the inside of the pot for dags! Trimming slip cast work: Usually I will trim the rims of your work on the wheel the following day to make that stage easier, however you will still need to check your work for lumps and bumps. Last but not least – check that your name is still clearly on the bottom of your work. Step Five – Bisque Firing When the work is completely dry it can go into the bisque kiln. The bisque kiln is fired to 1000°C. This process burns off the water in the clay as well as some of the chemically bound water. The structure of the clay is not altered that much at this temperature. Inside the bisque kiln, the work is stacked a little, small bowl inside a larger bowl and onto a heavy plate. Smaller items like decorations or drink coasters might get stacked several high. Consideration is paid to the weight of the stack and shape of the work. A bisque kiln can fire about one and a half times the amount of work that the glaze kiln can fire. The firing takes about 10 hours to complete the cycle and about two days to cool down. Once it has been emptied the work is placed in the glaze room ready for you to decorate! Step Six – Glazing Decorating your work with colour can be a lot of fun – and time consuming! There are three main options for surface treatment at this stage: Oxide Washes Underglazes Glazes Washes and underglazes do not “glaze” the work – It will still need a layer of glaze to fully seal the clay (washes don’t need glaze on surfaces not designed for food or liquid as they can gloss up a little on their own). Underglazes are stable colourants that turn out pretty much how they look in the jar. They can be mixed with each other to form other colours and can be used like water colours to paint onto your work. Mostly they should have a clear glaze on top to seal them. Oxides are a different species – the pink oxide (cobalt) wash turns out bright blue for instance. They don’t always need a glaze on top, and some glazes can change the colour of the wash! The glazes need no other “glaze” on top! Be careful of unknown glaze interactions – you can put any combination of glaze in a bowl or on a plate, but only a single glaze on the outside of any vertical surface! Glazes are a chemical reaction under heat. We don’t know the exact chemicals in the Mayco glazes we use. I can guess by the way they interact with each other, however, on the whole, you need to test every idea you have, and not run the test on a vertical surface! Simply put, glaze is a layer of glass like substance that bonds with the clay underneath. Clay is made of silica, alumina and water. Glaze is made of mostly silica. Silica has a melting point of 1700°C and we fire to 1240°C. The silica requires a “flux” to help it melt at the lower temperature. Fluxes can be all sorts of chemicals – a common one is calcium – calcium has a melting point of 2500°C, however, together they both melt at a much lower temperature! Colourants are metal oxides like cobalt (blue), chrome (green through black), copper (green, blue, even red!), manganese (black, purple and pink) iron (red brown), etc. Different chemicals in the glaze can have dramatic effects. for example, barium carbonate (which we don’t use) turns manganese bright pink! Other elements can turn manganese dioxide brown, blue, purple and reddish brown. Manganese dioxide is a flux in and of itself as well. So, glazes that get their black and purple colours, often interact with other glazes and RUN! Our mirror black is a good example – it mixes really well with many glazes because it fluxes them – causes them to melt faster. It will also bring out many beautiful colours in the glazes because it’s black colouring most definitely comes from manganese dioxide! Glaze chemistry is a whole subject on it’s own! We use commercial Mayco glazes on purpose – for their huge range of colour possibilities, stability, cool interactions, artistic freedom with the ability to easily brush the glazes on and ease of use. We currently have almost 50 glazes on hand! A major project is to test the interactions of all glazes with each other. That is 2,500 test tiles!!!! I’m going to make the wall behind the wheels the feature wall of pretty colours! Step Seven – Glaze (Gloss or sometimes called “Glost”) Firing Most of the time this is the final stage of making your creation (but not always!) The glaze kiln goes to 1240°C. This is called cone 6, or midrange. It is the low end of stoneware temperatures. Stoneware clays and glazes are typically fired at cone 8 – 10, that is 1260 – 1290°C. The energy requirement to go from 1240°C to 1280°C is almost a 30% more! Our clay is formulated to vitrify (mature, turn “glass-like”) at 1240°, as are our glazes. A glaze kiln take around 12 hours to reach temperature and two to three days to cool down. Sometimes a third firing process is required – this is for decoration that is added to work after the glaze firing. For example – adding precious metals and lustres. this firing temperature is usually around 600 – 800°C depending upon the techniques being used. There are many students interested in gold and silver trims – we will be doing this third type of firing soon! After firing your work will be in the student finished work shelves. Remember to pay for it before you head out the door! There is a small extra charge for using porcelain clay (it’s more than twice the price of regular clay), and for any third firing process! Once your work has been fired it can not turn back into clay for millennia – so don’t fire it if you don’t like it! Put it in the bucket for recycling. https://firebirdstudios.com.au/the-process-of-making-pottery/Ceramics have evolved over thousands of years.A white earthenware side plate with a gadroon edge. Has water marks and chips on front.‘Johnson Bros England Reg No 15587’flagstaff hill, warrnambool, shipwrecked-coast, flagstaff-hill, flagstaff-hill-maritime-museum, maritime-museum, shipwreck-coast, flagstaff-hill-maritime-village, johnson bros, ceramics, tableware -
 Flagstaff Hill Maritime Museum and Village
Domestic object - Plate, Alfred Meakin
The Process of Making Pottery Decorating, Firing, Glazing, Making, Technical There is a rhythm and flow to clay. It can’t be done all at once! Even the making process! It can take weeks to get everything done, especially if you can only work on your pottery once a week! Even though we have three hour classes, it’s often just not enough time! Here is an overview of some of the processes so you have a bit more grasp on some of the technical stuff! Step One – Design There are SO many ideas out there for making stuff in clay! From delicate porcelain jewellery, through to heavy sculptural work and everything in between. Deciding your direction is sometimes not that easy – when you first start, try everything, you will naturally gravitate to the style that you enjoy! The options and variations are endless and can get a wee bit overwhelming too! Check in with me before you start to ensure your ideas will work, what order you might do things, how you could achieve the look you are seeking and any other technical data required! Step Two – Making Clay is thixotropic. This means that as you work with it, the clay first gets sloppier and wetter, before is begins to dry in the atmosphere. For most things, you simply can’t do all parts of the project at once. An example of work order might look like: Get last weeks work out from the shelves Prepare clay for today’s work – roll your clay, prepare balls for throwing, make the first stage of a pinch pot) Clean up last week’s work and put it on the shelf for bisque firing Check that you have any glazing to do – and do enough of it that you will have time to finish your main project Do the next step of your next project – there might be a further step that can’t be complete immediately, in that case, wrap your work well and put onto the shelves. Letting your work rest for a while can really help keep your work clean and professional looking. Many things require bagging under plastic to keep it ready for work the next week – put your name on the outside of the bag so you can find your work easily. We have stickers and markers. Consider how you want to decorate your work – coloured slip can be applied at a fairly wet stage (remembering that it will make your work even wetter!). Trying to apply slip to dry clay won’t work! If you want to do sgraffito – you will need to keep the work leather hard (a state of dryness where you can still work the clay with a little effort and a little water and care). Step Three – Drying Most of the time your work can go into the rack uncovered to let it dry out for the following week. If you want to continue forming or shaping you will need to double bag your work – put your work on a suitable sized bat and put the bat in a bag so the base of the bag is under the bat, then put another bag over the top of the work and tuck the top of the bag under the bat. If you want to trim (or turn) your thrown work the following week, it should also be double bagged. If your work is large, delicate, or of uneven thicknesses, you should lightly cover your work for drying. When considering the drying process, bare in mind the weather, humidity and wind! The hotter and dryer, the faster things dry and work can dry unevenly in the shelves – this can lead to cracking – another time to lightly cover your work for drying. Step Four – Trimming and Cleaning Up Your work is dry! It is called greenware now and it is at it’s most fragile! Handle everything with two hands. I often refer to soft hands – keep everything gentle and with your fingers spread as much as possible. Try to not pick up things like plates too much, and always with both hands! Before your work can be bisque fired it should be “cleaned up”. You work won’t go into the kiln if it has sharp edges – when glazed, sharp edges turn into razor blades! Use a piece of fly wire to rub the work all over – this will scratch a little so be light handed. Use a knife or metal kidney to scrape any areas that require a bit more dynamic treatment than the fly wire offers! Finally, a very light wipe over with a slightly damp sponge can help soften and soothe all of your edges and dags! Trimming thrown work: If you are planning to trim (or turn) your thrown work (and you should be), make sure you bag it well – your work should be leather hard to almost dry for easiest trimming. Use this step to finish the work completely – use a metal kidney to polish the surface, or a slightly damp sponge to give a freshly thrown look. Wipe the sponge around the rim after trimming, and check the inside of the pot for dags! Trimming slip cast work: Usually I will trim the rims of your work on the wheel the following day to make that stage easier, however you will still need to check your work for lumps and bumps. Last but not least – check that your name is still clearly on the bottom of your work. Step Five – Bisque Firing When the work is completely dry it can go into the bisque kiln. The bisque kiln is fired to 1000°C. This process burns off the water in the clay as well as some of the chemically bound water. The structure of the clay is not altered that much at this temperature. Inside the bisque kiln, the work is stacked a little, small bowl inside a larger bowl and onto a heavy plate. Smaller items like decorations or drink coasters might get stacked several high. Consideration is paid to the weight of the stack and shape of the work. A bisque kiln can fire about one and a half times the amount of work that the glaze kiln can fire. The firing takes about 10 hours to complete the cycle and about two days to cool down. Once it has been emptied the work is placed in the glaze room ready for you to decorate! Step Six – Glazing Decorating your work with colour can be a lot of fun – and time consuming! There are three main options for surface treatment at this stage: Oxide Washes Underglazes Glazes Washes and underglazes do not “glaze” the work – It will still need a layer of glaze to fully seal the clay (washes don’t need glaze on surfaces not designed for food or liquid as they can gloss up a little on their own). Underglazes are stable colourants that turn out pretty much how they look in the jar. They can be mixed with each other to form other colours and can be used like water colours to paint onto your work. Mostly they should have a clear glaze on top to seal them. Oxides are a different species – the pink oxide (cobalt) wash turns out bright blue for instance. They don’t always need a glaze on top, and some glazes can change the colour of the wash! The glazes need no other “glaze” on top! Be careful of unknown glaze interactions – you can put any combination of glaze in a bowl or on a plate, but only a single glaze on the outside of any vertical surface! Glazes are a chemical reaction under heat. We don’t know the exact chemicals in the Mayco glazes we use. I can guess by the way they interact with each other, however, on the whole, you need to test every idea you have, and not run the test on a vertical surface! Simply put, glaze is a layer of glass like substance that bonds with the clay underneath. Clay is made of silica, alumina and water. Glaze is made of mostly silica. Silica has a melting point of 1700°C and we fire to 1240°C. The silica requires a “flux” to help it melt at the lower temperature. Fluxes can be all sorts of chemicals – a common one is calcium – calcium has a melting point of 2500°C, however, together they both melt at a much lower temperature! Colourants are metal oxides like cobalt (blue), chrome (green through black), copper (green, blue, even red!), manganese (black, purple and pink) iron (red brown), etc. Different chemicals in the glaze can have dramatic effects. for example, barium carbonate (which we don’t use) turns manganese bright pink! Other elements can turn manganese dioxide brown, blue, purple and reddish brown. Manganese dioxide is a flux in and of itself as well. So, glazes that get their black and purple colours, often interact with other glazes and RUN! Our mirror black is a good example – it mixes really well with many glazes because it fluxes them – causes them to melt faster. It will also bring out many beautiful colours in the glazes because it’s black colouring most definitely comes from manganese dioxide! Glaze chemistry is a whole subject on it’s own! We use commercial Mayco glazes on purpose – for their huge range of colour possibilities, stability, cool interactions, artistic freedom with the ability to easily brush the glazes on and ease of use. We currently have almost 50 glazes on hand! A major project is to test the interactions of all glazes with each other. That is 2,500 test tiles!!!! I’m going to make the wall behind the wheels the feature wall of pretty colours! Step Seven – Glaze (Gloss or sometimes called “Glost”) Firing Most of the time this is the final stage of making your creation (but not always!) The glaze kiln goes to 1240°C. This is called cone 6, or midrange. It is the low end of stoneware temperatures. Stoneware clays and glazes are typically fired at cone 8 – 10, that is 1260 – 1290°C. The energy requirement to go from 1240°C to 1280°C is almost a 30% more! Our clay is formulated to vitrify (mature, turn “glass-like”) at 1240°, as are our glazes. A glaze kiln take around 12 hours to reach temperature and two to three days to cool down. Sometimes a third firing process is required – this is for decoration that is added to work after the glaze firing. For example – adding precious metals and lustres. this firing temperature is usually around 600 – 800°C depending upon the techniques being used. There are many students interested in gold and silver trims – we will be doing this third type of firing soon! After firing your work will be in the student finished work shelves. Remember to pay for it before you head out the door! There is a small extra charge for using porcelain clay (it’s more than twice the price of regular clay), and for any third firing process! Once your work has been fired it can not turn back into clay for millennia – so don’t fire it if you don’t like it! Put it in the bucket for recycling. https://firebirdstudios.com.au/the-process-of-making-pottery/Ceramics have evolved over thousands of years.Earthenware dessert plate, cream colour. Made by Alfred Meakin, England. Backstamped ‘Alfred Meakin England’. flagstaff hill, warrnambool, shipwrecked-coast, flagstaff-hill, flagstaff-hill-maritime-museum, maritime-museum, shipwreck-coast, flagstaff-hill-maritime-village, alfred meakin, ceramics, earthenware, kitchenware -
 Flagstaff Hill Maritime Museum and Village
Domestic object - Jug
The Process of Making Pottery Decorating, Firing, Glazing, Making, Technical There is a rhythm and flow to clay. It can’t be done all at once! Even the making process! It can take weeks to get everything done, especially if you can only work on your pottery once a week! Even though we have three hour classes, it’s often just not enough time! Here is an overview of some of the processes so you have a bit more grasp on some of the technical stuff! Step One – Design There are SO many ideas out there for making stuff in clay! From delicate porcelain jewellery, through to heavy sculptural work and everything in between. Deciding your direction is sometimes not that easy – when you first start, try everything, you will naturally gravitate to the style that you enjoy! The options and variations are endless and can get a wee bit overwhelming too! Check in with me before you start to ensure your ideas will work, what order you might do things, how you could achieve the look you are seeking and any other technical data required! Step Two – Making Clay is thixotropic. This means that as you work with it, the clay first gets sloppier and wetter, before is begins to dry in the atmosphere. For most things, you simply can’t do all parts of the project at once. An example of work order might look like: Get last weeks work out from the shelves Prepare clay for today’s work – roll your clay, prepare balls for throwing, make the first stage of a pinch pot) Clean up last week’s work and put it on the shelf for bisque firing Check that you have any glazing to do – and do enough of it that you will have time to finish your main project Do the next step of your next project – there might be a further step that can’t be complete immediately, in that case, wrap your work well and put onto the shelves. Letting your work rest for a while can really help keep your work clean and professional looking. Many things require bagging under plastic to keep it ready for work the next week – put your name on the outside of the bag so you can find your work easily. We have stickers and markers. Consider how you want to decorate your work – coloured slip can be applied at a fairly wet stage (remembering that it will make your work even wetter!). Trying to apply slip to dry clay won’t work! If you want to do sgraffito – you will need to keep the work leather hard (a state of dryness where you can still work the clay with a little effort and a little water and care). Step Three – Drying Most of the time your work can go into the rack uncovered to let it dry out for the following week. If you want to continue forming or shaping you will need to double bag your work – put your work on a suitable sized bat and put the bat in a bag so the base of the bag is under the bat, then put another bag over the top of the work and tuck the top of the bag under the bat. If you want to trim (or turn) your thrown work the following week, it should also be double bagged. If your work is large, delicate, or of uneven thicknesses, you should lightly cover your work for drying. When considering the drying process, bare in mind the weather, humidity and wind! The hotter and dryer, the faster things dry and work can dry unevenly in the shelves – this can lead to cracking – another time to lightly cover your work for drying. Step Four – Trimming and Cleaning Up Your work is dry! It is called greenware now and it is at it’s most fragile! Handle everything with two hands. I often refer to soft hands – keep everything gentle and with your fingers spread as much as possible. Try to not pick up things like plates too much, and always with both hands! Before your work can be bisque fired it should be “cleaned up”. You work won’t go into the kiln if it has sharp edges – when glazed, sharp edges turn into razor blades! Use a piece of fly wire to rub the work all over – this will scratch a little so be light handed. Use a knife or metal kidney to scrape any areas that require a bit more dynamic treatment than the fly wire offers! Finally, a very light wipe over with a slightly damp sponge can help soften and soothe all of your edges and dags! Trimming thrown work: If you are planning to trim (or turn) your thrown work (and you should be), make sure you bag it well – your work should be leather hard to almost dry for easiest trimming. Use this step to finish the work completely – use a metal kidney to polish the surface, or a slightly damp sponge to give a freshly thrown look. Wipe the sponge around the rim after trimming, and check the inside of the pot for dags! Trimming slip cast work: Usually I will trim the rims of your work on the wheel the following day to make that stage easier, however you will still need to check your work for lumps and bumps. Last but not least – check that your name is still clearly on the bottom of your work. Step Five – Bisque Firing When the work is completely dry it can go into the bisque kiln. The bisque kiln is fired to 1000°C. This process burns off the water in the clay as well as some of the chemically bound water. The structure of the clay is not altered that much at this temperature. Inside the bisque kiln, the work is stacked a little, small bowl inside a larger bowl and onto a heavy plate. Smaller items like decorations or drink coasters might get stacked several high. Consideration is paid to the weight of the stack and shape of the work. A bisque kiln can fire about one and a half times the amount of work that the glaze kiln can fire. The firing takes about 10 hours to complete the cycle and about two days to cool down. Once it has been emptied the work is placed in the glaze room ready for you to decorate! Step Six – Glazing Decorating your work with colour can be a lot of fun – and time consuming! There are three main options for surface treatment at this stage: Oxide Washes Underglazes Glazes Washes and underglazes do not “glaze” the work – It will still need a layer of glaze to fully seal the clay (washes don’t need glaze on surfaces not designed for food or liquid as they can gloss up a little on their own). Underglazes are stable colourants that turn out pretty much how they look in the jar. They can be mixed with each other to form other colours and can be used like water colours to paint onto your work. Mostly they should have a clear glaze on top to seal them. Oxides are a different species – the pink oxide (cobalt) wash turns out bright blue for instance. They don’t always need a glaze on top, and some glazes can change the colour of the wash! The glazes need no other “glaze” on top! Be careful of unknown glaze interactions – you can put any combination of glaze in a bowl or on a plate, but only a single glaze on the outside of any vertical surface! Glazes are a chemical reaction under heat. We don’t know the exact chemicals in the Mayco glazes we use. I can guess by the way they interact with each other, however, on the whole, you need to test every idea you have, and not run the test on a vertical surface! Simply put, glaze is a layer of glass like substance that bonds with the clay underneath. Clay is made of silica, alumina and water. Glaze is made of mostly silica. Silica has a melting point of 1700°C and we fire to 1240°C. The silica requires a “flux” to help it melt at the lower temperature. Fluxes can be all sorts of chemicals – a common one is calcium – calcium has a melting point of 2500°C, however, together they both melt at a much lower temperature! Colourants are metal oxides like cobalt (blue), chrome (green through black), copper (green, blue, even red!), manganese (black, purple and pink) iron (red brown), etc. Different chemicals in the glaze can have dramatic effects. for example, barium carbonate (which we don’t use) turns manganese bright pink! Other elements can turn manganese dioxide brown, blue, purple and reddish brown. Manganese dioxide is a flux in and of itself as well. So, glazes that get their black and purple colours, often interact with other glazes and RUN! Our mirror black is a good example – it mixes really well with many glazes because it fluxes them – causes them to melt faster. It will also bring out many beautiful colours in the glazes because it’s black colouring most definitely comes from manganese dioxide! Glaze chemistry is a whole subject on it’s own! We use commercial Mayco glazes on purpose – for their huge range of colour possibilities, stability, cool interactions, artistic freedom with the ability to easily brush the glazes on and ease of use. We currently have almost 50 glazes on hand! A major project is to test the interactions of all glazes with each other. That is 2,500 test tiles!!!! I’m going to make the wall behind the wheels the feature wall of pretty colours! Step Seven – Glaze (Gloss or sometimes called “Glost”) Firing Most of the time this is the final stage of making your creation (but not always!) The glaze kiln goes to 1240°C. This is called cone 6, or midrange. It is the low end of stoneware temperatures. Stoneware clays and glazes are typically fired at cone 8 – 10, that is 1260 – 1290°C. The energy requirement to go from 1240°C to 1280°C is almost a 30% more! Our clay is formulated to vitrify (mature, turn “glass-like”) at 1240°, as are our glazes. A glaze kiln take around 12 hours to reach temperature and two to three days to cool down. Sometimes a third firing process is required – this is for decoration that is added to work after the glaze firing. For example – adding precious metals and lustres. this firing temperature is usually around 600 – 800°C depending upon the techniques being used. There are many students interested in gold and silver trims – we will be doing this third type of firing soon! After firing your work will be in the student finished work shelves. Remember to pay for it before you head out the door! There is a small extra charge for using porcelain clay (it’s more than twice the price of regular clay), and for any third firing process! Once your work has been fired it can not turn back into clay for millennia – so don’t fire it if you don’t like it! Put it in the bucket for recycling. https://firebirdstudios.com.au/the-process-of-making-pottery/The form of the jug has been in use for many centuries.Stoneware jug. Two tone brown glaze with pierced lip behind spout. Spout chipped.None.flagstaff hill, warrnambool, shipwrecked-coast, flagstaff-hill, flagstaff-hill-maritime-museum, maritime-museum, shipwreck-coast, flagstaff-hill-maritime-village, jug, ceramic jug -
 Red Cliffs Military Museum
Gift Box, Australian Red Cross Box WW11, 1944 (estimated)
A cardboard Red Cross Gift Box used by Australian Red Cross in WW11 to send comfort parcel to POW in Germany. This particular box belonged to VX34767 Private T.H. AndersonLeft top of Box: POW Food Parcel/Germany/same size 8lbs. Centre: Red Cross Symbol/A Gift/on behalf of your Next-of-Kin with the best/ wishes of the London Committee/ Australian Red Cross Society. Top right of Box: Postage label/Mrs (torn)?olls/149 (torn off) Street Geelong West Australia./ Below this is the contents list: Chocolate/Chewing Gum/ Dentifrice/ 4 hankerchiefs/ mail brush/ pullover/ pencil/ razor blades/ 2 safety pins/ shirts/ soap/ 3 prs sox/ shaving soap/ towel/mending wool. Left hand side lower down: Despatched 18/5/44/ VX 34767 Private T.H. Anderson/ Australian Prisoner Of War No 125514/ Stalag V11 A Germany/ C/O International Red Cross Society/ Geneva Switzerland.australian, cross, ww11, red, pow, t h, anderson -
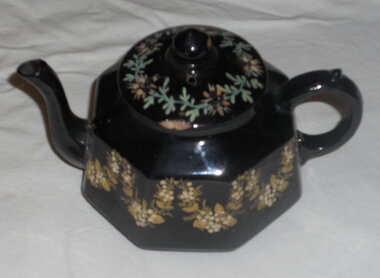 City of Moorabbin Historical Society (Operating the Box Cottage Museum)
Domestic object - Kitchen Equipment, Tea Pot, Between 1885 and 1905 after which the backstamp changed to G & S LTD
Earthenware is lightly fired, readily absorbs water if not glazed, and does not allow light to pass through it. Coarse earthenware is made from clay and grog (ground up fired pot). There are two main types of glazed earthenware: One is covered with a transparent lead glaze; when the earthenware body to which this glaze is applied has a cream colour, the product is called creamware. The second type, covered with an opaque white .in glaze, is variously called tin-enamelled, or tin-glazed, earthenware, majolica, faience, or delft. G&S marking could be Grove & Stark, Longton, England (1871-1884). In the 19th century, J. & G. Meakin ,1851 based in Hanley, Stoke-on-Trent, Staffordshire, was known for the vast quantities of cheap ironstone china it produced for the domestic English market and for export to Australia, Canada, New Zealand and the United States. Grove & Stark were taken over by Meakin early 20thC The Mark could also be Gibson & Sons (Ltd), were notably manufacturers of earthenware Burslem, Stoke-on-Trent. Founded around 1885 and traded until the mid 1970's. They were previously Gibson, Sudlow & Co. Manufactured between 1885 to 1905. Small earthen-ware, black-glazed tea-pot. 8 sided. The body of the tea-pot is decorated with hand-painted gold flowers and raised cream flowers. The lid is also hand -painted with green leaves and flowers. This floral pattern is named "Garland" The lid is not of the same pattern as the base. The spout was broken when brush tailed possum entered Cottage via chimney 27/4/2014. Can be repairedOn the base of the tea-pot. Makers Mark is G & S. "Garland". (Pattern), Rg. No. 175153. Also 'Made in England'. Under glaze there is the word: England.crockery, earthenwarre, gibson & son ltd, grove & stark ltd, pioneers, early settlers, bentleigh, market gardeners, moorabbin, cheltenham, pottery, stoke- on - trent, england, longton, burslem, wedgwood -
 City of Moorabbin Historical Society (Operating the Box Cottage Museum)
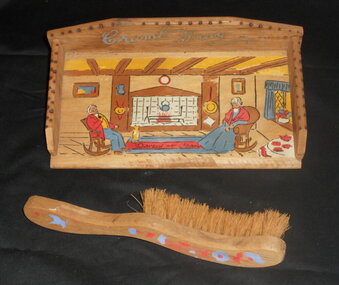
Domestic object - Kitchen Equipment, poker-work crumb tray and brush, c1900
... Small timber poker-work crumb tray and brush. Both also... tray with brush was used to clear crumbs spilt during meal ...This crumb tray with brush was used to clear crumbs spilt during meal times from the tableSmall timber poker-work crumb tray and brush. Both also have hand-painted decoration, and wording. There is a colourful painted scene of a couple seated in front of a fire-place, with the words "Darby and Joan".At the back of the tray base the words " Crumb Tray" are painted. The words "Darby and Joan" are painted on the tray. At the rear of the tray there is the price 1/6 in lead pencil.pioneers, early settlers, moorabbin, brighton, bentleigh, craftwork -
 Bendigo Historical Society Inc.
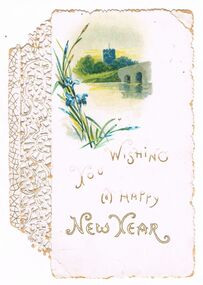
Ephemera - HAPPY NEW YEAR GREETING CARD
Happy New Year Greeting Card: Embossed Greeting card with Castle a scene and three blue Iris's with the words 'Wishing You A Happy New Year'. On the back is the Artistic Series Trade Mark of an easel with RTS on it and below is a paint board with six paint brushes with Artistic Series printed on the board all done in gold ink. At the bottom is 'By Special appointment' Publishers to Her Majesty the Queen. Hand written is 'George from Dav' Box 625Raphael Tuck & Sons, London ,Paris, New York. Designed at the Studios in England and Printed at the Fine Art Works in Saxony. Copyright.ephemera, mementoes, celebrations, happy new year greeting card -
 The Ed Muirhead Physics Museum
Harmonic Analyser, The Stanley#3
Wooden box (28.1) containing the following (11 items + 2x21disks (sets A &B): 28.2: black enamelled harmonic analyser (main body,serial no. 37 28.3: plastic slide rule (40 inch) 28.4: Instruction manual 28.5: Long steel metal rule (92 cm) with handles 28.6: Wooden clipboard with paper 28.7: brush 28.8: fixed arm planimeter Serial No. 25498 - 4 components and box 28.9: fixed arm planimeter Serial No. 25499 - 4 components and box 28.10 Harmonic analyser black piece 28.11 Harmonic Analyser long metal attachment 28.12 Harmonic Analyser short metal attachment 28.13 - 28.55: 42 metal discs (not numbered individually) 28.56 Key to box (not numbered)Front right hand side of box in texta: “GW7446”; on inside lid of box: “GW7446”; On harmonic analyser in white: “No. 3 Harmonic Analyser Stanley London Serial No. 37. Made in England”; On clipboard (28.6): ?“P.Cholec Shade”; Stamped on brush (28.7): “Made in England Pure Bristle”; Label in planimeter box (28.8): “7/124/F/152/500 Fixed Arm Planimeter Serial No. 25498. 1 Rev = 100 sq. cms. Constant = 18.676”. Inscribed on planimeter (28.8): “Albrit 25498 Made in England” Label in planimeter box (28.9): “7/124/F/152/500 Fixed Arm Planimeter Serial No. 25499. 1 Rev = 100 sq. cms. Constant = 18.676”. Inscribed On planimeter (28.8): “Albrit 25499 Made in England” On discs 28.13-28.55: Half are “A” disk and half are “B”. All are inscribed. -
 Bendigo Historical Society Inc.
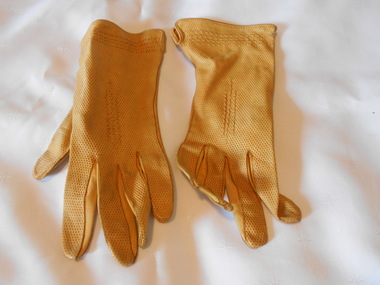
Clothing - MAGGIE BARBER COLLECTION: HONEY COLOURED LEATHER WRIST LENGTH GLOVES, 1920-30's
Clothing. Made from soft lambskin, the leather appears to be finely punched all over, giving the appearance of tiny pin holes over the outer surface, but not showing through to the inside. Finely bound at the top edge, and around a 3 cm long round split at the outer wrist. The inside of the leather has a brushed finish-soft and warm. Three rows of stitching on the back of the hand, and around the wrist give a decorative effect.Inside left glove 'LAMBSKINS. Made in Italy. Inside right glove 7.costume accessories, female, honey coloured leather gloves -
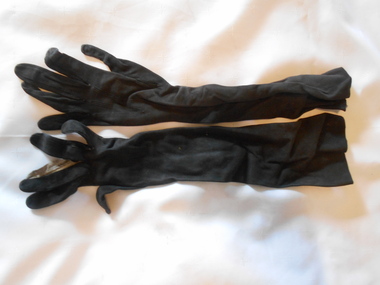 Bendigo Historical Society Inc.
Clothing - MAGGIE BARBER COLLECTION: BLACK ELBOW LENGTH 'CHAMOIS' FEEL GLOVES
Clothing. Black kid leather gloves, brushed to give a "chamois" feel. Twelve rows of machine stitching on the back of the hand fan out to give a pintucked effect.costume accessories, female, black elbow length kid leather gloves -
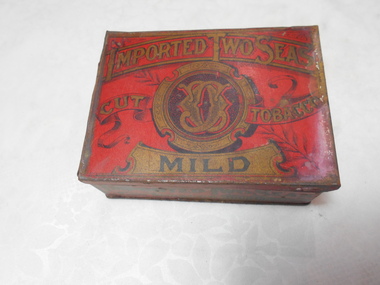 Bendigo Historical Society Inc.
Container - TOBACCO TIN WITH CIGARETTE ROLLERS
Imported Two Seas Tobacco Tin with contents 3 brass hand cigarette rollers & 3 small wooden items 1 a brush. Red tin with gold & black print Imported Two Seas Cut Tobacco Mild Four Ounces, The Leaf used in the manufacture of Imported Two Seas Cut Tobacco is selected from the choicest crops grown in Virginia Imported Two Seas Cut Tobacco is supplied in three grades of strength Mild Medium & Strong. One roller marked L'Universel L.T.Bte_S.G.D.G PatentManfactured at United States Bonded Manufacturing Warehouse Class6 No1 Petersburg Virginia USApersonal effects, smoking accessories, tobacco tin -
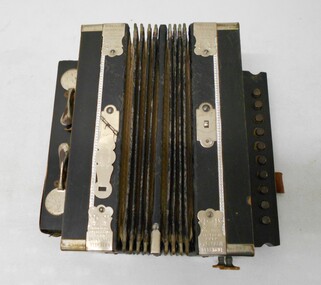 Bendigo Historical Society Inc.
Instrument - MALONE COLLECTION: KALBE'S IMPERIAL BUTTON ACCORDION
Kalbe’s Imperial Accordion Made in Germany. Ten metal keys on right hand side; on left hand side two metal keys for bass chords and one key for the bellows. Case of black polished wood, bellows has nine folds. Nickel plated markings on corners of bellows read "Imperial Accordion, made in Germany, trade mark" with images of two fouled anchors. The accordion is in working condition. A cleaning brush is included.musical instruments, keyboard, button accordion -
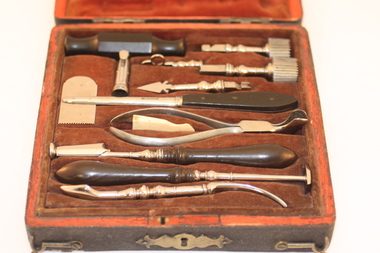 Royal Australasian College of Surgeons Museum and Archives
Trephine case
From Neurological Society of Australia. Wooden case with key. Contents (12 parts) include trephines, various sizes; perforator; key; ebony trephine handle; Hey skull saw; elevator; steel forceps; brush; lenticular; five pointed rugine. 18th or early 19th century.TREPHINE & SKULL SAW IN CASE OF SURGICAL INSTRUMENTS: EIGHTEENTH OR EARLY NINETEENTH CENTURY. This set of surgical instruments contains, in a wooden case covered with shagreen: two trephines and a perforator , with a key to remove the trephine centring pins a detachable ebony handle a Hey skull saw with the name BLACKWELL an elevator a pair of steel forceps a bone or ivory brush to clean the trephines a lenticular a 5-pointed rugine. The trephines are conical, with slight tapering to prevent over- penetration; they are approximately 17 and 20 mm in diameter. Each has a sharp centring point, which 5 can be removed. Hand trephines are operated with one hand, being rotated like a gimlet, by alternating pronation and supination of the forearm, which also exe1ts downward pressure. The skull saw was used where trephining was difficult, as in some depressed fractures; it was popularised by William Hey (1736-1819) of Leeds, though described by earlier writers. Hey, a Yorkshireman, studied in St George's Hospital, London, but worked with great distinction in the Leeds General Infirmary. The lenticular, a curious instrument seen in many eighteenth century illustrations, was used to smooth the margins of bone defects. The rugine could be used to scrape granulations. The design of the trephines and of most of the other instruments strongly suggests an English origin, probably in the eighteenth century. A very similar trephine is figured by the London surgeon Percivall Pott2 in 1779. Bennion l [ists three instrument makers named Blackwell, none earlier than 1817. Most of the instruments have been plated, presumably with nickel, at a date that must be much later. The nickel plating shows little sign of wear. -
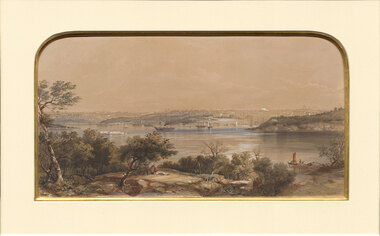 Benalla Art Gallery
Print, Conrad MARTENS, View of Sydney. NSW, 1855
Born: London, England 1801; Arrived: Sydney, New South Wales, Australia 1835; Died: Sydney, New South Wales, Australia 1878ColonialBennett Bequest, 1999 Hand-coloured lithograph depicting industrial waterscape with rocky shoreline and ships and buildings in background. Black painted timber frame with off white arched window mount and gold brushed internal window edgeRecto: Not signed, not dated, not titled print, waterscape, sea, harbour, land, figures, boats, tress, sydney harbour, buildings -
 Tatura Irrigation & Wartime Camps Museum
Domestic object - Cut throat razor
Used by the GROSS family of TaturaBakelite handle in arch shape with a brushed metal razor and handle. Contained in a reddy brown cardboard box, with a lid which slides over the black insert. Outside of box is brown with silver writing, On silver hand is E M DICKINSON INVICTA Sheffield EnglandW3/4 INVICTA Razor Manufactured Sheffield England E M DICKINSONvic and nita gross, bruce gross, cut throat razor -
 Duldig Studio museum + sculpture garden
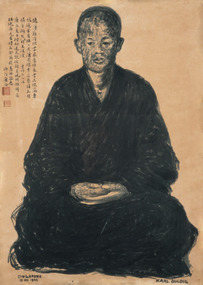
Drawing, Karl Duldig, The Buddhist Monk, Guangqia by Karl Duldig 1940, 1940
The Buddhist monk Guangqia visited Karl Duldig’s studio on two consecutive days, in the company of the noted Chinese writer, Professor Yu Dafu, a friend of Karl’s. Karl made two portraits of the monk, the first depicting him sitting, and the second in a standing pose. The portraits were drawn using a Chinese brush and Indian ink. Surviving sketches in the Studio’s collection indicate that Karl thought about creating a life-size sculpture later on, but this was not realised. Guangqia added inscriptions in his own hand to both drawings and stamped them with a red seal. The seated drawing has an inscription in which he quoted from a Buddhist poem, ‘A Contented Mind’ by the scholar Lingfeng of Mt Tiantai. In the summer I went to visit the Austrian sculptor Duldig with Professor Yu Da Fu. My virtue is slight – I cannot accept your offerings and gifts; I am amply rewarded by the clouds and springs. Rather than a table laden with pearl-like rice, I prefer the wind and leaves falling on my bed. Sitting quietly on my meditation cushion Is sweeter than the wheat offered by a thousand families. The pity is that I am gradually growing old; My bitter journey is not worthy of your offerings. The second drawing has a quote from a Buddhist poem on the study of Chán (Zen) Buddhism, by the famed Chán master, Dàjiàn Huìnéng (638–713): The portrait, with its figure positioned on a scroll-like ground and inscription is reminiscent of traditional Zen Buddhist portraiture. In this school of portraiture, which stretched back to at least the thirteenth century, monks were depicted sitting or standing facing the viewer, and typically the monk added an autographic inscription to the portrait. The portraits were often passed from master to disciple, continuing the disciples’ journey of spiritual enlightenment and were revered for their association with remarkable or holy priests. The Buddhist monk, Guangqai who added his inscription and stamp to the drawings would most certainly have been aware of this tradition. It is likely that Karl was aware of this tradition, one of the points where the studio’s collections of art works from Singapore intersect with the earlier Viennese collections can be found in the Library where a catalogue of an exhibition, 'Ausstellung Ostasiatischer Malerie und Graphik' is held. The Viennese Friends of Asian Art and Culture and the Albertina Museum staged this exhibition of East Asian painting and graphic works in 1932. Such was the internationalism of Duldig’s education in Vienna, that adaption to a new environment and culture in the Straits Settlement was swift, and he was able to interpret the artistic traditions of the place, and make them his own. It is part of the strength of the collection, that in many cases contemporary supporting documentation for the works of art is available. In this case there is a photograph of the Monk with Yu Ta-fu, and Karl and Eva Duldig, outside the studio at the time the drawings were made. Ann Carew 2016The portraits of Guangqai have national and international aesthetic significance. The works of art demonstrate the artist’s skill in capturing the physical appearance and demeanour of his subject, and his ability to adapt his working methods to incorporate traditional Asian materials and cultural practices. The portrait is one of few examples in Melbourne of a central European modernist artists working in, and engaging with Asia, during this period and it is culturally and aesthetically significant for this reason. The portraits are also historically interesting in documenting the life and experiences of Karl Duldig in the Straits Settlement (Singapore). Ann Carew 2016Brush drawing in chinese ink on paper. Seated Buddhist Monk. Chinese calligraphy hand written in black ink. Two red stamps under calligraphy.Signed Karl Duldig in l.r. corner. Dated Singapore 1940 in l.l. corner. -
 Nillumbik Shire Council
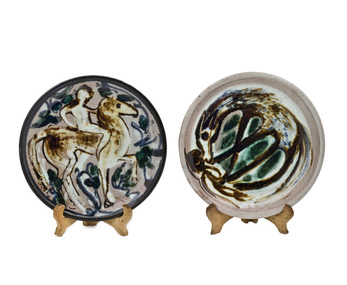
Ceramic (plates): Alma SHANAHAN (b.1924 - d.2015 Melb.), Alma Shanahan, Horse Power - The Flip Side, c.1965
... (x2) with brush decorations resting on hand made ceramic..., horse, dunmoochin Hand painted signature in brown/black on back ...Alma Shanahan (1924-2015) was a Victorian potter who came to live at Clifton Pugh's Dunmoochin art colony at Cottlesbridge, on Melbourne's outskirts in 1953. Unable to join the co-operative proper, as she was a potter, not a painter, she built her house at the top of the hill, 135 Barreenong Road, Cottles Bridge. The c.1953 house is historically, aesthetically and architecturally significant because it is a good example of the design and ethos of mud brick dwellings synonymous with Eltham and features the extensive use of recycled materials, which was characteristic of the 'Eltham style' of architecture. Like the others in the artist community, Alma Shanahan built her own residence in stages out of local materials. Shanahan was later joined by neighbours and Dunmoochin potters Peter and Helen Laycock. She trained for a term with Peter Laycock but was otherwise self-taught, basing her practice on the teachings of Bernard Leach. After Pugh's death in 1991 she became the longest standing Dunmoochin resident. Her works are incised with her full name. Alma Shanahan was a part of the Dunmoochin Artist's community whose (other) members (Kevin Nolan, John Howley, John Olsen, Mirka Mora, Peter Laycock, Helen Laycock, Peter Wiseman and Chris Wiseman) made an important contribution to Victoria's cultural history. From the mid 1950s Pugh persuaded a number of other painters, as well as potters and other artists, to come and live at Dunmoochin and they formed one of Victoria's most important artist communities. She started potting around 1961 (aged 37). "Horse Power" was made using Chullora clay, which indicates it was made during her first seven years of production. Horse Power is about man's search for "energy" and how the "energy" can turn around. Made from Chullora (Sydney) clay. Glazed stoneware plates (x2) with brush decorations resting on hand made ceramic stands. Plate one: 2006.64.1VA (Horse Power + stand) shows a figure on horse back with blue foliage in background. Plate two: 2006.64.2VA (Flip Side + stand) shows a horse with figure under it's hooves. Hand painted signature in brown/black on back of both plates; "Alma Shanahan"shanahan, stoneware, glaze, plates, horse, dunmoochin -
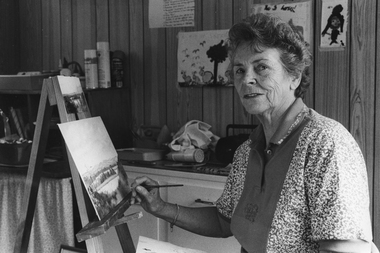 Stawell Historical Society Inc
Photograph, Grampians Community Health Centre photo of Mrs Val Potter nee Hemley
... is sitting in front of an easel with a paint brush in her right hand... is sitting in front of an easel with a paint brush in her right hand ...B/W copy from Grampians Community Health Centre Book Val is sitting in front of an easel with a paint brush in her right hand painting a canvas. She is wearing a floral shirt and has a bracelet on her right arm. There is a cupboard in background with children's paintings on the wall. -
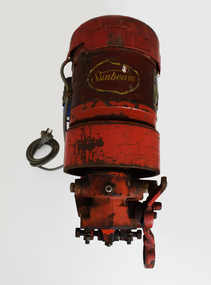 National Wool Museum
Machine - Shearing Motor, Sunbeam, 1960-69
With more and more woolsheds being connected to power lines, the need for electric shearing gear markedly increased from the 1960s onwards. The greater economy made electric gear an attractive proposition to many graziers. Requiring only an electric shearing motor, for small and medium scale operations, electric shearing motors were a more economical way of shearing a wool clip. The other option for graziers was Overhead shearing gear, which also required an Engine to provide shared power to a row of shearing stations. Still working, this Sunbeam Electric Shearing Motor – Heavy Duty Model, features a slow speed motor totally enclosed for protection against dust and insects. The full bearing down tube is easily removed and stored to be out of the way when not in use (not pictured). Providing 0.5 hp, which is twice the power ever needed for shearing sheep, this buffer allows for fluctuations in voltages that can occur in rural districts. Inventor Frederick Wolseley made the world's first commercially successful power-shearing system in Australia in 1888. US company Cooper, which had been founded in 1843 as a maker of sheep dip, began selling Wolseley equipment in the USA in 1895. The Chicago Flexible Shaft Company successfully entered the power-shearing market a few years later and entered into a joint venture with Cooper. It set up a branch in Sydney and sold shearing sets, and engines to power them, into the Australian market. In 1921 the US parent company, realising it needed to make products whose sales were not as seasonal as those of shearing equipment, made its first household appliances and branded them Sunbeam. In 1933, changes in exchange rates and taxes led the company to manufacture engines and shearing equipment in Australia via subsidiary Cooper Engineering, which changed its name to Sunbeam in 1946. Although most Australians know of this company as a major manufacturer of household appliances, its rural division flourished and retained the Sunbeam name for shearing equipment even after it was taken over by New Zealand company Tru-Test in 2001. This 0.5 horsepower vertical brushed motor air-cooled engine was designed to drive a single shearing plant. From the central cylinder which features a yellow “Sunbeam” sticker, a grey 240v power lead can be found on the left-hand side. A blue capacitor is located next to this power lead. Below, two legs extend and meet to form a foot which is fastened to a wall. On the right-hand side of the engine, a specification plate is located on the central cylinder. A yellow directional arrow sticker is located on the rotating section of the engine below the specification plate (location for photography, this section is designed to rotate and hence this sticker is not fixed in this location). At the rear of the cylinder, a plastic cap with small air cut outs protects the air-cooled engine from contaminants. At the front of the engine, the location for securing the bearing down tube is located. On the right-hand side of the lock for the bearing down tube is the handle, to which a string is often attached for switching the motor on and off by a shearer bent at the waist (not pictured). Sticker. Gold writing. Front of shearing motor “Sunbeam” Plate. Inscribed. Side of shearing motor. “Sunbeam / SHEARING MOTOR / MADE IN AUSTRALIA / 0.5 H.P. / 220/240 V / 1 PHASE A.C. / 4.0 AMPS / 50 C/S. / CONT. RTG. / 1425 R.P.M. / CLASS A INSUL / NO. J244560 / TYPE: NSB5C2/49." sheep sheering, shearing equipment, sunbeam, electric shearing motor -
 National Wool Museum
Quilt, Sure as night follows day
... brush dyed and hand quilted. The quilt was exhibited... crazy pieced, air brush dyed and hand quilted. The quilt ...The quilt was purchased from the Wool Quilt exhibition held at the National Wool Museum in 1995. It was subsequently exhibited in the Expressions 2000: The Wool Quilt Prize exhibition in the 'Invited exhibitors' section of the show. (Jan Irvine wrote the catalogue essay for this exhibition.) The quilt is part of the "Running Stitch" Collection. This quilt is titled "Sure as Night follows Day" and was made by Jan Irvine from worn and recycled woollen blankets with wool batting. The quilt has been crazy pieced, air brush dyed and hand quilted. The quilt was exhibited in the Running Stitch Contemporary Wool Quilt Exhibition held at the National Wool Museum in 1995 and was purchased for $1800 from this exhibition. The quilt was catalogue entry no. 18. It was later exhibited in "Expressions 2000: the wool quilt prize" from 16 Sept. to 3 Dec. 2000 (extended until 2/2/2001, catalogue entry no. 26).Catalogue entry from "Expressions 2000" Catalogue, held 16th September to 3 December 2000. Introduction to exhibition "fragility & endurance - textiles by Jan Irvine-Nealie", held at The Queen Victoria Museum and Art Gallery. Essay by Glenda King from exhibition catalogue "fragility & endurance - textiles by Jan Irvine-Nealie", held at The Queen Victoria Museum and Art Gallery, page 1 Essay by Glenda King from exhibition catalogue "fragility & endurance - textiles by Jan Irvine-Nealie", held at The Queen Victoria Museum and Art Gallery, page 2 Essay by Glenda King from exhibition catalogue "fragility & endurance - textiles by Jan Irvine-Nealie", held at The Queen Victoria Museum and Art Gallery, page 3 Essay by Glenda King from exhibition catalogue "fragility & endurance - textiles by Jan Irvine-Nealie", held at The Queen Victoria Museum and Art Gallery, page 4 Essay by Glenda King from exhibition catalogue "fragility & endurance - textiles by Jan Irvine-Nealie", held at The Queen Victoria Museum and Art Gallery, page 5 Essay by Glenda King from exhibition catalogue "fragility & endurance - textiles by Jan Irvine-Nealie", held at The Queen Victoria Museum and Art Gallery, page 6 Essay by Glenda King from exhibition catalogue "fragility & endurance - textiles by Jan Irvine-Nealie", held at The Queen Victoria Museum and Art Gallery, page 7 Essay by Glenda King from exhibition catalogue "fragility & endurance - textiles by Jan Irvine-Nealie", held at The Queen Victoria Museum and Art Gallery, page 8 Essay by Glenda King from exhibition catalogue "fragility & endurance - textiles by Jan Irvine-Nealie", held at The Queen Victoria Museum and Art Gallery, page 9 Essay by Glenda King from exhibition catalogue "fragility & endurance - textiles by Jan Irvine-Nealie", held at The Queen Victoria Museum and Art Gallery, page 10 Biographical notes from exhibition catalogue "fragility & endurance - textiles by Jan Irvine-Nealie", held at The Queen Victoria Museum and Art Gallery, page 1 Biographical notes from exhibition catalogue "fragility & endurance - textiles by Jan Irvine-Nealie", held at The Queen Victoria Museum and Art Gallery, page 2 Biographical notes from exhibition catalogue "fragility & endurance - textiles by Jan Irvine-Nealie", held at The Queen Victoria Museum and Art Gallery, page 3 Biographical notes from exhibition catalogue "fragility & endurance - textiles by Jan Irvine-Nealie", held at The Queen Victoria Museum and Art Gallery, page 4 Biographical notes from exhibition catalogue "fragility & endurance - textiles by Jan Irvine-Nealie", held at The Queen Victoria Museum and Art Gallery, page 5SURE AS NIGHT FOLLOWS DAY DESIGNER + MAKER: JAN IRVINE NSW AUSTRALIA MADE:1995...quilting, handicrafts, textile art, running stitch group, blankets, running stitch collection, irvine-nealie, ms jan -
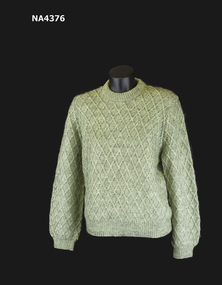 Whitehorse Historical Society Inc.
Clothing - Jumper, 1970
Hand knitted by Valda Arrowsmith for herself in the 1970s and worn for many years. Knitted to the original pattern (see Supplementary file) with a wide turn back cuff and altered by Betty Tickell to a turn under narrow cuff in 1980s.Pale green (eau de nil) mohair jumper knitted in lattice pattern. It has long sleeves and a round neck. Wool is brushed Carissa.costume, female, handcrafts, knitting -
 Whitehorse Historical Society Inc.
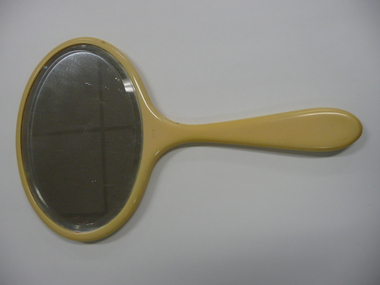
Domestic object - Dressing Table Set, c1900
belonged to Dorothy Meaghers' motherdonated by Ray Meagher who was a councillor 1972-1979. He was also chairman of works committee 1974-76, and Mayor of Nunawading 1976-77. Rays' wife Dorothy was on lake committee and supported the extension of the lake reserve. Ray was also a local builder.1 rectangular cream coloured tray .2 oval shaped hand mirror with handle, coloured cream .3 narrow oblong cream coloured brush .4 oblong cream brush .5 rounded square cream powder container with raised bump on each side .6 lid for powder container with raised bumps on each side square shape .7square handkerchief with farm animals- blue edged .8 round pink coloured powder puff, dark pink. .9 round pink coloured powder puff, light pink. .10 round circle of nylon meshon cream container 'made in England'personal effects-toilet requisites, cosmetics -
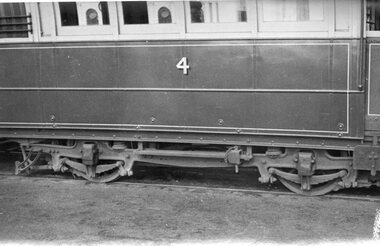
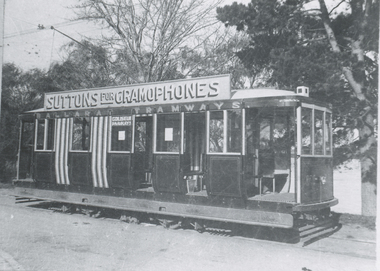 Ballarat Tramway Museum
Photograph - Black & White Photograph/s - set of 3, Electric Supply Co. of Vic (ESCo), 1913
Yields information about Ballarat No. 30, in the 1950's - SEC Official photograph.1708 - Black and white photograph of a Ballarat Sebastopol type tramcar when built new in 1913. Photo used in Keith Kings book, "The Ballarat Tramways" on page 28. Understood to be an ESCo photograph. Tram has "Suttons for Gramophones" roof advertisement, words "Ballarat Tramways" on the top rail above windows and "Coliseum Photoplays"in central window. Two of the four side blinds are in the down position, probably done to show their presence. Tram has a "bulls-eye" type destination indicator. Photographed outside the depot with Lake Wendouree in the background. Photograph is a photo of another print, with the words? "Original Rolling Stock" underneath the original print and the black ink "12" in the bottom left hand corner on the newer print. 1708.1 - as above, but without the "12" written on the photograph. The words "Ballarat Rolling Stock 2 Man Brush Type Car 1918". - added 18/11/2001. 1708.2 - as above, but with more of the label cut off. 1708.3 - Electronic copy of same photograph donated by Ron Hann on a CD of photographs given to him at the time of his visit in January 1963 by the Manager. Refer to email held with item 3841. Added 28/2/2010. See Reg Item 4568 for the CD. See page 28 of Keith Kings, The Ballarat Tramways. 1708.1 - "12" in pencil in top right hand corner.trams, tramways, sebastopol type, suttons, coliseum, destination indicators, esco -
 Ballarat Tramway Museum
Photograph - Black & White Photograph/s, John Webster, 6/06/1950 12:00:00 AM
Yields information about the appearance of one Geelong's single truck trams and its Brush truck.Black and white photograph of the bogie or truck of Geelong No. 4, photographed at the Railway Station. Shows a close up of the Brush truck. The underframe and body bolts. Photographed by John Webster, 6/6/1950. Copy 1 - On rear in ink "Tram 4 bogey / Railway Station Geelong Vic" and on right hand edge "BB32 F2 / T15 / F16 / 6/6/50 1/50 at 11, VV HP3".tramways, trams, geelong, trucks, tram 4 -
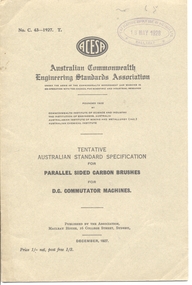 Ballarat Tramway Museum
Book, Australian Commonwealth Engineering Standards Association, "Parallel sided carbon brushes for DC Commutator Machines", 1927
Book - 16 pages + grey covers, side stapled, issued by the Australian Commonwealth Engineering Standards Association, Tentative Australian Standard C.43-1927, "Parallel sided carbon brushes for DC Commutator Machines". Dated Dec. 1927. Provides an index and information about carbon brushes including drawings.On top right hand corner has stamp of the "The Electric Supply Co. of Victoria Ltd Ballarat" and date "19 May 1928".trams, tramways, tramways, electrical equipment, motors -
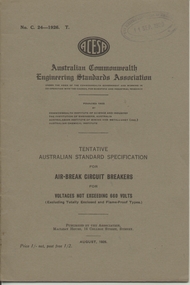 Ballarat Tramway Museum
Book, Australian Commonwealth Engineering Standards Association, "Flame proof air break switches for Voltages Not Exceeding 600Volts"s", 1926-1932
.1 - Book - 20 pages + grey covers, side stapled, issued by the Australian Commonwealth Engineering Standards Association, Tentative Australian Standard - "Air-break knife switches and laminated brush switches for voltages not exceeding 660Volts" - C23 - 1926, August 1926" .2 - Book - 24 pages + grey covers, side stapled, issued by the Australian Commonwealth Engineering Standards Association, Tentative Australian Standard - "Flame proof air break switches for Voltages Not Exceeding 600Volts", C25-1926, October 1926. .3 - Book - 24 pages + grey covers, side stapled, issued by the Australian Commonwealth Engineering Standards Association, Tentative Australian Standard - "Flame proof air break circuit breakers for Voltages Not Exceeding 600Volts", C26-1926, October 1926. .4 - Book - 24 pages + grey covers, side stapled, issued by the Australian Commonwealth Engineering Standards Association, Tentative Australian Standard - "Totally Enclosed air-break Circuit Breakers for Voltages not exceeding 660 Volts" - C27 - 1926, September 1926. .5 - Book - 24 pages + grey covers, side stapled, issued by the Australian Commonwealth Engineering Standards Association, Tentative Australian Standard - "Totally Enclosed air-break Switches for Voltages not exceeding 660 Volts" - C28 - 1926, December 1926. .6 - Book - 24 pages + grey covers, side stapled, issued by the Australian Commonwealth Engineering Standards Association, Tentative Australian Standard "Metallic Resistance Materials for Electrical Purposes" - C29-1926, November 1926. .7 - Book - 28 pages + grey covers, side stapled, issued by the Australian Commonwealth Engineering Standards Association, Tentative Australian Standard - "Face Plate controllers and resistances for use therewith Electric Motors (DC and AC Slip ring)" - C31-1926 - December 1926. .8 - Book - 28 pages + grey covers, side stapled, issued by the Australian Commonwealth Engineering Standards Association, Australian Standard "Contactor Controllers and Resistances for use therewith Electric Motors (DC and AC Slip ring)" - C32-1926 - December 1926. .9 Book - 36 pages + grey covers, side stapled, issued by the Australian Commonwealth Engineering Standards Association, Tentative Australian Standard - "Electrical Performance of Industrial Electric Motors and Generators with class A insulation" - C34-1927, October 1927 with a green label dated September 1932 advised that the tentative standard has been endorsed as a Standard with amendment. .10 - Book - 56 pages + grey covers, side stapled, issued by the Australian Commonwealth Engineering Standards Association, Tentative Australian Standard - "Electrical Performance of Large Electric Generators and Motors - Rating permitting overloads" - C35-1927, April 1927 with a green label dated September 1932 advised that the tentative standard has been endorsed as a Standard with amendment. On top right hand corner has the date stamp of the "The Electric Supply Co. of Victoria Ltd Ballarat" trams, tramways, power station, standards, materials, electrical systems -
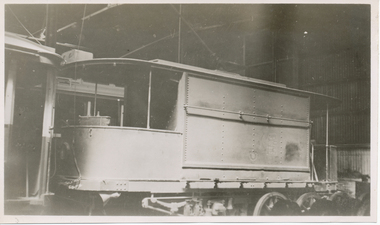 Ballarat Tramway Museum
Photograph - Black & White Photograph/s, Wal Jack, 7/03/1954 12:00:00 AM
Black and White print contained within the Wal Jack Bendigo and Geelong Album, see Reg Item 5003 for more details. Photo of the first or old Bendigo Water tram or scrubber inside the depot, 7-3-1954, Photo by Wal Jack. Wal's album notes say that the vehicle is "now out of use". See Reg Item 7880 for another photograph from the other side. See image i2 for rear of photograph. See image i3 for hi res scan of negative On the rear in blue ink "SEC old "Brush" scrubber inside depot 7-3-54" with Wal Jack copyright stamp in the top right hand corner and the number "T73PC" written in.trams, tramways, bendigo, depot, scrubber tram, sprinkler tram, scrubber, sprinkler -
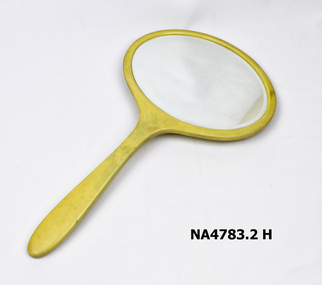
 Bendigo Historical Society Inc.
Accessory - DRESSING TABLE SET
... brush, comb and oval hand mirror with bevel edged glass.... early plastic dressing table set with hair brush, comb and oval ...Ivory coloured early plastic dressing table set with hair brush, comb and oval hand mirror with bevel edged glass.personal effects, hairdressing, dressing table set -
Hand Tool Preservation Association of Australia Inc
Brush
This item is part of the Thomas Caine Tool Collection, owned by The National Trust of Australia (Victoria) and curated by the Hand Tools Preservation Association of Australia.brush, 6" painters