Showing 45 items
matching hot plates
-
 Bendigo Historical Society Inc.
Document - BENDIGO BUSINESSES COLLECTION: MEURER'S ELECTROPLATING
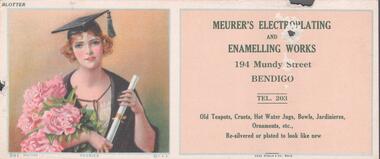
Blotter paper advertising Meurer's electroplating and enamelling works, 194 Mundy Street, Bendigo, tel. 203. Old teapots, cruets, hot water jugs, bowls, jardinières, ornaments, etc. Re-silvered or plated to look like new. On the left a drawing of a young lady in her graduation gown with a bunch of peonies.bendigo, business, meurer -
 Royal Australasian College of Surgeons Museum and Archives
Samovar
Donated by Sir Henry Newland.The samovar stands 41cm high, and is 39cm wide across the handles. It is made of Sheffield plate, and dates from the late 18th century. It is supported on a square base with four cast lion’s feet attached by elaborate mounts at the corners. The main vessel or tank is circular, and set on a short columnar stand. These elements are heavily fluted. There are two elaborately decorated solid cast silver handles attached to the sides of the tank. A long spout with a cast ivory handled tap extends from the bottom of the tank. The lid is plainer, with a fluted and scalloped edge, and is capped with a finial. Inside the tank is a cylindrical immersion container for hot coals, a primitive type of heating element. There is a crest, probably that of the original owner, engraved on the shoulder of the tank above the tap. A samovar is a Russian tea urn but the College’s samovar is not a tea urn, as it does not include the stand or the teapot. Undoubtedly it was intended to provide hot water for tea, and the absence of a matching teapot indicates a cultural difference between the English and the Russians, in the way in which they went about brewing tea. It is a showpiece, intended for use and display in the reception rooms of the house. In the 18th century tea was still a rare and exotic import from the Orient, so the serving of tea was an important act of hospitality and a statement of social status.Sir Henry Newland was the College President 1929-1935Antique sheffield plated samovar with shell design and pressed rib border, finely worked casted handles, spout with swivel top, with tapered centre column, square shaped base with cast lions feet -
 Puffing Billy Railway
Blackstone Oil Engine, 6 November 1908
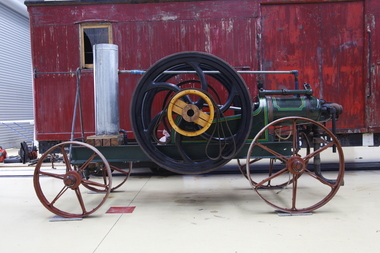
8HP Blackstone Lamps Start Oil Engine engine number 71076 Engine Details Maximum operating RPM of 240. Fitted with a 3'9" Flywheel Tested on the 6th of November 1908. Shipped to Cluter buck South Australia for installation on concrete base. Recovered and restored during the 80's in South Australia Purchased privately in 2013 in Tailem Bend South Australia and transported to Victoria. Currently on loan to the Puffing Billy Museum at Menzies Creek as an operating exhibit. Blackstone & Co. was a farm implement maker at Stamford, Lincolnshire, United Kingdom. In 1896 they built lamp start oil engines. The Lamp or hot-bulb engine (also hotbulb or heavy-oil engine) is a type of internal combustion engine. It is an engine in which fuel is ignited by being brought into contact with a red-hot metal surface inside a bulb, followed by the introduction of air (oxygen) compressed into the hot-bulb chamber by the rising piston. There is some ignition when the fuel is introduced, but it quickly uses up the available oxygen in the bulb. Vigorous ignition takes place only when sufficient oxygen is supplied to the hot-bulb chamber on the compression stroke of the engine. Most hot-bulb engines were produced as one-cylinder, low-speed two-stroke crankcase scavenged units Historic - Industrial - single cylinder, horizontal, 4 stroke, hot-bulb ignition oil engine Blackstone 8HP Oil Engine made from steel, wrought iron and brassOval Plate with Black Stones and Clutter Buck Brass Plaque engine number 71076blackstone, oil engine, clutter buck, black stone, puffing billy, hit and miss, engine, blackstone & co -
 Tatura Irrigation & Wartime Camps Museum
Photograph - copy, 1988 copy
Photographed at Exhibition of Camp memorabilia displayed at Temper Home for Aged, Bayswater, Victoria, in 1981.Colour photograph of items in daily use at camp. Plate, mug and cutlery. Laundry scoop, grater and iron used with hot coals. Negatives no 3. hand crafts, pow, camp internees -
Maldon Vintage Machinery Museum Inc
Oil Engine, 1912
10 HP horizontal cylinder oil engine in working order. Mounted on a steel chassis with 4 wrought iron wheels. Two flywheels and one flat belt pulley. Rectangular cooling water tank and cast iron exhaust pot with vertical exhaust pipe mounted at crankshaft end. Engine painted green with pale yellow trim. Blow torch start on compression when hot bulb is of certain temperature. Mechanical water and fuel pumps. Oval brass plate fixed to cylinder "The "Blackstone" / Carter's Patent / 61892 / Quote this No. / When ordering parts / Oil Engine"engines horizontal cylinder -
 City of Greater Bendigo - Civic Collection
Artwork, other - Gold Chicko Roll, Simplot Australia, 2001
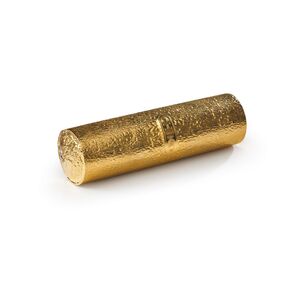
Commemorative object produced by Simplot Food Service and presented to the City of Greater Bendigo on the occasion of the 50th anniversary of the creation of the Chicko Roll by Bendigo born boiler maker, Frank McEncroe. The Chicko Roll has been an Australian icon since the 1960's and 70's. Inspired by the Chinese spring roll and first sold in 1951 as the "Chicken Roll" despite not actually containing chicken. The snack was designed to be easily eaten on the move without a plate or cutlery and is typically deep-fried in vegetable oil. By 1965 the ubiquitous Chicko Roll was sold in every fish and chip shop throughout the country and at the height of their popularity in the 1970s, 40 million Chiko Rolls were being sold Australia-wide each year and more than one million were exported to Japan.(Wikipedia https://en.wikipedia.org/wiki/Chiko_Roll). Advertised with the slogan 'Grab a Chiko', 'Hit the Hot Spot' and 'You Can't Knock the Roll' the marketing around the Chicko Roll was aimed towards the male population with women perched on Harley Davidson's prevocatively preparing to bite into a Chicko Roll. In 2008 with a push towards healthier eating, Chicko Roll reviewed its advertising and although it continues to target young men, it switched to using a 'fun, active' young women, riding a retro pushbike near the beach to improve its image. In 1995 J.R. Simplot, an American company who also own Leggo's, Birds Eye, Edgell and John Wes,t acquired Chicko Roll to sure up their foothold in the Australian market. Life size gold plated chicko roll in a hinged wooden presentation box with red lining. Double sided, printed letter accompanying the object explains its creation and significance.0365.1; CHICKOcity of greater bendigo commerce, mayor acherman -
 Mont De Lancey
Book, John F. Shaw and Co. Ltd, My Adventure Book, c.1920
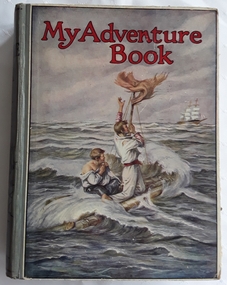
A collection of adventure stories for children.A large hardcover with the title printed in red at the top, My Adventure Book of stories for children by multiple authors, with a coloured illustration on the front cover of two men floating on a raft at sea waving to a sailing ship in the distance. The spine has the title, publisher and a lined drawing of a man on a horse. It is illustrated in monochrome and also colour plates. fictionA collection of adventure stories for children.adventure stories, children's fiction -
 Mont De Lancey
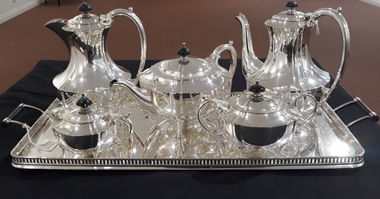
Silver service
... Six piece silver service - "Hecla plate" with tray, teapot... sets Six piece silver service - "Hecla plate" with tray, teapot ...Wedding gift to Annette and Neville Lord from Mr and Mrs William J Sebire 3rd March 1934Six piece silver service - "Hecla plate" with tray, teapot, hot water jug coffee pot, sugar basin and milk jug. tableware, tea and coffee sets -
 Wodonga & District Historical Society Inc
Domestic object - Hair Styling Set, Braun Electrics (Australia) Pty. Ltd, c1970
Braun was originally founded in Germany in 1921, making components for radio sets. After World War 2 they extended their range to include audio and camera equipment. By the 1950s and 1960s the company branched out into electric shavers, kitchen appliances and hair care products. Home hair styling sets and hot rollers became popular in the 1960s and continued to be an important woman's styling appliance throughout the 1970s and 1980s. In 1975 this product was advertised at a price of $37.95. From 1984 until 2007, Braun was a wholly owned subsidiary of Gillette, which had purchased a controlling interest in the company in 1967. Braun is now a subsidiary of Procter & Gamble, which acquired Gillette in 2005.Personal grooming items such as this became important personal accessories and grooming tools for women throughout the mid 20th century across Australia.This hair styler set contains 20 hair rollers which were heated by placing them on the 20 heating posts fitted inside the unit in the case. An electric cord supplied was attached to an electric socket. A red dot on top of each posts darkened when the rollers were sufficiently heated. A detailed instruction booklet is included. A mirror is attached to the inside of the lid.On 2 metal plates on back of unit: Plate 1: MANUFACTURED FOR BRAUN ELECTRICS (AUST) PTY. LTD. / 24 JOHNSTON ST., FITZROY, VIC. 650-WATT 240 V. A. C. ONLY 50 CYCLE CAT. NO. B102 Plate 2: VOLT 240 AC ONLY FREQUENCY 50 H Z. 0.66 AMP / RETURN TO SUPPLIER FOR REPAIR Across bottom: PATENTS PENDING / MADE IN HONG KONGbraun electrics, personal appliances, hair styling -
 Ballarat Tramway Museum
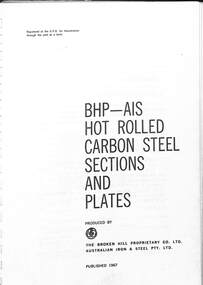
Book, Broken Hill Pty Co Ltd (BHP), "BHP - Hot rolled carbon steel sections and plates", 1967
Published by BHP 1967 gives the dimensions and properties of rails, steel sections and plates produced by Australian Iron and Steel and Broken Hill Pty Ltd. Was supplied free by BHP to students. Rail sections listed: 387 pound/yard crane rail 175 lb crane rail 146 lb crane rail 107 lb - 53 kg/m with fishplate and sleeper plates details 102 lb or 51 kg grooved tram rail 94 lb or 47 kg - fishplates and sleeper plates 91 lb or 45 kg NZR standard rail 82 lb or 41 kg - fishplates and sleeper plates 75 lb or 37 kg - fishplates and sleeper plates 63 lb or 30 kg - fishplates 45 lb or 22 kg - fishplates 30 lb or 15kg - fishplates 20 lb or 10kg - fishplates Yields information about rails and associated items produced by BHP AIS in 1967 along with other steel sections and plates.Book - 132 pages, white comb bound + blue plastic covers.railways, tramways, rails, bhp, fishplates, sleeper plates -
 Montmorency–Eltham RSL Sub Branch
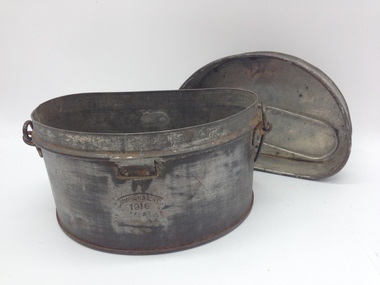
Functional object - Mess Tin WW1, WW1 Mess Tin, 1916
Mess tins were used to prepare or heat food, but thay were also used as a container from which to eat or drink. The tins are lightweight and sturdy but they became hot very quickly when heated.Used by Australian military servicemen during WW1Two piece "D" shaped silver coloured metal mess tin and lid. Used by Australian military servicemen during WW1, it is believed to be based on a British design. Made of tin plated steel, this mess tin has a wire rod carrying handle and rectangular metal wire clips for a shoulder strap, attached to the top section of the mess tin by metal rivets and straps. There is a metal wire rod folding handle mounted on the inside of the removable lid section. The mess tin has a folded seam on the bottom edge and along the left hand side. A wire rod is mounted around the top section of the mess tin as a base for the removable lid. The lid has a folded metal seam on the top edge and along the left hand side. The bottom edge of the lid is folded around a metal wire rod.A. SIMPSON & SON LTD 1916 ADELAIDEmess tin, ww1, australia, military, metal, two piece -
 Birregurra Historical Society
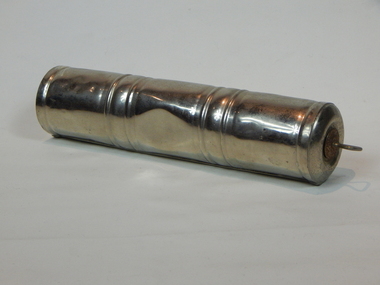
Domestic object - Can, Bed warmer
Donated to collection. Used in 1950s as hot water bottle to warm bed in cold Western District homes.Household object in 1950sSilver plated metal cylinder with metal screw top stopperPAT APPN 6368/42 Sunrise stainless steel Melbournecan, water bottle, hot water bottle, stainless steel, bed warmer -
 Flagstaff Hill Maritime Museum and Village
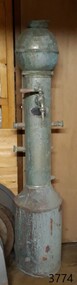
Functional object - Water Boiler, Jackson Boilers Ltd, 1920s
Jackson Boilers Ltd., brass founders, electro platers and sheet metal works made this tube water boiler. It was a fitting in the vessel Reginald M, a small cargo ship built at Port Adelaide in 1922 and named after her builder and first owner, John Murch. The Reginald M was launched at Largs Bay, South Australia, in 1922 to carry cargo around South Australia that included guano, barley, wool, horses, cattle, timber, explosives, potatoes, shell grit, and gypsum. It passed through numerous owners over the years and primarily maintained its purpose as a cargo vessel. In 1975, the decommissioned Reginald M was purchased by Flagstaff Hill Maritime Museum as an attraction. Although restoration efforts were undertaken and maintained for the craft above the water line, deterioration occurred below the surface and resulted in the ship being unsafe for visitors to board. It was broken up and removed from Flagstaff Hill in 2018, but items such as the historical boiler remain in Flagstaff Hill’s Collection. JACKSON BOILERS LTD.: - In 1911, Henry Jackson was the Managing Director at Jackson Boilers Ltd. He had gained around 30 years’ experience as a tin plate worker, plumber and gas fitter at Ilkey in 1881, then at Leeds by 1901. By 1921, he had changed employment from Jackson Boilers to Managing Director of Patent Water Boilers. During World War I, Jackson Boilers Ltd of Leeds performed war work like many other manufacturers at that time. The firm made cases for the explosive picric acid and electroplated fuse hole plugs. In 1918, the firm employed 15 males and 19 females. Jacksons Boilers became very successful throughout the first half of the twentieth century with showrooms and sales offices in Scotland, the Midlands and Southern England. It also had an office in Dublin, Ireland. In the post-war 1920s, the firm’s production included instantaneous water boilers and coffee machines for cafes, restaurants and canteens. Jackson Boilers also began to supply shipping lines with catering water boilers for their ships. The firm applied for a USA patent for the tube boiler in 1930, for the design which appears to have been invented in 1926. A 1971 advertisement adds the credentials, Members of the Catering Equipment Manufacturers’ Association. The tube water boiler was designed specifically for use in a ship's restaurant or dining area and patented by Jackson Boilers Ltd. of Leeds. The boiler is significant as a patented design, illustrating the evolution of maritime, commercial and domestic water boilers that have led to many innervations and improvements in today's boilers that are used in heating and in producing hot water for domestic and catering use. It is also significant as it is one of the earlier boilers the Jackson company made in the early 1920s before they applied for a US patent on their revised design in 1926.Water boiler, free standing Jackson's Tube boiler. A tall metal cylindrical stand with a metal sphere on top and several pipe fittings on the sides. A brass tap with a lever handle is connected to the front. A plaque with maker's details is attached under the tap. Details are also impressed into the cylinder above the tap.Jackson Boilers Leeds Ltd. "JACKSON'S PATENT" . Other details indecipherable. flagstaff hill maritime museum and village, flagstaff hill maritime museum, flagstaff hill, maritime museum, maritime village, warrnambool, great ocean road, leeds, jackson boilers ltd, jackson boilers, henry jackson, brass founders, electro platers, sheet metal works, patent water boilers, leeds manufacturer, tube water boiler, domestic boiler, tube domestic boiler, tube boiler, water heaters, water boilers, self-feeding water boilers, sheet metal work instantaneous water heaters, engineering, allied trades, metal workers, metal trade, food machinery, hospitality equipment, ship equipment, ship water boiler, ship heater, catering boilers, café boiler, restaurant boiler, canteen boiler, catering equipment manufacturers’ association, cema, kitchen equipment, kitchen appliance, war work, world war i, wwi, picric acid, picric acid cases, fuse hole plugs, electro plated fuse hole plugs, reginald m, cargo ship, port adelaide, 1922, john murch -
 Mont De Lancey
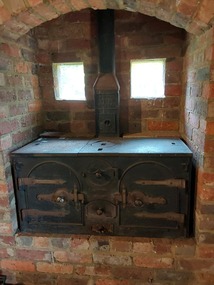
Domestic object - Kitchen Stove, C. Andrews, c1900's
The cast iron combustion stove is significant as part of the evolution of domestic cooking. Previously, cooking was mostly carried out in the outdoors on open fires, and later in fireplaces indoors. The cast iron combustion stove is significant as part of the evolution of domestic cooking. Cast iron stoves burn solid fuel such as wood or coal, and are used for cooking and warmth. The stoves have a firebox with a grate where the fuel is burned. The hot air flows through flues and baffles that heat the stove top and the oven. By the 1920s gas cookers were being introduced for domestic use, and by the 1930s electric home cookers were being offered to householders. A vintage cast iron kitchen stove set in the back wall of the Mont De Lancey Slab Kitchen. It has two steel decorative hinged doors with a handle to open and close. There is one pull out metal shelf in each compartment. Between the two doors is a round door which opens to reveal the wood box with a slatted base. This allows the ash and small coals from the fire to fall though to a pull-out tray below to be emptied outside when cooled. There is another lift-out kid to clean the ash and coals underneath.On the chimney plate 'Andrews, Patent Non Pariel' On the front of the stove below the round wood box 'C Andrews Geelong'cooking equipment, cooking stoves, fuel cooking stoves, domestic ovens -
 Whitehorse Historical Society Inc.
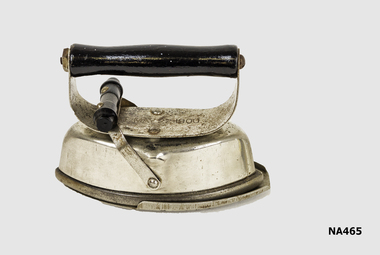
Functional object - Iron
Small travelling iron with stand. Also known as a 'Goffering' iron or 'Sad Iron'. The iron is in three parts - a base plate on which to place the hot iron - the top which consists of a handle, skirt, and locking device for the centre of the iron which placed on a fuel stove to heat. The core of this iron is asbestos.Patented - May 20 1900|Asbestosdomestic items, irons, personal effects, travel goods