Showing 110 items
matching tram 56
-
 Ballarat Tramway Museum
Slide - 35mm slide/s, Ben Parle, Apr. 1956
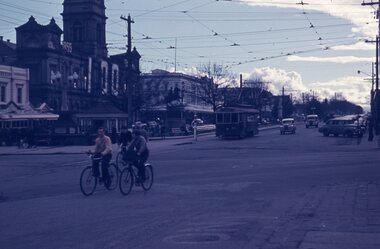
Agfacolour slide with words "Agfacolour" in blue top and bottom on one side, white cardboard mount with thick blue border on the printed side. Possibly hand done. Photo taken by Ben Parle 8/1956. Photo taken from the Ballarat Post Office footpath looking across to the Town Hall, with a single truck tramcar waiting on the north side, a bogie car on the south side, with a number of vehicles in the background. Slide is very dark/blue colour. The Town Hall has large numerals "100" in white, with the word "1855" apparent on the nearest side. The corresponding year is partially hidden by trees."Sturt Street Ballarat" "8/56"tramways, trams, sturt st, town hall -
 Ballarat Tramway Museum
Slide - 35mm slide/s, Ben Parle, Apr. 1956
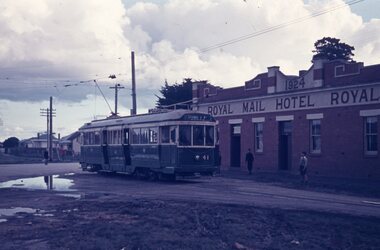
Agfacolour slide with words "Agfacolour" in blue top and bottom on one side, white cardboard mount with thick blue border on the printed side. Possibly hand done. Photo taken by Ben Parle 8/1956. Photo of No. 41 at the Sebastopol terminus, with the Destination of "Lydiard St Nth"."Sebastopol Ballarat" "8/56"tramways, trams, sebastopol, royal mail hotel, tram 41 -
 Ballarat Tramway Museum
Photograph - Black & White Photograph/s, John Radcliffe, 11/01/1956 12:00:00 AM
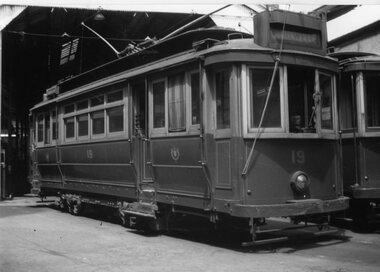
Yields information about Geelong 1in Ryrie St during the mid 1930's.Black and White Photograph of Geelong No.19 at the depot, with the destination of Chilwell. Shows the tramcar in detail, such as the trolley rope. Photo by John Radcliffe, 11/1/1956, three days after the first closures.In hand writing on the rear "Geelong Pengelly car 19 on depot forecourt 3 days after the fist closures." In the bottom left hand corner "11-1-56" and in the bottom right hand corner "WFS Collection / J. C. Radcliffe (Adelaide)" trams, tramways, geelong, depot, pengelly, tram 19 -
 Ballarat Tramway Museum
Ephemera, Wal Jack, Wal Jack notebook, 1940's
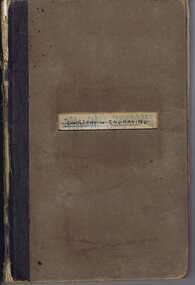
Demonstrates Wal Jack's records, hand written in a recycled notebook. Note - several sheets have been cut from the book - appear to be done before use by Wal. The crossed out sheets have not been imaged - these have been transferred by Wal to Reg Item 5507 and re-ordered. Image 30 shows a sample of a crossed out page. See related documents for a pdf file of the contents. Scan No. BTM5623iX Page No. Title or Subject Notes 1 Front 2 Inside Cover Addresses for Jack McLean, John Buckland Trooper Larsen Inside front cover. 3 1 Note re NSWT steam tram motor, MMTB PCC import issues, Peter Duckett seeking info and Photo of Julien’s battery tram on test in Melbourne 4 2 MMTB No. 8, 4, photos, Tyrell’s of Sydney photos, Perth 63 dimensions and MMTB plans for Domain Road & St Kilda Rd Jtn. 5 3 Notes re NSWGR P32, VR locos at Wodonga 13/10/1941, SAR V Class V143, SAR locos – W and Wx 6 4 NSW Private locos, Woy Woy quarry and AGL at Mortlake 5 Blank 6 Blank 7 7 First cable trams – links to photos T154, 29, 154 (Adelaide) 8 8 T156, Powelltown, Ray Pearson Negs 9 9 QR B18 ¼ locos, Ray Pearson’s scrap book, PMTT Zeppelin style trams, MMTB T class locations and 178/179 rebuilding. 10 10 Hawthorn horse tramway, VR Black Rock terminus sketch 11 11 NSW Tramways, Ryde, MMTB L class, Geelong tramway notes 12 12 Locomotive “Ballarat” in WA, Brisbane and various contacts. 13 13 Notes re VR News – 1943, H class, derailments, max speeds, Koondrook tramway and Geelong level crossing. Individual typed sheets pasted onto page – loose within book. 14 to 17 14/17 List of MMTB trams to 877 and work trams Some errors noted. 18 18 Newspaper cutting – Tram Record Day revenue (Brisbane 10/1943), Steam Trams at Journey’s end – Sydney – 6/1943 list of equipment being sold by Sydney Ferries, at Parramatta, 6/1943. MMTB Tram crossings in Melbourne, list of Sydney photos sent to Wal. Cuttings and Individual typed sheets pasted onto page. 19 19 Midland locos WA, VR open wagon stencils and a siding at Mt. Evelyn. Individual typed sheets pasted onto page. 20 20 Note re Sydney four wheel tourist trams and Hawthorn Max. Traction cars locations c1945. 21 to 23 21/23 Notes on Geelong Bogie trams and carrying flags for declaration of Newtown and Chilwell as a city – 1/10/1949 (See also Reg Item 5641) 24 to 26 24/26 Notes on Wellington Corporation Tramcars 37 27 Kelburn – Karoi cable line Wellington 28 to 29 28/29 Auckland Tramway Board tramcars notes 30/31 Blank 30 32/33 Notes on Ballarat tramcars – ESCo Crossed out 34/37 Ditto – SEC Crossed out 38 Music for the people notes Crossed out 39 Notes on Ballarat trams with tail lights Crossed out 40/43 Notes on Ballarat bogie trams Crossed out 44/45 Notes on SEC tram controllers, dead man and truck lengths. Crossed out 31 45 List of Ballarat Destination roll – Dec 1949 32, 33 46/47 Notes on Bendigo Bogie Trams – 1940’s 34 48 Bendigo Destination roll on a Birney tram Easter 1950, notes on tram tail lights and fares on the Bendigo system. 49 Blank – though headed “Bendigo Birney Trams” 50 Notes trams used on special days in Ballarat Crossed out 51 Ditto and No. 24 and 23 Crossed out 52 Ditto, 15, 11, 23 and Gold tram Crossed out 53 Notes on 34 caused delays, 5/1950, and use of 23 as gold tram Crossed out 54 Notes on repair to track at Sturt and Drummond 6/1951 Crossed out - see Reg Item 7720. 55 Notes on track work in Ballarat early 1950’s Crossed out 56/57 Notes on 33, 37, pay as you enter signs and 1953 special workings Crossed out 58/60 Notes trams used on special days in Ballarat Crossed out 61/64 Blank 35 65 “Salute to the Cable Tram” – transcription of text from Truck and Bus Transportation (July 1948) 36, 37 66/67 Continued from above and list cable tram routes, opening, closing, length and route colours. 38 68 List of photos in Truck and Bus Transportation, Anniversary Issue July 1948 of cable trams. 69 Blank 39 70 Notes on Brunswick TT, Fitzroy TT colours, Adelaide Service trams and MMTB route lengths. 40 71 Notes on HTT colours, tramcars, PMTT trams and colours and NMETL colours, trams and route destination signs 41 72 Notes on MMTB routes, cable and other Melbourne tram disposals, and sale of cable trams and storage at Brunswick. 42 73 Blank - page was headed Lugarno, Switzerland and Italian border 42 Handwritten sheet – photos to get – R. Field and Peter Duckett. 43, 44 74/75 Listing of trains on all lines leaving Ballarat and days run. 45 77 Listing of negatives sent to K. Rogers in 1944 and list of MMTB Max. Traction bogie trams 117 to 138 and disposal 46 77 Listing of MMTB trams, - appears to be something to do with photos or negs held. 47 78 Listing of Ray’s (Pearson) negs /photos of Brisbane trams and other railway photos. 79 Blank 48 80 Prices of pine timber in 4/1942, list of photos “I want”, notes re VR Train length, Ironbark Gully bridge, 3817 in Harden smash 7/1948 and 1948 Ballarat destination roll. Partly crossed out. Rear Cover. Has a strong association with Wal Jack, his work to collect and record both railway and tramway information. Yields information about tramways in Ballarat, Bendigo, Geelong and other cities tramways and railways.Grey covered book with black binding containing 40 lined sheets (80 pages) with handwritten notes with the front cover partly cut out and the words "Jewellery & Engraving" book written in. Contains some newspaper clippings and pasted typed notes as listed below. The image number of each sheet is given. See individual pdf files. trams, tramways, mmtb, ballarat, bendigo, sydney, brisbane, railways, geelong, new zealand, victorian railways, sec, esco -
 Ballarat Tramway Museum
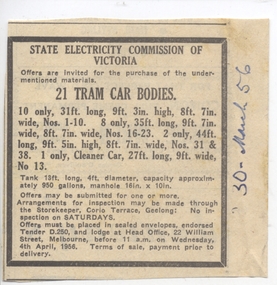
Newspaper, Geelong Advertiser, "21 Car bodies", 30/03/1956 12:00:00 AM
Newspaper clipping from the Geelong Advertiser, 30/3/1956, advertising 21 tram bodies for Sale by the SEC Geelong. Provides details of the dimensions of the tramcars and of the tank. Offers closure 4/4/1956. Contained originally within Reg Item 5623 at the front of this note book. For items see btm5623 loose items list.pdf.has date "30 March 56 in ink on right hand side.geelong, closure, sale of trams -
 Ballarat Tramway Museum
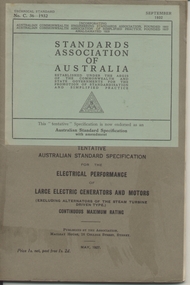
Book, Australian Commonwealth Engineering Standards Association, "Electrical Performance of Large Electric Generators and Motors - Continuous Maximum Rating", "Pressboard for Electrical Purposes", "Hard Drawn copper stranded circular conductors for overhead power transmission purposes", "for Indicating Ammeters, Voltmeters, wattmeters, frequency and power factor meters", "Instrument Transformers", "Liquid Starters for Electric Motors", "Star Delta switch starters for Electric Motors", "Multiple switch starters for Electric Motors", 1926-1933
.1 - Book - 56 pages + grey covers, side stapled, issued by the Australian Commonwealth Engineering Standards Association, Tentative Australian Standard - "Electrical Performance of Large Electric Generators and Motors - Continuous Maximum Rating" - C36-1927, May 1927 with a green label dated September 1932 advised that the tentative standard has been endorsed as a Standard with amendment. .2 - Book - 48 pages + grey covers, side stapled, issued by the Australian Commonwealth Engineering Standards Association, Tentative Australian Standard - "Electrical Performance of Alternators of the Steam Driven Type" - C38-1927 - December 1927 with a green label dated September 1932 advised that the tentative standard has been endorsed as a Standard with amendment. .3 - Book - 32 pages + grey covers, side stapled, issued by the Australian Commonwealth Engineering Standards Association, Tentative Australian Standard - "Electricity Meters" C39-1927, August 1927. .4 - Book - 28 pages + grey covers, side stapled, issued by the Australian Commonwealth Engineering Standards Association, Tentative Australian Standard - "Pressboard for Electrical Purposes" - C40-1927, January 1927. .5 - Book - 24 pages + grey covers, side stapled, issued by the Australian Commonwealth Engineering Standards Association, Tentative Australian Standard - "Hard Drawn copper stranded circular conductors for overhead power transmission purposes" C41-1930, August 1927, with a green label dated October 1932 advised that the tentative standard has been endorsed as a Standard with amendment. .6 - Book - 48 pages + grey covers, side stapled, issued by the Australian Commonwealth Engineering Standards Association, Tentative Australian Standard "for Indicating Ammeters, Voltmeters, wattmeters, frequency and power factor meters" - C42-1927 - December 1927, with a green label dated October 1932 advised that the tentative standard has been endorsed as a Standard with amendment. .7 - Book - 32 pages + grey covers, side stapled, issued by the Australian Commonwealth Engineering Standards Association, Tentative Australian Standard - "Instrument Transformers" - C45-1928, June 1928. .8 - Book - 28 pages + grey covers, side stapled, issued by the Australian Commonwealth Engineering Standards Association, Australian Standard "Liquid Starters for Electric Motors" C46-1927, December 1927. .9 - Book - 20 pages + grey covers, side stapled, issued by the Australian Commonwealth Engineering Standards Association, Australian Standard "Star Delta switch starters for Electric Motors" C47-1927, December 1927. .10 - Book - 24 pages + grey covers, side stapled, issued by the Australian Commonwealth Engineering Standards Association, Australian Standard "Multiple switch starters for Electric Motors" C48-1927, December 1927. On top right hand corner has the date stamp of the "The Electric Supply Co. of Victoria Ltd Ballarat" trams, tramways, power station, standards, materials, electrical systems -
 Ballarat Tramway Museum
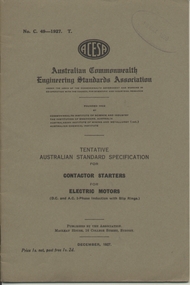
Book, Australian Commonwealth Engineering Standards Association, "Contactor Starters for Electric Motors", "Dimensions of insulated annealed copper conductors for electric power and light including voltage tests", "Vulcanised Fibre for Electrical Purposes", "Bus-bars and connections constructed of bare copper or aluminium", "Fixed Condensers for Radio Reception Purposes", "Graphic (Recording or chart recording) ammeters, voltmeters and wattmeters.", "5-Amp two pin wall plugs and sockets for domestic purposes (without earthing connection)", "Electric Cable Soldering Sockets", "Graphical Symbols and Schedule of Outlets for the Electrical Equipment of Buildings", "Porcelain Insulators for overhead powerlines and outdoor switching Structures", 1927-1939
.1 - Book - 28 pages + grey covers, side stapled, issued by the Australian Commonwealth Engineering Standards Association, Tentative Australian Standard - "Contactor Starters for Electric Motors" C49-1927, December 1927. .2 - Book - 56 pages + grey covers, side stapled, issued by the Australian Commonwealth Engineering Standards Association, Tentative Australian Standard - "Dimensions of insulated annealed copper conductors for electric power and light including voltage tests" C50-1928, June 1928. .3 - Book - 36 pages + grey covers, side stapled, issued by the Australian Commonwealth Engineering Standards Association, Tentative Australian Standard - "Vulcanised Fibre for Electrical Purposes" C51-1928, May 1928. .4 - Book - 16 pages + grey covers, side stapled, issued by the Australian Commonwealth Engineering Standards Association, Tentative Australian Standard - "Bus-bars and connections constructed of bare copper or aluminium" C52-1928, May 1928. .5 - Book - 16 pages + grey covers, side stapled, issued by the Australian Commonwealth Engineering Standards Association, Tentative Australian Standard - "Fixed Condensers for Radio Reception Purposes" - C53-1928, February 1928. .6 - Book - 32 pages + grey covers, side stapled, issued by the Australian Commonwealth Engineering Standards Association, Tentative Australian Standard "Graphic (Recording or chart recording) ammeters, voltmeters and wattmeters." C54-1928 March 1928. .7 - Book - 20 pages + grey covers, side stapled, issued by the Australian Commonwealth Engineering Standards Association, Tentative Australian Standard - "5-Amp two pin wall plugs and sockets for domestic purposes (without earthing connection)" C55-1928, August 1928, .8 - Book - 24 pages + grey covers, side stapled, issued by the Australian Commonwealth Engineering Standards Association, Tentative Australian Standard "Electric Cable Soldering Sockets" C56-1929, March 1929. .9 - Book - 8 pages + brown covers, side stapled, issued by the Australian Commonwealth Engineering Standards Association, Australian Standard "Graphical Symbols and Schedule of Outlets for the Electrical Equipment of Buildings" C64 and 65-1935, October 1935. .10 - Book - 24 pages + brown covers, side stapled, issued by the Australian Commonwealth Engineering Standards Association, Australian Standard "Porcelain Insulators for overhead powerlines and outdoor switching Structures" C67-1939, August 1939. On top right hand corner has the date stamp of the "The Electric Supply Co. of Victoria Ltd Ballarat" for items .1 to .8, SEC stamp on .10. trams, tramways, power station, standards, materials, electrical systems -
 Ballarat Tramway Museum
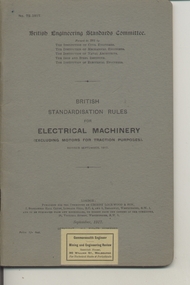
Book, British Engineering Standards Association, "Electrical Machinery excluding motors for traction purposes", 1927-1939
.1 - Book - 56 pages + grey covers, side stapled, issued by the British Engineering Standards Committee "Electrical Machinery excluding motors for traction purposes", No. 72-1917, September 1917. Has "Commonwealth Engineer" label along the bottom edge. .2 - Book 28 pages - light grey covers, side stapled, issued by the British Engineering Standards Association, "Insulating oils for use in Transformers, oil switches and circuit breakers" No. 148-1923, April 1923. Has a Tait Book Co. stamp along the bottom edge and ESCo date stamp 1 Oct. 1925. Printed by Gaylard & Sons London. .3 - Book 72 pages - light grey covers, side stapled, issued by the British Engineering Standards Association, "Tungsten Filament Electric Lamps" No. 161-1925, August 1927. Has a Tait Book Co. stamp along the bottom edge and ESCo date stamp 15 Feb. 1928. Printed by Waterlow & Sons London. .4 - Book 48 pages - light grey covers, side stapled, issued by the British Standards Institution, "Metal Sheathed paper insulated plain annealed copper conductors for electricity supply including voltage tests" No.1 48-1933, March 1933. Has a Tait Book Co. stamp along the bottom edge and ESCo date stamp 15 Feb. 1928. Printed by Waterlow & Sons London. trams, tramways, power station, standards, materials, electrical systems -
 Ballarat Tramway Museum
Photograph - Black & White Photograph/s, Keith Kings, 7/10/1956 12:00:00 AM
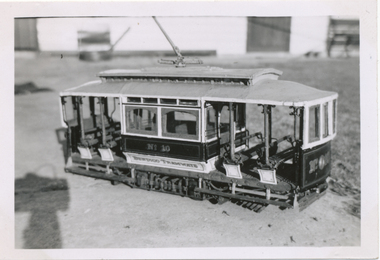
Black and White print contained within the Wal Jack Bendigo and Geelong Album, see Reg Item 5003 for more details. Photograph of a model of Bendigo tram ESCo 10. .1 - On rear in ink "Model of Bendigo No. 10 - original type, plus vestibules. Maker Unknown, now in possession of KSK. (7/10/56)" Has K.S.Kings stamp in top right hand corner and number "K(i)(6)" trams, tramways, bendigo, models, esco, tram 10 -
 Ballarat Tramway Museum
Magazine, RSL Victoria, Mufti - Vol. 56, No. 2 June 2016, Jun. 2016
Magazine - 76 pages including cover, "Mufti - Vol. 56, No. 2 June 2016 published by the Returned Services League Victorian Branch. On page 33 has an article about the launch of Cuthberts 939 and the Ballarat RSL and the BTM proposed for a new interpretative centre. Written by Lynne Redman, Welfare, Aged and Health Support Ballarat.trams, tramways, rsl, btm, museum, interpretative centre -
 Ballarat Tramway Museum
Photograph - Digital image, Wal Jack, 24/11/1956 12:00:00 AM
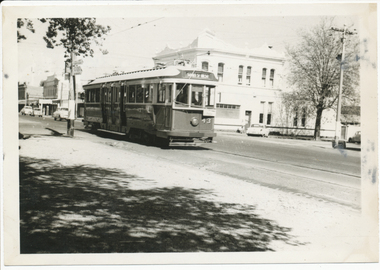
Yields information about the appearance of Sturt St in the mid 1950's and No. 43.Digital image from the Wal Jack Ballarat Album of photographs of No. 43 with destination of Sturt St West at Drummond St. Note auxiliary destination board and the Olympic rings sign on the pole behind the tram. Southern Cross Hotel in the background. Photo by Wal Jack 24-11-1956, while running an Olympic Games service. See image i2 for rear of photograph. See image i3 for hi res scan of print. See image i4 for hi res scan of negative on rear in black in "SEC Ballarat No. 43 in Sturt St 24-11-56" with Wal Jack stamp in top right hand corner with number "T241" written in.trams, tramways, sturt st, drummond st, olympics, hospital corner, tram 43 -
 Ballarat Tramway Museum
Photograph - Digital image, Wal Jack, 20/12/1956 12:00:00 AM
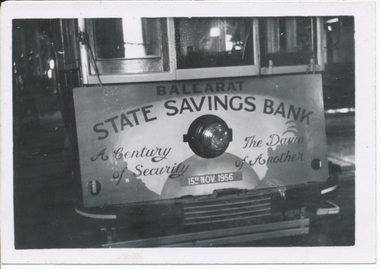
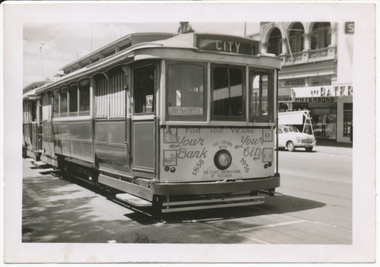
Yields information about how the centenary of the State Savings Bank of Victoria was celebrated on tram car posters.Digital image from the Wal Jack Ballarat Album of photographs of the front of Ballarat No. 43 (Note Wal's albums notes says No. 41) carrying a sign celebrating the Centenary of Service for the State Savings Bank (of Vic) with date 15 Nov 1956 on sign. Taken by Wal Jack, 20-12-1956. See image i2 for rear of photograph. See image i3 for hi res scan of print. See image i4 for hi res scan of negative On rear in blue ink "SEC Ballarat State Savings Bank centenary poster placed on No. 43, Wendouree Depot 20-12-56" with Wal Jack stamp in top right hand corner with number "T242" written in.trams, tramways, advertisements, state savings bank, centenary, tram 43 -
 Ballarat Tramway Museum
Photograph - Digital image, Wal Jack, 13/04/1956 12:00:00 AM
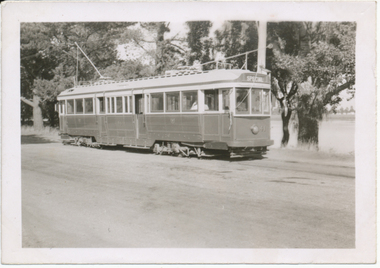
Yields information about how the trailing of bogie trams once work to make them ready for Ballarat was completed.Digital image from the Wal Jack Ballarat Album of photographs of Ballarat No. 41 - see Reg Item 5341, on its first trial run in Wendouree Parade, 13-4-56. Has Lake Wendouree in background and is showing Special. See image i2 for rear of photograph. On rear in blue ink "SEC Ballarat No. 41 ex Geelong 39 on 1st trail run Wendouree Parade 13-4-56" with Wal Jack stamp in top right hand corner with number "T235" written in.trams, tramways, delivery of tramcars, bogie trams, depot, commissioning, tram 41 -
 Ballarat Tramway Museum
Photograph - Digital image, Wal Jack, 14/11/1956 12:00:00 AM
Yields information about how the centenary of the State Savings Bank of Victoria was celebrated on tram car posters.Digital image from the Wal Jack Ballarat Album of photographs of the front of Ballarat No. 25 carrying a sign celebrating the Centenary of Service for the State Savings Bank (of Vic). Taken by Wal Jack, 14-11-1956. Photographed in City Loop with Patersons in the background. See image i2 for rear of photograph. On rear in blue ink "SEC Ballarat No. 25 with State Savings Bank centenary poster 1 end of car only, Sturt St loop - 100 years in Ballarat 15-11-56. Photo date 14-11-56" with Wal Jack stamp in top right hand corner with number "T240" written in.trams, tramways, advertisements, state savings bank, centenary, tram 25 -
 Ballarat Tramway Museum
Photograph - Digital image, Wal Jack, 29/03/1956 12:00:00 AM
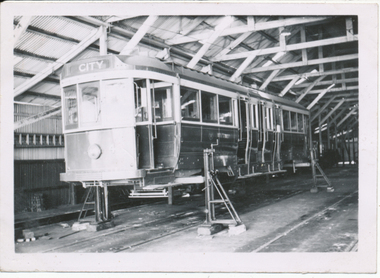
Yields information about how bogie trams were transported to Ballarat from Geelong and then received into the depot.Digital image from the Wal Jack Ballarat Album of photographs of Geelong No. 40 on jacks inside the depot after being delivered to the Ballarat depot, Wal Jack photo 29-3-1956. Became Ballarat No. 43 - see Reg Item 5346 also. . See image i2 for rear of photograph. See image i3 for hi res scan of print. See image i4 for hi res scan of negative On rear in blue ink "SEC Ballarat No. 40 ex Geelong inside Wendouree depot 29-3-56" with Wal Jack stamp in top right hand corner with number "T231" written in.trams, tramways, delivery of tramcars, bogie trams, depot, geelong, tram 40, tram 43 -
 Ballarat Tramway Museum
Photograph - Digital image, Wal Jack, 29/03/1956 12:00:00 AM
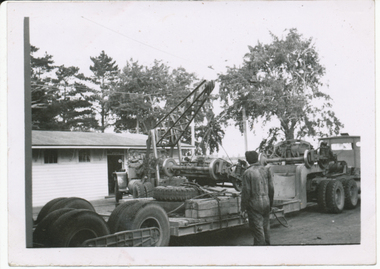
Yields information about how bogie trams were transported to Ballarat from Geelong and then received into the depot and offloading the bogies.Digital image from the Wal Jack Ballarat Album of photographs of Geelong No. 40 bogies being off loaded by Yellow Express Crane from the delivery truck in the depot yard, Wal Jack photo 29-3-1956. Became Ballarat No. 43 - see Reg Item 5345 and 7786 also. . See image i2 for rear of photograph. See image i3 for hi res scan of print. See image i4 for hi res scan of negative On rear in blue ink "SEC Ballarat No. Yellow Express No. 10 crane, lifting No. 1 end bogie off Yellow Express Road transport, (No. 40 ex Geelong) Wendouree depot 29-3-56" with Wal Jack stamp in top right hand corner with number "T231" written in.trams, tramways, delivery of tramcars, bogie trams, depot, tram 40, tram 43 -
 Ballarat Tramway Museum
Photograph - Digital image, Wal Jack, 15/05/1956 12:00:00 AM
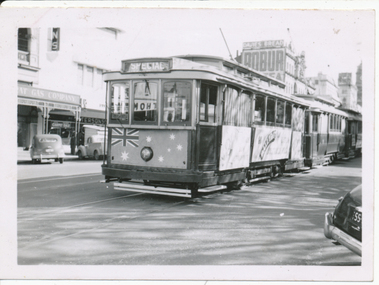
Yields information about the appearance of No. 25 promoting Made in Australia week during 1956.Digital image from the Wal Jack Ballarat Album of a photograph of No. 25 at the City loop, carrying banners for Made in Australia Week. Tram has a sheet with an Australian flag painted onto it, with holes made for the lights on the front of the tram, and three panels that have been fixed to the side of the tram. Tram has the destination of Special. The Town Hall is in the background. Photo by Wal Jack 15-5-1956. See image i2 for rear of photograph. See image i3 for hi res scan of print. See image i4 for hi res scan of negativeOn rear of photograph in ink "SEC, Ballarat No.25 with Made in Australia posters on sides, Sturt St Loop, Ballarat 15-5-56" and in top right hand corner, Wal Jack stamp with "T236" written in.trams, tramways, sturt st, city loop, advertisements, made in australia week, tram 25 -
 Ballarat Tramway Museum
Photograph - Digital image, Wal Jack, 18/05/1956 12:00:00 AM
Yields information about the appearance of No. 25 promoting Made in Australia week during 1956.Digital image from the Wal Jack Ballarat Album of a photograph of No. 25 at the Victoria St terminus, carrying banners for Made in Australia Week. Tram has a sheet with an Australian flag painted onto it, with holes made for the lights on the front of the tram, and three panels that have been fixed to the side of the tram. Tram has the destination of Gardens via Sturt St West. Photo by Wal Jack 18-5-1956 - see also Reg Item 5347. See image i2 for rear of photograph. See image i3 for hi res scan of print. See image i4 for hi res scan of negativeOn rear of photograph in ink "SEC, Ballarat No.25 done up with calico posters "Made in Australia" week, Victoria St terminus 18/5/56" and in top right hand corner, Wal Jack stamp with "T237" written in.trams, tramways, victoria st, advertisements, made in australia week, tram 25 -
 Ballarat Tramway Museum
Newspaper, Geelong Advertiser, "Eastern Park, Newtown, Trams Make Final Trips", 23/01/1956 12:00:00 AM
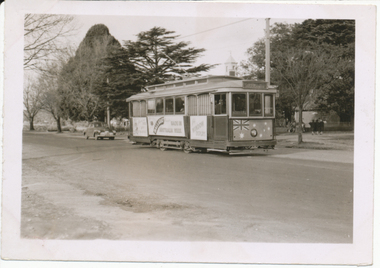
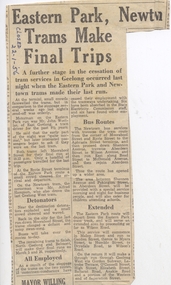
Newspaper clipping from the Geelong Advertiser - 23-1-56? - titled "Eastern Park, Newtown, Trams Make Final Trips", about the closure of tram services in Geelong and their replacement by buses on the previous day, 22-1-56 and notes the number of crews made redundant and whether they have found jobs within the SEC or gone elsewhere. Item was contained within the back cover of Reg Item 5485 - Service Exercise Book, black covers, with label, red binding titled "No. 2 - Ballarat Tramways & S.E.C. Systems" - see list. Has "Closed 22-1-56" written on the top left hand corner of the cutting.geelong, closure -
 Ballarat Tramway Museum
Photograph - Digital image, Wal Jack, 15/09/1956 12:00:00 AM
Yields information about the streetscape at Stones Corner mid 1950's.Digital image from the Wal Jack Ballarat Album of a photograph of No. 42 in Main Road, at Stones Corner, with the Victoria St tracks in the foreground. A pram is just visible at the front of the tram. In the background are shops for Treadwell carpets, Vic Westerman. Shows the general decay of the shops in this section of the street at the time. Photo by Wal Jack 15-9-1956. Also shows the signal contactors and section insulators for Main Road. See image i2 for rear of photograph. See image i3 for hi res scan of print. See image i4 for hi res scan of negativeOn rear of photograph in ink "SEC Ballarat No. 42 from Mt Pleasant at Victoria St Junc. Ballarat East 15-9-56" and Wal Jack stamp in top right hand corner with number "T238".trams, tramways, main road, stones corner, tram 42 -
 Ballarat Tramway Museum
Photograph - Digital image, Wal Jack, Reflective tape trial, Oct. 1956
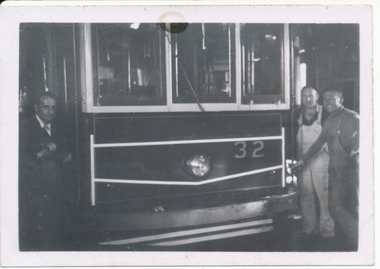
Yields information about the considerations taken in Ballarat to provide reflective tape onto the front of trams to provide warning to motorists and the poor street lighting at the time.Digital image from the Wal Jack Ballarat Album of first style of reflective tape on one end of No. 32 at the depot. Wal's notes that the style was not used. Triangles were used instead. Has three workers standing along the tramcar. No details of who took the photo but has Wal's handwriting on the rear. See image i2 for rear of photograph. See image i3 for hi res scan of print. See image i4 for hi res scan of negative Image5298i4a - cleaned image of 9/2021.On rear in ink "First type of Reflective tape Oct. '56"trams, tramways, safety, reflecting tape, modifications, tram 32 -
 Ballarat Tramway Museum
Photograph - Black & White Photograph/s, Wal Jack, 1/01/1956 12:00:00 AM
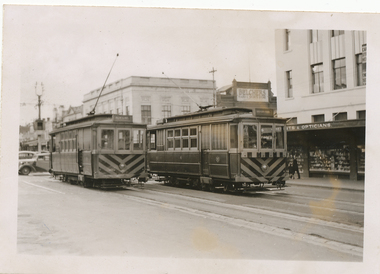
Black and White print contained within the Wal Jack Bendigo and Geelong Album, see Reg Item 5003 for more details. Photo of Geelong No. 5 and No. 4 in Ryrie St near Moorabool St. 1-1-1956, Photo by Wal Jack. In the background is Belchers Radio and Sport Store and a set of bar traffic lights. No. 5 has the destination of Newtown, and No. 4 the destination of Eastern Park. i1 - scan of print in the album i2 - rear of image i3 - scan of negative at 3200dpi added 27/6/2020.On the rear in blue ink "Geelong No. 5 to Newtown, No. 4 to Eastern Park, Ryrie St near Moorabool St, 1-1-56" with Wal Jack copyright stamp in the top right hand corner and the number "T1303" written in.trams, tramways, geelong, ryrie st, tram 5, tram 4 -
 Ballarat Tramway Museum
Photograph - Black & White Photograph/s, 8/01/1956 12:00:00 AM
Black and White print contained within the Wal Jack Bendigo and Geelong Album, see Reg Item 5003 for more details. Photo of Geelong No. 5 in Ryrie St at intersection with Moorabool St. Tram has the destination of City. In the background are Bank of New South Wales building, a set of bar lights and three other trams. Photographer not known. Dated 8/1/1956. On rear in ink "Car No. 5 on shuttle run Ryrie St to Beach on last day of running this service 8/1/56"trams, tramways, geelong, ryrie st, moorabool st, tram 5 -
 Ballarat Tramway Museum
Photograph - Black & White Photograph/s, Wal Jack, 1/01/1956 12:00:00 AM
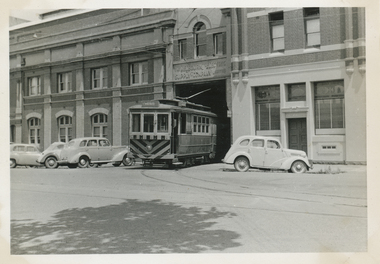
Black and White print contained within the Wal Jack Bendigo and Geelong Album, see Reg Item 5003 for more details. Photo of Geelong No. 4 standing outside the depot building with a number of cars parked outside. Photo by Wal Jack 1-1-1956. Printed on Ilford paper. i1 - scan of print in the album i2 - rear of image i3 - scan of negative at 3200dpi added 29/6/2020. On rear in ink "SEC Geelong No. 4 coming out of the depot, Corio Terrace Geelong 1-1-56". Has the Wal Jack copyright stamp in the top right hand corner with the number "T333" written in..trams, tramways, geelong, geelong depot, sec depot, corio terrace, mesco, tram 4 -
 Ballarat Tramway Museum
Photograph - Black & White Photograph/s, 8/01/1956 12:00:00 AM
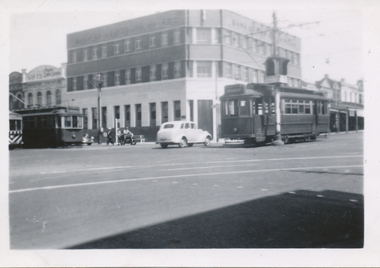
Black and White print contained within the Wal Jack Bendigo and Geelong Album, see Reg Item 5003 for more details. Photo of No. 17 to Belmont (right) and No 18 to West at the intersection of Moorabool and Ryrie Streets 8-1-1956. Photographer unknown. In the background is the Bank of New South Wales Building and a gifts building. The pole in the centre has a bar traffic light. Has written in ink on the rear "Intersection Ryrie and Moorabool Sts 8/1/56, Geelong"trams, tramways, geelong, ryrie st, moorabool st, tram 17, tram 18 -
 Ballarat Tramway Museum
Photograph - Black & White Photograph/s Geelong 18 at West terminus, 8/01/1956
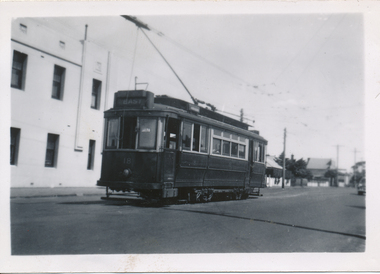
Photo of No. 18 at West, 2.30pm, last day of operations 8-1-1956. Photographer unknown - same as 5854. Tram has the destination of East. Black and White print contained within the Wal Jack Bendigo and Geelong Album, see Reg Item 5003 for more details. Two copies held. Has written in ink on the rear "No 18 at top of Packingham St (terminus) 2.30pm 8/1/56, Geelong"trams, tramways, geelong, pakington st, west, tram 18 -
 Ballarat Tramway Museum
Photograph - Black & White Photograph/s, 8/01/1956 12:00:00 AM
Black and White print contained within the Wal Jack Bendigo and Geelong Album, see Reg Item 5003 for more details. Photo of No. 18 turning out of Pakington St into Aberdeen St, last day of operations 8-1-1956. Photographer unknown - same as 5854. Shows the arrangement of the overhead and curves at this intersection. Has written in ink on the rear "No. 18 city bound from West to East, turning from Packington St into Aberdeen St 8/1/56. Next day was buses."trams, tramways, geelong, east, west, pakington st, tram 18 -
 Ballarat Tramway Museum
Photograph - Black & White Photograph/s, 8/01/1956 12:00:00 AM
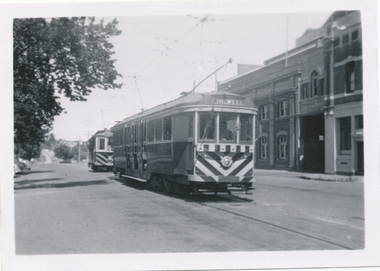
Black and White print contained within the Wal Jack Bendigo and Geelong Album, see Reg Item 5003 for more details. Photo of Geelong 35 in front of No. 5, from the Beach terminus, in Corio Terrace, last day of Service 8-1-1956 outside the depot. No. 35 has the destination of Chilwell No details on photographer. On rear in ink "No. 35 in front of No. 5 at depot enroute from Eastn Beach terminus 8/1/56"trams, tramways, geelong, depot, corio terrace, tram 35, tram 5 -
 Ballarat Tramway Museum
Photograph - Black & White Photograph/s, 8/01/1956 12:00:00 AM
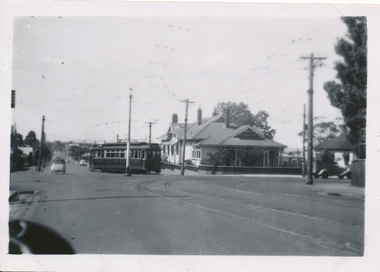
Black and White print contained within the Wal Jack Bendigo and Geelong Album, see Reg Item 5003 for more details. Photo of Geelong No 31 bound for North Geelong at Railway station junction, Malop and Mercer Streets 8/1/1956. General view of junction in the area with a Olympic tyre / service station No details on photographer. On rear in ink "No.31 bound for North Geelong at Railway Stn Junc Malop and Mercer Streets 8/1/56"trams, tramways, geelong, north, railway station, malop st, mercer st, tram 31 -
 Ballarat Tramway Museum
Photograph - Black & White Photograph/s, 8/01/1956 12:00:00 AM
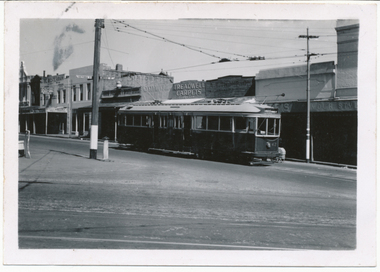
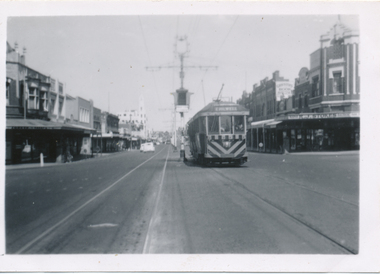
Black and White print contained within the Wal Jack Bendigo and Geelong Album, see Reg Item 5003 for more details. Photo of Geelong No 35 in Ryrie St, at Gheringhap St with destination of Chilwell, on the last day of service on this line. Has a bar traffic light in the photo and R. J. Stokes store. 8/1/1956. No details on photographer. On rear in ink "No.35 Chilwell bound in Ryrie St opposite Gheringhap St, Post Office Corner Geelong 8/1/56"trams, tramways, geelong, last day, ryrie st, traffic lights, tram 35