Showing 394 items
matching level crossing
-
 Melbourne Tram Museum
Document - Report, Public Transport Unions and Victorian Trades Hall Council, "Upgrade the Trains, Keep Sydney Road Trams - Position Paper on the Upfield Public Transport Corridor", Mar. 1989
... , level crossings and staffing. 1586.1 - as above but the full..., level crossings and staffing. 1586.1 - as above but the full ...1586 - Photocopy - report - 9 A4 sheets stapled in the top left hand corner, titled "Upgrade the Trains, Keep Sydney Road Trams - Position Paper on the Upfield Public Transport Corridor - Executive Summary", setting out the Union view of the conversion of the Upfield line to light rail. Notes the issues with the project, experience on the conversion of the St Kilda and Port Melbourne lines, level crossings and staffing. 1586.1 - as above but the full report - 66 pages, stapled along the side with clear plastic front, white card rear cover with a table of contents, including notes on the North-South rail (St Kilda and Port Melbourne) - experience to date, critique on The Met's Upfield line study, the Union's preferred option, Benefits of preferred option and the role of light rail, appendices and recommendations.trams, tramways, upfield light rail, sydney rd, unions, light rail -
 Ballarat Tramway Museum
Slide - 35mm slide/s - set of 9, Noel Simons, Sept. 1971
... at the level crossing at Ballarat Railway Station." 1174.2 - "No. 12... on Lydiard St. North service waits at the level crossing at Ballarat ...Set of 9 Kodak Ready-mount with slides made from the Association of Railway Enthusiast Provincial Tramways film strip. Reference Item 2560 details the ARE Film Strip, and provide references to other slides. See also Reg. item 1164. 1174.9 on plain white mount. 1174.1 - Tram 40 North bound for Lydiard St. North at the Railway Gates, with the gates closed. Tram carrying a heavy load of passengers. Railway station building and car park in background. Taken from the signal box. 1174.2 - Tram 12 bound for Gardens, photographed across the median strip plantation near Dawson St. Image i2a - adjusted 9/2021 to remove colour cast. 1174.3 - Tram 43 in bound along Wendouree Parade near Barrett Ave, passing a former tram stop and with "Warning Oncoming Trams" sign mounted on an adjacent pole. See also Reg. item 1172.1 for a photo taken in May 1971. This photo taken after the closure of the Victoria St. line, as the tram stop has been painted out. 1174.4 - Looking along the track to Sebastopol terminus on the west side of Albert St. - telephoto shot showing bogie tram in the far distance. Shows the nature of the track, poles, tram stop frequency and in the fare distance the terminus. Also show the trees that used to be along this section of the track. 1174.5 - No. 42 showing "Special" in Macarthur St. approaching Drummond St. north. Photo taken from under the verandah of a shop on the south side of the street that were many years later to become the Tramcar Restaurant. Note metal fence to cemetery. 1174.6 - Nos. 21 (Sebastopol) crossing 14 (Lydiard St. Nth) at the loop between Sayle and Grey St. Photo taken looking south. 1174.7 - No. 12 bound for Mt Pleasant, in Bridge St. about to stop at the junction for the two routes. Telephoto photo looking west along Bridge St. with many cars in the photo. Very few people on the street itself. 1174.8 - No. 30 and 17 at the City Terminus, on the north side of Sturt St. Taken from the Post Office corner with the Town Hall in the background. 1174.9 - No. 39 inbound along Sturt St. West. with many cars on the road. Bus stop on a pole on the other side of the road.1174.1 - "No. 40 on Lydiard St. North service waits at the level crossing at Ballarat Railway Station." 1174.2 - "No. 12 bound for 'Gardens' seen across the centre plantation in Sturt St." 1174.3 - "Barrett Ave." 1174.4 - "The Sebastopol route near the terminus" 1174.6 - "Nos. 21 and 14 crossing at Sayle St. Loop on Sebastopol route" 1174.7 - "No. 12 at Eastern end of Bridge St." 1174.8 - "Nos. 30 and 17 in Sturt St. at Cnr of Lydiard St." 1174.9 - "No. 39 City bound from 'Gardens" in Sturt St. West" All have date stamp of "Sep 1971" in black ink. Writing in blue ink.tramways, trams, lydiard st. nth, railway crossing, sturt st, wendouree parade, sebastopol, macarthur st., bridge st., sturt st. west, tram 12, tram 14, tram 17, tram 21, tram 30, tram 39, tram 40, tram 42, tram 43 -
 Southern Sherbrooke Historical Society Inc.
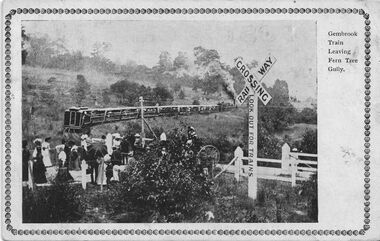
Postcard - Gembrook Train Leaving Fern Tree Gully
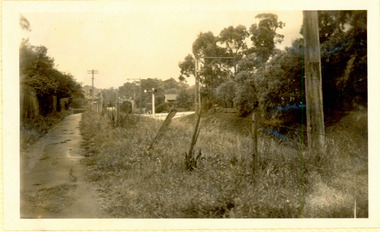
... '. The postcard has a photo of a level crossing at Ferntree Gully... has a photo of a level crossing at Ferntree Gully. The down ...B&W postcard, 'Gembrook Train Leaving Fern Tree Gully'. The postcard has a photo of a level crossing at Ferntree Gully. The down train has just cleared the crossing and a large group have either just crossed the line or are about to. One woman is carrying an umbrella. A horse-drawn carriage is in the process of crossing the track, obscured by a large shrub. There is a warning sign at the crossing saying 'Railway Crossing, Look out for trains'. Behind the train is a hill with scattered trees. The photo has a patterned, printed frame around it. On the back of the postcard is a written message. 'Am sending ad/vanced birthday/ cards to the/ little girls with/ love. Had a letter from Addie last/ week. A.S. Hunt' and in the address panel, 'Mrs W. Upton/ Wyndham/ Werribee.' A postage stamp has been removed from the card, obscuring the date stamp. -
 Ballarat Tramway Museum
Photograph - Black & White Photograph/s - set of 6, Charles Craig, 1950s
... at the railway level crossing, Ballarat, Lydiard St North featuring... the appearance and use of the Ballarat Railway Station level crossing ...Yields information about the appearance and use of the Ballarat Railway Station level crossing by trams prior to closure.Set of six black and white photographs of trams at the railway level crossing, Ballarat, Lydiard St North featuring the railway station, gates and signals, Reeds Coffee Palace and the Provincial Hotel. .1 - 28 heading south, with an R class and a K class locomotive in the view. .2 - 11, heading north - taken during the 1950's. .3 - 17 parked right up to the gates while K184 shunts at the station. .4 - single trucker (number obscured) - most likely 17 giving the passengers in the previous photo. .5 - Photo with two single truckers in the view and the gates being closed after the tram has passed. .6 - 11, at the gates with a bogie tram behind. No. 11 has a Briquettes roof advert and a Twin Lakes sign. Photo by Charles Craig - during 1971, except for .2, taken during the 1950's. trams, tramways, lydiard st north, railway station, signals, level crossings, tram 28, tram 11, tram 17 -
 Ballarat Tramway Museum
Document - Form/s, Australian Railway Historical Society (ARHS), "Farewell to the Ballarat Trams", Jul. 1971
... . On the front has a photo of 28 crossing Lydiard St North level crossing... St North level crossing with an R and J class steam ...Folded foolscap sheet - white paper - offset printed both sides, tour brochure - titled "Farewell to the Ballarat Trams". Rail tour brochure published jointly by the ARHS and TMSV gives details of the proposed tour, timetable, fares, tram hire, how to book and tour organisers and on the rear conditions of travel. On the front has a photo of 28 crossing Lydiard St North level crossing with an R and J class steam locomotives in the background and ESCo. No. 5, with the ARHS and TMSV logos. Printed by Kamera Press. .2 - tour circular duplicated yellow paper, for the tour of 21/8/1971 - giving tour arrangements, photo stops, tram tour, tram mail, and next tour dates. Contains a tear off slip for the last tram mail - see Reg Item 2942. Item added 19/10/2017.trams, tramways, arhs, tmsv, pamphlets, closure, tours -
 Ballarat Tramway Museum
Slide - 35mm slide/s - set of 6, Campbell Duncan, 19/09/1971 12:00:00 AM
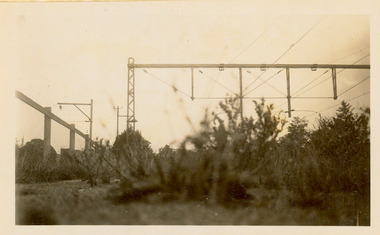
... of the SEC operated tramway. .1 - Tram 40, waits at the level... Railway Station Level Crossings Skipton St Albert St Sebastopol ...Yields information about the operations of the Ballarat Tramway system on the last day of SEC tramway operations in Ballarat.Set of 6 Kodak - Kodachrome slides - cardboard mounts - all taken on 19/9/1971, last day of operations prior to closure of the SEC operated tramway. .1 - Tram 40, waits at the level crossing gates - the gates are being opened. In the background is the station building and the signal gantry. Tram has the destination of Sebastopol. .2 - No. 42, with destination of Lydiard St north, northbound in Lydiard St, with railway station buildings and VRI in the background. .3 - No. 35 on inbound, Lydiard St North. .4 - No. 35, on inbound service, leaving Skipton St loop with another bogie in the background. .5 - No. 39 on inbound service, Albert St Sebastopol with the Sebastopol boundary sign and Binks Ford in the background. Tram has an everything under control in my all electric kitchen roof advert. .6 - No. 42, with destination of Sebastopol, Albert St Sebastopol.In ink on slide: .1 - Sun 19 Sept 71 - up Lydiard St Nth waits for gates to be opened after fast goods. .2 - Sun 19 Sept 1971, down Lydiard St Nth near VRI. .3 - Sun 19 Sept 1971, Up Lydiard St Nth .4 - Sun 19 Sept 1971, Up Sebastopol (supplementary service) has just crossed down in Skipton St near Drummond St. .5 - Sun 19 Sept 1971, Up Sebas at Ballarat / Sebastopol boundary. .6 - Sun 19 Sept 1971, c5.30pm down Sebas in Sebas shire.tramways, trams, lydiard st nth, railway station, level crossings, skipton st, albert st, sebastopol, closure, last day, tram 40, tram 42, tram 35, tram 39 -
 Ballarat Tramway Museum
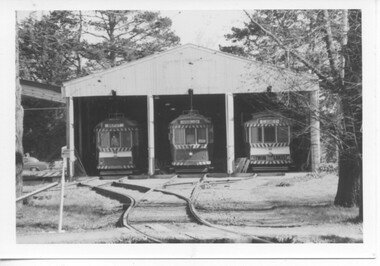
Photograph - Black & White Photograph/s - set of 8, late 1978, early 1978
... points, late 1978, early 1979. .1 - View from south of the level... points, late 1978, early 1979. .1 - View from south of the level ...Yields information the construction of the depot fan and access track to Wendouree Parade and has a strong association with the workers in the photograph.Set of eight Black and white photographs of the extensions to the tram depot and commencement of the trackwork to lay the King points, late 1978, early 1979. .1 - View from south of the level crossing showing the depot front - note the road numbers and sign at the front have been taken down. The steelwork for the depot extension has been erected. .2 - site for the King points with the track materials lay roughly out alongside . .3 - No. 27 in front of 40 on 3 road. .4 - sleepers interlaced for the King Points .5 - all the future materials laid out on the avenue - was like this for a long time .6 - King point materials looking with the mound of earth in the background. .7 - close up of the site of the King point, with the trolley in the background. .8 - rear view of the depot showing the steelwork that had erected. trams, tramways, depot construction, btps, operations, trackwork, tram 27 -
 Eltham District Historical Society Inc
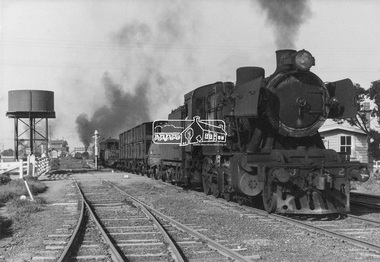
Photograph, George Coop, Steam locomotive J-502 hauling a specialist plant track repair and goods recovery train departing Echuca, Aug. 1963
... the train to pass through the Packenham Street level crossing.... the train to pass through the Packenham Street level crossing ...A special plant track repair and goods recovery train proceeding to a cattle train derailment on the Balranald (NSW) line from which sheep had also escaped. The train composition was made up of J-Class steam locomtive J-502, a water gin carrying extra water for the train given doubtful supplies en-route, a wagon to reload the surviving sheep, a wagon containing track tools and equipment, a carriage for the work crew, a bogie wagon containing all the specialist tools for re-railing the train, followed lastly by the Guard's van. The specialist wagons and their equipment were based at the Bendigo Depot (see painted markings on van side) in a state of readiness for immediate use as the need arose The train is viewed approaching the Iron Bridge grade out of the Echuca rail yard. The Gatekeepers hut is visible on the right. The gatekeeper would be notified of the approaching train at which time he would open the gate to allow the train to pass through the Packenham Street level crossing.Digital TIFF file Scan of black and white print Enlargement prints on textured paper (15.5 x 20.5 cm)george coop collection, echuca, j-502, j-class steam locomotive (vulcan foundry) -
 Eltham District Historical Society Inc
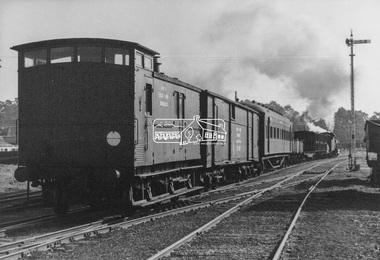
Photograph, George Coop, Steam locomotive J-502 hauling a specialist plant track repair and goods recovery train departing Echuca, Aug. 1963
... the train to pass through the Packenham Street level crossing.... the train to pass through the Packenham Street level crossing ...A special plant track repair and goods recovery train proceeding to a cattle train derailment on the Balranald (NSW) line from which sheep had also escaped. The train composition was made up of J-Class steam locomtive J-502, a water gin carrying extra water for the train given doubtful supplies en-route, a wagon to reload the surviving sheep, a wagon containing track tools and equipment, a carriage for the work crew, a bogie wagon containing all the specialist tools for re-railing the train, followed lastly by the Guard's van. The specialist wagons and their equipment were based at the Bendigo Depot (see painted markings on van side) in a state of readiness for immediate use as the need arose The train is viewed approaching the Iron Bridge grade out of the Echuca rail yard. The Gatekeepers hut is visible on the right. The gatekeeper would be notified of the approaching train at which time he would open the gate to allow the train to pass through the Packenham Street level crossing.Digital TIFF file Scan of black and white print Enlargement prints on textured paper (15.5 x 20.5 cm)george coop collection, echuca, j-502, j-class steam locomotive (vulcan foundry) -
 Ballarat Tramway Museum
Magazine, Institute of Engineers Australia, "Transactions of Multi-Disciplinary Engineering - Special Issue Engineering Heritage - Vol GE23 1999", "Conservation Planning and a 1905 Electric Tramcar", Apr. 2000
... on the Lydiard St Level crossing gates.... Planning Papers Level Crossings Lydiard St North Railway Station ...140 page paper cover book/magazine published by the Institute of Engineers Australia - Transactions of Multi-Disciplinary Engineering - Special Issue Engineering Heritage - Vol GE23 1999. Contains on pages 107 - 114 an item presented at the Ballarat Conference on Engineering Heritage during March 1999. Paper written by Warren Doubleday, titled "Conservation Planning and a 1905 Electric Tramcar". Fourteen papers presented at the conference contained within the volume. Paper has photographs of No. 12, recovery, work and other Ballarat photos. Printed on glossy white paper with two colour front cover - brown and black. Also contained is a letter from Ray Martin, the conference organiser, forwarding a copy of the transactions. Actually published early April 2000. Note all photographs were transmitted by email, about Dec. 1999. See image i3 for a pdf of the actual published document. Scanned as well is a paper on the Lydiard St Level crossing gates.trams, tramways, esco, institute of engineers, conservation planning, papers, level crossings, lydiard st north, railway station -
 Ballarat Tramway Museum
Photograph - Colour Print/s - set of 9, 29/09/1972 12:00:00 AM
... - ditto .5 - ditto, working in the pit by the level crossing .6... - ditto .5 - ditto, working in the pit by the level crossing .6 ...Set of nine colour prints of the drainage works and initial track construction carried out by the BTPS outside the depot on 29/9/1972. Photos with hand written captions on rear. .1 - Drainage works No. 2 Road, BTPS Depot .2 - ditto .3 - ditto .4 - ditto .5 - ditto, working in the pit by the level crossing .6 - Drivers eye view from Car 27, No. 2 road construction commencing - sleepers laid out with rail alongside. .7 - Construction of No. 2 road BTPS depot proceeds .8 - Time: 5.46 3/4 - Subject "The first blow" R. Gilbert, Sec BTPS drives the first "doggie" on the track connecting No. 2 road of the depot to Wendouree Parade. .9 - Time: 5.47pm. Subject: R. Gilbert, Sec BTPS drives the first doggie on the track connecting the depot to Wendouree Parade. Picture take of the first "doggie" being driven home.In ink on rear of each photo "23/9/72" and details - see abovetrams, tramways, depot, construction, gardens, buildings, btps -
 Melbourne Tram Museum
Album - Robert Thomson Slide Collection - box 16
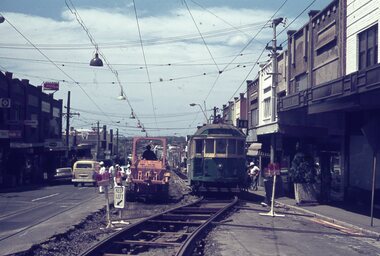
... RT389 26-1-1980 SW6 965 route 67, Glen Huntly Road level... route 3 route 52 tram 787 tram 986 level crossings Glen Huntly ...Photo - see pdf file for further information. Number Date Brief Description Box 16 RT372 23-1-1980 W2 271, High St Kew reconstruction trackwork – route 48 RT373 23-1-1980 W2 504 Burwood Road RT374 23-1-1980 Z7 East Burwood terminus RT375 23-1-1980 Z26 Burwood Highway, route 75 RT376 23-1-1980 W2 255 North Balwyn terminus, route 48 RT377 24-1-1980 W5 at North Coburg terminus – route 19 RT378 24-1-1980 Z37 (route 19) and a W route 20 at North Coburg terminus RT379 24-1-1980 W2 378? Park St St Kilda terminus, route 12 RT380 24-1-1980 Z121 route 88 at Bourke St terminus with Spencer St station in background RT381 25-1-1980 Z1 118 and another Z81? At East Preston terminus – both route 88 RT382 26-1-1980 SW5 812 route 67 at Carnegie terminus RT383 28-1-1980 MMTB Austerity bus No. 301 RT384 26-1-1980 SW5 818? And SW6 965 at Carnegie Glen Huntly Road at start of the single line Truganini Road – note the single track signs. Both route 67. RT385 26-1-1980 W2 504 at East Malvern Darling Road – route 3 RT386 26-1-1980 SW5 787 route 52, Mathews Ave. RT387 26-1-1980 SW5 684? Airport West terminus, route 52, RT388 26-1-1980 High St Kew track reconstruction, W6 986, route 48 RT389 26-1-1980 SW6 965 route 67, Glen Huntly Road level crossing RT390 27-1-1980 SW6 962 Collins St route 42 Spencer St terminus RT391 27-1-1980 Z3 121, route 88 Bourke St Mal with parked cars. RT392 27-1-1980 Z3 188? Bourke St route 96 RT393 27-1-1980 3MP tram Camberwell Route 72 at Gardiner level crossing RT394 28-1-1980 MMTB Bus 370, Leyland OPS1 on display RT395 28-1-1980 MAN Bus 103, on display showing Doncaster Depot Demonstrates the work of Robert Thomson in photography, collection and/or production of slidesAssembled album in a black presentation folder of 24 colour slides, collected or produced by Robert Thomson. A list of all photographs with details has been compiled. All rights reserved for all photos., melbourne, tramways, trams, tram 271, high st kew, trackworks, route 48, tram 504, tram 7, east burwood, tram 26, tram 255, north coburg, route 19, tram 37, park st st kilda, tram 121, bourke st, spencer st, tram 118, east preston, route 88, route 12, route 67, carnegie, tram 812, tram 67, buses, tram 965, truganini road, route 3, route 52, tram 787, tram 986, level crossings, glen huntly rd, matthews ave, tram 962, collins st, route 42, tram 188, route 72, gardiner -
 Federation University Historical Collection
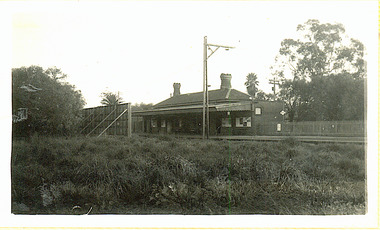
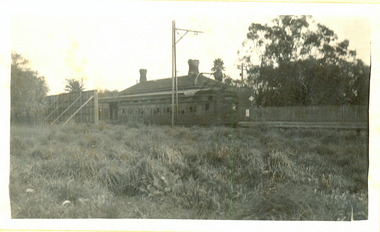
Photograph, Noel L. Harvey, Yendon Railway Station, 1968, 03/12/1968
... level crossing, but no recommendation could be made at present... level crossing, but no recommendation could be made at present ...Buninyong had no railway station so residents would travel to Yendon to catch the train. The Yendon Railway Station building was demolished soon after this photograph was taken. The bluestone was purchased by John Vernon, and was used to construct retaining walls in a garden enclosure between the first two buildings at the new Ballarat Institute of Advanced Education campus at Mt Helen. This is now known as the courtyard between building 'F' and building 'G' at the University of Ballarat mt Helen Campus. The following article was published in the Ballarat Courier on 06 December 1968. 'Yendon Station to be demolished - The old bluestone railway station at Yendon is to be demolished. C.A.D. Fisken told Buninyong Shire Council of the proposal at its meeting yesterday. Fortunately, he said, the beautiful stonework would not be lost. It would be used and incorporated in the new School of Mines building at Mt Helen. the retention of the century-old building was the subject of representations by Council to the Railways following the closure of the station for goods traffic 'some time ago'. The building had also been noted by the National Trust as one of special interest. The Railways Department advised the meeting that an inspection had been made at the Yendon level crossing, but no recommendation could be made at present for installation of flashing light signals.'Bluestone building with dressed bluestone door and window jambs and chimney. The roof is corrugated iron. The platform edge is also of bluestone construction. The building is the former Yendon Railway Station (now demolished) on the Ballarat -Geelong main line (the original Melbourne to Ballarat mainline). When the line was opened, this station may have been originally called Buninyong as it was built a number of years before the Ballarat to Buninyong branch line was built. This this has subsequently caused some confusion. The station was later renamed Yendon. Verso in blue ballpoint pen 'No 47 Yendon Railway Stn' Stamped in purple ink 'N.L. Harvey & Son, Photographers, 131 Sturt Streeet Ballarat, Phone 25766, After hours 23397, Will photograph anywhere anytime any place. (in pen 3/12/68),university of ballarat, ballarat institute of advanced education, yendon, railway, bluestone, john vernon -
 Ringwood and District Historical Society
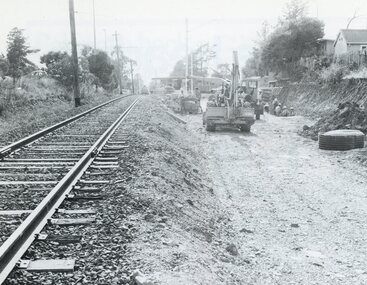
Photograph, Duplication of the five-kilometre section of railway line between Ringwood and Croydon in 1983
... at the Bedford Road level crossing in Ringwood. "The installation... barriers at the Bedford Road level crossing in Ringwood ...Digital scanFrom Vicrail News magazine, April 1983. “Duplication of the five-kilometre section of line between Ringwood and Croydon is on the way. Several major works will be undertaken over the next few months so the two tracks can be brought into service later this year. Intensive work on this section follows completion of duplication works between Ringwood and Bayswater on the Belgrave line last December. The completion of this 5.17 kilometre section between Ringwood and Bayswater means that this Belgrave line is now duplicated as far out as Ferntree Gully. Commuters using the Belgrave line now have an improved service with the intro duction in January of an additional evening peak train to Upper Ferntree Gully, two additional peak hour services in the morning from both Belgrave and Upper Ferntree Gully, and with the additional tracks delays on one line will not affect trains travelling in the opposite direction. Commenting on the completion of this stretch of track the Minister of Transport, Mr. Crabb, said a further improvement had been made with the commissioning of boom barriers at the Bedford Road level crossing in Ringwood. "The installation is part of the State Government's $9.4 million four-year plan to equip 70 dangerous level crossings throughout the State with boom barriers", he said. Works to be carried out on the Ringwood/ Croydon section include laying of new track, station works at Croydon and installation of boom barriers at East Ringwood. Already completed are bridge works to cater for double tracks at both Mt. Dandenong and Eastfield Roads between Croydon and East Ringwood and construction of an island platform at East Ringwood station. At several locations alignment of the existing track will be slightly relocated. The new line is being constructed with concrete sleepers and heavyweight rails. The existing line will also be reconstructed using these heavy 60kg per metre rails. Engineering works to be completed include installation of overhead wiring necessary to supply power to trains, construction of two new station buildings and a new platform at Croydon, provision of boom barriers, and pedestrian boom barriers at Dublin Road level crossing. East Ringwood, and replacement of existing timber overhead wire support structures with steel structures. Other works in this program included installation of boom barriers at Bedford Road, Ringwood and Scoresby Road, Bayswater and provision of a new platform for trains going to Melbourne and Heathmont. A new timetable on the Lilydale and Belgrave lines will commence when the Ringwood—Croydon duplication track work is completed.” -
 Hume City Civic Collection
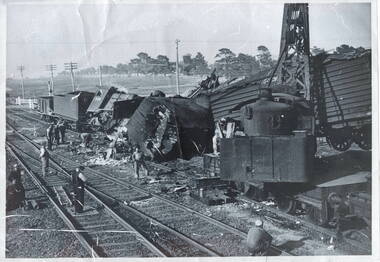
Photograph, Rail accident, 1952
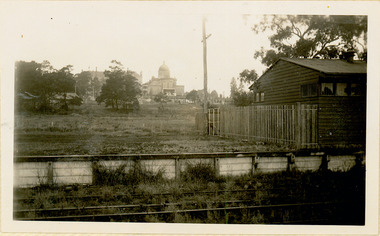
... Street level rail crossing and Sunbury Station on February 6th... Street level rail crossing and Sunbury Station on February 6th ...The train smash occurred in Sunbury between the Station Street level rail crossing and Sunbury Station on February 6th 1952 at around 10pm. The goods train was being pulled by the green locomotive, which was used to take the Jubilee train throughout Victoria in 1951, to acknowledge 125 of European settlement in Victoria, ran into the back of another stationary goods train on the rail line. The guard, A.C Read, in the stationary goods train was killed. P J Mcwhirter, the guard in the other train was injured. The tree lined street in the background is Horne Street.This smash was one of a number that have happened along the Sunbury rail line and in the vicinity of Sunbury Station over the years.A black and white photograph with a white border of a train smash which wrecked a steam engine and carriages. Workmen are on the tracks surveying the wreckage. A rail crossing is in the background.jubilee train, train crashes, station street, sunbury railway station, a c read, p j mcwhirter -
 Kew Historical Society Inc
Photograph - The last train at Barker Station, 1952
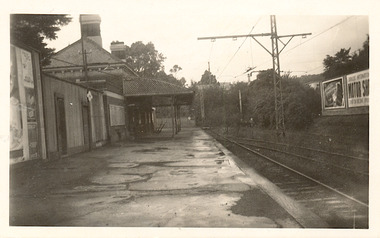
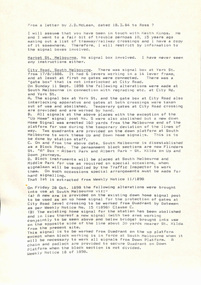
... — Barker. There were four road over-bridges and two level crossings... — Barker. There were four road over-bridges and two level crossings ...The Kew railway was opened in 1887, and diverged from the main (Box Hill–Lilydale) line about half-way between Hawthorn and Glenferrie. From the point of divergence the line was slightly less than one mile long, and it had only one intermediate station — Barker. There were four road over-bridges and two level crossings, including one over the busy Barkers Road. The line supported a passenger and goods service, and was electrified in December 1922, at the same time as the main line to Box Hill. There were a number of peak hour services which ran from Flinders Street station (Melbourne) to Kew, but in 1938 all but one of these were diverted to the Ashburton line, where traffic was growing. This had an adverse effect on Kew traffic, as passengers from Kew needed to cross over a footbridge at Hawthorn to change trains, and the main line trains were usually already crowded by the time they reached Hawthorn. At about the same time the off-peak trains were replaced by road buses. In 1952 all passenger trains were withdrawn, but the road bus service continued for many years. Goods trains were finally withdrawn in 1957, and the railway was dismantled in 1958-59. (Source: Frank Stamford, 'The Hawthorn - Kew Railway')Small black and white snapshot of the last passenger train at Barker Railway Station in 1952. The photograph, one of 12, is part of a larger album of newspaper clippings, timetables, tickets and photos relating to the Kew Railway Line, taken and compiled by Lachlan Richardson, while a resident of Kew. The album dates from the 1950s. The album is part of a larger subject file on the Kew Line, compiled over time by members of the Kew Historical Society."Last train at Barker Station / 1 August 1952"kew railway line, transport -- railways -- kew (vic.), barker railway station, kew branch line -
 Kew Historical Society Inc
Photograph - Barker Station, August 1952
... — Barker. There were four road over-bridges and two level crossings... — Barker. There were four road over-bridges and two level crossings ...The Kew railway was opened in 1887, and diverged from the main (Box Hill–Lilydale) line about half-way between Hawthorn and Glenferrie. From the point of divergence the line was slightly less than one mile long, and it had only one intermediate station — Barker. There were four road over-bridges and two level crossings, including one over the busy Barkers Road. The line supported a passenger and goods service, and was electrified in December 1922, at the same time as the main line to Box Hill. There were a number of peak hour services which ran from Flinders Street station (Melbourne) to Kew, but in 1938 all but one of these were diverted to the Ashburton line, where traffic was growing. This had an adverse effect on Kew traffic, as passengers from Kew needed to cross over a footbridge at Hawthorn to change trains, and the main line trains were usually already crowded by the time they reached Hawthorn. At about the same time the off-peak trains were replaced by road buses. In 1952 all passenger trains were withdrawn, but the road bus service continued for many years. Goods trains were finally withdrawn in 1957, and the railway was dismantled in 1958-59. (Source: Frank Stamford, 'The Hawthorn - Kew Railway')Small black and white snapshot of the last passenger train at Barker Railway Station in 1952. The photograph, one of 12, is part of a larger album of newspaper clippings, timetables, tickets and photos relating to the Kew Railway Line, taken and compiled by Lachlan Richardson, while a resident of Kew. The album dates from the 1950s. The album is part of a larger subject file on the Kew Line, compiled over time by members of the Kew Historical Society."Barker Station / August 1952"kew railway line, transport -- railways -- kew (vic.), barker railway station, kew branch line -
 Kew Historical Society Inc
Photograph - Kew Railway Station: Denmark Street entrance, 1952
... — Barker. There were four road over-bridges and two level crossings... — Barker. There were four road over-bridges and two level crossings ...The Kew railway was opened in 1887, and diverged from the main (Box Hill–Lilydale) line about half-way between Hawthorn and Glenferrie. From the point of divergence the line was slightly less than one mile long, and it had only one intermediate station — Barker. There were four road over-bridges and two level crossings, including one over the busy Barkers Road. The line supported a passenger and goods service, and was electrified in December 1922, at the same time as the main line to Box Hill. There were a number of peak hour services which ran from Flinders Street station (Melbourne) to Kew, but in 1938 all but one of these were diverted to the Ashburton line, where traffic was growing. This had an adverse effect on Kew traffic, as passengers from Kew needed to cross over a footbridge at Hawthorn to change trains, and the main line trains were usually already crowded by the time they reached Hawthorn. At about the same time the off-peak trains were replaced by road buses. In 1952 all passenger trains were withdrawn, but the road bus service continued for many years. Goods trains were finally withdrawn in 1957, and the railway was dismantled in 1958-59. (Source: Frank Stamford, 'The Hawthorn - Kew Railway')Small black and white snapshot of the entrance to Kew Station from Denmark Street in 1952. The photograph, one of 12, is part of a larger album of newspaper clippings, timetables, tickets and photos relating to the Kew Railway Line, taken and compiled by Lachlan Richardson, while a resident of Kew. The album dates from the 1950s. The album is part of a larger subject file on the Kew Line, compiled over time by members of the Kew Historical Society.kew railway line, transport -- railways -- kew (vic.), kew branch line, kew railway station -
 Kew Historical Society Inc
Photograph - Kew Station 22/4/51, F3
... — Barker. There were four road over-bridges and two level crossings... — Barker. There were four road over-bridges and two level crossings ...The Kew railway was opened in 1887, and diverged from the main (Box Hill–Lilydale) line about half-way between Hawthorn and Glenferrie. From the point of divergence the line was slightly less than one mile long, and it had only one intermediate station — Barker. There were four road over-bridges and two level crossings, including one over the busy Barkers Road. The line supported a passenger and goods service, and was electrified in December 1922, at the same time as the main line to Box Hill. There were a number of peak hour services which ran from Flinders Street station (Melbourne) to Kew, but in 1938 all but one of these were diverted to the Ashburton line, where traffic was growing. This had an adverse effect on Kew traffic, as passengers from Kew needed to cross over a footbridge at Hawthorn to change trains, and the main line trains were usually already crowded by the time they reached Hawthorn. At about the same time the off-peak trains were replaced by road buses. In 1952 all passenger trains were withdrawn, but the road bus service continued for many years. Goods trains were finally withdrawn in 1957, and the railway was dismantled in 1958-59. (Source: Frank Stamford, 'The Hawthorn - Kew Railway')Small black and white snapshot of Kew Railway Station, looking south to Barker Station. The photograph, one of 12, is part of a larger album of newspaper clippings, timetables, tickets and photos relating to the Kew Railway Line, taken and compiled by Lachlan Richardson, while a resident of Kew. The album dates from the 1950s. The album is part of a larger subject file on the Kew Line, compiled over time by members of the Kew Historical Society.kew railway line, transport -- railways -- kew (vic.), kew branch line, kew railway station -
 Kew Historical Society Inc
Photograph - Kew Branch Line : The Hawthorn Grove crossing, August 1952
... — Barker. There were four road over-bridges and two level crossings... — Barker. There were four road over-bridges and two level crossings ...The Kew railway was opened in 1887, and diverged from the main (Box Hill–Lilydale) line about half-way between Hawthorn and Glenferrie. From the point of divergence the line was slightly less than one mile long, and it had only one intermediate station — Barker. There were four road over-bridges and two level crossings, including one over the busy Barkers Road. The line supported a passenger and goods service, and was electrified in December 1922, at the same time as the main line to Box Hill. There were a number of peak hour services which ran from Flinders Street station (Melbourne) to Kew, but in 1938 all but one of these were diverted to the Ashburton line, where traffic was growing. This had an adverse effect on Kew traffic, as passengers from Kew needed to cross over a footbridge at Hawthorn to change trains, and the main line trains were usually already crowded by the time they reached Hawthorn. At about the same time the off-peak trains were replaced by road buses. In 1952 all passenger trains were withdrawn, but the road bus service continued for many years. Goods trains were finally withdrawn in 1957, and the railway was dismantled in 1958-59. (Source: Frank Stamford, 'The Hawthorn - Kew Railway')Small black and white snapshot of the Hawthorn Grove crossing, August 1952. The photograph, one of 12, is part of a larger album of newspaper clippings, timetables, tickets and photos relating to the Kew Railway Line, taken and compiled by Lachlan Richardson, while a resident of Kew. The album dates from the 1950s. The album is part of a larger subject file on the Kew Line, compiled over time by members of the Kew Historical Society.kew railway line, transport -- railways -- kew (vic.), kew branch line, hawthorn grove -- hawthorn (vic.), railway crossings -
 Kew Historical Society Inc
Photograph - Seven Carriage Train at Barker Station
... — Barker. There were four road over-bridges and two level crossings... — Barker. There were four road over-bridges and two level crossings ...The Kew railway was opened in 1887, and diverged from the main (Box Hill–Lilydale) line about half-way between Hawthorn and Glenferrie. From the point of divergence the line was slightly less than one mile long, and it had only one intermediate station — Barker. There were four road over-bridges and two level crossings, including one over the busy Barkers Road. The line supported a passenger and goods service, and was electrified in December 1922, at the same time as the main line to Box Hill. There were a number of peak hour services which ran from Flinders Street station (Melbourne) to Kew, but in 1938 all but one of these were diverted to the Ashburton line, where traffic was growing. This had an adverse effect on Kew traffic, as passengers from Kew needed to cross over a footbridge at Hawthorn to change trains, and the main line trains were usually already crowded by the time they reached Hawthorn. At about the same time the off-peak trains were replaced by road buses. In 1952 all passenger trains were withdrawn, but the road bus service continued for many years. Goods trains were finally withdrawn in 1957, and the railway was dismantled in 1958-59. (Source: Frank Stamford, 'The Hawthorn - Kew Railway')Small black and white snapshot of a seven carriage train approaching Barker Railway Station. The photograph, one of 12, is part of a larger album of newspaper clippings, timetables, tickets and photos relating to the Kew Railway Line, taken and compiled by Lachlan Richardson, while a resident of Kew. The album dates from the 1950s. The album is part of a larger subject file on the Kew Line, compiled over time by members of the Kew Historical Society."Seven Carriage Train at Barker Station"kew railway line, transport -- railways -- kew (vic.), barker railway station, kew branch line -
 Kew Historical Society Inc
Photograph - Farewell to 'Our Lady of Fatima'. Xavier College 22/4/51
... — Barker. There were four road over-bridges and two level crossings... — Barker. There were four road over-bridges and two level crossings ...The Kew railway was opened in 1887, and diverged from the main (Box Hill–Lilydale) line about half-way between Hawthorn and Glenferrie. From the point of divergence the line was slightly less than one mile long, and it had only one intermediate station — Barker. There were four road over-bridges and two level crossings, including one over the busy Barkers Road. The line supported a passenger and goods service, and was electrified in December 1922, at the same time as the main line to Box Hill. There were a number of peak hour services which ran from Flinders Street station (Melbourne) to Kew, but in 1938 all but one of these were diverted to the Ashburton line, where traffic was growing. This had an adverse effect on Kew traffic, as passengers from Kew needed to cross over a footbridge at Hawthorn to change trains, and the main line trains were usually already crowded by the time they reached Hawthorn. At about the same time the off-peak trains were replaced by road buses. In 1952 all passenger trains were withdrawn, but the road bus service continued for many years. Goods trains were finally withdrawn in 1957, and the railway was dismantled in 1958-59. (Source: Frank Stamford, 'The Hawthorn - Kew Railway')Small black and white snapshot of a train leaving Kew Station with the Xavier Chapel on the hill in the background, hence the ironic title provided by the photographer. The photograph, one of 12, is part of a larger album of newspaper clippings, timetables, tickets and photos relating to the Kew Railway Line, taken and compiled by Lachlan Richardson, while a resident of Kew. The album dates from the 1950s. The album is part of a larger subject file on the Kew Line, compiled over time by members of the Kew Historical Society."Farewell to 'Our Lady of Fatima'. Xavier College 22/4/51"kew railway line, transport -- railways -- kew (vic.), kew branch line, xavier college, kew railway station -
 Kew Historical Society Inc
Photograph - Kew Branch Line: Looking along cutting towards Barker Station 22/4/51
... — Barker. There were four road over-bridges and two level crossings... — Barker. There were four road over-bridges and two level crossings ...The Kew railway was opened in 1887, and diverged from the main (Box Hill–Lilydale) line about half-way between Hawthorn and Glenferrie. From the point of divergence the line was slightly less than one mile long, and it had only one intermediate station — Barker. There were four road over-bridges and two level crossings, including one over the busy Barkers Road. The line supported a passenger and goods service, and was electrified in December 1922, at the same time as the main line to Box Hill. There were a number of peak hour services which ran from Flinders Street station (Melbourne) to Kew, but in 1938 all but one of these were diverted to the Ashburton line, where traffic was growing. This had an adverse effect on Kew traffic, as passengers from Kew needed to cross over a footbridge at Hawthorn to change trains, and the main line trains were usually already crowded by the time they reached Hawthorn. At about the same time the off-peak trains were replaced by road buses. In 1952 all passenger trains were withdrawn, but the road bus service continued for many years. Goods trains were finally withdrawn in 1957, and the railway was dismantled in 1958-59. (Source: Frank Stamford, 'The Hawthorn - Kew Railway')Small black and white snapshot looking along cutting towards Barker Station 22/4/51. The photograph, one of 12, is part of a larger album of newspaper clippings, timetables, tickets and photos relating to the Kew Railway Line, taken and compiled by Lachlan Richardson, while a resident of Kew. The album dates from the 1950s. The album is part of a larger subject file on the Kew Line, compiled over time by members of the Kew Historical Society."Looking along cutting towards Barker Station 22/4/51"kew railway line, transport -- railways -- kew (vic.), barker railway station, kew branch line -
 Kew Historical Society Inc
Photograph - The last train at Kew Station, August 1952
... — Barker. There were four road over-bridges and two level crossings... — Barker. There were four road over-bridges and two level crossings ...The Kew railway was opened in 1887, and diverged from the main (Box Hill–Lilydale) line about half-way between Hawthorn and Glenferrie. From the point of divergence the line was slightly less than one mile long, and it had only one intermediate station — Barker. There were four road over-bridges and two level crossings, including one over the busy Barkers Road. The line supported a passenger and goods service, and was electrified in December 1922, at the same time as the main line to Box Hill. There were a number of peak hour services which ran from Flinders Street station (Melbourne) to Kew, but in 1938 all but one of these were diverted to the Ashburton line, where traffic was growing. This had an adverse effect on Kew traffic, as passengers from Kew needed to cross over a footbridge at Hawthorn to change trains, and the main line trains were usually already crowded by the time they reached Hawthorn. At about the same time the off-peak trains were replaced by road buses. In 1952 all passenger trains were withdrawn, but the road bus service continued for many years. Goods trains were finally withdrawn in 1957, and the railway was dismantled in 1958-59. (Source: Frank Stamford, 'The Hawthorn - Kew Railway')Small black and white snapshot of the last passenger train at Kew Railway Station in 1952. The photograph, one of 12, is part of a larger album of newspaper clippings, timetables, tickets and photos relating to the Kew Railway Line, taken and compiled by Lachlan Richardson, while a resident of Kew. The album dates from the 1950s. The album is part of a larger subject file on the Kew Line, compiled over time by members of the Kew Historical Society."The last train at Kew Station, August 1952"kew railway line, transport -- railways -- kew (vic.), kew branch line, kew railway station -
 Kew Historical Society Inc
Photograph - Kew Branch Line: Weeds at Kew Station 14/51
... — Barker. There were four road over-bridges and two level crossings... — Barker. There were four road over-bridges and two level crossings ...The Kew railway was opened in 1887, and diverged from the main (Box Hill–Lilydale) line about half-way between Hawthorn and Glenferrie. From the point of divergence the line was slightly less than one mile long, and it had only one intermediate station — Barker. There were four road over-bridges and two level crossings, including one over the busy Barkers Road. The line supported a passenger and goods service, and was electrified in December 1922, at the same time as the main line to Box Hill. There were a number of peak hour services which ran from Flinders Street station (Melbourne) to Kew, but in 1938 all but one of these were diverted to the Ashburton line, where traffic was growing. This had an adverse effect on Kew traffic, as passengers from Kew needed to cross over a footbridge at Hawthorn to change trains, and the main line trains were usually already crowded by the time they reached Hawthorn. At about the same time the off-peak trains were replaced by road buses. In 1952 all passenger trains were withdrawn, but the road bus service continued for many years. Goods trains were finally withdrawn in 1957, and the railway was dismantled in 1958-59. (Source: Frank Stamford, 'The Hawthorn - Kew Railway')Small black and white snapshot of how the Kew Branch Line was allowed to run down. The photograph, one of 12, is part of a larger album of newspaper clippings, timetables, tickets and photos relating to the Kew Railway Line, taken and compiled by Lachlan Richardson, while a resident of Kew. The album dates from the 1950s. The album is part of a larger subject file on the Kew Line, compiled over time by members of the Kew Historical Society.kew railway line, transport -- railways -- kew (vic.), barker railway station, kew branch line -
 Kew Historical Society Inc
Photograph - Kew Railway Station, May 1950
... — Barker. There were four road over-bridges and two level crossings... — Barker. There were four road over-bridges and two level crossings ...The Kew railway was opened in 1887, and diverged from the main (Box Hill–Lilydale) line about half-way between Hawthorn and Glenferrie. From the point of divergence the line was slightly less than one mile long, and it had only one intermediate station — Barker. There were four road over-bridges and two level crossings, including one over the busy Barkers Road. The line supported a passenger and goods service, and was electrified in December 1922, at the same time as the main line to Box Hill. There were a number of peak hour services which ran from Flinders Street station (Melbourne) to Kew, but in 1938 all but one of these were diverted to the Ashburton line, where traffic was growing. This had an adverse effect on Kew traffic, as passengers from Kew needed to cross over a footbridge at Hawthorn to change trains, and the main line trains were usually already crowded by the time they reached Hawthorn. At about the same time the off-peak trains were replaced by road buses. In 1952 all passenger trains were withdrawn, but the road bus service continued for many years. Goods trains were finally withdrawn in 1957, and the railway was dismantled in 1958-59. (Source: Frank Stamford, 'The Hawthorn - Kew Railway')Small black and white snapshot of Kew Railway Station inMay 1950. The photograph, one of 12, is part of a larger album of newspaper clippings, timetables, tickets and photos relating to the Kew Railway Line, taken and compiled by Lachlan Richardson, while a resident of Kew. The album dates from the 1950s. The album is part of a larger subject file on the Kew Line, compiled over time by members of the Kew Historical Society."Kew Railway Station, May 1950"kew railway line, transport -- railways -- kew (vic.), kew branch line, kew railway station -
 Kew Historical Society Inc
Photograph - Kew Railway Station, 1951
... — Barker. There were four road over-bridges and two level crossings... — Barker. There were four road over-bridges and two level crossings ...The Kew railway was opened in 1887, and diverged from the main (Box Hill–Lilydale) line about half-way between Hawthorn and Glenferrie. From the point of divergence the line was slightly less than one mile long, and it had only one intermediate station — Barker. There were four road over-bridges and two level crossings, including one over the busy Barkers Road. The line supported a passenger and goods service, and was electrified in December 1922, at the same time as the main line to Box Hill. There were a number of peak hour services which ran from Flinders Street station (Melbourne) to Kew, but in 1938 all but one of these were diverted to the Ashburton line, where traffic was growing. This had an adverse effect on Kew traffic, as passengers from Kew needed to cross over a footbridge at Hawthorn to change trains, and the main line trains were usually already crowded by the time they reached Hawthorn. At about the same time the off-peak trains were replaced by road buses. In 1952 all passenger trains were withdrawn, but the road bus service continued for many years. Goods trains were finally withdrawn in 1957, and the railway was dismantled in 1958-59. (Source: Frank Stamford, 'The Hawthorn - Kew Railway')Small black and white snapshot of Kew Railway Station in 1950. The photograph, one of 12, is part of a larger album of newspaper clippings, timetables, tickets and photos relating to the Kew Railway Line, taken and compiled by Lachlan Richardson, while a resident of Kew. The album dates from the 1950s. The album is part of a larger subject file on the Kew Line, compiled over time by members of the Kew Historical Society."Kew Station / 14/51 / 22/4/51 F5"kew railway line, transport -- railways -- kew (vic.), kew branch line, kew railway station -
 Ballarat Tramway Museum
Slide - 35mm slide/s - set of 11, Eldon Hogan, 15/07/1972 12:00:00 AM
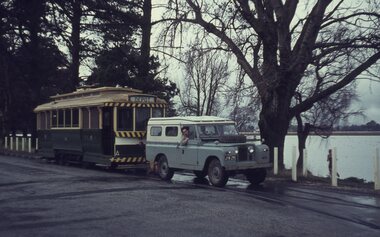
... winched up to the level crossing - Campbell Duncan ? on the winch... winched up to the level crossing - Campbell Duncan ? on the winch ...Set of 11 No. 35mm Agfa colour blue and white plastic mount slide - of the move of Ballarat trams 27, 28 and 14 from the old SEC depot onto the temporary access track to the BTPS depot on Saturday 15 July 1972 and Sunday 16 July 1972 (slides .10 and .11) .1 - John Withers and his land rover, towing No. 14 from the old depot - depot junction. .2 - No. 27 moves from Wendouree Parade onto the depot access track. .3 - ditto .4 - and onto the access track being pushed by hand. .5 - No. 28 being lifted onto the steel channels in order to slew it across Wendouree Parade .6 - being slewed across the road .7 - being readied to lift up onto the access track .8 - all three trams on the access track that evening. .9 - ditto Taken on 16 July 1972 .10 - No. 27 being winched up to the level crossing - Campbell Duncan ? on the winch. Note the mud! .11 - No. 14 being winched up the temporary access track - Rolf Jinks on the Winch. See Fares Please!, September 1972. tramways, trams, depot, btps, moving trams, wendouree parade, tram 27, tram 14, tram 28 -
 Melbourne Tram Museum
Document - Personal Papers, Jack McLean, Keith Kings, "Tramway / Railway level crossings", 1954
... Set pf personal papers concerning tramway / railway level... Trams tramways Level Crossings Railway squares Tramway Square ...Set pf personal papers concerning tramway / railway level crossings in Melbourne. Consist of .1 - letter to Ross dated 19/3/1984, carbon copy from Jack McLean, printed on computer paper perforated computer paper torn into strips - has hand written notes. Three separate sheets. Covers Market St Melbourne (Queensbridge) South Melbourne (City Road) St George Road - North Fitzroy Queens Parade Clifton Hill Epsom Road Showgrounds Glenferrie Road Hawthorn Glenferrie Road Malvern Burke Road Camberwell, Glenferrie Rd Kooyong, Burke Road Gardiner Glenhuntly Road Glenhuntly Glenhuntly Road Elsternwick, Whitehorse Road (Deepdene), Riversdale Road, Riversdale Lygon St North Carlton Nicholson St Footscray Nicholson St North Fitzroy, .2 - six pages - retype of above document on A4 computer printing paper - covers the same material. .3 - Hand drawing of the Melbourne rail system with crossing dates including bridges noted on it for cable and electric tramways. Has initials KK 12/54 in bottom right hand corner. drawn on lined double width foolscap paper.trams, tramways, level crossings, railway squares, tramway square, cable trams -
 Eltham District Historical Society Inc
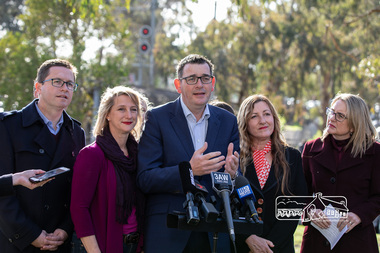
Photograph, Peter Pidgeon, Victorian Labor Government Press Release announcing planned upgrades to Hurstbridge line rail services and protection of historic Railway Trestle Bridge, Panther Place, Eltham, 1 August 2018, 1 Aug 2018
... and Rosanna and the removal of the dangerous level crossings... level crossings at Alphington and Rosanna. There’s more to do ...Announcement by Premier Daniel Andrews, Minister for Public Transport, Jacinta Allan and Member for Eltham, Vicki Ward mad alongside the Eltham Railway Trestle Bridge. MEDIA RELEASE "More Trains And Fewer Delays On The Hurstbridge Line" https://www.premier.vic.gov.au/wp-content/uploads/2018/08/180801-More-Trains-And-Fewer-Delays-On-The-Hurstbridge-Line-1.pdf Commuters on the Hurstbridge line will have more trains, more seats and fewer delays with a re-elected Andrews Labor Government to continue its massive upgrade of the Hurstbridge line. The Andrews Labor Government said it would deliver locals in Melbourne’s north-east more peak hour train services and less time stuck at boom gates, and we have. The first stage of the Hurstbridge Line Upgrade has been delivered – six months early and on budget. This includes the new Rosanna Station, duplicated track between Heidelberg and Rosanna and the removal of the dangerous level crossings at Alphington and Rosanna. There’s more to do and only Labor will deliver the next stage of the Hurstbridge Line Upgrade to give local commuters more train services and a more comfortable commute. The $530 million project will include a brand new train station at Greensborough and the duplication of three kilometres of track between Greensborough and Montmorency, and 1.5 kilometres of track between Diamond Creek and Wattle Glen to allow more train services during the morning peak. This will allow trains to run every six and a half minutes at Greensborough, every 10 minutes at Eltham and Montmorency, and every 20 minutes at Hurstbridge, Diamond Creek and Wattle Glen – as well as two extra Hurstbridge express services. Locals on the Labor Government’s new Mernda line will also get five extra train services during the morning peak, with a major upgrade of the Clifton Hill junction where the Mernda and Hurstbridge lines connect. Labor will also protect the Eltham Trestle Bridge – the last remaining timber bridge on Melbourne’s electric train network – which has local heritage protection and is an important part of the area’s character. The Liberals will leave this bridge to rot and demolish the nearby childcare centre and football club with their under-cooked and under-costed promise to upgrade the Hurstbridge line. Only Labor will protect this important piece of Melbourne’s history with planning work to be carried out for a long-term solution as part of the project. Stage two of the Hurstbridge Line Upgrade will create more than 950 jobs, with construction to start in 2020 and finish by 2022. Quotes attributable to Premier Daniel Andrews “We said we’d upgrade the Hurstbridge line and remove dangerous and congested level crossings at Rosanna and Alphington and we did – but there’s more to do.” “Only Labor will deliver the next stage of the Hurstbridge Line Upgrade with a new Greensborough Station and more trains, more often.” Quote attributable to Minister for Public Transport Jacinta Allan “The former Liberal Government promised new train lines but didn’t deliver a single kilometre of track – now they’re promising a half-baked upgrade of the Hurstbridge line with rubbery figures that don’t add up.” Quote attributable to Member for Eltham Vicki Ward “As a fifteen year old hopping on Red Rattlers at Eltham I wanted to do something to make the Hurstbridge line better. It’s taken me a few decades but finally our line will offer the frequency of services that are expected and needed in a 21st century city.”Born digital image (qty 27)jacinta allan, minister for public transport, panther place, premier daniel andrews, press announcement, railway line construction, trestle bridge, vicki ward mp for eltham, victorian parliament