Showing 457 items
matching jack hill
-
 Ballarat Tramway Museum
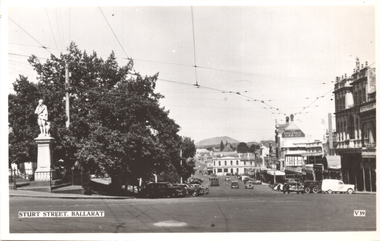
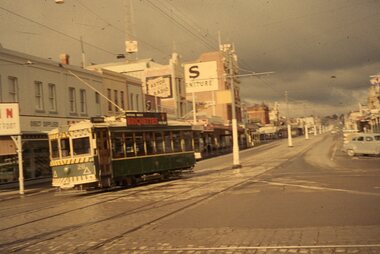
Postcard, Valentine & Sons Publishing Co, "Sturt Street, Ballarat", c1950
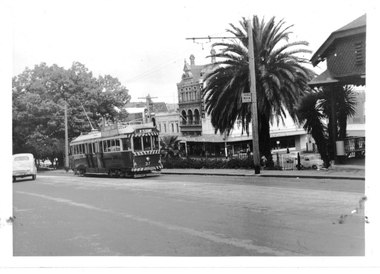
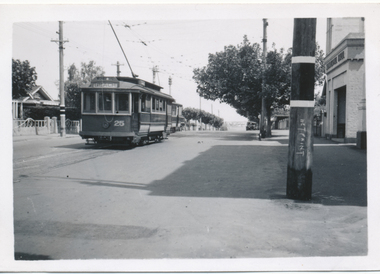
The photo shows the view of the south side of Sturt Street from Lydiad St, looking east. The Robbie Burns statue is on the left of the card, along with the Mechanics Institute, The Ballarat Gas Co, Buckshead Hotel. There is one tram parked in the parking loop. On the rear, Wal Jack in a note to Ken Magor has written: "4 wheeler (No. 30 or 33?) in parking loop. Lower Sturt St from Lydiard St, looking east showing narrow Bridge St and Victoria St hill. Mt Warrenheip 4 miles away." Has a sketch of the tram tracks as well. C1950Yields information about Ballarat during the late 1940s or early 1950s.Postcard black and white, undivided back, with a handwritten note on rear. Card No. V39.See image 2 for details of the handwritten note by Wal Jack on the rear. tramways, trams, sturt st, valentine -
 Ballarat Tramway Museum
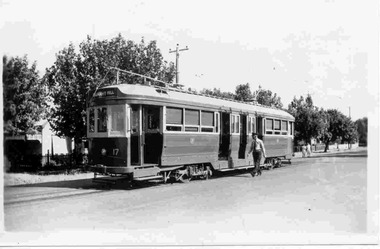
Photograph - Black & White Photograph/s - set of 2, Keith Kings, 9/01/1952 12:00:00 AM
Black and White photograph contained with Reg. Item 1902 - Photo Album from Keith Kings to Les Denmead 1970. Photograph of SEC Bendigo tram 17 at the Quarry Hill terminus. Date of photo 9/1/1952. Tram showing destination of Quarry Hill. Has driver walking alongside the tram. Keith Kings No. F(k)(3) Scanning: i - image file, p - presentation file, b - back of photograph. 1919.1 - Black and White print contained within the Wal Jack Bendigo and Geelong Album, see Reg Item 5003 for more details. Added 10/7/2013.Stamp in top left hand corner and handwritten number with "K.S. Kings No. F(k)(3) Copyright reserved". In blue ink "Bendigo / No.17 / Quarry Hill terminus / 9/1/52". .1 - has the additional words "ex Melbourne C-44"trams, tramways, bendigo, quarry hill, tram 17 -
 Ballarat Tramway Museum
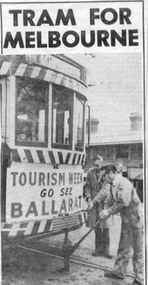
Newspaper, The Courier Ballarat, "Tram for Melbourne", 15/09/1971 12:00:00 AM
Yields information about the operation of Ballarat tram No. 36 in Melbourne to promote Ballarat after the closure of the SEC system.1060 - Newspaper clipping from The Courier, Ballarat, 15/9/1971 of the loading of tram 36 for running in Melbourne the previous day. Two photos (btm1060i1) shows Stan Lakey and Harry Van Oorschot jacking up the front of the tram and second photo (btm1060i2) shows Doug Wiseman and Bob Prentice on the main body jacks. Caption notes the transport of the tram to Melbourne for a week, advertising the Begonia Festival, Sovereign Hill and the Royal South St. competitions. It was to be retained by a Hawthorn preservation society, the item notes. 1060.1 - added 23/10/2004 - duplicate cutting. Image of whole cutting added 20/11/20131060 - In blue in the bottom right hand corner of the item - '15/9/71'trams, tramways, advertisements, melbourne, 36 in melbourne, moving trams -
 Ballarat Tramway Museum
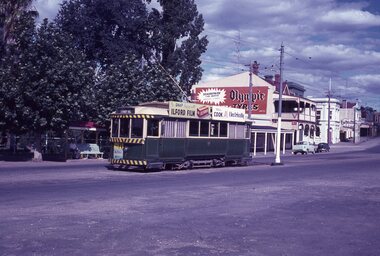
Slide - 35mm slide/s, Wal Jack, 6/01/1963 12:00:00 AM
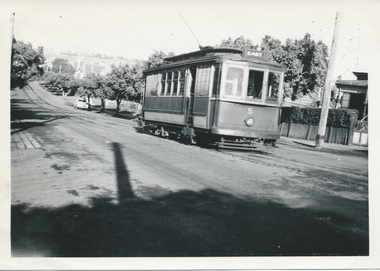
Bendigo No. 7 at Eaglehawk tram terminus, 6-1-1963. Tram has been fitted with lights and warning stripes. On front panel is Hutton's hams, and roof ads for Ilford film and 'Cook with electricity'. In background is park, shops on the north side of the terminus, including a large 'Olympic' tyres advertisement. Tram has destination of 'Quarry Hill''Ex Ballarat 19, SEC Bendigo No. 7, at Eaglehawk terminus, 6-1-63'tramways, trams, bendigo, eaglehawk, tram 7 -
 Ballarat Tramway Museum
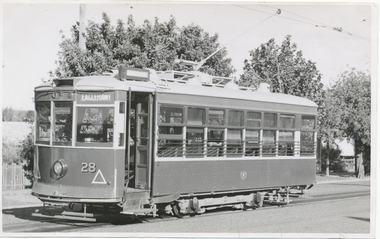
Slide - 35mm slide/s, Wal Jack, 17/06/1962 12:00:00 AM
Bendigo, Birney No. 28 turning into Mitchell St from Pall Mall, heading for Quarry Hill. Photo taken after tram has passed, looks along Mitchell Street towards railway station, with centre of the road poles. Not well in focus. Tram has Briquettes roof ad.'SEC Bendigo, Birney No. 28 in Mitchell St. 17-6-62'tramways, trams, bendigo, mitchell st, tram 28 -
 Ballarat Tramway Museum
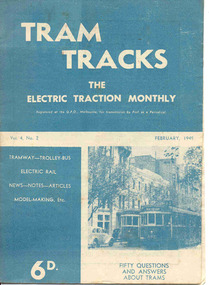
Magazine, Jack Richardson, "Tram Tracks - The Electric Traction Monthly", Feb. 1949 to August 1949
2467.1 - Vol. 4 No. 2, February 1949 of "Tram Tracks - The Electric Traction Monthly" of the Australian Electric Traction Association. Magazine consists of 16 printed pages with a 12 page supplement titled "Fifty Questions and Answers about trams in Australia". Has a single staple on the saddle. Incorporated within the magazine are articles or editorials on Tramways and Tramway Experts (Sydney and bus replacement), Interurban to St Kilda (conversion of VR St. Kilda line). General news items on Brisbane, Geelong, Launceston closure, Hobart, Bourke St routes, Perth, Adelaide, NSW, Christchurch, Overseas tramways and railways. Also has letters to the Editor, plans of a Birney tram for model makers and AETA Notes. Issue has advertisements for the Model Dockyard, ARLHS, The Hobby Shop, Barnes Tennis Centre, Fleet, Christie Model Railway Equipment of Sydney, Meadmore Model Engineering, Austral Bronze, Wattle Park, Traction Publications and Robilt "O" gauge locomotives. 2467.2 - Vol 4, No. 5 - May 1949 - 20 pages - red cover, 4th year, article by Peter Duckett with photos of Board members, "PCC Trucks here", MMTB advert for staff, news from Sydney, Newcastle, Melbourne (applications for new Chairman to replace Mr. Bell), Bendigo, Perth, Christchurch, Wellington, Wanganui, Bourke St construction work (photo of poles), Brisbane tramway history, map of CBD Melbourne, Melbourne and Sydney suburban railways, AETA News. 2467.3 - Vol 4, No. 6 - June 1949 - 16 pages - green pages, tramways and private cats, news from Sydney, Newcastle, Melbourne, Launceston, Hobart, article "Scrap Sydney Tams by 1960 - Newcastle this years say London experts", buses tackle football crowds (Sydney), Fremantle (Wal Jack letter), and Melbourne and Sydney suburban railways, AETA News. 2467.4 - Vol 4, No. 7 - July 1949 - 16 pages - tramways and the public, news from Sydney, Newcastle, Melbourne, appointment of R. Risson as new chairman, Perth, Adelaide, Launceston, tramcar solenoid brakes, National City Lines USA, and Melbourne and Sydney suburban railways, AETA News. 2467.5 - Vol 4, No. 8 - August 1949 - 8 pages - tramways and politics, photo of new points for Latrobe and William Sts, East Hills Line by C. C. Singleton, general tramway news, and advertisement for Robilt model railways. .2 to .4 added 15-2-2016 from the collection of Ian Stanley. .5 added 24-3-18 - from consolidation of Melbourne Tram Museum and BTM collections)trams, tramways, electric traction, aeta, australian tramways, mmtb, pcc, closure, sydney, newcastle, brisbane -
 Ballarat Tramway Museum
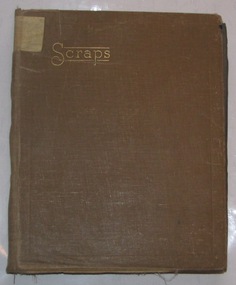
Album - Photo Album, Wal Jack, "M&MTB" No. 1, 1950's
Includes pages on Cable trams, MMTB A, C, G, L, T, U&V, SW2, W2, W3, W4, W5, CW5, SW5, SW6, X1, X2, Y, Y1, works cars, depots, NMETL, horse trams, Box Hill tram and battery tram photo. For details of each photograph and layouts see - Wal Jack Melbourne Album Reg Item 5000 listing.pdf Scanned individual photos and book in four parts as a pdf file.Has a strong association with Wal Jack and tramway developments within Australasia until 1964 and given their extent particular significance. Features M&MTB Melbourne Trams.Light brown, cloth covered photograph album with dark grey pages bound into the album containing MMTB Photographs. Marked "Scraps" in gold block on top left hand corner. Has the title "M&MTB" on top of fist page. Captions for photos held in with photo corners, generally white ink, some black ink and red pencil. Comprises Eight Pages plus inside of covers, some 353 black and white photographs with some colour postcards. trams, tramways, mmtb, tramcars, melbourne, wal jack -
 Ballarat Tramway Museum
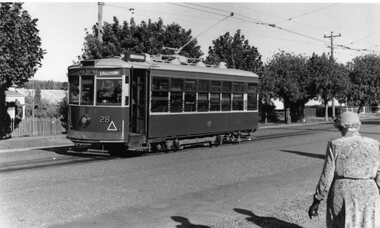
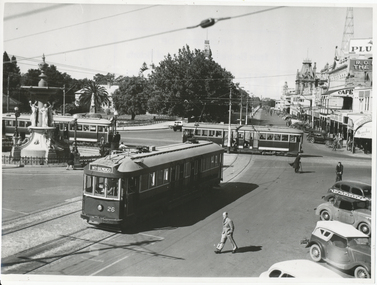
Photograph - Black & White Photograph/s, Wal Jack, 12/04/1959 12:00:00 AM
Yields information about Ballarat's trams, and the City centre area and motor vehicles late 1950's.Black and white print of Bendigo 28 at the Quarry Hill terminus, 12/4/1959, photo by Wal Jack. Has a lady walking across to the tram - dressed in gloves and hat. Tram has the destination of Eaglehawk. Photo print courtesy of Port Dock Railway Museum, now the National Railway Museum. See worksheet 4311 for letter and details of prints sent to Bill Scott, 19/10/2001. Any photo credit to mention NRM Collection.On rear of copy "SEC Bendigo #28 / Quarry Hill terminus / 12/4/59 / Wal Jack photo / National Railway Museum.trams, tramways, bendigo, quarry hill, tram 28 -
 Ballarat Tramway Museum
Photograph - Black & White Photograph/s, Wal Jack, Easter Saturday 1941
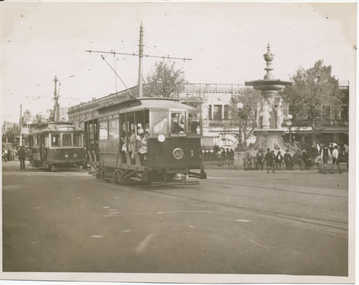
Black and White print contained within the Wal Jack Bendigo and Geelong Album, see Reg Item 5003 for more details. Photograph of ESCo tram No. 1 (carrying a white disc) and No. 2 at Charing Cross, Easter Saturday 1941. No. 1 is on the "wrong line", about to run through the cross over in front of the tram. No. 2 has the destination of Quarry Hill. i1 - scan of print in the album i2 - rear of image i3 - scan of negative at 3200dpi added 6/6/2020. On rear in ink "T196, Bendigo Tramways, No. 1 Original Class, No. 2 - ex MMTB A class, Charing Cross, Easter Saturday 1941. Wal Jack Photo.trams, tramways, bendigo, esco, secv, charing cross, tram 1, tram 2 -
 Ballarat Tramway Museum
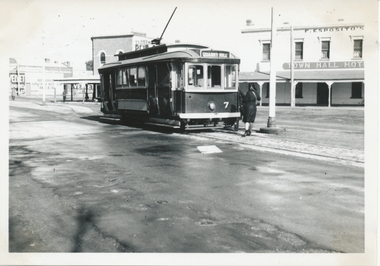
Photograph - Black & White Photograph/s, Wal Jack, 4/08/1943 12:00:00 AM
Black and White print contained within the Wal Jack Bendigo and Geelong Album, see Reg Item 5003 for more details. Photo of No. 7 at Eaglehawk terminus with a conductress completing the turning of the trolley pole. The F. Esposito's Town Hall hotel in the background along with advertisements for Velvet soap. Photo taken 4-8-1943 by Wal Jack. The tram has the destination of Quarry Hill, has white bumpers and white steps. i1 - scan of print in the album i2 - rear of image i3 - scan of negative at 3200dpi added 6/6/2020. On rear in ink "SEC Bendigo, 2nd No. 7, (ex PMTT), Eaglehawk (heavy snow storms) 4-8-43" with the Wal Jack copyright stamp in the top right hand corner and the number "T208" written in.trams, tramways, eaglehawk, world war i, conductresses, tram 7 -
 Ballarat Tramway Museum
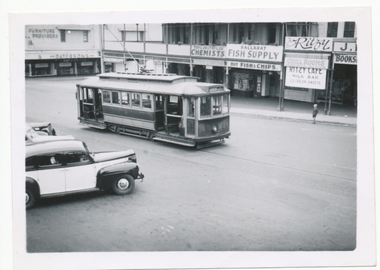
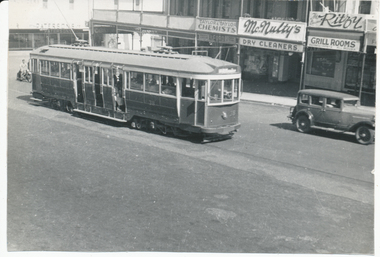
Photograph - Digital image, Wal Jack, 20/03/1949 12:00:00 AM
Yields information the appearance of the SEC tramcar No. 23, which was often decorated in 1949 and the streetscape.Digital image from the Wal Jack Ballarat Album of trams No. 23 in Sturt St climbing the hill enroute to Gardens. Shows how the barrier rails were arranged. In front of the tram area a number of angle parked cars. In the rear are Patersons Furniture, Taylor and Taylor Chemists, Ballarat Fish Supply, Ritzy Cafe and Grill Rooms and a book store. The tram itself is looking shabby. Photo taken 20-3-1949. See image i2 for rear of photograph. See image i3 for hi res scan of print. See image i4 for hi res scan of negativeon rear of photo in ink, "SEC Ballarat, No. 23, in Sturt St, Ballarat 20-3-1949" and in top right hand corner Wal Jack copyright stamp with number "T99" written.trams, tramways, sturt st, city loop, tram 23 -
 Ballarat Tramway Museum
Book, Jack Cranston, "The Goldfields of Ballarat 1851 - 1886 and The Eureka Stockade", 1970's?
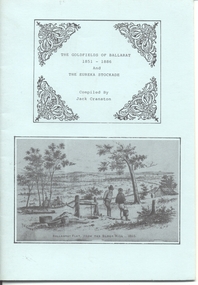
Book - "The Goldfields of Ballarat 1851 - 1886 and The Eureka Stockade", compiled by Jack Cranston. Comprises blue cover with 28 pages folded and stapled inside and fold out map glued to the inside of the rear cover, "Map of Ballaarat and Sebastopol" showing the various leads and gold bearing reefs of the goldfields. Also shows the location of Eureka Stockade and Sovereign Hill. Published for the Sovereign Hill Association, 1970's? Looks at the Goldfields, sources of Nuggets, mining population and statistics, the Miners Rebellion and the Stockade. Has numerous illustrations and copies of posters.trams, tramways, gold, eureka, sovereign hill -
 Ballarat Tramway Museum
Photograph - Digital image, L.W. Torr Best Street Bowen Hill and Brisbane Q, 4/03/1939 12:00:00 AM
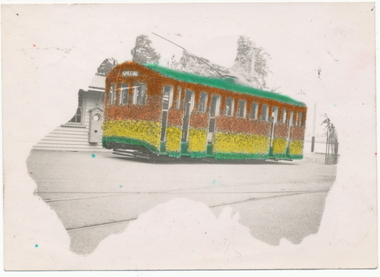
Yields information about Ballarat tram 29 when it was dressed for the Floral Festival and the launch of the tram and how it was used by a small photograph publisher for sales.Digital image from the Wal Jack Ballarat Album of a postcard featuring the 1939 Floral Tram, photograph at the depot, rendered in colour and positioned within an outline of a map of Australia. Wal's notes date it as 4-3-1939. Uses the same base photo similar to 1369, but without the motor bike in the rear. On the rear has a the stamp "L.W. Torr Best Street Bowen Hill, Brisbane Q" See image i2 for rear of photograph. See Reg Item 7000 for a hand coloured image.Stamped on the rear of the photograph "L.W. Torr Best Street Bowen Hills, Brisbane Q" and the date stamp "5 May 1939"trams, tramways, floral tram, decorated trams, depot, tram 29 -
 Ballarat Tramway Museum
Photograph - Digital image, Rose Stereograph Co, c1930
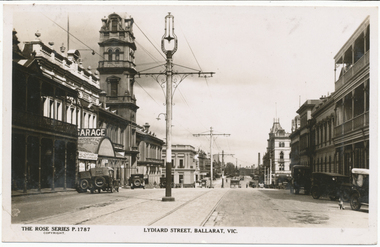
Yields information the appearance of Lydiard St north, centre poles and buildings.Digital image from the Wal Jack Ballarat Album of Rose Series postcard No. P 1787, of Lydiard St North looking south from near Mair St. shows the centre poles prior to their removal. A number of motor cars are parked in the street, a dog on the right hand side, and ESCo tram has just rounded the corner and about to climb the small hill. Published by Rose Stereograph Co., Armadale Victoria. For rear of postcard - see image i2.in pencil on rear "Old type of electric tram"trams, tramways, esco, lydiard st, poles -
 Ballarat Tramway Museum
Photograph - Digital image, Wal Jack, 26/01/1942 12:00:00 AM
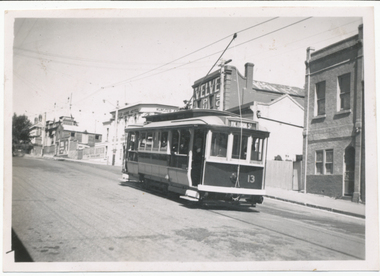
Yields information about the painting of the trams for the blackout era of the Second World War time, and how it was done. Only known photograph of a tram so far in Ballarat at the time of introduction. Shows the blackout headlight mask.Digital image from the Wal Jack Ballarat Album of a photograph of No. 13 climbing the Victoria St Hill en route to Victoria St 26-1-1942. Tram has been fitted with white bumper and white steps and possible other areas as well. Note the blackout shade on the headlights. In the background is the Munster Arms Hotel and a Velvet soap ad. Wal's album notes "No. 13 Victoria St 13-1-42 white bumpers and steps, & blackout shades over head lights (War Time) See image i2 for rear of photograph. See image i3 for hi res scan of print. See image i4 for hi res scan of negativeOn rear of photograph in ink "Ballarat Tramways No. 13 climbing Victoria St hill, Ballarat East Jan 1942 / W. Jack"trams, tramways, victoria st, world war i, blackouts, tram 13 -
 Ballarat Tramway Museum
Photograph - Digital image, Wal Jack, 12/04/1961 12:00:00 AM
Yields information about the alternative working used by the SEC when part of Sturt St was not available.Digital image from the Wal Jack Ballarat Album of a photograph of No. 37 climbing the Sturt St hill on the north side, running wrong line ex Mt Pleasant, due to road repairs on the south side of the street, 12-4-1962, Photo Wal Jack . Has the Ballarat Co and Patersons buildings in the background. Tram has the destination of Mt Pleasant. See image i2 for rear of photograph. See image i3 for hi res scan of print. See image i4 for hi res scan of negativeOn rear of photograph in ink "SEC, Ballarat No. 37 from Mt Pleasant climbing Sturt St hill north track 3.10pm 12-4-62, south side of Sturt St under road repairs" and Wal Jack stamp in top right hand corner with number "T1266" written in.trams, tramways, sturt st, mt pleasant, tram 37 -
 Ballarat Tramway Museum
Photograph - Digital image, Wal Jack, c1952
Yields information about one of Ballarat's bogie trams prior to its conversion to a one-man-type car.Digital image from the Wal Jack Ballarat Album of Ballarat 38 prior to conversion to a one-man type tram in Sturt St climbing the hill to Lydiard St. No details as to photographer and date. The tram was converted to one man operation in 1953, but was banned as such by the union at the time. Photo taken between October 1951 when the tram arrived in Ballarat and late 1952 when work would have started to convert it. See Reg Item 5296 for a Feb. 1953 photo of it service post conversion. Has in the photo Patersons building, Taylor and Taylor Chemists, McNultys dry cleaners, McNultys dry cleaners. See item 7739 for the negative by Wal Jack See image i2 for rear of photograph.trams, tramways, sturt st, conversion, one man trams, bogie trams, tram 38 -
 Ballarat Tramway Museum
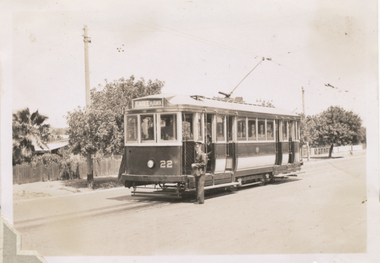
Photograph - Black & White Photograph/s, Wal Jack, 1/01/1941 12:00:00 AM
Black and White print contained within the Wal Jack Bendigo and Geelong Album, see Reg Item 5003 for more details. Photo of No. 22 at Quarry Hill 1-1-1941, has the conductor standing alongside the front of the tram. The tram has the destination of Eaglehawk. Photo by Wal Jack. Printed on Kodak Velox paper. i1 - scan of print in the album i2 - rear of image i3 - scan of negative at 3200dpi added 6/6/2020. On the rear in blue ink "T160, Bendigo Tramways, No. 22 at Quarry Hill 1-1-41" "W. Jack photo" in bottom right hand corner.trams, tramways, bendigo, quarry hill, conductors, tram 22 -
 Ballarat Tramway Museum
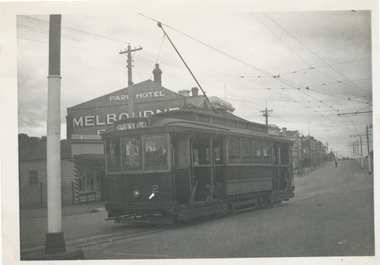
Photograph - Black & White Photograph/s, Wal Jack, 7/10/1939 12:00:00 AM
Black and White print contained within the Wal Jack Bendigo and Geelong Album, see Reg Item 5003 for more details. Photo of No. 2 at the Eaglehawk terminus, 7-10-1939, High St, with the Park Hotel in the background. Photo by Wal Jack. Tram has the destination of Quarry Hill. Printed on Ilford paper. i1 - scan of print in the album i2 - rear of image i3 - scan of negative at 3200dpi added 7/6/2020. On the rear in blue ink "SEC Bendigo No 2 (ex MMTB 115 M class) in High St Eaglehawk (terminus) 7th Oct. 1939." with Wal Jack copyright stamp in the top right hand corner and the number "T194" written in.trams, tramways, bendigo, high st, eaglehawk, tram 2 -
 Ballarat Tramway Museum
Photograph - Black & White Photograph/s, Wal Jack, 7/10/1939 12:00:00 AM
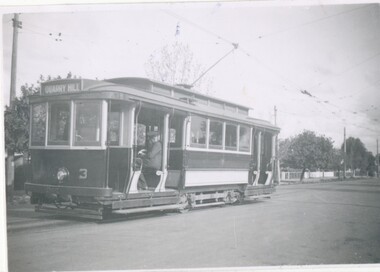
... Black and White print contained within the Wal Jack Bendigo... at Quarry Hill, Rly Picnic Day 7/10/39" with Wal Jack copyright ...Black and White print contained within the Wal Jack Bendigo and Geelong Album, see Reg Item 5003 for more details. Photo of No. 3 at Quarry Hill 7-10-1939, has the driver sitting in the front of the tram. The tram has the destination of Quarry Hill. Photo by Wal Jack/ i1 - scan of print in the album i2 - rear of image i3 - scan of negative at 3200dpi added 6/6/2020. On the rear in blue ink "SEC Bendigo No 3 at Quarry Hill, Rly Picnic Day 7/10/39" with Wal Jack copyright stamp in the top right hand corner and the number "T193" written in.trams, tramways, bendigo, quarry hill, crews, tram 3 -
 Ballarat Tramway Museum
Photograph - Black & White Photograph/s - set of 2, Keith Kings, 11/04/1953 12:00:00 AM
Black and White prints contained within the Wal Jack Bendigo and Geelong Album, see Reg Item 5003 for more details. Set of two photographs of the AETA Special trams Golden Jubilee Anniversary Saturday 11-4-1953, by Keith Kings. .1 - Bogie 23 and Birney 29 and service car 20 at Golden Square. .2 - Birney 29, Bogie 23 at Quarry Hill. On the rear in blue ink .1 - "Bendigo, AETA specials Bogie 23 & Birney 29 (also service car 20), at Golden Square, Saturday 11/4/53. /Golden Jubilee Celebrations. (Two flags broken off drop centre roof by centre pole notices!!!!)" .2 - "Bendigo, AETA specials Bogie 23 & Birney 29, at Quarry Hill, Saturday 11/4/53. /Golden Jubilee Celebrations." Both have the K. S. Kings copyright stamp in the top right hand corner, and the numbers H(f)(iii) and H(e)(ii) written in respectively.trams, tramways, bendigo, decorated trams, gold tram, quarry hill, golden square, aeta -
 Ballarat Tramway Museum
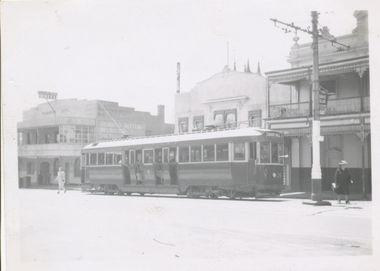
Photograph - Black & White Photograph/s, Keith Kings, 29/12/1947 12:00:00 AM
Black and White print contained within the Wal Jack Bendigo and Geelong Album, see Reg Item 5003 for more details. Photograph of No. 26 in Mitchell St Bendigo, outbound to Quarry Hill with the Terminus Hotel in the background. Wal's album notes date the photo as 29-12-1947. Photo by Leon Marshall Wood. In ink on rear "SEC of Victoria, Bendigo, Bogie drop centre car No.26 acquired from M&MTB 1947, ex MMTB "C" class, owned originally by Hawthorn Tramways Trust". In pencil, different hand writing "ex 135" and in bottom left hand corner, Leon Marshall Wood photo number "SEC 22" written in.trams, tramways, bendigo, bogie trams, quarry hill, mitchell st, tram 26 -
 Ballarat Tramway Museum
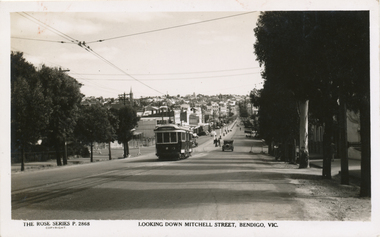
Postcard, Rose Stereograph Co, "Looking down Mitchel St Bendigo Vic"
Postcard contained within the Wal Jack Bendigo and Geelong Album, see Reg Item 5003 for more details. Rose Series Postcard No. 2868, titled "Looking down Mitchel St Bendigo Vic", from the railway overbridge. Has bogie tram No. 23 descending the hill, with the destination of Eaglehawk. Would appear the railway station entrance has been barriered off. Published by the Rose Stereograph Co. Armadale Vic, has the rose logo on the rear and a statement "A real photograph produced in Australia". No space for the stamp or address line. On rear in ink "Bogie 23" and in pencil "WJ"trams, tramways, bendigo, rose postcards, mitchell st, tram 28 -
 Ballarat Tramway Museum
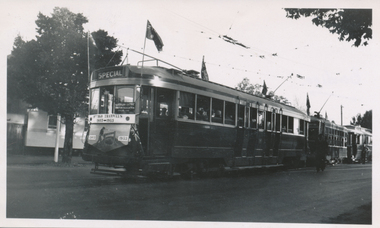
Photograph, Wal Jack, Bendigo No. 23 at Charing Cross, 3/01/1954
... of Quarry Hill, photo by Wal Jack 3-1-1954. Has the Beehive... Cross with the destination of Quarry Hill, photo by Wal Jack 3-1 ...Photo of No. 23 at Charing Cross with the destination of Quarry Hill, photo by Wal Jack 3-1-1954. Has the Beehive in the background, a Plume petrol sign and the watchmaker's clock in the background. Printed on Ilford paper. Two prints held. See image i2 for rear of photograph. See image i3 for hi res scan of negative Yields information about Bendigo tram 23 in 1954 and Charing Cross.Black and White print contained within the Wal Jack Bendigo and Geelong Album, see Reg Item 5003 for more details. On the rear in blue ink "SEC Bendigo No 23 bogie to Quarry Hill at Fountain (Charing Cross) Bendigo 3-1-54" with Wal Jack copyright stamp in the top right hand corner and the number "T59PC" written in.trams, tramways, bendigo, charing cross, tram 23 -
 Ballarat Tramway Museum
Photograph - Black & White Photograph/s, Wal Jack, 12/04/1959 12:00:00 AM
... of Bendigo Birney No.28 at Quarry Hill, Photo Wal Jack... Birney No.28 at Quarry Hill, Photo Wal Jack, with the destination ...Black and White print contained within the Wal Jack Bendigo and Geelong Album, see Reg Item 5003 for more details. Photo of Bendigo Birney No.28 at Quarry Hill, Photo Wal Jack, with the destination of Eaglehawk - 12/4/1959. i1 - scan of print in the album i2 - rear of image i3 - scan of negative at 3200dpi added 6/6/2020. On the rear in black ink "SEC Bendigo #28 at Quarry Hill, about to leave for Eaglehawk, 4.00pm, Sun 12th April 1959", in bottom left hand corner "Wal Jack Photo"trams, tramways, bendigo, quarry hill, birney, tram 28 -
 Ballarat Tramway Museum
Photograph - Black & White Photograph/s, State Electricity Commission of Victoria (SECV), late 1940's
Black and White print contained within the Wal Jack Bendigo and Geelong Album, see Reg Item 5003 for more details. Photo of the Charing Cross with three bogie trams at the intersection, SEC publicity photo c1950. Two of the bogies crossing on the Eaglehawk - Quarry Hill line have white or cream strips on the lower edge of the body. No 26 has the destination of North Bendigo, though it is on Golden Square line with the driver standing just inside the doorway. In the background is the fountain, the Gardens and Pall Mall. SEC Publicity Photo, see Inscriptions for notes re photo. On the rear is the SEC Publicity Photo stamp, with negative number 21.1 written in, "Yallourn" in pencil and a typed piece of paper taped to the rear of the photo noting the Provincial tramways owned by the SEC, but that it is loss making.trams, tramways, bendigo, charing cross, secv, pall mall, tram 26 -
 Ballarat Tramway Museum
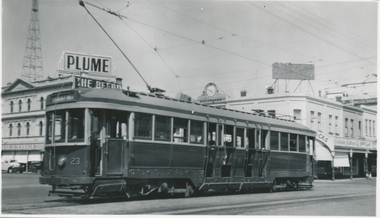
Photograph - Black & White Photograph/s, 12/01/1960 12:00:00 AM
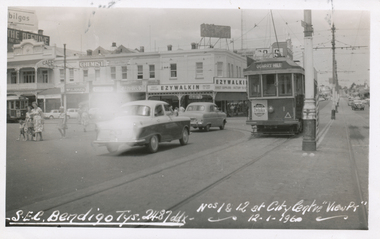
Black and White print contained within the Wal Jack Bendigo and Geelong Album, see Reg Item 5003 for more details. Photo, commercially produced?, of Bogie tram No. 1 and single trucker No. 12 at Charing Cross 12-1-1960, with the details of the photo written onto the negative and printed. Tram 1 has the destination of Quarry Hill and has a Cohn's drink advertisement on the rear panel. In the background are: The Beehive, Ezywalkin, Wm Jones Chemist, A. G. Relearn Optician, .Mobilgas. Note the advertisement Plume? over the Ezywalkin store has been blanked out. trams, tramways, bendigo, charing cross, secv, pall mall, tram 1, tram 12 -
 Ballarat Tramway Museum
Photograph - Black & White Photograph/s, Wal Jack, 23/06/1949 12:00:00 AM
Black and White print contained within the Wal Jack Bendigo and Geelong Album, see Reg Item 5003 for more details. Photo of Geelong No. 5 from Chilwell climbing up Pakington St Hill, from Mercer St. Chilwell. Has the destination of East. Photo by Wal Jack 23-6-1949. Printed on Ilford paper. See also Reg Item 7824 for another similar photograph. i1 - scan of print in the album i2 - rear of image i3 - scan of negative at 3200dpi added 17/6/2020. On rear in ink "SEC Geelong No."5 from Chilwell climbing up Pakington St Hill, from Mercer St. Chilwell. 23-6-49" Has the Wal Jack copyright stamp in the top right hand corner with the number "T281" written in..trams, tramways, geelong, chilwell, pakington st, tram 5 -
 Ballarat Tramway Museum
Photograph - Black & White Photograph/s, Wal Jack, 3/01/1945 12:00:00 AM
Black and White print contained within the Wal Jack Bendigo and Geelong Album, see Reg Item 5003 for more details. Photo of No. 25 and 1 at the junction between the Newtown and East lines, in Pakington St. Photo by Wal Jack 3/1/1945. City of Newtown and Chilwell offices on the right hand side. i1 - scan of print in the album i2 - rear of image i3 - scan of negative at 3200dpi added 29/6/2020. Has the rear in ink "SEC Geelong No. 25 from Beach to Newtown, No. 1 from East to Chilwell (straight down hill) Newtown Junc. Pakington St 3-1-45". Has the Wal Jack copyright stamp on the rear with the number T326 written in.trams, tramways, geelong, pakington st, newtown, east, tram 25, tram 1 -
 Ballarat Tramway Museum
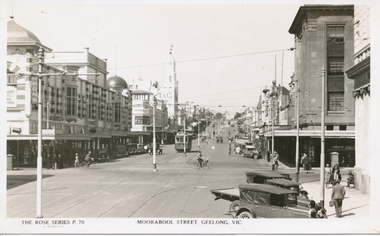
Photograph - Black & White Photograph/s, Rose Stereograph Co, Moorabool Street Geelong Vic, c1930
Photo of Geelong No 4 in Moorabool St, from a Rose Series Postcard, No. P 70, looking south along Moorabool Street at the intersection with Ryrie St. Geelong. Has the Solomon's store, T& G in the background. Photo c1930? Has a Birney tram on the hill. Printed by the Rose Stereograph Co. Original postcard held - see image 2 for pencil notes on the rear about the trams and their routes.Yields information about Moorabool St Geelong in the 1930s.Black and White print of a postcard contained within the Wal Jack Bendigo and Geelong Album, see Reg Item 5003 for more details.On rear in ink "SEC Geelong No. 4 with Birney tram on Moorabool St hill"trams, tramways, geelong, moorabool st, ryrie st, tram 4