Showing 754 items matching "metal work"
-
 Flagstaff Hill Maritime Museum and Village
Tatting Shuttle
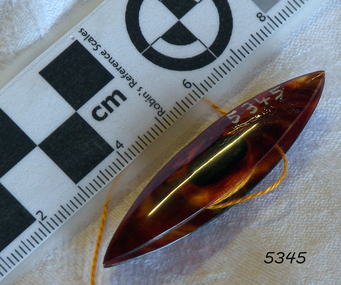
Tatting is a form of knotted lace making using thread and a small shuttle. Twisted threads are tied around or through small, pointed shuttles that can be made of bone, mother of pearl, tortoise shell, steel or plastic. This produces a stable, strong lace using simple knots of two half hitches to make rings and chains embellished with picots. The origins of tatting are not clear but early versions of decorative knotting were used by the Egyptians on their ceremonial dress. Tatting also has elements of fishermen's net making techniques and the decorative knotting that was practiced by aristocratic women from the 15th century. Tatting, as we know it today, emerged in the first half of the 19th century. The new availability of mercerised thread from 1835 encouraged a burgeoning of lace crafts of all sorts. It was known in Italy as "occhi" and in France as "la frivolite". Tatting looks fragile but is both strong and durable. An article in a column named "Wives and Daughters" published in the Star newspaper in May 1910 describes the durability of tatting lace - "there is edging and insertion still in existence that have outworn two sets of pillow slips." In the 19th century and well into the 20th century, tatting was used like crochet and knitted lace for decorative edgings, collars, doylies, tray cloths etc. At first, different tatting patterns were passed along by word of mouth from person to person, however in time, patterns regularly appeared in newspapers and magazines well into the 1950's. A shuttle is a small tool that looks like a small boat "sailing" in and out of the thread. Tatting is called "schiffchenarbeit" in German, which means "the work of a little boat". There are two popular types of shuttles. The first has closed ends and a removable bobbin where the thread is wound around - often made from metal or plastic. The second type has a post in the center where the thread is wound. The ends of this bobbin are open but snug. Because it is constructed in two pieces, it can be made from materials like bone, ivory or mother of pearl. Shuttles hold a larger amount of thread (as compared with needles) which means fewer ends to weave in. Fishermen in the past are thought to have used large shuttles to weave cord into certain knots whilst making their fishing nets. Their methods were copied by weavers, who innovated by using threads and smaller shuttles to make lace.Tatting Shuttle, tortoise-shellflagstaff hill, warrnambool, shipwrecked-coast, flagstaff-hill, flagstaff-hill-maritime-museum, maritime-museum, shipwreck-coast, flagstaff-hill-maritime-village, tatting shuttle, handcraft, needlework -
 Flagstaff Hill Maritime Museum and Village
Tatting Shuttle
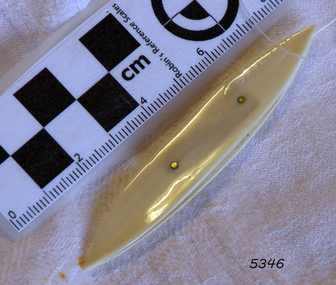
Tatting is a form of knotted lace making using thread and a small shuttle. Twisted threads are tied around or through small, pointed shuttles that can be made of bone, mother of pearl, tortoise shell, steel or plastic. This produces a stable, strong lace using simple knots of two half hitches to make rings and chains embellished with picots. The origins of tatting are not clear but early versions of decorative knotting were used by the Egyptians on their ceremonial dress. Tatting also has elements of fishermen's net making techniques and the decorative knotting that was practiced by aristocratic women from the 15th century. Tatting, as we know it today, emerged in the first half of the 19th century. The new availability of mercerised thread from 1835 encouraged a burgeoning of lace crafts of all sorts. It was known in Italy as "occhi" and in France as "la frivolite". Tatting looks fragile but is both strong and durable. An article in a column named "Wives and Daughters" published in the Star newspaper in May 1910 describes the durability of tatting lace - "there is edging and insertion still in existence that have outworn two sets of pillow slips." In the 19th century and well into the 20th century, tatting was used like crochet and knitted lace for decorative edgings, collars, doylies, tray cloths etc. At first, different tatting patterns were passed along by word of mouth from person to person, however in time, patterns regularly appeared in newspapers and magazines well into the 1950's. A shuttle is a small tool that looks like a small boat "sailing" in and out of the thread. Tatting is called "schiffchenarbeit" in German, which means "the work of a little boat". There are two popular types of shuttles. The first has closed ends and a removable bobbin where the thread is wound around - often made from metal or plastic. The second type has a post in the center where the thread is wound. The ends of this bobbin are open but snug. Because it is constructed in two pieces, it can be made from materials like bone, ivory or mother of pearl. Shuttles hold a larger amount of thread (as compared with needles) which means fewer ends to weave in. Fishermen in the past are thought to have used large shuttles to weave cord into certain knots whilst making their fishing nets. Their methods were copied by weavers, who innovated by using threads and smaller shuttles to make lace.Tatting Shuttle, ivory, flagstaff hill, warrnambool, shipwrecked-coast, flagstaff-hill, flagstaff-hill-maritime-museum, maritime-museum, shipwreck-coast, flagstaff-hill-maritime-village, tatting shuttle, handcraft, needlework -
 Flagstaff Hill Maritime Museum and Village
Tatting Shuttle
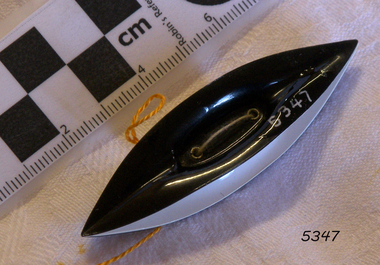
Tatting is a form of knotted lace making using thread and a small shuttle. Twisted threads are tied around or through small, pointed shuttles that can be made of bone, mother of pearl, tortoise shell, steel or plastic. This produces a stable, strong lace using simple knots of two half hitches to make rings and chains embellished with picots. The origins of tatting are not clear but early versions of decorative knotting were used by the Egyptians on their ceremonial dress. Tatting also has elements of fishermen's net making techniques and the decorative knotting that was practiced by aristocratic women from the 15th century. Tatting, as we know it today, emerged in the first half of the 19th century. The new availability of mercerised thread from 1835 encouraged a burgeoning of lace crafts of all sorts. It was known in Italy as "occhi" and in France as "la frivolite". Tatting looks fragile but is both strong and durable. An article in a column named "Wives and Daughters" published in the Star newspaper in May 1910 describes the durability of tatting lace - "there is edging and insertion still in existence that have outworn two sets of pillow slips." In the 19th century and well into the 20th century, tatting was used like crochet and knitted lace for decorative edgings, collars, doylies, tray cloths etc. At first, different tatting patterns were passed along by word of mouth from person to person, however in time, patterns regularly appeared in newspapers and magazines well into the 1950's. A shuttle is a small tool that looks like a small boat "sailing" in and out of the thread. Tatting is called "schiffchenarbeit" in German, which means "the work of a little boat". There are two popular types of shuttles. The first has closed ends and a removable bobbin where the thread is wound around - often made from metal or plastic. The second type has a post in the center where the thread is wound. The ends of this bobbin are open but snug. Because it is constructed in two pieces, it can be made from materials like bone, ivory or mother of pearl. Shuttles hold a larger amount of thread (as compared with needles) which means fewer ends to weave in. Fishermen in the past are thought to have used large shuttles to weave cord into certain knots whilst making their fishing nets. Their methods were copied by weavers, who innovated by using threads and smaller shuttles to make lace.Tatting Shuttle, black plastic flagstaff hill, warrnambool, shipwrecked-coast, flagstaff-hill, flagstaff-hill-maritime-museum, maritime-museum, shipwreck-coast, flagstaff-hill-maritime-village, tatting shuttle, handcraft, needlework -
 Flagstaff Hill Maritime Museum and Village
Tool - Torch, 1935-1960
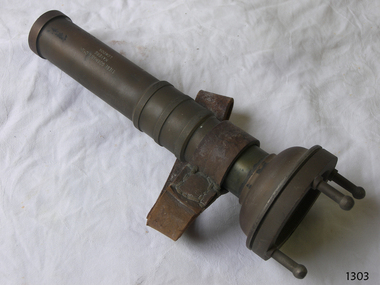
Diver's Submarine Electric Torches were first developed to give illumination for close examination work. They have to be self-contained, the older ones are powered by an accumulator type battery which could be recharged. Some models were fitted with a switch to turn the light off saving on the battery power. The lens is of a convex type and magnifies the light. Sometimes there was a protective grill across the glass or prongs to protect the glass from an impact. When fully charged the battery would last about seven hours. Torches are made from non-ferrous metal so as not to corrode in their watery environment. Siebe Gorman & Co Ltd has been producing hand-held, battery-powered, submarine electric torches for divers and the Ministry of Defence (MOD) since the 1920s. In 1961, the famous diving manufacturer C.E. Heinke merged with Siebe Gorman, and for a short while, torches were made with the combined 'Siebe Heinke' inscription. However, this linked inscription was later dropped, with a return to the Siebe Gorman name tag. Date of manufacture for these torches can be determined by their Admiralty Pattern (AP) number that was used to identify a particular item and were for naval stores use. Before NATO stock coding became more widely used, earlier MOD torches often have a simple four-digit group of AP numbers such as AP4456 or AP4458. In 1975 Siebe Gorman moved from their Neptune Works at Chessington in Surrey to a new location at Cwmbran in Wales and by this time their manufacture of diving equipment had declined. (For additional historic company information on Siebe & Gorman see notes section this document.)The item is significant as it gives us a snapshot into marine history and the development of diving equipment generally, especially that used for salvage operations before and during WW2. The company that made the torch Siebe Gorman was a leading inventor, developer and innovator of marine equipment with its early developments in helmets, compressors and other diving equipment. Items that are today eagerly sought after for maritime collections around the world. The items that have been donated to the Flagstaff Hill collection give us an insight as to how divers operated and the dangers they faced doing a very necessary and dangerous job.Divers torch, brass with glass lens , screw on piece with three lugs attached. Leather wrist strap attached & loose contact spring inside."Siebe Gorman and Co Ltd, Makers, London." Has A.P.4456 stamped on front faceflagstaff hill, warrnambool, shipwrecked-coast, flagstaff-hill, flagstaff-hill-maritime-museum, maritime-museum, shipwreck-coast, flagstaff-hill-maritime-village -
 Flagstaff Hill Maritime Museum and Village
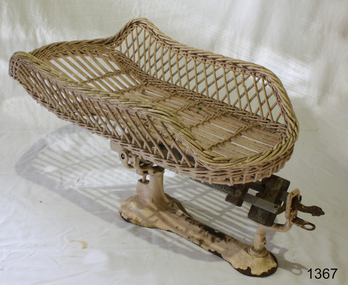
Instrument - Scale
Scale for babies with cane basket and sliding metal weights for lbs and ozs on two separate scale. Scale is worked on a beam balance principle.flagstaff hill, warrnambool, shipwrecked-coast, flagstaff-hill, flagstaff-hill-maritime-museum, maritime-museum, shipwreck-coast, flagstaff-hill-maritime-village, scale for babies -
 Flagstaff Hill Maritime Museum and Village
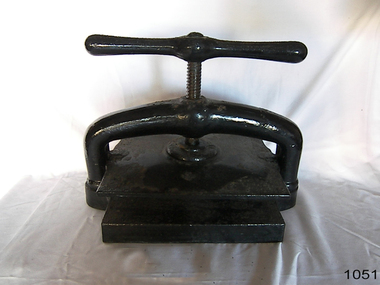
Equipment - Book binding press
Item used to repair books after their dust jackets, covers, flyleaves or pages had been damaged. These damaged items on a book were replaced and glued. The press allowed the glue to set under pressure until the repair was complete a press is also used for the gilding of books. The first book press has been documented in India around 100 BCE with various types and designs being used though the ages and are still in use today by craftsman to repair antique books.Over the centuries many materials from ivory to glass, have been used to bind books. Gilding has also long been a popular decorative treatment for book bindings and a book press is used in this operation. Since the 1800s, rare book conservationists have worked to perfect the methods used by their predecessors, and modern book binders are true craftsman with this press as an example of the equipment used in their trade. This item is significant as it is an early example of items used in book gilding and binding.Book binding press metal with square pressing surface driven by worm wheel thread and turning handle in working order. Noneflagstaff hill, warrnambool, shipwrecked-coast, flagstaff-hill, flagstaff-hill-maritime-museum, maritime-museum, shipwreck-coast, flagstaff-hill-maritime-village -
 Flagstaff Hill Maritime Museum and Village
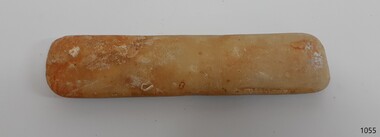
Equipment - Sharpening Stone, ca 1878
The sharpening stone can also be referred to as a whetstone, oil stone or honing stone. It is a well-worn double-sided sharpening stone retrieved from the wreck site of the Loch Ard. It is used to grind and hone the edges of metal blades and tools. ‘Natural’ sharpening stones like this one are quarried from ancient sedimentary rock that has metamorphosed from clay and volcanic ash to produce garnet crystals. Most modern stones are artificially produced, or ‘bonded’, abrasive stones, made by fusing clay and metal powder under heat and pressure. The softer yellow Corticule stone is found in thin vertical veins running through the more plentiful Belgian Blue rock. Coticule is a fine-grained and dense material that ‘cuts’ metal slowly but to a superior standard of sharpness and finish. The relatively coarser Belgian Blue is stronger and ‘cuts’ more quickly, but with a less polished finish. A double-sided whetstone is therefore valued for its increased durability (the harder BBW ‘backs’, or supports, the softer Coticule), and additional utility (the fine ‘grit’ of Coticule complements the coarser BBW to meet a range of sharpening needs). The blue-grey base of this stone is thinner than the remaining yellow Coticule on top. This suggests that the majority of grinding and honing work it has done on board the ship was for larger tools, rather than on surgical or shaving blades. Its rounded or spherical shaping may also be related to the ‘tumbling’ action of the sea on the ocean floor. History of the Loch Ard wreck: The Loch Ard got its name from ”Loch Ard” a loch that lies to the west of Aberfoyle, and the east of Loch Lomond. It means "high lake" in Scottish Gaelic. The vessel belonged to the famous Loch Line which sailed many vessels from England to Australia. The Loch Ard was built in Glasgow by Barclay, Curle & Co. in 1873, the vessel was a three-masted square-rigged iron sailing ship that measured 79.87 meters in length, 11.58 m in width, and 7 m in depth with a gross tonnage of 1693 tons with a mainmast that measured a massive 45.7 m in height. Loch Ard made three trips to Australia and one trip to Calcutta before its fateful voyage. Loch Ard left England on March 2, 1878, under the command of 29-year-old Captain Gibbs, who was newly married. The ship was bound for Melbourne with a crew of 37, plus 17 passengers. The general cargo reflected the affluence of Melbourne at the time. Onboard were straw hats, umbrellas, perfumes, clay pipes, pianos, clocks, confectionery, linen and candles, as well as a heavier load of railway irons, cement, lead and copper. There were other items included that were intended for display in the Melbourne International Exhibition of 1880. The voyage to Port Phillip was long but uneventful. Then at 3 am on June 1, 1878, Captain Gibbs was expecting to see land. But the Loch Ard was running into a fog which greatly reduced visibility. Captain Gibbs was becoming anxious as there was no sign of land or the Cape Otway lighthouse. At 4 am the fog lifted and a lookout aloft announced that he could see breakers. The sheer cliffs of Victoria's west coast came into view, and Captain Gibbs realised that the ship was much closer to them than expected. He ordered as much sail to be set as time would permit and then attempted to steer the vessel out to sea. On coming head-on into the wind, the ship lost momentum, the sails fell limp and Loch Ard's bow swung back towards land. Gibbs then ordered the anchors to be released in an attempt to hold their position. The anchors sank some 50 fathoms - but did not hold. By this time the ship was among the breakers and the tall cliffs of Mutton Bird Island rose behind. Just half a mile from the coast, the ship's bow was suddenly pulled around by the anchor. The captain tried to tack out to sea, but the ship struck a reef at the base of Mutton Bird Island, near Port Campbell. Waves subsequently broke over the ship and the top deck became loosened from the hull. The masts and rigging came crashing down knocking passengers and crew overboard. When a lifeboat was finally launched, it crashed into the side of Loch Ard and capsized. Tom Pearce, who had launched the boat, managed to cling to its overturned hull and shelter beneath it. He drifted out to sea and then on the flood tide came into what is now known as Lochard Gorge. He swam to shore, bruised and dazed, and found a cave in which to shelter. Some of the crew stayed below deck to shelter from the falling rigging but drowned when the ship slipped off the reef into deeper water. Eva Carmichael a passenger had raced onto the deck to find out what was happening only to be confronted by towering cliffs looming above the stricken ship. In all the chaos, Captain Gibbs grabbed Eva and said, "If you are saved Eva, let my dear wife know that I died like a sailor". That was the last Eva Carmichael saw of the captain. She was swept off the ship by a huge wave. Eva saw Tom Pearce on a small rocky beach and yelled to attract his attention. He dived in and swam to the exhausted woman and dragged her to shore. He took her to the cave and broke the open case of brandy which had washed up on the beach. He opened a bottle to revive the unconscious woman. A few hours later Tom scaled a cliff in search of help. He followed hoof prints and came by chance upon two men from nearby Glenample Station three and a half miles away. In a complete state of exhaustion, he told the men of the tragedy. Tom then returned to the gorge while the two men rode back to the station to get help. By the time they reached Loch Ard Gorge, it was cold and dark. The two shipwreck survivors were taken to Glenample Station to recover. Eva stayed at the station for six weeks before returning to Ireland by steamship. In Melbourne, Tom Pearce received a hero's welcome. He was presented with the first gold medal of the Royal Humane Society of Victoria and a £1000 cheque from the Victorian Government. Concerts were performed to honour the young man's bravery and to raise money for those who lost family in the disaster. Of the 54 crew members and passengers on board, only two survived: the apprentice, Tom Pearce and the young woman passenger, Eva Carmichael, who lost her family in the tragedy. Ten days after the Lochard tragedy, salvage rights to the wreck were sold at auction for £2,120. Cargo valued at £3,000 was salvaged and placed on the beach, but most washed back into the sea when another storm developed. The wreck of Lochard still lies at the base of Mutton Bird Island. Much of the cargo has now been salvaged and some items were washed up into Lochard Gorge. Cargo and artefacts have also been illegally salvaged over many years before protective legislation was introduced in March 1982. One of the most unlikely pieces of cargo to have survived the shipwreck was a Minton majolica peacock- one of only nine in the world. The peacock was destined for the Melbourne 1880 International Exhibition. It had been well packed, which gave it adequate protection during the violent storm. Today the Minton peacock can be seen at the Flagstaff Hill Maritime Museum in Warrnambool. From Australia's most dramatic shipwreck, it has now become Australia's most valuable shipwreck artifact and is one of very few 'objects' on the Victorian State Heritage Register. The shipwreck of the Loch Ard is of significance for Victoria and is registered on the Victorian Heritage Register ( S 417). Flagstaff Hill has a varied collection of artefacts from Loch Ard and its collection is significant for being one of the largest accumulation of artefacts from this notable Victorian shipwreck of which the subject items are a small part. The collections objects give us a snapshot of how we can interpret the story of this tragic event. The collection is also archaeologically significant as it represents aspects of Victoria's shipping history that allows us to interpret Victoria's social and historical themes of the time. Through is associated with the worst and best-known shipwreck in Victoria's history. A sharpening stone is also called a whetstone, oil, or honing stone. The stone is a worn double-sided rectangular block with rounded corners. There is a clear delineation between its coarser Belgian Blue base (grey colour) and its finer Belgian Coticule face (yellow colour). It bears sedimentary encrustation over one-third of its surface. flagstaff hill, warrnambool, shipwrecked coast, flagstaff hill maritime museum, maritime museum, shipwreck coast, flagstaff hill maritime village, great ocean road, loch line, loch ard, captain gibbs, eva carmichael, tom pearce, glenample station, mutton bird island, loch ard gorge, sharpening stone, whetstone, oilstone, double-sided stone, belgian coticule, belgian blue whetstone, oil stone, honing stone -
 Flagstaff Hill Maritime Museum and Village
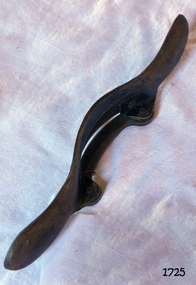
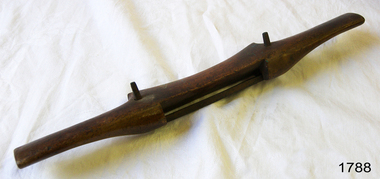
Tool - Spokeshave, Sides & Skinner, First half of the 20th century
A spokeshave is a hand tool used to shape and smooth woods in woodworking jobs such as making cart wheel spokes, chair legs, paddles, bows, and arrows. The tool consists of a blade fixed into the body of the tool, which has a handle for each hand. Historically, a spokeshave was made with a wooden body and metal cutting blade. With industrialization metal bodies displaced wood in mass-produced tools. Being a small tool, spokeshaves are not suited to working large surfaces. The name spokeshave dates back to at least the 16th century, though the early history of the tool is not well documented. The name spokeshave reflects the early use of the tool by wheelwrights. The first spokeshaves were made of wood usually beech with steel blades, before being largely superseded by the development of metal-bodied spokeshaves in the latter half of the 19th century, though many woodworkers still use wooden spokeshaves. Due to their widespread use and versatility vintage wooden spokeshaves remain commonly available and relatively low in price. Spokeshaves consist of a blade or iron secured to the body or stock of the tool, which has two handles one for each hand. The bottom surface of the tool is called the sole. The blade can be removed for sharpening, and adjusted to vary the depth of the cut. An early design consisted of a metal blade with a pair of tangs to which the wooden handles were attached, as with a draw knife. Unlike a draw knife, but like a plane, spokeshaves typically have a sole plate that fixes the angle of the blade relative to the surface being worked. There are a wide variety of different types of spokeshave, suited to different trades and applications. A now vintage tool made by an Australian manufacture in NSW who specialised in making pruning shears, hacksaw frames and heel shaves under the Erskin brand name. This tool is now sought after by collectors even though it was probably made in the first quarter of the 20th century. It gives a snapshot of how carpenters work with wood by hand showcasing their craftsmanship. Hollow face Spokeshave, metal body with black enamel finish. Erskin stamped on frontflagstaff hill, warrnambool, flagstaff-hill, flagstaff-hill-maritime-museum, maritime-museum, shipwreck-coast, flagstaff-hill-maritime-village, spokeshave, cabinet makers tools, wood working, cutting tool, shaping tool -
 Flagstaff Hill Maritime Museum and Village
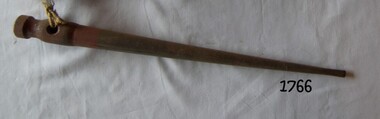
Tool - Fid, 1940s
A Fid is a conical tapered wooden tool used for separating the strands of rope for splicing. They were a tool traditionally made of wood or bone used to work with rope and canvas in marlinespike seamanship. A Fid differs from a marlinspike in material and purposes. A marlinspike is used in working with wire rope, natural and synthetic lines also may be used to open shackles, and is made of metal. A Fid is used to hold open knots and holes in the canvas, and to separate the "lays" (or strands) of synthetic or natural rope for splicing. A variation of the Fid, the grip fid, is used for ply-split braiding. The grip fid has a jamming cleat to pull a cord back through the cord split by the fid's point. Modern Fids are typically made of aluminium, steel, or plastic. In addition to holding rope open to assist the creation of a rope splice, modern push fid's have markings for precise measurements in a variety of sizes of rope. The length of these fid’s is typically 21 or 22 times the diameter of rope to be spliced. Fids have been used since sailing vessels were first used to travel the worlds seas the tool was invented to be used to splice rope and with working with canvas sails. A Fid is a sailors tool that has maintained its general design for hundreds of years and gives a snapshot into what the working life was like for sailors on board sailing ships for hundreds of years. The tool in its original design is still in regular use today by recreational sailors all over the world to splice and join lengths of rope.Metal Fid painted brown, flattened point turned end and hole for a lanyardNoneflagstaff hill, warrnambool, shipwrecked-coast, flagstaff-hill, flagstaff-hill-maritime-museum, maritime-museum, shipwreck-coast, flagstaff-hill-maritime-village, marlinspike -
 Flagstaff Hill Maritime Museum and Village
Tool - Spokeshave, Mathieson and Son, 1860 to 1910
A spokeshave is a hand tool used to shape and smooth woods in woodworking jobs such as making cart wheel spokes, chair legs, paddles, bows, and arrows. The tool consists of a blade fixed into the body of the tool, which has a handle for each hand. Historically, a spokeshave was made with a wooden body and metal cutting blade. With industrialization metal bodies displaced wood in mass-produced tools. Being a small tool, spokeshaves are not suited to working large surfaces. The name spokeshave dates back to at least the 16th century, though the early history of the tool is not well documented. The name spokeshave reflects the early use of the tool by wheel wrights. The first spokeshaves were made of wood usually beech with steel blades, before being largely superseded by the development of metal-bodied spokeshaves in the latter half of the 19th century, though many woodworkers still use wooden spokeshaves. Due to their widespread use and versatility vintage wooden spokeshaves remain commonly available and relatively low in price. Spokeshaves consist of a blade or iron secured to the body or stock of the tool, which has two handles – one for each hand. The bottom surface of the tool is called the sole. The blade can be removed for sharpening, and adjusted to vary the depth of the cut. An early design consisted of a metal blade with a pair of tangs to which the wooden handles were attached, as with a draw knife. Unlike a draw knife, but like a plane, spokeshaves typically have a sole plate that fixes the angle of the blade relative to the surface being worked. There are a wide variety of different types of spokeshave, suited to different trades and applications. Company History: The firm of Alexander Mathieson & Sons was one of the leading makers of hand tools in Scotland. Its success went hand in hand with the growth of the shipbuilding industries on the Firth of Clyde in the nineteenth century and the emergence of Glasgow regarded as the "second city of the Empire". It also reflected the firm's skill in responding to an unprecedented demand for quality tools by shipyards, cooperage's and other industries, both locally and far and wide. The year 1792 was deemed by the firm to be that of its foundation it was in all likelihood the year in which John Manners had set up his plane-making workshop on Saracen Lane off the Gallowgate in the heart of Glasgow, not far from the Saracen's Head Inn, where Dr Johnson and James Boswell had stayed on their tour of Scotland in 1773. Alexander Mathieson (1797–1851) is recorded in 1822 as a plane-maker at 25 Gallowgate, but in the following year at 14 Saracen's Lane, presumably having taken over the premises of John Manners. The 1841 national census described Alexander Mathieson as a master plane-maker at 38 Saracen Lane with his son Thomas Adam working as a journeyman plane-maker. In 1849 the firm of James & William Stewart at 65 Nicolson Street, Edinburgh was taken over and Thomas was put in charge of the business, trading under the name Thomas A. Mathieson & Co. as plane and edge-tool makers. Thomas's company acquired the Edinburgh edge-tool makers Charles & Hugh McPherson and took over their premises in Gilmore Street. The Edinburgh directory of 1856/7 the business is recorded as being Alexander Mathieson & Son, plane and edge-tool makers at 48 Nicolson Street and Paul's Work, Gilmore Street. The 1851 census records indicate that Alexander was working as a tool and plane-maker employing eight men. Later that year Alexander died and his son Thomas took over the business. Under the heading of an edge-tool maker in the 1852/3 (Post-Office Glasgow Annual Directory) the firm is now listed as Alexander Mathieson & Son. By the early 1850s, the business had moved to 24 Saracen Lane. The directory for 1857/8 records that the firm had moved again only a few years later to East Campbell Street, also off the Gallowgate, and that through further diversification was also manufacturing coopers' and tin men's tools. The ten-yearly censuses log the firm's growth and in 1861 Thomas was a tool manufacturer employing 95 men and 30 boys; in 1871 he had 200 men working for him and in 1881 300 men. By 1899 the firm had been incorporated as Alexander Mathieson & Sons Ltd, even though only Alexander's son Thomas appears ever to have joined the firm.A vintage tool made by a well-known firm made for other firms and individuals that worked in wood. The tool was used to shape various items mainly in use by wheel wrights. A significant vintage item from the mid to late 19th century that today is quite sought after by collectors. It gives us a snapshot of how trade people predominately worked materials such as wood by hand and with tools that were themselves hand made shows the craftsman's art of the time. Spokeshave with blade 4 inches wide.Mathieson and Son Glasgow. flagstaff hill, warrnambool, shipwrecked-coast, flagstaff-hill, flagstaff-hill-maritime-museum, maritime-museum, shipwreck-coast, flagstaff-hill-maritime-village, spokeshave, mathieson and son, carpentry tools, wheel wright tools -
 Flagstaff Hill Maritime Museum and Village
Plane
Block plane. A small metal plane, with a low cutting angle used for trimming across the grain on the end of a work piece, "blocking in."flagstaff hill, warrnambool, shipwrecked-coast, flagstaff-hill, flagstaff-hill-maritime-museum, maritime-museum, shipwreck-coast, flagstaff-hill-maritime-village -
 Flagstaff Hill Maritime Museum and Village
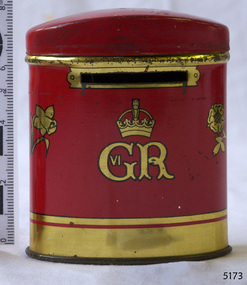
Souvenir - Money box, OXO Ltd, ca. 12-5-1937
Metal money boxes shaped like common familiar objects became popular in the 18th century. In the 20th century, they were used to promote and advertise events and businesses. In the 1950s metal money boxes shaped like a bank building were given away to children by their parents' bank to encourage them to save money. This metal money box was produced for the company of OXO Ltd of London. It was made specifically as a souvenir of the Coronation of King George VI of England, which happened on May 12, 1937. OXO Ltd. still makes OXO stock cubes, which contain a concentrated meat extract. The cubes are used to flavour soups, gravy, casseroles and other food recipes to enhance their flavour. The cubes are removed from their foil wrapper then crumbled into the dish and mixed with the ingredients. Chemist Justus von Liebig worked with engineer George Gilbert of Uruguay to produce Liebig’s Extract of Meat, the forerunner of OXO . In the late 1890s, OXO produced a liquid form of the meat extract and in 1899 registered the OXO trademark worldwide, and in 1900 in the UK. In 1910 the OXO 'penny' cube was in production and proved very popular. The money box is significant for its connection to British Monarch, King George IV, who reigned from 1932-1952. It is also significant for its connection to the OXO cube, a very well knon brand of food additive from the mid-19th century to current times.Souvenir money box, oval cylinder with domed, pull-off lid and framed coin slot, with seams on each side. It once contained six OXO Cubes. The red tin with gold tin has the Royal Insignia of King George VI and Elizabeth on one side and the Royal medallion-style portrait of King George VI and Elizabeth on the other side. There is an inscription on the base and floral decorations on the sides. It was produced for OXO Ltd, Thames House, London, England, to commemorate the coronation of King George V1 and Elizabeth on May 12th 1937.Logo, Royal Insignia: "[Crown] over "G VI R" Medallion-style Portrait image: "GEORGE VI AND ELIZABETH MAY 12TH 1937" around " (Image of King George VI and Elizabeth) " Printed on base: "CORONATION / SOUVENIR MONEY BOX / CONTAINING / 6 OXO CUBES / BRAND / OXO LTD., THAMES HOUSE, / LONDON, ENGLAND."flagstaff hill, flagstaff hill maritime museum and village, warrnambool, maritime museum, maritime village, great ocean road, shipwreck coast, money box, money safe, commemorative money box, coronation king george iv, 1937, vintage money box, oxo cube, numismatics -
 Flagstaff Hill Maritime Museum and Village
Domestic object - Plate
... with both hands! Before your work can be bisque fired it should... to finish the work completely – use a metal kidney to polish ...The Process of Making Pottery Decorating, Firing, Glazing, Making, Technical There is a rhythm and flow to clay. It can’t be done all at once! Even the making process! It can take weeks to get everything done, especially if you can only work on your pottery once a week! Even though we have three hour classes, it’s often just not enough time! Here is an overview of some of the processes so you have a bit more grasp on some of the technical stuff! Step One – Design There are SO many ideas out there for making stuff in clay! From delicate porcelain jewellery, through to heavy sculptural work and everything in between. Deciding your direction is sometimes not that easy – when you first start, try everything, you will naturally gravitate to the style that you enjoy! The options and variations are endless and can get a wee bit overwhelming too! Check in with me before you start to ensure your ideas will work, what order you might do things, how you could achieve the look you are seeking and any other technical data required! Step Two – Making Clay is thixotropic. This means that as you work with it, the clay first gets sloppier and wetter, before is begins to dry in the atmosphere. For most things, you simply can’t do all parts of the project at once. An example of work order might look like: Get last weeks work out from the shelves Prepare clay for today’s work – roll your clay, prepare balls for throwing, make the first stage of a pinch pot) Clean up last week’s work and put it on the shelf for bisque firing Check that you have any glazing to do – and do enough of it that you will have time to finish your main project Do the next step of your next project – there might be a further step that can’t be complete immediately, in that case, wrap your work well and put onto the shelves. Letting your work rest for a while can really help keep your work clean and professional looking. Many things require bagging under plastic to keep it ready for work the next week – put your name on the outside of the bag so you can find your work easily. We have stickers and markers. Consider how you want to decorate your work – coloured slip can be applied at a fairly wet stage (remembering that it will make your work even wetter!). Trying to apply slip to dry clay won’t work! If you want to do sgraffito – you will need to keep the work leather hard (a state of dryness where you can still work the clay with a little effort and a little water and care). Step Three – Drying Most of the time your work can go into the rack uncovered to let it dry out for the following week. If you want to continue forming or shaping you will need to double bag your work – put your work on a suitable sized bat and put the bat in a bag so the base of the bag is under the bat, then put another bag over the top of the work and tuck the top of the bag under the bat. If you want to trim (or turn) your thrown work the following week, it should also be double bagged. If your work is large, delicate, or of uneven thicknesses, you should lightly cover your work for drying. When considering the drying process, bare in mind the weather, humidity and wind! The hotter and dryer, the faster things dry and work can dry unevenly in the shelves – this can lead to cracking – another time to lightly cover your work for drying. Step Four – Trimming and Cleaning Up Your work is dry! It is called greenware now and it is at it’s most fragile! Handle everything with two hands. I often refer to soft hands – keep everything gentle and with your fingers spread as much as possible. Try to not pick up things like plates too much, and always with both hands! Before your work can be bisque fired it should be “cleaned up”. You work won’t go into the kiln if it has sharp edges – when glazed, sharp edges turn into razor blades! Use a piece of fly wire to rub the work all over – this will scratch a little so be light handed. Use a knife or metal kidney to scrape any areas that require a bit more dynamic treatment than the fly wire offers! Finally, a very light wipe over with a slightly damp sponge can help soften and soothe all of your edges and dags! Trimming thrown work: If you are planning to trim (or turn) your thrown work (and you should be), make sure you bag it well – your work should be leather hard to almost dry for easiest trimming. Use this step to finish the work completely – use a metal kidney to polish the surface, or a slightly damp sponge to give a freshly thrown look. Wipe the sponge around the rim after trimming, and check the inside of the pot for dags! Trimming slip cast work: Usually I will trim the rims of your work on the wheel the following day to make that stage easier, however you will still need to check your work for lumps and bumps. Last but not least – check that your name is still clearly on the bottom of your work. Step Five – Bisque Firing When the work is completely dry it can go into the bisque kiln. The bisque kiln is fired to 1000°C. This process burns off the water in the clay as well as some of the chemically bound water. The structure of the clay is not altered that much at this temperature. Inside the bisque kiln, the work is stacked a little, small bowl inside a larger bowl and onto a heavy plate. Smaller items like decorations or drink coasters might get stacked several high. Consideration is paid to the weight of the stack and shape of the work. A bisque kiln can fire about one and a half times the amount of work that the glaze kiln can fire. The firing takes about 10 hours to complete the cycle and about two days to cool down. Once it has been emptied the work is placed in the glaze room ready for you to decorate! Step Six – Glazing Decorating your work with colour can be a lot of fun – and time consuming! There are three main options for surface treatment at this stage: Oxide Washes Underglazes Glazes Washes and underglazes do not “glaze” the work – It will still need a layer of glaze to fully seal the clay (washes don’t need glaze on surfaces not designed for food or liquid as they can gloss up a little on their own). Underglazes are stable colourants that turn out pretty much how they look in the jar. They can be mixed with each other to form other colours and can be used like water colours to paint onto your work. Mostly they should have a clear glaze on top to seal them. Oxides are a different species – the pink oxide (cobalt) wash turns out bright blue for instance. They don’t always need a glaze on top, and some glazes can change the colour of the wash! The glazes need no other “glaze” on top! Be careful of unknown glaze interactions – you can put any combination of glaze in a bowl or on a plate, but only a single glaze on the outside of any vertical surface! Glazes are a chemical reaction under heat. We don’t know the exact chemicals in the Mayco glazes we use. I can guess by the way they interact with each other, however, on the whole, you need to test every idea you have, and not run the test on a vertical surface! Simply put, glaze is a layer of glass like substance that bonds with the clay underneath. Clay is made of silica, alumina and water. Glaze is made of mostly silica. Silica has a melting point of 1700°C and we fire to 1240°C. The silica requires a “flux” to help it melt at the lower temperature. Fluxes can be all sorts of chemicals – a common one is calcium – calcium has a melting point of 2500°C, however, together they both melt at a much lower temperature! Colourants are metal oxides like cobalt (blue), chrome (green through black), copper (green, blue, even red!), manganese (black, purple and pink) iron (red brown), etc. Different chemicals in the glaze can have dramatic effects. for example, barium carbonate (which we don’t use) turns manganese bright pink! Other elements can turn manganese dioxide brown, blue, purple and reddish brown. Manganese dioxide is a flux in and of itself as well. So, glazes that get their black and purple colours, often interact with other glazes and RUN! Our mirror black is a good example – it mixes really well with many glazes because it fluxes them – causes them to melt faster. It will also bring out many beautiful colours in the glazes because it’s black colouring most definitely comes from manganese dioxide! Glaze chemistry is a whole subject on it’s own! We use commercial Mayco glazes on purpose – for their huge range of colour possibilities, stability, cool interactions, artistic freedom with the ability to easily brush the glazes on and ease of use. We currently have almost 50 glazes on hand! A major project is to test the interactions of all glazes with each other. That is 2,500 test tiles!!!! I’m going to make the wall behind the wheels the feature wall of pretty colours! Step Seven – Glaze (Gloss or sometimes called “Glost”) Firing Most of the time this is the final stage of making your creation (but not always!) The glaze kiln goes to 1240°C. This is called cone 6, or midrange. It is the low end of stoneware temperatures. Stoneware clays and glazes are typically fired at cone 8 – 10, that is 1260 – 1290°C. The energy requirement to go from 1240°C to 1280°C is almost a 30% more! Our clay is formulated to vitrify (mature, turn “glass-like”) at 1240°, as are our glazes. A glaze kiln take around 12 hours to reach temperature and two to three days to cool down. Sometimes a third firing process is required – this is for decoration that is added to work after the glaze firing. For example – adding precious metals and lustres. this firing temperature is usually around 600 – 800°C depending upon the techniques being used. There are many students interested in gold and silver trims – we will be doing this third type of firing soon! After firing your work will be in the student finished work shelves. Remember to pay for it before you head out the door! There is a small extra charge for using porcelain clay (it’s more than twice the price of regular clay), and for any third firing process! Once your work has been fired it can not turn back into clay for millennia – so don’t fire it if you don’t like it! Put it in the bucket for recycling. https://firebirdstudios.com.au/the-process-of-making-pottery/Ceramics have evolved over thousands of years.White earthenware dinner plate. Crazing evident all over.Backstamped ‘Made in England S LTD’flagstaff hill, warrnambool, shipwrecked-coast, flagstaff-hill, flagstaff-hill-maritime-museum, maritime-museum, shipwreck-coast, flagstaff-hill-maritime-village, ceramics, tableware -
 Flagstaff Hill Maritime Museum and Village
Domestic object - Plate, Johnson Bros
... with both hands! Before your work can be bisque fired it should... to finish the work completely – use a metal kidney to polish ...The Process of Making Pottery Decorating, Firing, Glazing, Making, Technical There is a rhythm and flow to clay. It can’t be done all at once! Even the making process! It can take weeks to get everything done, especially if you can only work on your pottery once a week! Even though we have three hour classes, it’s often just not enough time! Here is an overview of some of the processes so you have a bit more grasp on some of the technical stuff! Step One – Design There are SO many ideas out there for making stuff in clay! From delicate porcelain jewellery, through to heavy sculptural work and everything in between. Deciding your direction is sometimes not that easy – when you first start, try everything, you will naturally gravitate to the style that you enjoy! The options and variations are endless and can get a wee bit overwhelming too! Check in with me before you start to ensure your ideas will work, what order you might do things, how you could achieve the look you are seeking and any other technical data required! Step Two – Making Clay is thixotropic. This means that as you work with it, the clay first gets sloppier and wetter, before is begins to dry in the atmosphere. For most things, you simply can’t do all parts of the project at once. An example of work order might look like: Get last weeks work out from the shelves Prepare clay for today’s work – roll your clay, prepare balls for throwing, make the first stage of a pinch pot) Clean up last week’s work and put it on the shelf for bisque firing Check that you have any glazing to do – and do enough of it that you will have time to finish your main project Do the next step of your next project – there might be a further step that can’t be complete immediately, in that case, wrap your work well and put onto the shelves. Letting your work rest for a while can really help keep your work clean and professional looking. Many things require bagging under plastic to keep it ready for work the next week – put your name on the outside of the bag so you can find your work easily. We have stickers and markers. Consider how you want to decorate your work – coloured slip can be applied at a fairly wet stage (remembering that it will make your work even wetter!). Trying to apply slip to dry clay won’t work! If you want to do sgraffito – you will need to keep the work leather hard (a state of dryness where you can still work the clay with a little effort and a little water and care). Step Three – Drying Most of the time your work can go into the rack uncovered to let it dry out for the following week. If you want to continue forming or shaping you will need to double bag your work – put your work on a suitable sized bat and put the bat in a bag so the base of the bag is under the bat, then put another bag over the top of the work and tuck the top of the bag under the bat. If you want to trim (or turn) your thrown work the following week, it should also be double bagged. If your work is large, delicate, or of uneven thicknesses, you should lightly cover your work for drying. When considering the drying process, bare in mind the weather, humidity and wind! The hotter and dryer, the faster things dry and work can dry unevenly in the shelves – this can lead to cracking – another time to lightly cover your work for drying. Step Four – Trimming and Cleaning Up Your work is dry! It is called greenware now and it is at it’s most fragile! Handle everything with two hands. I often refer to soft hands – keep everything gentle and with your fingers spread as much as possible. Try to not pick up things like plates too much, and always with both hands! Before your work can be bisque fired it should be “cleaned up”. You work won’t go into the kiln if it has sharp edges – when glazed, sharp edges turn into razor blades! Use a piece of fly wire to rub the work all over – this will scratch a little so be light handed. Use a knife or metal kidney to scrape any areas that require a bit more dynamic treatment than the fly wire offers! Finally, a very light wipe over with a slightly damp sponge can help soften and soothe all of your edges and dags! Trimming thrown work: If you are planning to trim (or turn) your thrown work (and you should be), make sure you bag it well – your work should be leather hard to almost dry for easiest trimming. Use this step to finish the work completely – use a metal kidney to polish the surface, or a slightly damp sponge to give a freshly thrown look. Wipe the sponge around the rim after trimming, and check the inside of the pot for dags! Trimming slip cast work: Usually I will trim the rims of your work on the wheel the following day to make that stage easier, however you will still need to check your work for lumps and bumps. Last but not least – check that your name is still clearly on the bottom of your work. Step Five – Bisque Firing When the work is completely dry it can go into the bisque kiln. The bisque kiln is fired to 1000°C. This process burns off the water in the clay as well as some of the chemically bound water. The structure of the clay is not altered that much at this temperature. Inside the bisque kiln, the work is stacked a little, small bowl inside a larger bowl and onto a heavy plate. Smaller items like decorations or drink coasters might get stacked several high. Consideration is paid to the weight of the stack and shape of the work. A bisque kiln can fire about one and a half times the amount of work that the glaze kiln can fire. The firing takes about 10 hours to complete the cycle and about two days to cool down. Once it has been emptied the work is placed in the glaze room ready for you to decorate! Step Six – Glazing Decorating your work with colour can be a lot of fun – and time consuming! There are three main options for surface treatment at this stage: Oxide Washes Underglazes Glazes Washes and underglazes do not “glaze” the work – It will still need a layer of glaze to fully seal the clay (washes don’t need glaze on surfaces not designed for food or liquid as they can gloss up a little on their own). Underglazes are stable colourants that turn out pretty much how they look in the jar. They can be mixed with each other to form other colours and can be used like water colours to paint onto your work. Mostly they should have a clear glaze on top to seal them. Oxides are a different species – the pink oxide (cobalt) wash turns out bright blue for instance. They don’t always need a glaze on top, and some glazes can change the colour of the wash! The glazes need no other “glaze” on top! Be careful of unknown glaze interactions – you can put any combination of glaze in a bowl or on a plate, but only a single glaze on the outside of any vertical surface! Glazes are a chemical reaction under heat. We don’t know the exact chemicals in the Mayco glazes we use. I can guess by the way they interact with each other, however, on the whole, you need to test every idea you have, and not run the test on a vertical surface! Simply put, glaze is a layer of glass like substance that bonds with the clay underneath. Clay is made of silica, alumina and water. Glaze is made of mostly silica. Silica has a melting point of 1700°C and we fire to 1240°C. The silica requires a “flux” to help it melt at the lower temperature. Fluxes can be all sorts of chemicals – a common one is calcium – calcium has a melting point of 2500°C, however, together they both melt at a much lower temperature! Colourants are metal oxides like cobalt (blue), chrome (green through black), copper (green, blue, even red!), manganese (black, purple and pink) iron (red brown), etc. Different chemicals in the glaze can have dramatic effects. for example, barium carbonate (which we don’t use) turns manganese bright pink! Other elements can turn manganese dioxide brown, blue, purple and reddish brown. Manganese dioxide is a flux in and of itself as well. So, glazes that get their black and purple colours, often interact with other glazes and RUN! Our mirror black is a good example – it mixes really well with many glazes because it fluxes them – causes them to melt faster. It will also bring out many beautiful colours in the glazes because it’s black colouring most definitely comes from manganese dioxide! Glaze chemistry is a whole subject on it’s own! We use commercial Mayco glazes on purpose – for their huge range of colour possibilities, stability, cool interactions, artistic freedom with the ability to easily brush the glazes on and ease of use. We currently have almost 50 glazes on hand! A major project is to test the interactions of all glazes with each other. That is 2,500 test tiles!!!! I’m going to make the wall behind the wheels the feature wall of pretty colours! Step Seven – Glaze (Gloss or sometimes called “Glost”) Firing Most of the time this is the final stage of making your creation (but not always!) The glaze kiln goes to 1240°C. This is called cone 6, or midrange. It is the low end of stoneware temperatures. Stoneware clays and glazes are typically fired at cone 8 – 10, that is 1260 – 1290°C. The energy requirement to go from 1240°C to 1280°C is almost a 30% more! Our clay is formulated to vitrify (mature, turn “glass-like”) at 1240°, as are our glazes. A glaze kiln take around 12 hours to reach temperature and two to three days to cool down. Sometimes a third firing process is required – this is for decoration that is added to work after the glaze firing. For example – adding precious metals and lustres. this firing temperature is usually around 600 – 800°C depending upon the techniques being used. There are many students interested in gold and silver trims – we will be doing this third type of firing soon! After firing your work will be in the student finished work shelves. Remember to pay for it before you head out the door! There is a small extra charge for using porcelain clay (it’s more than twice the price of regular clay), and for any third firing process! Once your work has been fired it can not turn back into clay for millennia – so don’t fire it if you don’t like it! Put it in the bucket for recycling. https://firebirdstudios.com.au/the-process-of-making-pottery/Ceramics have evolved over thousands of years.A white earthenware side plate with a gadroon edge. Has water marks and chips on front.‘Johnson Bros England Reg No 15587’flagstaff hill, warrnambool, shipwrecked-coast, flagstaff-hill, flagstaff-hill-maritime-museum, maritime-museum, shipwreck-coast, flagstaff-hill-maritime-village, johnson bros, ceramics, tableware -
 Flagstaff Hill Maritime Museum and Village
Domestic object - Plate, Alfred Meakin
... with both hands! Before your work can be bisque fired it should... to finish the work completely – use a metal kidney to polish ...The Process of Making Pottery Decorating, Firing, Glazing, Making, Technical There is a rhythm and flow to clay. It can’t be done all at once! Even the making process! It can take weeks to get everything done, especially if you can only work on your pottery once a week! Even though we have three hour classes, it’s often just not enough time! Here is an overview of some of the processes so you have a bit more grasp on some of the technical stuff! Step One – Design There are SO many ideas out there for making stuff in clay! From delicate porcelain jewellery, through to heavy sculptural work and everything in between. Deciding your direction is sometimes not that easy – when you first start, try everything, you will naturally gravitate to the style that you enjoy! The options and variations are endless and can get a wee bit overwhelming too! Check in with me before you start to ensure your ideas will work, what order you might do things, how you could achieve the look you are seeking and any other technical data required! Step Two – Making Clay is thixotropic. This means that as you work with it, the clay first gets sloppier and wetter, before is begins to dry in the atmosphere. For most things, you simply can’t do all parts of the project at once. An example of work order might look like: Get last weeks work out from the shelves Prepare clay for today’s work – roll your clay, prepare balls for throwing, make the first stage of a pinch pot) Clean up last week’s work and put it on the shelf for bisque firing Check that you have any glazing to do – and do enough of it that you will have time to finish your main project Do the next step of your next project – there might be a further step that can’t be complete immediately, in that case, wrap your work well and put onto the shelves. Letting your work rest for a while can really help keep your work clean and professional looking. Many things require bagging under plastic to keep it ready for work the next week – put your name on the outside of the bag so you can find your work easily. We have stickers and markers. Consider how you want to decorate your work – coloured slip can be applied at a fairly wet stage (remembering that it will make your work even wetter!). Trying to apply slip to dry clay won’t work! If you want to do sgraffito – you will need to keep the work leather hard (a state of dryness where you can still work the clay with a little effort and a little water and care). Step Three – Drying Most of the time your work can go into the rack uncovered to let it dry out for the following week. If you want to continue forming or shaping you will need to double bag your work – put your work on a suitable sized bat and put the bat in a bag so the base of the bag is under the bat, then put another bag over the top of the work and tuck the top of the bag under the bat. If you want to trim (or turn) your thrown work the following week, it should also be double bagged. If your work is large, delicate, or of uneven thicknesses, you should lightly cover your work for drying. When considering the drying process, bare in mind the weather, humidity and wind! The hotter and dryer, the faster things dry and work can dry unevenly in the shelves – this can lead to cracking – another time to lightly cover your work for drying. Step Four – Trimming and Cleaning Up Your work is dry! It is called greenware now and it is at it’s most fragile! Handle everything with two hands. I often refer to soft hands – keep everything gentle and with your fingers spread as much as possible. Try to not pick up things like plates too much, and always with both hands! Before your work can be bisque fired it should be “cleaned up”. You work won’t go into the kiln if it has sharp edges – when glazed, sharp edges turn into razor blades! Use a piece of fly wire to rub the work all over – this will scratch a little so be light handed. Use a knife or metal kidney to scrape any areas that require a bit more dynamic treatment than the fly wire offers! Finally, a very light wipe over with a slightly damp sponge can help soften and soothe all of your edges and dags! Trimming thrown work: If you are planning to trim (or turn) your thrown work (and you should be), make sure you bag it well – your work should be leather hard to almost dry for easiest trimming. Use this step to finish the work completely – use a metal kidney to polish the surface, or a slightly damp sponge to give a freshly thrown look. Wipe the sponge around the rim after trimming, and check the inside of the pot for dags! Trimming slip cast work: Usually I will trim the rims of your work on the wheel the following day to make that stage easier, however you will still need to check your work for lumps and bumps. Last but not least – check that your name is still clearly on the bottom of your work. Step Five – Bisque Firing When the work is completely dry it can go into the bisque kiln. The bisque kiln is fired to 1000°C. This process burns off the water in the clay as well as some of the chemically bound water. The structure of the clay is not altered that much at this temperature. Inside the bisque kiln, the work is stacked a little, small bowl inside a larger bowl and onto a heavy plate. Smaller items like decorations or drink coasters might get stacked several high. Consideration is paid to the weight of the stack and shape of the work. A bisque kiln can fire about one and a half times the amount of work that the glaze kiln can fire. The firing takes about 10 hours to complete the cycle and about two days to cool down. Once it has been emptied the work is placed in the glaze room ready for you to decorate! Step Six – Glazing Decorating your work with colour can be a lot of fun – and time consuming! There are three main options for surface treatment at this stage: Oxide Washes Underglazes Glazes Washes and underglazes do not “glaze” the work – It will still need a layer of glaze to fully seal the clay (washes don’t need glaze on surfaces not designed for food or liquid as they can gloss up a little on their own). Underglazes are stable colourants that turn out pretty much how they look in the jar. They can be mixed with each other to form other colours and can be used like water colours to paint onto your work. Mostly they should have a clear glaze on top to seal them. Oxides are a different species – the pink oxide (cobalt) wash turns out bright blue for instance. They don’t always need a glaze on top, and some glazes can change the colour of the wash! The glazes need no other “glaze” on top! Be careful of unknown glaze interactions – you can put any combination of glaze in a bowl or on a plate, but only a single glaze on the outside of any vertical surface! Glazes are a chemical reaction under heat. We don’t know the exact chemicals in the Mayco glazes we use. I can guess by the way they interact with each other, however, on the whole, you need to test every idea you have, and not run the test on a vertical surface! Simply put, glaze is a layer of glass like substance that bonds with the clay underneath. Clay is made of silica, alumina and water. Glaze is made of mostly silica. Silica has a melting point of 1700°C and we fire to 1240°C. The silica requires a “flux” to help it melt at the lower temperature. Fluxes can be all sorts of chemicals – a common one is calcium – calcium has a melting point of 2500°C, however, together they both melt at a much lower temperature! Colourants are metal oxides like cobalt (blue), chrome (green through black), copper (green, blue, even red!), manganese (black, purple and pink) iron (red brown), etc. Different chemicals in the glaze can have dramatic effects. for example, barium carbonate (which we don’t use) turns manganese bright pink! Other elements can turn manganese dioxide brown, blue, purple and reddish brown. Manganese dioxide is a flux in and of itself as well. So, glazes that get their black and purple colours, often interact with other glazes and RUN! Our mirror black is a good example – it mixes really well with many glazes because it fluxes them – causes them to melt faster. It will also bring out many beautiful colours in the glazes because it’s black colouring most definitely comes from manganese dioxide! Glaze chemistry is a whole subject on it’s own! We use commercial Mayco glazes on purpose – for their huge range of colour possibilities, stability, cool interactions, artistic freedom with the ability to easily brush the glazes on and ease of use. We currently have almost 50 glazes on hand! A major project is to test the interactions of all glazes with each other. That is 2,500 test tiles!!!! I’m going to make the wall behind the wheels the feature wall of pretty colours! Step Seven – Glaze (Gloss or sometimes called “Glost”) Firing Most of the time this is the final stage of making your creation (but not always!) The glaze kiln goes to 1240°C. This is called cone 6, or midrange. It is the low end of stoneware temperatures. Stoneware clays and glazes are typically fired at cone 8 – 10, that is 1260 – 1290°C. The energy requirement to go from 1240°C to 1280°C is almost a 30% more! Our clay is formulated to vitrify (mature, turn “glass-like”) at 1240°, as are our glazes. A glaze kiln take around 12 hours to reach temperature and two to three days to cool down. Sometimes a third firing process is required – this is for decoration that is added to work after the glaze firing. For example – adding precious metals and lustres. this firing temperature is usually around 600 – 800°C depending upon the techniques being used. There are many students interested in gold and silver trims – we will be doing this third type of firing soon! After firing your work will be in the student finished work shelves. Remember to pay for it before you head out the door! There is a small extra charge for using porcelain clay (it’s more than twice the price of regular clay), and for any third firing process! Once your work has been fired it can not turn back into clay for millennia – so don’t fire it if you don’t like it! Put it in the bucket for recycling. https://firebirdstudios.com.au/the-process-of-making-pottery/Ceramics have evolved over thousands of years.Earthenware dessert plate, cream colour. Made by Alfred Meakin, England. Backstamped ‘Alfred Meakin England’. flagstaff hill, warrnambool, shipwrecked-coast, flagstaff-hill, flagstaff-hill-maritime-museum, maritime-museum, shipwreck-coast, flagstaff-hill-maritime-village, alfred meakin, ceramics, earthenware, kitchenware -
 Flagstaff Hill Maritime Museum and Village
Domestic object - Jug
... with both hands! Before your work can be bisque fired it should... to finish the work completely – use a metal kidney to polish ...The Process of Making Pottery Decorating, Firing, Glazing, Making, Technical There is a rhythm and flow to clay. It can’t be done all at once! Even the making process! It can take weeks to get everything done, especially if you can only work on your pottery once a week! Even though we have three hour classes, it’s often just not enough time! Here is an overview of some of the processes so you have a bit more grasp on some of the technical stuff! Step One – Design There are SO many ideas out there for making stuff in clay! From delicate porcelain jewellery, through to heavy sculptural work and everything in between. Deciding your direction is sometimes not that easy – when you first start, try everything, you will naturally gravitate to the style that you enjoy! The options and variations are endless and can get a wee bit overwhelming too! Check in with me before you start to ensure your ideas will work, what order you might do things, how you could achieve the look you are seeking and any other technical data required! Step Two – Making Clay is thixotropic. This means that as you work with it, the clay first gets sloppier and wetter, before is begins to dry in the atmosphere. For most things, you simply can’t do all parts of the project at once. An example of work order might look like: Get last weeks work out from the shelves Prepare clay for today’s work – roll your clay, prepare balls for throwing, make the first stage of a pinch pot) Clean up last week’s work and put it on the shelf for bisque firing Check that you have any glazing to do – and do enough of it that you will have time to finish your main project Do the next step of your next project – there might be a further step that can’t be complete immediately, in that case, wrap your work well and put onto the shelves. Letting your work rest for a while can really help keep your work clean and professional looking. Many things require bagging under plastic to keep it ready for work the next week – put your name on the outside of the bag so you can find your work easily. We have stickers and markers. Consider how you want to decorate your work – coloured slip can be applied at a fairly wet stage (remembering that it will make your work even wetter!). Trying to apply slip to dry clay won’t work! If you want to do sgraffito – you will need to keep the work leather hard (a state of dryness where you can still work the clay with a little effort and a little water and care). Step Three – Drying Most of the time your work can go into the rack uncovered to let it dry out for the following week. If you want to continue forming or shaping you will need to double bag your work – put your work on a suitable sized bat and put the bat in a bag so the base of the bag is under the bat, then put another bag over the top of the work and tuck the top of the bag under the bat. If you want to trim (or turn) your thrown work the following week, it should also be double bagged. If your work is large, delicate, or of uneven thicknesses, you should lightly cover your work for drying. When considering the drying process, bare in mind the weather, humidity and wind! The hotter and dryer, the faster things dry and work can dry unevenly in the shelves – this can lead to cracking – another time to lightly cover your work for drying. Step Four – Trimming and Cleaning Up Your work is dry! It is called greenware now and it is at it’s most fragile! Handle everything with two hands. I often refer to soft hands – keep everything gentle and with your fingers spread as much as possible. Try to not pick up things like plates too much, and always with both hands! Before your work can be bisque fired it should be “cleaned up”. You work won’t go into the kiln if it has sharp edges – when glazed, sharp edges turn into razor blades! Use a piece of fly wire to rub the work all over – this will scratch a little so be light handed. Use a knife or metal kidney to scrape any areas that require a bit more dynamic treatment than the fly wire offers! Finally, a very light wipe over with a slightly damp sponge can help soften and soothe all of your edges and dags! Trimming thrown work: If you are planning to trim (or turn) your thrown work (and you should be), make sure you bag it well – your work should be leather hard to almost dry for easiest trimming. Use this step to finish the work completely – use a metal kidney to polish the surface, or a slightly damp sponge to give a freshly thrown look. Wipe the sponge around the rim after trimming, and check the inside of the pot for dags! Trimming slip cast work: Usually I will trim the rims of your work on the wheel the following day to make that stage easier, however you will still need to check your work for lumps and bumps. Last but not least – check that your name is still clearly on the bottom of your work. Step Five – Bisque Firing When the work is completely dry it can go into the bisque kiln. The bisque kiln is fired to 1000°C. This process burns off the water in the clay as well as some of the chemically bound water. The structure of the clay is not altered that much at this temperature. Inside the bisque kiln, the work is stacked a little, small bowl inside a larger bowl and onto a heavy plate. Smaller items like decorations or drink coasters might get stacked several high. Consideration is paid to the weight of the stack and shape of the work. A bisque kiln can fire about one and a half times the amount of work that the glaze kiln can fire. The firing takes about 10 hours to complete the cycle and about two days to cool down. Once it has been emptied the work is placed in the glaze room ready for you to decorate! Step Six – Glazing Decorating your work with colour can be a lot of fun – and time consuming! There are three main options for surface treatment at this stage: Oxide Washes Underglazes Glazes Washes and underglazes do not “glaze” the work – It will still need a layer of glaze to fully seal the clay (washes don’t need glaze on surfaces not designed for food or liquid as they can gloss up a little on their own). Underglazes are stable colourants that turn out pretty much how they look in the jar. They can be mixed with each other to form other colours and can be used like water colours to paint onto your work. Mostly they should have a clear glaze on top to seal them. Oxides are a different species – the pink oxide (cobalt) wash turns out bright blue for instance. They don’t always need a glaze on top, and some glazes can change the colour of the wash! The glazes need no other “glaze” on top! Be careful of unknown glaze interactions – you can put any combination of glaze in a bowl or on a plate, but only a single glaze on the outside of any vertical surface! Glazes are a chemical reaction under heat. We don’t know the exact chemicals in the Mayco glazes we use. I can guess by the way they interact with each other, however, on the whole, you need to test every idea you have, and not run the test on a vertical surface! Simply put, glaze is a layer of glass like substance that bonds with the clay underneath. Clay is made of silica, alumina and water. Glaze is made of mostly silica. Silica has a melting point of 1700°C and we fire to 1240°C. The silica requires a “flux” to help it melt at the lower temperature. Fluxes can be all sorts of chemicals – a common one is calcium – calcium has a melting point of 2500°C, however, together they both melt at a much lower temperature! Colourants are metal oxides like cobalt (blue), chrome (green through black), copper (green, blue, even red!), manganese (black, purple and pink) iron (red brown), etc. Different chemicals in the glaze can have dramatic effects. for example, barium carbonate (which we don’t use) turns manganese bright pink! Other elements can turn manganese dioxide brown, blue, purple and reddish brown. Manganese dioxide is a flux in and of itself as well. So, glazes that get their black and purple colours, often interact with other glazes and RUN! Our mirror black is a good example – it mixes really well with many glazes because it fluxes them – causes them to melt faster. It will also bring out many beautiful colours in the glazes because it’s black colouring most definitely comes from manganese dioxide! Glaze chemistry is a whole subject on it’s own! We use commercial Mayco glazes on purpose – for their huge range of colour possibilities, stability, cool interactions, artistic freedom with the ability to easily brush the glazes on and ease of use. We currently have almost 50 glazes on hand! A major project is to test the interactions of all glazes with each other. That is 2,500 test tiles!!!! I’m going to make the wall behind the wheels the feature wall of pretty colours! Step Seven – Glaze (Gloss or sometimes called “Glost”) Firing Most of the time this is the final stage of making your creation (but not always!) The glaze kiln goes to 1240°C. This is called cone 6, or midrange. It is the low end of stoneware temperatures. Stoneware clays and glazes are typically fired at cone 8 – 10, that is 1260 – 1290°C. The energy requirement to go from 1240°C to 1280°C is almost a 30% more! Our clay is formulated to vitrify (mature, turn “glass-like”) at 1240°, as are our glazes. A glaze kiln take around 12 hours to reach temperature and two to three days to cool down. Sometimes a third firing process is required – this is for decoration that is added to work after the glaze firing. For example – adding precious metals and lustres. this firing temperature is usually around 600 – 800°C depending upon the techniques being used. There are many students interested in gold and silver trims – we will be doing this third type of firing soon! After firing your work will be in the student finished work shelves. Remember to pay for it before you head out the door! There is a small extra charge for using porcelain clay (it’s more than twice the price of regular clay), and for any third firing process! Once your work has been fired it can not turn back into clay for millennia – so don’t fire it if you don’t like it! Put it in the bucket for recycling. https://firebirdstudios.com.au/the-process-of-making-pottery/The form of the jug has been in use for many centuries.Stoneware jug. Two tone brown glaze with pierced lip behind spout. Spout chipped.None.flagstaff hill, warrnambool, shipwrecked-coast, flagstaff-hill, flagstaff-hill-maritime-museum, maritime-museum, shipwreck-coast, flagstaff-hill-maritime-village, jug, ceramic jug -
 Federation University Historical Collection
Booklet - Booklet - Prospectus, The Warrnambool Junior Technical School, Prospectus 1916, 1916
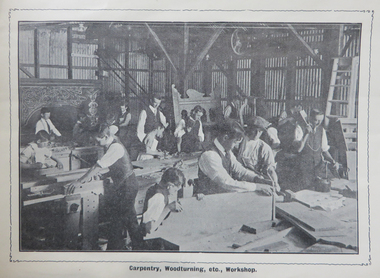
Used by Ballarat School of Mines and Industries. The Junior Technical School was a day school combining general education with a practical preparatory training for engineering and other trades, and for art and science work.Red soft covered booklet of 20 pages containing information on aim and purpose of the school, scholarships, admission, text books etc, hours, compulsory education, accommodation and school institutions. There is a photograph of carpentary and wood turning workshop and the sheet metal workshop.warrnambool, warrnambool junior technical school, prospectus, j.murray, t. livingstone, f. tate, fritz landmann, p. webb, b. abbey, e.b. phillips, f. morse, w.j. hickford, e. battarbee, m.j. tate, charles foyle, a. robinson, john alderidge, i. macdermid, letters of support, business men -
![Painting - Artwork - Painting, [Still Life] c 1931 - 1933, 1931-1933](/media/collectors/4f729f6797f83e0308601707/items/5d9428d221ea670878d79223/item-media/5dca306721ea670e48ad96aa/item-fit-380x285.jpg) Federation University Historical Collection
Federation University Historical CollectionPainting - Artwork - Painting, [Still Life] c 1931 - 1933, 1931-1933
The full folio of work undertaken by Alice Watson while a student at the Ballarat Technical Art School is held by Federation University Australia.Double sided. Two water colour paintings undertaken by Edith Alice (Alice) Watson for art course at the Ballarat Technical Art School, a division of the Ballarat School of Mines. One side has a corked bottle,jar with leaves and onions. At the side is a flower and two onions. Verso is a blue vase, metal mug, champagne glass, an onion and two tomatoes. E.A.WATSON verso lrs of paintingballarat technical art school, edith alice watson, ornament, flora, alumni, still life, water colour, onions, alice watson, tomatoes -
 Glenelg Shire Council Cultural Collection
Photograph - Photograph - Work barge and pile casings, n.d
... Coloured photo. Work barge on left. Metal pile casings... Barge Pile Casings Coloured photo. Work barge on left. Metal ...Port of Portland Authority Archivesport of portland archives, portland harbour, work barge, pile casings -
Glenelg Shire Council Cultural Collection
Photograph - Photograph - Lee Breakwater, Portland, n.d
Port of Portland Authority Archivesport of portland archives, lee breakwater, construction, tanker berth -
Glenelg Shire Council Cultural Collection
Photograph - Photograph - Portland Harbour, 05/12/1991
... . Work platform on metal pipe legs inside this area. Yellow piece... roped off. Work platform on metal pipe legs inside this area ...Port of Portland Authority ArchivesBack: Bottom right corner '5-12-91'port of portland archives -
Glenelg Shire Council Cultural Collection
Photograph - Photograph - Main Breakwater construction, Portland, n.d
Port of Portland Authority Archivesport of portland archives, breakwater, construction, portland, harbour -
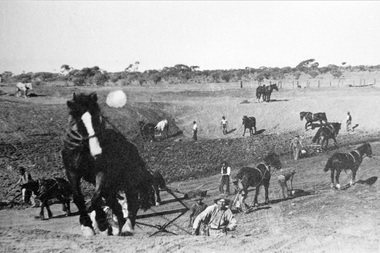 City of Moorabbin Historical Society (Operating the Box Cottage Museum)
Photograph, Black & White Horse drawn scoops earthwork in Moorabbin Shire c1900, c1900
The, horse drawn metal scoop ,guided by a man, was used to clear earth for road making. Well before the introduction of motorised, mechanical graders and trucks the painstaking, labour-intensive work was undertaken by large teams of sturdy men using strong horses such as the draught horse. Roads were needed by the market gardeners to transport their produce to market. Later as the heavy wagon loads continually caused ruts and general degradation of the roadways a Plateway system was installed so that the wagon wheels could roll along the rails thus protecting the roadways. August 31st 2021 Ron Nash, from WA, informs us "The men and horses pulling earth scoops in the photo are not moving earth for road making - they are excavating an "earth tank", or dam, as described in common nomenclature today. This skill was known as "tank sinking", and tank sinkers were active in many rural and remote areas in the 1800's and early 1900's, establishing sizeable dams for important water reserves for community and farm and railway use. With the advent of mechanised equipment such as bulldozers, the trade of tank sinking was still carried out, but on a faster basis. I am a former tank sinker and earth moving contractor, now long retired." Early settlers in Moorabbin Shire had to build the roads, plateways, drains, as the settlement of the land, in Dendy's Special Survey 1841 Brighton, spread and market gardeners need to transport their produce to market. Their most valuable possession was the draught horse that was used for ploughing, drawing carts and these scoops.Black & White photograph showing many horses pulling metal scoops guided by men to move earth for road making in Moorabbin Shire c 1900Back Handwritten Informationplateway, roadworks moorabbin shire, draught horses, metal scoops, paviers, box alonzo, smith j l; chaff cutter, horse drawn carts, toll gates brighton, motor cars 1900, steam engines, early settlers, bentleigh, mckinnon, parish of moorabbin, city of moorabbin, county of bourke, moorabbin roads board, shire of moorabbin, henry dendy's special survey 1841, were j.b.; bent thomas, o'shannassy john, king richard, charman stephen, highett william, ormond francis, maynard dennis, market gardeners, vineyards, orchards -
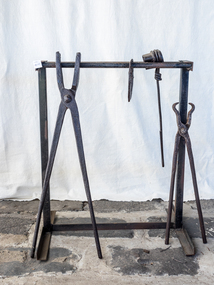 City of Moorabbin Historical Society (Operating the Box Cottage Museum)
Tools, Blacksmith tongs, c1880
... to work on any heated metal as required at his forge ... generic sized horseshoes on site. He needed tongs to work on any ...The Blacksmith used these tongs to make repairs at his forge. He could mend wheel bands, tools, farm equipment and also fine tune generic sized horseshoes on site. He needed tongs to work on any heated metal as required at his forge A Blacksmith was an essential person for the maintenance and making of farm and household equipment, and shoeing horses, in the pioneer settlements of Brighton, Moorabbin, Cheltenham c1900 A pair of forged steel blacksmith tongsmarket gardeners, pioneers, early settlers, moorabbin, brighton, cheltenham, blacksmith, tools, metalwork, forges, ploughs, horse-drawn carts -
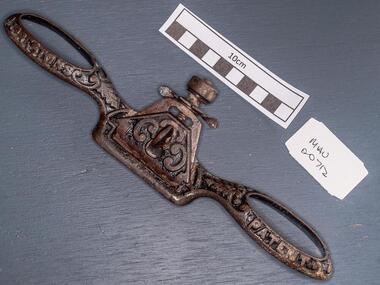 City of Moorabbin Historical Society (Operating the Box Cottage Museum)
Tools, Spokeshave steel ornate, c1900
A spokeshave is a tool used to shape and smooth wooden rods and shafts - often for use as wheel spokes, chair legs . Spokeshaves can be made from flat-bottom, concave, or convex soles, depending on the type of job to be performed. Spokeshaves can include one or more sharpened notches along which the wooden shaft is pulled in order to shave it down to the proper diameter. Historically, spokeshave blades were made of metal, whilst the body and handles were wood. An early design consisted of a metal blade with a pair of tangs to which the wooden handles were attached. Like a plane, spokeshaves typically have a sole plate that fixes the angle of the blade relative to the surface being worked. By the twentieth century metal handles and detachable blades had become the most common. Preston Tools was an English tool making company also known as E.P. Tools and Edward Preston Tools. Edward Preston Sr. (1805-1883) was first listed as a plane maker at 77 Lichfield Street in the 1833 Birmingham Directory but it is believed he may have started business there as early as 1825. Around 1850 his son, Edward Preston Jr. (1835-1908) left school to join his father's business and he later started up his own "wood and brass spirit level manufactory" at 97-1/2 Lichfield Street by 1864. By 1866 Edward Jr. had added planes, routers, joiners, coach, gun, cabinet and carpenters tools to his line, and the following year he moved his shop from his father's address and relocated to 26 Newton Street, before moving again to a much larger premises at 22-24 Whittall Street. This later became the office and factory of Edward Preston and Sons, who were forced to liquidate in 1934, due mainly to the Great Depression and mismanagement of the company. The plane making concern was sold to the Sheffield firm of C. & J. Hampton, who had subsequently merged in 1932 with Record Ridgeway Ltd.An ornate steel spokeshave wood plane with an adjustable screw.PRESTONS PATENTwoodwork, tools, spokeshave, moorabbin, cheltenham, bentleigh, early settlers, pioneers, market gardeners, woodplanes, craftwork, bicycle wheels, furniture, cabinetmaking, cartwheels, wagons, drays, preston edward, preston tools ltd -
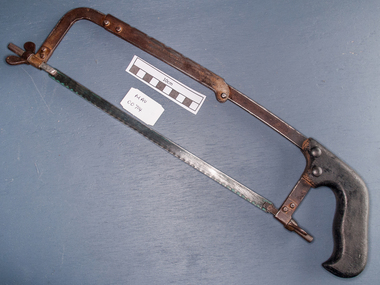 City of Moorabbin Historical Society (Operating the Box Cottage Museum)
Tools, steel hacksaw 'Marples', 20thC
A hacksaw is a fine-toothed saw, originally and principally for cutting metal. They can also cut various other materials, such as plastic and wood; for example, plumbers and electricians often cut plastic pipe and plastic conduit with them. On hacksaws, as with most frame saws, the blade can be mounted with the teeth facing toward or away from the handle, resulting in cutting action on either the push or pull stroke. In normal use, cutting vertically downwards with work held in a bench vice, hacksaw blades should be set to be facing forwards. Joseph Marples & Son Pty Ltd Traditional Craftsmans Hand Tools made in Sheffield. The finest quality hand made tools, backed by over 170 years of manufacturing heritage. .In the 1840’s Joseph Marples was one of several ‘Marples’ (most of which were related) in Sheffield manufacturing joiners tools, such as brass inlaid rosewood & ebony braces, boxwood spokeshaves, beech planes, gauges and squares. The business has remained within the family to this date, and has been based in Sheffield since those early days. Although modern technology has been used in some instances, many of the traditions of manufacturing fine hand tools has remained the same using selected materials and hand finishing, indeed the same threads are used in the gauges as were used over 100 years ago. A steel hacksaw. 'Marples' with bladeMARPLEStools, woodwork, metalwork, carpentry, pioneers, market gardeners, early settlers, moorabbin, cheltenham, bentleigh, ormond, joseph marples & son pty ltd, sheffield , england, -
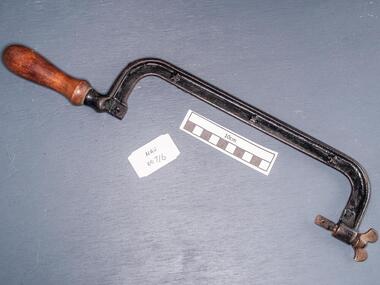 City of Moorabbin Historical Society (Operating the Box Cottage Museum)
Tools, steel hacksaw with wooden handle, c1900
A hacksaw is a fine-toothed saw, originally and principally for cutting metal. They can also cut various other materials, such as plastic and wood; for example, plumbers and electricians often cut plastic pipe and plastic conduit with them. On hacksaws, as with most frame saws, the blade can be mounted with the teeth facing toward or away from the handle, resulting in cutting action on either the push or pull stroke. In normal use, cutting vertically downwards with work held in a bench vice, hacksaw blades should be set to be facing forwards. A steel hacksaw with a wooden handle but without blade -
 City of Moorabbin Historical Society (Operating the Box Cottage Museum)
Tool - Horse-drawn Metal Scoop Road-working
This medium sized metal, horse-drawn, road-working scoop, with timber shafts is an example of those used in Moorabbin Shire in the late 1800s, and up until the 1940s for road-works, building dams, market-gardening work and other similar earthworks in the shire. The Box Cottage museum example would have been drawn by one horse, with the worker walking and steering the horse and scoop from behind using the timber shafts. There were even bigger metal scoops that required two or more horses to drag the scoop through the soil.Following the Dendy Special Survey 1841 allotments were sold to pioneer settlers who established market gardens in the Moorabbin area. Roads and roadside dams were needed as they transported both their stock and garden produce to markets in St Kilda and Melbourne By1880 the Shire of Moorabbin was using horse-drawn, road-working shovels on the main thoroughfares of the district.A medium sized metal, horse-drawn, road-working scoop, with timber shafts. Used by Moorabbin Shire in the late 1800s, and early 1900s for road-works, and other similar work in the shiremelbourne, shovel, brighton, moorabbin, metal, gardens, roads, markets, mckinnon, cheltenham, horse drawn, scoop, dendy henry, st kilda -
 City of Moorabbin Historical Society (Operating the Box Cottage Museum)
Clothing - Wedding Dress, Mary Box (nee Closter), circa 1918
Alonzo Box, of Oakleigh ,a nephew of William and Elizabeth Box who resided in 'Box Cottage' 1865 - 1914, married Mary Closter (Kloster), of Oakleigh, on June 12th 1918. Alozo's elder sister, Rebecca, sent a bolt of Chinese hand-embroidered silk from which this wedding dress was made. Rebecca Viloudakia, nee Box, was a missionary in China, and married to a Greek Silk Merchant. Alonzo Box, the 9th child of John and Martha Sheldrake Box , enlisted in the Army and landed at Gallipoli 25/4/1918. He was evacuated to Egypt and then sent to the battlefields of France and Flanders before returning home to Melbourne in February 1918. Rebecca Box, the eldest child of John and Martha Sheldrake Box, was in the first party of Methodist Missionaries to leave Australia for the China Inland Mission in 1890. During the Boxer Uprising 1900-1901 her Mission outpost was attacked but she escaped and was taken to Shanghai. She later married one of the rescue party Nicholas Viloudakia a Greek silk merchant .Australian Dress Register ID 573 12/5/2015 Following Henry Dendy's Special Survey 1841 pioneer settlers bought allotments of land in the area of Moorabbin Parish. Alonzo Box was the nephew of William and Elizabeth Box who bought the cottage on the 30acre allotment from an unknown pioneer settler in 1868 and resided there until Elizabeth's death in 1914. Alonzo Box served in the Army World War 1 1914- 1918 at Gallipoli, France and Flanders. Rebecca Box -Viloudakia was in the first party of Methodist Missionaries to leave Australia for the China Inland Mission in 1890 and was rescued during the Boxer Rebellion 1900-1901 and taken to Shanghai by her future husband.A cream two piece wedding dress made from a bolt of hand embroidered Chinese silk for the marriage of Mary Closter and Alonzo Box on June 12th, 1918. The bolt of Chinese silk was sent by Alonzo’s older sister, Mrs Rebecca Viloudakia, a missionary in China, who was married to a Greek silk merchant. The machine sewn dress was made by a dressmaker in Dandenong, Victoria. The jacket is blouson, with a front opening and is gathered at the waist by a band enclosing a drawstring. The collar is a sailor style that forms a slight / high V-shape front neckline. Four vertical roses are separated by three bands of lacework. The back of the jacket is plain silk. The right front of the jacket has a panel of embroidered roses, band of lacework and a facing fold that encloses 4 fastening presses. There are crocheted bobbles on the front representing buttons. The left jacket front also has the panel of embroidered roses, lacework and matching fold for the 4 fastening studs. The full length inset sleeves are gathered to a cuff that fastens with silk covered buttons. The sleeves have floral embroidery down the outside centre line. The left sleeve has an extra detachable cuff with embroidery on the flounce that matches the bottom panel of the skirt. It is held in position around the wrist by 4 white metal press studs. The skirt sits above the ankle. It consists of 5 panels slightly gathered at the back waistline with a left side placket 21cm with hooks and eyes and press studs. The waistband is lined with petersham and has 6 whalebone inserts. The front of the skirt has small pleats to fit the 3 decorated panels to the waistline. The front has 3 bands of lacework around the lower part. 3 panels form the centre front each embroidered with a different floral pattern. The back of the skirt is plain with 3 bands of lacework rising from the hem, which is sewn with spoke work stitch. The long waist sash/belt is plain silk with embroidered ends and 3 silk balls with crocheted caps suspended on 3 crocheted silk chains. It has a rose knot with 2 metal press stud fasteners. There are a variety of floral designs embroidered on the material including ‘corner motifs’ on the 2nd inner front panel of skirt. brighton, moorabbin, silk, box william, box elizabeth, box alonzo, box mary, kloster mary, closter mary, oakleigh, dandenong, chinese silk merchant, boxer rebellion 1900-1901, box rebecca, methodist china inland mission, viloudakia nichols, anzac landings, world war 1, gallipoli -
 City of Moorabbin Historical Society (Operating the Box Cottage Museum)
Functional object - Kitchen Equipment, Coolgardie Safe, c1900
The invention of the Coolgardie Safe is credited to Arthur Patrick McCormick, a contractor in Coolgardie, and later the Mayor of Narrogin. Coolgardie is in the Eastern Goldfields region of Western Australia. Gold was first discovered there in 1892; the townsite became a municipality in 1894, and by 1898 its population of 15,000 made it the third largest town in Western Australia after Perth and Fremantle. In the last decade of the 19th century, Coolgardie was the capital of the West Australian goldfields. Being 180 kilometres from the nearest civilisation, food supplies were initially scarce and expensive. As fresh food was a valuable commodity there was incentive to preserve it, and keep it out of reach of scavengers such as birds, dingos, dogs, ants, and flies. It was in an effort to do this, in the extreme heat of the Australian Interior, that McCormick came up with his design for the Coolgardie Safe. McCormick noticed that a wet bag placed over a bottle cooled its contents. He further noted that if this bottle was placed in a breeze, the bag would dry out more quickly, but the bottle would get colder. What McCormick had discovered was the principle of evaporation: ‘to change any liquid into a gaseous state requires energy. This energy is taken in the form of heat from its surroundings.’ Employing this principle, McCormick made a box for his provisions which he covered with a wet hessian bag. He then placed a tray on top, into which he poured water twice daily. He hung strips of flannel from the tray so that water would drip down onto the hessian bag, keeping it damp. As the water evaporated, the heat dissipated, keeping the food stored inside cool and fresh. The success of McCormick’s invention would not have worked without a steady supply of water. Fresh water was scarce in the eastern goldfields at this time but the demand for water from a steadily growing population encouraged innovation. The solution was to condense salt water. Heating salt water in tanks produced steam that was condensed in tall cylinders, cooled and then collected in catchment trays. By 1898 there were six companies supplying condensed water to the goldfields, the largest company producing 100,000 gallons of water a day. In the early 20th century, Coolgardie Safes were also manufactured commercially. These safes incorporated shelving and a door, had metal or wooden frames and hessian bodies. The feet of the safe were usually placed in a tray of water to keep ants away. (MAV website) The early settlers of Moorabbin Shire depended on this type of Food Safe to protect their food from flies and vermin as they established market gardens in the fertile area around the notorious Elster Creek A metal framed, 4 sided structure standing on 4 legs with 2 hinged doors on one side, a metal tray at base of food safe and a metal cover over top. Ridges on which to rest trays carrying food are inside safe. The Safe is enclosed by fly-wire mesh.'...IN.....GEELONG' A manufacturer's oval metal plate is embossed on one side of Safe but it is illegible.elster creek, moorabbin, brighton, dendy's special survey 1841, market gardens, infant mortality, disease, cemeteries, fruit, vegetables, pioneers, coolgardie safe, mccormick arthur patrick, dendy henry, vaccination, jones martha, jones ethel may