Showing 527 items matching "railway hotel"
-
 City of Ballarat Libraries
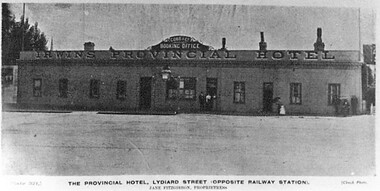
Postcard - Card Box Photographs, The Provincial Hotel, Lydiard Street Opposite Railway Station. Ballarat
... The Provincial Hotel, Lydiard Street Opposite Railway.... Booking Office. Plate 321 Chuck Photo Series. Provincial Hotel ...Jane Fitzgibbon, Proprietress. Cobb & Co. Booking Office. Plate 321 Chuck Photo Series.provincial hotel, jane fitzgibbon, lydiard street north, building, hotel, public, irwin's provincial hotel -
 Unions Ballarat
Photograph: Barry Jones and Norm Borchers, 2 August 1989
Barry Jones was at different times a member of state and federal parliament. He was also well known for his successful run in the quiz show Pick a Box and his talk-back radio show on Radio 3DB. The photograph was taken while Jones was Minister for Science, Customs and Small Business. Norm Borchers passed away in 2008. Borchers was a Club President of the Sebastopol Lions Club (1975-76). He worked for the railways as an engineering employee and was long-term trade unionist (Amalgamated Engineering Union and the Australian Railways Union) and ALP member; he lived and worked in the Ballarat area. Norm was active in workplace disputes during the ALP split in 1955. He was a long time supporter of Ballarat Trades Hall. The Foundry Hotel is located at the Corner of Eyre and Drummond Streets, Ballarat. A copy of the invitation to this event is also held: object 0354.Photograph.btlc, ballarat trades hall, ballarat trades and labour council, foundry hotel - ballarat, borcher, norm, politicians, cabinet -
Unions Ballarat
Photograph: Norm Borchers and Julia Gillard at North Star Hotel (1), 15/4/07
Photograph: Norm Borchers and Julia Gillard at North Star Hotel Norm Borchers passed away in 2008. Borchers was a Club President of the Sebastopol Lions Club (1975-76). He worked for the railways as an engineering employee and was long-term trade unionist (Amalgamated Engineering Union and the Australian Railways Union) and ALP member; he lived and worked in the Ballarat area. Norm was active in workplace disputes during the ALP split in 1955. He was a long time supporter of Ballarat Trades Hall. Julia Gillard was Deputy Prime Minister at the time this photograph was taken. Gillard was a lawyer before entering politics. She was the 27th Prime Minister of Australia from 2010 to 2013 and the first female prime minister. Kevin Rudd successfully challenged Gillard's leadership in 2013 and he went on to lose the election. Julia Gillard resigned from parliament following the leadership challenge. Photographbtlc, ballarat trades hall, ballarat trades and labour council, gillard, julia, borchers, norm, alp, australian labor party, prime minister, deputy prime minister -
Unions Ballarat
Photograph: Norm Borchers and Julia Gillard at the North Star Hotel (2), 15/4/07
Photograph: Norm Borchers and Julia Gillard at North Star Hotel Norm Borchers passed away in 2008. Borchers was a Club President of the Sebastopol Lions Club (1975-76). He worked for the railways as an engineering employee and was long-term trade unionist (Amalgamated Engineering Union and the Australian Railways Union) and ALP member; he lived and worked in the Ballarat area. Norm was active in workplace disputes during the ALP split in 1955. He was a long time supporter of Ballarat Trades Hall. Julia Gillard was Deputy Prime Minister at the time this photograph was taken. Gillard was a lawyer before entering politics. She was the 27th Prime Minister of Australia from 2010 to 2013 and the first female prime minister. Kevin Rudd successfully challenged Gillard's leadership in 2013 and he went on to lose the election. Julia Gillard resigned from parliament following the leadership challenge. Photographbtlc, ballarat trades hall, ballarat trades and labour council, gillard, julia, borchers, norm, prime minister, deputy prime minister, alp, australian labor party -
 Hume City Civic Collection
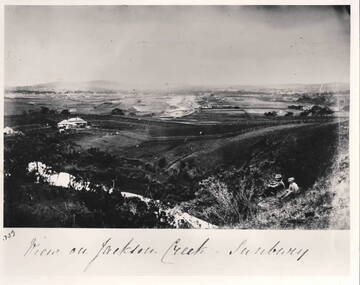
Photograph - View of Jackson Creek Sunbury, c1870
The photograph was taken on a rise overlooking the early settlement of Sunbury with Mount Holden and other hills across the skyline. The five arch railway bridge is visible in the distance on the RHS of the image. Two of Sunbury's early hotels, the John Franklin and the Ball Court are across the middle distance. Craiglee Vineyard with the vines growing is in the foreground. A black and white photograph with a white border.Written across the bottom: VIEW OF JACKSON CREEK SUNBURYsunbury, vineyards, jackson creek, craiglee vineyard -
 Hume City Civic Collection
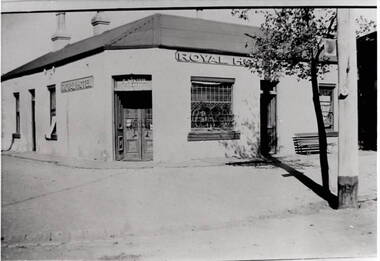
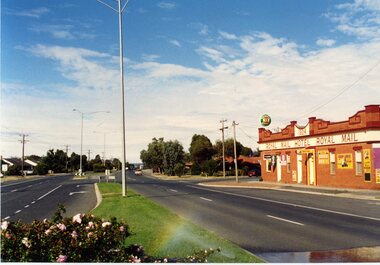
Photograph, Royal Hotel
... and the Olive Tree (formerly the Railway) hotels remain ...This is an image of the original single storey Royal Hotel building which was on the corner of Brook and Evans Streets. In the 1930s the single storey structure was demolished after a fire and replaced with a double storey Art Deco red brick building, which still stands on the same site.At one stage there were four hotels in Evans Street between Station Street and Brook Street. At some stage the Millett family owned them. The Royal and the Olive Tree (formerly the Railway) hotels remain on their original site but not in their original appearance.A black and white photograph with a cream border of a single storey hotel building with a headlight window on the RHS of the corner entry doorway, which also has lead light windows. A young tree and power pole are seen on the RHS of the image. hotels, royal hotel, s.winter, t. millett -
 Ballarat Tramway Museum
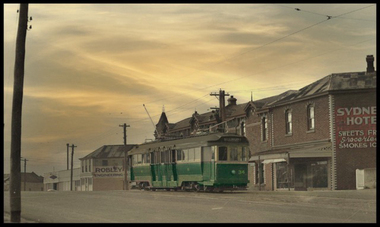
Photograph - Digital image, mid 1950's
Digital Image from a coloured postcard of Geelong 34 in Mercer St between Corio and Bayley St, just where the railway line to Cunningham Period went underneath. Tram has destination of Belmont. In the background are a building for Robley Engineering and the Sydney Hotel. trams, tramways, geelong, mercer st, bogie trams, tram 34 -
 Ballarat Tramway Museum
Photograph - Black & White Photograph/s, Ray Jackson, c1970
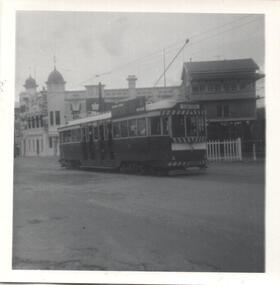
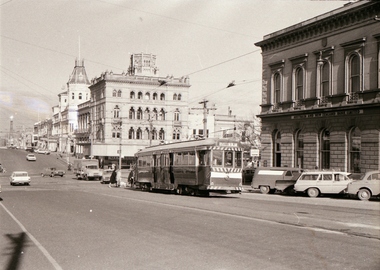
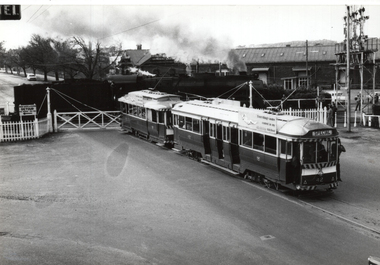
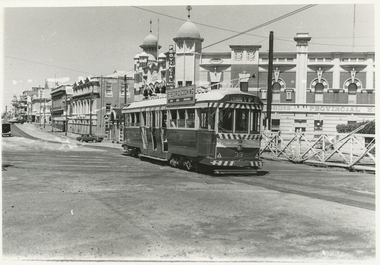
Yields information about tramway operations at the Ballarat station level crossing.Black and white photograph of tram 36? crossing the Lydiard St railway crossing with signal box and Provincial Hotel in the background. Tram has the destination of Sebastopol. c1970. trams, tramways, lydiard st north, level crossings, railway station, tram 36? -
 Ballarat Tramway Museum
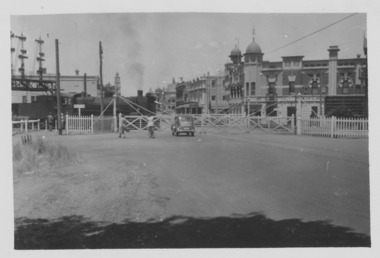
Photograph - Tram 26 - Lydiard St Level Crossing, Ken McCarthy, 6/1/1951
Photo of the Lydiard St Level Crossing showing #26 waiting at the closed gates. Also shows a car and pedestrians waiting while an A2 class locomotive occupies the crossing. In the background is the Provincial Hotel.Yields information about Lydiard St level Crossing in 1951.Black and white photograph on plain paperHas details of photograph and date on rear and number "760". #26 at Railway X ing Lydiard St Ballarat 6-1-51ballarat, lydiard st, lydiard st level crossing, tram 26, a2 class locomotive, provincial hotel -
 Ballarat Tramway Museum
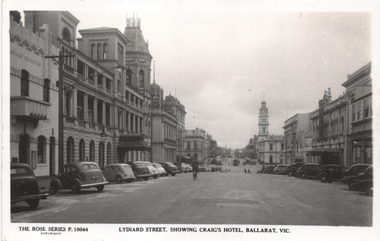
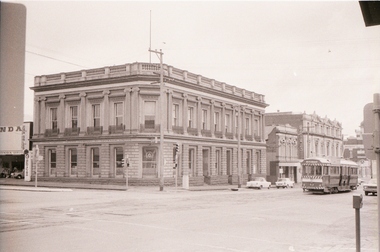
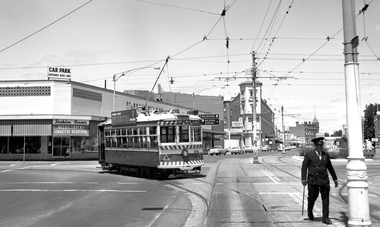
Postcard, Rose Stereograph Co, "Lydiard Street, showing Craig's Hotel, Ballarat Vic", late 1940s
The photo shows a view looking north from Lydiard St South with a tram in the far distance. Rose Series P10044. In the view are the buildings of Franklin Chambers, Craigs Hotel, and the Post Office. The Franklin Chambers Building with its Art Deco front has been refaced since this photo was taken. On the rear, Wal Jack in a note to Ken Magor has written "4-wheeler tram from Lydiard St North is about to turn left into Sturt St. Another tram seen in the background is just over the level crossing outside Ballarat Railway Station. Photo taken from Lydiard St South, about 1939-1940". Item 5463 has a poor-quality negative with a similar image to this postcard. See 8977 for a similar image also by Rose. Yields information about Lydiard St south during the 1940s.Postcard black and white, divided back, with a handwritten note on rear.See image 2 for details of the handwritten note by Wal Jack on the rear. tramways, trams, lydiard st south, criags hotel -
 Ballarat Tramway Museum
Negative - Set of 2, Campbell Duncan, 28/02/1971 12:00:00 AM
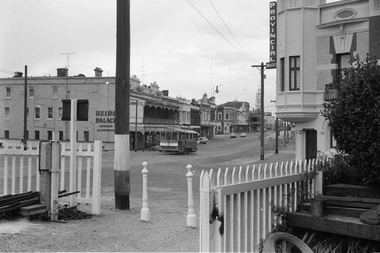
Yields information about tram operations and the street views at the Ballarat Station area and Lydiard St North.Set of 2 photographs taken on 28/2/1971 by Campbell Duncan of trams at the Ballarat Station level crossing, Lydiard St North.\ .1 - tram - inbound - after with Reid's Palace and the Provincial Hotel in the background. .2 - No. 30 outbound to Lydiard St North with the Ballarat B signal box and the Provincial Hotel in the background. Tram has Bliss bombs tilt tram to read pack advert.trams, tramways, lydiard st north, railway station, level crossings, signals, tram 30 -
 Ballarat Tramway Museum
Negative - Set of 4, Campbell Duncan, 2/07/1971 12:00:00 AM
Set of 4 photographs taken on 28/2/1971 by Campbell Duncan of trams on the Lydiard St North line between Sturt St and the Railway Station. .1 - No. 40 just after entering Lydiard St Nth, with Craigs Hotel, National Mutual Building and the ANZ bank in the background. .2 No. 36 entering the double track near the railway station with No. 40 waiting. Has buildings on the east side of the street, including JJ Coller & Co and Reid's Coffee Palace in the background. .3 - ditto .4 - Nos 36 and 40 crossing on the double track in Lydiard St North,trams, tramways, lydiard st north, tram 36 tram 40 -
 Ballarat Tramway Museum
Negative - Set of 2, Campbell Duncan, 10/08/1971 12:00:00 AM
Yields information about tram operations and the street views in Lydiard St near the railway station.Set of 2 photographs taken on 10/8/1971 by Campbell Duncan of trams in Lydiard St North. .1 - No. 43 inbound at Mair St with the Union Fidelity Insurance Company of Australasia Limited building in the background. Note the street fire alarm on the right hand side of the photograph. .2 - No. 34, outbound at Seymour St photographed through the verandah supports of the North Star Hotel - now (2016) Seymour's on Lydiard.trams, tramways, lydiard st north, traffic lights, mair st, seymour st, tram 43 -
 Ballarat Tramway Museum
Photograph - Black & White Photograph/s - set of 6, Charles Craig, 1950s
Yields information about the appearance and use of the Ballarat Railway Station level crossing by trams prior to closure.Set of six black and white photographs of trams at the railway level crossing, Ballarat, Lydiard St North featuring the railway station, gates and signals, Reeds Coffee Palace and the Provincial Hotel. .1 - 28 heading south, with an R class and a K class locomotive in the view. .2 - 11, heading north - taken during the 1950's. .3 - 17 parked right up to the gates while K184 shunts at the station. .4 - single trucker (number obscured) - most likely 17 giving the passengers in the previous photo. .5 - Photo with two single truckers in the view and the gates being closed after the tram has passed. .6 - 11, at the gates with a bogie tram behind. No. 11 has a Briquettes roof advert and a Twin Lakes sign. Photo by Charles Craig - during 1971, except for .2, taken during the 1950's. trams, tramways, lydiard st north, railway station, signals, level crossings, tram 28, tram 11, tram 17 -
 Ballarat Tramway Museum
Slide - 35mm slide/s, Robert Thomson, 5/04/1969 12:00:00 AM
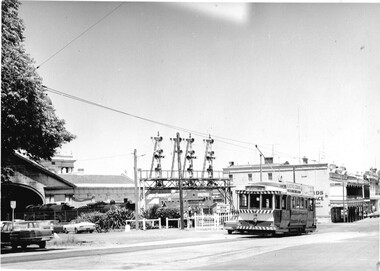
Yields information about Ballarat's trams in Lydiard St North and the railway level crossing.Agfa blue/white mount, colour slide of a bogie tram 36 crossing the Lydiard St North level crossing northbound. Has the railway gates in the view. Moody's Provincial Hotel, Hoyts and Reid's Coffee Palace are in the view. Shows the track arrangement at this location."5-4-69" in ink.tramways, trams, lydiard st north, railway station, level crossings, tram 36 -
 Ballarat Tramway Museum
Photograph - Tram tour - TMSV & ARHS, Richard Gilbert, 21/8/1971
A. Cook Tours database that the tour by the ARHS and TMSV using trams 11, 26, 39 and 42 and was a farewelll tour, with the first of the Ballarat tram lines closing the following day. See also item 9442 for other photographs. .1 - two trams (27 and 42) at the gates with an R class locomotive using the crossing. Both trams have SEC advertising. Tram 42 is running a special tour. .2 - tram 39, running a special tram service, loading passengers at the railway station tram stop. In the background is awning for the Provincial Hotel and SF Motors Mercedes Benz. .3 - tram 27 northbound crossing the level crossing. Yields information about the use of the Lydiard St Nth line prior to closure and the use of the level crossing. Series of 3 Black and white photographs of trams using the Lydiard St North level crossing.trams, tramways, lydiard st north, level crossings, railways, locomotives, ballarat station, special trams, tram 27, tram 42, tram 39 -
 Ballarat Tramway Museum
Photograph - Digital image, John Ward, 2/01/1972 12:00:00 AM
Digital image of the Bendigo tram 29 turning from Pall Mall into Mitchell St with the destination of Railway Station. In the background is the Fountain Plaza, advertising Melba Frocks and Gidgette Boutique, the City Family Hotel, Park Lane chicken shop. In the foreground is the Inspector returning the point bar to its holder on a pole. Photo by John Ward 2-1-1972. Slide title "04771 020172 7210-F SECV Birney tram 29 Pall Mall to Mitchell St at High St & View St Charing Cross Bendigo Vic"trams, tramways, bendigo, pall mall, mitchell st, charing cross, tram 29 -
 Ballarat Tramway Museum
Slide - 35mm slide/s - set of 5, Noel Simons, 19/11/1962 12:00:00 AM
Set of 5 transparencies taken on 19/11/1962 on Kodak mounts. 1186.1 - Bendigo 21 bound for Golden Square at Charing Cross with The Beehive buildings and shops in Pall Mall in the background. Trams has an ad for Cohns drinks on front bumper, SEC Best for Cooking roof ad. and Mamouney's furniture roof ad. Two women passengers boarding. 1186.2 - Bendigo 26 crossing Pall Mall from Mitchell St. bound for Eaglehawk with "Ezywalkin" shop in background. Tram has an SEC 'Electric Cooking' roof ad and a 'Streets Ice cream' ad on front dash. 1186.3 - Bendigo 7 arriving at the Charing Cross stop, bound for North Bendigo. Has a Huttons dash panel ad, a Castrol roof ad. Buildings as for 1186.1. Passengers waiting at the stop. 1186.4 - Bendigo 19 leaving Charing Cross for Golden Square with City Club Hotel alongside and other buildings as for 1186.1 in the background. Tram has Briquettes ad on front dash and SEC 'Electric Cooking' roof ad. 1186.5 - Bendigo 21in High St. at corner of Short St. heading for Charing Cross. Destination half way between Depot and Railway Station. Tram has ads for Cohns Drinks on dash panel, SEC 'Cook with Electricity' and a Sandhurst Milk roof ads.Information written on in black ink and date stamped in purple ink. 1186.1 - "No. 21 in Pall Mall at Charing Cross, Bendigo" 1186.2 - "No. 26 arriving at Alexandra Fountain, Charing Cross, Bendigo" 1186.3 - "No. 7 in Pall Mall at Charing Cross, Bendigo" 1186.4 - "No. 19 in High St., Bendigo, leaving Charing Cross for Golden Square" 1186.5 - "No. 21 in High St. Bendigo, at corner of Short St." tramways, trams, bendigo, charing cross, pall mall, high st., tram 7, tram 19, tram 21, tram 26 -
 Ballarat Tramway Museum
Slide - 35mm slide/s, Noel Simons, Sep. 1971
One slide on a Kodak Ready Mount made from the Association of Railway Enthusiast Provincial Tramways film strip, during September 1971 with a group of three trams at Charing Cross at dusk. Taken from an elevated position (the tower in the City Family Hotel) over looking the Alexandra fountain and looking towards the North on a wet evening. Two single truckers (1 possibly No. 6) and one bogie car waiting to proceed."Rainy evening at Charing Cross" in blue ink and "Sept 1971" in purple ink using a hand stamp.tramways, trams, charing cross, bendigo, tram 6 -
 Ballarat Tramway Museum
Slide - 35mm slide/s - set of 4, Noel Simons, Apr. 1972
Set of 4 transparencies - copy slides - possibly ARE film strip dated March 1972. 1209.2 and 1209.4 on Kodak Readymount mounts. 1209.1 - Bendigo 5, 6 and 28 on a special tram service in bound to the City on a tour in Caledonia St. about to enter Lucan St, or White Hills Road or Weeroona Ave. (mis match in names in various maps). Gas works in the background. No. 5 has a white disk on the rear of the tram. 1209.2 - Nos 2 and 26 at Charing Cross with the Fountain Plaza in the background. Both trams have the destination of Quarry Hill, though 26 is on the Eaglehawk bound track. 1209.3 - No. 19 at the Golden Square terminus, with the conductor or driver swinging the pole and Billy Rodda's Golden Square hotel in the background. 1209.4 - No. 7 at Fire Station loop, en route to North Bendigo, picking up a passenger with a pram. Part of a set of 20 slides made by the Association of Railway Enthusiast Provincial Tramways film strip. Reference Item 2560 details the ARE Film Strip and provide references to other slides.Information written on in blue ink and date stamped on purple ink. 1209.1 - "Nos 5, 6 and 28 in Caledonia St. about to enter Weeroona Ave." 1209.2 - "Nos 2 and 26 at Charing Cross." 1209.3 - "Swinging the pole on No. 19 at Golden Square Terminus." 1209.4 - "No. 7 inward bound from Golden Square stops at Fire Station Loop."tramways, trams, bendigo, charing cross, golden square, gas works, special trams, tram 2, tram 5, tram 6, tram 7, tram 19, tram 28 -
 Ballarat Tramway Museum
Slide - 35mm slide/s - set of 4, Noel Simons, Apr. 1972
Set of 4 transparencies - copy slides - possibly ARE film strip dated April 1972. 1210.3 on Kodak Readymount mount. 1210.1 - No. 3 arriving at Quarry Hill terminus. 1210.2 - Bogie car at Long Gully Loop, in the far distance, with a Hotel and the ESSO service station in between. Has Fosters Lager and Carlton signs on hotel. Note sign on the closet pole - "No standing between Notices" 1210.3 - Nos. 26 (Quarry Hill) and 25 (Eaglehawk) at Jobs Gully Loop. 1201.4 - No. 5 showing Charing Cross in bound for Charing Cross and No. 3 en route for Eaglehawk in View St. near the end of the double track. Appears to be SEC employee at the rear of No. 3. Part of a set of 20 slides made by the Association of Railway Enthusiast Provincial Tramways film strip. Reference Item 2560 details the ARE Film Strip and provide references to other slides.Information written on in blue ink and date stamped on purple ink. 1210.1 - "No. 3 arriving at Quarry Hill terminus." 1210.2 - "Bogie car at Long Gully Loop." 1210.3 - "Nos. 26 and 25 at Jobs Gully Loop." 1210.4 - "Nos 5 and 3 in View St. near the end of the double track."tramways, trams, bendigo, long gully, quarry hill, view st., tram 3, tram 5, tram 25, tram 26 -
 Ballarat Tramway Museum
Photograph - Colour Photograph/s - set of 15', Austin Brehaut, 1/04/2000 12:00:00 AM
Yields information about various locations in Ballarat in March 2000 for comparison with previous photographs.Set of 15 colour photographs taken by Austin Brehaut in April 2000 showing various locations that Ballarat trams once ran in, for use in a BTM presentation, named "Ballarat Past and Present" at the COTMA 2000 Ballarat Conference. All on Fujicolour Crystal Archive Paper. On rear in blue ink is the date, location and where relevant a reference number to photo locations that the author of the presentation had requested. Letter from Austin, filed with this worksheet. 1772.1 - Sebastopol terminus, 4/4/2000 .2 - Albert St. Sebastopol near "crossover" - 4/4/2000 .3 - Old depot site, 5/4/2000 .4 - From depot site at Depot junction - 5/4/2000 .5 - Albert St. Sebastopol, looking south above loop site - 5/4/2000 .6 - Mt. Pleasant line, in Barkly St. towards terminus - 5/4/2000 .7 - Mt. Pleasant terminus, Cobden Cnr. - 5/4/2000 .8 - Wendouree Parade at Macarthur St. - 5/4/2000 .9 - Site of old Power Station Cnr Ripon St. Wendouree Parade .10 - Sturt St. at Dawson St (site of crossover) towards former Golden City Hotel - 6/4/2000 .11 - From Grenville St - up Sturt St. hill - 6/4/2000 .12 - Lower Sturt St. toward Grenville St - 6/4/2000 .13 - Railway Station from Signal box - 27/4/2000 .14 - Lower Sturt St. toward Grenville St - 6/4/2000 .15 - Railway Station from Signal box - 27/4/2000 For 2010 comparisons see 4645 and 4646. See Aboveballarat, sebastopol, albert st, sec depot, railway station, mt pleasant, dawson st, sturt st -
 Ballarat Tramway Museum
Photograph - Black & White Photograph/s, Harvey Studios, 18/02/1953 12:00:00 AM
Yields information about the tram arrangements for a large group from Geelong and the Geelong wharfies made for their picnic - probably at the Gardens. Demonstrates transport arrangements in the 1950's.Black and white photograph of seven bogie trams lined up with passengers boarding in Lydiard St. North, between Mair St and the Railway Station for the Geelong Waterside Workers picnic day on Wednesday 18/2/1953. Closest tram is No. 40. Photo taken from the Railway Station car park entrance. Provincial Hotel and other buildings on west side of Lydiard St. in photo. Published in the Courier 19/2/1953 - advised by Alan Bradley - 15/3/2003. 1880.1 - Digital image of the same photo from the Wal Jack Album. See images i2 and i3 for details, i3 for the rear of the photograph. Wal Jack notes identifies the trams as Nos. 15, 35, 39, 38, 34, 37, 40"On rear in blue ink "10 - Special trams chartered to convey Geelong Waterside Workers Picnic participants from Railway Station to Lake Wendouree Botanical Gardens o Wednesday 18 Feby '53". Under writing is word "Ballarat" in pencil. In top right hand corner, in a purple ink hand stamp is "N.L. Harvey (Photo Press Service) A.M.P. Chambers Lydiard St. N Ballarat" On rear of .1 is the N.L.Harvey stamp and Wal's notes "SEC Ballarat Geelong Wharfies Specials, Lydiard St Nth at 11.5am, 18-2-53, Nos. 15, 35, 39, 38, 34, 37, 40"trams, tramways, picnics, lydiard st. nth, geelong waterside workers, charters, tram hire, tram 40 -
 Ballarat Tramway Museum
Slide - 35mm slide/s, Travis Jeffrey, late 1960's
Agfa plastic mount (blue base, white cover) of a photograph of No. 43 southbound in Lydiard St Nth entering the double track section. Photo taken late 1960's. Has the Provincial Hotel, Reid's Coffee Palace and the rail level crossing gates and Victoria House in the background. Tramcar has an "Everything's under control in my all electric kitchen" roof advertisement. Slide rescanned at 3200 dpi 25-10-2020, jpg replaced, tiff file retained. This file was scanned in 2003 and may show colour changes."BAS 48" in penciltramways, trams, railway station, lydiard st nth, tram 43 -
 Ballarat Tramway Museum
Slide - 35mm slide/s - set of 2, Peter Moses, Jan. 1969
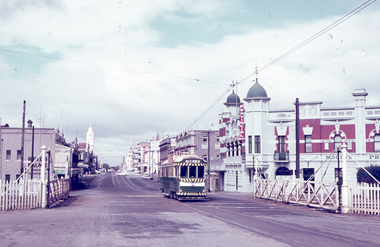
2059.1 - Photo of SEC Ballarat No.41 passing through the railway gates at Ballarat Railway Station, Lydiard St. North, with the destination of "Sebastopol". Tram has a SEC "Everything's under control in my all electric kitchen". Reid's Coffee Palace is the background. Photo shows the Ballarat Railway station clock tower, part of the train shed and the signals on the station side of the gates and another bogie tram waiting at the end of the double track in Lydiard St. for No. 41 to pass. 2059.2 - ditto, but with the two trams passing each other. The Provincial Hotel is also in the photograph. Kodak cardboard mount slide, taken by Peter Moses assumed Jan. 1969, dated only "Jan", but date lines up with Bendigo slides and type of numbering. Could be 1970.On the rear of the slides in black ink "P. Moses" along bottom left hand corner in black ink.tramways, trams, railway crossing, lydiard st, railway station, reid's coffee palace, provincial hotel, tram 41 -
 Ballarat Tramway Museum
Photograph - Black & White Photograph/s - Last tram from Sebastopol, Greg Triplett, Sep. 1971
Black and white reproduction of photographs used to illustrate the closure of the SEC Ballarat System, published in Association of Railway Enthusiast's (ARE) Dec 1971 issue of their magazine. Centre page photo shows tram 40 at Hospital corner, prior to running into the depot, while on rear pages are night photos of tram 35 at Sebastopol terminus (Royal Mail Hotel in background) and No. 41? at the Lydiard St. north terminus. trams, tramways, ballarat, closure, last tram , tram 40, 35 and 41? -
 Ballarat Tramway Museum
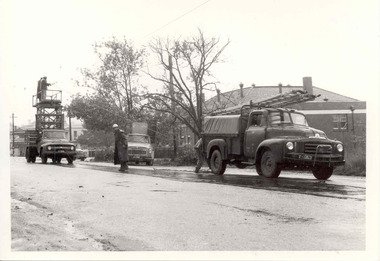
Photograph - Black & White Photograph/s, The Courier Ballarat, 23/04/1965 12:00:00 AM
Yields information about the way the SEC repair overhead failures on the Ballarat Tramway system - shows the trucks and the crews involved.Black and White copy photograph of a newspaper photograph taken by The Courier of repairs to damaged overhead wire, Lydiard St North, just to the north of the Railway level crossing. Tram services were disrupted as a result. Photo taken 23/4/1965, published 24/4/1965. Shows three SEC vehicles in use, including the tower truck. By the front of the truck, the overhead wire and a set of ears can be seen. The Victorian Railways Institute building is in the background. In the far background is the North Star hotel. The types of truck, from the left hand side are Ford (Tower Truck), International and a Bedford. Collected by Alan Bradley from the Ballarat Courier early 1980's. See Excel file "Record of Ballarat Courier Photos SEC era" (Archive Documents) for source of details.On rear stamped "Copyright, The Ballarat Courier Proprietary Limited." and "85%" in ink in the top left hand corner.tramways, trams, lydiard st nth, overhead, secv, repairs -
 Ballarat Tramway Museum
Photograph - Black & White Photograph/s, J. L. Southern Collection, late 1960's?
Demonstrates an aspect of Ballarat where trams crossed the railway level crossing in Lydiard St Nth.Black and White photograph of No. 39, north bound in Lydiard St Nth, mid 1960s, crossing railway level crossing. Tram has SEC roof advertisement of "Electric Cooking" and destination of Lydiard St Nth. Note the two numbers on the front of the tram - see also reg item 3601 for a 1969 photograph in the same location. Moody's Provincial Hotel in the background and the railway level crossing. in pencil on back "04381003"tramways, trams, railway station, level crossings, lydiard st nth, provincial hotel, tram 39 -
 Ballarat Tramway Museum
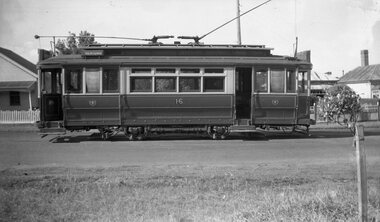
Photograph - B&W print of donated negative
Yields information about a converted Geelong Pengelly tram No. 16, Yields information about a converted Geelong Pengelly tram No. 16Black and white digital print from scan of a donated negative showing a converted single truck Pengelly car No. 16, possibly at a terminus - see below. Has the destination of Newtown. Photographer and date unknown. Black and White print made from scan of negative. Original Negative stored with Negatives. Dave O'Neil confirmed June 30/2009, after some searching at West terminus, photo was taken outside of the hotel. House with the chimney is still there. Though prior to 1951, West trams terminated at the Railway Station or Beach, and late 1930's at the Wharf. Some trams would do trips from those points to West and then would do a Newtown or Chilwell. This could explain destination showing Newtown, wasn't changed from Newown trip. Also in war years, some trams travelled from West to Newtown and Chilwell on Friday nights, late shopping. See related documents. Image rescanned from copy neg and updated 1/6/2020.tramways, trams, geelong, west, tram 16 -
 Ballarat Tramway Museum
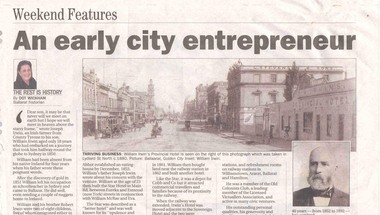
Newspaper, Dot Wickham, "An early city entrepreneur", 5/03/2005 12:00:00 AM
Yields information about William Irwin, Irwins Provincial Hotel and the tram line in Lydiard St Nth.Newspaper clipping from The Courier, 5 March 2005, titled "An early city entrepreneur" written by Dot Wickham about William Irwin, the proprietor of Irwin's Provincial Hotel. Gives a brief history of William Irwin, his Ballarat hotels, his local and other activities. Features a photo of Lydiard St Nth looking south from the railway level crossing with the horse tram lines in the photograph and Irwins Provincial Hotel on the right hand side, before reconstruction to a two story building.hotels, lydiard st nth