Showing 525 items
matching sign post
-
 Ballarat Tramway Museum
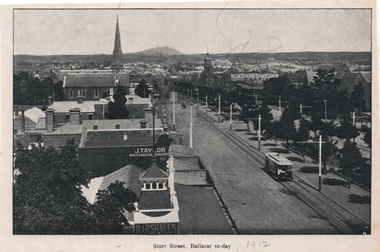
Photograph - Illustration, "Sturt Street Ballarat to-day", c1905/6
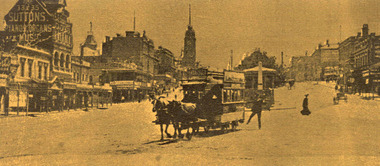
Set of two views from an illustrated publication on Ballarat. 1 - Illustration - "Sturt Street Ballarat to-day" looking east from the City Fire station along Sturt St with an ESCo tram eastbound. The destination sign is mounted on the dash panel indicating c1905/1906. In the view are Ballarat's Buildings, Mount Warrenheip, J Taylor Redhouse Bakery, and on the bottom edge a sign for Marshall's. 2 - Illustration - Post Office Ballarat, to-day - with an ESCo tram turning from Sturt St into Lydiard St North, with the Post Office in the view along with many pedestrians and some horse drawn vehicles. See also item 6245 for a postcard of the same view.Yields information about Ballarat and city views in 1905/1906.Illustration cut from a magazine or publication - set of two - back to backThe second image has "1912" in pencil along the bottom edge.ballarat, illustrations, sturt st, esco, post office, lydiard st nth -
 Ballarat Tramway Museum
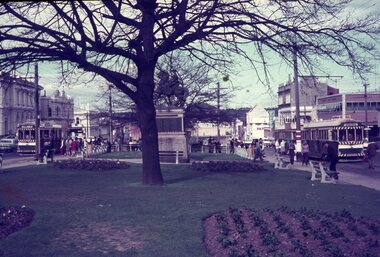
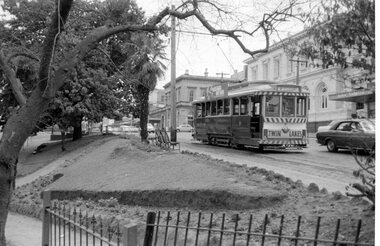
Slide - 35mm slide/s - set of 3, Dave Simpson, trams at the intersection of Sturt and Lydiard St - City terminus, late 1960's early 1970's
Yields information about the intersection of Sturt and Lydiard Sts tramway centre and Boer War monument.Set of three 35mm slides - AGFA dark blue / white plastic mounts of trams at the intersection of Sturt and Lydiard St - City terminus. 1 - view from the central median on the west side of Lydiard St, looking East with the Commonwealth Bank, Post Office, with many passengers at the location. The Boer War monument /statue is in the centre part of the photograph. 2 - No. 14 about to turn into Lydiard St North/ The short tram stop and End of Section sign are adjacent to the tram. 3 - Tram waiting at the north side tram stop - has a Twin Lakes and Cinzano sign. Has the ANZ bank and the SEC offices in the background.tramways, trams, sturt st, city, lydiard st, passengers, signs, tram 14 -
 Ballarat Tramway Museum
Photograph - Digital image Set of 5, George Coop, 1968 - 1970
Yields information about the tram operations at or near the Titanic Bandstand in Sturt St.Five (5) Digital images taken by George Coop during the period 1968 - 1970, of SEC trams in Sturt St, between Lydiard and Grenville Streets on the north side of Sturt St. .1 - Tram 11, descending the hill by the Titanic bandstand with the Post Office in the background. Trams has a Twin Lakes advert, Bliss Bombs and the destination of Mt Pleasant. .2 - Tram 31 ditto, except destination of Victoria St. .3 - Tram 13 with bandstand in the view - for Mt Pleasant. .4 - Tram 33, with a lady and man carrying a box descending the footpath. Tram has the destination of Victoria St and a Twin Lakes sign. .5 - Tram 26, at corner of Sturt and Camp Streets, with the Owen Williams store in the background. trams, tramways, sturt st, tram 11, tram 31, tram 13, tram 33, tram 26 -
 Ballarat Tramway Museum
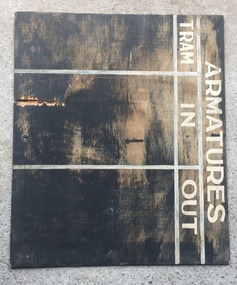
Sign, State Electricity Commission of Victoria (SECV), "Armatures", mid to late 1960's
... . Trams tramways Sign Sec Depot Armatures Tramcars Equipment Has ...Demonstrates how armatures movements (tram motors) were recorded at the SEC depot in Ballarat.Sign - made from three ply (wood) board, originally painted with black board paint and white lined and lettered for Armatures / Tram / possibly date in or out. Has two screw holes centrally top and bottom and has faded on either side of a central band, indicating it was attached to post. Has pencil marked on the top horizontal white line "369375 2 ? and 309981 1 ? 18th Oct"trams, tramways, sign, sec, depot, armatures, tramcars, equipment -
 Ballarat Tramway Museum
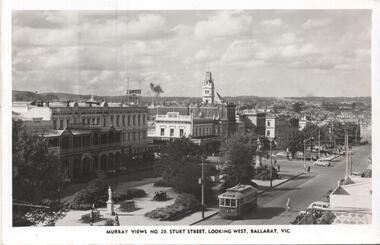
Postcard, Murray Views, Murray Views No. 29 - Sturt Street Looking West, Ballarat Vic.", c1955
Postcard - black and white - titled Murray Views No. 29 - Sturt Street Looking West, Ballarat Vic.", actually looking east from Doveton St towards Black Hill and Grenville St. Has tram 32 westbound to Gardens via Drummond St North. Divided back postcard with details of the maker on the right hand side, MV symbol and a space for a stamp. In the view are Lester House, Tunbridges, Crockers and the Post Office Tower. A Plume sign is also visible.Yields information about the appearance of Sturt St in the early 1950's, tram operations, buildings and motor vehicles.Postcard - divided back, unused Murray Viewstrams, tramways, sturt st, doveton st, tram 30 -
 Ballarat Tramway Museum
Slide - 35mm slide/s - set of 7, Noel Simons, 22/11/1962 12:00:00 AM
Set of 7 Kodachrome transparencies taken on 22/11/1962. 1161.1 - trams 38 and 20 in Sturt St. West at the Russell St. loop. No. 20 has possibly terminated and is showing "CITY" while 38 is showing "Mt Pleasant" Both trams fitted with dash canopy lighting, but no large white stripe. 20 has a Twin Lakes sign. 1161.2 - tram 33 just before Gardens Loop in Wendouree Parade, with destination of "Victoria St." Has a Twin Lakes sign. 1161.3 - tram 39 at corner of Lydiard St. North and Sturt St. with Post Office in background. 1161.4 - tram 40 turning from Sturt St into Lydiard St. North with Post Office in background and showing destination of Lydiard St. North. A blue Holden with red stripes for the Radio Cabs co. is in the foreground, along with pedestrians. 1161.5 - tram 41 in Sturt St. at the City terminus, showing destination of Mt Pleasant with Post Office and ANZ Bank buildings in background. Numerous people waiting on the seats at the tram stop. 1161.6 - tram 13 in Sturt St. near Doveton St. showing destination of Bell St. Many cars and pedestrians on the south side of Sturt St. Note the Austin motor car by the tram showing a stop signal. Tram 13 has a Twin Lakes sign. 1161.7 - trams 13, 26, and 39 in the City Loop near Bridge St. Has Morseheads and Grenville St. tram shelter in the background.1161.1 - "38 and 20 crossing in Sturt St. Ballarat near Russell Street" - in blue and black ink. The "Russell St" is a later addition, over white out. 1161.2 - "33 near Botanic Gardens terminus, Wendouree Parade, Ballarat" 1161.3 - "No. 39 in Lydiard St. Ballarat at Cnr. of Sturt St." 1161.4 - "No. 40 entering Lydiard St. from Sturt St. Ballarat" 1161.5 - "No. 41 in Sturt St. Ballarat at cnr of Lydiard St." 1161.6 - "No. 13 in Sturt St. Ballarat, at Cnr. of Doveton St." 1161.7 - "Nos. 13, 26, and 39 in Sturt St. Ballarat near Bridge St." All have date stamp of "22 Nov. 1962" in purple ink. All black ink unless otherwise noted.tramways, trams, ballarat, sturt st. west, wendouree parade, lydiard st., city loop, taxis, radio cabs, tram 13, tram 20, tram 26, tram 33, tram 38, tram 39, tram 40, tram 41 -
 Ballarat Tramway Museum
Slide - 35mm slide/s - set of 7, Noel Simons, 1970's
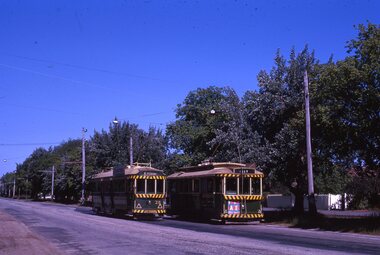
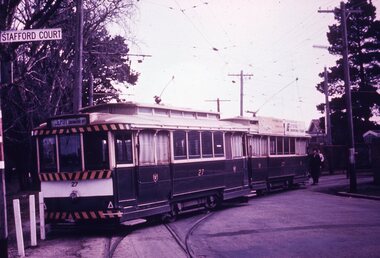
Set of 7 transparencies taken undated (appear to be 1970 or 71) on PAKON mounts. Also possibly copy slides as quality is poorish. 1175.1 - No. 27 has derailed at Depot, across Wendouree Parade, and No. 33 appears to be about to try and tow it back on. Wendouree Parade totally blocked. Adjacent pole has tram stop sign and has "Stafford Court" street sign mounted on it. 1175.2 - No. 43 at corner of Drummond St. South and Dana Street, with destination Lydiard St. North. 1175.3 - No. 42 (Mt Pleasant) and 21 (Gardens via Sturt St. West) crossing at Gardens Loop. 1175.4 - No. 42 bound for Lydiard St. Nth at intersection with Macarthur St. Shows the retaining wall for the cutting on the east side of Lydiard St. Nth. 1175.5 - No. 43 at corner of Lydiard St and Sturt St., at city terminus showing "Special" and tram 35 adjacent to Post Office in Lydiard St. Nth. Photo shows the small tram stop pole at this location and Post Office building. 1175.6 - No. 39 and 26 and 27 at the Mt Pleasant terminus. Near closure as a bus stop sign has been positioned on the west side of the road. No. 39 showing destination of "Gardens via Sturt St. West" 1175.7 - Nos 21 and 34 crossing at the Grant St. loop in Barkly St. 21 has destination of Mt Pleasant, while 34, - Gardens via Sturt St. West"All information on typed small white labels, on the top of the slides using black ink. 1175.1 - "27 derailed and 33 at depot" 1175.2 - "43 at cnr Drummond & Dana Sts" 1175.3 - "21 and 42 Gardens Terminus" 1175.4 - "42 at cnr Macarthur & Lydiard" 1175.5 - "43 & 35 at Post Office" 1175.6 - "39, 26 and 27 at Mt Pleasant" 1175.7 - "21 & 34 at Grant St"tramways, trams, wendouree parade, depot, accidents, derailments, drummond st. sth, gardens loop, post office, mt pleasant, grant st., tram 21, tram 26, tram 27, tram 33, tram 35, tram 42, tram 43 -
 Ballarat Tramway Museum
Slide - 35mm slide/s - set of 4, Noel Simons, Apr. 1967
Set of 2 slides made from the Association of Railway Enthusiast Provincial Tramways film strip, possibly during April 1967. 1192.1 and 1192.3 mounted in Kodak Ready Mounts. The others in plain white mounts. Slides dated Dec. 1968. 1192.1 - No. 21 out bound to Golden Square in High St., between Wattle and Vine Streets. Photo taken after tram has passed photographer. Has a sign for "Reid's Furnituorium" in the background. 1192.2 - Bendigo No. 28 dressed up as Myers Christmas tram, passing the Post Office and Courts in Pall Mall. 1192.3 - Bendigo No. 23 at Needle Loop en route to Eaglehawk. Tram has two SEC roof ads, one "Electric Cooking" and the other "Everything fine in my all electric kitchen". 1192.4 - Bendigo scrubber parked at the end of the main depot lead, alongside the depot office buildings.Details in blue ink, date hand stamped in purple ink. 1192.1 - "No. 21 heads along High St for Golden Square between Wattle and Vine Streets." 1192.2 - "Birney No. 28 in Christmas Garb, traverses Pall Mall en route to North Bendigo". 1192.3 - "No. 23 at Needle Loop on its run to Eaglehawk". 1192.4 - "Scrubber car at Bendigo Depot".tramways, trams, north bendigo, bendigo, bridge st loop, depot, tram 21, tram 23, tram 28, tram scrubber -
 Ballarat Tramway Museum
Slide - 35mm slide/s - set of 32, Noel Simons, 25/02/1971 12:00:00 AM
Set of 31 transparencies taken on 25/2/1972 on Kodak mounts. 1201.1 - Bendigo No. 26 in Bond St. just after leaving Long Gully en route for Quarry Hill. Has Norris Supermarket in background. Has two SEC roof ads. 1201.2 - No. 26 climbing View St. from Charing Cross en route to Eaglehawk. Has ANZ bank and AMOCO service station in background. 1201.3 - as for 1201.3, but after tram has passed photographer. Has buildings west of Mackenzie St. in photograph. 1201.4 - Tram stop and centre of the road pole with two "CARS STOP BY REQUEST" signs mounted on pole at the corner of Mackenzie St. 1201.5 - same position as for 1201.3, but with No. 5 descending the street. 1201.6 - same position as for 1201.2, but with No. 5 descending the street. Photo taken after tram has passed photographer. 1201.7 - No. 7 in Nolan St. from across the park at Lake Weeroona. 1201.8 - No. 7 entering McCrae St from Nolan St. - distant view. Note "TRAM "sign on left hand side under tree and overhead in McCrae St. from former track that once was in this street. 1201.9 - No. 7 in High St. with Cathedral in background. Tram en route to North Bendigo. Note scaffolding around Cathedral main spire area. 1201.10 - No. 7 crossing Bendigo Creek bridge in High St. near Golden Square. Has a Caltex Service station in the background. 1201.11 - No. 7 at Golden Square terminus with Sunburst Fruit Juices and a Peters Ice cream delivery vans alongside. 1201.12 - as for 1201.11 but photo taken from behind tram, with the end of the rails in the photograph. 1201.13 - No. 7 and 21 in Pall Mall at Charing Cross with No. 5 in the background. Taken some distance away from the location. 1201.14 - No. 7 at Golden Square terminus, taken a short distance from the tram terminus. Shows Milk Bar on right hand side and the hotel on the left hand side. Taken from the south side of the roadway. 1201.15 - as from 1201.14 but taken from the north side of the roadway. 1201.16 - No 5 waiting at California Gully loop. Distant photo showing surrounds 1201.17 - No. 5 en route for Quarry Hill crossing No. 26 at California Gully. 1201.18 - No. 26 at Eaglehawk terminus with Eaglehawk Town Hall and Post Office in background. 1201.19 - No. 21 arriving at Charing Cross en route to North Bendigo. Has Alexandra Fountain in the background, ANZ bank RACV building, and other buildings on the north side of Pall Mall or Nolan St. 1201.20 - No. 26 en route for Quarry Hill at Charing Cross, with crew standing by front door. Has Colonial Mutual life building, Armstrong Tyre Service (Firestone) and a sign for Cohns Drinks in the background. 1201.21 - as for 1201.20 but with No. 5 en route to Eaglehawk now in photograph. 1201.22 - No. 26 at Quarry Hill terminus. 1201.23 - No. 26 at Quarry Hill terminus, view of front portion of tram only from a gate at the Bendigo cemetery. 1201.24 - Track at the end of the Quarry Hill line showing the point blades of the former "Y" terminus and the overhead for this. 1201.25 - No. 2 at the Quarry Hill terminus, looking along the former Trackwork. 1201.26 - as for 1201.25 1201.27 - number not used. 1201.28 - Golden Square terminus from some distance from the actual terminus, showing the Warning sign "TRAM" for motorists from the south. No. 7 at the terminus. 1201.29 - No. 7 passing through the Golden Square shopping centre. Numerous cars and pedestrians. Tram en route for North Bendigo. 1201.30 - No. 7 in High St. Golden Square, en route for North Bendigo. Photo taken after tram has passed photographer. 1201.31 - No. 7 in High St. just past Wattle St. with the Cathedral in the background. Tram has two SEC roof ads good side on photo, 'Everything's fine in my all electric kitchen' and 'Electrical cooking - clean, quick, economical'. 1201.32 - No. 7 in High St. nearing Wattle St. Has Cathedral in the background. Photo taken after tram has passed photographer.Information written on in black ink and date stamped on purple ink. 1201.1 - "No. 26 in Bond St just after leaving Long Gully" 1201.2 - "No. 26 climbing View St. from Charing Cross" 1201.3 - "No. 26 ascending View St. from Charing Cross (At Mackenzie St.)" 1201.4 - "View St. & Mackenzie St." 1201.5 - "No. 5 in View St. near Mackenzie St." 1201.6 - "No. 5 in View St. nearing Charing Cross." 1201.7 - "No. 7 in Nolan St. seen from Lake Weeroona Park." 1201.8 - "No. 7 entering McRae St. from Nolan St. Note "TRAM" warning sign on left. 1201.9 - "No. 7 in High St. passing Short St." 1201.10 - "No. 7 crossing Bendigo Creek bridge in High St. near Golden Square." 1201.11 - "No. 7 at Golden Square terminus" 1201.12 - "No. 7 at Golden Square terminus" 1201.13 - "No 7, 21 and 5 at Charing Cross" 1201.14 - "No. 7 at Golden Square terminus" 1201.15 - "No. 7 at Golden Square terminus" 1201.16 - "No 5 waiting at California Gully loop." 1201.17 - "Nos. 5 and 26 crossing at California Gully loop" 1201.18 - "No. 26 at Eaglehawk terminus" 1201.19 - "No. 21 arriving at Charing Cross from Golden Square" 1201.20 - "No. 26 at Charing Cross" 1201.21 - "Nos. 5 and 26 at Charing Cross." 1201.22 - "No. 26 at Quarry Hill terminus" 1201.23 - "No. 26 at Quarry Hill terminus seen through the gates of the Bendigo Cemetery." 1201.24 - "Quarry Hill terminus showing remains for former double track layout abandoned before 1964." 1201.25 - "No. 2 at Quarry Hill terminus" 1201.26 - "No. 2 at Quarry Hill terminus" 1201.28 - "The Southern approach to Golden Square with No. 7 standing at the terminus, "TRAM" warning sign on the left. 1201.29 - "No. 7 passing through Golden Square Shopping Centre" 1201.30 - "No. 7 in High St. Golden Square" 1201.31 - "No. 7 in High St. passing Wattle St." 1201.32 - "No. 7 in High St. nearing Wattle St."tramways, trams, bendigo, bond st., view st., nolan st., high st., eaglehawk, california gully, charing cross, quarry hill, trackwork, tram 2, tram 5, tram 7, tram 21, tram 26 -
 Ballarat Tramway Museum
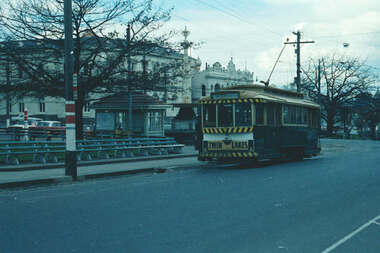
Photograph - Colour Negative, Colour Print, David Endacott, 1971
Colour positive (negative) of SEC tram No. 11 at the City terminus. Tram has destination of "Gardens via Sturt St. West" and a Twin Lakes advertising board on the front dash panel. Has fountain and tramway waiting shed in the background as well as the Ballarat Post Office. Tram stop pole and attached signs in front of the tramcar. A colour laser image of this negative made on 10/1/2000 using a Canon Laser printer has been placed on file at 01-01-57. Original film image scanned at 3200dpi 12/5/2020.ballarat, lydiard st. nth, city terminus, sturt st., tram 11 -
 Ballarat Tramway Museum
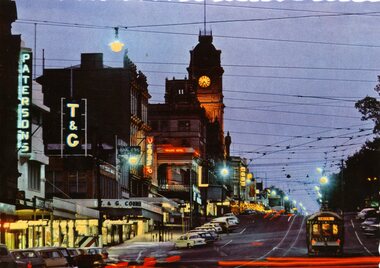
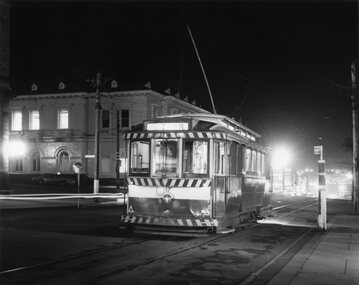
Postcard, Nu-color-vue or Nucolorvue Productions, Sturt St at night, late 1960's or early 1970's
Demonstrates post card making by a major postcard manufacture, late 1960's and yields information about Sturt St at night.Colour postcard with serrated edges of a Ballarat bogie tram at dusk in Sturt St, parked in City Loop. with Town Hall in background. Tram has destination of "CITY". Photo includes illuminated Paterson, T&G, Myer and the Vegas theatre signs. Has many parked cars in Sturt St, with red lines from the tail lights of vehicles moving on image. On rear , printed in dark green ink is the card details etc. "Ballarat, Victoria, Sturt St, Ballarat at dusk looking to the Town Hall." Nucolorvue card, BT 69. 2nd copy - in good order. See also Reg. Item 1176 for colour slide of this view. 960 copy 1 - made by enlarging postcard to an A4 print by colour photocopying and laminated for display purposes. Made July 2000 for the Trams at Night exhibition in the depot. Made by W.Doubleday. Has four Velcro dots on rear. Overall size 208H x 296W. Stored in same box at rear of large photos area in an A4 plastic folder. trams, tramways, ballarat, town hall, sturt st., tram 8 -
 Ballarat Tramway Museum
Photograph - Illustration/s, Ballarat Views, 1950's mid
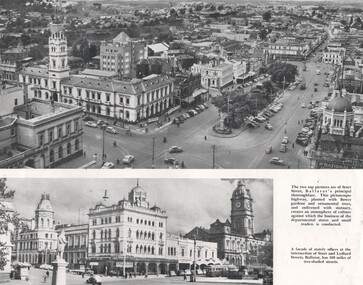
Single sheet of printed paper, collected from a magazine (p59/60) with two black and white photos of Ballarat and one colour of Bendigo. Photo 1 - 260mm long x 122mm high, photo of north east Ballarat from Town Hall, looking out to Black Hill. Photo similar to Reg. No. 102, but buildings on corner of Grenville and Bridge St has a Plume sign instead of a Mobilgas Ad. This indicates early to mid 1950's. One tram in loop in one in Bridge St. Also has a "Neptune" sign in photograph. Photo 2 - 195mm long x 75mm high - from north east corner of Sturt and Lydiard Sts looking towards Town Hall and Craig's Hotel. Photo includes SEC bogie at tram stop and the front end of bus travelling east in Sturt St. Photo 3 - 230mm long x 156mm high - colour printed photo of Pall Mall, Bendigo from west side (by Post Office), looking towards the Shamrock Hotel. Photo includes signs for "COR Motor Spirit", "Tanox Paint" and the rear of a Bendigo to Huntly bus. See item Reg. No. 102trams, tramways, ballarat, bendigo, pall mall, oil companies -
 Ballarat Tramway Museum
Photograph - Bromide of a b/w photograph, mid 1960's?
Bromide of a black and white photograph of Ballarat No. 40 crossing Sturt St. from Lydiard St. North with Post Office in background. No. 40 does not have any advertising signs. Showing destination of Sebastopol. Possibly photographed mid 1960's. Photographer unknown. Bromide made c1994 for possible publication, but not used.trams, tramways, sebastopol, sturt st., lydiard st north, post office, tram 40 -
 Ballarat Tramway Museum
Postcard - Folder set, "Ballarat Trams A Pictorial History in Four Post Cards", 1971
Set of four black and white postcards printed onto a one sided colour textured stock and contained within a folded white glossy paper envelope. The white envelope has the title "Ballarat Trams A Pictorial History in Four Post Cards" and a horse tram printed on it - made from heavy one sided paste board. The postcards consist of 1. Horse tram arriving at Grenville St with person stepping off - same image as Reg. Item No. 1539, 3898 2. ESCo tram soon after opening - c1905/1906 - has Gardens destination sign. 3 ESCo Sebastopol tram at the time of construction - with a "Suttons for Gramophones" roof advertisement and lettered "Ballarat Tramways". 4. SEC Tram - appears to be No. 32 in the Gardens area. On the rear of cards 1 and 2 is a text caption story that is relevant to the card picture. Cards 3 and 4 have a story board on the side and further information on the back. On the rear of card 4 are details about the tramway, some track details, rolling stock and mileage covered.trams, tramways, horse trams, esco, sebastopol type -
 Ballarat Tramway Museum
Slide - 35mm slide/s, Mark Plummer, Dec. 1968
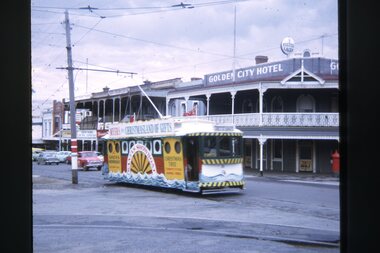
Photo of Ballarat tram No. 21, dressed as the Myers Santa Showboat tram, outbound or westbound in Sturt St. during December 1968. Photo taken at Dawson St., with the Golden City Hotel in the background. Tram has destination of "Grey St". Hotel has a Fosters Lager sign on the roof. A red pillar post box in the right hand side of the photograph. Kodak cardboard mount slide, taken Mark Plummer, December 1968.tramways, trams, myers santa tram, decorated trams, sturt st, dawson st, tram 21 -
 Ballarat Tramway Museum
Postcard - Folder set, Colorscans Richmond, "Ballarat Botanic Gardens and Lake Wendouree", c1980
Set of ten colour photos with title photo of Begonias, in a strip suitable for posting in an envelope of views of the Ballarat Botanic Gardens and Lake Wendouree. Made by Colorscans of 123 Dover St. Richmond. Folded so that they form a group that could be posted in a standard envelope. Has a note on the area on a small folding strip at the top. On the inside of the strip: 1. Statue Pomona and Begonia House in the Botanic Gardens 2. The Sarah George Ferry on Lake Wendouree 3. Lake Lodge at dusk 4. Adam Lindsay Gordon's Cottage, Botanic Gardens 5. The Prime Ministers Avenue, Botanic Gardens On the rear 1. Title photo set with Begonias in the Botanic Gardens 2. Vintage tram on the Botanic Gardens Tourist Tramway (No. 27 - in SEC colour scheme with Tram Rides sign). 3. Benzonis 'Flight from Pompeii' 4. Wishing Well in the Botanic Gardens 5. Black swans on the Lake 6. The Mosaic crown at the Shell House (By C.A. Pickford) Photographs by George Hurdes. See Tram 27 repainted by Museum to a different colour scheme in 1983/84. trams, tramways, lake wendouree, wendouree parade, botanical gardens -
 Ballarat Tramway Museum
Document - Instruction Book, Melbourne and Metropolitan Tramways Board (MMTB), "Sections and Fares", Aug. 1968
One Hundred & Eight (108) page book sewn with end papers on a grey colour Rexene heavy card covers. Titled "Melbourne and Metropolitan Tramways Board / Electric Tramways and Motor Omnibuses. / Sections and Fares / (Conductors) , / August 1966". Issued 14/8/1966, all decimal currency. Signed by R.C. Drummond, Traffic Manager. Details the sections and fares for each tram and bus route on the MMTB System in a tabular form. Page 5 has an index of routes, includes concession fares. General Instructions re fares, such as children, city concession, prepaid tickets, round trip excursion, Scholars concession, excess luggage, newspapers, children carriages, dental centre scholars, swimming class, state schools, Post Office, Police Concession, special hospital tickets, visiting nurses, scouts, Sunday morning, family excursions. all night services and Free Tramway Passes. Gives images of the type of pass, details of issued to, booklet passes, employees pass, blind persons, traffic officers, disabled soldiers, fare concession certificates, Special Metal "T" passes, seeing eye dogs. special prepaid tickets. Has some pasted in amendments.Some of the tables, first ones in the book have been marked with the stop numbers. trams, tramways, rules, instructions, mmtb, fares, conductors -
 Ballarat Tramway Museum
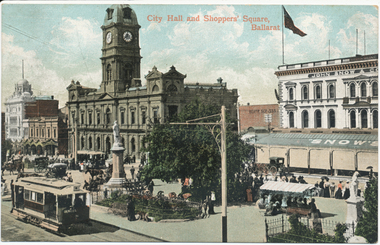
Postcard, Valentine & Sons Publishing Co, "City Hall and Shoppers Square Ballarat", 1905
Printed colour postcard titled "City Hall and Shoppers Square Ballarat". Has an inbound tram showing the Grenville St sign on the rear, and one of the crossbench cars loading passengers outside the Town Hall. Shows Snows building, people in the median strip - busy holiday or a Sunday. Images of the front and back of the card and a close-up of the two trams in the bottom left-hand corner. Note the lamp or coloured destination sign on the roof of the inbound tram. On the rear, the postcard has been divided into two with the words "Post Card" and "Printed in Great Britain" on the top, a "Valentine Series" on the side. Addressed to Miss J Johnstone, 30 Weighbridge St, Flemington, and with the words "Dear Jeannie, / How do you like this one. / Maggie". Has a 1d Victorian stamp, cancelled in Melbourne "5" with the date "25-1-05" This is an incorrect date - electric trams did not open until August 1905. 2nd copy unused.Yields information about the intersection of Sturt and Armstrong StreetsPostcard, coloured, divided back - used.trams, tramways, sturt st, esco, town hall, cross bench tram, snows, armstrong st -
 Ballarat Tramway Museum
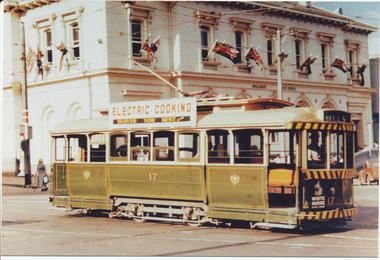
Photograph - Black & White Photograph/s, Chris Wurr, 1971
... the scene behind the tramcar. In the view are the Post Office, tram... behind the tramcar. In the view are the Post Office, tram stop ...Yields information about the streetscape at the City terminus at night and just how lonely it could be.Black and White photograph of No. 17 at the city terminus at night - time exposure. Tram has the destination of 'Sebastopol'. No other vehicles in the scene, though a motor car has passed the scene behind the tramcar. In the view are the Post Office, tram stop signs and buildings near Grenville St.Stamped on rear in black ink "Donated to BTPS by and Photo By" / "Chris Wurr 12 Truscott Street, Ararat 3377 (053) 52 3403.tramways, trams, city, sturt st, lydiard st, night photo, tram 17 -
 Ballarat Tramway Museum
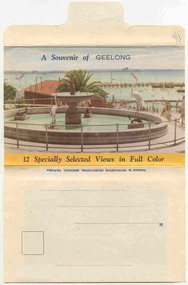
Postcard - Folder set, Nu-color-vue or Nucolorvue Productions, "A Souvenir of Geelong", 1950's
Set of 12 colour views of Geelong on a folded strip, glued within a colour printed cover, titled "A Souvenir of Geelong", printed on both sides of the strip. Booklet printed with an address area on rear. Produced by Nulcolorvue Productions, Mentone, Victoria. The rear has a slit on the rear cover that allowed the folder to be secured. On the inside of the front cover, has an introduction to Geelong, notes "modern tram and bus routes" Pictures are: 1. Gheringhap St showing Geelong City Hall and Post Office 2. The Barwon River, Geelong 3. T&G Building, Ryrie St - shows tramway overhead 4. Christ Church, Moorabool St 5. Malop St Geelong 6. Art Gallery and Park 7. St Marys Roman Catholic Cathedral 8. The Geelong Post Office with buses in background and a Safety Zone sign 9. Moorabool St Geelong - has overhead and a bar traffic light/ 10. Queens Park Geelong 11. The Waterfront at Geelong. 12. Eastern Beach Swimming Pool. Made during the early 1950's, given motor cars in the photo. trams, tramways, geelong, moorabool st, ryrie st -
 Ballarat Tramway Museum
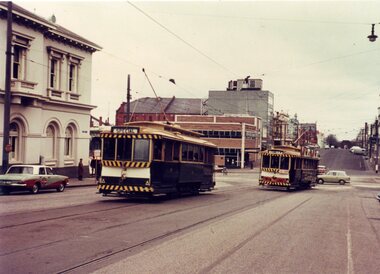
Postcard, Ron Scholten, Ballarat 18 and 21 in Lydiard St
Colour photograph, printed on a postcard back format of Ballarat No. 18, showing "special" and No. 21 turning from Sturt St into Lydiard St. Nth. Has Post Office, Commonwealth bank in the background. No. 21 has an auxiliary board advertising a Fete - see also Reg. Item 2020 and 3192 for 18 with the same sign.On the rear in pencil "Ball 18 & 21 / Ron Scholten Collection for BTM archives".trams, tramways, post office, sturt st, lydiard st nth, tram 671 -
 Ballarat Tramway Museum
Photograph - Digital image Set of 20, 1971-72
Set of 20 digital images of Bendigo Tramways, 1972 at or before closure while on a tram tour by Stuart Lodington. .1 - No. 7 at Golden Square terminus .2 - ditto .3 - No. 26 in bound on the Eaglehawk line with a crossing loop behind. .4 - Birney crossing the bridge by the tram depot. .5 - No. 29 running a special on the Eaglehawk line with a HBA billboard in the background. .6 - No. 29 with a driver walking in front of the tram at the above location. .7 - No. 29 on the Eaglehawk line .8 - ditto waiting for a tram at Manchester Loop with poppet head in the background. .9 - No. 29 on the Eaglehawk line .10 - Eaglehawk Town Hall at night. .11 - No. 7 at the depot junction in McCrae St, with Golden Square destination. .12 - No. 29 with the Camp Hotel Eaglehawk in the background. Also a Newsagent with The Sun, The Bendigo Advertiser and The Age signs on the building, High St .13 - No. 29 Mt Korong Rd, with the railway overbridge in the background. .14 - interior photo of Birney tram roof .15 - interior view of controls of Birney at Eaglehawk .16 - No. 29 outbound at the Depot Junction McCrae St. .17 - No. 18 at the Eaglehawk terminus .18 - close up view of No. 29 front. .19 - No. 29 in Nolan St, crossing the bridge, outbound. .20 - No. 18 at the Eaglehawk terminus with the Eaglehawk Town Hall, Post Office in the background. Has a circus banner on the side.trams, tramways, bendigo, eaglehawk, quarry hill, golden square, depot, mccrae st, nolan st, tram 7, tram 26, tram 29, tram 18 -
 Ballarat Tramway Museum
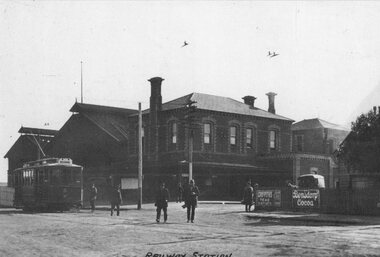
Photograph - Geelong No. 5 at the Railway Station, 1915
Photo of Geelong No.5 at the Railway Station, c 1915, Railway station in the background, prior to the extension and the construction of the awning over No. 1 platform area. Has title "Railway Station" along the bottom edge. In the view are signs for Griffiths teas and Bensdorp Cocoa. On the rear "Geelong Historical Post Card Series No. 9 Railway station with No. 5 Tramcar ready to depart for West Geelong 1915" Publisher not known. See also Reg item 4408 for another reproduction of this photograph. Illustration has been cut from a magazine.Yields information about Geelong Railway Station and tram No. 5 in 1915.Sepia-toned print of a postcard and an illustration of the same photograph.trams, tramways, geelong, railway station, tram 5 -
 Ballarat Tramway Museum
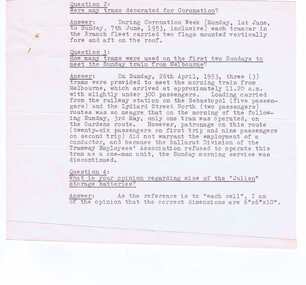
Document - Letter/s, State Electricity Commission of Victoria (SECV), c1953
Yields information about Ballarat tramcars in 1950's.Letter, typed two pages, signed H. W. Linaker as Manager answering questions for Wal Jack. Letter date etc not known as it appears the top half of the first page has been cut off, includes the response to the first question. From question 2, noting the Coronation week, the letter is post mid 1953. Q & A concern trams decorated for the Coronation, tram services provided on Sunday morning in 1953 that met the train from Melbourne, the size of the Julien storage batteries, date of sale of the Horse tram company to ESCo, the scrapping of trams, tram tickets older than 1934 but did have a folder of old sample ESCo tickets at the office and the address for the Mt Beauty Railway, The paper has a "Invicta Bond" watermark. trams, tramways, tramcars, ballarat, decorated trams, sunday services, julien system, battery tram, scrapped trams, tickets, esco, sec -
 Ballarat Tramway Museum
Photograph - Colour Photograph/s - set of 14, Carolyn Dean, 3/11/1990 12:00:00 AM
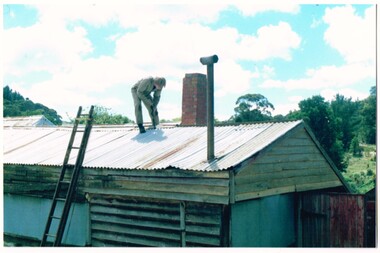
Yields information about the recovery of ESCo 12 by the BTM in 1990 and has a strong association with the people involved in the project.Set of 14 prints with digital images of the removal of the building around ESCo No. 12 at Nerrina on 3-11-1990. Scanned from original prints loaned by Carolyn Cleak (Dean at the time). Printed on Agfa paper. Originals of prints later found in a depot drawer. .1 - Commencement of the removal of the metal deck roof - David Tidy. .2 - ditto with the front of the tram showing and the building itself. .3 - Roof removal continuing - Len Millar .4 - The house from the north side. .5 - Photo of interior notice to Passengers re weekly tickets etc. .6 - as for .4 .7 - Photo of the interior number of the tram. .8 - as for .6 .9 - detail of linking in side at the saloon corner. .10 - close up of the tramcar number. .11 - close up of "Please have Exact Fare Ready sign" .12 - View of the tram after the roof and some of the sides removed. .13 - ditto, ready for removal .14 - detail of lining in the upper part of the saloon panel. Close up of post in image 13, added 22-12-2018 - see i15 All have on the rear "158.7 3.11.90" in ink on the rear.trams, tramways, esco, recovery, nerrina, acquisitions, notices and information, tram 12 -
 Ballarat Tramway Museum
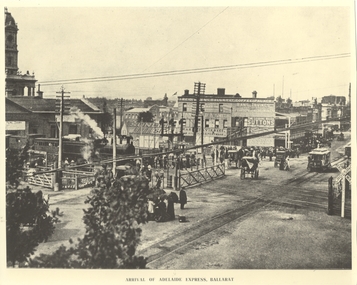
Photograph - Black & White Photograph/s, Lydidard St level crossing and a picnic train, c1905 to 1906
Yields information about the Lydiard St level crossing.Black and white photograph of No. ESCo No. 10 about to cross the Lydiard St level crossing. Photo has the title of "Arrival of Adelaide Express, Ballarat", which is not correct for the trains consist - more like a picnic special - this photo has been written up somewhere. D class loco, with two six wheel carriages behind the locomotive. Group of women with umbrellas (sun) waiting for the tram. Horse drawn carts, interlocked gates, signals prior to resignalling of the post and railway level crossing signs. In the background is Reids Coffee Palace, advertising Sunlight soap, Suttons Music, Pearson's Hard soap, Hans Irvines Champion Wines and Standard & Smith.trams, tramways, railway station, lydiard st north, reids coffee palace, esco, tram 10 -
 Ballarat Tramway Museum
Document - Instruction, State Electricity Commission of Victoria (SECV), "Important Instruction to Motormen and Conductors Shunting of Trams in Bridge Street", 17/03/1965 12:00:00 AM
Has a strong association with the Ballarat tram crews and yields information about the shunting of trams in Bridge St and the hazards in doing this.Quarto typed instruction, titled "Important Instruction to Motormen and Conductors Shunting of Trams in Bridge Street" about not shunting trams in Bridge St due to traffic hazard when turning the pole on trams. Trams to use Main St. Prepared by Les Denmead. Dated 17/3/1965 and signed by F.K. White as SEC District Manager.has handwritten note in ink in top left hand corner "Depot Foreman Please Post"trams, tramways, instructions, bridge st, police -
 Ballarat Tramway Museum
Postcard, Ron Scholten, SEC Ballarat tram 17
Yields information about the use of Special trams and the Ballarat railway station level crossing.Colour photograph, printed on a postcard back format of SEC Ballarat tram 17 crossing Sturt St from Lydiard St north with the Ballarat Post Office in the background. Doors have been changed over for the Sturt St central median strip. Note the lady with the walking stick behind the tram and the tram stop sign. Tram has an SEC Electric Cooking advertisement and the destination of Bell St.trams, tramways, lydiard st north, sturt st, post office, tram 26 -
 Ballarat Tramway Museum
Photograph - Digital image Set of 10, Tony Smith, 1971
Yields information about Ballarat Tramways and trams prior to the closure of the tramway system.Set of 10 digital images of Ballarat trams prior to closure, scanned from original slides by Tony Smith, 1971 prior to closure of the system. .1 - 35 and 43 crossing at Urquhart St, Drummond St Sth. 35 outbound to Sebastopol, 43 to Lydiard St Nth. .2 - 35 in Lydiard St North, about to turn into Sturt St, with the Commonwealth Bank and National Mutual, Craig's Hotel in the background. Note the tram stop signs on the pole nearest to the Post Office. Tram has destination of Sebastopol. .3 - 39 and 41 at Grey St Loop, on a wet day. 39 showing Lydiard St Nth, 41 Special. .4 - two bogie trams (35?) and 41? Albert St, south of Grey St Loop. .5 - two bogies trams (41 and 35?) and a single trucker at the Sebastopol terminus. 41 showing Special. .6 - two bogies trams (41, 35?) and single trucker at the Grey St Loop, waiting for another bogie tram to arrive. Has a "Bounds" running alongside the tram. On a wet muddy day. .7 - two single truckers crossing at Gregory St loop, Lydiard St. Nth. - photo out of focus. .8 - 35 and single trucker crossing at ditto. .9 - 39 and another bogie tram waiting for two other trams to meet at Gregory St. loop. .10 - two single truckers crossing at the King St loop, Victoria St - out of focus and over exposed.trams, tramways, urquhart st, drummond st sth, lydiard st nth, sturt st, albert st, sebastopol, grey st loop, gregory st, king st, tram 35, tram 43, tram 39, tram 41 -
 Ballarat Tramway Museum
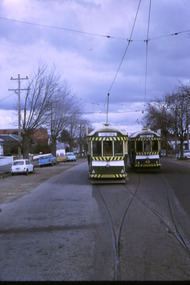
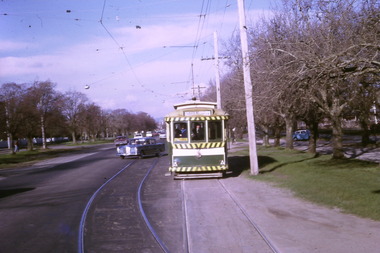
Photograph - Digital image Set of 10, Tony Smith, 1971
Yields information about Ballarat Tramways and trams prior to the closure of the tramway system.Set of 10 digital images of Ballarat trams prior to closure, scanned from original slides by Tony Smith, 1971 prior to closure of the system. .1 - 13 at the Parker St loop, Sturt St west waiting for another tram to arrive - Mercedes Benz car pull out around the stationary tramcar. .2 - 13 and another single trucker at the City terminus, north side of Sturt St. Note the conductor in the distance with a point bar about to hop onto the tram turning into Lydiard St North. Has the Post Office in the background. .3 - 26 arriving at the City stop, with the Mechanics Institute and Cooks Provide Hotel in the background. Tram has destination of Gardens via Drummond St North. .4 - 33 and 12 in Lydiard St Nth at Sturt St. 33 (Lydiard St Nth), 12 (Sebastopol). Has the post office and other buildings in the background .5 - 12 and 26 at city stop, south side with Town Hall and Myers in the background. 12 has destination of Sebastopol. .6 - 12 at intersection of Drummond St and Sturt St with Mobil petrol station in background and ad for Marshall batteries. Has the tram stop sign on the left hand side. Tram has destination of Sebastopol and a Twin Lakes sign. .7 - 30 northbound in Drummond St south at Sturt St about to turn into Sturt St. Has destination of Lydiard St Nth. Has the Southern Cross hotel in the background. .8 - 31 turning from Drummond St North into Sturt St, en route to Victoria St with the Shell service station in the background. Hospital Corner. Tram has roof advertisements for Johnnie Walker whisky. .9 - 30 and 31 (from above photos) in Sturt St. .10 - Tony Smith standing on the doorstep of 26 at Mt Pleasant terminus. Has the store in the background with The Sun and Robur tea adverts. trams, tramways, parker st loop, sturt st west, sturt st, conductors, drummond st, hospital corner, mt pleasant, tram 13, tram 26, tram 12, tram 30, tram 33