Showing 1656 items
matching tramways signs
-
 Ballarat Tramway Museum
Negative - Set of 5, Campbell Duncan, Carey Grammar school visit to Ballarat, 13/09/1969 12:00:00 AM
Yields information about the visit of the Carey Grammar school visit to Ballarat and the Eureka siding in 1969.Set of five negatives of the Carey Railway Club visit to Ballarat on Saturday 13/9/1969. .1 - 34 with the destination of Mt Pleasant at Carlton St loop, though running a Special .2 - 17 and 34 with another single trucker at Gardens Loop - 17 has a Twin Lakes sign and destination of Gardens via Sturt St West. 34 showing Special. .3 - side on view of 34 at Carlton St Loop - with a SEC electric cooking roof advert. .4 - DERM entering the Eureka Siding. .5 - DERM leaving the Eureka Siding, has the Millar Bros engineering works in the background.trams, tramways, tours, eureka, wendouree parade, carlton st loop, carlton st, railways, tram 34, tram 17 -
 Ballarat Tramway Museum
Negative - Set of 3, Campbell Duncan, 2/07/1971 12:00:00 AM
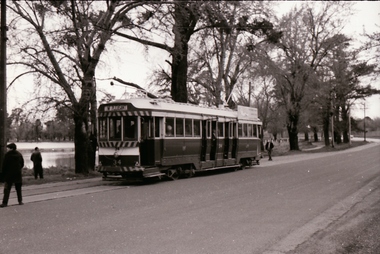
Yields information about tram operations and the street views in Wendouree Parade near Gardens Loop and signage at the Loop.Set of 3 photographs taken on 28/2/1971 by Campbell Duncan of trams in Wendouree Parade at the Gardens .1 - No. 34 departing Gardens Loop to Mt Pleasant, with the Kiosk in the background. .2 - ditto and a very quiet road. .3 - Tram stop signs at Gardens Loop. See also Reg Item 6696 for the photo of the tram arriving at the loop.trams, tramways, wendouree parade, gardens loop, tram 34 -
 Ballarat Tramway Museum
Negative - Set of 3, Campbell Duncan, 10/08/1971 12:00:00 AM
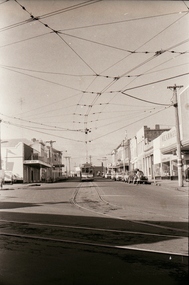
Yields information about tram operations and the street views at Stones Corner.Set of 3 photographs taken on 10/8/1971 by Campbell Duncan of trams in the Main of No. 31 approaching the junction with Bridge St and Victoria St. The tram has the destination of Gardens via Drummond North and a Twin Lakes sign. In the background are the Avery Scales store, Wearwell and Stones Corner. Shows the overhead arrangements at this location.trams, tramways, main road, stones corner, tram 31 -
 Ballarat Tramway Museum
Certificate - Framed Certificate - set of 3, State Electricity Commission of Victoria (SECV), "Award of Honour - Industrial Safety", 1962 to 1964
The State Electricity Commission of Victoria 1921 to 1993 was responsible for electricity generation in Victoria and the operation of three Provincial Tramways. It had a strong safety focus for the time. These certificates show the safety focus and the reporting of safety performance to employees and visitors.Demonstrates the safety record of the SEC Ballarat depot, has a strong association with the workers and Yields information about their performance and dates.Set of three Timber framed certificates, glass front, black painted side timber with brown paper or card or Masonite backing and masking tape around the edges, titled "Award of Honour - Industrial Safety", that the Tram Depot Ballarat had established a meritorious record for safe work with no lost time. Gives the period and the date of the away. Signed by the Manager - A. W. Linaker? or F. White and the Chairman of the Safety Committee "Wm K. Trusler". Screw holes in the top and the bottom of the frame centrally. .1 - dated 12-1-1962 for 1 year and 103 days. .2 -dated 19-6-1963 for 1 year and 155 days. .3 - dated 19-6-1964 - for 1 year.trams, tramways, depot, sec, safety, personnel -
 Ballarat Tramway Museum
Photograph - Digital image Set of 5, George Coop, 1968 - 1970
Yields information about the tram operations on the Sebastopol line at Grey St and the terminus.Five (5) Digital images taken by George Coop during the period 1968 - 1970, of SEC trams on the Sebastopol line .1 - Trams 40 (Sebastopol) and 41 (Lydiard St North, with Johnny Walker Whiskey roof adverts) cross at Grey St. .2 - Trams 40 (Lydiard St North) and 35 (Sebastopol) cross at Grey St. Photos has the street signs - Gray St and Bala St in the photo. .3 - ditto, with a male passenger with walking stick boarding 40 - photo shows the loop arrangements. .4 - Tram 40 at the Sebastopol terminus - has destination of Lydiard St North, the Royal Mail Hotel in the background. .5 - ditto with poles being reversed. Tram has roof adverts for Eureka Tiles and a SEC roof advert. trams, tramways, sebastopol, grey st loop, gray st, passengers, crews, tram 40, tram 41, tram 35 -
 Ballarat Tramway Museum
Photograph - Digital image Set of 6, George Coop, 1968 - 1970
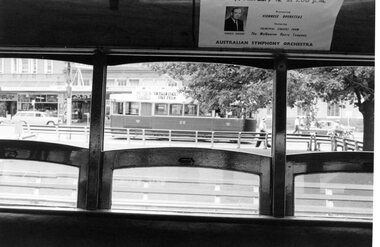
Yields information about the interior views of the Ballarat tramcars and the driver's compartment.Six (6) Digital images taken by George Coop during the period 1968 - 1970, of the interior of trams. .1 - looking out of the open windows of a the saloon of a single trucker to the tram 28, at the City terminus. There is an Australian Symphony Orchestra interior advert. .2 - Looking through the open passenger door, with No. 17 behind. .3 - Looking from the saloon towards to the open end, no car number apparent. .4 - Looking at the driver's bulkhead with the used ticket box and a hand on the controller. .5 - View of the driver's compartment - T1F Controller, PV brake valve and "Pay as you enter" reversed. .6 - Close up of the Westinghouse T1F controller. trams, tramways, interiors, controllers, brake valves, signs, westinghouse, tram 17, tram 28 -
 Ballarat Tramway Museum
Photograph - Black & White Photograph/s, Charles Craig, mid 1950's
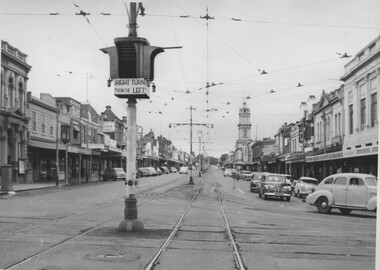
Photograph of the intersection of Ryrie and Moorabool Streets Geelong looking West along Ryrie St, showing the bar type traffic lights and that right hand turns were done from the left lane. Note the Safety zone sign. Two prints held - one large and one small in a vertical form with the traffic lights featured.. trams, tramways, geelong, ryrie st, moorabool st, traffic lights, safety zone -
 Ballarat Tramway Museum
Photograph - Black & White Photograph/s, Charles Craig, mid 1950's
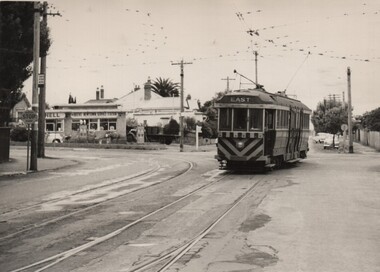
Photograph of the intersection of a bogie tram with destination of East and hazard stripes and dash canopy lighting turning from Pakington St (from West) into Aberdeen St at Pakington St junction. In the background is the Shell service station. Note the metal tram stop sign on the left. Two copies of the print held. trams, tramways, geelong, aberdeen st, east, west, tram stops -
 Ballarat Tramway Museum
Photograph - Black & White Photograph/s, Charles Craig, mid 1950's
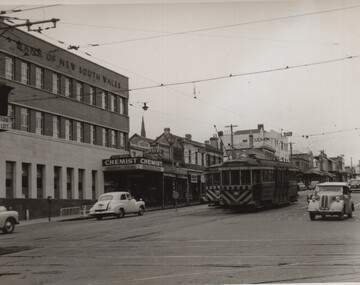
Photograph of the intersection of Ryrie and Moorabool Streets Geelong looking south along Moorabool St, with two bogie trams in Ryrie St, both with safety or hazard stripes. Trams have the destination of Belmont and North. Has the Bank of NSW in the view, E. A. O'Meara Chemist advertising Kodak film and the Geelong Nursery Nook. Adjacent to the tram for Belmont is the safety zone sign. trams, tramways, geelong, ryrie st, moorabool st, traffic lights -
 Ballarat Tramway Museum
Photograph - Black & White Photograph/s, Charles Craig, late 1960's early 1970's
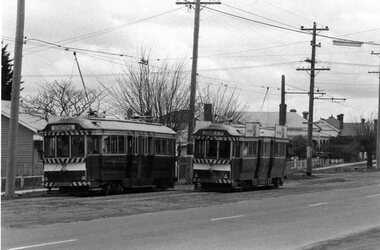
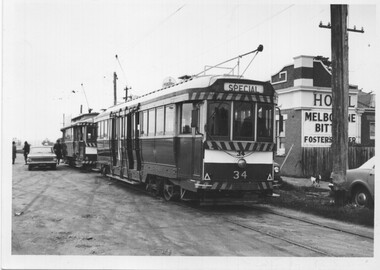
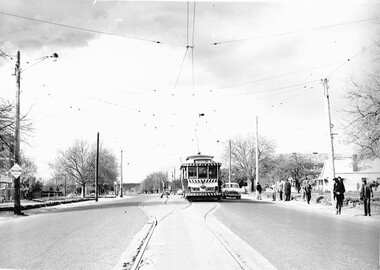
Yields information about tram operations on the Sebastopol line.Photograph of Ballarat trams (from the rear), 30 and 34 at the Sebastopol terminus - undated - late 1960's early 1970's with the Royal Mail hotel in the background. No. 34 running a special. On the hotel is a sign for Melbourne Bitter and Foster's Lager. Photo by Charles Craig? Has in red ink on rear - "34 and 30 Sebastopol"trams, tramways, sebastopol, tram 30, tram 34 -
 Ballarat Tramway Museum
Photograph - Black & White Photograph/s, Charles Craig, early 1950's?
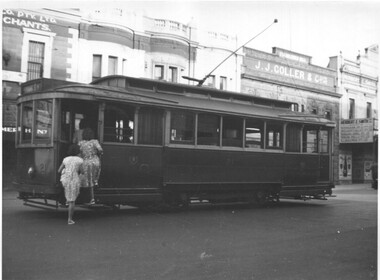
Yields information about the use of the trams and the appearance of Lydiard St North buildings during the early 1950's.Photograph of No. 21, in Lydiard St North, near the Railway Station, boarding two lady passengers. Has J. J. Coller & Co. building and the Hersert E Smith building and sign in the view. Early 1950's? photo by Charles Craig. trams, tramways, lydiard st north, tram 21 -
 Ballarat Tramway Museum
Photograph - Black & White Photograph/s set of 2, Charles Craig, 1950s
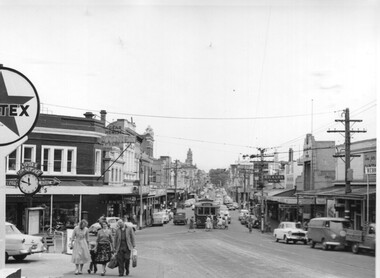
Yields information about the traffic and appearance of Bridge St during the 1950's.Set of two black and white photographs of trams in Bridge St at the intersection with Main Road and Victoria St .1 - tram at the intersection with Stones Corner and other shops in the background. Includes the Caltex services station, the Listers for Service clock and direction sign, with many people leaving the tram and walking along Victoria St. Has the Gear Chemist, Ricksha Paint and other shops in the view. .2 - No. 28 - for Gardens via Sturt St West and the intersection. Photo possibly early 1950's. Both photos by Charles Craig trams, tramways, bridge st, main road, victoria st, tram 28 -
 Ballarat Tramway Museum
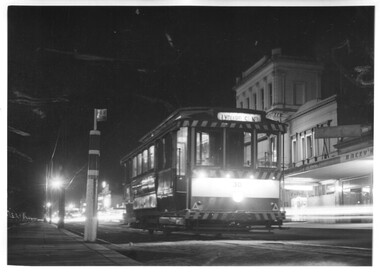
Photograph - Black & White Photograph/s, Charles Craig, early 1970's
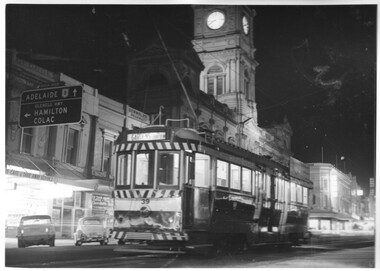
Yields information about the use of the appearance of City terminus and vehicles during the early 1970's and demonstrates night photography.Black and white photograph of Ballarat tram 39 at night, at the city terminus, south side of Sturt St with the Town Hall in the background. Tram has the destination of Gardens via Sturt St west. Has the signs for Gemmola's Pharmacy and Georges Oyster bar in the background. Photo by Charles Craig possibly early 1970's. trams, tramways, sturt st, city, night photo, tram 39 -
 Ballarat Tramway Museum
Photograph - Black & White Photograph/s, Charles Craig, early 1970's
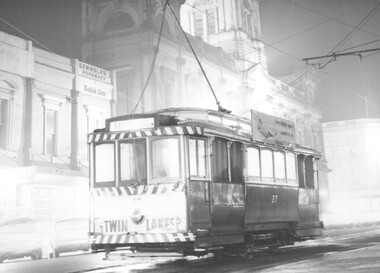
Yields information about the use of the appearance of City terminus and vehicles during the early 1970's and demonstrates night photography.Black and white photograph of Ballarat tram 27 at night, at the city terminus, south side of Sturt St with the Town Hall in the background. Tram has the destination of Gardens via Sturt St west. Has the signs for Gemmola's Pharmacy in the background. Photo by Charles Craig possibly early 1970's. Two copies held. trams, tramways, sturt st, city, night photo, tram 27 -
 Ballarat Tramway Museum
Photograph - Black & White Photograph/s, Charles Craig, early 1970's
Yields information about the use of the appearance of City terminus and vehicles during the early 1970's and demonstrates night photography.Black and white photograph of Ballarat tram 30 at the City terminus at night. Tram has the destination of Lydiard St North. In the background is the SEC offices and Racey's store. The small stop pole with the End of Section sign is in the photograph. Photo by Charles Craig possibly early 1970's. trams, tramways, sturt st, city, night photo, tram 30 -
 Ballarat Tramway Museum
Photograph - Black & White Photograph/s set of 2, Charles Craig, Aug. 1971
Yields information about the intersection of Sturt St and Hamilton Ave by trams prior to the closure of the SEC operated system.Black and White photograph of Nos 13 and 14 turning from Hamilton Ave into Sturt St west. Both tram have the destination of City. No. 13 has a Twin Lakes sign. Photo by Charles Craig possibly August 1971, prior to closure as the new bus stops signs are in view. trams, tramways, sturt st west, closure, hamilton ave, tram 13, tram 14 -
 Ballarat Tramway Museum
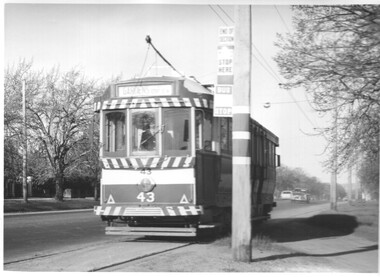
Photograph - Black & White Photograph/s, Charles Craig, Aug. 1971
Yields information about the Alfred St tram stop, showing signage prior to the closure of the SEC operated system.Black and White photograph of No. 43 with the destination of Gardens via Sturt St West at the Alfred St stop. Stop has the End of section sign, Tram stop here and a new Bus stop sign. Photo by Charles Craig August 1971, prior to closure as the new bus stops signs are in view. trams, tramways, sturt st west, closure, signs, tram stops, bus stops, alfred st, tram 43 -
 Ballarat Tramway Museum
Photograph - Black & White Photograph/s set of 2, Charles Craig, 1971
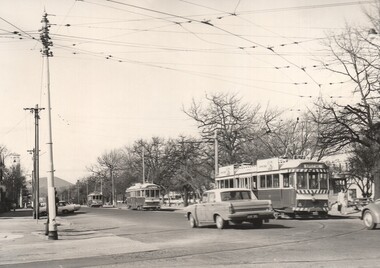
Yields information about the intersection of Sturt St and Drummond St and its use by trams in the period before the closure of the SEC system.Set of two Black and White photographs of trams near the intersection of Sturt St and Drummond St North, Hospital Corner. .1 - No. 41, another bogie and a single trucker travel along Sturt St south, the last tram has a destination of Special. .2 - Photo looking at the median strip with a tram on either side. Single trucker with a Twin Lakes sign inbound and another single truck outbound. Shows the position of the shelter and the ESCo switch box. Has a Marshal battery advert on a building in the background. Photo by Charles Craig - during 1971. trams, tramways, sturt st, hospital corner, drummond st, tram 41 -
 Ballarat Tramway Museum
Photograph - Black & White Photograph/s, Charles Craig, 1971
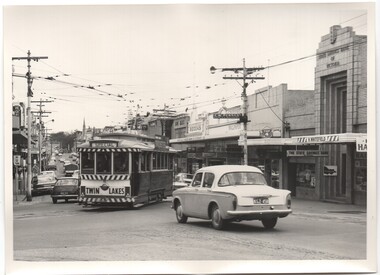
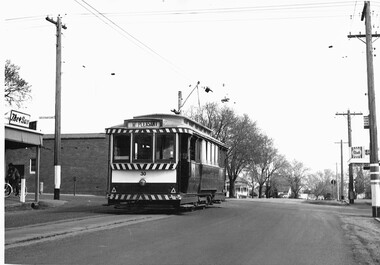
Yields information about Stones Corner, associated building and its use by trams in the period before the closure of the SEC system. Black and White photograph of tram of No. 11 at Stones Corner turning from Bridge St into Main Road. Tram showing Special, has a Twin Lakes sign and a Briquettes roof advert. In the background is H. Whitefield, the State Savings Bank of Victoria, a directional sign for C. W. Pennant wall paper Rodda and the ANZ bank? Photo by Charles Craig - during 1971. trams, tramways, bridge st, stones corner, main road, tram 11 -
 Ballarat Tramway Museum
Photograph - Black & White Photograph/s, Charles Craig, 1971
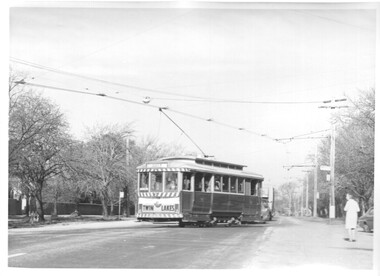
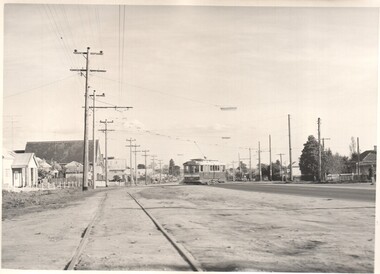
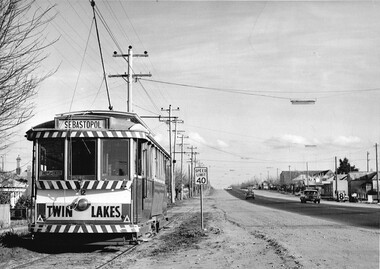
Yields information about the appearance of Albert St where the tram crossed at Ophir St, Sebastopol. Black and White photograph of a single trucker tram, with a Twin Lakes sign crossing Albert St, near Ophir St en route to Sebastopol. Shows the street scene at the time. Photo by Charles Craig - during 1971. trams, tramways, albert st, sebastopol, ophir st -
 Ballarat Tramway Museum
Photograph - Black & White Photograph/s - set of 3, Charles Craig, 1971
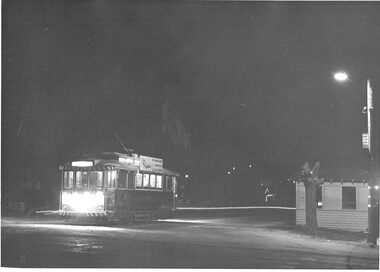
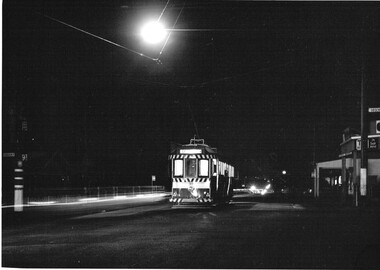
Yields information about the appearance and use of the Lydiard St terminus at night.Set of three black and white photographs of No.30 at the Lydiard St North terminus at night. Has the tram stop shelter in the view and the tram stop signs. Tram fitted with a SEC All electric cooking roof advert. Tram has the destination of Sebastopol. .1 - photo with shelter in the view - three copies .2 - photo with the terminus and street lights .3 - as for .1, but on the side of the street, has the lights of Ballarat in the view. Photo by Charles Craig - during 1971. trams, tramways, lydiard st north, night photo, tram 30 -
 Ballarat Tramway Museum
Photograph - Black & White Photograph/s set of 2, Charles Craig, 1971
Yields information about the appearance and use of the Mt Pleasant terminus at night.Set of two black and white photographs of No. 39 at the Mt Pleasant terminus, Barkly St. Have the shop at the terminus and the directional sign to the Observatory in the view, along with the tram stop pole. Adverts for TV week and Peter's Ice Cream are visible on the shop. Photo by Charles Craig - during August 1971 as one of the photos has the new bus stop sign in the view. trams, tramways, mt pleasant, barkly st, night photo, tram stops, bus stops, tram 39 -
 Ballarat Tramway Museum
Photograph - Black & White Photograph/s, Charles Craig, 1971
Has a strong association the closure of the Victoria St line and the special trams on the Saturday before. Yields information about the events.Black and white photographs of No. 11, inbound in Victoria St, at King St loop, showing Special. Photo most likely 21 or 22/8/1971 at the time of closure. Has many photographers n the view. Tram has a Twin Lakes sign. Photo by Charles Craig, probably August 1971.trams, tramways, victoria st, king st, closure, special trams, tram 11 -
 Ballarat Tramway Museum
Photograph - Black & White Photograph/s, Charles Craig, 1971
Yields information about the Mt Pleasant terminus just before the closure of the SEC operated system,Black and white photographs of No. 30 at the Mt Pleasant terminus, with the shops on each corner in the view. Adverts for The Sun, Streets Ice Cream. Pole on the right hand side has a "Car Stop Here" and "End of Section" sign. Tram has the destination of Mt. Pleasant. Photo by Charles Craig, probably August 1971.trams, tramways, barkly st, mt pleasant, signs, tram 30 -
 Ballarat Tramway Museum
Photograph - Black & White Photograph/s, Charles Craig, 1971
Yields information about the Victoria St terminus just before the closure of the SEC operated system,Black and white photographs of No. 12 at the Victoria St terminus, with the destination Gardens via Drummond St North. Photo most likely 21/8/1971 at the time of closure and possibly during the ARHS / TMSV tour. Has many photographers in the view. Tram has a Twin Lakes sign. Meagher's Hotel in the background with a Victoria Bitter sign. Photo by Charles Craig, probably August 1971.trams, tramways, victoria st, closure, special trams, tram 12 -
 Ballarat Tramway Museum
Photograph - Black & White Photograph/s set of 2, Charles Craig, 21/08/1971 12:00:00 AM
Yields information about tram operations in Wendouree Parade prior to closure following a big rain storm.Set of two black and white photographs of trams in Wendouree Parade after the big rain / hail storm on Friday 21/8/1971 .1 - No. 41 at the intersection with St Aidans Drive and Wendouree Parade, Tram has two Johnnie Walker roof advertisements .2 - No. 12 in Wendouree Parade, near Haddon St with destination of Gardens via Drummond North with a tram stop shelter in the background. Tram has a Twin Lakes sign. Photo by Charles Craig, at the time of the first closure of the Ballarat system, 23/8/1971 when the Victoria St line closed.trams, tramways, wendouree parade, haddon st, shelters, st aidans drive, closure, tram 41, tram 12 -
 Ballarat Tramway Museum
Photograph - Black & White Photograph/s, Charles Craig, Aug. 1971
Yields information about tram operations in Albert St Sebastopol and the Grey St crossing loop.Black and white photograph of No. 12 about to enter the Grey St loop, Albert St. Alongside the tram is a 40mph speed limit sign, Albert St shops and a Forest City signal. Photo by Charles Camera, at the time of the first closure of the Ballarat system, 23/8/1971 when the Victoria St line closed.trams, tramways, albert st, grey st loop, sebastopol, tram 12 -
 Ballarat Tramway Museum
Photograph - Digital image, W. J. Llewelyn, c1971
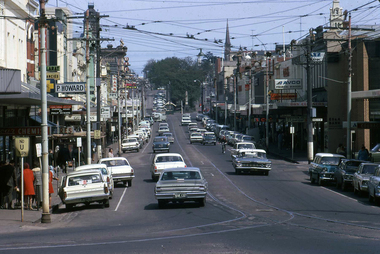
Yields information about the Royal Visit to Ballarat and the appearance of Bridge St during 1956 and just prior to the closure of the tramway.Set of three colour digital images taken of the Bridge St Ballarat by W. J. Llewelyn. .1 - Looking west along Bridge St from the Service Station, shows the various buildings, tram track, tram shelter and overhead. Appears to be c1971. .2 - Look east from Grenville St, 1954 with the Royal Visit decorations in the placed. Has the Dickins Self Service Grocery shop, Bucks Head Hotel and a sign for Morsheads store. Tram tracks and overhead apparent along with two trams in the far distance. .3 - Looking west along Sturt St from Bridge and Grenville St - shows the buildings in the background, tramway overhead, general congestion, letter box, tram stop shelter. A tram is parked in the loop. Has a Davies Bread advert on the Mechanics Institute building, also Thomas Jewellers, T& G and the Odeon Theatre sign.trams, tramways, bridge st, victoria st, stones corner, royal visit, grenville st, shelters, sturt st -
 Ballarat Tramway Museum
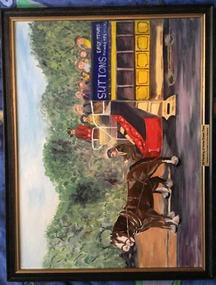
Painting - Framed Painting, Alan Dixon, "Oil Painting of Horse Drawn Tram", 2012
Has a strong association with the artist and demonstrates activities the Ballarat Tramway MuseumFramed painting - wooden frame - black and gold colour of Horse Tram No. 1 in Wendouree Parade, titled "Oil Painting of Horse Drawn Tram", fitted with a plastic gold engraved sign "Oil Painting of Horse Drawn Tram / painted and donated by Edna Stephens". Framed with a white card back and brown plastic tape - with metal hanging wire framed by Macarthur Framework and Gallery 1008 Sturt St Ballarat. See Inscriptions for note on artist.On rear in ink "Edna Stephens painted 2012 / Horse Drawn Tram Lake Wendouree Ballarat"trams, tramways, wendouree parade, painting, art work -
 Ballarat Tramway Museum
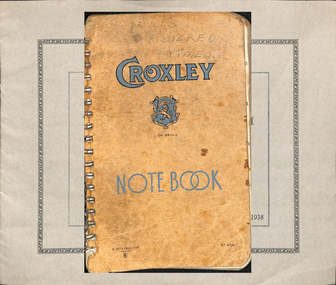
Ephemera, John Dixon Products and Norm Hunt, "Drivers Rostered Times", May. 1970
Has a strong association with tram crews and the rosters crew workings and Norm Hunt. Prepared by crews from sheets to enable them to know what service times to run, meal times, details of crew changes etc, based on their allocated shift or run from the roster.Notebook - 60 pages with brown card covers, wire spiral bound - Croxley or John Dixon Product with the Croxley symbol on the front cover and a list of their wire bound books on the rear. Each sheet faint ruled, both sides. Each sheet, the typewritten details of each SEC Ballarat run - giving sign on times, notes, timetables, which run taken or taken by, meal times, notes with regard to special instructions, finish times and total hours worked. Separated for Weekdays, Saturdays and Sundays. The May 1970 roster? On the last sheet has a heading "Owe Days", with names and number of days owed. See also Reg item 2298 and 4073 for other versions. trams, tramways, ballarat, rosters, employees, shifts, timetables