Showing 5062 items matching "crown"
-
 Ithacan Historical Society
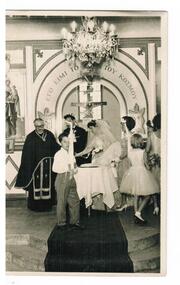
Photograph, Greek Orthodox wedding ceremony, c 1960s
The photograph was taken during the ceremony of the Sacrament of Marriage when the wedding party, led by the priest circles the ceremony table. Known as the Dance of Isaiah, it forms part of the rich and symbolic Greek Orthodox wedding. The circling represents a dance for the joy of God’s presence and the couple is lead by the priest who holds the Holy Gospel. The wedding crowns (stefana), which represent the couple being king and queen of their home, are joined by a ribbon symbolizing the couple's unity. Father Voyatzoglou is the priest officiating at the wedding service. A black and white photograph of a Greek wedding ceremony taken during the time of the ritual 'procession'. The wedding party at the altar includes the priest, the bride and groom, four bridesmaids, a flower girl and a candle bearer. A large chandelier hangs above the altar and there is a partial view of a religious icon which is part of the iconostasis, a wall which separates the nave from the sanctuary.wedding ceremony -
 Bendigo Military Museum
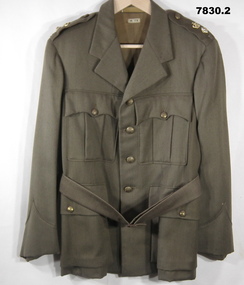
Uniform - JACKET, SERVICE DRESS, ARMY
1. Jacket - khaki colour wool/polyester fabric Service dress style with belt. Buttons - dull gold coloured metal with shank with raised emblem and lettering. Crown, map of Australia and "AUSTRALIAN MILITARY FORCES". Collar, shoulder epaulettes with three metal rank insignia pips. Gold and red crown, officer pip, Letter "R" = Lieutenant Colonel Retired. Four front pockets - top patch pockets with button closure flap. Lower - inset pockets with button closure flap. Khaki colour cotton sateen fabric lining body of jacket, brown strip lining to sleeves. White cotton manufacturers label on lining inside below collar. 2. Belt - khaki colour wool/polyester fabric service dress style. Copper colour metal buckle with two pins. Leather belt keepers and brown plastic buttons.Manufacturers information on label - dark brown ink print. 1. "M.TX".uniform, army, service dress -
 Bendigo Military Museum
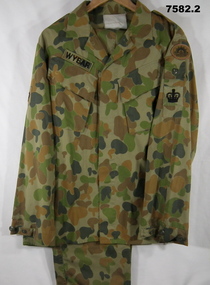
Uniform - UNIFORM, CAMOUFLAGE, ARMY, Australian Defence Industries, c
Uniform shirt and trousers issued to WO1 "Graham Russell WYBAR" Reg No. 317098. Refer Cat No. 6372.25 for photographs of G.R. Wybar.1. Shirt - camouflage jungle pattern, green and brown colours, polyester/cotton fabric with long sleeves, shoulder epaulettes, two front pockets with two button down flaps, left sleeve pocket with button down flap, green colour plastic buttons. Left shoulder patch with Rising Sun, crown and " THE AUSTRALIAN ARMY". Two rank insignia on sleeves and crown for WO1. Polyester fabric manufacturers label - no visible print information. 2. Trousers - camouflage jungle pattern green and brown colours, polyester/cotton fabric. Green colour plastic buttons, metal zipper fly, two side pockets, two front to side pockets with two button down flaps, back pocket and button down belt loops. Waist and pocket lining - polyester/cotton fabric. No manufacturers label.graham russell wybar, uniform, army, camouflage work dress -
 Bendigo Historical Society Inc.
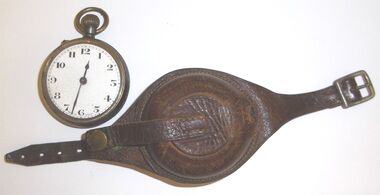
Functional object - FOB WATCH IN LEATHER PROTECTIVE COVER
Fob watch in leather protective cover with strap and buckle / stamp imprint on back of leather cover - Prov.pat.No Fob watch in leather protective cover with strap and buckle / stamp imprint on back of leather cover - Prov.pat.No. 14450 - letters in Biro 'W.A.V. 5 / inside of cover stamped '26' / stamp on strap -picture of a crown and word ' Brand ' / Fob watch - words on bottom of watch face 'Made in Italy' , blue metallic watch hands , dirt and mold round edges , inside the watch words 'Made in Italy ' ,numbers '35209. . 14450 - letters in Biro 'W.A.V. 5 / inside of cover stamped '26' / stamp on strap -picture of a crown and word ' Brand ' / Fob watch - words on bottom of watch face 'Made in Italy' , blue metallic watch hands , dirt and mold round edges , inside the watch words 'Made in Italy ' ,numbers '35209.personal effects -
 Bendigo Historical Society Inc.
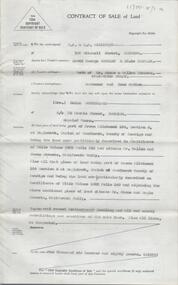
Document - H. A. & S. R. WILKINSON COLLECTION: CONTRACT OF SALE
Contract of sale of land dated 12th August, 1954 between Mr. D. G. & Mrs. E. Sumbler (vendor) and Mrs. H. Sutherland (purchaser). Property: land being part of Crown allotment 150 section M at Eaglehawk, Parish of Sandhurst, City of Bendigo, land described in certificate of title volume 5922 folio 213 and situate corner Wallen and Stone Streets, California Gully. Also all that piece of land being part of Crown allotment 150 section M at Eaglehawk, Parish of Sandhurst City of Bendigo, land described in certificate of title volume 1092 folio 240 and adjoining the above mentioned land situate corner Stone and eagle Streets, California Gully, together with 5 roomed weatherboard dwelling, all sundry outbuildings and all linos. Price: 1,680 pounds.organization, business, h.a. & s.r wilkinson real estate -
 Bendigo Historical Society Inc.
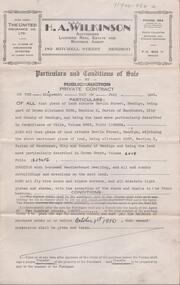
Document - H. A. & S. R. WILKINSON COLLECTION: CONTRACT OF SALE
Conditions of sale by private contract dated 19th July, 1950 between R. C. Orde (vendor) and H. J. & M. E. Stephenson (purchaser). Property: all that piece of land situate in Havlin Street, Bendigo being part of Crown allotment 326A section H, Parish of Sandhurst City of Bendigo, land described in certificate of title volume 5965 folio 1192804. Also all that piece of land situate in Havlin street adjoining the above mentioned land being allotment 326C section H land described in crown Grant volume 6018 folio 1293456, together with 5 room weatherboard dwelling and all sundry outbuildings, all fly wire doors, window screens, electric light globes and shades, with exception of the shade and chains in the front bedroom. Price: 2,585 pounds.organization, business, h.a. & s.r wilkinson real estate -
 Whitehorse Historical Society Inc.
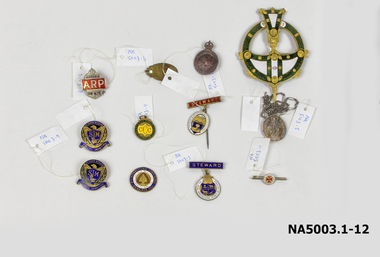
Medal - Badges, Approx 4. 1914 -1918 11. 1928-1929
1. Small circular white badge/red cross - bar pin 'A.N.C.M' 2. Oval medal with bar, long pin- red steward badge Royal Agricultural Show 3. Ditto - blue steward badge/brooch pin 4. AIF batch surmounted by crown 5. Oval Catholic religious medal/long chain 6. Oval badge: inscribed 7. Gold/Red/White/blue enamel badge - Free Trade 1929 8. Silver badge surmounted by crown/AP on red ground 9. Blue & gold badges: Eagle/shield/St John's Mitcham 10 & 11. Blue & gold badges: Eagle/shield/St John's Mitcham 11. Green & yellow circular on ring: Caufield Cricket Club 12. Ornate green/gold/white circular badge + pointed shaft1. Deo et Nomini Servimus A N C M 2. The Royal Agricultural Society of Victoria/Steward 3. The Royal Agricultural Society of Victoria/Steward 4. AIF - rest illegible/reverse: 4B349 5. Mostra TE ISS/Matrim/ Reverse: Congregation Des Enfants De Marie / scratched initials & date: B.Y.M 1891 6. P.J. Markham 678 Whitehorse Rd Mitcham Ringwood WNE 198 7.To promote land value, taxation and free trade. 4th International Conference Edinburgh 1929/Reverse: 50th anniversary of 'Progress & Poverty' by Henry George 8. Victoria ARP AH428 9&10. St John's Mitcham SJM Fide et Amorevinco/Reverse: scratched initials M.M. Millance 11. Caulfield Cricket Club1828-29 ccc/reverse: 20p.j. markham, mitcham post office -
 Bendigo Historical Society Inc.
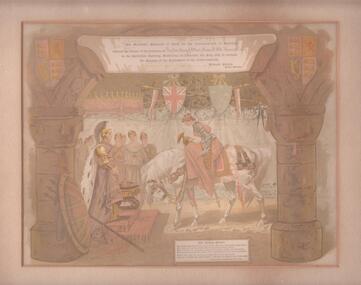
Document - DOCUMENT. ILLUMINATED REQUEST, 1901
Document. Illuminated request. His Majesty's Ministers of the State for the Commonwealth of Australia request the bonour of the prescence of The Secretary of Mcivor Shire Mr. H. D. Thomas and Lady in the Exhibition Building, Melbourne, on Thursday, 9th May , 1901, to witness the Opening of the Parliament of the Commonwealth. Edmund Barton, Prime Minister. At the bottom of the Picture there is a quote. The Young Queen. Authored by Kipling's Commonwealth Ode. Her hand was still on her sword hilt---the spur was still on her heel--- she had not cast her harness of grey war-dinted steel; High on her red-- splashed charger , beautiful, bold, and browned, Bright--eyed out of the battle, the young Queen rodeto be crowned, Loyal she gave the greeting, royal she bowed her head, Crying 'Crown me, my mother,' and the old Queen stood and said. -
 Melbourne Tram Museum
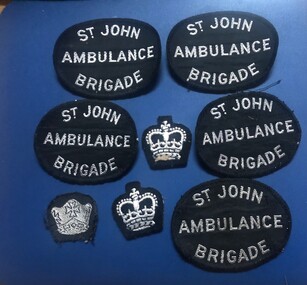
Uniform - Cloth badge, St Johns Ambulance, 1970's to mid 1980's
Set of uniform items for the "St John Ambulance Brigade" of Victoria used by Frank Kuffer as a member of the Brigade. .1 - Comprises: a. - 5 large uniform name badges with the words "St John Ambulance Brigade". Made on black cloth - backing, black stitching on the edge and the words "Conductor Trainer" stitched in white cotton - 54H x 71W. One of the badges has four silver female press studs in the corners. b. - two small badges with a crown (St Edward's Crown?)sewn in white stitching on a black cloth background - 32H x 31W. c. - one small coronet - 72H x 30W - has loose black threads. .2 - large uniform button - about 28mm diameter - black plastic with brass lug to enable the button to be sewn to a uniform with the organisation symbol and logo. .3 - small uniform button - about 16mm diameter. .trams, tramways, mmtb, ambulances, uniforms, st johns ambulance -
 Bendigo Historical Society Inc.
Document - MCCOLL, RANKIN AND STANISTREET COLLECTION: INDENTURE GOLD MINING LEASE NO. 11145 CROWN AND NORTH DEBORAH MINING COMPANY, 14th February, 1941
6 page document plus map : Gold mining lease No. 11145 between Crown ( King George VI) and North Deborah Mining Company, Parish of Sandhurst, dated 14th February, 1941. Map: Lease No. 11145 'Mining District of Bendigo, County of Bendigo, Parish of Sandhurst. Total area 48 acres, 3 roods, 22 perches. Map has extensive colour key indicating depths below surface that will be mined. Crown land and surface excised shown in orange cross-hatching. Lease holdings on map: 10753, 11020, 1363 T.L., 1115 T.L., 11013, 11062, 11033, 9988. Dam shown on 11013. Railway line marked through centre of map. Map refers to central area of Bendigo and includes reference to Hargreaves Street, Violet Street, Lily Street, Breen Street and Sullivan Street.bendigo, mining, north deborah mining company, breen street, lilly street, hargreaves street, voilet street, sullivan street. -
 Flagstaff Hill Maritime Museum and Village
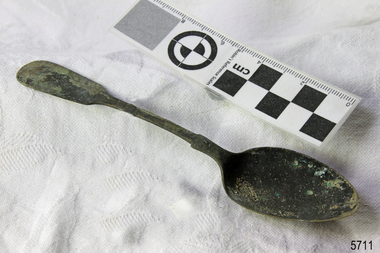
Domestic object - Spoon, c. 1878
This tea spoon is from the wreck of the LOCH ARD, a Loch Line ship of 1,693 tons which sailed from Gravesend, London, on 2 March 1878 with 17 passengers and a crew of 36 under Captain George Gibbs. “The intention was to discharge cargo in Melbourne, before returning to London via the Horn with wool and wheat”. Instead, on 1 June 1878, after 90 days at sea, she struck the sandstone cliffs of Mutton Bird Island on the south west coast of Victoria, and sank with the loss of 52 lives and all her cargo. The manifest of the LOCH ARD listed an array of manufactured goods and bulk metals being exported to the Colony of Victoria, with a declared value of £53,700. (202 bills of lading show an actual invoice value of £68, 456, with insurance underwriting to £30,000 of all cargo). Included in the manifest is the item of “Tin hardware & cutlery £7,530”. This teaspoon is one of 482 similar items of electro-plated cutlery from the LOCH ARD site, comprising spoons and forks of various sizes but all sharing the same general shape or design and metallic composition. 49 of these pieces display a legible makers’ mark — the initials “W” and “P” placed within a raised diamond outline, which is in turn contained within a sunken crown shape — identifying the manufacturer as William Page & Co of Birmingham. An electroplater’s makers’ marks, unlike sterling silver hallmarks, are not consistent identifiers of quality or date and place of manufacture. A similar line of five impressions was usually made to impress the consumer with an implication of industry standards, but what each one actually signified was not regulated and so they varied according to the whim of the individual foundry. In this case, the maker’s marks are often obscured by sedimentary accretion or removed by corrosion after a century of submersion in the ocean. However sufficient detail has survived to indicate that these samples of electro-plated cutlery probably originated from the same consignment in the LOCH ARD’s cargo. The following descriptions of maker’s marks are drawn from 255 tea spoons, 125 dessert spoons, and 99 table forks. These marks are clearly visible in 66 instances, while the same sequence of general outlines, or depression shapes, is discernible in another 166 examples. 1. A recessed Crown containing a raised Diamond outline and the initials “W” and “P” (the recognised trademark of William Page & Co) 2. An impressed Ellipse containing a raised, pivoted, Triangle in its lower part and bearing a Resurrection Cross on its upper section (a possible dissenting church symbol reflecting religious affiliation); OR a rounded Square impression containing a raised, ‘lazy’, letter “B” (possibly mimicking sterling silver hallmark signifying city of manufacture i.e. Birmingham) 3. An impressed rounded Square filled with a raised Maltese Cross (the base metal composite of nickel silver was also known as ‘German silver’ after its Berlin inventors in 1823) 4. A recessed Circle containing a Crab or Scarab Beetle image; OR a recessed Circle containing a rotated ‘fleur de lys’ or ‘fasces’ design 5. A depressed Diamond shape enclosing a large raised letter “R” and a small raised letter “D” (mimicking the U.K. Patent Office stamp which abbreviated the term ‘registered’ to “RD”, but also included date and class of patent) Suggested trade names for William Page & Co’s particular blend of brass plating are ‘roman silver’ or ‘silverite’. This copper alloy polishes to a lustrous gold when new, discolouring to a murky grey with greenish hue when neglected. HISTORY OF THE LOCH ARD The LOCH ARD belonged to the famous Loch Line which sailed many ships from England to Australia. Built in Glasgow by Barclay, Curdle and Co. in 1873, the LOCH ARD was a three-masted square rigged iron sailing ship. The ship measured 262ft 7" (79.87m) in length, 38ft (11.58m) in width, 23ft (7m) in depth and had a gross tonnage of 1693 tons. The LOCH ARD's main mast measured a massive 150ft (45.7m) in height. LOCH ARD made three trips to Australia and one trip to Calcutta before its final voyage. LOCH ARD left England on March 2, 1878, under the command of Captain Gibbs, a newly married, 29 year old. She was bound for Melbourne with a crew of 37, plus 17 passengers and a load of cargo. The general cargo reflected the affluence of Melbourne at the time. On board were straw hats, umbrella, perfumes, clay pipes, pianos, clocks, confectionary, linen and candles, as well as a heavier load of railway irons, cement, lead and copper. There were items included that intended for display in the Melbourne International Exhibition in 1880. The voyage to Port Phillip was long but uneventful. At 3am on June 1, 1878, Captain Gibbs was expecting to see land and the passengers were becoming excited as they prepared to view their new homeland in the early morning. But LOCH ARD was running into a fog which greatly reduced visibility. Captain Gibbs was becoming anxious as there was no sign of land or the Cape Otway lighthouse. At 4am the fog lifted. A man aloft announced that he could see breakers. The sheer cliffs of Victoria's west coast came into view, and Captain Gibbs realised that the ship was much closer to them than expected. He ordered as much sail to be set as time would permit and then attempted to steer the vessel out to sea. On coming head on into the wind, the ship lost momentum, the sails fell limp and LOCH ARD's bow swung back. Gibbs then ordered the anchors to be released in an attempt to hold its position. The anchors sank some 50 fathoms - but did not hold. By this time LOCH ARD was among the breakers and the tall cliffs of Mutton Bird Island rose behind the ship. Just half a mile from the coast, the ship's bow was suddenly pulled around by the anchor. The captain tried to tack out to sea, but the ship struck a reef at the base of Mutton Bird Island, near Port Campbell. Waves broke over the ship and the top deck was loosened from the hull. The masts and rigging came crashing down knocking passengers and crew overboard. When a lifeboat was finally launched, it crashed into the side of LOCH ARD and capsized. Tom Pearce, who had launched the boat, managed to cling to its overturned hull and shelter beneath it. He drifted out to sea and then on the flood tide came into what is now known as LOCH ARD Gorge. He swam to shore, bruised and dazed, and found a cave in which to shelter. Some of the crew stayed below deck to shelter from the falling rigging but drowned when the ship slipped off the reef into deeper water. Eva Carmichael had raced onto deck to find out what was happening only to be confronted by towering cliffs looming above the stricken ship. In all the chaos, Captain Gibbs grabbed Eva and said, "If you are saved Eva, let my dear wife know that I died like a sailor". That was the last Eva Carmichael saw of the captain. She was swept off the ship by a huge wave. Eva saw Tom Pearce on a small rocky beach and yelled to attract his attention. He dived in and swam to the exhausted woman and dragged her to shore. He took her to the cave and broke open case of brandy which had washed up on the beach. He opened a bottle to revive the unconscious woman. A few hours later Tom scaled a cliff in search of help. He followed hoof prints and came by chance upon two men from nearby Glenample Station three and a half miles away. In a state of exhaustion, he told the men of the tragedy. Tom returned to the gorge while the two men rode back to the station to get help. By the time they reached LOCH ARD Gorge, it was cold and dark. The two shipwreck survivors were taken to Glenample Station to recover. Eva stayed at the station for six weeks before returning to Ireland, this time by steamship. In Melbourne, Tom Pearce received a hero's welcome. He was presented with the first gold medal of the Royal Humane Society of Victoria and a £1000 cheque from the Victorian Government. Concerts were performed to honour the young man's bravery and to raise money for those who lost family in the LOCH ARD disaster. Of the 54 crew members and passengers on board, only two survived: the apprentice, Tom Pearce and the young woman passenger, Eva Carmichael, who lost all of her family in the tragedy. Ten days after the LOCH ARD tragedy, salvage rights to the wreck were sold at auction for £2,120. Cargo valued at £3,000 was salvaged and placed on the beach, but most washed back into the sea when another storm developed. The wreck of LOCH ARD still lies at the base of Mutton Bird Island. Much of the cargo has now been salvaged and some was washed up into what is now known as LOCH ARD Gorge. Cargo and artefacts have also been illegally salvaged over many years before protective legislation was introduced. One of the most unlikely pieces of cargo to have survived the shipwreck was a Minton porcelain peacock - one of only seven in the world. The peacock was destined for the Melbourne International Exhibition in 1880. It had been well packed, which gave it adequate protection during the violent storm. Today, the Minton peacock can be seen at the Flagstaff Hill Maritime Museum in Warrnambool. From Australia's most dramatic shipwreck it has now become Australia's most valuable shipwreck artefact and is one of very few 'objects' on the Victorian State Heritage Register. The LOCH ARD shipwreck is of State significance – Victorian Heritage Register S 417. Flagstaff Hill’s collection of artefacts from LOCH ARD is significant for being one of the largest collections of artefacts from this shipwreck in Victoria. It is significant for its association with the shipwreck, which is on the Victorian Heritage Register (VHR S417). The collection is significant because of the relationship between the objects, as together they have a high potential to interpret the story of the LOCH ARD. The LOCH ARD collection is archaeologically significant as the remains of a large international passenger and cargo ship. The LOCH ARD collection is historically significant for representing aspects of Victoria’s shipping history and its potential to interpret sub-theme 1.5 of Victoria’s Framework of Historical Themes (living with natural processes). The collection is also historically significant for its association with the LOCH ARD, which was one of the worst and best known shipwrecks in Victoria’s history. Unrestored tea spoon from the wreck of the LOCH ARD. The spoon design has a flattened fiddle-back handle, with a thin stem or shank, flared collar, and elongated bowl. The spoons metallic composition is a thin layer of brass alloy which has partially corroded back to a nickel-silver base metal. Approximately 15% of original electroplating remains with some verdigris. Five makers mark outlines are visible (Crown, Ellipse, Rounded Square, Circle, Diamond), including details of two: (3) Maltese Cross (4) Crab Designflagstaff hill maritime museum, shipwreck coast, great ocean road, loch line, loch ard, mutton bird island, loch ard gorge, electroplated cutlery, loch ard shipwreck, nickel silver, william page & co, birmingham, brass plating, makers marks -
 Flagstaff Hill Maritime Museum and Village
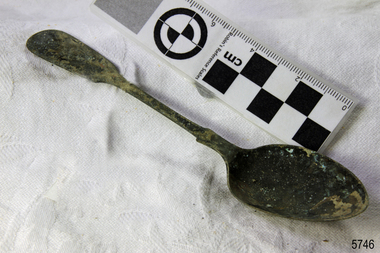
Domestic object - Spoon, c.1878
This tea spoon is from the wreck of the LOCH ARD, a Loch Line ship of 1,693 tons which sailed from Gravesend, London, on 2 March 1878 with 17 passengers and a crew of 36 under Captain George Gibbs. “The intention was to discharge cargo in Melbourne, before returning to London via the Horn with wool and wheat”. Instead, on 1 June 1878, after 90 days at sea, she struck the sandstone cliffs of Mutton Bird Island on the south west coast of Victoria, and sank with the loss of 52 lives and all her cargo. The manifest of the LOCH ARD listed an array of manufactured goods and bulk metals being exported to the Colony of Victoria, with a declared value of £53,700. (202 bills of lading show an actual invoice value of £68, 456, with insurance underwriting to £30,000 of all cargo). Included in the manifest is the item of “Tin hardware & cutlery £7,530”. This teaspoon is one of 482 similar items of electro-plated cutlery from the LOCH ARD site, comprising spoons and forks of various sizes but all sharing the same general shape or design and metallic composition. 49 of these pieces display a legible makers’ mark — the initials “W” and “P” placed within a raised diamond outline, which is in turn contained within a sunken crown shape — identifying the manufacturer as William Page & Co of Birmingham. An electroplater’s makers’ marks, unlike sterling silver hallmarks, are not consistent identifiers of quality or date and place of manufacture. A similar line of five impressions was usually made to impress the consumer with an implication of industry standards, but what each one actually signified was not regulated and so they varied according to the whim of the individual foundry. In this case, the maker’s marks are often obscured by sedimentary accretion or removed by corrosion after a century of submersion in the ocean. However sufficient detail has survived to indicate that these samples of electro-plated cutlery probably originated from the same consignment in the LOCH ARD’s cargo. The following descriptions of maker’s marks are drawn from 255 tea spoons, 125 dessert spoons, and 99 table forks. These marks are clearly visible in 66 instances, while the same sequence of general outlines, or depression shapes, is discernible in another 166 examples. 1. A recessed Crown containing a raised Diamond outline and the initials “W” and “P” (the recognised trademark of William Page & Co) 2. An impressed Ellipse containing a raised, pivoted, Triangle in its lower part and bearing a Resurrection Cross on its upper section (a possible dissenting church symbol reflecting religious affiliation); OR a rounded Square impression containing a raised, ‘lazy’, letter “B” (possibly mimicking sterling silver hallmark signifying city of manufacture i.e. Birmingham) 3. An impressed rounded Square filled with a raised Maltese Cross (the base metal composite of nickel silver was also known as ‘German silver’ after its Berlin inventors in 1823) 4. A recessed Circle containing a Crab or Scarab Beetle image; OR a recessed Circle containing a rotated ‘fleur de lys’ or ‘fasces’ design 5. A depressed Diamond shape enclosing a large raised letter “R” and a small raised letter “D” (mimicking the U.K. Patent Office stamp which abbreviated the term ‘registered’ to “RD”, but also included date and class of patent) Suggested trade names for William Page & Co’s particular blend of brass plating are ‘roman silver’ or ‘silverite’. This copper alloy polishes to a lustrous gold when new, discolouring to a murky grey with greenish hue when neglected. HISTORY OF THE LOCH ARD The LOCH ARD belonged to the famous Loch Line which sailed many ships from England to Australia. Built in Glasgow by Barclay, Curdle and Co. in 1873, the LOCH ARD was a three-masted square rigged iron sailing ship. The ship measured 262ft 7" (79.87m) in length, 38ft (11.58m) in width, 23ft (7m) in depth and had a gross tonnage of 1693 tons. The LOCH ARD's main mast measured a massive 150ft (45.7m) in height. LOCH ARD made three trips to Australia and one trip to Calcutta before its final voyage. LOCH ARD left England on March 2, 1878, under the command of Captain Gibbs, a newly married, 29 year old. She was bound for Melbourne with a crew of 37, plus 17 passengers and a load of cargo. The general cargo reflected the affluence of Melbourne at the time. On board were straw hats, umbrella, perfumes, clay pipes, pianos, clocks, confectionary, linen and candles, as well as a heavier load of railway irons, cement, lead and copper. There were items included that intended for display in the Melbourne International Exhibition in 1880. The voyage to Port Phillip was long but uneventful. At 3am on June 1, 1878, Captain Gibbs was expecting to see land and the passengers were becoming excited as they prepared to view their new homeland in the early morning. But LOCH ARD was running into a fog which greatly reduced visibility. Captain Gibbs was becoming anxious as there was no sign of land or the Cape Otway lighthouse. At 4am the fog lifted. A man aloft announced that he could see breakers. The sheer cliffs of Victoria's west coast came into view, and Captain Gibbs realised that the ship was much closer to them than expected. He ordered as much sail to be set as time would permit and then attempted to steer the vessel out to sea. On coming head on into the wind, the ship lost momentum, the sails fell limp and LOCH ARD's bow swung back. Gibbs then ordered the anchors to be released in an attempt to hold its position. The anchors sank some 50 fathoms - but did not hold. By this time LOCH ARD was among the breakers and the tall cliffs of Mutton Bird Island rose behind the ship. Just half a mile from the coast, the ship's bow was suddenly pulled around by the anchor. The captain tried to tack out to sea, but the ship struck a reef at the base of Mutton Bird Island, near Port Campbell. Waves broke over the ship and the top deck was loosened from the hull. The masts and rigging came crashing down knocking passengers and crew overboard. When a lifeboat was finally launched, it crashed into the side of LOCH ARD and capsized. Tom Pearce, who had launched the boat, managed to cling to its overturned hull and shelter beneath it. He drifted out to sea and then on the flood tide came into what is now known as LOCH ARD Gorge. He swam to shore, bruised and dazed, and found a cave in which to shelter. Some of the crew stayed below deck to shelter from the falling rigging but drowned when the ship slipped off the reef into deeper water. Eva Carmichael had raced onto deck to find out what was happening only to be confronted by towering cliffs looming above the stricken ship. In all the chaos, Captain Gibbs grabbed Eva and said, "If you are saved Eva, let my dear wife know that I died like a sailor". That was the last Eva Carmichael saw of the captain. She was swept off the ship by a huge wave. Eva saw Tom Pearce on a small rocky beach and yelled to attract his attention. He dived in and swam to the exhausted woman and dragged her to shore. He took her to the cave and broke open case of brandy which had washed up on the beach. He opened a bottle to revive the unconscious woman. A few hours later Tom scaled a cliff in search of help. He followed hoof prints and came by chance upon two men from nearby Glenample Station three and a half miles away. In a state of exhaustion, he told the men of the tragedy. Tom returned to the gorge while the two men rode back to the station to get help. By the time they reached LOCH ARD Gorge, it was cold and dark. The two shipwreck survivors were taken to Glenample Station to recover. Eva stayed at the station for six weeks before returning to Ireland, this time by steamship. In Melbourne, Tom Pearce received a hero's welcome. He was presented with the first gold medal of the Royal Humane Society of Victoria and a £1000 cheque from the Victorian Government. Concerts were performed to honour the young man's bravery and to raise money for those who lost family in the LOCH ARD disaster. Of the 54 crew members and passengers on board, only two survived: the apprentice, Tom Pearce and the young woman passenger, Eva Carmichael, who lost all of her family in the tragedy. Ten days after the LOCH ARD tragedy, salvage rights to the wreck were sold at auction for £2,120. Cargo valued at £3,000 was salvaged and placed on the beach, but most washed back into the sea when another storm developed. The wreck of LOCH ARD still lies at the base of Mutton Bird Island. Much of the cargo has now been salvaged and some was washed up into what is now known as LOCH ARD Gorge. Cargo and artefacts have also been illegally salvaged over many years before protective legislation was introduced. One of the most unlikely pieces of cargo to have survived the shipwreck was a Minton porcelain peacock - one of only seven in the world. The peacock was destined for the Melbourne International Exhibition in 1880. It had been well packed, which gave it adequate protection during the violent storm. Today, the Minton peacock can be seen at the Flagstaff Hill Maritime Museum in Warrnambool. From Australia's most dramatic shipwreck it has now become Australia's most valuable shipwreck artefact and is one of very few 'objects' on the Victorian State Heritage Register. The LOCH ARD shipwreck is of State significance – Victorian Heritage Register S 417. Flagstaff Hill’s collection of artefacts from LOCH ARD is significant for being one of the largest collections of artefacts from this shipwreck in Victoria. It is significant for its association with the shipwreck, which is on the Victorian Heritage Register (VHR S417). The collection is significant because of the relationship between the objects, as together they have a high potential to interpret the story of the LOCH ARD. The LOCH ARD collection is archaeologically significant as the remains of a large international passenger and cargo ship. The LOCH ARD collection is historically significant for representing aspects of Victoria’s shipping history and its potential to interpret sub-theme 1.5 of Victoria’s Framework of Historical Themes (living with natural processes). The collection is also historically significant for its association with the LOCH ARD, which was one of the worst and best known shipwrecks in Victoria’s history. Unrestored tea spoon from the wreck of the LOCH ARD. The spoon design has a flattened fiddle-back handle, with a thin stem or shank, flared collar, and elongated bowl. The spoons metallic composition is a thin layer of brass alloy which has partially corroded back to a nickel-silver base metal. Approximately 45% of original electroplating remains, mainly on back of spoon, with traces of verdigris. Five outlines of makers marks are visible on lower rear of handle (Crown, Ellipse, Circle, Circle, Diamond) and details of one are legible (Trade Mark).flagstaff hill maritime museum, shipwreck coast, flagstaff hill maritime village, great ocean road, loch line, loch ard, mutton bird island, loch ard gorge, electroplated cutlery, loch ard shipwreck, nickel silver, william page & co, birmingham, brass plating, makers marks -
 Flagstaff Hill Maritime Museum and Village
Domestic object - Spoon, c.1878
This tea spoon is from the wreck of the LOCH ARD, a Loch Line ship of 1,693 tons which sailed from Gravesend, London, on 2 March 1878 with 17 passengers and a crew of 36 under Captain George Gibbs. “The intention was to discharge cargo in Melbourne, before returning to London via the Horn with wool and wheat”. Instead, on 1 June 1878, after 90 days at sea, she struck the sandstone cliffs of Mutton Bird Island on the south west coast of Victoria, and sank with the loss of 52 lives and all her cargo. The manifest of the LOCH ARD listed an array of manufactured goods and bulk metals being exported to the Colony of Victoria, with a declared value of £53,700. (202 bills of lading show an actual invoice value of £68, 456, with insurance underwriting to £30,000 of all cargo). Included in the manifest is the item of “Tin hardware & cutlery £7,530”. This teaspoon is one of 482 similar items of electro-plated cutlery from the LOCH ARD site, comprising spoons and forks of various sizes but all sharing the same general shape or design and metallic composition. 49 of these pieces display a legible makers’ mark — the initials “W” and “P” placed within a raised diamond outline, which is in turn contained within a sunken crown shape — identifying the manufacturer as William Page & Co of Birmingham. An electroplater’s makers’ marks, unlike sterling silver hallmarks, are not consistent identifiers of quality or date and place of manufacture. A similar line of five impressions was usually made to impress the consumer with an implication of industry standards, but what each one actually signified was not regulated and so they varied according to the whim of the individual foundry. In this case, the maker’s marks are often obscured by sedimentary accretion or removed by corrosion after a century of submersion in the ocean. However sufficient detail has survived to indicate that these samples of electro-plated cutlery probably originated from the same consignment in the LOCH ARD’s cargo. The following descriptions of maker’s marks are drawn from 255 tea spoons, 125 dessert spoons, and 99 table forks. These marks are clearly visible in 66 instances, while the same sequence of general outlines, or depression shapes, is discernible in another 166 examples. 1. A recessed Crown containing a raised Diamond outline and the initials “W” and “P” (the recognised trademark of William Page & Co) 2. An impressed Ellipse containing a raised, pivoted, Triangle in its lower part and bearing a Resurrection Cross on its upper section (a possible dissenting church symbol reflecting religious affiliation); OR a rounded Square impression containing a raised, ‘lazy’, letter “B” (possibly mimicking sterling silver hallmark signifying city of manufacture i.e. Birmingham) 3. An impressed rounded Square filled with a raised Maltese Cross (the base metal composite of nickel silver was also known as ‘German silver’ after its Berlin inventors in 1823) 4. A recessed Circle containing a Crab or Scarab Beetle image; OR a recessed Circle containing a rotated ‘fleur de lys’ or ‘fasces’ design 5. A depressed Diamond shape enclosing a large raised letter “R” and a small raised letter “D” (mimicking the U.K. Patent Office stamp which abbreviated the term ‘registered’ to “RD”, but also included date and class of patent) Suggested trade names for William Page & Co’s particular blend of brass plating are ‘roman silver’ or ‘silverite’. This copper alloy polishes to a lustrous gold when new, discolouring to a murky grey with greenish hue when neglected. HISTORY OF THE LOCH ARD The LOCH ARD belonged to the famous Loch Line which sailed many ships from England to Australia. Built in Glasgow by Barclay, Curdle and Co. in 1873, the LOCH ARD was a three-masted square rigged iron sailing ship. The ship measured 262ft 7" (79.87m) in length, 38ft (11.58m) in width, 23ft (7m) in depth and had a gross tonnage of 1693 tons. The LOCH ARD's main mast measured a massive 150ft (45.7m) in height. LOCH ARD made three trips to Australia and one trip to Calcutta before its final voyage. LOCH ARD left England on March 2, 1878, under the command of Captain Gibbs, a newly married, 29 year old. She was bound for Melbourne with a crew of 37, plus 17 passengers and a load of cargo. The general cargo reflected the affluence of Melbourne at the time. On board were straw hats, umbrella, perfumes, clay pipes, pianos, clocks, confectionary, linen and candles, as well as a heavier load of railway irons, cement, lead and copper. There were items included that intended for display in the Melbourne International Exhibition in 1880. The voyage to Port Phillip was long but uneventful. At 3am on June 1, 1878, Captain Gibbs was expecting to see land and the passengers were becoming excited as they prepared to view their new homeland in the early morning. But LOCH ARD was running into a fog which greatly reduced visibility. Captain Gibbs was becoming anxious as there was no sign of land or the Cape Otway lighthouse. At 4am the fog lifted. A man aloft announced that he could see breakers. The sheer cliffs of Victoria's west coast came into view, and Captain Gibbs realised that the ship was much closer to them than expected. He ordered as much sail to be set as time would permit and then attempted to steer the vessel out to sea. On coming head on into the wind, the ship lost momentum, the sails fell limp and LOCH ARD's bow swung back. Gibbs then ordered the anchors to be released in an attempt to hold its position. The anchors sank some 50 fathoms - but did not hold. By this time LOCH ARD was among the breakers and the tall cliffs of Mutton Bird Island rose behind the ship. Just half a mile from the coast, the ship's bow was suddenly pulled around by the anchor. The captain tried to tack out to sea, but the ship struck a reef at the base of Mutton Bird Island, near Port Campbell. Waves broke over the ship and the top deck was loosened from the hull. The masts and rigging came crashing down knocking passengers and crew overboard. When a lifeboat was finally launched, it crashed into the side of LOCH ARD and capsized. Tom Pearce, who had launched the boat, managed to cling to its overturned hull and shelter beneath it. He drifted out to sea and then on the flood tide came into what is now known as LOCH ARD Gorge. He swam to shore, bruised and dazed, and found a cave in which to shelter. Some of the crew stayed below deck to shelter from the falling rigging but drowned when the ship slipped off the reef into deeper water. Eva Carmichael had raced onto deck to find out what was happening only to be confronted by towering cliffs looming above the stricken ship. In all the chaos, Captain Gibbs grabbed Eva and said, "If you are saved Eva, let my dear wife know that I died like a sailor". That was the last Eva Carmichael saw of the captain. She was swept off the ship by a huge wave. Eva saw Tom Pearce on a small rocky beach and yelled to attract his attention. He dived in and swam to the exhausted woman and dragged her to shore. He took her to the cave and broke open case of brandy which had washed up on the beach. He opened a bottle to revive the unconscious woman. A few hours later Tom scaled a cliff in search of help. He followed hoof prints and came by chance upon two men from nearby Glenample Station three and a half miles away. In a state of exhaustion, he told the men of the tragedy. Tom returned to the gorge while the two men rode back to the station to get help. By the time they reached LOCH ARD Gorge, it was cold and dark. The two shipwreck survivors were taken to Glenample Station to recover. Eva stayed at the station for six weeks before returning to Ireland, this time by steamship. In Melbourne, Tom Pearce received a hero's welcome. He was presented with the first gold medal of the Royal Humane Society of Victoria and a £1000 cheque from the Victorian Government. Concerts were performed to honour the young man's bravery and to raise money for those who lost family in the LOCH ARD disaster. Of the 54 crew members and passengers on board, only two survived: the apprentice, Tom Pearce and the young woman passenger, Eva Carmichael, who lost all of her family in the tragedy. Ten days after the LOCH ARD tragedy, salvage rights to the wreck were sold at auction for £2,120. Cargo valued at £3,000 was salvaged and placed on the beach, but most washed back into the sea when another storm developed. The wreck of LOCH ARD still lies at the base of Mutton Bird Island. Much of the cargo has now been salvaged and some was washed up into what is now known as LOCH ARD Gorge. Cargo and artefacts have also been illegally salvaged over many years before protective legislation was introduced. One of the most unlikely pieces of cargo to have survived the shipwreck was a Minton porcelain peacock - one of only seven in the world. The peacock was destined for the Melbourne International Exhibition in 1880. It had been well packed, which gave it adequate protection during the violent storm. Today, the Minton peacock can be seen at the Flagstaff Hill Maritime Museum in Warrnambool. From Australia's most dramatic shipwreck it has now become Australia's most valuable shipwreck artefact and is one of very few 'objects' on the Victorian State Heritage Register. The LOCH ARD shipwreck is of State significance – Victorian Heritage Register S 417. Flagstaff Hill’s collection of artefacts from LOCH ARD is significant for being one of the largest collections of artefacts from this shipwreck in Victoria. It is significant for its association with the shipwreck, which is on the Victorian Heritage Register (VHR S417). The collection is significant because of the relationship between the objects, as together they have a high potential to interpret the story of the LOCH ARD. The LOCH ARD collection is archaeologically significant as the remains of a large international passenger and cargo ship. The LOCH ARD collection is historically significant for representing aspects of Victoria’s shipping history and its potential to interpret sub-theme 1.5 of Victoria’s Framework of Historical Themes (living with natural processes). The collection is also historically significant for its association with the LOCH ARD, which was one of the worst and best known shipwrecks in Victoria’s history. Unrestored tea spoon from the wreck of the LOCH ARD. The spoon design has a flattened fiddle-back handle, with a thin stem or shank, flared collar, and elongated bowl. The spoons metallic composition is a thin layer of brass alloy which has partially corroded back to a nickel-silver base metal. Approximately 20% of original electroplating remains, with some verdigris, and 10% of surface area is covered by sedimentary encrustation, on bowl. Outlines of five makers marks are visible on lower rear of handle (Crown, Ellipse, Circle, Circle, Diamond) but interior details are unclear.flagstaff hill maritime museum, shipwreck coast, great ocean road, loch line, loch ard, mutton bird island, loch ard gorge, electroplated cutlery, loch ard shipwreck, nickel silver, william page & co, birmingham, brass plating, makers marks -
 Ballarat Clarendon College
Academic gown and mortarboard
A woollen academic gown and mortarboard worn by John Stayt, school teacher 1964-1993. Academic gown and mortarboard belonging to Mr John Stayt, teacher at Ballarat College, 1964-1993. Woollen academic gown; three quarter length, full sleeves. No hood or scarf. No embellishments.Silk label inside crown of hat: Made in England/Christy's London/Ryder & Amies/Cambridge Printed in ink on label: JMS (twice) Silk label sewn into backneckline of gown: University Robe Makers/Ryder & Amies/Cambridge Printed in ink on gown label: STAYTuniform, costume, mr john stayt, academic gown, mortarboard, master s gown -
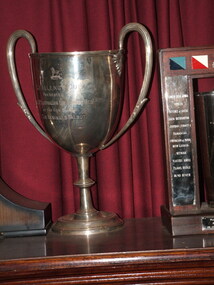 4th/19th Prince of Wales's Light Horse Regiment Unit History Room
Trophy - Silver Cup, Challenge Cup, Pre WW2
Object is property of the Regiment. It has been catalogued by the Unit History Room to provide a record of it.Silver cup. with two handles projecting 50 mm above rim of cup.CHALLENGE CUP PRESENTED TO THE 11TH AUSTRALIAN LIGHT HORSE REGT BY THE HON COLONEL SIR REGINALD TALBOT Maker's detail on edge of base: JAY s 142 & 144 Oxford Street London W Regimental crest Hallmarks - JJ, Queen's Crown, Lion. K trophy, mess property -
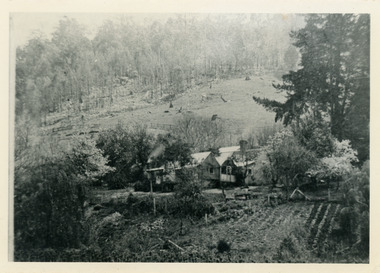 Mt Dandenong & District Historical Society Inc.
Photograph, Home Of Francis Matthew Child, c1910
The homestead of Francis Matthew Child taken from the forest area downstream of Child Bros. Sawmill.Black and white photograph showing the homestead of Francis Matthew Child.This photograph has a detailed inscription on the back handwritten by John Lundy-Clarke.Francis Matthews home on Crown Allotment “E” taken from the forest edge of Harry Child miners lease on which he had his mill. Mill was upstream to the left. The trees in the background were on Hand’s selection “F” and beyond them was the summit of Mt Kalorama.homestead, francis matthew child, sawmill, child's sawmill -
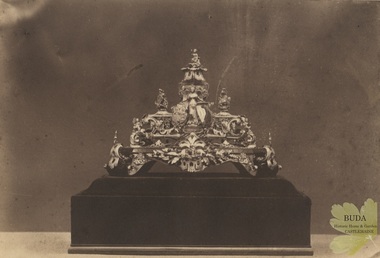 Buda Historic Home & Garden Castlemaine
Photograph, c1858 - 1860
Gold and Redgum Inkstand made by Ernest Leviny, c1855-1858. Presented to Mr J.V.A. Bruce, contractor for the Melbourne and Murray Railway by the workmen, at Woodend on Monday 8th July 1861. This gold inkstand was Leviny's first major masterpiece commenced around 1855 and made from gold found on the Victorian fields. It featured four gold nuggets representing the Southern Cross from the goldfields of Ballarat, Bendigo Maryborough and Castlemaine. It was exhibited in Melbourne in 1858, and again in 1861 where it was awarded a 1st Class Certificate at the Victorian Exhibition in Melbourne. In 1862 it was exhibited at the London International Exhibition where it attracted a great deal of attention and was published in The Art Journal Illustrated Catalogue accompanying the exhibition. The whereabouts of the Inkstand is currently unknown.Matt, albumen print, mounted on lightweight card backing. Albumen photograph of a gold and redgum inkstand. Elaborate inkstand highly decorated with cast figures. Mounted on a redgum base.Stamp embossed on upper left corner. Crown in a circle with the words Bristol Paper. Handwritten in ink under image. "Gold inkstand presented at the opening of the Railway, designed by the late Ernest Leviny Esq. October 13th 1862. Made of almost pure gold and cost £700".inkstand, ornament, gold, goldsmithing, london exhibition 1862, melbourne and murray railway, photograph, woodend, 8 july 1861, mr j. v. a. bruce -
 Moorabbin Air Museum
Clothing (item) - RAF 1941 Pattern Sidcot Suit Liner Size 5
Marking AM Crown ( Air Ministry) J.W.P 1019 Kapok Lining Size 5 Height 5' 10" to 5' 11" Breast 38"/40" Waist 34"/36" Seat 40"/42" Leg 301/2" H174255/40/C.I(D) 1941 -
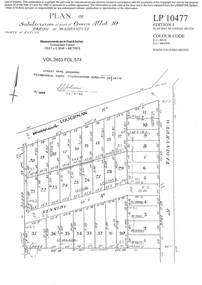 Ringwood and District Historical Society
Document - Subdivision Plan, LP10477 Parish of Warrandyte, County of Evelyn, Vol 2453 Fol 574 - 1924
LANDATA Land Victoria plan printout circa 2010Part of Crown Allotment 30. Map includes Warrandyte Road, Kennedy Avenue and Wonga Road, Ringwood. Street name amended from Wonga Road to Loughnan Road 1940. Other markings include CP102182, CP171386, LP127934, PS349846, RP7582, PS309312,RP8679 and CP106336. -
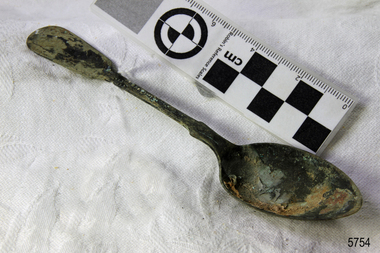
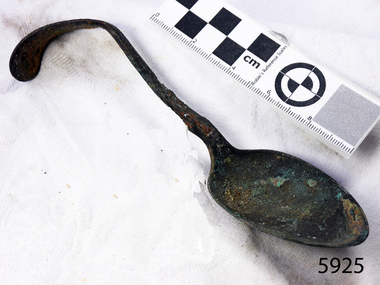 Flagstaff Hill Maritime Museum and Village
Spoon, circa 1878
This medium-sized dessert spoon is from the wreck of the LOCH ARD, a Loch Line ship of 1,693 tons which sailed from Gravesend, London, on 2 March 1878 with 17 passengers and a crew of 36 under Captain George Gibbs. “The intention was to discharge cargo in Melbourne, before returning to London via the Horn with wool and wheat”. Instead, on 1 June 1878, after 90 days at sea, she struck the sandstone cliffs of Mutton Bird Island on the south west coast of Victoria, and sank with the loss of 52 lives and all her cargo. The manifest of the LOCH ARD listed an array of manufactured goods and bulk metals being exported to the Colony of Victoria, with a declared value of £53,700. (202 bills of lading show an actual invoice value of £68, 456, with insurance underwriting to £30,000 of all cargo). Included in the manifest is the item of “Tin hardware & cutlery £7,530”. This dessert spoon is one of 482 similar items of electro-plated cutlery from the LOCH ARD site, comprising spoons and forks of various sizes but all sharing the same general shape or design and metallic composition. 49 of these pieces display a legible makers’ mark — the initials “W” and “P” placed within a raised diamond outline, which is in turn contained within a sunken crown shape — identifying the manufacturer as William Page & Co of Birmingham. An electroplater’s makers’ marks, unlike sterling silver hallmarks, are not consistent identifiers of quality or date and place of manufacture. A similar line of five impressions was usually made to impress the consumer with an implication of industry standards, but what each one actually signified was not regulated and so they varied according to the whim of the individual foundry. In this case, the maker’s marks are often obscured by sedimentary accretion or removed by corrosion after a century of submersion in the ocean. However sufficient detail has survived to indicate that these samples of electro-plated cutlery probably originated from the same consignment in the LOCH ARD’s cargo. The generally common range of marks are drawn from 255 tea spoons, 125 dessert spoons, and 99 table forks. These marks are clearly visible in 66 instances, while the same sequence of general outlines, or depression shapes, is discernible in another 166 examples. Suggested trade names for William Page & Co’s particular blend of brass plating are ‘roman silver’ or ‘silverite’. This copper alloy polishes to a lustrous gold when new, discolouring to a murky grey with greenish hue when neglected. HISTORY OF THE LOCH ARD The LOCH ARD belonged to the famous Loch Line which sailed many ships from England to Australia. Built in Glasgow by Barclay, Curdle and Co. in 1873, the LOCH ARD was a three-masted square rigged iron sailing ship. The ship measured 262ft 7" (79.87m) in length, 38ft (11.58m) in width, 23ft (7m) in depth and had a gross tonnage of 1693 tons. The LOCH ARD's main mast measured a massive 150ft (45.7m) in height. LOCH ARD made three trips to Australia and one trip to Calcutta before its final voyage. LOCH ARD left England on March 2, 1878, under the command of Captain Gibbs, a newly married, 29 year old. She was bound for Melbourne with a crew of 37, plus 17 passengers and a load of cargo. The general cargo reflected the affluence of Melbourne at the time. On board were straw hats, umbrella, perfumes, clay pipes, pianos, clocks, confectionary, linen and candles, as well as a heavier load of railway irons, cement, lead and copper. There were items included that intended for display in the Melbourne International Exhibition in 1880. The voyage to Port Phillip was long but uneventful. At 3am on June 1, 1878, Captain Gibbs was expecting to see land and the passengers were becoming excited as they prepared to view their new homeland in the early morning. But LOCH ARD was running into a fog which greatly reduced visibility. Captain Gibbs was becoming anxious as there was no sign of land or the Cape Otway lighthouse. At 4am the fog lifted. A man aloft announced that he could see breakers. The sheer cliffs of Victoria's west coast came into view, and Captain Gibbs realised that the ship was much closer to them than expected. He ordered as much sail to be set as time would permit and then attempted to steer the vessel out to sea. On coming head on into the wind, the ship lost momentum, the sails fell limp and LOCH ARD's bow swung back. Gibbs then ordered the anchors to be released in an attempt to hold its position. The anchors sank some 50 fathoms - but did not hold. By this time LOCH ARD was among the breakers and the tall cliffs of Mutton Bird Island rose behind the ship. Just half a mile from the coast, the ship's bow was suddenly pulled around by the anchor. The captain tried to tack out to sea, but the ship struck a reef at the base of Mutton Bird Island, near Port Campbell. Waves broke over the ship and the top deck was loosened from the hull. The masts and rigging came crashing down knocking passengers and crew overboard. When a lifeboat was finally launched, it crashed into the side of LOCH ARD and capsized. Tom Pearce, who had launched the boat, managed to cling to its overturned hull and shelter beneath it. He drifted out to sea and then on the flood tide came into what is now known as LOCH ARD Gorge. He swam to shore, bruised and dazed, and found a cave in which to shelter. Some of the crew stayed below deck to shelter from the falling rigging but drowned when the ship slipped off the reef into deeper water. Eva Carmichael had raced onto deck to find out what was happening only to be confronted by towering cliffs looming above the stricken ship. In all the chaos, Captain Gibbs grabbed Eva and said, "If you are saved Eva, let my dear wife know that I died like a sailor". That was the last Eva Carmichael saw of the captain. She was swept off the ship by a huge wave. Eva saw Tom Pearce on a small rocky beach and yelled to attract his attention. He dived in and swam to the exhausted woman and dragged her to shore. He took her to the cave and broke open case of brandy which had washed up on the beach. He opened a bottle to revive the unconscious woman. A few hours later Tom scaled a cliff in search of help. He followed hoof prints and came by chance upon two men from nearby Glenample Station three and a half miles away. In a state of exhaustion, he told the men of the tragedy. Tom returned to the gorge while the two men rode back to the station to get help. By the time they reached LOCH ARD Gorge, it was cold and dark. The two shipwreck survivors were taken to Glenample Station to recover. Eva stayed at the station for six weeks before returning to Ireland, this time by steamship. In Melbourne, Tom Pearce received a hero's welcome. He was presented with the first gold medal of the Royal Humane Society of Victoria and a £1000 cheque from the Victorian Government. Concerts were performed to honour the young man's bravery and to raise money for those who lost family in the LOCH ARD disaster. Of the 54 crew members and passengers on board, only two survived: the apprentice, Tom Pearce and the young woman passenger, Eva Carmichael, who lost all of her family in the tragedy. Ten days after the LOCH ARD tragedy, salvage rights to the wreck were sold at auction for £2,120. Cargo valued at £3,000 was salvaged and placed on the beach, but most washed back into the sea when another storm developed. The wreck of LOCH ARD still lies at the base of Mutton Bird Island. Much of the cargo has now been salvaged and some was washed up into what is now known as LOCH ARD Gorge. Cargo and artefacts have also been illegally salvaged over many years before protective legislation was introduced. One of the most unlikely pieces of cargo to have survived the shipwreck was a Minton porcelain peacock - one of only seven in the world. The peacock was destined for the Melbourne International Exhibition in 1880. It had been well packed, which gave it adequate protection during the violent storm. Today, the Minton peacock can be seen at the Flagstaff Hill Maritime Museum in Warrnambool. From Australia's most dramatic shipwreck it has now become Australia's shipwreck artefact and is one of very few 'objects' on the Victorian State Heritage Register most valuable. The LOCH ARD shipwreck is of State significance – Victorian Heritage Register S 417. Flagstaff Hill’s collection of artefacts from LOCH ARD is significant for being one of the largest collections of artefacts from this shipwreck in Victoria. It is significant for its association with the shipwreck, which is on the Victorian Heritage Register (VHR S417). The collection is significant because of the relationship between the objects, as together they have a high potential to interpret the story of the LOCH ARD. The LOCH ARD collection is archaeologically significant as the remains of a large international passenger and cargo ship. The LOCH ARD collection is historically significant for representing aspects of Victoria’s shipping history and its potential to interpret sub-theme 1.5 of Victoria’s Framework of Historical Themes (living with natural processes). The collection is also historically significant for its association with the LOCH ARD, which was one of the worst and best known shipwrecks in Victoria’s history. Unrestored dessert spoon from the wreck of the LOCH ARD. The spoon design has a flattened fiddle-back handle, with a thin stem or shank, flared collar, and a shallow rounded bowl. The spoons metallic composition is a thin layer of brass alloy which has partially corroded back to a nickel-silver base metal. Some verdigris and very little encrustation. Spoon handle and stem is badly bent. Outlines of five makers marks - Crown, Circle, Small circle, Circle, Diamond.flagstaff hill, warrnambool, shipwrecked coast, flagstaff hill maritime museum, maritime museum, shipwreck coast, flagstaff hill maritime village, great ocean road, loch line, loch ard, captain gibbs, eva carmichael, tom pearce, glenample station, mutton bird island, loch ard gorge, electroplated cutlery, loch ard shipwreck, william page and co, birmingham brass plating, dessert spoons -
 Flagstaff Hill Maritime Museum and Village
Weapon - Cannon, 1866
In the years following the Crimean War (1854-1857J) there was a great concern in the Colony that Imperial Russia would attempt an invasion. Coastal defences in the colony of Victoria were greatly strengthened by the Government as a result. Warrnambool was originally protected by cannons at Cannon Hill, approximately 1 kilometer west of the Flagstaff Hill Fortifications. These cannons included two 1866 guns, both 80 Pound Rifled Muzzle Loaders (RML) purchased by Victoria’s Colonial Government. They were part of a shipment of 26 such guns sent from England in December 1866. They are registered as No. 23 (80cwt-2qr-0lbs) - Gun 1, and No.13 (81cwt-1qr-12lbs) - Gun 2. They were cast at the Royal Gun Factory, Woolwich Arsenal, in 1866 and have a 6.3 inch bore. Both barrels carry the Royal Cypher of Queen Victoria, Insignia of the Royal Engineers, within the Garter and Motto surmounted by the Crown, with the Royal Cypher of Queen Victoria within the Garter (letters in centre “VR”, motto “HONI SOIT QUI MAL Y PENSE”, "Shame be to him who thinks evil of it."). The guns were originally supplied with wooden carriages. (The Royal Arsenal at Woolwich, England, was established eleven years after the Restoration of King Charles II. It was the principal supplier of armaments to the British and Empire Governments. At the height of its operations during World War One the factory covered 1300 acres and employed very nearly 80,000 workers. Woolwich was the Headquarters of the Royal Artillery since the raising of that Regiment in 1716. The Arsenal was closed in the late 1960’s.) These two cannons were transferred to the Warrnambool Garrison Artillery Battery Fortifications erected at Flagstaff Hill in 1887 as part of Victoria’s Coastal Defences. The original wooden carriages were subsequently replaced with the present iron garrison carriages in 1888. They are a “C” pivot. The ‘racers’ or curved track set into the floor of the gun emplacement (which enabled the guns to be traversed more quickly) are as specified for guns up to 10 inch, being of wrought iron 2.78 inches wide. A temporary third gun, now no longer on Flagstaff Hill’s site, was a 5 inch Rifled Breech Loading (BL) Armstrong gun mounted on an Elswick hydro pneumatic disappearing carriage It was faster to load and fire than the 80 pound RMLs and its arrival spelt the end of the older 80 pound guns’ useful life, apart from being used for practice sessions. The 5 inch BL gun was the main defensive weapon of the Warrnambool Battery until the Battery was downgraded in importance and the gun was recalled to Melbourne in 1910. The State of Victoria took over the ownership of the guns at the time of Australian Federation in 1901. In about 1901/1902 the Garrison Battery was converted to the Warrnambool Battery of the Australian Field Artillery (No 4 Field Battery). It was equipped with 4.7 inch naval guns mounted on field carriages. They were now a mobile unit but continued to use the Warrnambool Garrison area at Flagstaff Hill for practice. When the Fortifications were declared obsolete the two 80 Pounder RML were relocated to Cannon Hill in 1910. On the outbreak of World War One the 4.7 inch guns were recalled to Melbourne, and the Battery was disbanded. Most of the personnel probably re-enlisted in the local 4th Australian Light Horse Regiment. The two 80 Pounder RML were moved back to the Fortifications in 1973. They were both fully restored by Army First Year Apprentices at the Ordinance Factory in Bendigo in time for the centenary year of the fortifications in 1987. The guns are capable of firing 80 pound (32.3kg) armour piercing exploding shells 3.65kms out to sea. They were original manned by volunteers before a paid Garrison was established. Now the Guns are again fired by volunteers on Special Event days. Since restoration the Gun Number 1 had been fired on a regular basis but Gun Number 2 hadn’t been fired since the mid 1990’s. In April 2015 Gun Number 2 was serviced in preparation for the firing of both cannons on the ANZAC Centenary commemorations on April 25th 2015. Other guns from the original Cannon Hill location were obsolete by the time the 1887 Warrnambool Garrison Artillery Battery was built. These guns are (1) a 32 Pounder Muzzle Loading Smooth Bore (SB) cast in 1813 at the famous Carron Foundry, number 80837 and now located in the Warrnambool Botanic Gardens (2) a 68 Pounder Muzzle Loading Smooth Bore cast in 1861 at the equally august Low Moor Foundry, number 10310 and now located on the lawn area at the entrance to Flagstaff Hill Maritime Village. Both of these guns are mounted on their original wooden garrison carriages. There are only seven 32 Pounder SB made by Carron and fifteen 68 Pounder SB made at Low Moor known to exist in the State of Victoria (Conservation Management Plan for Victorian Guns and Cannon, South Western Victoria, May 2008, ref W/F/05)The Warrnambool Garrison has been added to the Victorian Heritage Register H1250 “for its intact battery and guns, a strong reminder of Victoria’s wealth and determination to protect itself from the perceived threat of invasion in the 1880’s.” The City of Warrnambool is one of several custodians of a collection of artillery pieces of heritage significance at a state, national and international level. These pieces are directly related to the defence of south-west Victoria in the 19th century. The care and preservation come under the Heritage Act 1995. Cannon. 80 Pound Rifled Muzzle Loading (RML) Gun on iron carriage and slide, installed in the Battery at Flagstaff Hill’s Fortifications. Made in 1866 at the Royal Gun Factory (R-G-F), Woolich, England. Gun Reg No 13. Flagstaff Hill Garrison Gun 2 (Gun No. 2). Insignia of the Royal Engineers, and the weight of the gun, stamped on top of the gun’s barrel. There is a brass plate on the side of the gun with the details of 1987 restoration.Stamped into the metal on top of the barrel, Insignia of the Royal Engineers; Garter and Motto “HONI SOIT QUI MAL Y PENSE”, surmounted by the Crown, with the Royal Cypher of Queen Victoria “VR” within the Garter. Also stamped on top of the gun are 2 inward pointing arrows above the weight ”81-1-12”. Brass plate “RESTORATION / BY / FIRST YEAR / APPRENTICES / ORDANANCE FACTORY / BENDIGO 1987”flagstaff hill, warrnambool, shipwrecked coast, flagstaff hill maritime museum, maritime museum, shipwreck coast, flagstaff hill maritime village, great ocean road, colonial defences, victoria’s coastal defences, warrnambool fortification, warrnambool garrison battery, warrnambool volunteer corps, ordinance, armaments, cannon hill fortifications, 4th australian light horse regiment, no 4 field battery, 80 pound cannon rifled muzzle loaders (rml), victorian colonial government, royal gun factory england, woolwich arsenal, royal cypher of queen victoria, garrison gun -
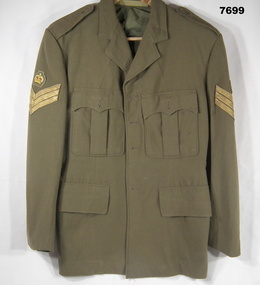 Bendigo Military Museum
Uniform - JACKET, SERVICE DRESS, ARMY, Australian Defence Industries, 1971
Jacket, khaki colour, wool/polyester fabric. Service dress style. No belt or buttons. Collar, shoulder epaulettes, four front pockets - top two with buttonhole and two metal press studs on flap, lower with flap. Rank Insignia on top sleeve - crown and stripes for Staff Sergeant. Lining - khaki polyester fabric with manufacturers label inside left. Label white cotton fabric.Manufacturers information on label - black ink print. "E.W. P/LTD/ SOUTH AUSTRALIA/ 1971/ ^/ SIZE 39 SHORT/ CLASS 8405/ 66-019-8482/ ARMY NO./ NAME/.DRY CLEAN ONLY/.REPRESS USING IRON AND DAMP/ CLOTH OR MEDIUM TO HOT/ STEAM IRON/. CREASE UPPER HALF OF/ LAPELS ONLY"uniform, army, service dress -
 Bendigo Military Museum
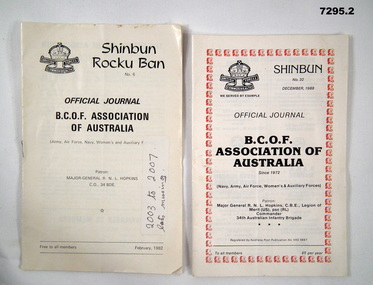
Booklet - BOOKLETS - BCOF, BCOF Association of Australia, 1. "SHINBUN ROCKU BAN" 2. "SHIBUN', 1982 and 1988
Booklets are the "OFFICIAL JOURNAL/ B.C.O.F. ASSOCIATION OF AUSTRALIA / since 1972/ Navy, Army, Air Force, Woman's & Auxiliary Forces." BOOKLETS - Items in the Collection of Richard William McGILVERY, RAAF. refer Cat No. 7287P for his service details, photo, awards.SOFT COVER BOOKLET. Cover - paper, black print on front and back on white paper. 2, Red print decorative frame/ border. Illustrated with the "BRITISH COMMONWEALTH FORCES", logo with crown. 1. 14 pages - cut, plain, white paper. Illustrated black and white photographs. 2. 40 pages, cut, plain, white paper. Illustrated - black and white photographs and cartoons.1. Front cover - white adhesive label, handwritten black ink "2003 to 2007/ lots missing". 1. "Shinbun Rocku Ban" No. 6 February 1982. 2. "Shinbun" No. 32 December 1988.history, booklets, bcof -
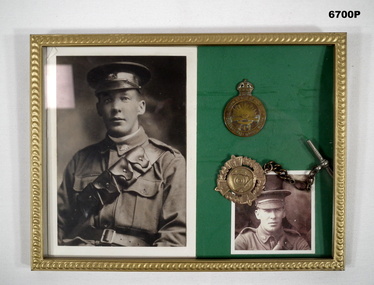 Bendigo Military Museum
Memorabilia - PHOTOGRAPHS & MEDALLIONS, FRAMED, During and post WW1
Pictures of G. B. Jackson, Driver, 17th Division from WW1. Also includes medallion issued by Dept of Defence to returned Active Service Veterans and medallion likely issued by local council. Refer 3446P for Service details.Gold ornate frame. Includes two photos of soldier in uniform on a green background. Also includes two medallions. 1. Gold medallion with 2 rifles over a bullseye target on a chain and crossbar. On back "G.J. Jackson, Epsom 15/11/15." 2. Round medallion with crown on top with Rising Sun and AIF in middle, issued to returning soldiers. Frame has glass cover. Includes label that says:- "Driver George Bailey Jackson No. 2172. 30th Motor Transport Comp, 17th Division Supply Column Australian Imperial Forces with British Exp Force France".passchendaele barracks trust, photo, 30th motor transport co., g. b. jackson -
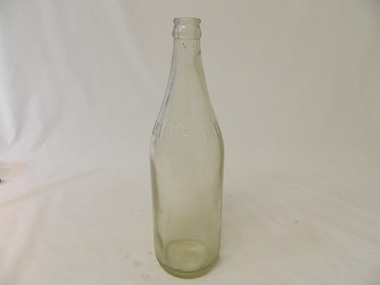
 Warrnambool and District Historical Society Inc.
Bottle, John Fletcher, Early 20th century
This bottle is known as a marble stopper bottle. The bottle was filled upside down so that as soon as the filling stopped the stopper was forced down to seal the bottle against the rubber ring. Pressure inside the bottle would keep the marble pressed against the top of the bottle. To open the bottle the marble was pressed down where it would fall into the neck chamber below. The marble would stay inside the chamber when the bottle was tilted up for drinking. This bottle came from the aerated waters factory of John Fletcher. This factory was commenced in the mid 19th century by John Davis. As a young boy John Fletcher worked at the cordial factory of John Rowley in Banyan Street, Warrnambool and then worked for John Davis at his Union Cordial Factory for many years. In 1885 he succeeded John Davis in this business. Fletcher’s business continued until 1930 and it later was bought by Ralph Reeves. John Fletcher manufactured aerated waters, soda, tonic waters, lemonade, ginger ale, hop beer, hop bitters, sarsaparilla and cordials. This bottle is of interest, firstly because it is a good example of the marble stopper type of bottle, no longer in use. It is also important because it is a John Fletcher bottle and he was a prominent soft drinks manufacturer in Warrnambool for over 40 years. This is a green-coloured glass bottle with a round base. The top of the body of the bottle has two heavy indentations either side, narrowing the entry to the body of the bottle. The neck is short and thick and the opening at the top of the bottle is moulded with a rubber ring around the inside. A glass marble is loose inside the bottle neck. The name of the manufacturer is moulded into the glass on the side and includes a crown symbol used as a trade mark.‘John Fletcher Trade Mark Warrnambool’ john fletcher, warrnambool, cordial manufacturers in warrnambool -
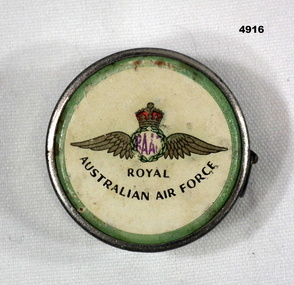 Bendigo Military Museum
Souvenir - TAPE MEASURE - RAAF
Small silver cased tape measure. One side has a coloured drawing of a RAAF emblem (Wings and Crown) under the emblem are the words: - "Royal Australian Air Force". There is a light green circle around the circumference. The actual tape is of a fibrous material and is marked in inches. There is a metal ring on the end of the tape. On the rear side is a small button mounted in the centre. Its function is to rewind the tape."Made in England" on the side of the casing and on the actual tape itself.souvenir, tape measure, raaf -
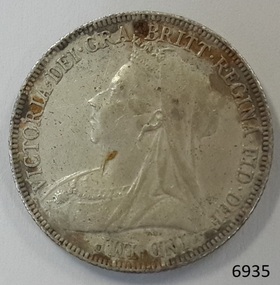 Flagstaff Hill Maritime Museum and Village
Currency - Coin, 1897
This Great Britain one shilling coin is dated 1897, which is during the reign of Queen Victoria. There were over 6 million of these coins minted. Queen Victoria succeeded King William IV to the British Throne in 1837 – she was only 18 years old at the time – and she ruled until 1901. British coins such as this one shilling were in circulation in the colony of Australia until 1910, when the Commonwealth of Australia began producing its own coinage. This one shilling coin was minted by the Royal Mint at Royal Mint Court, in Little Tower Hill, London, England. Coins for circulation in the Kingdom of England, Great Britain and most of the British Empire were produced here until the 1960’s when the Royal Mint shifted location to Wales. There are three main groups of shillings produced during Queen Victoria’s reign:- - The Young Head; 1837-1887, in 8 different versions, on the obverse showing the Queen’s maturing face over 50 years. - The Junior Head; 1887-1892, minted when Queen Victoria had been reigning for 50 years. Her head was smaller on the coins minted 1887-1889 than on those shillings minted 1889-1892. - The Old Head; 1893-1901, shows the veiled head of Queen Victoria. The obverse side of the coin was designed by Thomas Brock. The inscription’s translation is “Victoria by the Grace of God, Queen of the British territories, Defender of the Faith, Empress of India”. The reverse side of the coin was designed by Edward Paynter. The inscription "HONI SOIT QUI MAL Y PENSE" translates as "Evil be to him who evil thinks". AUSTRALIAN CURRENCY The early settlers of Australia brought their own currency with them so a wide variety of coins, tokens and even ‘promissory’ notes (often called IOU’s) were used in the exchange of goods and services. In 1813 Spanish dollars were imported and converted for use by punching a hole in the centre of the coin. Both the outer ring, called the holey dollar, and the punched out ‘hole’, called the dump, were then counter-stamped and used as the official currency. In 1825 the British Government passed the Sterling Silver Currency Act, making the British Pound the only legal form of currency in the Australian colonies. Not enough British currency was imported into the colony so other forms of currency were still used. In the mid 1800’s Australia entered the Gold Rush period when many made their fortunes. Gold was used for trading, often shaped into ingots, stamped with their weight and purity, and one pound tokens. In 1852 the Adelaide Assay Office, without British approval, made Australia’s first gold coin to meet the need for currency in South Australia after the Gold Rush began. In 1855 the official Australian Mint opened in Sydney, operating as a branch of the Royal Mint in London, and the gold was turned into coins called ‘sovereigns’. Other branches also opened in Melbourne and Perth. Up to the time of Australia becoming a federation in 1901 its currency included British copper and silver coins, Australian gold sovereigns, locally minted copper trade tokens, private banknotes, New South Wales and Queensland government treasury notes and Queensland government banknotes. After Federation the Australian government began to overwrite privately issued notes and prepared for the introduction of its own currency. In 1910 a National Australian Currency was formed, based on the British currency of ‘pounds, shillings and pence’ and the first Commonwealth coining was produced, removing the power from the States. In 1966, on February 14th, Australia changed over to the decimal currency system of dollars and cents. Australia did not have its own currency in the colonial times. Settlers brought money from other countries and they also traded goods such as grain when currency was scarce. For a long time there was no standardised value for the different currencies. In 1825 British currency became the only official currency in the colony of Australia and coins such as this silver shilling were imported into Australia to replace the mixture of foreign currency. Australia became a Federated nation on 1st January 1901. In 1910 National Australian Currency was formed and Australia produced its own currency, based on the British ‘pounds, shillings and pence’. The British currency was no longer valid. This silver shilling is of national significance as it represents the British currency used in Australia from 1825-1910. This silver shilling is also of significance to Australia as part one of the British Colonies ruled by Queen Victoria. It is part of the special silver and gold coins minted 1887-1893 to celebrate the 50 years Jubilee of Queen Victoria’s reign 1837-1887. Coin, Great Britain Shilling, 1897. Silver coin, round. Obverse; Queen Victoria head, ‘Old Head’, looking left. Reverse; 3 shields (each crowned) - 3 passant lions (England), 1 rampant lion (Scotland), golden harp (Northern Ireland) - floral symbols between them – 1 open rose, 2 thistles. Inscriptions on both sides of coin.Obverse “VICTORIA . DEI . GRA . BRITT . REGINA . FID . DEF . IND . IMP” Reverse “ONE SHILLING, 1897, Inner band, some letters hidden - HONI SO VI Y PENSE” flagstaff hill, warrnambool, shipwrecked coast, flagstaff hill maritime museum, maritime museum, shipwreck coast, flagstaff hill maritime village, great ocean road, coin, currency, money, legal tender, australian currency history, royal mint, british shilling 1897, thomas brock, edward paynter, great britain shilling, queen victoria currency, queen victoria 50 years golden jubilee shilling, colonial australia currency, numismatics -
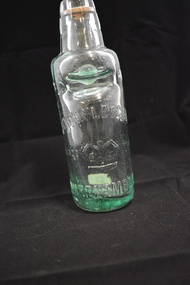
 Kiewa Valley Historical Society
Bottle - Soft Drink, 1940s
Soft drink came in bottles bought at the local grocery store or at a large city store on a shopping expedition. the shape of the bottles changed as did the stopper used to seal it. Bottles were re cycled remaining the property of the manufacturer. History of Murray Brewery, BeechworthHistorical. Change of bottles - shape, glass, stopper, embossing, use. Aesthetic. Display showing the embossing & shape especially if in good condition.Clear glass bottle. Embossed print in capital letters, around half of the circumference, one third of the way down from the top between the 2 longitudinal joins. The bottom half has straight sides and the top half tapers to the top where a metal crimp fits over the lip. Around the circumference is embossed print in capital letters. The base also has embossing. Crown Seal.Around circumference one third from top: 'Murray B.' Around circumference at base: ' Propetery of Murray Breweries pty Ltd. Beechworth.' Base: F1767 Symbol: 'AGM' and '445' 'M O'beer, drinks, lemonade, beechworth brewery, murray breweries, bottles -
 Federation University Historical Collection
Book, Robert S. Brain, Government Printer, Victorian Year Book 1895-8, 1901
This year book was published in the year of Australian Federation. It was the 22nd issue of the Victorian Year BookBrown soft covered book of 1000 page. The book contains a digest of the statistics of Victoria with reference to the other Australasian Colonies and other countries. Topics include the land system of Victoria, Crown lands, Agricultural statistics, cultivation, industry, livestock, wool, dairy farms, cattle, rabbits, manufactures, alcohol production, mining, defense. Statistics were provided by J.J. Fenton, Assistant Government Statist. -
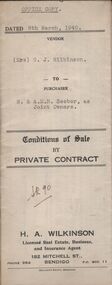 Bendigo Historical Society Inc.
Document - H.A. & S.R. WILKINSON COLLECTION: CONTRACT OF SALE
Conditions of sale by private contract dated 8th March, 1940 between Mrs. G.J. Wilkinson (seller) and R. and A.M.B. Seeber (buyers) for land situate Panton Street, Golden Square, being Crown allotment 1 section 6A land described in certificate of title volume 3571 folio 750198, together with 5-roomed weatherboard dwelling and all sundry. Price 350 pounds.organization, business, h.a. & s.r wilkinson real estate