Showing 27250 items
matching side-car
-
 Bendigo Historical Society Inc.
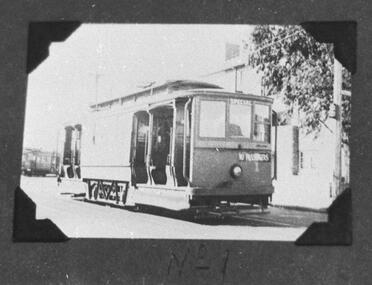
Document - BASIL MILLER COLLECTION: OPEN CROSS-SEAT TRAMS
Photo from 1892 battery-electrics replaced by steam tram cars Bendigo Railway station - Eaglehawk. Two copies.basil miller, bendigo trams -
 Flagstaff Hill Maritime Museum and Village
Bottle, circa 1885 - 1891
This bottle was one of the items salvaged from the wreck of the Fiji in 1891. Joseph Bosisto began manufacturing Eucalyptus Oil in Australia from 1854. This bottle is marked ‘J. BOSISTO”, which probably dates it from 1885 when the company J. Bosisto & Co. was formed. The marking on the bottom of the bottle “GERMAN/B_ _ E” could mean that the bottle was imported by J. Bosisto from Germany. In the early years bottles were imported from overseas countries including England and Germany. In 1872 the Melbourne Bottle Works was established to supply the bottles locally and more cheaply but had difficulty keeping up with the supply. From 1865 Australian-made Bosisto’s Eucalyptus Oil began to be exported to England then later to Germany and other countries. Bosisto’s Eucalyptus Oil won many prizes at exhibitions between 1854 – 1891. The three-masted iron barque Fiji had been built in Belfast, Ireland, in 1875 by Harland and Wolfe for a Liverpool based shipping company. The ship departed Hamburg on 22nd May 1891 bound for Melbourne, under the command of Captain William Vickers with a crew of 25. The ship’s manifest shows that she was loaded with a cargo of 260 cases of dynamite, pig iron, steel goods, spirits (whisky, schnapps, gin, brandy), sailcloth, tobacco, coiled fencing wire, concrete, 400 German pianos (Sweet Hapsburg), concertinas and other musical instruments, artists supplies including brushes, porcelain, furniture, china, and general cargo including candles. There were also toys in anticipation for Christmas, including wooden rocking horses, miniature ships, dolls with china limbs and rubber balls. On September 5th, one hundred days out from Hamburg in squally and boisterous south west winds the Cape Otway light was sighted on a bearing differing from Captain Vickers’ calculation of his position. At about 2:30am, Sunday 6th September 1891 land was reported 4-5 miles off the port bow. The captain tried to put the ship on the other tack, but she would not respond. He then tried to turn her the other way but just as the manoeuvre was being completed the Fiji struck rock only 300 yards (274 metres) from shore. The place is known as Wreck Bay, Moonlight Head. Blue lights were burned and rockets fired whilst an effort was made to lower boats but all capsized or swamped and smashed to pieces. Two of the younger crewmen volunteered to swim for the shore, taking a line. One, a Russian named Daniel Carkland, drowned after he was swept away when the line broke. The other, 17 year old able seaman Julius Gebauhr, a German, reached shore safely on his second attempt but without the line, which he had cut lose with his sheath-knife when it become tangled in kelp. He rested on the beach a while then climbed the steep cliffs in search of help. At about 10am on the Sunday morning a party of land selectors - including F. J. Stansmore, Leslie Dickson (or Dixon) and Mott - found Gebauhr. They were near Ryans Den, on their travels on horseback from Princetown towards Moonlight Head, and about 5km from the wreck. Gebauhr was lying in the scrub in a poor state, bleeding and dressed only in singlet, socks and a belt with his sheath-knife, ready for all emergencies. At first they were concerned about his wild and shaggy looking state and what seemed to be gibberish speech, taking him to be an escaped lunatic. They were reassured after he threw his knife away and realised that he was speaking half-English, half-German. They gave him food and brandy and some clothing and were then able to gain information about the wreck. Some of the men took him to Rivernook, a nearby guest house owned by John Evans, where he was cared for. Stansmore and Dickson rode off to try and summon help. Others went down to the site of the wreck. Messages for rescuing the rest of the crew were sent both to Port Campbell for the rocket rescue crew and to Warrnambool for the lifeboat. The S.S. Casino sailed from Portland towards the scene. After travelling the 25 miles to the scene, half of the Port Campbell rocket crew and equipment arrived and set up the rocket tripod on the beach below the cliffs. By this time the crew of the Fiji had been clinging to the jib-boom for almost 15 hours, calling frantically for help. Mr Tregear from the Rocket Crew fired the line. The light line broke and the rocket was carried away. A second line was successfully fired across the ship and made fast. The anxious sailors then attempted to come ashore along the line but, with as many as five at a time, the line sagged considerably and some were washed off. Others, nearly exhausted, had to then make their way through masses of seaweed and were often smothered by waves. Only 14 of the 24 who had remained on the ship made it to shore. Many onlookers on the beach took it in turns to go into the surf and drag half-drowned seamen to safety. These rescuers included Bill (William James) Robe, Edwin Vinge, Hugh Cameron, Fenelon Mott, Arthur Wilkinson and Peter Carmody. (Peter Carmody was also involved in the rescue of men from the Newfield.) Arthur Wilkinson, a 29 year old land selector, swam out to the aid of one of the ship’s crewmen, a carpenter named John Plunken. Plunken was attempting to swim from the Fiji to the shore. Two or three times both men almost reached the shore but were washed back to the wreck. A line was thrown to them and they were both hauled aboard. It was thought that Wilkinson struck his head on the anchor before s they were brought up. He remained unconscious. The carpenter survived this ordeal but Wilkinson later died and his body was washed up the next day. It was 26 year old Bill Robe who hauled out the last man, the captain, who had become tangled in the kelp. The wreck of the Fiji was smashed apart within 20 minutes of the last man being brought ashore, and it settled in about 6m of water. Of the 26 men on the Fiji, 11 in total lost their lives. The remains of 7 bodies were washed onto the beach and their coffins were made from timbers from the wrecked Fiji. They were buried on the cliff top above the wreck. The survivors were warmed by fires on the beach then taken to Rivernook and cared for over the next few days. Funds were raised by local communities soon after the wreck in aid of the sufferers of the Fiji disaster. Captain Vickers was severely reprimanded for his mishandling of the ship. His Masters Certificate was suspended for 12 months. At the time there was also a great deal of public criticism at the slow and disorganised rescue attempt to save those on board. The important canvas ‘breech buoy’ or ‘bucket chair’ and the heavy line from the Rocket Rescue was in the half of the rocket outfit that didn’t make it in time for the rescue: they had been delayed at the Gellibrand River ferry. Communications to Warrnambool were down so the call for help didn’t get through on time and the two or three boats that had been notified of the wreck failed to reach it in time. Much looting occurred of the cargo that washed up on the shore, with nearly every visitor leaving the beach with bulky pockets. One looter was caught with a small load of red and white rubber balls, which were duly confiscated and he was ‘detained’ for 14 days. Essence of peppermint mysteriously turned up in many settlers homes. Sailcloth was salvaged and used for horse rugs and tent flies. Soon after the wreck “Fiji tobacco” was being advertised around Victoria. A Customs officer, trying to prevent some of the looting, was assaulted by looters and thrown over a steep cliff. He managed to cling to a bush lower down until rescued. In 1894 some coiled fencing wire was salvaged from the wreck. Hundreds of coils are still strewn over the site of the wreck, encrusted and solidified. The hull is broken but the vessel’s iron ribs can be seen along with some of the cargo of concrete and pig iron. Captain Vickers presented Bill Robe with his silver-cased pocket watch, the only possession that he still had, as a token for having saved his life and the lives of some of the crew. (The pocket watch came with 2 winding keys, one to wind it and one to change the hands.) Years later Bill passed the watch to his brother-in-law Gib (Gilbert) Hulands as payment of a debt and it has been passed down the family to Gilbert Hulands’ grandson, John Hulands. Seaman Julius Gebauhr later gave his knife, in its hand crafted leather sheath, to F. J. Stansmore for caring for him when he came ashore. The knife handle had a personal inscription on it. A marble headstone on the 200m high cliffs overlooking Wreck Beach, west of Moonlight Head, paying tribute to the men who lost their lives when Fiji ran aground. The scene of the wreck is marked by the anchor from the Fiji, erected by Warrnambool skin divers in 1967. Amongst the artefacts salvaged from the Fiji are china miniature animals, limbs from small china dolls, rubber balls, this glass bottle, sample of rope from the distress rocket and a candlestick holder. These items are now part of the Fiji collection at Flagstaff Hill Maritime Museum, along with Captain Vickers’ pocket watch and Julius Gebauhr’s sheath knife. The glass bottle is registered as “Artefact Reg No Fiji/1”. Flagstaff Hill’s Fiji collection is of historical significance at a State level because of its association with the wreck Fiji, which is on the Victorian Heritage Register VHR S259. It also represents aspects of Victoria’s shipping history and its potential to interpret sub-theme 1.5 of Victoria’s Framework of Historical Themes (living with natural processes). The Fiji collection meets the following criteria for assessment: Criterion A: Importance to the course, or pattern, of Victoria’s cultural history. Criterion B: Possession of uncommon, rare or endangered aspects of Victoria’s cultural history Criterion C: Potential to yield information that will contribute to an understanding of Victoria’s cultural history. Clear glass oval medical bottle with rounded corners and flattened sides on front and back surfaces. Opening of bottle has a lip around it and could have been sealed with a stopper. There is a chip in the lip. One face of the bottle has a rectangular border with a name embossed vertically on it, “J. BOSISTO / RICHMOND”. The oval base of the bottle also has letters embossed on it “GE_ _AN” “B _ _ _ _ _”. There is also a large chip out of the base. The sides of the bottle have a vertical joining line. The bottle was recovered from the wreck of the Fiji.Flat side of bottle has rectangular border with “J BOSISTO / RICHMOND” embossed in the centre. The base of the bottle has “G E . . A N/B . . . . . .” embossed on it. Other letters have been removed with the chip. (probable wording was ‘GERMAN/BOTTLE)warrnambool, shipwrecked coast, flagstaff hill, flagstaff hill maritime museum, maritime museum, shipwreck coast, flagstaff hill maritime village, shipwrecked artefact, fiji, 1891, glass bottle, medicine bottle, bosistos, j bosistos, german bottle -
 Melbourne Tram Museum
Photograph - Swanston Street W class tram c1926
Shows a view looking south from the Town Hall in Swanston Street at Collins Street with a W class, along with many pedestrians, motor cars and passengers boarding or alighting from the tram. In the background is a building advertising "Table Talk" magazine. There is possibly a cable tram signal on the left hand side of the photos by a hop awning. Photo taken after the 1926 conversion of Swanston Street from cable tram to electric trams. 6423.1 - shows the full-size image obtained from an internet - shows tram W2 328 - from Rose Series P10522.Yields information about Swanston Street after the conversion from cable to electric trams.Black and white photograph - one of a series of photo cards from item 6424. has "L" in ink on rear.melbourne, cable trams, swanston street, w class tram, collins street, passengers, traffic, tramways, tramcars, tram 328 -
 Glenelg Shire Council Cultural Collection
Equipment - Equipment - Divers air pump, 1900-1930
Port of Portland CollectionFront: C. E. Heinke/ Submarine Engineer 103 GI Portland St London (brass plate on side of pump)port of portland archives -
 Ballarat Tramway Museum
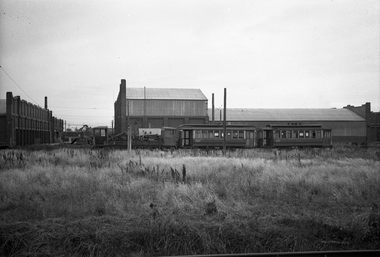
Negative - Copy, Ray Pearson
Set of 15 copy negatives, of black and white photographs of Victorian Railway trams from Ray Pearson Collection, taken by Dave Macartney in 1975c. Original negative held in the negative file. Scanned at 2400 dpi and cropped as necessary. Images as shown replaced by scan from the original Ray Pearson Album provided by Mal Rowe, April 2020 or that there is a better image. .1 - No. 1 - retained. .2 - Cr. T. Bent driving 1st spike - replaced .3 - Works car at Elwood - replaced .4 - No. 23 at Sandringham - replaced .5 - No. 35 at St Kilda - replaced .6 - ditto - replaced .7 - No. 51 at Sandringham - retained. .8 - St Kilda station view - retained. .9 - No. 3 cross bench car at Elwood - replaced .10 - No. 7 end view - replaced .11 - No. 5 at St Kilda Station - replaced .12 - No. 6 cross bench car side on view - replaced .13 - Cr. T. Bent driving 1st spike - replaced .14 - No. 7 - retained. .15 - Enclosed cross bench car at Sandringham - retained. trams, tramways, victorian railways, st kilda, sandringham -
 Ballarat Tramway Museum
Photograph - Black & White Photograph/s, Keith Kings, 24/09/1961 12:00:00 AM
Black and White photograph contained with Reg. Item 1902 - Photo Album from Keith Kings to Les Denmead 1970. Photograph of SEC Bendigo trams 28 and 29 at Charing Cross. Date of photo 24/9/1961. Both trams have the tiger stripes and dash canopy lighting added, but not the large white stripe above the headlight. Both trams have "Nothing Beats Briquettes for Heat" roof advertisements. The Beehive building in the background and other buildings on the east side of Pall Mall. Keith Kings No. L(n)(17) Scanning: i - image file, p - presentation file, b - back of photograph.Stamp in top left hand corner and handwritten number with "K.S. Kings No. L(n)(17) Copyright reserved". In blue ink "Bendigo / Nos. 28 and 29. / Birney Safety Cars. / Charing Cross 24/9/61"trams, tramways, bendigo, beehive building, charing cross, tram 28, tram 29 -
 Bendigo Military Museum
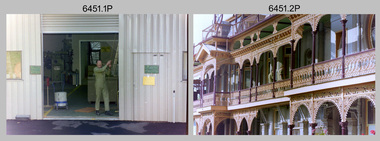
Photograph - Lithographic Squadron Personnel and Equipment, Army Survey Regiment, Fortuna, Bendigo, c1990
These 28 photographs of Lithographic Squadron personnel and equipment was taken at Fortuna, Bendigo circa 1990. The photos were taken on the east side of Fortuna Villa, the Print Room’s map trimming and dispatch work area and the inside and outside Air Survey Support Section (BARCRO).These 28 photographs of Lithographic Squadron Personnel and Equipment was taken at Fortuna, Bendigo circa 1990. The 35mm colour photograph negatives were scanned at 96 dpi and are part of the Army Survey Regiment’s Collection. .1) - Photo, colour, c1990. RAEME and maintenance support, unidentified civilian. .2) - Photo, colour, c1990. Eastern side of Fortuna Villa, unidentified, CPL Le-Anne (Smallshaw) Shirley. .3) - Photo, colour, c1990. Eastern side of Fortuna Villa, SGT Gary Kerr. .4) - Photo, colour, c1990. Eastern side of Fortuna Villa, CPL Roy Hicks. .5) - Photo, colour, c1990. Eastern side of Fortuna Villa, unidentified. .6) - Photo, colour, c1990. Unidentified passing Q-Store & Transport Compound. .7) - Photo, colour, c1990. Data Management & Map Library. .8) - Photo, colour, c1990. Unidentified officer passing Q-Store heading up to Map Library. .9) - Photo, colour, c1990. Eastern side of Fortuna Villa, SPR Michelle Withers. .10) - Photo, colour, c1990. Unidentified RAEME soldier passing Q-Store heading up to Map Library. .11) & .12) - Photo, colour, c1990. Delivery of bulk map printing paper. WO2 Jeff Willey on forklift, unidentified. .13) & .14) - Photo, colour, c1990. Print Room, Wohlenberg MCS-2 guillotine. .15) to .18) - Photo, colour, c1990. Air Survey Support Section (BARCRO), Carl Zeiss Rectifying Enlarger. .19) - Photo, colour, c1990. Air Survey Support Section (BARCRO), film contact frame. .20) - Photo, colour, c1990. Air Survey Support Section (BARCRO), Pakotone film development processors. .21) & .22) - Photo, colour, c1990. Air Survey Support Section (BARCRO) entry/exit. .23) & .24) - Photo, colour, c1990. Air Survey Support Section (BARCRO) miscellaneous equipment. .25) & .26) - Photo, colour, c1990. Air Survey Support Section (BARCRO), CPL Warren ‘Waldo’ Shirley. .27) & .28) - Photo, colour, c1990. Outside Air Survey Support Section (BARCRO), L to R: WO1 Peter Coombes, CPL Warren ‘Waldo’ Shirley..1P to .28P – There are no annotations.royal australian survey corps, rasvy, army survey regiment, army svy regt, fortuna, asr, litho sqn -
 Ballarat Tramway Museum
Document - letter and list, Bob Lilburn, "Scrapped Geelong Cars and "SEC Geelong Bogie Cars", Feb. 1971
Yields information about the disposition of Geelong trams following closure and those shipped to Ballarat or Bendigo along with dates.Handwritten letter from Bob Lilburn of West Essendon dated 7-2-1971 to Charles Craig forwarding him information of Geelong SEC bogie cars and Scrapped Geelong cars. Notes that his photo of Geelong 40 being loaded at the Geelong depot on 27-3-1956 was received in Ballarat the following day and that Pengelly 23 was the "workhorse" around the depot after closure. List of scrapped cars gives location as known by Bob at the time. The Geelong bogie car list gives the Melbourne number, Geelong number, dated received at Geelong, Transferred to (Ballarat or Bendigo), the number in that City, date received and any remarks. See 6748 for a the Ballarat Bogie list. trams, tramways, geelong, tramcars, ballarat, bendigo, transport -
 Eltham District Historical Society Inc
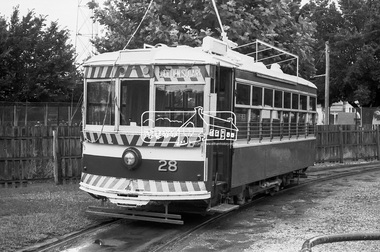
Photograph, Golden Square route Bendigo Tramways No. 28 parked, possibly near the Arnold Street Tram Depot, Bendigo, January 1972, Jan 1972
Birney (USA manufacture) tram carDigital TIFF file Scan of 35mm Ilford FP3 black and white negative transparencyarnold street depot, bendigo, bendigo tramways no. 28, eaglehawk, george coop collection, golden square, tram, birney (usa) tram car -
 Greensborough Historical Society
Tyre Repair Kit, Norman C. Porter, Plug Ezi Repair Outfit, 1960c
Consumer car tyre repair kitTin with metal cap, originally containing needle, rubber plugs and cement; no cement included. Printed in blue, yellow and blackPower Plus Plug Ezi Repair Outfit for tubeless tyres Stock no. 210 and Instructionstyre repair kit, motor car tyres -
![Photograph - Digital Image, Marilyn Smith, Greensborough Plaza 1978 [carpark], 1978_](/media/collectors/4f729f5697f83e03086015b8/items/5d3c119821ea6715d02fb0e2/item-media/5d3c11c621ea6715d02fdc20/item-fit-380x285.jpg) Greensborough Historical Society
Greensborough Historical SocietyPhotograph - Digital Image, Marilyn Smith, Greensborough Plaza 1978 [carpark], 1978_
Car park of Greensborough Plaza in 1978.Digital copy of colour photographmain street greensborough, greensborough plaza -
 Eltham District Historical Society Inc
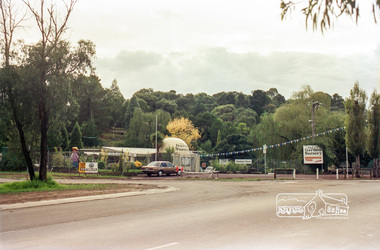
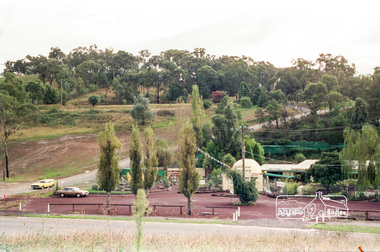
Photograph, The Garden Nursery at 1419 Main Road, Eltham at the corner of Kalbar Road, c.1987
Now a 7-Elleven and car washRoll of 35mm colour negative film, 7 stripsKodak GA 100 5095roads, main road, kalbar road -
 Eltham District Historical Society Inc
Photograph, The Garden Nursery at 1419 Main Road, Eltham at the corner of Kalbar Road, c.1987
Now a 7-Elleven and car washRoll of 35mm colour negative film, 7 stripsKodak GA 100 5095roads, main road, kalbar road -
 Victoria Police Museum
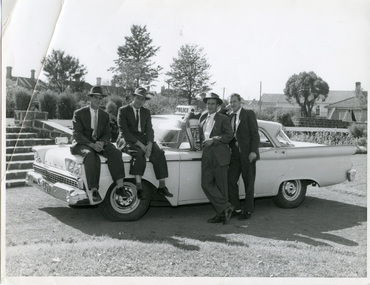
Photograph (police car)
Wireless Patrol crew and patrol carFord Fairlane registration number HCA-173 with two men sitting on the bonnet - Laurie Scala and Max McHugh and two men standing beside the vehicle - John Dix and Norm McDonald. Circa 1959police vehicles; wireless patrol; motor transport branch; ford fairlane car; scala, laurence; mchugh, max; dix, john; mcdonald, norman -
 Victoria Police Museum
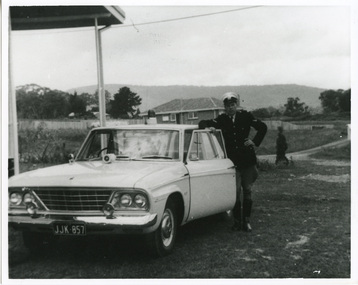
Photograph (police car)
Shows a Mobile Traffic Section car Norm Lieske, in uniform, standing beside opened passenger door of Studebaker Cruiser, registration number JJK-857. Circa 1966police vehicles; wireless patrol; motor transport branch; motor transport section; studebaker cruiser car; lieske, norman -
 Victoria Police Museum
Photograph (police car)
A Wireless Patrol car with driver inside Studebaker outside a brick house with a picket fence. Two young boys are standing to the right and an unidentified person is sitting in the driver's seat. Circa 1964police vehicles; wireless patrol; motor transport branch; motor transport section; studebaker car -
 St Kilda Historical Society
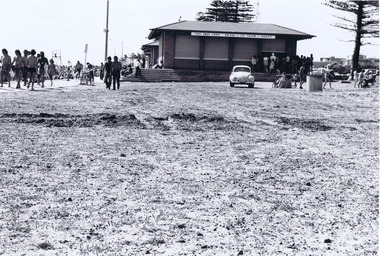
Postcard, Elwood Beach
Shows building, car and people on beachblack and white photograph, unmounted, original, good conditionOn back: Elwood Beach -
 Stawell Historical Society Inc
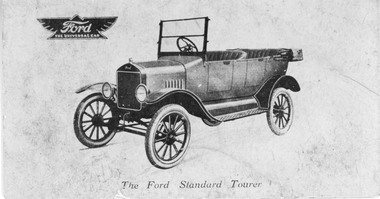
Photograph - Business Card, Wimmera Motor & Engineering Works --- Business Card, c1920
Young & Ledgar - Agents for Ford CarsFord Vehicles Business Card Young & Ledgers c1920 Authorized Forward DealerPhone Numbers on Back of card transport, motor vehicles -
Malmsbury Historical Society
Photograph (Item), "Parade At Malmsbury C1990, Vintage Cars", Malmsbury c1990
Buildings - Vintage Cars Associated with - Mhs -
Lakes Entrance Regional Historical Society (operating as Lakes Entrance History Centre & Museum)
Photograph, Bennett Vera, 1994
Second photograph, few cars in foregroundColour photograph completed Safeway store ready to open 1994 Lakes Entrance Victoriaoccupation, retail trade -
 Williamstown Botanic Gardens- Hobsons Bay City Council
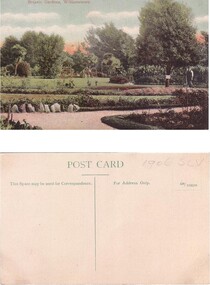
Postcard – Williamstown Botanic Gardens
The original postcards in this series (2013.002 to 2013.018) were generously loaned to Williamstown Botanic Gardens by a private collector for copying. The postcards are evidence of the interest the gardens held as a subject for postcard publishers. The text and images provide a snapshot into fashions, social interests and concerns of the time. The professionally produced images provide a pictorial history of Gardens including changing planting styles, various structures and features of the Gardens eg the aviary, cannons, the fountain, the second Curator’s Lodge and gates. The images offer an opportunity to compare garden vistas with the present day.Colour postcard of garden beds with man (gardener) standing beside tree with a sign on it on right side of card. A path is in the foreground with rocks standing at the edge.Front: ‘Botanic Gardens, Williamstown’. Reverse: ‘POST CARD’ centre top of card, underlined with a dividing line down the centre of the card. ‘This Space may be used for Correspondence.’ on left side of line; ‘For Address Only.’ and ‘155/103598’ inside dotted lines to indicate stamp placement. In pencil on top right corner ‘1906 SLV’ (believed to be inserted by the vendor).postcard, garden-beds, gardener, post-card, williamstown-botanic-gardens, hobsons-bay-city-council, 1906, colour-postcard -
 Bendigo Historical Society Inc.
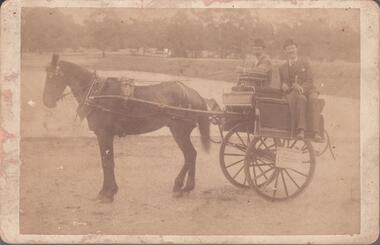
Photograph - CONSTABLE JOHN BARRY COLLECTION: JOHN AND THOMAS BARRY IRISH JAUNTING CAR
Sepia photo, horse drawn Irish Jaunting Car. John (Jnr) and Thomas Barry are sitting back to back in the car. John and Thomas won a medal (3822.5) at the Bendigo Agricultural Show in 1892. Their address was given as Barry Bros., Coachbuilders, Lyttleton Terrace East, Bendigo. Their residential address was Lucan Street.Unknownperson, bendigo, john and thomas barry -
Port Melbourne Historical & Preservation Society
Photograph - Administration building, J Kitchen & Sons Pty Ltd, Ingles Street, Port Melbourne, 1948
Large Black and white photograph in narrow gold coloured metal frame of the J Kitchen & Sons Pty Ltd new administration building in Ingles St Port Melbourne built in 1925, art deco design. Two cars parked near the entrance on left of photo, car on right is a 1948 Fordindustry, manufacturing, built environment - industrial, transport - motor vehicles, j kitchen & sons pty ltd -
 Melbourne Tram Museum
Negative, Wal Jack, c1940
Black and white negative by Wal Jack of Ballast car 11, U211 and 209 waiting scrapping at Preston Workshops The car numbers were detailed in the album held by the Ballarat Tramway Museum. Photo undated - see also Reg Item 5289. Could be 19-1-41 or 13-10-40.trams, tramways, preston workshops, u class, scrapped trams, stored trams, work trams, tram 211, tram 11, tram 209 -
 Melbourne Tram Museum
Ephemera - Ticket/s, Tramway Museum Society of Victoria (TMSV), Tramway Museum Society of Victoria, W2 Day tour, May. 1968
Ticket printed on dark blue card - with black printing - Tramway Museum Society of Victoria, W2 Day tour, 19 May 1968. Lists the cars to be used. For use on the Special cars only and notes it is the 24th tour of the TMSV. See Reg item 358 for a list of trams used on this tour and their details.trams, tramways, tickets, tours, tmsv, w2 class, melbourne -
 Whitehorse Historical Society Inc.
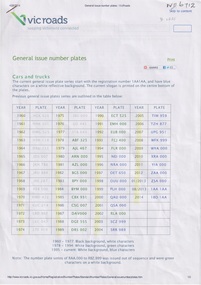
Document - Webpage, VicRoads, Victorian Roads Number Plates, 2014, and 2021 updated version
Victorian car, truck and motorcycle number plates and for the years 1960 to 2014 have been printed from the VicRoads website, supplemented by further brief notes describing the plates from 1930. An updated list of car plates is also included with an updated plate number for 2014 and a further 4 years between 2015-2018.Victorian car, truck and motorcycle number plates for the years 1960 to 2014 have been printed from the VicRoads website, supplemented by further brief notes describing the plates. An updated list of car plates is also included with an updated plate number for 2014 and a further 4 years between 2015-2018. non-fictionVictorian car, truck and motorcycle number plates and for the years 1960 to 2014 have been printed from the VicRoads website, supplemented by further brief notes describing the plates from 1930. An updated list of car plates is also included with an updated plate number for 2014 and a further 4 years between 2015-2018. number plates, car, truck, motorcycle -
 Flagstaff Hill Maritime Museum and Village
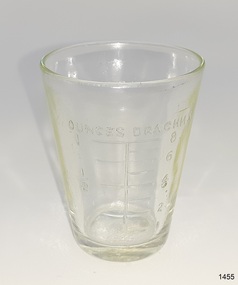
Container - Medicine Glass, ca. 1887 to early 20th century
This small medicine glass has ho manufacturer's or owner's marks. It has no side seams, the base is slightly concave, the embossed inscriptions are inside the glass, the clear glass has slight imperfections and ripples, and the glass is slightly opaque below the lip; these features point to the glass being blown into a mould, partially set, and spun between that mould and an internal mould that had the embossing on it, called a turn-mould process. The lip was then ground to be smooth. The process was patented in 1887 with the title of "Mold for blowing turned bottles".This medicine glass is significant as an example of medical equipment that has a design still used today. It is significant also for having the embossing inside the glass, which was likely produced by the turn-mould method of bottle (and container) making.Medicine glass or dose cup; clear glass with small imperfections and ripples in the glass, no side seams and a slightly concave base. All embossed marks are inside the glass. The imperial measurements are in graduated scales for tablespoons, teaspoons, and ounces and drachmas. "OUNCES DRACHMS" "TABLE TEA"flagstaff hill, warrnambool, shipwrecked coast, flagstaff hill maritime museum, maritime museum, shipwreck coast, flagstaff hill maritime village, great ocean road, medicine glass, measuring glass, dose cup, medicine dispensing, medicine measurement, sambell pharmacy warrnambool, sambell chemist and dentist, internal embossing, glass embossed inside, 20th century chemist, blown glass, two-piece mould, turn-moulded glass, turned bottles -
 Kew Historical Society Inc
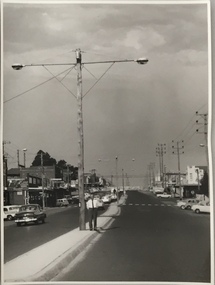
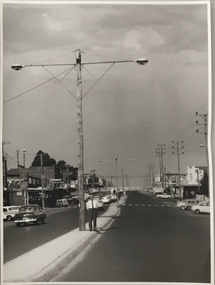
Photograph, Stuart Tompkins Studio, Electricity Supply Poles, North Road, Ormond, 1965
Research provided by Stuart Tompkins Studio, Box Hill, into alternatives for median strip street lighting to be used in Burke Road, Kew. The photographers identified variants in different suburbs appropriate to Kew's needs.The series from which the photograph is drawn provides a snapshot by a commercial photographic studio of each named vicinity in 1965 as well as providing examples of public works infrastructure being commissioned by local government in the 1960s. The photos originally formed part of the Engineering Department's files in the City of Kew before being donated to the kew Historical Society.Electricity Supply Poles, North Road, Ormond, 1965. Electricity supply poles photographed for the Kew City Council by Stuart Tompkins Studio. The photograph of North Road, Ormond west of Jasper Road, looking east depicts wooden poles carrying two lamps in a median strip and with two on each side alternately. It was noted that the supply wires were from one side only. The poles were described as 3′ above ground and 11.25″ in diameter. The plan was to use this approach for Burke Road, Kew. [There are three copies of this photograph in the Collection.] Typed inscription on reverse: "Electricity Supply Poles. Photographed for Kew City Council 8/2/65. No.1 North Road - Ormond, west of Jasper Road, looking east. Wooden poles carrying two lamps in median strip and two on each side alternately just as is proposed for Burke Road, Kew. Supply wires from one side only. Poles 3' above ground 11 1/4" dia." Studio stamp: "Stuart Tompkins Studio. 547 Station Street, Box Hill. WX1439."stuart tompkins studio, street lighting, south road (moorabin) 1965, public infrastructure -- city of kew, city of kew -- engineer's department -
 Kew Historical Society Inc
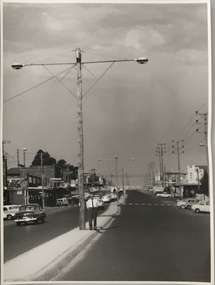
Photograph, Stuart Tompkins Studio, Electricity Supply Poles, North Road, Ormond, 1965
Research provided by Stuart Tompkins Studio, Box Hill, into alternatives for median strip street lighting to be used in Burke Road, Kew. The photographers identified variants in different suburbs appropriate to Kew's needs.The series from which the photograph is drawn provides a snapshot by a commercial photographic studio of each named vicinity in 1965 as well as providing examples of public works infrastructure being commissioned by local government in the 1960s. The photos originally formed part of the Engineering Department's files in the City of Kew before being donated to the kew Historical Society.Electricity Supply Poles, North Road, Ormond, 1965. Electricity supply poles photographed for the Kew City Council by Stuart Tompkins Studio. The photograph of North Road, Ormond west of Jasper Road, looking east depicts wooden poles carrying two lamps in a median strip and with two on each side alternately. It was noted that the supply wires were from one side only. The poles were described as 3′ above ground and 11.25″ in diameter. The plan was to use this approach for Burke Road, Kew. [There are three copies of this photograph in the Collection.] Typed inscription on reverse: "Electricity Supply Poles. Photographed for Kew City Council 8/2/65. No.1 North Road - Ormond, west of Jasper Road, looking east. Wooden poles carrying two lamps in median strip and two on each side alternately just as is proposed for Burke Road, Kew. Supply wires from one side only. Poles 3' above ground 11 1/4" dia." Studio stamp: "Stuart Tompkins Studio. 547 Station Street, Box Hill. WX1439."stuart tompkins studio, street lighting, south road (moorabin) 1965 -
 Kew Historical Society Inc
Photograph, Stuart Tompkins Studio, Electricity Supply Poles, North Road, Ormond, 1965
Research provided by Stuart Tompkins Studio, Box Hill, into alternatives for median strip street lighting to be used in Burke Road, Kew. The photographers identified variants in different suburbs appropriate to Kew's needs.The series from which the photograph is drawn provides a snapshot by a commercial photographic studio of each named vicinity in 1965 as well as providing examples of public works infrastructure being commissioned by local government in the 1960s. The photos originally formed part of the Engineering Department's files in the City of Kew before being donated to the kew Historical Society.Electricity Supply Poles, North Road, Ormond, 1965. Electricity supply poles photographed for the Kew City Council by Stuart Tompkins Studio. The photograph of North Road, Ormond west of Jasper Road, looking east depicts wooden poles carrying two lamps in a median strip and with two on each side alternately. It was noted that the supply wires were from one side only. The poles were described as 3′ above ground and 11.25″ in diameter. The plan was to use this approach for Burke Road, Kew. [There are three copies of this photograph in the Collection.] Typed inscription on reverse: "Electricity Supply Poles. Photographed for Kew City Council 8/2/65. No.1 North Road - Ormond, west of Jasper Road, looking east. Wooden poles carrying two lamps in median strip and two on each side alternately just as is proposed for Burke Road, Kew. Supply wires from one side only. Poles 3' above ground 11 1/4" dia." Studio stamp: "Stuart Tompkins Studio. 547 Station Street, Box Hill. WX1439."stuart tompkins studio, street lighting, south road (moorabin) 1965