Showing 960 items
matching b small
-
 Flagstaff Hill Maritime Museum and Village
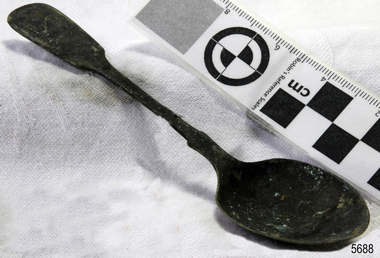
Spoon, circa 1878
This tea spoon is from the wreck of the LOCH ARD, a Loch Line ship of 1,693 tons which sailed from Gravesend, London, on 2 March 1878 with 17 passengers and a crew of 36 under Captain George Gibbs. “The intention was to discharge cargo in Melbourne, before returning to London via the Horn with wool and wheat”. Instead, on 1 June 1878, after 90 days at sea, she struck the sandstone cliffs of Mutton Bird Island on the south west coast of Victoria, and sank with the loss of 52 lives and all her cargo. The manifest of the LOCH ARD listed an array of manufactured goods and bulk metals being exported to the Colony of Victoria, with a declared value of £53,700. (202 bills of lading show an actual invoice value of £68, 456, with insurance underwriting to £30,000 of all cargo). Included in the manifest is the item of “Tin hardware & cutlery £7,530”. This teaspoon is one of 482 similar items of electro-plated cutlery from the LOCH ARD site, comprising spoons and forks of various sizes but all sharing the same general shape or design and metallic composition. 49 of these pieces display a legible makers’ mark — the initials “W” and “P” placed within a raised diamond outline, which is in turn contained within a sunken crown shape — identifying the manufacturer as William Page & Co of Birmingham. An electroplater’s makers’ marks, unlike sterling silver hallmarks, are not consistent identifiers of quality or date and place of manufacture. A similar line of five impressions was usually made to impress the consumer with an implication of industry standards, but what each one actually signified was not regulated and so they varied according to the whim of the individual foundry. In this case, the maker’s marks are often obscured by sedimentary accretion or removed by corrosion after a century of submersion in the ocean. However sufficient detail has survived to indicate that these samples of electro-plated cutlery probably originated from the same consignment in the LOCH ARD’s cargo. The following descriptions of maker’s marks are drawn from 255 tea spoons, 125 dessert spoons, and 99 table forks. These marks are clearly visible in 66 instances, while the same sequence of general outlines, or depression shapes, is discernible in another 166 examples. 1. A recessed Crown containing a raised Diamond outline and the initials “W” and “P” (the recognised trademark of William Page & Co) 2. An impressed Ellipse containing a raised, pivoted, Triangle in its lower part and bearing a Resurrection Cross on its upper section (a possible dissenting church symbol reflecting religious affiliation); OR a rounded Square impression containing a raised, ‘lazy’, letter “B” (possibly mimicking sterling silver hallmark signifying city of manufacture i.e. Birmingham) 3. An impressed rounded Square filled with a raised Maltese Cross (the base metal composite of nickel silver was also known as ‘German silver’ after its Berlin inventors in 1823) 4. A recessed Circle containing a Crab or Scarab Beetle image; OR a recessed Circle containing a rotated ‘fleur de lys’ or ‘fasces’ design 5. A depressed Diamond shape enclosing a large raised letter “R” and a small raised letter “D” (mimicking the U.K. Patent Office stamp which abbreviated the term ‘registered’ to “RD”, but also included date and class of patent) Suggested trade names for William Page & Co’s particular blend of brass plating are ‘roman silver’ or ‘silverite’. This copper alloy polishes to a lustrous gold when new, discolouring to a murky grey with greenish hue when neglected. HISTORY OF THE LOCH ARD The LOCH ARD belonged to the famous Loch Line which sailed many ships from England to Australia. Built in Glasgow by Barclay, Curdle and Co. in 1873, the LOCH ARD was a three-masted square rigged iron sailing ship. The ship measured 262ft 7" (79.87m) in length, 38ft (11.58m) in width, 23ft (7m) in depth and had a gross tonnage of 1693 tons. The LOCH ARD's main mast measured a massive 150ft (45.7m) in height. LOCH ARD made three trips to Australia and one trip to Calcutta before its final voyage. LOCH ARD left England on March 2, 1878, under the command of Captain Gibbs, a newly married, 29 year old. She was bound for Melbourne with a crew of 37, plus 17 passengers and a load of cargo. The general cargo reflected the affluence of Melbourne at the time. On board were straw hats, umbrella, perfumes, clay pipes, pianos, clocks, confectionary, linen and candles, as well as a heavier load of railway irons, cement, lead and copper. There were items included that intended for display in the Melbourne International Exhibition in 1880. The voyage to Port Phillip was long but uneventful. At 3am on June 1, 1878, Captain Gibbs was expecting to see land and the passengers were becoming excited as they prepared to view their new homeland in the early morning. But LOCH ARD was running into a fog which greatly reduced visibility. Captain Gibbs was becoming anxious as there was no sign of land or the Cape Otway lighthouse. At 4am the fog lifted. A man aloft announced that he could see breakers. The sheer cliffs of Victoria's west coast came into view, and Captain Gibbs realised that the ship was much closer to them than expected. He ordered as much sail to be set as time would permit and then attempted to steer the vessel out to sea. On coming head on into the wind, the ship lost momentum, the sails fell limp and LOCH ARD's bow swung back. Gibbs then ordered the anchors to be released in an attempt to hold its position. The anchors sank some 50 fathoms - but did not hold. By this time LOCH ARD was among the breakers and the tall cliffs of Mutton Bird Island rose behind the ship. Just half a mile from the coast, the ship's bow was suddenly pulled around by the anchor. The captain tried to tack out to sea, but the ship struck a reef at the base of Mutton Bird Island, near Port Campbell. Waves broke over the ship and the top deck was loosened from the hull. The masts and rigging came crashing down knocking passengers and crew overboard. When a lifeboat was finally launched, it crashed into the side of LOCH ARD and capsized. Tom Pearce, who had launched the boat, managed to cling to its overturned hull and shelter beneath it. He drifted out to sea and then on the flood tide came into what is now known as LOCH ARD Gorge. He swam to shore, bruised and dazed, and found a cave in which to shelter. Some of the crew stayed below deck to shelter from the falling rigging but drowned when the ship slipped off the reef into deeper water. Eva Carmichael had raced onto deck to find out what was happening only to be confronted by towering cliffs looming above the stricken ship. In all the chaos, Captain Gibbs grabbed Eva and said, "If you are saved Eva, let my dear wife know that I died like a sailor". That was the last Eva Carmichael saw of the captain. She was swept off the ship by a huge wave. Eva saw Tom Pearce on a small rocky beach and yelled to attract his attention. He dived in and swam to the exhausted woman and dragged her to shore. He took her to the cave and broke open case of brandy which had washed up on the beach. He opened a bottle to revive the unconscious woman. A few hours later Tom scaled a cliff in search of help. He followed hoof prints and came by chance upon two men from nearby Glenample Station three and a half miles away. In a state of exhaustion, he told the men of the tragedy. Tom returned to the gorge while the two men rode back to the station to get help. By the time they reached LOCH ARD Gorge, it was cold and dark. The two shipwreck survivors were taken to Glenample Station to recover. Eva stayed at the station for six weeks before returning to Ireland, this time by steamship. In Melbourne, Tom Pearce received a hero's welcome. He was presented with the first gold medal of the Royal Humane Society of Victoria and a £1000 cheque from the Victorian Government. Concerts were performed to honour the young man's bravery and to raise money for those who lost family in the LOCH ARD disaster. Of the 54 crew members and passengers on board, only two survived: the apprentice, Tom Pearce and the young woman passenger, Eva Carmichael, who lost all of her family in the tragedy. Ten days after the LOCH ARD tragedy, salvage rights to the wreck were sold at auction for £2,120. Cargo valued at £3,000 was salvaged and placed on the beach, but most washed back into the sea when another storm developed. The wreck of LOCH ARD still lies at the base of Mutton Bird Island. Much of the cargo has now been salvaged and some was washed up into what is now known as LOCH ARD Gorge. Cargo and artefacts have also been illegally salvaged over many years before protective legislation was introduced. One of the most unlikely pieces of cargo to have survived the shipwreck was a Minton porcelain peacock - one of only seven in the world. The peacock was destined for the Melbourne International Exhibition in 1880. It had been well packed, which gave it adequate protection during the violent storm. Today, the Minton peacock can be seen at the Flagstaff Hill Maritime Museum in Warrnambool. From Australia's most dramatic shipwreck it has now become Australia's most valuable shipwreck artefact and is one of very few 'objects' on the Victorian State Heritage Register. The LOCH ARD shipwreck is of State significance – Victorian Heritage Register S 417. Flagstaff Hill’s collection of artefacts from LOCH ARD is significant for being one of the largest collections of artefacts from this shipwreck in Victoria. It is significant for its association with the shipwreck, which is on the Victorian Heritage Register (VHR S417). The collection is significant because of the relationship between the objects, as together they have a high potential to interpret the story of the LOCH ARD. The LOCH ARD collection is archaeologically significant as the remains of a large international passenger and cargo ship. The LOCH ARD collection is historically significant for representing aspects of Victoria’s shipping history and its potential to interpret sub-theme 1.5 of Victoria’s Framework of Historical Themes (living with natural processes). The collection is also historically significant for its association with the LOCH ARD, which was one of the worst and best known shipwrecks in Victoria’s history. Unrestored tea spoon from the wreck of the LOCH ARD. The spoon design has a flattened fiddle-back handle, with a thin stem or shank, flared collar, and elongated bowl. The spoons metallic composition is a thin layer of brass alloy which has partially corroded back to a nickel-silver base metal. Only 10% of original electroplating remains as a dull bronze colour. Outlines of five makers marks are visible.flagstaff hill, warrnambool, shipwrecked coast, flagstaff hill maritime museum, maritime museum, shipwreck coast, flagstaff hill maritime village, great ocean road, loch line, loch ard, captain gibbs, eva carmichael, tom pearce, glenample station, mutton bird island, electroplated cutlery, loch ard shipwreck, nickel silver, william page & co, birmingham, brass plating, makers marks -
 Flagstaff Hill Maritime Museum and Village
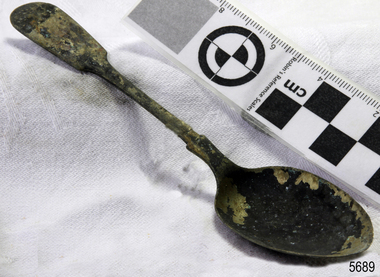
Spoon, circa 1878
This tea spoon is from the wreck of the LOCH ARD, a Loch Line ship of 1,693 tons which sailed from Gravesend, London, on 2 March 1878 with 17 passengers and a crew of 36 under Captain George Gibbs. “The intention was to discharge cargo in Melbourne, before returning to London via the Horn with wool and wheat”. Instead, on 1 June 1878, after 90 days at sea, she struck the sandstone cliffs of Mutton Bird Island on the south west coast of Victoria, and sank with the loss of 52 lives and all her cargo. The manifest of the LOCH ARD listed an array of manufactured goods and bulk metals being exported to the Colony of Victoria, with a declared value of £53,700. (202 bills of lading show an actual invoice value of £68, 456, with insurance underwriting to £30,000 of all cargo). Included in the manifest is the item of “Tin hardware & cutlery £7,530”. This teaspoon is one of 482 similar items of electro-plated cutlery from the LOCH ARD site, comprising spoons and forks of various sizes but all sharing the same general shape or design and metallic composition. 49 of these pieces display a legible makers’ mark — the initials “W” and “P” placed within a raised diamond outline, which is in turn contained within a sunken crown shape — identifying the manufacturer as William Page & Co of Birmingham. An electroplater’s makers’ marks, unlike sterling silver hallmarks, are not consistent identifiers of quality or date and place of manufacture. A similar line of five impressions was usually made to impress the consumer with an implication of industry standards, but what each one actually signified was not regulated and so they varied according to the whim of the individual foundry. In this case, the maker’s marks are often obscured by sedimentary accretion or removed by corrosion after a century of submersion in the ocean. However sufficient detail has survived to indicate that these samples of electro-plated cutlery probably originated from the same consignment in the LOCH ARD’s cargo. The following descriptions of maker’s marks are drawn from 255 tea spoons, 125 dessert spoons, and 99 table forks. These marks are clearly visible in 66 instances, while the same sequence of general outlines, or depression shapes, is discernible in another 166 examples. 1. A recessed Crown containing a raised Diamond outline and the initials “W” and “P” (the recognised trademark of William Page & Co) 2. An impressed Ellipse containing a raised, pivoted, Triangle in its lower part and bearing a Resurrection Cross on its upper section (a possible dissenting church symbol reflecting religious affiliation); OR a rounded Square impression containing a raised, ‘lazy’, letter “B” (possibly mimicking sterling silver hallmark signifying city of manufacture i.e. Birmingham) 3. An impressed rounded Square filled with a raised Maltese Cross (the base metal composite of nickel silver was also known as ‘German silver’ after its Berlin inventors in 1823) 4. A recessed Circle containing a Crab or Scarab Beetle image; OR a recessed Circle containing a rotated ‘fleur de lys’ or ‘fasces’ design 5. A depressed Diamond shape enclosing a large raised letter “R” and a small raised letter “D” (mimicking the U.K. Patent Office stamp which abbreviated the term ‘registered’ to “RD”, but also included date and class of patent) Suggested trade names for William Page & Co’s particular blend of brass plating are ‘roman silver’ or ‘silverite’. This copper alloy polishes to a lustrous gold when new, discolouring to a murky grey with greenish hue when neglected. HISTORY OF THE LOCH ARD The LOCH ARD belonged to the famous Loch Line which sailed many ships from England to Australia. Built in Glasgow by Barclay, Curdle and Co. in 1873, the LOCH ARD was a three-masted square rigged iron sailing ship. The ship measured 262ft 7" (79.87m) in length, 38ft (11.58m) in width, 23ft (7m) in depth and had a gross tonnage of 1693 tons. The LOCH ARD's main mast measured a massive 150ft (45.7m) in height. LOCH ARD made three trips to Australia and one trip to Calcutta before its final voyage. LOCH ARD left England on March 2, 1878, under the command of Captain Gibbs, a newly married, 29 year old. She was bound for Melbourne with a crew of 37, plus 17 passengers and a load of cargo. The general cargo reflected the affluence of Melbourne at the time. On board were straw hats, umbrella, perfumes, clay pipes, pianos, clocks, confectionary, linen and candles, as well as a heavier load of railway irons, cement, lead and copper. There were items included that intended for display in the Melbourne International Exhibition in 1880. The voyage to Port Phillip was long but uneventful. At 3am on June 1, 1878, Captain Gibbs was expecting to see land and the passengers were becoming excited as they prepared to view their new homeland in the early morning. But LOCH ARD was running into a fog which greatly reduced visibility. Captain Gibbs was becoming anxious as there was no sign of land or the Cape Otway lighthouse. At 4am the fog lifted. A man aloft announced that he could see breakers. The sheer cliffs of Victoria's west coast came into view, and Captain Gibbs realised that the ship was much closer to them than expected. He ordered as much sail to be set as time would permit and then attempted to steer the vessel out to sea. On coming head on into the wind, the ship lost momentum, the sails fell limp and LOCH ARD's bow swung back. Gibbs then ordered the anchors to be released in an attempt to hold its position. The anchors sank some 50 fathoms - but did not hold. By this time LOCH ARD was among the breakers and the tall cliffs of Mutton Bird Island rose behind the ship. Just half a mile from the coast, the ship's bow was suddenly pulled around by the anchor. The captain tried to tack out to sea, but the ship struck a reef at the base of Mutton Bird Island, near Port Campbell. Waves broke over the ship and the top deck was loosened from the hull. The masts and rigging came crashing down knocking passengers and crew overboard. When a lifeboat was finally launched, it crashed into the side of LOCH ARD and capsized. Tom Pearce, who had launched the boat, managed to cling to its overturned hull and shelter beneath it. He drifted out to sea and then on the flood tide came into what is now known as LOCH ARD Gorge. He swam to shore, bruised and dazed, and found a cave in which to shelter. Some of the crew stayed below deck to shelter from the falling rigging but drowned when the ship slipped off the reef into deeper water. Eva Carmichael had raced onto deck to find out what was happening only to be confronted by towering cliffs looming above the stricken ship. In all the chaos, Captain Gibbs grabbed Eva and said, "If you are saved Eva, let my dear wife know that I died like a sailor". That was the last Eva Carmichael saw of the captain. She was swept off the ship by a huge wave. Eva saw Tom Pearce on a small rocky beach and yelled to attract his attention. He dived in and swam to the exhausted woman and dragged her to shore. He took her to the cave and broke open case of brandy which had washed up on the beach. He opened a bottle to revive the unconscious woman. A few hours later Tom scaled a cliff in search of help. He followed hoof prints and came by chance upon two men from nearby Glenample Station three and a half miles away. In a state of exhaustion, he told the men of the tragedy. Tom returned to the gorge while the two men rode back to the station to get help. By the time they reached LOCH ARD Gorge, it was cold and dark. The two shipwreck survivors were taken to Glenample Station to recover. Eva stayed at the station for six weeks before returning to Ireland, this time by steamship. In Melbourne, Tom Pearce received a hero's welcome. He was presented with the first gold medal of the Royal Humane Society of Victoria and a £1000 cheque from the Victorian Government. Concerts were performed to honour the young man's bravery and to raise money for those who lost family in the LOCH ARD disaster. Of the 54 crew members and passengers on board, only two survived: the apprentice, Tom Pearce and the young woman passenger, Eva Carmichael, who lost all of her family in the tragedy. Ten days after the LOCH ARD tragedy, salvage rights to the wreck were sold at auction for £2,120. Cargo valued at £3,000 was salvaged and placed on the beach, but most washed back into the sea when another storm developed. The wreck of LOCH ARD still lies at the base of Mutton Bird Island. Much of the cargo has now been salvaged and some was washed up into what is now known as LOCH ARD Gorge. Cargo and artefacts have also been illegally salvaged over many years before protective legislation was introduced. One of the most unlikely pieces of cargo to have survived the shipwreck was a Minton porcelain peacock - one of only seven in the world. The peacock was destined for the Melbourne International Exhibition in 1880. It had been well packed, which gave it adequate protection during the violent storm. Today, the Minton peacock can be seen at the Flagstaff Hill Maritime Museum in Warrnambool. From Australia's most dramatic shipwreck it has now become Australia's most valuable shipwreck artefact and is one of very few 'objects' on the Victorian State Heritage Register. The LOCH ARD shipwreck is of State significance – Victorian Heritage Register S 417. Flagstaff Hill’s collection of artefacts from LOCH ARD is significant for being one of the largest collections of artefacts from this shipwreck in Victoria. It is significant for its association with the shipwreck, which is on the Victorian Heritage Register (VHR S417). The collection is significant because of the relationship between the objects, as together they have a high potential to interpret the story of the LOCH ARD. The LOCH ARD collection is archaeologically significant as the remains of a large international passenger and cargo ship. The LOCH ARD collection is historically significant for representing aspects of Victoria’s shipping history and its potential to interpret sub-theme 1.5 of Victoria’s Framework of Historical Themes (living with natural processes). The collection is also historically significant for its association with the LOCH ARD, which was one of the worst and best known shipwrecks in Victoria’s history. Unrestored tea spoon from the wreck of the LOCH ARD. The spoon design has a flattened fiddle-back handle, with a thin stem or shank, flared collar, and elongated bowl. The spoons metallic composition is a thin layer of brass alloy which has partially corroded back to a nickel-silver base metal. 50% of original electroplating remains. Two of five makers marks are legible: (1) Trade Mark (4) Crab Designflagstaff hill, warrnambool, shipwrecked coast, flagstaff hill maritime museum, maritime museum, shipwreck coast, flagstaff hill maritime village, great ocean road, loch line, loch ard, captain gibbs, eva carmichael, tom pearce, glenample station, mutton bird island, loch ard gorge, electroplated cutlery, loch ard shipwreck, nickel silver, william page & co, birmingham, brass plating, makers marks -
 Bendigo Military Museum
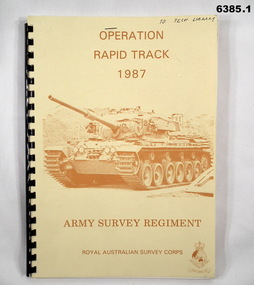
Administrative record - Army Survey Regiment - Operation Rapid Track 1987 Operation Report, Army Survey Regiment, Bendigo, 27 May 1987
The Survey Operation Report deals with the cartographic completion of four 1:50,000 topographical line maps and one Special 1:50,000 map covering the Puckapunyal Military Training Area. The report covers in detail the digital stereo plotting, field completion (checking) and the cartographic completion including printing. The four 1:50.000 maps are 7823-1 PYALONG, 7824-2 COSTERFIELD, 7923-4 TALLAROOK and 7924-3 NAGAMBIE. Annex A lists personnel and dates involved and is attached as 6385.2. Annex B lists the members of the field completion parties.A4 sized buff coloured light cardboard covered report, plastic spiral binding. Front cover includes text, Survey Corps badge and light brown image of a Centurian tank. "To Tech Library", Page 2 has two small handwritten notes indicating that Phase 2 was the Field Completion Phaseroyal australian survey corps, rasvy, fortuna, army survey regiment, army svy regt, asr -
 Bendigo Military Museum
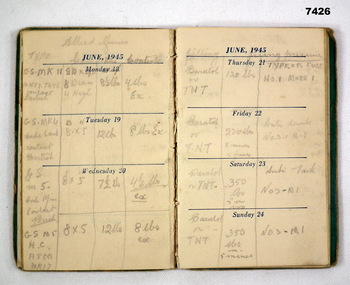
Book - DIARY WW2
In back says 1st ARTB Cowra NSW and 1st Aust Recruit Train Batt, 3rd PL, B Com, suggests diary used as a notebook while trainings. Notes seem to be engineering Technical notes.Small green book. Seems to be used more as a notebook than daily diary entries. Notebook has daily pages but notes start March 1945. Cover torn and multiple pages loose.Stamped inside "Aust Recruit Training Batt", and dated “21 Mar 1945”. In personal details Identity card No. E98021 RN and SPR C. Coy 1 Batt RAE Trg CT. Wagga.ww2, training batt, book -
 Bendigo Military Museum
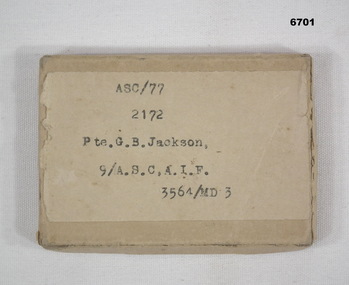
Container - BOX, MEDAL, Post 1918
Empty box that contained an issued service medal to Pte G. B. Jackson. Refer 3446P for his Service details.Small yellow cardboard box with name label stuck on the front.Written on front - “ÄSC/77. 2172 Pte G.B. Jackson, 9/A.S.C. A.I.F., 3564/MD 3".passchendaele barracks trust, medallion box -
 Bendigo Military Museum
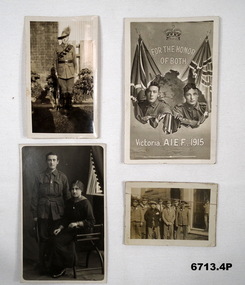
Photograph - PORTRAITS, WW1- AUSTRALIAN SOLDIERS, 1915
1. B & W portrait of an Australian Soldier standing to attention. At his side, he has a leather bandolier. He is wearing a slouch hat with emu feathers. He has leather leggings. His rifle appears to be a long Lee Enfield. 2. Portrait of 2 diggers super-imposed on map of Australia. Behind them are the British and Australian flags. 3.Portrait of a couple. The soldier is standing, the young lady is seated on a wooden chair. The man is in uniform, hat in hand. The lady has a long dark dress, long sleeves. She has a ring on her left hand. They both have a small light object in the centre of their chests. 4. Group Portrait (B & W) of hospitalised soldiers. They are in front of a building and door. There are 8 men in pix.1. On the rear is a small stamp "Kodak Print". 2. Front shows for the Honor of both. Victoria, A.J.E.F. 1915 on the rear is written Lin Shelton (RUN/RUP) Pearson. 3. On the rear is written in pencil "Nellie Curry". 4. On back is "Tom".passchendaele barracks trust, photographs, ww1, pearson -
 Bendigo Military Museum
Letter - LETTERS, WW2, Jan 42 - Sept 43
Item/s in collection re B. J. Ruler VX40780 refer Cat. No 5790 for his service details. Handwritten letters home to Australia from overseas on active duty. Envelopes have green printed service notes and censor notes. Small handwritten note from censor included in envelope/letterEnvelope addressed to “Mrs B. J. Ruler” various addresses in Victoria.letters, ww2 -
 Bendigo Military Museum
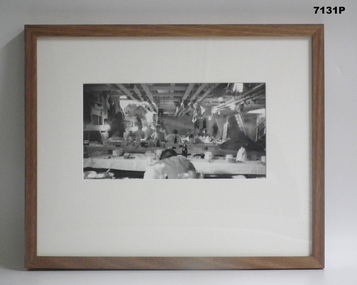
Photograph - PHOTOGRAPH, FRAMED WW1, Wayne Eels, C.2008/2009
The Grinton Collection. Mess deck laid out on the Karmala coming home. Refer Cat. No. 1280 for Jack Grintons service details.Photograph framed. Photograph - black and white photograph on paper depicting tables with cutlery and crockery and a small number of men in a "Ships Mess". Frame - Timber, light varnish finish, Perspex front, cardboard backing."Group 5: Quota 45 - Journey Home". "B. Ship's Mess".framed accessories, camera on the somme, 38th bn, ww1, grinton, hmat karmala -
 Bendigo Military Museum
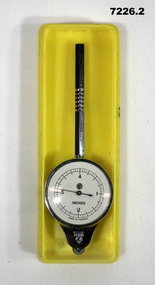
Equipment - MAP MEASURER/OPISMETER, DEPOSE
Vintage opisometer used for measuring distances on maps. Part of the Kevin John Herdman, No. 397661, Collection. See Catalogue No. 5942P for details of his service record..1) Circular chromed metal instrument with handle. Calibrated dial with black markings and hand on a white background. Reverse face has unit conversion details in black text on white background. Each face is covered with a convex glass lens. On the opposite end to the handle is a small wheel with milled edge. As it turns, the hand on the front dial turns to measure distance. .2) Rigid plastic rectangular storage case in two parts. Base is yellow, top is clear..1) Printed on front dial: 'INCHES, MADE IN FRANCE'. Printed on back dial: 'Unit conversion details'. Stamped on metal near wheel: 'DEPOSE, H(logo)B'. .2) Stamped on clear cover: 'CURVIMETRE, MAP MEASURER, H(logo)B, MADE IN FRANCE'.map, map measure, equipment, opisometer, kevin john herdman -
 Warrnambool and District Historical Society Inc.
Plate, Baby Plate - Elizabeth Morgan, c mid 19th century
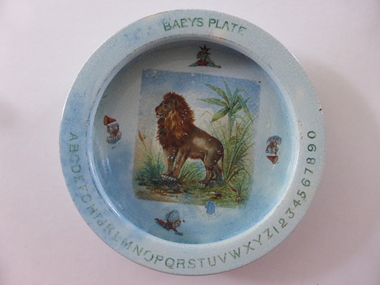
This child's plate was owned by Elizabeth Morgan who was married to Mr P B Webb who was mayor of Warrnambool in 1917. A common item which has significance as it belonged to a local person who was Mayoress of Warrnambool Pale blue straight edged round baby's plate with wide flat rim. Transfer of lion in greenery surrounds is in centre of bottom of plate. Four small transfers of clowns around the edge of the larger transfer.. The alphabet and numbers 1-10 are around the flat edge of the plate. The side has a small ridge which has the remnants of gold paint. A break in the glaze of the bottom of the plate displays blue material.Alphabet and numbers warrnambool, baby plate, elizabeth morgan -
 Warrnambool and District Historical Society Inc.
Postcard, Co-op Card, Early 21st Century
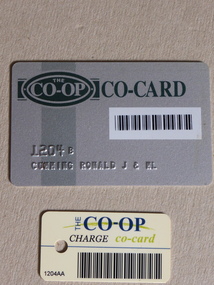
These cards were for use in connection with the Warrnambool Co-Op store. The Warrnambool Co-operative Society Limited was established in 1960 as the Allansford and District Artificial Breeders Co-operative Society Limited to provide herd improvement service to district farmers. In the mid 1970s the Co-Op opened a retail store in Warrnambool in Timor Street and gradually expanded, so that by the late 1990s they had 8000 members and employed 84 full time and 120 casual staff. The Co-Card enabled members to have trading arrangements with 200 other businesses. The Warrnambool Co-Op ceased operations in 2007.These cards are of interest as mementoes of the Warrnambool Co-Op, an important business concern in Warrnambool for over 40 years. The owner of the co-cards was Ronald Cumming. He and his wife. Leonie were members of the Historical Society for many years.These are two plasticised cards associated with the Warrnambool Co-Op. One is a Co-Card and the other is a Co-Op Charge Card used to receive discounts at other businesses. Both cards have bar codes. The larger card has a silver-coloured background with green printing and the smaller card is yellow with blue, black and yellow printing. Larger card - The Co-Op Co Card, 1204 B, Cumming Ronald J and ML (signed by Leonie Cumming on the back) Smaller card – The Co-Op Charge Card, 1204AA warrnambool co-operative society limited, co-card, warrnambool -
 Warrnambool and District Historical Society Inc.
Bottle, Perfume, Early 20th century
No information is available on these two bottles. Small perfume bottles were used extensively in Victorian and Edwardian times and are still in use today. Perfume bottles of the past are collectable items.These bottles are suitable as display items and have no local significance.These are two plain glass bottles of similar shape, one with a stopper. The bottles have a rounded bottom and a smaller neck. The stopper is of metal with a serrated top. There is printing on top of the stopper. ‘B & Co. L., Rd. No. 384531’perfume bottles, warrnambool -
 Warrnambool and District Historical Society Inc.
Book, The Rambler, 1942
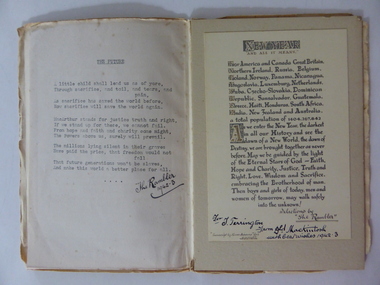
These two items were sent in the 1940s to Tom Terrington of Framlingham ( about 28 kilometres north east of Warrnambool) from Donald Mackintosh. Tom Terrington (b. 1897) worked at various jobs until he took over the Framlingham store in the 1940s. He was a scholarly person with a wide knowledge of English literature. He wrote poetry and researched and wrote extensively on Framlingham history. Donald Mackintosh (1866-1951) was Australia’s first Olympic shooting gold medallist. He competed in trapshooting events all over the world, winning 30 gold medals, making a considerable amount of money and holding the world trapshooting championship title from 1903 to 1908. He was a keen photographer and wrote poetry under the name of ‘The Rambler’. This small folder is of great interest as it contains a poem sent to Tom Terrington by Donald Mackintosh (The Rambler). Tom Terrington is important in Framlingham’s history and his friendship with Donald Mackintosh, an Australian and world trapshooting champion and a poet is of considerable interest. The tone of the poem echoes also the despondency felt by Australians during the darkest days of World War Two. This is a piece of cream thickened paper folded in two with a typed copy of a poem pasted on the inside of the paper and a copy of a prose piece typed in ornate script and pasted on to a piece of cardboard and enclosed in the cream folder. Both of the typed items have handwritten messages at the bottom of the text. The cream folder is a little crumpled and stained. ‘The Rambler 1942-3’ ‘For T. Terrington from Dld Mackintosh with best wishes 1942-3’ tom terrington, donald mackintosh -
 Kiewa Valley Historical Society
Photograph - Photographs x 13 - Cattlemen
11 of the 13 photos were taken by Tor Holth and used in his book "Cattlemen of the High Country" first published in 1980. Co writer was Jane Holth (Barnaby). Of the other two photos, one was taken by C. Roper (2 old gentlemen of the High Plains) and the other (Fred Roper, Tom Hollonds, Kyran Marum - early cattlemen) unknown photographer. The book tells the story of the lives of the mountain cattlemen of Victoria's high country, the harsh conditions and challenges they faced when they mustered their cattle before winter to bring them down to lower pastures. Huts were built of any materials available and were scattered about the high plains to provide shelter from the elements. Some are still standing despite the many bushfires that have ravaged the area.The photographs are of historic significance as they are of early pioneers in the cattle industry in the Kiewa Valley. The huts are of significant interest as they show different types of construction and materials as does the cattle yard at Bogong Jack's. All 13 photos are black and white and printed on photographic paper and are of varying size. 1.On the back, hand written in pencil - "Bogong Jacks hut on Fainter Spur". 2.15 in top right hand corner and 120% centre of photo and circled. 2.On the back a typewritten label cut out and fixed with sticky tape "45 b.&w. Cope Hut, known also as the Menzies of the high plains." Lower left corner is a handwritten label, written in red biro, COPE HUT (underlined) V circled and Journeys into History. 3. Top right hand corner '2.32(a) and across the back, written in pencil, 'Wallace's Hut 1976' and 'TOR HOLTH' in red biro on small sticker lower R corner. 4.2.32(c) in pencil top R corner. 'Wallaces Hut 1976' in pencil across back of photo. 5. '42.7a' in pencil top R corner. Written in pencil across back of photo 'Remains of the second Tawanga Hut.' 6. 'Jim Edmundson Mt. Beauty' handwritten in blue biro across back of photo. 7. '2.26' in pencil top R corner. 'Cattle yard at Bogong Jack's' handwritten in blue biro across back of photo. 8. 'Jim Edmondson of Edmondsons hut' written in pencil on back of photo. 9. 'Geoff Wallace Kergunyah' written in pencil on back of photo. 10.' Geoff Wallace Kergunyah' handwritten in pencil on back of photo. 11. 2.11 in pencil top R corner. 'Fred Roper & Jack Platt. Ph. C.Roper' handwritten in orange pen and under, in pencil, '2 old gentlemen of the High Plains.' 12. Written in black pen across back of photo 'Left to right Fred Roper, Tom Hollonds, Kyran Marum - early cattlemen' 13. Hand written on back of photo 'Sid Ryder' photos, cattlemen, high plains, huts -
 Kiewa Valley Historical Society
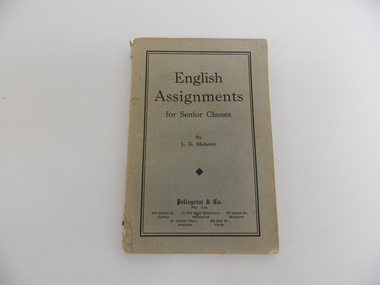
Book - English, English Assignments, 1955
English Education in the 1950s. Roy Davies who grew up and lived on a dairy farm in the Kiewa Valley.Historical: Comparison of education in Victoria. Provenance: The Davies family and their education living in an isolated valley, attending local country schools.Grey book with 2 lines around the perimeter, the outside one thicker than the inside one. Black writing. Cover is of thin cardboard. In black: English / Assignments / for Senior Classes / By / L. G. Mahony / small coloured in black diamond / Pellegrini & Co. / Pty. Ltd. / 543 George St Sydney / In the Myer Emporium, Melbourne / 370 Queen St., Brisbane / 68 Gawler Place, Adelaide / 820 Hay St., Perth Roy Davies 4 B in smudged blue ink on inside cover page. And stamped below 'The Assembley Book Shop / 44 Margaret Street / Sydneyeducation. english. davies family. -
 Kiewa Valley Historical Society
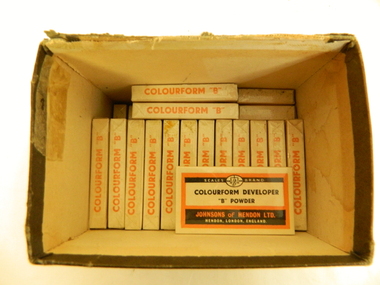
Photographic Equipment - Developer
... Large box - Johnson Colourform Outfit Small boxes... developer wilma davies Large box - Johnson Colourform Outfit Small ...The photographic envelopers were used to develop plates, films and lantern slides. They had to be mixed as per instructions on the packet. These may have been used by an individual or by a local school or organisation.Wilma Davies, a long term resident of the Kiewa Valley donated this photographic equipment.Brownish/black cardboard box with no lid (broken off). Label is black, white and orange on front. The remaining parts of the label seal are on the sides with a 'picture' of (weighing) scales and words Trade Mark in black on orange and white. Inside the box are 31 clear plastic sealed cardboard boxes of "Colourform developer "B" Powder". The boxes are white with a label on the front with black and orange print. The ends are clear, the sides have "Colourform "B" in orange and the back has 'Directions' in black .Large box - Johnson Colourform Outfit Small boxes Colourform developer "B" powder.photographic equipment, photography, johnsons of hendon, colour form developer powder, photo developer, wilma davies -
 Kiewa Valley Historical Society
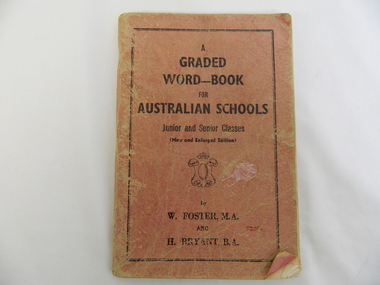
Book - School Text Book, A Graded Word Book for Australian Schools by W. Foster, M. A. and H. Bryant B. A
Spelling books were used in the Primary and Secondary schools during the 1950s. This book enabled the student to progress at his/her own pace. Roy Davies grew up and lived in the Kiewa Valley at Tawonga.Small faded red soft covered book with black writing on cover inside a border of a thin black line. In black: Junior and Senior Classes"Roy Davies 4B 1957". Inside cover page "accompanied, achievement, affair" hand written on inside title page.spelling, school, student, roy davies, education, mt beauty, tawonga -
 Warrnambool and District Historical Society Inc.
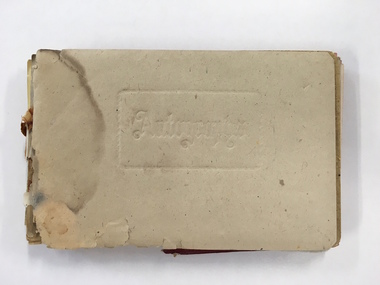
Booklet, Autograph Book, Late 1930s
According to the front page this autograph book belonged to Patricia Spencer of Spencer Street, Dartmoor. Dartmoor is a small settlement on the Princes Highway between Heywood and the South Australian border. It was first settled in the late 1850s and the main industry is the processing of timber from the surrounding pine plantations. Patricia Spencer attended Warrnambool High School in the late1930s and this album contains a number of entries from Warrnambool High School in 1938. It also has a page of eleven signatures of the Head Master, George Langley and other teachers from Warrnambool High School. There are also entries from people from Mortlake and Panmure and other entries with the person’s address not indicated. Autograph books such as this one were commonly owned by young people in the 19th and 20th centuries (up to about 1950) and were very popular with young girls.This album, although incomplete and tattered, is of interest because it is a good example of the social custom, more popular a couple of generations back than it is today, of young people owning and obtaining signatures and verses from their friends and acquaintances. It is also important because it contains signatures of Warrnambool High School teachers in 1938 and there are other entries of interest. This is a small autograph album that was originally bound with a cardboard cover with red leather backing but now has no front cover and only part of the back cover. The pages are all loose and the front section (buff-coloured) has a cardboard piece with felt padding. The pages are coloured in a variety of pastel tones and there are many handwritten entries of verses and signatures, with several from the ‘B’ Form, 1938, of ‘W.H.S. (Warrnambool High School). The album appears to have belonged to Patricia Spencer from Dartmoor. Some of the pages are torn and stained. At the back there are remnants of a sketch of an Asian scene and a letter to ‘Pat’ for her birthday. ‘Autographs’ ‘Patricia Spencer, Spencer Street, Dartmoor’ autograph albums, patricia spencer, warrnambool -
 Warrnambool and District Historical Society Inc.
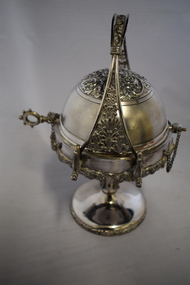
Household, Butter Cooler, Late 19th century
This butter cooler was used in households to prevent butter from melting in the warmer weather. Ice would have been used in the butter container. The top of the container is domed, indicating the shape of the butter at that time (late 19th century). This butter cooler would have been a costly item and would have graced the dining table of a family that had considerable means. It would have been used on a dining table even after the invention of refrigeration in the 1880s as the eating rooms would have had little or no cooling mechanisms in the late 19th and early 20th centuries. This butter cooler has no known local provenance but it is a very attractive item and is retained as a good example of a household item no longer in use. It will be very useful for display.This is a silver butter cooler with a circular base with an ornamented edge. The base has a stem holding two highly ornamented arms branching out from the sides. These arms hold an oval container which has a chased silver base and an overhanging chased silver top. Inside the container is the space to hold ice or cold water. On top of the inside of the container sits a small round lid which holds the butter and the ice. The lid has several small holes for the ice water to drain underneath. The base of this lid is impressed with moulded fruit and leaves. The oval container has an over-arching handle attached. This is highly ornamented in fretwork. The sides of the container have two projecting pieces for holding the butter cooler and two other smaller projecting pieces with chains attached for hanging the object. One of these pieces has an oval holder for turning the hinged top of the container to close the container. This top has a chased silver patterning on its top. When the lid is closed the container adapts to a globe or egg shape.‘Made and Guaranteed by Meriden B. Company 5085 U.S.A. household items, history of warrnambool, silver butter cooler -
 Warrnambool and District Historical Society Inc.
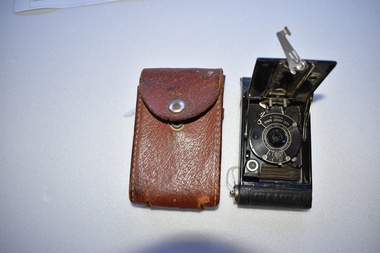
Camera, Black rectangular Kodak with case, 1925-1935
This camera was known as the Vest Pocket camera the earliest models of which were first manufactured in 1912-1914. The later model which was made from 1915 was very successful, selling 1.75 million units and was used during the First World War. This particular model was manufactured from 1925-1934 This camera has significance being one of the earliest made which made photography accessible to a much section of the community..1 Black rectangular camera with rounded ends and white metal fittings. There is a hinged back which when opened reveals a circular section with a folding bed behind.A metal hinged screw is on the left side The other side has a small circular red inset and a movable metal section. .2 Dark tan leather case, rectangular in shape with rounded edges.It closes with a silver metal clasp. There are two slits in the opposite end possibly for strap.There is a sunburst stamped into both sides of the case and it is stitched with coarse cotton thread..1 On outside of camera " Use Film No A127" Inside hinged Back, " made In USA by Eastman Kodak Co Rochester NY 27323 Vest Pocket Camera Model B .2 Kodak is stamped in the leather above the fastener. warrnambool, kodak, eastman kodak camera, vest pocket kodak model b -
 Warrnambool and District Historical Society Inc.
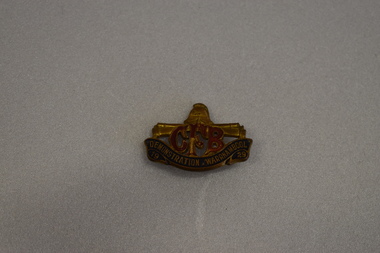
Badge, Country Fire Brigade 1929
The Warrnambool Fire Brigade was formed in 1863 with the first fire engine house in Liebig Street. Since then the brigade has been situated in Raglan Parade, Timor Street and today is in Mortlake Road. Fire Brigade demonstrations were a feature of rural Fire Brigades, particularly in the 19th century. At these demonstrations firemen from all over the state were involved in competition using hose reels, pumps and ladders etc. A torch light procession was always part of the demonstration. The state Fire Brigade Demonstration was held in Warrnambool in March 1929. One hundred and nineteen teams entered the Champion Fours and there were ninety one entrants in the one man ladder competition which was won by a fireman from Carrum who was carried shoulder high around the oval. This badge has considerable significance as it is our only memento of the Fire Brigade demonstration held in Warrnambool in 1929. A gold coloured metal badge featuring a profile of a fireman's helmet at the top, a horizontal bar, ornate capital Letters; C F B painted ( the letter F is missing some paint ) in the centre and a dark blue scroll with text at the base. There is a small hook and a small hollow cylinder on the reverse. The clip is missing.1929 DEMONSTRATION WARRNAMBOOL country fire brigade, country fire brigade demonstration, warrnambool -
 Eltham District Historical Society Inc
Document - Series Listing, Fraser Faithfull et al, Series 13: Eltham Shire Photograph Album 1985, 2000
Series consists of 174 colour and B&W photographs of sites and activities in the Shire of Eltham. Most shots are 150mm by 100, though there are a number of smaller shots laid out in montages, and 6 large (A4 size) colour shots. Subjects documented include the Eltham Library, Eltham Lower Park, Eltham Senior Citizens Centre, Housing Development, the Council Depot, Shire Offices, Eltham Child Care Centre, Miniature Railway, Community Centre, the Bike Track, a Citizenship Ceremony, Shillingham Cottage, Eltham Town Park and other sites.shire of eltham archives, series listing -
 Glen Eira Historical Society
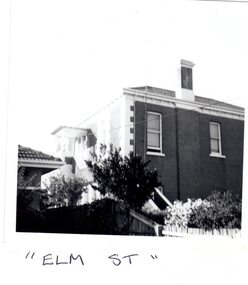
Article - Elm Avenue, 21, Elsternwick
1/One small black and white photograph of the residential property in 21 Elm Avenue. 2/Two advertisements for the sale of Flat 3, 21 Elm Avenue from unknown publications dated 07/03/2006 and 14/03/2006. The auction was to be held on 01/04/2006. Includes two exterior and one interior photograph Recent sale notice of 2/21 Elm Avenue dated 2013. Includes colour exterior photograph 4/Copy of letter dated 17/02/1998 from Heritage Victoria to J and B Chi Lok Wong, owners of 21 Elm Avenue, concerning nomination of the property for the Heritage Registerelm avenue, elsternwick, chimneys, brick houses, victorian style, architectural styles, architectural features, flats, hopetoun street, walton manor -
 Glen Eira Historical Society
Document - Bertram Street, 37, Elsternwick
A one page copy of correspondence dated 22/04/1988 concerning Bertram Street, 37, Elsternwick, the Gardenvale Railway Station and land sales in the area. Researched by the Brighton Historical Society. The file also includes a one page handwritten excerpt from the publication Sand, Swamp and Heath by Murray and Wells, about the subdivision named Gardenvale and the occupiers of Bertram Street, 37, Elsternwick.bertram street, elsternwick, prowse reginald, watson george j, gardenvale, parnell street, muntz street, muntz edwin parnell, muntz thomas b, surveyors, engineers, gardenvale station, market gardens, small and edwards, land developers, gardenvale on the hill, bullock h, landells rosalind -
 Waverley RSL Sub Branch
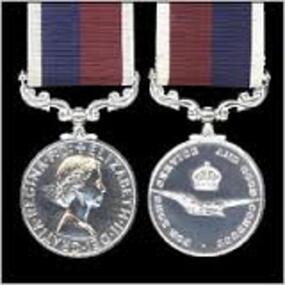
R.A.A.F. Long Service Medal
Awarded to Alan Bowers (A236814) who was a R.A.A.F. dental mechanic who serverd during WWII including service in Darwin, and then continued in the R.A.A.F. for some years after the end of WWII The Royal Australian Air Force (and all Commonwealth Air Forces) Long Service and Good Conduct Medal: Awarded to NCOs and ORs of the RAAF (RAF, RCAF etc) for 15 years service. A cupro-nickel plated medal, the obverse features the sovereign's head, the reverse features the crown and eagle emblem of the RAAF (and RAF). Officers are eligible for the award provided they have served a minimum 12 years in the ranks. The riband is dark blue and maroon with white edges. This medal ceased to be awarded in Australia in 1975 when it was replaced by the National Medal (and sbsequently the DFSM and DLSM) in the Australian system of honours and awards. http://www.heritagemedals.com.au/medals-1/service-long-service/air-force-long-service-and-good-conduct-medal.html History of the RAAF Dental Branch It took six years following the formation of the RAAF in 1921 for the first Dental Clinic to be established at Point Cook, Victoria. On 10th June 1927 Flying Officer James Carl Rosenbrock commenced work as an RAAF Dental Officer for the FlyingTraining School at Point Cook. As personnel numbers were still relatively small, Rosenbrock was also responsible for the dental care of all Victorian RAAF units, which involved treating members at 1AD Laverton, as well as Air Force Headquarters at Victoria Barracks in Melbourne. As Army Dental Officers were currently caring for RAAF personnel at Richmond, NSW, the Senior Dental Officer of the 3rd Military District in Victoria (SDO 3MD) requested through the military board that a similar arrangement be established, where that the newly appointed RAAF Dentist provide part time dental services to the Army units stationed at Queenscliff. This was seen as an effective reciprocal arrangement, with both units having a Dental Officer in attendance for, in total, around 3-4 weeks a year. Rosenbrock continued to serve as the sole RAAF Dental Officer until the middle of 1933, when the Air Board asked for his service to be terminated following ‘behaviour unbecoming of a RAAF officer'. He had borrowed several sums of money, of around 40 Pounds or so, from junior ranks on base (as well as from the Regimental Sergeant Major) and had failed to pay the money back. He was replaced by a fellow Victorian, FLGOFF Norman Henry Andrews, on the 18th Sep 1933, who went on to become our first Director of Dental Services, and was instrumental in establishing the organisations and conditions of the Branch that are still present today. Through a fair amount of persistence and hard work on the part of Norman Andrews, the RAAF Dental Branch began to expand from 1937, with the introduction of 2 additional positions, at RAAF station Richmond, and at the FlyingTraining School at Point Cook. This gave the RAAF 3 uniformed Dental Officers, which was expanded to 5 in the months leading up to WW2. 4 of these Dental Officers were based in Victoria and 1 at Richmond, with the other two RAAF units being cared for by the Army (as in the case of Pearce in WA) or by civilians (as in Darwin). With the sudden increase in RAAF personnel required at the outbreak of WW2, the number of RAAF Dental Officers increased dramatically, from 5 in 1939, 28 in 1940, 64 in 1941, 147 in 1942, 193 in 1943, 219 in 1944, and peaking at 227 in 1945. RAAF Dental Officers were required to work in a variety of locations, both in and out of Australia. Between 1940 and 1942 a massive construction programme occurred, with new dental clinics being established around Australia. Priority was given to aircrew training units in order to get these personnel dentally fit for operational deployment, but Dental Officers could equally find themselves posted to recruit depots, fixed stations, medical clearance stations, mobile dental sections, and RAAF and civilian hospitals. RAAF Dental Officers were posted to the large dental centres at Ascot Vale (Vic) and Bradfield Park (NSW) when first appointed, where they received military and clinical training, before being deployed to their needed location. Mobile Dental Units When Japan entered the war in 1941, the rapid deployment of troops to northern operational areas with less than ideal dental fitness was extremely high. As a result, the RAAF deployed a range of mobile dental units, either alone or with medical sections, to support the increasing number of isolated deployed personnel within Australia and overseas. There were three types of mobile unit used: a. Mobile Dental Unit – relied on using either a semi-trailer to get around or by building a surgery directly on to the truck chassis, and installing hydraulic chairs, units, x-rays, and laboratory equipment. They were able to move around between small units, such as RAAF radar stations, where they could plug into the local power supply and work immediately. b. Transportable Dental Units – used for stops of longer duration, where field equipment was carried in panniers from one unit to another by road or rail and housed in whatever accommodation was available at the destination. They were often carried within Australia on Tiger Moths and Dakota aircraft. c. Itinerant Dental Units – in some areas, the dental equipment was installed at the RAAF unit and the Dental Officer and their staff would travel from unit to unit, using the equipment available at each location. RAAF Dental BadgeAs the war developed in Europe, it soon became obvious that the RAF Dental support was not capable of supporting the increasing numbers of RAAF aircrew that were being sent for service with the RAF, with only enough Dental Officers available to provide one to every 2000 men ( instead of the preferred 1 to 600). As a result, the RAAF provided a mobile dental unit, fitted out in a caravan and pulled by a Ford V8 Coupe, to travel around England in support of RAAF personnel at various squadrons. Some degree of tact was needed to ensure that the RAF did not take this as a comment on the treatment they were providing, but it proved successful in maintaining a satisfactory state of dental fitness in RAAF personnel, and a second mobile unit was soon dispatched. They were also set up with a laboratory on board as well as the surgery, which was a major difference between the RAF and RAAF, as the RAF did not provide dentures for their troops (the RAAF would, providing they had served for 6 years). In 1943 the RAF was no longer able to provide Dental support to Australian troops in the Middle East, which resulted in the need for a transportable dental unit to be deployed from Australia. It functioned in a similar manner to the RAF, by moving from one squadron to another. It served in the Middle East and Africa, from Cairo across North Africa, to Italy, and eventually back to England to treat returned prisoners of war. GPCAPT Norman Andrews The growth and development of the RAAF Dental Branch owes a debt to one man in particular, GPCAPT Norman Andrews. As the second RAAF Dental Officer to enlist on 18 Sep 1933, Andrews became the principal architect of the structure and organisation of the RAAF Dental Branch leading up to and during WW2. Until early 1940, the RAAF Dental Branch was administered by the Director of Medical Services (Air), which placed it under the control of the Army Medical staff. The Army would provide their Inspector of Dental Services for advice whenever needed. In April 1940, the RAAF Medical service separated from the Army, resulting in the control of the RAAF Dental Branch shifting back to the RAAF. Andrews became the first Director of Dental Services, when the position was created in 1943 as recognition of the higher profile the Dental Branch was now playing in the RAAF Medical service. Until this time, Andrews's title had been as the Dental Staff Officer to the RAAF Medical Service. Andrews was responsible for the establishment of the war-time structure of the Dental service, establishing new dental centres at all major bases, creating mobile and transportable dental units, ensuring the continual growth of the Branch, maintaining professional development of staff through the establishment of a professional journal, and by organising renowned lecturers to speak at RAAF bases. He also believed in visiting as many dental units as possible to see for himself what conditions were like and to talk first-hand to staff in remote units. His itinerary during the war years, both in and out of Australia, shows a large number of trips in a variety of modes of transport in order to reach remote areas where units were serving. He was promoted to GPCAPT in July 1944, as the numbers of Dental Officers soon peaked at 227 towards the end of the war (1 GPCAPT, 9 WGCDRs, 60 SQNLDRs, and 157 FLTLTs). After the war, with the reduction in RAAF personnel required in uniform, the Dental Branch also reduced its numbers significantly. By 1947 there were only 18 Dental Officers serving (many part-time), with 1 GPCAPT, 1 WGCDR, 10 SQNLDRs, and 6 FLTLTs, and only 13 by 1950. With the decrease in Branch personnel numbers, the ‘powers to be' saw fit to reduce the Director of Dental Service rank to WGCDR, and as a result Norman Andrews found that in order to continue serving in the RAAF he would have to wear a reduced rank. This appears to have been a contributing factor in his decision to discharge at the relatively early age of 43 and accept an administrative job as Director of the Victorian Government's School Dental Service. Norman Andrews holds the proud honour of being the founder of the RAAF Dental Branch, which during the war was instrumental in educating servicemen of the importance of dental health and maintaining the dental fitness of troops in a variety of areas. Dental Orderlies (Assistants) The dental orderly mustering was first introduced in 1937. Until that time, medical orderlies were assigned to assist the Dental officer with their duties. As early as 1931 it had been noted by both RAAF and Army Dental Officers working in Victoria and Richmond that a lot of the troubles they were having would be solved by appointing a permanent Dental Orderly. Often they would find that the medical orderly they were assigned was a different one each day, and as a result the administration and work in general was very inefficient. By 1937, with the increase in Dental Officers to 3, it was realised that a Dental Orderly mustering needed to be created. Dental Mechanics/Technicians Before WW2, dental laboratory work was provided by civilian laboratories, as most RAAF units were stationed around metropolitan areas. At this time, service personnel were still required to pay for their own dentures, unless they had served for six years or had their dentures damaged during performance of their duties. In July 1940, mainly in response to the development of more remote RAAF dental units and the increasing demand for dental prostheses, the Dental Mechanic mustering was established. Unfortunately there was a very limited pool of civilian dental mechanics to recruit from, and as a result the RAAF set up a training school at Laverton (which was later moved to Ascot Vale) in June 1941 which conducted an intensive 6 month course in Dental mechanics. Dental mechanics were quickly in demand. In all fixed and mobile dental units at least 1 Mechanic was supplied for each Dental Officer, and indeed the RAAF supplied Dental Mechanics throughout all its deployments, something the RAF were unwilling, or unable, to do. Two grades of dental mechanic existed: the Senior Mechanic (with the rank of NCO), who was competent in all phases of laboratory work; and the Junior Mechanic, who could only handle routine work and not more advanced denture work. The progression to Senior required a further trade test in techniques including setting up, clasp-forming, casting and backing teeth. During the course of the War, two special courses were held for Mechanics. The first, directed at senior mechanics so that they could instruct others, was in 1942 when Acrylic Resin was first introduced as a denture base material, as an alternative to the current option of vulcanite. Later, towards the end of the War, a ‘refresher' course was provided for those that had served for the greatest period of time in order to allow them retraining in techniques that they had not practised during their service and which were common in civilian life. This included cast base dentures, crowns and bridges, partial dentures, and retainers. Towards the end of the War, a course was held with WAAAF trainees to train them as Mechanics. However, as the War was soon to end they never had the opportunity to progress within the mustering to become Senior Mechanics. The RAAF Dental Branch has survived 75 years of turbulence, with reviews of its viability occurring regularly every few years from as early as 1937. The Branch continues to provide excellent service to the ADF community and, despite reduced manpower, will continue to play an important role in Air Force Health operations. http://www.defence.gov.au/health/about/docs/RAAFDental.pdf40cm cupro-nickel plated medal, the obverse features the sovereign's head, the reverse features the crown and eagle emblem of the RAAF (and RAF). A23814 BOWERS.A. A. F.r.a.a.f long service medal, r.a.a.f good conduct, r.a.a.f. dental service medal -
 Waverley RSL Sub Branch
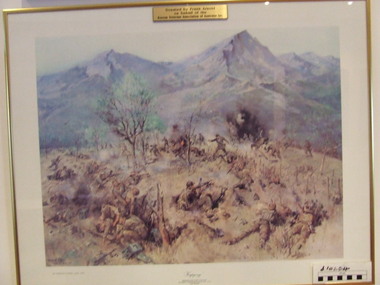
Print Kapyong, Kapyong
On 23 April, the 3rd Battalion, Royal Australian Regiment (3 RAR), under the command of Lieutenant Colonel Bruce Ferguson, and the 2nd Battalion, Princess Patricia's Canadian Light Infantry, occupied prominent hills on either side of the seven-kilometre-wide valley, where a small tributary joined the Kapyong River. Also forward were headquarters units, tanks and artillery. The 1st Battalion, Middlesex Regiment, were to the rear. Early in the evening, retreating South Koreans streamed past the Commonwealth position, with Chinese forces closely intermingled. Soon afterwards a platoon of American tanks supporting 3 RAR was overrun. The Kapyong valley was too large an area to defend with the forces available, and the brigade was spread very thinly. Throughout the night the Chinese repeatedly pressed the Australian positions, attacking in waves over their own dead and wounded. At dawn, A Company, under the command of Major Bernard "Ben" O'Dowd, found that the Chinese had infiltrated its position, but a counter-attack was able to eject them. Meanwhile B Company, which had spent the night on a hill near the riiver, discovered Chinese occupying some old bunkers on a small knoll. Hand-to-hand fighting ensued with grenades and bayonets. C Company, under the command of Captain Reg Saunders, was in position to reinforce both A and B Companies. "Major O'Dowd then directed the radio operator to contact anyone. The American 1st Marine Division answered but their operator refused to believe who our operator was speaking for. Major O'Dowd took the phone and demanded to speak to the commanding officer. The general in charge of the [Marine] division came on the phone and told O'Dowd we didn't exist as we had been wiped out the night before. Major O'Dowd said, 'I've got news for you, we are still here and we are staying here.'" Private Patrick Knowles, 3 RAR, on the morning of 24 April 1951 Fighting continued throughout the day with the Australians holding their positions, and the Chinese also engaging D Company. But late on 24 April, with their position now untenable, the Australians were forced into a fighting withdrawal down a ridge to the valley, where they rejoined the brigade. Their withdrawal was supported by New Zealand artillery from the 16th Field Regiment. Having found the Canadian position unassailable, the Chinese made no further attacks. By the afternoon of 25 April the road through to the Canadians had been cleared of Chinese and 2 PPCLI was relieved by US Army units. On Anzac Day 1951, the Australians rested after a long fight. Thirty-two Australians were killed and 53 were wounded for their part in stalling the Chinese advance and preventing Seoul from falling into enemy hands. Lieutenant Colonel Bruce Ferguson was awarded the Distinguished Service Order for his skilful leadership, and the Australian and Canadian battalions both received United States Presidential Distinguished Unit Citations for their part in the battle. http://www.awm.gov.au/exhibitions/korea/operations/kapyong/Print of painting of action in Kapyong Korea in wooden frame under glassDonated by Frank Arnold on behalf of Korean Veterans Association of Australia inc.korea, kapyong, 3rar -
 Federation University Historical Collection
Document - Document - Correspondence, VIOSH: Comments on Post Graduate Course in OHM; Max Brooke to Derek Viner, 1978
Victorian Institute of Occupational Safety and Health (VIOSH) Australia is the Asia-Pacific centre for teaching and research in occupational health and safety (OHS) and is known as one of Australia's leaders on the field. VIOSH has a global reputation for its innovative approach within the field of OHS management. VIOSH had its first intake of students in 1979. At that time the Institution was known as the Ballarat College of Advanced Education. In 1990 it became known as Ballarat University College, then in 1994 as University of Ballarat. It was 2014 that it became Federation University. VIOSH Australia students are safety managers, senior advisors and experienced OHS professionals. They come from all over Australia and industry. Students are taught active research and enquiry; rather than textbook learning and a one-size fits all approach. VIOSH accepts people into the Graduate Diploma of Occupational Hazard Management who have no undergraduate degree - on the basis of extensive work experience and knowledge. Max Brooke, a member of the Internal Working Party - Occupational Hazard Management - wrote to Derek Viner outlining his concerns re "Integration of the Management Sections in the PGI course in Occupational Hazard Management". His concerns were presented at further meetings of the Working Party. These discussions were held to fine tune the courses to be offered when the First Intake was due in 1979 Members of the Working Party were Max Brooke, G Fernandez, J Harvey, B Rollins, Derek VinerFour foolscap pages, one smaller page - all typedNotations in pencil and inkviosh, victorian institute of occupational safety and health, occupational hazard management, internal working party, derek viner, max brooke, g fernandez, j harvey, b rollins -
 Lara RSL Sub Branch
Lithgow 1907 Bayonet and scabbard, Lithgow 1907 Bayonet and scabbard Serial Number A 76966
WW1 bayonet manufactured in Australia.WW1 example of Australian Manufacturing The bayonet was designed at the Lithgow Small Arms factory in Australia starting around 1913, just prior to WWI. The Lithgow 1907 Bayonet would become Australia’s staple weapon along with it’s counter part, the Enfield No1 Mark III rifle. The wood on the hilts is often referred to as furniture and then starting around 1916 Queensland Maple was used. Queensland Maple would continue to be used until about 1941.Scabbard on the reverse marking stating MANGROVITE 44 and /i\ B. Wooden Hilt has marking of 6 pointed star and an A imprinted into it. (Both sides.) Pommel is stampted wi a serial number of A 76966. Hilt of the bayonet one side is stamped Lithcow 3 '21 over a crest of a six pointed star and a shield which encapules 1907 /1. The pommel also contains a button locking release from the rifle slide mount.1907, bayonet -
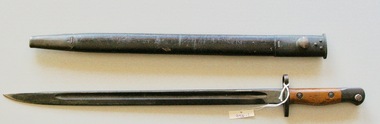
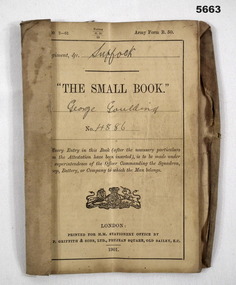 Bendigo Military Museum
Booklet - BOOK, SOLDIERS PAY, SUFFOLK REGIMENT UK 1901, British Army, 1901
Page 4 has handwritten description of soldier and enlistment details - George Goulding. Enlisted at St. Georges Barracks, London. County of Middlesex. 31 December 1897, age 18 yrs, 10 mths. He joined Suffolk Regiment for 7 years. He was born in Whitechapel, London. Height 5'5-1/2 ", Dark hair, tattoo on left forearm. He served in various places abroad. Malta, Dolpa, Sth Africa, Southampton.This is a small booklet titled "The Small Book" British Army form B.50. The soldier's name is George Goulding No. 4886. The Regiment is Suffolk. In the centre of the cover are the instructions for use, beneath that is the crest of Great Britain. The rear cover is khaki coloured buckram. Inside are 24 pages. These have Goulding's description - Navy regulations and details of Goulding's Service.british suffolk regiment, south african war, boer war, soldier -
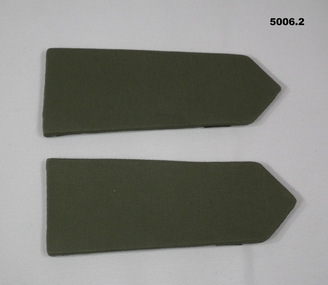 Bendigo Military Museum
Uniform - SHOULDER BOARD
Part of the Reverend Chaplain Major Thomas Bruce Williams, No 556101, Collection.A pair of khaki coloured hard shoulder boards stiffed with cardboard inserts. On the underside of each board are two fabric strips for attachment to an epaulette.Stamped on the back of each in white ink: 'SMALL 14/15 1/2'army chaplain, uniform, major thomas b. williams