Showing 929 items
matching ballarat north gardens reserve
-
 Ballarat Tramway Museum
Photograph - Black & White Photograph/s, 1905
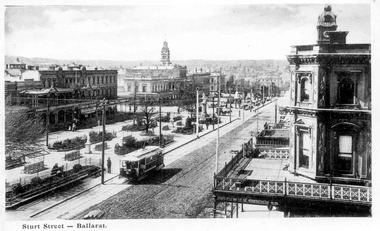
Black and white photograph mounted onto heavy cardboard. Image is an ESCo tram near the intersection of Doveton St. and Sturt St. travelling west along the south side of Sturt Street. Photo appears to be taken soon after opening of the electric trams, as the tramway is well paved compared to the rest of the street which shows vehicle tracks etc. Small horse drawn vehicle crossing in front of the photograph. Shows buildings along the north side of Sturt St. and the building at the SE corner of Doveton St. ESCo tram has destination board on the front dash of the tram. Has title printed on photograph of "Sturt St. Ballarat". See Reg. No. 834 and btm834i for image scanned from postcard for this photograph.trams, tramways, esco, sturt st, doveton st -
 Ballarat Tramway Museum
Photograph - Black & White Photograph/s, 1906
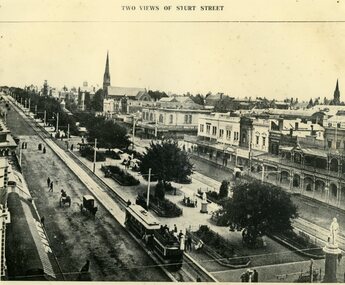
Black and white photograph of Sturt St. looking west from Town Hall 1906. Shows a ESCo tram hauling an ex-horse trailer . Has some other horse drawn vehicles in photo and a number of pedestrians. Shows the newly formed tramway road surface, poles etc. Has "Snows" store sign on left hand side of photograph and buildings along the north side of the Sturt St. Other buildings shown are William Day & Son, Walter Connell, Anderson & Morse coach builders. On the top of the item is the words "Two Views of Sturt St.". See also Reg Item No. 888 for the same item, but with a typed caption note stuck on the top edge. See Reg Item No. 2784 for the other "Two Views of Sturt St." image.trams, tramways, esco, sturt st., ballarat -
 Ballarat Tramway Museum
Document - Report, Legislative Assembly of Victoria, "Progress Report on the Select Committee on Electricity Supply", Nov. 1922
Sixteen page printed report titled "Progress Report on the Select Committee on Electricity Supply" and subtitled "The Provision of the State Electricity Commission Bill and the Purchase of the North Melbourne Electric Tramways and Lighting Company's works and undertakings" Published by the Order of the Legislative Assembly 21 November 1922." Folded and stapled along left hand edge. Sheets have rounded corners. Looks at the purchase of the NMETL and rural power. Has an Appendix titled "The Powers of the Commission and how they are being exercised" signed by John Monash and and other "The Problem of Retail Distribution of Electricity in Rural Districts".Stamp of ESCo in top right hand corner dated "28 Nov. 1922" and throughout the report, many pencil marks highlighting or underlining aspects.trams, tramways, sec, nmetl, power supply, councils -
Ballarat Tramway Museum
Document - Report, Legislative Assembly of Victoria, "Report of the Select Committee on Electricity Supply", Dec. 1922
Twenty Four page report titled "Report of the Select Committee on Electricity Supply - the supply of electricity to the south west district and the Sugarloaf scheme for the supply of electricity to the north eastern district". Has minutes of evidence. Published by the Order of the Legislative Assembly 7 December 1922.". Folded and stapled along left hand edge. Sheets on one copy has rounded corners. Two copies held. Stamp of the "Electric Supply Co. of Victoria Ltd" in top right hand corner dated 25 Aug. 1928"trams, tramways, sec, sugarloaf, power supply -
 Ballarat Tramway Museum
Newspaper, The Courier Ballarat, "Down the Tracks", Jan. 1997
Newspaper cuttings from The Courier, Ballarat, "Down the Tracks" column with notes Mr. Maurie Calnin JP. Mr Calnin was the President of the BTPS in the early 1970's. The item records Mr. Calnin's days as a Victorian Railway's North Ballarat Railway Workshop employee, a JP and a Magistrate on the Children's Court. 1735.1 - Ballarat Courier, p30, 24/1/1997 - 118H x 79W 1735.2 - Ballarat Courier, p26. 31/1/1997 - 190H x 96W1735.1 - in black ink 4 "*"'s on the top edge, "Courier p30 24/1/1997" and "former BTPS President" 1735.2 - in black ink "p26 Courier 31/1/1997"btps, magistrate, north ballarat workshops -
 Ballarat Tramway Museum
Postcard, WTP, ESCo tram near the intersection of Doveton St. and Sturt St, 1905
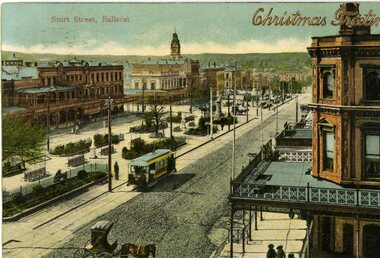
Photo appears to be taken soon after opening of the electric trams, as the tramway is well paved compared to the rest of the street which shows vehicle tracks etc. Small horse drawn vehicle crossing in front of the photograph. Shows buildings along the north side of Sturt St. and the building at the SE corner of Doveton St. ESCo tram has destination board on the front dash of the tram.Yields information about the appearance of Sturt St soon after the opening of the electric tram service in Ballarat.Printed colour postcard of an ESCo tram near the intersection of Doveton St. and Sturt St. travelling west along the south side of Sturt Street. Titled "Sturt Street, Ballarat" in the top left-hand corner and overprinted, embossed in gold, with the words "Christmas Greetings". On the rear of the postcard is a letter to Miss Hancock, Pitt St. Rockdale NSW, from a W.H. Nicholls. Message in pencil, address in ink. Postcard made by "WTP" Has a "Victoria One Penny" stamp. Does not appear to have been cancelled. Assumed used in 1905. On the rear of the second copy is a note to Miss Gibbs of Mole Creek Tasmania, dated 22/12/1907, sent from South Melbourne. See Reg. Item 834 for a scanned copy of another version of this postcard.Handwritten letter on card.trams, tramways, esco, sturt st, postcards, doveton st -
 Ballarat Tramway Museum
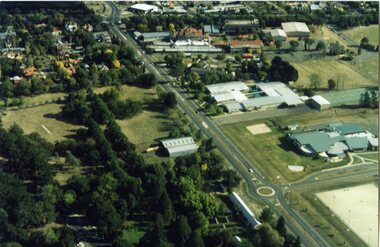
Photograph - Colour Photograph/s, Paul Mong, 29/03/2002 12:00:00 AM
Aerial photograph of the South Gardens Reserve and the Ballarat High School grounds showing the Ballarat Tramway Depot, Fish Hatchery and associated area from the north east aspect. Taken by Paul Mong 29 March 2002. On Fujicolor Crystal Archive Paper. Height of about 1000ft or 330m above ground level.btm, south gardens reserve, btm depot -
 Ballarat Tramway Museum
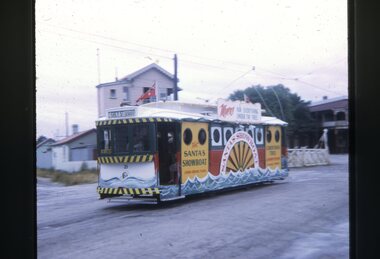
Slide - 35mm slide/s, Mark Plummer, Dec. 1968
Photo of Ballarat tram No. 21, dressed as the Myers Santa Showboat tram, southbound in Lydiard St North during December 1968. Has the railway level crossing, Ballarat B signal box and the Victoria Guest house in the background. Tram has "Grey St." as the destination. Kodak cardboard mount slide, taken Mark Plummer, December 1968.tramways, trams, lydiard st north, railway crossing, myers santa tram, decorated trams, tram 21 -
 Ballarat Tramway Museum
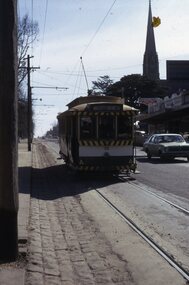
Slide - 35mm slide/s - set of 2, Mark Plummer, Sep. 1971
Photo of Ballarat tram No. 30 east bound or inbound in Sturt St., about to cross Doveton St. Tram has destination of Lydiard St. North. 2159.1 - shows gutter and pole arrangement in Sturt St. Has the spire of St Andrews Kirk (church) in the background. 2159.2 - photo taken just before tram crosses Doveton St. Note directional signs on the pole. Kodak cardboard mount slide, taken Mark Plummer, September 1971tramways, trams, sturt st, doveton st, tram 30 -
 Ballarat Tramway Museum
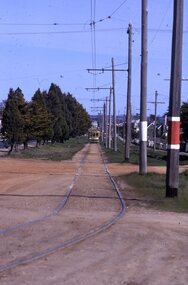
Slide - 35mm slide/s - set of 3, Mark Plummer, Sep. 1971
Series of three photos of Ballarat No. 17, northbound or inbound in Albert St. Sebastopol, approaching the Ophir St. crossing of Albert St. Note tram stop signs, aerial phone lines, the condition of the track and the gravel crossings. Tram has the destination of Lydiard St. North. Kodak cardboard mount slide, taken Mark Plummer, September 1971tramways, trams, albert st, sebastopol, ophir st, tram 17 -
 Ballarat Tramway Museum
Slide - 35mm slide/s, Mark Plummer, Sep. 1971
Photo of Ballarat tram No. 17, northbound in Albert St. Sebastopol, passing the Manchester Unity IOOF Sebastopol Hall, at 113 Albert St. Sebastopol It was originally the South Star Mine Office. Tram has destination of Lydiard St. North Kodak cardboard mount slide, taken Mark Plummer, September 1971tramways, trams, sebastopol, manchester unity, albert st, tram 17 -
 Ballarat Tramway Museum
Slide - 35mm slide/s - set of 3, Mark Plummer, Sep. 1971
Series of three photos of Ballarat No. 17, northbound or inbound in Albert St. Sebastopol, approaching and passing through the Grey (Gray) St. Loop. Note tram stop signs, the loop itself aerial phone lines, the condition of the track and the gravel crossings. Tram has the destination of Lydiard St. North. Kodak cardboard mount slide, taken Mark Plummer, September 1971tramways, trams, albert st, sebastopol, grey st, loops, tram 17 -
 Ballarat Tramway Museum
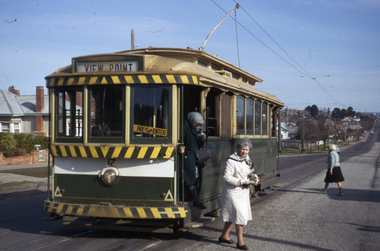
Slide - 35mm slide/s - set of 3, Mark Plummer, Sep. 1971
Series of three photos of Ballarat No. 17 at the Lydiard St. North terminus. 2169.1 - just after arrival, with passengers alighting and the driver changing the destination (View Point). Note the conductor's bag on the front cab window sill. 2169.2 - ditto with trolley pole being swung. Note the cemetery gate house building and the waiting room. 2169.3 - ditto, with tram about to depart. Kodak cardboard mount slides, taken Mark Plummer, September 1971tramways, trams, lydiard st. nth, lydiard st, passengers, tram 17 -
 Ballarat Tramway Museum
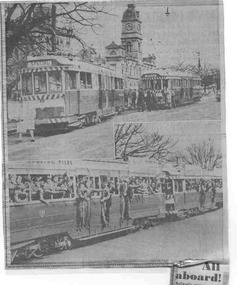
Newspaper, The Courier Ballarat, "All Aboard", 19/08/1971 12:00:00 AM
Has a good association with the final days of the SEC Ballarat system with the operation of the trams for schools (Ballarat North Technical College) and the things that could happen while on tour - 40 derails again.Newspaper clipping from The Courier, Ballarat, dated Thursday 19/8/1971, titled "All aboard". Features two photos of No. 40 and one of another bogie tram during a farewell tour of the Ballarat system the previous day by Ballarat North Technical school students. The lower photo features the school students while the upper photo shows No. 40 derailed near the corner of Sturt and Lydiard Streets with the Town Hall in the background. See Reg items 3765, 3766 for actual prints of the Courier photographs and Reg. item 1073 for another copy of the newspaper clipping. One of large group of newspaper cuttings from John Bainbridge, 7/4/02. Item has been folded for inclusion within a scrap book. Has a piece of plain paper Secured to the back of the portion that was not Secured to the scrap book itself. 2nd copy - clipped from newspaper - added 17-08-2006. In good condition.special trams, derailments, sturt st, charter trams -
 Ballarat Tramway Museum
Newspaper, The Courier Ballarat, "Tram Enthusiasts ", 24/04/1972 12:00:00 AM
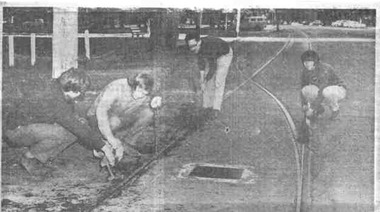
Newspaper clipping from The Courier, Ballarat, dated Monday April 24 1972, titled "Tram Enthusiasts ". Features a photograph of Lindsay Bounds, Richard Gilbert, John Withers and Jeffrey Bounds cleaning the points at the north end of the Gardens Loop. One of a large group of newspaper cuttings from John Bainbridge, 7/4/02.btps, gardens loop, tram enthusiasts -
 Ballarat Tramway Museum
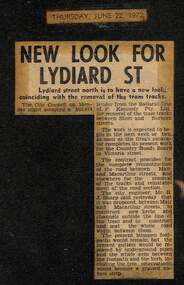
Newspaper, The Courier Ballarat, "New look for Lydiard St", 22/06/1972 12:00:00 AM
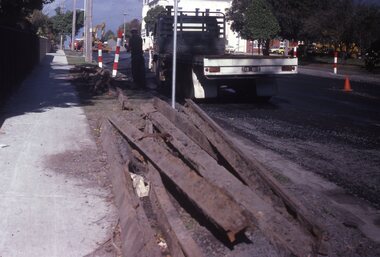
Newspaper clipping from The Courier, Ballarat, dated 22/2/1972, titled "New look for Lydiard St". Reports on the acceptance by the City of Ballaarat of a tender from P. Kennedy for removal of the tram tracks between Sturt and Norman St. in Lydiard St. North. City Engineer Mr. R. J. Sharp advised the street would be reconstructed between Mair and Macarthur St. with new kerbs and a full width seal. track removal, tram track removal, crb, lydiard st. -
 Ballarat Tramway Museum
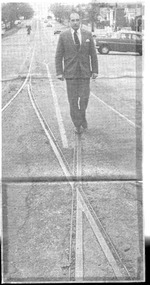
Newspaper, The Courier Ballarat, "A last look at the tram tracks", 4/07/1971 12:00:00 AM
Newspaper clipping from The Courier, Ballarat, dated Tuesday 4/7/1972, titled "A last look at the tram tracks" showing a photograph of the City of Ballaarat Mayor, Cr. Chisholm walking along Lydiard St. at the north end of the Macarthur St. loop prior to their removal. Work was expected to commence the following Monday and will take about 8 months. One of a large group of newspaper cuttings from John Bainbridge, 7/4/02. Item has been folded for inclusion within a scrap book. Has a piece of plain paper Secured to the back of the portion that was not Secured to the scrap book itself.track removal, tram track removal, crb, lydiard st -
 Ballarat Tramway Museum
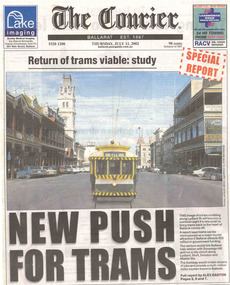
Newspaper, The Courier Ballarat, "Return of trams viable study", "New Push for Trams", "Taking tourism to the next level", "More tourists, more jobs expected", "Tram plan worthy of expected debate", 11/07/2002 12:00:00 AM
Set of three cuttings from The Courier, Ballarat dated Thursday 11/7/2002 regarding the reintroduction of trams to Ballarat. 2241.1 - Page 1 and 2 of The Courier, with page 1 titled "Return of trams viable study" and "New Push for Trams" as the commencement of a Special report showing a digitally constructed image of No. 13 in Lydiard St. North. Note the tram does not have a driver. Introduces reports by Alex Easton on pages 2, 6 and 7. On Page 2, titled "Taking tourism to the next level", has details of the Council viewpoints on the proposal, public consultation, a map of the route, and notes on the construction issues. Has a digital image of 13 crossing Sturt St. into Lydiard St. North. See images No. 1 to 3. 2241.2 - page 6 of The Courier, which joins with page 7 using the titled "More tourists, more jobs expected". Has Sections reviewing the study outcomes, benefits and a summary of the study. Page 6 has a photo of a passenger boarding No. 21, decorated as the Myers Christmas tram in Sturt St and a photo of Bridge St. in 1971 (very poor quality reproduction). See images No. 4 and 5. 2241.3 - page 7 of The Courier, has Sections detailing the history of Ballarat Trams, proposals for the City Tramway, costs, consultation, and comments from Peter Hiscock. Has a photo of Peter Hiscock and Mayor David Vendy in front of No. 13 at the BTM depot. See image No. 6. Also has a photo of Dianne Smith, Executive Director of Ballarat Tourism. On page 8, as part of The Courier's editorial Section, has comments on the proposals, titled "Tram plan worth of extended debate". Looks at the $20million cost. ballarat revival, editorial, ballarat city tramway, lydiard st. nth -
 Ballarat Tramway Museum
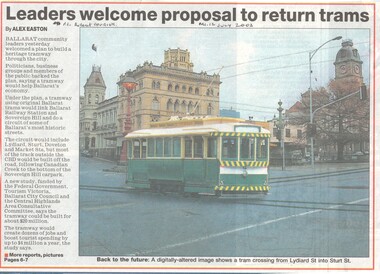
Newspaper, The Courier Ballarat, "Leaders welcome proposal to return trams", "Romantic image captures the city's imagination", 12/07/2002 12:00:00 AM
Set of three cuttings from The Courier, Ballarat dated Thursday 11/7/2002 regarding the reintroduction of trams to Ballarat. 2241.1 - Page 1 of The Courier, with page 1 titled "Leaders welcome proposal to return trams" with a digitally constructed image of No. 13 crossing Sturt St from Lydiard St. North. The item looks at the overall outcomes of the study and who funded it. See image No. 1. Text written by Alex Easton. 2241.2 - page 6 of The Courier, which joins with page 7 using the titled "Romantic image captures the city's imagination" reviewing reactions to the proposals from various politicians, business and community groups. Includes comments from Judy Verlin, former Mayor and impacts on traffic and parking issues. Also summarises in a Section "At a Glance" the pros and cons of the proposal. Has a photo of No. 31 at the intersection of Bridge, Victoria and Main Streets. Cartoon by Inkcinct, about the City Tramway and Sturt St redevelopment also on the page. 2241.3 - page 7 of The Courier, has Sections detailing the benefits of the proposals, inviting people to have their say and further summary information. Has a photo of Bendigo 5 in Pall Mall with destination of Eaglehawk and a photo of Christchurch No. 11 noting the economic benefits of trams in that city over the last seven years. Full Image and 2nd copy of sheets added 12-1-2016 from donation of Kathy Stanley. Second copy - Has date and page number written in under headline in ink.ballarat revival, christchurch, bendigo, ballarat city tramway -
 Ballarat Tramway Museum
Slide - 35mm slide/s - set of 11, May 1979c
Set of eleven colour slides (Kodak) showing the removal of tram track in Geelong, c May 1979. All in Pakington St., Newtown, ex Newtown route. 2268.1 - slide 29 - look south from the north of Retreat Road. .2 - 30 - No. 276 in background, looking south .3 - 31 - City of Newtown Town Hall in background. .4 - 32 - opposite to that of No. 29. .5 - 33 - Looking south .6 - 34 - looking south with Aphrasia St. in the background. .7 - 35 - as for .2 .8 - 36 - Opposite No. 278, looking south .9 - 1 - opposite No. 276/278. .10 - 2 - ditto .11 - 3 - Outside No. 278, looking south. Bus stop still in position. See Letter to Dave O'Neil and responses.tramways, trams, geelong, track removal, pakington st, newtown -
 Ballarat Tramway Museum
Book, Metropolitan Transit Authority (MTA), "Light Rail Transit System - Inner Area North-South Link", c1986
Sixteen page book, A4 portrait format, saddle stapled, titled "Light Rail Transit System - Inner Area North-South Link", published by the Metropolitan Transit Authority detailing the conversion of the former heavy electric suburban railway lines to St Kilda and Port Melbourne to electric trams or Light Rail. Has foreword by Tom Roper, Minister for Transport, Describes the proposed system, vehicles, development of articulated vehicles (2001, 2002), interchange with rail services, travel times and a map showing the proposed route, including a possible extension along Mitford St. and Broadway to Glenhuntly Road. Has a number of artists impressions of the vehicles at Station Pier and South Melbourne station. Includes colour photographs of the vehicles, conductors and photos of other light rail systems in Hanover and Amsterdam. Published c1986.trams, tramways, melbourne, light railways, mta, st kilda, port melbourne, articulated trams -
 Ballarat Tramway Museum
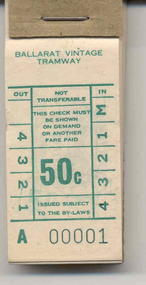
Ephemera - Ticket/s, Ballarat Tramway Museum (BTM), Block of 100 tickets, 1988
Demonstrates the Museum's ticketing systems and ongoing production of tickets.Block of 100 tickets - green ink on off white paper, with ticket number in green ink denomination 50c, headed Ballarat Vintage Tramway. On rear in green ink is an advertisement for the Tram Family Restaurant, corner Macarthur and Drummond St. North. The 100 tickets have been stapled onto a heavy brown cardboard back with a heavy metal staple and a small brown cardboard retaining strip at the top of the ticket. 2210 - A000001 to A000100 (The first block collected at the time of issue 6/3/1988) The tickets are in the style of the former State Electricity Commission of Victoria tramway tickets. Tickets in use as adult return fare from 12/3/88 to 30/6/91 and child return fare from 1/7/1991 to 1/11/98. Note last block issued 8/1/1991. Would have commenced using overprints again until fare rise as needed. See BTM fare chart, BTM Ticket issuing sheets.trams, tramways, btm, tickets -
 Ballarat Tramway Museum
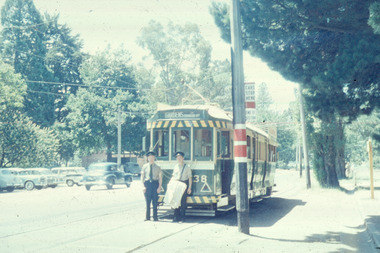
Slide - 35mm slide/s, Travis Jeffrey, c1961
Agfa plastic mount (blue base, white cover) with a photo of No. 38 at Gardens Loop. Tram is in the process of being fitted with dash canopy lights and tiger strips. Crew standing by the front of the tram. Note stop sign arrangements in the background. Tram has destination of Gardens via Drummond North. Slide rescanned at 3200 dpi 24-10-2020, jpg replaced, tiff file retained. This file was scanned in 2003 and may show colour changes."BAS 8" in penciltramways, trams, gardens loop, wendouree parade, tram 38 -
 Ballarat Tramway Museum
Slide - 35mm slide/s, Travis Jeffrey, c1961
Agfa plastic mount (blue base, white cover) with a photo of No. 34 northbound in Lydiard St. Nth early 1961. Tram is in the process of being fitted with dash canopy lights and tiger strips. The tram is about to use the crossover in Lydiard St. North. Has the George Hotel and Hoyts theatre in the background. Slide rescanned at 3200 dpi 24-10-2020, jpg replaced, tiff file retained. This file was scanned in 2003 and may show colour changes."BAS 12" in penciltramways, trams, lydiard st. nth, crossover, tram 34 -
 Ballarat Tramway Museum
Slide - 35mm slide/s, Travis Jeffrey, 1961
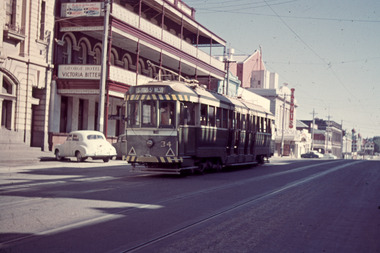
Agfa plastic mount (blue base, white cover) of a photograph of No. 41 at City terminus, on the south side outbound with passengers boarding the tramcar and others walking up to it. Tram is in the process of being fitted with dash canopy lights and tiger strips and has roof advertisements for Admiral TV and other electrical products. Tram has destination of Gardens via Drummond North. Photo taken early 1961. Has Commonwealth Bank and Mutual Life building in the background. Slide rescanned at 3200 dpi 24-10-2020, jpg replaced, tiff file retained. This file was scanned in 2003 and may show colour changes."BAS 19" in penciltramways, trams, city terminus, sturt st, tram 41 -
 Ballarat Tramway Museum
Slide - 35mm slide/s, Travis Jeffrey, c1962
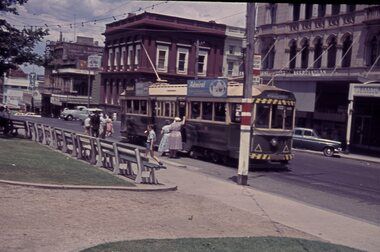
Agfa plastic mount (blue base, white cover) of a photograph of No. 42 at Lydiard St. North. Photo taken c1962. Tram has destination of Rubicon St . Tram fitted with an SEC cook with electricity roof advertisement. Driver, conductor, crew members are standing at the front of the tram. Note the drivers window is in the open position. Photo has the cemetery gates (New Cemetery) in the background. Slide rescanned at 3200 dpi 25-10-2020, jpg replaced, tiff file retained. This file was scanned in 2003 and may show colour changes. "BAS 32" in penciltramways, trams, lydiard st nth., new cemetery, tram 42 -
 Ballarat Tramway Museum
Slide - 35mm slide/s, Travis Jeffrey, c1962
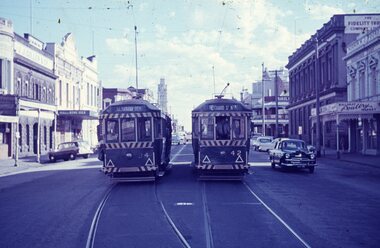
Agfa plastic mount (blue base, white cover) of a photograph of Nos. 34 and 42 at end of double track in Lydiard St Nth. Photo taken c1962. No. 34 showing Sebastopol, and 42 Lydiard St. North. Has the buildings north of Mair St. Note panel damage on the front end of No. 42 and the open drivers window. Slide rescanned at 3200 dpi 25-10-2020, jpg replaced, tiff file retained. This file was scanned in 2003 and may show colour changes."BAS 34" in penciltramways, trams, lydiard st, mair st, double track, tram 34, tram 42 -
 Ballarat Tramway Museum
Slide - 35mm slide/s, Travis Jeffrey, c1962
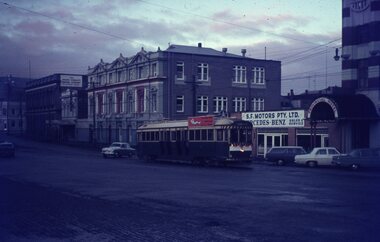
Agfa plastic mount (blue base, white cover) of a photograph of No. 36? Lydiard St Nth, before Provincial Hotel. Photo taken c1962. Has S.F. Motors (Mercedes Benz) dealership, the front verandah of the Provincial Hotel, ?? Commercial college and the Union Fidelity Trustees building in the background. Tram has a roof advertisement for the SEC "Everything's under control in my all electric kitchen". Slide rescanned at 3200 dpi 25-10-2020, jpg replaced, tiff file retained. This file was scanned in 2003 and may show colour changes."BAS 37" in penciltramways, trams, lydiard st north, sf motors, tram 36? -
 Ballarat Tramway Museum
Slide - 35mm slide/s, Travis Jeffrey, late 1960's
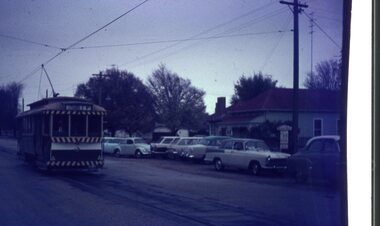
Agfa plastic mount (blue base, white cover) of a photograph of No. 13, Soldiers Hill area, Howard St., Broughton St Photo taken late 1960's. Tram has destination of Lydiard St. North. Has a number of parked motor vehicles in the background. Slide rescanned at 3200 dpi 25-10-2020, jpg replaced, tiff file retained. This file was scanned in 2003 and may show colour changes."BAS 39" in penciltramways, trams, lydiard st. nth, tram 13 -
 Ballarat Tramway Museum
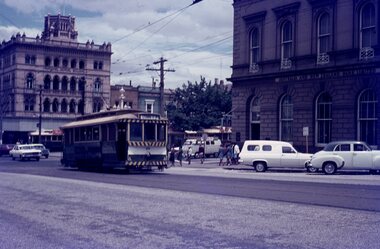
Slide - 35mm slide/s, Travis Jeffrey, late 1960's
Agfa plastic mount (blue base, white cover) of a photograph of No. 26, leaving Sturt St in Lydiard St Nth, with destination of Lydiard St. North. Photo taken late 1960's. Photo has two other trams in the background. Buildings in the background are National Mutual Life and the ANZ Bank. Slide rescanned at 3200 dpi 25-10-2020, jpg replaced, tiff file retained. This file was scanned in 2003 and may show colour changes."BAS 40" in penciltramways, trams, lydiard st. nth, sturt st, tram 26