Showing 450 items matching "crossing of the line"
-
 Ballarat Tramway Museum
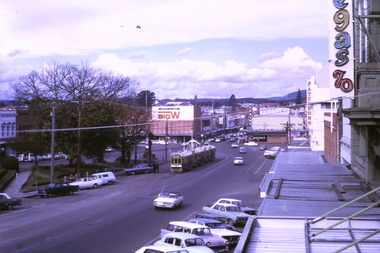
Photograph - Digital image Set of 10, Tony Smith, 19/09/1971 12:00:00 AM
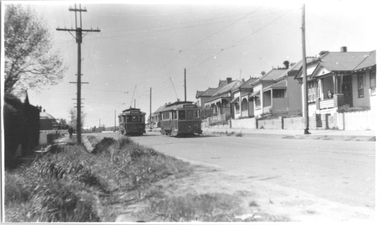
Yields information about Ballarat Tramways and trams prior to the closure of the tramway system.Set of 10 digital images of Ballarat trams prior to closure, scanned from original slides by Tony Smith, 1971 prior to closure of the system. This set of slides appears to be the last day of operations - 19/9/1971 .1 - Photo taken from Cooks Hotel balcony overlooking three bogie trams parked in the City Loop with Big W and Dickins store in the background. .2 - 42 in Albert St, showing destination of Sebastopol, though could be north bound near Ophir St. .3 - 42 crossing Ophir St to the north. .4 - 42 (Lydiard St Nth), 34 (Sebastopol) crossing at the Bell St loop .5 - 42, 35 and another bogie tram at ditto - note the neat line of photographers and one person (bounding) around. .6 - 34 and 35 leaving the Grey St loop southbound. .7 - 34 and 35 southbound in Albert St passing the Borough of Sebastopol Town Hall .8 - 34 nearing the Sebastopol terminus in Albert St .9 - 35 ditto .10 - 35 ditto after passing the camera looking towards the terminus.trams, tramways, sturt st, sebastopol, albert st, city loop, ophir st, bell st, grey st, borough of sebastopol, closure, tram 42, tram 34, tram 35 -
 Ballarat Tramway Museum
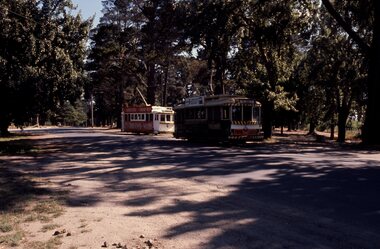
Slide - 35mm slide/s, Chas Bevan, 19/12/1970 12:00:00 AM
Yields information about the Carlton St loop area in Dec. 1970 (the wilds) and trams crossing at the loop.Colour slide - 35mm - of Ballarat single truckers No. 17 and 14 as the Christmas tram crossing at the Carlton St loop, Wendouree Parade; No 17 has the destination of Victoria St. Photo taken by Chas Bevan on Saturday 19-12-1970."Ballarat trams xing loop on lake line 19-12-70 - Myers Xmas"tramways, trams, carlton st, christmas trams, decorated trams, wendouree parade, tram 14, tram 17 -
 Ballarat Tramway Museum
Slide - 35mm slide/s - set of 11, Eldon Hogan, mid 1960's to early 1970's
Set of 11 Agfa Plastic mounted slides - from the Eldon Hogan collection - possibly on an ARE Bendigo tours late 1960's or early 1970's with No. 18 Scanned on the Canon scanner at the depot 15/12/1971 at the time of the installation of the scanner. .1 - No 18 at Golden Square terminus with Billy Rodda's Golden Square Hotel in the background. .2 - ditto and the Victoria Bitter fence alongside the hotel. .3 - ditto and another single trucker. .4 - No. 18 at the Fire Station Loop, Golden Square line, with destination of Railway Station. .5 - No. 18 passing the Central Deborah mine, Violet St. Tram has a Briquette advertisement on the roof - the flaming briquettes. .6 - Another bogie tram at ditto. .7 - No. 18 and No. 6 crossing McCrae St loop near the depot junction? .8 - ditto .9 - No. 18 and a single trucker at the North Bendigo terminus. .10 - ditto .11 - with the single trucker leaving.tramways, trams, bendigo, golden square, central deborah, north bendigo, mccrae st, tram 18, tram 6 -
 Ballarat Tramway Museum
Slide - 35mm slide/s - set of 11, Eldon Hogan, mid 1960's to early 1970's
... outbound, Golden Square line crossing the bridge over the creek..., Golden Square line crossing the bridge over the creek, adjacent ...Set of 11 Agfa Plastic mounted slides - from the Eldon Hogan collection - possibly on an ARE Bendigo tours - mid 1960's (black destination rolls) and late 1960's or early 1970's. Scanned on the Canon scanner at the depot 15/12/1971 at the time of the installation of the scanner. .1 - front of depot -26, 19, 24, 29 and 28 amongst those present. .2 - ditto .3 - 24 departing depot .4 - 26 at Eaglehawk .5 - No. 5 turning from Pall Mall into Mitchell St with town hall in background. .6 - No. 5 using crossover in Mitchell St - with Maples, CBA Bank, Astor, Homecrafts, Roger David shops or signs in the background. .7 - ditto .8 - bogie car at Charing Cross with the Fountain Plaza shopping centre in the background. .9 - Charing Cross, with the fountain in the foreground, The Beehive and three trams in the view. .10 - No. 24 outbound, Golden Square line crossing the bridge over the creek, adjacent to the discovery of Gold Monument. .11 - ditto. tramways, trams, bendigo, eaglehawk, depot, charing cross, golden square, tram 26, tram 19, tram 24, tram 29, tram 28, tram 26, tram 5 -
 Ballarat Tramway Museum
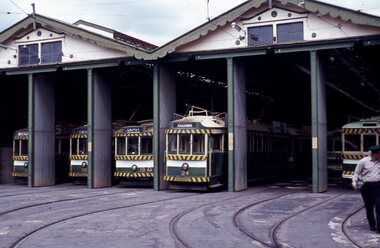
Photograph - Black & White Photograph/s, late 1973
Yields information about the appearance of BTM tram No. 661 in 1960, the use of X2 on the Point Ormond line and the reconstruction of the Glenhuntly Road level crossing at Elsternwick during 1960. Black and white photographs of the depot fan late 1973 showing progress in ballasting the fan and area being cleaned up. Three trams in the depot with doors open. Agfa paper with date stamp "?.12.73" trams, tramways, depot fan, btps, operations, trackwork -
 Ballarat Tramway Museum
Photograph - Black & White Photograph/s, John Alfred, 1960
Yields information about the appearance of BTM tram No. 661 in 1960, W2 349 and how the Carnegie line section of single track was worked.Black and white photograph of trams W3 661 (Route 4 Carnegie) and X2 675 (Point Ormond), Glenhuntly Road, Elsternwick Station, during the lowering of the railway line, 1960. Photo by John Alfred. Two copies held. See also Reg Item 5163 for an Ian Brady photograph prior to the work commencing.trams, tramways, mmtb, elsternwick, point ormond, w class trams, level crossings, tram 661, tram 675 -
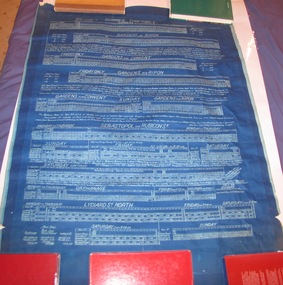 Ballarat Tramway Museum
Ephemera - Timetable, Electric Supply Co. of Vic (ESCo), "Summer Timetable Oct 1st 1914 to April 30 1915", Sept. 1914
... to April 30 1915", showing the run numbers crossing arrangements... numbers and crossing arrangements on the single line. Ballarat ...Yields information about the timetable tram services during the summer or 1914 - 1915, run numbers and crossing arrangements on the single line.Rolled blue print of the "Summer Timetable Oct 1st 1914 to April 30 1915", showing the run numbers crossing arrangements, for Gardens via Convent, Gardens via Ripon, Monday to Thursday and Friday, Saturday and Sunday. Also for Sebastopol and Rubicon St, Orphanage, Lydiard St - Mt Pleasant not listed. Gives roster arrangements, Safeworking or single line section staff arrangements, crossing points and other information. ballarat, rosters, shifts, timetables -
 Otway Districts Historical Society
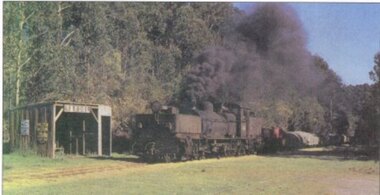
Photograph, R. Preston, Banool: Locomotive G42 and goods, c.1960, c.1960
... This original station on the Colac-Beech Forest line... increased train services on the line required a crossing station ...This original station on the Colac-Beech Forest line was first known as "Moorbanool" after the local parish, and then shortened to "Banool" on 1 November 1904. At first facilities consisted of a passenger shelter, a loop siding for 11 trucks, plus a residence for the ganger of the track gang based there. By 1912 with the extension of the line to Crowes increased train services on the line required a crossing station in this section of the track, and therefore Banool became a staff and ticket station with a crossing loop and home signals. However, this only lasted for two years and was abolished as an economy measure in 1916. Loading figures show that in most years the outwards tonnage at Banool was less than 150 tonnes. The station was reduced to a passenger shelter and goods loop only by 1929, and by the time of closure in 1962 most trains were steaming through.Colour. Locomotive G42 and its NQR goods wagons, loaded and unloaded, steaming past Banool station passenger shelter. 143mm x 274mm print.banool; moorbanool; railways; locomotive g42; -
 Otway Districts Historical Society
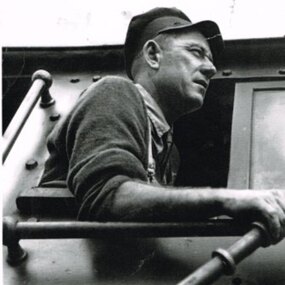
Photograph, Kevin L Holmes, Driver Bill Brady with Train Staff, 1961, 1961
... are called crossing stations. A "Train Staff", a thick, round metal... that every station on the line is not a crossing station. These roles ...Railway systems have methods by which trains can proceed in safety from station to station, free from the risk of collision with other trains. These methods are generally known as "Safeworking" and they particularly apply to trains on single lines where trains run in opposite directions. The stations between these two sections are called crossing stations. A "Train Staff", a thick, round metal rod, bearing the name of the two stations is issued and these places are designated as Train Staff stations. No train is permitted to proceed through the section unless the train driver either takes the staff for the section into his possession or personally sights the staff. (Note that every station on the line is not a crossing station. These roles were performed at Barongarook, Gellibrand, Banool, Beech Forest, Wyelangta, Weeaproinah and Crowes.) Except for the period 1927-1939 when Train Section Orders were applied instead, due to declining business Train Staff and Ticket working was used throughout on the line.B/W. Driver Bill Brady holding the Train Staff in the cabin of Garratt locomotive G42, at Weeaproinah 1961 railways, bill brady, train driver, weeaproinah, train staff -
 Otway Districts Historical Society
Photograph, Banool Station, c.1940, c.1940
... gang based there. Increasing train services on the line... for the track gang based there. Increasing train services on the line ...Originally known as "Moorbanool" after the local parish, the name was shortened to Banool on 1 November 1904. At first facilities consisted of a loop siding for eleven trucks and a passenger shelter, plus a residence for the ganger for the track gang based there. Increasing train services on the line required a crossing station in this section of track, so in 1913 Banool became a 'Staff & Ticket' station with a crossing loop, home signals, and a station office, although this only lasted two years. Loading statistics showed that in most years the outwards tonnage at Banool was less than 150 tonnes. From 1924 the amount of timber despatched began a slow rise, but apart from a few years activity was generally slack. The crossing loop, the usually empty goods loop being used if necessary, the home signals and its status as a staff station being removed over the period 1923-27. The track ganger shelter was removed around 1929 and the station reduced to a passenger shelter and goods loop only.B/W. A goods train passing Banool Station, c.1940. -
 Ballarat Tramway Museum
Photograph - Ballarat No. 20 (Mt Pleasant) and No. 26 (Gardens) crossing at the Grant St loop, Wal Jack, 3-10-1953
Print of No. 20 (Mt Pleasant) and No. 26 (Gardens) crossing at the Grant St loop in Barkly St, Mt Pleasant. held gives details on the rear - Football grand final 3-10-1953. Wal notes that it was the first time he had seen trams crossing at the loop. See item 7865 for a negative.Yields information about the Grant St loop on the Mt Pleasant line.Photograph, black and white - plain black with Wal Jack's note on rearWal Jack number stamp and number T56PC.tramways, trams, grant st, barkly st, mt pleasant, tram 20, tram 26 -
 Ballarat Tramway Museum
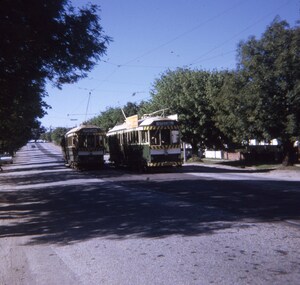
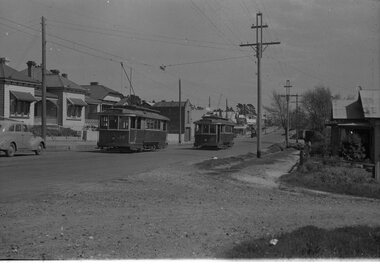
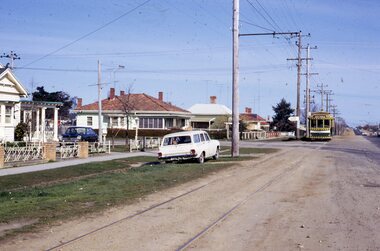
Slide - 27 mm sq slide/s - set of 2, Andrew Howlett, No. 34 and 37 crossing at the Duncan St loop in Drummond St North, Mar. 1969
Yields information about the Drummond St line and the Mills St loop area and a special tram tour using No. 37.Colour slide, Kodak white cardboard mount, developed Mar 1969 of No. 34 and 37 crossing at the Duncan St loop in Drummond St North. No. 34 has destination of Gardens via Drummond North, while No. 37 running a special service. .2 - No. 37 in the loop by itself. See Reg Items 7675, 7678, 7681, 7684, 7686, 7705 and 7713."Duncan St Loop Drummond St" in red ink.ballarat, tramways, trams, drummond st nth, mill st loop, tram 34, tram 37 -
 Ballarat Tramway Museum
Slide - 27 mm sq slide/s - set of 3, Andrew Howlett, Lydiard St North level crossing, March 1969?
... the Lydiard St Nth line, the level crossing and the terminus. Ballarat ...Yields information about the Lydiard St Nth line, the level crossing and the terminus.Set of three Colour slides, Kodak white cardboard mount, developed Mar 1969 of No. 37 .1 - while running a special crossing at the Lydiard St North level crossing at the Railway Station. Has the Reid's Coffee Palace and Railway Station in the background. .2 - No. 37 and a single trucker carrying a "Trotting at Bray Raceway" auxiliary board, at the Lydiard St North terminus. Has the shelter on the right-hand side. .3 - No. 37 waiting at the terminus. See Reg Items 7675, 7678, 7681, 7684, 7686, 7705 and 7713.ballarat, tramways, trams, lydiard st nth, railway station, shelters, level crossings, tram 37 -
 Ballarat Tramway Museum
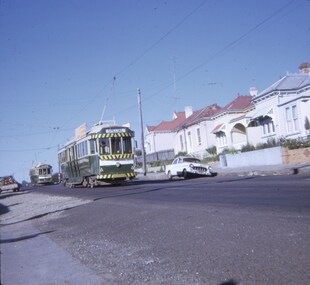
Slide - 27 mm sq slide/s, Andrew Howlett, Trams crossing at the Grant St loop, Barkly St Mt Pleasant, Feb or March 1969
Yields information about the Grant St loop on the Mt Pleasant line.Colour slide, Kodak white cardboard mount, developed Mar 1969 of No. 37 (Special) crossing No. 34 (Gardens) at the Grant St loop, Barkly St Mt Pleasant. See Reg Items 7675, 7678, 7681, 7684, 7686, 7705 and 7713.ballarat, tramways, trams, barkly st, tours, grant st, tram 37, tram 34 -
 Ballarat Tramway Museum
Slide - 27 mm sq slide/s - set of 2, Andrew Howlett, No. 41 in Albert St Sebastopol, Sep. 1968
Yields information about trams services on the Sebastopol line.Set of two Colour slides, Kodak white cardboard mount, developed Dec 1969 of No. 41 in Albert St Sebastopol. .1 - crossing Albert St. Tram has destination of Lydiard St North. .2 - No. 41 turning from Drummond St South into Sturt St with another bogie car turning from Sturt St. Has the Southern Cross Hotel in the background.ballarat, tramways, trams, sebastopol, albert st, tram 41 -
 Ballarat Tramway Museum
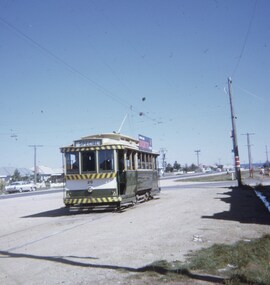
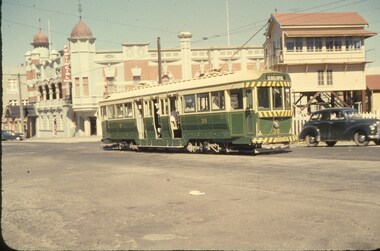
Slide - 27 mm sq slide/s - set of 2, Andrew Howlett, Tram 26 at the Sebastopol terminus, Mar.1968
Yields information about trams services on the Sebastopol line and special tram services.Set of two Colour slides, Kodak white cardboard mount, developed Mar 1968 of two photos of a PMTT stained glass window built in to a door way. .1 - at the Sebastopol terminus - tram showing Special and has a briquettes roof advert. .2 - 26 (Special) crossing another single trucker at the Urquhart St Loop in Drummond St South. . 1- "Sebastopol Term" in red ink. .2 - "Loop Sebastopol line"ballarat, tramways, trams, sebastopol, drummond st sth, urquhart st, tram 26 -
 Ballarat Tramway Museum
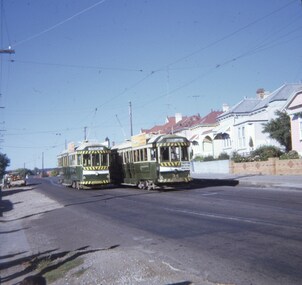
Slide - 27 mm sq slide/s, Andrew Howlett, trams 37 and 34 crossing at the Grant St Loop, Mar. 1969
Yields information about the services on the Mt Pleasant line and tram tours.Colour slides, Kodak white cardboard mount, developed Mar 1969 of trams 37 and 34 crossing at the Grant St Loop. No. 37 showing special, while No. 34 has destination of Gardens via Drummond North and is carrying an auxiliary sign "Trotting Bray Raceway Friday night". Barkly St, Mt Pleasant. See Reg Items 7675, 7678, 7681, 7684, 7686, 7705 and 7713.ballarat, tramways, trams, barkly st, mt pleasant, grant st, tram 37, tram 34 -
 Ballarat Tramway Museum
Negative, Wal Jack, early 1950's
Yields information about tram services on the Mt Pleasant line during the early 1950'sNegative and Digital images of the Wal Jack Ballarat Negative file of trams 26 and 33 crossing at the Grant St loop in Barkly St Mt Pleasant. No. 26 has the destination of Mt Pleasant and No.33, destination of City Oval.trams, tramways, barkly st, grant st, mt pleasant, tram 33 tram 26 -
 Ballarat Tramway Museum
Negative, Wal Jack, late 1940s
Negative and Digital images of the Wal Jack Geelong Negative file of Geelong 17 inbound in Melbourne Road on the North line, near Swinburne St at the level crossing used for goods traffic, opposite North Geelong railway yard. Tram has the destination of Belmont. In the background are various gasholders. Photo late 1940's. trams, tramways, geelong, north, level crossings, tram 17 -
 Ballarat Tramway Museum
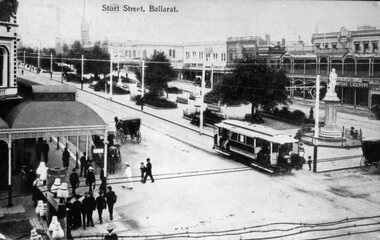
Photograph - copy of postcard - Sturt St Ballarat
Black and White copy photograph of a Ballarat Municipal library (No. 947) postcard at the time of the opening of the Electric tramway in Ballarat. Photo taken in 1905. Photo taken from the Town Hall with Snows building in the foreground and other buildings on the north side of Sturt St in the background. A number of horse drawn cabs and men and ladies - well dressed crossing the roads. The photograph also shows cabling on a telephone/telegraph line running directly in front of the photographer. See 8419 and 8999 for the postcard and a printed illustration.Yields information about the opening configuration of the trams and the street scene at the corner of Sturt and Armstrong Streets. Also shows a number of well dressed people walking along Sturt St.Copy photograph of a postcard held by the Ballarat Municipal Library - see also item 8419sturt st, armstrong st, esco, tramways, ballarat, tramcars -
 Ballarat Tramway Museum
Slide - Set of three slides - Sebastopol line, Paul Jenkins, September 1971
Set of three colour slides showing Ballarat tram 12 inbound in Albert St Sebastopol. The 3rd slides shows the tram crossing the road.Demonstrates tram operations on the Sebastopol line prior to closure.Set of three Kodachrome cardboard slides."Last Tram"tramways, ballarat, trams, tram 12, albert st., sebastopol -
 Ballarat Tramway Museum
Slide - 35mm slide/s, Wal Jack, 24/03/1962 12:00:00 AM
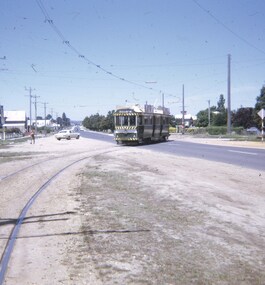
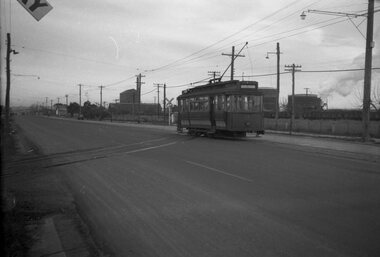
Photo of No. 39 about to cross railway line, Lydiard St. Tram fitted with dash canopy lighting, small triangles, Provincial Hotel and Ballarat B signal box in background. Austin A40? car in photo heading north. Tram heading south. Has 'Sebastopol' destination. Taken on 24-3-1962.'SEC Ballarat, No. 39 at Railway Xing, Ballarat R.Stn, Lydiard St. Nth, 24-3-62.' in blue inktramways, trams, lydiard st., railway crossing, level crossings, signals, tram 39 -
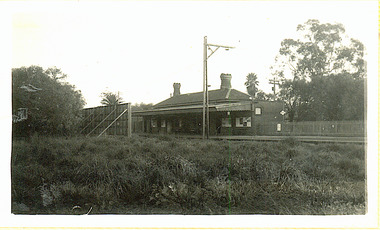 Kew Historical Society Inc
Photograph - The last train at Barker Station, 1952
The Kew railway was opened in 1887, and diverged from the main (Box Hill–Lilydale) line about half-way between Hawthorn and Glenferrie. From the point of divergence the line was slightly less than one mile long, and it had only one intermediate station — Barker. There were four road over-bridges and two level crossings, including one over the busy Barkers Road. The line supported a passenger and goods service, and was electrified in December 1922, at the same time as the main line to Box Hill. There were a number of peak hour services which ran from Flinders Street station (Melbourne) to Kew, but in 1938 all but one of these were diverted to the Ashburton line, where traffic was growing. This had an adverse effect on Kew traffic, as passengers from Kew needed to cross over a footbridge at Hawthorn to change trains, and the main line trains were usually already crowded by the time they reached Hawthorn. At about the same time the off-peak trains were replaced by road buses. In 1952 all passenger trains were withdrawn, but the road bus service continued for many years. Goods trains were finally withdrawn in 1957, and the railway was dismantled in 1958-59. (Source: Frank Stamford, 'The Hawthorn - Kew Railway')Small black and white snapshot of the last passenger train at Barker Railway Station in 1952. The photograph, one of 12, is part of a larger album of newspaper clippings, timetables, tickets and photos relating to the Kew Railway Line, taken and compiled by Lachlan Richardson, while a resident of Kew. The album dates from the 1950s. The album is part of a larger subject file on the Kew Line, compiled over time by members of the Kew Historical Society."Last train at Barker Station / 1 August 1952"kew railway line, transport -- railways -- kew (vic.), barker railway station, kew branch line -
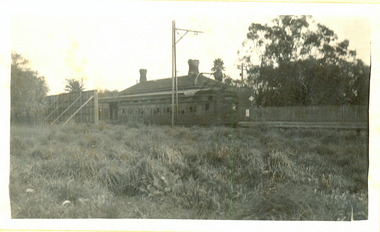 Kew Historical Society Inc
Photograph - Barker Station, August 1952
The Kew railway was opened in 1887, and diverged from the main (Box Hill–Lilydale) line about half-way between Hawthorn and Glenferrie. From the point of divergence the line was slightly less than one mile long, and it had only one intermediate station — Barker. There were four road over-bridges and two level crossings, including one over the busy Barkers Road. The line supported a passenger and goods service, and was electrified in December 1922, at the same time as the main line to Box Hill. There were a number of peak hour services which ran from Flinders Street station (Melbourne) to Kew, but in 1938 all but one of these were diverted to the Ashburton line, where traffic was growing. This had an adverse effect on Kew traffic, as passengers from Kew needed to cross over a footbridge at Hawthorn to change trains, and the main line trains were usually already crowded by the time they reached Hawthorn. At about the same time the off-peak trains were replaced by road buses. In 1952 all passenger trains were withdrawn, but the road bus service continued for many years. Goods trains were finally withdrawn in 1957, and the railway was dismantled in 1958-59. (Source: Frank Stamford, 'The Hawthorn - Kew Railway')Small black and white snapshot of the last passenger train at Barker Railway Station in 1952. The photograph, one of 12, is part of a larger album of newspaper clippings, timetables, tickets and photos relating to the Kew Railway Line, taken and compiled by Lachlan Richardson, while a resident of Kew. The album dates from the 1950s. The album is part of a larger subject file on the Kew Line, compiled over time by members of the Kew Historical Society."Barker Station / August 1952"kew railway line, transport -- railways -- kew (vic.), barker railway station, kew branch line -
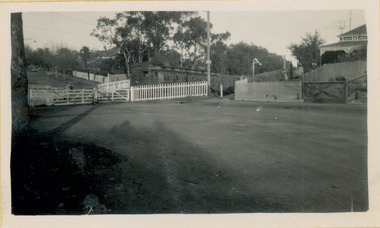
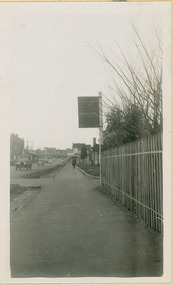 Kew Historical Society Inc
Photograph - Kew Railway Station: Denmark Street entrance, 1952
The Kew railway was opened in 1887, and diverged from the main (Box Hill–Lilydale) line about half-way between Hawthorn and Glenferrie. From the point of divergence the line was slightly less than one mile long, and it had only one intermediate station — Barker. There were four road over-bridges and two level crossings, including one over the busy Barkers Road. The line supported a passenger and goods service, and was electrified in December 1922, at the same time as the main line to Box Hill. There were a number of peak hour services which ran from Flinders Street station (Melbourne) to Kew, but in 1938 all but one of these were diverted to the Ashburton line, where traffic was growing. This had an adverse effect on Kew traffic, as passengers from Kew needed to cross over a footbridge at Hawthorn to change trains, and the main line trains were usually already crowded by the time they reached Hawthorn. At about the same time the off-peak trains were replaced by road buses. In 1952 all passenger trains were withdrawn, but the road bus service continued for many years. Goods trains were finally withdrawn in 1957, and the railway was dismantled in 1958-59. (Source: Frank Stamford, 'The Hawthorn - Kew Railway')Small black and white snapshot of the entrance to Kew Station from Denmark Street in 1952. The photograph, one of 12, is part of a larger album of newspaper clippings, timetables, tickets and photos relating to the Kew Railway Line, taken and compiled by Lachlan Richardson, while a resident of Kew. The album dates from the 1950s. The album is part of a larger subject file on the Kew Line, compiled over time by members of the Kew Historical Society.kew railway line, transport -- railways -- kew (vic.), kew branch line, kew railway station -
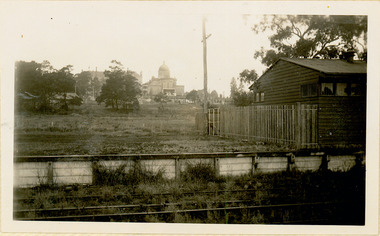
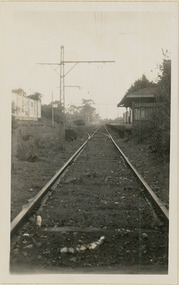 Kew Historical Society Inc
Photograph - Kew Station 22/4/51, F3
The Kew railway was opened in 1887, and diverged from the main (Box Hill–Lilydale) line about half-way between Hawthorn and Glenferrie. From the point of divergence the line was slightly less than one mile long, and it had only one intermediate station — Barker. There were four road over-bridges and two level crossings, including one over the busy Barkers Road. The line supported a passenger and goods service, and was electrified in December 1922, at the same time as the main line to Box Hill. There were a number of peak hour services which ran from Flinders Street station (Melbourne) to Kew, but in 1938 all but one of these were diverted to the Ashburton line, where traffic was growing. This had an adverse effect on Kew traffic, as passengers from Kew needed to cross over a footbridge at Hawthorn to change trains, and the main line trains were usually already crowded by the time they reached Hawthorn. At about the same time the off-peak trains were replaced by road buses. In 1952 all passenger trains were withdrawn, but the road bus service continued for many years. Goods trains were finally withdrawn in 1957, and the railway was dismantled in 1958-59. (Source: Frank Stamford, 'The Hawthorn - Kew Railway')Small black and white snapshot of Kew Railway Station, looking south to Barker Station. The photograph, one of 12, is part of a larger album of newspaper clippings, timetables, tickets and photos relating to the Kew Railway Line, taken and compiled by Lachlan Richardson, while a resident of Kew. The album dates from the 1950s. The album is part of a larger subject file on the Kew Line, compiled over time by members of the Kew Historical Society.kew railway line, transport -- railways -- kew (vic.), kew branch line, kew railway station -
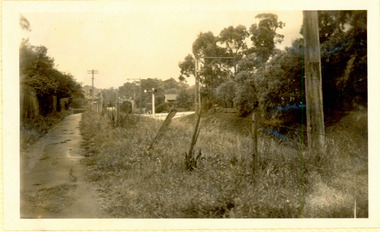
 Kew Historical Society Inc
Photograph - Kew Branch Line : The Hawthorn Grove crossing, August 1952
... Kew Branch Line : The Hawthorn Grove crossing, August 1952... Branch LIne Hawthorn Grove -- Hawthorn (Vic.) Railway crossings ...The Kew railway was opened in 1887, and diverged from the main (Box Hill–Lilydale) line about half-way between Hawthorn and Glenferrie. From the point of divergence the line was slightly less than one mile long, and it had only one intermediate station — Barker. There were four road over-bridges and two level crossings, including one over the busy Barkers Road. The line supported a passenger and goods service, and was electrified in December 1922, at the same time as the main line to Box Hill. There were a number of peak hour services which ran from Flinders Street station (Melbourne) to Kew, but in 1938 all but one of these were diverted to the Ashburton line, where traffic was growing. This had an adverse effect on Kew traffic, as passengers from Kew needed to cross over a footbridge at Hawthorn to change trains, and the main line trains were usually already crowded by the time they reached Hawthorn. At about the same time the off-peak trains were replaced by road buses. In 1952 all passenger trains were withdrawn, but the road bus service continued for many years. Goods trains were finally withdrawn in 1957, and the railway was dismantled in 1958-59. (Source: Frank Stamford, 'The Hawthorn - Kew Railway')Small black and white snapshot of the Hawthorn Grove crossing, August 1952. The photograph, one of 12, is part of a larger album of newspaper clippings, timetables, tickets and photos relating to the Kew Railway Line, taken and compiled by Lachlan Richardson, while a resident of Kew. The album dates from the 1950s. The album is part of a larger subject file on the Kew Line, compiled over time by members of the Kew Historical Society.kew railway line, transport -- railways -- kew (vic.), kew branch line, hawthorn grove -- hawthorn (vic.), railway crossings -
 Kew Historical Society Inc
Photograph - Seven Carriage Train at Barker Station
The Kew railway was opened in 1887, and diverged from the main (Box Hill–Lilydale) line about half-way between Hawthorn and Glenferrie. From the point of divergence the line was slightly less than one mile long, and it had only one intermediate station — Barker. There were four road over-bridges and two level crossings, including one over the busy Barkers Road. The line supported a passenger and goods service, and was electrified in December 1922, at the same time as the main line to Box Hill. There were a number of peak hour services which ran from Flinders Street station (Melbourne) to Kew, but in 1938 all but one of these were diverted to the Ashburton line, where traffic was growing. This had an adverse effect on Kew traffic, as passengers from Kew needed to cross over a footbridge at Hawthorn to change trains, and the main line trains were usually already crowded by the time they reached Hawthorn. At about the same time the off-peak trains were replaced by road buses. In 1952 all passenger trains were withdrawn, but the road bus service continued for many years. Goods trains were finally withdrawn in 1957, and the railway was dismantled in 1958-59. (Source: Frank Stamford, 'The Hawthorn - Kew Railway')Small black and white snapshot of a seven carriage train approaching Barker Railway Station. The photograph, one of 12, is part of a larger album of newspaper clippings, timetables, tickets and photos relating to the Kew Railway Line, taken and compiled by Lachlan Richardson, while a resident of Kew. The album dates from the 1950s. The album is part of a larger subject file on the Kew Line, compiled over time by members of the Kew Historical Society."Seven Carriage Train at Barker Station"kew railway line, transport -- railways -- kew (vic.), barker railway station, kew branch line -
 Kew Historical Society Inc
Photograph - Farewell to 'Our Lady of Fatima'. Xavier College 22/4/51
The Kew railway was opened in 1887, and diverged from the main (Box Hill–Lilydale) line about half-way between Hawthorn and Glenferrie. From the point of divergence the line was slightly less than one mile long, and it had only one intermediate station — Barker. There were four road over-bridges and two level crossings, including one over the busy Barkers Road. The line supported a passenger and goods service, and was electrified in December 1922, at the same time as the main line to Box Hill. There were a number of peak hour services which ran from Flinders Street station (Melbourne) to Kew, but in 1938 all but one of these were diverted to the Ashburton line, where traffic was growing. This had an adverse effect on Kew traffic, as passengers from Kew needed to cross over a footbridge at Hawthorn to change trains, and the main line trains were usually already crowded by the time they reached Hawthorn. At about the same time the off-peak trains were replaced by road buses. In 1952 all passenger trains were withdrawn, but the road bus service continued for many years. Goods trains were finally withdrawn in 1957, and the railway was dismantled in 1958-59. (Source: Frank Stamford, 'The Hawthorn - Kew Railway')Small black and white snapshot of a train leaving Kew Station with the Xavier Chapel on the hill in the background, hence the ironic title provided by the photographer. The photograph, one of 12, is part of a larger album of newspaper clippings, timetables, tickets and photos relating to the Kew Railway Line, taken and compiled by Lachlan Richardson, while a resident of Kew. The album dates from the 1950s. The album is part of a larger subject file on the Kew Line, compiled over time by members of the Kew Historical Society."Farewell to 'Our Lady of Fatima'. Xavier College 22/4/51"kew railway line, transport -- railways -- kew (vic.), kew branch line, xavier college, kew railway station -
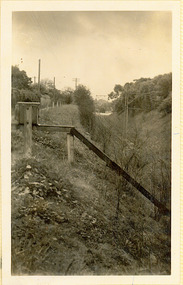 Kew Historical Society Inc
Photograph - Kew Branch Line: Looking along cutting towards Barker Station 22/4/51
The Kew railway was opened in 1887, and diverged from the main (Box Hill–Lilydale) line about half-way between Hawthorn and Glenferrie. From the point of divergence the line was slightly less than one mile long, and it had only one intermediate station — Barker. There were four road over-bridges and two level crossings, including one over the busy Barkers Road. The line supported a passenger and goods service, and was electrified in December 1922, at the same time as the main line to Box Hill. There were a number of peak hour services which ran from Flinders Street station (Melbourne) to Kew, but in 1938 all but one of these were diverted to the Ashburton line, where traffic was growing. This had an adverse effect on Kew traffic, as passengers from Kew needed to cross over a footbridge at Hawthorn to change trains, and the main line trains were usually already crowded by the time they reached Hawthorn. At about the same time the off-peak trains were replaced by road buses. In 1952 all passenger trains were withdrawn, but the road bus service continued for many years. Goods trains were finally withdrawn in 1957, and the railway was dismantled in 1958-59. (Source: Frank Stamford, 'The Hawthorn - Kew Railway')Small black and white snapshot looking along cutting towards Barker Station 22/4/51. The photograph, one of 12, is part of a larger album of newspaper clippings, timetables, tickets and photos relating to the Kew Railway Line, taken and compiled by Lachlan Richardson, while a resident of Kew. The album dates from the 1950s. The album is part of a larger subject file on the Kew Line, compiled over time by members of the Kew Historical Society."Looking along cutting towards Barker Station 22/4/51"kew railway line, transport -- railways -- kew (vic.), barker railway station, kew branch line